cloud only (xen & kvm) - docs.onapp.com · web viewonapp 3.0 administration ... with centos...
TRANSCRIPT

0
Author: anonymousVersion: 15Date: 2012.07.13
3.0 Administration GuideOnApp 3.0 Administration Guide

OnApp 3.0 Administration Guide v15
TABLE OF CONTENTS
1 Key to interface and icons........................13
2 Document Conventions..............................15
2.1 We use the following formatting elements to draw your attention to certain pieces of information:.....................................................................................................................................15
3 OnApp Cloud Overview..............................17
3.1 Main Components & Features.........................................................................................17
3.2 API and Integrations.........................................................................................................20
3.3 Hardware & Software Requirements...............................................................................20
3.4 Architecture.......................................................................................................................22
3.5 Network Configurations...................................................................................................233.5.1 Cloud Only (Xen & KVM)....................................................................................................233.5.2 Cloud & Storage..................................................................................................................253.5.3 Cloud Only (VMware)..........................................................................................................27
4 Dashboard.........................................28
4.1 Login Screen.....................................................................................................................29
4.2 User Profile........................................................................................................................304.2.1 API Key...............................................................................................................................30
4.3 Cloud Search Tool............................................................................................................31
5 Virtual Machines..................................32
5.1 Manage VMs......................................................................................................................325.1.1 View VMs............................................................................................................................335.1.2 VM Properties.....................................................................................................................345.1.3 Create VM...........................................................................................................................375.1.4 Build VM Manually..............................................................................................................405.1.5 Edit VM...............................................................................................................................40
DOCUMENT REVISIONS - LIST OF DEFAULT PERMISSIONS FOR USER ROLE 1
OnApp 3.0 Administration Guide v15
5.1.6 Migrate VM..........................................................................................................................415.1.7 Autoscale VM......................................................................................................................415.1.8 Segregate VM.....................................................................................................................425.1.9 Delete VM...........................................................................................................................435.1.10 Set VIP Status for VM.........................................................................................................445.1.11 VM Integrated Console.......................................................................................................445.1.12 VM Transactions and Logs.................................................................................................44
5.2 Manage VM Networks.......................................................................................................455.2.1 Configure Network Interface...............................................................................................455.2.2 Rebuild VM Network...........................................................................................................465.2.3 Set Firewall Rules...............................................................................................................475.2.4 Allocate/Remove IP Addresses..........................................................................................485.2.5 Display Network Speed for Network Interfaces on Virtual Machine Page..........................495.2.6 Edit Virtual Machine Network Speed..................................................................................49
5.3 Manage VM Disk Space....................................................................................................495.3.1 Add Disks to VM.................................................................................................................505.3.2 Edit VM Disks......................................................................................................................515.3.3 Migrate Disks......................................................................................................................525.3.4 Delete VM Disks.................................................................................................................525.3.5 Back up VM Disks...............................................................................................................535.3.6 Schedule VM Backups........................................................................................................535.3.7 Manage Backups................................................................................................................54
5.4 VM Statistics......................................................................................................................545.4.1 VM CPU Utilization.............................................................................................................555.4.2 VM Billing Statistics.............................................................................................................555.4.3 Network Interface Statistics................................................................................................565.4.4 Disk IOPS...........................................................................................................................56
6 VMware Virtual Machines...........................58
6.1 Manage VMware VMs........................................................................................................596.1.1 VMware VM Properties.......................................................................................................596.1.2 Create VMware VM.............................................................................................................616.1.3 Build VMware VM Manually................................................................................................646.1.4 Edit VMware VM.................................................................................................................646.1.5 Delete VMware VM.............................................................................................................656.1.6 VMware VM Transactions and Logs...................................................................................66
6.2 Manage VMware VM Networks........................................................................................676.2.1 Configure Network Interface of VMware VM......................................................................676.2.2 Rebuild Network of VMware VM.........................................................................................686.2.3 Publishing Rules.................................................................................................................686.2.4 Allocate/Remove IP Addresses to VMware VM..................................................................706.2.5 Display Network Speed for Network Interfaces on VMware VM Page...............................716.2.6 Edit VMware VM Network Speed.......................................................................................71
DOCUMENT REVISIONS - LIST OF DEFAULT PERMISSIONS FOR USER ROLE 2

OnApp 3.0 Administration Guide v15
6.3 Manage VMware VM Disk Space.....................................................................................716.3.1 Add Disks to VMware VM...................................................................................................726.3.2 Edit VMware VM Disks.......................................................................................................726.3.3 Migrate VMware VM Disks.................................................................................................736.3.4 VMware VM Snapshots......................................................................................................746.3.5 Delete VMware VM Disks...................................................................................................74
6.4 VMware VM Statistics.......................................................................................................746.4.1 VMware VM CPU Utilization...............................................................................................756.4.2 VMware VM Billing Statistics..............................................................................................756.4.3 VMware VM Network Interface Statistics............................................................................766.4.4 VMware VM Disk IOPS.......................................................................................................76
7 Load Balancers....................................78
7.1 View Load Balancer Details.............................................................................................78
7.2 Create Load Balancer Cluster.........................................................................................79
7.3 Create Autoscaling Cluster..............................................................................................81
7.4 Edit/Delete Load Balancer...............................................................................................82
8 DNS...............................................83
8.1 DNS Setup.........................................................................................................................838.1.1 Edit DNS Domain................................................................................................................84
8.2 DNS Zones.........................................................................................................................848.2.1 Create DNS Zone...............................................................................................................848.2.2 Edit DNS Zone....................................................................................................................898.2.3 Delete DNS Zone................................................................................................................898.2.4 User DNS Zones.................................................................................................................898.2.5 Set End-User Access to DNS Service................................................................................898.2.6 View/Edit/Delete User DNS Zones.....................................................................................90
9 Hypervisors.......................................91
9.1 View Hypervisors..............................................................................................................92
9.2 View Hypervisor Details...................................................................................................92
9.3 Edit Hypervisor Details....................................................................................................93
9.4 Reboot Hypervisor............................................................................................................93
DOCUMENT REVISIONS - LIST OF DEFAULT PERMISSIONS FOR USER ROLE 3

OnApp 3.0 Administration Guide v15
9.5 Other Hypervisor Settings...............................................................................................94
10 CloudBoot Hypervisors.............................95
10.1 Create CloudBoot Hypervisor.........................................................................................95
11 CloudBoot IPs.....................................99
11.1 View/Edit/Delete CloudBoot IP Addresses.....................................................................99
11.2 Create CloudBoot IP Address.........................................................................................99
12 Integrated Storage...............................100
12.1 Integrated Storage Data Stores.....................................................................................10012.1.1 How many virtual machines can reside on the integrated storage data store?................10012.1.2 View Integrated Storage Data Stores...............................................................................10112.1.3 View Integrated Storage Data Store Details.....................................................................10212.1.4 Create Integrated Storage Data Store..............................................................................10212.1.5 Edit Integrated Storage Data Store...................................................................................10312.1.6 Delete Integrated Storage Data Store..............................................................................104
12.2 Manage Integrated Storage Data Store Disks..............................................................10412.2.1 View the List of Integrated Storage Data Store Disks.......................................................10412.2.2 Add Disks to Integrated Storage Data Store.....................................................................10512.2.3 Remove Disks from Integrated Storage Data Store.........................................................10512.2.4 Repair Disks Assigned to Integrated Storage Data Store.................................................10612.2.5 Delete Disk........................................................................................................................10612.2.6 Rebalance VDisks Assigned to Integrated Storage Data Store........................................107
12.3 Storage Nodes.................................................................................................................10812.3.1 View the List of Storage Nodes........................................................................................10812.3.2 View Storage Node Details...............................................................................................10912.3.3 Edit Storage Node.............................................................................................................10912.3.4 Forget Storage Node........................................................................................................11012.3.5 Unassign Storage Node from Integrated Storage Data Store..........................................11212.3.6 View Storage Node Statistics...........................................................................................112
12.4 Manage Integrated Storage Drive Devices...................................................................11412.4.1 View Integrated Storage Data Store Drives......................................................................11412.4.2 Assign Drive......................................................................................................................11412.4.3 Prepare Drive....................................................................................................................114
12.5 Storage API Endpoint.....................................................................................................11512.5.1 Add Storage API Endpoint................................................................................................115
DOCUMENT REVISIONS - LIST OF DEFAULT PERMISSIONS FOR USER ROLE 4

OnApp 3.0 Administration Guide v15
13 Templates........................................116
13.1 View Template Details....................................................................................................117
13.2 Edit Template Details......................................................................................................117
13.3 Delete System Templates..............................................................................................118
13.4 Create Custom Templates.............................................................................................118
13.5 Edit/Delete Custom Templates......................................................................................119
13.6 Make Templates Public..................................................................................................119
13.7 Allow Users to Make Templates Public........................................................................119
13.8 Template Software Licenses.........................................................................................12013.8.1 KMS Licensing..................................................................................................................12113.8.2 MAK Licensing..................................................................................................................121
13.9 Template Store................................................................................................................122
14 CDN..............................................124
14.1 CDN Setup Wizard..........................................................................................................12614.1.1 Run CDN Setup Wizard....................................................................................................126
14.2 CDN Edge Servers..........................................................................................................12714.2.1 Create CDN Edge Server.................................................................................................12814.2.2 View CDN Edge Server Details........................................................................................13014.2.3 Edit CDN Edge Server......................................................................................................13114.2.4 Delete CDN Edge Server..................................................................................................13214.2.5 CDN Edge Server Network Interface Usage....................................................................132
14.3 CDN Storage Servers......................................................................................................13214.3.1 View CDN Storage Server Details....................................................................................13214.3.2 Create CDN Storage Server.............................................................................................13414.3.3 Delete CDN Storage Server.............................................................................................13514.3.4 Edit CDN Storage Server..................................................................................................135
14.4 CDN Resources...............................................................................................................13514.4.1 View CDN Resources.......................................................................................................13714.4.2 View CDN Resource Details.............................................................................................13714.4.3 Create HTTP CDN Resource...........................................................................................14314.4.4 Create Video On Demand CDN Resource.......................................................................14914.4.5 Create Live Streaming CDN Resource.............................................................................15114.4.6 Edit CDN Resource...........................................................................................................15414.4.7 Bandwidth Statistics..........................................................................................................154
DOCUMENT REVISIONS - LIST OF DEFAULT PERMISSIONS FOR USER ROLE 5

OnApp 3.0 Administration Guide v15
14.4.8 Stream Statistics...............................................................................................................15514.4.9 Prefetch Content...............................................................................................................15614.4.10 Purge Content...................................................................................................................15714.4.11 Billing Statistics.................................................................................................................157
14.5 CDN Edge Groups...........................................................................................................15814.5.1 View CDN Edge Group Details.........................................................................................15914.5.2 Create CDN Edge Group..................................................................................................15914.5.3 Edit/Delete CDN Edge Group...........................................................................................16014.5.4 Assign/Remove CDN Edge Group Locations...................................................................160
14.6 CDN Upload Instructions...............................................................................................16014.6.1 HTTP Push CDN Resource..............................................................................................16014.6.2 VOD Pull CDN Resource..................................................................................................16114.6.3 VOD Push CDN Resource................................................................................................16114.6.4 Live Streaming CDN Resource.........................................................................................163
15 VMware...........................................167
15.1 VMware Cloud Requirements........................................................................................167
15.3 Using VMware without Vyatta firewall..........................................................................169
15.4 Licensing.........................................................................................................................169
15.5 VMware vCenter Installation..........................................................................................170
15.6 Vyatta Installation...........................................................................................................171
15.7 Control Panel Configuration..........................................................................................172
15.8 Create Template for VMware Virtual Machine..............................................................173
16 SolidFire Integration............................176
16.1 SolidFire Management....................................................................................................176
16.2 SolidFire Quality of Service...........................................................................................177
17 Customer Networks................................178
17.1 View/Edit/Delete Customer Networks...........................................................................178
17.2 Create Customer Network..............................................................................................178
DOCUMENT REVISIONS - LIST OF DEFAULT PERMISSIONS FOR USER ROLE 6

OnApp 3.0 Administration Guide v15
18 Users............................................180
18.1 User Accounts.................................................................................................................18018.1.1 View Users........................................................................................................................18018.1.2 View User Account Details...............................................................................................18118.1.3 View/Add/Edit User Payments..........................................................................................18218.1.4 View User Account Billing Statistics.................................................................................18318.1.5 Whitelist IPs......................................................................................................................18418.1.6 Log in as User...................................................................................................................18418.1.7 Create User.......................................................................................................................18418.1.8 User Additional Fields.......................................................................................................18618.1.9 Edit User...........................................................................................................................18618.1.10 Add SSH Key....................................................................................................................18618.1.11 Delete User.......................................................................................................................18718.1.12 Suspend and Activate Users............................................................................................18718.1.13 View User Backups...........................................................................................................187
18.2 User Groups....................................................................................................................18818.2.1 Assign New User to Group...............................................................................................18818.2.2 Change User Group for User............................................................................................18818.2.3 Create User Group............................................................................................................18818.2.4 View/Edit/Delete User Group............................................................................................189
18.3 Drop Session...................................................................................................................18918.3.1 Drop Own Sessions..........................................................................................................189
19 Roles............................................190
19.1 Create New Role..............................................................................................................190
19.2 Edit Role..........................................................................................................................190
19.3 Delete Role......................................................................................................................191
20 Billing Plans....................................192
20.1 Create Billing Plan..........................................................................................................192
20.2 Set Billing Plan Prices And Resource Limits...............................................................192
20.3 Assign Users to Billing Plan..........................................................................................198
20.4 Change User's Billing Plan............................................................................................199
20.5 Edit/Copy/Delete Billing Plan.........................................................................................199
DOCUMENT REVISIONS - LIST OF DEFAULT PERMISSIONS FOR USER ROLE 7
OnApp 3.0 Administration Guide v15
21 Settings.........................................200
21.1 Hypervisors Settings......................................................................................................20021.1.1 View Hypervisor Settings..................................................................................................20021.1.2 Create Hypervisor.............................................................................................................20021.1.3 Create VMware hypervisor...............................................................................................20121.1.4 Edit Hypervisor..................................................................................................................20221.1.5 Manage Data Stores For Hypervisor................................................................................20221.1.6 Manage Networks For Hypervisor....................................................................................20321.1.7 Delete Hypervisor.............................................................................................................203
21.2 Hypervisor Zones Settings............................................................................................20421.2.1 Create Hypervisor Zone....................................................................................................20421.2.2 View/Edit/Delete Hypervisor Zone....................................................................................20421.2.3 View Hypervisor Zone Details...........................................................................................20521.2.4 Add Hypervisors to Hypervisor Zone................................................................................20521.2.5 Remove Hypervisors From Hypervisor Zone....................................................................20521.2.6 Manage Data Stores for Hypervisor Zones......................................................................20621.2.7 Manage Networks For Hypervisor Zone...........................................................................206
21.3 Data Stores Settings.......................................................................................................20721.3.1 View Data Stores..............................................................................................................20721.3.2 Create LVM Data Store....................................................................................................20821.3.3 Create VMware Data Store...............................................................................................20921.3.4 Create SolidFire Data Store..............................................................................................21321.3.5 Edit Data Store..................................................................................................................21521.3.6 Delete Data Store.............................................................................................................215
21.4 Data Store Zones Settings.............................................................................................21521.4.1 Create Data Store Zone....................................................................................................21521.4.2 View/Edit/Delete Data Store Zone....................................................................................21621.4.3 View Data Store Zone Details...........................................................................................21621.4.4 Attach Data Stores to Data Store Zone............................................................................21621.4.5 Remove Data Stores From Data Store Zone....................................................................217
21.5 Networks Settings...........................................................................................................21721.5.1 View networks...................................................................................................................21721.5.2 Create Network.................................................................................................................21721.5.3 Add IP Address to Network...............................................................................................21821.5.4 Delete IP Address from Network......................................................................................21821.5.5 Edit Network......................................................................................................................21921.5.6 Delete Network.................................................................................................................21921.5.7 Assign/Unassign IP Address from User............................................................................219
21.6 Network zones settings..................................................................................................22021.6.1 Create Network Zone........................................................................................................22021.6.2 View/Edit/Delete Network Zone........................................................................................22021.6.3 View Network Zone Details...............................................................................................22021.6.4 Add Networks to Network Zone........................................................................................221
DOCUMENT REVISIONS - LIST OF DEFAULT PERMISSIONS FOR USER ROLE 8

OnApp 3.0 Administration Guide v15
21.6.5 Remove Networks From Network Zone............................................................................221
21.7 IP Address Pools............................................................................................................22121.7.1 Create IP Address Pool....................................................................................................22121.7.2 View/Delete IP Address Pool............................................................................................222
21.8 Firewalls...........................................................................................................................22221.8.1 View/Edit/Delete Firewalls................................................................................................22221.8.2 Create firewall...................................................................................................................223
21.9 Backup Servers Settings...............................................................................................22321.9.1 Basic Backup Scheme......................................................................................................22321.9.2 Advanced Backup Scheme...............................................................................................22421.9.3 Create Backup Server.......................................................................................................22521.9.4 Create Cloud Boot Backup Server....................................................................................22621.9.5 Create Virtual Backup Server...........................................................................................22721.9.6 Edit Backup Server...........................................................................................................23021.9.7 Manage Backups For Backup Server...............................................................................23021.9.8 Delete Backup Server.......................................................................................................230
21.10 Backup Server Zones Settings......................................................................................23121.10.1 Create Backup Server Zone.............................................................................................23121.10.2 View Backup Server Zone Details....................................................................................23121.10.3 Edit Backup Server Zone..................................................................................................23121.10.4 Delete Backup Server Zone..............................................................................................23121.10.5 Add Backup Server to Backup Server Zone.....................................................................23221.10.6 Remove Backup Server From Backup Server Zone.........................................................232
21.11 Autobackup Presets Settings........................................................................................232
21.12 Disks Settings.................................................................................................................23321.12.1 View/Edit/Delete Disks......................................................................................................233
21.13 Configuration Settings...................................................................................................23421.13.1 Edit System Configuration................................................................................................23421.13.2 Edit Backups/Templates Configuration.............................................................................23721.13.3 Edit Interface Configuration..............................................................................................23821.13.4 Edit Defaults Configuration...............................................................................................239
21.14 License.............................................................................................................................241
21.15 Resolvers Settings..........................................................................................................24121.15.1 View Resolvers.................................................................................................................24121.15.2 Create Resolver................................................................................................................24121.15.3 Edit Resolver.....................................................................................................................24221.15.4 Delete Resolver................................................................................................................242
21.16 Schedules Settings.........................................................................................................24221.16.1 View/Edit/Delete Schedules..............................................................................................243
DOCUMENT REVISIONS - LIST OF DEFAULT PERMISSIONS FOR USER ROLE 9

OnApp 3.0 Administration Guide v15
21.17 Customer VLANs............................................................................................................24321.17.1 Create customer VLAN.....................................................................................................24321.17.2 Edit Customer VLAN.........................................................................................................24421.17.3 Delete Customer VLAN.....................................................................................................244
22 Tools............................................245
22.1 Logs.................................................................................................................................245
22.2 Statistics..........................................................................................................................24522.2.1 Cloud Usage.....................................................................................................................24622.2.2 CDN Usage.......................................................................................................................246
22.3 Alerts................................................................................................................................247
22.4 Sysadmin Tools..............................................................................................................247
23 Advanced Tasks...................................249
23.1 Reset Control Panel Administrator Password.............................................................249
23.2 Add IPs in Windows Environment................................................................................250
23.3 Create New Linux/Windows Templates........................................................................250
23.4 IP Investigation...............................................................................................................250
24 Localization and Customization...................251
24.1 Languages.......................................................................................................................25124.1.1 Add Custom Languages...................................................................................................25124.1.2 Enable Custom Language for Specific User.....................................................................252
24.2 Currencies.......................................................................................................................25224.2.1 Create currency................................................................................................................25224.2.2 Edit/Delete Currency.........................................................................................................253
24.3 Localization and Customization Search.......................................................................254
24.4 Look & Feel......................................................................................................................254
25 Permissions List.................................257
25.1 List of all OnApp Permissions.......................................................................................257
DOCUMENT REVISIONS - LIST OF DEFAULT PERMISSIONS FOR USER ROLE 10

OnApp 3.0 Administration Guide v15
25.2 List of Default Permissions for Admin Role.................................................................278
25.3 List of Default Permissions for User Role....................................................................282
26 Help.............................................287
27 Document Revisions...............................288
DOCUMENT REVISIONS - LIST OF DEFAULT PERMISSIONS FOR USER ROLE 11
OnApp 3.0 Administration Guide v15
This guide provides an overview of OnApp's cloud deployment and management software, and explains in detail how to configure and manage your cloud using the OnApp Control Panel interface.
DOCUMENT REVISIONS - LIST OF DEFAULT PERMISSIONS FOR USER ROLE 12
OnApp 3.0 Administration Guide v15
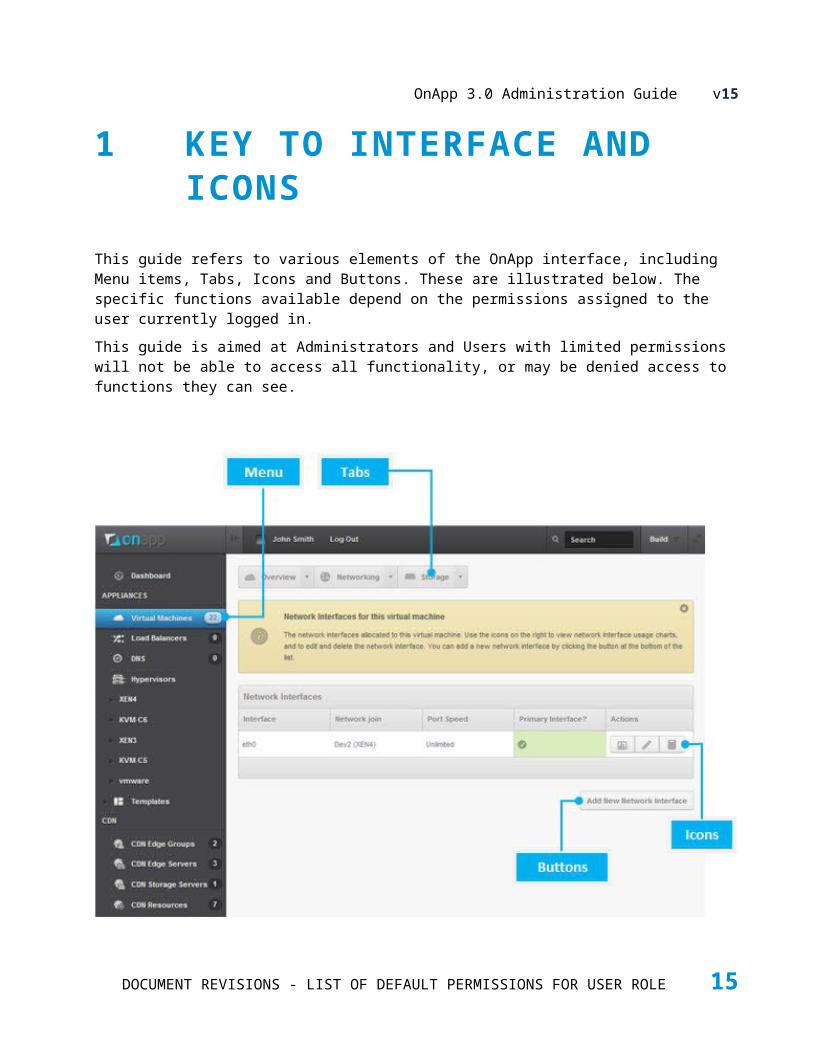
1 KEY TO INTERFACE AND ICONS
This guide refers to various elements of the OnApp interface, including Menu items, Tabs, Icons and Buttons. These are illustrated below. The specific functions available depend on the permissions assigned to the user currently logged in.
This guide is aimed at Administrators and Users with limited permissions will not be able to access all functionality, or may be denied access to functions they can see.
The following icons are referred to in this guide:
DOCUMENT REVISIONS - LIST OF DEFAULT PERMISSIONS FOR USER ROLE 13

OnApp 3.0 Administration Guide v15
We strongly recommend that you test all your custom scripts before upgrading your production environment to the 3.0 version of OnApp Cloud.
The version of the Ruby on Rails used in OnApp Cloud has changed from v3.0.7 to v3.0.20 for security reasons. As a consequence, the upgrade may affect the operation of scripts that are currently in use. Unfortunately, OnApp will not be able to troubleshoot or fix these issues.
DOCUMENT REVISIONS - LIST OF DEFAULT PERMISSIONS FOR USER ROLE 14
OnApp 3.0 Administration Guide v15
2 DOCUMENT CONVENTIONS
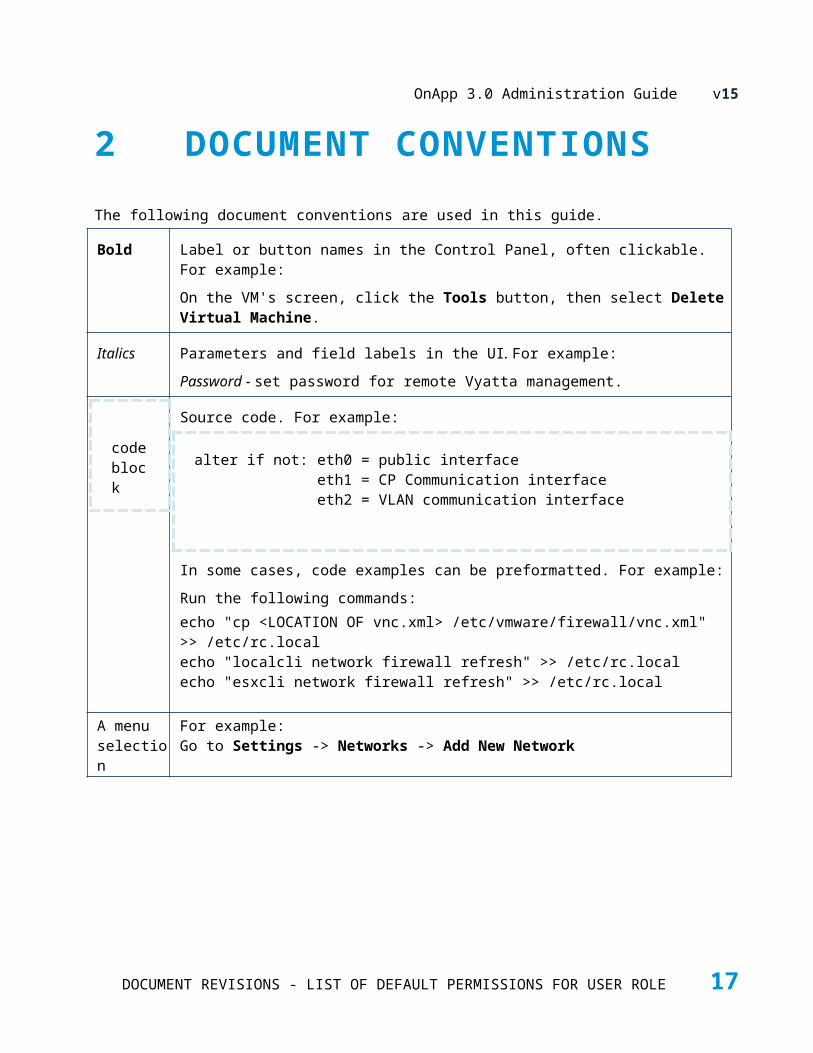
The following document conventions are used in this guide.
Bold Label or button names in the Control Panel, often clickable. For example:
On the VM's screen, click the Tools button, then select Delete Virtual Machine.
Italics Parameters and field labels in the UI. For example:
Password - set password for remote Vyatta management.
code block
Source code. For example:
alter if not: eth0 = public interface eth1 = CP Communication interface eth2 = VLAN communication interface
In some cases, code examples can be preformatted. For example:
Run the following commands:echo "cp <LOCATION OF vnc.xml> /etc/vmware/firewall/vnc.xml" >> /etc/rc.localecho "localcli network firewall refresh" >> /etc/rc.localecho "esxcli network firewall refresh" >> /etc/rc.local
A menu selection
For example:Go to Settings -> Networks -> Add New Network
2.1 We use the following formatting elements to draw your attention to certain pieces of information:
InfoAn info message emphasizes or explains the information within the chapter.
Clicking the OFF button performs graceful shutdown and then powers off the VM after the timeout set in the Configuration settings.
DOCUMENT REVISIONS - LIST OF DEFAULT PERMISSIONS FOR USER ROLE 15

OnApp 3.0 Administration Guide v15
NoteA Note message contains information essential for the task completion.
The maximum length of a Mount Point is 256 characters.
WarningA warning message informs you of something you should not do or be cautious.
You won't be able to restore a VM after deleting it.
DOCUMENT REVISIONS - LIST OF DEFAULT PERMISSIONS FOR USER ROLE 16
OnApp 3.0 Administration Guide v15
3 ONAPP CLOUD OVERVIEW
OnApp Cloud software enables service providers to turn their existing infrastructure (or any commodity hardware) into a single pool of resources - "a cloud" - which can then be sold to end users on a utility basis. It's a complete cloud deployment and management platform that's designed to make it easy for service providers to sell a wide range of cloud services.
OnApp Cloud can also be used by enterprise IT departments and MSPs to deliver cloud services to end users. For more information, see http://onapp.com/cloud.
This guide explains how to configure and use OnApp Cloud through the OnApp Control Panel management user interface. Depending on your OnApp Cloud license type (free or full), and how your cloud is configured, you can use the Control Panel to set up your own distributed SAN, DNS services and CDN services too, using OnApp's companion products, OnApp Storage and OnApp CDN. All of these functions are covered in this guide.
3.1 Main Components & FeaturesOnApp Cloud handles cloud deployment, VM deployment, VM management & resource allocation, hypervisor and SAN management, failover, user management, billing, self-provisioning, CDN and DNS, and other associated functions. Here's a brief description of the main components and features of an OnApp installation:
ServersThere are two required server types in an OnApp configuration – Hypervisor servers and the Controller server. OnApp also requires storage devices for templates, virtual machines and backups. These may also be servers.
Hypervisor serversThe hypervisor server is a Xen- or KVM-powered hypervisor running on bare metal, with CentOS Linux as the management operating system. This ensures highly efficient use of available hardware, and complete isolation of virtual server processes. The management OS controls virtual machines as well as handling network/disk connectivity, monitoring, IP address anti-spoofing and more. OnApp also supports clouds based on VMWare ESXi hypervisors.
Hypervisor servers:
Provide system resources such as CPU, memory, and network
Control the virtual differentiation of entities such as virtual machines and application data being delivered to cloud-hosted applications
Take care of secure virtualization and channeling of storage, data communications and machine processing
DOCUMENT REVISIONS - LIST OF DEFAULT PERMISSIONS FOR USER ROLE 17

OnApp 3.0 Administration Guide v15
Can be located at different geographical zones
Can have different CPU and RAM
OnApp also supports clouds based on VMWare ESXi hypervisors, though it operates in a slightly different way. With Xen/KVM OnApp controls hypervisors directly. With VMware, OnApp directly controls the VMware vCenter. This allows vCenter to control the VMs with the full range of VMware functionality including DRS and vMotion to ensure that the operation is optimal.
Controller serverThe Controller Panel server (sometimes known as the Control Panel server or Base server) hosts the OnApp user interface and manages all the processes controlled by OnApp.The Control Panel server:
Provides a web-based user interface
Assigns a virtual machine to a hypervisor server
Creates/starts/stops/deletes virtual machines
Resizes CPU and storage
Manages virtual machines through a console session
Creates backups of virtual machines
Allows virtual machines to be restored from a backup
Allows the creation of custom templates from virtual machine backups, for future deployment of new virtual machines
Displays your CPU usage and network utilization
Storage devicesFor VM template and backup storage we recommend that you set up a separate server with SSH (preferred) or NFS (for high end NAS). However, in a CloudBoot environment or for a small scale installation you can use the Control Panel server to host the templates and backups.You will also need a storage platform for virtual machine disk storage. From OnApp 3.0 onwards, there is an integrated storage platform that enables you to expose local storage drives across Hypervisors as a distributed block SAN with full redundancy and failover properties. Additionally, you can use any block based storage platform, such as local disks in hypervisors, an Ethernet SAN such as iSCSI or AoE, or hardware (fiber) SAN. Storage Area Networks are core segments of the cloud system, and OnApp can control their physical and virtual routing. This control enables seamless SAN failover management, including SAN testing, emergency migration and data backup.
NetworksWith OnApp you can create complex networks between virtual machines residing on a single host, or across multiple installations of OnApp. You can configure each virtual machine with one or more virtual NICs, each with its own IP and MAC address, to make them act like physical machines.OnApp ensures that each customer has their own dedicated virtual network, isolated and secure. They can only see their traffic, even if they share the same physical server as another customer. OnApp enables you to modify network configurations without changing actual cabling and switch setups.
TemplatesAn OnApp template is a pre-configured OS image that is used to build virtual machines. There are
DOCUMENT REVISIONS - LIST OF DEFAULT PERMISSIONS FOR USER ROLE 18

OnApp 3.0 Administration Guide v15
two types of templates for virtual machine deployment in OnApp: downloadable templates provided by OnApp, and custom templates you create from existing virtual machines. The OnApp template library includes a wide range of VM templates for various distributions of Windows and Linux, both 32- and 64-bit.
At present OnApp does not support VMs/templates with Active Directory Domain Controllers.
Virtual MachinesOnApp gives you complete control of your virtual machines (VMs), and all files and processes running on those machines. You can start, stop, reboot and delete virtual machines. You can move VMs between hypervisors with no downtime. OnApp also lets you perform automatic and manual backups, and restore VMs in case of failure.When creating a virtual machine, you can choose a hypervisor server with data store attached if you wish. If not, the system will search for hypervisors available that have sufficient RAM and storage for that virtual machine, and choose the one with the lowest (but sufficient) amount of RAM available.You can monitor the CPU usage of each virtual machine, and the network utilization of each network interface. This helps you decide if and when to change the resources available to each VM. OnApp also provides detailed logs of all tasks which are running, pending, have failed or have been completed.
ScalabilityOnApp is a highly scalable cloud deployment and management tool that allows you to add and remove hypervisors, data stores and resources at any time to meet your changing needs. You can add more CPUs and memory to a specific virtual machine to increase its capacity, and increase the total available RAM and CPU by adding new hypervisors.
High availabilityOnApp provides high reliability and availability in a number of ways:
Hypervisor failover management system — If a hypervisor fails, OnApp's self-healing architecture automatically moves virtual machines to another box. Hypervisors regularly update the control panel with their status. If they do not return valid data for a period of time, they are marked as offline, and an appropriate new hypervisor is selected for a virtual machine to boot there. This process is fully automatic but may take several minutes. When the crashed hypervisor comes online, it will be again available, but virtual machines previously migrated from it will not be migrated back.
Virtual machines — OnApp keeps virtual machines running even if the Control Panel server goes offline. In such an event, you won't be able to perform any actions to virtual machines until access to the Control Panel server has been restored.
Backup mechanisms — There is storage security provided by the backup mechanisms on both virtual and physical storage. Both automatic and manual backups provide the ability to capture the current state of a virtual machine. You can always restore the virtual machine from
DOCUMENT REVISIONS - LIST OF DEFAULT PERMISSIONS FOR USER ROLE 19
OnApp 3.0 Administration Guide v15
a backup if needed. There are also emergency mySQL backups as part of the disaster recovery system.
Database replication (planned feature) — OnApp will feature database replication which includes the creation and maintenance of multiple copies of the same database. Database replication improves availability: when your main database becomes unavailable, the slave copy will take over.
SecurityOnApp provides multiple layers of security:
Hypervisor — OnApp is a multi-hypervisor cloud system that currently supports Xen, KVM and VMware (Hyper-V and other hypervisors will be added in future releases). The first layer of security is provided by the hypervisor itself. For example, Xen provides full isolation between virtual machines and allows each virtual machine to access its own disk only. When a virtual machine makes a request for data, it gets redirected to its correct disk. Xen dictates which virtual machines and resources are allowed to run or be accessed at any given time.
Firewall — In addition to the hypervisor security mechanism, there is also an anti-spoof firewall which resides on the server where you store virtual machines. The firewall enables the management operating system of the hypervisor to examine packets entering and leaving the virtual machine. It blocks packets that do not belong to the virtual machine and accepts those meeting the rules. The firewall prevents IP spoofing and packet sniffing.
Control Panel — Virtual machines in OnApp are completely controlled by the administrator. Administrators have full root (Linux) or Administrator (Windows) access to accounts and machines. The Control Panel also lets you assign different levels of user access to virtual machines, hypervisors, consoles and disks.
Network Security is provided by completely isolating virtual machines from each other using VLANs. Each customer can be assigned their own VLAN, so using their private IP they can only access addresses within that VLAN. Using a public IP, they can only access those boxes which are manually specified, using the Integrated Console.
3.2 API and IntegrationsOur comprehensive RESTful xml and JSON API enables full integration of OnApp with third party applications.
OnApp integrates with popular billing applications like HostBill, Ubersmith and WHMCS, and with PHP applications via a wrapper (integration modules are available from the OnApp website: http://www.onapp.com/support/downloads).
The API makes integration straightforward for other applications, too, including other control panels, CRM and support and billing systems.
For a detailed API guide with code samples, see https://onappdev.atlassian.net/wiki/dashboard.action.
DOCUMENT REVISIONS - LIST OF DEFAULT PERMISSIONS FOR USER ROLE 20

OnApp 3.0 Administration Guide v15
3.3 Hardware & Software RequirementsAn OnApp installation requires at least two physical machines – one for the Control Panel server, and the other for the Hypervisor server. You can have as many Hypervisor servers as you need. You will also need storage for your virtual machines (a data store), and we recommend that you set up a separate server for storing backups and templates. These are the minimum requirements for a small cloud. For a larger deployment, OnApp's technical team will advise you on the best possible setup.
Server Requirements
Hypervisor servers x64 platform with AMD-V/VT-x hardware virtualization support enabled Quad Core 2Ghz+ CPU 8GB+ RAM 3x Gig network interface cards (4 recommended) 30 GB of free disk space (SSD Recommended)Control Panel server
Dual or Quad Core 2Ghz+ CPU 8GB RAM (16GB+ recommended) 100GB Raid 1 2x Gig network interface cards
Additional Server Recommendations
Backup server 1GB RAM 2TB+ NAS (alternatively, a large hard disk can be used on the Control Panel server for
backups)
Storage Requirements
Integrated Storage Platform Local Storage Only Enterprise SAN
Any number of integrated storage drives can be grouped together across any
Minimum 1 dedicated partition in each HV
Centralised Block Storage SAN (iSCSI, ATA over Ethernet or Fibre Channel) accessible to every HV
DOCUMENT REVISIONS - LIST OF DEFAULT PERMISSIONS FOR USER ROLE 21

OnApp 3.0 Administration Guide v15
Integrated Storage Platform Local Storage Only Enterprise SAN
HV
SSD drives recommended for best performance
at least 1 dedicated NIC assigned per HV for the SAN
multiple NICs bonded or 10GBit/s ethernet recommended
separate disk from the primary OS drive recommended
at least 1 dedicated 1GBit/s NIC assigned per HV for the SAN
multiple NICs bonded or 10GBit/s ethernet recommended
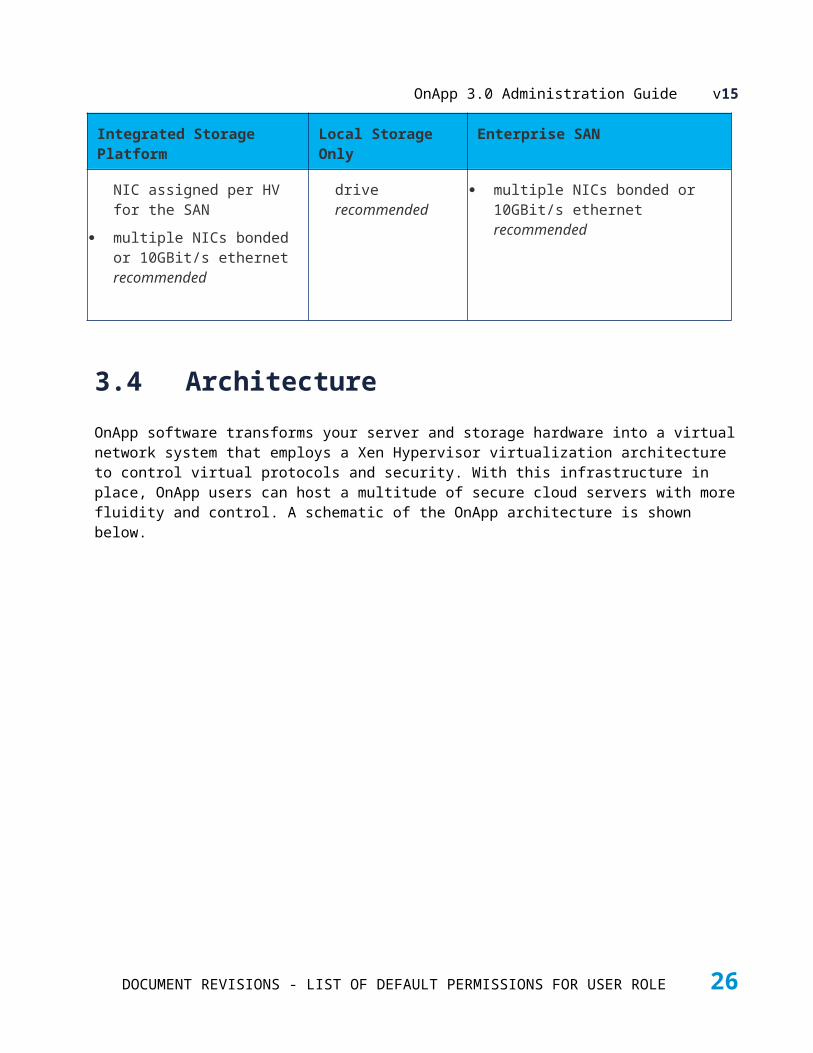
3.4 ArchitectureOnApp software transforms your server and storage hardware into a virtual network system that employs a Xen Hypervisor virtualization architecture to control virtual protocols and security. With this infrastructure in place, OnApp users can host a multitude of secure cloud servers with more fluidity and control. A schematic of the OnApp architecture is shown below.
DOCUMENT REVISIONS - LIST OF DEFAULT PERMISSIONS FOR USER ROLE 22

OnApp 3.0 Administration Guide v15
3.5 Network ConfigurationsThere are several supported network configurations:
3.5.1 Cloud Only (Xen & KVM)Basic Backup SchemeAdvanced Backup Scheme
DOCUMENT REVISIONS - LIST OF DEFAULT PERMISSIONS FOR USER ROLE 23

OnApp 3.0 Administration Guide v15
3.5.1.1 Cloud only Network Diagram (BBS)
3.5.1.2
3.5.1.3 Cloud only Network Diagram (ABS)
DOCUMENT REVISIONS - LIST OF DEFAULT PERMISSIONS FOR USER ROLE 24

OnApp 3.0 Administration Guide v15
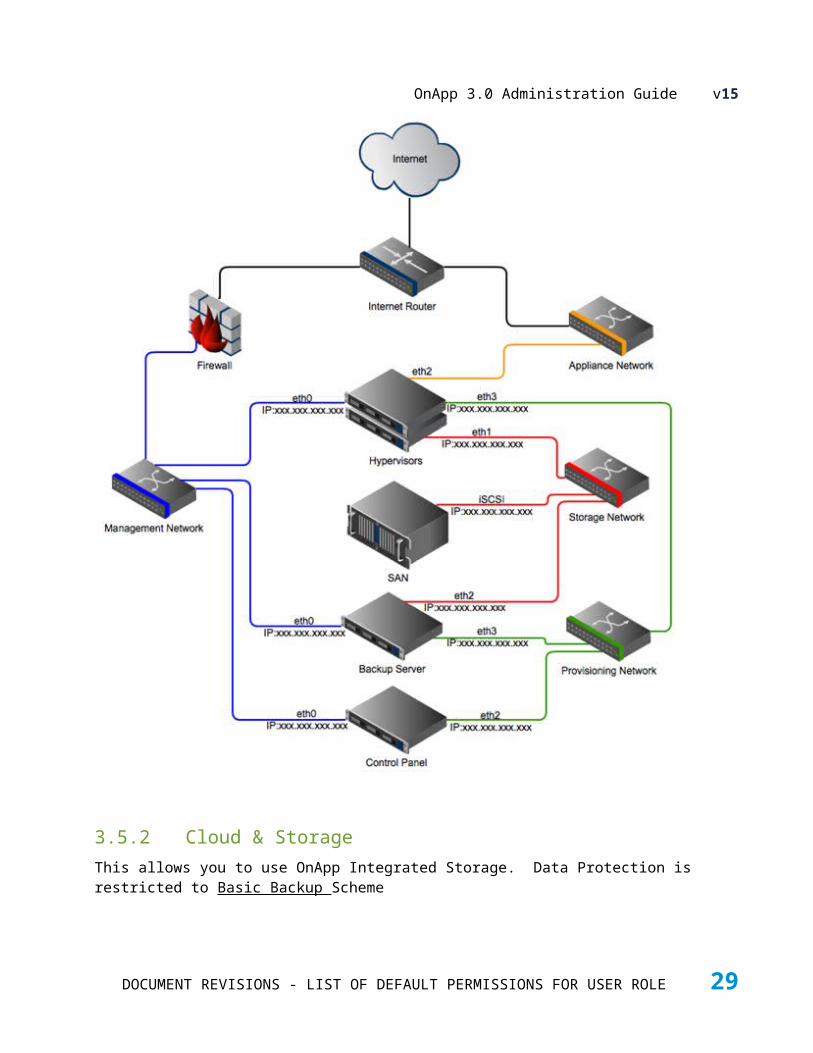
3.5.2 Cloud & StorageThis allows you to use OnApp Integrated Storage. Data Protection is restricted to Basic Backup Scheme
DOCUMENT REVISIONS - LIST OF DEFAULT PERMISSIONS FOR USER ROLE 25
OnApp 3.0 Administration Guide v15
3.5.2.1 Cloud and Storage Network Diagram (BBS)
3.5.2.2
DOCUMENT REVISIONS - LIST OF DEFAULT PERMISSIONS FOR USER ROLE 26

OnApp 3.0 Administration Guide v15
3.5.3 Cloud Only (VMware)
3.5.3.1 Cloud only Network Diagram (VMware)
DOCUMENT REVISIONS - LIST OF DEFAULT PERMISSIONS FOR USER ROLE 27

OnApp 3.0 Administration Guide v15
4 DASHBOARD
The OnApp dashboard is displayed after logging into the system. It provides three main views of usage and activity: Statistics, Cloud and Account. Click the icons by the silver dial to change the view.
Statistics This is the default view, showing the Memory (sum total of all hypervisors RAM resources), total
Storage (sum total of all data store capacities) and IOPS in the cloud, along with the space remaining. Storage space and RAM for a normal user are set by the billing plan limits. For administrators, the bars show the CPU usage, Storage usage (sum total of all VM disks capacities + orphan disks capacities) and Memory usage (sum total of RAM allocated to VMs + RAM allocated to orphaned VMs) of the entire cloud.
CloudClicking this icon shows details of the entire cloud:
DOCUMENT REVISIONS - LIST OF DEFAULT PERMISSIONS FOR USER ROLE 28
OnApp 3.0 Administration Guide v15
For normal users, it shows the total number of virtual machines, RAM, data stores, backups and disk space they're using.
For administrators, it shows the total number of virtual machines, hypervisors, data stores and backups in the entire cloud.
Activity logAt the bottom of the screen in each case is a record of recent transactions. To view details of a transaction, click its Ref number.
Normal users see recent transactions for their virtual machines.
Administrators see recent transactions for the entire cloud.
Build – in the upper right corner, click the Build button to create new virtual machine, load balancer or an edge server.
Full screen view – tick the Full Screen button in the upper right corner for the full screen view.
Click the Arrow button to hide the Control Panel's menu.
Use the Search tool for global search across the cloud.
To hide the infobox on a particular page, click the Close button in the upper-right corner of the infobox. For more infobox settings, refer to User Profile section.
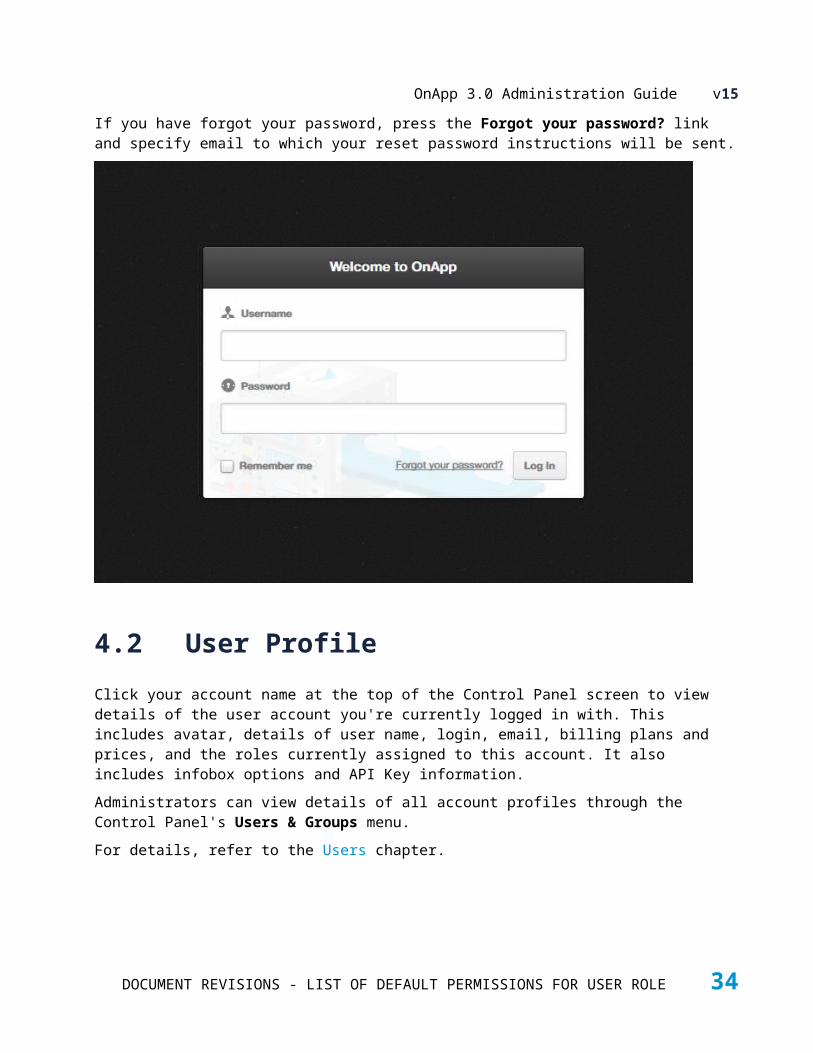
4.1 Login ScreenTo access your Control Panel, you must first provide a username and password. Authentication means identifying user and verifying that this user is allowed to access the OnApp Control Panel.
Check the Remember me box to have the CP remember your login details for 1 month. You will have to enter your login credentials again after you log out or clear your browser cookies.
If you have forgot your password, press the Forgot your password? link and specify email to which your reset password instructions will be sent.
DOCUMENT REVISIONS - LIST OF DEFAULT PERMISSIONS FOR USER ROLE 29

OnApp 3.0 Administration Guide v15
4.2 User ProfileClick your account name at the top of the Control Panel screen to view details of the user account you're currently logged in with. This includes avatar, details of user name, login, email, billing plans and prices, and the roles currently assigned to this account. It also includes infobox options and API Key information.
Administrators can view details of all account profiles through the Control Panel's Users & Groups menu.
For details, refer to the Users chapter.
4.2.1 API KeyThe API Key is used instead of the normal username/password credentials during API operations.A key is generated for each user by the system when the user account is created. To change the key, click the Regenerate Key button. A new key will be generated, and you'll be taken back to the main Dashboard screen.
DOCUMENT REVISIONS - LIST OF DEFAULT PERMISSIONS FOR USER ROLE 30

OnApp 3.0 Administration Guide v15
4.3 Cloud Search ToolThe search tool in the upper right corner allows you to search your cloud for:
IP addresses
Usernames
Users full names (first or last name, in any order)
VM labels
VM identifiers
Disk identifiers
Log IDs
Backups
Template labels
Permission labels/identifiers
OnApp page URLs/titles
Any word from locale texts (yellow help box texts), if other search results are not successful
Type what you want to search for into the search box, and press Return.The results are organized according to the menu item they refer to, e.g., Pages, Virtual Machines, Users, Locales, etc. Click a search result to open the relevant details page.
DOCUMENT REVISIONS - LIST OF DEFAULT PERMISSIONS FOR USER ROLE 31

OnApp 3.0 Administration Guide v15
5 VIRTUAL MACHINES
Virtual machines are based on templates and are deployed on hypervisors. Hypervisors give them access to CPU, disk and network resources. OnApp Cloud gives you high-end cloud management features including:
Automatic VM deployment
Automatic IP allocation
Setting firewall rules
Manual build option
Customizable backups
Hot and cold migration
VM performance monitoring
Load balancing and autoscaling
OnApp supports two kinds of storage for virtual machines: traditional centralized SANs, and the new distributed block storage functionality introduced with OnApp Storage, in which local disks in hypervisors provide the physical storage space allocated to virtual machines. In each case, the OnApp platform creates virtual data stores from the physical resources, and uses these to provide virtual machines with virtual disks.
5.1 Manage VMsAdministrators in OnApp have full control over the lifecycle of virtual machines. Virtual machines can be in the following states:
Created - A machine is created when you successfully Create VM from the Virtual Machines menu, having selected its template and set its properties, resources and network requirements.
Build - A virtual machine must be built after it is created. Building is the process of actually allocating the physical resources specified during its creation. This can be done manually, or automatically if you check the Build Virtual Machine Automatically box during the creation process.
Powered on - A power on starts the virtual machine, its operating system and processes.
Powered off - If the operating system cannot be stopped, it will be forcefully terminated.
Shut down - A shut down will attempt to gracefully stop a virtual machine and its operating system, which typically involves terminating all running applications.
Rebooted - Rebooted means a virtual machine has been shut down, and then powered on again.
DOCUMENT REVISIONS - LIST OF DEFAULT PERMISSIONS FOR USER ROLE 32
OnApp 3.0 Administration Guide v15
Deleted - When a virtual machine is deleted, its backups are still stored on the server and can be restored if required.
Re-built - To rebuild a virtual machine means to reinstall the template and reconfigure the resources and network. All data will be lost.
Failed - A failed virtual machine is one that is down, for example because of hardware or network problems. You will have to start the machine manually when those problems have been solved.
5.1.1 View VMsTo view all virtual machines deployed in the cloud:
1. Go to your Control Panel's Virtual Machines menu to see an overview of all virtual machines in the cloud: their label, operating system, VIP status (enabled or disabled), IP addresses, allocated disk size, RAM, backups, power status (with on/off buttons),.
2. Click the Actions button next to the VM for the quick access to the list of VM actions (the list of actions displayed depends on the VM status):
o Reboot a VM
o Recovery reboot
o Power off a VM
o CPU usage
o Backups
o Shutdown
o Start up
o Recovery start up
o Unlock
To search for a particular virtual machine, type the text you want to search for in the search box and click the Search button.
To view details of a specific virtual machine:
1. Go to your Control Panel's Virtual Machines menu.
2. Click the label of the virtual machine you're interested in.
3. On the screen that appears, you'll see the VM Properties table and activity log.
4. Click the Tools button to expand the Tools menu.
5. Use the top menu to manage your virtual machines. The schematic menu navigation with the references to appropriate sections is presented in the table below.
DOCUMENT REVISIONS - LIST OF DEFAULT PERMISSIONS FOR USER ROLE 33
OnApp 3.0 Administration Guide v15
Overview CPU Usage shows VM information and gives access to most of the VM actions
Billing Statistics
Autoscaling
Networking
Network Interfaces
gives access to VM networks
Firewall
IP Addresses
Storage Disks gives access to VM disks and backups/snapshots
Backups
5.1.2 VM PropertiesVM properties page gives general overview of the VM details:
Template this VM is built on
Power status & On/Off/Reboot buttons.
PLEASE NOTE: Clicking the OFF button terminates VM forcefully.
Hostname
Hypervisor
Login credentials
Owner
VIP status (on/off)
Price per hour
Memory
CPU(s)
Disk Size
Disk backups
IP Addresses
DOCUMENT REVISIONS - LIST OF DEFAULT PERMISSIONS FOR USER ROLE 34
OnApp 3.0 Administration Guide v15
NOTE: Only the first five IP addresses are displayed on the virtual machine properties page. To view the list of all virtual machine IP addresses, mouse over IP addresses area or go to the Networking > IP addresses tab.
Network Speed
Automation options: autoscale and automatic backups
Notes
Activity log
NotesA brief comment or reminder for a VM. Click the Actions button next to add admin's or user's note.
Options:Autoscale - move the slider to enable/disable the autoscaling rules set for this VM.
Autobackups - move the slider to enable/disable automatic backups for this VM.
If the automation options weren’t enabled during this virtual machine creation, you’ll be redirected to the form where you can configure them.
To expand the VM Tools menu, click the Tools button on the VM's screen. Tools menu enables you to perform the following actions on VMs (the exact list shown depends on the VM status):
Power options
o Reboot Virtual Machine - powers off and then restarts the VM.
o Reboot in Recovery - powers off and then restarts the VM Recovery mode with a temporary login ("root") and password ("recovery").
Windows virtual machines boot from the Linux-based recovery template in a recovery mode. You need to log in as admin via SSH or VNC console, then mount a Windows system disk manually.
PLEASE NOTE: You can not work with the "whole" disk (like mount -t ntfs-3g /dev/sdb1) while mounting and checking block devices inside the recovery image, as Windows disk is splitted into partitions.
o Suspend Virtual Machine - stops a VM, changes its status to suspended and disables all the other actions on VM, unless unsuspended.
o Shut Down Virtual Machine – pops up a dialog box, where you can either Shut Down VM (terminates the VM gracefully), or Power Off VM (terminates the VM forcefully).
DOCUMENT REVISIONS - LIST OF DEFAULT PERMISSIONS FOR USER ROLE 35
OnApp 3.0 Administration Guide v15
o Startup Virtual Machine - queues a start-up action for a VM that's currently powered off.
o Startup on Recovery - starts the VM in recovery mode with a temporary login ("root") and password ("recovery").
Performance options
o Migrate Virtual Machine - pops up the VM migration dialogue, enabling you to move the VM to a different hypervisor. Choose a hypervisor you want to migrate the VM to from the drop down list. Tick the Cold Migrate if Hot Migration fails box to cold-migrate virtual machine if hot migration fails.
o Segregate Virtual Machine – pops up a drop-down menu where you may choose a VM to keep away from (your VM will never be booted on the same hypervisor as specified VM).
Administrative options
o Reset Root Password - resets the root password for this VM (the password is displayed in VM Information).
o Change Owner - pops up a dialogue box with a drop-down of all users on the system, enabling you to pass ownership of the VM to the user selected from the list.
o Set SSH keys –assigns SSH keys of the admin and a VM owner to the VM. If a VM owner does not have any SSH keys, the system will only assign admin keys.
o Edit Administrator's note - makes an optional note, which will be displayed in VM information.
VM options
o Rebuild Virtual Machine - pops up the VM rebuild dialogue, where you can rebuild the VM on the same (or another) template. All data will be lost!
o Edit VM - opens the Adjust Resource Allocations screen for resizing this VM, where you can change number of CPUs, size of RAM, CPU priority and change VM label. Note, that resizing the VM may lead to reboot (depends on the template)!
o Migrate Virtual Machine - pops up the VM migration dialogue, enabling you to move the VM to a different hypervisor. Choose a hypervisor you want to migrate the VM to from the drop down list. Tick the Cold Migrate if Hot Migration fails box to cold-migrate virtual machine if hot migration fails.
o Delete Virtual Machine - removes the VM from the system.
Network options
o Edit Firewall Rules– redirects you to Networking -> Firewall menu, where you can set firewall rules.
DOCUMENT REVISIONS - LIST OF DEFAULT PERMISSIONS FOR USER ROLE 36
OnApp 3.0 Administration Guide v15
o Manage Network Interface - redirects to Network Interfaces screen, where you can configure VM's network interface.
o Rebuild Network - rebuilds network join, added to this VM (required after allocating new IP addresses).
5.1.3 Create VMVirtual machines are created from templates. To create a virtual machine:
1. Go to your Control Panel's Virtual Machines menu and press the "+" button, or click the Create New Virtual Machine button at the bottom of the screen.
2. Fill in the VM creation form step by step:
Step 1 of 4. Templateso Click the required Operating system label (Windows, Linux or FreeBSD) to expand the
list of template groups.
o Distribution - choose a template Distribution.
o Template - select the template.
o Click Next.
Greyed out templates mean that there are not enough resources to build a VM from this template.
Windows Licensing Type
This option only appears if your billing plan allows it, and if the relevant licensing options have been configured for the template group this template belongs to.If this option is available, choose the license type you require:
o For the KMS type, choose the licensing server
o For your own license, type your license key
If you don't specify the licensing type, MAK licensing will be set by default.
Step 2 of 4. Virtual Machine Properties
Give your virtual machine a label and a hostname. The hostname should consist of letters [A-Z a-z], digits [0-9] and dash [ - ]. For more info on hostname validation, refer to RFC standard documentation.
DOCUMENT REVISIONS - LIST OF DEFAULT PERMISSIONS FOR USER ROLE 37

OnApp 3.0 Administration Guide v15
Label and hostname are required parameters. You can create a virtual machine having specified only the required parameters and configure it later.
o Choose a hypervisor zone to build this VM on.
o Choose a specific hypervisor to build this VM on.
o Give your virtual machine a secure password. It can consist of 6-32 characters, letters [A-Za-z], digits [0-9], dash [ - ] and lower dash [ _ ]. You can use both lower- and uppercase letters.
o To encrypt your password, move the Encrypt Password slider to the right, then enter an encryption key in the field that appears.
o Click Next.
Step 3 of 4. Resources
Set the resources needed for this VM: RAM, CPU cores, CPU priority.
The amount of CPU resource a VM is given is the CPU priority (you can think of this as its "share percentage") multiplied by the number of cores allocated to that VM. This is a minimum number – clients can burst over it, up to 100% multiplied by the number of cores. For example, on a hypervisor with 3GHz CPU cores:
100% x 1 core = 3GHz (burstable to 3GHz)
10% x 2 cores = 600MHZ (burstable to 6GHz)
5 % x 4 cores = 600MHz (burstable to 12GHz)
By default, OnApp allows overselling of cloud resources. For example, OnApp will allow users to create 5 VMs with 100% CPU priority/1 CPU core on a hypervisor with a 4-core CPU. In this example, OnApp would reduce the guaranteed CPU for each VM.
Primary disko Choose a data store zone for this VM's primary disk.
o Set the primary disk size.
Swap disko Choose a data store zone for this VM's swap disk.
o Set the swap disk size
DOCUMENT REVISIONS - LIST OF DEFAULT PERMISSIONS FOR USER ROLE 38

OnApp 3.0 Administration Guide v15
There is no swap disk for Windows-based VMs. In all other cases, swap disk size must be greater than zero.
Network configurationo Choose a network zone from the drop-down box.
o If the option is available, you can also assign an IP address for the VM from the drop-down menu. Indicate HV and network to have the list of available IPs. Tick the Show Only My IP Addresses checkbox to view only own IP addresses in the IP addresses dropbox.
This option is enabled via the "Specify a network address on new VM page" checkbox on the Settings -> Configuration settings screen (under the System tab).
o Set the port speed for this VM.
You can't select unlimited port speed if the Network Zone is not selected. In this case the port speed will be 1 by default.It's possible to create virtual machine with unlimited network speed without selecting a network zone only if you have only one Network Zone assigned to your billing plan.
o Click Next.
Step 4 of 4. Automation settingso Move the Enable Automated Backup slider to the right if you want this VM to be backed
up automatically (according to the backup settings configured in the Settings/Autobackup Presets menu)
o Move the Build Virtual Machine slider to the right if you want the system to automatically build the VM. If you leave this box blank, you will have to build your machine manually after it is created.
o Move the Startup Virtual Machine Automatically slider to the right if you want the virtual machine to be started up automatically.
o Move the Enable ext4 File System for VM slider if you want to use ext4 file system instead of ext3 (for CentOS6 and RHES6 templates only!)
o Move the Enable Autoscale slider to the right to set autoscaling rules for this VM.
DOCUMENT REVISIONS - LIST OF DEFAULT PERMISSIONS FOR USER ROLE 39
OnApp 3.0 Administration Guide v15
OnApp must be configured properly before VMs can be created. You must:
Have at least one data store configured and assigned to a data store zone (Settings -> Data Stores -> Add New Data Store)
Have at least one network configured and assigned to a network zone (Settings -> Networks -> Add New Network)
Have at least one hypervisor configured and online (Settings -> Hypervisors -> Add New Hypervisor) Have at least one hypervisor assigned to a hypervisor zone (Settings -> Hypervisor Zones -> Choose a zone -> Press "+" sign next to an unassigned Hypervisor)
Have at least one data store attached to a hypervisor (Settings -> Hypervisors -> [choose a hypervisor] -> Manage Data Stores)
Have at least one network attached to a hypervisor (Settings -> Hypervisors -> [choose a hypervisor] -> Manage Networks)
Have assigned a billing plan to the user creating the VM (Users and Groups -> Edit [user])
3. Click the Create Virtual Machine button to start the creation process. You will be taken to the virtual machine details screen.
5.1.4 Build VM ManuallyIf you haven't checked the Build Virtual Machine option during the VM creation process, you will have to do this manually after the VM has been created. Building a virtual machine is the process of allocating physical resources to that VM.
To build a virtual machine manually:
1. Go to your Control Panel's Virtual Machines menu.
2. Click the label of the virtual machine you're interested in.
3. On the screen that appears, click the Tools button and then click Rebuild Virtual Machine.4. On the screen that pops up, use the drop-down menu to choose a template with which to build
the VM.
5. Tick the Required Start Up box to have your VM started automatically after it is built.
6. Click the Create Virtual Machine button to finish.
DOCUMENT REVISIONS - LIST OF DEFAULT PERMISSIONS FOR USER ROLE 40

OnApp 3.0 Administration Guide v15
5.1.5 Edit VMYou can edit CPU and RAM resources for all VMs. Depending on the OS it is built on, some VMs can have their CPU and RAM resized without needing to be powered off ("resize without reboot").
Windows 2008 and Windows 7 VMs can be resized without rebooting: Windows 2003 requires a reboot. With Linux it depends on kernel. E.g. CentOS with kernel 2.6.18 can be resized; Ubuntu cannot. Whether a template allows resize without reboot is shown on the main Templates menu screen.
To adjust VM CPU & RAM resources:
1. Go to your Control Panel's Virtual Machines menu.
2. Click the label of the machine you want to resize, to show its details screen.
3. Click the Tools button and select the Edit VM link.
4. Change CPU core/priority and RAM values , and click the Save Virtual Machine button:
If the VM template allows resize without reboot, the resize should be completed automatically: you will be returned to the VM details screen and see a message indicating the resize was successful.If the template does not allow this, you will be asked to confirm that the VM will need rebooting so that the resize can take place.
5.1.6 Migrate VMOnApp allows hot and cold migration of virtual machines between hosts that share common data stores (or data store zones). Hot migration means moving virtual machines that are running, while cold migration means moving virtual machines that are shut down.
Hot migration is not available for virtual machines based on Windows 2003. They must be cold migrated (that is, once they have been shut down).
To hot migrate a virtual machine:
1. Go to your Control Panel's Virtual Machines menu.
2. Click the label of the virtual machine you want to migrate.
3. Click the Tools button and press the Migrate Virtual Machine link.
4. In the window that appears, choose the target hypervisor from the drop-down menu.
5. Click the Start to Migrate button.
After migration, the power status of your virtual machine remains the same as before the migration. If you migrate a virtual machine that's running, the whole process is almost unnoticeable.OnApp administrators can control user access over virtual machine migration. Using OnApp permissions, you can allow/forbid users to perform migration of all virtual machines, or their own machines only. This is handled via the Control Panel's Users and Groups menu.
DOCUMENT REVISIONS - LIST OF DEFAULT PERMISSIONS FOR USER ROLE 41

OnApp 3.0 Administration Guide v15
5.1.7 Autoscale VMVM autoscaling allows you to change the RAM, CPU and disk size settings of a virtual machine automatically. VM resources scaling is based on rules you specify. For example, you can set up a rule that will add 1000MB of memory to a VM if RAM usage has been above 90% for the last 10 minutes - but add no more than 5000MB in total in 24 hours. Starting from the 3.0 version of the OnApp cloud, you can set autoscaling down settings alongside with autoscaling up.
For Linux-based VMs only.If the VM is based on Xen and the template allows resizing without reboot - see the Edit VM section – then virtual machine RAM and CPU will be increased without rebooting the VM.Disk space autoscaling requires a VM reboot. If you autoscale a VM's memory to a value greater than current VM RAM x 16 (which is a max_mem parameter in a configuration file and database), the VM will be rebooted anyway, regardless of the template it is built on.
To configure autoscaling setitngs:
1. Go to your Control Panel's Virtual Machines menu.
2. Click the label of the appropriate VM.
3. On the page that follows, click the Overview tab, and then click Autoscaling.4. Press the required tab to set the autoscaling options for: Memory Usage, Disk Usage or CPU
Usage.
5. Add autoscaling rules as explained below:
Set autoscale up options:
o If RAM usage is above X% for a specific time period, add Y MB – but no more than Z MB in a 24 hour period.
o If CPU usage is above X % for a specific time period, add Y% - but no more than Z% in a 24 hour period.
o If disk usage is above X % for a specific time period, add Y GB - but no more than Z GB in a 24 hour period.
o Move the Allow decreasing slider to the right to enable autoscaling down
Set autoscale down options:
o If RAM usage is below X% for a specific time period, remove Y MB – but no more than Z MB in a 24 hour period.
o If CPU usage is below X % for a specific time period, remove Y% - but no more than Z% in a 24 hour period.
o If disk usage is below X % for a specific time period, remove Y GB - but no more than Z GB in a 24 hour period.
o Move the Allow decreasing slider to the right to enable autoscaling down
DOCUMENT REVISIONS - LIST OF DEFAULT PERMISSIONS FOR USER ROLE 42

OnApp 3.0 Administration Guide v15
6. Click Apply.To delete an autoscaling rule:
1. Go to your Control Panel's Virtual Machines menu.
2. Click the label of the appropriate VM.
3. On the page that follows, click the Overview tab, and then click Autoscaling.4. Click Delete. This will delete all autoscaling rules.
5.1.8 Segregate VMIf required, you can instruct OnApp to make sure a VM is never booted on the same hypervisor as another specific VM. This may be important if, for example, you have two name servers or a load balanced web server, and you need to keep VMs on separate physical machines.To isolate one VM from another:
1. Go to your Control Panel's Virtual Machines menu.
2. Click the label of the virtual machine you want to segregate.
3. On the screen that appears, click the Tools button, then click Segregate Virtual Machine.
4. In the dialog box that pops up, use the drop-down menu to choose a VM you want to keep away from.
5. Click the Segregate VM button to finish.
5.1.9 Delete VMShut down the VM before destroying it. If you are deleting a VM that is running, the VM will be deleted after the time set in Timeout Before Shutting Down VMs configuration parameter.To remove the virtual machine from the cloud:
1. Go to your Control Panel's Virtual Machines menu.
2. On the screen that appears, you'll see the list of all virtual machines in the cloud. Click the label of the virtual machine you want to delete.
3. On the VM's screen, click the Tools button, then select Delete Virtual Machine.4. Tick the Move Last Backup to My Templates box if it is present to save the last VM's backup
as a template.
5. Tick the Destroy All Existing Backups box if you want to remove all existing backups of this virtual machine.
IMPORTANT: You won't be able to restore a VM after deleting it.Deleting a virtual machine removes all data stored on that VM. To save data saved on the
DOCUMENT REVISIONS - LIST OF DEFAULT PERMISSIONS FOR USER ROLE 43
OnApp 3.0 Administration Guide v15
VM, back up your virtual machine and tick the Destroy All Existing Backups box when following the instructions described in this section.
NOTE: Backups are deleted automatically when the virtual machine is deleted. To prevent backups from deletion, please contact OnApp support. This this will fill up your disk over time and requires administrator assistance to change the current behavior.
5.1.10 Set VIP Status for VMIf a hypervisor fails or reboots, the system migrates virtual machines to another server, one VM at a time. The order VMs are migrated in is random. However, you can give a virtual machine "VIP" status, and this will give that VM priority in the migration queue.To set or remove VIP status for a VM:
1. Go to your Control Panel's Virtual Machines menu.
2. Use the VIP button next to a required virtual machine to change its VIP status.
5.1.11 VM Integrated ConsoleOnApp includes an integrated VNC console that gives users direct access to their virtual machines through the OnApp Control Panel, if their user role permits. Administrators can access all virtual machine consoles for support and troubleshooting purposes.The console connects the user's browser to the VNC port made available via the hypervisor for the guest console. Both the administrator and the end user web UIs offer a console connection, regardless of the OS.
5.1.12 VM Transactions and LogsThe system records a detailed log of all the transactions happening to your virtual machines. The list of transactions logged by the system includes:
Provision virtual machine
Startup virtual machine
Stop virtual machine
Resize virtual machine without reboot
DOCUMENT REVISIONS - LIST OF DEFAULT PERMISSIONS FOR USER ROLE 44

OnApp 3.0 Administration Guide v15
Configure Operating System
Build disk
Resize disk
Format disk
Destroy disk
Take backup
Convert backup
Restore backup
Destroy backups
Destroy virtual machine
Destroy template
Download template
Update firewall
To view transactions for a virtual machine:
1. Go to your Control Panel's Virtual Machines menu.
2. Click the label of the virtual machine you're interested in.
3. The details screen for that virtual machine shows recent transactions in the Activity Log section. To view more transactions, click the More Logs button.
To cancel pending tasks, click Cancel All Pending Tasks for this virtual machine.
5.2 Manage VM NetworksThe Networking menu in the Virtual Machines menu enables you to manage network interfaces, allocate IP addresses and set firewall rules for VMs.
5.2.1 Configure Network InterfaceThe Networking -> Network Interfaces menu shows the virtual network interfaces allocated to this VM. Network interfaces join the physical network to the VM.When you create a VM a network interface is added automatically. This network interface will be assigned to the existing physical network using a spare IP (IPv4) and will be set primary by default.OnApp supports IPv4 and IPv6. Since not every application supports IPv6, at least one IPv4 address must be allocated to a VM's primary network interface.To see the list of all network interfaces allocated to the VM:
1. Go to your Control Panel's Virtual Machines menu.
2. Click the label of the virtual machine you're interested in.
DOCUMENT REVISIONS - LIST OF DEFAULT PERMISSIONS FOR USER ROLE 45
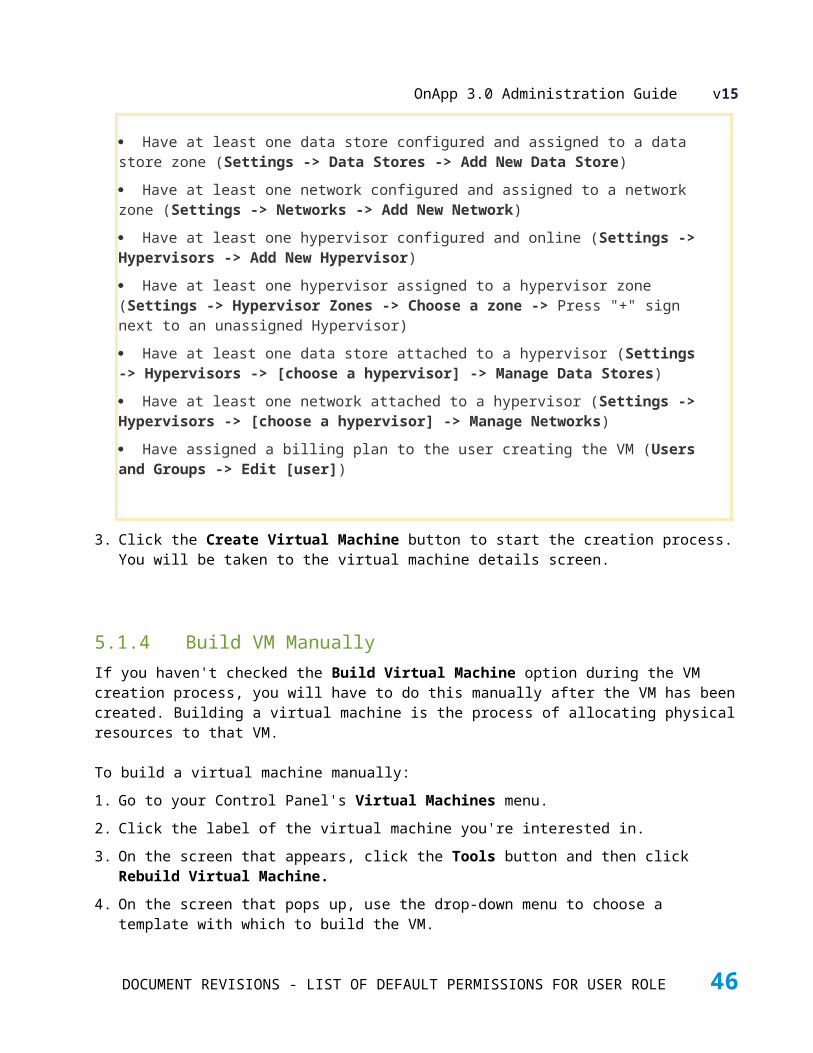
OnApp 3.0 Administration Guide v15
3. Click the Networking tab, then click Network Interfaces.4. On the page that follows you will see the following fields:
Interface – optional label of the network interface.
Network join – name of the network and a hypervisor or hypervisor zone this network is joined to.
Port speed – the speed set to the interface.
Primary interface – indication whether the interface is primary or not.
Here you can also view Interface Usage, Edit and Delete network interface (using icon controls) and Add a new network interface using the button at the bottom of the screen.To add a network interface:
1. Go to your Control Panel's Virtual Machines menu.
2. Click the label of the virtual machine you're interested in.
3. Click the Networking tab, then click Network Interfaces.4. Click the Add New Network Interface button at the bottom of the screen.
5. On the screen that appears, input values for the following parameters:
o Label – a human-friendly name for the new interface.
o Physical Network – choose a network join from the drop-down menu, which lists network joins assigned to the hypervisor/hypervisor zone on which the VM runs).
o Port speed – set port speed in Mbps, or make it unlimited.
6. Click the Add Network Interface button.
To edit network interface label, port speed or set it as primary (if none is marked as primary), click Edit icon next to the appropriate network interface. After editing the port speed, the virtual machine should be power cycled for the change to take effect.To delete a network interface, click the Delete icon next to the interface you want to delete.
To run the VM, at least one network interface with an assigned IP address (or addresses) is required! To allocate another physical network, add a new network interface.
5.2.2 Rebuild VM NetworkTo rebuild network join, added to the virtual machine (required after allocating new IP addresses):
1. Go to your Control Panel's Virtual Machines menu.
2. Click the label of a required VM.
3. On the screen that appears, click the Tools button, then click Rebuild Network.
DOCUMENT REVISIONS - LIST OF DEFAULT PERMISSIONS FOR USER ROLE 46

OnApp 3.0 Administration Guide v15
4. In the pop-up window that appears, move the Force Reboot slider to the right, then select the VM shutdown type:
o Power OFF virtual machine
o Shutdown virtual machineGracefully shutdown virtual machine
PLEASE NOTE: If the force reboot option is enabled, the system tries to enter the virtual server. Then, if the transaction fails, the virtual server will be rebooted.
In case the force reboot option is disabled and system can not enter the virtual server, the network rebuild operation will fail.
5. Move the Required Startup slider to the right to start up the VM automatically after the network is rebuilt.
6. Click the Rebuild Network button.
5.2.3 Set Firewall RulesWith OnApp you can set firewall rules for the network interfaces of virtual machines. There are two types of firewall rule:
ACCEPT – defines the packets that will be accepted by the firewall
DROP – define the packets that will be rejected by the firewall
To configure a firewall rule:
1. Go to your Control Panel's Virtual Machines menu.
2. Click the label of the VM for which you want to configure a firewall rule.
3. Click the Networking tab, then click Firewall.4. On the page that appears, set the following:
a. Choose the network interface.
b. Specify if the rule defines requests that should be accepted or dropped.
c. Set the IP address for which this rule is active.
Leave the empty field to apply this rule to all IPs
Enter hyphen-separated IPs to apply the rule to an IP range (e.g. 192.168.1.1-192.168.1.10)
Enter the IPs with slash to apply the rule to CIDR (e.g. 192.168.1.1/24)
d. Set the port for which this rule will is effective.
Leave the empty field to apply the rule to all ports
Enter colon-separated ports to apply the rule to a port range (e.g. 1024:1028)
DOCUMENT REVISIONS - LIST OF DEFAULT PERMISSIONS FOR USER ROLE 47

OnApp 3.0 Administration Guide v15
Enter comma-separated ports to apply the rule to the list of ports (e.g. 80,443,21)
e. Choose the protocol (TCP, UDP or ICMP).
5. Save the rule. The rule will be saved in the UI, but the transaction won't be started until you click the Apply Firewall Rules button.
6. To start the transaction which runs firewall rules for a VM, click Apply firewall rules button.
7. Use Up and Down arrow buttons in the left column to change firewall rule position.
Example: the Int1 ACCEPT 122.158.111.21 22 TCP firewall rule means that the Int1 network interface will accept all requests and packets addressed from 122.158.111.21 using the TCP protocol on port 22.The Int2 DROP 122.158.111.21 22 UDP firewall rule means that the Int2 network interface will reject all requests and packets from 122.158.111.21 using the UDP protocol on port 22. PLEASE NOTE: if you reboot a Xen-based VM from the console, the firewall rules for this VM will be lost, and you will need to update the firewall rules again.
5.2.4 Allocate/Remove IP AddressesIn the Networking -> IP Addresses tab you can find the list of assigned IP addresses, allocate new IP addresses and rebuild a network.To allocate a new IP Address to the VM:
1. Go to your Control Panel's Virtual Machines menu.
2. Click the label of the virtual machine you're interested in.
3. Click the Networking tab, then click IP Addresses.4. Click the Allocate New IP Assignment button.
5. Select a network interface from the drop-down menu (only the network interfaces you added to the VM will be available)
6. Select an IP address from the IP Pool associated with the network interface. You may select an IP address that's already assigned to a VM, but only one VM should be online at a time.Use Please show me used IP Pool, Show only my IPs and Show only IPv6 checkboxes to narrow the list of IP in the drop-down list.
7. Click the Add IP Address Assignment button.
8. Click the Rebuild Network button to rebuild the network.
You must rebuild the network after making changes to IP address allocations.
To remove an IP address from a VM:
1. Go to your Control Panel's Virtual Machines menu.
DOCUMENT REVISIONS - LIST OF DEFAULT PERMISSIONS FOR USER ROLE 48

OnApp 3.0 Administration Guide v15
2. Click the label of the virtual machine you're interested in.
3. Click the Networking -> IP Addresses tab.
4. Click the Delete icon next to the IP address you want to delete.
5. In the pop up window that appears:
o Choose Delete with Reboot option if you want to reboot a VM and rebuild the network immediately after deleting the IP address. After choosing the Delete with Reboot option you will be redirected to the VM's Overview page.
o Choose Delete without Reboot option if you don't want to reboot a VM. In this case to apply the changes, you will have to the reboot the VM additionally.
PLEASE NOTE: You can't delete an IP address that is in use.
5.2.5 Display Network Speed for Network Interfaces on Virtual Machine Page
The main Virtual Machines screen displays the network speed of each VM's primary network interface. To see the speed of all interfaces assigned to a VM:
1. Go to your Control Panel's Virtual Machines menu.
2. Click the label of the virtual machine you are interested in.
3. Click the Networking > Network Interfaces tab.
4. On the screen that appears, the Port Speed column shows the network speed of the network interface.
5.2.6 Edit Virtual Machine Network SpeedTo edit a virtual machine's network speed:
1. Go to your Control Panel's Virtual Machines menu.
2. Select the virtual machine you want to change.
3. Go to the Network tab-> Network Interfaces, and edit the network speed accordingly.
4. Click the Save Network Interface button to save changes.
DOCUMENT REVISIONS - LIST OF DEFAULT PERMISSIONS FOR USER ROLE 49

OnApp 3.0 Administration Guide v15
5.3 Manage VM Disk SpaceVirtual machine storage is provided by disks. A disk is a partition of a data store that is allocated to a specific virtual machine. Disks can be assigned as standard or swap disks (there are no swap disks for Windows based templates). They can also be set as primary (that is, the disk from which an OS will boot).Managing disks for the entire cloud is handled through the Control Panel's Settings menu. Disks for individual virtual machines are managed through the Control Panel's Virtual Machines menu, where you can:
See the list of disks allocated to this VM
Add a new disk
Resize a disk
Migrate a disk
Back up a disk or see already made backups for the disk
Set backup schedules
Check disk usage statistics (IOPS)
Delete a disk
PLEASE NOTE: Creating multiple partitions on one disk is forbidden for Windows-based virtual machines.
5.3.1 Add Disks to VMAdding a disk to a virtual machine will require that VM to be rebooted. If a VM is running when you try to add a new disk to it, you'll be asked to confirm the reboot. To add a disk to a virtual machine:
1. Go to your Control Panel's Virtual Machines menu.
2. Click a VM's label to open its details screen.
3. Click the Storage tab -> Disks.4. Click the Add New Disk button.
5. Fill in the details:
o Specify disk label.
o Choose the data store to create a disk on from the drop-down list.
o Move the slider to the right to specify the desired disk size.
o Tick the Hot Attach checkbox to enable disk hot attaching. In this case virtual machine will not be stopped when adding a disk.
DOCUMENT REVISIONS - LIST OF DEFAULT PERMISSIONS FOR USER ROLE 50
OnApp 3.0 Administration Guide v15
Hot attach option is only available for KVM 6/ CentOS 6 virtual machines.
NOTE: If virtual machine and the control panel server belong to different networks, the hot attach transaction will fail.
o Tick the Swap Space checkbox if this disk is swap space.
o Tick the Require Format Disk if this disk requires formatting.
Resize disk action may work incorrectly if an additional disk has been created without the require format disk option and formatted/partitioned another way. Use the require format disk option when creating an additional disk, otherwise use disk resize option at your own risk.
o Tick the Add to Linux FSTAB checkbox if the disk should be added to Linux FSTAB (for Linux virtual machines).
o If the disk should be added to the Linux FSTAB, specify its mount point.
The maximum length of a Mount Point is 256 characters. Spaces are not allowed. No more than one slash is allowed.
o Tick the Add to FreeBSD FSTAB checkbox if the disk should be added to FreeBSD FSTAB (for FreeBSD virtual machines).
6. Click the Add Disk button to finish.
When you add a new disk to a virtual machine it will automatically become available to that machine.
5.3.2 Edit VM DisksYou can easily resize disks when needed. The resize will fail if your current usage is greater than the new size you request. Note, that any changes on disk size will lead to reboot of your VM.
DOCUMENT REVISIONS - LIST OF DEFAULT PERMISSIONS FOR USER ROLE 51
OnApp 3.0 Administration Guide v15
To change the disk size:
1. Go to your Control Panel's Virtual Machines menu.
2. Make sure your virtual machine is powered off, then click its label to open its details screen.
3. Click the Storage tab -> Disks.4. Click the Actions button next to the disk you want to change, then click the Edit link.
5. Enter a new disk label and size in GB in the fields provided.
6. Click the Save Disk button.
You cannot decrease disk size for Windows-based and FreeBSD-based virtual machines. Only the increase disk size option is available.
You can't resize the primary disk for FreeBSD-based virtual machines.
Using OnApp Integrated Storage it is possible only to increase, not decrease the size of disks.
Decreasing disk size for Linux-based virtual machines may lead to filesystem inconsistencies. Make sure you have current backups before proceeding.
5.3.3 Migrate DisksYou can migrate disks of your virtual machines to other data stores, which are allocated to the same hypervisor. Unlike VM migration – disk migration requires reboot of the VM (despite the template it is based on).To migrate a disk:
1. Go to your Control Panel's Virtual Machines menu.
2. Make sure your virtual machine is powered off, then click its label to open its details screen.
3. Click the Storage tab -> Disks.4. Click the Actions button next to the disk you want to move to another data store, then click the
Import link.
5. On the screen that appears, select a target data store from a drop-down box.
DOCUMENT REVISIONS - LIST OF DEFAULT PERMISSIONS FOR USER ROLE 52
OnApp 3.0 Administration Guide v15
You can only migrate disks to data stores in data store zones assigned to your billing plan.
6. Click Start Migrate.
You cannot migrate a disk to a data store with less capacity than the disk size! PLEASE NOTE: Thin provisioning disks become thick provisioned after a disk migration. For example, if you use thin storage and move an 850GB disk between aggregates with 10GB actual usage, the 'dd' image of the local volume manager will take 850GB space, because the entire local volume manager is copied, including zero 'd space which may not be able to be recovered.
5.3.4 Delete VM DisksTo delete a disk:
1. Go to your Control Panel's Virtual Machines menu.
2. Make sure your virtual machine is powered off, then click its label to open its details screen.
3. Click the Storage -> Disks tab.
4. Click the Actions button next to the disk you want to delete, then click Delete.
5.3.5 Back up VM DisksTo back up a virtual machine:
1. Go to your Control Panel's Virtual Machines menu.
2. Click the label of the machine you want to back up.
3. Click the Storage tab -> Disks. You'll see a list of the disks allocated to that virtual machine.
4. Click the Actions icon next to a disk you want to take a backup of, then click Backup. You'll see a list of all the backups taken and pending for that disk, along with the tools to restore backups, delete them, and convert them to templates.
o To make a backup, click the Take Backup button at the end of the list.
DOCUMENT REVISIONS - LIST OF DEFAULT PERMISSIONS FOR USER ROLE 53

OnApp 3.0 Administration Guide v15
o To restore a backup, click the Restore link next to the backup you want to revert to.
o To convert a backup into the custom template, click Convert to Template link next to the backup (see Create custom templates).
PLEASE NOTE: Backups in the OnApp Control Panel are associated with a particular user instead of being associated with a virtual machine. To view the list of user backups, refer to View User Backups section.
5.3.6 Schedule VM BackupsIn addition to the system autobackup presets, you can schedule backups of VMs (VM disks) as required. For example, you can set up a schedule to back up your disks once a week.To add a backup schedule:
1. Go to your Control Panel's Virtual Machines menu.
2. Click the label of the virtual machine you want to schedule a backup for.
3. Click the Storage tab -> Disks.4. On the screen that appears, click the Actions button next to the disk you want to back up, then
click Schedule for Backups.5. On the screen that follows, click the New Schedule button.
6. Next, enter duration and choose a period from the drop-down menu: daily, weekly, monthly or yearly. The duration determines how frequently the backup will take place according to the period set. For example, duration of 2 and a period of days will take a backup every 2 days.
7. Click the Save button to finish.
Editing and deleting backup schedules is handled through the Control Panel's Settings menu, in the Schedules section.
The combination of Scheduled VM backups and Autobackup Presets provides a great deal of flexibility in the way backups are handled for the cloud, and for individual VMs. Autobackup Presets can be applied to all new VMs added to the cloud. Scheduled VM backups enable specific backups to be scheduled for individual VMs, outside of the autobackup pattern.
5.3.7 Manage BackupsBackups tab lists all backups performed for the VM (of all disks) and enables you to restore or convert them into custom templates.To restore backups or convert them to custom templates:
DOCUMENT REVISIONS - LIST OF DEFAULT PERMISSIONS FOR USER ROLE 54
OnApp 3.0 Administration Guide v15
1. Go to your Control Panel's Virtual Machines menu.
2. Click the label of the required virtual machine.
3. Click the Storage tab -> Backups.4. On the screen that appears, you'll see a list of all the backups taken and pending for that virtual
machine, along with the tools to restore backups, delete them, and convert them to templates.
o To restore a backup, click the Restore link next to the backup you want to revert to.
o To convert a backup into the custom template, click Convert to Template link next to the backup (see Create custom templates).
5.4 VM StatisticsFor your convenience, the system tracks VM performance and generates statistics on:
VM CPU Utilization
VM Billing statistics
Interface Usage
Disk IOPS
5.4.1 VM CPU UtilizationOnApp tracks CPU usage for virtual machines and generates charts that help analyze VM performance.The charts show the total CPU usage for all the cores of this particular VM for a specified time period. The vertical axis has a scale of 0.0-X.0, where 0.0 is 0% and X.0% is 100% of CPU utilization - X depends on the total number of cores used by the VM. The horizontal axis defines a time period.
To see CPU usage statistics:
1. Go to your Control Panel's Virtual Machines menu.
2. Click the label of the virtual machine you're interested in.
3. Click the Overview tab -> CPU Usage.
4. On the screen that appears, the top chart shows CPU usage for the last 24 hours. The bottom chart shows usage for the last three months (if there is enough data). If there less data available, the chart will show utilization for the time available.
5. Tick the Show in My Timezone box to show bandwidth statistics according to your profile's timezone settings.
6. To zoom into a time period, click and drag in a chart. Click the Show All button to zoom out again.
DOCUMENT REVISIONS - LIST OF DEFAULT PERMISSIONS FOR USER ROLE 55

OnApp 3.0 Administration Guide v15
To see what percentage of hypervisor CPU resource a VM takes, go to your Control Panel's Virtual Machines menu and click the label of the VM you're interested in. On the screen that appears, the CPU priority will show the amount of CPU resource given to this VM.
5.4.2 VM Billing StatisticsOnApp has a record of all the charges applied to your VMs for the last three month period. If a virtual machine was created less than three months ago, statistics are recorded for the VM's existence to date. You can view all statistics available, or those for a shorter period by setting a Start and End time.
To view billing statistics for a virtual machine:
1. Go to your Control Panel's Virtual Machines menu.
2. Click the label of the virtual machine you're interested in.
3. Click the Overview -> Billing Statistics tab.
4. Set Start and End time. By default the statistics are generated for the last three months or the actual VM existence period.
5. Tick the Show in my Timezone box to show bandwidth statistics according to your profile's timezone settings.
6. On the page that appears:
Date – particular date and time for the generated statistics
Users – the virtual machine owner. Click the owner name to see the User Profile (user details)
Virtual Machines – the virtual machine name with the total due for VM resources (CPU priority, CPUs, memory and template resources) for the point of time specified in the Date column.
Network Interfaces – the total due for the network interfaces used by this VM for the point of time specified in the Date column. Click the network interface name to see its details.
Disks – the list of disks assigned to this VM with the total due for the disk space resources (disk size, data read/written, reads/writes completed) for the point of time specified in the Date column. Click the disk name to see its details.
Costs – the total due for the Virtual Machines, Network Interfaces and Disks resources at the point of time specified in the Date column.
Scroll down to see Total Amount (the total due for the whole billing statistics period).
DOCUMENT REVISIONS - LIST OF DEFAULT PERMISSIONS FOR USER ROLE 56

OnApp 3.0 Administration Guide v15
5.4.3 Network Interface StatisticsOnApp tracks network usage for virtual machines and generates charts that help analyze network performance. To see network utilization statistics for a virtual machine:
1. Go to your Control Panel's Virtual Machines menu.
2. Click the label of the virtual machine you're interested in.
3. Click the Networking -> Network Interfaces tab.
4. Click the Statistics (chart) icon next to the network you're interested in.
5. On the screen that appears, the top chart shows bandwidth usage for the last 24 hours. The bottom chart shows usage for the last three months.
6. To zoom into a time period, click and drag in a chart. Click the Show all button to zoom out again.
5.4.4 Disk IOPSThe system tracks IOPS (Input/Output Operations per Second) for virtual machines and generates charts that help analyze VM disk performance. To see IOPS for a virtual machine:
1. Go to your Control Panel's Virtual Machines menu.
2. Click the label of the virtual machine you're interested in.
3. Click the Storage -> Disks tab.
4. Click the Actions button next to the required disk, and then choose IOPS.
5. Click the Statistics (chart) icon next to the disk you're interested in. There are four charts on the screen that appears:
o IOPS for the last hour
o IOPS for the last 24 hours
o Data written/read for the last 24 hours
o Data written/read for the last hour
6. To zoom into a time period, click and drag in a chart. Click the Show All button to zoom out again.
The OnApp API allows you to limit the Hourly IOPS and Hourly data by setting the limit=N
DOCUMENT REVISIONS - LIST OF DEFAULT PERMISSIONS FOR USER ROLE 57
OnApp 3.0 Administration Guide v15
parameter, where the N variable is the number of hours for which the charts will display the info.
DOCUMENT REVISIONS - LIST OF DEFAULT PERMISSIONS FOR USER ROLE 58

OnApp 3.0 Administration Guide v15
6 VMWARE VIRTUAL MACHINES
Virtual machines running on VMware hypervisors are managed almost the same as normal virtual machines. The only difference is that publishing rules are used instead of firewall rules and backups are replaced by snaphots. Also, as the VMware cluster is displayed as a pool of resources rather than per hypervisor, certain VM operations are unavailable in OnApp with VMware:
Migrate VM - VMware utilizes vMotion to ensure that the VMs are optimally placed on the Hypervisors
Backup process for VMware virtual machines differs from the standard OnApp backup scheme. See VMware VM Snaphots section for details.
Firewall for VMware VMs is presented with publishing rules. See Publishing Rules section for details.
Reboot in recovery, segregate and VIP status options are not available under VMware.
NOTE: Performing the following VM operations at vCenter may lead to performance inconsistencies. Please, do not execute the following actions in vCenter:
Power VMs ON and OFF
Pause and Unpause VMs
Edit the Properties for any VM
Create and delete Snapshots
Make changes to the distributed vswitch
Remove templates from the datastore
Rename templates
Delete the services account on the virtual machine
Remove or stop VMWare tools on the virtual machine
Performing the following actions in vCenter will not affect OnApp:
Migrate VMs between hypervisors using VMotion
Migrate VMs between datastores using Storage VMotion
Place Hypervisors into maintenance mode
Make changes to hypervisors when in maintenance mode
Back up VMs using third party tool (e.g. Veeam)
Enable, Disable or make changes to DRS
DOCUMENT REVISIONS - LIST OF DEFAULT PERMISSIONS FOR USER ROLE 59

OnApp 3.0 Administration Guide v15
6.1 Manage VMware VMsAdministrators in OnApp have full control over the lifecycle of VMware virtual machines. Virtual machines can be in the following states:
Created - A machine is created when you successfully Create VM from the Virtual Machines menu, having selected its template and set its properties, resources and network requirements.
Build - A virtual machine must be built after it is created. Building is the process of actually allocating the physical resources specified during its creation. This can be done manually, or automatically if you check the Build Virtual Machine Automatically box during the creation process.
Powered on - A power on starts the virtual machine, its operating system and processes.
Powered off - If the operating system cannot be stopped, it will be forcefully terminated.
Shut down - A shut down will attempt to gracefully stop a virtual machine and its operating system, which typically involves terminating all running applications.
Rebooted - Rebooted means a virtual machine has been shut down, and then powered on again.
Deleted - When a virtual machine is deleted, its backups are still stored on the server and can be restored if required.
Re-built - To rebuild a virtual machine means to reinstall the template and reconfigure the resources and network. All data will be lost.
Failed - A failed virtual machine is one that is down, for example because of hardware or network problems. You will have to start the machine manually when those problems have been solved.
6.1.1 VMware VM PropertiesVM properties page gives general overview of the VM details:
Template this VM is built on
Power status & On/Off/Reboot buttons.
PLEASE NOTE: Clicking the OFF button performs graceful shutdown and then powers off the VM after the timeout set in Configuration settings.
Hostname
Hypervisor
Login credentials
Owner
DOCUMENT REVISIONS - LIST OF DEFAULT PERMISSIONS FOR USER ROLE 60

OnApp 3.0 Administration Guide v15
Price per hour
Memory
CPU(s)
Disk Size
Disk backups
IP Addresses
Network Speed
Automation options: autoscale and automatic backups
Notes
Activity log
Add admin's or user's note to create a brief comment or reminder for a VM.
Options:Autoscale - move the slider to enable/disable the autoscaling rules set for this VM.
Autpbackups - move the slider to enable/disable automatic backups for this VM.
If the automation options weren’t enabled during this virtual machine creation, you’ll be redirected to the form where you can configure them.
To expand the VM Tools menu, click the Tools button on the VM's screen. Tools menu enables you to perform the following actions on VMs (the exact list shown depends on the VM status):
Power options Reboot Virtual Machine - powers off and then restarts the VM.
Suspend Virtual Machine - stops a VM, changes its status to suspended and disables all the other actions on VM, unless unsuspended.
Shut Down Virtual Machine – pops up a dialog box, where you can either Shut Down VM (terminates the VM gracefully), or Power Off VM (terminates the VM forcefully).
Startup Virtual Machine - queues a start-up action for a VM that's currently powered off.
Startup on Recovery - starts the VM in recovery mode with a temporary login ("root") and password ("recovery").
Performance options Migrate Virtual Machine - pops up the VM migration dialogue, enabling you to move the VM to a
different hypervisor. Choose a hypervisor you want to migrate the VM to from the drop down list. Tick the Cold Migrate if Hot Migration fails box to cold-migrate virtual machine if hot migration fails.
Administrative options
DOCUMENT REVISIONS - LIST OF DEFAULT PERMISSIONS FOR USER ROLE 61

OnApp 3.0 Administration Guide v15
o Reset Root Password - resets the root password for this VM (the password is displayed in VM Information).
o Set SSH keys –assigns SSH keys of the admin and a VM owner to the VM. If a VM owner does not have any SSH keys, the system will assign only admin keys.
o Edit Administrator's note - makes an optional note, which will be displayed in VM information.
VM options
o Rebuild Virtual Machine - pops up the VM rebuild dialogue, where you can rebuild the VM on the same (or another) template. All data will be lost!
o Edit VM - opens the Adjust Resource Allocations screen for resizing this VM, where you can change number of CPUs, size of RAM, CPU priority and change VM label. Note, that resizing the VM may lead to reboot (depends on the template)!
o Migrate Virtual Machine - pops up the VM migration dialogue, enabling you to move the VM to a different hypervisor. Choose a hypervisor you want to migrate the VM to from the drop down list. Tick the Cold Migrate if Hot Migration fails box to cold-migrate virtual machine if hot migration fails.
o Delete Virtual Machine - removes the VM from the system.
Network options
o Set Publishing Rules– redirects you to Networking -> Firewall menu, where you can set firewall rules.
o Manage Network Interface - redirects to Network Interfaces screen, where you can configure VM's network interface.
o Rebuild Network - rebuilds network join, added to this VM (required after allocating new IP addresses).
NOTE: Change owner, Reboot in recovery and Segregate options are not available under VMware.
6.1.2 Create VMware VMTo create a VMware virtual machine:
1. Go to your Control Panel's Virtual Machines menu and press the "+" button, or click the Create New Virtual Machine button at the bottom of the screen.
2. Fill in the VM creation form step by step:
DOCUMENT REVISIONS - LIST OF DEFAULT PERMISSIONS FOR USER ROLE 62
OnApp 3.0 Administration Guide v15
Step 1 of 4. Templates
o Click the down arrow next to the required Operating system label (Windows, Linux or FreeBSD) to expand the list of template groups.
o Distribution - choose a template Distribution.
o Template - select the template.
o Click Next.
PLEASE NOTE: You can not use regular OnApp templates for creating VMware VMs. For details how to create VMware templates, refer to Create Template for VMware Virtual Machine section.
Windows Licensing TypeThis option only appears if your billing plan allows it, and if the relevant licensing options have been configured for the template group this template belongs to.If this option is available, choose the license type you require:
o For the KMS type, choose the licensing server
o For your own license, type your license key
If you don't specify the licensing type, MAK licensing will be set by default.
Step 2 of 4. Virtual Machine Properties
Give your virtual machine a label and a hostname. The hostname should consist of letters [A-Z a-z], digits [0-9] and dash [ - ]. For more info on hostname validation, refer to RFC standard documentation.
Label and hostname are required parameters. You can create a virtual machine having specified only the required parameters and configure it later.
o Choose a hypervisor zone to build this VM on.
o Choose a specific hypervisor to build this VM on.
o Give your virtual machine a secure password. It can consist of 6-32 characters, letters [A-Za-z], digits [0-9], dash [ - ] and lower dash [ _ ]. You can use both lower- and uppercase letters.
o To encrypt your password, move the Encrypt Password slider to the right, then enter an encryption key in the field that appears.
o Click Next.
DOCUMENT REVISIONS - LIST OF DEFAULT PERMISSIONS FOR USER ROLE 63
OnApp 3.0 Administration Guide v15
Step 3 of 4. Resources
Set the resources needed for this VM: RAM, CPU cores, CPU priority.
The amount of CPU resource a VM is given is the CPU priority (you can think of this as its "share percentage") multiplied by the number of cores allocated to that VM. This is a minimum number – clients can burst over it, up to 100% multiplied by the number of cores. For example, on a hypervisor with 3GHz CPU cores:
100% x 1 core = 3GHz (burstable to 3GHz)
10% x 2 cores = 600MHZ (burstable to 6GHz)
5 % x 4 cores = 600MHz (burstable to 12GHz)
By default, OnApp allows overselling of cloud resources. For example, OnApp will allow users to create 5 VMs with 100% CPU priority/1 CPU core on a hypervisor with a 4-core CPU. In this example, OnApp would reduce the guaranteed CPU for each VM. If you build a VM on a KVM hypervisor running CentOS5, the CPU priority settings will be disabled and CPU priority value will be 100 by default.
Primary disko Choose a data store zone for this VM's primary disk.
o Set the primary disk size.
Swap disko Choose a data store zone for this VM's swap disk.
o Set the swap disk size
There is no swap disk for Windows-based VMs. In all other cases, swap disk size must be greater than zero.
Network configurationo Choose a Customer Network from the drop-down list.
o Click Next.
Step 4 of 4. Automation settings
DOCUMENT REVISIONS - LIST OF DEFAULT PERMISSIONS FOR USER ROLE 64
OnApp 3.0 Administration Guide v15
o Move the slider to the right you want this VM to be backed up automatically (according to the backup settings configured in the Settings/Autobackup Presets menu)
o Move the Build Virtual Machine Automatically slider to the right if you want the system to automatically build the VM. If you leave this box blank, you will have to build your machine manually after it is created.
o Move the Startup Virtual Machine Automatically slider to the right if you want the virtual machine to be started up automatically.
o Move the Enable Autoscale slider to the right to set autoscaling rules for this VM.
OnApp must be preconfigured before VMware VMs can be created. A Vyatta firewall must be configured and available for the cloud before creating any virtual machine. As all customer virtual machines are organized into VLAN’s, with Vyatta acting as the VM gateway.
3. Click the Create Virtual Machine button to start the creation process. You will be taken to the virtual machine details screen.
6.1.3 Build VMware VM ManuallyIf you haven't checked the Build Virtual Machine Automatically option during the VM creation process, you will have to do this manually after the VM has been created. Building a virtual machine is the process of allocating physical resources to that VM.
To build a virtual machine manually:
1. Go to your Control Panel's Virtual Machines menu.
2. Click the label of the virtual machine you're interested in.
3. On the screen that appears, click the Tools button and then click Rebuild Virtual Machine.4. On the screen that pops up, use the drop-down menu to choose a template with which to build
the VM.
5. Tick the Required Start Up box to have your VM started automatically after it is built.
6. Click the Build Virtual Machine button to finish.
6.1.4 Edit VMware VMYou can edit CPU and RAM resources for all VMs. Depending on the OS it is built on, some VMs can have their CPU and RAM resized without needing to be powered off ("resize without reboot").
DOCUMENT REVISIONS - LIST OF DEFAULT PERMISSIONS FOR USER ROLE 65
OnApp 3.0 Administration Guide v15
Windows 2008 and Windows 7 VMs can be resized without rebooting: Windows 2003 requires a reboot. With Linux it depends on kernel. E.g. CentOS with kernel 2.6.18 can be resized; Ubuntu cannot. Whether a template allows resize without reboot is shown on the main Templates menu screen.
To adjust VM CPU & RAM resources:
1. Go to your Control Panel's Virtual Machines menu.
2. Click the label of the machine you want to resize, to show its details screen.
3. Click the Tools button and select the Edit VM link.
4. Change CPU core/priority and RAM values , and click the Save Virtual Machine button:
If the VM template allows resize without reboot, the resize should be completed automatically: you will be returned to the VM details screen and see a message indicating the resize was successful.If the template does not allow this, you will be asked to confirm that the VM will need rebooting so that the resize can take place.
6.1.5 Delete VMware VMShut down the VM before destroying it. If you are deleting a VM that is running, the VM will be deleted after the time set in Timeout Before Shutting Down VMs configuration parameter.To remove the virtual machine from the cloud:
1. Go to your Control Panel's Virtual Machines menu.
2. On the screen that appears, you'll see the list of all virtual machines in the cloud. Click the label of the virtual machine you want to delete.
3. On the VM's screen, click the Tools button, then select Delete Virtual Machine.4. Tick the Move Last Backup to My Templates box if it is present to save the last VM's backup
as a template.
5. Tick the Destroy All Existing Backups box if you want to remove all existing backups of this virtual machine.
IMPORTANT: You won't be able to restore a VM after deleting it. Deleting a virtual machine removed all data stored on that VM. To save data saved on the VM, back up your virtual machine and tick the Destroy All Existing Backups box when following the instructions described in this section.
NOTE: Backups are deleted automatically when the virtual machine is deleted. To prevent
DOCUMENT REVISIONS - LIST OF DEFAULT PERMISSIONS FOR USER ROLE 66

OnApp 3.0 Administration Guide v15
backups from deletion, please contact the support. This this will fill up your disk over time and requires administrator assistance to change the current behavior.
6.1.6 VMware VM Transactions and LogsThe system records a detailed log of all the transactions happening to your virtual machines. The list of transactions logged by the system includes:
Provision virtual machine
Startup virtual machine
Stop virtual machine
Resize virtual machine without reboot
Configure Operating System
Build disk
Resize disk
Format disk
Destroy disk
Take backup
Convert backup
Restore backup
Destroy backups
Destroy virtual machine
Destroy template
Download template
Update firewall
To view transactions for a virtual machine:
1. Go to your Control Panel's Virtual Machines menu.
DOCUMENT REVISIONS - LIST OF DEFAULT PERMISSIONS FOR USER ROLE 67

OnApp 3.0 Administration Guide v15
2. Click the label of the virtual machine you're interested in.
3. The details screen for that virtual machine shows recent transactions in the Activity Log section. To view more transactions, click the More Logs button.
To cancel pending tasks, click Cancel All Pending Tasks for this virtual machine.
6.2 Manage VMware VM NetworksThe Networking menu in the Virtual Machines menu enables you to manage network interfaces, allocate IP addresses and set publishing rules for VMs.
6.2.1 Configure Network Interface of VMware VMThe Networking -> Network Interfaces menu shows the virtual network interfaces allocated to this VM. Network interfaces join the physical network to the VM.When you create a VM a network interface is added automatically. This network interface will be assigned to the existing physical network using a spare IP (IPv4) and will be set primary by default.OnApp supports IPv4 and IPv6. Since not every application supports IPv6, at least one IPv4 address must be allocated to a VM's primary network interface.To see the list of all network interfaces allocated to the VM:
1. Go to your Control Panel's Virtual Machines menu.
2. Click the label of the virtual machine you're interested in.
3. Click the Networking tab, then click Network Interfaces.4. On the page that follows you will see the following fields:
Interface – optional label of the network interface.
Network join – name of the network and a hypervisor or hypervisor zone this network is joined to.
Port speed – the speed set to the interface.
Primary interface – indication whether the interface is primary or not.
Here you can also view Interface Usage, Edit and Delete network interface (using icon controls) and Add a new network interface using the button at the bottom of the screen.To add a network interface:
1. Go to your Control Panel's Virtual Machines menu.
2. Click the label of the virtual machine you're interested in.
3. Click the Networking tab, then click Network Interfaces.4. Click the Add New Network Interface button at the bottom of the screen.
5. On the screen that appears, input values for the following parameters:
DOCUMENT REVISIONS - LIST OF DEFAULT PERMISSIONS FOR USER ROLE 68

OnApp 3.0 Administration Guide v15
o Label – a human-friendly name for the new interface.
o Physical Network – choose a network join from the drop-down menu, which lists network joins assigned to the hypervisor/hypervisor zone on which the VM runs).
o Port speed – set port speed in Mbps, or make it unlimited.
6. Click the Add Network Interface button.
To edit network interface label, port speed or set it as primary (if none is marked as primary), click Edit icon next to the appropriate network interface. After editing the port speed, the virtual machine should be power cycled for the change to take effect.To delete a network interface, click the Delete icon next to the interface you want to delete.
To run the VM, at least one network interface with an assigned IP address (or addresses) is required! To allocate another physical network, add a new network interface.
6.2.2 Rebuild Network of VMware VMTo rebuild network join, added to the virtual machine (required after allocating new IP addresses):
1. Go to your Control Panel's Virtual Machines menu.
2. Click the label of a required VM.
3. On the screen that appears, click the Tools button, then click Rebuild Network.4. In the pop-up window that appears, move the Force Reboot slider to the right, then select the
VM shutdown type:
o Power OFF virtual machine
o Shutdown virtual machine
o Gracefully shutdown virtual machine
5. Move the Required Statup slider to the right to startup the VM automatically after the network is rebuilt.
6. Click the Rebuild Network button.
6.2.3 Publishing RulesIf the VMware virtual machine is running within a customer network, it is necessary to enable Internet access to this virtual machine. Virtual machines running within customer network are invisible, as customer networks utilize local IP addresses and Vyatta is used to reroute/NAT traffic.
To publish a VM port, you have to configure a publishing rule for the VM. Publishing rules function as destination NAT, making virtual machines accessible from outside. When creating a publishing rule for a virtual machine, you select a new public IP for this VM, where the Vyatta will NAT incoming requests from this public IP to the private address of the server.
DOCUMENT REVISIONS - LIST OF DEFAULT PERMISSIONS FOR USER ROLE 69

OnApp 3.0 Administration Guide v15
6.2.3.1 View the List of Publishing RulesTo see the list of all publishing rules allocated to the VM:
1. Go to your Control Panel's Virtual Machines menu.
2. Click the label of the required virtual machine.
3. Click the Networking tab, then click Publishing Rules.4. On the page that follows, you will see the list of all publishing rules allocated to this virtual
machine, along with their details:
o Rule
o Outside IP Address
o Port
o Protocol
6.2.3.2 Create Publishing RuleTo create a new publishing rule:
1. Go to your Control Panel's Virtual Machines menu.
2. Click the label of the required virtual machine.
3. Click the Networking tab, then click Publishing Rules.4. On the page that follows, fill in the form that appears:
o Set the port for which this rule will is effective.
o Select the protocol type - TCP or UDP.
o Specify the outside IP address.
o Tick the Use customer network address check box to use IP address from the customer network this VM is assigned to.
o If the customer network is not selected, choose an external IP address from the drop-down box.
o Click Save.
DOCUMENT REVISIONS - LIST OF DEFAULT PERMISSIONS FOR USER ROLE 70
OnApp 3.0 Administration Guide v15
6.2.3.3 Delete Publishing RuleTo delete a publishing rule:
1. Go to your Control Panel's Virtual Machines menu.
2. Click the label of the required virtual machine.
3. Click the Networking tab, then click Publishing Rules.4. On the page that follows, click the Actions button next to the publishing rule you want to delete,
then choose Delete.
6.2.4 Allocate/Remove IP Addresses to VMware VMIn the Networking -> IP Addresses tab you can find the list of assigned IP addresses, allocate new IP addresses and rebuild a network.To allocate a new IP Address to the VM:
1. Go to your Control Panel's Virtual Machines menu.
2. Click the label of the virtual machine you're interested in.
3. Click the Networking tab, then click IP Addresses.4. Click the Allocate New IP Assignment button.
5. Select a network interface from the drop-down menu (only the network interfaces you added to the VM will be available)
6. Select an IP address from the IP Pool associated with the network interface. You may select an IP address that's already assigned to a VM, but only one VM should be online at a time.Use Please show me used IP Pool, Show only my IPs and Show only IPv6 checkboxes to narrow the list of IP in the drop-down list.
7. Click the Add IP Address Assignment button.
8. Click the Rebuild Network button to rebuild the network.
You must rebuild the network after making changes to IP address allocations.
To remove an IP address from a VM:
1. Go to your Control Panel's Virtual Machines menu.
2. Click the label of the virtual machine you're interested in.
3. Click the Networking -> IP Addresses tab.
4. Click the Delete icon next to the IP address you want to delete.
5. In the pop up window that appears:
o Choose Delete with Reboot option if you want to reboot a VM and rebuild the network immediately after deleting the IP address. After choosing the Delete with Reboot option you will be redirected to the VM's Overview page.
DOCUMENT REVISIONS - LIST OF DEFAULT PERMISSIONS FOR USER ROLE 71

OnApp 3.0 Administration Guide v15
o Choose Delete without Reboot option if you don't want to reboot a VM. In this case to apply the changes, you will have to the reboot the VM additionally.
PLEASE NOTE: You can't delete an IP address that is in use.
6.2.5 Display Network Speed for Network Interfaces on VMware VM Page
The main Virtual Machines screen displays the network speed of each VM's primary network interface. To see the speed of all interfaces assigned to a VM:
1. Go to your Control Panel's Virtual Machines menu.
2. Click the label of the virtual machine you are interested in.
3. Click the Networking > Network Interfaces tab.
4. On the screen that appears, the Port Speed column shows the network speed of the network interface.
6.2.6 Edit VMware VM Network SpeedTo edit a virtual machine's network speed:
1. Go to your Control Panel's Virtual Machines menu.
2. Select the virtual machine you want to change.
3. Go to the Network tab-> Network Interfaces, and edit the network speed accordingly.
4. Click the Save Network Interface button to save changes.
6.3 Manage VMware VM Disk SpaceVirtual machine storage is provided by disks. A disk is a partition of a data store that is allocated to a specific virtual machine. Disks can be assigned as standard or swap disks (there are no swap disks for Windows based templates). They can also be set as primary (that is, the disk from which an OS will boot).Managing disks for the entire cloud is handled through the Control Panel's Settings menu. Disks for individual virtual machines are managed through the Control Panel's Virtual Machines menu, where you can:
See the list of disks allocated to this VM
DOCUMENT REVISIONS - LIST OF DEFAULT PERMISSIONS FOR USER ROLE 72

OnApp 3.0 Administration Guide v15
Add a new disk
Resize a disk
Take disk snapshot or see already made disk snapshots
Check disk usage statistics (IOPS)
Delete a disk
6.3.1 Add Disks to VMware VMAdding a disk to a virtual machine will require that VM to be rebooted. If a VM is running when you try to add a new disk to it, you'll be asked to confirm the reboot. To add a disk to a virtual machine:
1. Go to your Control Panel's Virtual Machines menu.
2. Click a VM's label to open its details screen.
3. Click the Storage tab -> Disks.4. Click the Add New Disk button.
5. Fill in the details:
o Specify disk's label
o Choose the Data Store to create a disk on from the drop-down menu.
o Set the desired disk size.
o Specify if this disk is swap space, and requires formatting.
o Specify whether the disk should be added to Linux FSTAB, and its mount point.
The maximum length of a Mount Point is 256 characters. Spaces are not allowed. No more than one slash is allowed.
6. Click the Add Disk button to finish.
When you add a new disk to a virtual machine it will automatically become available to that machine.
DOCUMENT REVISIONS - LIST OF DEFAULT PERMISSIONS FOR USER ROLE 73

OnApp 3.0 Administration Guide v15
6.3.2 Edit VMware VM DisksYou can easily resize disks when needed. The resize will fail if your current usage is greater than the new size you request. Note, that any changes on disk size will lead to reboot of your VM.
To change disk size:
1. Go to your Control Panel's Virtual Machines menu.
2. Make sure your virtual machine is powered off, then click its label to open its details screen.
3. Click the Storage tab -> Disks.4. Click the Actions button next to the disk you want to change, then click the Edit link.
5. Enter a new disk label and size in GB in the fields provided.
PLEASE NOTE: Only the increase disk size option is available.
6. Click the Save Disk button.
6.3.3 Migrate VMware VM DisksYou can migrate disks of your virtual machines to other data stores, which are allocated to the same hypervisor or hypervisor zone. Unlike VM migration – disk migration requires reboot of the VM (despite the template it is based on).To migrate a disk:
1. Go to your Control Panel's Virtual Machines menu.
2. Make sure your virtual machine is powered off, then click its label to open its details screen.
3. Click the Storage tab -> Disks.4. Click the Actions button next to the disk you want to move to another data store, then click the
Import link.
5. On the screen that appears, select a target data store from a drop-down box.
You can only migrate disks to data stores in data store zones assigned to your billing plan.
6. Click Start Migrate.
You cannot migrate a disk to a data store with less capacity than the disk size! PLEASE NOTE: Thin provisioning disks become thick provisioned after a disk migration. For example, if you use thin storage and move an 850GB disk between aggregates with 10GB actual usage, the 'dd' image of the local volume manager will take 850GB space, because the entire local volume manager is copied, including zero 'd space which may not be able to be recovered.
DOCUMENT REVISIONS - LIST OF DEFAULT PERMISSIONS FOR USER ROLE 74

OnApp 3.0 Administration Guide v15
6.3.4 VMware VM SnapshotsVMware snapshot tools are used to perform snapshots by simply locking the filesystem disk (vmdk) and creating a new VMware disk with the changes made alongside, so the backup procedure for virtual machines running under VMware looks like: vmdk + vmdk(1) + vmdk(#).
To view the list of VM Snaphots:
1. Go to your Control Panel's Virtual Machines menu.
2. Click the label of the machine you want to back up.
3. Click the Storage tab -> Snapshots.4. On the screen that appears, you'll see the list of all VM snapshots.
To create a snaphot for VMware VM:
1. Go to your Control Panel's Virtual Machines menu.
2. Click the label of the machine you want to back up.
3. Click the Storage tab -> Snapshots.4. Click the Create New Snapshot button.
5. Give your snapshot a name.
6. Click Create Snapshot button.
To delete a VM snapshot, click the Actions button next to the required snaphot, then click Delete.
6.3.5 Delete VMware VM DisksTo delete a disk:
1. Go to your Control Panel's Virtual Machines menu.
2. Make sure your virtual machine is powered off, then click its label to open its details screen.
DOCUMENT REVISIONS - LIST OF DEFAULT PERMISSIONS FOR USER ROLE 75
OnApp 3.0 Administration Guide v15
3. Click the Storage -> Disks tab.
4. Click the Actions button next to the disk you want to delete, then click Delete.
6.4 VMware VM StatisticsFor your convenience, the system tracks VM performance and generates statistics on:
VM CPU Utilization
VM Billing statistics
Interface Usage
Disk IOPS
6.4.1 VMware VM CPU UtilizationOnApp tracks CPU usage for virtual machines and generates charts that help analyze VM performance.The charts show the total CPU usage for all the cores of this particular VM for a specified time period. The vertical axis has a scale of 0.0-X.0, where 0.0 is 0% and X.0% is 100% of CPU utilization - X depends on the total number of cores used by the VM. The horizontal axis defines a time period.
To see CPU usage statistics:
1. Go to your Control Panel's Virtual Machines menu.
2. Click the label of the virtual machine you're interested in.
3. Click the Overview tab -> CPU Usage.
4. On the screen that appears, the top chart shows CPU usage for the last 24 hours. The bottom chart shows usage for the last three months (if there is enough data). If there less data available, the chart will show utilization for the time available.
5. Tick the Show in My Timezone box to show bandwidth statistics according to your profile's time zone settings.
6. To zoom into a time period, click and drag in a chart. Click the Show All button to zoom out again.
To see what percentage of hypervisor CPU resource a VM takes, go to your Control Panel's Virtual Machines menu and click the label of the VM you're interested in. On the screen that appears, the CPU priority will show the amount of CPU resource given to this VM.
DOCUMENT REVISIONS - LIST OF DEFAULT PERMISSIONS FOR USER ROLE 76

OnApp 3.0 Administration Guide v15
6.4.2 VMware VM Billing StatisticsOnApp has a record of all the charges applied to your VMs for the last three month period. If a virtual machine was created less than three months ago, statistics are recorded for the VM's existence to date. You can view all statistics available, or those for a shorter period by setting a Start and End time.
To view billing statistics for a virtual machine:
1. Go to your Control Panel's Virtual Machines menu.
2. Click the label of the virtual machine you're interested in.
3. Click the Overview -> Billing Statistics tab.
4. Set Start and End time. By default the statistics are generated for the last three months or the actual VM existence period.
5. Tick the Show in my Timezone box to show bandwidth statistics according to your profile's timezone settings.
6. On the page that appears:
Date – particular date and time for the generated statistics
Users – the virtual machine owner. Click the owner name to see the User Profile (user details)
Virtual Machines – the virtual machine name with the total due for VM resources (CPU priority, CPUs, memory and template resources) for the point of time specified in the Date column.
Network Interfaces – the total due for the network interfaces used by this VM for the point of time specified in the Date column. Click the network interface name to see its details.
Disks – the list of disks assigned to this VM with the total due for the disk space resources (disk size, data read/written, reads/writes completed) for the point of time specified in the Date column. Click the disk name to see its details.
Costs – the total due for the Virtual Machines, Network Interfaces and Disks resources at the point of time specified in the Date column.
Scroll down to see Total Amount (the total due for the whole billing statistics period).
6.4.3 VMware VM Network Interface StatisticsOnApp tracks network usage for virtual machines and generates charts that help analyze network performance. To see network utilization statistics for a virtual machine:
1. Go to your Control Panel's Virtual Machines menu.
2. Click the label of the virtual machine you're interested in.
3. Click the Networking -> Network Interfaces tab.
DOCUMENT REVISIONS - LIST OF DEFAULT PERMISSIONS FOR USER ROLE 77
OnApp 3.0 Administration Guide v15
4. Click the Statistics (chart) icon next to the network you're interested in.
5. On the screen that appears, the top chart shows bandwidth usage for the last 24 hours. The bottom chart shows usage for the last three months.
6. To zoom into a time period, click and drag in a chart. Click the Show all button to zoom out again.
6.4.4 VMware VM Disk IOPSThe system tracks IOPS (Input/Output Operations per Second) for virtual machines and generates charts that help analyze VM disk performance. To see IOPS for a virtual machine:
1. Go to your Control Panel's Virtual Machines menu.
2. Click the label of the virtual machine you're interested in.
3. Click the Storage -> Disks tab.
4. Click the Statistics (chart) icon next to the disk you're interested in. There are four charts on the screen that appears:
o IOPS for the last hour
o IOPS for the last 24 hours
o Data written/read for the last 24 hours
o Data written/read for the last hour
5. To zoom into a time period, click and drag in a chart. Click the Show All button to zoom out again.
The OnApp API allows you to limit the Hourly IOPS and Hourly data by setting the limit=N parameter, where the N variable is the number of hours for which the charts will display the info.
DOCUMENT REVISIONS - LIST OF DEFAULT PERMISSIONS FOR USER ROLE 78

OnApp 3.0 Administration Guide v15
7 LOAD BALANCERS
Load balancing aids application availability and scalability. There are two load balancing options in OnApp:
Load balancer clustersWith this option, you specify which VMs (nodes) will participate in a load balancer cluster. Incoming traffic is distributed evenly between all the VMs added to a cluster – you still present a single host name to end users, but they actually access the cluster of VMs rather than a single end point. This helps application availability: if one VM fails, traffic is automatically routed to another in the cluster. You can add and remove cluster VMs as required.
Autoscaling clustersVM Autoscaling increases or decreases your VM capacity by automatically adding or removing nodes to a cluster. The cluster is scaled in (decreased) or out (increased) based on rules you specify in the Control panel. This aids application performance and scalability.
For instance, you can create a rule that will add 3 more nodes to a cluster if CPU usage has been more than 90% for the last 5 minutes; or rules that remove a node if there has been more than 256 MB RAM free for the last 20 minutes.
7.1 View Load Balancer DetailsLoad balancers are also virtual machines, so you can perform the same basic actions on them as for other VMs. To view load balancer details:
1. Go to your Control Panel's Load Balancers menu.
2. On the screen that appears, click the label of the load balancer required.
3. Load balancer properties page gives general overview of the load balancer details:
LB information Hostname and login
Power status & On/Off buttons
Template this LB is built on
Resources allocated to this LB
DOCUMENT REVISIONS - LIST OF DEFAULT PERMISSIONS FOR USER ROLE 79

OnApp 3.0 Administration Guide v15
Hypervisor and IPs
Owner
Prices per hour
Activity log
Notes - administrator's/user's notes
Add admin's or user's note to create a brief comment or reminder for a VM.
To expand the VM Tools menu, click the Tools button on the VM's screen. Tools menu enables you to perform the following actions on load balancers (the exact list shown depends on the load balancer status):
Tabs with additional toolsActions (the exact list shown depends on Balancer status):
Startup Balancer - Queues a start-up action for a Balancer that's currently powered off.
Reboot Balancer - Powers off and then restarts the Balancer.
Shut Down Balancer - Terminates the Balancer forcefully.
Delete Balancer - Removes the Balancer from the system.
Suspend Balancer - Stops a Balancer, and changes its status to suspended.
Migrate Balancer - Pops up the Balancer migration dialogue, enabling you to move the Balancer to a different hypervisor.
Rebuild Balancer - Pops up the Balancer rebuild dialogue, where you can rebuild the Balancer on the same (or another) template. All data will be lost!
Notes – Click the Actions button, then select Add Admin's Note or Add User's Note to create a brief comment or reminder for a Balancer.
Monitis Monitors - Shows the cluster load.
Cluster NodesThis is the list of the nodes which form the load balancer. Here you can:
Power on/off the node.
Delete a node from a cluster.
7.2 Create Load Balancer ClusterIn this scheme, load balancers manage incoming requests one by one, rotating them between the servers added to a cluster (a round-robin method).
DOCUMENT REVISIONS - LIST OF DEFAULT PERMISSIONS FOR USER ROLE 80

OnApp 3.0 Administration Guide v15
OnApp load balancers are based on Layer 4 load balancing which means that requests are distributed at the transport layer, such as TCP/UDP transport protocols. To add an LB cluster:
1. Go to your Control Panel's Load Balancers menu.
2. Click the Add a New Balancer button.
3. On the page that follows, fill in the form that appears:
Cluster Configurationo Port - specify the port for this load balancer to run on (e.g. 9090, 8080, 9008 etc.)
To add multiple load balancer ports, click the "+" button next to the first port.
Load Balancer Instanceo Label – give a name to your load balancer instance.
o Hostname – specify a host name that will identify your load balancer.
o Hypervisor zone – choose a hypervisor zone.
o Hypervisor – select a hypervisor that will be enabled for the cluster.
o Network zone – choose a network zone for this load balancer.
o Port Speed – use the slider to set a port speed or tick the Unlimited box if required.
Load Balancer Typeo Choose the Cluster option and click Next.
Cluster NodesThis is where you add and configure the nodes in this load balancing cluster. A node is a combination of a VM and an IP address.
o Select a virtual machine from the drop-down box and click the Add Node button.
PLEASE NOTE that the only VMs you can add to a cluster are those which are based on the selected hypervisor/hypervisor zone, have an IP in the defined network zone and are located in the same IP range.
4. Click Save.
DOCUMENT REVISIONS - LIST OF DEFAULT PERMISSIONS FOR USER ROLE 81

OnApp 3.0 Administration Guide v15
7.3 Create Autoscaling ClusterTo add an autoscaling cluster to your cloud:
1. Go to your Control Panel's Load Balancers menu.
2. Click the Add a Balancer button.On the page that follows, fill in the form that appears:
Cluster Configurationo Port - specify the port for this load balancer to run on (e.g. 9090, 8080)
Load Balancer Instanceo Label – give a name for your load balancer instance.
o Hostname – specify a host name which will identify your load balancer.
o Hypervisor zone – choose a hypervisor zone.
o Hypervisor – select a hypervisor that will be enabled for the cluster.
o Network zone – choose a network zone for this load balancer.
o Port Speed – use the slider to set a port speed or tick the Unlimited box if required.
Load Balancer Typeo Choose the Autoscaling option and click Next.
Cluster NodesThese settings configure the nodes that will be added to your cluster.
o Image template – choose a template from the drop-down box: nodes will be built on this template
o Min node amount – the minimum number of nodes in this cluster.
o Max node amount – the maximum number of nodes in this cluster.
Example: if you set Min node amount = 2 and Max node amount = 5, then the system will scale out the cluster up to 5 nodes, and scale in to 2 nodes if required.
PLEASE NOTE: the only templates you can add to a cluster are those based on the
DOCUMENT REVISIONS - LIST OF DEFAULT PERMISSIONS FOR USER ROLE 82

OnApp 3.0 Administration Guide v15
selected hypervisor/hypervisor zone.
Cluster Node ParametersThese are the settings for each node of a cluster. Each node added to a cluster will have the following parameters:
o Memory – set the amount of memory allocated per node in MB.
o CPUs – the number CPUs which will form each node.
o CPU Priority – specify CPU priority. For more info on CPU priority, refer to Create VMs section.
o Rate Limit – set the port speed for a node.
Autoscale Out ParametersSet the rules defining when the system should add more nodes to your autoscaling cluster. The system will add nodes until the limit set in the Max node amount field is reached.
Autoscale In ParametersSet the rules defining when the system should remove the nodes from your autoscaling cluster. The system will remove nodes until the limit set in the Min node amount field is reached.
3. Click Save.
7.4 Edit/Delete Load BalancerTo edit a load balancer:
1. Go to your Control Panel's Load Balancers menu.
2. Click the Actions icon next to a required load balancer, then choose Edit Cluster.3. When the page loads, edit necessary parameters and click Save.
When you increase the RAM of the nodes of a load balancer (autoscaling type) to a value greater than the current node RAMx16 (which is a max_mem parameter in a configuration file and database), the load balancer will be cold resized. When deleting load balancer ports, you can remove all but the first port.
To delete a load balancer:
1. Go to your Control Panel's Load Balancers menu.
2. Click the Delete icon next to a required load balancer.
3. When the confirmation window pops up, click OK.
DOCUMENT REVISIONS - LIST OF DEFAULT PERMISSIONS FOR USER ROLE 83

OnApp 3.0 Administration Guide v15
DOCUMENT REVISIONS - LIST OF DEFAULT PERMISSIONS FOR USER ROLE 84

OnApp 3.0 Administration Guide v15
8 DNS
The full version of OnApp Cloud (with CDN enabled) now gives you access to our free Anycast DNS service. Instead of managing your own DNS servers you can use our fully redundant global DNS, hosted at multiple datacenters around the world, and manage it through your OnApp Control Panel.You can use our DNS service with domains registered anywhere on a third party domain registrar. The Control Panel lets you set up hostnames, manage DNS records, aliases, Mail Exchange, TXT and SRV records.Using DNS has two main steps: setting up DNS hostnames , and managing DNS zones.
8.1 DNS SetupDNS setup allows you to create a DNS hostname. After you create a DNS hostname, you get access to creating and managing DNS zones. To set up a new DNS, make sure that:
CDN is enabled
You have dns_zone or dns_zone.setup permission to access this page.
You can create only one DNS domain. Once created, a DNS domain can't be deleted, only updated.
If an administrator uses the same license for two different Control Panels, they can use the same DNS domain for CP1 and CP2. To do this, administrator should set the same DNS domain settings for both Control Panels.
To add a DNS domain:
1. Go to your Control Panel's Settings menu.
2. Click the DNS Setup button.
3. On the screen that appears, type your fully qualified domain name.Mind that you won't be able to use a domain name that is already registered with OnApp DNS.
The domains of the following kind are forbidden:
o google
o microsoft
o domain.com
o onapp.com
o facebook.com
DOCUMENT REVISIONS - LIST OF DEFAULT PERMISSIONS FOR USER ROLE 85

OnApp 3.0 Administration Guide v15
o gmail.com
o googlemail.com
o yahoo
4. Click the Save button.
After the DNS domain is added, the DNS menu will be enabled to users (see DNS section)
Make sure your domain name registrar has designated your domain to the following glue records:
ns1: 69.168.228.2
ns2: 69.168.229.2
ns3: 69.168.230.2
ns4: 69.168.231.2
8.1.1 Edit DNS DomainTo edit your DNS domain:
1. Go to your Control Panel's Settings menu, and click the DNS Setup icon.
2. Type a new fully qualified domain name to replace your existing domain
3. Click the Save button to save changes.
If DNS domain is updated, all NS records for all DNS zones under this user will be updated.
8.2 DNS ZonesOnApp DNS Zone feature allows you to manage your and your clients' domain DNS. Each time DNS zone, record or setup settings are refreshed, the DNS configuration is immediately updated on the DNS vendor server.
8.2.1 Create DNS ZoneTo add a new DNS zone:
1. Go to your Control Panel's DNS menu.
2. Click the Create DNS Zone button.
DOCUMENT REVISIONS - LIST OF DEFAULT PERMISSIONS FOR USER ROLE 86

OnApp 3.0 Administration Guide v15
3. Fill in your domain name. At the domain registrar, point your domain to the following name servers:
o ns1.yourdomain.com
o ns2.yourdomain.com
o ns3.yourdomain.com
o ns4.yourdomain.com
Where yourdomain.com is your fully qualified domain name, which you have specified at DNS setup.
1. Tick the Auto Populate With Existing DNS record box to automatically import your existing DNS settings, or skip this step to start from scratch. Note that this option may not import all existing settings, so you should check your new record for any missing entries.
2. Click the Submit button.
3. On the page that appears, click the Add icons next to the DNS records you want to add. You can add and manage the following DNS records:
o SOA (Start of Authority) – change the start of authority time to live value (TTL).To change a SOA TTL, click the TTL cell next to the SOA record and type a new value.
o NS (Name Server) – change the TTL of the existing name servers or add new name servers.To change a name server's TTL, click the TTL cell next to the name server record and type a new value.
o A (Host) –-point your domain name to a static IP address.To create a new A record, enter the following parameters into the cells:Host – enter a host name or use the "@" sign to represent your current host.Point to – enter the IP address to which the user would be sent for this host name.TTL – set the time to live value for this record.
A record example:ftp 192.168.0.1 86400Where: ftp is the host; 643763287490 - IP , 86400 is TTL value.So your ftp.yourdomain.com will resolve to 2a00:1450:400b:c00::68 IP address and the TTL value = 86400 seconds.
o AAAA (Host)To create a new AAAA record, fill in the following cells:Host – enter a host name or use the "@" sign to represent your current host.Point to – enter the IP address to which the user would be sent for this host name.TTL – set the TTL value for this record.
AAAA record example:ftp 2a00:1450:400b:c00::68 86400Where: ftp is the host, 2a00:1450:400b:c00 – IPv6 address, 86400 is the TTL value.So your ftp.yourdomain.com will resolve to 2a00:1450:400b:c00 IPv6 address.
DOCUMENT REVISIONS - LIST OF DEFAULT PERMISSIONS FOR USER ROLE 87
OnApp 3.0 Administration Guide v15
o CNAME (Alias) – alias domain records to your domain.
Starting from the 3.0.6 version of the OnApp Cloud it is possible to use underscore character in the CNAME records.
To add a CNAME record, fill in the following cells:Host –.enter the host name or use the "@" sign to represent your current host.Point to –enter an alias you want to assign to your domain.TTL – set the TTL value.
CNAME record example:www example.com 86400Where: www is an alias, example.com is a valid domain name, 86400 is TTL value.
To add the aliases, make sure an A record is added to this domain.
o MX (Mail Exchange) - identify the mail server for your domain name.To add a MX record, fill in the following cells:Priority – set the MX priority to specify the routing order (lower value means higher priority).Host: enter the hostname to which the emails should goGoes to – enter the valid domain name.TTL – set the TTL value.
MX record example:10 mail example.com 86400Where: 10 is priority, mail is the host, example.com is a domain, 86400 is TTL.
o TXT – add additional information about the DNS zone.Host – enter the valid host nameValue – any free text you want within a TXT record.TTL – TTL value.
TXT record example:@ v=spf1 a mx ptr ip4:192.168.1.1 ~all 86400Where: @ is the host name, v=spf1 a mx ptr ip4:192.168.1.1 ~all is value, 86400 is TTL.
DOCUMENT REVISIONS - LIST OF DEFAULT PERMISSIONS FOR USER ROLE 88

OnApp 3.0 Administration Guide v15
o SRV (Service) –specify services that you have on your domain.To add a SRV record, enter the following cells parameters:Host – type the host for which this record is valid.Priority – set the host priority. Lower value means more preferred.Weight – the approximate weight for relative records with the same priority.Port – the port on which the service can be found.Points to – enter the domain name.TTL – set the time to live value.
SRV record example:xmpp._tcp 0 1 5222 jabber.example.com 86400Where: xmpp._tcp is a host,0 is priority, 1 is weight, 5222 is port, jabber.example.com is a points to value, 86400 is TTL.
8.2.1.1 WildcardsIn the OnApp version 3.0 it is possible to use wildcards in all DNS records. The table below explains the rules of wildcard use.
DNS record type
Allowed Disallowed
A *.example.com
**.example.com
*.abc.example.com
Note: multiple ‘*’ will be changed to single ‘*’. E.g. ****.example.com will be changed to *.example.com
Can only be prefixed for domain.
abc.*example.com
*.*.example.com
sub.*.example.com
abc.*.*.example.com
AAAA Same to A record Same to A record
MX Same to A record Same to A record
CNAME Same to A record
Note: СNAME wildcard record can not coexist with A record.
Same to A record
TXT *.example.com
*.*.example.com
sub.*.example.com
sub.*.*.example.com
*sub*.*.example.com
DOCUMENT REVISIONS - LIST OF DEFAULT PERMISSIONS FOR USER ROLE 89

OnApp 3.0 Administration Guide v15
DNS record type
Allowed Disallowed
Note: Wildcards are valid in any position , as long as the domain remains DNS zone's subdomain.
PLEASE NOTE: It is not possible to use wildcards for NS, SOA and SRV records because of PowerDNS limitations.
8.2.1.2 Underscore charactersIn the OnApp version 3.0 it is possible to use wildcards in all DNS records. The table below explains the rules of underscore use.
DNS Record type
Allowed Disallowed
A _abc.example.com
__abc.example.com
_abc_abc_.example.com
Note: Multiple ‘_’ e.g. ‘____’ will not be changed to a single underscore, unless stated.
abc._example.com
AAAA Same to A record Same to A record
MX Same to A record Same to A record
CNAME Same to A record
Note: СNAME record with underscore can not coexist with A record.
Same to A record
NS Same to A record Same to A record
SRV _xmpp._tcp.example.com
__xmpp.__tcp.example.com
_xmpp._tcp._.example.com
_xmpp._tcp._abc.example.com
Note: Multiple ‘_’ e.g. ‘____’ will be changed to a single underscore character.
All except examples in the Allowed column.
DOCUMENT REVISIONS - LIST OF DEFAULT PERMISSIONS FOR USER ROLE 90
OnApp 3.0 Administration Guide v15
DNS Record type
Allowed Disallowed
TXT All except examples in the Disallowed column.
Note: underscores are valid in any position , as long as the domain remains DNS zone's subdomain.
_example.com
abc._example.com
example.com_
example_.com
8.2.2 Edit DNS ZoneWhen you edit a DNS Zone, you manage the records assigned to this zone. The changes are instantly updated on DNS.
To edit a DNS zone:
1. Go to your Control Panel's DNS menu. On the screen that appears, the list of DNS zones will be displayed.
2. Click the Actions button next to the domain zone you want to change, then choose Edit.3. On the screen that appears, edit the DNS records as required:
o SOA (Start of Authority) – change the start of authority TTL.
o NS (Name Server) – change the TTL of the existing name servers or add a new name server.
o A(Host) – change the A host record properties:
In the Host text box, type the name for a host.
In the Point to text box, type the IP address for the new host.
Set the TTL value.
o AAAA (Host) – change the AAAA record properties as described for the A record.
o CNAME (Alias) – canonical name properties.
o MX (Mail Exchange) - - change the mail server properties for your domain name.
o SRV (Service) - specify services that you have on your domain.
8.2.3 Delete DNS ZoneTo delete a domain zone:
1. Go to your Control Panel's DNS menu.
2. Click the Actions button next to the domain zone you want to delete, then click Delete.3. Click OK to confirm the deletion.
DOCUMENT REVISIONS - LIST OF DEFAULT PERMISSIONS FOR USER ROLE 91

OnApp 3.0 Administration Guide v15
8.2.4 User DNS ZonesUser DNS zones tab allows you to manage your clients' DNS zones. Use the Actions button next to the required user DNS zone to edit/delete it. The changes will be instantly updated on our DNS.
8.2.5 Set End-User Access to DNS ServiceTo set end-users' access to DNS service:
1. Go to your Control Panel's Roles menu.
2. Click the Actions button next to the required user, then click Edit.3. On the screen that follows, choose the DNS Zone group in the Groups field.
4. The following list of DNS permissions will appear:
o Any action on DNS zone
o Create a new DNS zone
o Destroy any DNS zone
o Destroy own DNS zone
o See all DNS zones
o See own DNS zones
o Any action on DNS record
o Create a new DNS record
o Destroy any DNS record
o See all DNS records
o Update any DNS record
o DNS Setup
5. Tick the required boxes.
6. Click the Save button.
8.2.6 View/Edit/Delete User DNS ZonesTo view, edit and delete existing clients' DNS zones:
1. Go to your Control Panel's DNS menu.
2. Click the User DNS Roles tab. On the screen that appears, you'll see a list of all clients' DNS zones.
3. To edit a clients' DNS zone, click the Actions button next to it, then click Edit. On the screen that appears, edit its details and click the Save button.
DOCUMENT REVISIONS - LIST OF DEFAULT PERMISSIONS FOR USER ROLE 92

OnApp 3.0 Administration Guide v15
4. To delete a clients' DNS zone, click the Actions button next to the DNS zone you want to delete, then click Delete. You'll be asked to confirm deletion.
DOCUMENT REVISIONS - LIST OF DEFAULT PERMISSIONS FOR USER ROLE 93

OnApp 3.0 Administration Guide v15
9 HYPERVISORS
Hypervisors are Xen or KVM platforms running on bare metal with CentOS Linux as the management operating system, or VMWare ESX servers. They are used to provide hardware resources for virtual machines, ensuring highly efficient use of available hardware, and complete isolation of virtual server processes. Each virtual machine in the cloud is hosted by a specific physical hypervisor server, from which it receives CPU time, RAM and storage capacity from the Data Stores attached to that hypervisor. OnApp supports multiple hypervisor platforms including Xen,KVM and VMware.
Hypervisors:
Provide system resources such as CPU, memory, and network to virtual machines
Control the virtual differentiation of entities such as virtual machines and application data being delivered to cloud-based applications
Take care of secure virtualization and channeling of storage, data communications and machine processing
Can be located at different geographical zones
Can have different CPU and RAM
Hypervisors can also be organized into Hypervisor zones, which make it easy to offer tiered service levels and create private clouds for specific users.
With the OnApp cloud 3.0 release, Hypervisors can now be dynamically booted over the network using the CloudBoot technology, or statically installed from a CentOS base. Note that enabling the OnApp storage platform requires hypervisors to be provisioned using the CloudBoot interface.
The main Hypervisors menu option in the Control Panel provides access to basic tools for viewing, editing and rebooting hypervisors.
Tools for adding and removing hypervisors, and controlling hypervisor zones, are located in the Control Panel's Settings menu (Settings > Hypervisors, and Settings > Hypervisor Zones).
PLEASE NOTE: When a hypervisor is inaccessible for a period of time, commands queued during that period of time will be marked as failed. This is an an expected OnApp behavior.
DOCUMENT REVISIONS - LIST OF DEFAULT PERMISSIONS FOR USER ROLE 94
OnApp 3.0 Administration Guide v15
9.1 View HypervisorsThe Control Panel provides a quick way to see Hypervisors and Hypervisor zones in the cloud, along with a summary of their resources.
Click your Control Panel's main Hypervisors menu to see a list of all hypervisors in your cloud, and a quick overview of their details:
Label
IP address
Type (Xen, KVM etc)
Zone
Failover status
Total VMs hosted
CPU cores
CPU resources used/available
CPU speed
Total RAM/free RAM
Click the hypervisor's label to view the list of virtual machines controlled by that hypervisor.
9.2 View Hypervisor DetailsYou can drill into a specific hypervisor to see details of all virtual machines controlled by that hypervisor, and their resources. To do so:
1. Go to your Control Panel's Hypervisors menu (or click a hypervisor zone name underneath it). On the screen that appears you'll see a list of hypervisors.
2. Click a hypervisor's name (label) to see its details screen.
3. On the screen that appears, you'll see a list of all virtual machines hosted on that hypervisor, along with their IP address, power status, disk and RAM resources.
4. To drill into a specific VM, click its label.
5. To edit or reboot the hypervisor, click the Actions button next to required hypervisor and select the proper action.
DOCUMENT REVISIONS - LIST OF DEFAULT PERMISSIONS FOR USER ROLE 95
OnApp 3.0 Administration Guide v15
9.3 Edit Hypervisor DetailsYou can edit hypervisor details (its label, type, IP address and so on) via the hypervisor details screen, or through the Control Panel's Settings > Hypervisors menu (see Hypervisors Settings section for details: the editing functionality is the same whichever method you choose.)
To edit hypervisor details:
1. Go to your Control Panel's Hypervisors menu (or click a hypervisor zone name underneath it). On the screen that appears you'll see a list of hypervisors.
2. Click a hypervisor's name (label).
3. Click the Actions button, then click Edit.4. On the screen that follows, change details as required:
o The hypervisor's name (label)
o Its IP address
o Whether it's enabled or not (hypervisors that are not enabled cannot be used to host VMs)
o Move the slider to the right to disable failover. Hypervisor failover means VM migration to another hypervisor if the hypervisor on which it is running goes offline.
o Move the slider to the right to collect statistics for the hypervisor.
5. Click the Save Hypervisor button to save your changes.
You can also edit your hypervisors in the Control Panel's Settings menu. Refer to the Settings section of this guide for more details.
9.4 Reboot HypervisorTo reboot a hypervisor:
1. Go to your Control Panel's Hypervisors menu (or click a hypervisor zone name underneath the main hypervisor menu link).
2. Click the label (name) of the hypervisor you want to reboot.
3. On the hypervisor details screen that follows, click the Actions button, then click Reboot Hypervisor.
4. A new screen will open asking for confirmation (via two checkboxes) before reboot:
o Stop all virtual machines that cannot be migrated to another hypervisor? Check this box if you want VMs that cannot be migrated to be powered off. When a hypervisor is scheduled for a reboot, OnApp will first attempt to hot migrate all VMs it hosts. If hot migration is not possible for a VM, OnApp will attempt to cold migrate that VM. With this
DOCUMENT REVISIONS - LIST OF DEFAULT PERMISSIONS FOR USER ROLE 96

OnApp 3.0 Administration Guide v15
box checked, if cold migration fails, the VM will be stopped so the reboot may proceed. If you don't check this box, OnApp will attempt to hot and then cold migrate all VMs hosted by the hypervisor being rebooted – but will stop the migration process if any VM cannot be migrated.
o Are you sure you want to reboot this hypervisor? A simple confirmation to confirm that you want the hypervisor to reboot.
5. When you're certain you want to proceed with the reboot, click the Reboot button.
PLEASE NOTE: Reboot option is not available for VMware hypervisors.
9.5 Other Hypervisor SettingsAccess to detailed hypervisor and hypervisor zone settings is handled in the Control Panel's Settings menu. These are explained in the Settings section of this guide.
DOCUMENT REVISIONS - LIST OF DEFAULT PERMISSIONS FOR USER ROLE 97
OnApp 3.0 Administration Guide v15
10 CLOUDBOOT HYPERVISORS
CloudBoot functionality is a method of hypervisor installation without the presence of a local disk or other local storage, utilizing the PXE and DHCP servers.
This allows users to both lower their hardware requirements on the hypervisors (no local storage is required to boot a hypervisor) as well as make the process of adding new hypervisors to the cloud more efficient:
No manual admin work required to boot hypervisors
No local storage needed to boot hypervisors
Self discovery of new hypervisors added to the cloud
Ability to move hypervisors quickly between zones
Ability to move HVs quickly between Hypervisor KVM and XEN types
To start using Cloud Boot, you must enable Cloud Boot and Storage in the system configuration first (Settings > Configuration > CloudBoot). Visit Configuration Settings chapter for more details.
It’s recommended to use a separate network for hypervisors when using the Cloud Boot system to prevent errors of other servers (not HV’s) on the cloud to boot into the Cloud Boot network.
All hypervisors must reside on the same VLAN (this concerns hypervisors only, not the VM’s themselves).
The following Cloud Boot features are not available in the 3.0 version (they will be introduced in future releases):
Bonded NICs for the management/boot interface
10.1 Create CloudBoot Hypervisor
NOTE: In the 3.0.7 version of the OnApp Cloud the default RAM value for Xen CloudBoot hypervisors (dom0 RAM) is set to 2 GB.
DOCUMENT REVISIONS - LIST OF DEFAULT PERMISSIONS FOR USER ROLE 98

OnApp 3.0 Administration Guide v15
To create a CloudBoot hypervisor, follow the instructions below:
1. To add a hypervisor you must first configure the IP range the Control Panel will assign to hypervisors, and then add specific hypervisors to the Control Panel itself.
2. Go to your Control Panel’s Settings menu and click the Hypervisors icon.
3. Click the CloudBoot IPs tab – this is where you add an IP address or range for the hypervisor management interfaces, which hypervisors will acquire via DHCP when they boot
It is recommended to locate hypervisors management interfaces on a separate subnet with a dedicated NIC on the CP server also attached. In this configuration, the management subnet can use private address space and does not need to be externally addressable.
4. Next, power on your hypervisors. As they boot, the Control Panel will detect and record their MAC addresses.
o Click the New IP Address button.
o Enter a single address or a range of addresses to be used by the PXE server- e.g. 192.168.1.100-192.168.1.200 (see the note below).
o Enter a net mask and default gateway address (see the note below).
o Click the Submit button to finish.
The dynamic range should be quite a bit larger than the actual IPs that will get assigned. This allows space for reassigning new nodes that come online, without creating address collisions.
Hypervisor management interfaces must be on the same subnet as the Controller server, and addresses must be valid for that addressable subnet. The hypervisor management interface must also have PXE boot enabled.
5. Once the hypervisors are online and detected, you can add them to the Control Panel:
o Go to your Control Panel’s Settings menu.
o Click the Hypervisors icon.
o Click the Add New CloudBoot Hypervisor button at the bottom of the screen.
o On the next screen choose a hypervisor MAC from the drop-down list and click the Next button.
o Complete the form that appears:
Hypervisor properties
DOCUMENT REVISIONS - LIST OF DEFAULT PERMISSIONS FOR USER ROLE 99

OnApp 3.0 Administration Guide v15
Label - give the hypervisor a name.
PXE IP address - select an IP address for this hypervisor from the address pool available – see step 2.
Hypervisor type - choose Xen or KVM (Note that VMWare is not available as a CloudBoot option).
Enabled - move the slider to the right to allow VMs to be installed/booted on this hypervisor.
Collect stats- move the slider to the right to collect statistics for this hypervisor.
Disable failover - move the slider to the right to disable VM migration to another hypervisor if this hypervisor is marked as offline by the Contoller Server.
MTU - specify the maximum transportation unit size. You can set the frame size from 1500 to 9000 bytes.
OnApp Cloud 3.0.6 introduces Jumbo Frames support. The maximum transportation unit (MTU) is the maximum size of a unit that can be transmitted transferred via ethernet traffic. Any data that exceed the specified MTU value will be divided into smaller units before being transferred. Utilization of jumbo frames allows to reduce increase throughput and increase CPU utilization during large size file transfers.
Make sure that your NICs, switches and cables support jumbo frames. Please refer to your hardware product documentation for details.
The following options are relevant to the integrated storage platform:Storage disksFormat disks - check this to initialize all disks on the hypervisor. Leave unchecked to preserve disk content (e.g. if you switch a HV from Xen to KVM, but want to preserve the existing virtual disks)
Passthrough all disks (Xen) – select this for Xen hypervisors to pass through disks to the storage controller, however on KVM you can select a subset (see next option)
[disk labels] (KVM) – select individual disks to pass through the storage controller
Storage NICsFor each unused NIC on the Hypervisor, you can select whether it should be assigned as a general storage NIC for all storage traffic including the IO controller process, or whether it should be passed through exclusively to the storage IO controller process.Passthrough
DOCUMENT REVISIONS - LIST OF DEFAULT PERMISSIONS FOR USER ROLE 100
OnApp 3.0 Administration Guide v15
additional PCIs or storage controllers - if network interfaces are available but are not detected by the Control Panel, check this box to display all PCI devices available on the hypervisor – you can then choose specific devices to pass through to the storage controller.
6. Click the Add Hypervisor button to finish.
The hypervisor will automatically reboot and pick up the new configuration. This may take a few minutes. Once the reboot has completed, you should see the “active” light show up next to the hypervisor in the main Settings -> Hypervisors screen.
Note that you do not need to power cycle the hypervisor manually – the Control Panel handles this remotely, and takes care of the configuration automatically.
DOCUMENT REVISIONS - LIST OF DEFAULT PERMISSIONS FOR USER ROLE 101
OnApp 3.0 Administration Guide v15
11 CLOUDBOOT IPS
Cloud Boot IPs are IP addresses which hypervisors will acquire via DHCP when they boot.
11.1 View/Edit/Delete CloudBoot IP Addresses
To view the list of CloudBoot IP addresses:
1. Go to your Control Panel's Settings menu.
2. Click the Hypervisors icon, then click CloudBoot IPs tab.
3. On the screen that appears, you'll the range of CloudBoot IP addresses.
To edit an IP address, click the Edit icon next to it, then change its details as required.
To delete an IP address, click the Delete icon next to the required IP address.
11.2 Create CloudBoot IP AddressTo add new CloudBoot IP address:
1. Go to your Control Panel's Settings menu.
2. Click the Hypervisors icon, then click CloudBoot IPs tab.
3. On the screen that appears, click the New IP Address button.
4. Specify the following IP address properties:
o IP Address
o Netmask
o Gateway
5. Click Submit.
DOCUMENT REVISIONS - LIST OF DEFAULT PERMISSIONS FOR USER ROLE 102

OnApp 3.0 Administration Guide v15
12 INTEGRATED STORAGE
Integrated Storage functionality allows the cloud admin to build a highly scalable and resilient SAN storage target for virtual machine storage using local disks in hypervisors. Using the Integrated Storage, you can create a virtual data store in OnApp Cloud that spans multiple physical drives in hypervisors, with RAID-like replication and striping across drives. The SAN is fully integrated into the hypervisor platform, and the platform is completely decentralized: each node is capable of making decisions about data synchronization and load balancing, and communicates directly with other nodes to move content around dynamically without depending on any centralized controller. There is no single point of failure: for example, if a hypervisor fails, the SAN reorganizes itself and automatically recovers the data. The OnApp Integrated Storage makes exclusive use of cloud boot to provision hypervisors, so Hypervisors must be booted via cloud boot in order to enable the integrated SAN functionality. For details, refer to the CloudBoot Hypervisors section.
To start using integrated storage, you must have a Manage OnApp Storage permission enabled for your user role. Also, you have to enable the integrated storage in the system configuration manually (Settings > Configuration > OnApp Storage). Visit Configuration Settings chapter for more details.
The following Cloud Boot features are not available in the 3.0 version (they will be introduced in future releases):
Bonded NICs for the management/boot interface
12.1 Integrated Storage Data StoresIntegrated storage data store functionality allows to combine physical disks from any server in the system into a virtual data store to create a SAN. Afterwards you can remove disks from a server, add them to any other server and run anywhere in the system without impacting operation of your SAN. The disks in the SAN are grouped by performance.
12.1.1 How many virtual machines can reside on the integrated storage data store?
Use the following formula to calculate the number of virtual machines that can reside on the data store:
DOCUMENT REVISIONS - LIST OF DEFAULT PERMISSIONS FOR USER ROLE 103

OnApp 3.0 Administration Guide v15
(Storage node memory size - 128) ÷ 4
Where: Storage node memory size - integrated storage node's memory size in MB
128 - the maximum number of VDisks that can be hosted on back-end nodes
4 - the amount of memory required for NBD connection in MB
After that, divide the deduced numeral by the number of paths required per disk:
if the data store has 2 replicas and 2 stripes, it requires 4 paths per disk. Linux virtual machines have 2 disks, so 8 paths are required (if using the same data store configuration for main disk and swap).
For example:
The storage node memory = 640 MB (default value), then:
(640 -128) = 512 MB for NBD device paths
512 ÷ 4 = 128. Depending on the data store disk configuration,this number determines the maximum number of VDisks that can be created.
Then, if the data store has 2 replicas and 2 stripes, it requires 4 paths per disk. Linux virtual machines have 2 disks, so 8 paths are required (if using the same data store configuration for main disk and swap).
Then, the following number of virtual machines can be hosted on that data store:
128 / 8 = 16 Linux virtual machines
128 /4 = 32 Windows virtual machines (with 1 primary drive)
To be able to get more virtual servers in the cloud, we recommend using a lower config for swap drives.
12.1.2 View Integrated Storage Data StoresTo view the list of all integrated storage data store in the cloud:
1. Go to your Control Panel’s Integrated Storage menu.
2. On the screen that appears, you’ll see the list of all integrated storage data stores in the cloud.
3. Mouse over a data store to view the list of storage nodes attached to the data store grouped by hypervisor:
DOCUMENT REVISIONS - LIST OF DEFAULT PERMISSIONS FOR USER ROLE 104

OnApp 3.0 Administration Guide v15
4. To edit or delete a data store, click the Actions button next to the required data store, then select the appropriate action.
12.1.3 View Integrated Storage Data Store DetailsTo view the list of all integrated storage data store in the cloud:
1. Go to your Control Panel’s Integrated Storage menu.
2. On the screen that appears, you’ll see the list of all integrated storage data stores in the cloud.
3. Click the label of the data store to view its details.
4. On the screen that appears, you will see the following data store details:
o total size - total data store size in GB
o performance - the storage node performance level
o free size - free space available
o copies - the number of copies used for data in this datastore
o sector size - sector size in bytes
o stripes - the number of stripes the data store is be divided into
o overcommit - overcommit percentage
o max vdisk size - maximum vdisk size allowed
o a list of data store disks
12.1.4 Create Integrated Storage Data StoreBefore creating an integrated storage data store:
1. Create one or more Xen or KVM hypervisors with integrated storage enabled to group their drives together into a virtual data store.
2. Create a hypervisor zone.
3. Add your hypervisors to the hypervisor zone.
DOCUMENT REVISIONS - LIST OF DEFAULT PERMISSIONS FOR USER ROLE 105
OnApp 3.0 Administration Guide v15
4. Select the hypervisor zone as a storage API endpoint.
After that, you can proceed to the integrated storage data store creation.
To create new integrated storage data store:
1. Go to your Control Panel’s Integrated Storage menu.
2. On the screen that appears, you’ll see the list of all integrated storage data stores in the cloud.
3. To create a new data store, click the Create New Integrated Storage Datastore button, and complete the wizard that follows:
Name - give your datastore a name
Advanced settings - check this to reveal the advanced settings below:
o Replicas - increasing the number of copies increases resilience to invidivual drive failure.
o Stripes - increasing the number of stripes increases the number of physical disks involved in any single virtual disk.
o Overcommit - specify the overcommit percentage. You can set the following overcommit values: none (0%), 20%, 50% or unlimited (100%).
Storage Nodes
In order for your hard drives (nodes) to be detected and active, multicast traffic should be enabled on your switch, for the Onapp Integrated Storage Network/VLAN.
o HV filter - use this to filter the nodes (disks) available for inclusion in this data store, by specific hypervisors.
o Performance - use this to filter the nodes available for inclusion in this data store by performance.
o Select which disks you want to include in this data store by ticking the checkboxes next to the requied disks.
4. Click the Save button to create the data store. The data store must be assigned to a hypervisor zone and data store zone before you can provision storage to a VM.
12.1.5 Edit Integrated Storage Data StoreYou can add and remove disks from a data store at any time after the data store has been created. This makes it easy to expand your distributed storage as you add drives to hypervisors, or add new hypervisors.
DOCUMENT REVISIONS - LIST OF DEFAULT PERMISSIONS FOR USER ROLE 106

OnApp 3.0 Administration Guide v15
To edit a distributed storage data store:
1. Click the Integrated Storage menu item. The screen that appears shows all data stores currently available.
2. Click the Actions icon next to the datastore you want to edit, then choose Edit.3. Use filters to sort disks by hypervisors and performance, then click the checkboxes to add or
remove disks from the data store.
4. Click the Save button to save your changes.
12.1.6 Delete Integrated Storage Data StoreTo create new integrated storage data store:
1. Go to your Control Panel’s Integrated Storage menu.
2. On the screen that appears, you’ll see the list of all distributed storage data stores in the cloud.
3. Click the Actions icon next to the data store you want to remove, then choose Delete. You will be asked to confirm the deletion.
12.2 Manage Integrated Storage Data Store Disks
Disks are partitions of an integrated storage data store that can be allocated to specific virtual machines. OnApp Storage disks are managed through the Control Panel's Integrated Storage menu. Disks for individual virtual machines are managed through the Control Panel's Virtual Machines menu.
When you exceed the NBD device path limit, you will see the following message in the UI failure log when starting a virtual server: No free devices available for the operation.
12.2.1 View the List of Integrated Storage Data Store DisksTo view the list the integrated storage data store disks:
1. Go to your Control Panel Integrated Storage menu
2. Click the label of the required integrated storage data store.
3. Scroll down to the list of disk to view the list of all data store disks with the following details:
DOCUMENT REVISIONS - LIST OF DEFAULT PERMISSIONS FOR USER ROLE 107
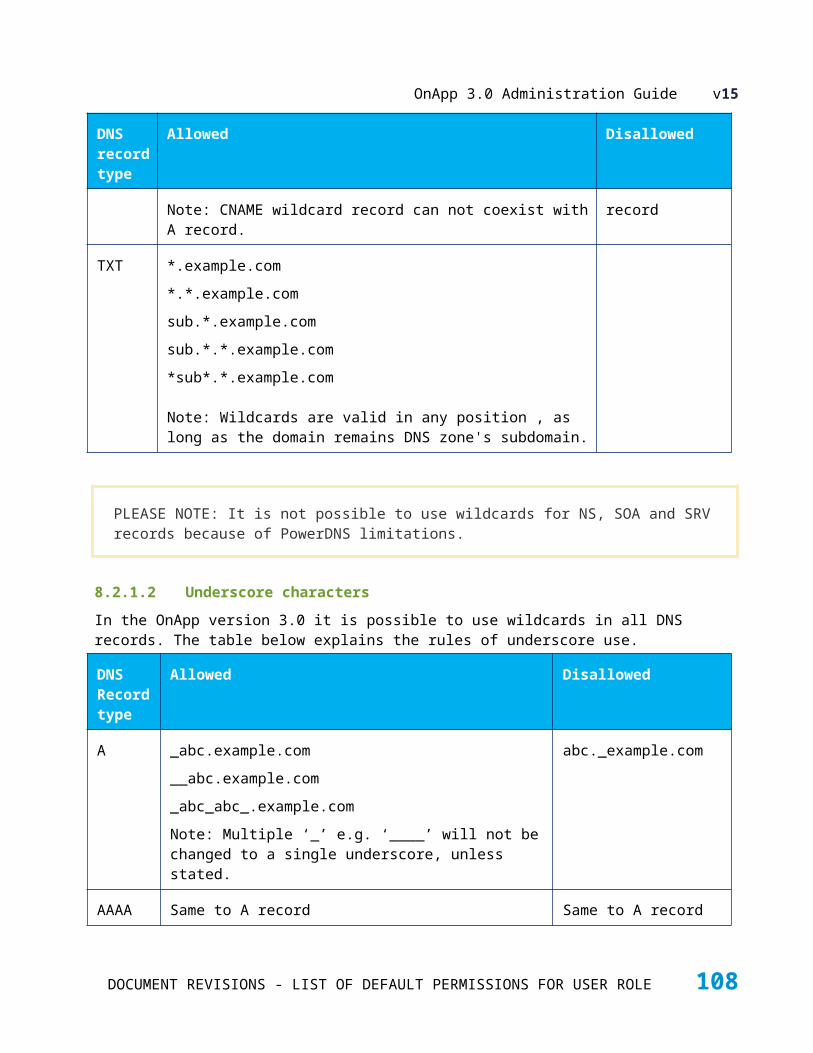
OnApp 3.0 Administration Guide v15
o Identifier
o Label
o Size
o Utilisation
12.2.2 Add Disks to Integrated Storage Data StoreTo add a new disk to the integrated storage data store:
1. Make sure that all VDisks are fully synced. Perform repair if it is required.
2. Migrate all VMs from the HV to which the drive(s) will be added.
3. Shut down the HV and connect the disk drive(s). Some VDisks will degrade - this is the expected behaviour.
4. Start up the HV.
5. Once the HV boots, ensure that the drive is ready for use in the Storage platform.
6. Run 'formatandconfigure /dev/sda' for all new / replaced drives (where /dev/sda is the new / replaced disk drive). onapp_scsi_id can help to identify if the drive has been previously identified.
7. Enable the new drive(s) via OnApp User Interface (Edit CloudBoot Hypervisor screen).
8. Restart groupmon service on the HV.
HV#: service groupmon restart
9. Repair all degraded disks:
HV#: repairvdisks
10. Migrate VMs back to HV.
12.2.3 Remove Disks from Integrated Storage Data StoreTo remove disk from the integrated storage data store:
1. Rebalance content away from Disk drive and remove the drive.
DOCUMENT REVISIONS - LIST OF DEFAULT PERMISSIONS FOR USER ROLE 108
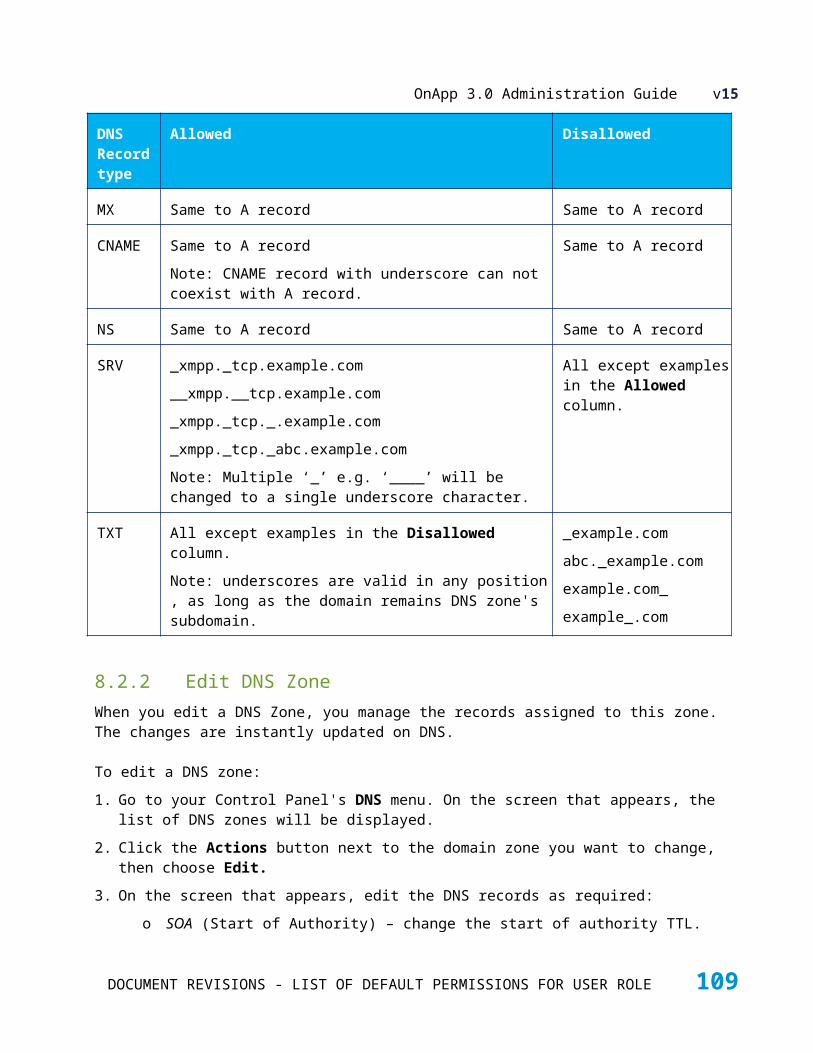
OnApp 3.0 Administration Guide v15
2. Re-balance all VDisks which use this drive to other drives that have free space, one path at a time.
3. Once empty, forget the node.Go to the Integrated Storage Nodes screen, select the Actions drop-down menu next to the required node, then choose Forget.
4. Ensure that all vDisks are fully synced (perform repair if it needed)
5. Migrate all VMs from the HV that hosts the drive to another HV.
6. From the Edit CloudBoot Hypervisor screen, deselect the drive that has been forgotten. Save your changes.
7. Shut down the HV and remove the failed drive.Some paths will be displayed as degraded - this is the expected behavior, as these are paths from other disk drives on the hypervisor that is down.
8. Once the drive has been removed, start up the HV again.
9. Repair all degraded disks. Starting from the 3.0.8 version, run repairvdisks in console on one of the HVs in the data store zone. Alternatively, repair every VDisk from the UI.
If there are sufficient good paths remaining, degrade the paths and then repair afterwards:
1. Perform steps 4-8 above.
2. Forget the node that has been removed from the UI (it will be in the inactive nodes list).
3. Repair the drives as described in the 9th step above.
12.2.4 Repair Disks Assigned to Integrated Storage Data StoreIn the event that a storage node reboots, or a drive fails, it may be necessary to repair the content of one or more virtual disks.
If there are sufficient copies remaining (as configured in the Advanced Settings while creating or editing a distributed data store) then drive content can always be repaired, without any downtime required.
1. Click the Integrated Storage menu, and then the label of a data store to show the virtual disks in that store.
2. If any of the VDisks has a red background, it can be repaired via UI.
3. Click the disk label to view its details.
4. On the screen that appears, select the Repair option next to the Consistency field. Note that only one VDisk can be repaired at a time.
5. When the disk is successfully repaired, the consistency value will be changed from the "Degraded" to "Fully synced'.
6. Once the content has been re-balanced, the disk will display a green icon again to indicate that all content is fully up to date.
DOCUMENT REVISIONS - LIST OF DEFAULT PERMISSIONS FOR USER ROLE 109
OnApp 3.0 Administration Guide v15
The disk will be synchronized a short time after the disk repair is finished (approximately in two minutes).
12.2.5 Delete Disk1. Go to your Control Panel Integrated Storage menu.
2. Click the label of the required integrated storage data store.
3. On the data store details screen, you will see the list of all disks assigned to this data store.
4. Click the Actions icon next to the disk you want to remove, then choose Delete.
5. Confirm the disk deletion.
12.2.6 Rebalance VDisks Assigned to Integrated Storage Data StoreRebalancing a VDisk assigned to Integrated Storage data store is moving the data from one node to another. You can rebalance a VDisk using User Interface or via Command Line Interface. Currently, rebalancing using UI is preferable.
To rebalance a VDisk via UI:
1. Go to your Control Panel's Integrated Storage > Data Stores menu.
2. Click the required Data Store label.3. On the page that loads, scroll down to the Disks section.
4. Click the label of the VDisk you're interested in.
5. On the page that appears scroll down to the Storage Nodes section and select the target node to host the content (deselect one of current nodes).
6. Click Rebalance Disk button to start the process. The disk will be shown as degraded while the rebalancing is taking place.
To rebalance a VDisk using CLI:
1. View the current members of the disk:
onappstore diskinfo <uuid>
2. Forget a member (members) from a particular VDisk. It is recommended to rebalance one path at a time.
onappstore forget forgetlist=<member> vdi_uuid=<VD_UUID>
DOCUMENT REVISIONS - LIST OF DEFAULT PERMISSIONS FOR USER ROLE 110

OnApp 3.0 Administration Guide v15
where VD_UUID is a particular VDisk
3. Choose a new member on which to host the VDisk.
onappstore repairmembership uuid=<uuid> memberlist=<member>
Memberlist restricts the members that can be chosen to one or more members. A single member forces the VDisk to use that as the member to host content.
4. Perform the repair that copies content from the master to the slave. The master will be one of the remaining replicas that hosts VDisk content for a stripe. The slave will be the destination drive where the content is copied to.
onappstore repair <uuid>
12.3 Storage NodesOnApp storage nodes are self-managing, self-discovering and self-contained hot-pluggable units. Each storage node manages and compresses its own content in the most efficient way possible, without loss of performance, using a highly efficient data de-duplication engine. This ensures that data is stored optimally across the whole environment, while maintaining data replication and drive resiliency properties. There is no centralized management system to fail, and each node can make decisions about data synchronization and load balancing without depending on a central controller.
The list of storage nodes can be found in the Integrated Storage menu:
DOCUMENT REVISIONS - LIST OF DEFAULT PERMISSIONS FOR USER ROLE 111
OnApp 3.0 Administration Guide v15
The number of NBD device paths that can exist on the storage node depends on the amount of RAM available to the storage node.
Use the following formula to calculate the number of NBD device paths per storage node:
(Storage node memory size - 128) ÷ 4Where:
128 - the maximum number of VDisks that can be hosted on back-end nodes
12.3.1 View the List of Storage NodesTo view the list of storage nodes:
1. Go to your Control Panel Integrated Storage menu
2. Click the Nodes tab.
3. On the screen that appears, you will see the list of all storage drives available on the cloud.
4. To filter storage nodes by specific hypervisors, choose the required hypervisor from the Hypervisor dropdown box and click the Apply button.
5. Press the Actions button next to the required node to view node's properties or forget it.
12.3.2 View Storage Node DetailsTo view the list of storage nodes:
1. Go to your Control Panel Integrated Storage menu.
2. Click the Nodes tab.
3. On the screen that appears, you will see the list of all storage nodes in the cloud.
DOCUMENT REVISIONS - LIST OF DEFAULT PERMISSIONS FOR USER ROLE 112

OnApp 3.0 Administration Guide v15
4. Click the Actions button next to the required storage node, then choose Properties.
5. On the screen that follows, you will see the following node details:
a.
Vendor - node vendor
Performance - node performance mode: low, normal or high.
Model - node model
Size - node size in bytes
Serial - serial number
Revision - SCSI inquiry product revision number
Status - storage node status: 1 if the node is enabled and 0 if it is disabled.
Storage Node IO statistics.
12.3.3 Edit Storage NodeTo edit storage node settings:
1. Go to your Control Panel Integrated Storage menu.
2. Click the Nodes tab.
3. On the screen that appears, you will see the list of all storage nodes in the cloud.
4. Click the Actions button next to the required storage node, then choose Properties.
5. On the screen that follows, click the Edit Node button under the Properties table.
6. On the screen that appears, you can change the following node settings:
o Vendor - node vendor
o Performance - node performance mode: low, normal or high
o Model - node model
o Size - node size in bytes
DOCUMENT REVISIONS - LIST OF DEFAULT PERMISSIONS FOR USER ROLE 113

OnApp 3.0 Administration Guide v15
o Serial - serial number
o Revision - SCSI inquiry product revision number
o Status - storage node status: 1 if the node is enabled and 0 if its disabled
7. Click the Save button to save your changes.
12.3.4 Forget Storage Node
Forget option make the data store forget about the drive. Use the forget option when you need to remove drives for maintenance or replacement in the following cases:
When a node disappears permanently, for example, due to disk removal or failure it is necessary to ‘forget’ it.
When you need to remove and repair the membership in order to resync a drive.
Forget command removes the failed storage node from all formerly owned vDisks. Use the forget disk option only if you are going to remove the vDisk completely!There are two options to forget the integrated storage node:
Via the OnApp Control Panel user interface.
Using the CLI tool.
To forget storage node via UI:1. Go to your Control Panel Integrated Storage menu
2. Click the Nodes tab.
3. On the screen that appears, you will see the list of all storage nodes in the cloud.
4. Click the Actions button next to the required storage node, then choose Forget.To be able to use the forgotten node again, you need to format it using the external utility or by running the following command via CLI:
formatandconfigure
To forget storage node via CLI:1. Check if that there are sufficient replicas and good paths for all vDisks that reside on that disk
before removing a physical drive. Then:
DOCUMENT REVISIONS - LIST OF DEFAULT PERMISSIONS FOR USER ROLE 114

OnApp 3.0 Administration Guide v15
o If there is a path for all stripe members, run the following command:
onappstore forget forgetlist=<memberlist_csv>
o If there are multiple failed members from different stripes, they will be displayed in a comma-separated as a comma-separated list; these nodes will be forgotten.
2. After that, the disk can then be safely removed.
3. You can add a new vDisk at this point.Before adding a new disk:
o Make sure that all vDisks that are hosted on the HV have sufficient replicas.
o Migrate all VMs are hosted on the HV to another hypervisor.
4. To register the disk,you need to deselect the old disk and select the new one via UI. Update the configuration by rebooting the hypervisor and running the groupmon restart command:
[root@<ipaddr_hv_1> ~]# service groupmon start
5. After that, add the disk to the data store by editing the Integrated Storage data store settings in the OnApp Control Panel.
6. Repair the degraded vDisks of the removed member.
7. Run the following commands in the CLI:
onappstore repairmembership <UUID>onappstore repair <UUID>
8. Check the disk status as before with the repair operation:
onappstore resynchstatus uuid=mq98y0trhi5bxo status={u'3335881780':{u'4142566975':59},u'138773005':{u'433710490':66}}result=SUCCESS
DOCUMENT REVISIONS - LIST OF DEFAULT PERMISSIONS FOR USER ROLE 115
OnApp 3.0 Administration Guide v15
12.3.5 Unassign Storage Node from Integrated Storage Data StoreTo unassign storage node from integrated storage data store:
1. Go to your Control Panel Integrated Storage menu.
2. Click the Nodes tab.
3. On the screen that appears, you will see the list of all storage nodes in the cloud.
4. Click the Actions button next to the required storage node, then choose Unassign.
12.3.6 View Storage Node StatisticsTo view the storage node IO statistics:
1. Go to your Control Panel Integrated Storage menu.
2. Click the Nodes tab.
3. On the screen that appears, you will see the list of all storage nodes in the cloud.
4. Click the Actions button next to the requied storage node, then choose Properties.
5. On the screen that follows, scroll down to the Statistics section.
6. On the Statistics screen, specify the viewing parameters:
a. Choose the required IO statistics type from the drop-down box. You can view the following IO statistics types:
read I/Os
read merges
read sectors
read ticks
write merges
write sectors
b. Set Start and End time. By default, the statistics are generated for the last three months or the actual VM existence period.
c. Tick the Show in my Timezone box to show bandwidth statistics according to your profile's time zone settings.
DOCUMENT REVISIONS - LIST OF DEFAULT PERMISSIONS FOR USER ROLE 116
OnApp 3.0 Administration Guide v15
d. Press Apply.
12.4 Manage Integrated Storage Drive Devices
Drive devices are physical hard drives that can be assigned to hypervisors tied to the integrated storage data stores and used as storage nodes. When the integrated storage is enabled and configured, the drive devices are available under the Nodes menu.
12.4.1 View Integrated Storage Data Store DrivesTo view the list of integrated storage data store drives:
DOCUMENT REVISIONS - LIST OF DEFAULT PERMISSIONS FOR USER ROLE 117
OnApp 3.0 Administration Guide v15
1. Go to your Control Panel Integrated Storage menu.
2. Click the Nodes tab.
3. On the screen that appears, you'll see the list of all available drives in the Drives table along with their details:
o Device - device identifier
o Vendor - node vendor
o Serial -serial number
o Revision - SCSI inquiry product revision number
12.4.2 Assign DriveTo assign a drive to the hypervisor:
1. Go to your Control Panel Integrated Storage menu.
2. Click the Nodes tab.
3. On the screen that appears, you'll see the list of all available drives in the Drives table.
4. Click the Actions button next to the required drive, then choose Assign.
You can view the assigned drive in the storage nodes list and under the main Integrated Storage menu.
12.4.3 Prepare DrivePreparing a drive is a process of formatting a hard drive to make it usable. To prepare a drive:
1. Go to your Control Panel Integrated Storage menu.
2. Click the Nodes tab.
3. On the screen that appears, you'll see the list of all available drives in the Drives table.
4. Click the Actions button next to the required drive, then choose Prepare.
12.5 Storage API EndpointStorage API endpoint utilization allows to view the storage of a several hypervisors assigned to the hypervisor zone that functions as an endpoint gateway. The API endpoint option allows to select
DOCUMENT REVISIONS - LIST OF DEFAULT PERMISSIONS FOR USER ROLE 118

OnApp 3.0 Administration Guide v15
hypervisor zones as storage API endpoints to link storage from several machines. Then, the storage channel is created automatically when adding a hypervisor to the hypervisor zone. The API endpoint utilization ensures correct communication between all data stores.
12.5.1 Add Storage API EndpointTo configure a Storage API endpoint:
1. Go to the Integrated Storage menu.
2. On the screen that appears, select the required hypervisor zone from the drop-down list. To select all hypervisor zones, tick the Any Hypervisor Zone checkbox.
3. Click Save.
DOCUMENT REVISIONS - LIST OF DEFAULT PERMISSIONS FOR USER ROLE 119

OnApp 3.0 Administration Guide v15
13 TEMPLATES
OnApp templates are used to deploy virtual machines in your cloud. A template is a fully preconfigured operating system environment – a tar + gzip archive that contains the root directory of an operating system. A basic template includes the data needed for a minimum OS installation, but templates may also include applications and additional OS components.There are two different kinds of template:
System templates These are provided by OnApp and downloaded from an online library. They comprise an operating system with the latest set of packages installed. Windows 2008 templates require 20GB of free disk space. Windows 2003 templates require 10GB. Most Linux templates require 2–10GB.
Custom/user templates These are templates you create by backing up an existing virtual machine, and converting that backup to a template. This allows you to pre-configure virtual machines (for example with specific OS settings, or pre-installed applications) and use the same configuration again and again.
It is not possible to change or reset the password if the Windows virtual server with Active Directory Domain Controllers is used as a domain controller.
The OnApp template library includes over 100 VM templates based on various 32-bit and 64-bit flavours of Windows and Linux operating systems. OnApp customers can also access a large number of JumpBox virtual appliances and deploy them as templates in OnApp. For the latest list see: http://onapp.com/cloud/features/vm-templates/
Only customers with a Paid license (not a free 16-core) have access to the complete template library, and special deals with JumpBox.
When using Windows 2003 templates, avoid updating drivers via Windows update. Use the latest XEN PV driver for 3.x templates instead. Otherwise, update drivers at your own risk and responsibility.
DOCUMENT REVISIONS - LIST OF DEFAULT PERMISSIONS FOR USER ROLE 120

OnApp 3.0 Administration Guide v15
13.1 View Template DetailsThe Control Panel's Templates List menu lists all of the templates available on your system, their version number, the Operating System they install, whether swap disk is allowed, and whether you can adjust their CPU cores/priority & RAM without rebooting a virtual machine based on that template ("resize without reboot").The templates are organized into four tabs:
System templates - the OS images provided by OnApp.
My templates - the list of custom templates created by the user who is currently logged in
Custom/User templates - the templates converted by users from VM backups. The tab will show the templates of the user who is currently logged in.
Inactive templates - the templates that are currently unavailable to build VMs on.
To see which virtual machines are based on a specific template:
1. Go to your Сontrol Panel's Templates > Templates List menu to bring up the list of templates.
2. Click the template's label (name) in the list.
13.2 Edit Template DetailsYou can edit a range of template details through the Control Panel, including minimum disk size required, version number, filename and label. To do so:
1. Go to your Control Panel's Templates > Templates List menu. You'll see a list of templates on your system.
2. Click the Actions icon next to the template you want to change, then choose Edit Template.3. On the screen that follows, enter template details as required:
o Label – change the template name
o Filename – edit the template filename
o Version – the template version
o Min disk size – the minimum VM disk size required to build a VM on this template (in GB)
o Min memory size – the minimum VM RAM required to build a VM on this template (in MB)
4. Click the Save button to finish.
DOCUMENT REVISIONS - LIST OF DEFAULT PERMISSIONS FOR USER ROLE 121

OnApp 3.0 Administration Guide v15
13.3 Delete System TemplatesTo delete a template:
1. Go to the Control Panel's Templates > Templates List menu.
2. Click the Actions icon next to the template you wish to delete, then choose Delete Template.When templates are deleted, virtual machines built from them will continue to run.
13.4 Create Custom TemplatesYou can create custom templates by making a backup of an existing virtual machine and saving it as a template for future use. To create a custom template:
1. Create a new virtual machine and configure it as you would like for your template.
2. Click the Actions icon next to this virtual machine, then choose Backups.
3. In the list of backups, click Convert to Template next to the backup you want to convert.
4. Click OK to proceed.
5. On the next screen, enter the following:
a. A label for your template.
b. The minimum memory size: make sure the minimum memory size takes into account the settings for the template on which the VM was built, plus any modifications you may have made to the template before making the backup.
c. The minimum disk size: ensure the value is based on the template settings and any possible modifications you may have made, e.g. installing additional software.
d. Click the Convert Backup button.
6. The backup will be scheduled for creation. When conversion is complete, it will be then listed on the Templates > Templates List > User Templates tab, from where you can edit it.
PLEASE NOTE: During the custom Windows template creation the Admin account is created anew.
When updating a custom template (by converting a more recent backup of a VM, for example), existing VMs built on previous versions will not be updated. Only new VMs, or those that are rebuilt, will use the new template.
DOCUMENT REVISIONS - LIST OF DEFAULT PERMISSIONS FOR USER ROLE 122

OnApp 3.0 Administration Guide v15
13.5 Edit/Delete Custom TemplatesYou can edit your custom templates at any time. To do so:
1. Go to your Control Panel's Templates > Templates List menu and click the User Templates tab. Your custom templates will be listed there.
2. Click the Edit icon next to the template you wish to edit, make your changes on the screen that follows, and click Save Template.
3. Click the Delete icon next to a template if you want to delete it.
13.6 Make Templates PublicThe template list is organized into three tabs. The User templates tab lists all the custom templates created form the backups. By default those templates are available only to those users who created them. To make user templates available to all users:
1. Go to your Control Panel's Templates > Templates List menu.
2. Click User templates tab.
3. Click the Actions button next to the template you want to make public, then select Make public.
4. Confirm the window that pops up.
When you make a custom template public, it is moved to a System templates tab.
13.7 Allow Users to Make Templates Public
All custom templates are private by default, which means they are only available to the users who created them. As administrator, you can give users the right to create templates that are available to all users – i.e. to create public templates. This is handled through the Control Panel's Users and Groups menu:
1. Go to your Control Panel's Users and Groups menu.
2. Click the Roles tab.
3. Click the Edit icon next to the role you want to edit.
DOCUMENT REVISIONS - LIST OF DEFAULT PERMISSIONS FOR USER ROLE 123

OnApp 3.0 Administration Guide v15
4. On the screen that follows, check the box next to the Make own template public permission.
13.8 Template Software LicensesTo create a virtual machine from a template which is based on paid software, such as MS Windows, you must have a valid license. The system verifies if you have a license before allowing the VM to be created, so before creating a VM you must first upload the license keys you've bought to OnApp, or connect to a licensing server.OnApp supports three license types:
MAK licensing: the default licensing type applied to all Windows-based VMs.
KMS licensing: this is applicable to Windows 2008 and Windows 7 VMs only.
User licenses: allow end users to input a license key when creating a VM.
The template licenses in OnApp are managed in two places:
1. Template store – where you specify which license types can be applied to templates assigned to the particular template group.
2. Billing plans – where you specify which license types a user on this plan can apply to their Windows-based VMs.
To avoid billing issues, do not use different Windows licensing types for the same template in one billing plan. In case you assign a template to template groups with different licensing types or different prices, it will be charged at a smaller price.
The billing plan settings override the template group settings. For example, if the KMS licensing is allowed by template group settings, but is not enabled in billing plan configuration, the user will not be able to create VMs using KMS licensing.
The user specifies the license type for a particular virtual machine during the VM creation process. The list of available license types depends on the template which is chosen for the VM, and the billing plan the user is signed up to.To enable users to choose the license type:
1. Create a template group
2. Specify which licenses can be used within this group
3. Assign the templates to this group
4. Create Billing Plan
5. Specify which license types can be used within this plan
6. Assign template groups to a billing plan (optional)
DOCUMENT REVISIONS - LIST OF DEFAULT PERMISSIONS FOR USER ROLE 124
OnApp 3.0 Administration Guide v15
7. Assign a user to this billing plan.
NOTE:
If you do not assign a template to a template group, the default MAK licensing is applied to that template.
If you do not assign any template group to a billing plan, the user can build VMs on any template available in the cloud. The choice of licenses will depend on the settings specified for the template group to which this template belongs.
13.8.1 KMS LicensingTo allow your users to create VMs (on Windows 2008 and Windows 7 templates) using KMS licensing:
1. Log in to your Control Panel as an Admin.
2. Enable KMS licensing for a particular template group, and attach the templates for which you plan to enable KMS licensing to this group (see Template Store in the next section).
Only Windows 2008 and Windows 7 templates can have KMS licensing enabled!
3. Enable KMS licensing for a billing plan, and assign this template group to a billing plan (see the Billing Plans section)
4. Sign up a user to this billing plan (see the Assign Users to Billing Plans section).
13.8.2 MAK LicensingTo add a MAK license to OnApp:1. Go to your Control Panel's Software Licenses menu.
2. Click the Add new License button.
3. Set the necessary parameters in the form that appears.
Where:
o Label – Windows OS distribution (2003, 2008, 7)
o R2 – tick this parameter if your license is for the second edition of Windows OS distribution
o x64 or x86 - specify the architecture
o Specify the Edition – STD (Standard), ENT (Enterprise), WEB (web), PRO (Professional), DC (Data center)
DOCUMENT REVISIONS - LIST OF DEFAULT PERMISSIONS FOR USER ROLE 125

OnApp 3.0 Administration Guide v15
o License – enter the license code, e.g. TZXTC-R4GGG-9TT3V-DYDY4-T628B
o Total - the total number of machines allowed by the license (the amount of licenses you bought from Microsoft)
4. Click Save.To view MAK license details:1. Go to your Control Panel's Software Licenses menu. This screen lists all the licenses you've
added to your OnApp installation with their details:
Label – the license name specifying the OS distribution, architecture and edition, e.g. Windows 2008 R2 x64 STD/ENT
License - the license code
Total - the number of VMs allowed by the license
Count - the number of licenses used
To edit/delete an existing MAK license:1. Go to your Control Panel's Software Licenses menu. This screen lists all the licenses you've
added to your OnApp installation.
2. Click the Edit/Delete icons next to the license you're interested in.
13.9 Template StoreTemplate store enables you to organize individual templates into groups that can be used as a paid resource for billing plans. This allows you to easily create groups of templates which can be added to the billing plan to limit the amount or types of templates that are available to a user.
The template groups have hierarchical (tree) structure:
Template group – e.g.OS
Child group
Templates
Click the Template group's label to expand the list of child groups, then click the template group's label to view the list of templates, respectively.
To add a template group:1. Go to your Control Panel's Template Store menu.
2. On the page that follows, click the "+" button next to the required template group's label, then select Add Child.
3. Give a name to your group.
4. Specify the Windows Licensing type: MAK, KMS, or User license.
DOCUMENT REVISIONS - LIST OF DEFAULT PERMISSIONS FOR USER ROLE 126

OnApp 3.0 Administration Guide v15
5. For KMS licensing, set the following parameters:
o Server label – the name of the KMS server
o KMS server host – the hostname of the licensing server
o KMS server port – the port used to connect to the licensing server
6. Click Save.7. On the page that appears, you'll be prompted to assign a template to a group.
To assign a template to a template group:1. Go to your Control Panel's Template Store menu.
2. Click the "+" button next to the required child group's label, then select Add Template.3. Choose the template from the drop-down box at the Add a template section.
4. Click Add a template to a group button to confirm.
To remove a template from a template group:1. Go to your Control Panel's Template Store menu.
2. Click the template group's label, then click the name of the template group from which you wish to remove a template.
3. Сlick the Delete icon next to a necessary template.
4. Confirm.
To change the template price:1. Go to your Control Panel's Template Store menu.
2. Click the name of the template group.
3. Click the price field next to the template which price you want to change and enter the value.
To view/edit/delete a template group:1. Go to your Control Panel's Template Store menu.
2. On the page that follows, you'll see the list of all template groups created within your cloud:
Click the group's label, then click the child group label to see the list of templates assigned to this group.
Click the Edit icon next to a group to edit its name.
Click Delete icon to delete a group.
DOCUMENT REVISIONS - LIST OF DEFAULT PERMISSIONS FOR USER ROLE 127

OnApp 3.0 Administration Guide v15
14 CDN
OnApp CDN is a software product that works with OnApp Cloud v2.3 and later. If you enable CDN for your end users, they can get access to a network of global edge servers (yours, and/or those provided by other cloud hosts) and use that network to deliver web content more quickly and reliably to visitors all over the world. Your CDN is managed alongside your cloud using your OnApp Control Panel. See http://www.onapp.com/cdn for more information.
OnApp provides the following CDN types:
HTTP Pull
HTP Push
Live Streaming
On Demand Streaming
Push HTTP Push method is similar to secondary server: the user uploads content to CDN and links to it, so the content is physically stored at CDN storage servers.
Pull With an HTTP Pull CDN, the website owner stores content on their server and rewrites URLs to include a subdomain. Then, when the specific content is requested, it is pulled to the CDN network from the host and delivered to the closest point to the consumer who requested that content (the content is cached on edge server).
StreamingThere are two supported streaming types in the OnApp CDN – live streaming and on demand streaming.
Live streaming Live streaming CDN allows to deliver the content to end users in a live broadcast mode. When using a live streaming CDN service, end user receive media the same time like a traditional broadcasting.
Video On Demand streaming Video On Demand streaming CDN allows to deliver video on request and makes it repeatedly accessed. Consumers can control content and are able to fast forward or rewind it the same as live streaming.
Only mp4 and flv files are currently supported by VoD streaming.
DOCUMENT REVISIONS - LIST OF DEFAULT PERMISSIONS FOR USER ROLE 128

OnApp 3.0 Administration Guide v15
To utilize CDN streaming service, you have to deploy CDN streaming Edge Server.
Setting up OnApp CDN includes:
Enabling CDN for your cloud in the OnApp customer dashboard (contact OnApp Support if you don’t have dashboard access)
Running CDN Setup wizard in your OnApp Control Panel
Setting up storage servers
Setting up edge servers
Adding CDN edge groups and assigning them to billing plans
Creating CDN resources (when you create a CDN resource, CDN is enabled automatically in the OnApp)
Assigning the billing plan to a user, and setting their permissions.
Storage servers store web content to be distributed over the Content Delivery Network. The content is then cached by edge servers and delivered to consumers.
Edge servers cache web content and deliver it to website visitors. They are virtual appliances that are deployed on hypervisors and managed just like VMs. You can use edge servers to sell CDN bandwidth to your end users, and/or submit the edge server to the OnApp CDN marketplace and sell your bandwidth to other hosts. You can create as many edge servers as you need and place them on different hypervisors in different geographical locations, and easily broaden your CDN by combining your own edge servers with other locations on the CDN marketplace. You can even build a CDN solely with marketplace resources. For details, refer to the Edge servers chapter.
Edge groups are groups of edge servers – your own, and those you subscribe to from the CDN marketplace. They are usually grouped by location, so they represent a pool of servers for a given geographical area.
Edge groups are assigned to billing plans to set the prices for the bandwidth that your end users consume. You can assign several groups to one billing plan at a time, and establish different geographical zones with different pricing. The bandwidth pricing of the billing plan is the price for CDN bandwidth sold to your end users.
CDN resources are specific servers with content an end user wants to distribute via the CDN. CDN resources are assigned to edge groups, which determines the list of servers taking part in distributing/caching of their data.
When creating a user account, you need to grant that user with all necessary permissions for managing CDN resources and assign him to the appropriate billing plan.
PLEASE NOTE: Starting from the OnApp Cloud v3.0, CDN is enabled automatically after adding the first DNS record or CDN resource.
DOCUMENT REVISIONS - LIST OF DEFAULT PERMISSIONS FOR USER ROLE 129

OnApp 3.0 Administration Guide v15
14.1 CDN Setup WizardThis section contains a compehensive guide through the CDN Setup wizard. The wizard is used to enable and configure the CDN service. Follow the stages of the wizard as instructed on the screen to configure a CDN portal. To make any changes after setup is complete, rerun the CDN wizard.
The setup cycle consists of 3 steps:
Permissions
CDN edge groups
Billing
You can rerun the wizard after the initial configuration as many times as you need.
14.1.1 Run CDN Setup WizardTo start the CDN wizard:
1. Go to your Control Panel's CDN Edge Servers menu.
2. Click the Start Wizard button to begin the CDN setup wizard.
3. Proceed the steps in wizard, as described below.
Step 1 of 3. Permissions Set the CDN permissions for the user role to enable CDN for your clients. Select a Client role
from the drop-down list to enable the required permissions. You can enable CDN permissions for additional groups later via Users and Groups menu.
Enable CDN resources permissions for the Administrator role. In case you have multiple roles assigned to your account, select the role from the drop-down list.
Be careful not to assign Administrator role to a Client shared role. You may skip the permissions section if you have set permissions before. PLEASE NOTE: users will not be able to purchase and manage their CDN resources unless they are enabled for their ROLE.
Step 2 of 3. CDN edge groups Give your edge group a unique label. For example, you can create an Edge group called "North
America" and add to it your North American POPs. You will be able to define additional groups later under the Users and Groups menu.
Choose the available locations from the Available Locations list. To add a location, click the '+' button next to the location you wish to add to the group.
Step 3 of 3. Billing
DOCUMENT REVISIONS - LIST OF DEFAULT PERMISSIONS FOR USER ROLE 130
OnApp 3.0 Administration Guide v15
Assign the CDN edge group to the billing plan from the drop-down list.
NOTE: You can't add two edge groups with the same location to one billing plan.
Specify the price per GB of CDN usage (traffic used by your clients on the locations within the edge group).You will be able to assign additional edge groups with different prices to the selected billing plan later, using a Users and Groups menu.
PLEASE NOTE: Any customer assigned to the selected billing plan will be able to create a CDN service, powered by the Edge Group locations at the defined price.
After you have finished configuring the CDN edge group properties, click the CDN Dashboard button to head back to the Dashboard or click Finish button to quit the CDN setup wizard.
User should have the following permissions enabled to run the CDN setup wizard:
Update any Role
See all Roles
Create a new edge group
14.2 CDN Edge ServersWeb content is cached in the network of edge servers on the CDN, distributed across different geographic locations.Currently there are two types of edge servers in OnApp: HTTP and Streaming.HTTP edge servers support both Push and Pull population methods in 80/20 ratio (80% HTTP Pull and 20% HTTP Push). When the edge server is created, its storage limit for HTTP Pull and HTTP Push is automatically assigned by system.Streaming edge server type allow to send a stream to one of the publishing points, or pick up the stream externally and deliver it to the end users.Take note that Operator has to deploy CDN streaming Edge Server to utilize CDN streaming service.Streaming edge server support only streaming services. The following protocols are supported:
DOCUMENT REVISIONS - LIST OF DEFAULT PERMISSIONS FOR USER ROLE 131

OnApp 3.0 Administration Guide v15
HTTP
RTMP/RTMPE/RTMPT/
HDS
RTSP/RTP
iPhone
SilverLight
MPEG-TS
Streaming service includes the following advanced features:
Hotlinking protection - protect your media from being hotlinked (linked to website without your permission)
Geo Blocking - restrict access to your media so that it is accessible only for certain countries/regions
RMTPE (secure Wowza) – streaming encryption.
You do not have to add the Wowza license key manually to enable streaming edge servers. A third party application - Wowza will be installed automatically when installing an edge server and you will simply be charged for it. Please, contact your account manager for details.
Content is delivered to end users from the server which is closest to the user, or has the best availability. If you have CDN enabled for your cloud, you can use the control panel to set up your own edge servers, and manage them in the same way you manage virtual machines. You can submit your edge server to the locations in marketplace to sell bandwidth across it.
To be able to sell CDN bandwidth through our online marketplace, you must first submit your edge server for assessment.
PLEASE NOTE: CDN edge servers do not support firewall and NAT (network address translation).
14.2.1 Create CDN Edge ServerTo add new CDN edge server:
1. Go to your Control Panel's CDN Edge Servers menu.
2. On the screen that appears, click the Create Edge Server button or press the "+" button.
DOCUMENT REVISIONS - LIST OF DEFAULT PERMISSIONS FOR USER ROLE 132

OnApp 3.0 Administration Guide v15
3. Fill in the edge server creation form step by step:
Step 1 of 3o Give your edge server a label. The label can consist of:
Lower- & upper-case letters [A-Za-z]Digits [0-9]Dash [ - ]Underscore [ _ ]Space character [ ]At sign [@]Brackets [ (){} ]Slashes [/]Caret [^]Dollar sign [$]Asterisk [*]Comma [,]Dot [.]
o Select an edge server type: HTTP or streaming
A third party application - Wowza will be installed automatically when installing a streaming edge server and additional charges will apply. Please, contact your account manager for details.
o Choose a hypervisor zone to build this server on.
o Choose a specific hypervisor to build this server on.
o Move the Add to Marketplace slider to the right to submit this server to the OnApp CDN marketplace.
o Click Next.
Any servers you submit will be assessed before they are accepted into the marketplace. Criteria include geographic location, bandwidth and server specs.
NOTE: If the Add to Marketplace checkbox is ticked, the minimum required disk size is 1 TB.
Step 2 of 3
DOCUMENT REVISIONS - LIST OF DEFAULT PERMISSIONS FOR USER ROLE 133

OnApp 3.0 Administration Guide v15
o Set the resources needed for this edge server: RAM, CPU cores and CPU priority.
o Choose a data store zone for this edge server's primary disk.
o Set the primary disk size.
The disk size is calculated in the following way: 10 GB for OS, the rest of total disk space is estimated 80% per Pull population and 20% per Push population.
o Choose a network zone and set the port speed for this edge server, or make it unlimited.
Step 3o Move the Build Edge Server Automatically slider to the right if you want the system to
automatically build the edge server. Otherwise, you will have to build your server manually after it is created.
4. Click Create Edge Server.
14.2.2 View CDN Edge Server DetailsEdge servers are virtual appliances that are much like other virtual machines in your cloud. You can perform the same basic actions on them as for VMs.
To view all edge servers in the cloud:
1. Go to your Control Panel's CDN Edge Servers menu to see an overview of all edge servers in your cloud: their label, IP addresses, power status (with on/off buttons), allocated disk size, RAM and backups.
2. To reboot, start up or shut down a CDN edge server, click the Actions button next to the required edge server, then select the relevant action.
3. To narrow the list of edge servers by type, click the relevant tab at the top of the list.
To view a particular edge server's details:
1. Go to your Control Panel's CDN Edge Servers menu.
2. Click the label of the edge server required.
3. On the screen that appears, use the top navigation tabs to manage your edge server.
Edge servers are managed with the same tools you use to manage VMs in your cloud. The table below links to the relevant sections of this guide's Virtual Machines chapter.
DOCUMENT REVISIONS - LIST OF DEFAULT PERMISSIONS FOR USER ROLE 134
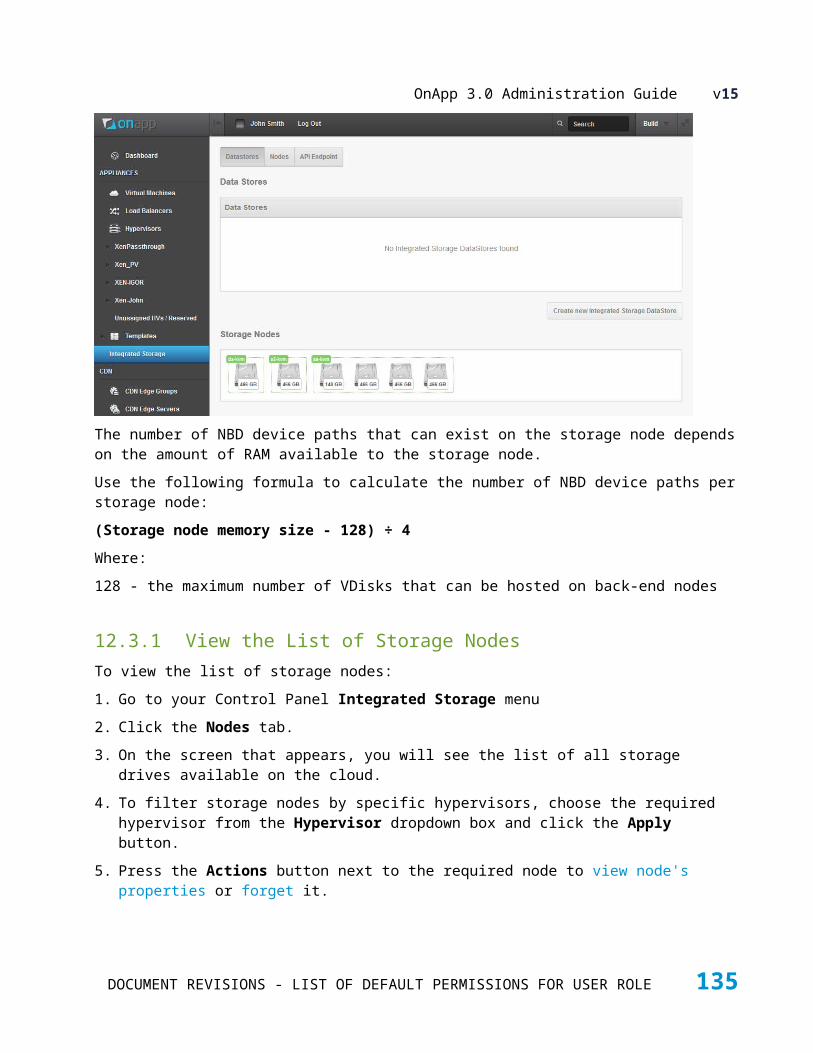
OnApp 3.0 Administration Guide v15
The exception is that autoscaling, backups and firewall rules are not available for edge servers.
Overview The Overview tab shows CDN edge server information and gives access to the most frequently-used management tools.
Properties CDN edge server's details page
CPU Usage CDN edge server's CPU usage statistics
Billing Statistics CDN edge server's billing statistics information
Networking The Networking tab gives access to the edge server's Network interfaces and IP addresses.
Network Interfaces CDN edge server's network configuration
IP Addresses CDN edge server's IP addresses
Storage Disks The Storage tab lets you manage your edge server's disks.
4. To expand the Tools menu, click the Tools button on the edge server's screen. The list of available options depends on the edge server's status. For options description, refer to VM Properties section.
14.2.3 Edit CDN Edge ServerEditing a CDN edge server means adjusting the resources allocated to it, changing its label and basic properties.
To edit a CDN edge server:
1. Go to your Control Panel's CDN edge server menu.
DOCUMENT REVISIONS - LIST OF DEFAULT PERMISSIONS FOR USER ROLE 135

OnApp 3.0 Administration Guide v15
2. Click the label of an edge server.
3. On the next screen, click the Tools button, then click the Edit CDN Edge Server link:
o Change the edge server label.
o Edit CPU core/priority and RAM values.
Note that the server will be rebooted if you edit resources allocated.
o Move the Add to Marketplace slider to the right to add the edge server to the marketplace. (This option is only available for edge servers that were not added to the marketplace earlier.)
4. Click Save Edge server.
14.2.4 Delete CDN Edge ServerTo delete a CDN edge server:
1. Go to your Control Panel's CDN edge servers menu.
2. Click the label of an edge server.
3. When the page loads, click the Tools button, then click Delete Edge Server.4. You will be asked for confirmation before the edge server is deleted.
14.2.5 CDN Edge Server Network Interface UsageNetwork Interface usage page displays bandwidth used in two charts: statistics for 24 hours and hourly statistics for the period up to three months.
To view the edge server's network interface usage statistics:
1. Go to your Control Panel's CDN Edge Servers menu.
2. Click the label of the Edge Server required.
3. On the screen that appears, click Networking tab > Network Interfaces.4. Click the Interface Usage icon next to the network interface needed.
5. On the screen that appears, set the start time and end time and click Apply.
DOCUMENT REVISIONS - LIST OF DEFAULT PERMISSIONS FOR USER ROLE 136

OnApp 3.0 Administration Guide v15
14.3 CDN Storage ServersCDN storage servers are used for storing the content to be distributed over CDN. When the content is requested on the CDN, it is served by the edge server nearest to the customer’s geographical location.
There are two types of CDN storage servers in OnApp: HTTP and Streaming.
14.3.1 View CDN Storage Server DetailsTo view the list of all CDN storage servers in the cloud:
1. Go to your Control Panel's CDN Storage Servers menu to see an overview of all storage servers in your cloud: their label, IP addresses, power status (with on/off buttons), allocated disk size, RAM and backups.
2. To reboot, startup/shutdown a storage server, click the Actions button next to the required storage server, then select the relevant action.
3. To narrow the list of storage servers by type, click the relevant tab at the top of the list.
To view a particular edge server's details:
1. Go to your Control Panel's CDN Storage Servers menu.
2. Click the label of the storage server required.
3. On the screen that appears, use the top navigation tabs to manage your storage server.
Storage servers are managed with the same tools you use to manage VMs in your cloud. The table below links to the relevant sections of this guide's Virtual Machines chapter. The exception is that autoscaling, backups and firewall rules are not available for storage servers.
Overview The Overview tab shows storage server's information and gives access to the most frequently-used management tools.
Properties Storage server's details page
CPU Usage Storage server's CPU usage statistics
DOCUMENT REVISIONS - LIST OF DEFAULT PERMISSIONS FOR USER ROLE 137

OnApp 3.0 Administration Guide v15
Overview The Overview tab shows storage server's information and gives access to the most frequently-used management tools.
Billing Statistics Storage server's billing statistics information
Networking The Networking tab gives access to the storage server's Network interfaces and IP addresses.
Network Interfaces Storage server's network configuration
IP Addresses Storage server's IP addresses
Storage Disks The Storage tab lets you manage your edge server's disks.
4. To expand the Tools menu, click the Tools button on the storage server's screen. The list of available options depends on the edge server's status). For options description, refer to VM properties section.
14.3.2 Create CDN Storage ServerTo create new storage server:
1. Go to your Control Panel’s CDN Storage Servers menu.
2. Click the Create Storage Server button at the bottom of the screen.
3. Fill in the storage server creation form step by step:
Step 1 of 3
Specify the storage server details:
o Specify the server's label in a human-recognizable format.
o Select the storage server type: HTTP or Streaming.
A third party application - Wowza will be installed automatically when installing a streaming storage server and additional charges will apply. Please, contact your account manager for details.
DOCUMENT REVISIONS - LIST OF DEFAULT PERMISSIONS FOR USER ROLE 138

OnApp 3.0 Administration Guide v15
o Specify the hypervisor and hypervisor zone.
o Click Next.
Step 2 orf 3o Set the resources needed for this storage server: RAM, CPU cores and CPU priority.
The minimum memory capacity is 8 GB.
o Choose a data store zone for this storage server’s primary disk
o Set the primary disk size (Storage server HDD). The minimum required disk size is 30 GB.
o Choose a network zone from the drop-down box.
o If the option is available, you can also assign an IP address for the VM from the drop-down menu. Indicate HV and network to have the list of available IPs.Tick the Show Only My IP Addresses checkbox to view only own IP addresses in the IP addresses dropbox.
o Set the port speed in Mbps or tick it as unlimited.
o Click Next.
Step 3o On the screen that appears, tick the Build Edge Server automatically box to build the
storage server automatically, otherwise you will have to build your storage server manually after it is created.
4. Click the Create Storage Server button to start the creation process.
14.3.3 Delete CDN Storage ServerTo delete a storage server:
1. Go to your Control Panel’s CDN Storage Servers menu.
2. On the screen that appears, you’ll see the list of all storage servers in the cloud. Click the HTTP/Streaming tabs to view storage servers by type.
3. Click the Actions button next to the storage server you want to remove, then click Delete.
DOCUMENT REVISIONS - LIST OF DEFAULT PERMISSIONS FOR USER ROLE 139

OnApp 3.0 Administration Guide v15
14.3.4 Edit CDN Storage Server1. Go to your Control Panel's CDN Storage Servers menu.
2. Click the label of a required storage server.
o On the next screen, click the Tools button, then click the Edit CDN Edge Server link under the Storage Server Options.
o Change the storage server label.
o Edit CPU core/priority and RAM values.
3. Click Save.
14.4 CDN ResourcesA CDN resource is a host (e.g. a specific web server), the content of which you are going to distribute over the network of edge servers.
There are three types of CDN resources in the OnApp Control Panel:
HTTP CDN resource type supports both Push and Pull population.
DOCUMENT REVISIONS - LIST OF DEFAULT PERMISSIONS FOR USER ROLE 140
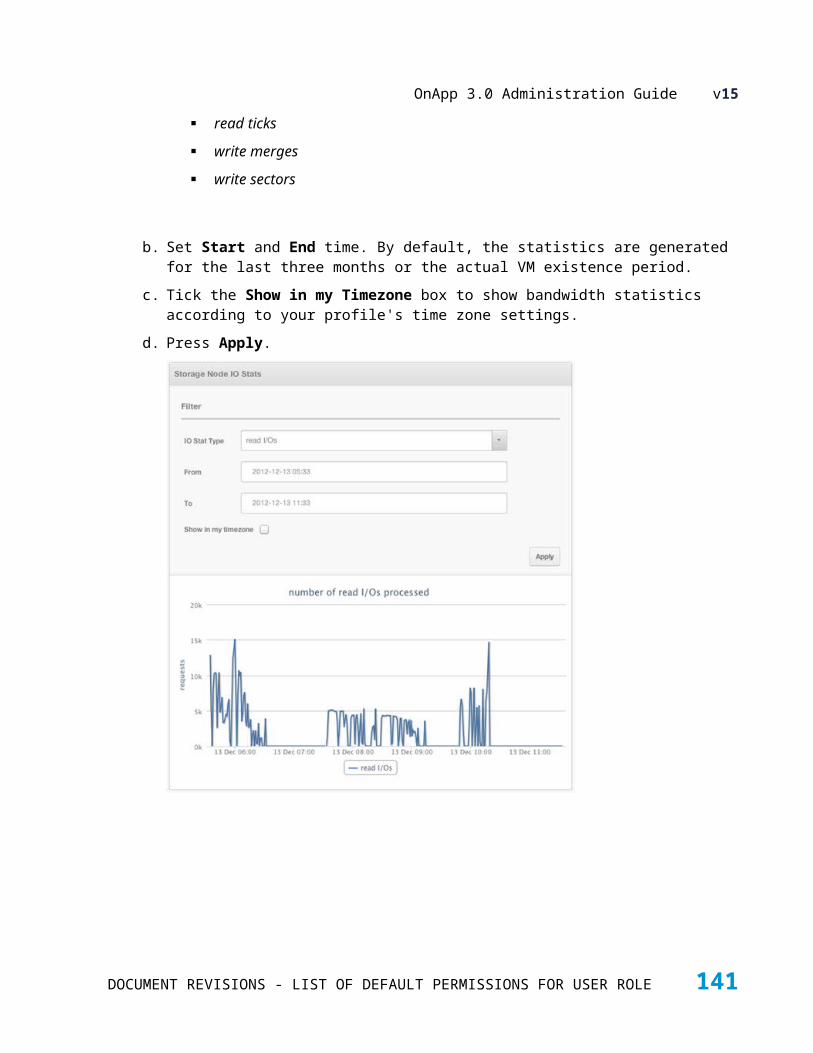
OnApp 3.0 Administration Guide v15
VoD CDN resource type (Pull and Push types) allows to use on demand video streaming service - uploading video and streaming to the end users.
Live Streaming CDN resource type allows to broadcast content using CDN.
Only servers added to the edge groups assigned to the resource will distribute/cache the host's content.
To activate the CDN Resources menu, at least one CDN Edge Group with at least one edge server or marketplace location must be available.
Apart from the CDN Resources permissions enabled, the following requirements must be met for the publisher to be able to create respective resources. If the requirements are not met, the publisher will not be able to create the particular resource type:
Resource Type
HTTP Pull HTTP Push VoD Pull VoD Push Live Streaming
Requirementsbased on user Edge group
User billing plan must includean edge group with at leastone location that supports HTTP.
User billing plan must includean edge group with at leastone location that supports HTTP Push,and an HTTP storage server.
User billing plan must includean edge group with at leastone location that supports VoD Pull.
User billing plan must includean edge group with at leastone location that supports VoD Push,and a streaming storage server
User billing plan must includean edge group with at leastone location that supports live streaming.
14.4.1 View CDN ResourcesGo to your Control Panel's CDN Resources menu.You will see the list of all CDN resources with the following information:
CDN Hostname – hostname of the CDN resource.
Origin Sites – path of the content that will be served from the CDN.
Type - resource type: HTTP Push, HTTP Pull, VoD or Live streaming.
Cost – cost of the resource.
To view HTTP, VoD or live streaming resources only, click the required tab.
DOCUMENT REVISIONS - LIST OF DEFAULT PERMISSIONS FOR USER ROLE 141
OnApp 3.0 Administration Guide v15
You can edit/delete a resource using the relevant icons next to each resource in the list, and add a resource with the New CDN Resource button.
14.4.2 View CDN Resource DetailsView basic and advanced details of a CDN Resource.
To view instructions and basic settings:
1. Go to your Control Panel's CDN Resources menu.
2. Click the required CDN Hostname.
3. On the page that appears, click Instructions and basic settings tab. The screen provides you with the following information:
CDN Resource detailso Owner
o CDN hostname
o Resource type
o SSL on - whether SSL is enabled for the resource or not
o CDN reference – the ID of the resource in database
o CDN status – shows the resource status.
Resource Path and Originso Path of the content that will be served from the CDN.
DNS settingso A CNAME for the CDN Hostname which can then be used to view the contents. Use this
for the origin settings.
Edge Groupso Shows to which Edge groups the resource is assigned.
Last 24 hours costo Cost of the resource for the last 24 hours.
To view advanced details:
1. Go to your Control Panel's CDN Resources menu.
2. Click a CDN Hostname.
DOCUMENT REVISIONS - LIST OF DEFAULT PERMISSIONS FOR USER ROLE 142
OnApp 3.0 Administration Guide v15
3. On the screen that appears, click the Advanced Details tab.
4. This screen provides you with the following information:
o Publisher name – name of the user who created the CDN Resource record
o IP Access Policy
o Country Access Policy
o URL Signing Enabled
o Hotlink Policy
o Password On
o Cache Expiry
14.4.2.1 View HTTP CDN Resource DetailsTo view instructions and basic settings of an HTTP CDN resource:
1. Go to your Control Panel's CDN Resources menu.
2. Click the required CDN Hostname.
3. On the page that appears, click Instructions and basic settings tab. The screen provides you with the following information:
CDN Resource details Owner
CDN hostname
Resource type - Push or Pull
SSL on - whether SSL is enabled for the resource or not
CDN reference – the ID of the resource in database
Resource status – shows the resource status.
Origins (HTTP Pull only)
Path of the content that will be served from the CDN.
Uploaded files (HTTP Push only)
A list of uploaded files. Click the file name to preview the video file.
Edge Groups Shows to which Edge groups the resource is assigned.
Last 24 hours cost Cost of the resource for the last 24 hours.
DOCUMENT REVISIONS - LIST OF DEFAULT PERMISSIONS FOR USER ROLE 143
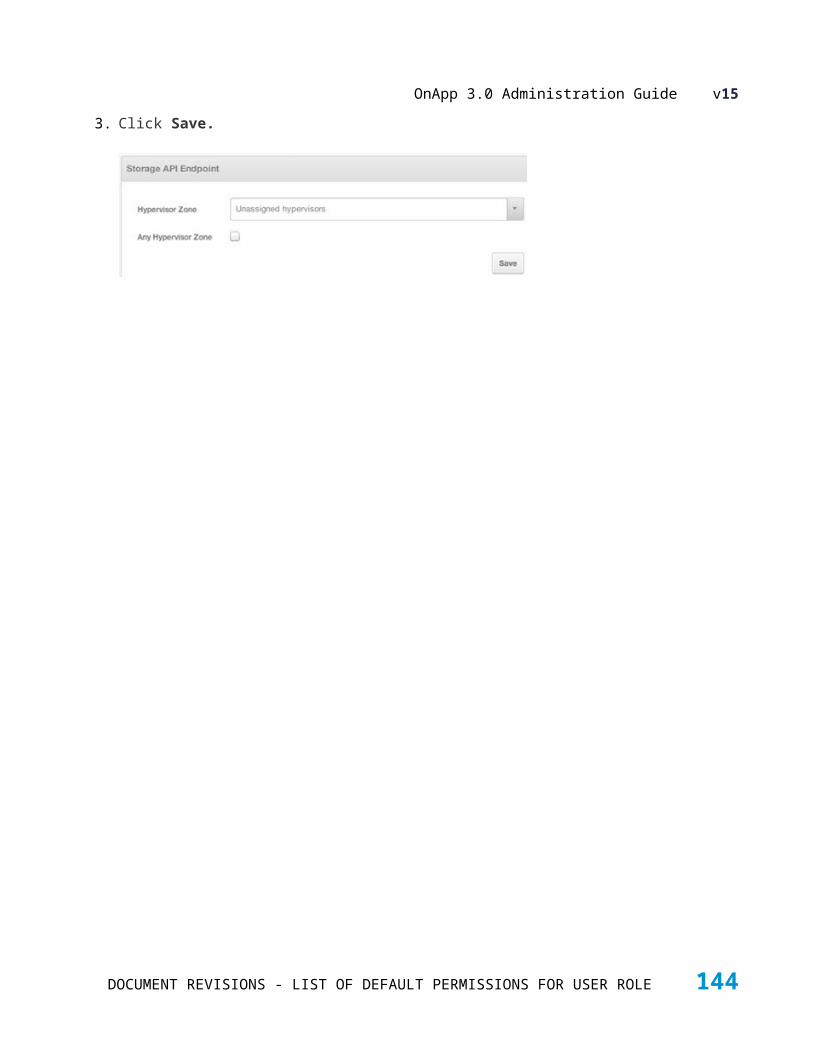
OnApp 3.0 Administration Guide v15
Advanced detailsClick the Advanced details tab to view advanced details of an HTTP CDN resource. The screen that appears will provide you with the following information:
Publisher name - name of the user who created the CDN Resource record
IP Access Policy - access policy from a range of IP addresses: either NONE (disabled), ALLOWED BY DEFAULT or DISABLED BY DEFAULT
Country Access Policy - access policy to the CDN resource's content for specified countries: either NONE (disabled), ALLOWED BY DEFAULT or DISABLED BY DEFAULT
Url Signing - whether access requires URL signing or not
Hotlink Policy - whether hotlink policy is enabled or not
Password On - whether the password is enabled or not
Cache Expiry - cache expiry time in minutes
MP4 Pseudo Streaming - whether the MP4 pseudo streaming is enabled or not
FLV Pseudo Streaming - whether the FLV pseudo streaming is enabled or not
Ignore Set-Cookie - whether content caching with SetCookie response headers is enabled or not
Limit rate
Limit rate after
Proxy cache key
Proxy read time out
Proxy connect time out
Nginx Settings:
o Limit rate - sets speed limit of a response to a client (per request) in KB/s. Maximum limit rate value - 2147483647 KB/s
o Limit rate after - sets the amount after which the speedof a response to a client will be limited in MB. Maximum limit rate after value -2147483647 KB
o Proxy cache key - key for caching
o Proxy read time out - proxy server response timeout in seconds. Maximum proxy read timeout value - 65535 seconds
o Proxy connect time out - timeout for establishing connection with proxy server in seconds. Maximum proxy connect time out value - 75 seconds.
Block search engine crawlers - whether search engine crawlers are blocked from indexing the CDN content or not (for HTTP Pull CDN resources only)
DOCUMENT REVISIONS - LIST OF DEFAULT PERMISSIONS FOR USER ROLE 144
OnApp 3.0 Administration Guide v15
Upload instructions (HTTP Push only)Click the Instructions tab to view the instructions for uploading files and embedding video from HTTP Push CDN resources.
Prefetch/Purge CDN content (HTTP Pull only)To prefetch or purge the resource content of the HTTP Pull CDN resource, click the required tab respectively.
View CDN resource billing statisticsTo view the resource billing statistics, click the Billing Statistics tab.
14.4.2.2 View VoD CDN Resource DetailsTo view details of a video on demand CDN resource:
1. Go to your Control Panel's CDN Resources menu.
2. Click the CDN hostname of a required VOD CDN resource.
3. On the page that appears you will see basic resource settings:
CDN Resource detailso Owner
o CDN hostname
o Resource type - VOD Push or VOD Pull
o SSL on - whether SSL is enabled for the resource or not
o CDN reference – the ID of the resource in database
o Resource status – shows the resource status.
Origins (VOD Pull only)
o Path of the content that will be served from the CDN.
DNS settingso CNAME for the CDN Hostname which is used to view the contents.
Uploaded files (VOD Push only)
DOCUMENT REVISIONS - LIST OF DEFAULT PERMISSIONS FOR USER ROLE 145
OnApp 3.0 Administration Guide v15
o A list of uploaded files. Click the file name to preview the video file.
Edge Groupso Shows to which Edge groups the resource is assigned.
Last 24 hours costo Cost of the resource for the last 24 hours.
Advanced detailsClick the Advanced details tab to view advanced details of a VOD CDN resource. The screen that appears will provide you with the following information:
Publisher name - name of the user who created the CDN Resource record
Country Access Policy - access policy to the CDN resource's content for specified countries: either NONE (disabled), ALLOWED BY DEFAULT or DISABLED BY DEFAULT
Auto Leech Protection - whether anti leeching is enabled or not
Secure Wowza - whether secure Wowza token is enabled or not
Token for Edge/Flash player - whether token for Edge/Flash player is enabled or not
Upload instructionsClick the Instructions tab to view the instructions for uploading files and embedding video from Video On Demand CDN resources.
View CDN resource billing statisticsTo view the resource billing statistics, click the Billing Statistics tab.
14.4.2.3 View Live Streaming CDN Resource DetailsTo view details of a live streaming CDN resource:
1. Go to your Control Panel's CDN Resources menu.
2. Click the CDN Hostname of a required live streaming CDN resource.
3. On the page that appears you will see basic resource settings:
CDN Resource detailso Owner
o CDN hostname
o Resource type - Live Streaming
DOCUMENT REVISIONS - LIST OF DEFAULT PERMISSIONS FOR USER ROLE 146
OnApp 3.0 Administration Guide v15
o CDN Reference the ID of the resource in database
o Publishing Point - the publishing point type: external or internal
o Main Internal Publishing Location - main internal publishing point URL address
o Failover Internal Publishing Location - internal publishing point failover URL
o Resource status – shows the resource status
DNS settingso CNAME for the CDN Hostname which is used to view the contents.
Edge Groupso Shows to which Edge groups the resource is assigned.
Last 24 hours costo Cost of the resource for the last 24 hours.
Advanced SettingsClick the Advanced details tab to view advanced details of a Live Streaming CDN resource. The screen that appears will provide you with the following information:
1. Go to your Control Panel's CDN Resources menu.
2. Click a CDN Hostname.
3. On the screen that appears, click the Advanced Details tab.
4. This screen provides you with the following information:
o Publisher name - name of the user who created the CDN Resource record
o Country Access Policy - access policy to the CDN resource's content for specified countries: either NONE (disabled), ALLOWED BY DEFAULT or DISABLED BY DEFAULT
o Auto Leech Protection - whether anti leeching is enabled or not
o Secure Wowza - whether secure Wowza token is enabled or not
o Token for Edge/Flash player - whether token for Edge/Flash player is enabled or not
Upload instructionsClick the Instructions tab to view the instructions for uploading files and embedding video from Live Streaming CDN resources.
DOCUMENT REVISIONS - LIST OF DEFAULT PERMISSIONS FOR USER ROLE 147
OnApp 3.0 Administration Guide v15
View CDN resource billing statisticsTo view the resource billing statistics, click the Billing Statistics tab.
14.4.3 Create HTTP CDN ResourceTo add an HTTP CDN resource:
1. Go to your Control Panel’s CDN Resources menu.
2. Click New CDN Resource button at the bottom of the screen.
3. On the screen that appears, select the type of CDN resource you want to create: HTTP, and click the required button
4. Fill in the following fields:
CDN Resource Propertieso CDN hostname – the hostname from where you will serve static content.
E.g. if your site (origin) is onapp.com, and you want to serve static content from the CDN and make it available at static.onapp.com, then static.onapp.com would be the CDN hostname.
o Content origin – specify the content origin type (PULL or PUSH)
Then:
o If you have selected the PULL type, specify the origin.
o If you have selected the PUSH type, specify the FTP password. It can consist of 6-32 alphanumeric characters.
Enable SSL
Tick this checkbox to enable the secure socket protocol for your CDN resource.
If the SSL protocol is enabled, you can only have up to fourth-level domain names.
If the CDN hostname ends with '.r.worldssl.net', SSL will be enabled automatically.
Advanced SettingsMove this slider to the right to configure the following advanced settings:
DOCUMENT REVISIONS - LIST OF DEFAULT PERMISSIONS FOR USER ROLE 148
OnApp 3.0 Administration Guide v15
Secondary CDN HostnamesSubmit secondary hostnames apart from the default one for HTTP based CDN sites. With this configured, users will be able to access the CDN site using secondary CDN hostname(s). You can add up to 7 secondary CDN hostnames to your CDN resource.
To be able to use a secondary hostname for the CDN resource with SSL enabled, you require an SSL certificate for your custom hostname. For help with questions about the SSL certificate purchase, please contact OnApp support.
IP AccessConfigure a rule to enable/disable access to the CDN resource’s content for a range of IP addresses.
o Access Policy – select Disabled to switch off a rule; otherwise choose between Allow by default/Block by default.
o Except for IP Addresses – input IP address(es) to which the access policy won’t be applied.
Country AccessConfigure a rule to enable/disable access to the CDN resource’s content for specified countries.
o Access Policy – select Disabled to switch off a rule; otherwise choose between Allow by default/Block by default.
o Except for Countries – select countries to which the access policy won’t be applied. To select more than one country, hold Ctrl during selection.
Hotlink Policyo Hotlink Policy – select Disabled to switch off a hotlink policy; otherwise choose between
Allow by default/Block by default.
o Except for domains – specify domains to which the hotlink policy won’t be applied
URL SigningProtect your files from unauthorized access with a key. A signed URL looks like `http://example.com/filename?hash=DMF1ucDxtqgxwYQ==`.
o Enable URL Signing – tick this checkbox to enable it.
DOCUMENT REVISIONS - LIST OF DEFAULT PERMISSIONS FOR USER ROLE 149

OnApp 3.0 Administration Guide v15
o URL Signing Key – input the key which will be used for URL signing. The secret key is similar to a password and can contain a minimum of 6 to a maximum of 32 characters. Symbols and spaces are not allowed.
You can also specify the expiration time, that is the time when this URL becomes invalid. The time is passed in the URL itself in a Unix timestamp format and takes part in hash generation.
Here is the example PHP script used to generate the hash key:
/** * Create hash link CDN resource * * @param string $cdnResourceUrl * The CDN resource URL, eg cdn.yourdomain.com * @param string $filePath * File path of the CDN resource * @param string $secretKey * The secret key that is obtained from CDN resource property * @param int $expiryTimestamp [optional] * UNIX timestamp format, specify how long the hash link is accessible to the public * By default will be accessible forever. * * @return string URL with generated hash link * URL with designated format to access the resource * * Example: * Generate hash link for resource www.example.com/images/photo.png for next 3 days, assume today is Sun, 01 Apr 2012. * * <?php * $hashLink = generateHashLink('www.example.com', '/images/photo.png', 'l33tf0olol', 1333497600); * * print $hashLink; * ?> * http://www.example.com/images/photo.png?secure=kaGd_cu6Iy4LDgfX3jy5Rw==,1333497600 * . */ function generateHashLink($cdnResourceUrl, $filePath, $secretKey, $expiryTimestamp = NULL){
// NOTE [yasir 20110331] + and ? are some of
DOCUMENT REVISIONS - LIST OF DEFAULT PERMISSIONS FOR USER ROLE 150

OnApp 3.0 Administration Guide v15
represented chars of based64 encoding (8 bits) // + is 62 and / is 63 . and These char should be replaced by other predefined chars. $searchChars = array('+','/'); $replaceChars = array('-', '_');
if($filePath[0] != '/'){ $filePath = "/{$filePath}"; }
if($pos = strpos($filePath, '?')){ $filePath = substr($filePath, 0, $pos); }
$hashStr = $filePath.$secretKey;
if($expiryTimestamp){ $hashStr = $expiryTimestamp.$hashStr; $expiryTimestamp = ",{$expiryTimestamp}"; }
return "http://{$cdnResourceUrl}{$filePath}?secure=". str_replace($searchChars, $replaceChars, base64_encode(md5($hashStr, TRUE))). $expiryTimestamp; }
Cache expiryo Cache expiry – set the cache expiry time in minutes.
Passwordo Enable Password – tick this checkbox to restrict access to the resource (cdn hostname).
o Unauthorized HTML – input the text which will be displayed for unauthorized login.
o Username – input username.
o Password – input password for the user.
To remove a user, clear both fields.
DOCUMENT REVISIONS - LIST OF DEFAULT PERMISSIONS FOR USER ROLE 151
OnApp 3.0 Administration Guide v15
Pseudo Streamingo Enable MP4 pseudo streaming – tick this checkbox to enable the pseudo streaming
support for MP4 file type.
o Enable FLV pseudo streaming – tick this checkbox to enable pseudo streaming for FVL file type, respectively.
With pseudo streaming enabled, your viewers can seek around a video even if it has not finished downloading. A Flash player and a video prepared are required for pseudo-streaming.
Ignore set cookie - tick this checkbox to enable caching content with Set-Cookie response headers.
Nginx Settingso Limit rate - sets speed limit of a response to a client (per request) in KB/s. Maximum
limit rate value - 2147483647 KB/s
o Limit rate after - the amount after which the speed of a response to a client will be limited in KB. Maximum limit rate after value -2147483647 KB
o Proxy read time out - proxy server response timeout in seconds. Maximum proxy read timeout value - 65535 seconds
o Proxy connect time out - timeout for establishing connection with proxy server in seconds. Maximum proxy connect time out value - 75 seconds.
o Proxy cache key - key for caching. Select one of 4 supported types from the drop down list:
$host$request_uri
$host$uri
$proxy_host$request_uri
$proxy_host$uri
Search Engine Crawlerso Block search engine crawlers - tick this checkbox to block web crawling bots from
indexing the CDN content (for HTTP Pull CDN resources only).
Edge Groups
DOCUMENT REVISIONS - LIST OF DEFAULT PERMISSIONS FOR USER ROLE 152

OnApp 3.0 Administration Guide v15
Tick the box next to the group(s) which will share the resource added. Available groups depend on the assigned billing plan limits.
The map displays own, subscribed and available CDN resources:
Map legend:
5. Click the Create CDN Resource button.
DOCUMENT REVISIONS - LIST OF DEFAULT PERMISSIONS FOR USER ROLE 153

OnApp 3.0 Administration Guide v15
14.4.4 Create Video On Demand CDN ResourceTo add a video on demand CDN resource:
1. Go to your Control Panel’s CDN Resources menu.
2. Click New CDN Resource button at the bottom of the screen.
3. On the screen that appears, select the type of CDN resource you want to create: VoD, and click the required button
4. Fill in the following fields:
CDN Resource Propertieso CDN hostname – specify the name which will serve as a label only
o Content origin – specify the content origin type
Then:
o If you have selected the PULL type, specify the origin.
o If you have selected the PUSH type, specify the FTP password.
Advanced SettingsMove this slider to the right to configure the following advanced settings:
Anti LeechConfigure anti leech properties to protect your content from unauthorized leeching. (Additional setup is required).
o Auto leech protection - select the Disabled option to switch off anti leech security or Block by default to protect your streams from unauthorized leeching. If the auto leech protection is set to block by default, fill in the Allowed domains field to specify the domains to which the anti-leeching policy won’t be applied.
Country AccessConfigure a rule to enable/disable access to the CDN resource’s content for specified countries.
o Access Policy – select Disabled to switch off a rule; otherwise choose between Allow by default/Block by default. If the access policy is set to block by default, fill in the Except for Countries field to specify countries to which the access policy won’t be applied. To select more than one country, hold Ctrl during selection.
DOCUMENT REVISIONS - LIST OF DEFAULT PERMISSIONS FOR USER ROLE 154

OnApp 3.0 Administration Guide v15
Secure Wowzao Enable secure Wowza – tick the box to protect your stream with Wowza secure token .
o Token for Edge/Flash player – specify the token authentication code. The authentication code will be then saved on the edge server. The token at the player side and the token at the edge server must match in order to make the video available.
Edge GroupsTick the box next to the group(s) which will share the resource added. Available groups depend on the assigned billing plan limits.
The map displays own, subscribed and available CDN resources:
Map legend:
DOCUMENT REVISIONS - LIST OF DEFAULT PERMISSIONS FOR USER ROLE 155

OnApp 3.0 Administration Guide v15
5. Click the Create CDN Resource button.
Only mp4 and flv files are currently supported.
14.4.5 Create Live Streaming CDN ResourceTo add a live streaming CDN resource:
1. Go to your Control Panel’s CDN Resources menu.
2. Click New CDN Resource button at the bottom of the screen.
3. On the screen that appears, select the type of CDN resource you want to create: Live Streaming, and click the required button
4. Fill in the following fields:
CDN Resource Propertieso CDN hostname – specify the name which will serve as a label only
o Publishing point – specify the resource's publishing point settings - Internal or External. The internal publishing point is one of your storage servers. The external publishing point is simply an URL.After you have selected the publishing point type, specify its setings:
External Publishing Point: External publishing location - specify your publishing point's URL as an RTMP
protocol. For example, rtmp://domain.com/xxx.
Failover external publishing location - specify the failover URL
Internal Publishing Point: Internal publishing location - select any of your edge servers from the drop-down
menu
Failover internal publishing location - specify the failover edge server
DOCUMENT REVISIONS - LIST OF DEFAULT PERMISSIONS FOR USER ROLE 156

OnApp 3.0 Administration Guide v15
Advanced SettingsMove this slider to the right to configure the following advanced settings:
Anti LeechConfigure anti leech properties to protect your content from unauthorized leeching. (Additional setup is required)..
o Auto leech protection - select the Disabled option to switch off anti leech security or Block by default to protect your streams from unauthorized leeching. If the auto leech protection is set to block by default, fill in the Allowed domains field to specify the domains to which the anti-leeching policy won’t be applied.
Country AccessConfigure a rule to enable/disable access to the CDN resource’s content for specified countries.
o Access Policy – select Disabled to switch off a rule; otherwise choose between Allow by default/Block by default. If the access policy is set to block by default, fill in the Except for Countries field to specify countries to which the access policy won’t be applied. To select more than one country, hold Ctrl during selection.
Secure Wowzao Enable secure Wowza – tick the box to protect your stream with Wowza secure token.
o Token for Edge/Flash player – specify the token authentication code. The authentication code will be then saved on the edge server. The token at the player side and the token at the edge server must match in order to make the video available.
Edge GroupsTick the box next to the group(s) which will share the resource added. Available groups depend on the assigned billing plan limits.
The map displays own, subscribed and available CDN resources:
DOCUMENT REVISIONS - LIST OF DEFAULT PERMISSIONS FOR USER ROLE 157

OnApp 3.0 Administration Guide v15
Map legend:
5. Click the Create CDN Resource button.
14.4.6 Edit CDN ResourceTo edit a CDN Resource:
1. Go to your Control Panel's CDN Resources menu.
2. Click the Edit icon next to a resource.
DOCUMENT REVISIONS - LIST OF DEFAULT PERMISSIONS FOR USER ROLE 158
OnApp 3.0 Administration Guide v15
3. On the screen that appears you can edit all CDN resource parameters (see the Create HTTP CDN Resource section for details).
4. Click the Apply changes button to finish.
14.4.7 Bandwidth StatisticsTo see the bandwidth statistics/graphs for CDN resources:
1. Go to your Control Panel's CDN Resources menu and then click the Bandwidth statistics tab.
2. Select type of filter – either GB or Mbits/s.
3. Specify the period in the From and To fields.
4. Select a resource or location for which the statistics will be generated.
5. Click the Apply button.
The statistics are displayed in two graphs: Cached and Non Cached.To zoom into a time period, click and drag in a chart. Click the Show all button to zoom out again.
You can also zoom into a time period drag the chart by holding down the left mouse button and moving the mouse on the calendar at the bottom of the screen. Click the Reset Zoom button to zoom out again.
DOCUMENT REVISIONS - LIST OF DEFAULT PERMISSIONS FOR USER ROLE 159
OnApp 3.0 Administration Guide v15
14.4.8 Stream StatisticsThe CDN streaming statistics screene shows the concurrent viewers report for your CDN streaming sites.
To view the statistics/graphs for your CDN streaming sites:
1. Go to your Control Panel's CDN Resources menu.
2. Click the Streaming statistics tab.
3. Specify the period in the From and To fields.
4. Select type of filter – either by resources or by locations
DOCUMENT REVISIONS - LIST OF DEFAULT PERMISSIONS FOR USER ROLE 160

OnApp 3.0 Administration Guide v15
5. Click the Apply button.
To zoom into a time period drag the chart by holding down the left mouse button and moving the mouse. Click the Reset Zoom button to zoom out again.
14.4.9 Prefetch ContentThis tool allows to pre-populate content of an HTTP Pull CDN resource to the CDN. Recommended only for files which are especially large.
To prefetch the content:
1. Go to your Control Panel's CDN Resources menu.
2. Click the required resource link.
3. On the page that appears, click the Prefetch tab.
DOCUMENT REVISIONS - LIST OF DEFAULT PERMISSIONS FOR USER ROLE 161

OnApp 3.0 Administration Guide v15
4. In the input field, specify paths on the CDN Resource to prefetch ( one per line). You may indicate only one path per line.
5. Click the Prefetch button to finish.
PLEASE NOTE: You can only prefetch content of HTTP Pull CDN resources.
14.4.10 Purge ContentThis tool allows instant removal of HTTP Pull cache content in the CDN, if newly updated content has not been properly replicated.
To purge content:
1. Go to CDN Resources menu.
2. Click the required resource link.
3. On the page that appears, click the Purge tab.
4. In the input field, specify paths on the CDN Resource to purge ( one per line). You may indicate only one path per line.
5. Click the Purge button to finish.
Then click the Purge All Contents of this Site button to purge all content.
PLEASE NOTE: You can only purge content of HTTP Pull CDN resources.
14.4.11 Billing StatisticsOnApp has a record of all the charges applied to your CDN resources. You can view the resource statistics under the statistics available, or those for a shorter period by setting a Start and End time.
To view billing statistics for a CDN resource:
1. Go to your Control Panel's CDN Resources menu.
2. Click the label of the resource you're interested in and then click the Billing Statistics tab.
3. Set Start and End time.
4. Move the Show in my Timezone slider to the right to show bandwidth statistics according to your profile's timezone settings.
DOCUMENT REVISIONS - LIST OF DEFAULT PERMISSIONS FOR USER ROLE 162

OnApp 3.0 Administration Guide v15
5. Press the Apply button.
6. On the screen that appears, you will see the following billing statistics details:
Date – particular date and time for the generated statistics
Edge Group - the edge group to which the CDN resource belongs to.
Traffic - resource traffic in MB.
Cost – the total due for the CDN resource at the point of time specified in the Date column.
Scroll down to see Total Amount (the total due for the whole billing statistics period).
14.5 CDN Edge GroupsCDN edge groups are groups of edge servers – your own, and those you subscribe to from the CDN marketplace. They are usually grouped by location, so they represent a pool of servers for a given geographical area. Once you have created an edge group containing edge servers in specific locations, you can then assign the group (or groups) to a specific CDN resource.The CDN edge groups menu enables you to see available edge server locations and form them into CDN Edge groups.
DOCUMENT REVISIONS - LIST OF DEFAULT PERMISSIONS FOR USER ROLE 163

OnApp 3.0 Administration Guide v15
You need to associate CDN Edge groups with billing plans to make them available for users.
14.5.1 View CDN Edge Group DetailsTo see details of a CDN Edge Group:
1. Go to your Control Panel's Users and Groups menu.
2. Select the CDN Edge Groups tab.
3. Click the label of the edge group you want to see.
4. On the screen that appears you will see the list of assigned locations and available locations with the following information:
o ID – the ID of a location
o City – the city the edge server is in.
o Country – the country the edge server is in.
o Operator – name of the edge server owner.
o Type - HTTP or streaming
o Source – either Marketplace (locations added from the CDN marketplace) or your Own Edge servers (servers added by you).
o Price – price per GB transferred.
14.5.2 Create CDN Edge GroupThere are two ways of creating a CDN edge group:
1. Using a CDN setup wizard
2. Creating the edge group under the Users and Groups menu
To create a new CDN Edge Group using a Users and Groups menu:
1. Go to your Control Panel's Users and Groups menu.
2. Select the CDN Edge Groups tab.
3. On the screen that appears, you will see existing groups with the number of assigned locations and associated billing plans.
4. Click the Create Edge Group button.
DOCUMENT REVISIONS - LIST OF DEFAULT PERMISSIONS FOR USER ROLE 164

OnApp 3.0 Administration Guide v15
5. On the screen that appears, give your new group a label and click the Create Edge Group button.
6. You will be redirected to the screen where you can assign locations to the group.
For details on CDN setup wizard, refer to CDN wizard section.
14.5.3 Edit/Delete CDN Edge GroupTo edit the name of a CDN Edge Group, or delete a group:
1. Go to your Control Panel's Users and Groups menu.
2. Select the CDN Edge Groups tab.
3. On the screen that appears you will see the list of existing groups:
To edit the group's label, click the Actions button, then click Edit. To delete the group, click the Actions icon, then click Delete.
14.5.4 Assign/Remove CDN Edge Group Locations1. Go to your Control Panel's Users and Groups menu.
2. Select the CDN Edge Groups tab.
3. Click the label of the CDN Edge Group you want to configure.
4. On the screen that appears you may assign or remove locations by clicking the Actions button next to the required location.
14.6 CDN Upload InstructionsHere is the list of instructions for uploading files and embedding video to CDN resources. Follow the step-by-step instructions below to upload files or embed video to the required CDN resource type.
14.6.1 HTTP Push CDN ResourceTo upload files to the HTTP Push CDN resource:
1. Connect to the FTP origin using an FTP client. For example, a browser plugin like FireFTP or FTP software like FileZilla.
2. Please wait up to 10 minutes until the FTP server configures with the HTTP resource.
3. Specify the following FTP details are:
DOCUMENT REVISIONS - LIST OF DEFAULT PERMISSIONS FOR USER ROLE 165

OnApp 3.0 Administration Guide v15
o Hostname: 575896514.origin.cdn.qaonapp.net
o Username: 575896514
o Password: The FTP password set at CDN resource creation.
4. Upload your files .
14.6.2 VOD Pull CDN ResourceTo upload files to the HTTP Push CDN resource:
Enter the following script into your webpage:
NOTE: 1234/ must prefix the path with "<resource_id>, it is ONLY applicable to VOD PULL playback.
<html> <head> <script src="http://video.customercdn.com/player.js"> type="text/javascript"></script></head><body> <div id="my-video-player" height=640 width=360 /> <script type="text/javascript"> CDNPlayer("my-video-player",1234, "1234/mystream.mp4"); </script></body></html>
Our easy video embed script automatically detects the browser type (Desktop or Mobile device) and loads the appropriate player. Currently, this is either Flow Player or the browser’s native HTML5 player. The streaming protocol is also set appropriately.
14.6.3 VOD Push CDN ResourceTo upload files to the VOD Push CDN resource:
DOCUMENT REVISIONS - LIST OF DEFAULT PERMISSIONS FOR USER ROLE 166
OnApp 3.0 Administration Guide v15
This is an instruction template. Replace “6789” with the resource id, and “customercdn.com” with the operator’s domain.
1. Connect to the FTP origing using an FTP client. For example, a browser plugin like FireFTP, or FTP software like FileZilla.
2. Please allow up to 10 minutes for the FTP server to be configured with the VOD resource.
3. Specify the FTP details:
o Hostname: 6789.origin.customercdn.com
o Username: 6789
o Password: the password set at creation
4. Upload your files.
5. Enter the following script into your webpage:
<html> <head> <script src="http://video.customercdn.com/player.js"> type="text/javascript"></script></head><body> <div id="my-video-player" height=640 width=360 /> <script type="text/javascript"> CDNPlayer("my-video-player",1234, "1234/mystream.mp4"); </script></body></html>
NOTE: 1234/ must prefix the path with "<resource_id>, it is ONLY applicable to VOD PULL playback.
DOCUMENT REVISIONS - LIST OF DEFAULT PERMISSIONS FOR USER ROLE 167
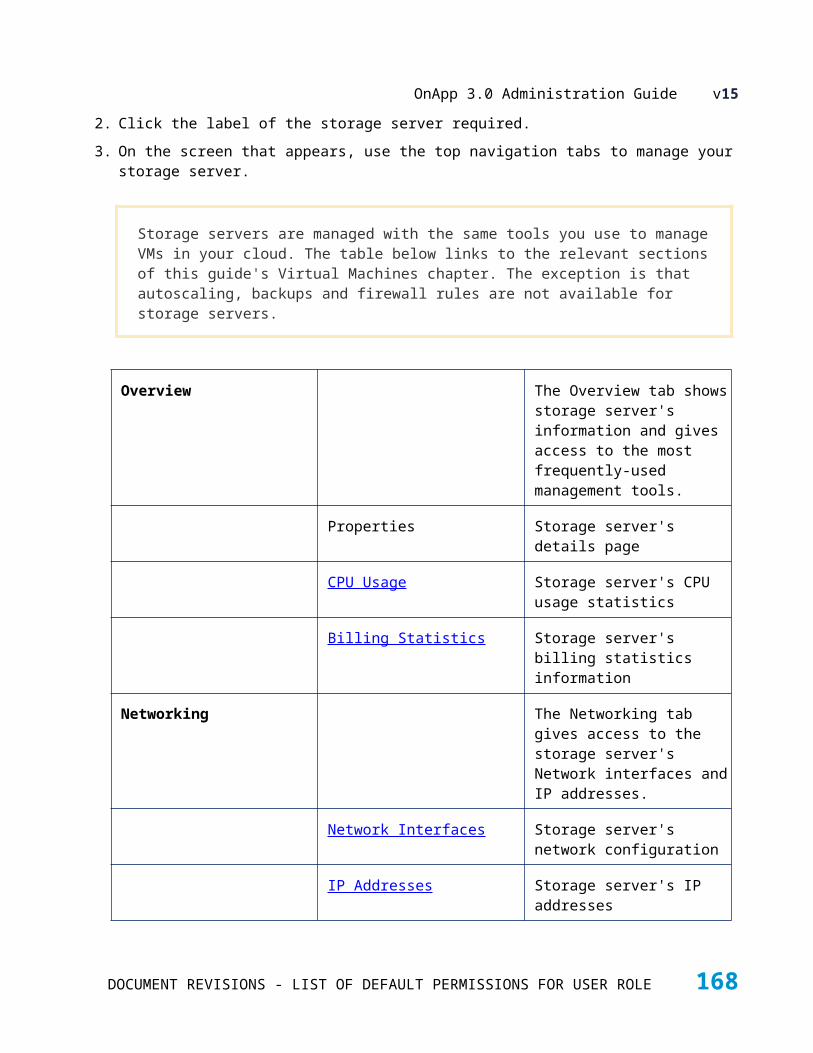
OnApp 3.0 Administration Guide v15
This is an instruction template. Replace “1234” with the resource id, “customercdn.com” with the operator’s domain, and “mystream.mp4” with the filename or stream name.
Our easy video embed script automatically detects the browser type (Desktop or Mobile device) and loads the appropriate player. Currently, this is either Flow Player or the browser’s native HTML5 player. The streaming protocol is also set appropriately.
14.6.4 Live Streaming CDN Resource1. Before you start, make sure your publishing point settings meet the following requirements (to
be able to retrieve with the Silverlight Player):
o h.264 Baseline 3
o AAC or MP3-stereo-44100Hz audio
o 2 seconds key frame frequency
o lower bitrate
2. Install and configure the Adobe Live media encoder:
This is an instruction template. Replace “1234” with the resource id, and “customercdn.com” with the operator’s domain.
a. Install Adobe Live Encoder.
b. Once the Adobe Live Encoder is installed, run the application and move on to the next step.
c. Complete the form:
FMS URL: rtmp://1234.publishstream.customercdn.com/P1234
DOCUMENT REVISIONS - LIST OF DEFAULT PERMISSIONS FOR USER ROLE 168
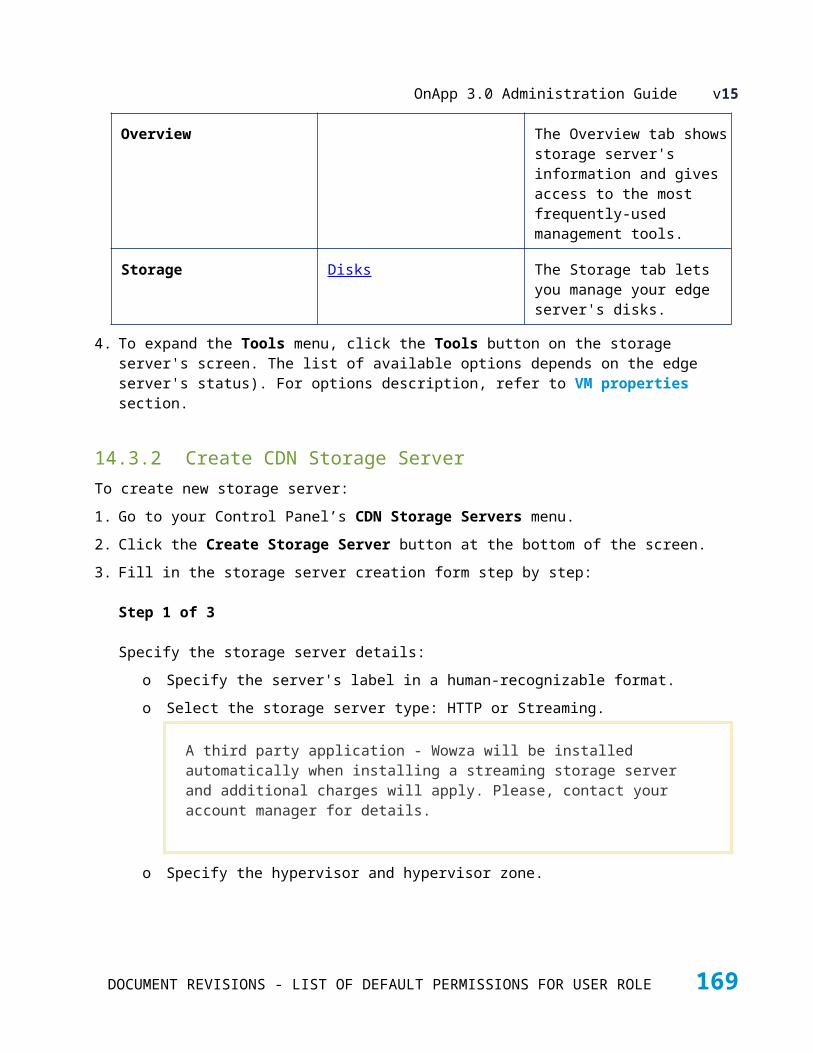
OnApp 3.0 Administration Guide v15
Backup URL: rtmp://backup.1234.publishstream.customercdn.com/P1234
Stream: your stream name
d. Press Connect.e. In the password pop up window, enter “P1234” as the username and the resource
secret key for the password.
f. Press Start to start publishing the live stream.
3. Enter the following script into your webpage to embed video to the Live Streaming CDN resource:
Our easy video embed script automatically detects the browser type (Desktop or Mobile device) and loads the appropriate player. Currently, this is either Flow Player or the browser’s native HTML5 player. The streaming protocol is also set appropriately.
DOCUMENT REVISIONS - LIST OF DEFAULT PERMISSIONS FOR USER ROLE 169

OnApp 3.0 Administration Guide v15
<html> <head> <script src="http://video.cdn.qaonapp.net/player.js"> type="text/javascript"></script> </head> <body> <div id="my-video-player" height=640 width=360 /> <script type="text/javascript"> CDNPlayer("my-video-player", 726128906, "mystream" ); </script> </body></html>
4. Publishing Instructions
We support a variety of methods to get the CDN URL to use in your player. SMIL
http://video.cdn.qaonapp.net/726128906/mystream.smil The SMIL playlist provides an RTMP URL and should be used with Flash-based players only. Longtail Player and Flow Player are compatible with SMIL redirection. Apple HTTP Live Streaming
http://video.cdn.qaonapp.net/726128906/mystream.m3u8 This returns a 302 redirect to a Apple HLS manifest and should be used with Apple HLS-compatible players only. Adobe HTTP Dynamic Streaming
http://video.cdn.qaonapp.net/726128906/mystream.f4m This returns an Adobe HDS manifest and should be used with Adobe HDS-compatible players only. Microsoft Smooth Streaming (Silverlight)
http://video.cdn.qaonapp.net/726128906/mystream.ism This returns a 302 redirect to Smooth Streaming manifest and should be used with Smooth Streaming-compatible players only. Javascript JSONP
DOCUMENT REVISIONS - LIST OF DEFAULT PERMISSIONS FOR USER ROLE 170
OnApp 3.0 Administration Guide v15
http://video.cdn.qaonapp.net/726128906/mystream.jsonp?callback=MyCallBack This returns a JSONP document, embeddable using <script>
An example of a callback with a successful result: MyCallBack({ “rtmp”: “rtmp://609821627.e.726128906.r.cdn.qaonapp.net/726128906/mystream”, “rtmpe”: “rtmp://609821627.e.726128906.r.cdn.qaonapp.net/726128906/mystream”, “apple”: “http://609821627.e.726128906.r.cdn.qaonapp.net/726128906/mystream/playlist.m3u8”, “adobe”: “http://609821627.e.726128906.r.cdn.qaonapp.net/726128906/mystream/manifest.f4m”, “rtsp”: “rtsp://609821627.e.726128906.r.cdn.qaonapp.net/726128906/mystream”, “silverlight”: “http://609821627.e.726128906.r.cdn.qaonapp.net/726128906/mystream/Manifest” }); An example with an error: MyCallBack({ “error”: “File not found” }); Javascript JSON
http://video.cdn.qaonapp.net/726128906/mystream.json This returns a JSON document. Cross-origin resource sharing is enabled to allow XMLHttpRequest from any domains.
An example of a callback with a successful result: { “rtmp”: “rtmp://609821627.e.726128906.r.cdn.qaonapp.net/726128906/mystream”, “rtmpe”: “rtmp://609821627.e.726128906.r.cdn.qaonapp.net/726128906/mystream”, “apple”: “http://609821627.e.726128906.r.cdn.qaonapp.net/726128906/mystream/playlist.m3u8”, “adobe”: “http://609821627.e.726128906.r.cdn.qaonapp.net/726128906/mystream/manifest.f4m”, “rtsp”: “rtsp://609821627.e.726128906.r.cdn.qaonapp.net/726128906/mystream”, “silverlight”: “http://609821627.e.726128906.r.cdn.qaonapp.net/726128906/mystream/Manifest” } An example of a callback with a JSON document with an error thrown: { “error”: “File not found” }
DOCUMENT REVISIONS - LIST OF DEFAULT PERMISSIONS FOR USER ROLE 171

OnApp 3.0 Administration Guide v15
15 VMWARE
VMware is a virtualization technology available for integration into OnApp 3.0. Use of the VMware vSphere 5 virtualization platform allows to build a virtualized cloud infrastructure utilizing the highest standards of reliability and performance.
OnApp Cloud integration with VMware allows to run and manage VMware ESXi hypervisors alongside with Xen and KVM hypervisors using the OnApp Control Panel.
When OnApp is used to control VMware, it operates in a different way that when it controls Xen or KVM: With Xen/KVM the control is made directly upon the hypervisors, while with VMware OnApp directly controls the VMware vCenter. This allows vCenter to control the VMs with the full range of VMware functionality including DRS and vMotion to ensure that the operation is optimal.
In OnApp all the ESXi hypervisors are displayed as a single combined hypervisor with a sum of the CPU, RAM and Disk resources rather than individual hypervisors.
The Hypervisor based firewalls that OnApp provides for Xen and KVM are not available in VMware and instead Vyatta Community Edition Firewalls replace that functionality. This is administered with the standard OnApp CP Firewall Interface on a VM basis.
OnApp VMware Features:
One NIC per VM
Customer VLANs (1 VLAN per each customer)
Customer networks
IP address pools
Firewalls
VMware hypervisors
VMware virtual machines
VMware data stores
OnApp supports the functionality specified in the VMware VSPP Standard model.
If you are looking to run VMware ESXi servers through OnApp then you will have to install and configure vCenter and Vyatta.
Please see the OnApp with VMware Installation guide for further details.
15.1 VMware Cloud RequirementsThe following are the requirements for VMware integration with OnApp Control Panel:
DOCUMENT REVISIONS - LIST OF DEFAULT PERMISSIONS FOR USER ROLE 172
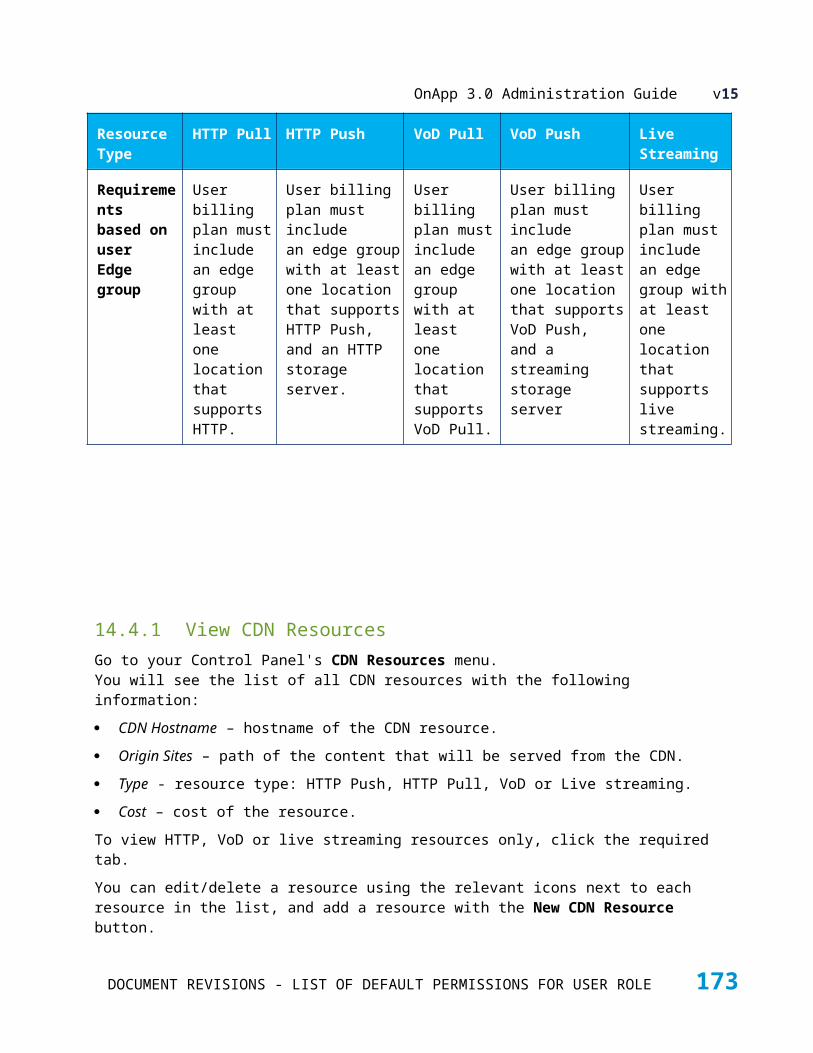
OnApp 3.0 Administration Guide v15
There must be a datacenter created via the vCenter, and the datacenter must have a cluster. The cluster name will be used in the OnApp configuration settings.
Your ESXi servers must be added to the cluster for CP.
At least one datastore on the ESXi servers is required that can be used to provision VMs. This datastore has to be accessible to all ESXi servers in the cluster. This is also the datastore’s name that will be used in CP.
The CP server need to have access to the vCenter and all of the ESXi servers in the cluster used by CP on the management network.
A Vyatta firewall, or pair, must be installed. These can be Physical or Virtual firewalls running on an attached network.
The OnApp Controller Server will communicate with vCenter and Vyatta over the OnApp management network. The Vyatta installation will also connect to the OnApp appliance network.
Before starting configuring VMware within the OnApp loud you need to ensure that your environment is suitable for OnApp integration with VMware. Firstly, we suggest you read this: Network roles in OnApp Cloud, using VMware.
There are two supported network configurations that can be used under VMware. For details, refer to the Recommended network configurations chapter of the Preparation guide.
To be able to configure VMware within the cloud, you need to install vCenter and Vyatta firewall externally. For more information, see Additional hardware considerations for VMware chapter of the Preparation guide.
OnApp displays the VMware cluster as a pool of resources rather than per hypervisor. Because of this there are certain functions that are unavailable in OnApp with VMware.
Migrate VM - VMware will use vMotion to ensure that the VMs are optimally placed on the Hypervisors.
Reboot Hypervisor - This type of action must be dealt with by an Administrator from the vCenter console. Likewise with putting a HV into maintenance mode.
NOTE:Under VMware backups utilise the VMware snapshot tools and are performed by simply locking the filesystem disk (vmdk) and creating a new VMware disk with the changes made alongside.So the backup procedure for virtual machines running under VMware looks like: vmdk + vmdk(1) + vmdk(#).
DOCUMENT REVISIONS - LIST OF DEFAULT PERMISSIONS FOR USER ROLE 173

OnApp 3.0 Administration Guide v15
A Vyatta firewall must be configured and available for the cloud before creating any virtual machine. As all customer virtual machines are organized into VLAN’s, with Vyatta acting as the VM gateway.
15.2
15.3 Using VMware without Vyatta firewall
Starting from the 3.0.7 version of the OnApp Cloud it is possible to use VMware with an external firewall instead of Vyatta.
The ability to use VMware without a firewall is designed to allow hosting providers to remove the Vyatta completely and route virtual machines to their gateway.
External firewall settings are set per hypervisor zone: you have to specify the default gateway and ID of the VLAN the gateway is located on during the hypervisor zone creation. This VLAN will be used for all virtual machines residing within the hypervisor zone. Each hypervisor zone can have different gateway and VLAN settings. Refer to the Create Hypervisor Zone section for details.
NOTE: OnApp will not control the external firewall performance. Make sure that your external firewall is configured properly before switching to the new scheme.
Despite customer VLANs and customer networks are not used with the external firewall, these settings should be configured normally as they will be required in case of reverting to Vyatta.
Switching to the default settingsYou can restore the default settings and revert to Vyatta by simply disabling the Default gateway and VLAN options for a hypervisor zone. The system will switch to Vyatta automatically and reconfigure all VM network settings.
15.4 LicensingOnApp Cloud v3.0 supports VMWare vSphere 5, with all standard OnApp functionality available in line with the VMware VSPP 'Standard' licensing model.
DOCUMENT REVISIONS - LIST OF DEFAULT PERMISSIONS FOR USER ROLE 174
OnApp 3.0 Administration Guide v15
15.5 VMware vCenter InstallationFollow these guidelines to install and configure the VMware vCenter:
1. Install the VMWare vCenter server by following VMware documentation instructions.
2. Create an administrator account on the vCenter server or use the default “administrator” account and specify login credentials.
3. Create a vCenter virtual datacenter.
4. On the datacenter, create a new cluster, turn on DRS and note the cluster name. Later, the cluster name will be used when you configure it as a hypervisor on OnApp CP.
5. Open the following ports on the vCenter:
o TCP/UDP 902
o TCP 443
o TCP 80
o TCP/UDP 5988-5989
For details, refer to the VMware documentation.
6. Install VMWare ESXi servers by following the VMware documentation instructions.
7. Add all ESXi servers to the cluster.
8. Attach all ESXi servers to the shared SAN storage. Remember the data store label. Later you’ll use this data store name when configuring a data store in CP.
9. Create a Distributed Switch.
10. Open the VNC ports on the ESXi host:
o Enable SSH service on the ESXi host. To do so:
o Enable SSH service on each ESXi host: Configuration > Service Properties > SSH > Options > Start
o SSH into each HV in turn and run the following commands:
wget http://downloads.repo.onapp.com/onapp-vmware-firewall-vnc-manage.shsh onapp-vmware-firewall-vnc-manage.sh
o Restart the ESXi server for changes to come into effect.
DOCUMENT REVISIONS - LIST OF DEFAULT PERMISSIONS FOR USER ROLE 175

OnApp 3.0 Administration Guide v15
11. Enable NTP on all ESXi server. For correct time synchronization, use the same NTP server for vCenter and CP.
12. Allow virtual machines to start and stop automatically with the system.
13. Make sure that OnApp CP has access to the ESX servers.
15.6 Vyatta InstallationVyatta InstallationIf running a virtual Vyatta on the vCenter you need to do some additional hypervisor configuration:
1. On each hypervisor, create three virtual machine port groups:
o eth0 - for public access
o eth1 - for Vyatta communication with CP
o eth2 - fne for VLAN communication with all virtual machines. Set VLAN to 4095 when creating a normal port group, or to 1-4094 trunk range when creating a Distributed Switch port group.
2. Create a new Vyatta instances on the vCenter with three network interfaces and attach on to each of the created port groups.
3. Install Vyatta v.6.4 or later from http://vyatta.org/ and install it by creating and booting the Vyatta LiveCD.
4. Login as user vyatta with password vyatta and run the "install image" command.
5. Remove the LiveCD.
6. Reboot system.
7. Log in using the vyatta user credentials.
8. Run the following commands:
alter if not: eth0 = public interface eth1 = CP Communication interface eth2 = VLAN communication interfaceconfigureset service sshset service ssh allow-rootset interface ethernet eth0 address <OUTSIDEIPADDRESS/CIDR>set system gateway-address <OUTSIDEGATEWAYADDRESS>set interface ethernet eth1 address <COMMUNICATIONIPADDRESS/CIDR>set firewall state-policy established action acceptset firewall state-policy related action acceptset firewall state-policy invalid action drop
DOCUMENT REVISIONS - LIST OF DEFAULT PERMISSIONS FOR USER ROLE 176
OnApp 3.0 Administration Guide v15
set firewall state-policy invalid log enableset firewall name INSIDE_OUTset firewall name INSIDE_OUT default acceptset vpn ipsec ipsec-interfaces interface eth0set system login user vyatta authentication plaintext-password <NEWPASSWORD>commitsave
9. Configure the firewalls in Firewalls section.
15.7 Control Panel ConfigurationRead the steps described in this section carefully to get a common notion of the VMware configuration within the OnApp cloud.
VMware implementation comprises several new features implemented in the OnApp cloud.
Customer VLANS - VLANs are used to segment virtual network so that customer networks are isolated from one another as if they were on physically different segments. Each customer can have one VLAN with VMware VMs based on it. Configuring VLANs is essential, as it secures the network traffic and reduces the traffic overload.
Customer networks - customer networks are used to isolate VMware virtual machines from other customers' VMs via VLAN. All the customer network traffic is handled by Vyatta to ensure high level of data protection. For detail, see Customer Networks section of the Admin guide.
IP Address Pools - a range of IP addresses that you can associate with VLANs. You'll have to select an IP address pool during the customer network creation. See IP Address Pools section of the Admin guide for details.
Firewalls (Vyatta firewall is used to manage VLANs and route VMware VM networking traffic in and out of OnApp. Because all customer VMs are running inside customer networks, firewalls are required as the VM gateways. See Firewalls section of the Admin guide for details.
So, to configure the OnApp cloud with VMware, you have to configure Firewalls, create a VLAN to isolate your virtual machines, create an IP address pool and customer network. Aside from that, the rest of cloud configuration steps remains unchanged.
You must enable the Contol Panel server network access to the vCenter and each cluster. The configuration instructions depend on your setup.
CP ConfigurationTo configure VMware on CP:
DOCUMENT REVISIONS - LIST OF DEFAULT PERMISSIONS FOR USER ROLE 177
OnApp 3.0 Administration Guide v15
1. Create new VMware hypervisor in the Hypervisors settings. See the Create VMware hypervisor section of the Admin guide for details how to do that.The hypervisor will remain offline until all the configuration steps are complete.
2. Add a separate block of IPs to a network. Then, users will have to set up their routers so that this block is routed to the Vyatta's public IP.
3. Create new IP address pool. If the customer networks will use NAT, add private IP ranges to this IP pools section. If the custom networks will not use NAT, the public IP addresses added at step 2 should be added to this IP address pool.
4. Check that you have the Customer Networks and Customer VLANs permissions enabled (users with Admin role have full access by default).
5. Make sure you do not have hypervisor zone limitations in your billing plan.
6. Create new customer network for that user. Select the IP address pool you have created at step 2.
7. Create new data store zone.
8. Create new VMware datastore and assign it to data store zone.
9. Create a range of VLANs you want to use in the cloud.
10. Assign customer network, network and datastore to the VMware hypervisor you have created at step 1.
11. Specify the vCenter cluster name in the System Configuration settings.
12. In the Default Settings configuration, define the service account name that will be automatically created on all virtual machines to be able to communicate with them. OnApp/settings/edit#defaults
13. Create VMware VM templates by following the instructions in the Create Template for VMware Virtual Machine chapter.
You can also download and deploy a ready-made VMware template by following the instructions of the VMware Template Installation Guide. NOTE: That template is for testing purposes only!
14. Log in as this user you have created at step 4 and create a new VM in VMware.
DOCUMENT REVISIONS - LIST OF DEFAULT PERMISSIONS FOR USER ROLE 178

OnApp 3.0 Administration Guide v15
15.8 Create Template for VMware Virtual Machine
You can also dowload and deploy a ready-made VMware template by following the instructions of the VMware Template Installation Guide. NOTE: That template is for testing purposes only!
Linux Templates
SUDO installation is required for the VMware Linux templates.
1. Connect to vCenter
2. Create a virtual machine using a New Virtual Machine wizard.
3. Open VM settings and attach ISO with OS
4. Install OS on this VM (password should be Password1)
5. Install VMware tools inside the VM by following the VMware instructions. (This step is required!)
6. Make sure that the network service is enabled and the NetworkManager service is disabled before converting a CentOS/RHEL VM to template:
chkconfig NetworkManager --levels 2345 offchkconfig network --levels 2345 on
7. Select your VM > Template > Clone to Template8. After this, add the record manually to the OnApp templates table. For example:
id: 5label: CentOS 5created_at: 2012-06-18 13:32:06updated_at: 2012-06-18 13:32:06version: 1.0file_name: CentOSoperating_system: linuxoperating_system_distro: rhelallowed_swap: 0state: activechecksum: NULLallow_resize_without_reboot: NULLmin_disk_size: 25user_id: NULL
DOCUMENT REVISIONS - LIST OF DEFAULT PERMISSIONS FOR USER ROLE 179

OnApp 3.0 Administration Guide v15
template_size: NULLallowed_hot_migrate: 0operating_system_arch: NULLoperating_system_edition: NULLoperating_system_tail: NULLparent_template_id: NULLvirtualization: NULLmin_memory_size: NULLdisk_target_device: NULLcdn: 0backup_server_id: NULLext4: 0initial_password:password
Where file_name is the template's name.
NOTE: template file name (file_name) must match the letter case of a VMware template label in the vCenter.
Example for CentOS
insert into templates (id,label,created_at,updated_at,version,file_name,operating_system,operating_system_distro,allowed_swap,state,checksum, allow_resize_without_reboot,min_disk_size,template_size,allowed_hot_migrate,operating_system_arch,operating_system_edition,operating_system_tail,virtualization, min_memory_size,disk_target_device,cdn,backup_server_id,ext4,initial_password) values ('','CentOS 5.8 vmware','','','1.0','CentOSTemplate','linux','rhel','0','active','','0','10','0','1','','','','vmware','128','','0','','0','');
Example for Win2008 x64 STD R2
insert into templates (id,label,created_at,updated_at,version,file_name,operating_system,operating_system_distro,allowed_swap,state,checksum, allow_resize_without_reboot,min_disk_size,template_size,allowed_hot_migrate,operating_system_arch,operating_system_edition,operating_system_tail,virtualization, min_memory_size,disk_target_device,cdn,backup_server_id,ext4,initial_password) values ('','Windows 2008 Standard Edition R2 x64
DOCUMENT REVISIONS - LIST OF DEFAULT PERMISSIONS FOR USER ROLE 180
OnApp 3.0 Administration Guide v15
vmware','','','3.1','win2008R2Template','windows','2008','0','active','','0','20','13714564','1','x64','STD','R2','vmware','1024','','0','','0','');
DOCUMENT REVISIONS - LIST OF DEFAULT PERMISSIONS FOR USER ROLE 181

OnApp 3.0 Administration Guide v15
16 SOLIDFIRE INTEGRATION
Starting with version 3.0 OnApp is integrated with the SolidFire storage management system. With the Solid Fire integration it is possible to utilize the SF SAN directly within the OnApp cloud and manage the SolidFire cluster via the SolidFire API.
You can perform the following options with SolidFire:
Allocate dedicated LUNs from the SF cluster per virtual machne disk, when creating a VM. (LUN is created per each VM disk, with a separate lun per swap disk.)
Manage SolidFire LUNs automatically via API.
Create virtual machines without the swap disk.
Implement backups / snapshots using SF CloneVolume method.
To be able to utilize SolidFire in the cloud, you need to install the SolidFire storage system first.
There is a disk dependency between OnApp and SolidFire - when a new disk is created on the OnApp side, a new LUN is created automatically on the SF side, using the CreateVolume API call.
As the SolidFire data store has two interfaces (OnApp and SolidFire) you have to specify two IP addresses when creating a SolidFire Data Store.
To be able to use the SF volume, you have to enable export to this device (hypervisor or a data store). To do that, you need to send an account username and initiator password to the iscsi_ip address. You will be able to use this device after the authorization.
The following options are not available under SolidFire: It is not possible to migrate SolidFire disks, as SF virtualises the storage layer.
SolidFire does not support live disk resize. To resize disk, you need to shut down the virtual machine first and use the CloneVolume functionality to increase the disk size. After the disk resize operation is complete, the original volume will be replaced with the new one and deleted, after that the VM will be booted.
16.1 SolidFire Management Gather statistics
Statistics gathering is performed by the OnApp Usage collection system using the GetVolumeStats API call.
Create data store You can create one SolidFire data store per cloud that will represent the space available at the SolidFire side. Use GetLimits/GetClusterCapacity API calls to view data store size availability.
DOCUMENT REVISIONS - LIST OF DEFAULT PERMISSIONS FOR USER ROLE 182

OnApp 3.0 Administration Guide v15
Activate/deactivate disk All activation/deactivation operations should include automating the OpenISCSI Initiator on the HyperVisor activation/deactivation for the specific Volume.
Remove disk The Disk/LUN is removed with the DeleteVolume API call.
Backup disk Using the CloneVolume API call, with readOnly option, a snapshot is created which you can then mount on the backup server for backup processing. The clone is than taken down after the backup using DeleteVolume API call.
For more details, refer to the SolidFire API documentation.
16.2 SolidFire Quality of ServiceSolidFire provides a substantial QoS control for the effiicient performance in a cloud environment.
SolidFire data store zone has the following parameters:
Minimum IOPS (SF clusters with lower minimum IOPS will have lower priority when a system is overloaded)
Maximum IOPS
Burst IOPS
It is possible to cofigure the minimum IOPS resource properties as a minIOPS resource in the billing plan. The maximum IOPS and burst IOPS are static values that can differ per zone, thus providing tiered functionality.
For details how to change minIOPS settings, refer to the Set Billing Plan Prices And Resource Limits section of this guide.
For more details on Solid Fire management, refer to Solid Fire documentation.
SolidFire data store requires authorization for sending API requests from the CP to the SolidFire cluster (you will need to provide Cluster Admin authorization credentials when creating a SolidFire data store).
A Cluster Admin must be created on the SF side before creating a data store in the OnApp control panel.
DOCUMENT REVISIONS - LIST OF DEFAULT PERMISSIONS FOR USER ROLE 183

OnApp 3.0 Administration Guide v15
17 CUSTOMER NETWORKS
This is a VMware only feature in the OnApp 3.0 version.
Customer networks are used for isolation of customer’s virtual machines from other customers' VMs via VLAN. All the customer network traffic is handled by Vyatta to ensure high level of data protection.
You can assign either public or private IP addresses to your customer network.
If private IP pools are used for the customer networks, a public IP will be assigned to the network automatically. It will be used as a network address for Internet access from the virtual machine located inside the customer network. In this case, Vyatta firewall will be used to translate network addresses.
If a server in the customer network in this scenario requires port translation, for example a web or FTP server, then a new public IP will be assigned to NAT to the internal address.
If public IP addreses are used for the customer network these will route directly to the VMs (the same as our implementation of XEN and KVM). The only difference is that Vyatta will be used to route the traffic to the virtual machines located inside the customer network.
17.1 View/Edit/Delete Customer NetworksTo view the list of all customer networks:
1. Go to your Control Panel's Customer Networks menu:
a. Go to your Control Panel's Users and Groups menu.
b. Click the name of the required user.
c. On the screen that appears, click Customer Networks tab.
2. On the screen that appears, you'll see the list of all available customer networks.
3. To edit a customer network, click the Actions button next to the required network, then click Edit.
4. To delete a customer network, click the Actions button next to the required network, then click Delete.
DOCUMENT REVISIONS - LIST OF DEFAULT PERMISSIONS FOR USER ROLE 184
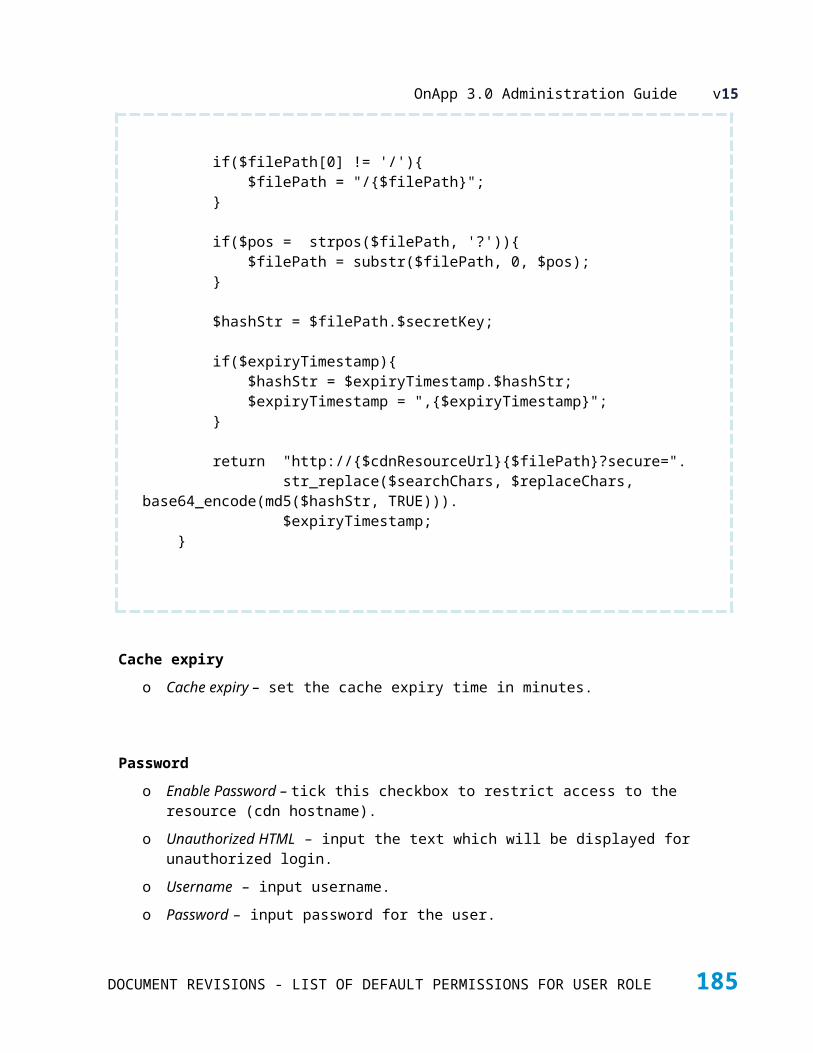
OnApp 3.0 Administration Guide v15
17.2 Create Customer NetworkTo create new customer network:
1. Go to your Control Panel's Customer Networks menu:
a. Go to your Control Panel's Users and Groups menu.
b. Click the name of the required user.
c. On the screen that appears, click Customer Networks tab.
2. On the screen that appears, click New Customer Network button or press "+".
3. Specify the following customer network details:
o Label
o IP address pool
o Prefix size (CIDR)
o Is nated - select this check box to use NAT for translating the traffic from Vyatta's single eternal IP to local customer network IPs . Leave this box unchecked if you are using your own firewall with external IP address.
4. Click Create Customer Network.
DOCUMENT REVISIONS - LIST OF DEFAULT PERMISSIONS FOR USER ROLE 185

OnApp 3.0 Administration Guide v15
18 USERS
OnApp provides very fine control over cloud users and what they're allowed to do. You can set up as many different types of user as you need, and customize their access to cloud resources and Control Panel functions as required.For example, standard, VIP and reseller users can have different capabilities and resource limits. You might provide basic cloud management functionality to L1 support staff (e.g. reboot virtual machines but not destroy them) while your L3 admins have full rights. Your development teams will probably need to deploy test VMs in the cloud just as a customer would, only without being charged for them. Meanwhile, your billing staff need a "billing only" view with no access to customer resources.This fine control is enabled by a combination of user accounts, roles and permissions and billing plans.
18.1 User AccountsThere are two types of accounts in OnApp: administrators and users. An administrator account is created automatically when OnApp is installed. Administrators have full access to the system, including managing virtual machines and hypervisors, performing actions on templates and backups, and configuring data stores and networks. There can be several Administrators in OnApp.User accounts are created by administrators, and only have access to those actions which are specified by an administrator.
18.1.1 View UsersFor a quick view of user account details, go to your Control Panel's Users and Groups menu. You'll see a list of all user accounts in your cloud, along with their details:
Full name – user's name and surname
Username – user's screen name
User role – the role set for the user
User group – the group to which the user is assigned
Status – user's status (active or deleted)
You can scroll through the list of users with the Previous/Next buttons at the bottom of the screen, as well as use search tool to search for a specific user.Click the Actions button next to the required user to edit, suspend or delete them, view the list of whitelist IPs or login as user.Click Drop All Sessions button to terminate all sessions.
DOCUMENT REVISIONS - LIST OF DEFAULT PERMISSIONS FOR USER ROLE 186
OnApp 3.0 Administration Guide v15
Every user including you will be logged out.
To get the list of additional fields, click the User Additional Fields button.To view detailed information about users account, click user's full name.
18.1.2 View User Account DetailsTo view account details of a particular user:
1. Go to your Control Panel Users menu.
2. On the screen that appears, click the full name of the user to view their account details.
3. The screen that appears will display the following user details:
The user details screen that appears shows the following information:
User details
o Avatar – user's avatar (This feature is available if the Use gravatar option is enabled).
o Full name– user's name and surname.
o Login – user's screen name.
o Email – user's email.
o Timezone– timezone set for this user.
o Locale – locales set for this user.
o Last access log– click the button to view the list of IPs and time user's account was accessed from.
o Drop other sessions - click this button to drop other sessions except the active one, will be dropped
User guidance
o Display infoboxes – whether infoboxes are displayed or not for this user.
o Restore infoboxes - click this button to display infoboxes for the user.
API info
DOCUMENT REVISIONS - LIST OF DEFAULT PERMISSIONS FOR USER ROLE 187
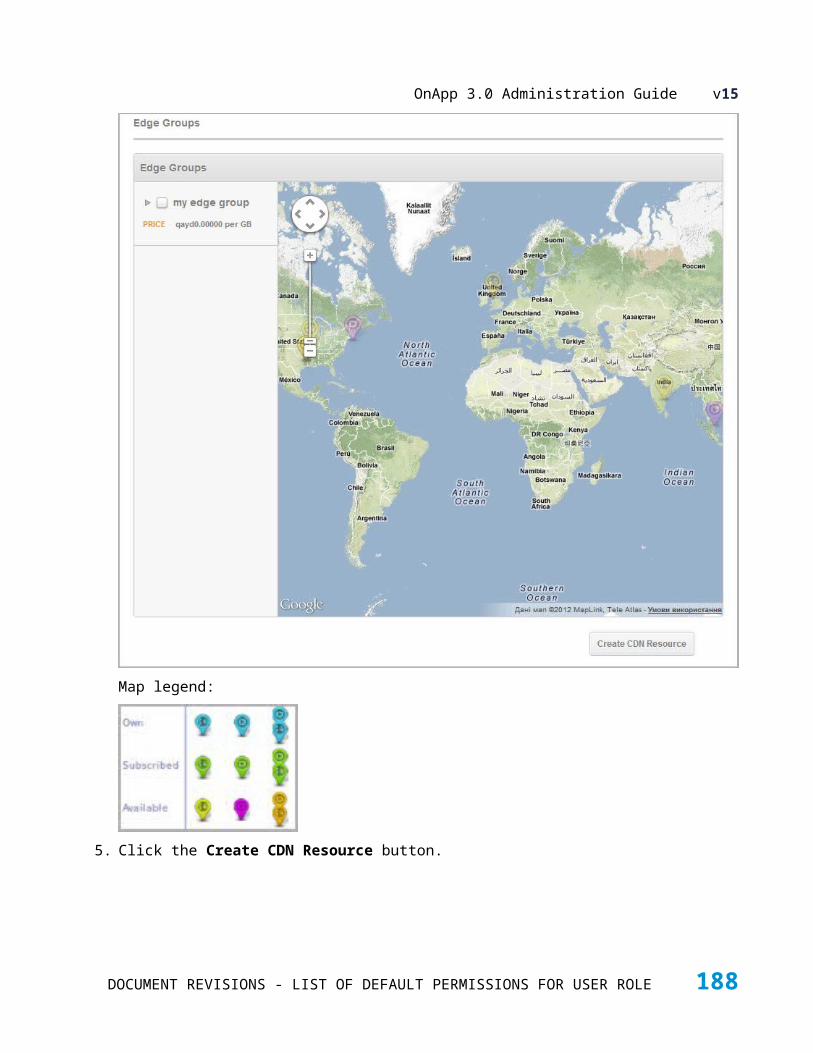
OnApp 3.0 Administration Guide v15
o API key - click the Regenerate key button to generate a new API key.
Billing details
o Billing plan - click the plan label to see its details.
o Monthly fee - a set monthly price for a billing plan.
o Outstanding amount- the total amount of money owned by this user since it has been created, for all resources, minus the amount of Payments. The sum is displayed for the period since a user has been created until the last 24hrs.
Click the Virtual Machine Hourly Statistic link to view the hourly billing statistics for all VM resources (CPU, CPU priority, Disk Size, Memory, IP Address, Virtual Machine, Template&Backup Storage, Disk size and IP Address) and Network interface usage (Data read/written, Input/Output requests, Port speed, Data received and Data sent), as well as total amount due for this user.
Click the Monthly bills link to view the total due per each month of the year specified in the drop-down list.
Click the User statistic to view user's resource usage statistics
o Payments - the total amount of payments made.
o Total cost - the sum of used resources cost and virtual machines cost
o Hourly price - shows the price for VMs, Load Balancers, and other resources per hour.
User details
o User role – the role set for the user.
o User group – the group to which the user is assigned.
Payments - the list of payments with their details.Backups - the list of user backups with their details.
DOCUMENT REVISIONS - LIST OF DEFAULT PERMISSIONS FOR USER ROLE 188
OnApp 3.0 Administration Guide v15
18.1.3 View/Add/Edit User PaymentsTo view, add and edit payments for a user:
1. Go to your Control Panel's Users and Groups menu.
2. Click the name of the required user.
3. On the screen that appears, click Payments tab.
4. Click the Edit icon to change details of a specific payment.
5. Click the Add New Payment button at the end of the list to add a new payment.
18.1.4 View User Account Billing StatisticsThe system has a record of all the billing statistics on a user account for the last three months. If the account was created less than three months ago, statistics are generated for the actual period. You can also define a shorter period by setting Start and End time.To view billing statistics for an account:
1. Go to your Control Panel's Users and Groups menu. You'll see a list of all user accounts in your cloud.
2. Click the name of the required user.
3. Scroll down to the Billing statistics section and click the User Statistics link to view user's billing statistics details.
4. On the screen that appears, set Start and End time. By default the statistics are generated for the last three months or the actual account existence period. On the page that appears:
Daily Stats – particular date and time for the generated statistics
Used Resources Cost – the total due for the resources used for all virtual machines
Virtual Machines cost – the total due for all the VMs minus Backups/Templates Cost (if any)
Total cost – the sum of Used resources cost and Virtual Machines cost
Resources cost– the money owed per virtual machine for the following resources:
o CPU
o CPU Priority
o Disk Size
o Memory
o IP Address
o Virtual Machine
o Template&Backup Storage
DOCUMENT REVISIONS - LIST OF DEFAULT PERMISSIONS FOR USER ROLE 189

OnApp 3.0 Administration Guide v15
o Disk size
o IP Address
Usage cost– the money owed per virtual machine for the following resource usage:
o Data read/written
o Input/Output requests
o Port speed
o Data received
o Data sent
Total – the total due per virtual machine for Resources and Usage cost.
18.1.5 Whitelist IPsWhitelist IP addresses are IPs from which a particular user can access the OnApp control panel. If whitelisted IP addresses are specified for a particular user, the user can only access CP from that defined IP addresses.
To add a whitelist IP address:
1. Go to your Control Panel's Users and Groups menu.
2. Click the name of the required user. You will see the User Profile page.
3. Click the White List tab.
4. On the page that appears, click Add new IP button.
5. Fill in the form that appears:
o IP - an IP you wish to enter to the white list.
o Description - any description (this may be a reason why you entered an IP to the list, etc.)
6. Click Add new IP.7. Repeat steps 4-6 if you need to add more IPs to the white list.
To edit/delete a whitelisted IP address, click the Actions button next to the required IP address, and then choose the required action.
18.1.6 Log in as UserAdministrators can log in as a user to see their view of the cloud. To do so:
1. Go to your Control Panel's Users and Groups menu. You'll see a list of all user accounts in your cloud.
2. Click the Actions button next to the user you'd like to log in as, then select Login as option.
3. Your screen will refresh and you should now be logged in as that user.
DOCUMENT REVISIONS - LIST OF DEFAULT PERMISSIONS FOR USER ROLE 190
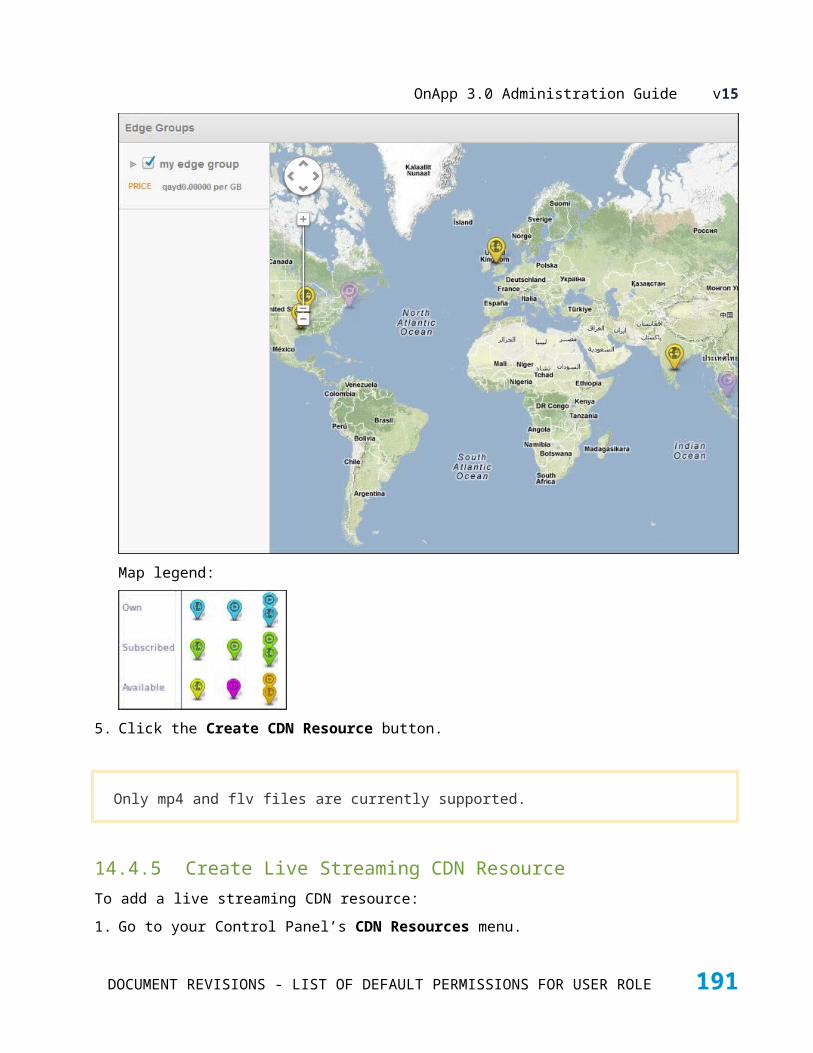
OnApp 3.0 Administration Guide v15
To return to your original view of the cloud, click the Back to Admin Area link at the top of the screen.
18.1.7 Create UserTo add a new user:
1. Go to your Control Panel's Users and Groups menu. You'll see a list of all user accounts in your cloud.
2. Click the Create User button at the bottom of the list.
3. Fill in the user creation form step by step:
Step 1 of 4o Move the Use Gravatar slider to the right to use the gravatar image.
o Login name - provide user login name. It can consist of 4-40 characters, letters [A-Za-z], digits [0-9], dash [ - ], lower dash [ _ ], [@]. You can use both lower- and uppercase letters.
o First name - specify user first name. It can consist of any 1-20 characters.
o Last name - specify user last name. It can consist of any 1-20 characters.
o Email address - specify user email.
o Time zone - select the required time zone from the drop-down box.
o Locale - specify user locale settings by selecting the appropriate locale from the drop-down box(see Locales section for details).
o Password - specify user password and confirm it. The password can consist of 6-40 characters and must meet the password complexity requirements.
o Display infoboxes - move the slider to the right to display guidance infoboxes for the user.
o Click Next.
Step 2 of 4o Assign user to the billing plan by selecting the required billing plan from the drop-down
box.
o Click Next.
DOCUMENT REVISIONS - LIST OF DEFAULT PERMISSIONS FOR USER ROLE 191

OnApp 3.0 Administration Guide v15
Step 3 of 4o User role - select the user role for this user.
o User group - assign user to the user group by selecting the required user group from the drop-down box.
o Click Next.
Step 4o Specify Auto-suspending options if any. You can configure the system to suspend a
user at a definite time or in several hours after creation.
4. Click the Save button to finish.
18.1.8 User Additional FieldsUser Additional Fields allow administrators to create custom fields and use them with the API or a third party system. The custom fields are stored and edited in the user profile.To add a new Additional Field:
1. Log in to the Control Panel as an Admin.
2. Go to the Users and Groups menu.
3. On the screen that appears, click the User Additional Fields button at the bottom of the list.
4. Click the Create Additional Field at the bottom of the list.
5. Fill in the form that appears. You can choose the string/integer data type, and set the Default Value that will be displayed if a user hasn't specified data for this field, or if they have entered information that doesn't match the data type.
6. Click the Add New Field button to finish.
To edit or delete an additional field:
1. Click the Edit icon next to an additional field to change its details.
2. Click the Delete icon next to an additional field to delete it.
18.1.9 Edit UserTo edit a user account:
1. Go to your Control Panel's Users and Groups menu. You'll see a list of all user accounts in your cloud.
2. Click the Edit icon next to the user you want to edit.
3. Change their details as required on the screen that appears.
DOCUMENT REVISIONS - LIST OF DEFAULT PERMISSIONS FOR USER ROLE 192

OnApp 3.0 Administration Guide v15
4. Click the Save button to finish.
18.1.10 Add SSH KeyTo add a SSH key to a user profile:
1. Go to your Control Panel's Users and Groups menu.
2. Click the Edit icon next to the required user.
3. Click the SSH Key button.
4. On the pop-up screen you can add a new key, and edit/delete a key.
The SSH key will be automatically assigned to all VMs the user creates.To assign keys to existing VMs, go to the VM Overview -> Properties menu.
18.1.11 Delete UserTo delete a user account:
1. Go to your Control Panel's Users and Groups menu. You'll see a list of all user accounts in your cloud.
2. Click the Actions icon next to the user you want to remove, then choose Delete. You'll be asked for confirmation before the user is deleted.
18.1.12 Suspend and Activate UsersSuspending a user account makes it inactive, but still present on the system. A suspended user will not be able to log into the Control Panel. To suspend an account:
1. Go to your Control Panel's Users and Groups menu. You'll see a list of all user accounts in your cloud.
2. Click the Suspend icon next to the user you want to suspend. You'll be asked for confirmation before the user is suspended.
3. To activate a suspended user, click the Activate user button next to their entry in the Users and Groups menu.
You can also set a user to auto-suspend at a certain time/date on the user's Edit Profile screen (Users & Groups > [user name] > Edit Profile tab).
DOCUMENT REVISIONS - LIST OF DEFAULT PERMISSIONS FOR USER ROLE 193

OnApp 3.0 Administration Guide v15
18.1.13 View User BackupsBackups in OnApp clouds are associated with user account. To view backups of a particular user:
1. Go to your Control Panel's Users and Groups menu.
2. You'll see a list of all user accounts in your cloud. Click the User Statistics link next to a required user.
3. On the User Details screen, click Backups tab.
4. On the screen that appears, you'll see the list of backups that belong to this user along with their details:
o date when the backup was taken
o disk
o status
o backup size
o backup type
o virtual machine
o customer
To move to the VM's backups page, delete a backup or convert it to template, click the Actions button next to template and then select the required action.
18.2 User GroupsYou can assign users into different user groups, so you can give different groups of users different cloud experiences. At present you can assign a UI theme to specific user groups (Settings -> Look&Feel menu).
18.2.1 Assign New User to GroupThis happens on the Add New User screen, as part of the user creation process:
1. Go to your Control Panel's Users and Groups menu.
2. Click the Create User button.
3. Select the User group for the user from the user group drop-down menu.
4. Complete the other user detail fields, and click the Save button.
DOCUMENT REVISIONS - LIST OF DEFAULT PERMISSIONS FOR USER ROLE 194
OnApp 3.0 Administration Guide v15
18.2.2 Change User Group for UserYou can change the group a user is assigned to on the Edit User screen:
1. Go to your Control Panel's Users and Groups menu.
2. Click the Actions icon next to the user, then click Edit.3. Select a user group for the user from the user group drop-down menu.
4. Click the Save button.
18.2.3 Create User GroupTo add a user group:
1. Go to your Control Panel's Users and Groups menu.
2. Click the User Groups tab.
3. On the page that follows, click Add a New Group button.
4. When the page loads, enter a user group name (Label) and click Save.
18.2.4 View/Edit/Delete User GroupTo view, edit and delete a user group :
1. Go to your Control Panel's Users and Groups menu.
2. Click the User Groups tab.
3. Click a group's label to see all the users with their details assigned to the questioned group.
4. To edit user group details, click the Actions icon next to a user group you want to change, then click Edit.
5. Click the Delete icon next to a user group to delete a specific group.
18.3 Drop SessionThe Drop session panel is used to terminate a session from an OSA-ICC. You can use this functionality if you need to terminate a session because you can't get to a PC or you have a bad connection. If the auto-reconnect option was selected during the customization of your session, the option will automatically reconnect your session after you drop it. To drop sessions:
1. Go to your Control Panel's Users and Groups menu.
2. On the Users tab, click the Drop all sessions tab in the lower left corner of your screen.
DOCUMENT REVISIONS - LIST OF DEFAULT PERMISSIONS FOR USER ROLE 195
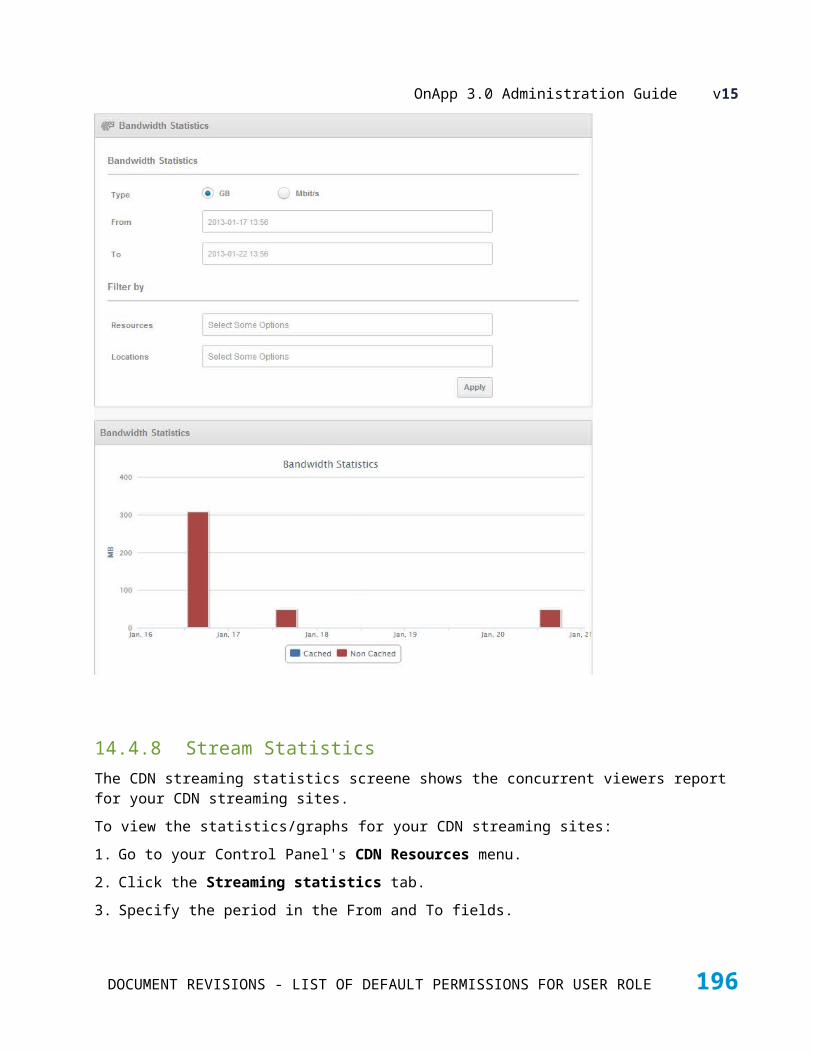
OnApp 3.0 Administration Guide v15
18.3.1 Drop Own SessionsTo terminate own sessions:
1. Click the My Profile button at the top of the Control Panel screen to view details of the user account you're currently logged in with.
2. On the screen that appears, click Drop Other Sessions button.
All sessions, except the active one, will be dropped.
To be able to use drop session functionality, you should have the following permissions enabled for your user role:
Drop all the existing sessions (sessions.drop_all)
Drop all the user sessions but the current (sessions.drop_others)
For details on permissions, refer to the Permissions List section.
DOCUMENT REVISIONS - LIST OF DEFAULT PERMISSIONS FOR USER ROLE 196

OnApp 3.0 Administration Guide v15
19 ROLES
OnApp allows you to assign roles to users. Each role has a set of permissions associated with it. By assigning users to different roles you can control what those users are allowed to do.Roles are assigned to users during the user creation process. OnApp provides the following pre-configured user roles: Administrator and User. For details on user permissions, see Permissions List.
19.1 Create New RoleTo add a new role:
1. Go to your Control Panel's Users and Groups menu.
2. Click the Roles tab.
3. Press the "+" button or click the Create Role button at the bottom of the screen.
4. On the screen that follows, give the role a description (label) and use the radio buttons to set its permissions.
5. Click the Save button to finish.
On the Add New Role screen there are also buttons to give full access to the role (this automatically checks all relevant boxes to allow that role to perform any action) and to deselect all permissions, if you want to start from scratch.
19.2 Edit RoleTo edit a role:
1. Go to your Control Panel's Users and Groups menu.
2. Click the Roles tab. You'll see a list of all roles on your system and a number of users assigned to each role.
3. Click the Actions button next to the role you want to change, then click Edit.
DOCUMENT REVISIONS - LIST OF DEFAULT PERMISSIONS FOR USER ROLE 197

OnApp 3.0 Administration Guide v15
4. On the screen that appears, change the role's description and permissions, then click the Save button.
19.3 Delete RoleTo delete a role:
1. Go to your Control Panel's Users and Groups menu.
2. Click the Roles tab. You'll see a list of all roles on your system.
3. Click the Actions button next to the role you want to delete, then click Delete. You'll be asked for confirmation before the role is removed.
DOCUMENT REVISIONS - LIST OF DEFAULT PERMISSIONS FOR USER ROLE 198

OnApp 3.0 Administration Guide v15
20 BILLING PLANS
Before users can create virtual machines in your cloud, it is important to set prices for the resources they use. This is a three-step process: creating a billing plan, setting prices and resources limits for that plan, and then assigning users to that plan.
20.1 Create Billing PlanTo create a billing plan:
1. Go to your Control Panel's Billing Plans menu.
2. On the screen that appears, press "+" button or click the Create Billing Plan button at the bottom of the screen.
3. Complete the form on the screen that follows:
o Label - give your billing plan a name.
o Monthly price – set a monthly price for the billing plan. This price will be applied regardless of the actual prices for used resources.
o Currency - set a currency to charge in.
4. Specify Windows licensing support settings:
o Tick the MAK licensing box to enable MAK licensing for a user signed up for this plan
o Tick the KMS licensing box to allow using KMS service
o Choose User licence to allow inserting custom licenses
5. Click Save to finish.
20.2 Set Billing Plan Prices And Resource Limits
You can set pricing and limits for cloud resources for each billing plan.
To add a resource to a billing plan:
Go to your Control Panel's Billing Plans menu.
The screen that appears shows all billing plans currently available. Click the Actions button next to the plan in question, then click Resources.
DOCUMENT REVISIONS - LIST OF DEFAULT PERMISSIONS FOR USER ROLE 199
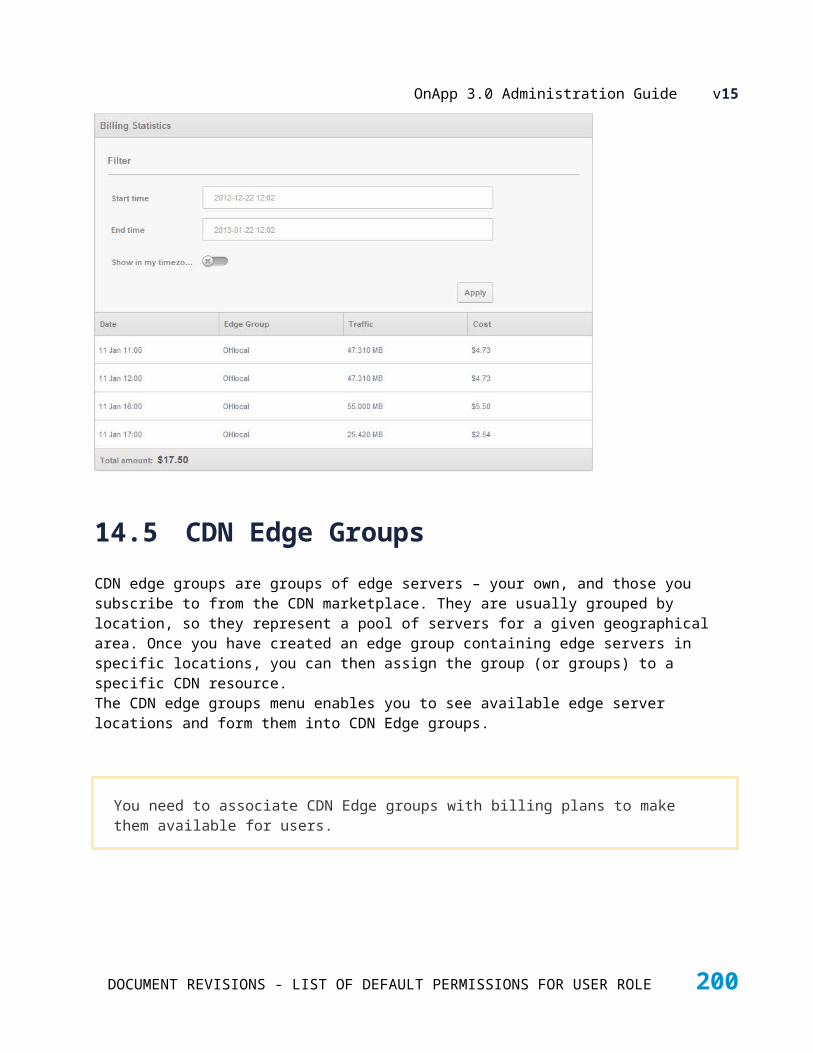
OnApp 3.0 Administration Guide v15
The screen that appears shows all resources currently assigned to this billing plan.
To add new resource limit:
1. Click the "+" button in the upper right corner of the required limit.
2. In the dialogue box that appears, select the required resource type (for virtual machines and user VM limits), target and limit type and press the Add Resource button.
3. After that, specify the resource's Min and Max limits and prices.
4. Set limits and prices for each resource assigned to the plan:
o On the billing plan resources screen (Billing Plans > Resources) you can enter prices and limits for each resource in the table shown.
o Click the cells next to the required resource, type a value and press Enter.
o If you leave the limit fields blank, no limit will be applied to that resource. The resource types are explained below.
Note that billing plan resource limits are per user, not per VM. So, a user assigned to a plan with a maximum available disk size of 500Gb cannot exceed that limit across all of their VMs.
Limits for virtual machines
To add resource limits for virtual machines:
o Go to the billing plan resources screen (Billing Plans > Resources).
o Click the "+" button next in the upper right corner of the Limits for virtual machines box.
o In the pop-up window that appears, select the resource type from the drop-down menu:
CPU (Free, Max, On, Off) - the number of CPU cores that users get for free, and the maximum number of CPU cores they can request under this plan. You can set prices per CPU core, per hour, for VMs powered on and off.
CPU Priority(Free, Max, On, Off)* - the CPU priority % that users get for free, and the maximum CPU priority they can request under this plan. You can set prices per CPU priority %, per hour, for VMs powered on and off.
Disk size (Free, Max, On, Off) - the disk space users get for free, and the maximum disk space they can request under this plan. You can set prices for disk space for VMs powered on and off. Disk size is measured in GB and priced per hour.
Memory (Free, Max, On, Off) - the amount of RAM users get for free, and the maximum RAM they can request under this plan. You can set RAM prices for VMs powered on and off. RAM is measured in MB and priced per hour.
DOCUMENT REVISIONS - LIST OF DEFAULT PERMISSIONS FOR USER ROLE 200

OnApp 3.0 Administration Guide v15
IP address (Free, Max, On, Off) - the number of IP addresses users get for free, and the maximum number of IP addresses they can request under this plan. You can set IP address prices for VMs powered on and off. IP addresses are priced per hour.
o Click Save.
User VM limits
To add resource limits for user VMs:
o Go to the billing plan resources screen (Billing Plans > Resources).
o Click the "+" button next in the upper right corner of the Limits for virtual machines box.
o In the pop-up window that appears, select the resource type from the drop-down menu:
Virtual machines (Max) - the maximum number of virtual machines users can create.
Autoscaling (Free, Max, Price) – the number of VMs using Autoscaling that user can create for free as well as total amount of such VMs. You can also set the price for the VMs using Autoscaling (per VM).
Template & backup storage (Disk size for free, Disk size, Price) - the amount of free disk space users get for backup and template storage, and the total amount of disk space they can use for backups and templates. Disk space is measured in GB, and priced per hour.
Backup (Max) - the number of backups users can create, subject to their maximum template/backup storage space limit. Backups are not priced individually: instead, you can set prices for template and backup storage.
Template (Max) - the number of templates a user can create, subject to their maximum template/backup storage space limit. Templates are not priced individually: instead, you can set prices for template and backup storage.
Customer network limits - (Free, Max) - the number of customer networks users can create for free, and the maximum number of customer networks they can create.
o Click Save.
DOCUMENT REVISIONS - LIST OF DEFAULT PERMISSIONS FOR USER ROLE 201

OnApp 3.0 Administration Guide v15
Limits for template store
To add resource limits for template store:
o Go to the billing plan resources screen (Billing Plans > Resources).
o Click the "+" button in the upper right corner of the Limits for template store box.
o In the pop-up window that appears, select the target template distribution from the drop-down menu, and click Save.
When you add a template store limits to a billing plan, you limit the number of preconfigured system templates available to a user signed up for this billing plan – they can only choose from templates specified.
Limits for hypervisor zones
To add limits for hypervisor zones:
o Go to the billing plan resources screen (Billing Plans > Resources).
o Click the "+" button in the upper right corner of the Limits for hypervisor zones box.
o In the pop-up window that appears, select the target hypervisor from the drop-down menu, and click Save.
Limits for data store zones
To add limits for data store zones:
o Go to the billing plan resources screen (Billing Plans > Resources).
o Click the "+" button in the upper right corner of the Limits for data store zones box.
o In the pop-up window that appears, select the target data store and limit type from the drop-down menu, and click Save.
o Set limits and prices for the data store zone:
Disk Size - set a maximum amount of data store zone space users get for free, and total amount of backup server space users can request. You can set prices for backup server space. Disk size is measured in GB.
DOCUMENT REVISIONS - LIST OF DEFAULT PERMISSIONS FOR USER ROLE 202

OnApp 3.0 Administration Guide v15
Data read - set the amount of data read users can send for free, and the price over free units. Data read is measured in GB and priced per GB.
Data written - set the amount of data written users can send for free, and the price over free units. Data written is measured in GB and priced per GB.
Input requests - specify the number of input requests per hour users can get for free and the price over free units. Input requests are measured in millions and priced per million requests.
Output requests - specify the number of output requests per hour users can get for free and the price over free units.Output requests are measured in millions and priced per million requests.
Limits for network zones
To add limits for network zones:
o Go to the billing plan resources screen (Billing Plans > Resources).
o Click the "+" button in the upper right corner of the Limits for network zones box.
o In the pop-up window that appears, select the target network and a limit type from the drop-down menu, and click Save.
o Set limits and prices for the network zone:
IP address (Free, Max, On, Off) - the number of IP addresses users get for free, and the maximum number of IP addresses they can request under this plan. IP addresses are priced per hour.
Port speed - set the amount of port speed user gets for free, and the maximum port speed amount user can request. The port speed is measured in Mb per second and priced per Mb.
Data reсeived - set the amount of data received users can send for free, and the price over free units. Data sent is measured in GB and priced per GB.
Data sent - set the amount of data sent users can send for free, and the price over free units. Data received is measured in GB and priced per GB.
DOCUMENT REVISIONS - LIST OF DEFAULT PERMISSIONS FOR USER ROLE 203

OnApp 3.0 Administration Guide v15
By adding hypervisor, data store and network zone resources to a billing plan, you can add to the overall limits enforced by the billing plan by limiting what amount of resource is available in different zones of your cloud.For example: a user is assigned to a billing plan with a total limit of 10 IP addresses. The plan is associated with 2 network zones: NZ1, a high performance zone, which has a limit of 2 IPs; and NZ2, which has a limit of 8 IPs.In this case, the user would be able to use a maximum of 10 IPs for all of their VMs - of which, up to 2 may be located in NZ1, and up to 8 located in NZ2.
Limits for edge groups
To add limits for edge groups:
o Go to the billing plan resources screen (Billing Plans > Resources).
o Click the "+" button in the upper right corner of the Limits for edge groups box.
o In the pop-up window that appears, select the target edge group from the drop-down menu, and click Save.
o Set limits and prices for the edge group. Limits for edge groups are measured in GB and priced per GB.
PLEASE NOTE: if no limits or edge groups are specified, no edge groups will be available to this billing plan.
Limits for backup server zones
To add limits for backup server zones:
o Go to the billing plan resources screen (Billing Plans > Resources).
o Click the "+" button in the upper right corner of the Limits for backup server zones box.
DOCUMENT REVISIONS - LIST OF DEFAULT PERMISSIONS FOR USER ROLE 204
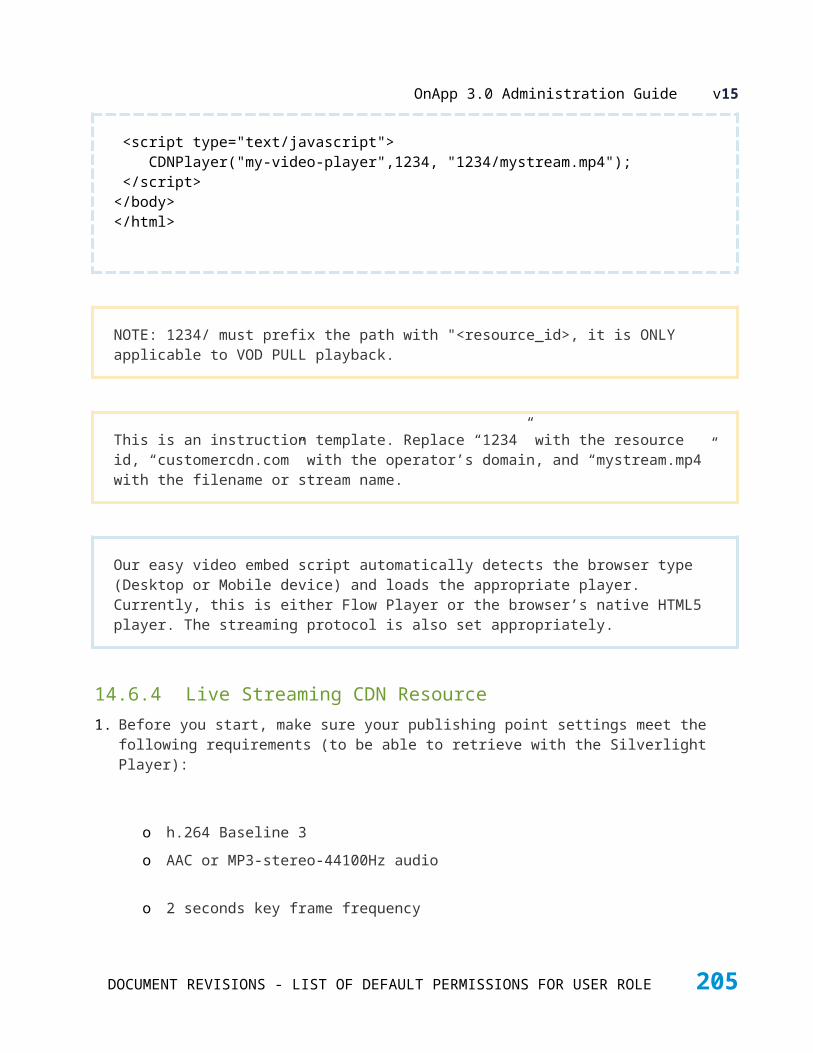
OnApp 3.0 Administration Guide v15
o In the pop-up window that appears, select the target backup server zone from the drop-down menu, and click Save.
o Then you'll need to set limits and prices for the backup server zone:
Backups - set the amount of backups users get for free, and the total amount they may use. You can set prices for backups.
Backup Disk Size - set a maximum amount of backup server space users get for free, and total amount of backup server space users can request. You can set prices for backup server space. Backup server space is measured in GB.
Templates - set the amount of templates users can send for free, and the prices for each template over that limit.
Template Disk Size - set the amount of template disk size users can receive for free, and the prices for each GB over that limit. Template disk size is measured in GB, and priced per GB.
o If you specify backup server zone in the billing plan, users will be able to use only the backup servers specified in the backup server zones assigned their billing plan.
o If the billing plan does not contain any assigned backup servers zone, users will be able to use any available Backup Server.
Limits for guaranteed minIOPS
(for billing plans with SolidFire data stores added)
To add limits for guaranteed minIOPS:
o Go to the billing plan resources screen (Billing Plans > Resources).
o Click the "+" button in the upper right corner of the Limits for guaranteed minIOPS box.
o In the pop-up window that appears, select the target data store zone from the drop-down menu, and click Save.
20.3 Assign Users to Billing PlanAssigning a new user to a billing plan takes place on the Add New User screen, as part of the user creation process:
DOCUMENT REVISIONS - LIST OF DEFAULT PERMISSIONS FOR USER ROLE 205

OnApp 3.0 Administration Guide v15
1. Go to your Control Panel's Users and Groups menu.
2. Click the Create User button.
3. Fill in the required details and click Next.4. On the screen that appears, select a billing plan for the user from the billing plan drop-down
menu.
5. Complete the other user detail fields, and click the Save button.
20.4 Change User's Billing PlanChanging a user's billing plan takes place on the Edit User screen:
1. Go to your Control Panel's Users and Groups menu.
2. Click the Actions button next to the user in question, then click Edit.3. Select a billing plan for the user from the billing plan drop-down menu.
4. Click the Save button.
Editing a billing plan that is associated with more than one user will affect all users attached to it. If you wish to only affect that user then copy the billing plan and associate it only with the single user.
20.5 Edit/Copy/Delete Billing PlanTo edit, copy or delete a billing plan:
Go to your Control Panel's Billing Plans menu. The screen that appears will show all the billing plans currently set up on the cloud:
Click a billing plan name to view its details.
Click the Actions icon next to a required billing plan, then click Copy. Click the Edit icon next to a required billing plan to change the plan details.
Click the Delete icon next to a billing plan to remove it from the system. You'll be asked for confirmation before the plan is removed.
Editing a billing plan that is associated with more than one user will affect all users attached to it. If you wish to only affect that user then copy the billing plan and associate it only with the single user.
DOCUMENT REVISIONS - LIST OF DEFAULT PERMISSIONS FOR USER ROLE 206

OnApp 3.0 Administration Guide v15
DOCUMENT REVISIONS - LIST OF DEFAULT PERMISSIONS FOR USER ROLE 207
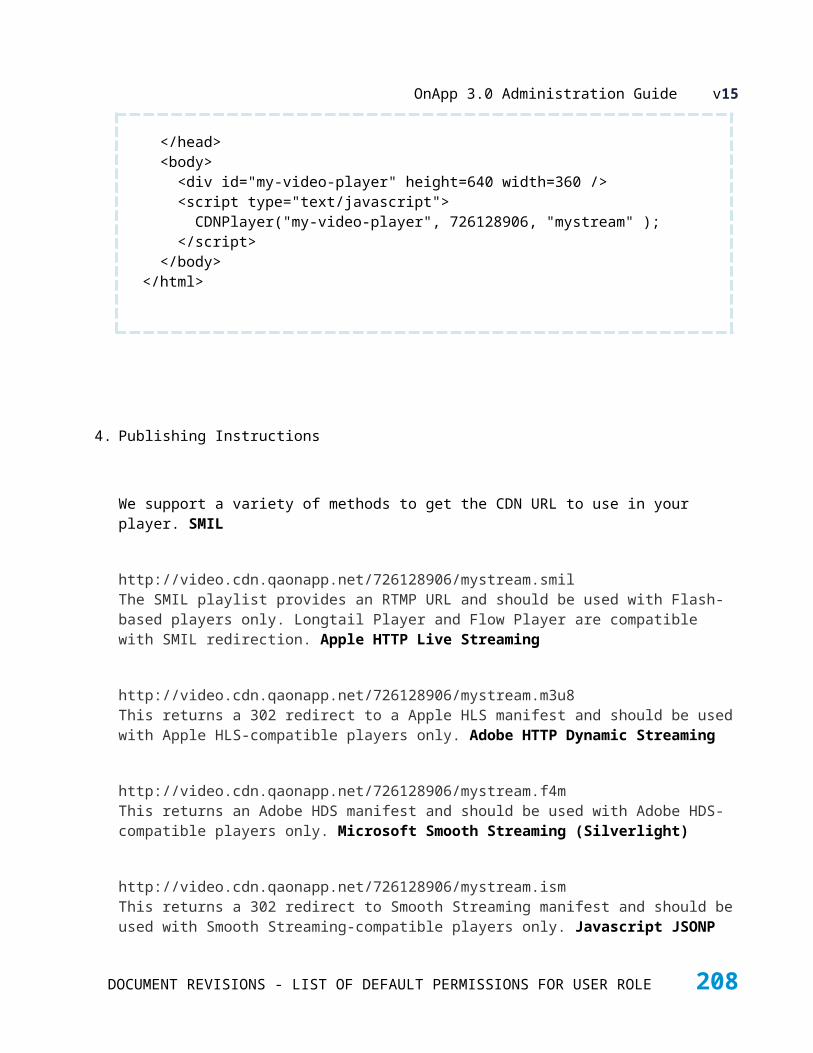
OnApp 3.0 Administration Guide v15
21 SETTINGS
The Control Panel's Settings menu is where you get detailed control over low-level cloud settings for hypervisors, data stores, disks, networks, resolvers, schedules, backups and the configuration of OnApp itself.
21.1 Hypervisors SettingsHypervisors are a critical part of the cloud. You should only change hypervisor settings if you're absolutely sure you know what you're doing.
21.1.1 View Hypervisor SettingsTo view hypervisor settings:
1. Go to your Control Panel Settings menu.
2. Click the Hypervisors icon.
3. On the screen that appears, you will see the list of all hypervisors in the cloud along with their details:
o Label
o IP Address
o Hypervisor power status
o CPU Cores - number of CPU cores
o RAM - total/free RAM
o Features - , where the first icon shows hypervisor failover status, the second one - statistics collection and the third one - CloudBoot status.
To view a particular hypervisor details, click the label of a required hypervisor.
To edit or delete a hypervisor, click the Actions button next to the hypervisor, then select the required action.
21.1.2 Create HypervisorYou can add more physical hypervisors at any time. To add a hypervisor:
1. Go to your Control Panel Settings menu.
DOCUMENT REVISIONS - LIST OF DEFAULT PERMISSIONS FOR USER ROLE 208

OnApp 3.0 Administration Guide v15
2. Click the Hypervisors icon.
3. Press "+" button or click the Add a New Hypervisor button underneath the list of Hypervisors on the screen.
4. On the screen that appears:
o Enter a hypervisor label.
o Add an IP address.
o Add a backup IP address.
o Choose a hypervisor type (Xen, KVM or VMware).
o Move the slide to the right to enable a hypervisor. Hypervisors that are not enabled cannot be used to host VMs.
o Move the slider to the right to collect statistics for this hypervisor.
o Move the slider to the right to disable failover on this hypervisor (failover is automatic VM migration to another hypervisor if this one goes down).
5. Click the Save button. The hypervisor will be added to the system. You can view it under the Hypervisors menu. Click the Back button to return to the Hypervisor Settings page.
21.1.3 Create VMware hypervisorVMware hypervisor is a combination of all ESXi hypervisors at the vCenter displayed as a single combined hypervisor with a sum of the CPU, RAM and Disk resources rather than individual hypervisors.
VMware hypervisors behave differently from Xen or KVM: with Xen/KVM the control is made directly upon the hypervisors, while with VMware OnApp directly controls the VMware vCenter. This allows vCenter to control the VMs with the full range of VMware functionality including DRS and vMotion to ensure that the operation is optimal.
To create a VMware hypervisor:
1. Go to your Control Panel's Settings menu.
2. Click the Hypervisors icon.
3. Press "+" button or click the Add a New Hypervisor button underneath the list of Hypervisors on the screen.
4. On the screen that appears:
o Enter a hypervisor label.
o Add an IP address.
o Add a backup server IP address - leave this field blank.
DOCUMENT REVISIONS - LIST OF DEFAULT PERMISSIONS FOR USER ROLE 209
OnApp 3.0 Administration Guide v15
o Choose a VMware hypervisor type and whether the hypervisor is enabled or not (hypervisors that are not enabled cannot be used to host VMs).
o Move the slider to the right to collect statistics for this hypervisor.
o Move the slider to the right to disable failover on this hypervisor (failover is automatic VM migration to another hypervisor if this one goes down).
o Specify vCenter login and password.
o Enter the vCenter cluster name.
o Enter the distributed virtual switch name.
5. Click the Save button. The hypervisor will be added to the system. You can view it under the Hypervisors menu. Click the Back button to return to the Hypervisor Settings page.
21.1.4 Edit HypervisorTo edit a hypervisor:
1. Go to your Control Panel's Settings menu.
2. Click the Hypervisors icon.
3. Click the Actions button next to the Hypervisor you want to edit, then click Edit.4. On the screen that follows, change details as required:
o The hypervisor's name (label).
o Its IP address.
o Add a provisioning network IP address.
o Whether it's enabled or not (hypervisors that are not enabled cannot be used to host VMs).
o Move the slider to the right to disable failover on this hypervisor (failover is automatic VM migration to another hypervisor if this one goes down).
o Move the slider to the right to collect statistics for the hypervisor.
5. Click the Save button to save your changes.
DOCUMENT REVISIONS - LIST OF DEFAULT PERMISSIONS FOR USER ROLE 210

OnApp 3.0 Administration Guide v15
21.1.5 Manage Data Stores For HypervisorData stores can easily be attached and removed from hypervisors. This association between a hypervisor and a data store is called a data store join.To add/remove data store joins:
1. Go to your Control Panel's Settings menu and click the Hypervisors icon.
2. Click the label of the hypervisor you want to manage data stores for.
3. On the screen that appears, click the Actions button, then click Manage Data Stores.4. On the screen that follows, you'll see a list of all data stores currently associated with this
hypervisor.
To remove a data store join, click the Delete icon next to it. You'll be asked for confirmation before the store is removed.
To add a new data store join, choose a data store from the drop-down menu and click the Add Data Store button.
21.1.6 Manage Networks For HypervisorNetworks can easily be attached and removed from hypervisors. This association between a hypervisor and a network is called a network join.To add/remove network joins:
1. Go to your Control Panel's Settings menu and click the Hypervisors icon.
2. Click the label of the hypervisor you want to manage networks for.
3. On the screen that appears, click the Actions button, then click Manage Networks.4. On the screen that follows, you'll see a list of all networks currently associated with this
hypervisor.
To remove a network join, click the Delete icon next to it. You'll be asked for confirmation before the network is removed.
To add a new network join, choose a network from the drop-down menu, enter its interface name (eth0, eth1) and click the Add Network button.
21.1.7 Delete HypervisorHypervisors can be removed from your cloud if required. A hypervisor cannot be removed until all of the virtual machines assigned to it are migrated to another hypervisor.To remove a hypervisor:
1. Go to your Control Panel's Settings menu.
2. Click the Hypervisors icon.
DOCUMENT REVISIONS - LIST OF DEFAULT PERMISSIONS FOR USER ROLE 211

OnApp 3.0 Administration Guide v15
3. Click the Actions button next to the hypervisor you want to delete, then click Delete.
21.2 Hypervisor Zones SettingsHypervisor zones can be used to create different tiers of service - for example, by setting up different zones for high-performance hypervisor servers, with different prices for virtual machines deployed on that zone.Hypervisor zones can have data stores and networks attached to them. The combination of hypervisor, data store and network groups can be used to create private clouds for customers.
21.2.1 Create Hypervisor ZoneTo create a new hypervisor zone:
1. Go to your Control Panel's Settings menu and click the Hypervisor Zones icon.
2. Press "+" or click the Add New Hypervisor Zone button.
3. On the screen that follows:
o Give your hypervisor zone a name (label)
o Move the Memory Guarantee slider to the right to enable the memory guarantee option.
Utilization of the memory guarantee option ensures reservation of a free hypervisor memory space for virtual machines residing on the KVM hypervisors which are currently switched off. This prevents the space from being occupied by other virtual machines. Memory guarantee option only applies to KVM hypervisors and has no effect on Xen. For Xen hypervisors, the memory ballooning option is used by default.
Specify the default gateway and VLAN to use custom firewall for VMware virtual machines within this hypervisor zone:
o Default gateway - external gateway IP address. All virtual machines within a hypervisor zone will be rerouted to this gateway.
o VLAN - address of a VLAN the default gateway is located on with prefix length specified. For example: 10.0.0.1/24.
NOTE: Make sure that VLAN traffic can be passed across the network.
Refer to the VMware section for details.
4. Click the Save button.
DOCUMENT REVISIONS - LIST OF DEFAULT PERMISSIONS FOR USER ROLE 212

OnApp 3.0 Administration Guide v15
21.2.2 View/Edit/Delete Hypervisor ZoneTo view hypervisor zones:
1. Go to your Control Panel's Settings menu, and click the Hypervisor Zones icon.
2. The screen that appears will show all zones currently set up in the cloud. These zones will also show under the main Hypervisors menu in the Control Panel.
3. Click a zone's label (name) to see details of the zone and to access the functions for adding/removing hypervisors to/from the zone.
Click the Actions button next to a zone, then click Edit to change its name and disable failover of all the hypervisors added to this zone.
Click the Actions button next to a zone, then click Delete to remove it from the cloud. You'll be asked for confirmation before the zone is removed.
21.2.3 View Hypervisor Zone DetailsTo view details of a hypervisor zone:
1. Go to your Control Panel's Settings menu and click the Hypervisor Zones icon.
2. Click the label of the zone you're interested in. The screen that follows shows details of that zone:
o Hypervizor zone’s label.
o Actions to edit zone (change its name), manage data stores and manage networks.
o A list of hypervisors assigned to the zone.
o A list of hypervisors in the cloud that are not assigned to the zone.
21.2.4 Add Hypervisors to Hypervisor ZoneTo add a hypervisor to a zone:
1. Go to your Control Panel's Settings menu and click the Hypervisor Zones icon.
2. Click the label of the zone you want to add a hypervisor to. The screen that appears will show you all hypervisors in the cloud, organized into two lists – those assigned to the zone already, and those that are unassigned.
3. In the unassigned list, find the hypervisor you want to add to the zone and click the Actions button next to it, then click Add.
DOCUMENT REVISIONS - LIST OF DEFAULT PERMISSIONS FOR USER ROLE 213
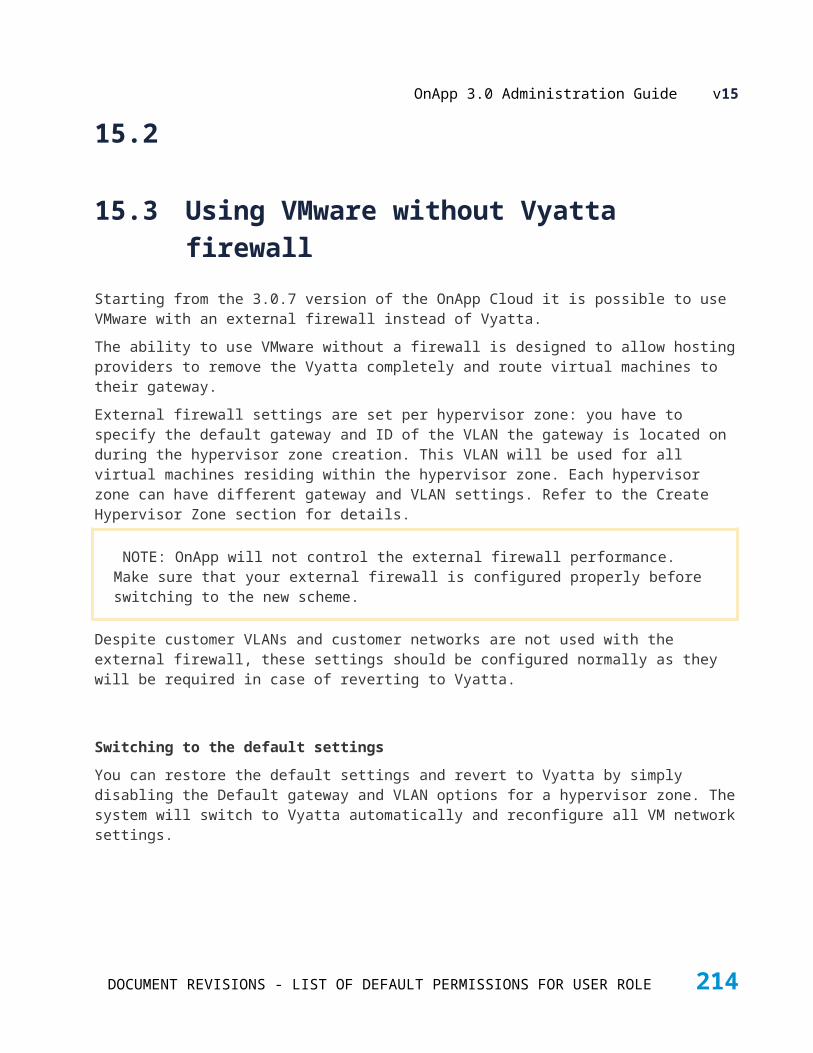
OnApp 3.0 Administration Guide v15
21.2.5 Remove Hypervisors From Hypervisor ZoneTo remove a hypervisor from a zone:
1. Go to your Control Panel's Settings menu and click the Hypervisor Zones icon.
2. Click the label of the zone you want to remove a hypervisor from. The screen that appears will show you all hypervisors in the cloud, organized into two lists – those assigned to the zone already, and those that are unassigned.
3. In the assigned list, find the hypervisor you want to remove, click the Actions button next to it, then click Delete.
You can only remove a hypervisor from a hypervisor zone if it currently hosts no virtual machines.
21.2.6 Manage Data Stores for Hypervisor ZonesData stores can easily be attached and removed from hypervisor zones. This association between a hypervisor zone and a data store is called a data store join.
1. Go to your Control Panel's Settings menu and click the Hypervisor Zones icon.
2. Click the label of the hypervisor zone you want to manage data stores for.
3. On the screen that appears, click the Manage Data Stores link in the Actions section.
4. On the screen that follows you'll see a list of all data stores currently associated with this hypervisor zone.
To remove a data store from the zone, click the Delete icon next to it. You'll be asked for confirmation before the store is removed.
To add a new data store, choose one from the drop-down menu and click the Add Data Store button.
21.2.7 Manage Networks For Hypervisor ZoneNetworks can easily be attached and removed from hypervisor zones. This association between a hypervisor zone and a network is called a netwok join.
1. Go to your Control Panel's Settings menu and click the Hypervisor Zones icon.
DOCUMENT REVISIONS - LIST OF DEFAULT PERMISSIONS FOR USER ROLE 214
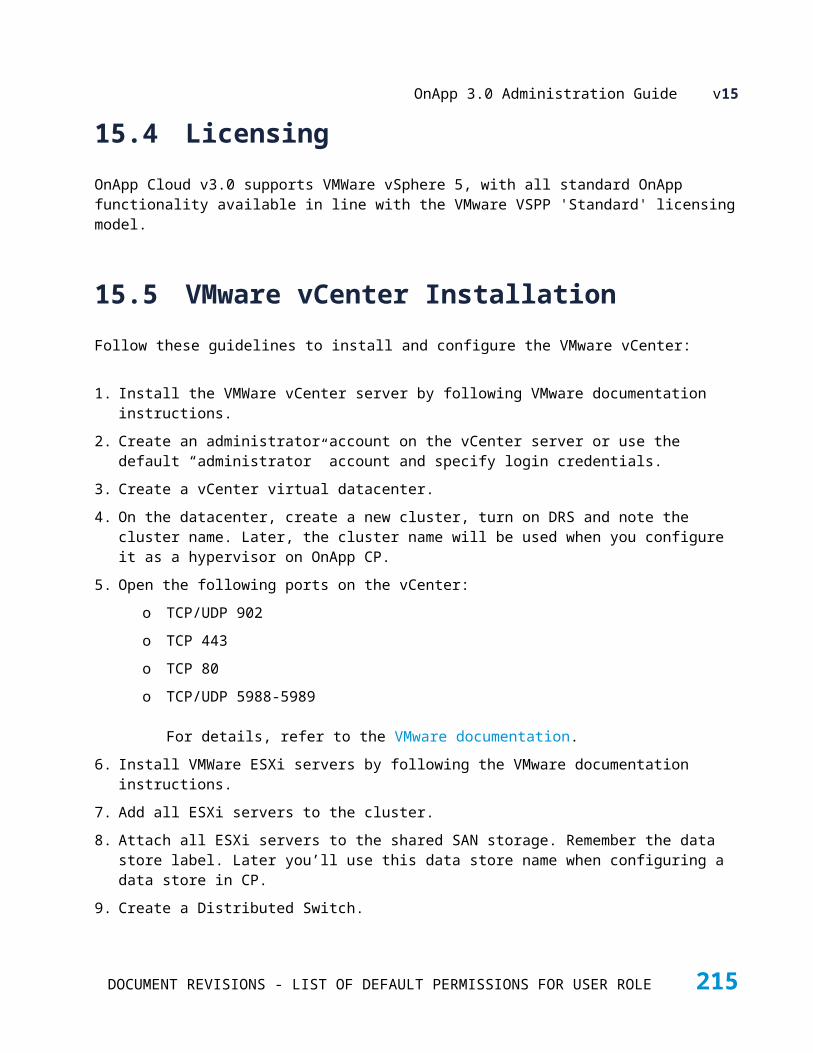
OnApp 3.0 Administration Guide v15
2. Click the label of the hypervisor zone you want to manage data stores for.
3. On the screen that appears, click the Manage Networks link in the Actions section.
4. On the screen that follows you'll see a list of all networks currently associated with this hypervisor zone.
To remove a network, click the Delete icon next to it. You'll be asked for confirmation before the network is removed.
To add a new network, choose one from the drop-down menu, enter its interface name (eth0, eth1) and click the Add Network button.
21.3 Data Stores SettingsData stores provide disk space for your virtual machines and operating systems. Data stores are attached to hypervisors. There are three types of data stores in OnApp:
1. Traditional logical volume data stores based on a centralized SAN.
2. ESXi datastores used under VMware.
3. Integrated storage data stores (the core Integrated Storage functionality). See Integrated Storage chapter for details.
4. SolidFire data stores (introduced in the OnApp v3.0).
The basic management tools are the same for all data store types, but the creation process differs.
Use caution when changing data store settings!
Note: starting with version 3.0. OnApp is integrated with the SolidFire storage management system. It is now possible to perform the following options with the Solid Fire:
Allocate dedicated LUN from SF cluster per virtual machine disk, when creating a VM (LUN is created per each VM disk, with a separate LUN per swap disk).
Create virtual machines without the swap disk.
Implement backups / snapshots using SF CloneVolume method
Logical unit number (LUN) ia unique identifier assigned to one or several virtual machine disks, addressed by SCSI protocol. In the SolidFire SAN environment, a RAID controller provides multiple LUN support, presenting storage as multiple devices. In this case, a LUN is used to present a view of the disk storage to the virtual machine. When a LUN is assigned to a virtual machine, it acts as its physical disk drive. Regardless of the use, each logical unit is treated as a single device.
LUN allows to differentiate up to eight logical units. In LUN division, SAN is configured in
DOCUMENT REVISIONS - LIST OF DEFAULT PERMISSIONS FOR USER ROLE 215

OnApp 3.0 Administration Guide v15
such a way to match LUNs to proper virtual machnes.
Use of LUN mapping allows to improve security by setting a storage access limitations, so that only LUNs authorized to access a particular virtual machine can access the specific port.
21.3.1 View Data StoresTo view all data stores on your cloud:
1. Go to your Control Panel Settings menu.
2. Click the Data Stores icon. The screen that appears lists all data stores currently available.
21.3.2 Create LVM Data StoreTo create a data store:
1. Go to your Control Panel Settings menu.
2. Click the Data Stores icon.
3. Click the Create Data Store link at the bottom of the screen.
4. Follow the steps in the creation wizard:
Step 1 of 2
o Enter a label and IP address for your data store.
o Move the slider to the right to enable a data store. When disabled, OnApp will not allow new disks to be created automatically on that data store. This is useful to prevent an established data store from becoming too full. It also lets you prevent the automatic creation of root disks on 'special' data stores (high speed, etc).
o Click Next.
Step 2
o Set disk capacity in GB.
DOCUMENT REVISIONS - LIST OF DEFAULT PERMISSIONS FOR USER ROLE 216

OnApp 3.0 Administration Guide v15
o If required, you can also bind the data store with a local hypervisor. This is helpful if you wish that the data store and a hypervisor were located on the same physical server thus decreasing the time needed for a hypervisor-data store connection.
o If required, you can also assign the data store to a data store zone. The drop-down menu lists all data store zones set up in the cloud (to add or edit data store zones, see the section on Data store zones in the Settings section of this guide)
o Select the lvm data store type.
5. When you've finished configuring the store, click the Create Data Store button.
To use the data store, you have to assign it either to a hypervisor or a hypervisor zone.
21.3.3 Create VMware Data StoreTo add a VMware data store to the OnApp control panel:
1. Go to your Control Panel Settings menu and click the Data Stores icon:
2. On the screen that appears, click the Create Data Store button:
DOCUMENT REVISIONS - LIST OF DEFAULT PERMISSIONS FOR USER ROLE 217

OnApp 3.0 Administration Guide v15
3. Follow the steps in the creation wizard:
Step 1 of 2
o Enter a label of the vCenter data store. The label of VMware data store must match the vCenter data store label!
o Leave the IP address field empty.
o Move the slider to the right to enable a data store. When disabled, OnApp will not allow new disks to be created automatically on that data store. This is useful to prevent an established data store from becoming too full. It also lets you prevent the automatic creation of root disks on 'special' data stores (high speed, etc).
o Click Next.
Step 2
Set disk capacity in GB.
DOCUMENT REVISIONS - LIST OF DEFAULT PERMISSIONS FOR USER ROLE 218

OnApp 3.0 Administration Guide v15
If required, you can also bind the data store with a local hypervisor. This is helpful if you wish that the data store and a hypervisor were located on the same physical server thus decreasing the time needed for a hypervisor-data store connection.
If required, you can also assign the data store to a data store zone. The drop-down menu lists all data store zones set up in the cloud (to add or edit data store zones, see the section on Data store zones in the Settings section of this guide)
Select the vmware data store type.
When you've finished configuring the store, click the Create Data Store button
After that, go to the Settings menu again and select Data Stores:
The data store you have just created will be displayed in the data stores list:
DOCUMENT REVISIONS - LIST OF DEFAULT PERMISSIONS FOR USER ROLE 219

OnApp 3.0 Administration Guide v15
Copy the value from the Identifier column to your clipboard and go to your vCenter Client:
In the vCenter Client please go to your data stores
DOCUMENT REVISIONS - LIST OF DEFAULT PERMISSIONS FOR USER ROLE 220
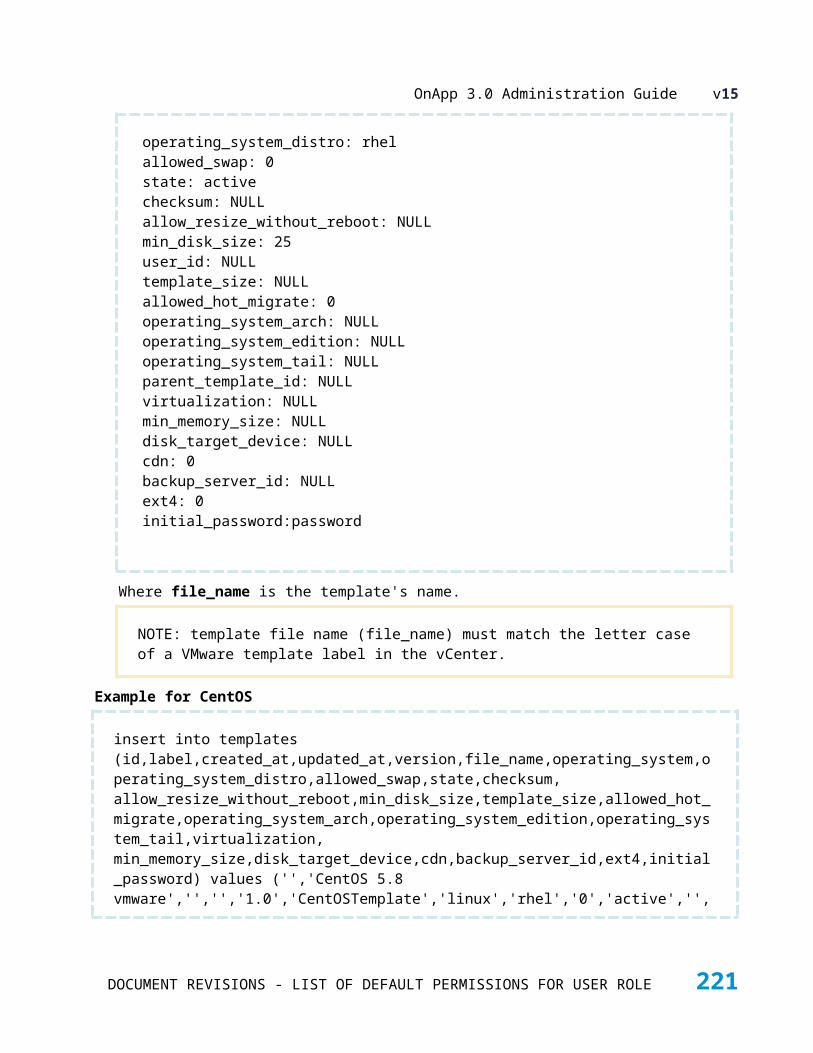
OnApp 3.0 Administration Guide v15
Right click on your new data store, here named NewDataStore
Click Rename and paste the Identifier value from the OnApp CP in the Name field, then press Enter. The name of your new data store has now been changed and is ready to be used by OnApp CP
21.3.4 Create SolidFire Data StoreYou can create one SolidFire data store per cloud that will represent the space available at the SolidFire side.
To create a SolidFire data store:
1. Go to your Control Panel Settings menu.
2. Click the Data Stores icon.
3. Click the Create Data Store link at the bottom of the screen.
DOCUMENT REVISIONS - LIST OF DEFAULT PERMISSIONS FOR USER ROLE 221

OnApp 3.0 Administration Guide v15
4. Follow the steps in the creation wizard:
Step 1 of 3o Enter a data store label.
o Specify an IP address to be used for managing the data store via CP (Inasmuch SolidFire data stores have two interfaces, you'll have to specify the IP address for the cluster admin later.)
o Select a solidfire data store type.
o Move the slider to the right to enable a data store. When disabled, OnApp will not allow new disks to be created automatically on that data store. This is useful to prevent an established data store from becoming too full. It also lets you prevent the automatic creation of root disks on 'special' data stores (high speed, etc).
o Click Next.
Step 2 of 3o Set disk capacity in GB.
o If required, you can also bind the data store with a local hypervisor. This is helpful if you wish that the data store and a hypervisor were located on the same physical server thus decreasing the time needed for a hypervisor-data store connection.
o If required, you can also assign the data store to a data store zone. The drop-down menu lists all data store zones set up in the cloud (to add or edit data store zones, see the section on Data store zones in the Settings section of this guide).
Step 3o Specify the Cluster Admin settings:
iSCSI IP - iSCSI IP address
Username - specify username for cluster authorization
Password - specify password for cluster authorization
o Specify the Solid Fire Account settings:
Username - specify SolidFire account username
Initiator secret - specify iSCSI initiator secret (optional)
DOCUMENT REVISIONS - LIST OF DEFAULT PERMISSIONS FOR USER ROLE 222

OnApp 3.0 Administration Guide v15
Target secret - specify iSCSI initiator secret (optional)
Initator secret and target secret are optional parameters. They are created automatically for a newly created account. For the new account they will be taken from the SolidFire database.
If you specify target and initiator secrets for an existing user, they will be overwritten.
5. When you've finished configuring the store, click the Create Data Store button.
21.3.5 Edit Data StoreTo edit a data store:
1. Go to your Control Panel's Settings menu.
2. Click the Data Stores icon. You'll see a list of the data stores on your system.
3. Click the Actions button next to the store you want to change, then click Edit.4. As required, change the data store's label, IP address, disk capacity and data store zone, and
whether the store is enabled or disabled.
5. Click the Save Data Store button to finish.
21.3.6 Delete Data StoreTo delete a data store:
1. Go to your Control Panel's Settings menu.
2. Click the Data Store icon.
3. You'll see a list of the data stores on your system.
4. Click the Actions icon next to the data store you want to delete, then click Delete. You'll be asked for confirmation before the store is deleted.
21.4 Data Store Zones SettingsData store zones can be used to create different tiers of service – for example, by setting up different zones for ordinary and high-performance SANs in the cloud. Zones can also be used to create private clouds for specific users.
DOCUMENT REVISIONS - LIST OF DEFAULT PERMISSIONS FOR USER ROLE 223
OnApp 3.0 Administration Guide v15
21.4.1 Create Data Store ZoneTo create a new data store zone:
1. Go to your Control Panel's Settings menu and click the Data Store Zones icon.
2. Click the Create Data Store Zone button.
3. On the screen that follows, give your data store zone a name (label) and then click the Save button.
21.4.2 View/Edit/Delete Data Store ZoneTo view/edit/delete data store zones:
1. Go to your Control Panel's Settings menu, and click the Data Store Zones icon.
2. The screen that appears will show all data store zones currently set up in the cloud.
Click a zone's label (name) to see details of the zone and to access the functions for adding/removing data stores to/from the zone.
To change the zone's name, click the Actions button next to the data store zone, then click Edit.To remove zone from the cloud, click the Actions button next to the zone, then click Delete. You'll be asked for confirmation before the zone is removed.
21.4.3 View Data Store Zone DetailsTo view details of a data store zone:
1. Go to your Control Panel's Settings menu and click the Data Store Zones icon.
2. Click the label of the zone you're interested in. On the screen that appears, you will see the following data store zone details:
o Its label
o A list of data stores assigned to the zone
21.4.4 Attach Data Stores to Data Store ZoneTo add a data store to a zone:
1. Go to your Control Panel's Settings menu and click the Data Store Zones icon.
2. Click the label of the zone you want to add a data store to.
DOCUMENT REVISIONS - LIST OF DEFAULT PERMISSIONS FOR USER ROLE 224
OnApp 3.0 Administration Guide v15
3. On the screen that follows, click the Actions button next to the unassigned data store you want to add, then click Attach.
21.4.5 Remove Data Stores From Data Store ZoneTo remove a data store from a zone:
1. Go to your Control Panel's Settings menu and click the Data Store Zones icon.
2. Click the label of the zone you want to remove a data store from.
3. On the screen that appears, click the Actions button next to the data store you want to remove, then click Delete.
21.5 Networks SettingsOnApp enables you to modify network configurations quickly and easily. Use caution when changing network settings.
21.5.1 View networksTo view the networks currently available in your cloud:
1. Go to your Control Panel's Settings menu.
2. Click the Networks icon.
3. The screen that appears shows every network available in your cloud.
Click a network's label to show details of IPs assigned to that network, and to add new IP addresses.
Click the Edit icon to change the network's label, VLAN and network zone settings.
21.5.2 Create NetworkTo add a new network:
1. Go to your Control Panel's Settings menu.
2. Click the Networks icon: the screen that appears shows every network available in your cloud.
3. Click the Add New Network button at the end of the list.
4. On the screen that follows, give the new network a name (label), a VLAN number, and assign it to a network zone if required.
5. Click the Add Network button to finish.
DOCUMENT REVISIONS - LIST OF DEFAULT PERMISSIONS FOR USER ROLE 225

OnApp 3.0 Administration Guide v15
The network label is simply your choice of a human-readable name – "public", "external", "1Gb", "10Gb" etc. The VLAN field only needs to be given a value if you are tagging the IP addresses you will add to this network with a VLAN ID (IEEE 802.1Q). If you plan to tag IP addresses in this way, you need to make sure the link to the public interface on the hypervisors is a trunked network port. If you are not VLAN tagging addresses, this field can be left blank and the public port on the hypervisor can be an access port Once you have added a network to OnApp you will need to add an IP address range to the new network.
To use the network, you have to assign it either to a hypervisor or a hypervisor zone.
21.5.3 Add IP Address to NetworkOnce a network has been added you need to add IP addresses to that network. The system supports dual-stack protocol implementation (both IPv4 and IPv6).To add IPv4 or IPv6 addresses:
1. Go to your Control Panel's Settings menu.
2. Click the Networks icon: the screen that appears shows every network available in your cloud.
3. Click the name (label) of the network you want to add addresses to.
4. On the screen that follows you'll see a list of all IP addresses currently assigned to this network.
5. Click the Add New IP Address button at the bottom of the screen, and complete the form that appears:
o IP Address– You can create either single IP address or a range of IP addresses.
Single IP address example: '192.168.1.5' (IPv4); '2001:db8:0:0:8:800:200C:417A' (IPv6).
Range example: '192.168.0.2-254' or '192.168.0.2-192.168.0.254' (IPv4); '2001:db8:8:800:200C:417A-427A' (IPv6).
o Netmask – Netmask example: '255.255.255.0' (IPv4) or '24' (IPv6).
o Gateway – Enter a single IP to specify a gateway. If you leave this blank the address will be added without a gateway.
o Don't use as primary during VM build – If you tick this box, the IP addresses you add will never be assigned as primary IPs. Primary IPs are only allocated to VMs when the VM is built, so with this box ticked, the address range will never be assigned to a newly built VM.
6. Click the Add New IP Address button to finish.
The number of IP addresses you can add at one time is defined on the Settings -> Configuration screen, under the Interface tab. To add more IP addresses than the maximum number configured, just repeat the procedure again.
DOCUMENT REVISIONS - LIST OF DEFAULT PERMISSIONS FOR USER ROLE 226
OnApp 3.0 Administration Guide v15
21.5.4 Delete IP Address from NetworkTo delete an IP address from a network:
1. Go to your Control Panel's Settings menu.
2. Click the Networks icon.
3. Click the name (label) of the network you wish to remove an address from.
4. On the page that appears you will see the list of IP addresses added to this network. Tick the box next to a required address and click the Remove Selected IP icon. You can also select several addresses and remove them. The Filter at the bottom of the page will simplify the selection process.
21.5.5 Edit NetworkTo change the name, VLAN or network zone of an existing network:
1. Go to your Control Panel's Settings menu.
2. Click the Networks icon.
3. Click the Actions button next to the network you want to change, then click Edit.4. Change its details on the screen that follows, then click the Save Network button.
The network label is simply your choice of a human-readable name – "public", "external", "1Gb", "10Gb" etc. The VLAN field only needs to be given a value if you are tagging the IP addresses you will add to this network with a VLAN ID (IEEE 802.1Q). If you plan to tag IP addresses in this way, you need to make sure the link to the public interface on the hypervisors is a trunked network port. If you are not VLAN tagging addresses, this field can be left blank and the public port on the hypervisor can be an access port.
21.5.6 Delete NetworkTo delete an existing network, so it is no longer available as a cloud resource:
1. Go to your Control Panel's Settings menu.
2. Click the Networks icon.
3. Click the Actions button next to the network you want to remove, then click Delete. You will be asked for confirmation before the network is deleted.
DOCUMENT REVISIONS - LIST OF DEFAULT PERMISSIONS FOR USER ROLE 227

OnApp 3.0 Administration Guide v15
21.5.7 Assign/Unassign IP Address from UserYou can assign an IP Address or several IP addresses to a particular user, so that they could create a VM based on it:
1. Go to your Control Panel's Settings menu.
2. Click the Networks icon.
3. Click the name (label) of the network from which you wish assign/unassign an IP address to a user.
4. On the page that appears, you will see the list of IP addresses added to this network. Tick the box or drag a rectangle around next to a required address or several addresses. You can also select IP addresses by dragging a rectangle around IP addresses you want to select. The Filter at the bottom of the page will simplify the selection process.
To assign, click Assign IP Addresses. On the window that pops up, fill in the user name and click Assign IP Address button.
To unassign, click Unassign IP Addresses.
21.6 Network zones settingsNetwork zones can be used to create different tiers of service – for example, by setting up different zones for different network resources in the cloud. Zones can also be used to create private clouds for specific users.
21.6.1 Create Network ZoneTo create new network zone:
1. Go to your Control Panel's Settings menu and click the Network Zones icon.
2. Click the Create Network Zone button.
3. On the screen that follows, give your network zone a name (label) and then click the Save button.
21.6.2 View/Edit/Delete Network ZoneTo view network zones:
1. Go to your Control Panel's Settings menu, and click the Network Zones icon.
2. The screen that appears will show all network zones currently set up in the cloud.
3. Click a zone's label (name) to see details of the zone and to access the functions for adding/removing networks to/from the zone.
DOCUMENT REVISIONS - LIST OF DEFAULT PERMISSIONS FOR USER ROLE 228

OnApp 3.0 Administration Guide v15
To change network zone's name, click the Actions button next to required zone, then click Edit.To remove it from the cloud, click the Actions icon next to the zone, then click Delete. You'll be asked for confirmation before the zone is removed.
21.6.3 View Network Zone DetailsTo view details of a network zone:
1. Go to your Control Panel's Settings menu and click the Network Zones icon.
2. Click the label of the zone you're interested in. The screen that follows shows details of that zone:
o Network zone's label
o A list of networks assigned to the zone
21.6.4 Add Networks to Network ZoneTo add a network to a zone:
1. Go to your Control Panel's Settings menu and click the Network Zones icon.
2. Click the label of the zone you want to add a network to. The screen that appears will show you all networks in the cloud, organized into two lists – those assigned to the zone already, and those that are unassigned.
3. In the unassigned list, find the network you want to add to the zone and click the Add icon next to it.
21.6.5 Remove Networks From Network ZoneTo remove a network from a zone:
1. Go to your Control Panel's Settings menu and click the Network Zones icon.
2. Click the label of the zone you want to remove a network from. The screen that appears will show you all networks in the cloud, organized into two lists – those assigned to the zone already, and those that are unassigned.
3. In the assigned list, find the network you want to remove, and click the Delete icon next to it.
DOCUMENT REVISIONS - LIST OF DEFAULT PERMISSIONS FOR USER ROLE 229
OnApp 3.0 Administration Guide v15
21.7 IP Address PoolsIP Address Pools are network configurations that you can associate with VLANs. They assign IP addresses to VMware virtual machines included to customer VLANs. Each IP address pool consists of a range of IP addresses. When configuring an IP Address Pool, you set a range of IPv4 or IPv6 addresses and specify the network address of a VLAN that this pool will be available to.
21.7.1 Create IP Address PoolTo create new IP address pool:
1. Go to your Control Panel’s Settings menu.
2. Click the IP Address Pools icon.
3. Click the Add IP address Pool button at the bottom of the screen.
4. On the screen that apears, specify the details as required:
o network address – specify the address of a VLAN network address that will be associated with this IP address pool.
o CIDR- specify CIDR notation. Example: 24
5. Click Add IP Address pool.
21.7.2 View/Delete IP Address PoolTo view, edit or edelete an IP address pool:
1. Go to your Control Panel’s Settings menu.
2. Click the IP Address Pools icon.
3. On the screen that appears, you’ll see the list of all IP address pools in the cloud.
4. Click an IP address pool's label to view it’s details.
5. To edit or delete an IP address pool, click the Actions button next to the required pool, then select the proper action.
21.8 FirewallsFirewalls are used to manage VLANs and route VM networking traffic in and out of OnApp. Vyatta Community Edition is used with standard OnApp CP Firewall Interface on a VM basis. Because all customer VM are running inside customer network, firewalls are required as the VM gateway. The shared Vyatta must be installed and configured for CP to control it before creating any VMware virtual machine.
DOCUMENT REVISIONS - LIST OF DEFAULT PERMISSIONS FOR USER ROLE 230

OnApp 3.0 Administration Guide v15
Documentation on Vyatta can be found at www.vyatta.com
21.8.1 View/Edit/Delete FirewallsTo view the list of firewalls:
1. Go to your Control Panel's Settings menu and click the Firewalls icon.
2. On the screen that appers, you'll see the list of all firewalls.
3. To edit a firewall, click the Actions button next to the required firewall, then choose Edit.4. To delete a firewall, click the Actions button next to the firewall you want to remove, then
choose Delete.
21.8.2 Create firewallTo configure firewall settings:
1. Go to your Control Panel's Settings menu.
2. On the screen that appears, click Firewalls icon.
3. Specify the following settings:
o IP Address for CP communication - IP address used to manage firewall via CP
o CIDR for CP communication - internal IP address prefix size
o VLAN interface name - interface used for managing firewall via CP
o External IP Address - external firewall IP
o External CIDR - external IP address prefix size
o External Interface Name - external firewall interface
o External Gateway - external gateway address
o Default Rule - default firewall settings for new VMs (DROP/ACCEPT)
o User Name - specify username for the remote Vyatta management
o Password - set password for remote Vyatta management
4. Click Add firewall button.
DOCUMENT REVISIONS - LIST OF DEFAULT PERMISSIONS FOR USER ROLE 231

OnApp 3.0 Administration Guide v15
21.9 Backup Servers SettingsBackup servers are servers responsible for storing backups and templates of virtual machines running in the cloud, in order to prevent data loss in the event of failure.There are now two ways to handle backup and template storage in your cloud.
21.9.1 Basic Backup SchemeRunning disk-related actions on hypervisorsThis was the default backup method prior to OnApp Cloud 2.3.2. In this scenario, template/backup storage works as follows:
Backups and templates are stored on a single backup/template server.
Backup transactions are performed on hypervisors.
After the backup is taken on a hypervisor, it is put on the backup/template server. This server can be accessed via SSH or NFS.
o In order to make this server accessible via SSH, you should configure SSH file transfer server options.
o In order to make this server accessible via NFS, you should mount the appropriate directory from this server to each hypervisor.
Backups created are stored at the path defined in Settings -> Configuration -> Backups/templates
Currently, only the Basic Backup Scheme is available if you're using the OnApp Storage integrated SAN.
Only one Backup Scheme can be used per cloud, so if you use OnApp Storage you will need to use the Basic Backup Scheme regardless of which other Hypervisor Groups that are present.
21.9.2 Advanced Backup SchemeRunning disk-related actions on one or more dedicated backup serversThis backup scheme can be used in OnApp Cloud 2.3.2 and above. This option does not use hypervisors to take backups. Instead, you deploy one or more dedicated backup servers, which handle transactions and store all backups & templates.
If you have added one or more backup servers, all backups will be stored on these servers.
DOCUMENT REVISIONS - LIST OF DEFAULT PERMISSIONS FOR USER ROLE 232

OnApp 3.0 Administration Guide v15
If there is more than one backup server, backups are performed on the server with the most available disk space.
A network is used to connect hypervisor with the backup server. (An IP address is assigned to hypervisor and a backup server to build an NBD connection. If no IP is assigned to the hypervisor, an IP from the management network will be used.
Using this method, templates are also stored on the dedicated backup server(s). When converting a backup to a template, the new template will be stored on the same server as the backup.
Dedicated backup servers handle the following activities:
Backup and template related actions Take a backup
Restore a backup
Convert backup to template
Destroy backup
Destroy template
Disk related actions Configure OS on virtual machine
Provision virtual machine
Create disk
Format disk
Resize disk
Migrate disk
Destroy disk
VM related actions Set SSH keys
Network Configuration
Rebuild network
Attach/detach Network Interface
If there are no dedicated backup servers in the cloud, all these actions will be performed by hypervisors, and backups/templates stored according to the settings defined in Settings -> Configuration -> Backups/templates.
The use of dedicated backup servers is available for non-local data stores only.
If your cloud uses a combination of local storage and SANs, you will only be able to use the new backup method for virtual machines that have been allocated SAN-based storage.
DOCUMENT REVISIONS - LIST OF DEFAULT PERMISSIONS FOR USER ROLE 233

OnApp 3.0 Administration Guide v15
If only local storage is used, you shouldn't define any dedicated backup servers – instead, configure your SSH or NFS settings in the Settings -> Configuration -> Backups/templates menu.
Starting from the OnApp v3.0 you can use dedicated Cloud Boot backup servers and virtual backup servers in your cloud. Please refer to the Create Cloud Boot Backup Server and Create Virtual Backup Server sections for more details.
21.9.3 Create Backup ServerTo create a backup server:
1. Go to your Control Panel's Settings menu, then press Backup servers icon.
2. Click the Create Backup Server button.
3. Fill in the form that appears:
o Label - give your backup server a label
o IP address - enter the backup server IP address (IPv4)
o Backup IP address - add a provisioning network IP address
o Capacity - set the backup server capacity (in GB)
4. Tick the Enabled box to enable the backup server.
5. Click the Add Backup Server button.
21.9.4 Create Cloud Boot Backup Server
We strongly recommend you to deploy one or more backup servers for backups and VM provisioning when using a Cloud Boot functionality.
Follow the step-by-step instructions provided in this chapter to configure cloud boot backup servers in your cloud.
1. Create new KVM hypervisor with an IP address from the dynamic range. See the Create Hypervisor chapter of this guide for details. Wait till the hypervisor comes online.
2. Go to your Control Panel's Settings menu, then press Backup servers icon.
3. Click the Create Backup Server button.
4. Fill in the form that appears:
DOCUMENT REVISIONS - LIST OF DEFAULT PERMISSIONS FOR USER ROLE 234

OnApp 3.0 Administration Guide v15
o Label - give your backup server a label
o IP address - enter the IP address ofa hypervisor you have created at step 1.
o Backup IP address - add a provisioning network IP address
o Capacity - set the backup server capacity (in GB)
5. Tick the Enabled box to enable the backup server.
6. After that, assign your backup server to the backup server zone.
If you intend to attach LVM-based storage and create backups, you should also add the IP address of the KVM HV added in step 1 in the 'Backup IP address' field of each of your hypervisors.Before executing any of the steps above:
1. Update Cloud Boot and CP server RPMs:
yum update onapp-store-installyum update onapp-cp-install
2. Configure Cloud Boot settings:
/onapp/onapp-store-install/onapp-store-install.sh
PLEASE NOTE: You should configure some local or remote attached storage for persistent backups on the provisioning/backup server.
21.9.5 Create Virtual Backup ServerVirtual backup servers are designed to reduce IO load in Domain 0 of Xen hypervisors. Utilization of virtual servers helps to reduce load on hypervisor servers and improve their performance and may be used as an alternative to dedicated backup servers. The backup servers can then be used to offload the backup activities from Dom0 and free up resources from the Hypervisor. Once configured via the CloudBoot interface, virtual backup servers are managed exactly the same as dedicated physical backup servers.
For clouds using the backup scheme without dedicated backup servers, virtual backups appliance should be used rather than the standard procedure.
PLEASE NOTE: You need to configure a backup target for storing backups before using a virtual backup server.
If you reboot a hypervisor that functions as a virtual backup server without a target specified,
DOCUMENT REVISIONS - LIST OF DEFAULT PERMISSIONS FOR USER ROLE 235

OnApp 3.0 Administration Guide v15
all backups will be lost!
How can you tell if a backup server is virtual or dedicated?In the UI, there will be an additional HV with the MAC address beginning with "de:be", that is available when selecting "Add a new CloudBoot appliance".
From the CP server side, running "backupServerAdmin list" command will show the presence of a backup server as per step 4 below.
Virtual backup servers are included in the onappstore rpm and need to be configured manually via the CP terminal.
You can execute the following commands:
Command backupServerAdmin
Usage:
backupServerAdmin list
backupServerAdmin create <HV MAC Addr> <RAM> <vCPUs><Bridge1,Bridge2,...BridgeN>
backupServerAdmin delete <HV MAC Addr> <VMname>
backupServerAdmin start <HV MAC Addr> <VMname>
backupServerAdmin stop <HV MAC Addr> <VMname>
backupServerAdmin move <Src HV MAC Addr> <Dst HV MAC Addr> <VMname>
backupServerAdmin hvnetinfo <HV MAC Addr>
Where:
HV MAC Addr - MAC address of a Xen hypervisor that is used for the virtual backup server
RAM - virtual backup server RAM
vCPUs - virtual backup server CPUS
DOCUMENT REVISIONS - LIST OF DEFAULT PERMISSIONS FOR USER ROLE 236
OnApp 3.0 Administration Guide v15
Bridge1,Bridge2,...BridgeN - bridge identifiers configured on the hypervisors
Src HV MAC Addr - the MAC address of the HV we will move the virtual backup server from during the migration
Dst HV MAC Addr - target MAC IP address during the virtual backup server migration
VMname - virtual backup server name that is generated automatically during the creation process
backupServerAdmin list report example:
Node <MAC_ADDRESS> (<IP_ADDR>)Backup Server '<BS_NAME>':Memory: 'BS_RAM'vCPUs: 'BS_CPU'Networks: ['bridge=BRIDGENAME,vifname=VIFNAME,mac=MAC_ADDR'*]Running: TRUE/FALSE
To add the virtual backup server via CLI:
1. List available hypervisors and IP addresses:
backupServerAdmin list
2. Query Networks available to a given hypervisor:
backupServerAdmin hvnetinfo
3. Create a config on a chosen hypervisor:
backupServerAdmin create
4. Find the ID of the backup server:
backupServerAdmin list
5. Start the Backup server VM:
DOCUMENT REVISIONS - LIST OF DEFAULT PERMISSIONS FOR USER ROLE 237

OnApp 3.0 Administration Guide v15
backupServerAdmin start
6. Wait for two minutes. After that, go to the OnApp Control Panel and create new Xen Cloud Boot hypervisor with the MAC of a virtual backup server address obtained with the 'backupServerAdmin list' command.
7. Restart the backup server from the CLI:
backupServerAdmin stopbackupServerAdmin start
To create new virtual backup server in the OnApp Control Panel:
1. Go to your Control Panel's Settings menu, then press Backup servers icon.
2. Click the Create Backup Server button.
3. Fill in the form that appears:
o Label - give your backup server a label
o IP address - enter the IP address of a virtual backup server
o Skip the Backup IP address field, as it is not required for the virtual backup server
o Capacity - set the backup server capacity (in GB)
4. Tick the Enabled box to enable the backup server.
21.9.6 Edit Backup ServerTo edit a backup server:
1. Go to your Control Panel's Settings menu and click the Backup Servers icon.
2. Click the backup server's label.
3. On the screen that appears, you'll see the list of all backup servers currently set up in the cloud.
4. Click the Actions button next to the backup server you want to edit, then click Edit to change the backup server's properties:
o Label
o IP address
o Provisioning network IP address
o Capacity (in GB)
o Enabled box – if you leave the enabled box empty, the backup server will be disabled.
5. Click the Edit Backup Server button to save changes.
DOCUMENT REVISIONS - LIST OF DEFAULT PERMISSIONS FOR USER ROLE 238

OnApp 3.0 Administration Guide v15
21.9.7 Manage Backups For Backup ServerClick a backup server zone's label to perform the following actions with a backup server:
See the list of all backups currently present on the backup server.
Remove a particular backup.
Proceed to the backup page.
21.9.8 Delete Backup ServerTo delete a backup server:
1. Go to your Control Panel's Settings menu and click the Backup Servers icon.
2. Click the backup server's label.
3. On the screen that appears, you'll see the list of all backup servers currently set up in the cloud.
4. Click the Actions button next to the backup server you want to remove from the cloud, then click Delete. You'll be asked to confirm deletion.
All the backups stored on that backup server will be deleted!
21.10 Backup Server Zones SettingsThe Backup server zones feature can be used to create different tiers of service – for example, by organizing backup servers in the cloud into different backup server zones. You can also specify limits and prices individually for each Backup Server Zone assigned to the Billing Plan.
21.10.1 Create Backup Server ZoneTo create a new backup server zone:
1. Go to your Control Panel's Settings menu and click the Backup Server Zones icon.
2. On the screen that appears, click the Create New Backup Zone button at the bottom of the list.
3. Give your network zone a name and click Save.
21.10.2 View Backup Server Zone DetailsTo view details of a backup server zone:
DOCUMENT REVISIONS - LIST OF DEFAULT PERMISSIONS FOR USER ROLE 239

OnApp 3.0 Administration Guide v15
1. Go to your Control Panel's Settings menu and click the Backup Server Zones icon.
2. On the screen that appears, you'll see all backup server zones currently set up in the cloud.
3. Click the label of the zone you're interested in. The screen that appears shows details of that zone:
o Zone's label
o List of assigned backup servers
o List of unassigned backup servers
21.10.3 Edit Backup Server ZoneTo edit a backup server zone:
1. Go to your Control Panel's Settings menu.
2. Click the Backup Server Zones icon.
3. Click the Actions button next to the backup server zone, then click Edit to change the zone's name.
4. Click Save.
21.10.4 Delete Backup Server ZoneTo delete a backup server zone:
1. Go to your Control Panel's Settings menu
2. Click the Backup Server Zones icon.
3. Click the Actions button next to the zone you want to remove, then click Delete. You will be asked to confirm deletion.
21.10.5 Add Backup Server to Backup Server ZoneTo attach a backup server to the backup server zone:
1. Go to your Control Panel's Settings menu and click the Backup Server Zones icon.
2. Click the label of the zone you want to attach a backup server to. On the screen that appears you will see the list of all backup servers in the cloud organized into two groups – those already assigned to this backup server zone and those that are unassigned.
3. Choose an unassigned backup server and click the Add icon next to it.
21.10.6 Remove Backup Server From Backup Server ZoneTo remove a backup server to the backup server zone:
DOCUMENT REVISIONS - LIST OF DEFAULT PERMISSIONS FOR USER ROLE 240
OnApp 3.0 Administration Guide v15
1. Go to your Control Panel's Settings menu and click the Backup Server Zones icon.
2. Click the label of the zone you want to attach a backup server to. On the screen that appears you will see the list of all backup servers in the cloud organized into two groups – those already assigned to this backup server zone and those that are unassigned.
3. In the assigned list, find the backup server you want to remove, and click the Delete icon next to it.
21.11 Autobackup Presets SettingsAutobackup presets are a simple way to set up an automatic backup schedule when Virtual Machines are created. Once configured, they can be applied to a VM automatically when the Automatic Backups Required box is checked during VM creation.A number of preset backup time periods are available (daily, weekly, monthly and annual backups) which are configured further by specifying how often each backup is taken. So, for example, you can set up automatic backups every 2 days, every 1 month, or even every 12 months (the same as every 1 year). Each type of backup can be enabled or disabled.
To view and edit autobackup presets:
1. Go to your Control Panel's Settings menu
2. Click the Autobackup Presets icon. You'll see a list of the presets available on the following screen, and whether they are enabled or not.
3. To change a preset, click its Actions icon, then click Edit to change the period and frequency, and whether that preset is enabled or not.
4. Click the Save button to finish.
The combination of Autobackup Presets and Scheduled VM backups provides a great deal of flexibility in the way backups are handled for the cloud, and for individual VMs. Autobackup Presets can be applied to all new VMs added to the cloud. Scheduled VM backups enable specific backups to be scheduled for individual VMs, outside of the autobackup pattern.
DOCUMENT REVISIONS - LIST OF DEFAULT PERMISSIONS FOR USER ROLE 241

OnApp 3.0 Administration Guide v15
21.12 Disks SettingsThe disk settings screen lets you view, edit, migrate and delete every disk in the cloud, and provides quick access to their backup and schedule functions.
21.12.1 View/Edit/Delete DisksThe Disk Settings screen lists all the disks in the cloud and indicates disk ID, disk label, disk size, data store they're configured on, the virtual machine they're assigned to, their type, status, number of backups taken and backup status.
Use the Yes/No buttons to change disk's autobackup status.
Click Actions -> Edit button next to a disk to change its size.
Click Actions -> Migrate button next to a disk to migrate it to another data store.
Click Actions -> IOPS button next to a disk to see its IOPS usage statistics.
Click Actions -> Backup button next to a disk to view its backups, and to take a new one.
Click Actions -> Schedule For Backups button next to a disk to view its scheduled backups and to add a new schedule.
Click Actions -> Delete button next to a disk to delete it. You'll be asked for confirmation before the disk is removed. All backups for this disk will be removed too.
21.12.1.1 Disk Wipe
The latest version of OnApp Cloud (v3.0) gives you two ways to clean VM data when deleting or migrating a VM's disk. By default, OnApp Cloud will format the physical disk space used by a virtual machine when that VM's virtual disk is deleted, or when the VM disk is migrated to another data store.
You can also choose to wipe/format a VM's disk (filling it with zeroes) by changing a configuration setting on the OnApp Controller Server. To enable this behaviour:
1. Log in as root on your OnApp Controller Server.
2. Edit the following configuration file: /onapp/interface/config/on_app.yml and set the wipe_out_disk_on_destroy parameter to true.
3. Restart OnApp service: service onapp restart.
The wipe_out_disk_on_destroy value is set to FALSE by default. If you wish to return disk wiping behaviour to the default setting (formatting rather than zeroing disks), simply edit the config file and set the value to FALSE again.
PLEASE NOTE: In OnApp Cloud v2.x disk wiping was enabled by applying a specific LV Wipe patch. If you installed this patch you should remove it before you enable disk wiping
DOCUMENT REVISIONS - LIST OF DEFAULT PERMISSIONS FOR USER ROLE 242

OnApp 3.0 Administration Guide v15
under OnApp Cloud v3.0. For uninstall instructions, see the guide here: LV wipe add-on
21.13 Configuration SettingsThe configuration settings screen lets you change various aspects of your OnApp installation. To edit these OnApp configuration settings:
1. Go to your Control Panel's Settings menu.
2. Click the Configuration icon. Click the tabs to edit the relevant config settings (System, Backups/Templates, Interface) – these are explained in the subsections that follow.
21.13.1 Edit System Configuration1. Go to your Control Panel's Settings menu, and click the Configuration icon.
2. Click the System tab to change the following application settings:
License info
o License key - the key for your OnApp installation.
Hypervisors*
o Hypervisor live times* - determines how many times the Control Panel server will attempt to contact a hypervisor before failover is initiated.
If you change settings here and save, the Control Panel server will restart OnApp services.
Application updates
o Update server URL - the location OnApp software updates are downloaded from.
VM Console Ports*
These are the ports used to remotely connect to virtual machines using the integrated VNC
DOCUMENT REVISIONS - LIST OF DEFAULT PERMISSIONS FOR USER ROLE 243

OnApp 3.0 Administration Guide v15
console.Set the port range using the remote access session start port and remote access last port fields.
If you change settings here and save, the Control Panel server will restart OnApp services.
Email - this is where you configure OnApp to send email alerts for failed transactions and changes of hypervisor status.
o System notification - tick this checkbox to enable email alerts.
o System host - enter a server IP or URL. Email alerts link to transaction logs for alert events, and those logs are opened from the server configured here.
o System email – the email address from which help requests and email alerts are sent.
o System support email - the email address to which the system will send alerts about failed transactions and change of hypervisor status.
Miscellaneous
o App name – here you may change the application name.
o Generate comment - this text is added by OnApp to system configuration files, such as resolv.conf.
o CPU guarantee - tick this checkbox to make sure there is enough CPU on the system to create a new VM.
This prevents the system from creating VMs with more CPU than is available for a hypervisor. For example, on a hypervisor with 4 CPU cores, with CPU guarantee enabled, you will only be able to create 4 VMs with 100% CPU priority. The system will not allow you to create a 5th VM.
o Enable huge pages - tick this checkbox to enable huge pages utilization. Huge pages are the memory pages of size 2MB. Use of hugepages allows to reduce the number of page walks as compared to a standard method of translation from a virtual address to physical 4kB page.
DOCUMENT REVISIONS - LIST OF DEFAULT PERMISSIONS FOR USER ROLE 244

OnApp 3.0 Administration Guide v15
o Show IP address selection for new VM – tick this checkbox to enable IP address assignment during VM creation.
o Simultaneous transactions - the number of transaction runners which the daemon will execute at the same time.
o Zombie transaction time - set the duration in minutes for the system to consider a task as "pending" before it can be relegated to zombie status.
o Timeout Before Shutting Down VMs - specify the VM shutdown period (from 30 to 300 seconds). This will allow to refuse the shutdown if the VM is booting and retry every 30 seconds till it is registered.
o Allow initial password encryption – tick this box to enable root password encryption for virtual machines.
o Allow hypervisor password encryption – tick this box to enable root password encryption for hypervisors.
Delay in seconds between executing background tasksSets frequency in seconds for executing the following tasks:
o Backup taker delay
o Billing stats updater delay
o Cluster monitor delay
o Hypervisor monitor delay
o Schedule runner delay
o Transaction runner delay
o CDN sync delay
CloudBoot
o Enable CloudBoot - tick this checkbox to enable/disable the PXE boot system on the cloud.
o Static config target - the IP of NFS server that contains virtual machine image templates.
o CP server Cloudboot target - the IP of Control Panel server.
DOCUMENT REVISIONS - LIST OF DEFAULT PERMISSIONS FOR USER ROLE 245
OnApp 3.0 Administration Guide v15
OnApp Storage
o Enable OnApp Storage- tick this checkbox to enable/disable the OnApp storage on the cloud.
o Use Local Read Path - tick this checkbox to minimise the network throughput dependency for read heavy workloads. When the Use Local Read Path feature is enabled, reads go over the local software bridge to a local replica of the data rather than traverse a physical NIC + switch.
VMware
VMware cluster name - the name of the VMware cluster
3. Click the Save Configuration button to finish.
21.13.2 Edit Backups/Templates Configuration1. Go to your Control Panel's Settings menu, and click the Configuration icon.
2. Click the Backups/Templates tab to manage the following settings:
Paths toSets paths for various OnApp files (shown here with default path examples)
o Template path - /data/templates
o Recovery templates path - /onapp/tools/recovery
o Backups path - /data/backups
Backup/template serverBackups and templates can be stored on a remote server or a mounted disk. To store backups & templates remotely, configure the following settings:
o Use NBD for backups - move this slider to the right to use NDB for backups. If the NBD usage is enabled, an additional network interface will be used for backup servers, in other case simple backup scheme with dedicated backup servers will be used. Use of network block devices prevents simultaneous snapshot activation on hypervisor and data store, so that the snapshot is active on one device and shared via NBD with the other.
DOCUMENT REVISIONS - LIST OF DEFAULT PERMISSIONS FOR USER ROLE 246
OnApp 3.0 Administration Guide v15
Disabling NBD backups if using a dedicated backup server is not recommended. The failback option will mount a VS snapshot directly on the backup server to take the backup which is against LVM best practices and could have unexpected consequences.
o Use SSH file transfer - move this slider to the right to enable SSH data transfer for your template/backup server. If this option is not enabled, you will need to mount the templates/backup server manually.
o SSH file transfer server - specify the IP address of the backup/template server.
o SSH file transfer server - specify the IP address of the remote server.
o SSH file transfer user - the login used for remote server authentication. A password is not required, as it is required that you store a host key.
o SSH file transfer options - the SSH protocol options that set the rules and behavior of how to log into the remote server. By default, the options are set to omit adding new host keys to the host file, and skip password authentication. They also specify the path where the host key is stored. For a detailed list of configuration options, refer to ssh protocol man pages (under the -o option description. See http://unixhelp.ed.ac.uk/CGI/man-cgi?ssh+1).
Backup processeso Simultaneous backups - the maximum number of hypervisor and data store backup
processes allowed at once on the Control Panel.
o Simultaneous backups per data store - if this number exceeds the overall total, the overall total limit will be enforced.Simultaneous backups per hypervisor - if this number exceeds the overall total, the overall total limit will be enforced.
For example: if Total number allowed is 10, and Total per data store and Total per hypervisor are set to 5, then up to 10 backups can be taken at once is 10 – 5 per data store, and 5 per hypervisor.
3. Click the Save Configuration button to finish.
21.13.3 Edit Interface Configuration1. Go to your Control Panel's Settings menu, and click the Configuration icon.
2. Click the Interface tab to change the following application settings:
DOCUMENT REVISIONS - LIST OF DEFAULT PERMISSIONS FOR USER ROLE 247
OnApp 3.0 Administration Guide v15
Locales
o Locales – select locales which will be available for the users.
IP addreses
o IP range limit – set the number of IPs that can be added as a range at the same time.
AJAX update rates (ms)
o Ajax power update time– specify the AJAX power update time and AJAX pagination update time.
Pagination
o Pagination max items limit – the maximum number of items after which the Show All option can not be applied.
3. Click the Save Configuration button to finish.
21.13.4 Edit Defaults Configuration1. Go to your Control Panel's Settings menu, and click the Configuration icon.
2. Click the Defaults tab to change the following application settings:
Enforce password complexity- move the slider to the right to specify the following password complexity configuration settings:
o Minimum length - specify minimum required password length (0-99). The default value is 12.
o Enforce at least one upper and lower case letter - move this slider to the right to enforce user using both uppercase and lowercase letters in their password.
o Enforce at least one letter and number - move this slider to the right to enforce user using both letters and numbers in their password.
DOCUMENT REVISIONS - LIST OF DEFAULT PERMISSIONS FOR USER ROLE 248

OnApp 3.0 Administration Guide v15
o Enforce symbols - move this slider to the right to enforce user using symbols in their password.
o Enforce unique password every time - move this slider to the right to make user enter unique password each time they change password (the last 12 passwords are saved in OnApp configuration). This refers to the user account passwords only.
o Lockout attempts - the number of unsuccessful logon attempts that are allowed before user's account is locked out.
o Expiry (Months) - specify the password expiry period in months.
Daemon will be restarted automatically after changing the password complexity configuration.
The password complexity configuration settings will be saved after disabling the Enforce Password Complexity option and enabling it again.
New Virtual Machineso Default Image Template - choose a particular OS template as the default for VM
creation. A new virtual machine will be created using this template, unless otherwise set in the wizard.
o Service Account Name - specify the service account name that will be automatically created on all virtual machines to be able to communicate with them.
Firewallo Default firewall policy – default settings for a VM's Networking -> Firewall tab
(accept/drop)
o Enable KVM anti spoofing - tick the checkbox to run the anti-spoofing mechanism for IP addresses of the network interfaces attached to KVM-based virtual machines. To apply the anti-spoofing, it is necessary to restart the Control Panel and OnApp Daemon.
SSH Optionso SSH port – specify the port used to connect to hypervisors and backup servers.
SSH Keyso SSH-keys – click to manage the administrator SSH keys. The keys will be automatically
assigned to all VMs which will be created in the cloud later.To assign the keys to existing VMs, go to VM Overview -> Properties menu.
3. Click the Save Configuration button to finish.
DOCUMENT REVISIONS - LIST OF DEFAULT PERMISSIONS FOR USER ROLE 249
OnApp 3.0 Administration Guide v15
21.14 LicenseThe license screen lets you view and edit your OnApp license key details. To edit OnApp license details:
1. Go to your Control Panel's Settings menu.
2. Click the License icon.
3. The screen that appears will show the following license details:
o license type
o license key
o core limit
o license status
4. Click the Change License Key button to change the OnApp license key. You will be redirected to the System Configuration page.
5. To accelerate the license validation after changing the license, click the Restart License Client button.
21.15 Resolvers SettingsOnApp Resolvers work like DNS servers – they translate a hostname to an IP address.
You should specify at least 2 resolvers for each network in OnApp. When a new VM is provisioned, these resolvers are injected into the resolver configuration automatically.
21.15.1 View ResolversTo view the resolvers on your system:
1. Go to your Control Panel's Settings menu.
2. Click the Resolvers icon. The screen that appears lists all resolvers set up for your cloud.
DOCUMENT REVISIONS - LIST OF DEFAULT PERMISSIONS FOR USER ROLE 250
OnApp 3.0 Administration Guide v15
21.15.2 Create ResolverTo add a new resolver:
1. Go to your Control Panel's Settings menu.
2. Click the Resolvers icon.
3. On the screen that appears, click the Create resolver button.
4. Specify resolver details:
o address * - the resolver IP address
o network_id * - the ID of the network to which this resolver should belong
5. Click Create resolver button.
21.15.3 Edit ResolverTo edit an existing resolver:
1. Go to your Control Panel's Settings menu.
2. Click the Resolvers icon.
3. Click the Actions icon next to the resolver you want to change, then click Edit.
21.15.4 Delete ResolverTo delete an existing resolver:
1. Go to your Control Panel's Settings menu.
2. Click the Resolvers icon.
3. Click the Actions button next to the resolver you want to remove, then click Delete. You will be asked for confirmation before the resolver is removed.
21.16 Schedules SettingsThe schedules settings screen lets you view, edit and delete all backups scheduled for virtual machines in the cloud.To add a new schedule:
1. Go to your Control Panel's Settings menu.
2. Click the Schedules icon to see the list of all backup schedules in the system.
3. Click the Actions button next to the required disk and select the Schedule For Backups from the split menu.
DOCUMENT REVISIONS - LIST OF DEFAULT PERMISSIONS FOR USER ROLE 251

OnApp 3.0 Administration Guide v15
4. On the screen that appears, specify the duration and period. You can set schedule backup period in days, weeks, months or years.
You can also schedule backup for a disk via Virtual Machines menu. For details, refer to Schedule VM backups section.When you create a schedule, the first backup is taken automatically. All subsequent backups will be taken at the same time the first one was taken. Each backup erases the previous backup. The total number of backups allowed depends on user's billing plan.When a schedule is no longer needed, we recommend deleting it so that the task will no longer run.
21.16.1 View/Edit/Delete SchedulesTo view, edit and delete schedules:
1. Go to your Control Panel's Settings menu.
2. Click the Schedules icon to see a list of all schedules on the system.
Click the Delete icon next to a schedule to remove it.
Click the Edit icon next to a schedule to change its frequency.
21.17 Customer VLANsVLANs are used to segment virtual network so that customer networks are isolated from one another as if they were on physically different segments. Each customer can have one VLAN with VMware VMs based on it. Configuring VLANs is essential, as it secures the network traffic and reduces the traffic overload.
Customer VLAN is a group of virtual machines functioning as if they’re connected to a single network (even if they are not, in fact). In a customer VLAN, a network provides services to one subscriber. This allows to meet the performance by reducing the amount of external traffic and makes the network segmenting more efficient.
Customer VLANs feature requires a separate VLAN tag to be used for each customer (other customers networks are invisible to each of the other users).
Currently it is not possible for users to have more than 1 VLAN.
21.17.1 Create customer VLANTo create new customer VLAN:
DOCUMENT REVISIONS - LIST OF DEFAULT PERMISSIONS FOR USER ROLE 252
OnApp 3.0 Administration Guide v15
1. Go to your Control Panel’s Settings menu.
2. Click the Customer VLANs icon.
3. Click the Add New VLAN button at the bottom of the screen.
4. On the screen that appears, specify the VLAN ID range from 1 to 4094.
The Starts from value should be always less than the Ends to value.
5. Click Add Customer VLAN.
21.17.2 Edit Customer VLANTo edit a customer VLAN:
1. Go to your Control Panel’s Settings menu.
2. Click the Customer VLANs icon.
3. On the screen that appears, you’ll see the list of all customer VLANs.
4. To edit VLAN settings, click the Actions button next to the required VLAN, then click Edit.5. On the screen that appears, change VLAN details as required:
o the VLAN ID
o user to which this VLAN is assigned
6. Click the Save Customer VLAN button.
21.17.3 Delete Customer VLANTo delete a customer VLAN:
1. Go to your Control Panel’s Settings menu.
2. Click the Customer VLANs icon.
3. On the screen that appears, you’ll see the list of all customer VLANs.
4. Click the Actions button next to the VLAN you want to remove, then click Delete.
DOCUMENT REVISIONS - LIST OF DEFAULT PERMISSIONS FOR USER ROLE 253

OnApp 3.0 Administration Guide v15
22 TOOLS
OnApp provides a number of tools to help you monitor and manage your OnApp system: Logs, Cloud Usage Statistics, CDN Usage Statistics, Sysadmin Tools and Alerts. To access them, click the relevant links under the main Tools menu item in the Control Panel.
22.1 LogsOnApp logs all cloud management actions that take place on cloud resources, including virtual machines, disks, data stores, hypervisors, templates, networks.
To access and manage logs:
Click the Control Panel's Logs menu to view the log of all transactions in the cloud.
To view details of a specific transaction, click its Ref number.
You can also search for a transaction using the search box at the end of the list.
Click Clean Logs to completely clear the log.
Click Cancel All Pending Tasks to cancel all tasks scheduled for completion.
Click Clean All Pending Backups to remove all pending backups from the log.
You can relegate "pending" transactions to zombie status by clicking the pending status of a transaction, and then clicking the Failed option in the pop-up window.
This option becomes available if the transaction has been pending for the period of time specified in the Settings -> Configuration -> Zombie transaction time parameter.
22.2 StatisticsStats menu unites cloud usage and CDN usage statistics generated by the OnApp Statistics receiver.The statistics receiver is an SNMP agent that collects data from host and guest systems and saves it in the round-robin database for the future processing. The collected data are then converted into hourly, daily, weekly and monthly statistics. The interval can be changed in the application configuration file.Hourly statistics are stored in the database for the last 2 months.Daily statistics are stored for 12 months.Old statistics data are stored as a monthly statistics (12 months, respectively).
DOCUMENT REVISIONS - LIST OF DEFAULT PERMISSIONS FOR USER ROLE 254

OnApp 3.0 Administration Guide v15
22.2.1 Cloud UsageThe Usage Statistics screen lists every virtual machine in the cloud, along with their details:
Owner - the owner's username.
CPU used - the average CPU percentage that the VM has been using during the last 72 hours or during the specified period.
Disk reads completed - the number of read operations performed by the disk.
Disk writes completed - the number of write operations performed by the disk.
Disk data read - the amount of data read from a disk.
Disk data written - the amount of data written to a disk.
Bandwidth sent - the number of Bytes sent by this VM.
Bandwidth received - the number of Bytes received by this VM.
By default, statistics are generated for the last 72 hours. To specify another period, set the Start and End time and click the Apply button. You can sort by all categories except the virtual machine name: click a column label to sort in ascending order (you'll see an arrow appear to show how the data is being sorted). Click it again to sort in descending order. You can also drill into a specific VM, or its owner, by clicking the relevant links in the list.
22.2.2 CDN UsageCDN usage report lists the summary of CDN Resources used by CDN with their details:
Owner – the owner's user name. Click the owner's name for details.
Edge Group – the edge group to which the CDN resource belongs to.
Location – CDN redge server's location.
Data cached – cached CDN traffic in MB.
Data non cached – non cached CDN traffic in MB.
By default, statistics are generated for the last 72 hours. To specify another period, set the Start and End time and click the Apply button. Tick the Show in my Timezone box to show CDN usage statistics according to your profile's time zone settings.
DOCUMENT REVISIONS - LIST OF DEFAULT PERMISSIONS FOR USER ROLE 255
OnApp 3.0 Administration Guide v15
22.3 AlertsAlerts are created when zombies appear on the system. These are listed in the Control Panel's Alerts screen. There are different kinds of zombies:
Zombie virtual machines - VMs which are detected by the OnApp controller as currently running on a hypervisor, but which are not in OnApp's database. Also, VMs running on a HV the CP is not expecting it to be running on.
Zombie disks - disks which are detected by the OnApp controller as existing on a data store, but which are not in OnApp's database.
Zombie data stores - data stores which are detected by the OnApp controller as existing in the cloud, but which are not in OnApp's database.
Zombie transactions - transactions which have running status but their PIDs do not exist on the system, or transactions that have exceeded the zombie transaction time.
The Alerts menu also lists the Background processes running on your system. Max Amount values show the maximum number of background processes which can run simultaneously. Running shows the number of processes running at the moment.
In most cases you can remove the zombie elements from the system by clicking the Delete icon next to a zombie. For further help, contact support.
22.4 Sysadmin ToolsThe Sysadmin Tools screen provides tools for a number of system administration tasks.
Background Task Daemon
Daemon is responsible for executing all background tasks such as:
Transactions
Backup takers
Billing stats updater
Cluster monitor
DOCUMENT REVISIONS - LIST OF DEFAULT PERMISSIONS FOR USER ROLE 256

OnApp 3.0 Administration Guide v15
Hypervisor monitor
Schedule runner
To operate the daemon, use the following buttons:
Reload daemon – restarts the tasks, and completes all running tasks if their PIDs still exist.
Start daemon - starts up all the tasks.
Stop daemon - completes any backups in progress, but prevents any more backups from starting; stops all tasks in progress.
Check status – shows PID of the task and its status.
Reload delayed jobs - reloads the delayed jobs.
Transactions/logs Clean all pending backups - removes all transactions relating to pending backups from the
log.
Cancel all pending tasks - removes all pending actions from the log.
Clean logs - completely clears the log.
Top IOPS disks
Top IOPS statistics chart displays 10 with top IOPS usage along with the following details:
Hostname - hostname of a virtual machine the disk is located at.
Disk - disk ID.
Total IOPS - total number of I/O operations per second.
IOPS Read - number of read I/O operations per second.
IOPS Written - number of written I/O operations per second.
DOCUMENT REVISIONS - LIST OF DEFAULT PERMISSIONS FOR USER ROLE 257

OnApp 3.0 Administration Guide v15
23 ADVANCED TASKS
This chapter describes more sophisticated operations, which help manage different OnApp functionalities. It is highly recommended that only advanced users perform these tasks.
23.1 Reset Control Panel Administrator Password
To generate a new password for an administrator user:
1. Log in to your OnApp Cloud Control Panel using SSH:
2. Go to the directory where your Control Panel is installed:
cd /onapp/interface
3. To set a predefined password, run:
RAILS_ENV=production rake onapp:password[admin,new_password]
Make sure there are no spaces in brackets.
If the operation was successful you will see a Password successfully changed to 'new_password' message. If the operation could not be completed, you will see an error report.
DOCUMENT REVISIONS - LIST OF DEFAULT PERMISSIONS FOR USER ROLE 258

OnApp 3.0 Administration Guide v15
23.2 Add IPs in Windows EnvironmentAfter you allocate an IP address assignment in your Control Panel, it is necessary to add IPs directly in your Windows environment.To add an additional IP address in Windows 2003/2008 Server and Windows 7:
1. Locate the My Network Places icon on your desktop, right click and select Properties.
2. To open the network properties dialogue, right-click on External or Ext. Select Properties.3. Select Internet Protocol (TCP/IP) and click Properties.4. Click Advanced.5. Click Add, enter the IP address and corresponding Subnet mask.
6. Click Add.If you wish to add more IP addresses, repeat steps 5 and 6 until you have added the IP addresses we assigned to you.
23.3 Create New Linux/Windows TemplatesWe're preparing separate documents to explain how to create Windows and Linux templates from scratch, rather than from existing VM templates. Contact support or your integration specialist for more information.
23.4 IP InvestigationThis tool has been completed for Cloud Administrators to perform IP audit investigations to ascertain historically which VM was attached to a specific IP address. Please contact support if you wish to do this and we will provide the CLI syntax for use.
DOCUMENT REVISIONS - LIST OF DEFAULT PERMISSIONS FOR USER ROLE 259
OnApp 3.0 Administration Guide v15
24 LOCALIZATION AND CUSTOMIZATION
You can easily adapt the Control Panel to your requirements by translating to different custom languages, adding new currencies and currency formats, and changing images, colors, names and titles. You can also assign differently localized/customized Control Panel views to different users. This chapter explains all of this functionality.
24.1 LanguagesOnApp uses a standard Rails I18n internationalization system. You can add any language to your Control Panel and translate all the interface labels, error messages and other texts into a single custom language or several languages.
24.1.1 Add Custom LanguagesYou can add custom languages by translating the phrases using Control Panel UI. To do so:
1. Go to your Control Panel's Settings i18n Customization menu.
2. Click Add new locale button and select the required language from the list.
3. Click the appropriate custom language name.
4. On the screen that appears:
o Subset name – the names correspond to the .yml files located at /onapp/interface/config/locales directory
o English Items – the number of phrases in the original language files
o Custom Language Items – the number of translated phrases in the custom language files
o Missing Items – the number of phrases which haven't been translated yet to a custom language
o Out of Date Items – the number of phrases which have changed in English since the translation was made
5. Click a subset name. On the screen that follows:
o Provide a translation in the Custom Language Phrase field next to an appropriate English value. Press Enter.
DOCUMENT REVISIONS - LIST OF DEFAULT PERMISSIONS FOR USER ROLE 260
OnApp 3.0 Administration Guide v15
o To copy the English value to a target custom language, click the Submit button in the Copy column next to a required value.
6. Restart the HTTPD service to apply new locale.
Click the Out of date tab to view phrases that exist in English and your custom language, but where the English phrase has been changed since the last translation.
Click the Missing tab to view phrases that exist in English but are missing in your custom language.
Click the Missing or out of date tab to view phrases that either exist in English but not in your custom language or exist in both languages but the English phrase has changed since the last translation.
24.1.2 Enable Custom Language for Specific UserNow that you have added one or more custom languages, you can specify which language a particular user will see in their view of the Control Panel. For this:
1. Go to your Control Panel's Users and Groups menu.
2. Click a user's name.
3. On the page that appears, click the Edit Profile tab.
4. Choose your custom language from the Locales drop-down list.
5. Click Save.
24.2 CurrenciesBy default, the system includes three currencies: USD, EUR and GBP. You can add more currencies at any time.
24.2.1 Create currencyTo add a currency:
1. Go to your Control Panel's Settings menu.
2. Click the Currencies icon.
3. On the page that follows, click the Create New button.
4. Fill in the form that appears:
o name - give the label to your currency
o unit - insert a currency symbol
DOCUMENT REVISIONS - LIST OF DEFAULT PERMISSIONS FOR USER ROLE 261
OnApp 3.0 Administration Guide v15
o code - –fill in a three-character currency code that is generally used to represent the currency you wish to add
o separator - – specify a character used to format decimal numbers, e.g 100.99.
o delimiter - – set a grouping character used to separate thousands, e.g: 100,000,000.
o precision – specify the number of digits after the delimiter. The precision parameter is used to display the costs total for a certain period, e.g. Outstanding amount, Total Cost, Payments.
o precision per unit – the number of digits after the delimiter. The precision per unit parameter is used to display the prices for the resources , e.g. for CPU, Disk size, RAM, IP, Data stores, Edge servers, Disks, Backups, Templates, etc.
o format- set how the currency will be displayed in the control panel. Use the following parameters:
%n - for the digits
%u - for the currency symbol
5. Click Save.
For example, the currency form for US Dollars might look as follows…
Name: US Dollar
Unit: $ Code: USD
Separator: . Delimiter: , Precision: 5 Precision per unit :8 Format: %n %u
…and the prices will be displayed in the following way: $7,000.00000
PLEASE NOTE that v2.3.2 adds a new field to the currency section in your Control Panel's Settings menu (Settings > Currencies).You can now set Precision and Precision per Unit to specify the number of digits used after the delimiter.
By default, Precision per Unit is set to 2. If you have hourly prices set with a larger precision value in your previous version of OnApp, this may cause billing data for VMs to appear blank or to display the incorrect value in the Control Panel and the API, after you upgrade to v2.3.2. The solution is to edit the Precision per Unit value to match your previous level of precision for that currency, after you complete your v2.3.2 upgrade.
DOCUMENT REVISIONS - LIST OF DEFAULT PERMISSIONS FOR USER ROLE 262

OnApp 3.0 Administration Guide v15
24.2.2 Edit/Delete CurrencyTo edit and delete existing currencies:
1. Go to your Control Panel's Settings menu.
2. Click the Currencies icon.
To edit a currency, click the Actions icon next to it,then click Edit. On the screen that appears, edit currency details and click the Save button.
To delete a currency, click the Actions icon next to the currency you want to remove, then click Delete. You will be asked for confirmation before the currency is deleted.
You cannot delete a currency that is associated with a billing plan.
24.3 Localization and Customization Search
The search box in the Localization and Customization menu allows you to search by the following parameters:
Item ID
English Value
Translation
To search:
1. Log in to your Control Panel.
2. Go to the Settings menu.
3. Click the I18n Customization icon.
4. Click the required language Name (e.g. "English").
5. On the following page, click the appropriate Subset Name (e.g. "core").
6. Type the search phrase into the search box and press Return.
7. If required, make changes and click Update.
DOCUMENT REVISIONS - LIST OF DEFAULT PERMISSIONS FOR USER ROLE 263
OnApp 3.0 Administration Guide v15
24.4 Look & FeelYou can skin various aspects of the Control Panel's look & feel, including the logo displayed, background colors and other graphics. To do so:
1. Go to your Control Panel's Settings menu and click the Look & Feel icon.
2. Press the "+" button.
3. Use the fields provided to skin the UI, as explained below:
Changes, including disabling and deleting UI elements, will not be applied unless the Enable Skin checkbox is ticked, and you click the Save Skin button at the bottom of the screen.
Theme options
o Label - give a name to your theme.
o Active – use this checkbox to specify whether the theme is displayed or not. If this box is not checked, the default colors and graphics are used, irrespective of other settings.
User group
o User Groups - check the groups of users for whom you wish to apply the theme.
General
o Title - enter the desired title which will be displayed at the top left corner of the browser window.
o Logo- click the Browse button to choose a custom logo.
Check the Disable Logo box to prevent a logo from displaying.
Check the Delete box to remove a custom logo.
o Favicon- click the Browse button to choose a custom logo.
Check the Disable favicon box to prevent the favicon from displaying.
Check the Delete box to remove a favicon.
DOCUMENT REVISIONS - LIST OF DEFAULT PERMISSIONS FOR USER ROLE 264
OnApp 3.0 Administration Guide v15
Powered by
o Hide – check the box to remove the Powered by OnApp message at the top of the navigation pane.
o Url – enter an URL you wish to link to instead of http://www.onapp.com/.
o Color- this is the color displayed in the main body of the page (e.g. behind the fields you're currently editing).
To change the color, click the field to pop up a palette chooser, or enter a CSS color code.
To revert to the default color, leave this field blank.
The color will not be displayed unless any full screen Background Image you're using is disabled.
o Text – specify the text which will be added after Powered by instead of OnApp.
Panel
o Color- this is the color displayed in the main body of the page (e.g. behind the fields you're currently editing).
To change the color, click the field to pop up a palette chooser, or enter a CSS color code.
o Top image- click the Browse button to choose a custom image.
Check the Disable top image box to prevent the top background image displaying.
Check the Delete box to remove a custom image.
o Bottom image- click the Browse button to choose a custom image.
Check the Disable bottom image box to prevent the footer image displaying.
Check the Delete box to remove a custom image.
Wrapper
o Color- this is the color displayed around the rest of the UI.
To change the color, click the field to pop up a palette chooser, or simply enter a CSS color code To revert to the default color, leave this field blank.
The color will not be displayed unless any full screen Background Image you're using is disabled.
DOCUMENT REVISIONS - LIST OF DEFAULT PERMISSIONS FOR USER ROLE 265
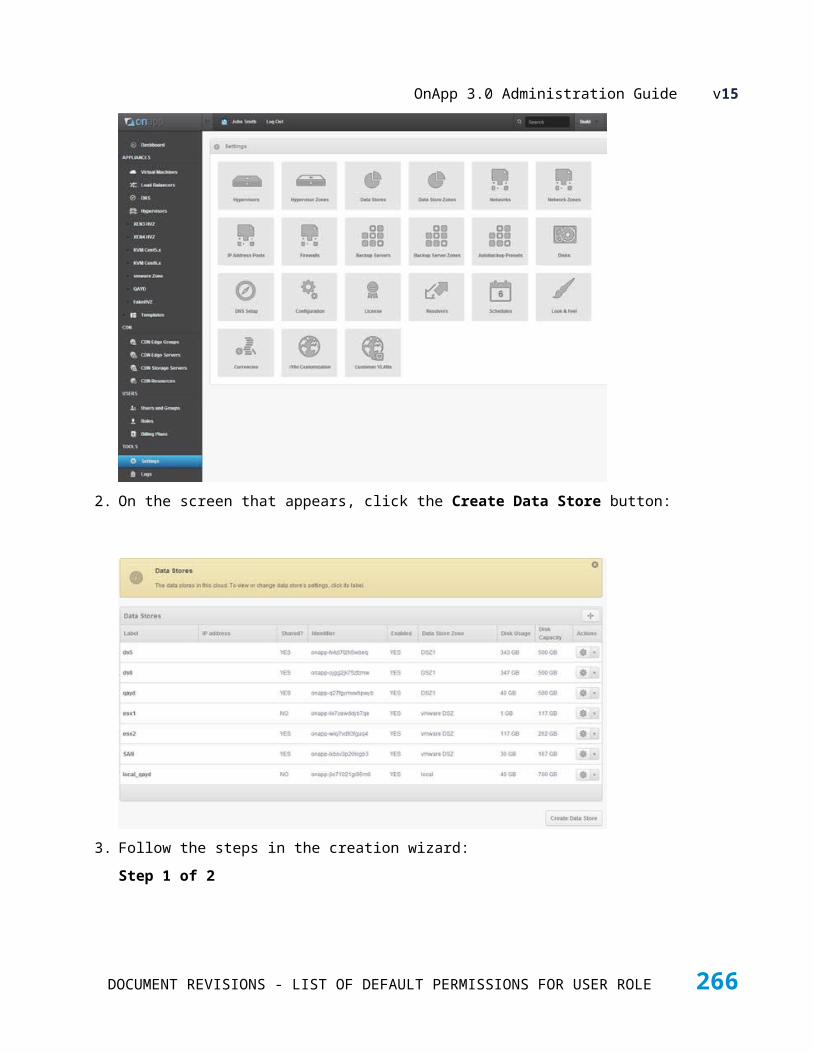
OnApp 3.0 Administration Guide v15
o Bodyimage- click the Browse button to choose a custom image.
Check the Disable body image box to prevent the top background image displaying.
Check the Delete box to remove a custom image.
o Header&Footer HTML - enter the html codes to display instead of default header and footer.
4. Click Save theme button to create a theme.
DOCUMENT REVISIONS - LIST OF DEFAULT PERMISSIONS FOR USER ROLE 266
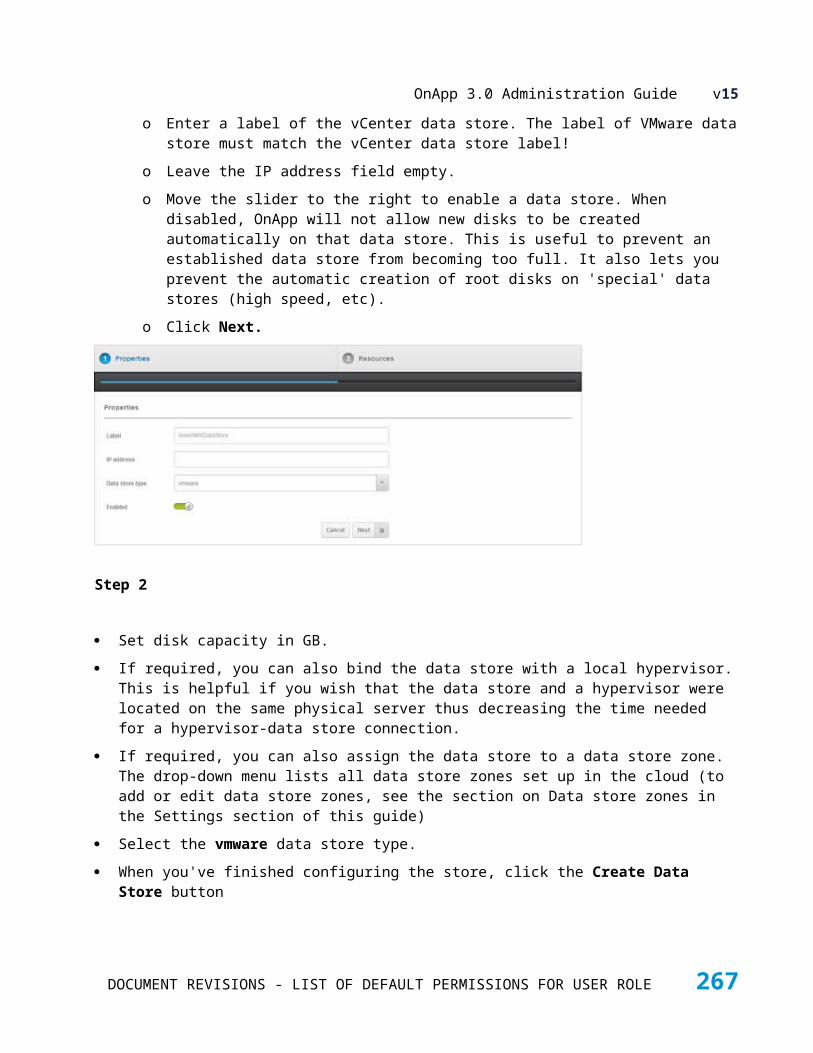
OnApp 3.0 Administration Guide v15
25 PERMISSIONS LIST
The permissions are used to determine what the OnApp users are authorized to do within the cloud. OnApp uses role-based access to specify what users can view, edit, create or remove in OnApp. Each role is a set of permissions defined for the OnApp cloud that you can assign to specific users to control user access to the cloud settings. To set the permissions:
1. Go to your Control Panel's Roles menu.
2. On the screen that follows, you'll see a list of all roles on your system on the following screen.
3. Click the Actions button next to the relevant role, then click Edit.4. Change the role's permissions for schedules as required, then click the Save button.
The Permissions chapter comprises the complete list of OnApp cloud permissions as well as the default permissions for the Admin and User roles.
25.1 List of all OnApp PermissionsThe list below includes all the permissions that can be set up in OnApp.
AutoscalingsOnApp administrators can control users' ability to manage VM autoscaling configuration through the Control Panel's Roles menu. The following autoscaling permissions for user roles can be set:
Any Actions with Autoscaling Configuration - the user can take any actions with autoscaling configuration
Create Autoscaling Configuration - the user can create autoscaling configuration
Destroy any Autoscaling Configuration - the user can delete autoscaling configuration
Destroy own Autoscaling Configuration - the user can only delete own autoscaling configuration
Read all Autoscaling Configuration - the user can read autoscaling configuration
Read own Autoscaling Configuration - the user can only read own autoscaling configuration
Update all Autoscaling Configuration - the user can edit autoscaling configuration
Update own Autoscaling Configuration - the user can only edit own autoscaling configuration
For details, refer to the Autoscale VMs section.
DOCUMENT REVISIONS - LIST OF DEFAULT PERMISSIONS FOR USER ROLE 267

OnApp 3.0 Administration Guide v15
Autobackup templatesOnApp administrators can control users' ability to manage autobackup presets configuration through the Control Panel's Roles menu. The following autobaclup presets permissions for user roles can be set:
Any action on autobackup presets - the user can take any action on autobackup presets that have been backed up automatically
See all autobackup presets - the user can see all autobackup presets that have been backed up automatically
Update any autobackup presets - the user can edit any autobackup presets that has been backed up automatically
For details, refer to Autobackup presets settings section.
Backup server zonesOnApp administrators can control users' ability to manage backup server zones through the Control Panel's Roles menu. The following backup server zone permissions for user roles can be set:
Any action on backup server zones - the user can take any action on backup server zones
Create a new backup server zone - the user can create a new backup server zone
Delete any backup server zone - the user can delete any backup server zone
See list of all backup server zones - the user can see list of all backup server zones
See details of any backup server zone - the user can see details of any backup server zone
Update any backup server zone - the user can edit any backup server zone
For details, refer to Backup server zones chapter.
Backup serversOnApp administrators can control users' ability to manage backup servers through the Control Panel's Roles menu. You can set the following backup server permissions for user roles:
Any action on Backup servers - the user can take any action on any Backup server
Add a new Backup server - the user can add a Backup server
Delete any Backup server - the user can delete any Backup server
See all Backup servers - the user can see all Backup servers
Update any Backup server - the user can edit any Backup server
For details, refer to Backup servers chapter.
BackupsOnApp administrators can control users' ability to manage backups through the Control Panel's Roles menu. You can set the following backup permissions for user roles:
Any action on backups - the user can take any action on any backup
Convert any backup to template - the user can take any backup of any virtual machine, and convert it to a template
Convert own backup to template - the user can only convert their own backups to templates
DOCUMENT REVISIONS - LIST OF DEFAULT PERMISSIONS FOR USER ROLE 268

OnApp 3.0 Administration Guide v15
Create backup for any VM - the user can create a backup of any virtual machine
Create backup for own VM - the user can only create backups of their own virtual machines
Destroy any backup - the user can delete any backup
Destroy own backup - the user can only delete their own backups
See all backups - the user can see all backups
See own backups - the user can only see their own backups
Update any backup - the user can edit any backup
Update own backup - the user can only edit their own backups
For details, refer to Back up VM disks section.
Base resourcesOnApp administrators can control users' ability to manage billing plan resources through the Control Panel's Roles menu. You can set the following base resource permissions for user roles:
Any action on resources - the user can take any action on base resources
Create a new resource - the user can create a new base resource
Delete any resource - the user can delete any base resource
See list of all resources - the user can see list of all base resources
See details of any resource - the user can see details of any base resource
See own base resources - the user can only see own base resources
Update any resource - the user can edit any base resource
For details, refer to Billing plans chapter.
Billing plansOnApp administrators can control users' ability to manage billing plans through the Control Panel's Roles menu. You can set the following billing plan permissions for user roles:
Any action on billing plans - the user can take any action on any billing plan
Create a new billing plan - the user can create a new billing plan
Delete any billing plan - the user can delete any billing plan
See list of all billing plans - the user can see list of all billing plans
See details of any billing plan - the user can see details of any billing plan
See own billing plan - the user can only see own billing plan
Update any billing plan - the user can edit any billing plan
For details, refer to Billing Plans chapter.
CDN resourcesOnApp administrators can control users' ability to manage CDN resources through the Control Panel's Roles menu. You can set the following CDN resources permissions for user roles:
Any action on CDN resources - the user can take any action on CDN resources
DOCUMENT REVISIONS - LIST OF DEFAULT PERMISSIONS FOR USER ROLE 269

OnApp 3.0 Administration Guide v15
Create a new CDN resource - the user can create a new CDN resource
Destroy any CDN resource - the user can delete a CDN resource
Destroy own CDN resources - the user can only delete their own CDN resources
See all CDN resources - the user can see all CDN resources
See own CDN resources - the user can only see their own CDN resources
Update any CDN resource - the user can edit any CDN resource
Update own CDN resources - the user can only edit their own CDN resources
For details, refer to CDN Resources chapter.
CDN usage statsOnApp administrators can control users' ability to manage CDN usage statistics through the Control Panel's Roles menu. You can set the following CDN usage statistics permissions for user roles:
See details of CDN usage statistics - the user can see CDN usage statistics details
User can see CDN usage statistics - the user can see CDN usage statistics
User can see own CDN usage statistics - the user can only see own CDN usage statistics
For details, refe to CDN usage section.
CloudBoot Manage CloudBoot configurations - the user can manage Cloud Boot settings
CurrenciesOnApp administrators can control users' ability to manage currency through the Control Panel's Roles menu. You can set the following currency permissions for user roles:
Any action with Currencies - the user can take any action on currencies
Create new Currency - the user can create a new currency
Delete any Currency - the user can delete any currency
See list of all Currencies - the user can view any currency
Update all Currencies - the user can update any currency
For details, refer to Currencies section.
Customer networks Any action on customer networks – the user can take any action on customer networks
Create own customer network – the user can create own customer networks
Destroy own customer network – the user can delete own customer networks
See own customer networks – the user can view own customer networks
Customer VLANs Any action on Customer VLAN - the user can see all actions available on customer VLANs
DOCUMENT REVISIONS - LIST OF DEFAULT PERMISSIONS FOR USER ROLE 270

OnApp 3.0 Administration Guide v15
Create a new Customer VLAN - the user can create a new customer VLAN
Destroy any Customer VLAN - the user can delete all customer VLANs
See all Customer VLANs - the user can view any customer VLAN
Update any Customer VLAN - the user can edit any customer VLAN
For details, refer to Customer VLANs section.
DashboardOnApp administrators can control users' access to the dashboard through the Control Panel's Roles menu. You can set the following dashboard permissions for user roles:
All actions on Dashboard - the user can see all available dashboard actions
See Alerts - the user can see alerts on the dashboard, including zombie VMs and transactions, and background processes
See Global Statistic - the user can see Global Dashboard statistics
See License Details - the user can see Dashboard Cloud Licences' details
For details, refer to Dashboard chapter.
Global statisticsOnApp administrators can control users' ability to view global statistics through the Control Panel's Roles menu. You can set the following global statistics permissions for user roles:
See Global Statistics - the user can see statistics for the entire cloud on the dashboard
For details, refer to Dashboard chapter.
Data store joinsOnApp administrators can control users' ability to manage data store joins through the Control Panel's Roles menu. You can set the following data store joins permissions for user roles:
All actions on datastores on Hypervisor - the user can take any action on data stores attached to a hypervisor
Add Data Store to any Hypervisor - the user can add a data store to any hypervisor
Remove Data Store from any Hypervisor - the user can detach a data store from any hypervisor
For details, refer to Manage data stores for hypervisor zones section.
Data store zonesOnApp administrators can control user access to data store zones management. You can set the following data store zone permissions for user roles:
Any action on data store zones - the user can take any action on data store zones
Create a new data store zone - the user can create a new data store zone
Delete any data store zone - the user can delete any data store zone
See list of all data store zones - the user can see list of all data store zones
DOCUMENT REVISIONS - LIST OF DEFAULT PERMISSIONS FOR USER ROLE 271

OnApp 3.0 Administration Guide v15
See details of any data store zone - the user can see details of any data store zone
Update any data store zone - the user can edit any data store zone
For details, refer to Data store zones section.
Data storesOnApp administrators can control user access to data store management. You can set the following data store permissions for user roles:
Any action on data_stores - the user can take any action on data stores
Create a new data_store - the user can create a new data store
Destroy any data_store - the user can delete any data store
See all data_stores - the user can see all data stores
Update any data_store - the user can edit any data store
For details, refer to Data stores section.
DisksOnApp administrators can control user access to disks management. You can set the following disks permissions for user roles:
Any action on disks - the user can take any action on disks
Autobackup for any disk - the user can schedule an automatic backup on any disk
Autobackup for own disk - the user can only schedule automatic backups on their own disks
Create a new disk - the user can create a new disk
Destroy any disk - the user can delete any disk
Destroy own disk - the user can only delete their own disks
See all disks - the user can see all disks
See own disks - the user can only see their own disks
Unlock any disk - the user can unlock any disk
Update any disk - the user can edit any disk
Update own disk - the user can only edit their own disks
For details, refer to Manage VM disk space section.
DNS zoneOnApp administrators can control users' ability to manage DNS zones through the Control Panel's Roles menu. You can set the following DNS zone permissions for user roles:
Any action on DNS zone - the user can take any action on DNS zone
Create a new DNS zone - the user can create a new DNS zone
Destroy any DNS zone - the user can delete a DNS zone
Destroy own DNS zone - the user can only delete their own DNS zones
See all DNS zones - the user can see all DNS zones
DOCUMENT REVISIONS - LIST OF DEFAULT PERMISSIONS FOR USER ROLE 272
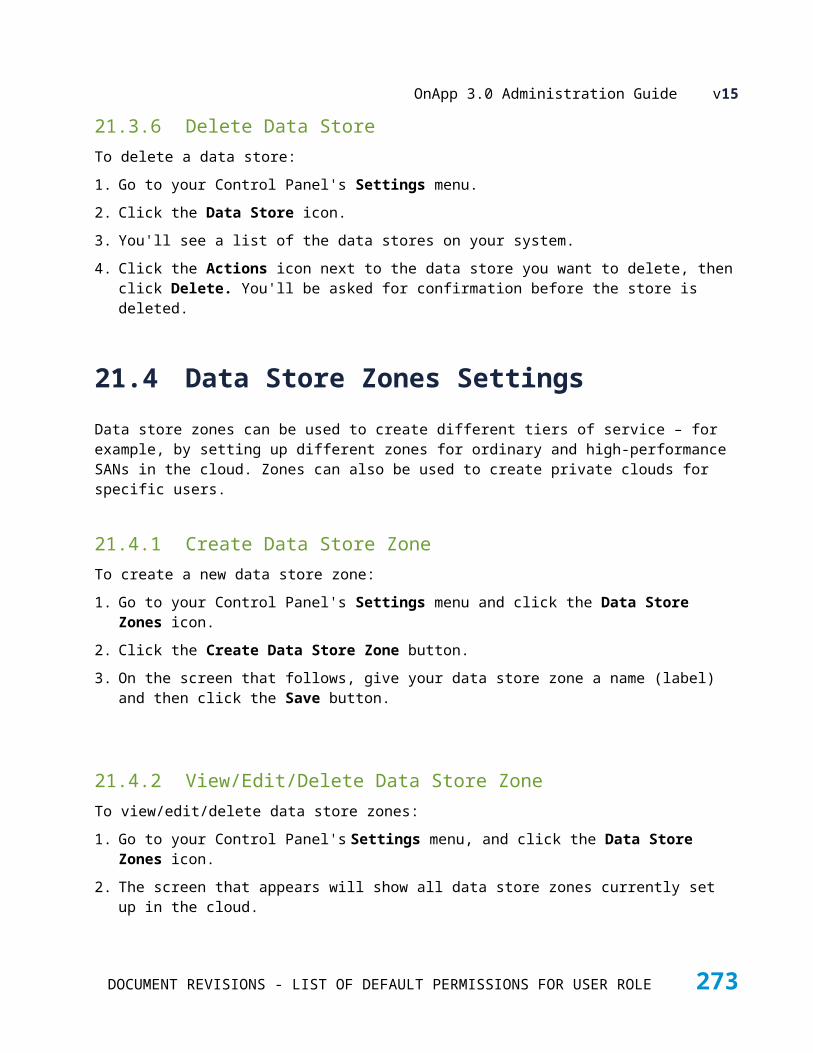
OnApp 3.0 Administration Guide v15
See own DNS zones (- the The user can only see their own DNS zones
Any action on DNS record - the user can take any action on DNS record
Create a new DNS record - the user can create a new DNS record
Destroy any DNS record - the user can delete a DNS record
See all DNS records - the user can see all DNS records
See own DNS records - the user can see own DNS records
Update any DNS record - the user can update any DNS record
Update own DNS record - the user can update own DNS record
DNS Setup - the user can set up DNS
For details, refer to DNS chapter.
Edge groupsOnApp administrators can control users' ability to manage edge groups through the Control Panel's Roles menu. You can set the following edge groups permissions for user roles:
Any action on edge groups - the user can take any action on edge groups
Create a new edge group - the user can create a new edge group
Destroy any edge group - the user can delete any edge group
See all edge groups - the user can see all edge groups
Update any edge group - the user can edit any edge group
For details, refer to CDN edge groups section.
Edge serversOnApp administrators can control users' ability to manage edge servers through the Control Panel's Roles menu. You can set the following edge server permissions for user roles:
Any action on Edge Server - the user can take any actions on edge servers
Change an owner of any Edge Server - the user can change the owner of any edge server
Create a new Edge Server - the user can create a new edge server
Destroy any Edge Server - the user can destroy any edge server
Destroy own Edge Servers - the user can destroy own edge servers
Migrate any Edge Server - the user can migrate any edge server
Migrate own Edge Servers - the user can migrate own edge servers
Any power action on Edge Servers- the user can take any power-related action on edge server
Any power action on own Edge Servers - the user can take any power-related action on own edge servers
See all Edge Servers - the user can see all edge servers
See own Edge Servers - the user can see own edge servers
Rebuild Network on any Edge Server - the user can rebuild network on any edge server
DOCUMENT REVISIONS - LIST OF DEFAULT PERMISSIONS FOR USER ROLE 273
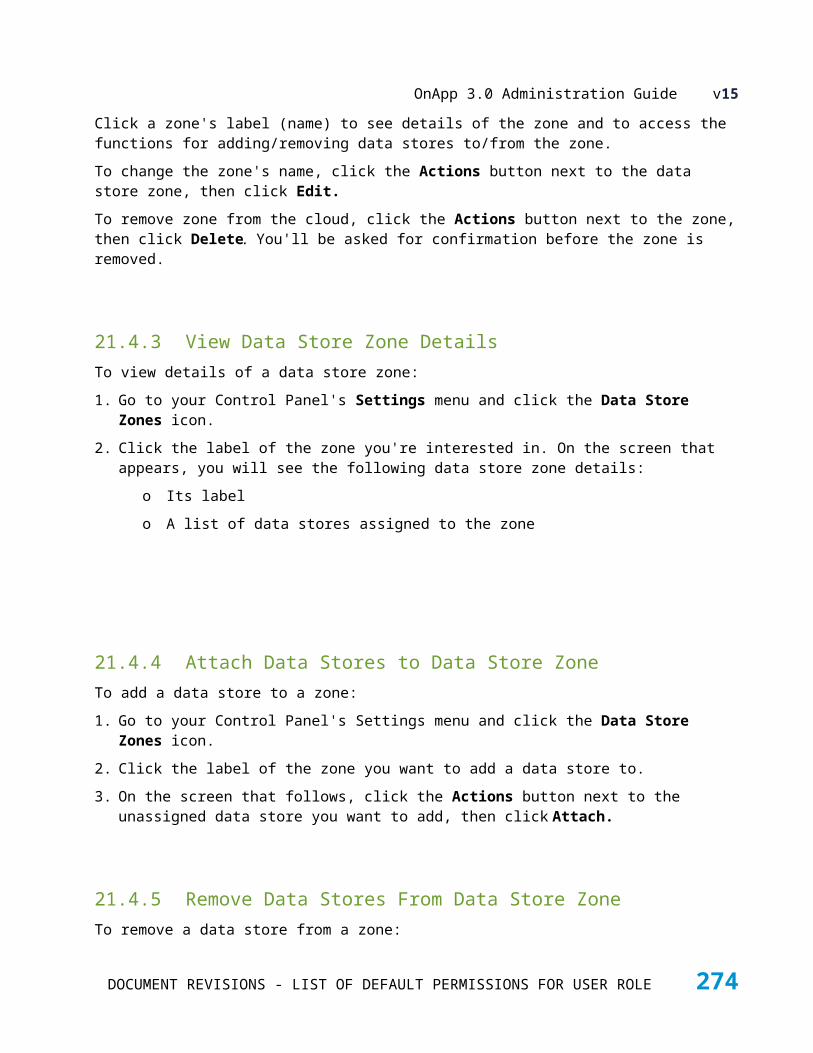
OnApp 3.0 Administration Guide v15
Rebuild Network on own Edge Servers - the user can only rebuild network on own edge servers
Change Suspended status for Edge Server - the user can change Suspended status for any edge server
Unlock any Edge Server - the user can unlock any edge server
Update any Edge Server - the user can update any edge server
Update own Edge Servers - the user can update own edge servers
For details, refer to CDN edge servers section.
Firewall rulesOnApp administrators can control users' ability to manage firewall rules through the Control Panel's Roles menu. You can set the following firewall rules permissions for user roles:
Any Action on Firewall Rules - the user can take any actions with firewall rules
Create Firewall Rules for anyone - the user can create firewall rules for anyone
Create own Firewall Rules - the user can only create own firewall rules
Destroy any Firewall Rules - the user can delete any firewall rules
Destroy own Firewall Rules - the user can only delete own firewall rules
Read all Firewall Rules - the user can read all firewall rules
Read own Firewall Rules - the user can only read own firewall rules
Update all Firewall Rules - the user can edit all firewall rules
Update own Firewall Rules - the user can only edit own firewall rules
For details, refer to Set firewall rules section.
Global searchOnApp administrators can control user access to global search. You can set the following global search for user roles:
Global search - global search through the whole database
For details, refer to Cloud search tool section.
GroupsOnApp administrators can control user access to groups management. You can set the following group permissions for user roles:
Any action on groups - the user can take any action on groups
Create a new group - the user can create a new group
Destroy any group - the user can delete a group
See all - the user can see all groups
Update any - the user can edit any group
For details, refer to User groups section.
HelpOnApp administrators can control user access to help section.
DOCUMENT REVISIONS - LIST OF DEFAULT PERMISSIONS FOR USER ROLE 274
OnApp 3.0 Administration Guide v15
All actions on Help - the user can take any action under the Help menu
Send Support requests - the user can send support requests from the Help menu
For details, refer to Help chapter.
Storage servers Any action on storage server - the user can take any actions on storage servers
Create a new storage server - the user can create a new storage server
See all storage servers - the user can see all storage servers
See own storage servers - the user can see own storage servers
Update any storage server - the user can update any storage server
Update own storage servers - the user can update own storage server
Destroy any storage server - the user can destroy any storage server
Destroy own storage servers - the user can destroy own storage servers
Console to any storage server - the user can access any storage server via console
Console to own storage servers - the user can access own storage servers via console
Any power action on storage servers - the user can take any power-related action on storage server
Any power action on own storage servers - the user can take any power-related action on own storage servers
Unlock any storage server - the user can unlock any storage server
Change Suspended status for storage server - the user can change Suspended status for any storage server
Migrate any storage server - the user can migrate any storage server
Migrate own storage servers - the user can migrate own storage servers
For details, refer to
Hypervisor zonesOnApp administrators can control users' ability to manage hypervisor zones. This is handled through the Control Panel's Roles menu. You can set the following hypervisor zone permissions for user roles:
Any action on hypervisor zones - the user can take any action on hypervisor zones
Create a new hypervisor zone - the user can create a new hypervisor zone
Delete any hypervisor zone - the user can delete any hypervisor zone
See list of all hypervisor zones - the user can see list of all hypervisor zones
See details of any hypervisor zone - the user can see details of any hypervisor zone
DOCUMENT REVISIONS - LIST OF DEFAULT PERMISSIONS FOR USER ROLE 275

OnApp 3.0 Administration Guide v15
Show Hypervisor Zones on VirtualMachine creation - display hypervisor zones on Add New Virtual Machine screen
Note: the See Details of any Hypervisor Zone permission must be enabled for this permission to work properly.
Update any hypervisor zone - the user can edit any hypervisor zone
For details, refer to Hypervisor zone settings chapter.
HypervisorsOnApp administrators can control users' ability to manage hypervisors. This is handled through the Control Panel's Roles menu. You can set the following hypervisor permissions for user roles:
Any action on hypervisors - the user can take any action on hypervisors
Create a new hypervisor - the user can create a new hypervisor
Destroy any hypervisor - the user can delete any hypervisor
See all hypervisors - the user can see all hypervisors
Show Hypervisors on Virtual Machine creation - display hypervisors on Add New Virtual Machine screen.
Note: the See All Hypervisors permission must be enabled for this permission to work properly.
Reboot any hypervisor - the user can reboot any hypervisor
Update any hypervisor (- the user can edit any hypervisor
For details, refer to to Hypervisor settings chapter.
Internationalization locales Edit Internationalization Locales - the user can view and edit all non-English language phrases
For details, refer to Localization and customization chapter.
Template groupsOnApp administrators can control users' ability to manage image template groups. This is handled through the Control Panel's Roles menu. You can set the following image template groups permissions for user roles:
Any action on template group - the user can take any action on template groups
Create a new template group - the user can create a new template group
Delete any template group - the user can delete a template group
See list of all template groups - the user can see all template groups
See details of any template group (image_template_groups.read). The user can view template group details
DOCUMENT REVISIONS - LIST OF DEFAULT PERMISSIONS FOR USER ROLE 276

OnApp 3.0 Administration Guide v15
Update any template group (image_template_groups.update)The user can edit any template group
For details, refer to Template groups section.
OnApp Storage Manage OnApp storage - the user can access the OnApp storage settings
IO statsOnApp administrators can control user access to IOPS statistics.
Full access to IO Statistics - the user has full access to IO Statistics
See Own Statistics - the user can see own statistics
See all IO Statistics - the user can see all IO Statistics
See own IO Statistics - the user can see own IO Statistics
For details, refer to disk IOPS section
IP Address Pools Any action on IP Address Pool - the user has full access to IP address pools
Create a new IP Address Pool - the user can create new IP address pools
Destroy any IP Address Pool - the user can delete any IP address pool
See all IP Address Pools - the user can see all IP address pools
For details, refer to IP Address Pools chapter.
Virtual Machine's IP AddressesOnApp administrators can control users' ability to manage IP address joins. This is handled through the Control Panel's Roles menu. You can set the following IP address joins permissions for user roles:
All actions on virtual machine's IP addresses - the user can take any action on virtual machine IP addresses
Add IP address to any virtual machine - the user can add an IP address to any virtual machine
Add IP address to own virtual machine - the user can only add IP addresses to their own virtual machines
Remove IP address from any virtual machine - the user can remove an IP address from any virtual machine
Remove IP address from own virtual machine - the user can only remove IP addresses from their own virtual machines
See IP addresses assigned to any virtual machines - the user can see IP addresses assigned to any virtual machine
See IP addresses assigned to own virtual machines - the user can only see IP addresses assigned to their own virtual machines
For details, refer to Allocate/Remove IP Addresses section.
DOCUMENT REVISIONS - LIST OF DEFAULT PERMISSIONS FOR USER ROLE 277

OnApp 3.0 Administration Guide v15
IP addressesOnApp administrators can control users' ability to manage IP addresses. This is handled through the Control Panel's Roles menu. You can set the following IP address permissions for user roles:
Any action on IP addresses - the user can take any action on IP addresses
Assign IP address to user - the user can assign IP address to user
Create a new IP address - the user can create a new IP address
Destroy any IP address - the user can delete any IP address
See all IP addresses - the user can see all IP addresses
Unassign IP address from user - the user can unassign IP address from user
Update any IP address settings - the user can edit any IP address settings
For details, refer to Assign/ Unassign IP addresses to a user section.
Last access log OnApp administrators can control users' access to log. You can set the following last access log permissions for user roles:
Any action on last access log - the user can perform any action on last access log of any user
See the last access log of any user - the user can see the last access log of other users
See own last access log - the user can only see their own last access log
Load balancersOnApp administrators can control users' ability to manage load balancers. This is handled through the Control Panel's Roles menu. You can set the following load balancer permissions for user roles:
Any action on load balancer - the user can take any action on load balancer
Migrate any load balancer - the user can migrate any load balancer
Migrate own load balancer - the user can only migrate their own load balancer
For details, refer to Load balancers section.
Load balancing clustersOnApp administrators can control users' ability to manage load balancing clusters. This is handled through the Control Panel's Roles menu. You can set the following load balancing cluster permissions for user roles:
Any action on load balancing cluster - the user can make any action on relation load balancing
Configure autoscale out parameter of load balancing cluster - the user can configure Autoscale Out when creating/updating a load balancing cluster
Create new load balancing cluster - the user can create a new load balancing cluster
Delete any load balancing cluster - the user can delete any load balancing cluster
Delete own load balancing cluster - the user can only delete own load balancing clusters
See details of any load balancing cluster - the user can see details of any load balancing cluster
See details of own load balancing cluster - the user can only see details of own load balancing cluster
DOCUMENT REVISIONS - LIST OF DEFAULT PERMISSIONS FOR USER ROLE 278
OnApp 3.0 Administration Guide v15
Update any load balancing cluster - the user can make changes on any load balancing cluster
Update own load balancing cluster - the user can only change own load balancing cluster
For details, refer to Load balancers section.
Log itemsOnApp administrators can control users' ability to manage log items. You can set the following log items permissions for user roles:
Any action on log items - the user can take any action on log items
Delete any log item - the user can delete any log item
Delete own log item - the user can only delete their own log items
See list of all log items - the user can see all log items
See list of own log items - the user can only see their own log items
See details of any log item - the user can see details of any log item
See details of own log item - the user can only see details of their own log items
For details, refer to Logs section.
Autoscaling monitorsOnApp administrators can control users' access to monitis monitors. You can set the following monitis monitors permissions for user roles:
Any Actions on relation autoscaling monitors - the user can perform any actions on relation monitis monitors
View autoscaling monitor information - the user can view monitis monitor information
For details, refer to View load balancer details section.
Monthly bills statisticsOnApp administrators can control users' access to monthly bills statistics. You can set the following monthly bills permissions for user roles:
Full access to Monthly Bills Statistics - the user has full access to monthly bills statistics
See all Monthly Bills Statistics - the user can see all monthly bills statistics
See only own Monthly Bills Statistics - the user can only see own monthly bills statistics
For details, refer to View user account details section.
NameserversOnApp administrators can control users' ability to manage name servers. This is handled through the Control Panel's Roles menu. You can set the following nameservers permissions for user roles:
Any action on nameservers - the user can take any action on nameservers
Create a new nameserver - the user can create a new nameserver
Destroy any nameserver - the user can delete any nameserver
See all nameservers - the user can see all nameservers
Update any nameserver settings - the user can edit any nameserver
DOCUMENT REVISIONS - LIST OF DEFAULT PERMISSIONS FOR USER ROLE 279

OnApp 3.0 Administration Guide v15
For details, refer to DNS chapter.
Network zonesOnApp administrators control a user's ability to manage network zones. This is handled through the Control Panel's Roles menu. You can set the following network zone management permissions for user roles:
Any action on network zones - the user can take any action on network zones
Create a new network zone - the user can create a new network zone
Delete any network zone - the user can delete any network zone
See list of all network zones - the user can see list of all network zones
See details of any network zone - the user can see details of any network zone
Update any network zone - the user can update any network zone
For details, refer to Network zones section.
NetworksOnApp administrators control how users can manage networks. This is handled through the Control Panel's Roles menu. You can set the following network permissions for user roles:
Any action on networks - the user can take any action on networks
Create a new network - the user can create a new network
Destroy any network - the user can delete any network
See all networks - the user can see all networks
Update any network - the user can edit any network
For details, refer to Networks section.
PaymentsOnApp administrators control how users can manage payments. This is handled through the Control Panel's Roles menu. You can set the following payments permissions for user roles:
Any action on payments - the user can take any action on payments
Create a new payment - the user can create a new payment
Destroy any payment - the user can delete any payment
See all payments - the user can see all payments
See own payments - the user can only see their own payments
Update any payment - the user can edit any payment
For details, refer to View, add and edit user payments section.
PermissionsOnApp administrators control a user's ability to manage permissions. This is handled through the Control Panel's Roles menu.
Any action on permissions - the user can take any action on permissions
Create a new permission - the user can create a new permission
DOCUMENT REVISIONS - LIST OF DEFAULT PERMISSIONS FOR USER ROLE 280
OnApp 3.0 Administration Guide v15
Destroy any permission - the user can delete any permission
See all permissions - the user can see all permissions
Update any permission - the user can edit any permission
Relation group templatesOnApp administrators control how users can manage relation group templates. This is handled through the Control Panel's Roles menu. You can set the following relation group templates permissions for user roles:
Any action on relation group templates - the user can take any action on relation group templates
Create a new relation group template - the user can create a new relation group template
Destroy any relation group template - the user can delete any relation group template
See list of all relation group templates - the user can see a list of all relation group templates
See all relation group templates - the user can see all relation group templates
For details, refer to Template groups section.
Resource limitsOnApp administrators control how users can manage resource limits. This is handled through the Control Panel's Roles menu. You can set the following resource limits permissions for user roles:
Any action on resource limit - the user can take any action on resource limits
Create a new resource limit - the user can create a new resource limit
Destroy any resource limit - the user can delete any resource limit
See all resource limits - the user can see all resource limits
See own resource limits - the user can only see their own resource limits
Update any resource limit - the user can edit resource limits for any user account
For details, refer to Billing plans, resource limits and roles chapter.
RolesOnApp administrators control a user's ability to manage roles. This is handled through the Control Panel's Roles menu.
Any action on Roles - the user can take any action on roles
Create a new Role - the user can create a new role
Destroy any Role - the user can delete any role
See all Roles - the user can see all roles
See user's own roles - the user can see only roles assigned to them
Update any Role - the user can edit any role
For details, refer to Roles section.
DOCUMENT REVISIONS - LIST OF DEFAULT PERMISSIONS FOR USER ROLE 281
OnApp 3.0 Administration Guide v15
Schedule logsOnApp administrators control a user's ability to manage schedule logs. This is handled through the Control Panel's Roles menu.
Any action on schedule logs - the user can take any action on schedule logs
Create a new schedule log - the user can create a new schedule log
Destroy any schedule log - the user can destroy any schedule log
See all schedule logs - the user can see all schedule logs
See own schedule logs - the user can only see their own schedule logs
Update any schedule log - the user can edit any schedule log
For details, refer to Schedules section.
SchedulesOnApp administrators control users ability to manage schedules. This is handled through the Control Panel's Roles menu. You can set the following schedule management permissions for user roles:
Any action on schedules - the user can take any action on schedules
Create a new schedule - the user can create a new schedule
Destroy any schedule - the user can delete any schedule
Destroy own schedule - the user can only delete their own schedules
See all schedules - the user can see all schedules
See own schedules - the user can only see their own schedules
Update any schedule - the user can edit any schedule
Update own schedule - the user can only edit their own schedules
For details, refer to Schedules section.
SessionsOnApp administrators control a user's ability to drop sessions. You can set the following drop session permisissions for user roles:
Any actions on sessions - the user can take any action on sessions
Drop all the existing sessions - the user can drop all the existing sessions including their own
Drop all the user sessions but the current - the user can delete all the sessions created under their account but their current
For details, refer to Drop session section.
SettingsOnApp administrators control a user's ability to manage settings. This is handled through the Control Panel's Roles menu.
Any action on settings - the user can take any action on settings
See settings - the user can see all settings
DOCUMENT REVISIONS - LIST OF DEFAULT PERMISSIONS FOR USER ROLE 282
OnApp 3.0 Administration Guide v15
Restart Dashboard Client - the user can restart the dashboard client
Update Settings - the user can edit everything in the Settings menu
View OnApp version - the can navigate to /version to see which version of OnApp is installed
For details, refer to Settings chapter.
SSH keysOnApp administrators control how users can manage SSH keys. This is handled through the Control Panel's Roles menu. You can set the following SSH keys permissions for user roles:
Add ssh keys for all the virtual machines - the user can add ssh keys for all the virtual machines
Add ssh keys for own virtual machines - the user can only add ssh keys for own virtual machines
For details, refer to Add SSH key section.
Storage Servers Any action on Storage Server - the user can take any actions on storage servers
Change an owner of any Storage Server - the user can change the owner of any storage server
Create a new Storage Server - the user can create a new storage server
Destroy any Storage Server - the user can delete any storage server
Destroy own Storage Servers - the user can delete own storage servers
Migrate any Storage Server - the user can migrate any storage server
Migrate own Storage Servers - the user can migrate own storage servers
Any power action on Storage Servers - the user can migrate own storage servers
Any power action on own Storage Servers - the user can take any power-related action on own storage servers
See all Storage Servers - the user can see all storage servers
See own Storage Servers - the user can see own storage servers
Rebuild Network on any Storage Server - the user can rebuild network on any storage server
Rebuild Network on own Storage Servers - the user can only rebuild network on own storage servers
Change Suspended status for Storage Server - the user can change Suspended status for any storage server
Unlock any Storage Server - the user can unlock any storage server
Update any Storage Server - the user can update any storage server
Update own Storage Servers - the user can update own storage servers
For details, refer to CDN storage servers section.
Sysadmin toolsOnApp administrators control how users can manage sysadmin tools. This is handled through the Control Panel's Roles menu. You can set the following sysadmin tools permissions for user roles:
DOCUMENT REVISIONS - LIST OF DEFAULT PERMISSIONS FOR USER ROLE 283

OnApp 3.0 Administration Guide v15
All actions on Sysadmin Tools - the user can take any action on the Sysadmin Tools menu
Any action Sysadmin Tools - the user can see all actions on the Sysadmin Tools menu
For details, refer to Sysadmin tools section.
TemplatesOnApp administrators control how users can manage templates. You can set the following template sets permissions for user roles:
Any action on templates - the user can take any action on templates
Create a new template - the user can create a new template
Destroy any template - the user can delete any template
Destroy own template - the user can only delete their own templates
Destroy user template - the user can delete user templates
See the list of inactive templates - user can see the list of inactive templates
Make any template public - the user can make any template public
Make own template public - the user can only make their own templates public
Make user template public - the user can make user templates public
Manage own templates - the user can create and manage their own templates
Manage global templates - the user can manage any public template
Manage user templates - the user can create and manage user templates
See all templates - the user can see all templates
See own templates - the user can only see their own templates
See all public templates - the user can see all public templates
See user templates - the user can see user templates
Update any template - the user can edit any template
Update own template - the user can only edit their own templates
Update user template - the user can update user templates
For details, refer to Templates chapter.
ThemesOnApp administrators control a user's ability to manage themes. You can set the following themes permisissions for user roles:
Any action on Themes - the user can make any action on themes
Create Theme - the user can create new themes
Destroy Theme - the user can delete themes
Read Theme - the user can read themes
Update Theme - the user can make changes in themes
DOCUMENT REVISIONS - LIST OF DEFAULT PERMISSIONS FOR USER ROLE 284
OnApp 3.0 Administration Guide v15
For details, refer to Look and feel section.
TransactionsOnApp administrators control a user's ability to manage transactions. You can set the following transations permisissions for user roles:
Any action on transactions - the user can take any action on transactions
Cancel zombie transactions - the user can cancel transactions which run too long and are most likely failed
Cancel own zombie transactions - the user can cancel transactions which run too long and are most likely failed and belong to this user
Delete all transactions from log - the user can delete all transactions from a log
Delete own transactions from logs - the user can only delete their own transactions from a log
See list of all transactions - the user can see all transactions
See list of own transactions - the user can only see their own transactions
See details of all transactions - the user can see details of any transaction
See details of own transaction - the user can only see details of their own transactions
For details, refer to VM transactions and logs section.
User additional fieldsOnApp administrators control a user's ability to manage user additional fields. You can set the following user additional fields permisissions for user roles:
Any action on user additional fields - the user can perform any action on additional fields for user
Create user additional fields - the user can create user additional fields
Destroy any user additional fields - the user can delete any user additional fields
Read all user additional fields - the user can read all user additional fields
Update all user additional fields - the user can edit all user additional fields
For details, refer to User Additional Fields section.
User groupsOnApp administrators control a user's ability to manage user groups. You can set the following user groups permisissions for user roles:
Any action on user groups - the user can take any action on user groups
Create a new user group - the user can create a new user group
Destroy user group - the user can delete any user group
See list of all user groups - the user can see the list of all user groups
See details of any user group - the user can see details of any user group
Update any user group - the user can edit any user group
For details, refer to User groups section.
DOCUMENT REVISIONS - LIST OF DEFAULT PERMISSIONS FOR USER ROLE 285
OnApp 3.0 Administration Guide v15
User hourly statisticsOnApp administrators can control user's access to hourly statistics. You can set the following hourly statistics permisissions for user roles:
Full access to user hourly statistics - the user has full access to user hourly statistics
See all user hourly statistics - the user can see hourly statistics
See own user hourly statistics - the user can only see own hourly statistics
For details, refer to View user account billing statistics section.
White IPsOnApp administrators control a user's ability to manage white IPs. You can set the following white IPs permisissions for user roles:
Manage all White IPs for users - the user can take any action on White IPs for users
Create white IP for all users - the user can create any white IP
Create own white IP - the user can create own white IP
Destroy white IP for all users - the user can destroy any white IP
Destroy own white IPs - the user can only destroy own white IP
Read all white user IPs - the user can read all white IPs
Read own white IPs - the user can read own white IPs
Update white IP for all users - the user can update any white IP
Update own white IPs - the user can update own white IP
For details, refer to Whitelist IPs section.
UsersOnApp administrators can control users' ability to manage users configuration. This is handled through the Control Panel's Roles menu. You can set the following users permissions for user roles:
Any action on users - the user can take any action on user accounts
Change user password - the user can change user's password
Change own password - the user can only change own password
Create any user - the user can create a new user account
Destroy any user - the user can delete any user account
Destroy own user - the user can only delete their own user account
User can login as any user - the user can login as any user
See all users - the user can see all user accounts
See all users prices - the user can see all users prices
See user backups/templates prices – the user can see users’ backups/templates prices
See user billing plan – the user can see users’ billing plans
DOCUMENT REVISIONS - LIST OF DEFAULT PERMISSIONS FOR USER ROLE 286

OnApp 3.0 Administration Guide v15
See user hourly prices – the user can see see users’ hourly prices
See user monthly prices – the user can see users’ monthly prices
See user outstanding amount – the user can see users’ outstanding amount
See user summary payments – the user can see user’s summary payments
See user total cost – the user can see users’ total cost
See user virtual machine prices – the user can see users’ virtual machine prices
See own users – the user can only see their own user account
Enable/disable user – the user can enable/disable any users
Update any user – the user can edit any user account
Generate API key – the user can generate API key for all users
Generate own API key – the user can only generate own key
Update own user – the user can only edit their own user account
For details, refer to Users chapter.
Virtual machinesOnApp administrators can control users' ability to manage virtual machines. This is handled through the Control Panel's Roles menu. You can set the following virtual machines permissions for user roles:
Any action on virtual machines – the user can take any action on virtual machines
Change an owner of any virtual machine – the user can change the owner of any virtual machine
Console to any virtual machine – the user can access any virtual machine via console
Console to own virtual machine – the user can only access their own virtual machine via console
Create a new virtual machine – the user can create a new virtual machine
Destroy any virtual machine – the user can delete any virtual machine
Destroy own virtual machine – the user can only delete their own virtual machines
Migrate any virtual machine – the user can migrate any virtual machine
Migrate own virtual machine – the user can only migrate their own virtual machines
Any power action on virtual machines – the user can take any power-related action on virtual machines
Any power action on own virtual machines – the user can only take power-related actions on their own virtual machines
See all virtual machines – the user can see all virtual machines
See own virtual machines – the user can only see their own virtual machines
Rebuild Network of any virtual machine – the user can rebuild network of any virtual machine
DOCUMENT REVISIONS - LIST OF DEFAULT PERMISSIONS FOR USER ROLE 287
OnApp 3.0 Administration Guide v15
Rebuild Network of own virtual machine – the user can only rebuild network of own virtual machine
Reset root password of any virtual machine – the user can reset the root password for any virtual machine
Reset root password of own virtual machine – the user can only reset the root password of their own virtual machines
Set SSH keys – the user can set their own ssh keys after the virtual machine is created
Set VIP status – the user can set/delete VIP status for virtual machines
Change Suspended status for Virtual Machine – the user can change Suspended status for a virtual machine
Unlock any virtual machine – the user can unlock any virtual machine
Update all virtual machine – the user can edit any virtual machine
Update own virtual machine – the user can only edit their own virtual machines
For details, refer to Virtual Machines section.
Virtual Machine Snapshots
OnApp administrators can control user's access to VMware virtual machine snapshots. You can set the following snapshot permisissions:
Any action on Virtual Machine Snapshots - the user can take any action on snapshots
Create or Restore own Virtual Machine Snapshot - the user can create/restore own snapshots
Destroy own Virtual Machine Snapshot - the user can delete own snapshots
See own Virtual Machine Snapshots - the use can see the list of own snapshots
Virtual Machine's statisticsOnApp administrators control user's access to virtual machine statistics. You can set the following statistics permisissions for user roles:
Full access to Statistics – the user has full access to statistics
See All Statistics – the user can see all statistics
See Own Statistics – the user can only see their own statistics
For details, refer to VM statistics section.
25.2 List of Default Permissions for Admin Role
The list below includes the set of default permissions for the Admin role in the OnApp v3.0.
DOCUMENT REVISIONS - LIST OF DEFAULT PERMISSIONS FOR USER ROLE 288

OnApp 3.0 Administration Guide v15
Autoscaling Configuration Any Actions with Autoscaling Configuration - the user can take any actions with autoscaling
configuration
Autobackup Presets Any action on autobackup presets - the user can take any action on autobackup presets that
have been backed up automatically
Backup Server Zones Any action on backup server zones - the user can take any action on backup server zones
Backup Servers Any action on Backup servers - the user can take any action on any Backup server
Backups Any action on backups - the user can take any action on any backup
Base Resources Any action on resources - the user can take any action on base resources
Billing Plans Any action on billing plans - the user can take any action on any billing plan
CDN Resources Any action on CDN resources - the user can take any action on CDN resources
CDN Usage Statistics See details of CDN usage statistics - the user can see CDN usage statistics details
CloudBoot Manage CloudBoot configurations - the user can manage Cloud Boot settings
Currencies Any action with Currencies - the user can take any action on currencies
Customer Networks Any action on customer networks – the user can take any action on customer networks
Customer VLANs Any action on Customer VLAN - the user can see all actions available on customer VLANs
Dashboard All actions on Dashboard - the user can see all available dashboard actions
Data Store Joins All actions on datastores on Hypervisor - the user can take any action on data stores attached
to a hypervisor
Data Store Zones
DOCUMENT REVISIONS - LIST OF DEFAULT PERMISSIONS FOR USER ROLE 289

OnApp 3.0 Administration Guide v15
Any action on data store zones - the user can take any action on data store zones
Data Stores Any action on data_stores - the user can take any action on data stores
Disks Any action on disks - the user can take any action on disks
DNS Zones Any action on DNS zone - the user can take any action on DNS zone
Edge Groups Any action on edge groups - the user can take any action on edge groups
Edge Servers Any action on Edge Server - the user can take any actions on edge servers
Firewall Rules Any Action on Firewall Rules - the user can take any actions with firewall rules
Global Search Global search - global search through the whole database
Groups Any action on groups - the user can take any action on groups
Help All actions on Help - the user can take any action under the Help menu
Hypervisor Zones Any action on hypervisor zones - the user can take any action on hypervisor zones
Hypervisors Any action on hypervisors - the user can take any action on hypervisors
Internationalization Edit Internationalization Locales - the user can view and edit all non-English language phrases
Template Groups Any action on template group - the user can take any action on template groups
OnApp Storage Manage OnApp storage - the user can access the OnApp storage settings
IO Statistics Full access to IO Statistics - the user has full access to IO Statistics
Virtual Machine's IP Addresses
DOCUMENT REVISIONS - LIST OF DEFAULT PERMISSIONS FOR USER ROLE 290

OnApp 3.0 Administration Guide v15
All actions on virtual machine's IP addresses - the user can take any action on virtual machine IP addresses
IP Address Pools Any action on IP Address Pool - the user has full access to IP address pools
IP Addresses Any action on IP addresses - the user can take any action on IP addresses
Last Access Log Any action on last access log - the user can perform any action on last access log of any user
Load Balancers Any action on load balancer - the user can take any action on load balancer
Load Balancing Clusters Any action on load balancing cluster - the user can make any action on relation load balancing
Log Items Any action on log items - the user can take any action on log items
Autoscaling Monitors Any Actions on relation autoscaling monitors - the user can perform any actions on relation
monitis monitors
Monthly Billing Statistics Full access to Monthly Bills Statistics - the user has full access to monthly bills statistics
Nameservers Any action on nameservers - the user can take any action on nameservers
Network Zones Any action on network zones - the user can take any action on network zones
Networks Any action on networks - the user can take any action on networks
Payments Any action on payments - the user can take any action on payments
Permissions Any action on permissions - the user can take any action on permissions
Relation Group Templates Any action on relation group templates - the user can take any action on relation group
templates
Resource Limits Any action on resource limit - the user can take any action on resource limits
DOCUMENT REVISIONS - LIST OF DEFAULT PERMISSIONS FOR USER ROLE 291
OnApp 3.0 Administration Guide v15
Roles Any action on Roles - the user can take any action on roles
Schedule Logs Any action on schedule logs - the user can take any action on schedule logs
Schedules Any action on schedules - the user can take any action on schedules
Sessions Any actions on sessions - the user can take any action on sessions
Settings Any action on settings - the user can take any action on settings
SSH Keys Add ssh keys for all the virtual machines - the user can add ssh keys for all the virtual machines
Storage Servers Any action on Storage Server - the user can take any actions on storage servers
Sysadmin Tools All actions on Sysadmin Tools - the user can take any action on the Sysadmin Tools menu
Templates Any action on templates - the user can take any action on templates
Themes Any action on Themes - the user can make any action on themes
Transactions Any action on transactions - the user can take any action on transactions
User Additional Fields Any action on user additional fields - the user can perform any action on additional fields for
user
User Groups Any action on user groups - the user can take any action on user groups
White IPs Manage all White IPs for users - the user can take any action on White IPs for users
Users Any action on users - the user can take any action on user accounts
Virtual Machine Snapshots Any action on Virtual Machine Snapshots - the user can take any action on snapshots
DOCUMENT REVISIONS - LIST OF DEFAULT PERMISSIONS FOR USER ROLE 292

OnApp 3.0 Administration Guide v15
Virtual Machines Any action on virtual machines – the user can take any action on virtual machines
Virtual Machine's Statistics Full access to Statistics – the user has full access to statistics
25.3 List of Default Permissions for User Role
The list below includes the set of default permissions for the User role in the OnApp v3.0 Beta 2.
Backups Convert own backup to template - the user can only convert their own backups to templates
Create backup for own VM - the user can only create backups of their own virtual machines
Destroy own backup - the user can only delete their own backups
See own backups - the user can only see their own backups
Update own backup - the user can only edit their own backups
Base Resources See own base resources - the user can only see own base resources
Billing PlansSee own billing plan - the user can only see own billing pl
See own billing plan - the user can only see own billing plan
CDN Resources Create a new CDN resource - the user can create a new CDN resource
Destroy own CDN resources - the user can only delete their own CDN resources
See own CDN resources - the user can only see their own CDN resources
Update own CDN resources - the user can only edit their own CDN resources
CDN Usage Statistics User can see own CDN usage statistics - the user can only see own CDN usage statistics
Customer Networks Create own customer network – the user can create own customer networks
Destroy own customer network – the user can delete own customer networks
See own customer networks – the user can view own customer networks
DOCUMENT REVISIONS - LIST OF DEFAULT PERMISSIONS FOR USER ROLE 293
OnApp 3.0 Administration Guide v15
Data Stores See all data_stores - the user can see all data stores ee all data_stores - the user can see all d Disks Autobackup for own disk - the user can only schedule automatic backups on their own disks
Create a new disk - the user can create a new disk
Destroy own disk - the user can only delete their own disks
See own disks - the user can only see their own disks
Unlock any disk - the user can unlock any disk
Update own disk - the user can only edit their own disks
DNS Zones Create a new DNS zone - the user can create a new DNS zone
Destroy own DNS zone - the user can only delete their own DNS zones
See own DNS zones (- the The user can only see their own DNS zones
Any action on DNS record - the user can take any action on DNS record
See own DNS records - the user can see all DNS records
Update own DNS records - the user can update own DNS records
Edge Groups See all edge groups - the user can see all edge groups Firewall Rules Create own Firewall Rules - the user can only create own firewall rules
Destroy own Firewall Rules - the user can only delete own firewall rules
Read own Firewall Rules - the user can only read own firewall rules
Update own Firewall Rules - the user can only edit own firewall rules
Groups See all - the user can see all groups
Hypervisors
See all hypervisors - the user can see all hypervisors
Show Hypervisors on Virtual Machine creation - display hypervisors on Add New Virtual Machine screen.
Template Groups See list of all template groups - the user can see all template groups
DOCUMENT REVISIONS - LIST OF DEFAULT PERMISSIONS FOR USER ROLE 294
OnApp 3.0 Administration Guide v15
See details of any template group (image_template_groups.read)The user can view template group details
IO StatisticsSee own IO Statistics - the user can see own IO Statisti
See own IO Statistics - the user can see own IO Statistics
Virtual Machine's IP Addresses Add IP address to own virtual machine - the user can only add IP addresses to their own virtual
machines
Remove IP address from own virtual machine - the user can only remove IP addresses from their own virtual machines
See IP addresses assigned to own virtual machines - the user can only see IP addresses assigned to their own virtual machines
IP AddressesSee all IP addresses - the user can see all IP addressesSee all IP addresses - the user can see all IP addresses
See all IP addresses - the user can see all IP addresses
Load Balancers Migrate own load balancer - the user can only migrate their own load balancer
Load Balancing Clusters Create new load balancing cluster - the user can create a new load balancing cluster
Delete own load balancing cluster - the user can only delete own load balancing clusters
See details of own load balancing cluster - the user can only see details of own load balancing cluster
Update own load balancing cluster - the user can only change own load balancing cluster
Log Items Delete own log item - the user can only delete their own log items
See list of own log items - the user can only see their own log items
See details of own log item - the user can only see details of their own log items
Monthly Billing Statistics See only own Monthly Bills Statistics - the user can only see own monthly bills statistics
Nameservers See all nameservers - the user can see al
See all nameservers - the user can see all nameservers
Networks See all networks - the user can see all networks
Payments See all payments - the user can see all payments
DOCUMENT REVISIONS - LIST OF DEFAULT PERMISSIONS FOR USER ROLE 295
OnApp 3.0 Administration Guide v15
See own payments - the user can only see their own payments
Resource Limits See own resource limits - the user can only see their own resource limits
Roles See all Roles - the user can see all roles
Templates See all Roles - the
Manage own templates - the user can create and manage their own templates
Transactions Delete own transactions from logs - the user can only delete their own transactions from a log
See list of own transactions - the user can only see their own transactions
See details of own transactions - the user can only see details of their own transactions
Users Change own password - the user can only change own password
See own users – the user can only see their own user account
See user backups/templates prices – the user can see users’ backups/templates prices
See user billing plan – the user can see users’ billing plans
See user hourly prices – the user can see see users’ hourly prices
See user monthly prices – the user can see users’ monthly prices
See user outstanding amount – the user can see users’ outstanding amount
See user summary payments – the user can see user’s summary payments
See user virtual machine prices – the user can see users’ virtual machine prices
Update own user – the user can only edit their own user account
Generate own API key – the user can only generate own key
Virtual Machine Snapshots Create or Restore own Virtual Machine Snapshot - the user can create/restore own snapshots
Destroy own Virtual Machine Snapshot - the user can delete own snapshots
See own Virtual Machine Snapshots - the use can see the list of own snapshots
Virtual Machines Console to own virtual machine – the user can only access their own virtual machine via
console
Create a new virtual machine – the user can create a new virtual machine
Destroy own virtual machine – the user can only delete their own virtual machines
Migrate own virtual machine – the user can only migrate their own virtual machines
DOCUMENT REVISIONS - LIST OF DEFAULT PERMISSIONS FOR USER ROLE 296

OnApp 3.0 Administration Guide v15
Any power action on own virtual machines – the user can only take power-related actions on their own virtual machines
See own virtual machines – the user can only see their own virtual machines
Rebuild Network of own virtual machine – the user can only rebuild network of own virtual machine
Reset root password of own virtual machine – the user can only reset the root password of their own virtual machines
Update own virtual machine – the user can only edit their own virtual machines
Virtual Machine's Statistics See Own Statistics – the user can only see their own statistics
DOCUMENT REVISIONS - LIST OF DEFAULT PERMISSIONS FOR USER ROLE 297

OnApp 3.0 Administration Guide v15
26 HELP
The help menu lets you submit support requests to the OnApp team. All OnApp customers with a full (paid) license are entitled to 24/7 support.
Click the Help link in the Control Panel, and complete the form on the screen that follows.
Alternatively you can call +1 (888) 876-8666, or email [email protected] with your problem.
DOCUMENT REVISIONS - LIST OF DEFAULT PERMISSIONS FOR USER ROLE 298
OnApp 3.0 Administration Guide v15
27 DOCUMENT REVISIONS
v3.7, 15th May 2013 Create Hypervisor Zone section adds info on the ability to specify VMware firewall settings per
hypervisor zone.
Added information about the ability to use VMware without firewall to the VMware section.
Create VMware hypervisor section adds info on the following parameters:
o cluster name
o distributed virtual switch name
Create Template for VMware Virtual Machine adds on the additional step for the CentOS/RHEL template creation.
v3.6, 18th April 2013 Create CloudBoot Hypervisor section adds info on jumbo frames.
Create DNS Zone adds info on the ability to use the underscore character in the CNAME record.
v3.5, 16th April 2013 Updated information about the memory guarantee option in the Create Hypervisor Zone
section.
v3.4, 8th April 2013 Create HTTP CDN Resource section adds info on FTP password parameter limitation. FTP
password can now consist of 6-32 alphanumeric characters.
View HTTP CDN Resource Details and Create HTTP CDN Resource sections add info on the maximum values for the following Nginx parameters:
o limit rate
o limit rate after
o proxy read time out
o proxy connect time out
v3.3, 20th February 2013
Added List of Default Permissions for Admin Role section
DOCUMENT REVISIONS - LIST OF DEFAULT PERMISSIONS FOR USER ROLE 299

OnApp 3.0 Administration Guide v15
List of Default Permissions for User Role section
Storage API Endpoint section to the Integrated Storage chapter
Manage Integrated Storage Data Store Disks section to the Integrated Storage chapter
Manage Integrated Storage Drive Devices section to the Integrated Storage chapter
Storage Nodes section
Document Conventions section
Updated
View HTTP CDN Resource Details and Create HTTP CDN Resource add info on the ability to block search engine crawlers from indexing the CDN content
Sysadmin Tools section adds info on top 10 disks with IOPS usage
Create VM section adds notification about UI improvement
Updated the Hypervisors section with the notification about OnApp behavior during the period when the hypervisor is marked as offline
Autoscale VM adds info on the ability to configure autoscale down options
Create HTTP CDN Resource adds info on the ability to block Google crawling bot and Nginx settings
Manage VM Disk Space adds warning about disk partitioning
Edit VM Disks adds warning about disability to decrease disk size of Windows-based virtual machines
Renamed redundancy parameter to replicas in the Create Integrated Storage Data Store section.
Added warning about NBD backups to the Edit Backups/Templates Configuration section
Added note about the secondary CDN hostname configuration for the CDN resource with SSL enabled to the Create HTTP CDN Resource section
Create HTTP CDN Resource adds info on changed SSL logic.
Added warning about the hot attach transaction limitation to the Add Disks to VM
Added note about the secondary hostname utilization with SSL enabled to the Create HTTP CDN Resource section
CPU value is now displayed as an average value used during the specified period in the Cloud Usage statistics
Updated the Add Custom Languages with the notification about restarting the HTTPD service
Added warning about the disk resize inconsistencies under certain conditions
Renamed the following parameters in the Create Live Streaming CDN Resource section:
o External publishing url to External publishing location
o Failover external publishing url to Failover external publishing location
DOCUMENT REVISIONS - LIST OF DEFAULT PERMISSIONS FOR USER ROLE 300

OnApp 3.0 Administration Guide v15
o Internal publishing point to Internal publishing location
o Failover internal publishing point to Failover internal publishing location
Added link to the VMware Template Installation Guide in the Control Panel Configuration and Create Template for VMware Virtual Machine sections.
v3.2, 24th January 2013 Edited definition of the zombie transaction parameter in the Alerts section
v3.1, 16th January 2013 Updated Create Live Streaming CDN Resource and Create Video On Demand CDN Resource
sections with the latest info on the enable auto leech settings. Enable auto leech parameter can now only be set to Disabled or Block by Default
v3.0, 30th November 2012 View HTTP CDN Resource Details and Create HTTP CDN Resource sections add info on
Nginx settings
v2.9, 28th November 2012 Updated instructions to open the VNC ports in the VMware vCenter Installation section.
CDN Streaming Instructions section adds info on VOD Live Straming CDN resources limited mode
v2.8, 26th November 2012Added Control Panel Configuration section to the VMware chapter
Updated
CDN edge servers section adds info on impossibility to use firewall and NAT for CDN edge servers
v2.7, 21st November 2012 Create Template for VMware Virtual Machine section adds info on the required SUDO
installation
v2.6, 19th November 2012Added: Notification about impossibility to change VM owner to the VMware VM Properties section
Create SolidFire Data Store section
Create Resolver section
SolidFire Integration section
View Hypervisor Settings section
DOCUMENT REVISIONS - LIST OF DEFAULT PERMISSIONS FOR USER ROLE 301
OnApp 3.0 Administration Guide v15
CDN Streaming Instructions section
Updated: Renamed Usage to IOPS in the Disks settings section
Edit Backups/Templates Configuration adds info on NBD usage
Create Hypervisor Zone section adds info on memory guarantee parameter
Create CDN Storage Server section
Set Billing Plan Prices And Resource Limits adds info on minIOPS limits
Data Stores Settings adds info on SolidFire data stores
Edit Backups/Templates Configuration adds info on Use NBD for backups parameter
Autoscale VM section adds info on autoscaling down
View Live Streaming CDN Resource Details section
Stream Statistics section with the info on the latest parameters
v2.5, 12th November 2012 Improved zombie definition in the Alerts chapter
v2.4, 1st November 2012 Added notification about Windows 2003 templates to the Templates chapter v2.3, 1st July 2012Added: Firewalls chapter
Create VMware Data Store section toData Stores Settings chapter
Create VMware hypervisor section to Hypervisor Settings chapter
CloudBoot Hypervisors chapter
VMware Virtual Machines chapter
VMware chapter
Set Firewall Rules section adds info on firewall rule positioning
View User Backups section
IP Address Pools chapter
Customer VLANs chapter
Create Live Streaming CDN Resource section to the CDN Resources chapter
Create Video On Demand CDN Resource section to the CDN Resources chapter
Integrated Storage chapter
CDN Storage Servers section
DOCUMENT REVISIONS - LIST OF DEFAULT PERMISSIONS FOR USER ROLE 302

OnApp 3.0 Administration Guide v15
Delete VM section
Statistics chapter
Permissions List chapter (merged separate permissions sections and added missing permissions)
CDN Setup Wizard section to the CDN chapter
Assign/Unassign IP addresses to a user section
Drop Session section to the Users chapter
Updated: Create DNS Zone adds info on underscore and wildcard use
Edit Defaults Configuration adds info on the Service Account Name parameter
Add Custom Languages section with the info on the latest parameters
View User Account Details section adds info on user backups
CDN Resources section adds info on CDN resource creation requirements
VM Properties section adds note about VM shutdown method
Create HTTP CDN Resource section with the map of CDN resources
Rebuild VM Network section adds info on Force Reboot option
View Template Details section adds info on My Templates tab
Reboot Hypervisor section adds note on VMware hypervisors
Data Store Settings chapter adds info on distributed data stores
Edit System Configuration section adds info on CloudBoot, OnApp Storage and VMware configuration settings
Updated VM Properties section with a note about virtual machines based on VMware hypervisors
Complemented Hypervisors chapter with the info on the latest parameters
Virtual Machines chapter adds info on distributed storage functionality
Hypervisors Settings chapter adds info on vmware hypervisor type
User Profile section adds info on avatar and infobox options.
Edit Defaults Configuration section adds info on Enforce password complexity feature
Edit system Configuration section adds info on Timeout Before Shutting Down VMs parameter
Removed deprecated edge server permissions
Create Custom Templates section adds info about custom Windows template creation process
Updated Set Billing Plan Prices And Resource Limits section with a note about edge group limits
CDN Edge Servers section adds info on the latest parameters
DOCUMENT REVISIONS - LIST OF DEFAULT PERMISSIONS FOR USER ROLE 303
OnApp 3.0 Administration Guide v15
CDN Resources section adds info on new resource types
Reorganized guide structure to reflect the current GUI design
View CDN Edge Server Details with details on Tools menu
Edit CDN edge server section with info how to add the edge server to the marketplace
Updated Billing Plans section with the information on the latest parameters
Added missing info about the Hide Deleted Users filter to the View User Account Details section
Schedules Settings section with details on backups scheduling
Renamed Template groups chapter to Template Store. Added info on the latest parameters
Updated Hypervisors chapter with the up-to-date info
Renamed Usage Statistics to Cloud Usage and moved it to the Statistics chapter
Corrected the Cloud Search Tool section
Removed Permissions list section from the Roles chapter
Changed Roles and permissions chapter heading to Roles to reflect thenew interface design
Edit/Delete Load Balancer section adds info on the latest parameters
Migrate Disks section with note about the migration of thin provisioning disks
Renamed Adjust Resource Allocation to Edit VM
Create CDN Edge Group section
Edit Interface Configuration section adds info on latest pagination scheme
Updated Allocate IP Addresses chapter with explanation of Remove IP Address with Reboot option.
Renamed Allocate IP addresses section to Allocate/Remove IP Addresses
Edit VM section adds info on Tools menu
Updated VM Properties section with the information about Tools menu.
Updated View VMs section with to reflect the new UI design; added a notification about the search tool
Create VM section adds info on required parameters
Updated Cloud Search Tool section with the info on new search box placing
Updated Dashboard chapter with the info on the latest parameters
v2.3, 11th July 2012 Corrected URL signing information in the Add new CDN resource section (symbols and spaces
are not allowed)
V2.2, 24th May 2012 Corrected information in the configure network interface section about powercycling VMs after
editing a network interface
DOCUMENT REVISIONS - LIST OF DEFAULT PERMISSIONS FOR USER ROLE 304
OnApp 3.0 Administration Guide v15
v2.1, 22nd May 2012 Added note to the Create currency section to explain the potential impact of new currency fields
on the correct display of VM billing data in the Control Panel and API, and how to prevent this from happening
v2.0, 8th May 2012 Updated/corrected nameserver information in the DNS chapter
v1.9, 26th April 2012 Updated the Create Custom Templates section with the requirements for Min memory size and
Min disk size values
v1.8, 13th April 2012Added: Backup servers chapter
Backup server zones chapter
DNS chapter
License section
Universal search form section
Localization and Customization Search section
User Additional Fields section
Updated: Manage VM Networks section with the info on how to remove an IP address
Set Billing Plan Prices And Resource Limits section with the info on backup server zone resource limits
Template Software Licenses contains new Windows licensing type parameters
Template groups section adds info on Windows licensing type
Load Balancers chapter with the info on new parameters
Add CDN edge server section adds info on edge server label validation
Bandwidth statistics section adds info on the latest parameters
Changed CPU Share to CPU Priority
Create Custom Templates section
Create VMs section adds info on new licensing type for Windows VMs
Autoscale VMs section
Set Firewall Rules section
Manage VM Networks section adds info on Display Network Speed for Network Interfaces on Virtual Machine Page
Migrate Disks section with the info on new parameters
DOCUMENT REVISIONS - LIST OF DEFAULT PERMISSIONS FOR USER ROLE 305

OnApp 3.0 Administration Guide v15
VM CPU Utilization and VM Billing Statistics sections add info on Show in my Timezone option
Label description in Add CDN edge server section
Add Disks to VM section with mount point validation description
Edit Defaults Configuration section with the info on IP address anti-spoofing and SSH ports option
Add IP Address to Network section with a note to reflect maximum number of IPs that can be added at once (1,000)
Removed Template sets section
Create currency section with the details on Precision per unit parameter
v1.6, 8th December 2011 Updated:
o Updated instructions on how to turn back to Admin area at a Log in as User section
o Create VMs section contains hostname validation requirements
o View User Account Billing Statistics section adds info on Used resources cost field
o View/Edit/Delete Disks section with the info on new controls
o Templates chapter
o Alerts section clarifies the listed background processes
o Edit hypervisor and Create Hypervisor sections with the info on new options
o Edit system configuration section with the explanation of Zombie transaction time parameter
o Logs chapter
o Autoscale VMs section
v1.5, 28th November 2011 Updated Allocate IP addresses description to reflect current functionality more accurately. It is
not currently possible to allocate an IP to a VM if that IP has already been allocated, so this text has been removed (the ability to "share" IPs in this way will be fixed in a future update)
Removed detail about creating new templates. This is now handled in separate documents – contact us for more information
v1.4, 17th November 2011 Added screenshot to the CDN Resources section to clarify location of CDN Resources menu
v1.3, 21st October 2011 Removed redundant price and autoscale settings from Add CDN edge server section
v1.2, 6th October 2011
DOCUMENT REVISIONS - LIST OF DEFAULT PERMISSIONS FOR USER ROLE 306
OnApp 3.0 Administration Guide v15
Updated hardware requirements information – CP RAM and HV NICs
v1.1, 6th October 2011 Added CDN introduction with basic workflow description
v1.0, 3rd October 2011 Added
o Set VIP status subsection
o Configure Network Interface subsection
o Allocate IP addresses subsection
o Add SSH Key section
o Template sets section
o Advanced Tasks chapter
o CDN edge servers chapter
o CDN resources chapter
o CDN edge groups chapter
Updatedo Virtual Machines chapter is reorganized. Now it consists of 4 main sections: Manage
VMs, Manage VM network, Manage VM Disk Space and VM Statistics
o VM Properties (prev. View VM details) contains new items in the Actions list
o Create VMs and Add new users sections contain login/password validation requirements
o Create Network section contains information how to join a network to a hypervisor or a hypervisor zone
o Add IP address(es) contains information on adding IPv6 addresses
o Edit defaults configuration section contains information on SSH keys
o Edit system configuration section
o Edit Backups/Templates Configuration section
o Sysadmin Tools section
o Dashboard section with the info on Disk size and memory calculation for the cloud and a particular user
o Add Custom Languages section updated with the info on adding new locales
o Set Billing Plan Prices And Resource Limits section updated with info on adding Edge group limits
Other detail is unchanged from the last version (v1.1) of the Admin Guide for OnApp 2.2
DOCUMENT REVISIONS - LIST OF DEFAULT PERMISSIONS FOR USER ROLE 307

OnApp 3.0 Administration Guide v15
DOCUMENT REVISIONS - LIST OF DEFAULT PERMISSIONS FOR USER ROLE 308