cobalt qube 2 user manual - oracle documentation
TRANSCRIPT

Cobalt Qube TM 2
User Manual
©2000 Cobalt Networks, Inc. All rights reserved.
Part Number: 070-00221-01
Date: 07-2000
Cobalt Networks and Cobalt Qube are trademarks of Cobalt Networks, Inc. All other company, brand and product names may be registered trademarks or trademarks of their respective companies and are hereby recognized.
This publication and the information herein is furnished “AS IS”, subject to change without notice, and should not be construed as a commitment by Cobalt Networks, Inc. Furthermore, Cobalt Networks, Inc., assumes no responsibility or liability for any errors or inaccuracies, makes no warranty of any kind (express, implied or statutory) with respect to this publication, and expressly disclaims any and all warranties of merchantability, fitness for particular purposes and non-infringement of third-party rights.
The majority of the software used within the Cobalt Qube 2 can be freely distributed under the terms of the BSD copyright and the GNU Public License. However, some applications remain the property of their owners and require their permission to redistribute. For a complete listing of the software used within the Cobalt Qube 2, and the terms under which it can be distributed, refer to the Cobalt Web site at http://www.cobalt.com.
The copyright for the Glimpse search engine used in this product is held by the University of Arizona. Use of it is limited to this product. Rights to distribute Glimpse can be obtained from the University of Arizona. For more information, access the Glimpse Web site at http://glimpse.cs.arizona.edu.
The copyright for the InfoPlace Document Organizer is held by InfoPlace. Its use is limited to the Qube 2 only. For more information, or to obtain rights to distribute the Document Manager software, access the InfoPlace Web site at http://www.infoplace.com.
The Cobalt Qube 2 includes software developed by the Apache Group for use in the Apache HTTP server project (http://www.apache.org/).
The Cobalt Qube 2 also includes Majordomo, a package for managing Internet mailing lists. The latest version of Majordomo can be obtained from ftp://ftp.greatcircle.com/pub/majordomo/ .
Sendmail is a trademark of Sendmail, Inc.
Cobalt Networks, Inc. 555 Ellis Street Mountain View, CA 94043 www.cobalt.com
In the U.S.A.:
Phone (888) 70-COBALT (650) 623-2500
Fax (650) 623-2501
Outside the U.S.A.:
Phone +1 (650) 623-2500 Fax +1 (650) 623-2501

Important SafeguardsFor your protection, please read all these instructions regarding your Cobalt Qube 2 and retain for future reference.
1. Read Instructions
Read and understand all the safety and operating instructions before operating the appliance.
2. Ventilation
The Cobalt Qube 2’s bottom vents and fan opening are provided for ventilation and reliable operation of the product, and to protect it from overheating. These openings must not be blocked or covered. This product should not be placed in a built-in installation unless proper ventilation is provided.
3. Lithium Battery
The lithium battery on the system board provides power for the real-time clock and CMOS RAM. The battery has an estimated useful life expectancy of 5 to 10 years. If your system no longer keeps accurate time and date settings, it may be time to change the battery. Contact Cobalt for service information. There are no operator-serviceable parts inside.
Warning: There is a danger of explosion if the battery is incorrectly replaced or replaced with the wrong type of battery. Replace only with the same or equivalent type recommended by the equipment manufacturer. Dispose of used batteries according to manufacturer’s instructions.
Avertissement : Il y a danger d’explosion s’il y a remplacement incorrect de la pile. Remplacer uniquement avec une pile du même type ou d’un type équivalent recommandé par le fabricant. Mettre au rebut les piles usagées conformément aux instructions du fabricant.
Achtung: Explosionsgefahr wenn die Battery in umgekehrter Polarität eingesetzt wird. Nur mit einem gleichen oder ähnlichen, vom Hersteller empfohlenen Typ, ersetzen. Verbrauchte Batterien müssen per den Instructionen des Herstellers verwertet werden.
iii
4. Power Cord
!Caution: The power-supply cord is used as the main disconnect device. Ensure that the socket outlet is located or installed near the equipment and is easily accessible.
!Attention : Le cordon d’alimentation sert d’interrupteur général. La prise de courant doit être située ou installée à proximité du matériel et offrir un accès facile.
!Achtung: Zur sicheren Trennung des Gerätes vom netz ist der Netzstecker zu ziehen. Vergewissern Sie sich, dass die Steckdose leicht zugänglich ist.
5. Electrical Shock
To reduce the risk of electrical shock, do not disassemble this product. Take it to a qualified service person when service or repair work is required. Opening or removing covers may expose you to dangerous voltage or other risks. Incorrect reassembly can cause electric shock when this product is subsequently used.
6. Browsers
Both Netscape Navigator® and Microsoft® Internet Explorer have bugs that can cause intermittent, unexplained failures. When using a Web browser to interact with your Cobalt Qube 2, you may occasionally experience a browser failure. Released product versions of the browsers are usually more reliable than beta versions and later versions typically work the most reliably. A browser program failure, although annoying, does not adversely affect your Cobalt Qube 2’s data.
iv

Regulations and InformationThis equipment has been tested and found to comply with the limits for a Class B digital device, pursuant to Part 15 of the FCC Rules. These limits are designed to provide reasonable protection against harmful interference in a residential installation. This equipment generates, uses and can radiate radio frequency energy and, if not installed and used in accordance with the instructions, may cause harmful interference to radio communications. However, there is no guarantee that interference will not occur in a particular installation. If this equipment does cause harmful interference to radio or television reception, which can be determined by turning the equipment off and on, the user is encouraged to try to correct the interference by one or more of the following measures:
• Re-orient or re-locate the receiving antenna.
• Increase the separation between the equipment and receiver.
• Connect the equipment into an outlet on a circuit different from that to which the receiver is connected.
• Consult the dealer or an experienced radio/TV technician for help.
In order to maintain compliance with FCC regulations, shielded cables must be used with this equipment. Operation with non-approved equipment or unshielded cables is likely to result in interference to radio and TV reception. The user is cautioned that changes and modifications made to the equipment without the approval of manufacturer can void the user’s authority to operate this equipment.
This equipment is in compliance with Underwriters Laboratories (UL) and is UL-listed.
v

vi

Contents
Important Safeguards iii
1 Introduction 1General 2
Front view of the Qube 2 2
Rear view of the Qube 2 3
Qube 2 requirements 4
Target audience for the Qube 2 5
Cobalt Developer Network 5
Organization of the user manual 5
List of chapters and appendices 7
Customer Service and Technical Support 8
General Cobalt information 8
Cobalt Technical Support and Service 8
Email contact 8
Technical Support telephone numbers 8
Further information 9
Before contacting Cobalt Networks Technical Support 10
To speed up your support call 10
Cobalt logo badge 11
2 Setting up the Qube 2 13Qube 2 setup 13
Phase 1: Making the Connection 13
Connecting to the network 13
Connecting the locking power supply 14
Powering on the Qube 2 14
Configuring Network Settings 14
Using the LCD console to configure the network 15
Configuring the Qube 2 through a DHCP server 16
Configuring the Qube 2 manually 17
Entering the IP address 17
vii
Contents
Phase 2: Setting up with the Web browser 19
Active Assist — Online Help 20
Configuring the Qube 2 with the Setup Wizard 20
Network Integration 20
Administrator Setup 22
Password guidelines 24
Services Setup 25
Time Setup 26
Access Rights 27
Users Setup 28
Groups Setup 29
Product Registration 30
Completing configuration with the Setup Wizard 30
3 Services on the Qube 2 33Managing your Personal Profile 34
Using email on the Qube 2 34
Setting up your email client 35
Email aliases 36
Email relaying 37
Developing Web pages 38
FrontPage 98 and FrontPage 2000 Server Extensions 38
Using Page Builder 39
Using an HTML editor 39
CGI scripts 39
Publishing Web pages using FTP 40
Sharing files and transferring data 41
Using Windows file sharing (SMB) 42
Before you begin: Windows 95 and Windows 98 users 42
Setting up Windows file sharing for Windows 95 and 98 43
Setting up Windows file sharing for Windows NT 44
Using AppleShare 45
Using AppleShare over IP 46
Using FTP 46
viii
Contents
Working in collaboration through discussions 47
Dynamic Host Configuration Protocol (DHCP) server 47
What is DHCP and what are the benefits? 47
What is a configuration? 48
What are leases? 48
How does DHCP work? 48
Domain Name System (DNS) 50
Network Address Translation (NAT) 50
IP Firewall 52
Internet access through high-speed serial port 52
Searching for information on the Qube 2 52
Managing documents 53
Creating a new InfoBase 53
Install software 53
4 Administrator Site 55Qube 2 Administrator 57
Configuring the Qube 2 Administrator settings 57
Modifying the Qube 2 Administrator settings 59
Resetting the Qube 2 Administrator password 60
Users 61
Configuring the user settings 61
Configuring the default user settings 61
Adding a user 63
Modifying a user account 65
Modifying a user’s email settings 66
Adding an email alias for a user 68
Removing a user 68
Groups 69
Configuring the group settings 70
Configuring the default group settings 71
Adding a group 72
Modifying a group 74
Removing a group 75
ix

Contents
Mailing lists 75
Configuring the mailing list settings 77
Adding a mailing list 77
Forwarding incoming email to several recipients 78
Modifying a mailing list 79
Removing a mailing list 80
Network 80
Ethernet settings 81
Entering the settings for the network configuration 82
Network Address Translation (NAT) 84
Enabling or disabling the NAT feature 84
Modem settings and the high-speed serial port 84
Changing the modem settings 86
Verifying the status of the modem connection 87
Control Panel 87
Services 88
Managing the settings for the services 89
Web server 89
Discussion group 89
Email server 89
SMTP server 90
Enabling the email server 91
Enabling the email relaying feature 94
File Transfer Protocol server 95
Windows file sharing (SMB) 97
Apple file sharing (AppleShare) 98
Simple Network Management Protocol (SNMP) agent 99
Legato file backup 99
Domain Name System (DNS) server 100
Dynamic Host Configuration Protocol (DHCP) server 100
Access rights 103
User add and remove 104
Public site access 104
Install CGI scripts 104
Telnet access 105
x

Contents
IP Firewall 106
Adding an IP filtering rule 107
Modifying an IP filtering rule 109
Removing an IP filtering rule 110
Time 110
Maintenance 111
Backup 111
Manual backup 112
Scheduled backup 114
Backup file locations 116
Restore 117
Install software 119
Third-party software 121
Installing third-party software 121
Reboot 121
Shutdown 122
System Status 122
Memory 123
Central Processing Unit (CPU) 123
Disk 123
Network 124
Modem 124
Service Status 124
Web 125
Email 126
File sharing services 126
Simple Network Management Protocol (SNMP) 126
Domain Name System (DNS) 126
Dynamic Host Configuration Protocol (DHCP) 126
Telnet 126
Public Site 127
Active Monitor 127
xi

Contents
5 Public Site 129Home 130
View Users 131
Viewing the users 131
Viewing a user’s personal Web page 132
Sending an email to another user 132
Creating Web content 132
View Groups 133
Viewing the groups 133
Viewing a group’s public Web page 134
Viewing a group’s private Web page 134
Sending an email to a group 134
Posting a message to a discussion thread 135
Creating Web content 135
Working in collaboration through discussions 135
Rules of discussions 135
Description of a discussion thread 135
Creating a new discussion topic 137
Joining an existing discussion 138
Viewing an existing message 138
Changing the order of the messages 138
Adding a new message 139
Adding an attachment to a message 139
Replying to a message 140
Deleting a message 140
Deleting a discussion thread 140
Exiting a discussion 140
Search 141
Performing a search 142
Interpreting search results 144
Personal Profile 144
Modify user 145
Email 145
Forward email to 146
Automatic vacation reply 146
Forwarding incoming email to several recipients 146
xii
Contents
Usage data 146
Backup 147
Restore 148
Page Builder 149
Accessing the Page Builder tool 149
Page Builder window 150
Programs 151
Managing documents 151
Using the Infoplace Document Organizer 153
Logging in to an InfoBase 153
Accessing online help 153
Designating easy-to-find documents 153
Finding specific documents 154
Administrator Site 154
A Using the LCD console 155Changing network configuration 156
Rebooting 157
Powering down 158
Resetting network configuration 159
Resetting IP Firewall 160
B Product Specifications 161Technical Data for the Qube 2 161
Hardware 161
Software 161
Features 161
System management 162
Physical data 162
Regulatory approvals 163
Upgrading your Qube 2 163
Opening the Qube 2 164
Adding a memory module 165
Adding a PCI expansion card 166
Closing the Qube 2 167
I/O board 168
CPU card 169
xiii

Contents
C Advanced Information 171URL for the default Qube 2 home page 171
Telnet access 171
CGI scripts 172
D Domain Name System 173Basic DNS 173
Enabling the DNS server feature 173
Configuring a primary DNS server 174
Specifying a reverse lookup (PTR) record 175
Specifying a mail server (MX) record 175
Specifying an alias (CNAME) record 176
Configuring a secondary DNS server 177
Adding a secondary name-server authority for a domain 177
Adding a secondary name-server authority for a network 177
Advanced DNS 178
Network Mask Notation Conversion 178
Quick Start Guide for Domain Name Service (DNS) 179
Brief history of the Domain Name System (DNS) 184
What is a DNS record? 185
Who manages your DNS records? 185
How does DNS work? 185
E Licenses 187
F Glossary 193
xiv

Chapter 1
Introduction
The Cobalt Qube 2 is a powerful and versatile network server. It fits easily within an existing network, and it enhances workgroup activities by providing many communication and collaboration services. Here is a sample of what you can do with the Cobalt Qube 2:
• Web publishing You can access a broad range of Web publishing capabilities for users and groups.
• Email The Qube 2’s email service allows you to communicate internally and externally to individuals and groups. It includes auto-forward and auto-response capabilities. You can even create mailing lists that include external users.
• Share access to the Internet You can use the high-speed serial port to connect through a modem, or the second Ethernet port to connect through a leased line.
• File sharing By displaying the Qube 2 on the desktop as a shared network device, you can move files easily to and from the Qube 2, using standard file-sharing capabilities.
• Private discussion groups You can work in collaboration with (and remotely from) the members of your group to develop and document information related to a particular topic. Only group members can access these discussions.
• Searching and automatic text indexing You can locate information on the Qube 2 by searching for words or phrases stored in text and HTML files. The search index is updated automatically every day.
• Document archival and retrieval The InfoPlace Document Organizer allows you to store, locate and retrieve any kind of document.
These services can be used within an extranet or an intranet environment, or across the Internet.
1
Chapter 1
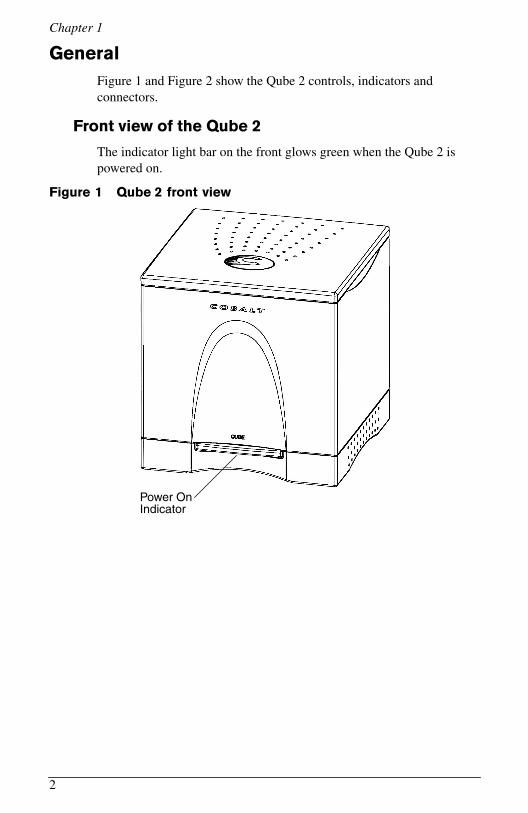
General Figure 1 and Figure 2 show the Qube 2 controls, indicators and connectors.
Front view of the Qube 2
The indicator light bar on the front glows green when the Qube 2 is powered on.
Figure 1 Qube 2 front view
Power OnIndicator
2
Introduction
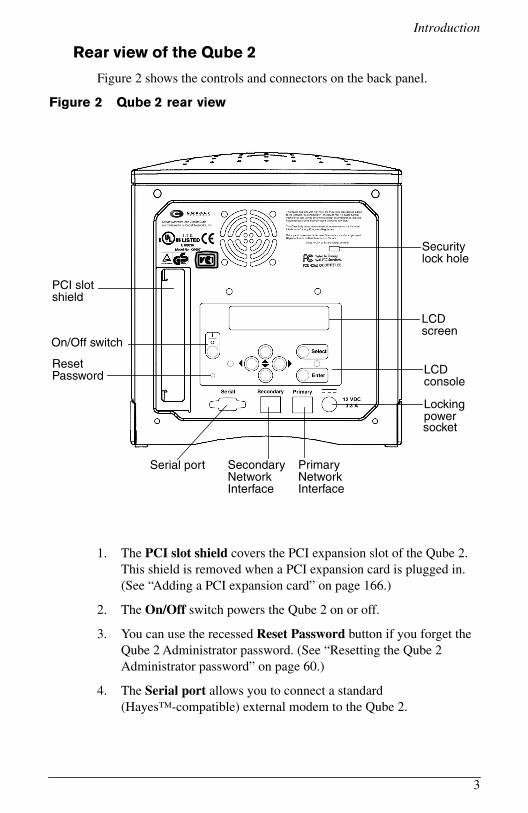
Rear view of the Qube 2
Figure 2 shows the controls and connectors on the back panel.
Figure 2 Qube 2 rear view
1. The PCI slot shield covers the PCI expansion slot of the Qube 2. This shield is removed when a PCI expansion card is plugged in. (See “Adding a PCI expansion card” on page 166.)
2. The On/Off switch powers the Qube 2 on or off.
3. You can use the recessed Reset Password button if you forget the Qube 2 Administrator password. (See “Resetting the Qube 2 Administrator password” on page 60.)
4. The Serial port allows you to connect a standard (Hayes™-compatible) external modem to the Qube 2.
PCI slotshield
ResetPassword
Securitylock hole
LCDscreen
LCDconsole
Secondary
Lockingpowersocket
Serial port
On/Off switch
PrimaryNetworkInterface
NetworkInterface
3

Chapter 1
5. The Secondary Network Interface accepts a second10/100 BaseTX network cable and, as an option, can connect the Qube 2 to the Internet.
6. The Primary Network Interface accepts a 10/100 Base-TX network cable and is used to connect the Qube 2 to your intranet.
7. The Locking power socket receives the power connector from the power adaptor.
8. The LCD console allow you to enter network configuration information, reboot the Qube 2, reset the network configuration, reset the IP firewall filtering rules and power down the Qube 2.
9. The LCD screen displays messages and values entered. Use the arrow buttons to toggle between choices or to enter values. (See “Using the LCD console to configure the network” on page 15.)
10. The Security lock hole is used to secure the unit with a standard computer-locking security cable.
Qube 2 requirements To use the Qube 2, you need:
• A 10/100BaseTX Transmission Control Protocol/Internet Protocol (TCP/IP) -based local area network (LAN).
• A personal computer (attached to the network) that uses a Web browser (Netscape Navigator or Microsoft Internet Explorer, versions 4.0 or later).
• Network parameters, which you can obtain from your system or network administrator; these include the Qube 2’s assigned IP address, the subnet mask of your network and, if communicating with other networks, a gateway/router address.
Note: If you intend to set up the Qube 2 to obtain its network parameters from a dynamic host configuration protocol (DHCP) server, you do not need to obtain this information from the network administrator. For more information, see “Dynamic Host Configuration Protocol (DHCP) server” on page 47.
• An Internet service provider, if you plan to connect to the Internet.
4

Introduction
Target audience for the Qube 2 The user manual is for anyone who will set up the Qube 2 network server appliance for a group of users. You should be familiar with Microsoft® WindowsTM, Macintosh® or other operating systems, and Netscape Navigator®, Microsoft® Internet Explorer or other Web browsers.
For solutions that extend the functionality of the Qube 2, visit the Online Solutions Directory on Cobalt’s Web site at http://www.cobalt.com/solutions/ .
Cobalt Developer Network
Cobalt provides a wide range of resources, such as technical notes and white papers, for developers of Linux applications for Cobalt platforms. Premium resources are also available.
To register with the Cobalt Developer Network at no cost, visit the Web site at http://developer.cobalt.com/ .
Organization of the user manualChapter 3 describes the features of the Qube 2.
Chapter 4 is based on the Administrator Site screen of the browser-based user interface (UI); the Administrator Site screen has a brown border on the left side. See Figure 3.
Chapter 5 is based on the Public Site screen of the UI; the Public Site has a blue border down the left side. See Figure 4.
5

Chapter 1
Figure 3 Administrator Site screen
Figure 4 Public Site screen
6

Introduction
List of chapters and appendices
Chapter 1 “Introduction” on page 1 includes an overview of the Qube 2’s features and directs you to the information in other chapters of this guide.
Chapter2 “Setting up the Qube 2” on page 13 describes the hardware setup of the Qube 2 and the network integration process.
Chapter 3 “Services on the Qube 2” on page 33 explains the features available on the Qube 2.
Chapter 4 “Administrator Site” on page 55 explains the features on the Qube 2 Administrator user interface (UI) screen.
Chapter 5 “Public Site” on page 129 explains the features on the Qube 2 Public Site UI screen.
Appendix A “Using the LCD console” on page 155 explains the LCD console functions.
Appendix B “Product Specifications” on page 161 lists the Qube 2 technical specifications.
Appendix C “Advanced Information” on page 171 provides information on backup URLs, resetting the administration password, telnet and CGI scripts.
Appendix D “Domain Name System” on page 173 gives an in-depth explanation of the DNS service.
Appendix E “Licenses” on page 187 lists licensing information.
Appendix F “Glossary” on page 193 provides a glossary of terms used in the Qube 2 manual.
7

Chapter 1
Customer Service and Technical SupportFor Cobalt product information, visit the support section of the Cobalt Web site at http://www.cobalt.com/support/. The site includes a Knowledge Base that customers can query; a list of Frequently Asked Questions (FAQs) that provide additional information is also available through the Knowledge Base.
General Cobalt information
In the U.S.A., call (888) 70-COBALT or (888) 702-6225, or send email to [email protected].
Outside the U.S.A., call +1 650 623-2500, or send email to [email protected].
In Europe, the Middle East and Africa, call +31 71 565 7000, or send email to [email protected].
In Japan, send email to [email protected].
Cobalt Technical Support and Service
Email contact
You can contact Cobalt Networks Technical Support by email using the Online Email Support Form. This form provides us all the information we need to service your request in a timely fashion.
Go to the URL http://www.cobalt.com/support/ and click on the Contact Support link.
Technical Support telephone numbers
In the U.S.A., call (800) 266-4378.
In Europe, the Middle East and Africa, call +31 (71) 565-7070 (Netherlands)
Customers in Japan can send email to [email protected].
8

Introduction
Further information Cobalt also offers other information resources.
Discussion Groups Cobalt has made available a number of discussion groups through which users can share information.
To view the current list of Cobalt discussion groups, type the URL http://www.cobalt.com/support/resources/usergroups.html. The names of the discussion groups show up as hypertext links.
To subscribe to or unsubscribe from a discussion group, or to view previous postings to a group, click on the group name. A new browser window opens, displaying information about the discussion group.
New discussion groups are added periodically. The current groups include:
• an announcement list concerning Cobalt products
• an information list for developers working on Cobalt products
• a users list for sharing information between users of Cobalt products
• a security list for users to address network security issues on Cobalt products
The Knowledge Base Cobalt offers access to its online database of common installation and configuration problems and solutions. You can access the site under http://www.cobalt.com/support/kb/ .
Online technical papers For customers looking for more in-depth technical information, there are a number of technical papers available on Cobalt Networks’ Web site at http://www.cobalt.com/support/ . The technical papers cover, among others, such topics as:
• a quick start guide for Domain Name System (DNS)
• a FAQ for email relay
• how to deploy a Qube 2 with Digital Subscriber Loop (DSL)
• how to create a package (.pkg) file
Education For those who desire a premium level of technical expertise with Cobalt Networks products, we offer a number of training courses. The intended audience includes end users, Cobalt resellers, system and network administrators, systems engineers, product developers, support technicians, consultants and trainers. You can access the site at http://www.cobalt.com/support/education/index.html/ .
9
Chapter 1
Solutions For customers looking for business-case information concerning Cobalt products, there are also a number of white papers available on Cobalt’s Web site at http://www.cobalt.com/solutions/ .
Developers If you are a software or hardware developer, look for information at http://developer.cobalt.com/ .
Before contacting Cobalt Networks Technical Support
First, make an effort to resolve the problem on your own. Take note of all actions you perform and any error messages so that, if necessary, you can describe them to a member of the Technical Support team.
Refer to the user manual and try our online services to answer your questions. The Technical Support KnowledgeBase, the User Groups, the Online Documentation and the Solutions page offer a wealth of information and may answer your question quickly.
To speed up your support call
When contacting Cobalt Networks Technical Support, the more information you can provide, the better. Before you call or email, have the following information ready.
• the serial number, located on the back panel, or the MAC address of the Primary Network Interface, accessible through the user interface, of your Qube 2
• any additional software installed on your system
• any peripherals connected to your system
• a hard copy of any error messages you have received and the time when they occurred
• the process you were running or the changes you had made when the error occurred
• the steps you have taken to resolve the problem
10

Introduction
Cobalt logo badgeFor more information on the Qube 2 server, click on the Cobalt Networks logo badge in the top left corner.
A table with the configuration information for your Qube 2 server appears. The table shows:
• the amount of RAM
• the size of the hard disk
• the version of the Cobalt OS
• Cobalt Networks trademark information
The table also contains three hypertext links:
• About The Product displays the services available on the Qube 2 server, links to Cobalt Networks Technical Support and a link to the Solutions guide.
• Cobalt Networks, Inc. Web site takes you to the URL http://www.cobalt.com.
• Credits and Acknowledgements acknowledges the software used on the Qube 2.
11

Chapter 1
12

Chapter 2
Setting up the Qube 2
This chapter guides you through the process of connecting and configuring the Cobalt Qube 2 for your network and user community. A typical setup process takes less than 15 minutes, after which you can begin using all of the Qube 2 services.
If the Qube 2 has been configured previously for a different network, refer to “Changing network configuration” on page 156 in Appendix A.
Qube 2 setupThe setup process occurs in two phases.
• “Phase 1: Making the Connection” explains the physical connection of the Qube 2 to a power source and the network.
• “Phase 2: Setting up with the Web browser” explains the network integration process and allows the administrator to select services and create users and groups, using any browser-enabled computer.
Phase 1: Making the Connection
Connecting to the network
Connect the Primary Network Interface (10/100 BaseTX) of the Qube 2 to your local network with a twisted-pair ethernet cable; see Figure 5.
Figure 5 Network connectors
Locking
Secondary
powersocket
NetworkInterface
PrimaryNetworkInterface
Serial port
13

Chapter 2
If you want to connect the Qube 2 to the Internet, you can use either an external modem or the Secondary Network Interface (if you have a leased line to the Internet).
• For a modem connection to the Internet: Connect a standard (Hayes-compatible) external modem to the serial port of the Qube 2; see Figure 5.
• For a leased line connection to the Internet: Connect the Secondary Network Interface (10/100 BaseTX) to your Internet line with twisted-pair ethernet cabling; see Figure 5.
Connecting the locking power supply
To connect the locking power supply, pull back on the sliding connector and push the connector into the 12V DC locking power socket; see Figure 5. Connect the other end of the power supply cord to an electrical outlet.
Powering on the Qube 2
Turn on the power by pressing the On/Off switch on the back of the Qube 2; see Figure 2.
The hard disk spins up and the fan turns on. The light bar on the front of the unit blinks a few times and then glows steadily.
A number of status messages are displayed on the LCD screen as the Qube 2 completes its boot process.
!Caution: It is important to follow the proper power-down procedure before turning off the Qube 2. Refer to “Powering down” on page 158 in Appendix A.
Configuring Network Settings
Now that you have made the network and power connections, you can configure the network settings.
The Qube 2 requires specific network information in order to function properly. Depending on the network environment, the Qube 2 may be able to obtain all of the necessary information from a dynamic-host-configuration-protocol (DHCP) server on the network. If
14

Setting up the Qube 2
so, the Qube 2 tries to configure itself automatically. If not, you must enter the necessary information manually, using the LCD console on the back of the Qube 2; see Figure 6.
Before you proceed, make sure you have the following information:
• the IP address assigned to the Qube 2
• the subnet mask of your network
Note: A gateway or router address is not required for a Qube 2 that is only connected to a local area network (LAN). If you connect to another network through the Qube 2, you require a gateway address. If you use a modem to connect to the Internet, the modem serves as the gateway.
Using the LCD console to configure the network
Figure 6 shows the LCD console for the Qube 2.
The LCD screen on the back of the Qube 2 displays two lines of text. The top line of the LCD presents instructions on data to enter; the bottom line displays the data already entered. Use the arrow buttons below the LCD screen to enter the required network information manually.
Appendix A, “Using the LCD console”, on page 155 provides more information about the LCD console.
Figure 6 LCD console
Enter
Select
15

Chapter 2
During startup, the LCD screen on the back of the Qube 2 displays status information about the boot process itself. When setting up the Qube 2, you use the LCD console to enter network configuration information for the Qube 2. Once the Qube 2 is running, the LCD console is used to change network configuration information, reboot the unit and power down the unit.
The arrow buttons function as follows:
The Left arrow button moves the cursor to the left between the digits displayed in the LCD screen.
The Right arrow button moves the cursor to the right between the digits displayed in the LCD screen.
The Up arrow button increases the digit located at the cursor position.
The Down arrow button decreases the digit located at the cursor position.
The Select button displays the next option.
The Enter button accepts the information entered or the option displayed.
Configuring the Qube 2 through a DHCP server
The Qube 2 first checks to see whether a DHCP server is present on the network. If there is a functioning DHCP server that is set up to serve leased IP addresses, the Qube 2 configures itself automatically. If the network information can be configured automatically, the LCD screen displays the Qube 2’s actual IP address upon completion of the boot process.
IMPORTANT: To function properly over long periods of time, the IP address of the Qube 2 must remain fixed, meaning that the DHCP server must not assign it to a different machine at a later date. Unfortunately, some DHCP servers do not honor requests for permanent IP addresses. As a result, the system or network administrator may need to assign a different (and permanent) IP address to the Qube 2. If so, you will need to change the network configuration information.
Coordinate any changes to the IP address, subnet mask or gateway address with your system administrator.
Select
Enter
16

Setting up the Qube 2
Configuring the Qube 2 manually
IMPORTANT: In this phase, you configure only the Primary Network Interface. To complete this phase, you must know:• the IP address assigned to the Qube 2• the subnet mask of your network
Note: A gateway or router address is not required for a Qube 2 that is only connected to a local area network (LAN). If you connect to another network through the Qube 2, you require a gateway address. If you use a modem to connect to the Internet, the modem serves as the gateway.
If the Qube 2 is unable to find a DHCP server on the network, the LCD display reads:
PRIMARY IP ADDR:000.000.000.000
A blinking cursor appears on the second line of the LCD display. The following steps explain how to enter the required network information for the Primary Network Interface. The Secondary Network Interface is configured through the Web browser as described in the next section.
An IP address consists of four numbers, ranging from 0 to 255, separated by periods (for example, 192.168.25.77).
Entering the IP address
To enter the IP address for the Qube 2:
1. Use the arrow buttons on the LCD console to enter the IP address assigned to the Qube 2.
2. Press the button to accept the IP address.
If the IP address is valid, the following prompt appears:
PRIMARY NETMASK:000.000.000.000
3. Enter the IP address of the netmask for your network.
4. Press the button to accept the entry.
If the netmask is valid, the following prompt appears:
ENTER GATEWAY:000.000.000.000
Enter
Enter
17
Chapter 2
5. Enter the IP address of the gateway for your network. If your
network does not have a gateway, do not enter a number — press
the button to accept the default value of
“000.000.000.000.”
Note: A gateway or router address is not required for a Qube 2 that is only connected to a local area network (LAN). If you connect to another network through the Qube 2, you require a gateway address. If you use a modem to connect to the Internet, the modem serves as the gateway.
6. Press the button.
The LCD displays:
[S]AVE [C]ANCEL
7. To save the configuration information, use the left and right arrow
buttons to select [S]ave, and then press the button. You’ll
see:VERIFYING AND SAVING
Note: Selecting [C]ancel cancels the configuration and the LCD screen displays: PRIMARY IP ADDR: again. You must go through the entry process again.
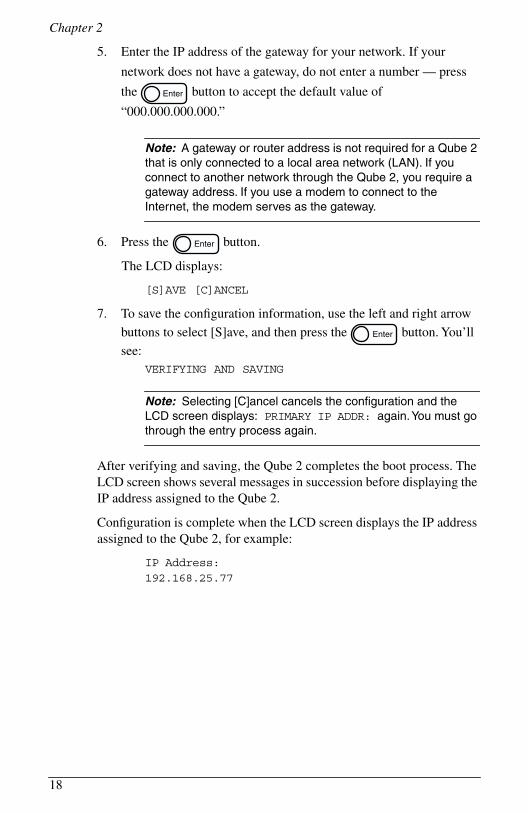
After verifying and saving, the Qube 2 completes the boot process. The LCD screen shows several messages in succession before displaying the IP address assigned to the Qube 2.
Configuration is complete when the LCD screen displays the IP address assigned to the Qube 2, for example:
IP Address:192.168.25.77
Enter
Enter
Enter
18
Setting up the Qube 2
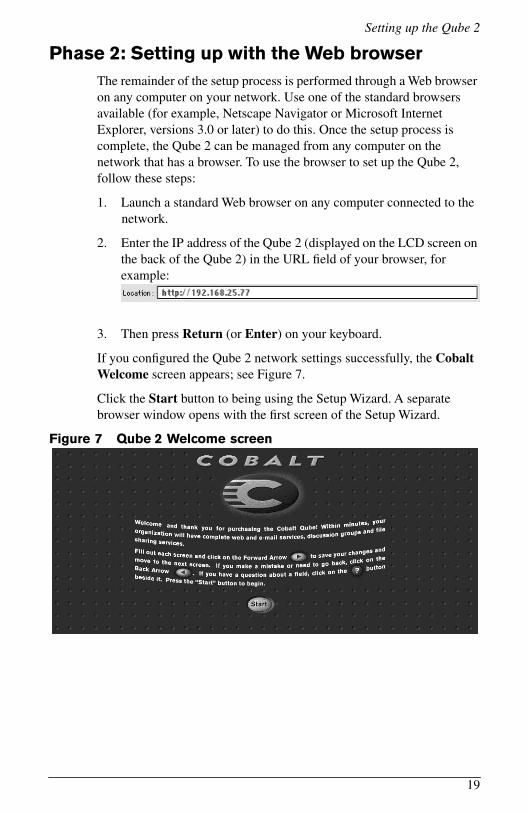
Phase 2: Setting up with the Web browserThe remainder of the setup process is performed through a Web browser on any computer on your network. Use one of the standard browsers available (for example, Netscape Navigator or Microsoft Internet Explorer, versions 3.0 or later) to do this. Once the setup process is complete, the Qube 2 can be managed from any computer on the network that has a browser. To use the browser to set up the Qube 2, follow these steps:
1. Launch a standard Web browser on any computer connected to the network.
2. Enter the IP address of the Qube 2 (displayed on the LCD screen on the back of the Qube 2) in the URL field of your browser, for example:
3. Then press Return (or Enter) on your keyboard.
If you configured the Qube 2 network settings successfully, the Cobalt Welcome screen appears; see Figure 7.
Click the Start button to being using the Setup Wizard. A separate browser window opens with the first screen of the Setup Wizard.
Figure 7 Qube 2 Welcome screen
19

Chapter 2
Active Assist — Online Help
Active Assist provides real-time context-sensitive help on the UI.
To access Active Assist, place the cursor over the icon beside any
item. A description of the item appears at the bottom of the browser
page.
Configuring the Qube 2 with the Setup Wizard
To configure the Qube 2, enter information into the fields on the Setup Wizard screens. These fields are described in the sections that follow.
The Setup Wizard is a series of seven screens that guide you through the setup process. After completing each step, click on the NEXT button to apply the changes and move on to the next step.
The Qube 2 performs automatic checks on the information entered and alerts you when an illegal value or a problem is encountered. When the information is entered correctly at each stage, the Qube 2 enters the changes in its configuration files before proceeding to the next step. Changes may take several seconds to complete.
Note: For help with a particular field in the Setup Wizard, move
the pointer over the Active Assist icon adjacent to the field
and help text is displayed at the bottom of the screen.
Network Integration
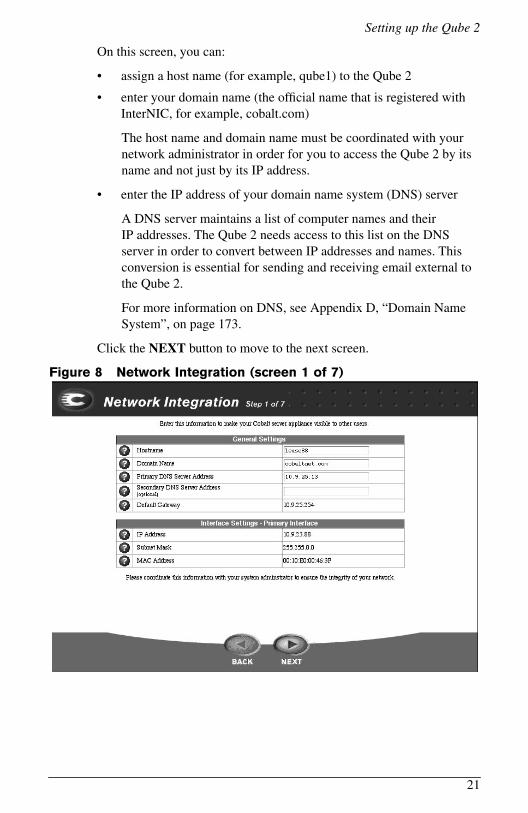
Figure 8 shows the Network Integration screen. For more information on the network settings, see “Network” on page 80.
If the Qube 2 obtained its network parameters from a dynamic host configuration protocol (DHCP) server, the Network Integration screen of the Setup Wizard appears with all the fields filled in. You just need to click the NEXT button to move to the next screen.
For more information, see “Dynamic Host Configuration Protocol (DHCP) server” on page 47.
20
Setting up the Qube 2
On this screen, you can:
• assign a host name (for example, qube1) to the Qube 2
• enter your domain name (the official name that is registered with InterNIC, for example, cobalt.com)
The host name and domain name must be coordinated with your network administrator in order for you to access the Qube 2 by its name and not just by its IP address.
• enter the IP address of your domain name system (DNS) server
A DNS server maintains a list of computer names and their IP addresses. The Qube 2 needs access to this list on the DNS server in order to convert between IP addresses and names. This conversion is essential for sending and receiving email external to the Qube 2.
For more information on DNS, see Appendix D, “Domain Name System”, on page 173.
Click the NEXT button to move to the next screen.
Figure 8 Network Integration (screen 1 of 7)
21

Chapter 2
Administrator Setup
The Administrator Setup screen appears; see Figure 9. The Qube 2 Administrator has several responsibilities:
1. setting up and maintaining the users, groups and services on the Qube 2
2. responding to email alerts from the Qube 2 in order to forestall potential problems
Figure 9 Administrator Setup (screen 2 of 7)
22
Setting up the Qube 2
To set up the Qube 2 Administrator, you must enter the following information.
• Full name Enter the first name and last name, separated by a space, of the person serving as the Qube 2 Administrator.
• Password Enter a password in this field. A value must be entered to proceed. For guidelines on choosing a password, see “Password guidelines” on page 24.
• Existing email address The Qube 2 Administrator can enter an address here so that all email messages addressed to the admin account and any system alerts for failed services are forwarded to this address. This feature is important if the Qube 2 Administrator does not use the “admin” account as his or her main email account. This address can be an email address on the Qube 2 or an external address.
Note: We recommend that you reserve the email account “admin” for system messages and alerts only, and that you do not publicize this admin account. To send comments or suggestions to the Qube 2 Administrator, create instead an email alias such as “sysadmin” for that user.
For information on how to add an email alias, see “Adding an email alias for a user” on page 68.
Be sure to remember the password to access the Qube 2 Administration features in the future.
If you forget the password or want to reset the password, see “Resetting the Qube 2 Administrator password” on page 60.
If you want to change the password, see “Modifying the Qube 2 Administrator settings” on page 59.
Click the NEXT button to move to the next screen.
23

Chapter 2
Password guidelines
Use the following guidelines when choosing a password:
1. Use between six and eight alphanumeric characters; you can use a password with more than eight characters, but Linux truncates the password at eight characters and verifies the password against those eight characters only.
The valid characters include: a-z A-Z 0-9 % ! @ $ ^ & * - _ = \ | . , / ? ; : +
2. Use both upper- and lower-case letters.
Note: A password is case-sensitive.
3. Do not use a proper name.
4. Do not use a word found in a dictionary.
5. Do not use a date.
6. Do not use a command word.
7. Do not use a string of consecutive keys on a keyboard (for example, “qwerty”).
24
Setting up the Qube 2
Services Setup
The Services Setup screen appears; see Figure 10. Choose the services that you would like to be active on the Qube 2.
For an explanation of services, refer to Chapter 3, “Services on the Qube 2”, on page 33.
Click the NEXT button to move to the next screen.
Figure 10 Services Setup (screen 3 of 7)
25
Chapter 2
Time Setup
The Time Setup screen appears see Figure 11. Enter the current date, time and time zone on the Qube 2.
For more information on the time settings, see “Time” on page 110.
Click the NEXT button to move to the next screen.
Figure 11 Time Setup (screen 4 of 7)
26
Setting up the Qube 2
Access Rights
The Access Rights screen appears; see Figure 12. Two options are available:
• The open option allows any individual to self-register as a user.
• The restricted option allows only the Qube 2 Administrator to add a user.
Note: Cobalt recommends using the restricted option.
For more information on the settings for access rights, see “Access rights” on page 103.
Click the NEXT button to move to the next screen.
Figure 12 Access Rights (screen 5 of 7)
27

Chapter 2
Users Setup
The Users Setup screen appears; see Figure 13. From this screen, you can add users to the Qube 2 and allocate the user disk space limits. The Qube 2 Administrator can modify how the Qube 2 selects the user name, password and the default disk usage limits by clicking Set User Defaults.
For more information on the setting up users, see “Configuring the user settings” on page 61.
The Qube 2 Administrator can manage the services on the Qube 2. The administrator is also a special user — that is, he or she is (by default) a member of all groups created on the Qube 2.
Note: To add users through the browser interface after the Qube 2 is set up, see “Configuring the user settings” on page 61.
Note: Due to a limitation in the Linux operating system, a Qube 2 Administrator or any other user can belong to a maximum of 32 groups only.
Click the NEXT button to move to the next screen.
Figure 13 Users Setup (screen 6 of 7)
28

Setting up the Qube 2
Groups Setup
The Groups Setup screen appears; see Figure 14. On this screen, the Qube 2 Administrator can create different groups of users. Each group has its own mailing list, Web site, file storage and private discussion area. “Set Group Defaults” establishes the maximum allowed disk space that groups can use.
Note: To add groups through the browser interface after the Qube 2 is set up, see “Configuring the group settings” on page 70.
For more information on the setting up groups, see “Configuring the group settings” on page 70.
Click the NEXT button to move to the next screen.
Figure 14 Groups Setup (screen 7 of 7)
29

Chapter 2
Product Registration
The Product Registration screen appears; see Figure 15. If you are connected to the Internet, you can register the Qube 2 by completing the online registration.
If you are not connected to the Internet, this screen does not appear. Fill out the registration card included in the packaging materials and return it to Cobalt Networks, Inc. By doing so, you will receive notifications of system and security upgrades and new product information.
Cobalt Networks, Inc.555 Ellis StreetMountain View, CA USA 94043
Note: If you are not yet connected to the Internet, you cannot register online.
Completing configuration with the Setup Wizard
When you’ve entered the information in the Setup Wizard, click FINISH.
Once the Qube 2 has been configured, the Public Site screen appears and the setup is complete; see Figure 16. This page also appears when you point your browser at the URL http://<IP address>/cobalt/ .
The buttons on the left side of this screen provide access to the information and functions on this site. Move the cursor over the buttons to find out what they do.
30

Setting up the Qube 2
Figure 15 shows the online registration page.
Figure 15 Online registration page
31

Chapter 2
Figure 16 shows the Public Site screen on the Qube 2.
Figure 16 Public site on the Qube 2
32
Chapter 3
Services on the Qube 2
This chapter offers a brief overview of the services available on the Cobalt Qube 2. The services are described in detail in Chapter 4, “Administrator Site”, on page 55 and Chapter 5, “Public Site”, on page 129.
These services include:
• email and mailing lists
• Web publishing
• file sharing through Windows file sharing, Appleshare and file transfer protocol (FTP)
• discussion groups
• Dynamic Host Configuration Protocol (DHCP) server
• Domain Name System (DNS) server
• Network Address Translation (NAT)
• IP firewall
• Internet access through a high-speed serial port
• text search
• document management with the InfoPlace Document Organizer
• installation of software
33

Chapter 3
Managing your Personal Profile Registered users on the Qube 2 can manage their own Personal Profile using any standard Web browser. The features accessible from this screen are:
• modify user
• usage data
• backup
• restore
• Page Builder
For more information, see “Personal Profile” on page 144.
Using email on the Qube 2To use all of the Qube 2’s email capabilities, you must configure the email parameter settings correctly. You must also configure your email client to send email to and retrieve email from the Qube 2.
For more information on setting up email on the Qube 2, see “Email server” on page 89.
34
Services on the Qube 2
Setting up your email client
Ensure that the following information is entered into your email client on your personal computer.
Note: The Qube 2 does not offer an email client. The Qube 2 is an email server that receives email addressed to a domain name. To access your email messages, you require an email client such as Microsoft Outlook or Qualcomm’s Eudora products.
1. Email address The format is either
<username>@domainname (see the note below) or
<username>@hostname.domainname
(for example, [email protected]) where:
• <username> is the user ID assigned to you (for example, myname)
• <hostname> is the name assigned to the Qube 2 (for example, qube1)
• <domainname> is either the official domain name that is registered with InterNIC (for example, “cobalt.com”), or an intranet domain name specific to your network. Obtain this information from your system administrator.
Note: To use the shorter email format <username>@domainname, you must enter the domain name in the email parameters table, in the field “Receive email addressed to these hosts/domains.”
2. SMTP server The format is hostname.domainname (for example, qube1.cobalt.com).
3. POP3 server The format is hostname.domainname (for example, qube1.cobalt.com).
4. IMAP server The format is hostname.domainname (for example, qube1.cobalt.com).
Note: Occasionally, an email application asks for an “incoming” mail server. The incoming mail server is the POP3 server.
35
Chapter 3
Email aliases
Each registered user on the Qube 2 must have a unique user name (for example, mary or john.smith or khoward). This user name is used to send or retrieve email.
The Email Alias feature allows you to create an arbitrary email address without creating a user account on the Qube 2. An email message addressed to the alias is forwarded to an existing email address.
If you add more than one alias for a user, enter one alias per line. You can only use lowercase alphanumeric characters, periods (.), hyphens (-) and underscores (_) in the alias.
Let us say that the XYZ Company has a Qube 2 and that the company’s domain name is xyz.com. The email addresses for the users of the Qube 2 is <username>@xyz.com. Employee Timothy Stonis has a user name of “tstonis”; his email address is “[email protected]”.
A user can have several email aliases that point to a his or her user name. For example, Timothy Stonis can have can have the aliases “[email protected]” and “[email protected]”; if he were an avid soccer player, he might want to use the alias “[email protected]”. All of these aliases point to his user name <tstonis> at xyz.com. Emails addressed to any of these aliases are forwarded to “[email protected]”.
However, having a large number of aliases for each user can cause problems. If a new user is added and the user name that is automatically generated by the Qube 2 is already in use, a warning appears in the help text at the bottom of the screen, stating that <username> is already in use as a mailing list or alias. The Qube 2 does not accept the New User entry.
Following the previous example, let us say that Timothy Howard is a new employee at the XYZ Company. If he wanted to have “timothy” as his user name, the Qube 2 help text would state that “Name timothy is already in use as a mailing list or alias.”
A Qube 2 Administrator can also set up aliases such as [email protected], [email protected], [email protected], [email protected] or [email protected] that point to a specific user name.
36
Services on the Qube 2
Email relaying
Simple Mail Transfer Protocol (SMTP) service is different from Post Office Protocol (POP), telnet and file transfer protocol (FTP) services in that SMTP does not try to authenticate a user when an SMTP connection is made. Every email server on the Internet has to be able to deliver email to you, so the email servers must be able to connect freely to send the email.
The Qube 2 accepts email if the recipient has a user account or an alias email account, or if the sending host (your client computer) is trusted to relay outgoing emails to another domain. These trusts are defined by host or domain names, as well as by IP addresses and networks. A network is a range of IP addresses; a network can be as small as one IP address, but that is not very practical.
!Caution: Some users advise you to open relay to all.com, .edu, .net and other top-level domain addresses. This is BAD ADVICE. Doing so allows hosts belonging to .com, .edu, .net and others to relay email through your Cobalt server. These open relays can lead to unsolicited commercial email (“spam mail”) being forwarded through your server.
Spam mail can appear as though it originated from your server and as a result, others may blacklist your server as a known spam site. If your server is blacklisted, many mail servers will not relay your email and your customers will not receive a large amount of their email messages.
37

Chapter 3
If you have users who access your server through the Internet, ask your Internet Service Provider (ISP) which networks are used by their remote access (dial-up) equipment.
For example, if the ISP says the network 192.168.10.5 through 192.168.10.24, then enter “192.168.10” to the “Relay email from these hosts/domains” field of the Email Parameters menu. If your ISP gives you a list of 30 networks used by 30 points-of-presence (POPs) (which are regional ISP offices) across the country and your clients can dial in from any of them, then you must trust all 30 networks or these users cannot send email through your Qube 2.
Note: If you do not want to allow email to be sent through the Qube 2, leave the “Relay email from these hosts/domains” field blank.
For more information, see “Enabling the email relaying feature” on page 94.
Developing Web pagesThe Qube 2 automatically provides a default home page for each individual user and each group. It also supports a broad range of Web publishing capabilities that allow both novice and expert users to build and publish custom Web pages.
Note: To access your home page, enter the URLhttp://<hostname>/users/<username>/ , where <hostname> is the fully qualified domain name of your Qube 2 and <username> is your user identification on the Qube 2.
FrontPage 98 and FrontPage 2000 Server Extensions
The Qube 2 includes the FrontPage 98 and FrontPage 2000 Server Extensions, which allow users with FrontPage client applications to publish and edit Web content easily. Users can create and post Web pages using standard style templates and pre-configured tools—including form processing and search tools. It is not necessary to know anything about FTP or other file transfer protocols.
38

Services on the Qube 2
Using Page Builder
The Qube 2 includes Page Builder, a tool that allows you to create Web pages without having to learn how to write HTML scripts.
To enter the Page Builder tool:
• click Edit This Page at the bottom of your home page, or
• from the Personal Profile screen, click Page Builder at the top
Once you are in the Page Builder tool, you can get instructions for using it by clicking the Instructions button on the left side of the screen.
For more information, see “Page Builder” on page 149.
Using an HTML editor
You can create complex Web pages using any of the standard HTML editors and the HTML publishing capabilities of many popular desktop productivity applications. You can create and link the Web pages themselves on your desktop computer, and then move them to the appropriate subdirectory in the Qube 2 through an FTP application; see “Publishing Web pages using FTP” on page 40.
CGI scripts
The Qube 2 supports common gateway interface (CGI) scripts, such as those written in Perl or C, as well as Unix shell scripts.
CGI scripts allow you to develop highly interactive, powerful Web-based applications by building server-side CGI scripts that generate Web pages in response to specific user inputs. These applications range from simple scheduling and conferencing applications to sophisticated electronic commerce solutions.
You can develop CGI scripts on your desktop machine and then transfer them to the Qube 2 through an FTP-based application that allows permission bits to be set to “Executable”.
CGI scripts must use .pl or .cgi filename extensions in order to be executed by the Web server.
39
Chapter 3
Use FTP to upload .cgi and .pl files; use ASCII mode to upload CGI files. Once the file is on the Qube 2, use your FTP program to make the script executable. You can also use the telnet command:chmod 775 <filename>.cgi.
The path to Perl is /usr/bin/perl .
To set the access rights for installing CGI scripts, see “Install CGI scripts” on page 104.
Publishing Web pages using FTPAfter creating your Web pages, you can publish them on the Qube 2 using FTP.
Ensure that you have the following information:
• the host name or the IP address of your Qube 2
• your username and password
• a filename of your choice to save as your main page (the default filename is index.html)
Launch your FTP software and establish an FTP link to the Qube 2. Upload your HTML files. If you need help, consult the instructions for your FTP application.
By default, the files you upload using FTP are stored in your personal directory; the directory path is:
/<IP address>/users/<username> where
• <IP address> is the Qube 2’s IP address
• <username> is your user name
Note to Qube 2 Administrators: To post Web pages for the private home site, you must upload to the directory /groups/home/private/ .
40

Services on the Qube 2
Sharing files and transferring data You can access or connect to the Qube 2 through your desktop computer as you would any other shared network volume. The Qube 2 can be mounted from any Windows or Macintosh computer — it appears as a mounted volume on your desktop computer.
Note: Windows file sharing is enabled by default on the Qube 2; Appleshare must be enabled by the user. For more information, see “Windows file sharing (SMB)” on page 97 and “Apple file sharing (AppleShare)” on page 98.
Once you have mounted the Qube 2, you can copy and move individual files and entire subdirectories to and from the Qube 2 by dragging and dropping.
The method of connecting to the Qube 2 varies, depending on your computer’s operating system.
The Qube 2 offers several methods for transferring data. Use the following guidelines to decide which method is appropriate:
• Windows file sharing (Server Message Block [SMB]) for Windows 95, Windows 98 and Windows NT.
• Apple file sharing (AppleShare) for Macintosh.
• File Transfer Protocol (FTP) on all platforms. Advanced users use FTP to transfer files.
Note: The file-sharing protocol is selected in the Setup Wizard or in the Control Panel screen of the Qube 2 Administrator Site. See “Control Panel” on page 87.
41
Chapter 3
Using Windows file sharing (SMB)
Windows-based machines use a file-sharing protocol called Server Message Block (SMB) or Common Internet File System (CIFS). Once SMB is set up, the Qube 2 appears in your Network Neighborhood as a machine named <hostname>. The <hostname> is the name that the Qube 2 Administrator assigned to the Qube 2, either in the Setup Wizard or the Control Panel screen of the Qube 2 Administrator Site.
Clicking the <hostname> icon in Network Neighborhood opens a window that provides an overview of the files and subdirectories that you can access.
Note: If you don’t see the Network Neighborhood on your computer, consult with your network administrator.
Before you begin: Windows 95 and Windows 98 users
The user name on the Qube 2 must be identical to the user name on your computer before you can access your subdirectory on the Qube 2. If necessary, restart your computer and log in as a new user, using the user name and password that are stored on the Qube 2.
If your Windows password does not match the Qube 2 password, you are prompted for the Cobalt password when you first connect to your Qube 2 through Network Neighborhood.
42

Services on the Qube 2
Setting up Windows file sharing for Windows 95 and 98
1. If the user name is the same on both your computer and the Qube 2, go to Step 6.
2. If the user name on your computer is different from the user name on the Qube 2, click the Start button in the bottom left corner of your screen.
3. Select Shut Down. The Shut Down Windows dialog appears.
4. Within the Shut Down Windows dialog, select “Close all programs and log on as a different user”. Click Yes.
Your computer closes any applications that are running, logs you out and prompts you with an Enter Network Password menu.
5. Enter the same user name and password that are stored on the Qube 2. Your computer logs you in. If your Windows password does not match the Qube 2 password, you are prompted for the Cobalt password when you first connect to your Qube 2 through Network Neighborhood on your Windows desktop.
6. Double-click on the Network Neighborhood icon. The Qube 2 (listed as the <hostname> assigned to the Qube 2) should be included in the listing.
7. If the Qube 2 is not listed, double-click on the Entire Network icon to cause your computer to scan the entire network for devices that can be shared. Select the name of the workgroup/domain of which the Qube 2 is a member. The default workgroup for the Qube 2 is WORKGROUP.
You can also use the Find feature in Windows to locate the Qube 2.
• Click Start in the bottom left corner of the Windows screen.
• Select Find and then Computer. The Find:Computer dialog appears.
• Enter the hostname of the Qube 2 in the field and click Find Now. The results appear in a window below the Find:Computer dialog.
Note: It can take up to 15 minutes for a Windows PC to update its network information so that the Qube 2 is visible in the Network Neighborhood. The Find feature should produce quicker results.
43
Chapter 3
8. Once the Qube 2 shows up in the Network Neighborhood list, double-click it to open it on your desktop computer. A password prompt appears. Enter the user name and password used on the Qube 2; the password is case-sensitive.
Click OK.
9. If you are using a workgroup name other than WORKGROUP, the Qube 2 may not appear in Network Neighborhood immediately.
• To view your current workgroup name, click Start in the bottom left corner of the Windows screen.
• Select Settings and then Control Panel. The Control Panel window appears.
• Select Network. The Network dialog appears.
• Select the Identification tab. The computer name, workgroup and computer description are displayed. Make note of the workgroup name and return to Step 7.
Note: The Qube 2 Administrator can change the server workgroup name through the Control Panel so that it matches your Windows 95/98 workgroup name. See “Windows file sharing (SMB)” on page 97.
Setting up Windows file sharing for Windows NT
1. Double-click the Network Neighborhood icon. If you are using the WORKGROUP domain or workgroup name, the Qube 2 (listed as <hostname>) should be included in the list.
If the Qube 2 is not listed, double-click on the Entire Network icon to have your computer scan the entire network for devices that can be shared. Select WORKGROUP.
2. Once the Workgroup server list is visible, double-click the Qube 2 that you want to access. You can log into the Qube 2 as the Qube 2 Administrator or as any one of the registered users.
3. You may see a password prompt (depending on how your computer has been configured). If so, enter the user name and password used on the Qube 2; the password is case-sensitive.
Click OK.
44
Services on the Qube 2
4. You may want to log in to the Qube 2 as a different user. If you see a password prompt in Step 3, you can do so.
However, if your Windows NT account uses the same user name and password as the Qube 2, account, the password prompt in Step 3 will not appear. In this case, you must first exit your Windows NT session.
• From the Start menu, select “Shut down the computer”. The Shut Down Windows NT dialog appears.
• Select the radio button “Close all programs and log on as a different user”. The computer closes all programs and logs out as the current user. A password prompt then appears for a new user.
• Enter the enter the user name and password.
• Click OK.
Using AppleShare
The Macintosh file-sharing protocol is called AppleShare. If AppleShare is enabled in the Setup Wizard, the Qube 2 appears as an AppleShare volume in the Macintosh’s Chooser.
1. From the Apple menu in the top left corner, select Chooser. The Chooser dialog appears.
2. In the window on the left, select AppleShare.
3. In the list in the scrolling window on the right, double-click the Qube 2 you want to access (listed as <hostname>).
“Connect to the file server...” appears in the dialog box.
4. Select Registered User. Enter the user name and password used on the Qube 2; the password is case-sensitive.
5. Click OK. A dialog displays the volumes on the Qube 2; if a volume is not accessible, it is grayed-out.
6. Double-click the volume(s) you want to access:
• GroupHome — provides access to group directories
• [<username>] — provides access to user directories
7. Click OK. The selected volume appears on the desktop.
45

Chapter 3
Using AppleShare over IP
The Qube 2 supports the use of AppleShare over IP, which means you can access your Qube 2 across an intranet or over the Internet. The Qube 2 shares its volume through AppleShare over IP by default.
If you want to connect to a remote Appleshare volume over the Internet:
1. From the Apple menu in the top left corner, select Chooser. The Chooser dialog appears.
2. In the window on the left, select AppleShare.
3. In the right corner, click Server IP Address. The Server IP Address dialog appears.
4. Enter the fully qualified host name or IP address of the Qube 2 that you want to access.
5. Click Connect.
Using FTP
File Transfer Protocol (FTP) is typically available on platforms that support Transmission Control Protocol/Internet Protocol (TCP/IP), which are the underlying protocols used by the Qube 2. FTP is designed for transferring individual files.
1. In your FTP application, enter the IP address or the host name of the Qube 2.
2. Enter your user name and password.
You are logged into the user main directory. Refer to the documentation of your FTP program for instructions on transferring files.
Note: The user root directory is not the same as the Qube 2’s root directory. Many HTML publishing programs that use FTP require full path names to transfer files.
For example, user Bill Lumbergh’s home directory is accessed through the URL ftp://<hostname.domainname>/home/users/blumbergh/ . The “sales” group home directory is accessed through the URL ftp://<hostname.domainname>/home/groups/sales/ .
46

Services on the Qube 2
Working in collaboration through discussionsThreaded discussions allow groups of individuals to develop and document a body of information on a particular topic. The discussion feature lets users collaborate without having to meet face-to-face. This feature is especially useful for individuals who are geographically dispersed or who otherwise find it difficult to meet.
Another key feature is the self-documenting nature of a threaded discussion: users can review postings to understand the who, what and why of a particular topic.
For more information, see “Working in collaboration through discussions” on page 135.
Dynamic Host Configuration Protocol (DHCP) server
The Dynamic Host Configuration Protocol (DHCP) allows the Qube 2 to assign automatically the network configuration information (such as IP address, domain name, DNS service, subnet mask and gateway) to client computers that support DHCP, including Macintosh and Windows desktop computers.
The Qube 2 Administrator can enable the DHCP feature on the Qube 2 so that the Qube 2 is able to assign automatically the network information necessary for your desktop computer.
For more information on setting up DHCP on the Qube 2, see “Dynamic Host Configuration Protocol (DHCP) server” on page 100.
What is DHCP and what are the benefits?
DHCP is a way for a networked computers to obtain its TCP/IP settings when it boots up. With DHCP configured and enabled, a network administrator does not need to configure workstations manually, or modify networking settings when computers move or the network changes. This saves time and expense.
47
Chapter 3
What is a configuration?
The Qube 2 DHCP configuration includes the default Gateway, DNS servers, subnet mask and IP address from an address pool.
What are leases?
When the Qube 2 sends a configuration to a requesting DHCP client, one of the DHCP options returned is the lease time. The lease time tells the DHCP client how long it can use the IP address. Before the lease time expires, the DHCP client sends a lease renewal request to the Qube 2. The Qube 2 then sends back to the client a renewed lease time, along with any other settings that have changed (for example, new IP address[es] for the DNS server).
A short lease time is useful in a network that has a limited number of IP addresses at its disposal.
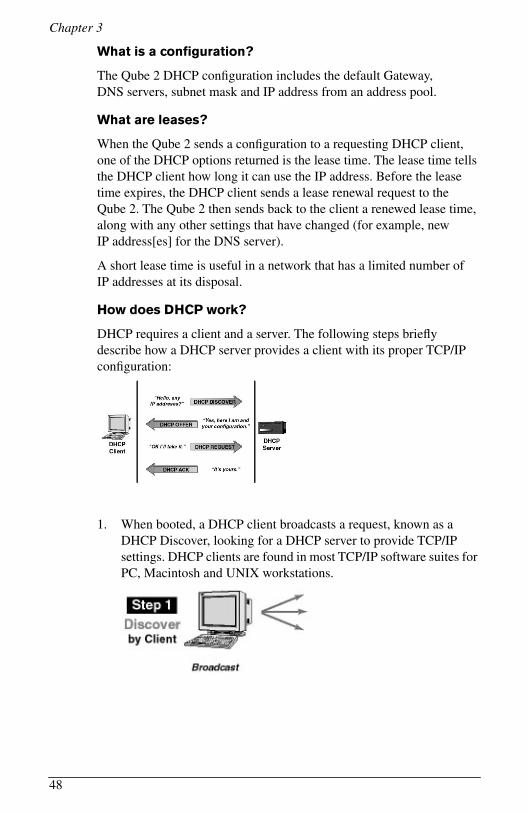
How does DHCP work?
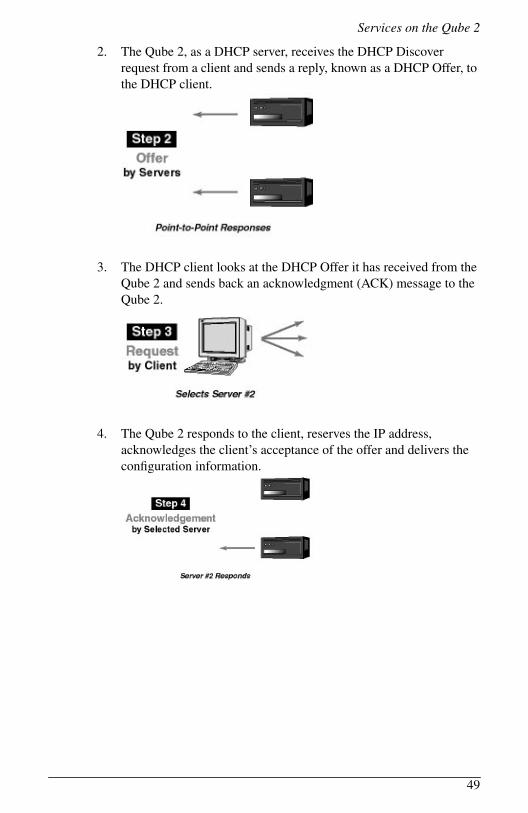
DHCP requires a client and a server. The following steps briefly describe how a DHCP server provides a client with its proper TCP/IP configuration:
1. When booted, a DHCP client broadcasts a request, known as a DHCP Discover, looking for a DHCP server to provide TCP/IP settings. DHCP clients are found in most TCP/IP software suites for PC, Macintosh and UNIX workstations.
48
Services on the Qube 2
2. The Qube 2, as a DHCP server, receives the DHCP Discover request from a client and sends a reply, known as a DHCP Offer, to the DHCP client.
3. The DHCP client looks at the DHCP Offer it has received from the Qube 2 and sends back an acknowledgment (ACK) message to the Qube 2.
4. The Qube 2 responds to the client, reserves the IP address, acknowledges the client’s acceptance of the offer and delivers the configuration information.
49

Chapter 3
Domain Name System (DNS) The Domain Name System (DNS) is a vital and integral part of the Internet. Setting up DNS correctly on your Qube 2 is very important. For this reason, we have created an appendix solely for explaining DNS. See Appendix D, “Domain Name System”, on page 173.
The appendix covers the following items:
• basic DNS issues
• advanced DNS issues
• a quick start guide detailing a sample setup of DNS for a Qube 2
• a brief history of the DNS service
If your network administrator is using the Qube 2 as a DNS server, you can enter the IP address of the Qube 2 into the “DNS server” field in the TCP/IP configuration on your desktop computer.
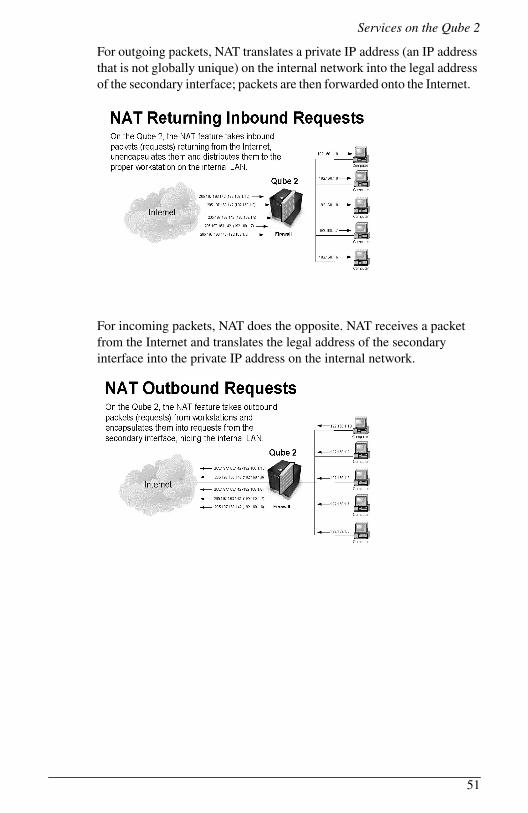
Network Address Translation (NAT) The Network Address Translation (NAT) feature simplifies and conserves IP addresses by presenting a single IP address for a private network to the public network. NAT enables private IP intranetworks that use non-registered IP addresses to connect to the Internet. NAT is both a security measure and a method of conserving IP addresses.
To enable NAT, see “Network Address Translation (NAT)” on page 84.
On the Qube 2, NAT functions as a router connecting two networks together. NAT advertises only one IP address for the entire network to the outside world. This provides additional security, since the entire internal network is hidden from the outside world behind that single IP address.
All packets transmitted from the local area network (LAN) to the Internet (including over modem connections) are masqueraded by NAT.
50
Services on the Qube 2
For outgoing packets, NAT translates a private IP address (an IP address that is not globally unique) on the internal network into the legal address of the secondary interface; packets are then forwarded onto the Internet.
For incoming packets, NAT does the opposite. NAT receives a packet from the Internet and translates the legal address of the secondary interface into the private IP address on the internal network.
51

Chapter 3
IP Firewall A firewall is a set or filtering rules used to allow or deny IP packets access to the Qube 2.
The IP Firewall option allows you to specify simple packet-filtering rules, which limit access to your Qube 2. You can choose to deny or allow communication in either direction between your Qube 2 and any or all IP addresses.
For more information, see “IP Firewall” on page 106.
Internet access through high-speed serial port The Qube 2 is equipped with a high-speed serial port to which you can connect an external modem. If you have (or can obtain) a standard point-to-point protocol (PPP) dial-up account with an Internet Service Provider (ISP), a phone line and a modem, your Qube 2 can provide Internet access for your network — no router is required.
For more information, see “Modem settings and the high-speed serial port” on page 84.
Searching for information on the Qube 2 The search function allows a user to search rapidly for a string of text in all text and HTML files on the Qube 2, including the Web pages. The search index is updated nightly.
The results are presented as a list that includes the file name and a one-line description of the files that meet the criteria.
For more information, see “Search” on page 141.
An index entry for each stored text file is created on the Qube 2 every day at 1:00 a.m. This index is a database of all of the key words used in a particular file, their location within that file and their relation to other words used in that file. For more information, see “Designating easy-to-find documents” on page 153.
52

Services on the Qube 2
Managing documentsThe InfoPlace Document Organizer allows users to store information — documents, images, graphics, multimedia files and URLs — on the Qube 2 in such a way that other users can find it quickly. The InfoPlace Document Organizer is entirely Web-based; you do not have to leave your browser to use it.
The InfoPlace Document Organizer maintains a database of information about the documents it stores on the Qube 2. This database is called an Infobase. Each Qube 2 group can have several Infobases; each Infobase can be accessed and used only by the group members.
For more information, see “Managing documents” on page 151.
Creating a new InfoBase
The Qube 2 Administrator can create can create an Infobase for any group. To create a new InfoBase:
1. On the Public Site screen, click Programs on the left. The Program List table appears.
2. Click “InfoPlace Document Organizer” in the table. An authentication dialog appears.
3. Enter your user name and password.
4. Click OK. A separate browser window opens to the Log In screen of the InfoPlace Document Organizer software.
5. Select “New InfoBase” from the pull-down menu.
6. Click Continue. A new InfoBase appears in the window.
Install softwareYou can add new software to the Qube 2 from the browser. You can install new software obtained either from the Cobalt Networks Web site or from a CD supplied by Cobalt Networks.
For more information, see “Install software” on page 119.
53

Chapter 3
54

Chapter 4
Administrator Site
This chapter describes the functions that can be performed only by the Cobalt Qube 2 Administrator. To access the Qube 2 Administrator Site, you can either:
• from the Public Site, click Administrator Site on the left, or
• enter the URL http://<hostname>.<domainname>/admin/ into your browser
You are prompted for the Qube 2 Administrator user name and password.
Figure 17 shows the Administrator Site screen. The options on this screen are described in the remainder of this chapter.
• users (see page 61)
• groups (see page 69)
• mailing lists (see page 75)
• network (see page 80)
• control panel (see page 87)
• maintenance (see page 111)
• system status (see page 122)
• service status (see page 124)
• public site (see page 127)
• Active Monitor (see page 127)
55
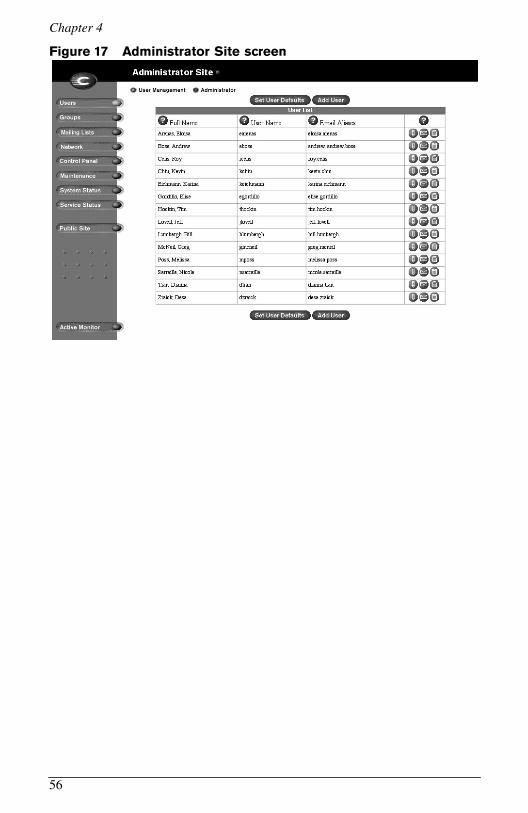
Chapter 4
Figure 17 Administrator Site screen
56

Administrator Site
Qube 2 Administrator The Qube 2 Administrator, with the user name “admin”, has full control of the Qube 2. The administrator enters the network settings, enables or disables the various services, performs maintenance functions and receives system alerts and warnings by email.
The Qube 2 Administrator is automatically a member of each group created on the Qube 2.
Note: Due to a limitation in the Linux operating system, a Qube 2 Administrator or any other user can belong to a maximum of 32 groups only.
Configuring the Qube 2 Administrator settings
!Caution: Be sure to remember the password you enter here — otherwise, you will need to reset it (See “Resetting the Qube 2 Administrator password” on page 60).
To configure the settings for the Qube 2 Administrator:
1. On the Administrator Site screen, click Users on the left. The User List table appears.
2. Click Administrator at the top. The Administrator Settings table appears. See Figure 18.
3. Enter the first name and last name of the administrator, separated by a space. The user name is automatically set as “admin”.
4. Enter the password twice to ensure that you have entered it as intended. For guidelines on choosing a password, see “Password guidelines” on page 24.
5. As an option, enter an email address that will receive system alerts for failed services.
6. Click Save Changes.
57

Chapter 4
Figure 18 shows the Administrator Settings table.
Figure 18 Administrator Settings table
58
Administrator Site
Modifying the Qube 2 Administrator settings
!Caution: Be sure to remember the password you enter here — otherwise, you will need to reset it (See “Resetting the Qube 2 Administrator password” on page 60).
To modify the settings for the Qube 2 Administrator:
1. On the Administrator Site screen, click Administrator at the top of the screen. The Administrator settings table appears.
2. Modify the one or all of the following fields. You cannot modify the user name.
• Full name Enter the first name and last name of the administrator, separated by a space.
• New password Enter the new password twice to ensure that you have entered it as intended. For guidelines on choosing a password, see “Password guidelines” on page 24.
• Existing email address As an option, enter an email address that will receive system alerts and warning messages for failed services.
3. Click Save Changes. The UI on the screen refreshes.
59

Chapter 4
Resetting the Qube 2 Administrator password
When the Qube 2 Administrator password is cleared, the root account is not accessible until a new administrator password is assigned.
!Caution: After you clear the password, enter a new one as soon as possible to protect the security of the Qube 2. At this point, anyone on the network can assign the Qube 2 Administrator password until you assign a new one.
If you forget the password for the Qube 2 Administrator, you can reset the password:
1. Push and hold a paper clip in the recessed Reset Password button (on the back of the Qube 2; see Figure 2). Hold the button in for approximately 2 seconds.
The LCD screen displays
RESETTING ADMIN PASSWORD
2. In your Web browser, enter the URL http://<IP address>/admin/ to access the Administrator Site screen.
3. If a prompt appears asking for a user name or password, enter “admin” as the user name and leave the password blank. Click OK.
4. Click Users on the left.
5. Click Administrator at the top. The Administrator Settings table appears.
6. Enter the new password twice to ensure that you have entered it as intended. For guidelines on choosing a password, see “Password guidelines” on page 24.
7. Click Save Changes.
60
Administrator Site
UsersIn the Users section, you can manage user settings and the Qube 2 Administrator settings.
To access this section, on the Administrator Site, click the Users button on the left. The Users List table appears; the table displays the full name of each user (for example, Jessica Smith) and the name he or she uses to log in to the Qube 2 (for example, jsmith). This is called the “user name” or “userID”.
Configuring the user settings
The Qube 2 Administrator can:
• configure the default user settings
• add a user
• modify the user’s information
• modify the user’s email settings
• remove a user
Configuring the default user settings
To configure the default user settings:
1. On the Administrator Site screen, click Users on the left. The Users List table appears.
2. Click Set User Defaults. The User Defaults table appears. See Figure 19.
You can configure the default settings for:
• the maximum allowed disk space (MB). This value is the default amount of disk space available to a newly created user for file storage and Web pages. The original default value is 30 MB.
The value entered must be a whole number greater than zero.
• the format of the user name. You can choose the format for creating user names.
3. Click Save Changes.
61

Chapter 4
Figure 19 shows the User Defaults table.
Figure 19 User Defaults table
62
Administrator Site
Adding a user
To add a user:
1. On the Administrator Site screen, click Users on the left. The Users List table appears.
2. Click Add User. The Add New User table appears. See Figure 20.
3. Fill in the fields:
• Full name Enter the first and last names of the user, separated by a space (for example, Bill Lumbergh).
• User name The user name is generated automatically from the user’s full name, according to the user name format specified in the default settings.
Note: The Qube 2 Administrator can change the generated user name.
• Password Enter the password twice to ensure that you have entered it as intended. For guidelines on choosing a password, see “Password guidelines” on page 24.
• Maximum allowed disk space (MB) This value is the amount of disk space available to a user for file storage and Web pages.
The value entered must be a whole number greater than zero.
• Email aliases Enter additional names for which the user can receive email. To add more than one alias, enter one alias per line or separate them with spaces.
For more information on email aliases, see “Email aliases” on page 36.
4. Click Save Changes. The UI on the screen refreshes and the Users List table appears with the new user.
63
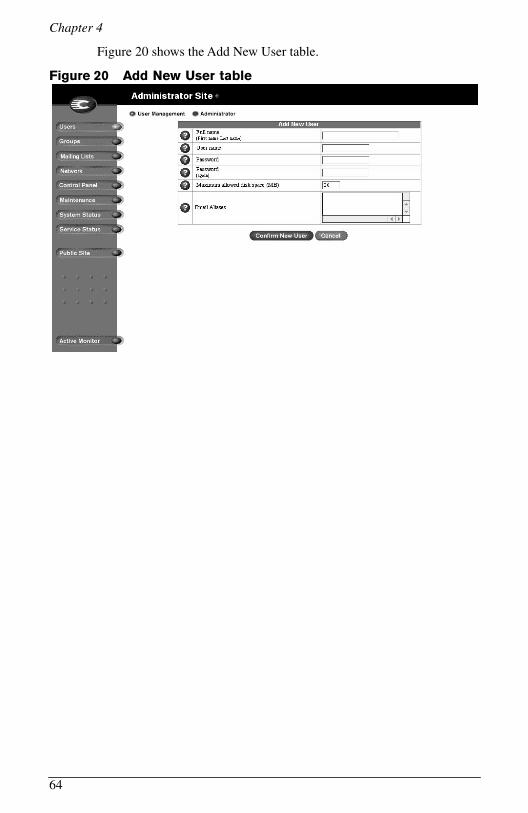
Chapter 4
Figure 20 shows the Add New User table.
Figure 20 Add New User table
64
Administrator Site
Modifying a user account
To modify the information for user’s account:
1. On the Administrator Site screen, click Users on the left. The Users List table appears.
2. In the Users List table, locate the user whose account information you want to modify.
3. Click the green pencil icon next to that user’s name. The
Modify User table appears.
4. Modify the one or all of the following fields. You cannot modify the user name.
• New full name Enter the first and last names of the user, separated by a space (for example, Alan Williams).
• New password Enter the new password twice to ensure that you have entered it as intended. For guidelines on choosing a password, see “Password guidelines” on page 24.
• Maximum allowed disk space (MB) This value is the amount of disk space available to a user for file storage and Web pages.
The value entered must be a whole number greater than zero.
5. Click Confirm Modify. The UI on the screen refreshes and the Users List table appears with the modified user. If you modified the full name, the user may appear in a different position in the list.
65

Chapter 4
Modifying a user’s email settings
To change a user’s email settings:
1. On the Administrator Site screen, click Users on the left. The Users List table appears.
2. In the Users List table, locate the user whose email settings you want to modify.
3. Click the blue envelope icon next to that user’s name. The
Email Settings table appears. See Figure 21.
4. Modify the one or all of the following fields.
• Forward email to Enter the email address to which you want to forward automatically your email messages.
To forward email to more than one address, see “Forwarding incoming email to several recipients” on page 78.
• Email aliases Enter additional names for which the user can receive email. To add more than one alias, enter one alias per line or separate them with spaces.
For more information on email aliases, see “Email aliases” on page 36.
• Vacation/Autoresponder Email Reply If you want to automatically send a custom email message to everyone who sends you email, check the box and enter the response message.
This feature is useful if you want to send an automatic response message to the sender, or when you know that you will not be reading or responding to incoming email messages for a period of time.
Note: A vacation-reply email is sent only once per week to each sender.
5. Click Save Changes. The UI on the screen refreshes and the Users List table appears. If you modified the email aliases, the modifications show up in the table.
66

Administrator Site
Figure 21 shows the Email Settings table for a user.
Figure 21 Email Settings table
67
Chapter 4
Adding an email alias for a user
To add an email alias for a user:
1. On the Administrator Site screen, click Users on the left. The Users List table appears.
2. In the Users List table, locate the user for whom you want to add an email alias.
3. Click the blue envelope icon next to that user’s name. The
Email Settings table appears.
4. In the Email aliases field, enter additional name(s) for which the user can receive email. To add more than one alias, enter one alias per line.
For more information on email aliases, see “Email aliases” on page 36.
5. Click Save Changes. The UI on the screen refreshes and the Users List table appears. If you modified the email aliases, the modifications show up in the table.
Removing a user
To remove a user:
!Caution: You cannot undo this action.
If you remove a user, you delete the user account and all of the files.
1. On the Administrator Site screen, click Users on the left. The Users List table appears.
2. In the users list, locate the user that you want to remove.
3. Click the brown trashcan icon next to that user’s name. A
confirmation dialog box appears, asking if you want to delete the
user.
4. Click OK in the confirmation dialog box. The UI on the screen refreshes and the Users List table appears. The deleted user has been removed from the table.
68
Administrator Site
Groups In the Groups section, you can manage the group settings.
To access this section, on the Administrator Site, click Groups on the left. The Groups List table appears; see Figure 22. The table displays the group name and the members of each group.
You can add groups to the Qube 2 and allocate disk space for each group. New users can be added easily, and existing users can be removed easily from a group — just click to turn their check boxes on or off.
Only members of a group can join in the threaded discussion of that group, and view or post Web content to the home page of the private group. The Qube 2 Administrator can delete messages from a threaded discussion or Web content from a home page.
When a new group is added, a mailing list is automatically created for that group. See “Mailing lists” on page 75.
The Qube 2 Administrator is automatically a member of each group created on the Qube 2.
Note: Due to a limitation in the Linux operating system, a Qube 2 Administrator or any other user can belong to a maximum of 32 groups only.
69

Chapter 4
Figure 22 shows the Groups List table.
Figure 22 Groups List table
Configuring the group settings
The Qube 2 Administrator can:
• configure the default group settings
• add a group
• modify the members of a group and the maximum allowed disk space for the group
• remove a group
The group “home” is generated automatically. Its members have the ability to modify the home page of the Qube 2 server.
70

Administrator Site
Configuring the default group settings
To configure the default settings for a group:
1. On the Administrator Site screen, click Groups on the left. The Groups List table appears.
2. Click Set Group Defaults. The Group Defaults table appears. See Figure 23.
3. Enter a value (in MB) for the maximum amount of disk space available to a group for file storage, Web pages and threaded discussions.
The value entered must be a whole number greater than zero.
4. Click Save Changes.
Figure 23 shows the Group Defaults table.
Figure 23 Group Defaults table
71
Chapter 4
Adding a group
To add a group:
1. On the Administrator Site screen, click Groups on the left. The Groups List table appears.
2. Click Add Group. The Add New Group table appears. See Figure 24.
3. Fill in the fields:
• Group name Enter the name of the group.
The name can be a maximum of 12 characters long; you can only use lowercase English letters, numbers, and the hyphen (-) and underscore (_) characters.
• Maximum allowed disk space (MB) This value is the amount of disk space available to a user for file storage and Web pages.
The value entered must be a whole number greater than zero.
4. The lower part of the Add New Group table lists all of the users on the Qube 2.
To add a member to the group, click to turn on the check box next to the user name.
To remove a member from the group, click to turn off the check box next to the user name.
5. Click Confirm New Group. The UI on the screen refreshes and the Groups List table appears with the new group and members.
72
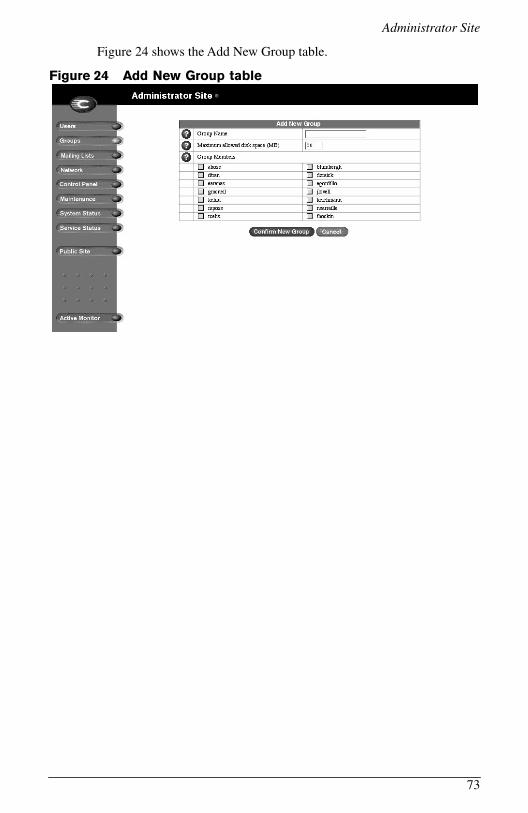
Administrator Site
Figure 24 shows the Add New Group table.
Figure 24 Add New Group table
73

Chapter 4
Modifying a group
To modify the members of a group or the maximum allowed disk space for the group:
1. On the Administrator Site screen, click Groups on the left. The Groups List table appears.
2. In the list, locate the group that you want to modify.
3. Click the green pencil icon next to that group. The Modify
Group table appears.
4. Modify the one or both of the following fields.
• Maximum allowed disk space (MB) This value is the amount of disk space available to a user for file storage and Web pages.
The value entered must be a whole number greater than zero.
• Group Members Add members to or remove members from the group
To add a member to the group, click to turn on the check box next to the user name.
To remove a member from the group, click to turn off the check box next to the user name.
5. Click Confirm Modify. The UI on the screen refreshes and the Groups List table appears. If you modified the group members, the modifications show up in the table.
74

Administrator Site
Removing a group
To remove a group:
!Caution: You cannot undo this action.
If you remove a group, you delete the group, all of the files in the group directory, the group directory itself, the associated mailing list for that group (if one has been created), and the Windows file sharing and Appleshare settings.
1. On the Administrator Site screen, click Groups on the left. The Groups List table appears.
2. In the list, locate the group that you want to remove.
3. Click the brown trashcan icon next to that group. A
confirmation dialog box appears, asking if you want to delete the
group.
4. Click OK in the confirmation dialog box. The UI on the screen refreshes and the Groups List table appears. The deleted group is removed from the table.
Mailing listsIn the Mailing Lists section, you can create and manage mailing lists for the site.
To access this section, on the Administrator Site, click Mailing Lists on the left. The Mailing Lists table appears; see Figure 25. The table displays the mailing list name and the recipients for each mailing list.
75
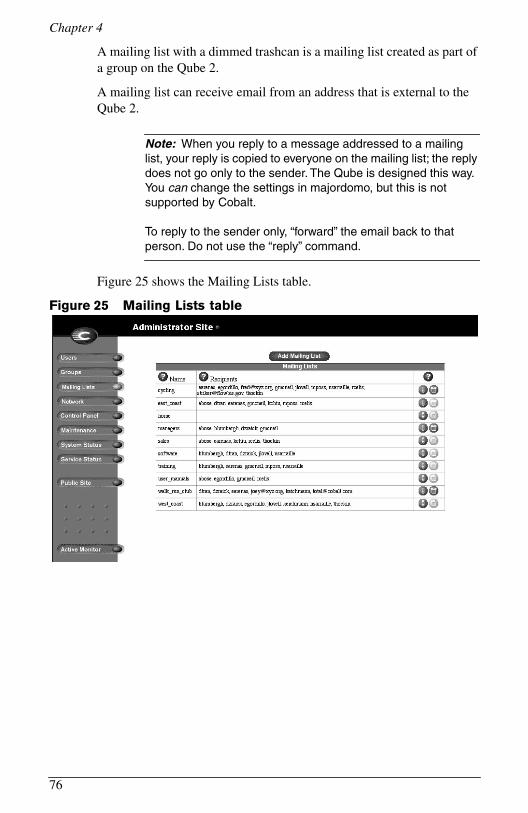
Chapter 4
A mailing list with a dimmed trashcan is a mailing list created as part of a group on the Qube 2.
A mailing list can receive email from an address that is external to the Qube 2.
Note: When you reply to a message addressed to a mailing list, your reply is copied to everyone on the mailing list; the reply does not go only to the sender. The Qube is designed this way. You can change the settings in majordomo, but this is not supported by Cobalt.
To reply to the sender only, “forward” the email back to that person. Do not use the “reply” command.
Figure 25 shows the Mailing Lists table.
Figure 25 Mailing Lists table
76

Administrator Site
Configuring the mailing list settings
The Qube 2 Administrator can:
• add a mailing list
• modify a mailing list
• remove a mailing list
Adding a mailing list
To add a mailing list:
1. On the Administrator Site screen, click Mailing Lists on the left. The Mailing Lists table appears.
2. Click Add Mailing List. The Add Mailing List table appears. See Figure 26.
3. Enter a name for the mailing list.
You can only use lowercase English letters, numbers, and the hyphen (-) and underscore (_) characters. There is no limit on the number of characters in the name.
4. Add recipients to the mailing list.
• To add an external recipient to the mailing list, enter the complete email address in the “External Recipients” field (for example, [email protected])
• To add an existing Qube 2 user, click to turn on the check box next to the user name at the bottom of the table.
To remove an existing Qube 2 user, click to turn off the check box next to the user name
5. Click Confirm New Mailing List. The UI on the screen refreshes and the Mailing Lists table appears with the new mailing list and members.
77

Chapter 4
Figure 26 shows the Add Mailing List table.
Figure 26 Add Mailing List table
Forwarding incoming email to several recipients
If a user will not be accessing his or her email account for a period of time and wants to forward incoming email messages to several recipients, the Qube 2 Administrator can create a mailing list for the user. To do so:
1. The Qube 2 Administrator creates a mailing list made up of the email addresses to which the user wants to forward the email. See “Adding a mailing list” on page 77.
2. In the user’s email settings, the Qube 2 Administrator enters the name of the mailing list in the Forward Email To field. See “Modifying a user’s email settings” on page 66.
Note: The forwarded email message is NOT saved in the email account of the original recipient.
78

Administrator Site
Modifying a mailing list
To modify a mailing list:
1. On the Administrator Site screen, click Mailing Lists on the left. The Mailing Lists table appears.
2. In the list, locate the group that you want to modify.
3. Click the green pencil icon next to that mailing list. The
Modify Mailing List table appears.
4. Modify the one or both of the following fields.
• Mailing list name Modify the name of the mailing list.
You can only use lowercase English letters, numbers, and the hyphen (-) and underscore (_) characters. There is no limit on the number of characters in the name.
• External recipients Add or remove external recipients.
To add an external recipient, enter the complete email address in the field (for example, [email protected])
• Registered users Add or remove Qube 2 users.
To add a member to the group, click to turn on the check box next to the user name.
To remove a member from the group, click to turn off the check box next to the user name.
5. Click Confirm Modify. The UI on the screen refreshes and the Mailing Lists table appears with the modifications to the mailing list.
79

Chapter 4
Removing a mailing list
A mailing list with a dimmed trashcan is a mailing list created as part of a group on the Qube 2. To remove this mailing list, you must remove the corresponding group. See “Removing a group” on page 75.
To remove a mailing list:
1. On the Administrator Site screen, click Mailing Lists on the left. The Mailing Lists table appears.
2. In the list, locate the group that you want to remove.
3. Click the brown trashcan icon next to that mailing list. A
confirmation dialog box appears, asking if you want to delete the
mailing list.
4. Click OK in the confirmation dialog box. The UI on the screen refreshes and the Mailing Lists table appears. The deleted mailing list is removed from the table.
NetworkIn the Network section, you can enter the network configuration information and the modem settings for the Qube 2. The network settings make the Qube 2 visible to other computers.
If you change the IP address on this screen (or from the LCD console), the Qube 2 reboots.
IMPORTANT: Coordinate the network configuration information with your system administrator to ensure the integrity of your network. Incorrect network settings can result in a loss of connectivity.
The Qube 2 can be set up in three different ways:
• Both intranet and Internet communication is provided through the Primary Network Interface.
• Intranet access is provided through the Primary Network Interface; Internet access is provided through the Secondary Network Interface.
• Intranet access is provided through the Primary Network Interface; Internet access is provided by modem through the high-speed serial port.
80

Administrator Site
Ethernet settings
Be sure to enter the IP address of your DNS server(s) here. Otherwise, the Simple Mail Transfer Protocol (SMTP) will not work. SMTP is used for transferring electronic mail messages.
For more information on DNS, see Appendix D, “Domain Name System”, on page 173.
Figure 27 shows the network settings tables.
Figure 27 Network settings tables
81

Chapter 4
Entering the settings for the network configuration
To enter or change the settings for the network configuration for the Qube 2:
1. On the Administrator Site screen, click Network on the left. The settings tables for the network configuration appear. See Figure 27.
2. Modify the one or all of the general settings.
Note: For help with a particular field, move the mouse pointer
over the Active Assist icon adjacent to the field. Help text
appears in a window at the bottom of the screen.
• Host name This is a name you assign to the Qube 2 — for example, qube1. This field must be filled in.
• Domain name The Qube 2 requires a domain name (for example, mydomain.com or xyz.com). The host name and domain name must be coordinated by the network administrator in order for you to access the Qube 2 by its name and not just by its IP address.
The Qube 2 Administrator must also register the domain name. Visit the Internet Corporation for Assigned Names and
Numbers (ICANN) at http://www.icann.org for a list of accredited domain-name registrars.
• Primary DNS server address This is the IP address of your primary domain name system (DNS) server. A primary DNS server maintains a list of computer names and their IP addresses. The Qube 2 needs access to this list on the primary DNS server in order to convert between IP addresses and names. This conversion is essential for sending and receiving email external to the Qube 2.
Note: The Qube 2 can serve as the DNS server and provide the host name.
82

Administrator Site
• Secondary DNS server address This is the IP address of your secondary DNS server. A secondary DNS server can provide redundant DNS service to your computers. If the primary DNS server is turned off, then your Qube 2 can use the secondary DNS server with no loss of performance.
Note: Your primary DNS server and secondary DNS server cannot not be on the same server.
• Default gateway This is the IP address of the network gateway, such as your router or firewall. A gateway address is required to connect to systems outside the local network. It may be left empty if you do not wish to access outside networks. If you are using a modem, the word modem is entered in this field.
• IP forwarding If this feature is enabled, IP packets from one network interface can be routed to another.
3. Modify the one or all of the interface settings.
• IP address This is the IP address of the primary interface which connects to your Intranet. This field must be filled in.
• Subnet mask This is the subnet mask of the primary interface. The normal subnet mask for a class C network is 255.255.255.0. Yours may differ depending on the size of your network.
• Network Address Translation (NAT) If this feature is enabled, network traffic on the internal network (the primary network interface) sent through the Qube 2 is masqueraded as if it were coming from the external interface (the modem or secondary network interface).
For more information, see “Network Address Translation (NAT)” on page 84.
• Media Access Control (MAC) address The MAC address is the ethernet hardware address of the primary network interface. This hardware address is unique to every ethernet device; it cannot be changed.
4. Click Save Changes.
83

Chapter 4
Network Address Translation (NAT)
The Network Address Translation (NAT) feature allows the Qube 2 to present a single IP address for a private network to the public network. NAT enables private IP intranetworks that use non-registered IP addresses to connect to the Internet. NAT is both a security measure and a method of conserving IP addresses.
For more information on how NAT works, see “Network Address Translation (NAT)” on page 50.
!Caution: Before enabling NAT on your network, coordinate this with your system administrator to ensure the integrity of your network.
Enabling or disabling the NAT feature
To enable or disable the NAT feature on the Qube 2:
1. On the Administrator Site screen, click Network on the left. The settings tables for the network configuration appear.
2. In the Interface Settings table, click the check box next to Network Address Translation (NAT). A check mark indicates that NAT is enabled.
3. Click Save Changes.
Modem settings and the high-speed serial port
The Qube 2 is equipped with a high-speed serial port to which you can connect an external modem. If you have (or can obtain) a standard point-to-point protocol (PPP) dial-up account with an Internet Service Provider (ISP), a phone line and a modem, your Qube 2 can provide Internet access for your network — no router is required.
Using the external modem and the second Ethernet port, the Qube 2 can also act as a router. The Qube 2 Administrator can set the phone number, user name, password and initialization string for the modem settings.
84
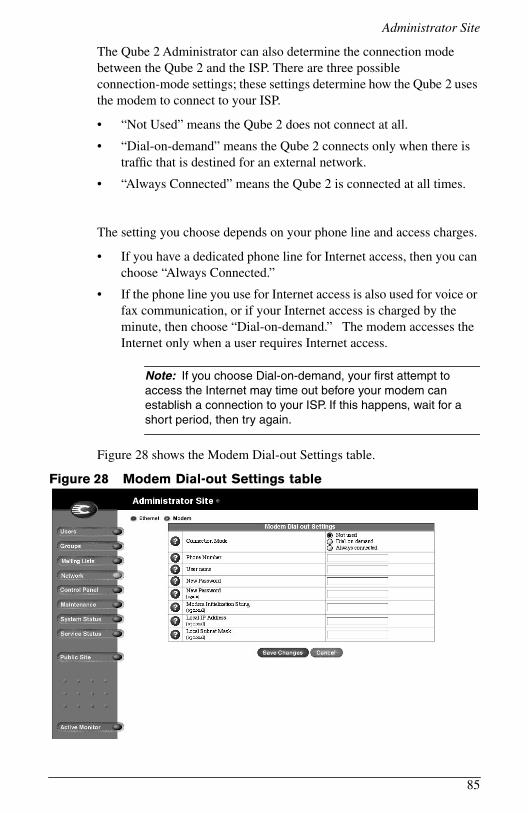
Administrator Site
The Qube 2 Administrator can also determine the connection mode between the Qube 2 and the ISP. There are three possible connection-mode settings; these settings determine how the Qube 2 uses the modem to connect to your ISP.
• “Not Used” means the Qube 2 does not connect at all.
• “Dial-on-demand” means the Qube 2 connects only when there is traffic that is destined for an external network.
• “Always Connected” means the Qube 2 is connected at all times.
The setting you choose depends on your phone line and access charges.
• If you have a dedicated phone line for Internet access, then you can choose “Always Connected.”
• If the phone line you use for Internet access is also used for voice or fax communication, or if your Internet access is charged by the minute, then choose “Dial-on-demand.” The modem accesses the Internet only when a user requires Internet access.
Note: If you choose Dial-on-demand, your first attempt to access the Internet may time out before your modem can establish a connection to your ISP. If this happens, wait for a short period, then try again.
Figure 28 shows the Modem Dial-out Settings table.
Figure 28 Modem Dial-out Settings table
85
Chapter 4
Changing the modem settings
To enter or change the modem settings for the Qube 2:
1. On the Administrator Site screen, click Network on the left. The settings tables for the network configuration appear.
2. Click Modem at the top. The Modem Dial-out Settings table appears. See Figure 28.
3. Modify the one or all of the following fields.
Note: For help with a particular field, move the mouse pointer
over the Active Assist icon adjacent to the field. Help text
appears in a window at the bottom of the screen.
• Connection mode The connection mode determines when the modem connects to the PPP account.
• Phone number This is the phone number to dial to access the PPP account for the given user. Do not include spaces in the phone number.
• User name This is the user name used to log into the PPP account. This is set by the provider of the PPP account, for example your ISP.
• New password This is the password used to authenticate the PPP connection for the given user. Enter the password twice for verification.
• Modem initialization string (optional) Just before dialing, the initialization string is sent to the modem to initialize the modem, for example ATZ. The Qube 2 brings the modem to its default factory settings.
• Local IP address (optional) This is the IP address for the PPP link if you are using a fixed IP address assigned by your provider. If the IP address for the PPP link is assigned dynamically by the connecting server, leave this field blank.
• Local subnet mask (optional) This is the netmask for the PPP link if you are using a fixed IP address assigned by your provider. If the IP address for the PPP link is assigned dynamically by the connecting server, leave this field blank.
4. Click Save Changes.
86
Administrator Site
Verifying the status of the modem connection
To verify the status of the modem connection:
1. On the Administrator Site screen, click System Status on the left. The Memory Status table appears.
2. Click Modem at the top. The Modem Status table appears. See Figure 28.
Control PanelThrough the Control Panel screen, the Qube 2 Administrator can enter the settings for the
• services
• access rights to different features and capabilities
• IP firewall
• time and time zone
Note: For help with a particular field, move the mouse pointer
over the Active Assist icon adjacent to the field. Help text
appears in a window at the bottom of the screen.
87

Chapter 4
Services
Figure 29 shows the Service Settings table of the Services section.
Figure 29 Service Settings table
88
Administrator Site
Managing the settings for the services
To manage the settings for the Qube 2 services:
1. On the Administrator Site screen, click Control Panel on the left. The Service Settings table appears. See Figure 29.
2. To turn on any of the services listed in the Service Settings table (except Web server and Discussion Group, which are always on), click the check box next to that service. The services are described in the sections that follow.
3. Click Save Changes.
Note: Instructions for users on how to use the Qube 2 services are given in Chapter 3.
Web server
This service is always on. It allows users to access Web content.
Discussion group
This service is always on. It allows users to access discussions groups. Discussion groups are online discussions or message boards which are open to group members. Sample uses include policy discussions, brainstorming, and planning.
Email server
The Qube 2 supports email for entire domains (for example, www.mydomain.com). By default, each registered user has an email account created on the Qube 2.
The Qube 2 supports multiple client and server email protocols but does not implement virtual email users. This means that for the entire Qube 2, each user must have a unique user name, even if the users are on different virtual sites. For more information, see “Email relaying” on page 37.
89

Chapter 4
SMTP server
The Qube 2 can act as a Simple Mail Transfer Protocol (SMTP) server for sending and receiving Internet email. The Qube 2 Administrator can configure several parameters that can affect the performance of the SMTP server.
Users created on any virtual site can retrieve their email using the Post Office Protocol 3 (POP3) and the Internet Message Access Protocol 4 (IMAP4). Users can send mail using the Simple Mail Transfer Protocol (SMTP).
For the Qube 2 to receive email, the network or system administrator must enter a mail server host name in your organization’s domain name system (DNS) server. The IP address of the DNS server must be entered in the network settings for the Qube 2 or the SMTP protocol will not work. For more information, see “Network Integration” on page 20.
For more information on DNS, see Appendix D, “Domain Name System”, on page 173.
Figure 30 shows the Email Parameters tables.
Figure 30 Email Parameters tables
90

Administrator Site
Enabling the email server
To enable the email server, click the Email Server check box. Now you can set the email parameters.
To configure the email parameters:
IMPORTANT: To receive email, the host name of the Qube 2 (as specified in the Setup Wizard) must be entered into your organization’s DNS server. SMTP does not work unless the IP address of the DNS server has been entered in the Network section of the Administrator Site.
1. On the Administrator Site screen, click Control Panel on the left. The Service Settings table appears; the Email server option is checked on by default.
2. Click the Parameters link next to Email Server. The Email Parameters table appears. See Figure 30.
3. Fill in the fields in the Email Parameters table. The following paragraphs explain these fields.
4. Click Save Changes in the Email Parameters table.
5. Click Save Changes in the Service Settings table
Configure the email parameters as follows.
• Email Delivery Settings table This option specifies how frequently email is delivered by the email server on the Qube 2. The “Immediate” option means email is delivered as soon as a user sends the message. The other options queue the messages, sending them at the specified frequency, reducing the amount of time your Internet connection is in use.
The settings you choose here and in the Email Retrieval Settings table depend upon your Qube 2’s connection to the Internet and your access charges.
• If you connect to the Internet through a dedicated phone line or by ethernet (through the secondary network interface), then you can choose to have your email delivered and retrieved more often, or “Immediately.”
• If you connect to the Internet through a modem that shares a phone line with other functions, or if your Internet access is charged by the minute, then you should specify less-frequent mail delivery and pickup.
91
Chapter 4
• Email Retrieval Settings table ISPs often arrange for all messages to an organization to be retrieved from a single mailbox. This mailbox is usually referred to as a “multidrop mailbox” because it contains email messages addressed to more than one person. Your ISP must configure your multidrop mailbox at the ISP to accept all email for your domain. The domain of the Qube 2 must match the domain of the email that is to be collected.
The Qube 2 retrieves the email and then distributes it to the users on the Qube 2. Email messages that are addressed to recipients who are not listed as users on the Qube 2 are forwarded to the Qube 2 Administrator.
These settings control how your Qube 2 retrieves mail from such a multidrop mailbox. Set the Remote Email Server, User and Password fields to the appropriate values for accessing your multidrop mailbox. The frequency settings control how often email is retrieved.
Note: If you set the same frequency for email delivery and retrieval, then both take place at the same time, saving you access time and charges.
• Advanced Email Settings table This table includes the following settings:
• Maximum email message size (KB) It is important to enter a value in this field to limit the size of incoming email messages. If this field is blank, you can receive a message that exceeds the available disk space. Such a message would be returned to the sender as “undeliverable.” The default value is 5 MB; the value must be a whole number greater than zero.
• Relay email from these hosts/domains In this field, enter the IP addresses or domain names of the sites for which the SMTP server is allowed to relay email messages. If you intend to receive mail addressed directly to your domain name, add that name here.
For more information, see “Email relaying” on page 37.
92

Administrator Site
• Receive email addressed to these hosts/domains In this field, enter the IP addresses or domain names of the sites on which you receive email. To receive email, your domain must be specified in this field.
For example, if you want to receive email addressed to you at “[email protected]”, then you must enter “domain.com” in this field. Otherwise, a sender will have to include the host name in your email address (for example, [email protected]).
• Block email from these users/hosts/domains In this field, enter email addresses, host or domains from which you want to block any email. Anyone trying to send you messages from one of these addresses or domains will receive an error message in return.
!Caution: Some users advise you to open relay to all .com, .edu, .net and other top-level domain addresses. This is BAD ADVICE. Doing so allows hosts belonging to .com, .edu, .net and others to relay email through your Cobalt server. These open relays can lead to unsolicited commercial email (“spam mail”) being forwarded through your server.
Spam mail can appear as though it originated from your server and as a result, others may blacklist your server as a known spam site. If your server is blacklisted, many mail servers will not relay your email and your customers will not receive a large amount of their email messages.
93

Chapter 4
Enabling the email relaying feature
To enable email relaying, add the IP addresses (or domain names, or both) of the machines which use your Cobalt Qube 2 as the SMTP server.
Note: If you do not want to allow email to be sent through the Qube 2, leave the “Relay email from these hosts/domains” field blank. You can download email but cannot send outgoing emails through Qube 2. Systems messages are still delivered locally to the Qube 2 Administrator.
1. On the Administrator Site screen, click Control Panel on the left. The Service Settings table appears; the Email server option is checked on by default.
2. Click the Parameters link next to Email Server. The Email Parameters table appears. See Figure 30. One field is labeled “Relay for the following hosts/domains”. The following paragraphs explain how to fill in this field. For more information, see “Email relaying” on page 37.
3. Click Save Changes in the Email Parameters table.
4. Click Save Changes in the Service Settings table.
The entries you add to this field serve as part of a pattern match against the email that the client is sending. As a result, some handy shortcuts are possible. If you have a number of hosts in the same network block, you can, as a shortcut, simply enter the number of the network block.
94

Administrator Site
For example, specifying a network such as 192.168.1 in the “Relay email from these hosts/domains” field trusts all IP addresses from 192.168.1.1 through 192.168.1.254.
Note: There is no trailing period on the number of the network block and there are only three octets entered in the field. It is important that you do not include a trailing dot after the part of the IP address that you want to match.
If you want to allow connections from a host that ends, for example, in mydomain.com, add the string mydomain.com in the text area. If you intend to receive mail addressed directly to your domain name, add that name here.
Note: If you entering a domain name or part of a domain name in the text box, you must have reverse DNS working on your clients.
File Transfer Protocol server
As the Qube 2 Administrator, you can enable the anonymous File Transfer Protocol (FTP) server, set limits on the size of files that can be uploaded and set the number of simultaneous users. This feature allows a user without a password to download and upload files through FTP, up to the specified disk-space limit.
Figure 31 shows the FTP Settings table.
Figure 31 FTP Settings table
95

Chapter 4
To change the FTP settings for your Qube 2:
1. On the Administrator Site screen, click Control Panel on the left. The Service Settings table appears; the FTP server option is checked on by default.
2. Click Parameters next to the FTP Server option. The FTP Settings table appears. See Figure 31.
3. You can turn anonymous FTP on or off.
If you turn it on, you can indicate a size limit (in MB) for incoming files; you can also limit the number of simultaneous users of the anonymous FTP service.
4. Click Save Changes in the FTP Settings table.
5. Click Save Changes in the Service Settings table.
To download a file through anonymous FTP, log on to the site with the user name “guest” or “anonymous”. You can enter any password.
When you log on with one of these user names, you enter the directory /home/groups/home/ftp/. This directory can also be accessed by the URL ftp://<IP address>/ .
The Qube 2 Administrator can post files here for downloading through FTP client software or a Web browser.
To upload a file, you must use FTP client software (for example, Fetch or WS-FTP) and access the directory /home/ftp/incoming/ .
Once you have uploaded a file, you (as a guest) cannot see it or access it on the FTP site. However, all registered site users with telnet/shell privileges can access it.
The size limit specified for a file uploaded by FTP is the total amount of disk space allocated for an FTP upload. If this disk space is set to zero, guests cannot upload to the FTP site.
96
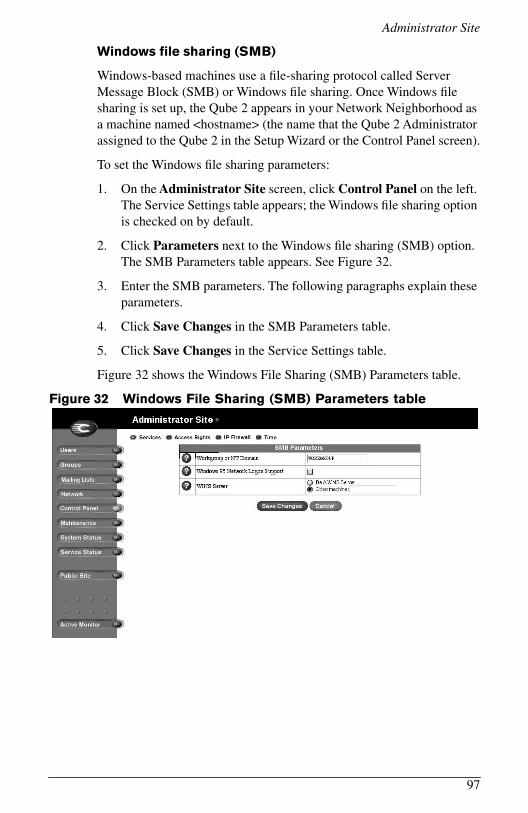
Administrator Site
Windows file sharing (SMB)
Windows-based machines use a file-sharing protocol called Server Message Block (SMB) or Windows file sharing. Once Windows file sharing is set up, the Qube 2 appears in your Network Neighborhood as a machine named <hostname> (the name that the Qube 2 Administrator assigned to the Qube 2 in the Setup Wizard or the Control Panel screen).
To set the Windows file sharing parameters:
1. On the Administrator Site screen, click Control Panel on the left. The Service Settings table appears; the Windows file sharing option is checked on by default.
2. Click Parameters next to the Windows file sharing (SMB) option. The SMB Parameters table appears. See Figure 32.
3. Enter the SMB parameters. The following paragraphs explain these parameters.
4. Click Save Changes in the SMB Parameters table.
5. Click Save Changes in the Service Settings table.
Figure 32 shows the Windows File Sharing (SMB) Parameters table.
Figure 32 Windows File Sharing (SMB) Parameters table
97

Chapter 4
The parameters are:
• Workgroup or NT Domain Enter a workgroup or NT domain to which you want the Qube 2 to belong. This entry determines how the Qube 2 appears in the Network Neighborhood on a Windows client machine.
• Windows 95 Network Logon Support Enable this option if you want the Qube 2 to act as a Windows logon server, authenticating users when they begin a session on a Windows 95 or Windows 98 machine. This means that when Windows users log into the network, they are authenticated using their Qube 2 account.
• WINS Server If your Windows network spans more than one TCP/IP subnet, you must use a WINS server for NetBIOS name resolution. To use your Qube 2 as a WINS server, click the radio button “Be a WINS Server.”
If you do have a WINS server on your network, be sure to specify the IP address of the WINS server in the “Other machine” field. If you do not have a WINS server on your network, choose “Other machine” field and leave the field blank.
For detailed information on setting up Windows file sharing, see “Using Windows file sharing (SMB)” on page 42.
Apple file sharing (AppleShare)
AppleShare is the Macintosh file-sharing protocol. This option allows you to share files between the Qube 2 and Macintosh computers on your network. In the Qube 2, Appleshare works over IP networks, which makes Macintosh-to-Qube 2 file sharing faster (even on your internal network).
To enable Apple file sharing:
1. On the Administrator Site screen, click Control Panel on the left. The Service Settings table appears.
2. Click the check box next to “Apple file sharing (AppleShare)” to enable this option.
3. Click Save Changes in the Service Settings table. The UI screen refreshes.
98

Administrator Site
Simple Network Management Protocol (SNMP) agent
You can specify the SNMP communities that can have read-only and read-and-write access to this SNMP agent. The default read-access community is “public.”
To specify the SNMP communities:
1. On the Administrator Site screen, click Control Panel on the left. The Service Settings table appears.
2. Click the check box next to “Simple Network Management Protocol (SNMP) Agent” to enable this option.
3. Click Save Changes in the Service Settings table. The UI screen refreshes.
4. Click Parameters next to the SNMP Agent option. The SNMP Parameters table appears.
5. Enter the SNMP communities that can have read-only and read-and-write access to this SNMP agent. The default read-only community is “public”.
6. Click Save Changes in the SNMP Parameters table.
7. Click Save Changes in the Service Settings table.
Legato file backup
You can use the Legato NetWorker® client software to support backup and restore needs on the Qube 2. To use this feature, you must install the Legato Networker Server software. The software is available at www.legato.com.
To enable or disable the Legato file backup option:
1. On the Administrator Site screen, click Control Panel. The Service Settings table appears.
2. Click the check box next to Legato File Backup to on or off.
3. Click Save Changes in the Service Settings table. The UI screen refreshes.
The Legato NetWorker client is now activated on the Qube 2. You now have to configure the Legato NetWorker® Server software to locate the Qube 2 on the network.
99

Chapter 4
Domain Name System (DNS) server
The Domain Name System (DNS) is a vital and integral part of the Internet. Setting up DNS correctly on your Qube 2 is very important. For this reason, we have created an appendix solely for explaining DNS. See “Domain Name System” on page 173.
The appendix covers the following items:
• basic DNS issues
• advanced DNS issues
• a quick start guide detailing a sample setup of DNS for a Qube 2
• a brief history of the DNS service
Dynamic Host Configuration Protocol (DHCP) server
The Dynamic Host Configuration Protocol (DHCP) feature allows the Qube 2 to assign automatically the network configuration information to network devices that support DHCP, including Macintosh and Windows desktop computers. This information includes the domain name, DNS service, IP address, subnet mask and gateway.
The DHCP server assigns addresses only to machines on the primary network interface.
On the DHCP Parameters page, you can configure:
• the settings for DHCP clients
• the DHCP server to assign dynamic or static network information to the clients.
To configure the settings for a DHCP client:
1. On the Administrator Site screen, click Control Panel on the left. The Service Settings table appears.
2. Click Parameters next to the DHCP Server option. The DHCP Parameters page appears with three options.
3. Click Settings for DHCP Clients. The Settings for DHCP Clients table appears; see Figure 33. The fields are blank by default.
100
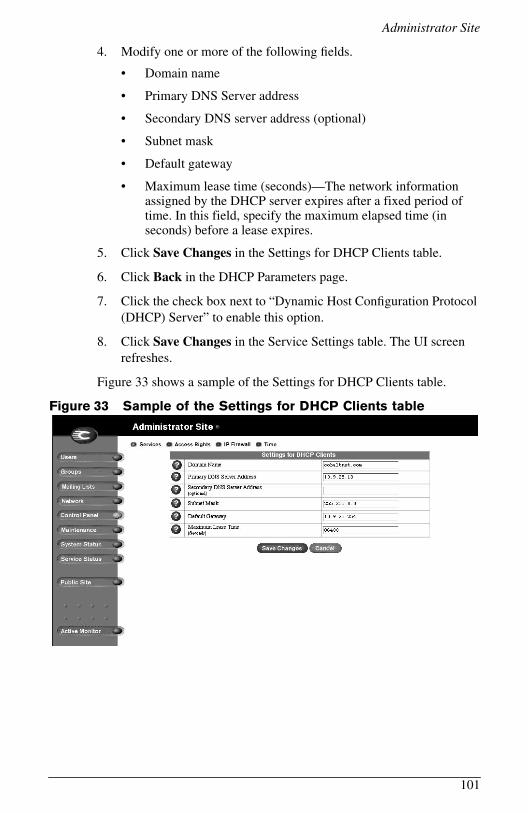
Administrator Site
4. Modify one or more of the following fields.
• Domain name
• Primary DNS Server address
• Secondary DNS server address (optional)
• Subnet mask
• Default gateway
• Maximum lease time (seconds)—The network information assigned by the DHCP server expires after a fixed period of time. In this field, specify the maximum elapsed time (in seconds) before a lease expires.
5. Click Save Changes in the Settings for DHCP Clients table.
6. Click Back in the DHCP Parameters page.
7. Click the check box next to “Dynamic Host Configuration Protocol (DHCP) Server” to enable this option.
8. Click Save Changes in the Service Settings table. The UI screen refreshes.
Figure 33 shows a sample of the Settings for DHCP Clients table.
Figure 33 Sample of the Settings for DHCP Clients table
101
Chapter 4
To assign dynamic or static network information to the DHCP clients:
1. On the Administrator Site screen, click Control Panel on the left. The Service Settings table appears.
2. Click Parameters next to the DHCP Server option. The DHCP Parameters page appears with three options.
3. Click Settings for DHCP Clients. The Settings for DHCP Clients table appears.
• to assign dynamic network information, go to Step 4.
• to assign static network information, go to Step 5.
4. Click Add Dynamic Address Assignment. The Add New Dynamic Address Assignment table appears.
Enter the lower end and upper end of a range of IP addresses for the DHCP server to assign dynamically. For example, if you enter 205.3.4.1 – 205.3.4.3, the DHCP server assigns 205.3.4.1, 205.3.4.2 and 205.3.4.3 to the DHCP clients.
Click Confirm Address Assignment. The UI returns to the DHCP Parameters page.
5. Click Add Static Address Assignment. The Add New Static Address Assignment table appears.
IP Address In this field, enter the IP address that the DHCP server will consistently assign to the network device with the specific hardware ethernet (MAC) address.
MAC address In this field, enter the hardware ethernet (MAC) address of the network device to which the DHCP server will consistently assign the IP address.
Click Confirm Address Assignment. The UI returns to the DHCP Parameters page.
6. Click Back in the DHCP Parameters page.
7. If DHCP has not been enabled, click the check box next to Dynamic Host Configuration Protocol (DHCP) Server to enable this option.
8. Click Save Changes in the Service Settings table. The UI screen refreshes.
Note: You must save the changes in the Service Settings table for the DCHP information to take effect.
102

Administrator Site
Access rights
Under Access Rights, you can specify the users who:
• can add or delete users
• can access the Qube 2 home page
• can install CGI scripts
• have telnet access
To configure the access rights:
1. On the Administrator Site screen, click Control Panel on the left. The Service Settings table appears.
2. Click Access Rights at the top. The tables for access rights appear. See Figure 34.
3. Enter the parameters for the access rights. The following paragraphs explain these parameters.
4. Click Save Changes on the Access Rights page.
Figure 34 shows the Access Rights tables.
Figure 34 Access Rights tables
103
Chapter 4
User add and remove
With this option, you specify who can add or remove users from the Qube 2.
• Open Any individual can register new users and all users can delete themselves.
• Restricted Only the Qube 2 Administrator can add or remove users.
Note: Cobalt recommends the Restricted option.
Public site access
With this option, you specify who can access to the Qube 2 home page.
• Open Anyone in the world can access the Qube 2 home page.
• Restricted Only registered users can access the Qube 2 home page.
Install CGI scripts
!Caution: Poorly written CGI scripts can cause performance problems on the server.
With this option, you can set the access rights so that only the Qube 2 Administrator can add CGI script files, or both users and the administrator can add CGI script files.
• Open Both users and the Qube 2 Administrator are allowed to install CGI scripts. This option is more flexible but less secure.
• Restricted Only the Qube 2 Administrator is allowed to install CGI scripts. This option is less flexible but more secure.
By creating CGI scripts, users and groups can have Web sites that run programs that dynamically generate HTML pages in response to specific user inputs. CGI scripts can be created on a user’s desktop computer and then transferred to the Qube 2 with an FTP application.
For more information on creating CGI scripts, see “CGI scripts” on page 39.
104

Administrator Site
Telnet access
Warning to the Qube 2 Administrator: You can adversely affect the performance of your Qube 2 if you modify system configuration files. Check your warranty card for details.
Warning: Telnet access should only be used by advanced users who want to run shell scripts or use shell commands. An advanced user is someone who is proficient in the internal workings of the Unix operating system.
With this option, you specify who has telnet access to the Qube 2.
• Off No telnet access is available. This is the most secure option.
• Root only Only the root user can telnet into the Qube 2.
• Root and all registered users The root user and all registered users can telnet into the Qube 2. This is the least secure option but provides the most flexibility.
105

Chapter 4
IP Firewall
A firewall is a set or filtering rules used to allow or deny IP packets access to the Qube 2.
The IP Firewall option allows you to specify simple packet-filtering rules, which limit access to your Qube 2. You can choose to deny or allow communication in either direction between your Qube 2 and any or all IP addresses.
IMPORTANT: Adding or editing rules automatically disables IP filtering. Click Enable IP Filtering to re-enable IP filtering after editing a rule. Coordinate this information with your system administrator to ensure the integrity of your network.
The Qube 2 Administrator can:
• add an IP filtering rule
• modify an IP filtering rule (including the order in which the rules are applied)
• remove an IP filtering rule
Figure 35 shows the Add New IP Filtering Rule table.
Figure 35 Add New IP Filtering Rule table
106
Administrator Site
Adding an IP filtering rule
To add an IP filtering rule:
1. On the Administrator Site screen, click Control Panel on the left.
2. Click IP Firewall at the top. If there are any existing IP filtering rules, they appear in the IP Filtering Rule List table.
3. Click Add Rule. The Add New IP Filtering Rule table appears; see Figure 35. A description of the fields follows this procedure.
4. Click Confirm New Rule. The UI on the screen refreshes and the IP Filtering Rule List table appears with the modifications.
5. Click Enable IP Filtering to re-enable the IP filtering function.
The rules are specified as follows (replace the field names in square brackets with their values):
“[Policy] packets from [Source] address(es) to [Destination] address(es) on the [Port] port(s) using [Protocol] protocol(s).”
The default IP filtering rule is:
“ALLOW packets from ANY address(es) to ANY address(es) on ANY port(s) using ALL protocol(s).”
• Rule number The Rule Number determines the order in which the filtering rules are applied. Rules are applied from the lowest number to the highest, starting with 1. For example, an IP packet filtered out in rule number 1 does not test against rule number 2, since rule number 1 is applied first.
• Policy The Policy determines whether packets meeting the criteria of the rule are accepted or denied. Accepted packets are allowed to pass unfiltered through the server. Denied packets are dropped from the server.
• Source IP address The source IP address applies the Policy to the IP address or range of addresses from which the IP packet originates.
• Destination IP address The destination IP address applies the Policy to the IP address or range of addresses to which the IP packet is destined.
107
Chapter 4
• Subnet mask Whether a rule applies to a single IP address or a range of addresses is determined by the value in the subnet mask field. For a single IP address, choose the value 32, which is a 32-bit subnet mask. For a range of IP addresses, choose a smaller subnet mask.
The “decimal value” of the subnet mask (for example, 32-bit) corresponds to an equivalent subnet mask as a “Dotted Quad” address, as shown in the table below. The table also displays examples of the IP address ranges that would be filtered by a rule with the corresponding subnet mask.
Decimal Dotted Quad Example IP Address Ranges Filtered32-bit = 255.255.255.255 Filters only 192.168.27.2 24-bit = 255.255.255.0 Filters from 192.168.27.0 to 192.168.27.25516-bit = 255.255.0.0 Filters from 192.168.0.0 to 192.168.255.255 8-bit = 255.0.0.0 Filters from 192.0.0.0 to 192.255.255.255
• Port The Port field determines the port or the range of ports that the Policy applies to. A port is used for specifying where a logical connection can be made between the client and server software programs. For example, port 80 is the HTTP port and port 23 is the telnet port.
• Protocol The Protocol field specifies whether the rule filters communication using TCP, UDP, ICMP or all three protocols. A protocol is a standardized form of communication between network devices.
108

Administrator Site
Modifying an IP filtering rule
To modify an IP filtering rule:
1. On the Administrator Site screen, click Control Panel on the left.
2. Click IP Firewall at the top. The IP Filtering Rule List table appears.
3. In the list, locate the filtering rule that you want to modify.
4. Click the green pencil icon next to that rule. The Modify
IP Filtering Rule table appears.
5. Modify the one or all of the following fields. See the description of each field under “Adding an IP filtering rule” on page 107.
• Rule number (to change the order of the rules)
• Policy
• Source IP address
• Destination IP address
• Subnet mask
• Port
• Protocol
6. Click Confirm Modify. The UI on the screen refreshes and the IP Filtering Rule table appears with the modifications.
109

Chapter 4
Removing an IP filtering rule
To remove an IP filtering rule:
1. On the Administrator Site screen, click Control Panel on the left.
2. Click IP Firewall at the top. The IP Filtering Rule List table appears.
3. In the list, locate the filtering rule that you want to remove.
4. Click the brown trashcan icon next to that rule. A confirmation
dialog box appears, asking if you want to delete the IP filtering rule.
5. Click OK in the confirmation dialog box. The UI on the screen refreshes and the IP filtering List table appears. The deleted rule has been removed from the table.
Time
The Qube 2 Administrator can configure the correct time and date and the time zone for the Qube 2.
1. On the Administrator Site screen, click Control Panel on the left. The Service Settings table appears.
2. Click Time at the top. The Time Settings table appears.
3. Select the time and date with the pull-down menus.
4. Select the correct time zone in the Time Zone pull-down menu.
5. As an option, you can also specify the name of a Network Time Protocol (NTP) server with which the Qube 2 will synchronize its internal clock every night. Enter the host name or IP address of the NTP server. Click Synchronize Now.
You can find a list of publicly available NTP servers at:http://www.eecis.udel.edu/~mills/ntp/servers.html.
6. Click Save Changes.
110
Administrator Site
MaintenanceThe Maintenance section of the Administrator Site screen provides several Web-based utilities that facilitate the day-to-day operations of the Qube 2.
The Qube 2 Administrator can use the following utilities:
• backup
• restore
• install software
• reboot
• shutdown
To access these utilities:
1. On the Administrator Site screen, click Maintenance on the left. The File Backup table appears.
2. Choose a utility at the top. The utilities are described in the following sections.
Backup
!Caution: A backup captures data only (for example, email messages stored on the server or Web files). It does NOT back up the settings for users or groups.
As the Qube 2 Administrator, you can perform different types of backups. This is a separate function from the Legato backup feature.
!Caution: You can use Microsoft Internet Explorer 3.0 to back up a Cobalt server but not to restore a backup file. Upgrade to a later version of Internet Explorer or use a different browser software to restore the backup file.
111

Chapter 4
Manual backup
This feature allows administrators to manually back up data stored on the Qube 2. Figure 36 shows the File Backup table.
Figure 36 File Backup table
112
Administrator Site
To manually back up data stored on the Qube 2:
1. On the Maintenance screen, the Backup utility appears by default. The File Backup table is on the screen. See Figure 36.
2. In “Data to Backup,” select the type of backup:
• All server configuration, email and user files This option backs up all the server configuration files for the users and the system setup, all users’ files, all group files and all email in-boxes.
• All server configuration This option backs up all the server configuration files for the users and the administrator, as well as all the system setup information.
• All users and groups files This option backs up all the user files, all the group files and all email in-boxes.
• Files and email of user This option backs up the files and email in-box for a specific user.
Choose the user from the pull-down menu.
• Files and email of group This option backs up the files and email for a specific group.
Choose the group from the pull-down menu.
3. To back up all files or to back up files changed within a certain time frame, choose an option from the pull-down menu adjacent to “Backup files modified in the last.”
You can choose “Backup all Files,” 31 days, 14 days, 7 days, 2 days or 1 day.
4. Click Start Backup. A separate dialog pops up in which you specify and filename and path. The filename is given the extension .qub.
5. Assign a path and a file name on your computer for storing the backup data. Click Save.
The file transfer takes several seconds to several minutes. Do not interrupt or cancel the file transfer. If the file transfer fails, delete the partial back up file from your computer. If you try to restore a partial back up file, you can corrupt the data on your Qube 2.
113

Chapter 4
Scheduled backup
This feature allows administrators to schedule regular automatic backups. Figure 37 shows the Scheduled File Backup table.
Figure 37 Scheduled File Backup table
114

Administrator Site
To schedule regular, automatic backups:
1. On the Maintenance screen, the Backup utility appears by default. The File Backup table is on the screen.
2. Click Scheduled Backup. The Scheduled File Backup table appears; see Figure 37.
3. In “Data to Backup,” select the type of Backup, as described in step 2 in “Manual backup” on page 112.
4. To back up all files or to back up files changed within a certain time frame, choose an option from the pull-down menu adjacent to “Backup files modified in the last.”
You can choose “Backup all Files,” 31 days, 14 days, 7 days, 2 days or 1 day.
5. Choose the frequency of the automatic backup.
• Daily means each day at 1 a.m.
• Weekly means every Sunday morning at 1 a.m. (Saturday night going into Sunday morning)
• Monthly means on the first day of every month at 1 a.m.
6. Choose a backup method.
• FTP Server writes the backup file to an FTP server.
• NFS places the backup file on a mountable NFS resource.
• SMB Server (Windows File Sharing) places the backup file onto a directory shared from a Windows machine.
7. Enter a location for storing the backup data.
The location you specify depends in part on the backup method you select in step 6. See “Backup File Locations” below for an explanation of locations you can enter here.
8. If the backup destination associated with your method of backup requires a password for access, enter the password in this field. This field is ignored for the NFS and anonymous FTP methods. See “Backup file locations” on page 116.
9. Click Save Changes.
115

Chapter 4
Backup file locations
For a backup by FTP Server:
• A location of <username>@ftp.server.com puts the backup file in the initial login directory.
• A location of <username>@ftp.server.com/path/to/backups/ puts the backup file in the specified path on the server, using <username> to login.
For a backup by Anonymous FTP:
• For an anonymous FTP connection, the file must be put in a directory where anonymous FTP users have write access. This is generally the /incoming/ directory.
• A location of ftp.server.com/incoming places the backup file on ftp.server.com under the /incoming/ directory.
• The “Password” field should contain the password for the specified user or be left blank for anonymous logins.
For a backup by NFS Server:
• The location should be <server>:/<share> , where <server> is the NFS server and <share> is the NFS volume to mount and write to. You must have write privileges to this directory.
• The “Password” is ignored for NFS server backups.
For a backup by SMB Server (Windows File Sharing):
• The location should be <user>@\\windowspc\<share> . This mounts the volume <share> on the Windows server, using <user> as the login. The “Password” field must contain the password for <user>.
• For volumes that do not require a user, the location should be \\windowspc\share .
For All Scheduled backups:
• Ensure the target location is available and has enough disk space to hold the backup archive. Failure to do this may result in zero-length or truncated archives.
116
Administrator Site
Restore
You must restore data from the same machine on which the data was backed up. The Qube 2 Administrator can restore all the files on the Qube 2.
Note: Legato NetWorker® client software is also available on the Qube 2 to support backup and restore needs. For more information, see “Legato file backup” on page 99.
!Caution: The system restores data only (for example, email messages stored on the server or Web files). It does NOT restore users or groups to a Qube 2.
!Caution: The system does not merge the current and backed-up data. When data is restored, any changes made to files on the Qube 2 since the last backup are lost.
!Caution: You can use Microsoft Internet Explorer 3.0 to back up a Cobalt server but not to restore a backup file. Upgrade to a later version of Internet Explorer or use a different browser software to restore the backup file.
117
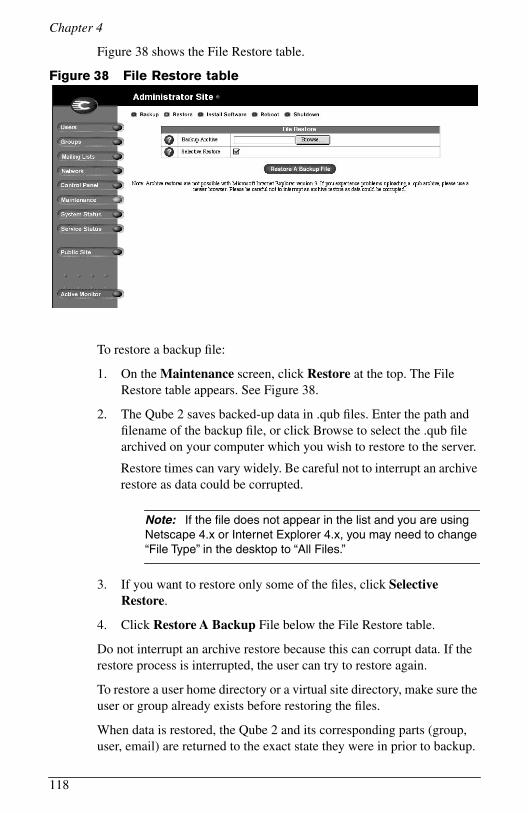
Chapter 4
Figure 38 shows the File Restore table.
Figure 38 File Restore table
To restore a backup file:
1. On the Maintenance screen, click Restore at the top. The File Restore table appears. See Figure 38.
2. The Qube 2 saves backed-up data in .qub files. Enter the path and filename of the backup file, or click Browse to select the .qub file archived on your computer which you wish to restore to the server.
Restore times can vary widely. Be careful not to interrupt an archive restore as data could be corrupted.
Note: If the file does not appear in the list and you are using Netscape 4.x or Internet Explorer 4.x, you may need to change “File Type” in the desktop to “All Files.”
3. If you want to restore only some of the files, click Selective Restore.
4. Click Restore A Backup File below the File Restore table.
Do not interrupt an archive restore because this can corrupt data. If the restore process is interrupted, the user can try to restore again.
To restore a user home directory or a virtual site directory, make sure the user or group already exists before restoring the files.
When data is restored, the Qube 2 and its corresponding parts (group, user, email) are returned to the exact state they were in prior to backup.
118

Administrator Site
Install software
You can add new software to the Qube 2 from the browser. You can install new software obtained either from the Cobalt Networks Web site or from a CD supplied by Cobalt Networks.
Figure 39 shows the Install Software table.
Figure 39 Install Software table
119
Chapter 4
To install or upgrade software from Cobalt’s Web site:
1. Through your Web browser, go to http://www.cobalt.com/support/ .
2. Download the new software to your desktop computer.
3. On the Administrator Site screen of the Qube 2, click Maintenance on the left.
4. Click Install Software at the top. The Install Software table appears; see Figure 39.
5. You can either:
• enter the path and file name of the package that you downloaded to your computer, or
• click Browse to locate the package that you downloaded to your computer. Click Open to select the package.
6. Click Install a .pkg package to automatically install or upgrade the new software on the Qube 2.
To install software from a CD:
1. Insert the CD into a computer on the same network as the Qube 2.
2. On the computer that has the CD, go to the Administrator Site screen.
3. Click Maintenance on the left.
4. Click Install Software at the top.
5. Click Browse to locate the package file on the CD.
6. Click Open to select the package file.
7. Click Install a .pkg package to automatically install or upgrade the new software on the Qube 2.
120

Administrator Site
Third-party software
The Software On The Cobalt Server table lists the various software packages that have been installed on the Qube 2, including the version of the Cobalt OS and any the third-party software. See Figure 39.
Installing third-party software
For solutions that extend the functionality of the Qube 2, visit the Online Solutions Directory on Cobalt’s Web site at http://www.cobalt.com/solutions/ .
To install third-party software, you need to create a .pkg file. On the Cobalt Networks Web site, you can find a document that explains how to create a .pkg file.
1. Through your Web browser, go to http://www.cobalt.com/support/ . The Cobalt Networks Support page appears.
2. Click Resources in the green bar at the top. The Cobalt Support Resource page appears.
3. Click How-To’s in the table.
4. Under the heading “Other Documents”, click How to create a .PKG file. An HTML file explaining how to create a .pkg file appears in the window.
Reboot
Rebooting the Qube 2 sometimes cures problems with certain services. The Active Monitor software recommends when a reboot is necessary.
To reboot the Qube 2 through your browser:
1. On the Administrator Site screen, click Maintenance on the left.
2. Click Reboot at the top. The Reboot Cobalt Server table appears with a warning that rebooting the server will make it unavailable to the network while rebooting.
3. Click Reboot.
You can also reboot the Qube 2 through its LCD console; refer to “Rebooting” on page 157 in Appendix A.
Rebooting can take as long as a few minutes.
121

Chapter 4
Shutdown
!Caution: Turning off the power switch before the Qube 2 tells you to do so can result in lost or corrupted data.
The Qube 2 can only be shut down from the LCD console located on the back of the unit. Refer to “Powering down” on page 158 in Appendix A. Shutting down may take as long as a few minutes.
System StatusThe System Status section allows the Qube 2 Administrator to monitor the memory, CPU, disk and network status, as well as the modem if it is being used. In all cases, the Qube 2 monitors the status of each of the subsystems and displays a green, yellow, red or grey circle beside each item.
The status of the system components is monitored by a Cobalt Networks utility called Active Monitor. For more information, see “Active Monitor” on page 127.
To view the status of the various system components:
1. On the Administrator Site screen, click System Status on the left. The status table displays the status of the system component.
• Green indicates correct functioning.
• Yellow indicates a potential problem.
• Red indicates that a problem exists.
• Grey indicates that a component or service is inactive or that no information is available yet.
2. The default screen displays the Memory Status table. To choose another component, click the name at the top of the screen.
3. In the Disk Status table under Disk, you can view the disk-usage statistics for the Users or Groups. Click on the hyperlink to see those statistics.
Click Back to return to the Disk Usage table.
122

Administrator Site
Figure 40 shows a sample of the disk-usage statistics for each user.
Figure 40 Disk Usage table
Memory
The Memory Status chart tells you if memory swapping is high. If you see a red light in this chart, you may want to add more memory to the Qube 2.
Central Processing Unit (CPU)
The CPU Usage chart provides a real-time update of CPU load. It indicates the number of tasks waiting to be executed. This chart helps you evaluate whether the Qube 2’s CPU is being used heavily or lightly.
Disk
The Disk Usage Summary describes the total disk space occupied by system files, by users and by groups, the amount of free disk space left and the total size of the disk. You can click on the links for the users or groups to see the disk-usage statistics for each user or group. See Figure 40.
123

Chapter 4
Network
The Network Usage chart displays the number of network packets successfully sent and received, the total number of errors when sending or receiving network packets, the number of network packets dropped after failure in sending or receiving, and the number of attempts to send several network packets at the same time (the number of collisions) on the Network 1 interface.
Modem
The Modem Status chart displays the status of the connection, the amount of time connected, the number of bytes received and the number of bytes transmitted.
Service StatusThe Service Status section allows the Qube 2 Administrator to monitor Web, email and discussion services, and the status of the file sharing services, SNMP, DNS, DHCP and telnet services. It follows the same LED conventions as the System Status section.
The status of the system services is monitored by a Cobalt Networks utility called Active Monitor. For more information, see “Active Monitor” on page 127.
To view the status of the various system services:
1. On the Administrator Site screen, click Service Status on the left. The status table displays the status of the system component.
• Green indicates correct functioning.
• Yellow indicates a potential problem.
• Red indicates that a problem exists.
• Grey indicates that a component or service is inactive or that no information is available yet.
2. The default screen displays the Web Status table. To choose another component, click the name at the top of the screen
3. The status charts for certain services include hyperlinks that provide further statistics. Click on the hyperlink to see those statistics.
Click Back to return to the previous screen.
124
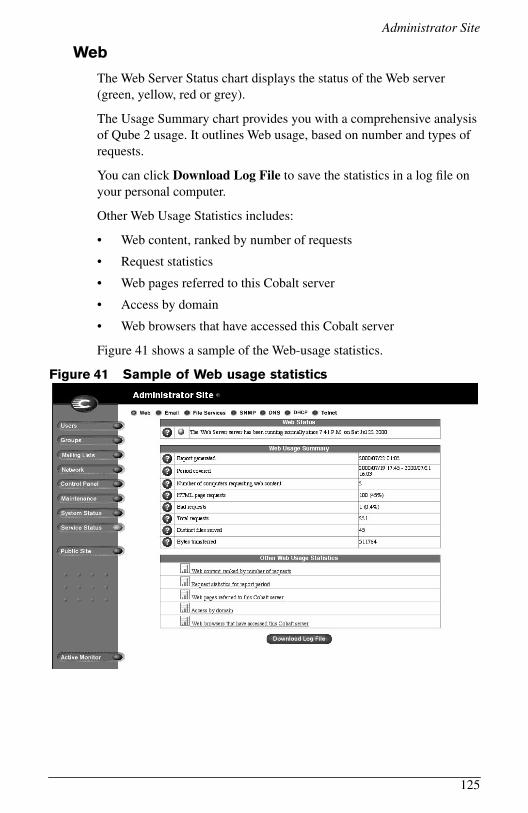
Administrator Site
Web
The Web Server Status chart displays the status of the Web server (green, yellow, red or grey).
The Usage Summary chart provides you with a comprehensive analysis of Qube 2 usage. It outlines Web usage, based on number and types of requests.
You can click Download Log File to save the statistics in a log file on your personal computer.
Other Web Usage Statistics includes:
• Web content, ranked by number of requests
• Request statistics
• Web pages referred to this Cobalt server
• Access by domain
• Web browsers that have accessed this Cobalt server
Figure 41 shows a sample of the Web-usage statistics.
Figure 41 Sample of Web usage statistics
125

Chapter 4
The Email Status chart displays the status of the Post Office Protocol 3 (POP3) server, the Internet Message Access Protocol (IMAP) server and the Simple Mail Transfer Protocol (SMTP) service.
File sharing services
The File Services chart displays the status of the File Transfer Protocol (FTP) service, the Windows File Sharing (SMB/CIFS) service, and the AppleShare service.
Simple Network Management Protocol (SNMP)
The Simple Network Management Protocol (SNMP) chart displays the operational status of the SNMP server, either normal or otherwise.
Domain Name System (DNS)
The Domain Name System (DNS) chart indicates whether DNS is active and whether it is operating properly. For more information on DNS, see Appendix D, “Domain Name System”, on page 173.
Dynamic Host Configuration Protocol (DHCP)
The Dynamic Host Configuration Protocol (DHCP) chart indicates whether DHCP is active and whether it is operating properly.
Telnet
The telnet status chart displays the operational status of the telnet server, either normal or otherwise.
126

Administrator Site
Public SiteTo move to the Public Site screen of the Qube 2, click Public Site on the left. For more information, see Chapter 5 “Public Site”.
Active Monitor The Qube 2 uses Active Monitor software. Active Monitor is a Cobalt Networks utility that runs on a Qube 2 and updates key system information every 15 minutes.
Active Monitor checks:
• the status of the Qube 2 (functioning, warning of failure, failed or inactive)
• the status of the services on the Qube 2
To access Active Monitor, click Active Monitor on the Administrator Site screen. To view the details for a system component or service, click the colored circle next to the name of the component or service.
Figure 42 shows a sample of the Active Monitor screen.
Table 1 explains the colors of the circles in Active Monitor.
127

Chapter 4
Figure 42 Active Monitor screen
Table 1 Colors and status indicators
Color Status
Green Correct functioning
Yellow Advance warning of potential problems that should be investigated by the Qube 2 Administrator (for example, low disk space)
Red Failure
Grey Inactive or information is not yet available
128

Chapter 5
Public Site
This chapter describes the functions that registered users or the Cobalt Qube 2 Administrator can perform on the Public Site of the Qube 2.
As a registered user of the Qube 2, you can:
• contact and collaborate with other users through email, mailing lists and discussions
• change your full name and password
• send and receive email, and configure your email options
• monitor the usage of your directory’s disk space
• back up, restore and transfer your files
• search for information on the Qube 2
To access the Public Site, enter the IP address of the Qube 2 or the URL http://<hostname>.<domainname>/ into your browser.
If you are logged in as the Qube 2 Administrator and are on the Administrator Site, click Public Site on the left.
The features available on the Public Site screen are described in the remainder of this chapter.
• home
• view users
• view groups
• search
• network
• personal profile
• programs
• administrator site
129

Chapter 5
Figure 43 shows the Public Site screen.
Figure 43 Public Site screen
Home When you first access the Qube 2, the home page on the Public Site screen appears. The default home page contains general information about the Qube 2.
The buttons on the left provide access to all the functionality of the Qube 2.
Additional help can be accessed on the Cobalt Networks Web page. For more information, see “Cobalt logo badge” on page 11.
The Qube 2 Administrator or any member of the Home group can easily replace the default page with a personalized page. (For more information on groups, see “Groups” on page 69.)
To replace the default page, transfer your new content to the directory /home/groups/home/ . After doing so, the Public Site screen can be accessed with the URL http://<hostname>/cobalt/ .
130
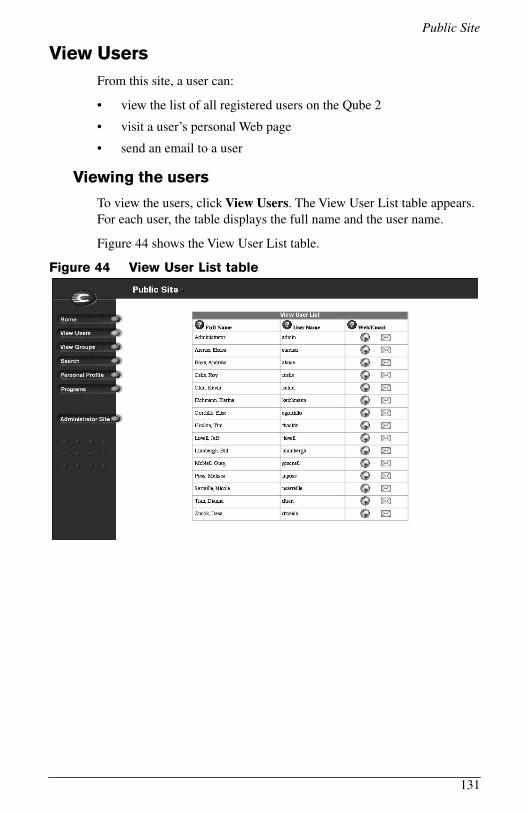
Public Site
View Users From this site, a user can:
• view the list of all registered users on the Qube 2
• visit a user’s personal Web page
• send an email to a user
Viewing the users
To view the users, click View Users. The View User List table appears. For each user, the table displays the full name and the user name.
Figure 44 shows the View User List table.
Figure 44 View User List table
131
Chapter 5
Viewing a user’s personal Web page
To view a user’s personal Web page:
1. Click View Users. The View User List table appears. See Figure 44.
2. Click the green globe icon next to that user. The Web page for
the user appears in the browser window. If the user has not created
Web-page content, a default Web page appears.
3. To return to the View User List table, click the Back button on your Web browser.
Sending an email to another user
To send an email to another user:
1. Click View Users. The View User List table appears. See Figure 44.
2. Click the green envelope icon next to that user. This action
launches the email client on your personal computer. An email
message window appears, addressed to the user.
3. To return to the View User List table, click the Back button on your Web browser.
Creating Web content
To create Web content on the Qube 2, see “Developing Web pages” on page 38.
132

Public Site
View Groups From this site, a user can:
• view the list of all of the groups on the Qube 2
• visit a group’s public Web page (available to all registered users on the Qube 2)
• visit a group’s private Web page (available only to the members of the group)
• send an email to a group
• post a message to a discussion board for the group
Viewing the groups
To view the groups, click View Groups. The View Group List table appears. For each group, the table displays the group name and the user names of the members of the group.
Figure 45 shows the View Group List table.
Figure 45 View Group List table
133

Chapter 5
Viewing a group’s public Web page
To view a group’s public Web page:
1. Click View Groups. The View Group List table appears. See Figure 45.
2. Click the green globe icon next to that group. The public Web
page is open to all registered users on the Qube 2.
The public Web page for the group appears in the browser window. If no Web-page content has been created, a default Web page appears.
3. To return to the View Group List table, click the Back button on your Web browser.
Viewing a group’s private Web page
To view a group’s private Web page:
1. Click View Groups. The View Group List table appears. See Figure 45.
2. Click the green globe with padlock icon next to that group.
The private Web page is restricted to members of the group only. An
authentication dialog appears.
3. Enter your user name and password.
4. Click OK. The private Web page for the group appears in the browser window. If no Web-page content has been created, a default Web page appears.
5. To return to the View Group List table, click the Back button on your Web browser.
Sending an email to a group
To send an email to a group:
1. Click View Groups. The View Group List table appears. See Figure 45.
2. Click the green envelope icon next to that group. This action
launches the email client on your personal computer. An email
message window appears, addressed to the group.
3. To return to the View Group List table, click the Back button on your Web browser.
134

Public Site
Posting a message to a discussion thread
For a detailed explanation of discussion threads, see “Working in collaboration through discussions” on page 135.
Creating Web content
To create Web content on the Qube 2, see “Developing Web pages” on page 38.
Working in collaboration through discussions Threaded discussions allow groups of individuals to develop and document a body of information on a particular topic. The discussion feature lets users collaborate without having to meet face-to-face. This feature is especially useful for individuals who are geographically dispersed or who otherwise find it difficult to meet.
Another key feature is the self-documenting nature of a threaded discussion: users can review postings to understand the who, what and why of a particular topic.
Rules of discussions
Discussions are group-based and are automatically created for each group. Only members of a particular group are allowed to participate in discussions belonging to that group. These discussions are private; individuals outside the group are not allowed to access the group’s discussions.
Note: The Qube 2 Administrator is automatically a member of each group on the Qube 2.
Description of a discussion thread
When you join a discussion thread or start a new discussion, a separate browser window opens. The title bar of the new browser window displays “Discussion Group - <groupname>”. The discussion group window contains three frames:
• The top frame holds the command buttons and the column headings.
• The middle frame displays the messages (if any) as hypertext links in a “nested” arrangement (replies are indented from the original message).
• The bottom frame displays the message of the highlighted message.
135
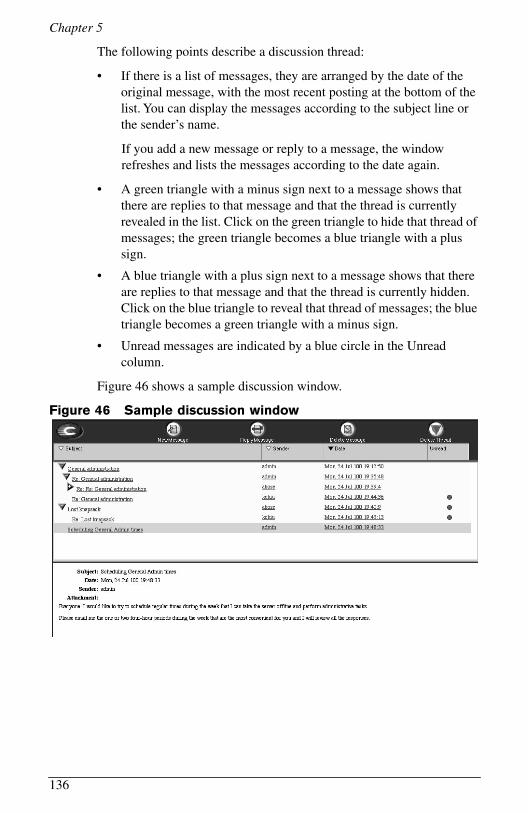
Chapter 5
The following points describe a discussion thread:
• If there is a list of messages, they are arranged by the date of the original message, with the most recent posting at the bottom of the list. You can display the messages according to the subject line or the sender’s name.
If you add a new message or reply to a message, the window refreshes and lists the messages according to the date again.
• A green triangle with a minus sign next to a message shows that there are replies to that message and that the thread is currently revealed in the list. Click on the green triangle to hide that thread of messages; the green triangle becomes a blue triangle with a plus sign.
• A blue triangle with a plus sign next to a message shows that there are replies to that message and that the thread is currently hidden. Click on the blue triangle to reveal that thread of messages; the blue triangle becomes a green triangle with a minus sign.
• Unread messages are indicated by a blue circle in the Unread column.
Figure 46 shows a sample discussion window.
Figure 46 Sample discussion window
136
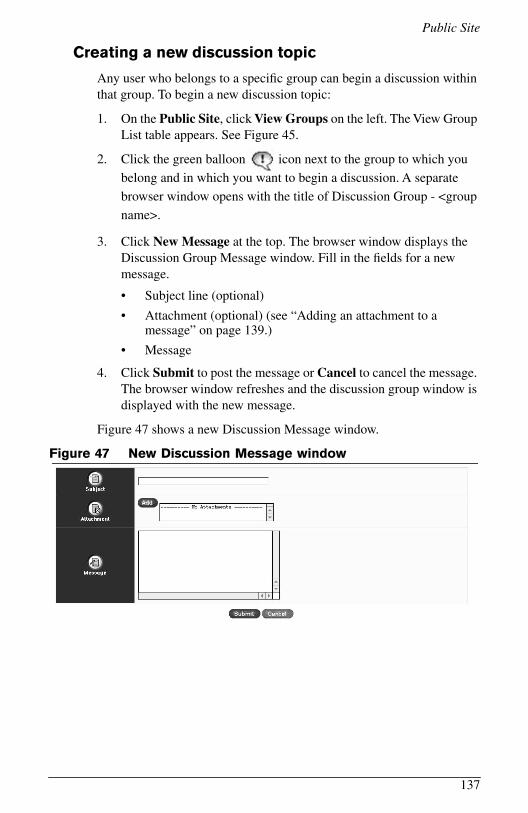
Public Site
Creating a new discussion topic
Any user who belongs to a specific group can begin a discussion within that group. To begin a new discussion topic:
1. On the Public Site, click View Groups on the left. The View Group List table appears. See Figure 45.
2. Click the green balloon icon next to the group to which you
belong and in which you want to begin a discussion. A separate
browser window opens with the title of Discussion Group - <group
name>.
3. Click New Message at the top. The browser window displays the Discussion Group Message window. Fill in the fields for a new message.
• Subject line (optional)
• Attachment (optional) (see “Adding an attachment to a message” on page 139.)
• Message
4. Click Submit to post the message or Cancel to cancel the message. The browser window refreshes and the discussion group window is displayed with the new message.
Figure 47 shows a new Discussion Message window.
Figure 47 New Discussion Message window
137

Chapter 5
Joining an existing discussion
1. On the Public Site, click View Groups on the left. The View Group List table appears. See Figure 45.
2. Click the green balloon icon next to the group to which you
belong. A separate browser window opens for the discussion group.
3. If there are already entries for a discussion group, they appear as hypertext links in a “nested” arrangement (replies are indented from the original message). See the sample discussion in Figure 46.
!Caution: No one person in a group controls the content of the discussion thread. Any member of a group can add a new message, reply to a message or delete any of the existing messages.
Viewing an existing message
To view the body of a particular message, click the subject line of that message. The body of the message appears in the bottom frame of the discussion group window.
Changing the order of the messages
Next to each column heading is a small triangle. The black triangle indicates the column according to which the list of messages is sorted.
To change the order of the postings in a thread, click the white triangle next to the column heading according to which you want to sort the list of messages. The discussion group window refreshes according to the new sort order.
138

Public Site
Adding a new message
To add a new message:
1. Click New Message at the top. The browser window displays the Discussion Group Message window. Fill in the fields for a new message.
• Subject line (optional)
• Attachment (optional) (see “Adding an attachment to a message” on page 139.)
• Message
2. Click Submit to post the message or Cancel to cancel the message. The browser window refreshes and the discussion group window is displayed with the new message.
Adding an attachment to a message
To add an attachment to a message:
1. In the Discussion Group Message window, click Add in the Attachment frame. Again, a separate browser window opens and offers a list of files in your personal directory on the Qube 2.
2. If there is a folder in the list, click on the folder to display its contents.
3. Click on the file you want to attach to highlight it.
4. Click Open. The browser window closes and the file appears in the Add field of the Discussion Group Message screen. To attach another file, return to Step 1.
5. Click Submit to post the message. The browser window refreshes and the discussion group window is displayed with the new message.
139
Chapter 5
Replying to a message
The reply appears indented in the list, under the original message to which it is replying, in a “nested” arrangement. The content of the original message is indented within the reply message.
To reply to a message:
1. Click Reply Message at the top. The browser window displays the Discussion Group Message window.
2. Fill in the fields for a new message.
• Subject line (optional)
• Attachment (optional) (see “Adding an attachment to a message” on page 139.)
• Message
3. Click Submit to post the message or Cancel to cancel the message. The browser window refreshes and the discussion group window is displayed with the new message.
Deleting a message
To delete a message from the list:
1. Click once on the message to highlight it.
2. Click Delete Message at the top. A confirmation dialog appears, asking if you want to delete the message.
3. Click OK. If there are “nested” replies to this message, they are NOT deleted; they remain in the list.
Deleting a discussion thread
To delete a thread of messages from the list:
1. Click once to highlight the message at the top of the thread that you want to delete. You can delete a revealed or hidden thread.
2. Click Delete Thread at the top. A confirmation dialog appears, asking if you want to delete the message and all replies to it.
3. Click OK. The top message and all replies to it are deleted.
Exiting a discussion
To exit a discussion, close the browser window. You do not need to sign out of the discussion.
140
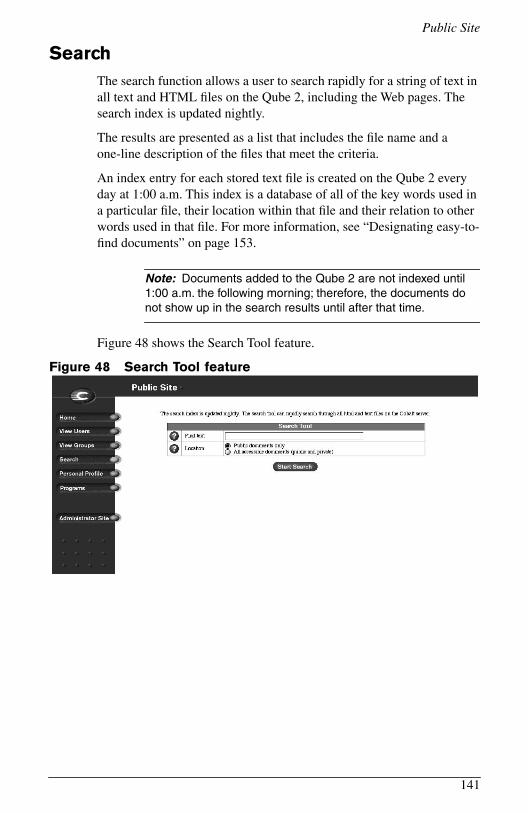
Public Site
Search The search function allows a user to search rapidly for a string of text in all text and HTML files on the Qube 2, including the Web pages. The search index is updated nightly.
The results are presented as a list that includes the file name and a one-line description of the files that meet the criteria.
An index entry for each stored text file is created on the Qube 2 every day at 1:00 a.m. This index is a database of all of the key words used in a particular file, their location within that file and their relation to other words used in that file. For more information, see “Designating easy-to-find documents” on page 153.
Note: Documents added to the Qube 2 are not indexed until 1:00 a.m. the following morning; therefore, the documents do not show up in the search results until after that time.
Figure 48 shows the Search Tool feature.
Figure 48 Search Tool feature
141

Chapter 5
Performing a search
To search for a string of text:
1. Click Search on the left. The Search Tool table appears. See Figure 48.
2. In the Find Text field, enter the string for which you want to search. The string must contain at least three characters; the search is not case-sensitive.
3. You can search for a string in public documents only, or in both public and private documents belonging to you or your groups.
• Public documents only — allows any user (registered or unregistered) to search all text files, including HTML files stored on all of the public directories on the Qube 2. This search includes all of the user and group public directories, but does not include any discussion groups.
• All accessible documents — allows an authenticated user (a registered user who has an authenticated password) to search for text files in all of the public directories and in all of the private user and group directories to which that user has access privileges, including all discussion groups to which the user belongs.
Note: If you select “All accessible documents” and you have not been authenticated, a dialog box prompts you for a user name and password.
Click the radio button for Public Documents only or All Accessible Documents.
4. Click Start Search. After a few minutes, the search results appear.
142

Public Site
Figure 49 shows the results of a sample search on the word “cobalt”.
Figure 49 Results of a sample search
If there is no match for your search, a message appears stating that no documents match your query.
If there is a match for your search, the results appear in a numbered list and show the following information for each match (see Figure 49):
• title of the document (a hypertext link)
• the location of the document, shown as a URL (a hypertext link)
• a summary of the context in which the search string was found
If you click on the hypertext link, your browser displays the file containing the search string.
Note: The match can be found in the HTML code for a Web site so the search string may not appear on screen when you click on the hypertext link for a match.
143

Chapter 5
Interpreting search results
The search results are presented as a list of files that meet the search criteria.
If the target file is a standard text file, then the file name, path name and the line containing the first occurrence of the search text are displayed. To see the contents of the file in a standard browser window, click the file name.
If the target file is an HTML file, then the title of the page, the URL for the page and the first occurrence of the line within the file are listed. To view the formatted HTML page in the browser window, click the file.
Personal ProfileYou can manage your Qube 2 directory using any standard Web browser.
1. Enter the URL http://<IP address>/cobalt/ . The Public Site screen appears.
2. Click Personal Profile on the left side of the screen.
3. Enter your username and password, if prompted.
Figure 50 shows the Personal Profile screen. The features accessible from this screen are:
• modify user
• usage data
• backup
• restore
• Page Builder
These features are described in the sections that follow.
144

Public Site
Figure 50 Personal Profile screen
Modify user
The Modify User section allows you to change your full name and password. To change these settings:
1. On the Personal Profile screen, click Modify User at the top. The Modify User table appears. See Figure 50.
2. Change the settings in the table.
3. Click Confirm Modify.
The Qube 2 supports email for individuals and groups. By default, an email account is created on the Qube 2 for each registered user.
An email message sent to a group address is distributed automatically to the email address of each individual who belongs to that group. Group mailing lists can also include email addresses that are not within the domain of the Qube 2.
You can forward your incoming messages to another email address and create an automatic vacation reply. These options are described in the following two sections.
To set your email options:
1. On the Personal Profile screen, click Email at the top. The Email Settings table appears.
2. Select the email options in the table. The following paragraphs explain these options.
3. Click Save Changes.
145

Chapter 5
Forward email to
You can have your Qube 2 email forwarded to another email address. Enter the destination address in the “Forward Email To” field in the Email Settings table.
Automatic vacation reply
You can create a vacation-reply message that is automatically sent to each person who sends you email. This feature is useful when you know that you will not be reading or responding to incoming email messages for a period of time.
A vacation-reply message is sent only once per week to each sender.
To set up a vacation reply:
1. On the Personal Profile screen, click Email at the top. The Email Settings table appears.
2. Click the check box “Vacation/Autoresponder Email Reply” to activate the option.
3. In the scrolling field, type the text of the message you want to send to users while you are away.
4. Click Save Changes.
Forwarding incoming email to several recipients
If you will not be accessing your email account for a period of time and want to forward incoming email messages to several recipients, the Qube 2 Administrator can create a mailing list for you. You then enter the name of the mailing list in the “Forward Email To” field in your Email Settings table.
For more information, see “Forwarding incoming email to several recipients” on page 78.
Usage data
The Usage Data section of the Personal Profile screen displays a Disk Usage table showing:
• the total disk space occupied by your files
• the amount of available disk space
• your total disk space allocation
To access this table, on the Personal Profile screen, click Usage Data at the top. The Disk Usage table appears.
146

Public Site
Backup
You can back up your files located in your home directory.
!Caution: A backup captures data only (for example, email messages stored on the server or Web files). It does NOT back up the settings for Web sites or users.
!Caution: Once a file transfer begins, do NOT interrupt or cancel the backup process. If you do, or if the file transfer fails for any other reason, you must delete the partial backup file stored on your personal computer and try again. If you try to use a partial file to restore data to the Qube 2, you risk corrupting the data already stored on the server.
To back up your files:
1. On the Personal Profile screen, click Backup at the top. The File Backup window appears.
2. Click Backup My Home Directory. A prompt appears, asking you to save a file containing all your backup data.
147

Chapter 5
Restore
You can restore to your home directory a .qub backup file that you created previously. This restores all files and subdirectories.
!Caution: The system restores data only (for example, email messages stored on the server or Web files). It does NOT restore Web sites or site users to a Qube 2.
!Caution: The system does not merge the current and backed up data. When data is restored, any changes made to files on the Qube 2 since the last backup are lost.
To restore the backed-up files from your local disk to your home directory on the Qube 2:
1. On the Personal Profile screen, click Restore at the top. The File Restore table appears.
2. In the Backup Archive field, enter the path and file name for the .qub backup file on your personal computer. If you do not know the path, click Browse to locate the backup file.
3. Click on the file to highlight it.
4. Click Open. The file appears in the Backup Archive field
5. If you want to restore only some of the files, check Selective Restore.
6. Click Restore a Backup File below the File Restore table.
148
Public Site
Page Builder
The Qube 2 includes Page Builder, an interactive web development tool that allows you to create Web pages without having to learn how to write HTML scripts.
Accessing the Page Builder tool
There are two ways to access the Page Builder tool. The first method is as follows.
1. On the Personal Profile screen, click Page Builder at the top. The Page Builder tool appears in the browser window. A blank window opens within the Page Builder tool.
2. To start using the tool, you first need to save a new HTML file. On the left, select New from the pull-down menu.
3. Enter the name of the file in the File Name field.
4. Click New.
5. The left column now displays a number tasks that you can perform on the new file. For more details, see “Page Builder window” on page 150.
You can also click Instructions on the left to access the online help window.
6. To exit the Page Builder tool, click either Exit (to exit without saving your changes) or Save and Exit (to save your changes before exiting). The Public Site screen appears.
149

Chapter 5
The second method is as follows.
1. On the Public Site screen, click View Users. The View User List table appears.
2. Click the green globe icon next to the user’s name. A default
home page appears with the title “Welcome to <user>’s Home
Page”.
3. Click Edit This Page at the bottom. An authentication dialog appears.
4. Enter your user name and password.
5. Click OK. The Page Builder window opens.
6. The left column displays a number tasks that you can perform on the default home page file. For more details, see “Page Builder window” on page 150.
You can also click Instructions on the left to access the online help window.
7. To exit the Page Builder tool, click either Exit (to exit without saving your changes) or Save and Exit (to save your changes before exiting). The Public Site screen appears.
Page Builder window
There are four sections to the Page Builder window. See Figure 51.
• The left hand column is the Control Panel. In this section, you can perform file activities, select existing blocks of your Web page to edit, insert new blocks into your Web page or change the color of your Web page. You can also access online instructions for using the Page Builder tool.
• The top window to the right of the Control Panel is the Build window. This window displays the Web page as it is being built.
• Below the Build window is the Edit window. You can view and edit the details of a particular block of your Web page in the Edit window.
• Below the Edit window is the Help window which displays help
messages when you click on the Active Assist question mark icons.
150

Public Site
Once you are in the Page Builder tool, you can access the online help window by clicking Instructions in the Control Panel column.
Figure 51 shows the Page Builder window for a user’s default home page.
Figure 51 Page Builder window
Programs The Qube 2 is shipped with the InfoPlace Document Organizer pre-loaded. The Qube 2 Administrator can also install software programs on the Qube 2 server.
Click Programs on the left. A Program List table appears. This tables lists all of the programs installed on the Cobalt server.
To access a program, click on the name (shown as a hypertext link).
Managing documents The InfoPlace Document Organizer allows users to store information— documents, images, graphics, multimedia files and URLs—on the Qube 2 in such a way that other users can find it quickly. The InfoPlace Document Organizer is entirely Web-based; you do not have to leave your browser to use it.
151
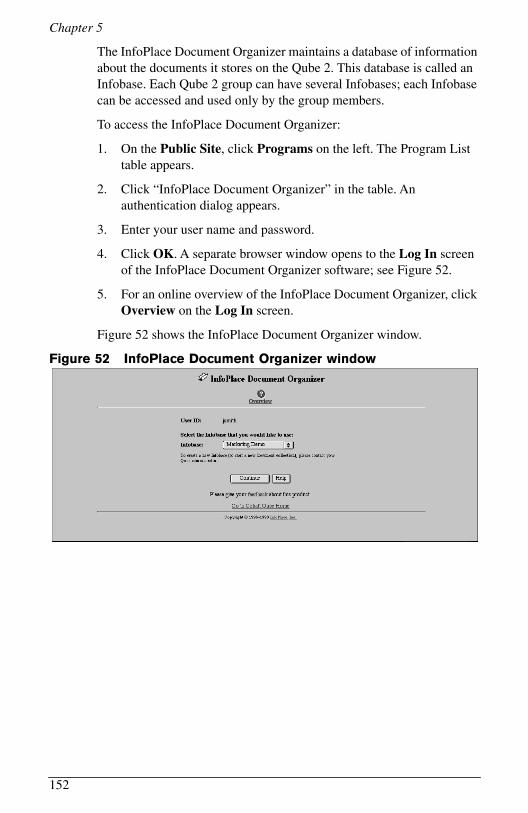
Chapter 5
The InfoPlace Document Organizer maintains a database of information about the documents it stores on the Qube 2. This database is called an Infobase. Each Qube 2 group can have several Infobases; each Infobase can be accessed and used only by the group members.
To access the InfoPlace Document Organizer:
1. On the Public Site, click Programs on the left. The Program List table appears.
2. Click “InfoPlace Document Organizer” in the table. An authentication dialog appears.
3. Enter your user name and password.
4. Click OK. A separate browser window opens to the Log In screen of the InfoPlace Document Organizer software; see Figure 52.
5. For an online overview of the InfoPlace Document Organizer, click Overview on the Log In screen.
Figure 52 shows the InfoPlace Document Organizer window.
Figure 52 InfoPlace Document Organizer window
152
Public Site
Using the Infoplace Document Organizer
The Qube 2 Administrator can create an Infobase for any group. Contact your Qube 2 Administrator. For more information, see “Creating a new InfoBase” on page 53.
Note: When you logging in to the InfoPlace Document Organizer, you can select the Infobase labeled “Demo” in order to try moving files to the Qube 2 and finding documents that have already been stored using the Document Organizer.
Logging in to an InfoBase
To log in to a particular InfoBase:
1. From the Log In screen of the InfoPlace Document Organizer, select the InfoBase from the pull-down menu.
2. Click Continue. The InfoBase appears in the window.
Accessing online help
Online help for the InfoPlace Document Organizer is available from two sources.
• From the Log In screen, select Overview to get a summary of the capabilities of the InfoPlace Document Organizer; this summary appears in a separate browser window.
• Once you have logged in to an Infobase, you can get help on
specific menu items by clicking on the Active Assist question mark
icon at the top of the page. This action opens a separate
browser window displaying the summary of the capabilities of the
InfoPlace Document Organizer.
Designating easy-to-find documents
When you place a new document on the Qube 2 through the InfoPlace Document Organizer, it prompts you for pertinent document information: the author of the document, creation date, modification date, title, type, key words and document summary.
The document information is captured in a record that describes the properties of a given document. Other members of the group can search for the document based on the properties stored in the Infobase records. See “Search” on page 141.
153

Chapter 5
Finding specific documents
You can find documents based on specific criteria. For example, you can ask the InfoPlace Document Organizer to find all of the documents authored by “Bill Lumbergh” and labeled “Competitive Analysis.”
The InfoPlace Document Organizer finds all of the documents within its Infobase that meet both of the criteria and presents the results to you as a list of URLs. From the browser, you have the option of checking the properties of each of these URLs.
You can also click on one of the URLs, download the file to your computer and open the file in its original application, as long as you have that application software.
Administrator Site If you are the Qube 2 Administrator, you can access the Administrator Site screen from the Public Site screen.
Click Administrator on the left. If you are not already logged in as the administrator, you are prompted for the Qube 2 Administrator user name and password.
For more information on the Administrator Site screen, see Chapter 4, “Administrator Site”.
154
Appendix A
Using the LCD console
During startup, the LCD screen on the back of the Cobalt Qube 2 displays status information about the boot process itself.
When setting up the Qube 2, you use the LCD console to enter network configuration information for the Qube 2.
Once the Qube 2 is running, the LCD console serves several purposes. Through the LCD console, you can:
• change network configuration information, which is useful if you change the location of the Qube 2.
• reboot the unit, which restarts the entire system.
• power down the unit in a way that allows the Qube 2 to close all open files and minimizes startup time the next time the Qube 2 is powered on.
!Caution: It is important to follow the proper power-down procedure before turning off the Qube 2. Refer to “Powering down” on page 158.
You access each of these functions by holding down the button
on the LCD console for approximately two seconds. This action causes
the LCD screen to enter its function mode. Press the button
until the function you want appears on the LCD screen. To cancel the
LCD function mode, select the EXIT function when it appears on the
screen. Press the button and select YES.
Select
Select
Enter
155
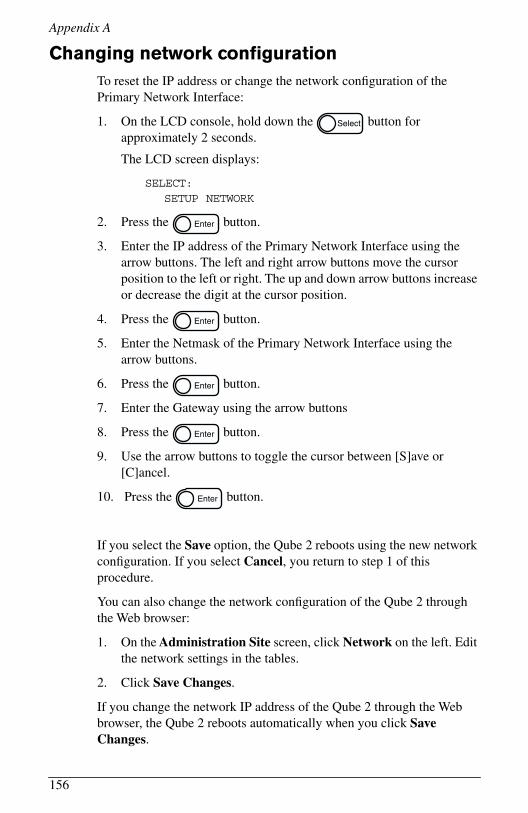
Appendix A
Changing network configuration To reset the IP address or change the network configuration of the Primary Network Interface:
1. On the LCD console, hold down the button for approximately 2 seconds.
The LCD screen displays:
SELECT:SETUP NETWORK
2. Press the button.
3. Enter the IP address of the Primary Network Interface using the arrow buttons. The left and right arrow buttons move the cursor position to the left or right. The up and down arrow buttons increase or decrease the digit at the cursor position.
4. Press the button.
5. Enter the Netmask of the Primary Network Interface using the arrow buttons.
6. Press the button.
7. Enter the Gateway using the arrow buttons
8. Press the button.
9. Use the arrow buttons to toggle the cursor between [S]ave or [C]ancel.
10. Press the button.
If you select the Save option, the Qube 2 reboots using the new network configuration. If you select Cancel, you return to step 1 of this procedure.
You can also change the network configuration of the Qube 2 through the Web browser:
1. On the Administration Site screen, click Network on the left. Edit the network settings in the tables.
2. Click Save Changes.
If you change the network IP address of the Qube 2 through the Web browser, the Qube 2 reboots automatically when you click Save Changes.
Select
Enter
Enter
Enter
Enter
Enter
156

Using the LCD console
Rebooting To reboot the Qube 2 through the LCD console:
1. On the LCD console, hold down the button for approximately 2 seconds.
The LCD screen displays:
SELECT:SETUP NETWORK
2. Press the button until REBOOT appears in the LCD screen:
SELECT:REBOOT
3. Press the Enter button.
4. Use the arrow buttons to toggle the cursor between [Y] and [N]. Select [Y] to reboot the system.
5. Press the button.
You can also reboot the Qube 2 through the Web browser:
1. On the Administration Site screen, click Maintenance on the left. The tables for the scheduled backup appears.
2. Click Reboot at the top.
A warning box appears, stating that rebooting the Cobalt server will make it unavailable to the network for a few minutes.
3. Click Reboot.
Select
Select
Enter
157

Appendix A
Powering down
!Caution: To prevent the potential loss of data, it is important to follow the proper power-down procedure before turning off the Qube 2.
To power down the Qube 2:
1. On the LCD console, press and hold down the button for approximately 2 seconds.
The LCD screen displays:
SELECT:SETUP NETWORK
2. Press the button until POWER DOWN appears in the
LCD screen:
SELECT:POWER DOWN
3. Press the button.
4. Use the arrow buttons to toggle the cursor between [Y] and [N]. Select [Y] to power down the system.
The LCD screen displays:
PLEASE SWITCHPOWER OFF NOW
5. Press the On/Off button on the back panel to turn off the Qube 2.
Select
Select
Enter
158
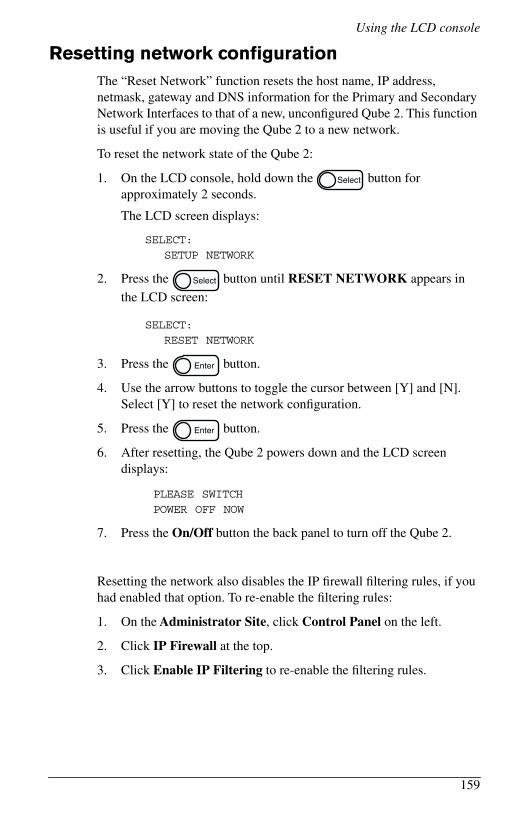
Using the LCD console
Resetting network configurationThe “Reset Network” function resets the host name, IP address, netmask, gateway and DNS information for the Primary and Secondary Network Interfaces to that of a new, unconfigured Qube 2. This function is useful if you are moving the Qube 2 to a new network.
To reset the network state of the Qube 2:
1. On the LCD console, hold down the button for approximately 2 seconds.
The LCD screen displays:
SELECT:SETUP NETWORK
2. Press the button until RESET NETWORK appears in
the LCD screen:
SELECT:RESET NETWORK
3. Press the button.
4. Use the arrow buttons to toggle the cursor between [Y] and [N]. Select [Y] to reset the network configuration.
5. Press the button.
6. After resetting, the Qube 2 powers down and the LCD screen displays:
PLEASE SWITCH POWER OFF NOW
7. Press the On/Off button the back panel to turn off the Qube 2.
Resetting the network also disables the IP firewall filtering rules, if you had enabled that option. To re-enable the filtering rules:
1. On the Administrator Site, click Control Panel on the left.
2. Click IP Firewall at the top.
3. Click Enable IP Filtering to re-enable the filtering rules.
Select
Select
Enter
Enter
159
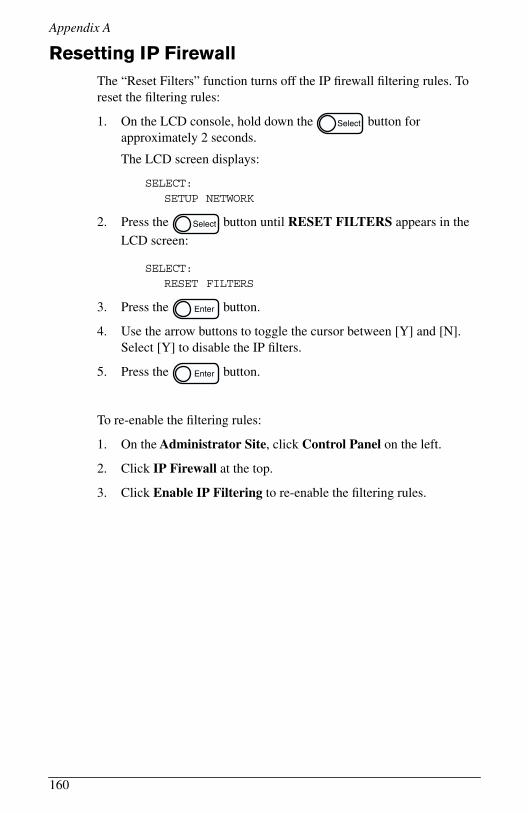
Appendix A
Resetting IP Firewall The “Reset Filters” function turns off the IP firewall filtering rules. To reset the filtering rules:
1. On the LCD console, hold down the button for approximately 2 seconds.
The LCD screen displays:
SELECT:SETUP NETWORK
2. Press the button until RESET FILTERS appears in the
LCD screen:
SELECT:RESET FILTERS
3. Press the button.
4. Use the arrow buttons to toggle the cursor between [Y] and [N]. Select [Y] to disable the IP filters.
5. Press the button.
To re-enable the filtering rules:
1. On the Administrator Site, click Control Panel on the left.
2. Click IP Firewall at the top.
3. Click Enable IP Filtering to re-enable the filtering rules.
Select
Select
Enter
Enter
160
Appendix B
Product Specifications
Technical Data for the Qube 2
Hardware
The Qube 2 has the following hardware components. See http://www.cobalt.com for the most up-to-date information on the hardware specifications.
• 64-bit superscalar RISC controller
• 16-MB, 32-MB or 64-MB DRAM, packaged in Single In-Line Memory Modules (SIMMs) (60 ns, 72 pin, EDO, 3.3 v)
• Possible to upgrade to a maximum of 256-MB DRAM (two 128-MB modules)
• Ultra ATA hard drive
• Two 10/100 BaseTX ethernet network interfaces
• PCI slot for expansion
• LCD console for easy setup and administration
• High-speed serial port
Software
The Qube 2 has the following software features.
Features
• Linux 2.0 multitasking operating system
• Apache 1.3 Web server, HTTP /1.1 compliant
• Common gateway interface (CGI) support
• Perl 5.0 scripting
• FrontPage98 and FrontPage 2000 Server Extensions 3.0
• Email protocol support: Simple Mail Transfer Protocol (SMTP), Internet Message Access Protocol (IMAP4), Post Office Protocol (POP3)
• File transfer protocol (FTP) support
161

Appendix B
• Server Message Block (SMB)/CIFS
• AppleShare (and AppleShare over IP)
• The Glimpse search engine
• Domain Name System (DNS) server: Berkeley Internet Name Domain (BIND)
• Legato Networker client
• InfoPlace Document Organizer
System management
• Browser-based Setup Wizard
• Browser-based Qube 2 administration
• Online Active Assist real-time help
• Active Monitor maintenance agents
• Advanced management using telnet
• Text and HTML indexing and searching
• Private discussion groups
• Browser-based HTML editor
• Browser-based backup and restore utility
• Browser-based software upgrade
Physical data
The Qube 2 has the following physical characteristics.
• Dimensions: 7.25 in. x 7.25 in. x 7.75 in. (18.4 cm x 18.4 cm x 19.7 cm)
• Weight: 6.25 lbs. (2.8 kg)
• Power requirements: Input rating 100-240 V, 50/60 Hz
• Power consumption: 25 watts
• Operating environment:
39oF to 108oF (5oC to 40oC)
10% to 80% humidity (non-condensing)
• Non-operating environment:
14oF to 122oF (-10oC to 50oC)
5% to 93% humidity (non-condensing)
• Light-emitting diodes (LEDs): Power, Network Activity, Link
162
Product Specifications
Regulatory approvals• CISPR 22B
• VCCI-B
• UL
• C-UL
• TUV
• CE
Upgrading your Qube 2 Before you purchase a component to add to the Qube 2, ensure that the component fits into the allocated space:
• The SIMM modules must be less than 0.4 inches (10.1 mm) thick.
• The PCI card must be less than 5.5 inches (139 mm) long.
If you have 128 MB of memory installed, the second memory slot (slot 2) is empty in the Qube 2. If you add a memory module:
• you can have mismatched sizes of memory modules (for example, you can install a 128-MB module and a 64-MB module).
• if you have mismatched sizes of memory modules, you must install the larger module in slot 1.
If you want to add a memory module and a PCI expansion card to the Qube 2 at the same time, add the memory module first.
163
Appendix B
Opening the Qube 2
Warning: You MUST power down the Qube 2 before opening the unit.
1. Power down the Qube 2. See “Powering down” on page 158.
2. Unplug the Qube 2.
3. Remove the power cord from the rear panel of the Qube 2. The power connector is located in the bottom right corner. See Figure 2 on page 3. To remove the power cord, slide the locking sleeve back and pull the connector out.
4. Remove the four screws on the back panel to release the blue plastic housing from the sheet metal cover underneath.
5. Slide the plastic housing up.
!Caution: Pull the bottom piece out gently to get past the serial port.
6. Turn the Qube 2 upside down. Remove the two screws from the bottom to release the grey plastic skirt from the sheet metal.
7. With the Qube 2 still upside down and the rear panel facing away from you, pull up on the plastic tabs on the rear side of the plastic skirt and slide the skirt toward you.
8. Turn the Qube 2 right side up. Remove the two screws (one on each side) on the sides of the sheet metal cover.
9. Pull the sides of the sheet metal cover away from the bottom of the Qube 2 and lift the cover off. You can now access the electronics of the Qube 2.
164
Product Specifications
To add a memory module, see “Adding a memory module” on page 165.
To add a PCI expansion card, see “Adding a PCI expansion card” on page 166.
IMPORTANT: If you want to add a memory module and a PCI expansion card to the Qube 2 at the same time, add the memory module first.
Adding a memory module
Be careful not to damage components during the upgrade.
1. If a PCI expansion card is already installed, you have to remove the card before you can add the memory module. If a PCI card is not installed, go to Step 4.
2. Remove the screw holding the PCI card in place.
3. Pull the PCI card out of the connector on the input/output (I/O) board.
4. Remove the screw holding the central processing unit (CPU) card in place.
5. Pull the CPU card out of the slot on the I/O board. See Figure 53.
6. If you have 128 MB of memory installed, the second memory slot (slot 1) is empty in the Qube 2. See Figure 54.
You can have mismatched sizes of memory modules (for example, you can install a 128-MB module and a 64-MB module).
165

Appendix B
7. If you have mismatched sizes of memory modules, you must install the larger module in Slot 0. See Figure 54.
If the memory module you are adding is larger than the module currently installed, remove the current module from slot 0 and install the larger memory module. Install the smaller module in slot 1.
If the memory module you are adding is smaller than the module currently installed, install the smaller module in slot 1.
8. If a PCI expansion card had been installed, replace the PCI card in the PCI connector on the I/O board. Fasten the PCI card in place with the screw that was holding the PCI slot cover.
9. If you want to close up the Qube 2, go to “Closing the Qube 2” on page 167.
If you want to add a PCI expansion card, go to “Adding a PCI expansion card” on page 166.
Adding a PCI expansion card
Be careful not to damage components during the upgrade.
1. Remove the screw holding the PCI slot cover in place. Remove the slot cover.
2. Install the PCI card into the PCI connector on the I/O board. See Figure 53.
3. Fasten the PCI card in place with the screw that was holding the PCI slot cover. Save the PCI slot cover in case you want to remove the PCI card later.
4. Go to “Closing the Qube 2” on page 167.
166
Product Specifications
Closing the Qube 2
To close up the Qube 2, perform the steps for opening the Qube 2 in reverse order.
1. Slide the sheet metal cover over the metal frame. The edge with the wider lip faces forward (the side of with the light bar).
2. Replace the two screws (one on each side) on the sides of the sheet metal cover.
3. Turn the Qube 2 upside down. With the rear panel facing away from you, place the grey plastic skirt on the Qube 2. Align the notches in the sheet metal and slide the skirt so that it locks into place.
4. With the Qube 2 still upside down, replace the two screws in the bottom to fasten the plastic skirt to sheet metal.
5. Turn the Qube 2 right side up. Ensure that the light bar fits snugly in the groove of the grey skirt.
6. Slide the plastic housing down over the sheet metal cover.
!Caution: Pull the bottom piece out gently to get past the serial port.
7. Replace the four screws on the back panel to fasten the blue plastic housing to the sheet metal underneath.
8. Connect the power cord to the rear panel of the Qube 2. The power connector is located in the bottom right corner. Plug the power cord into a power supply and connect the network cables.
9. You can now power up the Qube 2.
167
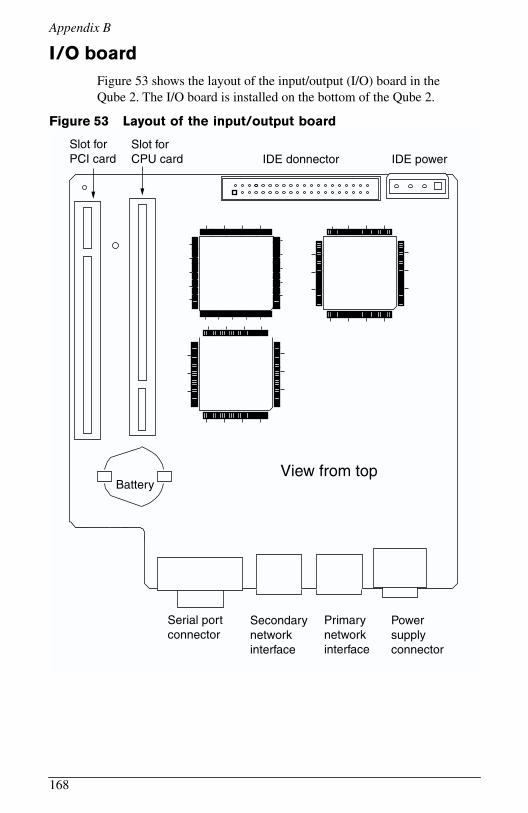
Appendix B
I/O boardFigure 53 shows the layout of the input/output (I/O) board in the Qube 2. The I/O board is installed on the bottom of the Qube 2.
Figure 53 Layout of the input/output board
Serial portconnector
Secondarynetwork interface
Primarynetwork interface
Powersupplyconnector
Battery
IDE donnector IDE powerSlot forPCI card
Slot forCPU card
View from top
168
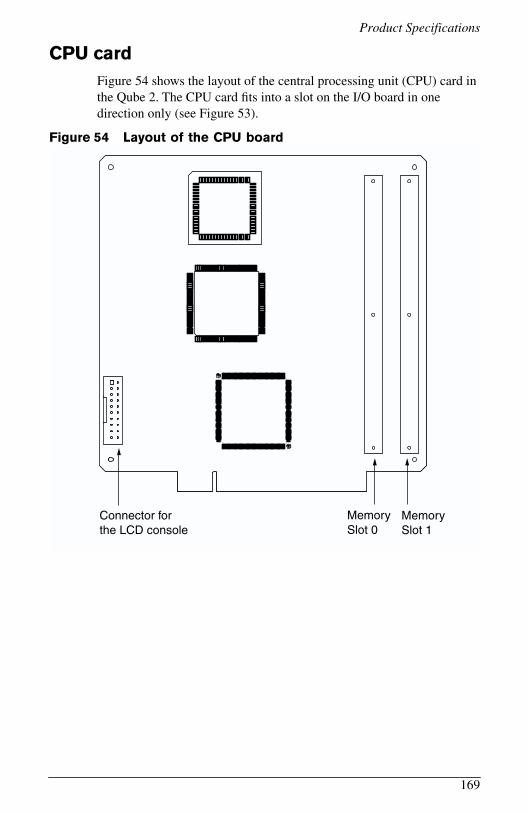
Product Specifications
CPU card Figure 54 shows the layout of the central processing unit (CPU) card in the Qube 2. The CPU card fits into a slot on the I/O board in one direction only (see Figure 53).
Figure 54 Layout of the CPU board
MemorySlot 0
MemorySlot 1
Connector forthe LCD console
169

Appendix B
170

Appendix C
Advanced Information
URL for the default Qube 2 home page Once the Qube 2 has been configured, the default home page is accessed from the directory /home/groups/home/ . This page appears when a user accesses the URL http://<hostname>/ . The home page file is “index.html”.
When the Qube 2 Administrator changes the “index.html” file to create a new home page, the default home page is replaced. Any user can continue to access the Cobalt Qube 2 home page by accessing the URL http://<hostname>/cobalt/ .
Telnet access
Warning to the Qube 2 Administrator: You can adversely affect the performance of your Qube 2 if you modify system configuration files. Check your warranty card for details.
Warning: Direct root logins are not allowed on the Qube 2. To obtain a root shell, telnet to the server and login as the user “admin”. From the command prompt, type “su -” and press enter. Enter the administrator’s password at the password prompt. Only the Qube 2 Administrator can su - to root.
Telnet access should only be used by advanced users who want to run shell scripts or use shell commands. An advanced user is someone who is proficient in the internal workings of the Unix operating system.
171
Appendix C
The Access Rights section under the Control Panel provides three options for controlling telnet access:
• You can turn telnet access off completely. This is the most secure and safest option for the Qube 2.
• You can limit telnet access to the Unix “root” user.
• You can allow telnet access for all users.
Note: The second and third options pose security risks; however, they allow the user to configure options supported by the Linux operating system that cannot be configured through the Web-based administration interface.
CGI scriptsThe Qube 2 supports common gateway interface (CGI) scripts, such as those written in Perl or C, as well as Unix shell scripts.
CGI scripts allow you to develop highly interactive, powerful Web-based applications by building server-side CGI scripts that generate Web pages in response to specific user inputs. These applications range from simple scheduling and conferencing applications to sophisticated electronic commerce solutions.
You can develop CGI scripts on your desktop machine and then transfer them to the Qube 2 through an FTP-based application that allows permission bits to be set to “Executable”.
CGI scripts must use .pl or .cgi filename extensions in order to be executed by the Web server.
Use FTP to upload .cgi and .pl files; use ASCII mode to upload CGI files. Once the file is on the Qube 2, use your FTP program to make the script executable. You can also use the telnet command:chmod 775 <filename>.cgi.
The path to Perl is /usr/bin/perl .
To set the access rights for adding CGI script files, see “Install CGI scripts” on page 104.
172
Appendix D
Domain Name System
Basic DNS The Internet uses a distributed naming system called the Domain Naming System (DNS). DNS allows us to refer to computers by host names as well as by Internet Protocol (IP) addresses.
IP addresses are hard to remember and are inconvenient to use. DNS allows us to use host names and domain names which can resolved to IP addresses. DNS servers translate host names and domain names (for example, www.cobalt.com) to an associated IP address (for example, 192.168.1.10.)
For example, Cobalt Networks has registered the domain name “cobalt.com” for use by our servers “mail.cobalt.com”, “www.cobalt.com” and others. The host names “mail” and “www” represent different servers registered in the same domain.
A domain name is a computer name suffix shared by a group of computers in the same organization. A domain name should be associated with an IP address through a Forward Lookup record. Domain names are organized in a hierarchy; this hierarchy includes your company or server name, and a country code (for example, .uk or .ca) or a top-level domain (for example, .com or .edu).
A Web site on the server is created with one IP address, one host name and one domain name that together establish the identity of that Web site on the Internet.
Each domain name requires a primary domain authority on one DNS server. A secondary DNS server acts as a backup to the primary. DNS information is configurable only on the primary server, and not on the backup server.
173

Appendix D
Enabling the DNS server feature
IMPORTANT: Always click Save Changes to DNS Server after modifying DNS records. If you do not, the changes will not take effect.
To enable the DNS server on the Qube 2:
1. On the Administrator screen, click Control Panel. The Service Settings table appears.
2. Click the check box for Domain Name System (DNS) Server to turn it on (if it is not already turned on).
3. Click Save Changes.
To set the optional DNS services, click Parameters next to the DNS service in the Service Settings table.
Configuring a primary DNS server
A primary DNS server maintains a list of name records and their associated IP addresses. This list is made available to other DNS servers if your domain is registered with your country-specific domain-naming organization. Your Internet service provider (ISP) can help you register your Internet server.
To configure a primary DNS server for your Qube 2:
1. On the Administrator screen, click Control Panel. The Service Settings table appears.
2. Click the check box for Domain Name System (DNS) Server to turn it on (if it is not already turned on).
3. Click Save Changes.
4. Click Parameters next to the DNS service in the Service Settings table. The DNS Settings table appears.
5. Click Add Forward Lookup.
6. Enter the host name and domain name you want to serve (for example, www and yourdomain.com) and enter its IP address (for example, 192.168.1.1).
7. You can enable Automatic Reverse Lookup Generation for this IP address and host name pair so that IP address/host name pairs can be resolved in both directions. Reverse lookup (PTR) records that are generated automatically assume the network mask of 255.255.255.0 (24 bits.)
174

Domain Name System
8. Click Update List.
9. Click Save Changes to DNS Server.
Specifying a reverse lookup (PTR) record
A DNS server can also resolve a computer host name to an IP address, which is known as reverse lookup. The network mask, or subnet size, is specified by an integer from 8 to 32.
See Table 2 “Network Mask Notation Conversion.” on page 178.
To specify a reverse lookup (PTR) record:
1. On the Administrator screen, click Control Panel. The Service Settings table appears.
2. Click Parameters next to the DNS service in the Service Settings table. The DNS Settings table appears.
3. Click Add Reverse Lookup.
4. Enter the host name and domain name you want to serve (for example, www and yourdomain.com) and enter its IP address (for example, 192.168.1.1) and network mask (for example, 24).
5. Click Update List.
6. Click Save Changes to DNS Server.
Specifying a mail server (MX) record
To specify a mail server (MX) record:
1. On the Administrator screen, click Control Panel. The Service Settings table appears.
2. Click Parameters next to the DNS service in the Service Settings table. The DNS Settings table appears.
3. Click Add Mail Server Lookup.
4. Enter the host name and domain name you want to serve (for example, www and yourdomain.com). Enter the name of the host that will exchange the mail for the domain entered in the second field.
You can also set the priority for mail delivery through a pull-down menu.
5. Click Update List.
6. Click Save Changes to DNS Server.
175

Appendix D
Specifying an alias (CNAME) record
This feature allows you to alias one host name to another. The target host name does not need to be a member of the local domain. For example, you can create an alias record from “news.domain.com” to “uucp.isp.net”.
!Caution: Do not use an Alias (CNAME) Record to cause a domain name to resolve to a host name.
For example, do not create an Alias (CNAME) Record for mydomain.com that resolves to www.mydomain.com. Instead, add a new Address (A) Record for mydomain.com to the IP address used by www.mydomain.com. See “Configuring a primary DNS server” on page 174.
To specify an alias (CNAME) record:
1. On the Administrator screen, click Control Panel. The Service Settings table appears.
2. Click Parameters next to the DNS service in the Service Settings table. The DNS Settings table appears.
3. Click Add Alias Lookup.
4. Enter the host name and domain name for which you want to create an alias (for example, www and yourdomain.com) and enter the host name and domain name for the target. The target host name is optional.
5. Click Update List.
6. Click Save Changes to DNS Server.
176

Domain Name System
Configuring a secondary DNS server
You can configure a secondary DNS server to provide redundant DNS service to your computers. If the primary DNS server is turned off, a computer can use the secondary DNS server with no loss of performance.
Adding a secondary name-server authority for a domain
To add a secondary name-server authority for a domain:
1. On the Administrator screen, click Control Panel. The Service Settings table appears.
2. Click Parameters next to the DNS service in the Service Settings table. The DNS Settings table appears.
3. Click Add Secondary Forward Domain.
4. In the first field, enter the name of the domain whose DNS information will be served by the IP address in the second field. In the second field, enter the IP address of the primary DNS server for the Qube 2.
5. Click Update List.
6. Click Save Changes to DNS Server.
Adding a secondary name-server authority for a network
To add secondary name-server authority for a network:
1. On the Administrator screen, click Control Panel. The Service Settings table appears.
2. Click Parameters next to the DNS service in the Service Settings table. The DNS Settings table appears.
3. Click Add Secondary Reverse Domain.
4. In the first field, enter the network (for example, 192.168.1) whose DNS information will be served by the IP address in the third field. In the second field, enter the number of bits (8-30) for the network mask. In the third field, enter the IP address of the primary DNS server for the specified network.
5. Click Update List.
6. Click Save Changes to DNS Server.
177

Appendix D
Advanced DNS
Network Mask Notation Conversion
Use Table 2 to convert between dot-quad and bit-count subnet mask and network size notations.
Table 2 Network Mask Notation Conversion.
Dot-Quad Bit count
255.0.0.0 8
255.128.0.0 9
255.192.0.0 10
255.224.0.0 11
255.240.0.0 12
255.248.0.0 13
255.252.0.0 14
255.254.0.0 15
255.255.0.0 16
255.255.128.0 17
255.255.192.0 18
255.255.224.0 19
255.255.240.0 20
255.255.248.0 21
255.255.252.0 22
255.255.254.0 23
255.255.255.0 24
255.255.255.128 25
255.255.255.192 26
255.255.255.224 27
255.255.255.240 28
255.255.255.248 29
178
Domain Name System
Quick Start Guide for Domain Name Service (DNS)
This quick start guide assumes that you have already registered your domain with InterNIC or some other registration service. If you have not, refer to the FAQ section on Cobalt’s Web site (http://www.cobalt.com/support, under the Knowledge Base link) for information on registering your domain name.
For more information on registering a Web site, visit the Internet Corporation for Assigned Names and Numbers (ICANN) at http://www.icann.org.
In the following examples, we will configure a sample domain called “mydomain.com” for Web service and e-mail service using a sample IP address 192.168.10.10.
IMPORTANT: Substitute your domain name and IP address where the sample domain name or sample IP address appears.
The recommended minimum configuration for Web and e-mail service requires these records:
• A Forward Lookup record (Address (A) Record) for mydomain.com which points to 192.168.10.10
• A Forward Lookup record (Address (A) Record) for www.mydomain.com which points to 192.168.10.10
• A Mail Server Lookup record (Mail Server (MX) Record) for mydomain.com which points to www.mydomain.com
• A Reverse Lookup record (Reverse Address (PTR) Record) for 192.168.10.10 which points to mydomain.com
179

Appendix D
These records allow anyone on the Internet to type either “mydomain.com” or “www.mydomain.com” in order to access your Web site. To set up these records, go to the Parameters section of the DNS server in the Cobalt user interface (UI).
1. On the Administrator Site screen, click Control Panel on the left. The Service Settings table appears.
2. Click the check box to enable Domain Name System (DNS) service.
3. Click Save Changes. The browser screen refreshes.
4. Click Parameters next to the DNS service in the Service Settings table.
The DNS Settings table appears, as in Figure 55.
Figure 55 DNS Settings table
180
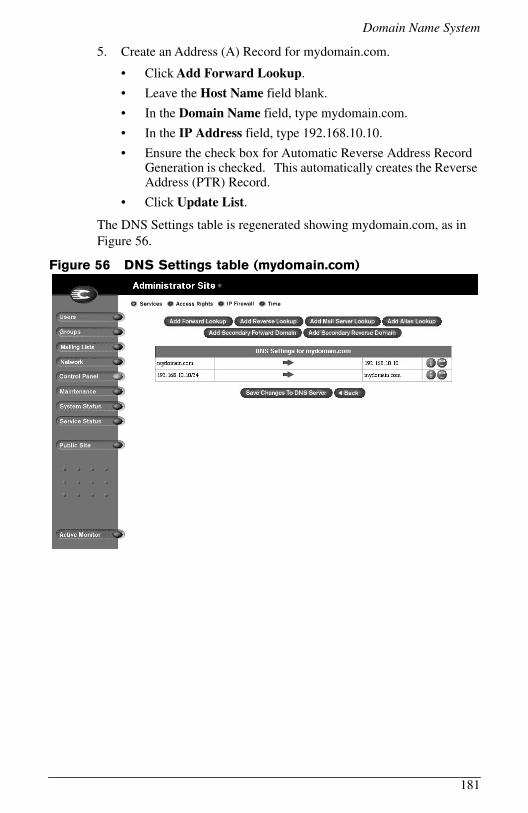
Domain Name System
5. Create an Address (A) Record for mydomain.com.
• Click Add Forward Lookup.
• Leave the Host Name field blank.
• In the Domain Name field, type mydomain.com.
• In the IP Address field, type 192.168.10.10.
• Ensure the check box for Automatic Reverse Address Record Generation is checked. This automatically creates the Reverse Address (PTR) Record.
• Click Update List.
The DNS Settings table is regenerated showing mydomain.com, as in Figure 56.
Figure 56 DNS Settings table (mydomain.com)
181

Appendix D
6. Create an Address (A) Record for “www.mydomain.com”.
• Click Add Forward Lookup.
• In the Host Name field, type www.
• In the Domain Name field, type mydomain.com.
• In the IP Address field, type 192.168.10.10.
• Remove the check from the check box for Automatic Reverse Address Record Generation.
• Click Update List.
Note: Do not make this a CNAME record. Some email server software cannot process CNAME records. If you would like to create multiple names for one IP address, create multiple A records. See “Specifying an alias (CNAME) record” on page 176 for the appropriate applications of CNAME records.
The DNS Settings table is regenerated showing mydomain.com and www.mydomain.com, as in Figure 57.
Figure 57 DNS Settings table (mydomain.com and www.mydomain.com)
182

Domain Name System
7. To receive mail for “mydomain.com”, create a Mail Server (MX) Record. An MX record is similar to a A record but points to a name rather than an IP address. It is critical that the MX record point to a name which has a corresponding A record with the proper IP address.
• Click Add Mail Server Lookup.
• Leave the Host Name field blank.
• In the Domain Name field, type mydomain.com.
• In the Mail Server field, type www.mydomain.com.
• In the Delivery Preference field, you can choose from the pull-down menu Very Low, Low, High or Very High.
For our example, the Delivery Preference can be set to High.
• Click Update List. See Figure 58.
You are now finished with creating your DNS records.
8. IMPORTANT! Click Save Changes to DNS Server. This activates the changes you have made. If you exit this screen without saving your changes, they will not become active.
The completed DNS Settings table is regenerated as in Figure 58.
Figure 58 Completed DNS Settings table
183
Appendix D
To edit another domain, select another domain from the Select Domain or Network... pull-down menu. You can select any domain that you have configured for the DNS server.
To add a new domain, follow the same steps as described above. In the Domain Name field, replace the default domain name with the new domain name that you want to create.
For further information, refer to the following:
• In the Cobalt Knowledge Base, search on “DNS”.
• http://www.dnswiz.com/dnsworks.htm
• http://www-europe.cisco.com/warp/public/787/indexDNS.html
Brief history of the Domain Name System (DNS)In the 1960s, the U.S. Department of Defense Advanced Research Projects Agency (ARPA, and later DARPA) began funding an experimental wide area computer network called the ARPAnet. The ARPAnet used a centrally administered file called HOSTS.TXT which held all name-to-address mapping for each host computer connected to the ARPAnet. Since there were only a handful of host computers at the start, HOSTS.TXT worked well.
When the ARPAnet moved to the Transmission Control Protocol/Internet Protocol (TCP/IP) suite of protocols and become known as the Internet, the population of the network exploded. HOSTS.TXT became plagued with problems, namely
• traffic and load
• name collisions
• consistency
A replacement for the HOSTS.TXT file was needed. The goal was to create a system that solved the problems inherent in a unified host table system. The new system should allow local administration of data and also make that data globally available.
In 1984, the architecture of a new system called Domain Name System (DNS) was designed and is the basis of the DNS service used today on the Internet.
184

Domain Name System
DNS is a distributed database that allows local administration of the segments on the overall database. Data in each segment of the database are available across the entire network through a client-server scheme consisting of name servers and resolvers.
What is a DNS record?
People are much more comfortable dealing with names rather than strings of numbers. A domain name such as “cobalt.com” is much easier to remember than the IP address which consists of four octets of numbers such as 207.91.131.30. Domain names must be registered with Root Domain Registration Service, such as Network Solutions, Inc. (www.networksolutions.com)
Computers, on the other hand, prefer numbers to names. Since computers have the final say when a user is looking for a company Web site, a mechanism is needed to convert the human-friendly domain name to the computer-friendly IP address.
DNS records on a DNS server perform this function. The records translate a domain name to an IP address; a record equates a domain name such as “cobalt.com” to an IP address such as 207.91.131.30. Once the domain name has been converted or “resolved” to an IP address, then (and only then) can the user connect to your Web site.
Without DNS and domain names, the user would be required to remember the IP address of every site they wanted to visit. With DNS servers and DNS records, customers and their software can easily remember how to get to your site.
Who manages your DNS records?
Your DNS records can reside on any Cobalt server that has the DNS service enabled. You or your administrator can easily configure a Cobalt server to act as a DNS server. To provide DNS service, InterNIC requires a site to maintain both a primary and a secondary server. Your Cobalt server can act as the primary server and a DNS server from your Internet service provider (ISP) can act as the secondary server.
How does DNS work?
The basic method that allows a domain name to direct customers to your Web site is shown in Figure 59. This diagram describes a request made by a Web browser as the customer attempts to log on to your Web site.
185
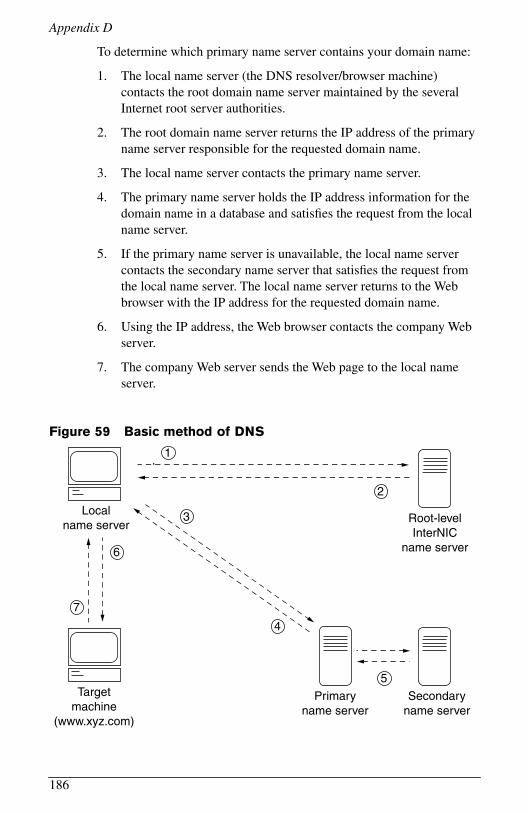
Appendix D
To determine which primary name server contains your domain name:
1. The local name server (the DNS resolver/browser machine) contacts the root domain name server maintained by the several Internet root server authorities.
2. The root domain name server returns the IP address of the primary name server responsible for the requested domain name.
3. The local name server contacts the primary name server.
4. The primary name server holds the IP address information for the domain name in a database and satisfies the request from the local name server.
5. If the primary name server is unavailable, the local name server contacts the secondary name server that satisfies the request from the local name server. The local name server returns to the Web browser with the IP address for the requested domain name.
6. Using the IP address, the Web browser contacts the company Web server.
7. The company Web server sends the Web page to the local name server.
Figure 59 Basic method of DNS
Localname server
1
Root-levelInterNIC
name server
2
Primaryname server
Secondaryname server
3
4
5Target
machine(www.xyz.com)
6
7
186

Appendix E
Licenses
THE BSD COPYRIGHTCopyright ©1991, 1992, 1993, 1994 The Regents of the University of California. All rights reserved.
Redistribution and use in source and binary forms, with or without modification, are permitted provided that the following conditions are met:
1. Redistributions of source code must retain the above copyright notice, this list of conditions and the following disclaimer.
2. Redistributions in binary form must reproduce the above copyright notice, this list of conditions and the following disclaimer in the documentation and/or other materials provided with the distribution.
3. All advertising materials mentioning features or use of this software must display the following acknowledgment: This product includes software developed by the University of California, Berkeley and its contributors.
4. Neither the name of the University nor the names of its contributors may be used to endorse or promote products derived from this software without specific prior written permission.
THIS SOFTWARE IS PROVIDED BY THE REGENTS AND CONTRIBUTORS “AS IS” AND ANY EXPRESS OR IMPLIED WARRANTIES, INCLUDING BUT NOT LIMITED TO, THE IMPLIED WARRANTIES OF MERCHANTABILITY AND FITNESS FOR A PARTICULAR PURPOSE ARE DISCLAIMED. IN NO EVENT SHALL THE REGENTS OR CONTRIBUTORS BE LIABLE FOR ANY DIRECT, INDIRECT, INCIDENTAL, SPECIAL, EXEMPLARY OR CONSEQUENTIAL DAMAGES (INCLUDING, BUT NOT LIMITED TO, PROCUREMENT OF SUBSTITUTE GOODS OR SERVICES; LOSS OF USE, DATA, OR PROFITS; OR BUSINESS INTERRUPTION) HOWEVER CAUSED AND ON ANY THEORY OF LIABILITY, WHETHER IN CONTRACT, STRICT LIABILITY, OR TORT (INCLUDING NEGLIGENCE OR OTHERWISE) ARISING IN ANY WAY OUT OF THE USE OF THIS SOFTWARE, EVEN IF ADVISED OF THE POSSIBILITY OF SUCH DAMAGE.
187
Appendix E
GNU GENERAL PUBLIC LICENSEVersion 2, June 1991
Copyright (C) 1989, 1991 Free Software Foundation, Inc.59 Temple Place - Suite 330, Boston, MA 02111-1307, USA
TERMS AND CONDITIONS FOR COPYING, DISTRIBUTION AND MODIFICATION
0. This License applies to any program or other work which contains a notice placed by the copyright holder saying it may be distributed under the terms of this General Public License. The “Program,” below, refers to any such program or work, and a “work based on the Program” means either the Program or any derivative work under copyright law: that is to say, a work containing the Program or a portion of it, either verbatim or with modifications and/or translated into another language. (Hereinafter, translation is included without limitation in the term “modification.”) Each licensee is addressed as “you.”
Activities other than copying, distribution and modification are not covered by this License; they are outside its scope. The act of running the Program is not restricted, and the output from the Program is covered only if its contents constitute a work based on the Program (independent of having been made by running the Program). Whether that is true depends on what the Program does.
1. You may copy and distribute verbatim copies of the Program’s source code as you receive it, in any medium, provided that you conspicuously and appropriately publish on each copy an appropriate copyright notice and disclaimer of warranty; keep intact all the notices that refer to this License and to the absence of any warranty; and give any other recipients of the Program a copy of this License along with the Program.
You may charge a fee for the physical act of transferring a copy, and you may at your option offer warranty protection in exchange for a fee.
2. You may modify your copy or copies of the Program or any portion of it, thus forming a work based on the Program, and copy and distribute such modifications or work under the terms of Section 1 above, provided that you also meet all of these conditions:
a. You must cause the modified files to carry prominent notices stating that you changed the files and the date of any change.
b. You must cause any work that you distribute or publish, that in whole or in part contains or is derived from the Program or any part thereof, to be licensed as a whole at no charge to all third parties under the terms of this License.
c. If the modified program normally reads commands interactively when run, you must cause it, when started running for such interactive use in the most ordinary way, to print or display an announcement including an appropriate copyright notice and a notice that there is no warranty (or else, saying that you provide a warranty) and that users may redistribute the program under these conditions, and telling the user how to view a copy of this License. (Exception: if the Program itself is interactive but does not normally print such an announcement, your work based on the Program is not required to print an announcement.)
188

Licenses
These requirements apply to the modified work as a whole. If identifiable sections of that work are not derived from the Program, and can be reasonably considered independent and separate works in themselves, then this License, and its terms, do not apply to those sections when you distribute them as separate works. But when you distribute the same sections as part of a whole which is a work based on the Program, the distribution of the whole must be on the terms of this License, whose permissions for other licensees extend to the entire whole, and thus to each and every part regardless of who wrote it.
Thus, it is not the intent of this section to claim rights or contest your rights to work written entirely by you; rather, the intent is to exercise the right to control the distribution of derivative or collective works based on the Program.
In addition, mere aggregation of another work not based on the Program with the Program (or with a work based on the Program) on a volume of a storage or distribution medium does not bring the other work under the scope of this License.
3. You may copy and distribute the Program (or a work based on it, under Section 2) in object code or executable form under the terms of Sections 1 and 2 above, provided that you also do one of the following:
a. Accompany it with the complete corresponding machine-readable source code, which must be distributed under the terms of Sections 1 and 2 above on a medium customarily used for software interchange; or,
b. Accompany it with a written offer, valid for at least three years, to give any third party, for a charge no more than your cost of physically performing source distribution, a complete machine-readable copy of the corresponding source code, to be distributed under the terms of Sections 1 and 2 above on a medium customarily used for software interchange; or,
c. Accompany it with the information you received as to the offer to distribute corresponding source code. (This alternative is allowed only for noncommercial distribution and only if you received the program in object code or executable form with such an offer, in accord with Subsection b above.)
The source code for a work means the preferred form of the work for making modifications to it. For an executable work, complete source code means all the source code for all modules it contains, plus any associated interface definition files, plus the scripts used to control compilation and installation of the executable. However, as a special exception, the source code distributed need not include anything that is normally distributed (in either source or binary form) with the major components (compiler, kernel, and so on) of the operating system on which the executable runs, unless that component itself accompanies the executable.
If distribution of executable or object code is made by offering access to copy from a designated place, then offering equivalent access to copy the source code from the same place counts as distribution of the source code, even though third parties are not compelled to copy the source along with the object code.
4. You may not copy, modify, sublicense or distribute the Program except as expressly provided under this License. Any attempt otherwise to copy, modify, sublicense or distribute the Program is void, and will automatically terminate your rights under this License. However, parties who have received copies, or rights, from you under this License will not have their licenses terminated, so long as such parties remain in full compliance.
189

Appendix E
5. You are not required to accept this License, since you have not signed it. However, nothing else grants you permission to modify or distribute the Program or its derivative works. These actions are prohibited by law if you do not accept this License. Therefore, by modifying or distributing the Program (or any work based on the Program), you indicate your acceptance of this License to do so, and all its terms and conditions for copying, distributing or modifying the Program or works based on it.
6. Each time you redistribute the Program (or any work based on the Program), the recipient automatically receives a license from the original licensor to copy, distribute or modify the Program subject to these terms and conditions. You may not impose any further restrictions on the recipients’ exercise of the rights granted herein. You are not responsible for enforcing compliance by third parties to this License.
7. If, as a consequence of a court judgment or allegation of patent infringement or for any other reason (not limited to patent issues), conditions are imposed on you (whether by court order, agreement or otherwise) that contradict the conditions of this License, they do not excuse you from the conditions of this License. If you cannot distribute so as to satisfy simultaneously your obligations under this License and any other pertinent obligations, then as a consequence you may not distribute the Program at all. For example, if a patent license would not permit royalty-free redistribution of the Program by all those who receive copies directly or indirectly through you, then the only way you could satisfy both it and this License would be to refrain entirely from distribution of the Program.
If any portion of this section is held invalid or unenforceable under any particular circumstance, the balance of the section is intended to apply and the section as a whole is intended to apply in other circumstances.
It is not the purpose of this section to induce you to infringe any patents or other property right claims or to contest validity of any such claims; this section has the sole purpose of protecting the integrity of the free software distribution system, which is implemented by public license practices. Many people have made generous contributions to the wide range of software distributed through that system in reliance on consistent application of that system; it is up to the author/donor to decide if he or she is willing to distribute software through any other system and a licensee cannot impose that choice.
This section is intended to make thoroughly clear what is believed to be a consequence of the rest of this License.
8. If the distribution and/or use of the Program is restricted in certain countries either by patents or by copyrighted interfaces, the original copyright holder who places the Program under this License may add an explicit geographical distribution limitation excluding those countries, so that distribution is permitted only in or among countries not thus excluded. In such case, this License incorporates the limitation as if written in the body of this License.
9. The Free Software Foundation may publish revised and/or new versions of the General Public License from time to time. Such new versions will be similar in spirit to the present version, but may differ in detail to address new problems or concerns.
Each version is given a distinguishing version number. If the Program specifies a version number of this License which applies to it and “any later version”, you have the option of following the terms and conditions either of that version or of any later version published by the Free Software Foundation. If the Program does not specify a version number of this License, you may choose any version ever published by the Free Software Foundation.
190

Licenses
10. If you wish to incorporate parts of the Program into other free programs whose distribution conditions are different, write to the author to ask for permission. For software which is copyrighted by the Free Software Foundation, write to the Free Software Foundation; we sometimes make exceptions for this. Our decision will be guided by the two goals of preserving the free status of all derivatives of our free software and of promoting the sharing and reuse of software generally.
NO WARRANTY
11. BECAUSE THE PROGRAM IS LICENSED FREE OF CHARGE, THERE IS NO WARRANTY FOR THE PROGRAM, TO THE EXTENT PERMITTED BY APPLICABLE LAW. EXCEPT WHEN OTHERWISE STATED IN WRITING, THE COPYRIGHT HOLDERS AND/OR OTHER PARTIES PROVIDE THE PROGRAM “AS IS” WITHOUT WARRANTY OF ANY KIND, EITHER EXPRESSED OR IMPLIED, INCLUDING, BUT NOT LIMITED TO, THE IMPLIED WARRANTIES OF MERCHANTABILITY AND FITNESS FOR A PARTICULAR PURPOSE. THE ENTIRE RISK AS TO THE QUALITY AND PERFORMANCE OF THE PROGRAM IS WITH YOU. SHOULD THE PROGRAM PROVE DEFECTIVE, YOU ASSUME THE COST OF ALL NECESSARY SERVICING, REPAIR OR CORRECTION.
12. IN NO EVENT, UNLESS REQUIRED BY APPLICABLE LAW OR AGREED TO IN WRITING, WILL ANY COPYRIGHT HOLDER, OR ANY OTHER PARTY WHO MAY MODIFY AND/OR REDISTRIBUTE THE PROGRAM AS PERMITTED ABOVE, BE LIABLE TO YOU FOR DAMAGES, INCLUDING ANY GENERAL, SPECIAL, INCIDENTAL OR CONSEQUENTIAL DAMAGES ARISING OUT OF THE USE OR INABILITY TO USE THE PROGRAM (INCLUDING BUT NOT LIMITED TO LOSS OF DATA OR DATA BEING RENDERED INACCURATE OR LOSSES SUSTAINED BY YOU OR THIRD PARTIES OR A FAILURE OF THE PROGRAM TO OPERATE WITH ANY OTHER PROGRAMS), EVEN IF SUCH HOLDER OR OTHER PARTY HAS BEEN ADVISED OF THE POSSIBILITY OF SUCH DAMAGES.
191

Appendix E
192

Appendix F
Glossary
10/100 BaseTX
An Ethernet connection over twisted-pair cables with a throughput of 10 Mb/s or 100 Mb/s.
10BaseT
A 10-Mb/s baseband Ethernet specification using two pairs of twisted-pair cabling (Category 3, 4, or 5): one pair for transmitting data and the other for receiving data. 10BaseT (part of the IEEE 802.3 specification) has a distance limit of approximately 328 feet (100 meters) per segment.
100BaseTX
A 100-Mb/s baseband Fast Ethernet specification using two pairs of either unshielded twisted pair (UTP) or shielded twisted pair (STP) wiring. The first pair of wires is used to receive data; the second pair is used to transmit. To guarantee proper signal timing, a 100BaseTX segment cannot exceed 328 feet (100 meters) in length. 100BaseTX is based on the IEEE 802.3 standard.
AppleShare
A file-sharing protocol in Apple system software that allows sharing of files and network services through a file server in the Apple Macintosh environment.
Carrier sense
In a local area network (LAN), an ongoing activity of a data station to detect whether another station is transmitting.
Carrier sense multiple access with collision detection (CSMA/CD)
A protocol that requires carrier sense and in which a transmitting data station that detects another signal while transmitting stops sending, sends a jam signal and then waits for a variable period of time before sending again. Used in ethernet LAN technology.
193

Appendix F
CGI
see Common gateway interface (CGI)
Common gateway interface (CGI)
A set of rules that describe how a Web server communicates with another application running on the same computer and how the application (called a CGI program) communicates with the Web server. Any application can be a CGI program if it handles input and output according to the CGI standard.
Collision
In an ethernet network, a collision is the result of two devices attempting to transmit data at exactly the same time. The network detects the “collision” of the two transmitted packets and discards them both. Collisions are a natural occurrence on an ethernet network.
Ethernet technology uses carrier sense multiple access/collision detect (CSMA/CD) to allow devices to take turns using the signal carrier line. When a device wants to transmit, it checks the signal level of the line to determine whether another device is already using it. If the line is already in use, the device waits and tries again, perhaps in a few seconds. If the line is not in use, the device transmits.
However, two devices can transmit at the same time in which case a collision occurs and both devices detect it. Each device then waits a random amount of time and retries until successful in getting the transmission sent.
CSMA/CD
see carrier sense multiple access with collision detection (CSMA/CD)
DHCP
see Dynamic Host Configuration Protocol (DHCP)
DNS
see Domain Name System (DNS)
Domain name
The location of an organization or other entity on the Internet. For example, the address www.cobalt.com locates an Internet address for the domain name “cobalt.com” at a particular IP address and a particular host server named “www.”
194
Glossary
Domain Name System (DNS)
The Internet service responsible for translating a human-readable host name such as cobalt.com into a numeric IP address (111.123.45.67) for TCP/IP communications.
Dynamic Host Configuration Protocol (DHCP)
A protocol that provides a mechanism for allocating IP addresses dynamically so that an address can be reused when a host no longer needs it.
Ethernet
The most widely used technology for local area networks (LANs). Standard ethernet runs at 10 Mb/s, 100 Mb/s or 1000 Mb/s. It balances speed, price, ease of installation and availability.
File sharing
The public or private sharing of computer data or space in a network with various levels of access privileges.
File Transfer Protocol (FTP)
A standard Internet protocol and a way to exchange files between computers connected to the Internet. FTP is an application protocol that uses TCP/IP protocols. FTP is commonly used to transfer Web page files from the computer that was used to create the files to the computer that acts as the server for these files. It is also used to download programs and other files to your computer from other servers.
Using FTP, you can update — delete, rename, move and copy — files at a server. You need to log on to an FTP server. However, publicly available files are easily accessed using anonymous FTP.
FTP
see File Transfer Protocol (FTP)
Gateway
A network device that acts as an entrance to another network. A gateway can also be any device that passes packets from one network to another network across the Internet.
HTML
see HyperText Markup Language (HTML)
195
Appendix F
HTTP
see HyperText Transfer Protocol (HTTP)
HyperText Markup Language (HTML)
A set of “markup” symbols or tags inserted in a text file intended for display on a World Wide Web browser. The markup tags tell the Web browser how to display a Web page’s content, words, and images. HTML is a subset of Standardized Generalized Markup Language (SGML).
HyperText Transfer Protocol (HTTP)
A set of rules for exchanging files (text, graphic images, sound, video and other multimedia files) on the World Wide Web.
ICANN
see Internet Corporation for Assigned Names and Numbers (ICANN)
IEEE 802.3
IEEE local area network (LAN) protocol that specifies an implementation of the physical layer and the media access control (MAC) sublayer of the data link layer. IEEE 802.3 uses CSMA/CD access at a variety of speeds over a variety of physical media. Extensions to the IEEE 802.3 standard specify implementations for Fast Ethernet. Physical variations of the original IEEE 802.3 specification include 10Base2, 10Base5, 10BaseF, 10BaseT and 10Broad36. Physical variations for Fast Ethernet include 100BaseT, 100BaseT4 and 100BaseX.
IMAP
see Internet Message Access Protocol (IMAP)
Internet Corporation for Assigned Names and Numbers (ICANN)
The private (non-government) non-profit corporation that has been formed to assume responsibility for the IP address space allocation, protocol parameter assignment, domain name system (DNS) management and root server system management functions. These functions were previously performed by the Internet Assigned Numbers Authority (IANA). The U.S. government is essentially turning over control of the Internet to ICANN, although domain name registration performed by Network Solutions, Inc. (NSI) will continue to be under U.S. government contract for a limited time.
196

Glossary
Internet domain
An Internet domain is a host naming convention used to ensure that no two individual hosts on the global Internet have the same host name. An Internet domain should not be confused with an NT Domain.
Internet Message Access Protocol (IMAP)
Internet Message Access Protocol is a standard protocol for accessing email from your local server. IMAP is a client/server protocol in which email is received and held for you by your Internet server. You (or your email client) can view just the heading and the sender of the letter and then decide whether to download the mail from the server. You can also create and manipulate folders or mailboxes on the server, delete messages or search for certain parts or an entire note. IMAP requires continuous access to the server during the time that you are working with your mail.
IMAP can be thought of as a remote file server. Another protocol, Post Office Protocol (POP), can be thought of as a store-and-forward service.
POP and IMAP deal with receiving email from your local server; Simple Mail Transfer Protocol (SMTP) is a protocol for transferring email between points on the Internet. You send email with SMTP and a mail handler receives it on your recipient’s behalf. Then the mail is read using POP or IMAP.
See also “Post Office Protocol 3 (POP3)” and “Simple Mail Transfer Protocol (SMTP)”.
Internet Protocol (IP)
A network-layer protocol in the TCP/IP stack offering a connectionless internetwork service. IP provides features for addressing, type-of-service specification, fragmentation and reassembly, and security. IP is defined in RFC 791.
197

Appendix F
IP address
A 32-bit address assigned to hosts using Transmission Control Protocol/Internet Protocol (TCP/IP). An IP address belongs to one of five classes (A, B, C, D or E) and is written as four octets separated by periods (for example, 192.168.10.10), also called the dotted decimal format. Each address consists of a network number, an optional subnetwork number and a host number. The network and subnetwork numbers together are used for routing, while the host number is used to address an individual host within the network or subnetwork. A subnet mask is used to extract network and subnetwork information from the IP address. Also called an Internet address.
LAN
see local area network (LAN)
Leased IP address
An IP address assigned by the Dynamic Host Configuration Protocol (DHCP) to an unrecognized computing device. This method involves setting up a leased pool of IP addresses that are allocated dynamically when new devices are booted and recognized on the network.
Local area network (LAN)
A high-speed, low-error data network covering a relatively small geographic area (up to a few thousand meters). A LAN connects workstations, peripherals, terminals and other devices in a single building or other geographically limited area. LAN standards specify cabling and signaling at the physical and data link layers of the Open Systems Interconnection (OSI) model. Widely used LAN technologies include Ethernet, fiber distributed data interface (FDDI) and token ring.
See also wide area network (WAN).
Logical memory
see virtual memory
Media access control (MAC) sublayer
The lower of the two sublayers of the data link layer defined by the IEEE. The MAC sublayer handles access to shared media, such as whether token passing or contention is used.
198

Glossary
Media access control (MAC) address
A standardized data-link-layer address that is required for every port or device that connects to a LAN. Other devices in the network use these addresses to locate specific ports in the network, and to create and update routing tables and data structures. MAC addresses are six bytes long and are controlled by the IEEE. Also known as a hardware address, a MAC-layer address and a physical address.
When your computer is connected to the Internet, a correspondence table relates your IP address to your computer's physical (MAC) address on the network
Name server
A program that constitutes the server half of the DNS client-server mechanism. A name server contains information about a segment of the DNS database and makes it available to a client called a resolver. A resolver is often just a library routine that creates queries and sends them across a network to a name server.
NAT
see Network Address Translation (NAT)
Netmask
see subnet mask
Network Address Translation (NAT)
A mechanism for reducing the need for globally unique IP addresses. NAT allows an organization with addresses that are not globally unique to connect to the Internet by translating those addresses into globally routable address space. Also known as Network Address Translator.
Network Time Protocol (NTP)
A protocol built on top of the Transmission Control Protocol (TCP) that synchronizes the time of a local computer client or server to radio clocks and atomic clocks located on the Internet. This protocol is capable of synchronizing distributed clocks within milliseconds over long time periods. Some configurations include cryptographic authentication to prevent accidental or malicious protocol attacks.
NTP
see Network Time Protocol (NTP)
199

Appendix F
Packet
The unit of data that is routed between an origin and a destination on the Internet or any other packet-switched network. The packet includes a header containing control information and (usually) user data. Packets are most often used to refer to network layer units of data.
PCI
see Peripheral Component Interface (PCI)
Peripheral Component Interconnect (PCI)
Peripheral Component Interconnect (PCI) is an interconnection system between a microprocessor and attached devices in which expansion slots are spaced closely for high-speed operation. PCI is designed to be synchronized with the clock speed of the microprocessor, in the range of 20 MHz to 33 Mhz.
PCI transmits 32 bits at a time in a 124-pin connection (the extra pins are for power supply and grounding) and 64 bits in a 188-pin connection in an expanded implementation. PCI uses all active paths to transmit both address and data signals, sending the address on one clock cycle and data on the next. Burst data can be sent starting with an address on the first cycle and a sequence of data transmissions on a certain number of successive cycles.
POP3
see Post Office Protocol (POP3)
Post Office Protocol 3 (POP3)
Post Office Protocol (POP) is a standard protocol for receiving email. POP is a client/server protocol in which email is received and held for you by your Internet server. When you read your mail, all of it is immediately downloaded to your computer and no longer maintained on the server. POP3 is built into the Netscape Navigator and Microsoft Internet Explorer browsers.
POP can be thought of as a store-and-forward service. Another protocol, Internet Message Access Protocol (IMAP), can be thought of as a remote file server.
200

Glossary
POP and IMAP deal with receiving email from your local server; Simple Mail Transfer Protocol (SMTP) is a protocol for transferring email between points on the Internet. You send email with SMTP and a mail handler receives it on your recipient’s behalf. The mail is then read using POP or IMAP.
See also “Internet Message Access Protocol (IMAP)” and “Simple Mail Transfer Protocol (SMTP)”.
Root name server
On the Internet, the root name server system is the manner in which an authoritative master list of all top-level domain names (such as .com, .net, .org and individual country codes) is maintained and made available.
SCSI
see Small Computer System Interface (SCSI)
Secure Socket Layer (SSL)
Encryption technology for the Web used to provide secure transactions (for example, the transmission of credit card numbers for e-commerce).
Server
A system program that awaits requests from client programs in the same computer or across a network, and services those requests. A server can be dedicated, in which case this is its sole function, or non-dedicated, where the system can be used in other ways, such as a workstation.
Server Message Block (SMB)
A protocol that enables client applications in a computer to read and write files on a computer network and to request services from server programs in a computer network for systems running Microsoft Windows.
201
Appendix F
Simple Mail Transfer Protocol (SMTP)
The TCP/IP standard protocol for transferring electronic mail messages between points on the Internet. SMTP specifies how two mail systems interact and the format of control messages they exchange to transfer mail.
SMTP is a protocol for transferring email between points on the Internet; Post Office Protocol (POP) and Internet Message Access Protocol (IMAP) deal with receiving email from your local server. You send email with SMTP and a mail handler receives it on your recipient’s behalf. The mail is then read using POP or IMAP.
See also “Internet Message Access Protocol (IMAP)” and “Post Office Protocol 3 (POP3)”.
Simple Network Management Protocol (SNMP)
A network management protocol used almost exclusively in TCP/IP networks. SNMP provides a means to monitor and control network devices, and to manage configurations, statistics collection, performance and security on a network.
Small Computer System Interface (SCSI)
A parallel interface standard used by Apple Macintosh computers, PCs and many Unix systems for attaching peripheral devices to computers. SCSI interfaces provide for faster data transmission rates (up to 80 Mb/s) than standard serial and parallel ports. In addition, you can attach many devices to a single SCSI port, so that SCSI is really an input/output bus rather than simply an interface. Although SCSI is an ANSI standard, there are many variations, so two SCSI interfaces can be incompatible. For example, SCSI supports several types of connectors.
SMB
see Server Message Block (SMB)
SMTP
see Simple Mail Transfer Protocol (SMTP)
SNMP
see Simple Network Management Protocol (SNMP)
SSL
see Secure Socket Layer (SSL)
202
Glossary
Subnet mask
A number that, in conjunction with an IP address, defines the set of IP addresses that are considered “local.” For example, if your IP address is 192.168.25.77 and your subnet mask is 255.255.255.0, then addresses between 192.168.25.1 and 192.168.25.255 are considered local. Also known as netmask.
Swap file
A space on a hard disk used as the virtual memory extension of a computer’s random access memory (RAM). Having a swap file allows the computer’s operating system to pretend that it has more RAM than it actually does. The least-recently-used files in RAM are “swapped out” to your hard disk until they are needed later; in their place, new program segments or data can be “swapped in” to RAM.
Transmission Control Protocol (TCP)
A connection-oriented transport-layer protocol that provides reliable full-duplex data transmission. TCP is part of the TCP/IP protocol stack.
Transmission Control Protocol/Internet Protocol (TCP/IP)
A common name for the suite of protocols developed in the 1970s to support the construction of worldwide internetworks. TCP and IP are the two best-known protocols in the suite. The TCP/IP protocols enable computers and networks to connect to an intranet or Internet.
Virtual memory
A concept that, when implemented by a computer and its operating system, allows programmers to use a very large range of memory or storage addresses for stored data.
Wide area network (WAN)
A data communications network that serves users across a broad geographic area and often uses transmission devices provided by common carriers. Asynchronous transfer mode (ATM), frame relay, Switched Multimegabit Data Service (SMDS) and X.25 are examples of WANs.
See also local area network (LAN).
203

Appendix F
204