cockpit - endorphin.es – be so kind and read the manual. it will provide you with the information...
TRANSCRIPT

Flight plan 1.1
Cockpit

First things first
RTFM – be so kind and read the manual. It will provide you with the information you need to fully indulge in the module you just purchased – for which we like to thank you.
Enjoy your sound experiences, dear sonic traveller.
Beginning from the product's purchase date a 1-year warranty is guaranteed for each product in case of any manufactur-ing errors or other functional deficiencies during runtime.
The warranty dœs not apply in case of:
• damage caused by misuse
• mechanical damage arising from careless treatment (dropping, vigorous shaking, mishandling, etc.)
• damage caused by liquids or powders penetrating the device
• heat damage caused by overexposure to sunlight or heating
• electric damage caused by improper connecting
Visit us:
http://endorphin.es
http://youtube.com/user/TheEndorphines
http://facebook.com/TheEndorphines
Drop us a line:
FURTH BARCELONA, S.L.
VAT ID:ES B66836487
© 2013-2017 – Endorphin.es – International Airways

© 2013-2017 – Endorphin.es – International Airways page 1 of 7
COCKPIT OPERATED BY ENDORPHIN.ES AIRWAYS
READY FOR TAKE-OFF
• 6 HP width, up to 1 1/2“ in depth – super slim and SHUTTLE friendly
• 4 stereo channel performance mixer – the missing link in the 84 HP SHUTTLE system
• Connect your desktop synthesizers/iPad/drum machine/mp3 player to be mixed altogether with the rest of your modular gear
• Two channels of send and return to use iOS devices as an FX processor (using 4 pin TRRS cable)
• On-board compressor with external sidechain control to add proper dynamics or ducking to your mix
• Stereo output for speakerphones or headphones with enough current to drive a wide range of headphones

© 2013-2017 – Endorphin.es – International Airways page 2 of 7
WELCOME TO THE NEW ENDORPHIN.ES – COCKPIT!
The COCKPIT is a four stereo channel performance mixer.
Each channel accepts either a stereo or mono, either modular or line level. Connect all devices together for your live perfor-mance. Limited with the channels? Add another COCKPIT with the up to infinite daisy chain option without loosing a channel by patching one COCKPIT into the next one. The mixer is built using analogue stereo VCAs with a smart digital control – i.e. all audio is mixed in analogue way, however the level of each channel is controlled with digital encoders (or CV for ducking).
FADERS
Everything starts at the inputs. Each channel has an input jack marked with 4 arrows pointing inside.
The encoder near each input adjusts the level on the signal. Turning it CW will make the channel's level higher and turning it CCW will attenuate the channel off to full silence. Since encoder's rotation is endless, it doesn’t have a line that shows its current position to understand the level of the channel. For that rea-son there’s a bi-colour LED near each encoder knob and the brightness of the LED shows how high the level is. When the LED is green the channel is on. Shortly pushing the encoder knob (button function), mutes the channel. When the channel is muted, the LED colour turns red. However, the brightness of the LED remains same as it was before and indicates the volume level also in the muted state. With this feature you can also decrease or increase the level of the channel when muted, which comes in handy, if you want to mute (push encoder) a sound at full volume, change the volume to zero (by turning CCW), unmute it (push encoder) and fade it back into the mix again (by turning CW).
Hint: Every few seconds the position of all encoders (levels of all channels) as well some other encoder buttons enabled set-tings are stored into memory so after turning your modular system power off and on again you will have all the settings you had before.
SEND-RETURN
You may already realise there are two types of channel input jacks. Channel 1 and 2 utilize ordinary jacks with met-al nuts and channel 3 and 4 use a black jacks and have also red arrows pointing to the outside. These connectors accept special 3.5 mm (1/8”) TRRS (tip-ring-ring-sleeve) plugs (usually called AUX-plug) that you may use with all devices that use the CTIA standard (that Apple® and some other manufacturers use).
These four-pin TRRS phone connectors may be used to add an iOS device (mono into the device via external microphone input) for processing that audio and outputting it back through the same cable (tip and ring/left and right) as stereo signal.
How that works? L/R channels of channel 1 input mixed together into one mono channel attenuated at appropriate level with the CH1/3 trimmer on the backside and are sent into the iOS device via external microphone (4th pin) input at the TRRS plug. The iOS device does the processing of the signal (by using an App as a DSP effect processor or using as a scope App to monitor the waveform) and outputs it back with the same TRRS cord however with tip and ring pins back into channel 3.
© 2013-2017 – Endorphin.es – International Airways page 3 of 7
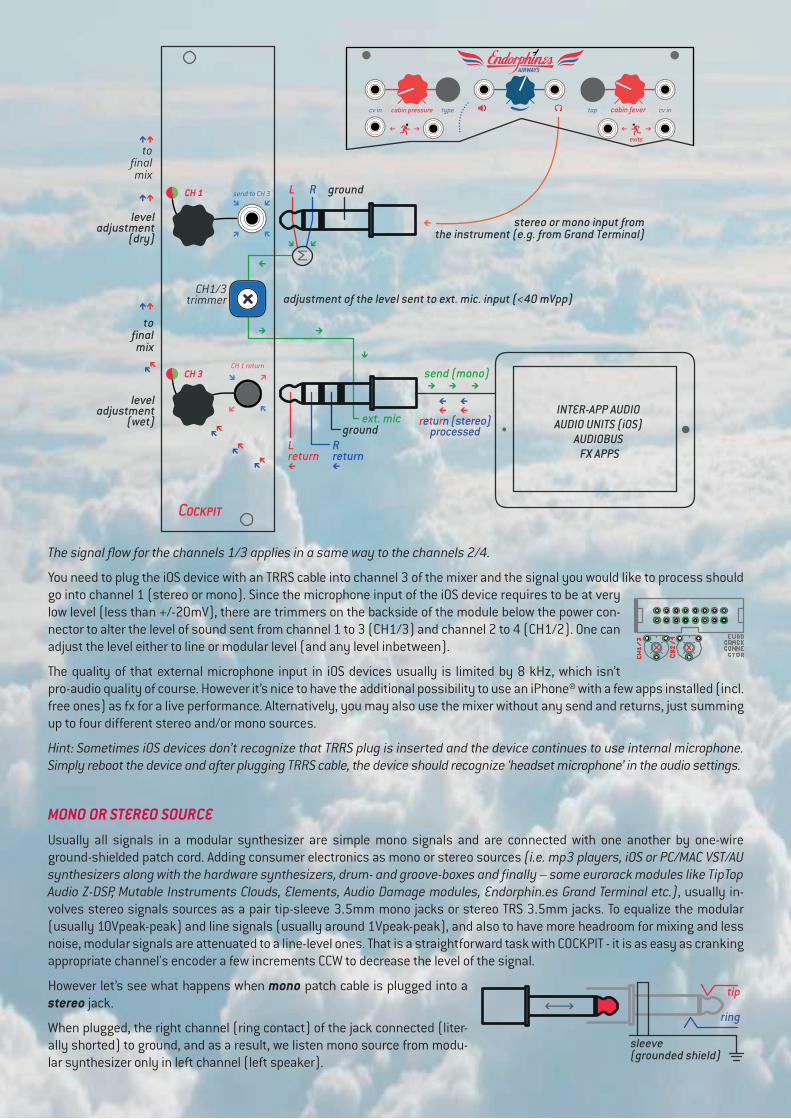
The signal flow for the channels 1/3 applies in a same way to the channels 2/4.
You need to plug the iOS device with an TRRS cable into channel 3 of the mixer and the signal you would like to process should go into channel 1 (stereo or mono). Since the microphone input of the iOS device requires to be at very low level (less than +/-20mV), there are trimmers on the backside of the module below the power con-nector to alter the level of sound sent from channel 1 to 3 (CH1/3) and channel 2 to 4 (CH1/2). One can adjust the level either to line or modular level (and any level inbetween).
The quality of that external microphone input in iOS devices usually is limited by 8 kHz, which isn’t pro-audio quality of course. However it’s nice to have the additional possibility to use an iPhone® with a few apps installed (incl. free ones) as fx for a live performance. Alternatively, you may also use the mixer without any send and returns, just summing up to four different stereo and/or mono sources.
Hint: Sometimes iOS devices don’t recognize that TRRS plug is inserted and the device continues to use internal microphone. Simply reboot the device and after plugging TRRS cable, the device should recognize ‘headset microphone’ in the audio settings.
MONO OR STEREO SOURCE
Usually all signals in a modular synthesizer are simple mono signals and are connected with one another by one-wire ground-shielded patch cord. Adding consumer electronics as mono or stereo sources (i.e. mp3 players, iOS or PC/MAC VST/AU synthesizers along with the hardware synthesizers, drum- and groove-boxes and finally – some eurorack modules like TipTop Audio Z-DSP, Mutable Instruments Clouds, Elements, Audio Damage modules, Endorphin.es Grand Terminal etc.), usually in-volves stereo signals sources as a pair tip-sleeve 3.5mm mono jacks or stereo TRS 3.5mm jacks. To equalize the modular (usually 10Vpeak-peak) and line signals (usually around 1Vpeak-peak), and also to have more headroom for mixing and less noise, modular signals are attenuated to a line-level ones. That is a straightforward task with COCKPIT - it is as easy as cranking appropriate channel's encoder a few increments CCW to decrease the level of the signal.
However let’s see what happens when mono patch cable is plugged into a stereo jack.
When plugged, the right channel (ring contact) of the jack connected (liter-ally shorted) to ground, and as a result, we listen mono source from modu-lar synthesizer only in left channel (left speaker).

© 2013-2017 – Endorphin.es – International Airways page 4 of 7
As far as you mix mono signals only to obtain one final mono signal sausage – that is pretty much alright, however when stereo sources added, then it requires doubling the mono signals in both, the left and the right channel.
For that reason there is a set of green jumpers on the backside of the COCKPIT – 1 jumper per channel (1 to 4). Each jumper obviously may be in two positions. For example S–CH1–M. When jumper connected on pins pair S–CH1, then the input of chan-nel 1 is a full stereo input that will accept and adjust left and right channels and output them to the left and right channel of your speakerphones. However when the jumper is installed on CH1–M position, channel 1 input accepts mono signals only, ignoring the signal that may occur from the ring (right), and that left signal will appear in the left speaker and then exactly doubled in your right speaker (the level of this doubled signal can of course also be adjusted with the encoder).
When no jumper is installed, then absolutely no right signal from that channel (whenever stereo or mono plug inserted) will appear in your right speakerphone.
Tipp: We advise that configuration when you use all mono jacks and signals for inputs and outputs and want to use the signal furthermore within your modular setup for instance.
The COCKPIT module is designed to carry ‘send’ and ‘return’ with an iOS device via the exter-nal microphone input. The release of an XPansion¬ that puts all jumpers as toggle switches to a faceplate along with sends and returns for external processing gear, like guitar pedals or stereo effect units, is planned.
DAISY CHAIN
If 4 channels are not enough for you and you need more, you may add an/other COCKPIT(s) to your rack and connect it/them to the first one with an up to infinite daisy chain using two female/female jumper wires (left and right pins) as connection. One mixer has to be master – its final output will go to your headphones or speakers. Another slave may be connected to the mas-ter (you may consider it as sort of a group with its own sub-mix level). The master level of the slave is regulated with the blue gain knob on the slave itself. After you chose its level, it will be mixed with all the channels of master at that level. Keep in mind you will not be able to adjust the volume of the slave from the master – the final volume of slaves can be adjusted on slaves only.
Easy to remember: SLAVE are outputs and MASTER are inputs.
DUCKING COMPRESSOR WITH A SIDECHAIN INPUT
If you are familiar with side chain ducking or pumping compressors – frequently used on the radio stations or the latest EDM hit single – it may be easier to understand what that part of the module does. The COCKPIT doesn’t include a straightforward compressor, but more an audio ducking utility that works in a few different modes (see below).
Theory corner start: Let’s see how a general-purpose compressor works. Basically what a compressor does, is attenuating the signal (closing the VCA) under incoming CV to make the incoming audio signal dynamically equal (e.g. higher amplitudes to be lowered to average ones). CV is extracted from that audio signal with the algorithm to analyse the peaks (or better say RMS level). Before passing into the VCA, that audio signal is split: The sidechain signal is passed through the envelope follower (with adjusted attack and decay levels for the slew limiter) to extract the CV from the audio and then that CV is mixed (de-creased proportionally) from the CV input that controls the level of the VCA through which the actual audio signal is passing. That proportional amount of CV applied may be considered as ‘ratio’.
Of course, instead of CV, extracted from the envelope follower, any other CV may be applied. It is easy to connect an envelope generator – into what is called ‘sidechain’ input of the compressor.

© 2013-2017 – Endorphin.es – International Airways page 5 of 7
In techno music one effect with compressor is used intentionally. That’s when the bass or synth arpeggio are ducked (atten-uated) every time the kick drum is appears. At sharp (instant) kick drum's attack, the level of synth is immediately decreased. While the kick drum is decaying, the synth line returns to a normal volume and then is decreased again at the next hit of the kick. So far, the amplitude of the bass line/arpeggio synth is variable, or let’s say being modulated in a very synchronous way – creating a pumping/ducking effect.
The kick drum passed via envelope follower usually generates a CV that is similar to what an envelope generator delivers. Also, adjusting the attack and decay times and the shapes of an envelope (as the Airplanes of the Terminal and Grand Terminal are able to), may recreate the same behaviour of an envelope CV from a kick drum. All we need to do is to apply the envelope generator into the sidechain input and adjust the level of influence. Theory corner end.
The sidechain compressor of the COCKPIT can work in three different modes. Each mode involves a different approach, and might be chosen, depending on the modules or tools you wish to use, or which result you’re up to.
When you press all four encoder buttons (CH 1-2-3-4) simultaneously and hold them for longer than 1 second, you switch to the next mode, one by one. You will notice that the blue LED will blink as many times, as the number of the mode it is set (1, 2 or 3 consequent blinks). The currently selected mode is saved during module’s power off and when you turn on the power of your modular system, you will notice same amount of blinking times that states the currently selected sidechain mode.
1. Ducking with CV: The input of the COCKPIT accepts unipolar CV from 0 to approximately +5V. Every-thing that goes above +5V is being saturated, and everything that is below zero will be cut off.
To enable ducking on a channel, just press and hold the encoder's button for more than 1 second. After that you will immediately see the channel LED will strobe/blink (with the inverted colour of the actual channel's state – enabled > red or muted > green – so if the channel is enabled and its LED is green, then once per few seconds that LED will blink with a very short red light). To disable the ducking for that channel, simply hold its encoder's button again for more than 1 second.
(Short press on encoder button will do the mute/unmute job, and long press will enable/disable the ducking on that channel.)
The red knob (the one with the duck icon) adjusts the level of ducking. Adjust it to the desired pumping level/intensity. The blue LED near that knob shows the amplitude of the input signal and lights up when the ducking level increases.
TIPP: When no plug is inserted into sidechain jack, then the sum of all four channels is sent to the sidechain input of the ducking compressor. That connection may seem a bit experimental (since the channel generates envelope CV being ducked afterwards by its own that may sound as amplitude modulation), however at some point may bring interesting results.
2. Ducking with audio: It that mode the sidechain input is amplified in approx. 10 times with an enve-lope follower at the input. Now you may simply input a sound source (a kick or snare drum for instance – at a consumer line level – approx. 1Vpp) and the CV will be extracted from that audio source and applied to the channels you assigned to the ducking by pressing-and-holding the encoder for over one second (just as you did in the CV in mode described above).
Tipp: If the ducking effect seems too hefty, it may be, that the audio you want to use is too 'hot' – attenuating may help.
3. Ducking with triggers: In that mode sidechain input accepts triggers in standard modular level (everything that is higher than 1V is recognized as on and lower than 250mV as off). Every trigger generates internal envelope (falling ramp) in the COCKPIT. That envelope has instant (zero) attack and the decay time is defined by the red knob with the duck icon above. Time of decay varies from 10ms to 10 seconds and at full CCW knob position there is no effect applied.

© 2013-2017 – Endorphin.es – International Airways page 6 of 7
To enable sidechain control on a certain channel, you have to press and – while pressing – rotate black knob/encoder of a the channel you want affected by the ducking. While pressing and holding you may notice that LED near certain knob will light up orange (which is basically a mix of the green and red light) and the bright-ness of orange LED will state the amount of ducking applied. After you release the black knob, that LED will become again either green (if that channel is on), or red (if channel is muted) with previously defined volume (brightness of the LED).
Tipp: The third mode is useful, when you don’t have any spare en-velope or audio source, but have a clock, or rather like working with complex clock patterns than with envelopes or audio. It may also be derived from almost any drum machine as MIDI-clock (transformed into PPQN/24 pulses), or from a separate audio output.
mode number of blinks sidechain input compression controls
1 0 ... +5V CV • To enable the channel to be under sidechain control, long hold CH 1-4 black knobs. The LED near that knob will start to blink approxi-mately once per second .
• Red knob defines the amount of influence of the CV applied.
2 1Vpp audio • Same as mode 1, however sidechain input accepts line-level audio signal (mp3 player, iPad, iPhone etc.) and internal envelope follower is applied to that signal.
• Red knob defines the amount of influence of the CV applied.
3 0 ... +5V clock • Sidechain input accepts clock/triggers.
• COCKPIT generates falling RAMP under incoming trigger and red knob defines the time of decay.
• At full CCW position no ducking is applied.
• By pressing and turning CH 1-4 knobs, you adjust the influence level of compressor to a certain channel separately.

© 2013-2017 – Endorphin.es – International Airways page 7 of 7
FINAL OUTPUT
The mix of all four channels (including daisychained channels, if connected) pass to the final output, which is a 3.5 mm stereo jack.
The blue knob adjusts the level of the output, from the full silence when CCW or high gain output at full CW state. That is a high current output capable of driving a wide range of headphones or connecting your monitors directly (with stereo TRS 3.5 mm 1/8” to two mono XLR or 1/4” TS plugs so you may plug into a concert mixer/amplifier or pass the signal to another module.
You may use stereo 3.5 mm cable splitters to pass the signal to different sources. For example you may record audio into your DSLR camera directly with 3.5 mm stereo aux cable while monitoring the sound in your speakerphones.
That output has a short-circuit protection which means you may plug a mono cable there. Still, with that mono connection the right channel’s output will be shorted to ground (see ‘MONO OR STEREO SOURCE’ paragraph above) but the module is able to withstand that. However, that may also cause extra current consumption and generating extra heat.
Just as with GRAND TERMINAL, we include 3.5mm TRS STEREO PLUG into two separate LEFT and RIGHT TS MONO adapter, so you may route the signal to your mixer, PA monitors or other mono/stereo modules in your rack easier: