community handbook guide - stonegateneighbors.orgstonegateneighbors.org/help/community handbook...
TRANSCRIPT

MYCOMMUNITY TM
Community Handbook Guide
Volume
1

March 30, 2018
Version 13.1
T A M P A A U T O M A T E D L O G I C
Community Handbook Guide
Tampa Automated Logic 7819 Niagara Ave Tampa, FL. 33617
Phone 813.985.6386

C O M M U N I T Y H A N D B O O K G U I D E
March 30, 2018
Version 13.1.2
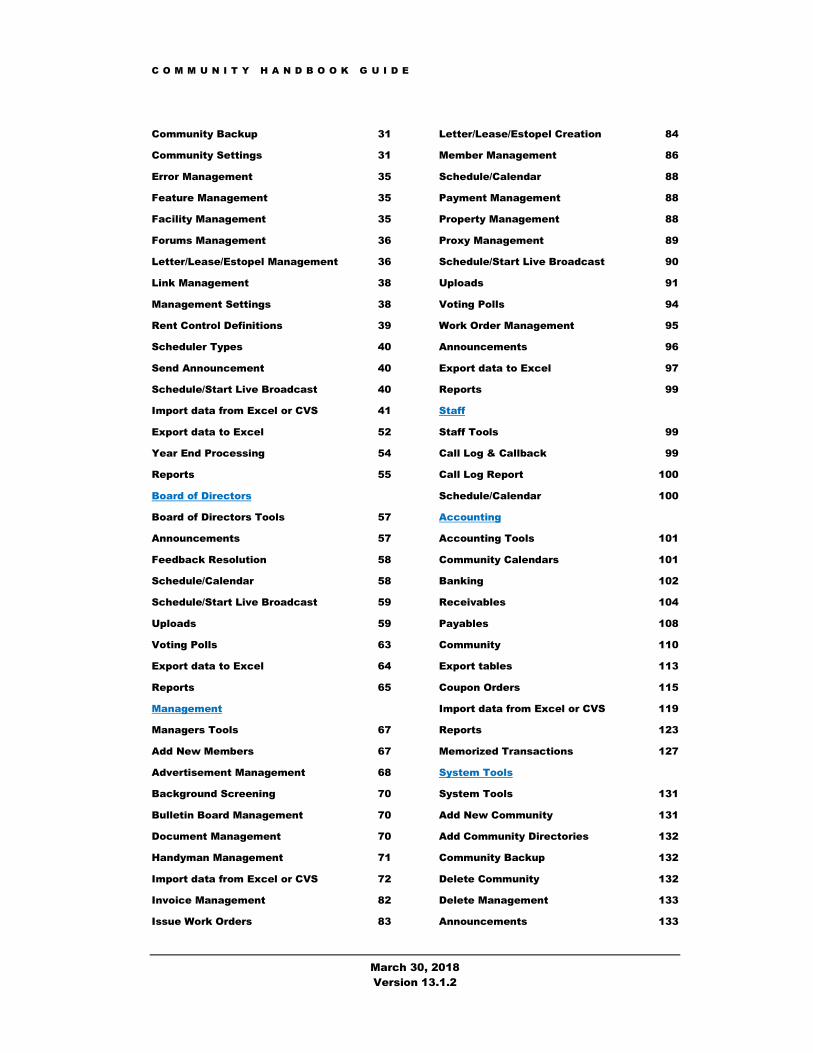
Table of Contents
Introduction
How to Use This Manual 4
Common Elements of the Community 4
Database Integrity 5
Member Types 5
Privileges and Access 6
How Members are activated 8
Logging In 9
Logging Out 10
Management
For Rent or Sale 11
Other Classifieds 11
Notifying Management 12
Community Map 12
Site Help 12
Activities
Community Calendars 14
Community Events 15
Events Calendar 15
Handyman 16
Community Links 16
Directory 17
Member Directory 17
Community Handbook 17
View Scheduled Live Broadcast 17
My Account 17
Online Payment History 18
Account Activity 18
Change Password 18
Edit Profile 19
Handbook 19
Letters & Documents 19
List Property 19
Make Online Payment 20
Newsletter
Current Newsletter 21
Newsletters 21
Board Matters
Board 22
Agenda 22
Additional Board Menu Items 22
Board Activity 23
Board Members 23
Meeting Dates 23
View Meetings 23
Documents 23
Community Documents 23
Financials 24
Insurance Documents 24
Legal Documents 24
Minutes 24
Operational Documents 24
Policies Documents 24
Vendor Documents 24
Other Documents 25
Estimates 25
Community Forums
Forums 26
Search 27
Administration
Administrators Tools 28
Add New Management 28
Announcement Management 29
Background Screening 29
Community Calendars 30
Committees 31
C O M M U N I T Y H A N D B O O K G U I D E
March 30, 2018
Version 13.1.2
Community Backup 31
Community Settings 31
Error Management 35
Feature Management 35
Facility Management 35
Forums Management 36
Letter/Lease/Estopel Management 36
Link Management 38
Management Settings 38
Rent Control Definitions 39
Scheduler Types 40
Send Announcement 40
Schedule/Start Live Broadcast 40
Import data from Excel or CVS 41
Export data to Excel 52
Year End Processing 54
Reports 55
Board of Directors
Board of Directors Tools 57
Announcements 57
Feedback Resolution 58
Schedule/Calendar 58
Schedule/Start Live Broadcast 59
Uploads 59
Voting Polls 63
Export data to Excel 64
Reports 65
Management
Managers Tools 67
Add New Members 67
Advertisement Management 68
Background Screening 70
Bulletin Board Management 70
Document Management 70
Handyman Management 71
Import data from Excel or CVS 72
Invoice Management 82
Issue Work Orders 83
Letter/Lease/Estopel Creation 84
Member Management 86
Schedule/Calendar 88
Payment Management 88
Property Management 88
Proxy Management 89
Schedule/Start Live Broadcast 90
Uploads 91
Voting Polls 94
Work Order Management 95
Announcements 96
Export data to Excel 97
Reports 99
Staff
Staff Tools 99
Call Log & Callback 99
Call Log Report 100
Schedule/Calendar 100
Accounting
Accounting Tools 101
Community Calendars 101
Banking 102
Receivables 104
Payables 108
Community 110
Export tables 113
Coupon Orders 115
Import data from Excel or CVS 119
Reports 123
Memorized Transactions 127
System Tools
System Tools 131
Add New Community 131
Add Community Directories 132
Community Backup 132
Delete Community 132
Delete Management 133
Announcements 133

C O M M U N I T Y H A N D B O O K G U I D E
March 30, 2018
Version 13.1.2
Statistics 133
Synchronize Database 134
Export data to Excel 135
Vendor Tools
Submit Invoice 137
Request Invoice Status 137
Change Password 138
Edit Profile 138
Download IRS Form W-9 138
Vendor Instructions 138
Appendix
IRS Form W-9 139
Community Questionnaire 140
Management Questionnaire 142
Member Survey Form 143
Vendor Instructions (sample) 144
Letter Samples 146
Accounting Samples 159
Miscellaneous Samples 185

4
Introduction
Making the most productive use of your online community.
his handbook is divided into three section based on the type of user. There are ten types of users, the Standard General user (Tenant, Owner, and CoOwner), the Board of Directors, the Manager, the Administrator, the Accountant, Special Users, Staff, and the Vendor. Each has different needs and responsibilities when it comes to interacting with the online
community web site software. Their respective privileges and responsibilities are covered in detail in their respective chapters.
How to Use This Manual
Watch for these icons throughout this manual which help to identify important information and procedures.
Common Elements of the Community
Navigation throughout the online community is accomplished by the use of the menu bar on the top of each page or with links within the body of a page. The menu consists of features that have been enabled by your community. Look for the familiar pointing hand to identify links and features.
Look for the on most pages where help is available. Clicking this icon will open help for that page. This online help may often be more complete and up-to-date
than this manual. Also note that positioning your cursor over features and links will display a tip about that feature. Required fields are indicated by “*”.
The online community requires members to login to take full advantage of the site. Therefore with the exception of the communities “Home” page all users are directed to login when trying to access other pages in the community.
T
I C O N K E Y S
Valuable information
Test your knowledge
Keyboard exercise
Workbook review
N A V I G A T I O N
U S A G E

5
The community’s privacy policy and terms of service is available at the bottom of every page. Of course, the community retains the right to reject any material that it is not consistent with the purpose of the community’s web site, is contrary to community standards, or is offensive in nature.
Online Help is available from all pages by clicking the “Help” link at the bottom of all pages.
Anyone found posting material that is contrary to community standards, or is offensive in nature may be subject to prosecution and will be denied further access to the community’s site.
Please report any such abuse to the community’s management or Board of Directors.
Database Integrity
The community database is automatically backed up when the community is accessed and thereafter whenever accessed after a twenty-four (24) hour period. This insures that your data is never at risk more than twenty-four hours plus the
time difference between accesses since the last backup.
Member Types There are three types of memberships in the community. These members can be added to the system using the “Add New Member” menu option. (Administration > Management Tools > Add New Member)
Tenant or Owner or CoOwner
These are residents and/or owners of property in the community. They may or may not reside within the community.
They may also be given any of the privileges listed below.
Vendor
These are members of the community that provide services to the community. They have restricted access and privileges through the “Vendor” menu option.
Vendors will have access to: Change Password, Download IRS Form W-9, Edit Profile, Vendor Instructions, Request Invoice Status, Submit Invoice, and Account Activity.
P R I V A C Y
P O L I C Y &
T E R M S O F
U S E
H E L P
O F F E N S I V E
M A T E R I A L
D A T A B A S E
B A C K U P

6
However they also may be given any of the privileges listed below. Note: This should only be done if they need access to other parts of the system.
Special
These are, as the name indicates, special users with very limited access through the “Special User” menu option. This group would usually include Real Estate Agents, Lawyers, and Collection Attorneys.
They will have access to: Change Password, Edit Profile, Community Documents, Operational Documents Community Policies and Procedures.
However they also may be given any of the privileges listed below. Note: This should only be done if they need access to other parts of the system.
Privileges and Access
Privilege Accessed Features
Everyone Home and Classifieds menus.
Standard Member
(Consists of Tenants, Owners, and CoOwner)
All the above plus Management, My Activities, Newsletter, Board, Forums, and Search menus. If activated by the community.
Administrator
All the above Standard Member menus plus Administration > Administrator Tools which provides access to Add New Management, Announcements, Background Screening, Calendars, Committees, Community Backup, Community Settings, Errors, Export to Excel, Facilities, Features, Forums, Import Excel/CSV Data, Letters/Leases/Estopels, Links, Management Setup, Members, Rent Control Definitions, Scheduler Types, Send Announcements, Year End Processing, and Reports.
Manager
All the above Standard Member menus plus Administration > Managers Tools which provides access to Add New Member, Account Activity, Background Screening, Bulletin Board, Committees, Call Log, Callback, Documents, Export to Excel, Feedback Resolution, Handyman, Import Excel/CSV Data, Invoices, Issue Work Order, Letter/Lease/Estopel, Members, Payments, Properties, Proxies, Scheduler/Calendar, Send Announcements, Sponsors, Uploads, Polls,

7
Work Orders, and Reports.
Board Member
All the above Standard Member menus plus Administration > Board of Directors Tools which provides access to Export to Excel, Feedback Resolution, Send Announcements, Scheduler/Calendar, Uploads, Polls, and Misc. Reports.
Vendor Home and Classifieds and Vendors menus.
Accountant
Home and Classifieds menus plus Administration > Accounting Tools which provides access to Community Backup, Banking, Customers, Vendors, Community, and Accounting Reports.
The Banking menu provides access to Accounts, Deposits, Check Register, Write Checks, Transfers, and Reconcile.
The Customers menu provides access to Invoices/Orders, Credits/Refunds, Accept Payments, Open Orders, Account Activity, Statements.
The Vendors menu provides access to Bills and Credits, Pay Bills, Account Activity, and Print 1099-MISC.
The Community menu provides access to General Journal, Budgets, Reserve Schedule, Products, Chart of Accounts, and Export to Excel, Import Excel/CSV Data, Process Memorized, and Create Coupon Order.
Staff Home and Classifieds menus plus Administration > Staff Tools which provides access to Call Log, Callback, Scheduler/Calendar, and Reports.
Special Users Home and Classifieds and Special User menus.

8
The General User
Everyone is a member of this category of user.
nyone who accesses the online community is a member of the general user group and has minimal access to the home page. To gain access to the other features provided to the community it becomes necessary for users to login to the community.
How Members are activated
Depending on how the community was originally setup by the system administrator will control how members are activated. There a two possible configurations, one that requires a manager to add new members, called “Management Activation Mode”,
and the second that permits members to activate themselves, “Member Activation Mode”.
1. When the community’s manager is adding a new member, Management Activation Mode, they fill out a new member profile form which consists of the first name, last name, and email address. By default, ALL new members added in this mode are given the password of “password” (lowercase), which is case sensitive. When completed the new member is sent an email informing them of the new membership and giving them instructions on how to activate their new membership. By using this method, it ensures that the user take an active role in activating their membership and complies with accepted internet standards of use. No passwords are stored within the system. Instead your community employs the salted password hashing method for password protection. Only cryptographic hash functions are used to implement password hashing.
2. Also while in the Management Activation Mode, members can request activation from the login page by clicking “Request Activation” and filling out the request form online. When submitted an email is sent to the manager containing the necessary information for the manager to then add the new member as above.
3. In the mode that allows members to activate their own membership, Member Activation Mode, this is accomplished by clicking the “Activate, It’s Free” link and completing the profile form.
Upon completion and submitting, the new member will be sent an email to the specified email address containing a URL to complete activation. The new member must go to that URL location and complete the membership application by clicking the “Click to Complete Activation” button.
A new member that receives a new membership email may also remove their membership by following the URL to deactivate. This email also contains links that also allows the member to modify notification and activation settings.
When in Management Activation Mode, users can only de-activate their account.
A A C T I V A T I N G
M E M B E R S

9
Logging In
Everyone is a member of this category of user.
nyone who accesses the online community has minimal access to the home menu item. To gain access to the other features provided to the community it is necessary for users to login to their community.
Logging In
To login, select your community from the drop down list of communities. The community uses a combination of an email address and a password to validate active
members. Enter your email address and password and then click the “Log In” button. Once you have been verified, your community home page will open and it will be indicated that you are logged in.
NOTE:
Passwords are case sensitive, meaning that a capital “A” is considered different than a lower case “a”. The default password for new users is “password’ (lowercase).
By checking the “Remember My Default Community” checkbox you can save your default community for future use. If logging in with an email link, that community will be used.
By checking the “Remember My Email Address” checkbox you can save your email address for future use. Also if you don’t remember your password click the “Forgot your password?” link to reset your current password to “password” (lowercase). An email will be sent confirming this activity.
If it has been more than one (1) month since a user last logged in, they will be presented with a dialog informing them that 'By logging into this website you agree to receive ALL communications from the Board of Directors of’ <community name> ‘, either directly Or on behalf of the Association by the current Property Manager, in electronic format utilizing the email address provided here. Communications that are required to be provided in hard copy by Statute will continue to be hand-delivered Or sent by mail.'
If the community’s administrator has allowed for member activation then you may activate your own membership by clicking the “Activate, It’s Free” link and completing the profile form.
Chapter
1
A L O G G I N G I N

10
Logging Out
To logout of the community click the Logout button. This will return you to the home page and will require you to re-login to access other community features. L O G G I N G O U T

11
Classifieds
To place a property up for sale or rent, or to offer something for sale.
embers can place items for sale or advertise anything in the classifieds. These classifieds are available for anyone that accesses the web site, login is NOT required.
For Rent or Sale
This is a listing of all properties that have been offered for sale or rent. Users can toggle back and forth between those that are for rent and for sale. Logged in members may list their properties. Properties entered here are removed after 6
months.
The Bulletin Board is for personal use only and is where owners and residents can post free classified ads.
t should not be used to advertise one's business. The community retains the right to reject an ad that it is not consistent with the purpose of this Bulletin Board, is contrary to community standards, or is offensive in nature.
NOTE: Bulletins are deleted after three months, real estate listings after six months. Please report abuses to the community’s management or Board of Directors.
Other Classifieds
Members can offer other item for sale or rent or make inquiries to purchase or rent a property by placing an ad in one of the other section provided. It should be noted
that these items are removed after 3 months.
Chapter
2
M
P R O P E R T Y
L I S T I N G S
I
F O R S A L E

12
Contacting Management
To notify management of a problem, to get clarification on something or make suggestions.
rom time to time members may find a need to contact the communities management. Communicating through the online feedback allows members to quickly inform management of problems and get quick resolution in that the community’s manager will receive an email directly from the user.
Notifying Management
To communicate directly with the management of the community, highlight the Management menu item and then click the Contact Management link. This will open the community’s management feedback page and display the management
information. If map and driving information has been activated then the “Map” and “Driving Directions” links will be active and provide information as to how to get to the management companies business location. This menu option is available on the initial site if community has turned on the “Special Management Menu Option” in community settings.
By completing the feedback page and submitting it, an email is sent directly to the community manager for action. By default replies will be by email unless otherwise specified.
An advantage of using this manner of communication with the community’s management is that a record of all correspondences is maintained and can be reviewed by your Board of Directors.
Community Map
Located under the Management menu item is a link to your communities map if one has been provided.
Site Help
This manual is available as ‘Site Help’.
Chapter
3
F
N O T I F Y
M A N A G E M E N T
M A P
H E L P

13

14
My Activities
Do you have a need to be following your communities events, find a handyman or just get to local links that may be helpful?
se the activities menu to keep informed of community events. When you are in need of help for those little projects, look here for a handyman to help you. There are also links that other neighbors have provided that you may find helpful.
Community Calendars
eeping track of where and when is vital for a smooth running community. This is where a community calendar can be a real handy tool. Clicking on the desired event will open that event for further information, such as times, locations and other pertinent information.
Click the Calendars link to open the community’s calendars page. Select the calendar to view.
Use to view available calendars. Select the calendar to view. Click 'Month-Day-List' buttons to see desired view. Use the <<, < and >, >> to move between years and months. Click an appointment to display that appointments detail. Map and Weather information is available for the event if a location is specified. Clicking the 'Email' button to send calendar. Click the 'Save' button to save the calendar or open it. Click the 'Print' button to print the calendar. Use the 'RSS' button to add this calendar to your RSS reader.
If you are using Outlook
Use the 'Publish Online' feature to publish your own calendars. Set the location to: 'http://Your_Community_Url/CommunityData/Your_Community_Directory/AssocId
?/Calendars/'.
Chapter
4
U
K C A L E N D A R S

15
‘Your_Community_Url’ is the URL you entered to access your community. ‘Your_Community_Directory’ is available from your community administrator. The ? in ‘AssocId?’ is the integer assigned to your community. These are available from your community’s administrator on the 'Community Settings'
page. Set any other features for your calendar. Including advanced features to handle
automatic updates. It is also required that the name of your personal calendar contain your membership
number in the community. This is available from your profile or community administrator.
Events
Community sponsored events.
p coming community events are presented. Clicking on the desired event will open that event for further information, such as times, locations and other pertinent information.
Community Events
Click the Events link to open the community’s events page. Select the desired event to get additional information about the event. Click the view image to open the event
for viewing/printing in a new tab/window. To view help, click the help icon.
If the event allows for RSVP’s and you have NOT RSVP’d, the RSVP icon will be available for you to RSVP.
If you have already RSVP’d, the icon will be available to remove your RSVP reservation from the event.
From this page you can also download available viewers for Microsoft and Adobe Acrobat if needed.
To add an event to the Events page, contact the community’s management or Board of Directors.
Events Calendar
Click the Events Calendar link to open the community’s calendar. By default the current day’s calendar is opened showing the scheduled events for the day. To view
help, click the help icon.
U
E V E N T S
E V E N T S
C A L E N D A R

16
The Handyman
When the need arises to find a reputable contractor or handyman.
hen you are considering some repairs or remodeling to your home, wouldn’t it be nice to be able to find a reliable contractor or merchant. Well this is just the place. Contractors and merchants listed here are entered by your friends and neighbors. They are rated for their performance, either good or bad, so you will know in advance if they are someone
you would like to hire. Just follow the three steps to finding a good contractor or merchant.
Handyman
To access the Handyman listings of the community click the Handyman link. This will open the community’s “Handyman” page. To view help in entering a new
handyman or selecting a handyman click the help icon.
Step 1: Select a category.
Step 2: Select a handyman. This will open step 3 to display detailed information about the selected handyman.
Step 3: If you are comfortable with the handyman contact them.
Do not forget to rate all handymen you have hired so that your friends and neighbors can benefit from your experience, either good or bad. In time the community will develop an extensive list of reputable contractors and merchants for all to use.
Links
Links to the outside world.
his area of the community’s site is available for members to access local or long distance links to the rest of the internet world.
Community Links
Click the Links link to open the community’s links page that displays local and long distance links to other sites that may be of interest to the community’s members.
W
H A N D Y M A N
T
L I N K S

17
Members may add links to the community by clicking “Add a New Link” and entering the URL to the site, a title to be used and a brief description of the site being added. Of course, the community retains the right to reject a link that is not consistent with the purpose of the community, is contrary to community standards, or is offensive in nature.
Directory
Who are your neighbors?
Member Directory
Click the Directory link to open the community’s directory page that displays a list of those members that have indicated their willingness to have their name, phone
number and email address made available.
Members may edit their profile by clicking “Edit Your Profile” from this page if they wish to change the information being displayed or wish to remove themselves from the directory. From the directory members will be able to send email directly to the other members listed.
Community Handbook
If there is a community handbook uploaded to the community’s site than menu option for that will appear. This is a link to the handbook and will be displayed in a
new tab or window.
View Scheduled Live Broadcast
If the community has setup live broadcasting there will be a menu option under “My Activities”. This is a link to the scheduler broadcast, by clicking “View Scheduled Live Broadcast” the scheduled live broadcast will be opened in a new browser tab or
window.
My Account
Adding and updating your personal information
eeping your profile information up to date is a vital activity for the success of your community’s web site.
By moving the mouse over the “My Account” menu item you are presented with a sub-menu of activities specific to the users account. These include; “Account
Activity”, “Change Password”, “Edit Profile”, “Handbook”, “Letter & Documents”, “List Property”, “Make Payment” and “Online Payment History”.
D I R E C T O R Y
H A N D B O O K
L I V E
B R O A D C A S T
K M Y A C C O U N T

18
Online Payment History
Are you keeping up to date about your financial activity?
The “Online Payment History” link presents your payment activity that has been made through the community web site, including onetime credit card and e-check transactions and Automatic Recurring Billing subscriptions (ARB/ACH). Displayed is the status, amount, transaction Id’s, important dates and for ARB’s the payment method and interval. For ARB/ACH transaction you have an ability to change or
cancel the subscription. There is also a link to the payment page to make it easy to make a payment.
This feature is handled by Authorize.Net and is only available if the community has completed
the required application process and activated the feature for the community.
Account Activity
Are you keeping up to date about your financial activity?
If community has been activated the accounting part of the system, then “Account Activity” link presents your account activity. This allows for your review of your activity through the community web site, including Payments (paid/received),
Receivables (invoices/orders), and Payables (invoices/bills). Displayed is the status of any payments made or received, orders, and bills.
In the upper left hand corner there is icon. When clicked the Account Activity report is opened for viewing and/or printing.
Change Password
Need a new password.
Use the “Change Password” link to change your password.
O N L I N E
P A Y M E N T
H I S T O R Y
A C C O U N T
A C T I V I T Y
P A S S W O R D S

19
Edit Profile
Keep your personal information up to date.
Use the “Edit Profile” link to view/modify your profile. From here you can change information like your name and address, email address, community membership,
properties you own or rent.
Handbook
How to use the web site.
Use the “Handbook” link to view the community’s handbook.
Letters & Documents
From time to time you may receive a letter from your community.
The “Letters & Documents” link presents you with a listing of all letters or other documents that have been sent to you from your community. In a tree view on the left, there will be shown the categories, sub-categories and year of the letters sent. By
clicking the “Year” folder a more detailed display of those letters is displayed. The actual letter can be shown by double-clicking on the file name or the icon in the detail table.
List Property
Do you want to sell your property?
The “List Property” link presents a page for listing your properties for sale or rent. Enter the pertinent information and click the “Submit” button. This will then display an additional form to upload photos of your property.
E D I T P R O F I L E
H A N D B O O K
L E T T E R S &
D O C U M E N T S
P R O P E R T Y
L I S T I N G S

20
Make Online Payment
Helping you to keep current with your community assessments.
The “Make Online Payment” link presents a page for making assessment payments to the community. This process is handled by a third party processor over a secure internet connection and is only available if the community has completed the required
application process and activated the feature for the community. It should also be noted that at no time is any credit card information being stored on the community web site and the payment request is transmitted over a secure internet connection.
Authorize.Net
o Members have the capability to make single payments via credit card or Electronic Check, E-Check. Or to setup an Automatic Recurring Billing, ARB which is also known as ACH.
PayPal
o Members have the capability to make single payments via credit card or their PayPal accounts.
M A K E A
P A Y M E N T

21
The Community Newsletter
If your community has a newsletter
he community newsletter is a great way to keep the community informed of everything from upcoming events, meetings, or whatever there is an interest in.
Current Newsletter
To access the community’s current newsletter click the ‘Current Newsletter’ link. This will open the community’s current newsletter in a new window.
Newsletters
To access the community’s other newsletters, click the ‘Previous Newsletters’ link. This will open the community’s newsletter page to display the available archived
newsletters.
Chapter
5
T
C U R R E N T
N E W S L E T T E R
N E W S L E T T E R S

22
The Board
Have you read your communities documents? Do you know your board members? Do you want to read your communities meeting minutes and financial statements?
he community is established under a particular set of rules and regulations known as the community’s documents that are filed with the local governing body to protect the rights and responsibilities of the community’s members. The community usually has a Board of Directors, elected by the membership of the community that is responsible for overseeing the
operations of the community. They usually hold regular meetings and take minutes, maintain financial statements.
Board
To access the community’s documents, Board of Directors and Financial statements click the Board menu item. This will open the community’s board page. This page
displays the current meeting schedule for the Board of Directors as well as the meeting dates for the current year. In addition there are links to the board membership, community minutes, financials and documents. There is also a link to management and a community map if available.
Agenda
By clicking the Agenda link the community’s current meeting agenda may be viewed and/or printed. This agenda should be updated from meeting to meeting so as to
present the most current agenda. Upon uploading new agendas, the previous agenda is overwritten.
Additional Board Menu Items
Additional sub-menu items that are accessible from the main “Board” menu include:
Under the “Documents” sub-menu access is provided to the community’s Financial, Insurance, Legal, Minutes, Operational, Community, Policies, and Vendor documents. This allows for all the members of the community to stay fully informed as to the operations of the community.
Chapter
6
T
B O A R D
A G E N D A
B O A R D M E N U
I T E M S

23
Under the “Board Activities” sub-menu access is provided to the Board Members, Meeting Dates, and View Meetings.
Board Activity
The Board Activity menu item presents a sub-menu of items specific to the Community’s Board of Directors. There are the “Board Members”, “Meeting dates”, and “View Meetings”. The specifics of each of these items are explained below.
Board Members
To access the members of the Board of Directors click the “Board of Directors” link or the “Board Members” menu option. This will provide a listing of the current members of the Board of Directors along with their position held, phone number if available
and email address. You can directly email a board member by clicking their email address and creating an email as you normally would.
Meeting Dates
By clicking the “Meeting Dates” link a page containing the next scheduled board and annual meeting and all other scheduled meetings is presented.
View Meetings
By clicking the “View Meetings” menu item you will be presented with a list of board meeting video’s that are available for membership viewing. This allows those members that cannot make the scheduled board meeting to review the proceedings.
This can be extremely useful for out of town owners.
Documents
The Documents menu item presents a sub-menu of the various types of community documents. Below is a description of those types of documents. From these pages
you can view and print the respective documents. Also you can download available viewers for Microsoft and Adobe Acrobat.
Community Documents
By clicking the Community Documents link the community’s documents will be available for viewing and/or printing. This page presents the communities documents that pertain to the community operation. From this page you can also download
available viewers for Microsoft and Adobe Acrobat.
B O A R D
A C T I V I T Y
B O A R D O F
D I R E C T O R S
M E E T I N G S
D A T E S
V I E W
M E E T I N G S
D O C U M E N T S
C O M M U N I T Y
D O C U M E N T S

24
Financials
By clicking the Financial Documents link a page containing links to the current year’s financial statements is presented. It shows all the months of the year and those for which there is a copy of the financial statements will be active. From here you can
view the Balance Sheet, Income Statement and Reserve Statement for the selected month that is active. Change the selected year to view previous year’s financial statements. If available you can view the currently selected year’s Budget report by clicking on the Budget link. From this page you can also download available viewers for Microsoft and Adobe Acrobat.
Insurance Documents
By clicking the Insurance Documents link the community’s insurance documents will be available for viewing and/or printing. From this page you can also download available viewers for Microsoft and Adobe Acrobat.
Legal Documents
By clicking the Legal Documents link, community legal documents will be available for viewing and/or printing. From this page you can also download available viewers for Microsoft and Adobe Acrobat.
Minutes
By clicking the “Minutes” link a page containing links to the current year’s minutes is presented. It shows all the months of the year and those for which there is a copy of
the minutes will be active. Change the selected year to view previous year’s minutes. From this page you can also download available viewers for Microsoft and Adobe Acrobat.
Operational Documents
By clicking the Operational Documents link, documents pertaining to the day to day operations of the community will be available for viewing and/or printing. From this page you can also download available viewers for Microsoft and Adobe Acrobat.
Policies Documents
By clicking the Policies Documents link, community policy documents will be available for viewing and/or printing. From this page you can also download available viewers for Microsoft and Adobe Acrobat.
Vendor Documents
By clicking the Vendor Documents link, community documents pertaining to vendors will be available for viewing and/or printing. From this page you can also download available viewers for Microsoft and Adobe Acrobat.
F I N A N C I A L
D O C U M E N T S
I N S U R A N C E
D O C U M E N T S
L E G A L
D O C U M E N T S
M I N U T E S
O P E R A T I O N A L
D O C U M E N T S
P O L I C Y
D O C U M E N T S
V E N D O R
D O C U M E N T S

25
Other Documents
By clicking the Other Documents link, community documents pertaining to the community other than those above will be available for viewing and/or printing. From this page you can also download available viewers for Microsoft and Adobe
Acrobat.
Estimates
By clicking the Estimates link, which is only available to Administrators, BOD Members, and Managers, estimates received by the community will be available for
viewing and/or printing. From here old estimates can be deleted as necessary.
O T H E R
D O C U M E N T S
E S T I M A T E S

26
The Community Forums
To discuss community issues with other members.
o communicate with other members of the community there are forums. All members have access the “Resident Forum” which is for posting general questions or news, and participate in community discussions. If you are identified as an Administrator you will also have access to the “Administrator Forum”, if a Board member you will be given access to the “Board of Directors
Forum”.
Forums
There are three standard forums; ‘Administrators/Managers’ (Administrators and Managers Only), ‘Board of Directors’ (Board Members Only), ‘Residents’. If committees
have been established, there will also be separate forums for those committees (Available to members of that committee only). Click the Forums link to communicate directly with other members of the community. This will open the forums page from which you can select the forum to enter. Once in a particular forum you may start a new thread or select an existing thread if there are any available.
Click the new thread link to create a new thread in the forum. This will open a page from which to post a new message. Enter a subject for this new thread and type the message in the area designated. Click the “Submit” button to add this new thread. You can control how this message is presented and processed by checking the desired features before submitting.
Clicking a desired thread presents the parent thread with all its children. You may reply to any of the messages by clicking the post reply link to open the “Post a Reply Message” page. Enter a reply message and click the “Submit” button to add the reply. You can change the subject if you like and can control how this message is presented and processed by checking the desired features before submitting. If you are the author of a thread you may edit that message by clicking the edit link and making any changes you desire.
Chapter
7
T
F O R U M S

27
The Community Search
To find community information.
o find community information just search for it.
Search
Click the Search link to find information that may be in the community’s data directory. This will open the search page from which you can enter text to search for.
Note that this can take some time to perform depending on the number of files being stored for the community.
Chapter
7 Chapter
8
T
S E A R C H

28
Administrators
Those who are tasked with keeping the site operating for the good of the community.
n addition to the capabilities of the normal user and the Board of Directors as noted above the Administrator is provided additional features under the “Administration” page within the “Administrative Tools” section. These include Association and Management configuration, User and Bulletin Board management, Adding Members and Properties, managing Local Links,
Advertisements, Handyman Listings, Forums, the community’s documents and much more.
Administrators Tools
Members of the community or other persons that have been appointed by the community to administrator the community’s web site. These persons have access to
the “Board of Directors Tools” and the “Administrative Tools” on the “Administration” page.
Administrators are responsible for maintaining the functionality of the site. They usually do not control the availability of the site on the internet. That job is designated to the Web Master.
Add New Management
Adding a new management company to the community’s site.
se to add new management companies to the Web Site.
Enter the appropriate information. Click the 'Submit' button to save the new management company when done. Required information is indicated by ‘*’.
Chapter
9
I
A D M I N
U A D D

29
Announcement Management
Notifying members.
se to manage/monitor the community’s announcements. Click the icon to display the pages help and follow the directions for managing the community’s documents.
Click on the Announcements link to manage/monitor announcements.
By default, all community announcements are displayed for the previous twelve months. The criteria being used to retrieve data can be changed by setting the filter. Change the “Status”, and/or “Date Ranges” to filter the data to you own needs.
The announcements list contains the date created, who created the announcement, and the sent status. Selecting the page selectors at the bottom of the announcement grid will page through the available announcements. Select an announcement from the list by clicking the edit icon to display that announcements detail information. You can delete the announcement by clicking the mark.
The announcement detail displays specific information about the selected announcement. Only announcements that have NOT been sent may be edited. The date when this announcement is to be sent can be changed by entering a new date in the “Send On” textbox. The sender of the announcement can be modified to reflect the email address of the sender. The recipients to whom the announcement will be sent can be modified by selecting either “Requesting Members Only” or “All Members”. The “Subject” line shows the subject of the announcement. The announcement textbox area contains the actual announcement. The file name in the attachment textbox shows the desired file to attach. Click the “Save Changes” button when changes have been completed.
Background Screening
Who are they?
se Background Screening to order background reports for the community.
Click on the Background Screening link to order a background report.
This will open a login screen in another browser window or tab. Login with your username and password. Click the ‘Order’ tab and enter the required information.
U A N N O U N C I N G
U B A C K G R O U N D
S C R E E N I N G

30
Community Calendars
Community calendars.
eeping track of where and when is vital for a smooth running community. This is where a community calendar can be a real handy tool. Clicking on the desired event will open that event for further information, such as times, locations and other pertinent information.
Click the Calendars link to open the community’s calendars page. Select the calendar to view.
Use to view available calendars. Select the calendar to view. Click 'Month-Day-List' buttons to see desired view. Use the <<, < and >, >> to move between years and months. Click an appointment to display that appointments detail. Map and Weather information is available for the event if a location is specified. Clicking the 'Email' button to send calendar. Click the 'Save' button to save the calendar or open it. Click the 'Print' button to print the calendar. Use the 'RSS' button to add this calendar to your RSS reader.
If you are using Outlook
Use the 'Publish Online' feature to publish your own calendars. Set the location to: 'http://Your_Community_Url/CommunityData/AssocId?/Calendars/'. Your_Community_Url is the URL you entered to access your community. The ? in AssocId? is the integer assigned to your community. This is available from your community’s administrator on the 'Community Settings' page. Set any other features for your calendar. Including advanced features to handle
automatic updates. It is also required that the name of your personal calendar be the same as your member
name in the community.
K C A L E N D A R S

31
Committees
Committees.
se to create committees within the community. These committees allow for committee
members to communicate privately with other members of that committee. Click the icon to display the pages help and follow the directions for managing the community’s committees.
Community Backup
Backup database.
se to back-up the community’s database and save a local copy of the communities data.
Click the icon to display the pages help and follow the directions for managing the community’s database.
Click on the Community Back-up link to back up the community database and optionally download a local copy. Select the desired backup to perform.
Full Back-up: Does a full database back-up. Named:?????.bak. Differential Back-up: Does a database backup of differences since last backup.
Named:?????_Differential.bak Dated Back-up: Does a full database backup, naming the file with the current time and
date. Named:?????_Dated_timedate stamp.bak Where ????? is your database name. Check ‘Save Local Copy’ to create and download a copy of the community’s data. This
should be saved to a secure location, USB, or CD/DVD for safe keeping.
Community Settings
The community’s details.
he community usually consists of an association of some sort, such as a homeowners association, a condo association or even an apartment complex. This organization can be configured to present its web site in different ways. Click the Community Settings link to edit association settings, meetings, and other related items.
These are the basic settings for the community, the name and address of the association. The short name is used throughout the site where the full name is not
U
U B A C K U P
T
S E T T I N G S

32
appropriate. Email processing, enabled by default, automatically sends letters via email as well as allowing for printing and snail mail. Additionally, a member must also authorize use of email.
The default accounting mode is “Accrual Based”. If your community wants to use “Cash Basis” select that option. Note: Some states, like Florida, require “Accrual Based” accounting for Condominiums and HOA’s.
Select the Base Currency for the community, by default USD is selected. This is use to determine what currency monies are displayed in.
The home page features provides for turning on/off parts of the home page. Administrators can configure which features are presented on the home page and
preview them before making them public. These features are provided in groupings of two (2) columns and five (5) rows. Check the column and row for the feature desired and then preview those selections. These features can be customized as desired on a community by community basis.
Sites may display the National Weather link by checking the checkbox to enable this feature.
Select the menus that the site should enable/display to its users.
Accounting: Enables the accounting feature of the system. This also enables the ‘Account Activity’ feature under the ‘My Activity/My Account’ menu. Be sure to give someone the ‘Accountant’ privilege to have access to this menu option under ‘Administration’.
Board: Enables the ‘Board’ menu option and its sub-menu items.
BOD Announcements: Selecting this option enables Board of Director members to send announcements from the ‘Board of Directors Tools’ menu option.
Calendars: This enables the ‘Calendars’ menu option for ‘My Activities’, Administrator Tools’, ‘Board of Directors Tools’, ‘Managers Tools’, and ‘Accounting Tools’. Available calendars, if available, are displayed based on the member that is logged in.
Classifieds: This enables the ‘Classifieds’ menu option. Note: Initially, the ‘Classified’ menu is ONLY affected by the settings for the first community in the list of available communities because at that point no one is logged in.
Directory: Turns on the ‘Directory’ under the ‘My Activities’ menu.
Events: Turns on the ‘Events’ menu option under ‘My Activities’.
Forums: Select this to enable the community ‘Forums’ menu option. Once enabled, the available forums will be determined by the privileges of the logged in member.
Handyman: Turns on the ‘Handyman’ under the ‘My Activities’ menu.
Links: Turns on the ‘Links’ menu option under the ‘My Activities’ menu.
H O M E P A G E
W E A T H E R
M E N U S

33
Letters & Documents: Enable the ‘Letters & Documents’ menu option under the ‘My Activities/My Account’ menu.
Make Payments: Turns on the ‘Make Payments’ menu under the ‘My Activities/My Account’ menu. This feature is handled by Authorize.Net and is only available if the community has completed the required application process and activated the feature for the community.
Management: Enables the ‘Management’ menu. This then sets up the sub-menus based on availability of certain documents.
Newsletter: Turn on the ‘Newsletter’ menu option.
Scheduler/Calendar: Enables ‘Scheduling and Calendar’. This allows for scheduling facilities for events by reserving the space for the desired date and time.
Search: Select this to enable search capabilities for the community.
Payment History: This will turn on the ‘Online Payment History’ menu option under the ‘My Activities/My Account’ menu. This feature is handled by Authorize.Net and is only available if the community has completed the required application process and activated the feature for the community.
Proxy Voting: Enables managers to create proxies to allow members to vote online.
Vendor Interface: Turns on the ‘Vendor’ menu option for those members that have vendor privileges. This allows vendors to submit invoices online through the community site.
Special: Enables ‘Special Users’. This allows for adding ‘Special Users’, usually Realtors and Lawyers, which have limited access to the system
Enter the maximum number of board members for this association.
Tracking is a feature that can be used to follow what users are doing on the community site. Tracking settings are used to set the overall tracking capabilities of
the community site. As the administrator you can turn tracking on or off for all members and you can delete all the current tracking history. It should also be noted that tracking can also be turned on or off on individual member accounts. This can be handy if it becomes necessary to trouble shoot specific error that may be arising with individual users.
An overall site background image or color can be defined in this section. If an image is defined than it will be displayed as the overall background for the community. This file must be a JPG, GIF or PNG type file. High resolution files are desirable here so
they will cover the entire background where possible. This image is NOT repeated so the larger the image is, within reason, the better it will appear.
B O A R D
T R A C K I N G
S I T E
B A C K G R O U N D

34
If no image is defined than a default color will be used unless a new background color is selected. With a little trial and error a nice combination can be selected. Delete the overall background image file to NOT display an overall background header image.
The main detail background and or color may be specified in this section. This is the background to be displayed to the right of the login screen and for the main home page. If an image or color is not specified than a default color will be used.
Additionally by setting the color to ‘Transparent’ the settings for the overall background will be seen.
Delete the main detail image file to NOT display a detail image.
Again a little trial and error will result in combination that is best for the community.
The community logo can be uploaded here. This image will be used on letters and statements. This file must be a JPG, GIF or PNG type file, avoid large files Delete
the logo image file to NOT display a logo on letters and statements.
This section is to designate an image to be displayed as a map of the community. Use the browse button to select the image file to be used for the communities map. Note:
This file must be a JPG, GIF or PNG.
This section is to configure which management company or organization will be used by the community and how members are to be added to the community. Select the
desired management company from the dropdown list. Click the manner in which the community will add members, by management or by membership. Selecting 'Management' requires management to enter limited membership profile information with a default password for the new member. This password will be “password” and is case sensitive. Selecting 'Membership' allows new members to enter their own initial profile when activating their membership. This enables the “Activate It’s Free” link on the login page.
Configure the communities meeting schedule by entering the required information and meeting place. This is used on the “Board” page to display the communities
meeting schedule for the current year and when the next meeting is scheduled for.
If the community provides online payments, then configure the community’s payment processor information. This information is provided by the payment processing company that will be handling the community’s online payments.
Currently “Authorize.Net” and “PayPal” are the services that are supported. Contact Authorize.Net or PayPal for further information. This feature is handled by Authorize.Net or PayPal and is only available if the community has completed the required application process and activated the feature
for the community. See the online help by clicking the icon for full instructions on setting up this feature.
When complete click the “Submit” button to save your changes and configure the community.
M A I N D E T A I L
B A C K G R O U N D
L O G O
M A P
M A N A G E M E N T
M E E T I N G S
P A Y M E N T
P R O C E S S I N G

35
Error Management
When there is an error.
se to manage errors that are captured during the operation of the community web site. Click
the icon to display the pages help and follow the directions for managing the community’s errors.
Find an error in the list by moving up and down through the list. Change pages by selecting the page selectors at the bottom of the user grid.
Select an error from the list by clicking icon to view the error detail. To permanently delete a document, click on the icon. Use extreme caution in using this functionality, as it can NOT be undone.
Feature Management
Home Page Features.
se to manage the features that are available for placing on the home page. These are the informational and directional information displayed on the home page.
Find a feature in the list by moving up and down through the list. Select the features from the list. Use the control and shift keys to select multiple features. Click the “Delete Home Page Feature” to delete the feature. If you delete a feature currently in
use, it will be removed from the home page. Use extreme caution in using this functionality, as it can NOT be undone.
Facility Management
Where.
se to manage and monitor the community’s facilities. Click the icon to display the pages help and follow the directions for managing the community’s facilities.
U E R R O R S
U H O M E P A G E
F E A T U R E S
U

36
Manage all the community’s facilities from here. Use to entry what facilities are available in the community. These will be the facilities that can be reserved using Scheduler/Calendar.
To permanently delete a facility, click on the icon.
Forums Management
Monitoring those who have things to say.
se to manage and monitor the community’s forums. Click the icon to display the pages help and follow the directions for managing the community’s forums.
Manage all the community’s forums from here. To begin, select the forum to manage from the list to display all the active messages for that forum.
Find a message in the list by moving up and down through the list. Change pages by selecting the page selectors at the bottom of the grid.
View the message by clicking the read image icon.
To permanently delete a message, click on the icon. This will also delete any child messages associated with the message being removed. Use extreme caution in using this functionality, as it can NOT be undone.
Letter/Lease/Estopel Management
Letter/Lease/Estopel Definitions.
se to manage community letter, lease and estopel definitions. Click the icon to display the pages help and follow the directions for creating Letter/Lease/Estopel definitions.
Letter/Lease/Estopel definitions are presented in a grid showing all currently created letter definitions. Shown is the “Category”, “Sub-Category”, “Reference”, “Reference
Text”, “Body text”, “Comment Text” and “Template”. By default all Categories and Sub-Categories are displayed. From here you can change the retrieved letter definitions by selecting the desired Category and/or Sub-Category. Additionally letter definition can be deleted, edited, previewed and printed, and created. To move from definition page to definition page, select the desired page at the
M A N A G E
F A C I L I T I E S
U M A N A G E
F O R U M S
U D E F I N I T I O N

37
bottom of the grid. Note: There MUST be at least one defined category in order for managers to create template based letters or upload letters previously created by other means.
Clicking the icon will delete that letter definition. Use extreme caution in using this functionality, as it can NOT be undone. Deleting a definition does NOT delete the letter folders or files already on the system.
Click on the icon to edit a letter definition. This will open another window where you can edit the selected letter definition, where changing the Category, Sub-Category and other details will change the selected Letter Template. Click the
“Submit” button to save the changes.
Click on the icon to create a new letter. This will open another window where you create a new letter definition. Select the desired Category, Sub-Category and Letter Template for this letter. New Categories and Sub-Categories can be created by
checking the appropriate checkbox and entering the new Category or Sub-Category name up to 25 characters. The Letter Templates have been pre-defined in PDF formats. Select the desired Letter Template appropriate for this letter definition.
There are four sections available in which text can be inserted into the letter definition;
Reference Section: Provides a place for a reference which is used at the top of the letter. This has a maximum length of 100 characters.
Reference Text Section: Usually used to provide additional text concerning the Reference. This text will be indented and italic when a letter is created.
Letter Body Text Section: This is the letters body text. It can contain multiple paragraphs and other configurations as created in this section.
Comments Text Section: This is an additional section of the letter. It can contain multiple paragraphs and other configurations as created in this section and will be located after the Body Text Section when the letter is created.
Note: Lease/Estopel/Intent to Lien/Intent to Foreclose/Release of Lien type letters will place the Reference section before the actual information contained in these type letters. While the Reference Text, Letter Body Text, and Comments Text sections are placed after the actual information.
When completed, click the “Submit” button to save the changes.
D E L E T E
D E F I N I T I O N
E D I T
D E F I N I T I O N
C R E A T E N E W
D E F I N I T I O N

38
To preview and/or print the selected letter definition, click the icon. This will open the selected letter in another browser window for viewing and/or printing from your browser. This is NOT available for Lease/Estopel/Intent to Lien/Intent to Foreclose/Release of Lien type definitions because there is additional interview
information required for leases. To preview go to the Managers Tools and select Letters/Leases/Estopel and create a test letter to preview.
Except for Estopel and Leases, letters will fit double window envelopes provided by Harland Clarke. We have tested CE17S envelopes. Call 1-800-503-2345 to place orders.
Link Management
Local Links.
se to manage local links to the Web Site. Click the icon to display the pages help and follow the directions for managing links.
Find a link in the list by moving up and down through the list. Change pages by selecting the page selectors at the bottom of the user grid. Selecting a link from the
lists will open the site in a new browser window for review.
To permanently delete a link, click on the icon. Use extreme caution in using this functionality, as it can NOT be undone.
Management Settings
Who is managing the community?
he community is usually managed by a property management company which assists the community in handling its day to day affairs. Click the Management Settings link to open the management settings page where you can edit/view management company information.
Use the management settings page to view/modify management information. The managers name and email address are used when contacting the management
company using the management feedback page.
P R E V I E W &
P R I N T I N G
D E F I N I T I O N
U L I N K S
T S E T T I N G S

39
The map and driving URL’s are used on the management feedback page to provide directions to the management company. This can be the MapQuest.com URL that relates to the management companies address.
Use the browse button to select the image file to be used for the management company links. Note: This file must be a JPG, GIF or PNG type file 120px wide by 46px high.
Click the “Submit Changes” button to save your changes.
Rent Control Definitions
Some communities can be rent controlled.
se to define rent controls that may be used in the community. Click the icon to display the pages help and follow the directions for defining rent controls.
Click on the Rent Controls Definitions link to create or edit rent control definitions.
Click the delete button to delete the selected Rent Control. Caution: this CANNOT be undone.
Click the edit button to edit the selected Rent Control.
Click the plus button to add new Rent Controls.
Adding a Rent Control:
Enter a name, description for the new Rent Control.
Select the term interval; 'None', 'Day(s)', 'Week(s)', 'Month(s)', 'Year(s)' for the Rent Control. This represents the interval that applies to this Rent Control.
Enter the term length, 0-52. This is the number of intervals to apply. Ex: if the term interval is 'Month' and the term length is 3 then this formula applies every three (3) months.
Enter a multiplier to use with this Rent Control. Ex: 0.25, 1.25, 2.56, 2.5678 etc. NOTE: The decimal precision is to 4 places and will be rounded up or down if additional places are specified.
Click the 'Submit Button' to add the Rent Control.
Apply the same criteria as above for adding a Rent Control.
U R E N T
C O N T R O L

40
Scheduler Types
The type of event for which a reservation is made.
se to define scheduler types that may be used in the community. Click the icon to display the pages help and follow the directions for defining scheduler types.
Create scheduler types. Click the delete button to delete the selected Scheduler Type. Caution: this CANNOT be undone.
Send Announcement
Notifying members.
ending the community an announcement is a quick and easy process for administrators. This can be used by administrators and management to get urgent information to the community’s membership.
Click on the Announcements link to create an announcement. The recipients to whom the announcement will be sent are determined by selecting either “Requesting
Members Only” or “All Members”. Announcements can be sent from either “Member Services” or the person actually creating the announcement. Enter the announcement subject on the “Subject” line then type your announcement in the announcement textbox area. An attachment can also be added to the announcement by entering the file name in the attachment textbox or clicking the “Browser” button to select the desired file to attach. Click the “Submit” button to send the announcement when ready. When complete, a message to that effect will be displayed.
Schedule/Start Live Broadcast
Live broadcasts allow members to attend meetings from anywhere.
cheduling live broadcasts is like any other community announcement is a quick and easy process. If live broadcasting has been enabled the “Schedule/Start Live Broadcast” menu option will be available.
Click on the “Schedule/Start Live Broadcast” link to create an announcement for a scheduled live broadcast. The recipients to whom the announcement will be sent are determined by selecting either “Requesting Members Only” or “All Members”.
Announcements can be sent from either “Member Services” or the person actually creating the
U S C H E D U L E R
T Y P E S
S A N N O U N C I N G
S L I V E
B R O A D C A S T S

41
announcement. Enter the broadcast date and time in the appropriate locations. Click the “Notify Member of Live Broadcast” button to send the announcement when ready.
Also from this same menu option you can start a live broadcast. Click the “Start Live Broadcast” link which will open the broadcast in a new browser tab or window. In this tab or window, login using the provided broadcast channel username and password. Then select the desired broadcast channel name and start the broadcast. This will open the broadcast screen where you may be asked to allow access to your camera and microphone. Select “Allow”, and then click the “Start Broadcast” button to actually start the broadcast. From this broadcast screen you can control other features of live broadcasting.
Import data from Excel or CVS
Administrators will find it helpful to be able to import existing Excel/CSV data directly into the community.
mport Excel/CSV workbook data into the system and avoid importing duplicates. This will make the administrators life a bit easier.
To import, select the appropriate type from the list either “Members”, “Properties” or “Authorize.Net Transactions”. Special Note: We have seen some CSV (comma
separated values) files that don't import properly. It is recommended to convert these to Excel Workbook formatted as shown below and then import the Excel file.
To import members there must be a worksheet named “Members” in the Excel workbook. This is very specific and is also case sensitive. It must be “Members”, not
“members” or “Member”. Everyone gets the default password (“password”) which is case sensitive. Members that where NOT added will be indicated at the end of the import process.
The worksheet must have the following 17 named columns (column names are case sensitive):
Email: This must be a valid email address. (If blank, “[email protected]” will be used, where ??? will be an incremented number)
Lastname: The member’s last name. (can be blank)
Firstname: The member’s first name. (can be blank)
MI: The member’s middle initial. (can be blank)
Addr1: The member’s first address line. (can be blank)
Addr2: The member’s second address line. (can be blank)
I I M P O R T T Y P E
M E M B E R S

42
City: The member’s city. (can be blank)
State: The member’s state. (can be blank) (see State Codes below).
PostalCode: The member’s postal code or zip code. (can be blank)
Country: The member’s country. (can be blank) (see Country Codes below).
Phone: The member’s phone. (can be blank)
CellPhone: The member’s cell phone. (can be blank)
MemberType: The member’s type. (can be blank, defaults to “Owner”)
Notify: Notify member of announcements. (can be blank, defaults to “False” else must be 0 for "No" or 1 for "Yes")
Directory: Include member in directory. (can be blank, defaults to “False” else must be 0 for "No" or 1 for "Yes")
EmailAuth: Member has authorized email communications. (can be blank, defaults to “False” else must be 0 for "No" or 1 for "Yes")
DOB: Members date of birth (can be blank, defaults to 01/01/0001)
To import properties there must be a worksheet named “Properties” in the Excel workbook. This is very specific and is also case sensitive. It must be “Properties”, not
“property” or “properties”. Properties that where NOT added will be indicated at the end of the import process.
The worksheet must have the following 21 named columns (column names are case sensitive):
PropType: The property type; Condo=0, Single Family House=1, Apartment=2.
RentControled: 0=None.
Building: This is the building number if applicable. (can be blank)
Addr1: The properties address. (cannot be blank)
Addr2: The properties second address line (can be blank)
City: City where property is located (can be blank)
State: State or Province where property is located. (see State Codes below).
P R O P E R T I E S

43
PostalCode: can be blank
Country: Country where property is located can be blank (Defaults to "USA"). Otherwise must comply with US Postal country codes (see Country Codes below).
CouponAmt1: must be between 0.00 and 999999.99
CouponAmt2: must be between 0.00 and 999999.99
CouponAmt3: must be between 0.00 and 999999.99
CouponAmt4: must be between 0.00 and 999999.99
CouponAmt5: must be between 0.00 and 999999.99
CouponAmt6: must be between 0.00 and 999999.99
CouponAmt7: must be between 0.00 and 999999.99
CouponAmt8: must be between 0.00 and 999999.99
CouponAmt9: must be between 0.00 and 999999.99
CouponAmt10: must be between 0.00 and 999999.99
CouponAmt11: must be between 0.00 and 999999.99
CouponAmt12: must be between 0.00 and 999999.99
State Name Code
Alberta
Aguascalientes
Alaska
Alabama
Arkansas
American Somoa
Arizona
British Columbia
Baja California
Baha California Sur
California
Campeche
AB
AGU
AK
AL
AR
AS
AZ
BC
BCN
BCS
CA
CAM
V A L I D S T A T E
C O D E S

44
Chihuahua
Chiapas
Mexico City
Colorado
Coahuila
Colima
Connecticut
District of Columbia
Delaware
Durango
Florida
Federated States of Micro
Georgia
Guerrero
Guam
Guanajuato
Hawaii
Hidalgo
Iowa
Idaho
Illinois
Indiana
Jalisco
Kansas
Kentucky
Louisiana
Massachusetts
Manitoba
Maryland
Maine
México
Marshall Islands
Michigan
Michoacán
Minnesota
Missouri
Morelos
CHH
CHP
CMX
CO
COA
COL
CT
DC
DE
DUR
FL
FS
GA
GRO
GU
GUA
HI
HID
IA
ID
IL
IN
JAL
KS
KY
LA
MA
MB
MD
ME
MEX
MH
MI
MIC
MN
MO
MOR

45
Northern Mariana Islands
Mississippi
Montana
Nayarit
New Brunswick
North Carolina
North Dakota
Nebraska
Newfoundland
New Hampshire
New Jersey
Nuevo León
New Mexico
Nova Scotia
Northwest Territory
Nevada
New York
Oaxaca
Ohio
Oklahoma
Ontario
Oregon
Pennsylvania
Prince Edward
Puerto Rico
Puebla
Palau
Quebec
Querétaro
Rhode Island
Quintana Roo
South Carolina
South Dakota
Sinaloa
Saskatchewan
San Luis Potosí
Sonora
MP
MS
MT
NAY
NB
NC
ND
NE
NF
NH
NJ
NLE
NM
NS
NT
NV
NY
OAX
OH
OK
ON
OR
PA
PE
PR
PUE
PW
QC
QUE
RI
ROO
SC
SD
SIN
SK
SLP
SON

46
Tabasco
Tamaulipas
Tlaxcala
Tennessee
Texas
Utah
Virginia
Veracruz
Virgin Islands
Vermont
Washington
Wisconsin
West Virginia
Wyoming
Yukon Territory
Yucatán
Zacatecas
<None>
TAB
TAM
TLA
TN
TX
UT
VA
VER
VI
VT
WA
WI
WV
WY
YT
YUC
ZAC
ZZ
Country Name Code
Albania TIA
Algeria ALG
Angola LAD
Argentina BUE
Aruba CUR
Australia SYD
Austria VIE
Bahrain BAH
Bangladesh DAC
Belgium BRU
Belize BZE
Benin COO
Bolivia LPB
Brazil RIO
Bulgaria SOF
V A L I D C O U N T R Y
C O D E S

47
Burkina Faso OUA
Burundi BJM
Cameroon DLA
Canada CAN
Central African Republic BGF
Chile SCL
China SHA
Colombia BOG
Congo BZV
Costa Rica SJO
Cote d'Ivoire ABJ
Cuba HAV
Czechoslovakia PRG
Denmark CPH
Dominican Republic SDQ
Ecuador GYE
Egypt CAI
El Salvador SAL
Ethiopia ADD
Fiji SUV
Finland HEL
France PAR
French Guiana CAY
Gabon LBV
Germany (East) SXF
Germany (West) FRA
Ghana ACC
Great Britain LON
Greece ATH
Guatemala GUA
Guyana GEO
Haiti PAP
Honduras TGU
Hong Kong HKG
Hungary BUD
Iceland REK
India DEL
Indonesia JKT

48
Iran THR
Iraq BGW
Ireland DUB
Israel TLV
Italy ROM
Jamaica KIN
Japan TYO
Jordan AMM
Kenya NBO
Korea SEL
Kuwait KWI
Lebanon BEY
Liberia ROB
Libya TIP
Luxembourg LUX
Madagascar TNR
Malaysia KUL
Mali BKO
Mauritania NKC
Mauritius MRU
Mexico MEX
Morocco CAS
Mozambique MPM
Netherlands AMS
New Zealand AKL
Nicaragua MGA
Niger NIM
Nigeria LOS
Norway OSL
Oman MCT
Pakistan KHI
Panama PTY
Papua New Guinea POM
Paraguay ASU
Peru LIM
Philippines MNL
Poland WAW
Portugal LIS

49
Qatar DOH
Reunion RUN
Romania BUH
Rwanda KGL
Saudi Arabia DHA
Senegal DKA
Sierra Leone FNA
Singapore SIN
Somalia HGA
South Africa JNB
Spain MAD
Sri Lanka CMB
Sudan KRT
Suriname PBM
Sweden STO
Switzerland BSL
Syria DAM
Taiwan TPE
Tanzania DAR
Thailand BKK
Tobago POS
Togo LFW
Tunisia TUN
Turkey IST
Uganda KLA
United Arab Emirates DXB
United States USA
Uruguay MVD
USSR MOW
Venezuela CCS
Yemen SAH
Yugoslavia BEG
Zimbabwe HRE
<None> ZZZ
To import transactions there must be a worksheet named “Transactions” in the CSV file. This is very specific and is also case sensitive. It must be “Transactions”, not “transactions”. If necessary, this can be changed using
A U T H O R I Z E N E T
T R A N S A C T I O N S

50
Microsoft Excel. How transactions where processed will be indicated at the end of the import process.
The worksheet must have the following 12 named columns (column names are case sensitive):
SubscriptionId: The subscription Id.
SubscriptionStatus: The subscription status.
Payment #: The payment number.
TotalRecurrences: 9999 = On going
TransactionId: The transaction Id.
Amount: The amount of this transaction.
Currency: The currency this transaction is conducted in.
Method: Credit Card, E Check
CustFirstName: Customers first name.
CustLastName: Customers last name.
RespCode: The response code.
RespText: The response text.
To import chart of accounts there must be a worksheet named “ChartOfAccts” in the Excel workbook. This is very specific and is also case sensitive. It must be “ChartOfAccts”, not “chartofaccts” or “chartOfAccounts”. Accounts that where
NOT added will be indicated at the end of the import process.
The worksheet must have the following 5 named columns (column names are case sensitive):
AcctId: The account Id. (can NOT be blank)
AcctType: This is the account type (use the following numbers to represent the type of account); 1=Cash, 2=Bank Account, 3=Accounts Receivable, 4=Assets, 5=Fixed Assets, 6=Other Assets, 7=Accounts Payable, 8=Equity, 9=Liability, 10=Long Term Liability, 11=Credit Card,12= Loan, 13=Income, 14=Other Income, 15=Expenses, 16=Other Expenses, 17=Cost of Goods, 18=Reserves. (can NOT be blank)
AcctName: This is the name of the account. (can NOT be blank)
C H A R T O F
A C C O U N T S

51
SubCategory: This is the account that this account is a sub-category of. (can be blank)
Description: Description of this account. (can be blank)
Before importing the data into the system, you must first upload the Excel spreadsheet.
Click "Upload Excel Workbook" to select the spreadsheet to upload.
Click the "Browse" button to find the file to upload.
Click the "Upload File" button to perform the actual upload.
You can view the data prior to importing using the “View Excel” feature to verify its format and integrity.
Click the "View Excel Data" button to view the data in the uploaded file.
This is presented in a grid for verification that this is indeed the data you want to import and that is in the proper format.
If the format does not conform to the above layout, edit the worksheet to match the above layouts.
After you are satisfied with the data format and the Excel file layout, the actual importing is done here
Click the "Import Excel Data" button to actually import the Excel data into the system.
Duplicate data is skipped so as to not have multiple records.
Data that was not imported is displayed.
All newly imported members will be given a default password of “password”. It should be noted that this is all lowercase and that passwords are case sensitive.
U P L O A D D A T A
V I E W D A T A
I M P O R T D A T A

52
Export data to Excel
Administrators will find it helpful to be able to export existing data directly into Excel.
xport data to an Excel. This will make the administrators life a bit easier.
To export members to an Excel worksheet named “Members”.
The worksheet will have the following 13 named columns (column names are case sensitive):
Email:
Lastname: The member’s last name. (can be blank)
Firstname: The member’s first name. (can be blank)
MI: The member’s middle initial. (can be blank)
Addr1: The member’s first address line. (can be blank)
Addr2: The member’s second address line. (can be blank)
City: The member’s city. (can be blank)
State: The member’s state. (can be blank)
PostalCode: The member’s postal code or zip code. (can be blank)
Country: The member’s country. (can be blank)
Phone: The member’s phone. (can be blank)
CellPhone: The member’s cell phone. (can be blank)
MemberType: The member’s type. (can be blank)
Notify: Notify member of announcements. (can be blank, defaults to “False” else must be 0 for "No" or 1 for "Yes")
Directory: Include member in directory. (can be blank, defaults to “False” else must be 0 for "No" or 1 for "Yes")
EmailAuth: Member has authorized email communications. (can be blank, defaults to “False” else must be 0 for "No" or 1 for "Yes")
E M E M B E R S

53
DOB: Members date of birth (can be blank, defaults to 01/01/0001)
To export properties to an Excel worksheet named “Properties”.
The worksheet will have the following 9 named columns (column names are case sensitive):
PropType: The property type; Condo=0, Single Family House=1, Apartment=2.
RentControled: 0=None.
Building: This is the building number if applicable. (can be blank)
Addr1: The properties address. (cannot be blank)
Addr2: The properties second address line (can be blank)
City: City where property is located (can be blank)
State: State or Province where property is located.
PostalCode: can be blank
Country: Country where property is located.
To export chart of accounts to an Excel worksheet named “ChartOfAccts”.
The worksheet will have the following 5 named columns (column names are case sensitive):
AcctId: The account Id. (can NOT be blank)
AcctType: This is the account type ( the following numbers to represent the type of account); 1=Cash, 2=Bank Account, 3=Accounts Receivable, 4=Assets, 5=Fixed Assets, 6=Other Assets, 7=Accounts Payable, 8=Equity, 9=Liability, 10=Long Term Liability, 11=Credit Card,12= Loan, 13=Income, 14=Other Income, 15=Expenses, 16=Other Expenses, 17=Cost of Goods, 18=Reserves. (can NOT be blank)
AcctName: This is the name of the account. (can NOT be blank)
SubCategory: This is the account that this account is a sub-category of. (can be blank)
Description: Description of this account. (can be blank)
P R O P E R T I E S
C H A R T O F
A C C O U N T S

54
To export, select the appropriate type from the list either “Members”, “Properties” or “Chart of Accounts”.
Preview data before exporting the data. Click the "View Data Layout" button to preview the data prior to export.
Performs the actual data export. Click the "Export Excel Data" button to actually export the data into Excel.
Determine the format of the export by selecting: CSV, XLSX, or XLS. By default CSV is select as it is the most universal format that can be read by many programs, including Microsoft Excel.
Year End Processing
Administrators can do year end processing to complete the community requirements at year end.
erform year-end processing to back up all the communities data and preserve it for future use if needed. This one stop will make the administrators life easier by creating a zip file of all important community data.
This one step will be the biggest time saver for any property management team. Just click the ‘Start Year End Processing’ button and the system goes to work for you.
First it creates a dated backup of the Community database and stores it in the community data directories ‘Backup’ folder.
Next, the Community data directories are archived creating a ‘Zip File’ named with the current date of the current community data. This includes all ads, attachments, community documents, events, financials, images, imports, insurance documents, legal documents, letters, minutes, newsletters, operational documents, policy documents, proxy documents, home page features, vendor, and video information as well as the previously created dated backup of the database.
Deletes Calls and Reservations older than 2 years.
Deletes completed Work Orders older than 3 years.
E X P O R T T Y P E
V I E W D A T A
L A Y O U T
E X P O R T D A T A
S A V E I N
E X C E L 2 0 1 0
F O R M A T
P S T A R T Y E A R
E N D P R O C E S S

55
Deletes community data over 7 years old in accordance with IRS practices. This includes all events, financials, insurance documents, letters, minutes, newsletters, proxy, vendor specific documents, and video information.
This will also delete all accounting transactions over 7 years old and any products that have been de-activated more than 7 years ago.
Finally this ‘Year End Processing’ updates the community database to reflect the old community data files that were deleted.
It is recommended that the created ‘Zip’ archive be saved to a safe place or to a CD/DVD for safe keeping.
Reports
Community administrative reports.
et all the information available from the community lists. This list may be viewed and/or printed.
View/print mailing labels for the community. Select Owners, Tenants, Vendors, or any combination of those. Labels can only be printed for active members. We have tested using Avery 8660 labels but the following Avery 1" x 2 5/8", 30 per sheet - address labels should also be compatible: 15160, 15510, 15660, 16460, 18160, 18260,
18660, 28660, 32660, 38260, 45160, 48160, 48260, 48360, 48460, 48860, 48960, 5160, 5260, 55160, 5520, 55260, 55360, 5620, 5630, 5660, 5810, 58160, 58260, 58660, 5960, 6240, 6241, 6970, 75160, 8160, 8250, 8460, 85560, 8620, 8660, 8810, 88560, 8860, 8920.
View/print the community’s list of members. Select All, Owners, Tenants, and Vendors. Labels can be printed for active or in-active members.
View/print the community’s price list of products and services. Select the period desired. Only active items will be printed.
View/print the community’s list of properties. Select All, Condominiums, Single Family House or Apartment.
G
M A I L I N G
L A B E L S
M E M B E R S
L I S T
P R I C E L I S T
P R O P E R T I E S
L I S T

56
View/print the community’s list of vendors that are 1099 eligible. Select “Active Vendors Only or All Vendors”. Select the “Current Year”, “Last Year” or “2 Years Back” for the period to get vendors from.
View/print the community’s letters report. Select Summary or Detailed. Select the letter categories to include in a detailed report. Set the report time frame, “Year-to-Date”, or “This Quarter”, or “This Month” or specify a specific date range. By default the “Summary” report is selected and all letter categories are included.
View/print a sign-in sheet for community events.
V E N D O R 1 0 9 9
L I S T
L E T T E R S
R E P O R T
S I G N - I N
S H E E T

57
Directors
Those volunteers who are tasked with overseeing the operation of the community.
n addition to the capabilities of the normal user as noted above the Board of Directors are provided additional features under the “Administration” page within the “Board of Directors Tools” section. These include Calendars, Export, Feedback Resolution, managing Broadcasts, Announcements, Uploads, and Polls.
Board of Directors Tools
The Board of Directors has additional capabilities.
n addition to the capabilities of the normal user as noted above the Board of Directors is provided additional features under the “Administration” page in the “Board of Directors Tools” section. These include announcements, feedback resolution, uploads, and polling.
Members of the community that have been appointed or elected to the Board of Directors as designated by the community’s documents are noted as board members
by the community’s administrator. This places their profile information on the current board members and enables “Board of Directors Tools” on the “Administration” page.
Announcements
Notifying members.
ending the community an announcement is a quick and easy process for board members. This can be used by members of the Board of Directors and management to get urgent information to the community’s membership.
Chapter
10
I
I M E M B E R S
S

58
Click on the Announcements link to create an announcement. The recipients to whom the announcement will be sent are determined by selecting either “Requesting
Members Only” or “All Members”. Announcements can be sent from either “Member Services” or the person actually creating the announcement. Enter the announcement subject on the “Subject” line then type your announcement in the announcement textbox area. An attachment can also be added to the announcement by entering the file name in the attachment textbox or clicking the “Browser” button to select the desired file to attach. Click the “Submit” button to send the announcement when ready. When complete, a message to that effect will be displayed.
Feedback Resolution
Tracking the needs and wants of the community.
eedback from the community is a great way to maintain avenues of communication. Resolving member issues and questions is accomplished using the feedback resolution feature of the community.
Click on the Feedback Resolution link to view feedback from the community’s members. You can only edit feedback that is not resolved.
By default, all community feedback is displayed. You can filter the list by changing the criteria being used to retrieve data. Change the “Status”, “Feedback Type”, and/or “Date Ranges” to filter the data to you own needs.
The feedback list contains an ID, date submitted, who submitted it, and the resolved status. Selecting the page selectors at the bottom of the user grid will page through the available feedback items. Select a feedback from the list or click the edit icon to display that feedbacks detail information. You can
change the resolved status of the feedback by clicking the check mark.
The feedback detail displays specific submission and resolution information. Look here to see how the feedback was resolved or to resolve a feedback. Only un-resolved issues can be edited by making entries into the resolution message and clicking the “Save Changes” button.
Schedule/Calendar
Schedule events and meetings.
cheduling events and meetings is easy and quick. If Scheduler/Calendar has been enabled the
“Schedule/Calendar” menu option will be available. Click the icon to display the pages help and follow the directions for scheduling.
A N N O U N C I N G
F F E E D B A C K
S

59
Schedule/Start Live Broadcast
Live broadcasts allow members to attend meetings from anywhere.
cheduling live broadcasts is like any other community announcement is a quick and easy process. If live broadcasting has been enabled the “Schedule/Start Live Broadcast” menu option will be available.
Click on the “Schedule/Start Live Broadcast” link to create an announcement for a scheduled live broadcast. The recipients to whom the announcement will be sent are determined by selecting either “Requesting Members Only” or “All Members”.
Announcements can be sent from either “Member Services” or the person actually creating the announcement. Enter the broadcast date and time in the appropriate locations. Click the “Notify Member of Live Broadcast” button to send the announcement when ready.
Also from this same menu option you can start a live broadcast. Click the “Start Live Broadcast” link which will open the broadcast in a new browser tab or window. In this tab or window, login using the provided broadcast channel username and password. Then select the desired broadcast channel name and start the broadcast. This will open the broadcast screen where you may be asked to allow access to your camera and microphone. Select “Allow”, and then click the “Start Broadcast” button to actually start the broadcast. From this broadcast screen you can control other features of live broadcasting.
Uploads
Adding and updating information to the community’s site.
ploading documents to the community’s web site is the main stay of the community. It keeps the community informed and up to date. The web site supports uploading minutes, financial and budget information, and community documents and events; in Microsoft Word document, PDF, HTML, or JPG image formats. Members are notified of most
uploads. The default behavior can be overridden by checking the check box to prevent notification.
Select “Upload Minutes” and follow the directions to upload community minutes. The minutes will be saved for the designated year and month specified and will be
activated on the minute’s page found from the board page. Upon completion of the upload, all members that asked to be notified will be sent an email announcing this upload.
Note:
An existing document must be removed first before it can be updated or overwritten. This is done by an administrator using document management.
S L I V E
B R O A D C A S T S
U M I N U T E S

60
Select “Upload Financials” and follow the directions to upload community financials. The financials will be saved for the designated year and month specified and will be
activated on the financials page found from the board page. You can upload any or all of the available types of financial statements. Upon completion of the upload, all members that asked to be notified will be sent an email announcing these uploads.
Note:
An existing document must be removed first before it can be updated or overwritten. This is done by an administrator using document management.
Select “Upload Audits” and follow the directions to upload community audits. The audit will be saved for the designated year specified and will be activated on the
financials page found from the board page. Upon completion of the upload, all members that asked to be notified will be sent an email announcing these uploads. Caution should be exercised on the year designated, as most audits are for previous years.
Note:
An existing document must be removed first before it can be updated or overwritten. This is done by an administrator using document management.
Select “Upload Budgets” and follow the directions to upload community budgets. The budget will be saved for the designated year specified and will be activated on the
financials page found from the board page. You can upload a single file that contains the budget or if you are uploading a Microsoft Excel budget that has been saved as HTML, in this case follow the direction very carefully. Upon completion of the upload, all members that asked to be notified will be sent an email announcing these uploads.
Note:
An existing document must be removed first before it can be updated or overwritten. This is done by an administrator using document management.
Select “Upload Calendars” and follow the directions to upload community calendars. You can use this feature to upload any calendar (.ics file). Use Office’s Publish
Calendar to automatically publish calendars that will always be up-to-date.
Select “Upload Documents” and follow the directions to upload community documents. Select the type of document being uploaded, “Community Document”, “Legal Document”,
“Policy Document”, “Insurance Document”, “Operational Document” or “Vendor Document”. These documents will be saved and added to the community documents page found from the board page. Upon completion of the upload, all members that asked to be notified will be sent an email announcing these uploads.
F I N A N C I A L S
A U D I T S
B U D G E T S
C A L E N D A R S
D O C U M E N T S

61
Note:
An existing document must be removed first before it can be updated or overwritten. This is done by an administrator using document management.
Select “Upload Events” and follow the directions to upload community events. Community events will be saved and added to the “my activities” page. Upon
completion of the upload, all members that asked to be notified will be sent an email announcing these uploads.
Note:
An existing document must be removed first before it can be updated or overwritten. This is done by an administrator using document management.
Select “Upload Agenda” and follow the directions to upload community agenda. The current agenda will be saved and will be activated on the board’s page. Upon
completion of the upload, the user is notified that the upload was successful. Members are notified by email announcing the upload of the new agenda.
Note:
The previous agenda is overwritten. Therefore always upload the agenda for the currently upcoming community meeting.
Select “Upload Newsletter” and follow the directions to upload community newsletters. The newsletter will be saved and will be available from the ‘Newsletter’ menu option.
Upon completion of the upload, all members that asked to be notified will be sent an email announcing these uploads.
Note:
An existing document must be removed first before it can be updated or overwritten. This is done by an administrator using document management.
Select “Upload Videos” and follow the directions to upload community videos. The video will be saved and will be available under the “Board” menu options. Enter the
required information and click the “Submit” button to upload the video. Videos must be no larger than 100MB. Large videos files can be accommodated by spreading them over multiple files uploaded individually. Upon completion of the upload, all members that asked to be notified will be sent an email announcing these uploads.
E V E N T S
A G E N D A
N E W S L E T T E R
V I D E O S

62
Note:
An existing document must be removed first before it can be updated or overwritten. This is done by an administrator using document management.
Select “Upload Home Page Features” and follow the directions to upload features for the community home page. The feature skins will be saved and will be available for use on the home page.
Upload Skins:
These are the informational forms that the community can display on the home page. Enter the file name to upload or click the browse button to choose a file. Click the submit button only once to upload the file. Note: Only htm, html and ascx files are supported. Note: If the htm/html file was created with Microsoft Word then only upload filtered
htm and html files.
Feature Skins:
To enable these feature skins, use the Community Settings option under administration to select features to be used on the home page.
o The home page consists of 2 columns each having 5 rows. Allowing for up to 8 feature skins.
o The top and bottom feature skins are 2 columns wide, creating one cell each.
Creating Feature Skins:
Skins can be created using Microsoft Word or custom ascx files can be created by TALogic.
Skin sizes: o Top and bottom row skins should be NO wider than 600 pixels. o Those used on the center 2 columns should NOT be wider than 300 pixels.
Skins created using Microsoft Word can contain tables, anchors and references and other html code.
When creating your own features some trial and error may be necessary to finally get what you are looking for.
o You may have to delete unwanted skins using the Administrator Tools > Features menu option and then re-upload a revised feature skin.
o Note: If the htm/html file was created with MicroSoft Word then only upload filtered htm and html files.
o Also, htm/html files should NOT contain any images as they will NOT be displayed.
Custom ascx files are more versatile and can contain almost anything. o To have a custom ascx feature file created please contact TALogic.
H O M E P A G E
F E A T U R E S

63
Select “Upload Estimates” and follow the directions to upload.
Voting Polls
Get the members opinions.
olling the community can be a great way for the Board of Directors and management to learn what the members want.
Click on the Voting Poll link to view the community’s polls. From here you can check the results of any poll, edit the poll, or delete the poll. The polls status is also
displayed, those that are marked as active are currently being presented to members on the community’s home page.
Clicking the edit icon will permit modifying the select poll. It is recommended that once a poll has been published that no further changes be made to that poll, as that would invalidate the poll.
Clicking “Results” will display the current results of the poll.
Clicking the delete icon will delete the poll and all its results. Be very careful about using this feature, as it is NOT reversible.
Click “Add New Poll” to create a new community poll. Enter a title for the poll and the dates the poll should be active for. Then click the “Save” button. At this point
you will be able to preview the poll as it is being created.
Enter questions in the poll questions text box and click the “Add Question” button to add the new question. It will be added to the questions list box. Use the to delete the selected question, the up and down arrows to change the order of the question.
For the selected question you can enter answers in the answer choices text box and click the “Add Choice” button to add the new choice for the selected question. Use the to delete the selected choice.
Select the roles for which this poll applies. This will restrict who is polled, for example to poll only owners select the “Owners” radio button.
Use the “Preview” button to view the poll being designed. The “Save” button will save the poll for future editing, without saving all edits will be lost so save frequently.
When the poll has been created completely check the activate checkbox. This will activate the poll on the start date and complete it on the end date.
E S T I M A T E S
P P O L L S
A D D P O L L

64
Export data to Excel
Board members will find it helpful to be able to export existing data directly into Excel.
xport data to an Excel. This will make the administrators life a bit easier.
To export members to an Excel worksheet named “Members”.
The worksheet will have the following 13 named columns:
Email:
Lastname: The member’s last name. (can be blank)
Firstname: The member’s first name. (can be blank)
MI: The member’s middle initial. (can be blank)
Addr1: The member’s first address line. (can be blank)
Addr2: The member’s second address line. (can be blank)
City: The member’s city. (can be blank)
State: The member’s state. (can be blank)
PostalCode: The member’s postal code or zip code. (can be blank)
Country: The member’s country. (can be blank)
Phone: The member’s phone. (can be blank)
CellPhone: The member’s cell phone. (can be blank)
MemberType: The member’s type. (can be blank)
Notify: Notify member of announcements. (can be blank, defaults to “False” else must be 0 for "No" or 1 for "Yes")
Directory: Include member in directory. (can be blank, defaults to “False” else must be 0 for "No" or 1 for "Yes")
EmailAuth: Member has authorized email communications. (can be blank, defaults to “False” else must be 0 for "No" or 1 for "Yes")
E M E M B E R S

65
DOB: Members date of birth (can be blank, defaults to 01/01/0001)
To export properties to an Excel worksheet named “Properties.
The worksheet will have the following 2 named columns:
Building: This is the building number if applicable. (can be blank)
Addr: The properties address. (cannot be blank)
To export, select the appropriate type from the list either “Members” or “Properties”.
Preview data before exporting the data.
Click the "View Data Layout" button to preview the data prior to export.
Performs the actual data export.
Click the "Export Excel Data" button to actually export the data into Excel.
Click the "View Data Layout" button to preview the data prior to export.
Determine the format of the export.
When checked the exported file will be in Excel 2010 format (xlsx).
Un-check to save in Excel 2007 format (xls).
Reports
Community reports for the Board of Directors.
et all the information that the Board of Directors will need about the community. In addition to the reports available to an administrator, the Board of Directors has access to these reports.
View/print the community’s financial statement. This creates an un-audited financial statement the community. From here, select the bank accounts and any other reports to include in the financial statement.
P R O P E R T I E S
E X P O R T T Y P E
V I E W D A T A
L A Y O U T
E X P O R T D A T A
S A V E I N
E X C E L 2 0 1 0
F O R M A T
G F I N A N C I A L
S T A T E M E N T

66
Bank Accounts: Some reports can be limited to specific bank accounts. Select the bank accounts to include in the Consolidated Financial Statement. Click the 'Select ALL' button to select all bank accounts.
Date Specific Reports: Some reports can be limited by date. Select the reports to include in the Consolidated Financial Statement. Click the 'Select ALL' button to select all reports. Set the criteria for these date specific reports. By default, these reports are compiled 'Year to Date'. This can be modified by selecting 'Between these dates' and setting the 'From' and 'through' dates. Use the
icon to select the desired dates.
Period Specific Reports: Some reports can be limited by period. Select the reports to include in the Consolidated Financial Statement. Click the 'Select ALL' button to select all reports. Set the criteria for these reports by setting the desired period. By default, these reports are compiled using the current period of the month when run. This can be modified by setting the 'For this
Period' date. Use the icon to select the desired period.
To publish this report to the Community website for all to see, check the ‘Publish this report to
community!’ Click the icon to open the report for viewing and/or printing.
View/print the community’s checks.
View/print the community’s deposits.
View/print the community’s budgets. To publish this report to the Community website for all to see, check the ‘Publish this report to community!’
C H E C K S
D E P O S I T S
B U D G E T S

67
Managers
Those who are tasked with overseeing the day to day operation of the community.
n addition to the capabilities of the normal user as noted above the Managers are provided additional features under the “Administration” page within the “Managers Tools” section. These include Adding New Members, Account Activity, Export, Community Documents, Member Management, Invoices, Work Orders, managing Broadcasts, Announcements, Uploads,
Letter/Lease/Estopel letters, Background Screening, Polls and Proxies, and much more.
Managers Tools
Managers of the community or other persons that have been appointed by the community to perform management tasks will use this menu item to access a sub-
menu of tasks specific to managers. These persons have access to the “Managers Tools” on the “Administration” page.
Managers are responsible for maintaining the operation of the community.
Add New Members
Adding a new member to the community’s site.
se to add new memberships, when new memberships are to be added by management to the Web Site.
Select the appropriate member type; “Tenant or Owner” or “Vendor” or “Special User” if
Chapter
11
I
M A N A G E R S
U
T Y P E

68
implemented. This will open the appropriate data entry screens.
Enter the appropriate information. Click the 'Add Membership' button to save the new member when done.
NOTE: The new members email address must be unique to the system and the new member’s password will be 'password' (case sensitive).
Required information is indicated by “*”. By default “Tenants and Owners” have their email authorization set to ‘off’ and “Vendors” is set ‘on’.
Advertisement Management
Paying for the community’s site is just an ad away.
se to manage advertisers for the associations web site. Click the icon to display the pages help and follow the directions for managing advertisements.
If there are no advertisers listed, then the page opens in add mode. To add new
advertisers click the plus icon. This will open the detail panel. Enter the appropriate information. Use the browse button to select the image file to be used for the advertiser. Note: This file must be a JPG or GIF type file and should be of a business card size.
Select the appropriate frequency for the advertiser. Note: This affects how often the advertiser is displayed in relation to all the other advertisers.
Enter any fee for the advertiser and check the 'Paid' box if the fee has been paid.
Click the ‘submit’ button to save the new advertiser. Clicking the 'Reset' button will clear all entries in the advertisers detail panel.
To edit an advertiser click the button. This will open the detail panel for the selected advertiser. Edit the information as noted above for a new advertiser.
To permanently delete an advertiser, click on the icon. Use extreme caution in using this functionality, as it can NOT be undone.
P R O F I L E
R E Q U I R E D
U A D D N E W
E D I T
D E L E T E

69
Calendars
Community calendars.
eeping track of where and when is vital for a smooth running community. This is where a community calendar can be a real handy tool. Clicking on the desired event will open that event for further information, such as times, locations and other pertinent information.
Click the Calendars link to open the community’s calendars page. Select the calendar to view.
Use to view available calendars. Select the calendar to view. Click 'Month-Day-List' buttons to see desired view. Use the <<, < and >, >> to move between years and months. Click an appointment to display that appointments detail. Map and Weather information is available for the event if a location is specified. Clicking the 'Email' button to send calendar. Click the 'Save' button to save the calendar or open it. Click the 'Print' button to print the calendar. Use the 'RSS' button to add this calendar to your RSS reader.
If you are using Outlook Calendars
Use the 'Publish Online' feature to publish your own calendars. Set the location to: 'http://Your_Community_Url/CommunityData/Your_Community_Directory/AssocId
?/Calendars/'. Your_Community_Url is the URL you entered to access your community. Your_Community_Directory is available from your community administrator. The ? in AssocId? is the integer assigned to your community. These are available from your community’s administrator on the 'Community Settings'
page. Set any other features for your calendar. Including advanced features to handle
automatic updates. It is also required that the name of your personal calendar be the same as your member
name in the community.
K C A L E N D A R S

70
Background Screening
Who are they?
se Background Screening to order background reports for the community.
Click on the Background Screening link to order a background report.
This will open a login screen in another browser window or tab. Login with your username and password. Click the ‘Order’ tab and enter the required information.
Bulletin Board Management
Bulletin Board Management.
se to manage the bulletin board for the community’s web site. Managing the bulletin board consists of identifying bulletins that need to be removed from the site and then deleting
them. Note that bulletins are automatically removed after 3 months. Click the icon to display the pages help and follow the directions for editing/viewing bulletin board
information.
Select the type of bulletin board message you are deleting.
To view the bulletin text, select the desired bulletin.
You can permanently delete a bulletin by clicking on the . Use extreme caution in using this functionality, as it can NOT be undone.
Additionally you can delete ALL the selected type of bulletins by clicking on the 'Delete ALL Bulletins of Selected Type' button. Use extreme caution in using this functionality, as it can NOT be undone.
Document Management
Community Documents.
se to manage documents. Click the icon to display the pages help and follow the directions for managing the community’s documents.
U B A C K G R O U N D
S C R E E N I N G
U
D E L E T E
B U L L E T I N S
U

71
Add/Edit community documents for the Web Site.
Select a document type to view a limited selection of community documents. Find a document in the list by moving up and down through the list. Change pages by
selecting the page selectors at the bottom of the user grid.
Select a document from the list by clicking icon. This will display the detail for editing, where you can modify the title and description. Events also require the event date and allow for RSVP’s and RSVP by date.
If the document is an Event and allows for RSVP’s, the icon will be available. Clicking the icon will open the events RSVP report for viewing and/or printing.
To permanently delete a document, click on the icon. Use extreme caution in using this functionality, as it can NOT be undone.
Note: All RSVP’s for an Event are also deleted when the Event is deleted.
Handyman Management
Mr. Fix-It.
se to manage handyman settings for the community’s web site. Click the icon to display the pages help and follow the directions for managing handyman listings. From here add categories; manage the handyman and member ratings.
Find the category in the list by moving up and down through the list. Change pages by selecting the page selectors at the bottom of the user grid. Selecting the category
will display the handyman list for that category.
Add a new category by clicking the sign and entering a name for the new category. Click the ‘Save Category’ button to save the new category.
By selecting a handyman from the list the ratings are displayed.
To permanently delete a handyman, click on the icon. Use extreme caution in using this functionality, as it can NOT be undone.
To permanently delete a rating, click on the icon. Use extreme caution in using this functionality, as it can NOT be undone.
D O C S
U C A T E G O R I E S
H A N D Y M A N
R A T I N G S

72
Import data from Excel or CVS
Administrators will find it helpful to be able to import existing Excel/CSV data directly into the community.
mport Excel/CSV spreadsheet data into the system and avoid importing duplicates. This will make the administrators life a bit easier.
To import, select the appropriate type from the list either “Members”, “Properties” or “Authorize.Net Transactions”. Special Note: We have seen some CSV (comma
separated values) files that don't import properly. It is recommended to convert these to Excel Spread format as shown below and then import the Excel file.
To import members there must be a worksheet named “Members” in the Excel spreadsheet. This is very specific and is also case sensitive. It must be “Members”, not
“members” or “Member”.
The worksheet must have the following 13 named columns (column names are case sensitive):
Email: This must be a valid email address. (If blank, “[email protected]” will be used, where ??? will be a incremented number)
Lastname: The member’s last name. (can be blank)
Firstname: The member’s first name. (can be blank)
MI: The member’s middle initial. (can be blank)
Addr1: The member’s first address line. (can be blank)
Addr2: The member’s second address line. (can be blank)
City: The member’s city. (can be blank)
State: The member’s state. (can be blank) (see valid state codes below)
PostalCode: The member’s postal code or zip code. (can be blank)
Country: The member’s country. (can be blank) (see valid country codes below)
Phone: The member’s phone. (can be blank)
I I M P O R T T Y P E
M E M B E R S

73
CellPhone: The member’s cell phone. (can be blank)
MemberType: The member’s type. (can be blank, defaults to “Owner”)
Notify: Notify member of announcements. (can be blank, defaults to “False” else must be 0 for "No" or 1 for "Yes")
Directory: Include member in directory. (can be blank, defaults to “False” else must be 0 for "No" or 1 for "Yes")
EmailAuth: Member has authorized email communications. (can be blank, defaults to “False” else must be 0 for "No" or 1 for "Yes")
DOB: Members date of birth. (can be blank, defaults to “01/01/0001”)
To import properties there must be a worksheet named “Properties” in the Excel spreadsheet. This is very specific and is also case sensitive. It must be “Properties”,
not “property” or “properties”.
The worksheet must have the following 21 named columns (column names are case sensitive):
PropType: The property type; Condo=0, Single Family House=1, Apartment=2.
RentControled: 0=None.
Building: This is the building number if applicable. (can be blank)
Addr1: The properties address. (cannot be blank)
Addr2: The properties second address line (can be blank)
City: City where property is located (can be blank)
State: State or Province where property is located. (see valid state codes below)
PostalCode: can be blank
Country: Country where property is located. (see valid country codes below)
CouponAmt1: must be between 0.00 and 999999.99
CouponAmt2: must be between 0.00 and 999999.99
CouponAmt3: must be between 0.00 and 999999.99
P R O P E R T I E S

74
CouponAmt4: must be between 0.00 and 999999.99
CouponAmt5: must be between 0.00 and 999999.99
CouponAmt6: must be between 0.00 and 999999.99
CouponAmt7: must be between 0.00 and 999999.99
CouponAmt8: must be between 0.00 and 999999.99
CouponAmt9: must be between 0.00 and 999999.99
CouponAmt10: must be between 0.00 and 999999.99
CouponAmt11: must be between 0.00 and 999999.99
CouponAmt12: must be between 0.00 and 999999.99
State Name Code
Alberta
Aguascalientes
Alaska
Alabama
Arkansas
American Somoa
Arizona
British Columbia
Baja California
Baha California Sur
California
Campeche
Chihuahua
Chiapas
Mexico City
Colorado
Coahuila
Colima
Connecticut
District of Columbia
AB
AGU
AK
AL
AR
AS
AZ
BC
BCN
BCS
CA
CAM
CHH
CHP
CMX
CO
COA
COL
CT
DC
V A L I D S T A T E
C O D E S

75
Delaware
Durango
Florida
Federated States of Micro
Georgia
Guerrero
Guam
Guanajuato
Hawaii
Hidalgo
Iowa
Idaho
Illinois
Indiana
Jalisco
Kansas
Kentucky
Louisiana
Massachusetts
Manitoba
Maryland
Maine
México
Marshall Islands
Michigan
Michoacán
Minnesota
Missouri
Morelos
Northern Mariana Islands
Mississippi
Montana
Nayarit
New Brunswick
North Carolina
North Dakota
Nebraska
DE
DUR
FL
FS
GA
GRO
GU
GUA
HI
HID
IA
ID
IL
IN
JAL
KS
KY
LA
MA
MB
MD
ME
MEX
MH
MI
MIC
MN
MO
MOR
MP
MS
MT
NAY
NB
NC
ND
NE

76
Newfoundland
New Hampshire
New Jersey
Nuevo León
New Mexico
Nova Scotia
Northwest Territory
Nevada
New York
Oaxaca
Ohio
Oklahoma
Ontario
Oregon
Pennsylvania
Prince Edward
Puerto Rico
Puebla
Palau
Quebec
Querétaro
Rhode Island
Quintana Roo
South Carolina
South Dakota
Sinaloa
Saskatchewan
San Luis Potosí
Sonora
Tabasco
Tamaulipas
Tlaxcala
Tennessee
Texas
Utah
Virginia
Veracruz
NF
NH
NJ
NLE
NM
NS
NT
NV
NY
OAX
OH
OK
ON
OR
PA
PE
PR
PUE
PW
QC
QUE
RI
ROO
SC
SD
SIN
SK
SLP
SON
TAB
TAM
TLA
TN
TX
UT
VA
VER

77
Virgin Islands
Vermont
Washington
Wisconsin
West Virginia
Wyoming
Yukon Territory
Yucatán
Zacatecas
<None>
VI
VT
WA
WI
WV
WY
YT
YUC
ZAC
ZZ
Country Name Code
Albania TIA
Algeria ALG
Angola LAD
Argentina BUE
Aruba CUR
Australia SYD
Austria VIE
Bahrain BAH
Bangladesh DAC
Belgium BRU
Belize BZE
Benin COO
Bolivia LPB
Brazil RIO
Bulgaria SOF
Burkina Faso OUA
Burundi BJM
Cameroon DLA
Canada CAN
Central African Republic BGF
Chile SCL
China SHA
Colombia BOG
V A L I D C O U N T R Y
C O D E S

78
Congo BZV
Costa Rica SJO
Cote d'Ivoire ABJ
Cuba HAV
Czechoslovakia PRG
Denmark CPH
Dominican Republic SDQ
Ecuador GYE
Egypt CAI
El Salvador SAL
Ethiopia ADD
Fiji SUV
Finland HEL
France PAR
French Guiana CAY
Gabon LBV
Germany (East) SXF
Germany (West) FRA
Ghana ACC
Great Britain LON
Greece ATH
Guatemala GUA
Guyana GEO
Haiti PAP
Honduras TGU
Hong Kong HKG
Hungary BUD
Iceland REK
India DEL
Indonesia JKT
Iran THR
Iraq BGW
Ireland DUB
Israel TLV
Italy ROM
Jamaica KIN
Japan TYO
Jordan AMM

79
Kenya NBO
Korea SEL
Kuwait KWI
Lebanon BEY
Liberia ROB
Libya TIP
Luxembourg LUX
Madagascar TNR
Malaysia KUL
Mali BKO
Mauritania NKC
Mauritius MRU
Mexico MEX
Morocco CAS
Mozambique MPM
Netherlands AMS
New Zealand AKL
Nicaragua MGA
Niger NIM
Nigeria LOS
Norway OSL
Oman MCT
Pakistan KHI
Panama PTY
Papua New Guinea POM
Paraguay ASU
Peru LIM
Philippines MNL
Poland WAW
Portugal LIS
Qatar DOH
Reunion RUN
Romania BUH
Rwanda KGL
Saudi Arabia DHA
Senegal DKA
Sierra Leone FNA
Singapore SIN

80
Somalia HGA
South Africa JNB
Spain MAD
Sri Lanka CMB
Sudan KRT
Suriname PBM
Sweden STO
Switzerland BSL
Syria DAM
Taiwan TPE
Tanzania DAR
Thailand BKK
Tobago POS
Togo LFW
Tunisia TUN
Turkey IST
Uganda KLA
United Arab Emirates DXB
United States USA
Uruguay MVD
USSR MOW
Venezuela CCS
Yemen SAH
Yugoslavia BEG
Zimbabwe HRE
<None> ZZZ
To import transactions there must be a worksheet named “Successful” in the CSV file. This is very specific and is also case sensitive. It must be “Successful”.
The worksheet must have the following 12 named columns (column names are case sensitive):
SubscriptionId: The subscription Id.
SubscriptionStatus: The subscription status.
A U T H O R I Z E N E T
T R A N S A C T I O N S

81
Payment #: The payment number.
TotalRecurrences: 9999 = On going
TransactionId: The transaction Id.
Amount: The amount of this transaction.
Currency: The currency this transaction is conducted in.
Method: Credit Card, E Check
CustFirstName: Customers first name.
CustLastName: Customers last name.
RespCode: The response code.
RespText: The response text.
To import chart of accounts there must be a worksheet named “ChartOfAccts” in the Excel spreadsheet. This is very specific and is also case sensitive. It must be “ChartOfAccts”, not “chartofaccts” or “chartOfAccounts”.
The worksheet must have the following 5 named columns (column names are case sensitive):
AcctId: The account Id. (can NOT be blank)
AcctType: This is the account type (use the following numbers to represent the type of account); 1=Cash, 2=Bank Account, 3=Accounts Receivable, 4=Assets, 5=Fixed Assets, 6=Other Assets, 7=Accounts Payable, 8=Equity, 9=Liability, 10=Long Term Liability, 11=Credit Card,12= Loan, 13=Income, 14=Other Income, 15=Expenses, 16=Other Expenses, 17=Cost of Goods, 18=Reserves. (can NOT be blank)
AcctName: This is the name of the account. (can NOT be blank)
SubCategory: This is the account that this account is a sub-category of. (can be blank)
Description: Description of this account. (can be blank)
Before importing the data into the system, you must first upload the Excel spreadsheet.
Click "Upload Excel Spreadsheet" to select the spreadsheet to upload.
C H A R T O F
A C C O U N T S
U P L O A D D A T A

82
Click the "Browse" button to find the file to upload.
Click the "Upload File" button to perform the actual upload.
You can view the data prior to importing using the “View Excel” feature to verify its format and integrity.
Click the "View Excel Data" button to view the data in the uploaded file.
This is presented in a grid for verification that this is indeed the data you want to import and that is in the proper format.
If the format does not conform to the above layout, edit the worksheet to match the above layouts.
After you are satisfied with the data format and the Excel file layout, the actual importing is done here
Click the "Import Excel Data" button to actually import the Excel data into the system.
Duplicate data is skipped so as to not have multiple records.
Data that was not imported is displayed.
All newly imported members will be given a default password of “password”. It should be noted that this is all lowercase and that passwords are case sensitive.
Invoice Management
Vendor Invoices.
se to manage vendor invoices submitted through the Web Site.
Invoices are presented in a tree view under “Community Invoices”. The second level is the vendor that submitted the invoice and the third level is the year the invoice was
submitted. Invoices are then displayed in date order, latest first. Click the (+/-) to open and close the desired levels. Double clicking an invoice will display the invoice in a separate window.
V I E W D A T A
I M P O R T D A T A
U I N V O I C E S

83
To upload a vendors invoice click the “Upload an Invoice” button and follow the direction.
In processing the selected/checked invoices the community manager can email those invoices to the accounting department as designated in the management profile. Additionally, the manager can add other email address to receive copies of the invoices.
Checked invoices can be deleted by clicking the “Delete Checked Invoices” button. You will be presented with a request to confirm the deletion. Use extreme caution in using this functionality, as it can NOT be undone.
Invoices that have been opened can be printed from the page that is displayed in a separate window.
Issue Work Orders
Create Work Orders for Vendors.
se to create a work order for community jobs.
Work Orders are created here by selecting the work order type and the vendor and completing the necessary information. Click the “Submit” button to save the work order and email it to the selected vendor. A confirmation will be displayed showing
the work order number and other information.
U P L O A D
I N V O I C E S
E M A I L
C H E C K E D
I N V O I C E S
D E L E T E
I N V O I C E S
P R I N T I N G
I N V O I C E S
U I S S U E W O R K
O R D E R

84
Letter/Lease/Estopel Creation
Create Letters/Leases/Estopel using the community’s templates.
se to create community letters to send to members or vendors. Click the icon to display the pages help and follow the directions for creating letter and leases.
Creating letters using the letter definitions is an easy process of selecting the Category, Sub-Category, Letter, and a recipient. 'Recipient Mode' is selected by default. This
means the list created is for members by name. However if you find it more convenient to have the list created by property, switch to 'Property Mode' and the list will be created by property address.
Recipient Mode
o From the drop down list select the Recipient to receive this letter.
o The recipient list can be filtered by selecting a type, “All, Owners Only, Tenants Only, or Vendors Only”. Except for Estopel and Leases, letters will fit double window envelopes provided by Harland Clarke. We have tested CE17S envelopes. Call 1-800-503-2345 to place orders.
o If the letter is to be sent to all recipients in the recipient list, then check the “Send to All …” checkbox. This will create a letter using a generic heading and greeting.
o Select the Category from the dropdown list.
o Select the Sub-Category from the dropdown list.
o Select the property associated with this letter from the dropdown list.
Property Mode
o Select the property from the list.
o Select the Category from the dropdown list.
o Select the Sub-Category from the dropdown list.
o Select the member associated with this property from the dropdown list.
Up to 4 photos can be attached to a letter. Click the “Add Photos” button and follow directions to add up to 4 photos.
Tracking numbers, tracking numbers, i.e. Certified Mail or UPS tracking numbers, can be attached to a letter when creating a letter by entering the tracking number and clicking the ‘Add/Change Tracking Number” button. If a tracking number is specified. It will be printed on the letter and email created.
U L E T T E R S

85
The letter can be pre-viewed before final submission by clicking “Preview”. Note that attached photos are NOT shown. Clicking “Create Final…” will have the following affects:
If “Email Processing” is enabled for the community and the member is authorized for email communications. (By default the community is enabled for email processing but members are NOT. The
community setting can be set by an administrator using the ‘Administrator Tools/Community Settings’ menu option. Member email authorization can be set using the ‘Administrator Tools/Members’ menu option or the
‘Managers Tools/Members’ menu option )
o The letter is saved and emailed to the selected member, if authorized, and displayed in the browser for viewing and printing. The emailed letter will also contain an attachment of the saved ‘PDF’ file and the manager is notified of the success or failure of the email being sent. The letter can be reviewed and printed, if necessary, from the members detail available from the ‘Managers Tools/Members’ menu option. (A copy is saved for future viewing, review and printing)
If “Email Processing” is disabled for the community or the member is not authorized for email communications. (By default the community is enabled for email processing but members are NOT. The
community setting can be set by an administrator using the ‘Administrator Tools/Community Settings’ menu option. Member email authorization can be set using the ‘Administrator Tools/Members’ menu option or the
‘Managers Tools/Members’ menu option )
o The letter is saved and displayed in the browser for viewing and printing. (A copy is
saved for future viewing, review and printing)
The Lease category is used to create a lease. When selected, a “Lease Agreement Interview” will be opened where detailed information will be entered. Caution: Be sure
to select the owner of the premises and the property for which a lease is being written, as this lease will be emailed as noted above. Once the “Lease Agreement Interview” is completed click the “Save …” button to save the interview and re-activate the “Preview” and “Create Final…” links buttons.
The Estopel category is used to create an Estopel for a pending sale. When selected, an “Estopel Request Interview” will be opened where detailed information will be entered.
Caution: Be sure to select the owner of the premises and the property for which an Estopel is being written, as this Estopel will be emailed as noted above. Once the “Estopel Request Interview” is completed click the “Save …” button to save the interview and re-activate the “Preview” and “Create Final…” links buttons.
The Intent to Lien category is used to create a notice of intent to record a claim of lien on a property. When selected, an “Intent to Lien Interview” will be opened where detailed information will be entered. Caution: Be sure to select the owner of the
premises and the property for which a lien is being written, as this lien will be emailed as noted above. Once the “Intent to Lien Interview” is completed click the “Save …” button to save the interview and re-activate the “Preview” and “Create Final…” links buttons.
The Intent to Foreclose category is used to create a notice to foreclose. When selected, an “Intent to Foreclose Interview” will be opened where detailed information will be entered. Caution: Be sure to select the owner of the premises and the property for
L E A S E S
E S T O P E L
I N T E N T T O
L I E N
I N T E N T T O
F O R E C L O S E

86
which a notice of foreclose is being written, as this lien will be emailed as noted above. Once the “Intent to Foreclose Interview” is completed click the “Save …” button to save the interview and re-activate the “Preview” and “Create Final…” links buttons.
The Release of Lien category is used to create a notice of release of lien on a property. When selected, a “Release of Lien Interview” will be opened where detailed information
will be entered. Note: Because this letter requires actual signatures it will NOT be emailed as noted above. Once the “Release of Lien Interview” is completed click the “Save …” button to save the interview and re-activate the “Preview” and “Create Final…” links buttons.
Member Management
Who’s who in the community?
se to edit user profiles, reset passwords, apply user roles, de-activate and other user related
administration. Click the icon to display the pages help and follow the directions for editing/viewing member information.
Find a user in the list by moving up and down through the list. Filter the list by selecting (All, Owners Only, Tenants Only, Vendors Only or Special Users Only).
You can further restrict the list by selecting the first letter of the member’s last name. The letters available is determined by the last names of the type selected. Change pages by using the page selector at the bottom of the user grid if needed.
If you don’t know the members last name or property address but do have the members ID number you can find the member by entering their ID and clicking the ‘Find Member’ or ‘Find Properties’ button. This will present the members name or list of properties.
Selecting a user from the list will display that user’s detail information.
You can change the active status of the user by clicking the check mark.
You can permanently delete a user by clicking on the icon. If in Management Activation Mode this member will be de-activated if there is a data integrity issue. Board members can NOT be deleted. Use extreme caution in using this functionality, as it can NOT be undone.
Use the security Question/Answer combination to validate a member.
A member’s password can be changed by clicking on the 'Change Password' button. This will reset the password to “password” (lowercase) and email it to the member.
Since some communities may have multiple associations, modify the associations the user is a member of by checking or un-checking the relevant associations.
R E L E A S E L I E N
U M E M B E R L I S T
M E M B E R
D E T A I L

87
Change the user’s type by selecting the appropriate choice (Tenant/Owner)
Remove properties the user owns or rents by selecting the address to remove.
Remove properties the user has listed for sale/rent by selecting the address to remove.
Add/Remove member’s roles using the roles section. You can NOT remove the 'Everyone' role; by adding or removing the 'Board of Directors' role you add/remove this member from this community’s board.
This section shows the available properties and which properties the member owns/rents and any properties listed for sale or rent. Also seen here is the total
number of properties in the community, the number of owner and tenant occupied properties and the percentage of owner occupied properties for the community.
The letters section shows any letters for the selected member. Use the icon for help using this section. This is where you can enter tracking numbers and view/print
any letter. If this member is a vendor, documents received from that vendor are also available.
Any resolution concerning a letter can be added here. Click the icon to edit any resolution and
the icon to view/print the resolution report.
Administrators and Managers can upload previously created letters.
Administrators must have created letter categories to assign these letters to. Go to (Administration > Administrator Tools > Letters/Leases/Estopels) to create these categories.
Click the “Open Upload Letters” button to open the upload window.
Select the appropriate category from the dropdown list. This will be the folder name these letters will be uploaded to.
Enter the date of the letter. The year will be used to create a year folder under the above category folder where the file will be uploaded to.
Use the browse button to find the file to upload. Only pdf, doc, and docs files will be accepted.
Click the “Upload letter/document” to upload the file to the selected category and year.
Click the “Close Upload Letters” button to close the upload window.
Uploads are restricted to pdf, doc, and docx files only.
If the member has the Board of Director role then a special “Board Member” section is activated where the member’s position on the board is designated by selecting the appropriate choice.
The building # is the building the member lives in. This may be left blank.
Checking the 'Show Board Members Info' box will show this members info in the Board of Directors page.
P R O P E R T I E S
L E T T E R S
B O A R D
M E M B E R S

88
Schedule/Calendar
Schedule events and meetings.
cheduling events and meetings is easy and quick. If Scheduler/Calendar has been enabled the
“Schedule/Calendar” menu option will be available. Click the icon to display the pages help and follow the directions for scheduling.
Payment Management
Manage the payments for a property.
se to manage assessment payments.
This presents the community’s payment activity that has been made through the community web site, including onetime credit card and e-check transactions and automatic recurring billing subscriptions (ARB/ACH). Displayed is the status,
amount, transaction Id’s, important dates and for ARB’s the payment method and interval. For ARB/ACH transactions you have an ability to change or cancel the subscription. This feature is handled by Authorize.Net and is only available if the community has completed the required application process and activated the feature for the community.
Property Management
Manage the community’s properties.
se to manage properties settings. Add/Edit community properties for the Web Site. Click
the icon to display the pages help and follow the directions for editing/viewing property information.
To add new properties click the plus icon. This will open the detail panel. Select the appropriate association from the drop down list and enter the other appropriate
information. Click the ‘submit’ button to save the new property. Clicking the 'Reset' button will clear all entries in the property detail panel. Click the 'Create Lockbox Id's' button to create lockbox Id's for all properties that don't already have a lockbox Id and there is an identified owner for the property. Note: these ’Lockbox Id's' are used to help track to which property invoices and payments may belong.
S
U A C C O U N T
A C T I V I T Y
U A D D

89
The systems created Lockbox Id’s are in the following format:
The first two (2) characters are the community Id.
Characters three through five (3-5) are the members Id.
The last two (2) characters represent the property Id.
It should be noted that the Lockbox Id is frequently used by banks to identify the property that received payments apply to. In this way the back does NOT need to know the actual property location or the payee.
To edit a property click the button. This will open the detail panel for the selected property. Edit the information as noted above for a new property. Click the
‘submit’ button to save the new property. Clicking the 'Reset' button will clear all entries in the property detail panel.
To permanently delete a property, click on the icon. Use extreme caution in using this functionality, as it can NOT be undone.
Proxy Management
Everyone gets to vote.
roxies are a community’s way for the membership to vote on important issues concerning the community.
Click on the Proxy Management link to view the community’s proxies. From here you can check the results of any proxy, edit a non-activated proxy, or delete the
proxy. The proxy status is also displayed, those that are marked as active are currently being presented to members on the community’s home page and can NOLONGER be edited.
Clicking the edit icon will permit modifying the selected proxy. It is recommended that once a proxy has been published that no further changes be made to that proxy, as that would invalidate the proxy.
Clicking “Results” will display the current results of the proxy.
Clicking the delete icon will delete the proxy and all its results. Be very careful about using this feature, as it is NOT reversible.
Click “Add New Proxy” to create a new community proxy. Enter a title for the proxy and the dates the proxy should be active for. Then click the “Save” button. At this
E D I T
D E L E T E
P P R O X Y
A D D P R O X Y

90
point you will be able to preview the proxy as it is being created.
Enter questions in the proxy questions text box and click the “Add Question” button to add the new question. It will be added to the questions list box. Use the to delete the selected question, the up and down arrows to change the order of the question.
For the selected question you can enter answers in the answer choices text box and click the “Add Choice” button to add the new choice for the selected question. Use the to delete the selected choice.
Select the roles for which this proxy applies. This will restrict who is notified of the proxy, for example to send this proxy to owners select the “Owners” radio button.
Use the “Preview” button to view the proxy being designed. The “Save” button will save the proxy for future editing, without saving all edits will be lost so save frequently.
When the proxy has been created completely check the activate checkbox and save. This will activate the proxy on the start date and complete it on the end date and send an email to the selected group.
Schedule/Start Live Broadcast
Live broadcasts allow members to attend meetings from anywhere.
cheduling live broadcasts is like any other community announcement is a quick and easy process. If live broadcasting has been enabled the “Schedule/Start Live Broadcast” menu option will be available.
Click on the “Schedule/Start Live Broadcast” link to create an announcement for a scheduled live broadcast. The recipients to whom the announcement will be sent are determined by selecting either “Requesting Members Only” or “All Members”.
Announcements can be sent from either “Member Services” or the person actually creating the announcement. Enter the broadcast date and time in the appropriate locations. Click the “Notify Member of Live Broadcast” button to send the announcement when ready.
Also from this same menu option you can start a live broadcast. Click the “Start Live Broadcast” link which will open the broadcast in a new browser tab or window. In this tab or window, login using the provided broadcast channel username and password. Then select the desired broadcast channel name and start the broadcast. This will open the broadcast screen where you may be asked to allow access to your camera and microphone. Select “Allow”, and then click the “Start Broadcast” button to actually start the broadcast. From this broadcast screen you can control other features of live broadcasting.
S L I V E
B R O A D C A S T S

91
Uploads
Adding and updating information to the community’s site.
ploading documents to the community’s web site is the main stay of the community. It keeps the community informed and up to date. The web site supports uploading minutes, financial and budget information, and community documents and events; in Microsoft Word document, PDF, HTML, or JPG image formats. Members are notified of most
uploads. The default behavior can be overridden by checking the check box to prevent notification.
Select “Upload Minutes” and follow the directions to upload community minutes. The minutes will be saved for the designated year and month specified and will be
activated on the minute’s page found from the board page. Upon completion of the upload, all members that asked to be notified will be sent an email announcing this upload.
Note:
An existing document must be removed first before it can be updated or overwritten. This is done by an administrator using document management.
Select “Upload Financials” and follow the directions to upload community financials. The financials will be saved for the designated year and month specified and will be
activated on the financials page found from the board page. You can upload any or all of the available types of financial statements. Upon completion of the upload, all members that asked to be notified will be sent an email announcing these uploads.
Note:
An existing document must be removed first before it can be updated or overwritten. This is done by an administrator using document management.
Select “Upload Audits” and follow the directions to upload community audits. The audit will be saved for the designated year specified and will be activated on the
financials page found from the board page. Upon completion of the upload, all members that asked to be notified will be sent an email announcing these uploads. Caution should be exercised on the year designated, as most audits are for previous years.
Note:
An existing document must be removed first before it can be updated or overwritten. This is done by an administrator using document management.
Select “Upload Budgets” and follow the directions to upload community budgets. The
U M I N U T E S
F I N A N C I A L S
A U D I T S
B U D G E T S

92
budget will be saved for the designated year specified and will be activated on the financials page found from the board page. You can upload a single file that contains the budget or if you are uploading a Microsoft Excel budget that has been saved as HTML, in this case follow the direction very carefully. Upon completion of the upload, all members that asked to be notified will be sent an email announcing these uploads.
Note:
An existing document must be removed first before it can be updated or overwritten. This is done by an administrator using document management.
Select “Upload Documents” and follow the directions to upload community documents. Select the type of document being uploaded, “Community Document”, “Legal Document”,
“Policy Document”, “Insurance Document”, “Operational Document”, “Vendor Document”, and “Pending ARC’s”. These documents will be saved and added to the community documents page found from the board page. Upon completion of the upload, all members that asked to be notified will be sent an email announcing these uploads. Pending ARC’s are NOT notified.
Note:
An existing document must be removed first before it can be updated or overwritten. This is done by an administrator using document management.
Select “Upload Events” and follow the directions to upload community events. Community events will be saved and added to the “my activities” page. Upon
completion of the upload, all members that asked to be notified will be sent an email announcing these uploads.
Note:
An existing document must be removed first before it can be updated or overwritten. This is done by an administrator using document management.
Select “Upload Agenda” and follow the directions to upload community agenda. The current agenda will be saved and will be activated on the board’s page. Upon
completion of the upload, the user is notified that the upload was successful. Members are notified by email announcing the upload of the new agenda.
D O C U M E N T S
E V E N T S
A G E N D A

93
Note:
The previous agenda is overwritten. Therefore always upload the agenda for the currently upcoming community meeting.
Select “Upload Newsletter” and follow the directions to upload community newsletters. The newsletter will be saved and will be available from the ‘Newsletter’ menu option.
Upon completion of the upload, all members that asked to be notified will be sent an email announcing these uploads.
Note:
An existing document must be removed first before it can be updated or overwritten. This is done by an administrator using document management.
Select “Upload Videos” and follow the directions to upload community videos. The video will be saved and will be available under the “Board” menu options. Enter the
required information and click the “Submit” button to upload the video. Videos must be no larger than 100MB. Large videos files can be accommodated by spreading them over multiple files uploaded individually. Upon completion of the upload, all members that asked to be notified will be sent an email announcing these uploads.
Note:
An existing document must be removed first before it can be updated or overwritten. This is done by an administrator using document management.
These are the informational forms that the community can display on the home page. Select “Upload Home Page Features” and follow the directions to upload features for the community home page. The feature will be saved and will then be available for use on
the home page.
Creating Skins: Skins may be created using Microsoft Word. Skins should NOT be wider than 300 pixels. Skins created using Microsoft Word can contain tables, anchors and references and other html code.
Note: If the htm/html file was created with Microsoft Word then only upload filtered htm or html files. Also, htm/html files should not contain any images as they will NOT be displayed.
Custom ascx skins are more versatile and can contain almost anything. To have a custom ascx feature file created please contact TALogic.
N E W S L E T T E R
V I D E O S
H O M E P A G E
F E A T U R E S

94
Upload Skins: Enter the file name to upload or click the browse button to choose a file. Click the submit button only once to upload the file.
Note: Only htm, html and ascx files are supported. If the htm/html file was created with Microsoft Word then only upload filtered htm and html files.
Feature Skins: To enable these forms, use the Community Settings option under administration to select features.
Select “Upload Estimates” and follow the directions to upload.
Voting Polls
Get the members opinions.
olling the community can be a great way for the Board of Directors and management to learn what the members want.
Click on the Voting Poll link to view the community’s polls. From here you can check the results of any poll, edit the poll, or delete the poll. The polls status is also
displayed, those that are marked as active are currently being presented to members on the community’s home page.
Clicking the edit icon will permit modifying the select poll. It is recommended that once a poll has been published that no further changes be made to that poll, as that would invalidate the poll.
Clicking “Results” will display the current results of the poll.
Clicking the delete icon will delete the poll and all its results. Be very careful about using this feature, as it is NOT reversible.
Click “Add New Poll” to create a new community poll. Enter a title for the poll and the dates the poll should be active for. Then click the “Save” button. At this point
you will be able to preview the poll as it is being created.
Enter questions in the poll questions text box and click the “Add Question” button to add the new question. It will be added to the questions list box. Use the to delete the selected question, the up and down arrows to change the order of the question.
For the selected question you can enter answers in the answer choices text box and click the “Add Choice” button to add the new choice for the selected question. Use the to delete the selected choice.
E S T I M A T E S
P P O L L S
A D D P O L L

95
Select the roles for which this poll applies. This will restrict who is polled, for example to poll only owners select the “Owners” radio button.
Use the “Preview” button to view the poll being designed. The “Save” button will save the poll for future editing, without saving all edits will be lost so save frequently.
When the poll has been created completely check the activate checkbox. This will activate the poll on the start date and complete it on the end date.
Work Order Management
Managers create work orders for the community to keep everything running smoothly.
se to manage community work orders.
Work Orders are presented in a grid showing all current work orders. Shown is the “WO #”, “Vendor”, “Status”, “Type”, “Amount”, “Authorized By”, “Important
Dates”, and “Additional Detail”. By default all Work Orders, Work Order Types for all Vendors are displayed. By changing the Work Order Type, the Work Order Status, and/or the Vendor and clicking the “Get Selected Work Orders” button will narrow the returned work orders. To move from page to page, select the desired page at the bottom of the grid.
The displayed information is as follows:
WO #: This is the work order number assigned by the system.
Vendor: The vendor this work order was sent to.
Status: The current status of the work order. Available statuses are, “Open”, “Closed”, “On Hold”, and “Canceled”.
Type: This is the type of work order.
Amt: This is the amount of the work order.
Authorized By: The person that authorized the work order.
Important Dates: This is a drop down of the important date concerning the work order.
Additional detail: This dropdown displays additional information about the work order. By selecting an item in the dropdown and then clicking the information icon, the full detail will be displayed in the text area below the work order grid.
U W O R K O R D E R S

96
Click the Work Order Report to create a report of the selected criteria. Be sure to “Get Selected Work Orders” to load those work orders to be in the report. Reports can be printed from the browser.
Clicking the icon will delete that work order. Use extreme caution in using this functionality, as it can NOT be undone.
Click on the icon to edit a letter. This will open another window where you can edit the selected work order and re-send the modified work order to the vendor. Click the “Cancel” button to cancel the edit and return to the previous page.
To preview and/or print the selected work order, click the icon. This will open the selected work order in another browser window for viewing and/or printing from your browser.
Click on the icon to create a new work order.
Click on the icon to mark the work order as complete. This will open another window in which comments can be entered. Click the “Submit” button to submit the work order as completed and save any comment entered.
Announcements
Notifying members.
ending the community an announcement is a quick and easy process for board members. This can be used by members of the Board of Directors and management to get urgent information to the community’s membership.
Click on the Announcements link to create an announcement. The recipients to whom the announcement will be sent are determined by selecting either “Requesting
Members Only” or “All Members”. Announcements can be sent from either “Member Services” or the person actually creating the announcement. Enter the announcement subject on the “Subject” line
W O R K O R D E R
R E P O R T
D E L E T E W O R K
O R D E R S
E D I T W O R K
O R D E R S
P R E V I E W &
P R I N T I N G
W O R K O R D E R S
C R E A T E N E W
W O R K O R D E R S
M A R K W O R K
O R D E R A S
C O M P L E T E
S A N N O U N C I N G

97
then type your announcement in the announcement textbox area. An attachment can also be added to the announcement by entering the file name in the attachment textbox or clicking the “Browser” button to select the desired file to attach. Click the “Submit” button to send the announcement when ready. When complete, a message to that effect will be displayed.
Export data to Excel
Managers will find it helpful to be able to export existing data directly into Excel.
xport data to an Excel. This will make the administrators life a bit easier.
To export members to an Excel worksheet named “Members”.
The worksheet will have the following 13 named columns:
Email:
Lastname: The member’s last name. (can be blank)
Firstname: The member’s first name. (can be blank)
MI: The member’s middle initial. (can be blank)
Addr1: The member’s first address line. (can be blank)
Addr2: The member’s second address line. (can be blank)
City: The member’s city. (can be blank)
State: The member’s state. (can be blank)
PostalCode: The member’s postal code or zip code. (can be blank)
Country: The member’s country. (can be blank)
Phone: The member’s phone. (can be blank)
CellPhone: The member’s cell phone. (can be blank)
MemberType: The member’s type. (can be blank)
Notify: Notify member of announcements. (can be blank, defaults to “False” else must be 0 for "No" or 1 for "Yes")
E M E M B E R S

98
Directory: Include member in directory. (can be blank, defaults to “False” else must be 0 for "No" or 1 for "Yes")
EmailAuth: Member has authorized email communications. (can be blank, defaults to “False” else must be 0 for "No" or 1 for "Yes")
DOB: Members date of birth (can be blank, defaults to 01/01/0001)
To export properties to an Excel worksheet named “Properties.
The worksheet will have the following 2 named columns:
Building: This is the building number if applicable. (can be blank)
Addr: The properties address. (cannot be blank)
To export, select the appropriate type from the list either “Members” or “Properties”.
Preview data before exporting the data.
Click the "View Data Layout" button to preview the data prior to export.
Performs the actual data export.
Click the "Export Excel Data" button to actually export the data into Excel.
Click the "View Data Layout" button to preview the data prior to export.
Determine the format of the export.
When checked the exported file will be in Excel 2010 format (xlsx).
Un-check to save in Excel 2007 format (xls).
P R O P E R T I E S
E X P O R T T Y P E
V I E W D A T A
L A Y O U T
E X P O R T D A T A
S A V E I N
E X C E L 2 0 1 0
F O R M A T

99
Reports
Community manager’s reports.
et all the reports the manager needs for the community. The manager has access to all reports, including those available to administrators, Board of Directors and accountants.
Staff
Those who are tasked with overseeing the operation of the office.
he Accounts are provided additional features under the “Administration” page within the “Accountants Tools” section. These include Banking, Receivables, Payables, Budgeting, Reporting, and much more.
Staff Tools
Community staff
he need to manage the office of any community.
If the community has office staff than the “Staff Tools” menu option will be available from the “Administration” section. A member that has been granted staff access has
the following sub-menus “Call Log”, “Callback”, “Scheduler/Calendar”, and “Reports”. From these you will be able to handle all the community’s activities and reporting needs. NOTE: All pages have the help
icon to provide instant help in the event you are not sure of how to use the current page.
Call Log & Callback
Community phone calls.
eeping track incoming phone calls is vital for a smooth running community. This is where the community staff can log all incoming calls for the specified manager or other personnel. Use the “Callback” menu option to review logged call and make notes concerning call
G
T
T S T A F F
K

100
resolutions.
Call Log Report
How is the Community handling phone calls?
se the Call Log Report from any reports menu to get your call and or review calls for other staff members.
Schedule/Calendar
Schedule events and meetings.
cheduling events and meetings is easy and quick. If Scheduler/Calendar has been enabled the
“Schedule/Calendar” menu option will be available. Click the icon to display the pages help and follow the directions for scheduling.
U
S

101
Accountants
Those who are tasked with overseeing the financial operation of the community.
he Accountants are provided additional features under the “Administration” page within the “Accountants Tools” section. These include Banking, Receivables, Payables, Budgeting, Reporting, and much more.
Accounting Tools
Community level accounting
he need to maintain accurate financial records are a must for any community.
If the community has activated the community accounting feature than the “Accounting Tools” menu option will be available from the “Administration”
section. A member that has been granted accountant access has the following sub-menus “Banking”, “Receivables”, “Payables”, “Community”, and “Reports”. From these you will be able to handle all the
community’s activities and reporting needs. NOTE: All accounting pages have the help icon to provide instant help in the event you are not sure of how to use the current page.
Community Calendars
Community calendars.
eeping track of where and when is vital for a smooth running community. This is where a community calendar can be a real handy tool. Clicking on the desired event will open that event for further information, such as times, locations and other pertinent information.
Chapter
12
T
T A C C O U N T I N G
K

102
Click the Calendars link to open the community’s calendars page. Select the calendar to view.
Use to view available calendars. Select the calendar to view. Click 'Month-Day-List' buttons to see desired view. Use the <<, < and >, >> to move between years and months. Click an appointment to display that appointments detail. Map and Weather information is available for the event if a location is specified. Clicking the 'Email' button to send calendar. Click the 'Save' button to save the calendar or open it. Click the 'Print' button to print the calendar. Use the 'RSS' button to add this calendar to your RSS reader.
If you are using Outlook
Use the 'Publish Online' feature to publish your own calendars. Set the location to: 'http://Your_Community_Url/CommunityData/AssocId?/Calendars/'. Your_Community_Url is the URL you entered to access your community. The ? in AssocId? is the integer assigned to your community. This is available from your community’s administrator on the 'Community Settings' page. Set any other features for your calendar. Including advanced features to handle
automatic updates. It is also required that the name of your personal calendar be the same as your member
name in the community.
Banking
Community banking.
o maintain the community’s banking needs.
View all community bank accounts. Bank accounts can be activated/de-activated. Accounts with NO balance or open transactions may be deleted. Otherwise they are
de-activated. Accounts may be modified by clicking the edit icon and editing the appropriate information. New bank accounts may be added by clicking the add icon and entering the required information. Special attention should be applied to bank accounts that are for community reserves, i.e. reserve funds that are being held in CD’s or other long term investment accounts. When adding these types of accounts, click the ‘This is a Reserve account’ and select the reserve account to associate this bank account with from the dropdown list. These types of accounts often do NOT have routing numbers or check writing privileges. In these cases do NOT enter a routing number and set the starting check number to zero (0). Select the currency the account is denominated in, USD is selected by default.
C A L E N D A R S
T A C C O U N T S

103
Enter deposits into community bank accounts. Select the bank account to make these deposits to. This will display all ‘Un-Deposited Funds’ for that account. Select the
deposits to make and click the ‘Make Deposits’ button to enter the deposits into the system.
View the community check register. Select the bank account for which the check register will be displayed. By default the latest entries page will be displayed first, use the page up and page down to view other entries. Depending on the status
of the transaction, various actions may be taken if necessary. Caution should be applied when making changes to the check register, i.e. ’Un-Deposited Fund’ transactions may be deleted, resulting in all associated orders being removed; checks that have been written but not yet cleared may be ‘Void’; the ‘Cleared’ and ‘Deposited’ status’ may be changed (this does NOT change any action that has already taken place at the bank where this account is held); clicking the edit icon opens an edit window for the selected transaction where certain attributes of the transaction may be changed; checks can be printed/re-printed by clicking the ‘Print’ icon.
Write check for the community. Select the bank account to draw this check against and select the account this check should be applied to. By default the current date will be used for the date on the check, this may be changed if needed. Enter an amount for this check from $0.01 to $99,999,999.99 and then from the dropdown list select a
payee. This will set the dollar amount text on the check. The check number can be overridden by changing the system generated check number. There are two (2) ways to save the check; the first is to click the ‘Save Check’ button which will save the check and activate the ‘Print Check’ button, the second method is to click the ‘Save and Write a NEW Check’ button which will save the check and reset the form for another check. When using the second method, go to the Check Register to print those checks. We have tested using LMP12 checks and CE05B or CE05BS envelopes provided by Harland Clarke. Call 1-800-503-2345 to place orders.)
Transfer funds amongst accounts. Select the accounts to transfer to and from. Enter the amount to transfer and click ‘Save & New’ to complete the transfer. NOTE: Transfers involving physical bank accounts is NOT permitted; use a check from one
account to the other. This provides a paper trail for the transaction.
Perform reconciliation of all community bank accounts. Begin by selecting the bank account from the dropdown list and setting the statement date. Next enter
the ending balance from the bank statement and enter any charges and interest earned. Select the account to apply these to, i.e. ‘Bank Charges’ and ‘Interest Earned’, then click the ‘Continue’ button to move on to step two. Step 2 displays all Payments/Checks and Deposits/Other Credits that have NOT been previously cleared prior to the statement date. NOTE: Payments and Checks, and Deposits and Other Credits that have been written and printed or deposited equal or prior to the statement date are included. Additionally, transaction after the statement date can be included by checking the 'Show transactions ...' checkbox. Click the 'Select All ...' buttons to select the transactions to clear during this reconciliation. NOTE: you can individually select or unselect transactions by checking/unchecking the checkbox in the respective column. Clicking the 'Modify Settings' button will return to step 1 where those setting can be changed. As items are selected the 'Selected' and 'Balance' boxes are updated to reflect the reconciliation. The 'Cleared Balance' represents the total of the selected Payments + the selected Deposits. The 'Difference'
D E P O S I T S
C H E C K
R E G I S T E R
W R I T E
C H E C K S
T R A N S F E R S
R E C O N C I L E

104
represents the total of the (Service Charge + the Interest Earned + the Ending Balance) - Cleared Balance. If the 'Difference' does NOT equal $0.00 then there is something missing and you should carefully review your bank statement and the selected items to determine where the problem is. Clicking the 'Reconcile Now' button will try to reconcile the bank statement. If the 'Difference' equals $0.00 then reconciliation will proceed without any further action. However, if the 'Difference' is not $0.00 then a 3rd. step will be presented. If the 3rd. step you can return to step 2 to rectify the problem or elect to allow the system to make an automatic adjustment to rectify the discrepancy.
Receivables
What the Community has coming.
eeping the community healthy, financially, requires handling its day to day needs. To this end receivables are essential.
This is where you can create invoices/orders. Use the ‘Member Type’ to filter which members are shown in the customer list. From the customer dropdown, select the customer(s) for whom to create Invoices/Orders. If Lockbox Id’s have
been assigned to properties, the Lockbox Id will be shown. If the select member has multiple properties, then a dropdown list of available Lockbox Id’s will be presented from which to select the property the invoice applies to. Enter an Invoice date if different from the current date. Select the account this Invoice applies to. Select any terms that may apply. Select the item to add to the Invoice/Order. Enter the quantity for the selected item. Click the button to add the item to the Invoice/Order. Once an item is added to the Invoice/Order use the button to remove the item from the Invoice/Order, the button to increase the quantity and the button to decrease the quantity. Enter any memo you wish to attach to the Invoice/Order. Click 'Submit Invoice/Order' button to save the Invoices/Orders. This will display a list of Invoices/Orders just created. Clicking one of these Invoices/Orders will open the Invoice/Order in another window for viewing and/or printing. Click the 'Reset or Enter New Invoice/Order' button to clear the Invoice/Order to create a new one.
Select either Refund or Credit and complete the required information. Select the customer from the customer dropdown list. Select the account to apply this Refund/Credit to. In the event of a Refund, enter the date and reference (usually
invoice #). Select the product being refunded and the quantity. Then click the button to add the item to the refund. Continue this until all refunded items are listed. Use the button to delete items or the button and button to increment the quantity up or down. Enter any memo you wish attached to this Refund. In the event of a Credit, enter the date. The ‘Reference #’ is automatically supplied. Enter a credit amount and any memo you wish attached to this Credit. Click the 'Submit Refund/Credit' button to save the Refund/Credit. This will enable the 'Print Refund/Credit' button, which if clicked will open the Refund/Credit
K I N V O I C E S
A N D O R D E R S
R E F U N D S A N D
C R E D I T S

105
in another window for viewing and/or printing. Click the 'Reset .....' button to reset the form to enter a new Refund/Credit. NOTE: This does NOT save the current Refund/Credit.
To view open orders, select the customer from the customer dropdown list. By default this will show all open orders for the selected customer. This can be modified to a particular date range by selecting 'Between these dates' and changing
the start and end dates. The Dates column contains dropdown lists showing the date of the order and its due date. The Invoice column contains dropdown lists showing the amount of the invoice, the invoice number, and the invoice date. The Discount column contains dropdown lists showing the amount of the discount and the discount date. The Detail column contains the items on the order. You can expand an item by clicking on the item or clicking the icon to reveal that items detail (Quantity & Unit Price & Description). Clicking the will collapse the item. The Balance column shows the outstanding balance for the order. Click the button to delete this Order. Caution: this CANNOT be undone.
Click the button to open the order in another window for viewing/printing. Click the
button to mark that order as paid. (Note: this has no effect on the GL) Click the button to edit this order. This opens the order detail where you can modify the order, adding and removing order items, change quantities. (Note: The Lockbox Id can also be changed from here) Clicking the 'Update Order' button will update the order with the changes made and close the order detail. To add an item to the order; select the item from the 'Item' dropdown list and set the quantity. Then Click the button to add the item. Click the button to delete that order item from the Order. Caution: this CANNOT be undone. Adding or deleting an item to the order is automatically saved and the order is updated. Increasing/Decreasing the quantity of an order item is accomplished by clicking the up or down buttons. This increases or decreases the quantity by 1 and is automatically saved to the order. The 'Close Edit' will close the order detail without saving any changes other than those made to the Order Items.
To also show closed orders, click the ‘Show Closed Orders’ checkbox. Click the button to mark that order as unpaid and restore the balance to the invoice amount (Note: this has no effect on the GL)
Accept payments by selecting the mode to use, “Member Mode is selected by default. This will display all open Invoices/Orders for the selected customer.
Enter a payment date if different from the current date. Enter payment amount and reference #, usually the customers check number. Select the payment method, account to apply this payment to and bank account to post this payment to. Enter any memo you wish to be attached to this payment. Select the Invoices/Orders to apply this payment against by checking the checkbox in the right column. If there are any discounts or credits available they will be applied to the payment. Click the 'Apply Payment' button to apply the payment to all those selected open Invoices/Orders. If the payment amount is insufficient to pay the selected open Invoices/Orders then a partial payment will be applied. If the payment amount exceeds the amount of open Invoices/Orders than a credit will be created for the excess amount. Click 'Clear Payment' to clear the form.
O P E N O R D E R S
P A Y M E N T S
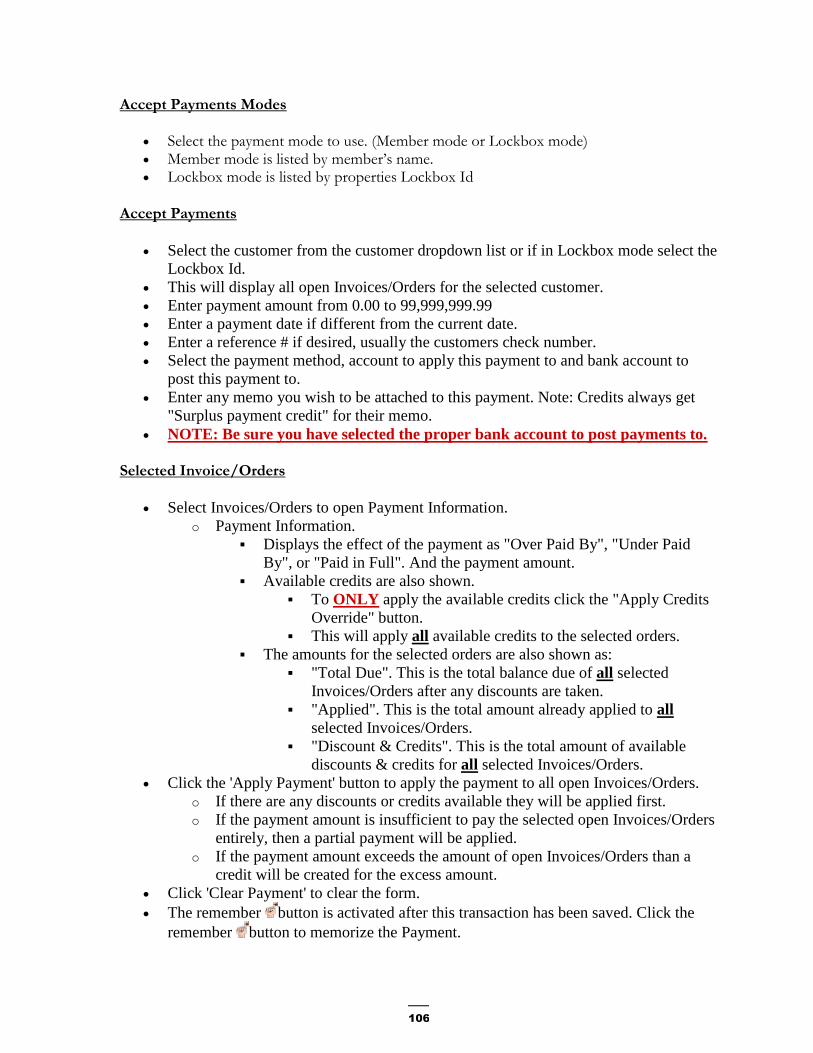
106
Accept Payments Modes
Select the payment mode to use. (Member mode or Lockbox mode) Member mode is listed by member’s name. Lockbox mode is listed by properties Lockbox Id
Accept Payments
Select the customer from the customer dropdown list or if in Lockbox mode select the
Lockbox Id.
This will display all open Invoices/Orders for the selected customer.
Enter payment amount from 0.00 to 99,999,999.99
Enter a payment date if different from the current date.
Enter a reference # if desired, usually the customers check number.
Select the payment method, account to apply this payment to and bank account to
post this payment to.
Enter any memo you wish to be attached to this payment. Note: Credits always get
"Surplus payment credit" for their memo.
NOTE: Be sure you have selected the proper bank account to post payments to.
Selected Invoice/Orders
Select Invoices/Orders to open Payment Information.
o Payment Information.
Displays the effect of the payment as "Over Paid By", "Under Paid
By", or "Paid in Full". And the payment amount.
Available credits are also shown.
To ONLY apply the available credits click the "Apply Credits
Override" button.
This will apply all available credits to the selected orders.
The amounts for the selected orders are also shown as:
"Total Due". This is the total balance due of all selected
Invoices/Orders after any discounts are taken.
"Applied". This is the total amount already applied to all
selected Invoices/Orders.
"Discount & Credits". This is the total amount of available
discounts & credits for all selected Invoices/Orders.
Click the 'Apply Payment' button to apply the payment to all open Invoices/Orders.
o If there are any discounts or credits available they will be applied first.
o If the payment amount is insufficient to pay the selected open Invoices/Orders
entirely, then a partial payment will be applied.
o If the payment amount exceeds the amount of open Invoices/Orders than a
credit will be created for the excess amount.
Click 'Clear Payment' to clear the form.
The remember button is activated after this transaction has been saved. Click the
remember button to memorize the Payment.

107
If available, select the customer from the customer dropdown list. Otherwise the currently logged in user account is shown. By default this will show all activity for the selected account. This can be modified to a particular date range by selecting
'Between these dates' and changing the start and end dates.
The Payments (Paid/Received) List displays the following: the Date column shows the date
of the activity, the column indicates if the item has been printed, the column indicates
if the item has been deposited, the column indicates if the item has cleared the bank.
The Receivables (Invoices/Orders) List displays the following: the Dates column contains dropdown lists showing the date of the activity and its due date, the Invoice column contains dropdown lists showing the amount of the invoice, the invoice number, and the invoice date, the Discount column contains dropdown lists showing the amount of the discount and the discount date, the Memo/Prop column displays any memo attached to the invoice and if the property referred to by the Lockbox Id is different than the mailing address the property address is shown., the Detail column contains the items on the order. You can expand an item by clicking on the item or clicking the icon to reveal that items detail (Quantity & Unit Price & Description). Clicking the will collapse the item, The Balance column shows
the outstanding balance for the order. Click the button to print the Invoice/Order.
The Payables (Invoices/Bills) List displays the following: the Dates column contains dropdown lists showing the date of the activity and its due date, the Invoice column contains dropdown lists showing the amount of the invoice, the invoice number, and the invoice date, the Discount column contains dropdown lists showing the amount of the discount and the discount date, The Balance column shows the outstanding balance for the order.
In the upper left hand corner there is icon. When clicked the Account Activity report is opened for viewing and/or printing.
Create customer statements by using the ‘Statement’ option from the ‘Accounting > Receivables’ menu option. Set the statement date to appear on the statement. Note:
From and through dates are used to determine which customers appear in the list of customers. They must have open invoices between those dates. Click the “Include Members with Zero Balances” button to include members with no balance due. Click ‘All due & open Transaction’ to include all open transactions or use the ‘Transactions between …’ to limit the available transactions. If you want payments, received or made, to appear on the statements, select which to include. Select those customers to create statements for, set any additional options. Use the ‘Create Preview Statement’ to create a preview
that can be viewed by clicking the icon. Click the icon to create statements for all customers that were selected in the customer list. Statements will be automatically sent to customers that have authorized email communications. Note: Statements that do get emailed will not be available for viewing here, but are available from the ‘Members’ page in the ‘Letters’ section. Un-sent statements are also saved in this location. The un-sent statements are available for processing by
A C C O U N T
A C T I V I T Y
S T A T E M E N T S

108
selecting the statement in the ‘Un-Sent’ statement list and clicking the icon to open that statement for further processing by an alternate manner.
Payables
What the Community owes.
good community is financially responsible, paying its bills in a timely manner.
Enter any bills or credits received by the Community. Select the type 'Bill or Credit', select the vendor that this Bill/Credit is from. Summary information and recent activity for the last 30 days is shown to the right. Enter the requested information about the Bill/Credit received. Click 'Submit' to save the Bill/Credit. Click 'Clear' to clear the form.
Bills or Credits can be "Split" over multiple accounts by clicking the 'Split' button.
o This will open a grid to enter 'Splits'.
o Select the account to split this invoice into from the dropdown list.
o Enter the amount of this split.
o Enter a memo if desired.
o Click 'Add New Row' to create more splits and repeat for each split.
NOTE: It is NOT recommended to enter more than 12 splits for one invoice, as this will make the statement section of checks invalid.
All un-paid bills for all vendors are shown by default. This can be modified by changing to a specific date and/or selecting a specific vendor. Select those bills
you want to pay by clicking on the checkbox in the first column. You can also click the 'Select all Invoices/Bills' button to check all displayed bills. Selecting a specific invoice will show with a green background. By default the amount to pay will be set to the invoice amount. This can be changed to whatever amount you would like to pay on that invoice. Selecting a specific invoice will display discounts and credits available in the Invoice/Bill Information section.
Selected Invoice/Bill Information and Actions:
Any available discount amounts ('Disc. Amt') are automatically applied to invoices
selected to be paid.
If there are available credits they will be displayed.
A R E C O R D
B I L L S A N D
C R E D I T S
P A Y B I L L S

109
o Select any available credits and click 'Apply Selected Credits' to apply those
credits to the selected invoice.
o Selected credits cannot be applied to the selected invoice if the credit excedes
the selected invoice amount 'Amt to Pay'.
o Un-checking an invoice will also release any credit(s) applied to that invoice.
Selected Invoices/Bills Payment Processing:
The payment date defaults to the current date but can be changed as needed.
The default payment method is 'Check' and can be changed if needed by selected a
different payment method from the dropdown list. It is suggested that you use 'Check'
as the payment method for Automatic Debits.
When the payment method is 'Check'.
o The check number to be used is displayed.
o This check number may be changed here if necessary.
o Check numbers must be integers.
So if you are entering an automatic debit with a reference number like
'013117-1'. Remove the '-' and used the whole number.
If the reference number contains letters or other characters. remove
then too.
o However this does NOT change the bank accounts next check to this new
check number plus one.
o This has to be done manually for the bank account.
Select the appropriate account to make payments from. Note: This list is in
alphabetical order by the name of the account set in the chart of accounts.
o Note: Do NOT select more than ten (10) invoices for a specific vendor, as
this will cause the statement section of checks to be invalid. Clicking 'Pay Selected Invoices/Bills' to pay Bills.
The remember button is activated after this transaction has been saved. Click the
remember button to memorize the Payment.
Note: Checks are printed from the 'Check Register'
Deleting Invoices/Bills
You can only delete one Invoice/Bill at a time and that Invoice/Bill the one in the row
where the is.
Clicking the 'Delete Button' to delete that Invoice/Bill in that row.
o Note: Use with extreme caution as this CANNOT be undone.
If available, select the customer from the customer dropdown list. Otherwise the currently logged in user account is shown. By default this will show all activity for the selected account. This can be modified to a particular date range by selecting
'Between these dates' and changing the start and end dates.
A C C O U N T
A C T I V I T Y

110
The Payments (Paid/Received) List displays the following: the Date column shows the date
of the activity, the column indicates if the item has been printed, the column indicates
if the item has been deposited, the column indicates if the item has cleared the bank.
The Receivables (Invoices/Orders) List displays the following: the Dates column contains dropdown lists showing the date of the activity and its due date, the Invoice column contains dropdown lists showing the amount of the invoice, the invoice number, and the invoice date, the Discount column contains dropdown lists showing the amount of the discount and the discount date, the Detail column contains the items on the order. You can expand an item by clicking on the item or clicking the icon to reveal that items detail (Quantity & Unit Price & Description). Clicking the will collapse the item, The Balance column shows
the outstanding balance for the order. Click the button to print the Invoice/Order.
The Payables (Invoices/Bills) List displays the following: the Dates column contains dropdown lists showing the date of the activity and its due date, the Invoice column contains dropdown lists showing the amount of the invoice, the invoice number, and the invoice date, the Discount column contains dropdown lists showing the amount of the discount and the discount date, The Balance column shows the outstanding balance for the order.
Print the 1099-MISC forms for those vendors that are 1099 eligible. This uses the IRS 1099-MISC forms available online from IRS.gov. Follow this link to order:
http://www.irs.gov/Businesses/Online-Ordering-for-Information-Returns-and-Employer-Returns
Community
The Community.
laning the community finances requires making entries into the general ledger if required, creating viable budgets, having products or services provided, and a proper chart of accounts to track it all.
Make entries into the General Ledger through the General Journal. Set the date if different than the current date. Select the account to make an entry to from the account dropdown list. Enter a debit or credit amount for the selected account.
Enter any description and/or reference you wish attached to the transaction. NOTE: you can only make one credit or debit at a time. Clicking 'Add to Above Grid' to insert the transaction. Click the 'Cancel' button to cancel the transaction and reset the form.
P R I N T 1 0 9 9 -
M I S C
P G E N E R A L
J O U R N A L

111
Transactions are displayed in the General Ledger Transactions table. Click the delete button to delete this transaction. Caution: this CANNOT be undone. Click the 'Clear' button to remove ALL transactions from the General Ledger Transactions table. Caution: this CANNOT be undone. To edit a transaction, first delete the transaction and then insert a new transaction. When the total debits and credits are equal, the 'Save & New' button will be enabled. Clicking the 'Save & New' button will save the transactions to the general ledger and then clear the Transaction table in preparation for a new entry.
If there are budgets available, select the budget year of the budget to open. Clicking the 'Delete this Budget' button will delete the budget for the selected year.
Caution: this CANNOT be undone. Click the 'Create New Budget for this Budget Year' button to create a new budget for the select year.
Creating New Budgets: A new blank budget is created by clicking the 'Create New Budget for this Budget Year' button. Creating duplicate budgets for a given year is NOT allowed. Click the 'Delete' button to delete a particular budget line item. It is NOT usually recommended to delete budget items unless they are no longer going to be used. Click the 'Edit' button to place that line item into edit mode.
Editing Budget Items: Click the 'Edit' button to place that line item into edit mode. Click the 'Cancel' button to exit edit mode without saving any changes. Click the 'Update' button to save changes and exit edit mode. While in edit mode, enter budget amounts for each month for the selected line item. NOTE: By entering an amount in the January column and clicking the 'Copy Across' button each month will be given the same amount and the yearly amount will be given the total. You may change any amount at any time and the yearly amount will be updated after clicking the 'Update' button. Repeat the above for each line item in the budget, paging through the entire budget.
Adding Budget Items: Click the 'Add Budget Item' button to add additional items to the budget. This will open a window to select accounts to add. Click the 'Return to Budget' button to exit the 'add budget items' mode and return to the selected budget. Make selection of accounts to add the current budget. Select any available accounts to add to the budget from the drop-down list. Use the 'Select All/Unselect All' to quickly make selections or check individual accounts. When satisfied with your selection(s) click the 'OK' button or click the 'Cancel' button to close the selection box without making changes to your selection. Click the 'Add Selected Accounts' to add those accounts to the budget. When completed, click the 'Return to Budget' button to return to the current budget. The accounts just added will now be in the budget ready to be edited as needed.
Create the communities reserve schedules. Regardless the number of reserve accounts your community may have, there should be a reserve schedule for each one.
Click the report button to open the Reserve Schedule report.
B U D G E T S
R E S E R V E
S C H E D U L E S

112
If there are NO Reserve Schedules you will be able to add your first Reserve
Schedule.
Click the delete button to delete the selected Reserve Schedule. Caution: this
CANNOT be undone.
Click the edit button to edit the selected Reserve Schedule.
Click the plus button to add new Reserve Schedule.
Editing/Adding Reserve Schedules:
Click the edit button to edit the selected Reserve Schedule or click the plus
button to add a new Reserve Schedule.
Enter the required reserve item name. Note: That some reports and lists are ordered
alphabetically, so if you want an account to appear at the top, name as such.
Enter the Estimated Total Useful Life for the reserve item in years.
Enter the Estimated Remaining Useful Life for the item in years.
Enter the Estimated Total Cost for the project.
Select the bank account to use to fund the project.
Select the reserve account associated with this project.
Click the "Recalculate Estimated Required Funding" button to re-calculate the
required funding.
This is a list of all products/services available. Click the button to edit the selected item. This opens the detail section where you can edit all properties of the item; item name, rate, account, and description. The 'Rate' is the amount for
each item, account is the account this item is associated with, and term is the discount that can be applied to this item (not implemented). Clicking the 'Submit' button will save the product/service. Click the button to add additional products/services. This opens the detail section where you can add new products/services. Enter the required information for the item; item name, rate, account, and description. The 'Rate' is the amount for each item, account is the account this item is associated with, and term is the discount that can be applied to this item (not implemented). Clicking the 'Submit' button will save the
product/service. Click the button to activate/de-activate the product/service. Note: de-activated products are NOT available when creating invoices/orders. It is suggested that if you have items that change often that you create different items for them. For example, if you have a monthly maintenance fee that changes each year that you create a new item for that year and then de-activate the old item ex: 2010 Fee, 2011 Fee, 2012 Fee, etc. By doing so you will always have a record of what the old fees were.
This is a list of accounts used in the system to keep track of it all. If there are NO accounts you will be prompted to setup default accounts. Once the default accounts have been created, click the 'Refresh Chart of Accounts' to see the newly
create chart of accounts. They will be displayed showing the account number, type, sub-
P R O D U C T S
C H A R T O F
A C C O U N T S

113
category, name and description. New accounts may be added at any time. Click the delete button to delete the selected account. Caution: this CANNOT be undone and will NOT
be allowed if there are existing transactions using this account. Click the edit button to edit the selected account. Bank accounts, Credit Card accounts and Cash accounts require special handling. (See below) Click the plus button to add new accounts.
Editing/Adding Accounts: Click the edit button to edit the selected account or click the plus button to add new accounts. Enter the require name for the account. Note: That some reports and lists are ordered alphabetically, so if you want an account to appear at the top name as such. Enter the account # you want assigned to this account. The allowed account numbers is controlled by the account type as selected. Note: Again, some reports and lists are ordered by account #, so if you want an account to appear at the top use a lower number. The account type defaults to the type of the account of the account where you clicked the button. However this may be changed at any time. An account can be a sub-category of another account within the account type. This is used for reporting purposes to group items, ex: the Utility account could be the sub-category for Electric Power, Sewer & Water, and Telephone and will be reported under the group named Utility. To include the parent account within the group you must set the sub-category of the parent account to itself, ex: the Utility account would have Utility as its sub-category. An optional description can be attached to the account. Bank accounts, Credit Card accounts and Cash accounts require special handling. (See below)
Bank Accounts: Bank accounts require information about the bank where the account is held; the bank account number, current balance and starting check number are required. NOTE: If this account is NOT a checking account, enter 0 for the starting check number. If this account is for a 'Reserve' account check the '... Reserve ...' checkbox. This will then present a list of reserve accounts that this account can be associated with, select the appropriate account from this list. This will ensure that reporting is handled properly for reserve type accounts. When adding bank accounts, select the currency the account is denominated in. By default USD are selected. Once the new account is submitted and saved, the currency can no longer be changed.
Credit Card Accounts: Credit Card accounts require the same bank information as bank accounts along with the credit card number and current balance.
Cash Accounts: Cash accounts only require the current balance being held in cash.
Export tables
To export tables used by the accounting module to an Excel worksheet.
E X P O R T
T A B L E S

114
Managers will find it helpful to be able to export existing data directly into Excel.
Export data to an Excel. This will make the administrators life a bit easier.
Select Data Table:
Select the table to export.
o Export Accounts Payable:
Worksheet name will be: "AP"
o Export Accounts Payable Detail:
Worksheet name will be: "AP Detail"
o Export Accounts Receivable:
Worksheet name will be: "AR
o Export Accounts Receivable Detail:
Worksheet name will be: "AR Detail"
o Export Accounts Bank Accounts:
Worksheet name will be: "Bank Accts"
o Export Budget:
Worksheet name will be: "Budget"
o Export Accounts Chart of Accounts:
Worksheet name will be: "Chart of Accounts"
o Export Accounts Chat of Accounts Types:
Worksheet name will be: "Chart of Accounts Types"
o Export Check Register:
Worksheet name will be: "Check Register"
o Export Check Transaction Types:
Worksheet name will be: "Check Transaction Types"
o Export General Ledger:
Worksheet name will be: "General Ledger"
o Export Items:
Worksheet name will be: "Items"
o Export Reconcile:
Worksheet name will be: "Reconcile"
View Data Layout:
Click the "Preview Data Layout" button to view the data prior to export.
This is presented in a grid for verification that this is indeed the data you want to
export.
Export Data:
Click the "Export Data" button to actually export the data to Excel.

115
Coupon Orders
We realize that many communities use coupon books from your banks to facilitate assessment payments. To make this annual occurrence easier, we have implemented "Create Coupon Orders
Financial Institution
Select the financial institution to create coupons for. Select the file format to create. (Excel or CSV)
Order Coupons
Select the communities bank account (this will display the bank account # that funds will be
deposited into by the bank) Select the type of coupon to create. (Single or Variable Amount Coupons) Enter the number by which the bank identifies the community. Select the payment frequency. (Monthly, Quarterly, Semi-annually, or Annually) Enter the number of coupons. Due Date and Payment Amount
o Enter the first due date. o Enter the payment amount.
If left blank then the coupon amount assigned to the unit will be used. Otherwise this amount will override assigned amounts and be used for
ALL coupons. o If ordering variable amounts coupons their respective amounts as necessary.
The due dates will be on the same day for each month as that of the first due date for the number of months selected in the payment frequency.
If the amount is left blank then the coupon amount assigned to the unit will be used.
Otherwise this amount will override assigned amounts and be used for ALL coupons.
Enter late messages and misc. comments as necessary.
Create Order
Click the 'Create Coupon Order' to create the order file. The file will be created and made available within your browser. Review the file created and then upload that file to your bank for processing your
coupon order per their instructions.
File Formats
Single Amount Coupons o Financial institution:
C O U P O N
O R D E R S

116
Format Type: 1 Create a homeowner file for Single Amount Coupons using the Sample Excel File Format
Column Max # of
Characters Field Name Description
A 13 Bank Account # Bank account number that payments will be
deposited to.
B 8 Unit # Actual Unit # - Alphanumeric.
C 5 Bank Assoc # Association number used by Bank.
D 6 Start Date MMDDYY
E 8 Payment Amt No decimals, no dollar sign, $154.0-0
would look like 00015400
F 2 # of coupons
G 35 Name of
Property
H 30 Homeowner
Name
(Optional) If not printed on the coupon can
leave column blank.
I 30 Late Message
Line No.1
Use this line to print a different message for
each unit, or this line can be used to print the same message for all units.
(Optional) If not printed on the coupon
leave blank.
J 30
Late Message Line
No. 2
Use this line to print a different message for
each unit, or this line can be used to print the same message for all units.
(Optional) If not printed on the coupon
leave column blank.
K 30 Misc. Comment
Use this line to print a different message for
each unit, or this line can be used to print
the same message for all units.
(Optional) If not printed on the coupon
leave column blank.
L 1 Payment
Frequency
M=Monthly, Q=Quarterly, S=Semi-annual,
A=Annual
M 8 Lockbox Id
This number must match your system’s unit
number for automatic payment posting. The
field can contain numbers and/or capital
letters only. There can be no spaces or
special characters in the field, for example;
no dashes, commas, number sign, etc.
N 30 Homeowner
Address Line 1
Required if bank is mailing coupons
directly to homeowner.
O 30 Homeowner
Address Line 2
Required if bank is mailing coupons
directly to homeowner.
P 30 Homeowner
Address Line 3
Required if bank is mailing coupons
directly to homeowner.
o *Association Number o The Association number is a unique five-digit number used to identify each
association. This number cannot contain alphas or characters. Management

117
companies may elect to assign their own Association Number or elect the financial institution to assign the number for them. Assignment of the Association Number for self-managed associations is determined by certain criteria
Variable Amount Coupons o Financial institution:
Format Type: 2 Create a homeowner file for Variable Amount Coupons using the Sample Excel File Format
Column Max # of
Characters Field Name Description
A 13 Bank Account
#
Bank account number that
payments will be deposited
to.
B 8 Unit # Actual Unit # -
Alphanumeric.
C 5 Bank Assoc # Association number used by
Bank.
D 6 Start Date 1 MMDDYY
F,H,J,L,N,P,R,T,V,X,Z 6 each Due Dates 2-
12
MMDDYY. Will be
completed based on number
of payments in order. Enter
the due date for the
remaining months that you
want to print. The day of the
month must match for each
payment. For example, if
due date is on the 2nd day of
the month for Due Date 1,
all due dates must be on the
2nd for that unit order.
E 8 Payment
Amount 1
No decimals, no dollar sign,
$154.0-0 would look like
00015400
G,I,K,M,O,Q,S,U,W,Y,AA 8 each Payment
Amount2 2-12
No decimal, no dollar sign,
$154.00 would look like
00015400. Will be
completed based on number
of payments in order.
Complete the Payment
Amount for each Due Date
you have entered. If not
using all 12 due dates leave
remaining columns empty.
Do not include due dates
that do not need coupons.
Do not shift everything over.
AB 2 # of coupons
02-12 (Variable Amount
coupons are available for up
to 12 coupons)
AC 35 Name of
Property
AD 30 Homeowner
Name
(Optional) If not printed on
the coupon can leave
column blank.

118
AE 30 Late Message
Line No.1
Use this line to print a
different message for each
unit, or this line can be used
to print the same message for all units.
(Optional) If not printed on
the coupon leave blank.
AF 30
Late Message Line
No. 2
Use this line to print a
different message for each
unit, or this line can be used
to print the same message
for all units.
(Optional) If not printed on
the coupon leave column
blank.
AG 30 Misc.
Comment
Use this line to print a
different message for each
unit, or this line can be used
to print the same message
for all units.
(Optional) If not printed on
the coupon leave column
blank.
AH 1 Payment
Frequency
M=Monthly, Q=Quarterly,
S=Semi-annual, A=Annual
AI 8 Lockbox Id
This number must match
your system’s unit number
for automatic payment
posting. The field can
contain numbers and/or
capital letters only. There
can be no spaces or special
characters in the field, for
example; no dashes,
commas, number sign, etc.
AJ 30
Homeowner
Address Line
1
Required if bank is mailing
coupons directly to
homeowner.
AK 30
Homeowner
Address Line
2
Required if bank is mailing
coupons directly to
homeowner.
AL 30
Homeowner
Address Line
3
Required if bank is mailing
coupons directly to
homeowner.
o *Association Number o The Association number is a unique five-digit number used to identify each
association. This number cannot contain alphas or characters. Management companies may elect to assign their own Association Number or elect the financial institution to assign the number for them. Assignment of the Association Number for self-managed associations is determined by certain criteria.

119
Import data from Excel or CVS
Accounts will find it helpful to be able to import existing Excel/CSV data directly into the community.
mport Excel/CSV spreadsheet data into the system and avoid importing duplicates. This will make the administrators life a bit easier.
To import, select the appropriate type from the list either “Members”, “Properties” or “Authorize.Net Transactions”. Special Note: We have seen some CSV (comma
separated values) files that don't import properly. It is recommended to convert these to Excel Spread format as shown below and then import the Excel file.
To import members there must be a worksheet named “Members” in the Excel spreadsheet. This is very specific and is also case sensitive. It must be “Members”, not
“members” or “Member”. Everyone gets the default password (“password”) which is case sensitive. Members that where NOT added will be indicated at the end of the import process.
The worksheet must have the following 13 named columns (column names are case sensitive):
Email: This must be a valid email address. (If blank, “[email protected]” will be used, where ??? will be an incremented number)
Lastname: The member’s last name. (can be blank)
Firstname: The member’s first name. (can be blank)
MI: The member’s middle initial. (can be blank)
Addr1: The member’s first address line. (can be blank)
Addr2: The member’s second address line. (can be blank)
City: The member’s city. (can be blank)
State: The member’s state. (can be blank)
PostalCode: The member’s postal code or zip code. (can be blank)
Country: The member’s country. (can be blank)
Phone: The member’s phone. (can be blank)
CellPhone: The member’s cell phone. (can be blank)
I I M P O R T T Y P E
M E M B E R S

120
MemberType: The member’s type. (can be blank, defaults to “Owner”)
Notify: Notify member of announcements. (can be blank, defaults to “False” else must be 0 for "No" or 1 for "Yes")
Directory: Include member in directory. (can be blank, defaults to “False” else must be 0 for "No" or 1 for "Yes")
EmailAuth: Member has authorized email communications. (can be blank, defaults to “False” else must be 0 for "No" or 1 for "Yes")
DOB: Members date of birth (can be blank, defaults to 01/01/0001)
To import properties there must be a worksheet named “Properties” in the Excel spreadsheet. This is very specific and is also case sensitive. It must be “Properties”,
not “property” or “properties”. Properties that where NOT added will be indicated at the end of the import process.
The worksheet must have the following 21 named columns (column names are case sensitive):
PropType: The property type; Condo=0, Single Family House=1, Apartment=2.
RentControled: 0=None.
Building: This is the building number if applicable. (can be blank)
Addr1: The properties address. (cannot be blank)
Addr2: The properties second address line (can be blank)
City: City where property is located (can be blank)
State: State or Province where property is located.
PostalCode: can be blank
Country: Country where property is located.
CouponAmt1: must be between 0.00 and 999999.99
CouponAmt2: must be between 0.00 and 999999.99
CouponAmt3: must be between 0.00 and 999999.99
CouponAmt4: must be between 0.00 and 999999.99
P R O P E R T I E S

121
CouponAmt5: must be between 0.00 and 999999.99
CouponAmt6: must be between 0.00 and 999999.99
CouponAmt7: must be between 0.00 and 999999.99
CouponAmt8: must be between 0.00 and 999999.99
CouponAmt9: must be between 0.00 and 999999.99
CouponAmt10: must be between 0.00 and 999999.99
CouponAmt11: must be between 0.00 and 999999.99
CouponAmt12: must be between 0.00 and 999999.99
To import transactions there must be a worksheet named “Transactions” in the CSV file. This is very specific and is also case sensitive. It must be “Transactions”, not “transactions”. If necessary, this can be changed using
Microsoft Excel. How transactions where processed will be indicated at the end of the import process.
The worksheet must have the following 12 named columns (column names are case sensitive):
SubscriptionId: The subscription Id.
SubscriptionStatus: The subscription status.
Payment #: The payment number.
TotalRecurrences: 9999 = On going
TransactionId: The transaction Id.
Amount: The amount of this transaction.
Currency: The currency this transaction is conducted in.
Method: Credit Card, E Check
CustFirstName: Customers first name.
CustLastName: Customers last name.
RespCode: The response code.
A U T H O R I Z E N E T
T R A N S A C T I O N S

122
RespText: The response text.
To import chart of accounts there must be a worksheet named “ChartOfAccts” in the Excel spreadsheet. This is very specific and is also case sensitive. It must be “ChartOfAccts”, not “chartofaccts” or “chartOfAccounts”. Accounts that where
NOT added will be indicated at the end of the import process.
The worksheet must have the following 5 named columns (column names are case sensitive):
AcctId: The account Id. (can NOT be blank)
AcctType: This is the account type (use the following numbers to represent the type of account); 1=Cash, 2=Bank Account, 3=Accounts Receivable, 4=Assets, 5=Fixed Assets, 6=Other Assets, 7=Accounts Payable, 8=Equity, 9=Liability, 10=Long Term Liability, 11=Credit Card,12= Loan, 13=Income, 14=Other Income, 15=Expenses, 16=Other Expenses, 17=Cost of Goods, 18=Reserves. (can NOT be blank)
AcctName: This is the name of the account. (can NOT be blank)
SubCategory: This is the account that this account is a sub-category of. (can be blank)
Description: Description of this account. (can be blank)
Before importing the data into the system, you must first upload the Excel spreadsheet.
Click "Upload Excel Spreadsheet" to select the spreadsheet to upload.
Click the "Browse" button to find the file to upload.
Click the "Upload File" button to perform the actual upload.
You can view the data prior to importing using the “View Excel” feature to verify its format and integrity.
Click the "View Excel Data" button to view the data in the uploaded file.
This is presented in a grid for verification that this is indeed the data you want to import and that is in the proper format.
If the format does not conform to the above layout, edit the worksheet to match the above layouts.
C H A R T O F
A C C O U N T S
U P L O A D D A T A
V I E W D A T A

123
After you are satisfied with the data format and the Excel file layout, the actual importing is done here
Click the "Import Excel Data" button to actually import the Excel data into the system.
Duplicate data is skipped so as to not have multiple records.
Data that was not imported is displayed.
All newly imported members will be given a default password of “password”. It should be noted that this is all lowercase and that passwords are case sensitive.
Reports
Community financial reports.
et all the information about the finances of the community.
View/print the community’s financial statement. This creates an un-audited financial statement the community. From here, select the bank accounts and any other reports to include in the financial statement. This is the ONLY report that can be
memorized. Click the icon to memorize this report with the currently selected criteria.
Bank Accounts: Some reports can be limited to specific bank accounts. Select the bank accounts to include in the Consolidated Financial Statement. Click the 'Select ALL' button to select all bank accounts.
Date Specific Reports: Some reports can be limited by date. Select the reports to include in the Consolidated Financial Statement. Click the 'Select ALL' button to select all reports. Set the criteria for these date specific reports. By default, these reports are compiled 'Year to Date'. This can be modified by selecting 'Between these dates' and setting the 'From' and 'Through' dates. Use the
icon to select the desired dates.
Period Specific Reports: Some reports can be limited by period. Select the reports to include in the Consolidated Financial Statement. Click the 'Select ALL' button to select all reports. Set the criteria for these reports by setting the desired period. By default, these reports are compiled using the current period of the month when run. This can be modified by setting the 'For this
Period' date. Use the icon to select the desired period.
I M P O R T D A T A
G F I N A N C I A L
S T A T E M E N T

124
To publish this report to the Community website for all to see, check the ‘Publish this report to
community!’ Click the icon to open the report for viewing and/or printing.
View/print the community’s balance sheet.
View/print the community’s trial balance.
View/print the community’s profit & loss statement. If there are multiple communities and ‘CrossOver’ reporting is enabled than a dropdown list of communities is presented to allow selection of which communities are to be included
in the report.
View/print the community’s income & expense statement. If there are multiple communities and ‘CrossOver’ reporting is enabled than a dropdown list of communities is presented to allow selection of which communities are to be included in the report. See ‘chart of accounts’ on page 95 for details on how to group
accounts.
View/print the community’s general ledger.
View/print the community’s checks.
View/print the community’s deposits.
View/print the community’s check register.
B A L A N C E
S H E E T
T R I A L
B A L A N C E
P R O F I T &
L O S S
I N C O M E A N D
E X P E N S E S
G E N E R A L
L E D G E R
C H E C K S
D E P O S I T S
C H E C K
R E G I S T E R

125
View/print a summary of the community’s receivables.
View/print a summary of the community’s payables.
View/print a detailed report of the community’s receivables.
View/print a detailed report of the community’s payables.
View/print a detailed report of the community’s outstanding invoices.
View/print a detailed report of the community’s prepaid invoices.
View/print the community’s reconciliation.
A G E D
A C C O U N T S
R E C E I V A B L E
S U M M A R Y
A G E D
A C C O U N T S
P A Y A B L E
S U M M A R Y
A G E D
A C C O U N T S
R E C E I V A B L E
D E T A I L
A G E D
A C C O U N T S
P A Y A B L E
D E T A I L
O U T S T A N D I N G
I N V O I C E S
P R E P A I D
R E C O N C I L E

126
View/print the community’s budgets. To publish this report to the Community website for all to see, check the ‘Publish this report to community!’
View/print the community’s price list of products and services.
View/print mailing labels for the community. Select Owners, Tenants, Vendors, or any combination of those. We have tested using Avery 15160 labels but the following Avery 1" x 2 5/8", 30 per sheet - address labels should also be compatible: 15160, 15510, 15660, 16460, 18160, 18260, 18660, 28660, 32660, 38260, 45160, 48160, 48260,
48360, 48460, 48860, 48960, 5160, 5260, 55160, 5520, 55260, 55360, 5620, 5630, 5660, 5810, 58160, 58260, 58660, 5960, 6240, 6241, 6970, 75160, 8160, 8250, 8460, 85560, 8620, 8660, 8810, 88560, 8860, 8920.
View/print the community’s list of members.
View/print the community’s list of properties.
View/print a report of the community’s expenses..
View/print the community’s list of Chart of Accounts.
View/print the community’s list of vendors that are 1099 eligible.
B U D G E T S
P R I C E L I S T
M A I L I N G
L A B E L S
M E M B E R S
L I S T
P R O P E R T I E S
L I S T
D E T A I L
E X P E N S E
C H A R T O F
A C C O U N T S
L I S T
V E N D O R 1 0 9 9
L I S T

127
Memorized Transactions
Memorizing a transaction or report.
ave time by memorizing for future use.
If you have a transaction that you frequently enter, you can save time by
memorizing it for future use. Watch for the remember icon to indicate that the transaction or report can be memorized.
If you frequently enter the same line items for a transaction, you can memorize that transaction so that you won't have to re-enter it each time. For example, you can memorize a member’s monthly maintenance fee or your monthly utility bill.
You can memorize transactions from the various accounting screens, Customer; Invoice and Orders, Accept Payments or Vendor; Bills and Credits, Pay Bills and from the Financial
Statement report. Watch for the remember icon, in the upper left, to indicate that the transaction or report can be memorized.
By selecting the 'Remind me' for a transaction or report the user with the required privileges will be given a reminder when logged in.
By selecting the 'Do NOT Remind me' for a transaction or report, NO Reminder will be given a reminder when logged.
By selecting ‘Auto’ for a transaction or report the user with the required privileges will be given a reminder when logged in.
If the amounts on the transaction do not change (for example, if you always collect the same monthly maintenance fee or pay the same monthly rent), you can fill in all the details for the transaction and be notified when this transaction needs to be entered. Then click the 'Process all Checked Memorized Transaction and Report' button to process all selected memorized transactions or reports. This process will NOT present these transactions/reports for viewing/printing.
If the amounts or other details sometimes change, you can still create a memorized transaction, but DO NOT select ‘Auto’. Instead use 'Remind me'. When you want to use your memorized transaction, just ‘Select’ it from the ‘Available Memorized Transaction and Reports’ grid list. From there
you can click the icon to delete the memorized transaction or report, click the edit icon to
edit it as needed, or click the icon or the icon to process the memorized transaction or report.
S M E M O R I Z E
R E M I N D M E
D O N O T
R E M I N D M E
A U T O

128
Watch for the remember icon, in the upper left, to indicate that the transaction or report can be memorized. Then follow these simple steps.
1. Enter the transaction or report as you'd like memorized. For transactions, you must first
save the transaction to activate the remember icon. The Financial Statement report can be memorized without running the report, only changing any criteria will activate the memorize
icon.
2. Click the remember icon to memorize the transaction or report. 3. Enter a name for the memorized transaction or report. A default name is provided,
depending on where the transaction or report originated from. This name can be any word or phrase that describes the transaction best for you.
4. Complete the following fields as necessary:
Select a Reminder type: o Remind Me: will give a reminder when someone logs in with the required
privileges.
o Do NOT Remind Me: will NOT give a reminder. o Auto: will give a reminder when someone logs in with the required privileges.
Click the ‘How often’ drop-down arrow, and choose how often you want to be reminded about the transaction or report.
Enter the number of reminders to provide. Note: 0 will provide NO reminders. This number is decremented each time the memorized transaction or report in run and when the number of remaining reminders reaches zero (0) there will be no further reminders for this transaction or report.
Enter the ‘Next Due’ date for this transaction or report to run. This is the next date on which to run this transaction or report after the current transaction that has just been entered.
Enter the ‘Day in Advance’ you want to be reminded about this transaction or report. This is the number of days in advance of the ‘Next Due’ date.
Sending Email:
o If the member referenced by this memorized transaction or report has
authorized email communication then the 'Check to Send Email' will be
enabled.
o However if email authorization is NOT allowed then this checkbox will NOT
be enabled and will be unchecked.
o Checking this will email this transaction to the member.
Select a group to assign this memorized transaction or report to.
o Select 'None' to not assign to a group.
o Select <add new> to add a new group. This will open the 'Add New Group'
section where a name for the new group can be entered, then click the 'Save
New Group' button to save this new group.
Click the 'Create a new memorize Transaction or Report' button to save.
Click the 'Replace this memorize Transaction or Report' button to replace.
Click the 'Delete this memorize Transaction or Report' button to delete.
H O W T O

129
When a user with the required privileges logs in and there are memorized
transactions or reports to be run, there will be the remember icon on the right
side of the page and a notification saying “Reminder!”. Clicking the remember icon will open the Process Memorized Transaction and Reports page from which processing can be done. Processing memorized transactions or reports can also be accomplished by users with Accountant privileges from the Accounting Tools > Community > Process Memorized menu option.
1. Transaction and reports are listed in the left column under the ‘Memorized Transactions and Reports’ tree and are also listed in the ‘Available Memorized Transaction and Reports’ grid on the right.
2. Transactions or reports that are Auto will automatically be checked in the tree, indicating that these transactions or reports will be run by clicking the ‘Process all Checked Memorized Transactions and Reports’ button. These can be individually selected or un-selected or use the ‘Un-Select/Select All’ button to change all.
3. Click the icon or icon to open or close that section of the tree. 4. Clicking on a group name will display only that group’s transactions or reports in the grid
and if the group is checked then all transactions or reports in that group will also be
checked or un-checked. 5. There are two (2) ways to process memorized transactions and reports.
a. By checking all those transactions and reports to be processed in the tree list, as explained above, and then clicking the ‘Process all Checked Memorized Transactions and Reports’ button.
b. Click the icon or the icon to process the memorized transaction or report. NOTE: This is the preferred method for using memorized transaction and reports with members that are NOT email authorized.
c. Click the icon to delete the memorized transaction or report. Caution: This cannot be undone.
d. Click the edit icon to edit the transaction or report as needed.
6. Using method (a) will process all the checked transactions and reports and be notified of the success or failures. NOTE: There will be no transaction or reports presented here for viewing or printing. If this is required than use method (b).
a. Transactions of type ‘Bill’ or ‘Bill Payment’ that have no associated open bill or invoice will be processed as a credit to the account.
7. Using method (b) will allow for the processing of individual transactions or reports. a. This is the preferred method for using memorized transaction and reports with
members that are NOT email authorized. b. To process an individual memorized transaction or report, it must first be selected
by clicking the ‘Select’ link in the grid to the right.
c. If the transaction or report is Auto then the button will be displayed. Clicking
the button will then process that memorized transaction or report. Once the
transaction or report is processed, a button will be activated and you can view/point the processed transaction or report.
d. If the transaction or report is NOT Auto then the button will be displayed.
Clicking the button will then process that memorized transaction or report by
P R O C E S S I N G

130
opening another window/tab for processing the selected transaction or report.
Select the icon in that window/tab to get help for that process. e. Once the transaction or report is processed, close that window/tab to return to the
previous window/tab and click the ‘Refresh’ button to remove the just completed memorized transaction or report from the active lists.
8. Clicking the edit icon will open the edit window where the memorized transaction or report can be modified as needed.
a. This can be handy in situations where fees have changed and you don’t want to create a new set of memorized transactions every year.
b. Use this to edit the transaction or report name, type, how often to run, number of reminders, next due date, days in advance to be reminded, group, and whether to send an email. If the selected item is a transaction then the amount of the transaction can also be modified. If the item is a report than the ‘Publish this report to community!’ option can be modified.
c. When complete click the ‘Replace …’ button to save changes or click the ‘Cancel Edit’ button to cancel.
9. Clicking the icon will delete the memorized transaction or report. Caution: this CANNOT be undone.

131
System Tools
System level activity
here are certain activities that are reserved for someone that understands the interactivity of the web site.
A member that has been granted system access has the following capabilities that affect the entire site. From here you will be able to add new communities, delete
existing communities, delete management companies and view site statistics.
Add New Community
New community coming on board.
hen a new community needs to be added to the web site.
Enter the appropriate information. Required information is note by ‘*’. When complete click the “Submit” button to save changes.
Enter the number of board members.
If the community has a map, Use the browse button to select the image file to be used for the community map. Note: This file must be a GIF file.
Select a management company for this new community.
Chapter
13
T S Y S T E M
W S E T T I N G S
B O A R D O F
D I R E C T O R S
M A P
M A N A G E M E N T
M E E T I N G S

132
Select the appropriate settings to setup the meeting time for the community if known.
Add Community Directories
Community storage directories.
hen a community needs to have its data directories created.
Use the “Add Community Directories” link to add/recreate community data directories. Click the “Add Directories” button to create the directories for the current community.
Community Backup
Backup database.
se to back up the community’s database. Click the icon to display the pages help and follow the directions for managing the community’s database.
Click on the Community Backup link to back up the community database. Select the desired backup to perform.
Full Back up: Does a full database backup. Differential Backup: Does a database backup of differences since last backup. Dated Backup: Does a full database backup, naming the file with the current time and
date.
Delete Community
Community is leaving the site.
hen a community needs to be removed from the web site.
Use the “Delete Community” link to remove a community. Click the “Delete Selected Community” button to finalize the deletion. Caution: this can NOT be undone.
W D I R E C T O R I E S
U B A C K U P
W D E L E T E

133
Delete Management
New community coming on board.
hen a management company needs to be removed from the web site.
Use the “Delete Management” link to remove a management company from the site. Click the “Delete Management” button to finalize the deletion. Caution: this can NOT
be undone.
Announcements
Notifying members.
ending the community an announcement is a quick and easy process for board members. This can be used by members of the system administrators to get urgent information to the community’s membership.
Click on the Announcements link to create an announcement. The recipients to whom the announcement will be sent are determined by selecting either “Requesting
Members Only” or “All Members”. Announcements can be sent from either “Member Services” or the person actually creating the announcement. Enter the announcement subject on the “Subject” line then type your announcement in the announcement textbox area. An attachment can also be added to the announcement by entering the file name in the attachment textbox or clicking the “Browser” button to select the desired file to attach. Click the “Submit” button to send the announcement when ready. When complete, a message to that effect will be displayed.
Statistics
What is going on within the site?
o view the activities of the web site.
The “Statistics” link presents a page showing the statistics for the web site.
W D E L E T E
S A N N O U N C I N G
T S T A T S

134
Synchronize Database
Keeping databases synchronized across backup servers!
o keep a backup server in sync with the production serve. This is an attempt to keep multiple versions of a database in sync with each other in case of a server failure.
The “Synchronize Databases” link presents a page where a system operator can synchronize the default database for the current community. Additionally, other
databases on the network that enable “Change Tracking” can also be synchronized.
Perform Database Synchronization:
Configure the Synchronization by selecting the appropriate type. Click the 'Perform Sync' button to sync the master database with the slave database. Click the 'Reset' button to reset the default connections. The results will be show when complete.
Modify the default Synchronization:
Change the connection string for the master and slave databases to sync other databases. Click the 'De-Provision' to remove all the sync provisions from the database and delete the table list. Click the 'Perform Sync' button to sync the master database with the slave database.
Select New SQL Connection:
Click the 'Select New SQL Connection' button to open the Select Sql Server section. Select a desired Sql server from the drop down list. Click the 'Refresh' button to refresh the SQL server list. Select how to log on to the server, using Windows or SQL authorization. SQL Server authorization requires a valid 'User Name and Password'. Select the database name from the drop down list. Click the 'Test Connection' button to ensure that a connection can be made to the selected database. Click the 'Set Master' button to set the Master Database to the selected database. Click the 'Set Slave' button to set the Slave Database to the selected database. Click the 'Cancel' button to close the Select Sql Server section.
T S Y N C H R O N I Z E

135
Export data to Excel
System operators will find it helpful to be able to export existing data directly into Excel.
xport data to an Excel. This will make the administrators life a bit easier.
To export members to an Excel worksheet named “Members”.
The worksheet will have the following 13 named columns:
Email:
Lastname: The member’s last name. (can be blank)
Firstname: The member’s first name. (can be blank)
MI: The member’s middle initial. (can be blank)
Addr1: The member’s first address line. (can be blank)
Addr2: The member’s second address line. (can be blank)
City: The member’s city. (can be blank)
State: The member’s state. (can be blank)
PostalCode: The member’s postal code or zip code. (can be blank)
Country: The member’s country. (can be blank)
Phone: The member’s phone. (can be blank)
CellPhone: The member’s cell phone. (can be blank)
MemberType: The member’s type. (can be blank)
To export properties to an Excel worksheet named “Properties.
The worksheet will have the following 2 named columns:
Building: This is the building number if applicable. (can be blank)
E M E M B E R S
P R O P E R T I E S

136
Addr: The properties address. (cannot be blank)
To export, select the appropriate type from the list either “Members” or “Properties”.
Preview data before exporting the data.
Click the "View Data Layout" button to preview the data prior to export.
Performs the actual data export.
Click the "Export Excel Data" button to actually export the data into Excel.
Click the "View Data Layout" button to preview the data prior to export.
Determine the format of the export.
When checked the exported file will be in Excel 2010 format (xlsx).
Un-check to save in Excel 2007 format (xls).
E X P O R T T Y P E
V I E W D A T A
L A Y O U T
E X P O R T D A T A
S A V E I N
E X C E L 2 0 1 0
F O R M A T

137
Vendors
Those that provide services to the community.
very community requires services which in most cases are provided by outside vendors and contractors.
Submit Invoice
Vendors submit invoices using this menu option. Invoices must conform to the “Vendor Invoice and Payment Processing Instructions”. Additionally vendors must have a completed IRS Form W-9 and Certificate of Insurance on file with the
management company before invoices will be processed. Submitted invoices are acknowledged when submitted successfully.
Vendors can submit completed IRS Form W-9 and Certificate of Insurance via this menu option by selecting the appropriate option button when submitting these documents.
When invoices or completed IRS Form W-9 and Certificate of Insurance are submitted by the vendor an email is automatically sent to the property manager for their review. The manager can then process the invoice in their normal business practice.
Additional documents can be submitted by selecting the “Other” option.
Request Invoice Status
To request a status updates on an existing invoice communicate directly with the management of the community. This will open the community’s management feedback page and display the management information.
By completing the feedback page and submitting it, an email is sent directly to the community manager for action. By default replies will be by email unless otherwise specified.
Chapter
14
E
S U B M I T
I N V O I C E
I N V O I C E
S T A T U S

138
An advantage of using this manner of communication with the community’s management is that a record of all correspondences is maintained and can be reviewed by your Board of Directors.
Change Password
Need a new password.
Use the “Change Password” link to change your password.
Edit Profile
Keep your personal information up to date.
Use the “Edit Profile” link to view/modify your profile. From here you can change information like your company name and address, contact, email address, employer
Id number, employer license number if any, community’s you provide services to.
Download IRS Form W-9
This is the IRS Form W-9 which is required of all vendors before they can upload invoices for payment and processing. This version is an editable PDF file which can
be filled out and uploaded back to management via the “Submit Invoice” menu option.
Vendor Instructions
These are the instruction for the vendor to follow in order to submit invoices for payment and processing. These instructions are created and defined by the
management company. They are uploaded via the “Upload” facility under “Board Tools” menu option. A sample version is available from Tampa Automated Logic.
P A S S W O R D S
E D I T P R O F I L E
I R S F O R M W - 9
I N S T R U C T I O N S

139
Appendix:
Documents are useful in managing the community.
very community has documents or forms used to help manage the community in an orderly manner.
IRS Form W-9
The IRS Form W-9 is provided as a convenience to the community and management. Updates are available at the IRS web site if needed.
Chapter
15
E
I R S F O R M W - 9

140
Community Questionnaire
Community’s Legal Name: _________________________________________________________
Address: _____________________________________________________________________
City: __________________________ State: _________ Zip: ________ Country: __________
Community Short Name: _______________________________________________________
Community Phone Number: _______________________________________________________
Tax Id Number ( EIN or TIN or SSN): _______________________________________
Desired Domain Name: (Subject to availability at additional cost)
First choice: _________________________________________________________________
Second choice: _______________________________________________________________
Third choice: ________________________________________________________________
55 And OverCommunity: Yes No
Enable National Weather Channel: Yes No
(Enabled) Community Features
Accounting Directory Letters &
Documents Payment
History
Board Events Management Proxy
Voting
BOD Announcements
Forums Newsletter Vendor
Interface
Calendars Handyman Online
Payments
Allow Special Users
Classifieds Links Search Schedule
Make Payments and Payment History is handled by Authorize.Net and is only available if the community has completed the required application process and activated the feature for the community.
Number of Units: ________________

141
Enable Tracking: Yes No
Home Page Image: Yes No ________________________________________
Site Background Image: Yes No _________________________________________
Site Background Color: Yes No _________________________________________
Main Detail Image: Yes No _________________________________________
Main Detail Color: Yes No _________________________________________
Community Logo: Yes No _________________________________________
Community Map: Yes No _________________________________________
Community Handbook: Yes No ________________________________________
Management Company: ________________________________________________________ Management Only Can Add Members? : Yes No
Payment Processing
Processing URL:
Login ID:
Transaction Key:
Accepted Credit Cards:
Processing Fee:
Make Payments and Payment History is handled by Authorize.Net and is only available if the community has completed the required application process and activated the feature for the community.
Additional Notes

142
Management Questionnaire
Company Name: ______________________________________________________________
Address: ____________________________________________________________________
City: __________________________ State: _________ Zip: ________ Country: __________
Phone: ________________________________ Fax: ________________________________
Management Short Name: ______________________________________________________
Member Services Email: ________________________________________________________
Unattended Email: ____________________________________________________________
Accounting Email: ____________________________________________________________
Manager: ____________________________________________________________________
Managers Email: ______________________________________________________________
IRS Form W-9: Yes No ______________________________________________
Vendor Instructions: Yes No _______________________________________________
Map URL: ____________________________________________________________________
Driving Instructions URL: ______________________________________________________
Management Image: ___________________________________________________________
Instructions:
1. Member Services Email refers to the email address to be used when sending emails.
2. Unattended Email refers to the email address used when no response is expected.
3. Accounting Email refers to the email address for directing vendor invoices.
4. Map & Driving URL is the URL that displays direction to your location.
5. Management Image is the image to display for the management company.

143
Member Survey Form
Member Type: Tenant/Owner Vendor
First Name: __________________ MI: ____ Last Name: _____________________________
Address: ____________________________________________________________________
City: __________________________ State: _________ Zip: ________ Country: __________
Phone: ________________________________ Cell: ________________________________
Email Address: _______________________________________________________________
Notify me of all announcements: Yes No
Include me in member’s directory: Yes No
Authorize community to communicate with me via email: Yes No
I am a: Owner Tenant Vendor
Current account balance: $______________________
Community’s: ________________________________________________________________
List Units owned or rented: ________________________________________________________
Vendor Information (if applicable)
Company Name: ______________________________________________________________
Tax ID number ( EIN or TIN or SSN): _______________________________________
License Number (if applicable): __________________________________________________
Vendor is 1099 eligible: Yes No
Current account balance: $______________________
Community’s serviced: _________________________________________________________
Description of Service Provided: _________________________________________________
____________________________________________________________________________
____________________________________________________________________________

144
Vendor Instructions (sample)
Vendor Invoice and Payment Processing Instructions Introduction The management company, here after “Management” that manages the administrative and financial operations of the community that contracted your services and is responsible for processing all invoices and payments for the community association. Management is committed to promptly paying you for your services provided to the community and in order to do so we have provided the following invoice and payment processing instructions. We look forward to building a positive working relationship with your company for the benefit of the Community. Required Documents IRS Form W-9
Management requires a completed IRS Form W-9 to be on file for all vendors. Please submit a completed W-9 if this is the first time you are providing services to Management you can download a W-9 form from the website. Completed IRS Form W-9 can be uploaded via the “Submit Invoice” menu option. Certificate of Insurance
Management requires an up to date Certificate of Insurance to be on file for all vendors providing on-site services to the community (e.g. landscaping, repair and maintenance, pool services, etc…). Please ensure that you have submitted an up to date Certificate of Insurance for each community that you service. Please refer any questions regarding insurance requirements to the Community Association Manager that procured your services. Certificates of Insurance can be uploaded via the “Submit Invoice” menu option. Account Name and Billing Address
The account name and billing address should be styled as follows: Association Legal Name
C/O the management company Street or P.O. Box City, State Zip Invoice Information Requirements
Please include the following information on your invoice: • Association Legal Name • Invoice Number • Invoice Date • Remittance Address • Management Work Order or Reference Number (if applicable) • Service date(s) • Description of Service(s) Provided • Contact information (addresses, phone number, and e-mail address) Invoice Submission Procedures
Invoices may be submitted by one of three methods: 1. Electronic submission using our web site (preferred method and fastest process)
2. E-mailed as an attachment to Management 3. Mailed to the appropriate mailing address Submission guidelines: • Please select only one of these methods for submission. • Please submit each invoice in a separate document or e-mail.

145
• Submitting invoices to the local Management branch office or the Community Association Manager will delay processing (Please submit one invoice per association) Invoice and Payment Processing Procedures
Management processes invoices and payments every business day in an effort to process payments as quickly as possible. Management utilizes a proprietary automated system to process invoices for payment and has processes and controls in place to safeguard the association's assets and maintain an appropriate audit trail. These processes entail each and every vendor invoice going through multiple steps and approvals prior to disbursement. This length of the process can vary for each invoice depending upon numerous factors including ensuring that the vendor provided all necessary and correct information and their product/service was satisfactory. It will generally take up to 30 days for a vendor to receive payment after receipt of an invoice, including mail time, unless there are issues with the product, service, vendor, or cash position of the community. Management considers utility, insurance, leasing, and financial services companies to be “Recurring” type vendors and can pay invoices received from such vendors in fewer than 30 days if required. All other vendors are considered “Non-Recurring” vendors, and the 30 day payment term applies. Management recommends that our clients not contract services from “Non-Recurring” vendors who impose unreasonable or restrictive payment terms. Requiring payment in fewer than 30 days is not standard in any industry and is considered unreasonable. Unreasonable fees are fees or charges assessed by “Non-Recurring” vendors because such vendor required payment under more restrictive terms than outlined here (e.g. a late fee charged because the vendor required payment in 20 days). In an effort to protect the interests of our clients, it is standard operating procedure for Management to initially refuse payment of any amounts they deem to be “Unreasonable Fees”. Under special circumstances the Management can process “Rush” check requests in fewer than 30 days? A Rush request can be processed as quickly as 24 – 48 hours, but additional fees billable from Management to the Community may apply. Further explanation of the 30 day term:
This assumes the invoice is submitted to Management via regular mail. If the invoice is not mailed to the correct Management, check processing will be delayed. If the envelope is not postmarked on the same day as the invoice date, then expect 30 days from
the postmarked date, not 30 days from the invoice date. If the invoice is submitted via upload on the Management home page, this may expedite
processing by 5-7 days (so payment may be expected in 23-25 days, instead of 30 days) If the invoice is submitted via fax or via email to Management, this may expedite processing by 3-
5 days (so payment may be expected in 25-27 days, instead of 30 days) Other Common Factors:
New Vendors. For the first invoice received from a new Vendor, expect an additional 5 days to process (or longer if the Vendor does not submit all required paperwork)
Second Signers. For checks to vendors that require a second signature from a Board Member, the Board Member should expect to receive the check from Management in the timeline specified herein; The Vendor will then receive payment according to the Board Member’s schedule.
Insufficient Funds. If the community has insufficient funds, check processing will be delayed.
Contact Information
If you have any questions, comments, or concerns related to invoice and payment processing procedures, please contact Management.

146
Samples:
Sample documents make it much easier to see what you will get.
very community has documents or forms used to help manage the community in an orderly manner. Here are samples of those documents that can be created for your community. NOTE: Actual reports and letters may vary slightly form those presented here; please refer to actual reports and letters prepared by the community.
Letter Samples
This sample of an Account Statement letter is provided as a convenience to the community and management.
This sample of a Collections letter is provided as a convenience to the community and management.
This sample of a Deed Restriction letter is provided as a convenience to the community and management.
This sample of an Estopel letter is provided as a convenience to the community and management.
This sample of a General letter is provided as a convenience to the community and management.
This sample of Intent to Foreclose letter is provided as a convenience to the community and management.
Chapter
16
E
A C C O U N T
S T A T E M E N T
C O L L E C T I O N S
D E E D
R E S T R I C T I O N
E S T O P E L
G E N E R A L
I N T E N T T O
F O R E C L O S E

147
This sample of Intent to Lien letter is provided as a convenience to the community and management.
This sample of an Invoice is provided as a convenience to the community and management.
This sample of a Lease is provided as a convenience to the community and management.
This sample of a Notice is provided as a convenience to the community and management.
This sample of a Purchase Order is provided as a convenience to the community and management.
This sample of a Release of Lien letter is provided as a convenience to the community and management.
I N T E N T T O
L I E N
I N V O I C E
L E A S E
N O T I C E
P U R C H A S E
O R D E R
R E L E A S E O F
L I E N

148

149

150

151

152

153

154

155

156

157

158

159
Accounting Samples
This sample of the Chart of Accounts is provided as a convenience to the community and management.
This sample of the 1099 Vendor List is provided as a convenience to the community and management. It shows the vendors and the amount to be reported
on their 1099.
This sample of a 1099 is provided as a convenience to the community and management.
This is the Cover Page on the Consolidated Financial Report and is provided as a convenience to the community and management.
This is the Aged Accounts Payable Detail Report and is provided as a convenience to the community and management.
This is the Aged Accounts Payable Summary Report and is provided as a convenience to the community and management.
This is the Aged Accounts Receivable Detail Report and is provided as a convenience to the community and management.
This is the Aged Accounts Receivable Summary Report and is provided as a convenience to the community and management.
This sample of a Balance Sheet is provided as a convenience to the community and management.
This sample of a Budget is provided as a convenience to the community and management.
This sample of a Check Register is provided as a convenience to the community and management.
C H A R T O F
A C C O U N T S
1 0 9 9 L I S T
1 0 9 9
C O V E R P A G E
A G E D A P
D E T A I L
A G E D A P
S U M M A R Y
A G E D A R
D E T A I L
A G E D A R
S U M M A R Y
B A L A N C E
S H E E T
B U D G E T
C H E C K
R E G I S T E R

160
This sample of a Check is provided as a convenience to the community and management.
This sample of a Checks Report is provided as a convenience to the community and management.
This sample of a Credit Memo is provided as a convenience to the community and management.
This sample of a Deposits Report is provided as a convenience to the community and management.
This sample of a General Ledger is provided as a convenience to the community and management.
This sample of a Income Statement is provided as a convenience to the community and management.
This sample of an Invoice is provided as a convenience to the community and management.
This sample of a Profit & Lose Statement is provided as a convenience to the community and management.
This sample of a Bank Reconciliation is provided as a convenience to the community and management.
This sample of a Refund is provided as a convenience to the community and management.
This sample of a Statement is provided as a convenience to the community and management.
This sample of a Trial Balance is provided as a convenience to the community and management.
C H E C K
C H E C K S
R E P O R T
C R E D I T M E M O
D E P O S I T S
R E P O R T
G E N E R A L
L E D G E R
I N C O M E
S T A T E M E N T
I N V O I C E
P R O F I T & L O S E
S T A T E M E N T
B A N K
R E C O N C I L E
R E F U N D
S T A T E M E N T
T R I A L B A L A N C E

161
This sample of a Trial Balance is provided as a convenience to the community and management.
R E S E R V E
S C H E D U L E S

162

163

164

165

166

167

168

169

170

171

172

173

174

175

176

177

178

179

180

181

182

183

184

185
Miscellaneous Samples
This sample of the Detailed Members Letters report is provided as a convenience to the community and management.
This sample of the Mailing Labels is provided as a convenience to the community and management.
This sample of the Event RSVP’s is provided as a convenience to the community and management.
This sample of the Members List is provided as a convenience to the community and management.
This sample of the Price List is provided as a convenience to the community and management.
This sample of the Property List is provided as a convenience to the community and management.
This sample of a Work order is provided as a convenience to the community and management.
This sample of a Work Orders List is provided as a convenience to the community and management.
This sample of a Call Log is provided as a convenience to the community and management.
D E T A I L E D
M E M B E R
L E T T E R S
M A I L I N G
L A B E L S
E V E N T R S V P
M E M B E R S L I S T
P R I C E L I S T
P R O P E R T Y L I S T
W O R K O R D E R
W O R K O R D E R S
L I S T
C A L L L O G

186

187

188

189

190

191

192

193

194

195

196

197

198

199