connecting tablo to wi-fi with pc do this, navigate to your pc's list of available networks....
TRANSCRIPT

Connecting Tablo to Wi-Fi with PC
Once you have taken your Tablo out of the box and you have attached the power, antenna and
hard drive, you are ready to set up Tablo via Wi-Fi.
Begin by opening your Chrome browser and navigating to the web app.
You will be taken to the main ‘Connect to Tablo’ screen. Select 'Add via Wi-Fi'.
The next screen will instruct you to connect to your Tablo’s network.
To do this, navigate to your PC's list of available networks. This is usually near the bottom right
corner of the screen on the toolbar.
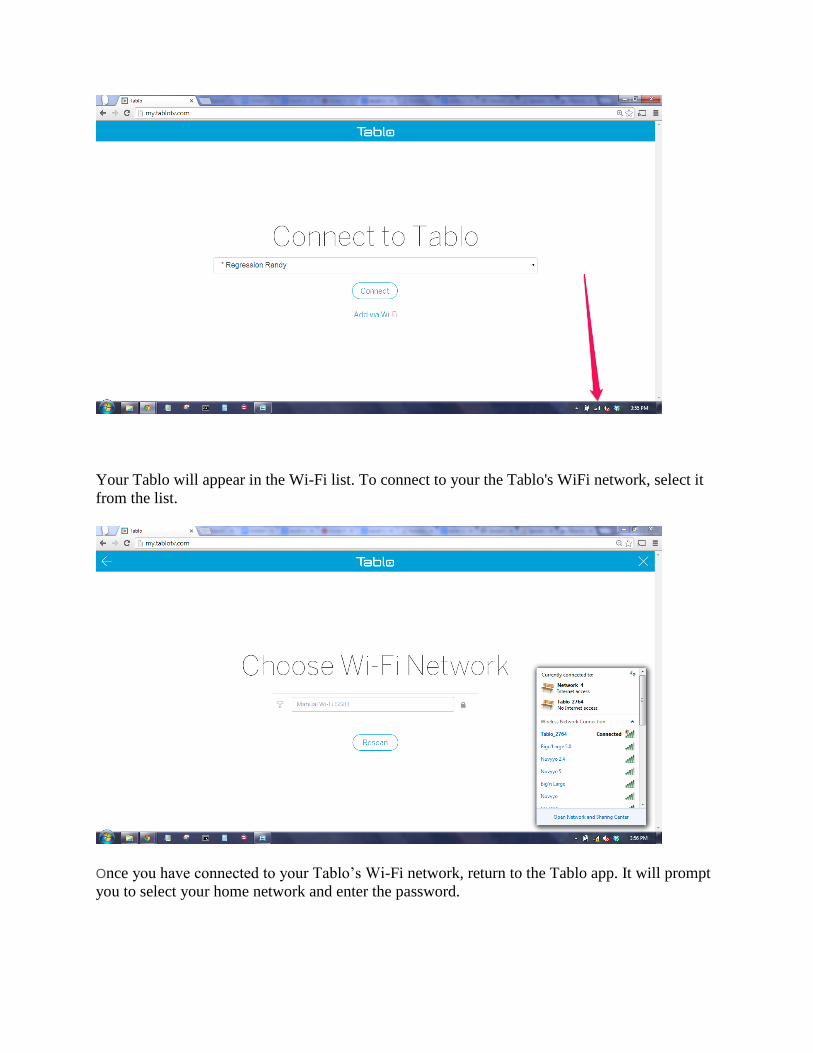
Your Tablo will appear in the Wi-Fi list. To connect to your the Tablo's WiFi network, select it
from the list.
Once you have connected to your Tablo’s Wi-Fi network, return to the Tablo app. It will prompt
you to select your home network and enter the password.
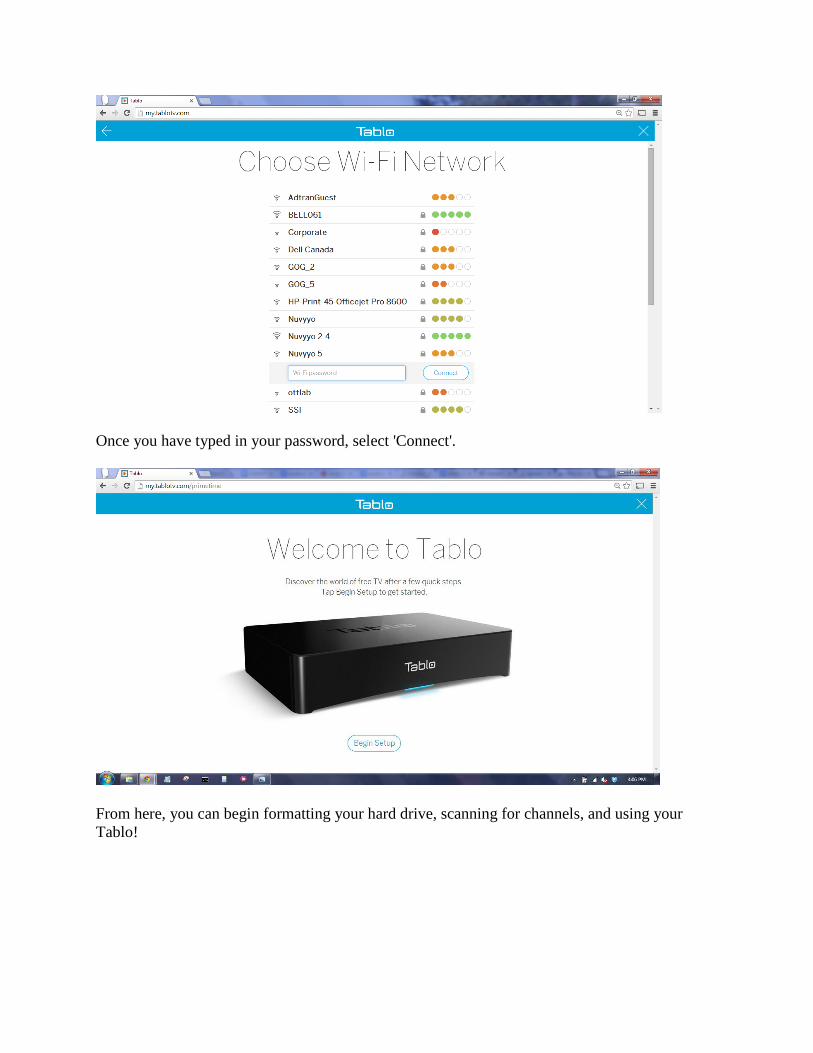
Once you have typed in your password, select 'Connect'.
From here, you can begin formatting your hard drive, scanning for channels, and using your
Tablo!

Connecting Tablo to Wi-Fi with Android
Once you have taken your Tablo out of the box and you have attached the power, antenna and
hard drive, you are ready to set up Tablo via Wi-Fi.
Begin by downloading the Tablo app from the Google Play Store, then open the Tablo app on
your iPad.
When you open the Tablo app, you will be taken to the main ‘Add a new Tablo’ screen.
Select 'Add via Wi-Fi'.
Tap 'Continue' on the prompt that appears.

The next screen will instruct you to connect to your Tablo’s network.
To do this, exit from the Tablo app and navigate to the Settings screen.

Select Wi-Fi under the settings menu. Your Tablo will appear in the Wi-Fi list. To connect to
your the Tablo's WiFi network, select it from the list.
Once you have connected to your Tablo’s Wi-Fi network, return to the Tablo app.
It will prompt you to select your home network and enter the password.

Once you have typed in your password, select 'Join'.
From here, you can begin formatting your hard drive, scanning for channels, and using your
Tablo!

Connecting Tablo to Wi-Fi with iPad
Tablo Support - David July 05, 2017 21:20
Follow
Once you have taken your Tablo out of the box and you have attached the power, antenna and
hard drive, you are ready to set up Tablo via Wi-Fi.
Begin by downloading the Tablo app from the App store, then open the Tablo app on your iPad.
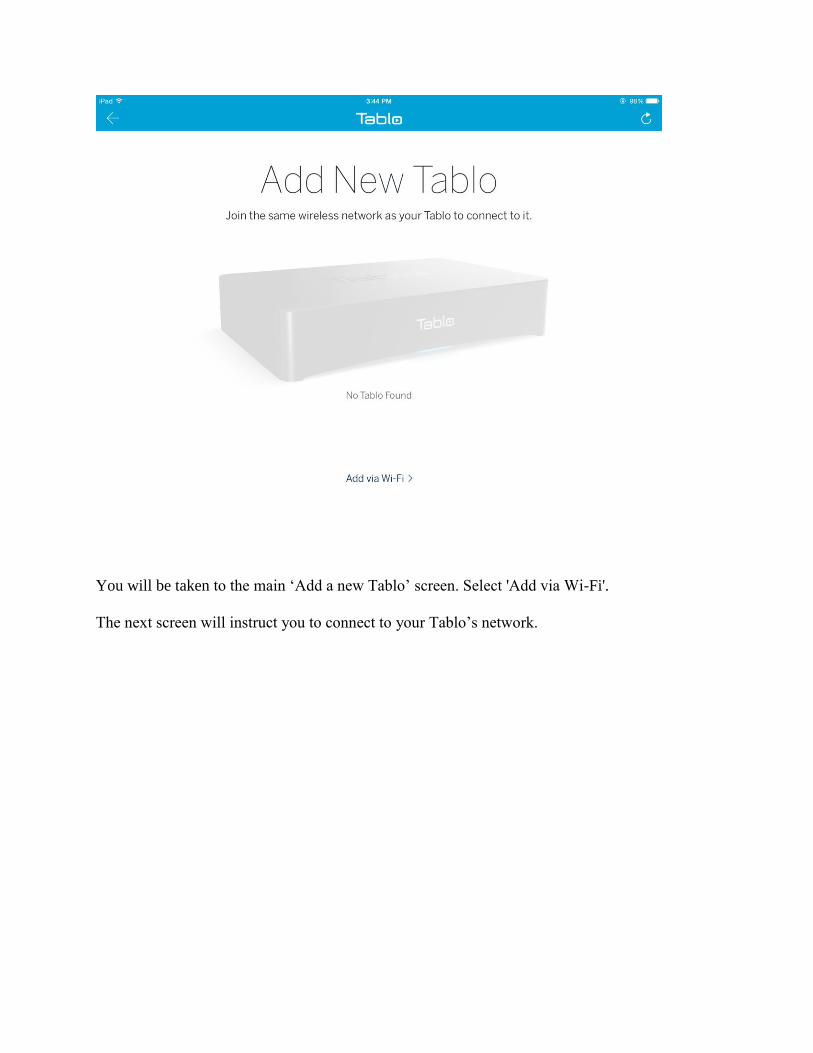
You will be taken to the main ‘Add a new Tablo’ screen. Select 'Add via Wi-Fi'.
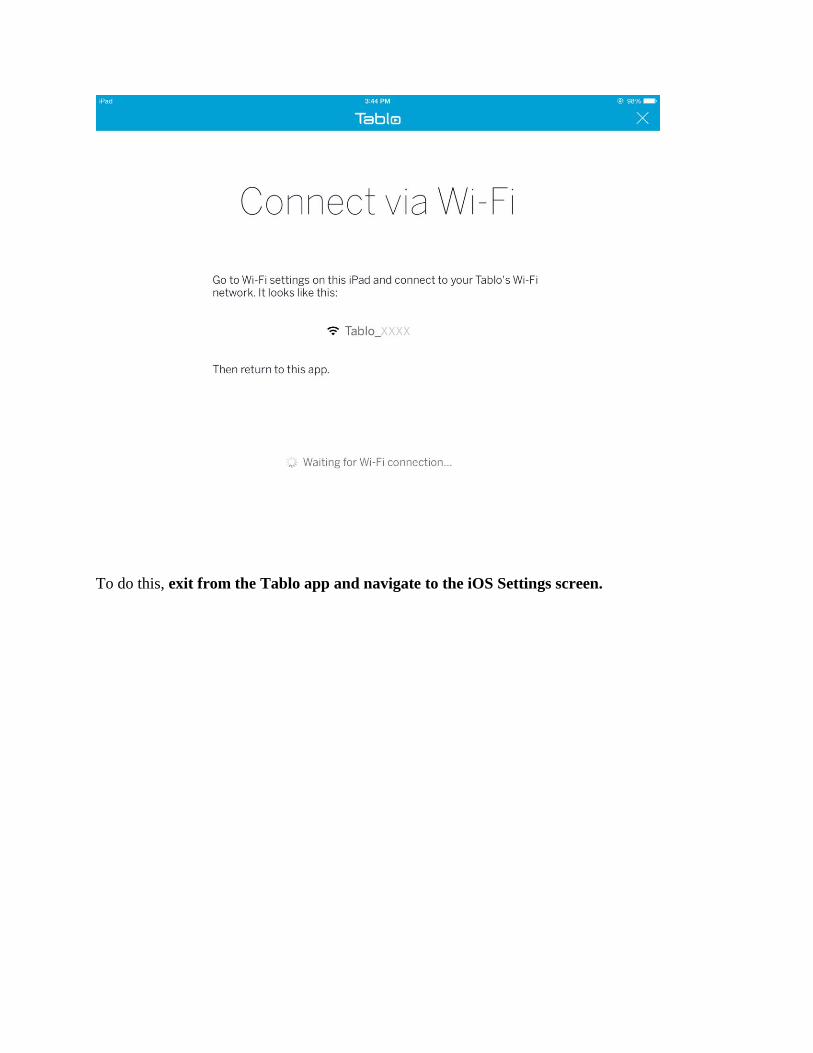
The next screen will instruct you to connect to your Tablo’s network.

To do this, exit from the Tablo app and navigate to the iOS Settings screen.

Select Wi-Fi under the settings menu.
Your Tablo will appear in the Wi-Fi list. To connect to your the Tablo's WiFi network, select it
from the list. A check mark will confirm that you have successfully connected to it.

Once you have connected to your Tablo’s Wi-Fi network, return to the Tablo app. It will
prompt you to select your home network and enter the password.
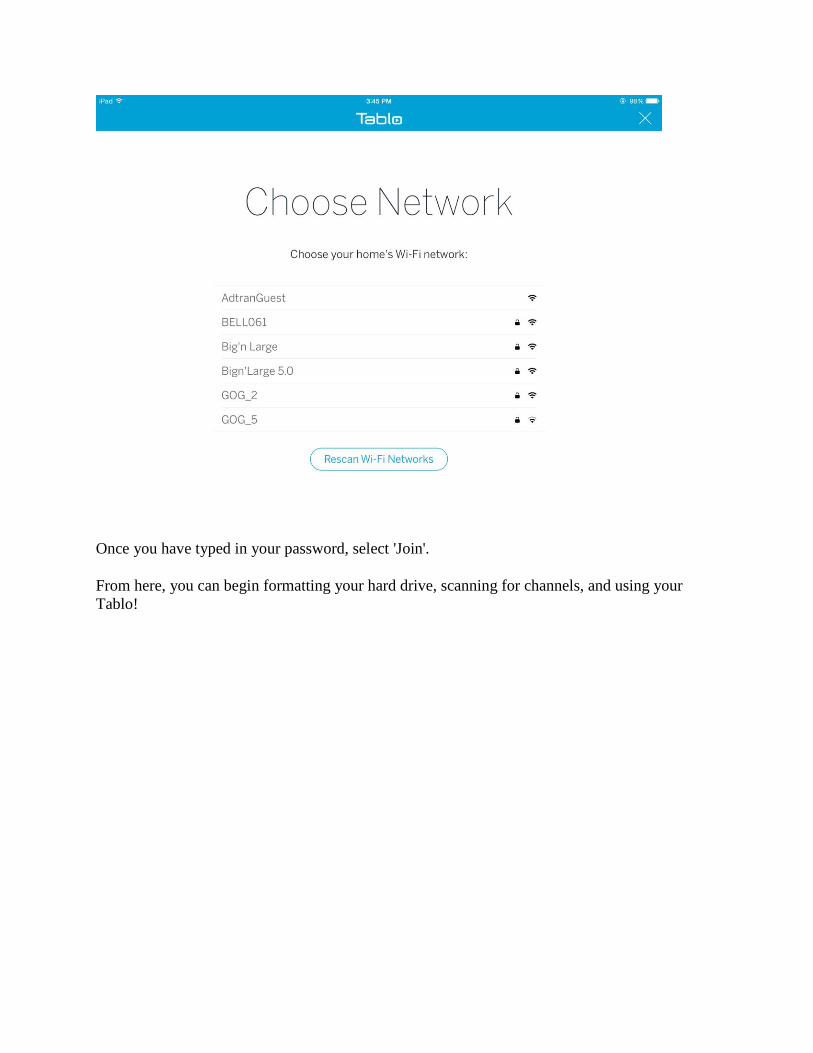
Once you have typed in your password, select 'Join'.
From here, you can begin formatting your hard drive, scanning for channels, and using your
Tablo!

Connecting Tablo to Hidden Wi-Fi Networks
Once you have taken your Tablo out of the box and you have attached the power, antenna and
hard drive, you are ready to set up Tablo via Wi-Fi.
Begin by downloading the Tablo app from the App store, then open the Tablo app on your iPad.

You will be taken to the main ‘Add a new Tablo’ screen. Select 'Add via Wi-Fi'.
The next screen will instruct you to connect to your Tablo’s network.

To do this, exit from the Tablo app and navigate to the iOS Settings screen.

Select Wi-Fi under the settings menu.
Your Tablo will appear in the Wi-Fi list. To connect to your the Tablo's WiFi network, select it
from the list. A check mark will confirm that you have successfully connected to it.

Once you have connected to your Tablo’s Wi-Fi network, return to the Tablo app. A list of
detected networks will be displayed. Scroll to the bottom and select 'Other'.

Enter the the hidden SSID name and password and select Join.

Once you have typed in your password, select 'Join'.
From here, you can begin formatting your hard drive, scanning for channels, and using your
Tablo!

Edit your Tablo's Wi-Fi Network
Make sure that your Tablo is NOT connected via Ethernet before your follow the steps below. If
it is, remove the Ethernet cable and reboot the Tablo by tapping the blue reset button on the back
of the unit. Wait ~1 minute before proceeding to the steps below.
To Edit your Tablo's W-Fi network, you first need to disconnect from your Tablo.
You will be taken to the main ‘Connect to Tablo’ screen. Select the 'Edit' button on the top right
corner of the screen.

This will give you a new set of options. Select 'Edit Wi-Fi'.

The next screen will instruct you to connect to your Tablo’s network.
To do this, exit from the Tablo app and navigate to the iOS Settings screen.

Select Wi-Fi under the settings menu.
Your Tablo will appear in the Wi-Fi list. To connect to your the Tablo's WiFi network, select it
from the list. A check mark will confirm that you have successfully connected to it.

Once you have connected to your Tablo’s Wi-Fi network, return to the Tablo app. It will prompt
you to select your home network and enter the password.

Edit your Tablo's Wi-Fi Network
Make sure that your Tablo is NOT connected via Ethernet before your follow the steps below. If
it is, remove the Ethernet cable and reboot the Tablo by tapping the blue reset button on the back
of the unit. Wait ~1 minute before proceeding to the steps below.
To Edit your Tablo's W-Fi network, you first need to disconnect from your Tablo.

You will be taken to the main ‘Connect to Tablo’ screen. Select the 'Edit' button on the top right
corner of the screen.

This will give you a new set of options. Select 'Edit Wi-Fi'.

The next screen will instruct you to connect to your Tablo’s network.

To do this, exit from the Tablo app and navigate to the iOS Settings screen.

Select Wi-Fi under the settings menu.
Your Tablo will appear in the Wi-Fi list. To connect to your the Tablo's WiFi network, select it
from the list. A check mark will confirm that you have successfully connected to it.

Once you have connected to your Tablo’s Wi-Fi network, return to the Tablo app. It will prompt
you to select your home network and enter the password.

Rebooting the Tablo DVR
A regular reboot of your Tablo solves many minor problems and should always be your first
troubleshooting step.
To reboot your Tablo DVR, quickly press and release the blue reset button on the back right of
the unit. Wait for the Tablo's blue LED to stop flashing. When the blue LED is solid, the reboot
is complete. None of your Tablo DVR's data or recordings will be deleted with this type of
reboot.
Power Cycle the Tablo DVR
If the reboot step above does not solve your issue, you can try power cycling your Tablo. To do
this, remove the A/C power adaptor from the back of the unit for ~10 seconds. Then re-attach the
power adaptor to the Tablo. The unit can take up to 3 minutes to boot up from this type of reset.
None of your Tablo's data or recordings will be deleted with this type of reboot.

Power Cycle the Router
If the Tablo DVR reboot steps above do not solve your issue, you may be having connectivity-
based issues. Try power cycling your router. To do this, remove the A/C adaptor from the router
for ~10 seconds. Then re-attach the power adapter to the router. The router can take a few
minutes to boot up from this type of reset. Once your router is back online, repeat the Tablo
reboot cycles noted above.
Re-Syncing Applications
If your problem persists through the above troubleshooting steps, try uninstalling and reinstalling
the Tablo app on your viewing device. This will clear any cache or old data the application may
have stored.
If you are using the Tablo app through the Chrome browser, you can manually clear the cache by
navigating to: Settings > History > Clear browsing data.
Run a New Channel Scan
Once you connect to your Tablo, run a new channel scan. You can run a channel scan through
any of the Tablo apps (excluding Roku for the time being) by navigating to: Settings > Edit
channel lineup > Rescan> Add to guide.
If these steps do not successfully solve your issue, we recommend consulting the Tablo
Knowledge Base, Tablo Community or Tablo Support team for further assistance.
Does Tablo OTA DVR connect to my TV?
No, Tablo OTA DVRs do not have an HDMI connection. Instead, Tablo streams live TV and
recordings over your home network to compatible HDMI-enabled devices connected to your TV
like streaming set-top-boxes and gaming systems. You can also use the Tablo web app with an
HDMI-enabled computer connected to your TV, or directly on Smart TVs powered by Roku,
Android TV or most LG WebOS 2.0 and 3.0 operating systems.

Can I use Tablo OTA DVR without a subscription?
Yes. But to enjoy the full Tablo experience, a subscription to our optional guide data service is
recommended. Without a Tablo subscription, you can still watch live TV and set manual
recordings by date/time/channel but one-touch and series recordings, cover art, and advanced
features are only available with active subscriptions. Read more about using Tablo without a
subscription on the Tablo Guide Data Subscriptions page.
Does Tablo OTA DVR support 5.1 Surround Sound?
No. Tablo 2-Tuner, Tablo 4-Tuner, and Tablo DUAL OTA DVRs do not support 5.1 Surround
Sound.
In order to stream TV to all supported devices, Tablo's firmware transcodes audio and video in a
single stream. This current transcoding architecture prevents support for multiple audio tracks. If
surround sound is important to you, check out the Tablo ENGINE app for Android TV devices.
Does Tablo OTA DVR support closed captioning?
Yes! Tablo supports closed captioning on the majority of its platforms including iOS
smartphones and tablets, Android smartphones and tablets, Roku, Android TV, Amazon Fire TV,
Apple TV and the web app at my.tablotv.com. You can read more about Tablo's closed
captioning support on the Tablo blog.
Can I record streaming services like Sling TV or Netflix with Tablo?
No. Legal and technical reasons prevent Tablo from recording content from sources other than
an ATSC OTA TV antenna. You can read more about this on the Tablo blog.
Can I record cable or satellite signals with Tablo?
No. Tablo is designed to record and stream Over-The-Air (OTA) broadcast signals from ATSC
TV antennas. We do not support recording from cable or satellite signals, cableCARDs, or
clear/unencrypted cable (QAM).