contents - fight4family · contents overhand knot ... so you both understand and can use the right...
TRANSCRIPT
Contents Overhand Knot ........................................................................................................................................ 2
Square Knot ............................................................................................................................................. 2
Clove Hitch .............................................................................................................................................. 3
Bowline ................................................................................................................................................... 3
Figure 8 ................................................................................................................................................... 4
Sheet Bend .............................................................................................................................................. 4
Two Half Hitches ..................................................................................................................................... 5
Taut Line Hitch ........................................................................................................................................ 5
Fisherman’s Knot .................................................................................................................................... 6
Double Fisherman’s Knot ........................................................................................................................ 6
Water Knot .............................................................................................................................................. 7
Rolling Hitch ............................................................................................................................................ 7
Prusik Knot .............................................................................................................................................. 7
Timber Hitch............................................................................................................................................ 8
Blood Knot ............................................................................................................................................... 8
Man Harness ........................................................................................................................................... 9
Carrick Bend ............................................................................................................................................ 9
Trucker’s Hitch ...................................................................................................................................... 10
Barrel Hitch ........................................................................................................................................... 10
Sheepshank ........................................................................................................................................... 11
Tripod Lashing ....................................................................................................................................... 11
Square Lashing ...................................................................................................................................... 12
One of the key skills for anyone serious about being prepared, knot tying is often a skill taken for granted by inexperienced woodsmen. There are right and wrong knots for every job, follow the steps and advice in this guide to ensure you know what you are doing next time you pick up a piece of rope.
Whether you need to scale a mountain or do some work around your house, a good knot can make the job so much simpler. If you are ever in a situation where your life is depending on the knot you tie, would you rather know exactly what you are doing or rely on the random collection of loops and turns most people call a "knot"?
I know which I'd prefer.
Knot tying is an essential skill, and what's really great is that most knots are very simple. With a bit of practice you will learn the art of knot tying, so you both understand and can use the right knots - whatever the situation. Follow our advice and grab some rope to practice alongside, you will by tying fantastic knots in no time!
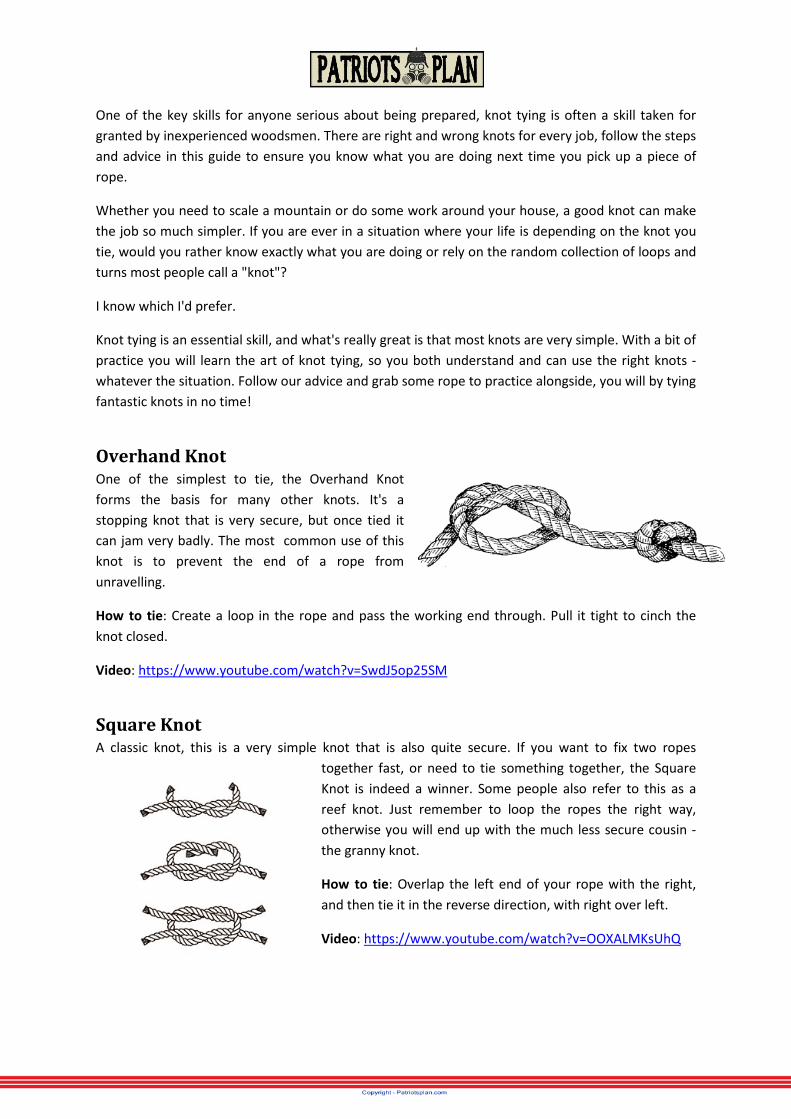
Overhand Knot One of the simplest to tie, the Overhand Knot forms the basis for many other knots. It's a stopping knot that is very secure, but once tied it can jam very badly. The most common use of this knot is to prevent the end of a rope from unravelling.
How to tie: Create a loop in the rope and pass the working end through. Pull it tight to cinch the knot closed.
Video: https://www.youtube.com/watch?v=SwdJ5op25SM
Square Knot A classic knot, this is a very simple knot that is also quite secure. If you want to fix two ropes
together fast, or need to tie something together, the Square Knot is indeed a winner. Some people also refer to this as a reef knot. Just remember to loop the ropes the right way, otherwise you will end up with the much less secure cousin - the granny knot.
How to tie: Overlap the left end of your rope with the right, and then tie it in the reverse direction, with right over left.
Video: https://www.youtube.com/watch?v=OOXALMKsUhQ

Clove Hitch An easy knot for beginners, it's fast and simple to tie (and untie). A very useful binding knot it allows you to fasten a line to a tree branch or a post securely and easily. If you are using this knot on a smooth surface, you will need to add another knot as a back-up because clove hitches can sometimes slip.
How to tie: First make a loop of rope around the tree branch or post you are securing to. Follow this with a second loop that crosses itself, but before you tighten it pass the free end of the rope underneath the second loop. Pull it tight and the clove hitch will secure.
Video: https://www.youtube.com/watch?v=aewgmUeHpuE
Bowline The Bowline creates a fixed noose at the end of a rope that cannot shrink, slip or expand. In sailing it's commonly used to secure sheets to the clew of a headsail, or to tie two ropes together. The
biggest advantage of the bowline is that no matter how tight it gets after taking a load, it's always easy to untie. This knot is often taught with a story of a rabbit coming out of the hole in front of the tree, going behind the tree, and back down his
original hole. The "rabbit" is the end of the rope, the hole and the tree are formed in the standing end.
How to tie: Form a loop on top of the long end of a rope. Pass the free end of the rope through the loop and then around behind the rope. Continue moving the free end of the rope down through the original loop, while maintaining the second loop which becomes your bowline loop. Pull the long end of the rope to tighten. To untie a bowline, turn the knot over and "break its back" by bending it downwards.
Video: https://www.youtube.com/watch?v=hIdsTZTUl6E
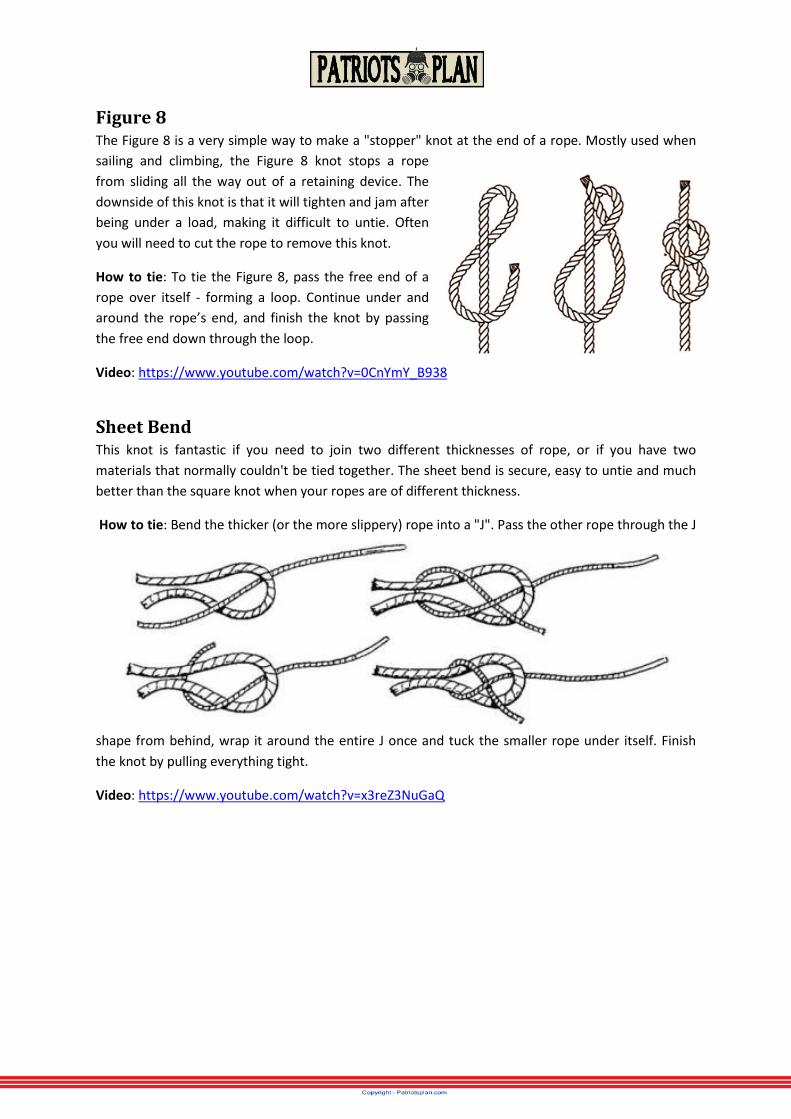
Figure 8 The Figure 8 is a very simple way to make a "stopper" knot at the end of a rope. Mostly used when sailing and climbing, the Figure 8 knot stops a rope from sliding all the way out of a retaining device. The downside of this knot is that it will tighten and jam after being under a load, making it difficult to untie. Often you will need to cut the rope to remove this knot.
How to tie: To tie the Figure 8, pass the free end of a rope over itself - forming a loop. Continue under and around the rope’s end, and finish the knot by passing the free end down through the loop.
Video: https://www.youtube.com/watch?v=0CnYmY_B938
Sheet Bend This knot is fantastic if you need to join two different thicknesses of rope, or if you have two materials that normally couldn't be tied together. The sheet bend is secure, easy to untie and much better than the square knot when your ropes are of different thickness.
How to tie: Bend the thicker (or the more slippery) rope into a "J". Pass the other rope through the J
shape from behind, wrap it around the entire J once and tuck the smaller rope under itself. Finish the knot by pulling everything tight.
Video: https://www.youtube.com/watch?v=x3reZ3NuGaQ
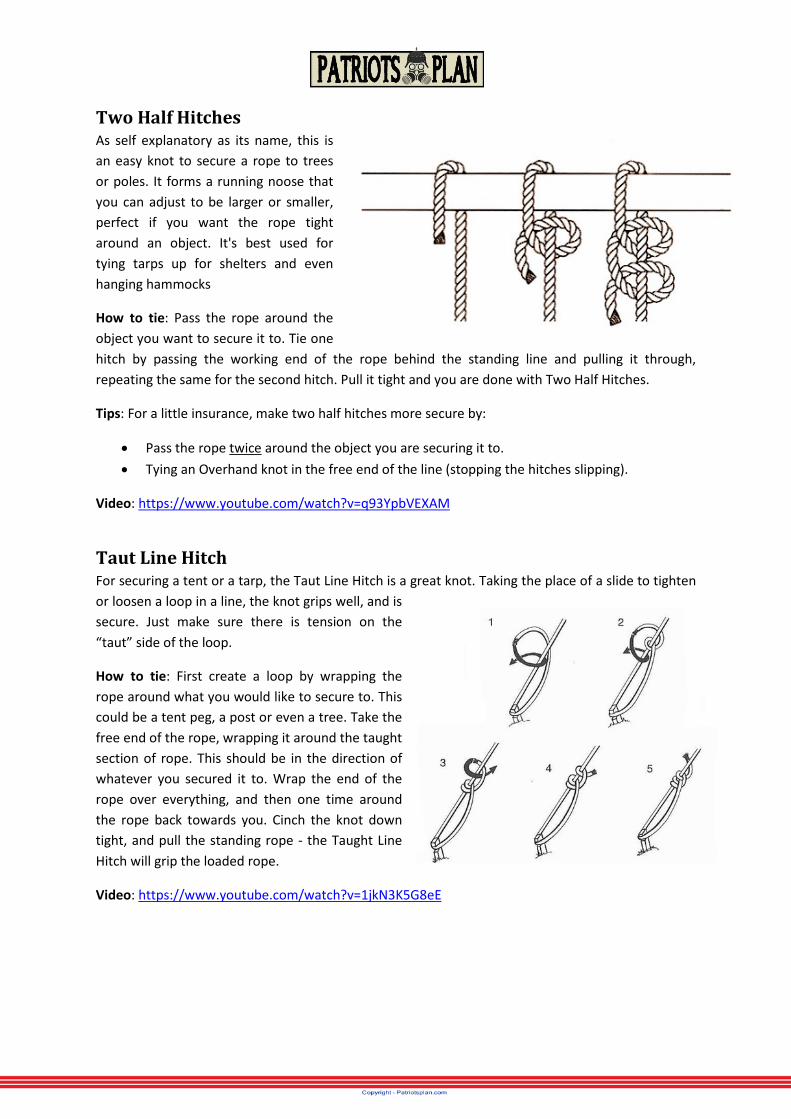
Two Half Hitches As self explanatory as its name, this is an easy knot to secure a rope to trees or poles. It forms a running noose that you can adjust to be larger or smaller, perfect if you want the rope tight around an object. It's best used for tying tarps up for shelters and even hanging hammocks
How to tie: Pass the rope around the object you want to secure it to. Tie one hitch by passing the working end of the rope behind the standing line and pulling it through, repeating the same for the second hitch. Pull it tight and you are done with Two Half Hitches.
Tips: For a little insurance, make two half hitches more secure by:
• Pass the rope twice around the object you are securing it to. • Tying an Overhand knot in the free end of the line (stopping the hitches slipping).
Video: https://www.youtube.com/watch?v=q93YpbVEXAM
Taut Line Hitch For securing a tent or a tarp, the Taut Line Hitch is a great knot. Taking the place of a slide to tighten or loosen a loop in a line, the knot grips well, and is secure. Just make sure there is tension on the “taut” side of the loop.
How to tie: First create a loop by wrapping the rope around what you would like to secure to. This could be a tent peg, a post or even a tree. Take the free end of the rope, wrapping it around the taught section of rope. This should be in the direction of whatever you secured it to. Wrap the end of the rope over everything, and then one time around the rope back towards you. Cinch the knot down tight, and pull the standing rope - the Taught Line Hitch will grip the loaded rope.
Video: https://www.youtube.com/watch?v=1jkN3K5G8eE
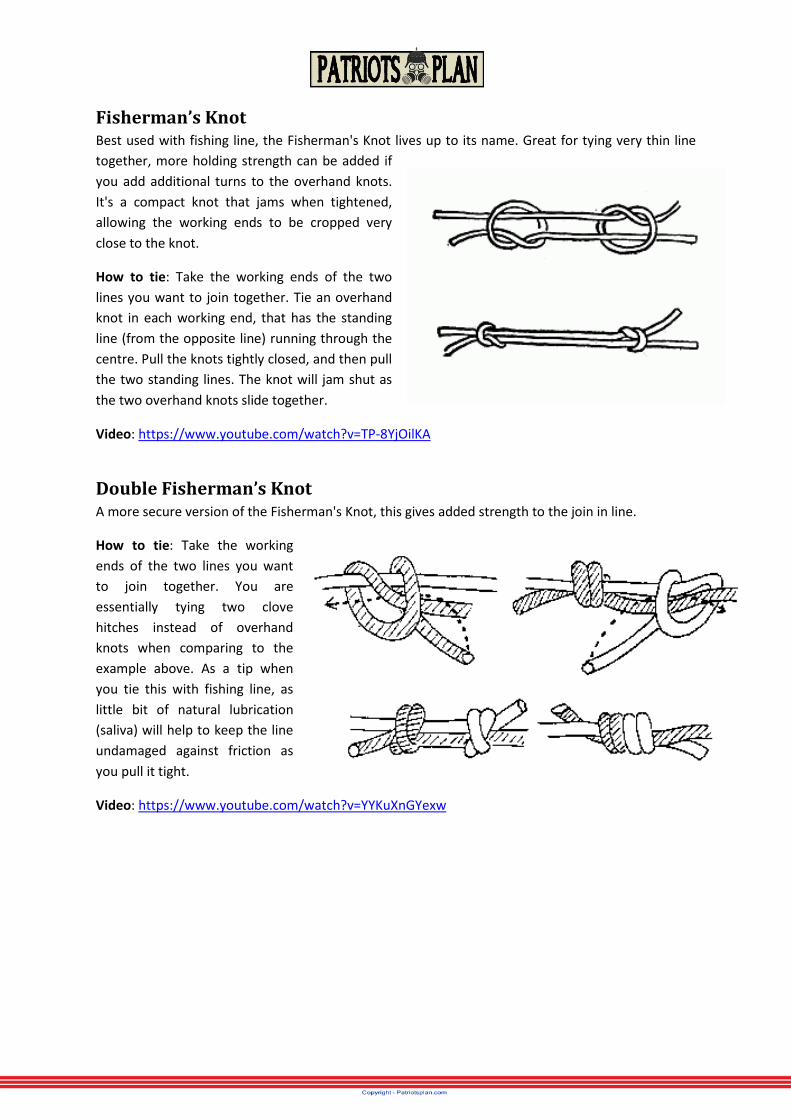
Fisherman’s Knot Best used with fishing line, the Fisherman's Knot lives up to its name. Great for tying very thin line together, more holding strength can be added if you add additional turns to the overhand knots. It's a compact knot that jams when tightened, allowing the working ends to be cropped very close to the knot.
How to tie: Take the working ends of the two lines you want to join together. Tie an overhand knot in each working end, that has the standing line (from the opposite line) running through the centre. Pull the knots tightly closed, and then pull the two standing lines. The knot will jam shut as the two overhand knots slide together.
Video: https://www.youtube.com/watch?v=TP-8YjOilKA
Double Fisherman’s Knot A more secure version of the Fisherman's Knot, this gives added strength to the join in line.
How to tie: Take the working ends of the two lines you want to join together. You are essentially tying two clove hitches instead of overhand knots when comparing to the example above. As a tip when you tie this with fishing line, as little bit of natural lubrication (saliva) will help to keep the line undamaged against friction as you pull it tight.
Video: https://www.youtube.com/watch?v=YYKuXnGYexw
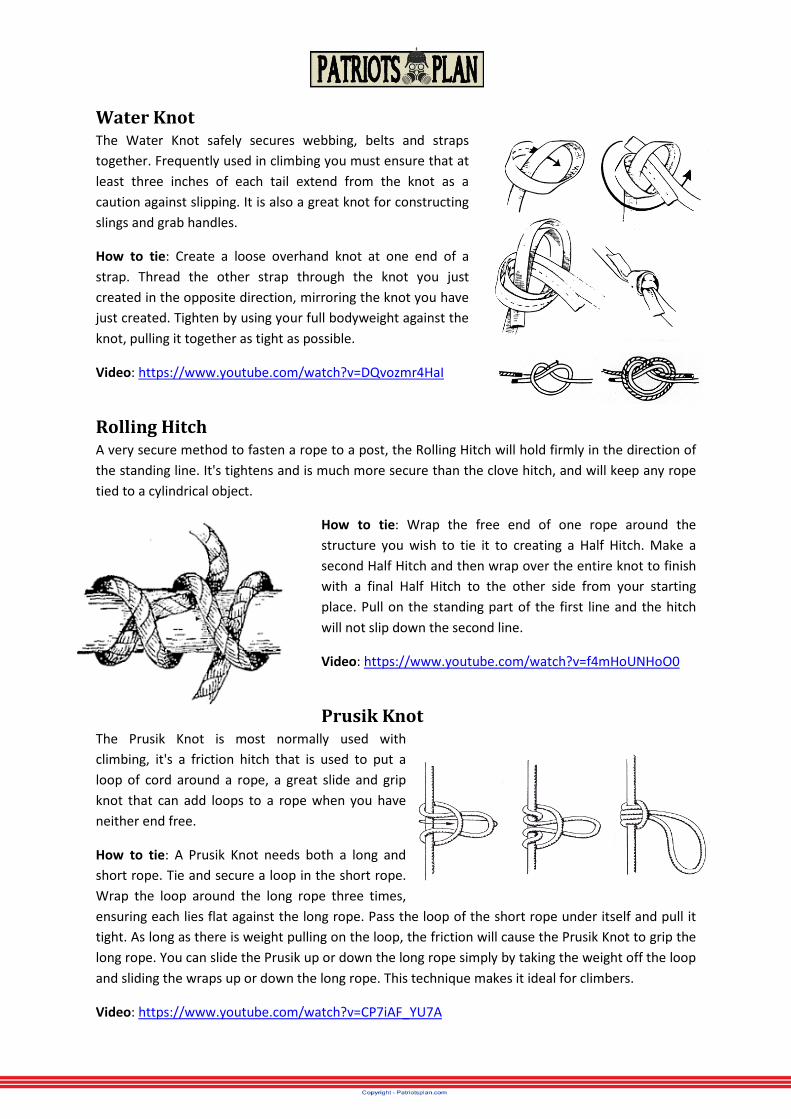
Water Knot The Water Knot safely secures webbing, belts and straps together. Frequently used in climbing you must ensure that at least three inches of each tail extend from the knot as a caution against slipping. It is also a great knot for constructing slings and grab handles.
How to tie: Create a loose overhand knot at one end of a strap. Thread the other strap through the knot you just created in the opposite direction, mirroring the knot you have just created. Tighten by using your full bodyweight against the knot, pulling it together as tight as possible.
Video: https://www.youtube.com/watch?v=DQvozmr4HaI
Rolling Hitch A very secure method to fasten a rope to a post, the Rolling Hitch will hold firmly in the direction of the standing line. It's tightens and is much more secure than the clove hitch, and will keep any rope tied to a cylindrical object.
How to tie: Wrap the free end of one rope around the structure you wish to tie it to creating a Half Hitch. Make a second Half Hitch and then wrap over the entire knot to finish with a final Half Hitch to the other side from your starting place. Pull on the standing part of the first line and the hitch will not slip down the second line.
Video: https://www.youtube.com/watch?v=f4mHoUNHoO0
Prusik Knot The Prusik Knot is most normally used with climbing, it's a friction hitch that is used to put a loop of cord around a rope, a great slide and grip knot that can add loops to a rope when you have neither end free.
How to tie: A Prusik Knot needs both a long and short rope. Tie and secure a loop in the short rope. Wrap the loop around the long rope three times, ensuring each lies flat against the long rope. Pass the loop of the short rope under itself and pull it tight. As long as there is weight pulling on the loop, the friction will cause the Prusik Knot to grip the long rope. You can slide the Prusik up or down the long rope simply by taking the weight off the loop and sliding the wraps up or down the long rope. This technique makes it ideal for climbers.
Video: https://www.youtube.com/watch?v=CP7iAF_YU7A

Timber Hitch The Timber Hitch is a fantastic way to secures a rope to a cylindrical object when you need to haul it or to provide support. The name comes from its traditional use by lumbermen for attaching ropes to tree trunks, branches and limbs. The addition of a second hitch (in front of the timber hitch) creates a "Killick Hitch," preventing the knot from rolling while hauling long items.
How to tie: Simply run the working end of the rope around the log you need to haul. Make a loop around the standing end of the rope, and wrap the working end around itself four or five times. Pull both ends tight and the Timber Hitch will secure against the log, add a final half hitch for added stability (as seen in the second image).
Video: https://www.youtube.com/watch?v=u7TT1IcEYPY
Blood Knot A more extreme version of a Fishermans Knot, this is the most secure method to fasten two separate fishing lines together. Whether you need to mend a broken line or attach leaders and tippets, the Blood Knot will have you covered. It's best advantage is that it maintains much of the fishing lines inherent strength. The downside is the dexterity required to tie, this knot can take some practice!
How to tie: Start a Blood Knot be overlapping the two working ends of the fishing line, wrapping the free end of one around the other line 5-6 times. Pass the free end back between the two lines. Wrap the other line 5-6 times, and bring the working end back between the two lines in the opposite direction of the other line. use some moisture to reduce any friction damage as you tighten the knit, pull it tight and hard to secure.
Video: https://www.youtube.com/watch?v=ufncs42S8G8
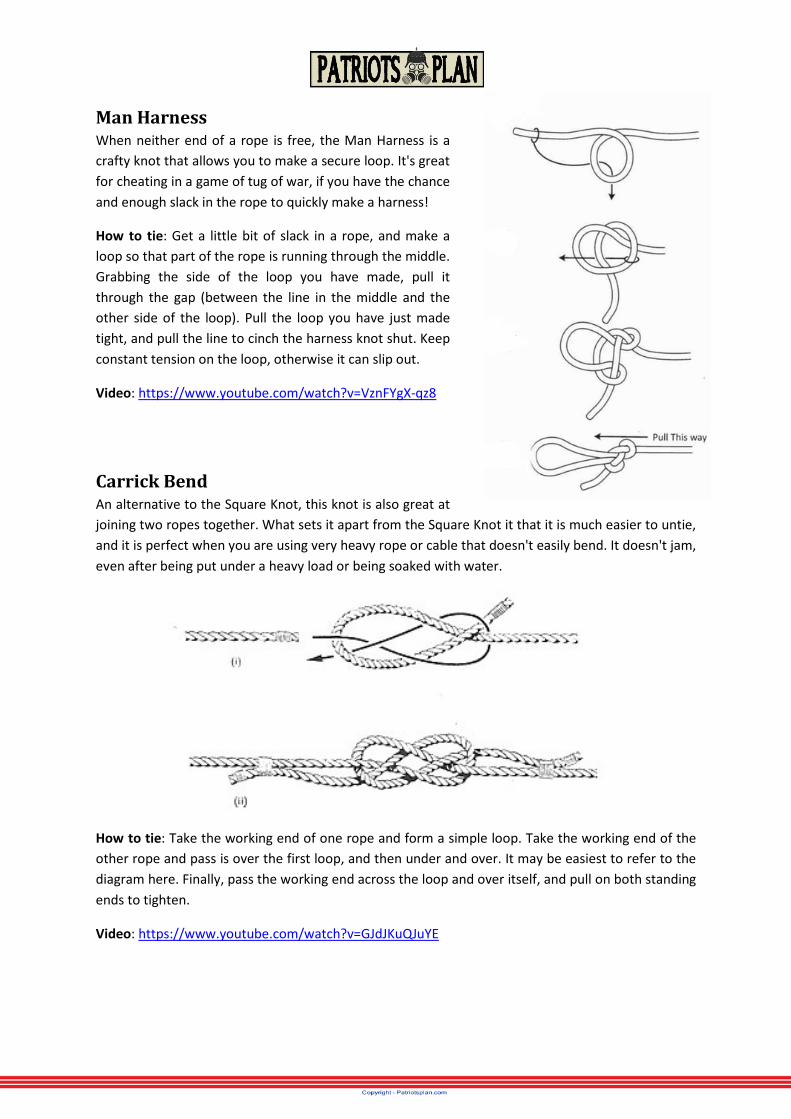
Man Harness When neither end of a rope is free, the Man Harness is a crafty knot that allows you to make a secure loop. It's great for cheating in a game of tug of war, if you have the chance and enough slack in the rope to quickly make a harness!
How to tie: Get a little bit of slack in a rope, and make a loop so that part of the rope is running through the middle. Grabbing the side of the loop you have made, pull it through the gap (between the line in the middle and the other side of the loop). Pull the loop you have just made tight, and pull the line to cinch the harness knot shut. Keep constant tension on the loop, otherwise it can slip out.
Video: https://www.youtube.com/watch?v=VznFYgX-qz8
Carrick Bend An alternative to the Square Knot, this knot is also great at joining two ropes together. What sets it apart from the Square Knot it that it is much easier to untie, and it is perfect when you are using very heavy rope or cable that doesn't easily bend. It doesn't jam, even after being put under a heavy load or being soaked with water.
How to tie: Take the working end of one rope and form a simple loop. Take the working end of the other rope and pass is over the first loop, and then under and over. It may be easiest to refer to the diagram here. Finally, pass the working end across the loop and over itself, and pull on both standing ends to tighten.
Video: https://www.youtube.com/watch?v=GJdJKuQJuYE
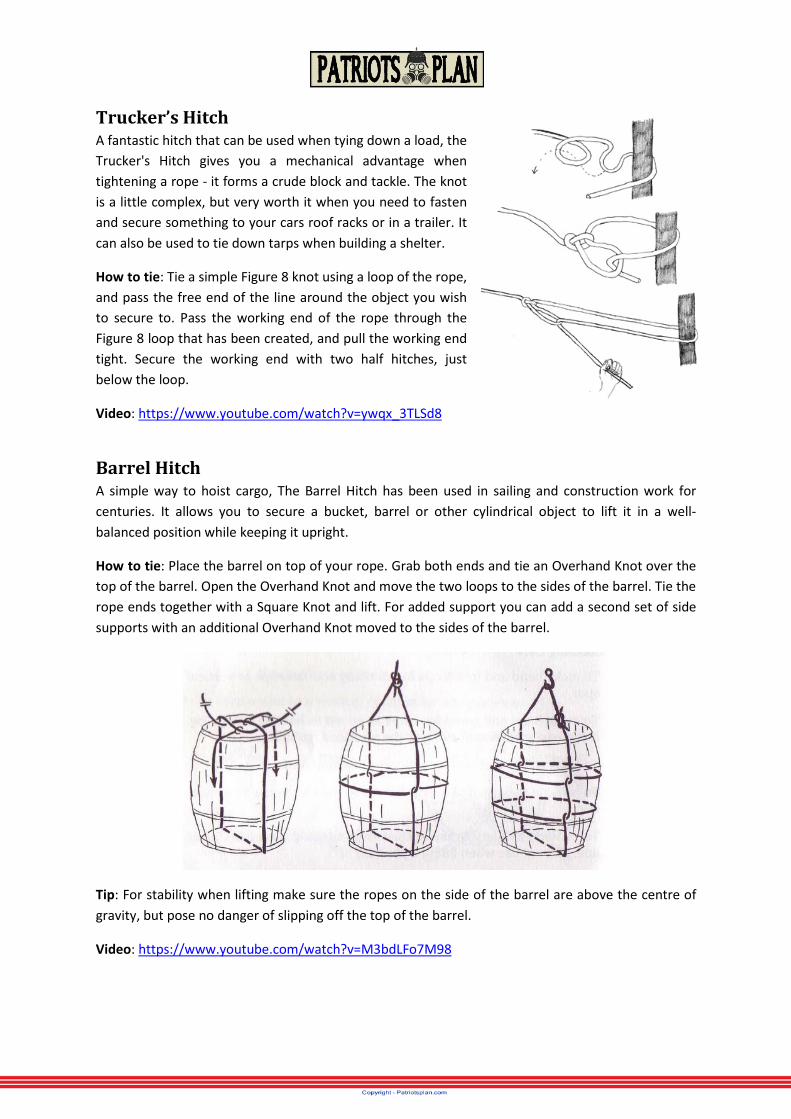
Trucker’s Hitch A fantastic hitch that can be used when tying down a load, the Trucker's Hitch gives you a mechanical advantage when tightening a rope - it forms a crude block and tackle. The knot is a little complex, but very worth it when you need to fasten and secure something to your cars roof racks or in a trailer. It can also be used to tie down tarps when building a shelter.
How to tie: Tie a simple Figure 8 knot using a loop of the rope, and pass the free end of the line around the object you wish to secure to. Pass the working end of the rope through the Figure 8 loop that has been created, and pull the working end tight. Secure the working end with two half hitches, just below the loop.
Video: https://www.youtube.com/watch?v=ywqx_3TLSd8
Barrel Hitch A simple way to hoist cargo, The Barrel Hitch has been used in sailing and construction work for centuries. It allows you to secure a bucket, barrel or other cylindrical object to lift it in a well-balanced position while keeping it upright.
How to tie: Place the barrel on top of your rope. Grab both ends and tie an Overhand Knot over the top of the barrel. Open the Overhand Knot and move the two loops to the sides of the barrel. Tie the rope ends together with a Square Knot and lift. For added support you can add a second set of side supports with an additional Overhand Knot moved to the sides of the barrel.
Tip: For stability when lifting make sure the ropes on the side of the barrel are above the centre of gravity, but pose no danger of slipping off the top of the barrel.
Video: https://www.youtube.com/watch?v=M3bdLFo7M98

Sheepshank A great knot for shortening a length of rope without cutting it, a Sheepshank is basically half magic trick, half practical knot. If you miscalculate the length of rope you need in the field, this knot will save you without having to cut the rope. It works best for coarse rope, putting too little or too much tension on the rope will cause the Sheepshank to fall apart.
How to tie: To tie a Sheepshank, fold the rope in thirds so that it is at the new length you need. Tie a Half Hitch at one end of the continuing rope, close to the end of one of the loops. Tie a second Half Hitch at the other standing end, so it catches the second loop. Tighten the entire set of knots slowly and carefully until the half hitches take hold.
Video: https://www.youtube.com/watch?v=8uaFf6xxdBo
Tripod Lashing The Tripod Lashing is most commonly used when you are camping. It allows three poles to be joined together to form a tripod, which has many uses . As part of a shelter or to hold a pot above the fire, tripods are stable and secure structures that can be easily constructed.
How to tie: Find three poles of equal length that you want to join together. Lie them side by side on the ground, with one pole in the opposite direction to the other two. Tie a Clove Hitch around one of the poles on the side. Wrap the rope around all three poles 5-6 times, and then wrap the rope twice between each pole as you work back towards the original Clove Hitch. Tie the end of the rope to the centre pole, or to the original Clove Hitch and spread the legs of the tripod. It should securely stand on its own.
Video: https://www.youtube.com/watch?v=55thqbbYF14
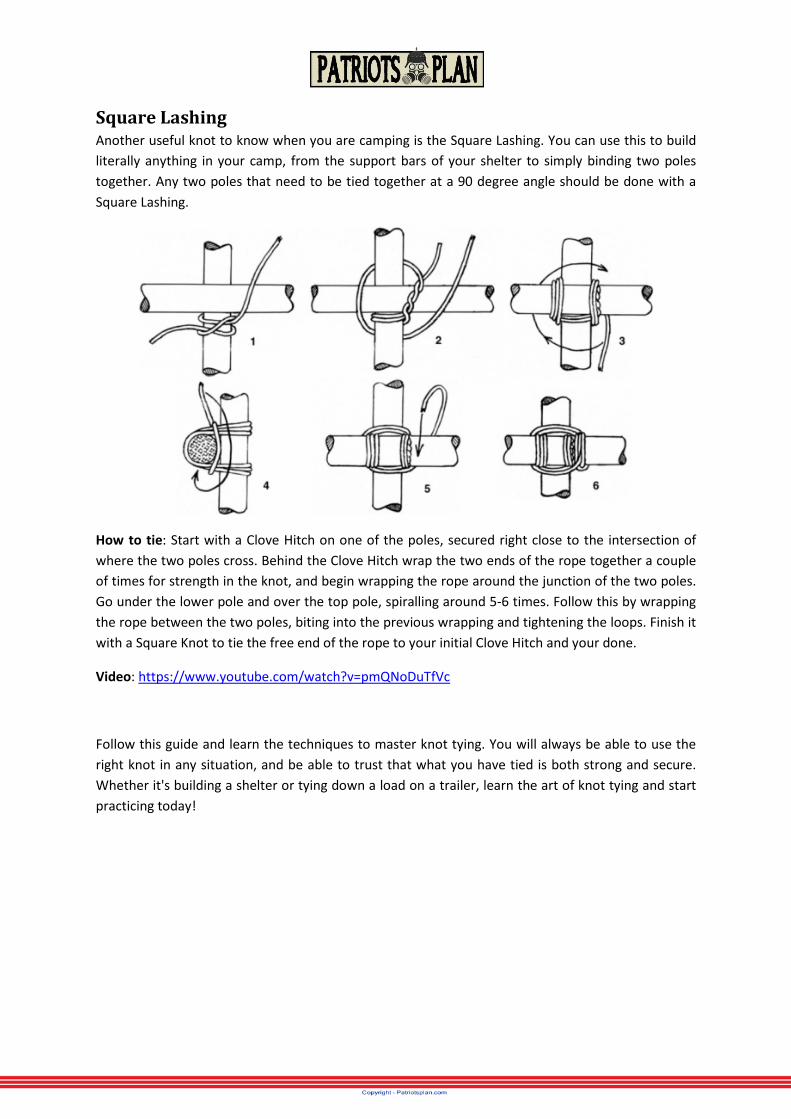
Square Lashing Another useful knot to know when you are camping is the Square Lashing. You can use this to build literally anything in your camp, from the support bars of your shelter to simply binding two poles together. Any two poles that need to be tied together at a 90 degree angle should be done with a Square Lashing.
How to tie: Start with a Clove Hitch on one of the poles, secured right close to the intersection of where the two poles cross. Behind the Clove Hitch wrap the two ends of the rope together a couple of times for strength in the knot, and begin wrapping the rope around the junction of the two poles. Go under the lower pole and over the top pole, spiralling around 5-6 times. Follow this by wrapping the rope between the two poles, biting into the previous wrapping and tightening the loops. Finish it with a Square Knot to tie the free end of the rope to your initial Clove Hitch and your done.
Video: https://www.youtube.com/watch?v=pmQNoDuTfVc
Follow this guide and learn the techniques to master knot tying. You will always be able to use the right knot in any situation, and be able to trust that what you have tied is both strong and secure. Whether it's building a shelter or tying down a load on a trailer, learn the art of knot tying and start practicing today!