contents overview 3 configuration 4 - … · contents overview ..... 3 ... dynamics nav database...
TRANSCRIPT

1
GUIDE TO INTEGRATION IMPLEMENTATION
4110 George Road, Tampa, FL 33634 | 813-463-4740 | [email protected]
Contents OVERVIEW ................................................................................................ 3
Feature Summary .................................................................................................................. 3
CONFIGURATION ..................................................................................... 4
System Requirements ............................................................................................................ 4
ConnectWise Manage Configuration ...................................................................................... 4
Configuration of Manage Login ................................................................................................................ 4
Configuration of GL Accounts ................................................................................................................... 5
Configuration of the Accounting Package................................................................................................. 6
Dynamics NAV Configuration ................................................................................................. 7
OData Services Activation ......................................................................................................................... 7
Exposing OData Endpoints ........................................................................................................................ 7
OData Endpoint Entry Example ................................................................................................................ 8
Additional OData Configuration ................................................................................................................ 9
Mapping Corresponding Data .............................................................................................. 10
Customers ............................................................................................................................................... 11
Vendors ................................................................................................................................................... 12
Members ................................................................................................................................................. 13
GL Accounts ............................................................................................................................................ 14
Multi-Segmented GL Accounts ............................................................................................................... 14
Tax Codes ................................................................................................................................................ 17
Receivable Invoices ................................................................................................................................. 21
Credit Memos ......................................................................................................................................... 21
Expenses ................................................................................................................................................. 21
Products .................................................................................................................................................. 21
Item Receipts .......................................................................................................................................... 22
Inventory Transfers & Adjustments ........................................................................................................ 22
Terms ...................................................................................................................................................... 22
Warehouses ............................................................................................................................................ 23
Clearing Transactions .......................................................................................................... 24
Installation .......................................................................................................................... 25
USING THE APPLICATION ..................................................................... 27
2
GUIDE TO INTEGRATION IMPLEMENTATION
4110 George Road, Tampa, FL 33634 | 813-463-4740 | [email protected]
Logging In ............................................................................................................................ 27
Connecting to OData Endpoints ........................................................................................... 28
The Main Screen .................................................................................................................. 30
Running a New Batch .......................................................................................................... 31
Setting up the Batch ................................................................................................................................ 31
Selecting Specific Invoices ....................................................................................................................... 32
Selecting Specific Expenses ..................................................................................................................... 33
Selecting Specific Inventory Transactions ............................................................................................... 34
Select a Batch ID ..................................................................................................................................... 34
Run the Batch .......................................................................................................................................... 35
Validating a Batch ............................................................................................................... 36
Invoices ................................................................................................................................................... 37
Expenses ................................................................................................................................................. 38
Inventory ................................................................................................................................................. 40
Inventory Adjustments & Transfers ........................................................................................................ 41
Credit Memos ......................................................................................................................................... 42
Rerunning an Existing Batch................................................................................................. 43
Un-posting Transactions ...................................................................................................... 44
Invoices ................................................................................................................................................... 44
Batches .................................................................................................................................................... 44
Synchronizing Invoice Payments .......................................................................................... 45
Modules .............................................................................................................................. 46
Multi-Currency Module .......................................................................................................................... 46
Customizations ........................................................................................................................................ 46

3
GUIDE TO INTEGRATION IMPLEMENTATION
4110 George Road, Tampa, FL 33634 | 813-463-4740 | [email protected]
Overview The ConnectWise ManageTM-Dynamics NAVTM Integration allows you to import your Manage accounting data directly into your Dynamics NAV application.
Feature Summary Below is a quick list of features available within this integration:
1 Create Customers
2 Create Vendors
3 Create Products
4 Multiple currency
5 Standard Invoices
6 Agreement Invoices
7 Miscellaneous Invoices
8 Down Payment Invoices
9 Credit Memos
10 Expenses
a. Transfer with Expense as Bill Option
b. Transfer without Expense as Bill Option
11 Procurement
a. Item receipts
b. Inventory Adjustments
c. Inventory Transfers (Multiple Warehouses if available)
12 Sync Invoice Payments
Feature is fully implemented Feature will be added in future release Feature is partially implemented Accounting package does not support feature NA Feature is not available
4
GUIDE TO INTEGRATION IMPLEMENTATION
4110 George Road, Tampa, FL 33634 | 813-463-4740 | [email protected]
Configuration
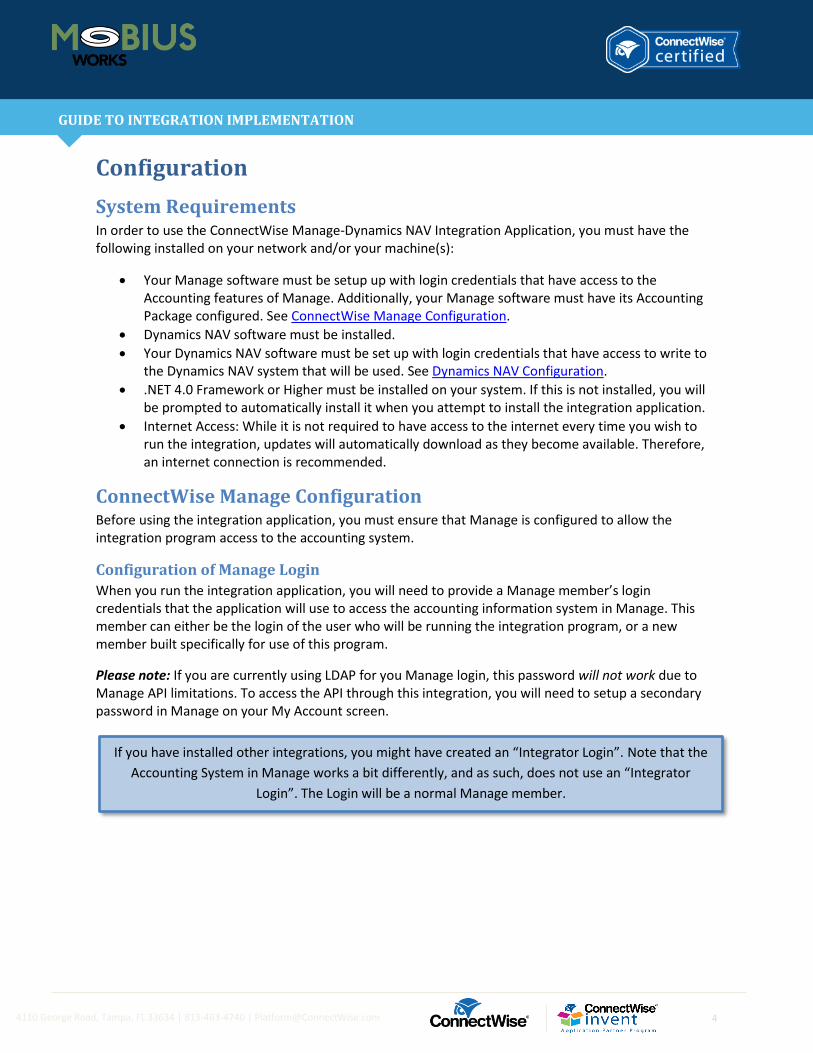
System Requirements In order to use the ConnectWise Manage-Dynamics NAV Integration Application, you must have the following installed on your network and/or your machine(s):
• Your Manage software must be setup up with login credentials that have access to the Accounting features of Manage. Additionally, your Manage software must have its Accounting Package configured. See ConnectWise Manage Configuration.
• Dynamics NAV software must be installed.
• Your Dynamics NAV software must be set up with login credentials that have access to write to the Dynamics NAV system that will be used. See Dynamics NAV Configuration.
• .NET 4.0 Framework or Higher must be installed on your system. If this is not installed, you will be prompted to automatically install it when you attempt to install the integration application.
• Internet Access: While it is not required to have access to the internet every time you wish to run the integration, updates will automatically download as they become available. Therefore, an internet connection is recommended.
ConnectWise Manage Configuration Before using the integration application, you must ensure that Manage is configured to allow the integration program access to the accounting system.
Configuration of Manage Login
When you run the integration application, you will need to provide a Manage member’s login credentials that the application will use to access the accounting information system in Manage. This member can either be the login of the user who will be running the integration program, or a new member built specifically for use of this program.
Please note: If you are currently using LDAP for you Manage login, this password will not work due to Manage API limitations. To access the API through this integration, you will need to setup a secondary password in Manage on your My Account screen.
If you have installed other integrations, you might have created an “Integrator Login”. Note that the
Accounting System in Manage works a bit differently, and as such, does not use an “Integrator
Login”. The Login will be a normal Manage member.

5
GUIDE TO INTEGRATION IMPLEMENTATION
4110 George Road, Tampa, FL 33634 | 813-463-4740 | [email protected]
In order for the Member to be able to work with the accounting information, they must be assigned as a security role that allows access to the GL Interface. With a default installation, the “Role ID” field must be set to either “Finance”, “Executive” or “Admin”.
If, instead, you wish to create your own role rather than use the Manage defaults, you need to ensure that the security role levels setting is set to ”All” for ”Add Level ”, ”Edit Level ”, ”Delete Level” and ”Inquire Level” on the ”Accounting Interface” line within the Finance Module, as depicted below:
Additionally, you need to ensure that that the security role levels setting is set to “All” for “Inquire Level” on the “API Reports” line within the System Module, as depicted below.
Configuration of GL Accounts
Your company will need to have their GL Accounts properly configured in order for Manage to provide the integration application with the correct information. Because this process is largely specific to your Company, the exact details of this configuration are outside of the scope of this document. Please visit the ConnectWise University before beginning to set up your GL Accounts, or speak with your ConnectWise Consultant at [email protected] for more information.

6
GUIDE TO INTEGRATION IMPLEMENTATION
4110 George Road, Tampa, FL 33634 | 813-463-4740 | [email protected]
Configuration of the Accounting Package
Once your accounts are set up, you will need to set up the Accounting Package. This describes to Manage how your accounts will be exported to Dynamics NAV. It has a number of options, some of which are specific to other accounting software (such as QuickBooks). You can set up this screen at System > Setup Tables > Accounting Package using the following steps:
1. Set the “Accounting Package Setup” dropdown to “Other.” 2. In the Sales Tax Options section, ensure that “Include Sales Tax” is checked. 3. If you will be transferring Expenses, ensure that “Transfer Expense as a Bill” is checked. 4. In the Product Options section, ensure that “Inventory SOH Option” is checked. 5. If you will be transferring Costing, ensure that “Include COGS Entries” is checked. 6. In the Account Segments section, choose the maximum number of segments an account in your
company will have. Ensure that each segment to be a part of your GL Account structure has a type of “Account.” (Please note that Classes may be used in certain circumstances.)
7. In the COGS Segments section, choose the maximum number of segments a COGS account in your company will have. Ensure that each segment to be a part of your GL Account structure has a type of “Account.”
You’ll notice that there are a few other options in the Accounting Package that we have not explicitly
mentioned, such as “Include Invoices”, “Include Expenses” and “Include Procurement Items.” Some
of these fields only affect the default values of the Accounting Integration screen built into Manage.
This integration does not use that screen; so, these options will have no effect on the integration.
2
4
5
3
1
6
7

7
GUIDE TO INTEGRATION IMPLEMENTATION
4110 George Road, Tampa, FL 33634 | 813-463-4740 | [email protected]
Dynamics NAV Configuration A properly configured ODBC connection is required. The integration will NOT function without one.
The integration requires a collection of OData Web Service “endpoints” to be exposed in order to
function. OData is a web service protocol that allows the integration to read and write data to the
Dynamics NAV database and must be activated using the Dynamics NAV Administration tool.
OData Services Activation
1. Ensure OData Services is enabled. This checkbox must be checked.
2. Note the Port value. This will be required in the URL to access exposed OData endpoints.
3. Edit button to enable editing if OData Services is NOT enabled.
Exposing OData Endpoints
After OData Services have been enabled, Dynamics NAV must have the following list of endpoints
exposed. In the Dynamics NAV client the Web Services interface can be opened by navigating to
Departments > Administration > IT Administration > Services > Web Services. Create a new “Page” Object
Type for each Object ID in the following table and ensure that each new entry has the Published column
checked. The Object Name represents the interface to be exposed. The Service Name can be any URL
safe value that represents the interface being exposed. Each defined Service Name should be unique to
the Object Name.
1 3 2

8
GUIDE TO INTEGRATION IMPLEMENTATION
4110 George Road, Tampa, FL 33634 | 813-463-4740 | [email protected]
Object ID Object Name
4 Payment Terms
5 Currencies
14 Salespeople/Purchasers
15 Location List
18 G/L Account List
20 General Ledger Entries
21 Customer Card
22 Customer List
25 Customer Ledger Entries
26 Vendor Card
27 Vendor List
30 Item Card
31 Item List
38 Item Ledger Entries
40 Item Journal
43 Sales Invoice
44 Sales Credit Memo
45 Sales List
51 Purchase Invoice
53 Purchase List
110 Customer Posting Groups
111 Vendor Posting Groups
112 Inventory Posting Groups
132 Posted Sales Invoice
138 Posted Purchase Invoice
209 Unites of Measure
254 Purchase Journal
312 Gen. Business Posting Groups
313 Gen. Product Posting Groups
470 Tax Business Posting Groups
471 Tax Product Posting Groups
OData Endpoint Entry Example
The following screenshot illustrates an example entry for Object ID 43, Sales Invoice.
The Service Name of “ARInvoice” will be applied to the OData URL upon publishing. Confirm that the
OData Web Service is working by navigating to the OData URL in your browser.

9
GUIDE TO INTEGRATION IMPLEMENTATION
4110 George Road, Tampa, FL 33634 | 813-463-4740 | [email protected]
Additional OData Configuration
Depending on the Dynamics NAV version and/or release, there may be additional fields for exposed
OData endpoints that need to be added to the “Page” from within the Dynamics NAV Development
environment. The integration requires “mapping” to all required user defined endpoint service names
before any data can be transferred into Dynamics NAV. This Endpoint Mapping interface attempts to
validate the available fields for each endpoint and will log any issues if they exist. See Integration
Configuration, for details on the integrations Endpoint Mapping Module.
As an example, if your General Ledger Entries endpoint (object ID 20) does not have the
“External_Document_Number” field available, it will need to be added using the Dynamics NAV
Development Environment. Open the NAV Development Environment and open the proper database by
navigating to File > Database > Open
Select the proper Database Name and click OK. This should open the Object Designer. If the Object
Designer is not visible it can be opened by navigating to Tools > Object Designer.
Make sure the “Page” Object Type is selected then find the Object Name or ID needed (in this case
General Ledger Entries, ID 20). Select the row and click Design to open the Page Designer.

10
GUIDE TO INTEGRATION IMPLEMENTATION
4110 George Road, Tampa, FL 33634 | 813-463-4740 | [email protected]
Select the first available field record then Navigate to View > Field Menu to open the Field Menu list.
Scroll until the Field necessary is found (in this case External_Document_Number), select the row, and
click OK. Click Yes to the Confirmation prompt to add the field(s) that is selected. Navigate to Tools >
Compile to update the Dynamics NAV database to complete adding the missing field to the Page.
Mapping Corresponding Data There is data in Manage that will have corresponding data in Dynamics NAV. For example, when you
create an invoice in Manage for the Company “Acme Inc.”, the integration program will need to create
an Invoice in Dynamics NAV for the Customer “Acme Inc.”. In order to know against which Dynamics
NAV Customer this invoice will be created, Manage needs some way to associate the “Acme Inc.” in
Manage with the “Acme Inc.” in Dynamics NAV. This process of associating data is known as mapping.
The following sections will describe what data needs to be mapped. When an improper mapping is
found, the integration program will fail before attempting to export any data, giving you the information
needed to fix the mapping.
11
GUIDE TO INTEGRATION IMPLEMENTATION
4110 George Road, Tampa, FL 33634 | 813-463-4740 | [email protected]
Customers
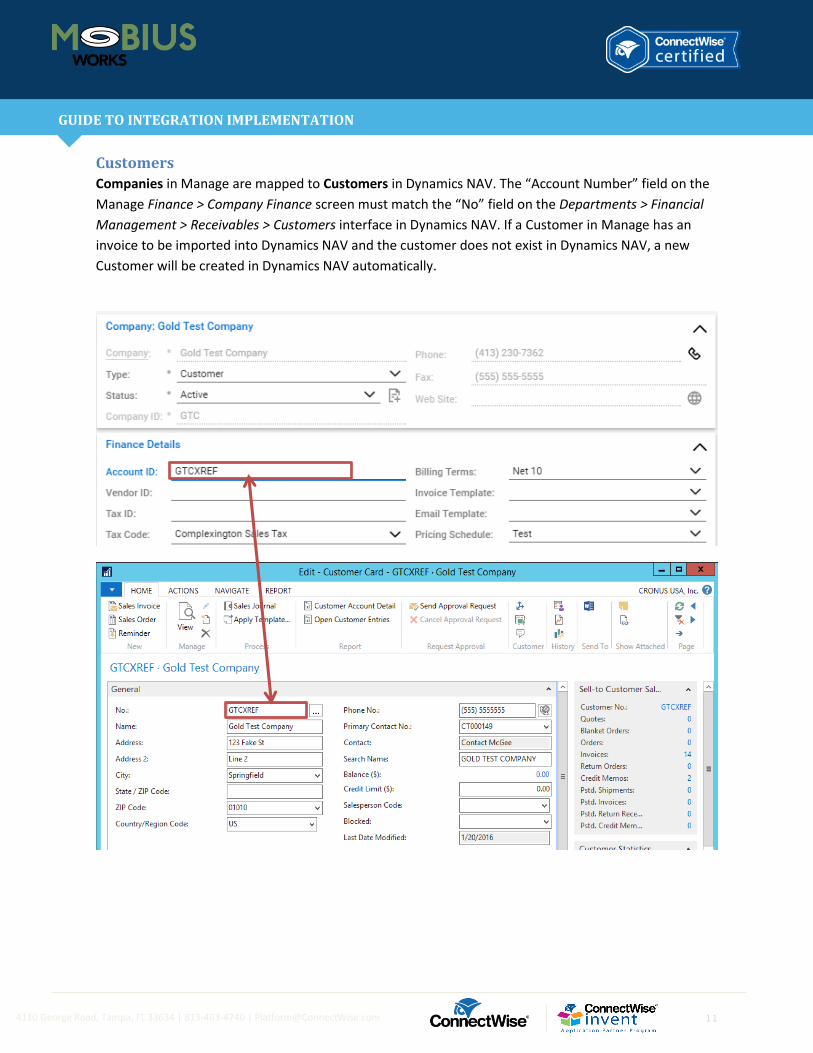
Companies in Manage are mapped to Customers in Dynamics NAV. The “Account Number” field on the
Manage Finance > Company Finance screen must match the “No” field on the Departments > Financial
Management > Receivables > Customers interface in Dynamics NAV. If a Customer in Manage has an
invoice to be imported into Dynamics NAV and the customer does not exist in Dynamics NAV, a new
Customer will be created in Dynamics NAV automatically.

12
GUIDE TO INTEGRATION IMPLEMENTATION
4110 George Road, Tampa, FL 33634 | 813-463-4740 | [email protected]
Vendors
Companies flagged as Vendors in Manage are mapped to Vendors in Dynamics NAV. The “Vendor Xref”
field on the Manage Finance > Company Finance screen must match the “No” field on the Departments
> Financial Management > Payables > Vendors interface in Dynamics NAV. If a Vendor in Manage has a
PO to be imported into Dynamics NAV and the Vendor does not exist in Dynamics NAV, a new Vendor
will be created in Dynamics NAV automatically.

13
GUIDE TO INTEGRATION IMPLEMENTATION
4110 George Road, Tampa, FL 33634 | 813-463-4740 | [email protected]
Members
With the Expenses: Transfer as Bill option checked in the Manage Accounting Package setup table,
billable expenses will be created as Purchase Invoices in Dynamics NAV. Therefore, Members on an
expense will map to Vendors in Dynamics NAV. The “Vendor Nbr” field on the Manage System >
Members screen needs to match the “No” field on the Departments > Financial Management > Payables
> Vendors interface in Dynamics NAV.

14
GUIDE TO INTEGRATION IMPLEMENTATION
4110 George Road, Tampa, FL 33634 | 813-463-4740 | [email protected]
GL Accounts
The “Account” field for a GL Account in the System > Setup Tables > GL Accounts table in Manage must
be consistent with the “No” field for a GL Account in the Departments > Financial Management >
General Ledger > Chart of Accounts interface in Dynamics NAV. Note that Accounts will not be
automatically created in Dynamics NAV if they are not found. An error message will be raised during the
validation phase halting the transfer.
Multi-Segmented GL Accounts
The subaccounts of a multi-segmented GL Account in Manage can be mapped to Dynamics NAV
Dimension codes which can be applied to transaction line details. Dynamics NAV supports up to 8
Dimension codes per line detail. The integration will only consider the first 8 subaccount segments of a
GL Account coming from Manage. The number of segments for GL Accounts in Manage is defined on the
Accounting Package setup table by navigating to System > Setup Tables and searching for “Accounting

15
GUIDE TO INTEGRATION IMPLEMENTATION
4110 George Road, Tampa, FL 33634 | 813-463-4740 | [email protected]
Package”. Please note that a multi-segment GL Account mapping setup requires all segments of a GL
Account in Manage to have a value if any subaccount segments will be mapped.
In the following example, we will be mapping a 3-part multi-segmented GL Account in Manage to
Dynamics NAV. The root, or the first part, of the GL Account will map to the Dynamics NAV Chart of
Accounts as detailed in the GL Accounts section. The “Department” and “Project” segments will map to
Dynamics NAV Dimension Codes. The Segment Type must be “Account”.
The order of account segments in Manage should match the order of Dimension Codes in Dynamics NAV
General Ledger setup found at Departments > Financial Management > Setup > Administration >
General Ledger Setup under “Dimensions”.
Please note that, while it is not necessary for the Dimension codes to match the Account segment
caption, the order is important. Therefore, it is recommended to name each accordingly for clarity.
16
GUIDE TO INTEGRATION IMPLEMENTATION
4110 George Road, Tampa, FL 33634 | 813-463-4740 | [email protected]
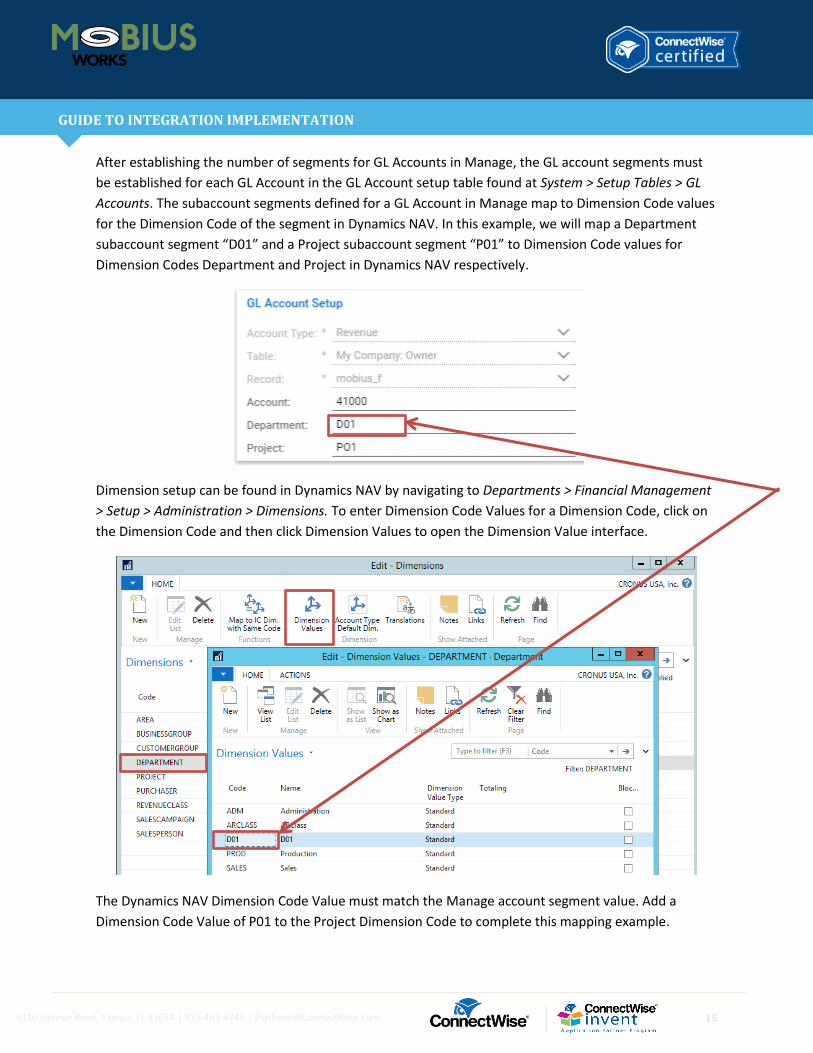
After establishing the number of segments for GL Accounts in Manage, the GL account segments must
be established for each GL Account in the GL Account setup table found at System > Setup Tables > GL
Accounts. The subaccount segments defined for a GL Account in Manage map to Dimension Code values
for the Dimension Code of the segment in Dynamics NAV. In this example, we will map a Department
subaccount segment “D01” and a Project subaccount segment “P01” to Dimension Code values for
Dimension Codes Department and Project in Dynamics NAV respectively.
Dimension setup can be found in Dynamics NAV by navigating to Departments > Financial Management
> Setup > Administration > Dimensions. To enter Dimension Code Values for a Dimension Code, click on
the Dimension Code and then click Dimension Values to open the Dimension Value interface.
The Dynamics NAV Dimension Code Value must match the Manage account segment value. Add a
Dimension Code Value of P01 to the Project Dimension Code to complete this mapping example.

17
GUIDE TO INTEGRATION IMPLEMENTATION
4110 George Road, Tampa, FL 33634 | 813-463-4740 | [email protected]
Tax Codes
Tax Codes in Manage map to Tax Areas in Dynamics NAV. A Dynamics NAV Tax Area consists of one or
more Tax Jurisdictions. Each Tax Jurisdiction in Dynamics NAV requires a TAXABLE and NONTAXABLE Tax
Detail. This section details the mapping process of a multi-level tax configuration in Manage. A single
level tax configuration can be implemented following these same steps with just one Manage Tax Level
mapping to one Dynamics NAV Tax Jurisdiction. Consider the following Manage Tax Code:

18
GUIDE TO INTEGRATION IMPLEMENTATION
4110 George Road, Tampa, FL 33634 | 813-463-4740 | [email protected]
The color coding will be used to assist and simplify the mapping process. First, there must be a Tax Area
defined in Dynamics NAV with a Code that matches the Manage Tax Code value of COMPLEX. It is
recommended to have each Manage Tax Level Tax Code Xref value match the Tax Code (consider the
color coding). To define a Tax Area in Dynamics NAV, navigate to Departments > Financial Management
> Setup > Sales Tax > Tax Areas and click New.
Next, Tax Jurisdictions need to be applied as Tax Area lines. These lines map to Manage Tax Levels. Click
New under Lines to add a Tax Jurisdiction. If the Tax Jurisdiction does not already exist it will need to be
created first. Click on the drop down for Tax Jurisdiction and click New.

19
GUIDE TO INTEGRATION IMPLEMENTATION
4110 George Road, Tampa, FL 33634 | 813-463-4740 | [email protected]
Create a Tax Jurisdiction for each Tax Level in Manage mapping the Manage Tax Agency Xref to the
Dynamics NAV Tax Jurisdiction Code.
Note the Tax Account (Sales) column. This is where the Tax Payable can be specified for each tax level.
These accounts would map from the Manage GL Account setup table. Depending on your Manage setup,
each level may or may not use the same GL Account.
Once all Tax Jurisdictions have been defined the integration requires Tax Details for both a TAXABLE and
NONTAXABLE Tax Group Code. For each Tax Jurisdiction mapping to the Tax Area, select the Tax
Jurisdiction line, click the NAVIGATE tab, and click Details to open the Tax Details interface.
On the Tax Details for each level, add a detail for each required Tax Group Code. On the TAXABLE Tax
Group Code line, enter the Manage tax rate for the corresponding Tax Level. On the NONTAXABLE Tax
Group Code line, enter 0. Note that the Manage tax rate is a decimal value. Dynamics NAV expects a
percentage tax rate. Therefore .01 in Manage should be entered as 1 in Dynamics NAV.

20
GUIDE TO INTEGRATION IMPLEMENTATION
4110 George Road, Tampa, FL 33634 | 813-463-4740 | [email protected]
After completing the Tax Jurisdiction entries and their Tax Details for each Manage Tax Level, complete
the Tax mapping by applying the Tax Jurisdiction Codes as Tax Area Lines on the Tax Area interface.
When an invoice flagged as taxable transfers through the integration, the Tax Code applied to that
invoice will be assigned as the Tax Area Code on the Sales Invoice Header in Dynamics NAV and the Tax
Liable flag will be set to true. For all taxable lines on the invoice, the TAXABLE Tax Group Code will be
used for the line in Dynamics NAV. All non-taxable lines on the invoice will use the NONTAXABLE Tax
Group Code. If an invoice coming through from Manage is not marked as taxable, a Tax Area Code will
not be applied to the Sales Invoice Header and the Tax Liable flag will be set to false.

21
GUIDE TO INTEGRATION IMPLEMENTATION
4110 George Road, Tampa, FL 33634 | 813-463-4740 | [email protected]
Receivable Invoices
Receivable Invoices in Manage will be created as Sales Invoices in Dynamics NAV listed on the
Departments > Financial Management > Receivables > Sales Invoices interface.
Credit Memos
Credit Memos in Manage will be created as Sales Credit Memos in Dynamics NAV listed on the
Departments > Financial Management > Receivables > Sales Credit Memos interface.
Expenses
If the Expense: Transfer as Bill option is checked in the Manage Accounting Package setup table,
Expenses will be created as Purchase Invoices in Dynamics NAV listed on the Departments > Financial
Management > Payables > Purchase Invoices interface.
If the Expense: Transfer as Bill option is NOT checked in the Manage Accounting Package setup table,
Expenses will be created as DEFAULT batch Purchase Journal Entries in Dynamics NAV listed on the
Departments > Financial Management > Payables > Purchase Journals interface.
Products
The “Product ID” field on the Procurement > Product Catalog list in Manage will map to the “No.” field
on the Item Card screen in Dynamics NAV. If a Product in Manage does not exist in Dynamics NAV, it will
be created automatically. Please note that integration does not support serialization of products; so, any
serialized products in Manage will be created in Dynamics NAV as non-serialized.

22
GUIDE TO INTEGRATION IMPLEMENTATION
4110 George Road, Tampa, FL 33634 | 813-463-4740 | [email protected]
Item Receipts
Item Receipts in Manage will be created as Purchase Invoices in Dynamics NAV listed on the
Departments > Financial Management > Payables > Purchase Invoices interface.
It is important to note a few points on closing and batching Item Receipts out of Manage:
1. An Item Receipt represents the receipt of an item on a purchase order.
2. Item Receipts can be batched immediately after the item has been received and the line
item on the Manage Purchase Order has been closed.
3. Item Receipts will be broken into multiple Dynamics NAV Purchase Invoices if
a) Line items are received, closed, and batched separately and/or
b) Line items have differing Packing Slip values.
4. Freight will not be accounted for until the Manage Purchase Order itself is closed.
a) Freight will be created as a separate Dynamics NAV Purchase Invoice if the Freight
Packing Slip value does not match the PO Number or any line item Packing Slip values.
5. Since Dynamics NAV Purchase Invoice No. values must be unique, the following outline the
convention used to create unique Purchase Invoice No. values when Item Receipts are split
into multiple Dynamics NAV Purchase Invoices.
a) If the Packing Slip value matches the PO Number, the PO Number will be used.
b) If the Packing Slip value does NOT match the PO Number, the PO Number + Packing Slip
values will be used in the following format: [PO Number]-[Packing Slip]
Therefore, it is necessary to use different Packing Slip values per item if batching line items separately.
Inventory Transfers & Adjustments
Inventory Transfers & Adjustments in Manage will be created as DEFAULT batch Item Journal Entries in
Dynamics NAV listed on the Departments > Warehouse > Inventory > Item Journals interface.
Terms
Billing Terms in Manage will be created as Payment Terms in Dynamics NAV. The “Terms Xref” field in
the System > Setup Tables > Billing Terms screen in Manage will be the “Code” field on the Payment
Terms screen in Dynamics NAV. The “Due Days” field in Manage will be the amount in the “Due Date
Calculation” field + the letter “D” (to indicate days) in Dynamics NAV. The “Description” field in Manage
will be the “Description” field in Dynamics NAV.

23
GUIDE TO INTEGRATION IMPLEMENTATION
4110 George Road, Tampa, FL 33634 | 813-463-4740 | [email protected]
Warehouses
Warehouses in Manage will be mapped to Locations in Dynamics NAV. The “LocationXref” field in the
System > Setup Tables > Warehouse List > Warehouse screen in Manage will be the “Code” field on the
Dynamics NAV Departments > Warehouse > Setup > Locations screen in Dynamics NAV.
24
GUIDE TO INTEGRATION IMPLEMENTATION
4110 George Road, Tampa, FL 33634 | 813-463-4740 | [email protected]
Clearing Transactions If you do not have any transactions in Manage that you have already exported to an accounting
package, you can skip this section.
If you currently have transactions in Manage that you have either manually created in Dynamics NAV (or
otherwise created in accounting software, and therefore have no need to account for them in Dynamics
NAV), you will not want the integration application to export those transactions into Dynamics NAV
again.
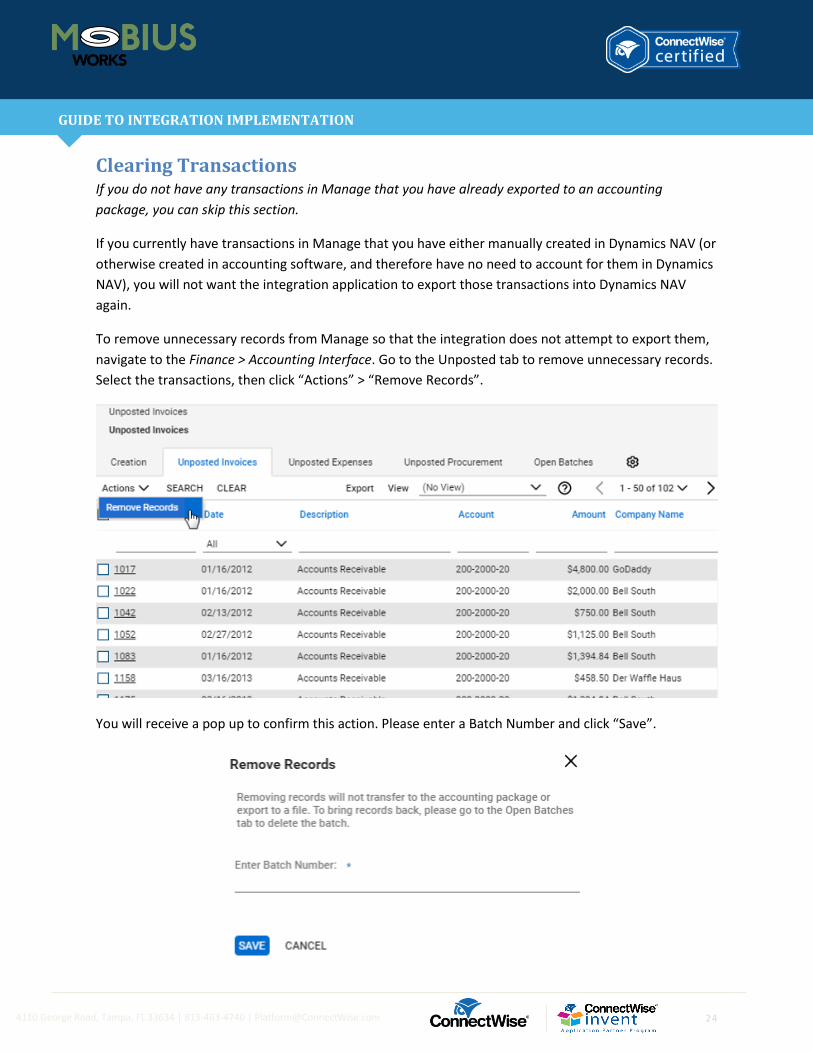
To remove unnecessary records from Manage so that the integration does not attempt to export them,
navigate to the Finance > Accounting Interface. Go to the Unposted tab to remove unnecessary records.
Select the transactions, then click “Actions” > “Remove Records”.
You will receive a pop up to confirm this action. Please enter a Batch Number and click “Save”.

25
GUIDE TO INTEGRATION IMPLEMENTATION
4110 George Road, Tampa, FL 33634 | 813-463-4740 | [email protected]
Installation To install the ConnectWise Manage-Dynamics NAV Integration Application, follow the instructions
below. Note that the steps and screen shots are from a machine that already had the .NET Framework
installed.
1. Go to the installation page: http://deployment.mobiusworks.com/DynamicsNAVIntegration
2. Click Install.

26
GUIDE TO INTEGRATION IMPLEMENTATION
4110 George Road, Tampa, FL 33634 | 813-463-4740 | [email protected]
The installation creates a ConnectWise Manage-Dynamics NAV Integration Application desktop icon.
A Mobius Works, LLC folder is created in the Start menu where ConnectWise Manage-Dynamics NAV
Integration Application is placed.
The application will also open immediately after installation. You will be required to activate the
integration with the license key file. Click “Select License File” to install your license file and activate the
integration.
If you do not have a license file, please contact your ConnectWise Account Manager at

27
GUIDE TO INTEGRATION IMPLEMENTATION
4110 George Road, Tampa, FL 33634 | 813-463-4740 | [email protected]
Using the Application
Logging In The first time you run the application, you will be prompted for both your Dynamics NAV and Manage
credentials. They will be retained on the Login screen for your convenience when you run the
application the next time.
1. Enter the following Dynamics NAV information in the Login screen:
• OData URL: URL representing the root of the OData web service.
• Company ID: This is the Dynamics NAV company database.
• Credential Type:
• Username & Password: This is a username and password for an account that has sufficient privileges in Dynamics NAV. If using Windows Authentication as the Credential Type, Username & Password are not required. See Dynamics NAV Configuration.
2. Enter the following ConnectWise Manage information in the Login screen:
• Site – The domain name of the Manage site. For example, “connectwise.mycompany.com”.
• Company ID – Your company database ID as assigned by Manage
• Username & Password: The login credentials of the member that you set up in the ConnectWise Manage Configuration section.
3. Save Password – Check this box if you would like your Dynamics NAV and Manage passwords saved for the next time you run the application.
4. Click Login.
Your passwords will be encrypted using Window’s built-in cryptography system. Therefore, the
saved password will only be allowed to be used by the currently logged in user on the same
machine.
28
GUIDE TO INTEGRATION IMPLEMENTATION
4110 George Road, Tampa, FL 33634 | 813-463-4740 | [email protected]
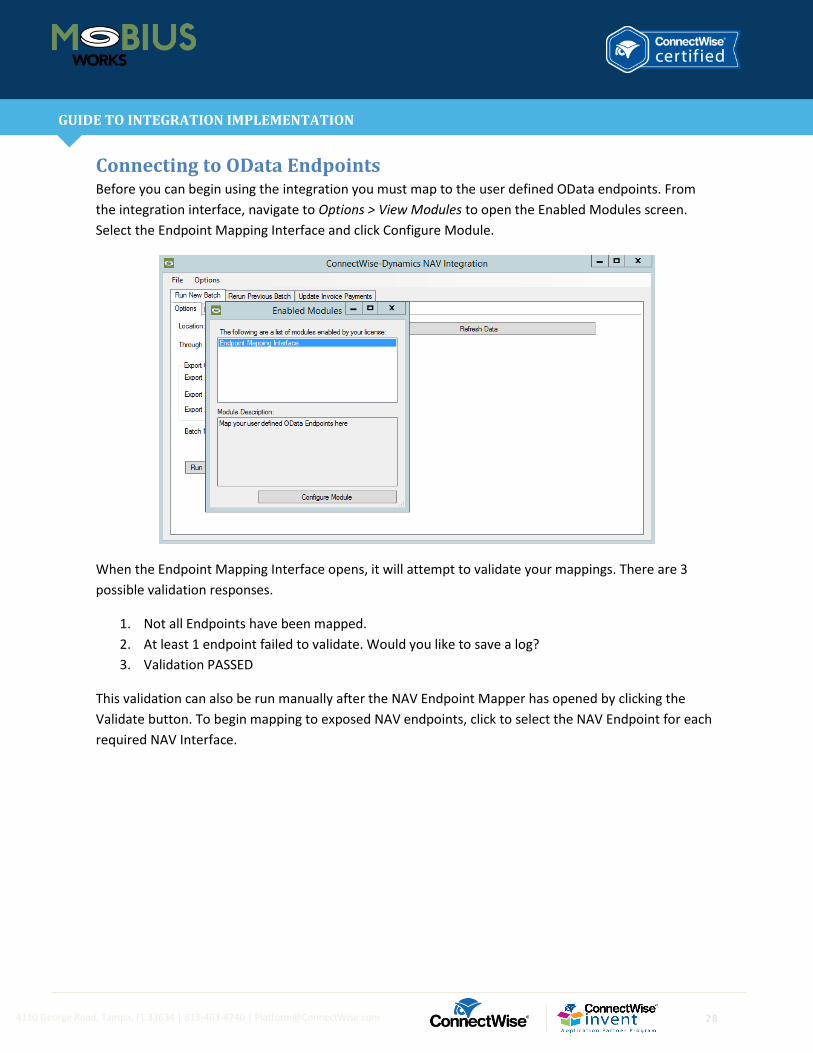
Connecting to OData Endpoints Before you can begin using the integration you must map to the user defined OData endpoints. From
the integration interface, navigate to Options > View Modules to open the Enabled Modules screen.
Select the Endpoint Mapping Interface and click Configure Module.
When the Endpoint Mapping Interface opens, it will attempt to validate your mappings. There are 3
possible validation responses.
1. Not all Endpoints have been mapped.
2. At least 1 endpoint failed to validate. Would you like to save a log?
3. Validation PASSED
This validation can also be run manually after the NAV Endpoint Mapper has opened by clicking the
Validate button. To begin mapping to exposed NAV endpoints, click to select the NAV Endpoint for each
required NAV Interface.

29
GUIDE TO INTEGRATION IMPLEMENTATION
4110 George Road, Tampa, FL 33634 | 813-463-4740 | [email protected]
As you populate the NAV Endpoint mappings, validation logic will run and check off the Valid? checkbox
for each row. If a row does not check the Valid? checkbox, you can use the Validate button to generate a
log containing details. In this case response #2 will display providing the option to save a log. Review of
this log will indicate why the validation for a particular endpoint may have failed. Generally, this occurs
when a field is missing from the endpoint’s Page object. See Additional OData Configuration for details
on adding missing fields to an endpoint Page.
After completing the Endpoint mappings, it is recommended to use the Export Mappings button to store
your defined mappings. This allows for quickly importing your mappings back into the integration using
the Import Mappings button. This is useful in the event that the integration needs to be installed on a
new workstation or reinstalled for any reason. We recommend storing your mappings.json export in the
same location as the integration’s activation license.

30
GUIDE TO INTEGRATION IMPLEMENTATION
4110 George Road, Tampa, FL 33634 | 813-463-4740 | [email protected]
The Main Screen The following is a guide of the various parts of the Main Screen.
1. File Menu: The file menu gives you the ability to exit the application, install a new license, or
logout and return to the login form.
2. Run New Batch Tab: This tab allows you to select transactions and options needed to run a
batch, which will export a list of transactions from Manage and import them into Dynamics NAV.
3. Rerun Previous Batch: This tab allows you to select a batch that was previously run. This is
useful for running a batch that successfully imported to Dynamics NAV, but for reasons (such as
a backup restore on the Dynamics NAV system), needs to be run again.
4. Update Invoice Payments: This will look for updated balances on Accounts Receivable invoices
in Dynamics NAV and update the corresponding Manage invoice with the amount that has been
paid.
1
2 3 4
31
GUIDE TO INTEGRATION IMPLEMENTATION
4110 George Road, Tampa, FL 33634 | 813-463-4740 | [email protected]
Running a New Batch
Setting up the Batch
The following explains how to use the integration application to run a new batch. This operation will
export transactions that you select from Manage and import them into Dynamics NAV. When the
operation finishes, a new “Batch” is created in Manage that remembers the transactions that were part
of the batch.
1. Select Location – If you are going to import records from a specific office location, choose the
location from the dropdown box. To import records from all available locations, leave the field
blank. If you have a location that is not present in the combo box, then that location does not
have any transactions to export.
2. Select Through Date – If you wish to only select transactions that occurred up to a certain date,
select that date as the “through date”. Transactions that occurred after the “Through Date” will
not show as transactions that you can select for the batch.
3. Select Export Options – Select the various options that will control the export. These options are
described below:
a. Export Invoices – Check this box to have AR Invoices exported as part of the batch.
Leaving this box unchecked means that AR Invoices will not be exported as part of the
batch.
b. Invoice - This dropdown allows you to select the level of detail that is shown on an
invoice line. For example, the invoice line for a Service Ticket in Manage might show in
its description “Ticket #1234 – Set up computer for new hire”. With “Default” selected,
this invoice line will simply say “Service.” The “Condensed” option will provide brief
details and the “Detailed” option will provide extensive details.
c. Export Expenses – Check this box to have reimbursable exported as part of the batch.
d. Export Inventory – Check this box to have inventory transactions (Item Receipts,
Inventory Adjustments, and Inventory Transfers) included as part of the batch.
You may sometimes find that a transaction you expected to be listed is not because of a missed step
somewhere along the way (such as an invoice never having been marked as “Closed”). After performing
this step, you can press “Refresh Data” in order for that transaction to show up in the list of
transactions.
Note that transactions in Manage are set up to use the accounts as they existed at the time the
transaction was closed. For example, if the Manage GL Setup Table has 1100 set for Accounts
Receivable, then the invoice will be tagged with 1100 when it is closed. If you then change the
Accounts Receivable account in the Manage GL Setup Table to 1200, the invoice will STILL use the
old account, 1100. To update a closed invoice to use the new account, set the invoice to an “Open”
status, save the change, then set it back to a “Closed” status, and save again. This will effectively
“reset” the GL accounts against which the invoice is set.

32
GUIDE TO INTEGRATION IMPLEMENTATION
4110 George Road, Tampa, FL 33634 | 813-463-4740 | [email protected]
Selecting Specific Invoices
By clicking on the “Invoices” tab, you can explicitly control which invoices you want to include in the
batch.
Checking the checkbox in the “Include” column will cause the transaction to be included in the batch.
Conversely, unchecking the checkbox in the “Include” column will cause the transaction to NOT be
included in the batch. You may also click the “Select All” or “Deselect All” buttons to check or uncheck all
transactions, respectively.
33
GUIDE TO INTEGRATION IMPLEMENTATION
4110 George Road, Tampa, FL 33634 | 813-463-4740 | [email protected]
Selecting Specific Expenses
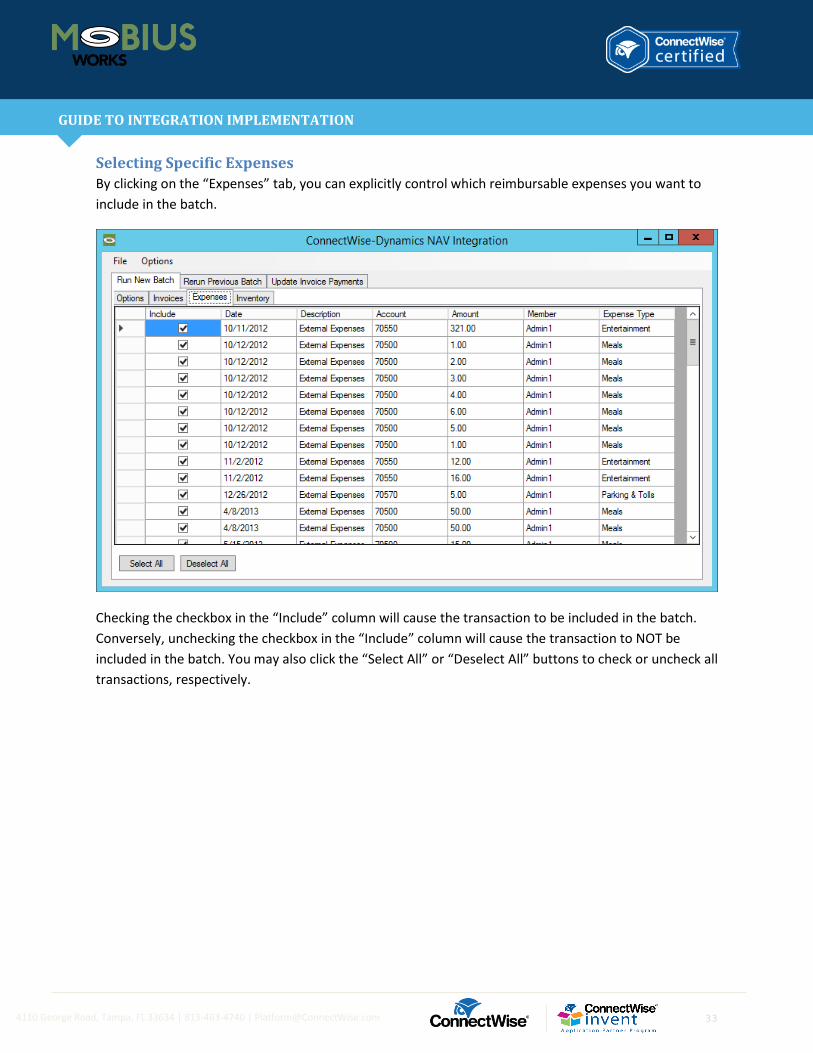
By clicking on the “Expenses” tab, you can explicitly control which reimbursable expenses you want to
include in the batch.
Checking the checkbox in the “Include” column will cause the transaction to be included in the batch.
Conversely, unchecking the checkbox in the “Include” column will cause the transaction to NOT be
included in the batch. You may also click the “Select All” or “Deselect All” buttons to check or uncheck all
transactions, respectively.

34
GUIDE TO INTEGRATION IMPLEMENTATION
4110 George Road, Tampa, FL 33634 | 813-463-4740 | [email protected]
Selecting Specific Inventory Transactions
By clicking on the “Inventory” tab, you can explicitly control which Item Receipts, Inventory
Adjustments, and/or Inventory Transfers you want to include in the batch.
Checking the checkbox in the “Include” column will cause the transaction to be included in the batch.
Conversely, unchecking the checkbox in the “Include” column will cause the transaction to NOT be
included in the batch. You may also click the “Select All” or “Deselect All” buttons to check or uncheck all
transactions, respectively.
Select a Batch ID
Once you select the transactions that you want to export in the batch, you must pick a Batch Number.
Manage recommends that you use a separate batch for Invoice, Expense, and Inventory transactions. In
order to ensure that your batch numbers stay unique and easy to understand, a naming convention is
also recommended. A common naming convention might be the date, initials of the person running the
batch, and the type of batch being run. For example, if John Doe were to run three batches on January
1st of 2013, he might run the integration three times with the following batch numbers:
• 20130101JD-I (Used for all invoice transactions)
• 20130101JD-E (Used for all reimbursable expense transactions)
• 20130101JD-P (Used for all inventory transactions. “P” stands for “Procurement”)
Determine which Batch Number you wish to use and type it into the “Batch Number” field.
35
GUIDE TO INTEGRATION IMPLEMENTATION
4110 George Road, Tampa, FL 33634 | 813-463-4740 | [email protected]
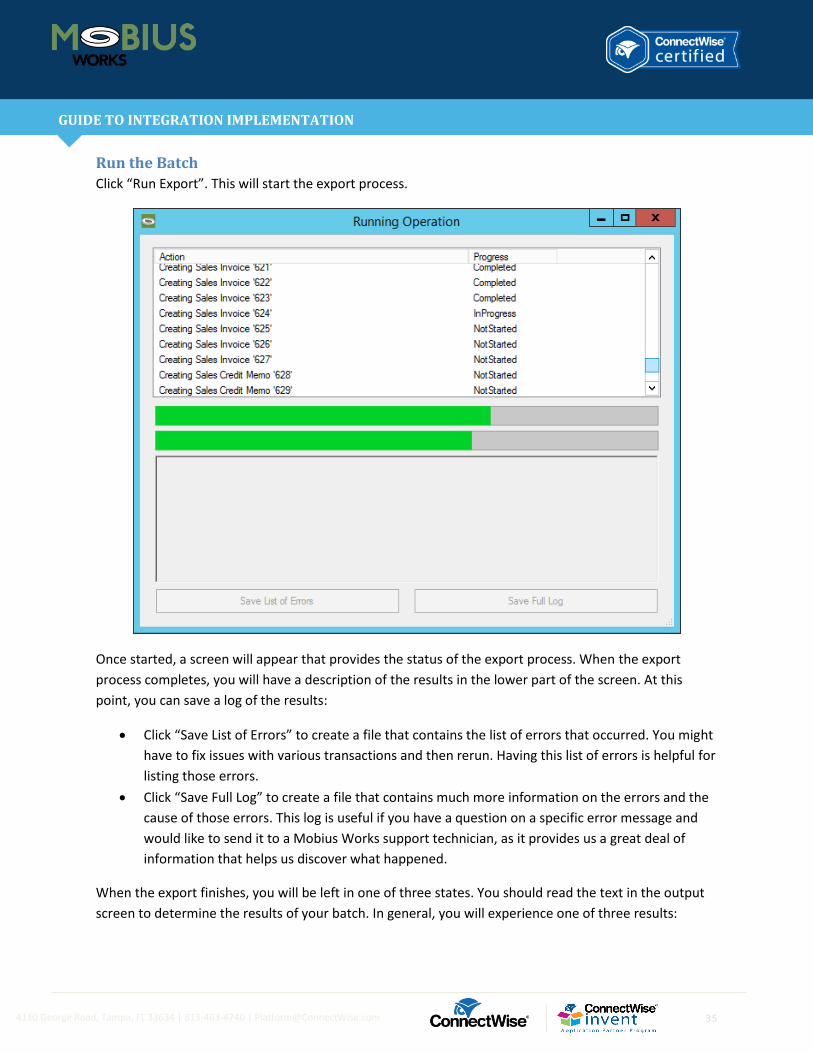
Run the Batch
Click “Run Export”. This will start the export process.
Once started, a screen will appear that provides the status of the export process. When the export
process completes, you will have a description of the results in the lower part of the screen. At this
point, you can save a log of the results:
• Click “Save List of Errors” to create a file that contains the list of errors that occurred. You might
have to fix issues with various transactions and then rerun. Having this list of errors is helpful for
listing those errors.
• Click “Save Full Log” to create a file that contains much more information on the errors and the
cause of those errors. This log is useful if you have a question on a specific error message and
would like to send it to a Mobius Works support technician, as it provides us a great deal of
information that helps us discover what happened.
When the export finishes, you will be left in one of three states. You should read the text in the output
screen to determine the results of your batch. In general, you will experience one of three results:

36
GUIDE TO INTEGRATION IMPLEMENTATION
4110 George Road, Tampa, FL 33634 | 813-463-4740 | [email protected]
1. The batch failed
In this case, an error occurred before any transactions started to be imported into Dynamics NAV. These
errors might be as simple as not being able to connect to either Manage or Dynamics NAV.
Additionally, this integration performs a number of validation checks before starting to push
transactions to Dynamics NAV. An example validation is to check to make sure that a Vendor has been
mapped successfully and the Vendor ID it was mapped to exists in the Dynamics NAV system. If any such
validations fail, the batch will fail entirely.
You should fix whatever the error messages indicate and try to run the batch again. Because no
transactions were exported, just as if you had never run the batch.
2. The batch completed successfully
In this case, the batch was run successfully. All selected transactions were exported to Dynamics NAV
and no errors occurred. Additionally, Manage was updated with the information of all the transactions,
creating a new “Batch” with the Batch ID provided that stores the list of transactions that were selected.
These transactions will no longer show in the integration screen since they are considered to have been
transferred to Dynamics NAV.
3. The batch completed, but some transactions contained errors
In this case, all the validation passed, and at least one transaction was successfully imported into
Dynamics NAV. However, there were some transactions that failed. In this case, a batch is still created
with the transactions that did successfully transfer. Since a batch was created for the successful
transactions, another batch will need to be created once the unsuccessful transactions are corrected
based on the suggestion(s) in the error message.
For example, assume that John Doe ran batch “20130101JD-I”, which pushed 25 successful invoices to
Dynamics NAV, but failed on three invoices. John should correct the issues described by the error
messages, and then create another batch for these last three. This new batch number could be called
“20130101JD-I-1”
Validating a Batch Although the integration program itself performs a number of validations (such as checking to make
sure that an account specified on a transaction is an account in Dynamics NAV), it is a good idea to check
some of the data to ensure that things have worked reliably.

37
GUIDE TO INTEGRATION IMPLEMENTATION
4110 George Road, Tampa, FL 33634 | 813-463-4740 | [email protected]
Invoices
To verify invoices in Dynamics NAV, navigate to Home > Sales Invoices:

38
GUIDE TO INTEGRATION IMPLEMENTATION
4110 George Road, Tampa, FL 33634 | 813-463-4740 | [email protected]
Expenses
With Transfer as Bill Enabled
To verify expenses in Dynamics NAV, navigate to Home > Sales Credit Memos > Purchase Invoices:
39
GUIDE TO INTEGRATION IMPLEMENTATION
4110 George Road, Tampa, FL 33634 | 813-463-4740 | [email protected]
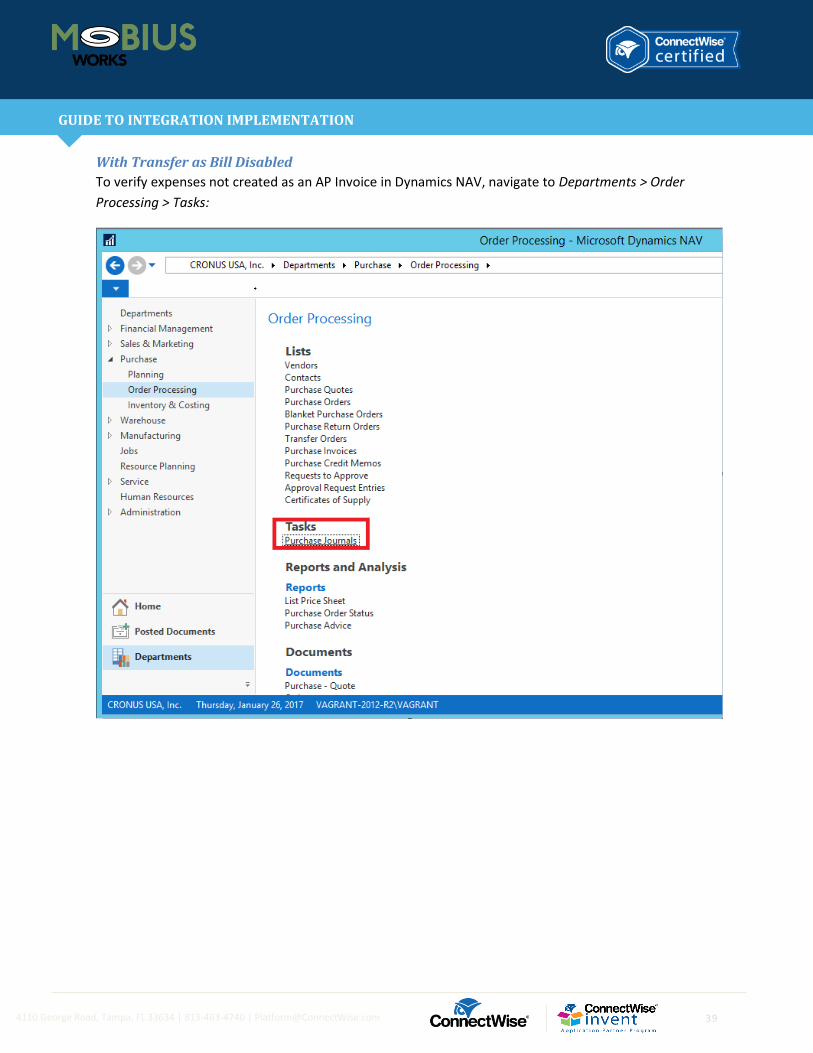
With Transfer as Bill Disabled
To verify expenses not created as an AP Invoice in Dynamics NAV, navigate to Departments > Order
Processing > Tasks:

40
GUIDE TO INTEGRATION IMPLEMENTATION
4110 George Road, Tampa, FL 33634 | 813-463-4740 | [email protected]
Inventory
To verify inventory in Dynamics NAV, navigate to Home > Sales Credit Memos > Items:

41
GUIDE TO INTEGRATION IMPLEMENTATION
4110 George Road, Tampa, FL 33634 | 813-463-4740 | [email protected]
Inventory Adjustments & Transfers
To verify inventory adjustments and transfers in Dynamics NAV, navigate to Home > Sales Credit Memos
> Item Journals:

42
GUIDE TO INTEGRATION IMPLEMENTATION
4110 George Road, Tampa, FL 33634 | 813-463-4740 | [email protected]
Credit Memos
To verify credit memos in Dynamics NAV, navigate to Home >Sales Credit Memos:

43
GUIDE TO INTEGRATION IMPLEMENTATION
4110 George Road, Tampa, FL 33634 | 813-463-4740 | [email protected]
Rerunning an Existing Batch There might be a rare case where you have previously run a batch, and you wish to run that batch
against your Dynamics NAV software again. For example, you might have run a batch successfully, only
to have the Dynamics NAV software require to be restored from a backup, thus losing all of the changes.
In this case, you’d want to rerun the batch.
One way to do this would be to use the Accounting Interface screen in Manage to delete the batch, but
this means that you would have to carefully select the transactions again, which could be error-prone.
Another possibility is to click the “Rerun Existing Batch” tab in the integration program. In this tab, you
would type in the Batch ID, then click “Run” rerun the batch. The batch is then rerun against the
Dynamics NAV database.
WARNING: While this can be useful, this feature can be used to duplicate transactions in the Dynamics
NAV system. This could occur if the transactions created in the Dynamics NAV system, as a result of the
first run of the batch, still exist in the Dynamics NAV system when the batch is rerun! Use caution when
rerunning batches!
44
GUIDE TO INTEGRATION IMPLEMENTATION
4110 George Road, Tampa, FL 33634 | 813-463-4740 | [email protected]
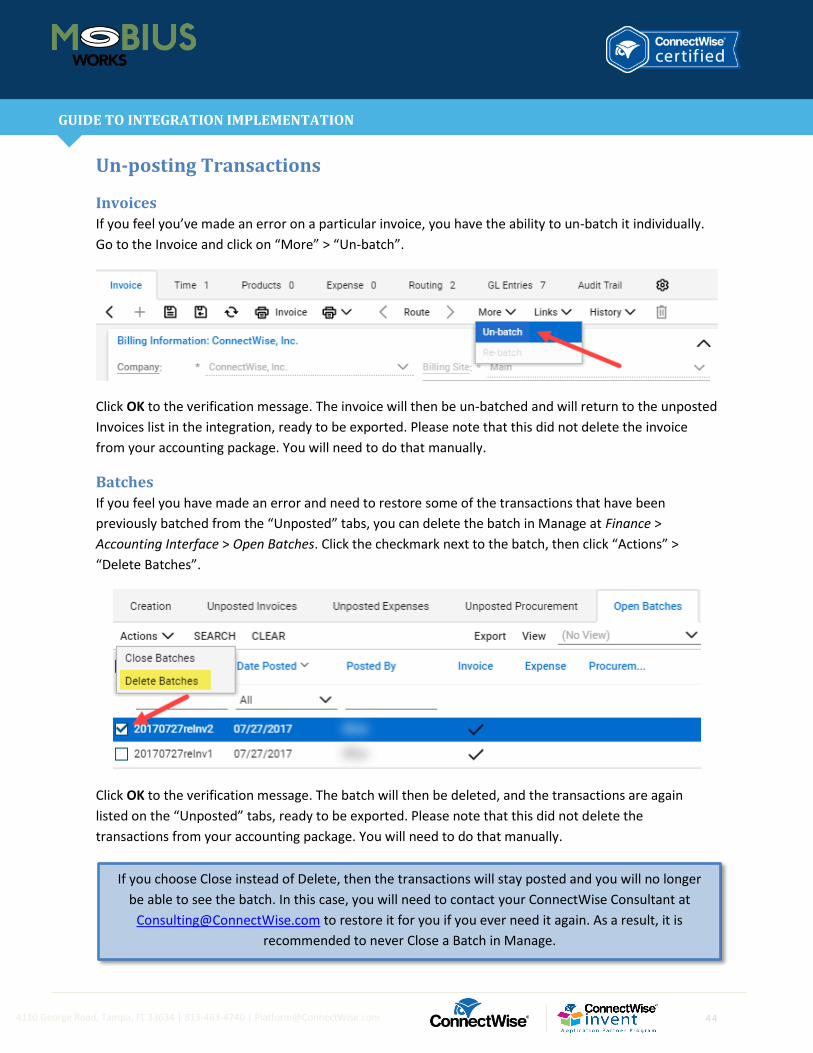
Un-posting Transactions
Invoices
If you feel you’ve made an error on a particular invoice, you have the ability to un-batch it individually.
Go to the Invoice and click on “More” > “Un-batch”.
Click OK to the verification message. The invoice will then be un-batched and will return to the unposted
Invoices list in the integration, ready to be exported. Please note that this did not delete the invoice
from your accounting package. You will need to do that manually.
Batches
If you feel you have made an error and need to restore some of the transactions that have been
previously batched from the “Unposted” tabs, you can delete the batch in Manage at Finance >
Accounting Interface > Open Batches. Click the checkmark next to the batch, then click “Actions” >
“Delete Batches”.
Click OK to the verification message. The batch will then be deleted, and the transactions are again
listed on the “Unposted” tabs, ready to be exported. Please note that this did not delete the
transactions from your accounting package. You will need to do that manually.
If you choose Close instead of Delete, then the transactions will stay posted and you will no longer
be able to see the batch. In this case, you will need to contact your ConnectWise Consultant at
[email protected] to restore it for you if you ever need it again. As a result, it is
recommended to never Close a Batch in Manage.

45
GUIDE TO INTEGRATION IMPLEMENTATION
4110 George Road, Tampa, FL 33634 | 813-463-4740 | [email protected]
Synchronizing Invoice Payments Your typical workflow will include creating invoices in Manage, and exporting those invoices to
Dynamics NAV. However, when you receive payments from customers, you will use Dynamics NAV to
record that the payment was received. Since it is useful to be able to look at an invoice in Manage and
know if that invoice has been paid without needing to access Dynamics NAV, the integration program
allows you to synchronize payment updates so that Manage shows you what payments have been made
to invoices. Use the following steps to accomplish this:
1. At the integration main form, click on the “Update Invoice Payments” tab.
2. Select the “Start Date”. You will have the following options for a Start Date:
• Last Successful Run: Will synchronize all invoices that were updated with new payment info in
Dynamics NAV since the last time the current user ran a synchronization on the current
computer.
• Past Week: Will synchronize all invoices that were updated with new payment info in Dynamics
NAV in the past 7 days.
• Past Two Weeks: Will synchronize all invoices that were updated with new payment info in
Dynamics NAV in the past 14 days.
• Past Month: Will synchronize all invoices that were updated with new payment info in Dynamics
NAV since the current day in the past month (e.g., if today is the 10th of April, all invoices
updated on March 10th and later will be synced).
• Custom Date: Will synchronize all invoices that were updated with new payment info in
Dynamics NAV since a date of your choosing up until today.
3. Click “Run Sync”.
All invoices that were updated on or after the Start Date will have their payment info updated in
Manage. This info includes the total amount that has been paid, and the date that the invoice was paid
46
GUIDE TO INTEGRATION IMPLEMENTATION
4110 George Road, Tampa, FL 33634 | 813-463-4740 | [email protected]
in full. You can view these results in Manage “Invoice Search” screen, by accessing Finance -> Invoice
Search. Each invoice will have a “Paid Amount” and “Date Paid” field. Note that the “Date Paid” field will
only be filled with a date if the invoice was paid in full.
Note: At this time the integration has no way to distinguish invoices from Manage generated by the
integration and invoices created manually in Dynamics NAV that do not correspond to an invoice in
Manage. It is possible during payment sync that the integration will find payments made against invoices
that do not exist in Manage. If this happens, you will receive errors stating an invoice(s) could not be
found in Manage. While this may be disconcerting, the payment sync action will continue to run and
update invoices that do exist in Manage.
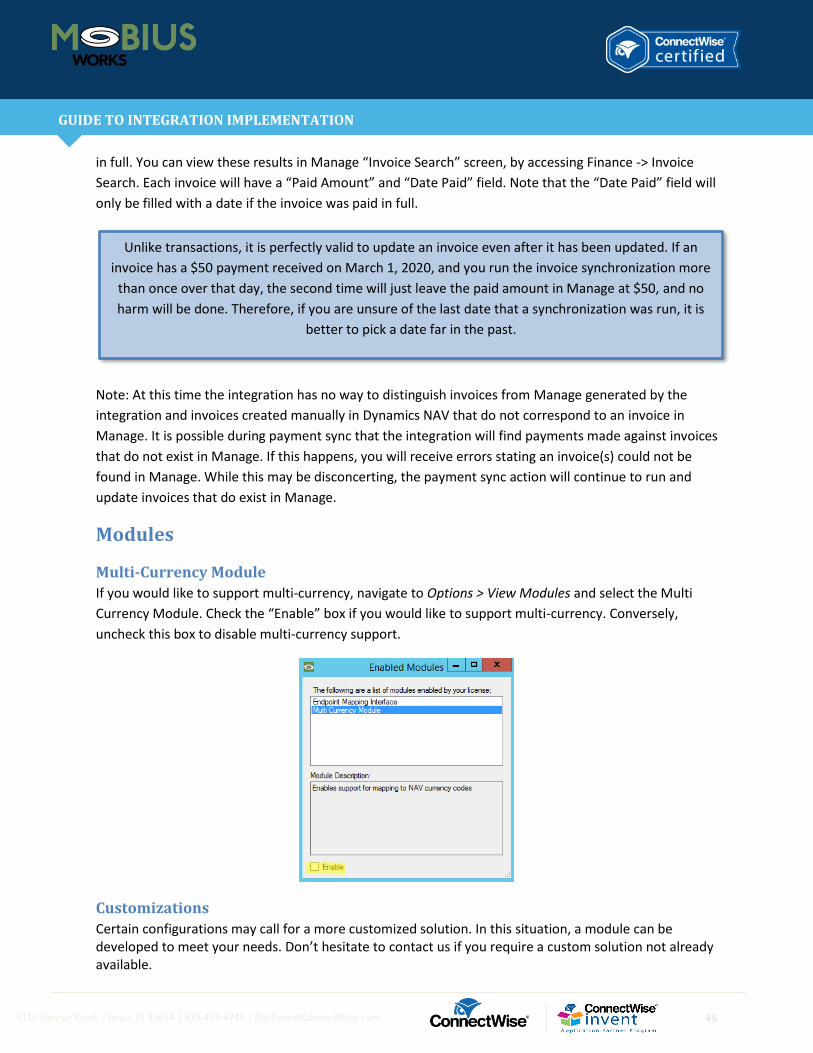
Modules
Multi-Currency Module
If you would like to support multi-currency, navigate to Options > View Modules and select the Multi
Currency Module. Check the “Enable” box if you would like to support multi-currency. Conversely,
uncheck this box to disable multi-currency support.
Customizations
Certain configurations may call for a more customized solution. In this situation, a module can be developed to meet your needs. Don’t hesitate to contact us if you require a custom solution not already available.
Unlike transactions, it is perfectly valid to update an invoice even after it has been updated. If an
invoice has a $50 payment received on March 1, 2020, and you run the invoice synchronization more
than once over that day, the second time will just leave the paid amount in Manage at $50, and no
harm will be done. Therefore, if you are unsure of the last date that a synchronization was run, it is
better to pick a date far in the past.