contract management 7 - city university of new york
TRANSCRIPT

PUBLIC SECTORCONTRACT MANAGEMENT

Contract Management 2
NOTICE
SUNGARD PUBLIC SECTOR BI-TECH LLC MAKES NO REPRESENTATIONS OR WARRANTIES, ORAL OR WRITTEN, EXPRESS OR IMPLIED, WITH RESPECT TO THE SYSTEM, SERVICES, SOFTWARE, DOCUMENTATION, OPERATING ENVIRONMENT, ANY OTHER SOFTWARE OR SERVICES PROVIDED HEREUNDER OR ANY OTHER MATTER ADDRESSED HEREUNDER, AND SUNGARD PUBLIC SECTOR BI-TECH LLC EXPLICITLY DISCLAIMS ALL OTHER WARRANTIES, EXPRESS OR IMPLIED, INCLUDING THE IMPLIED WARRANTIES OF TITLE, MERCHANTABILITY AND FITNESS FOR A SPECIFIC PURPOSE. SunGard Public Sector Bi-Tech LLC shall not be liable for errors contained herein or for incidental or consequential damages in connection with the furnishing, performance or use of this material. This documentation is proprietary and confidential information of SunGard Public Sector Bi-Tech LLC. Copying, reproduction or distribution is strictly prohibited. All rights reserved.
Copyright © 2008 by
SunGard Public Sector Bi-Tech LLC
890 Fortress Street
Chico, CA 95973
Should you wish to make a comment, or if you find an error in the text, please contact us via email:

Contract Management 3
Document Change Log
Version Date Change Description
7.9 February 2008 7.9 Version
Contract Management 4
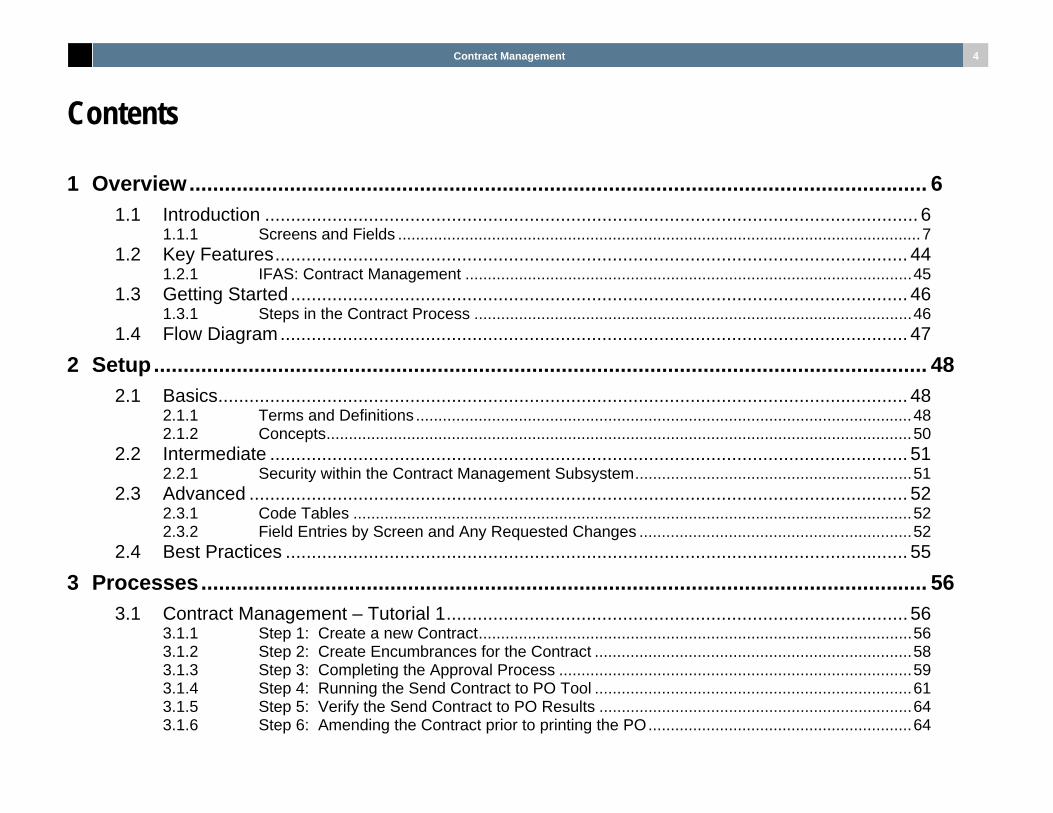
Contents
1 Overview............................................................................................................................. 6
1.1 Introduction .............................................................................................................................. 6 1.1.1 Screens and Fields .....................................................................................................................7
1.2 Key Features.......................................................................................................................... 44 1.2.1 IFAS: Contract Management ....................................................................................................45
1.3 Getting Started ....................................................................................................................... 46 1.3.1 Steps in the Contract Process ..................................................................................................46
1.4 Flow Diagram......................................................................................................................... 47
2 Setup................................................................................................................................... 48
2.1 Basics..................................................................................................................................... 48 2.1.1 Terms and Definitions ...............................................................................................................48 2.1.2 Concepts...................................................................................................................................50
2.2 Intermediate ........................................................................................................................... 51 2.2.1 Security within the Contract Management Subsystem..............................................................51
2.3 Advanced ............................................................................................................................... 52 2.3.1 Code Tables .............................................................................................................................52 2.3.2 Field Entries by Screen and Any Requested Changes .............................................................52
2.4 Best Practices ........................................................................................................................ 55
3 Processes........................................................................................................................... 56
3.1 Contract Management – Tutorial 1......................................................................................... 56 3.1.1 Step 1: Create a new Contract.................................................................................................56 3.1.2 Step 2: Create Encumbrances for the Contract .......................................................................58 3.1.3 Step 3: Completing the Approval Process ...............................................................................59 3.1.4 Step 4: Running the Send Contract to PO Tool .......................................................................61 3.1.5 Step 5: Verify the Send Contract to PO Results ......................................................................64 3.1.6 Step 6: Amending the Contract prior to printing the PO...........................................................64
Contract Management 5
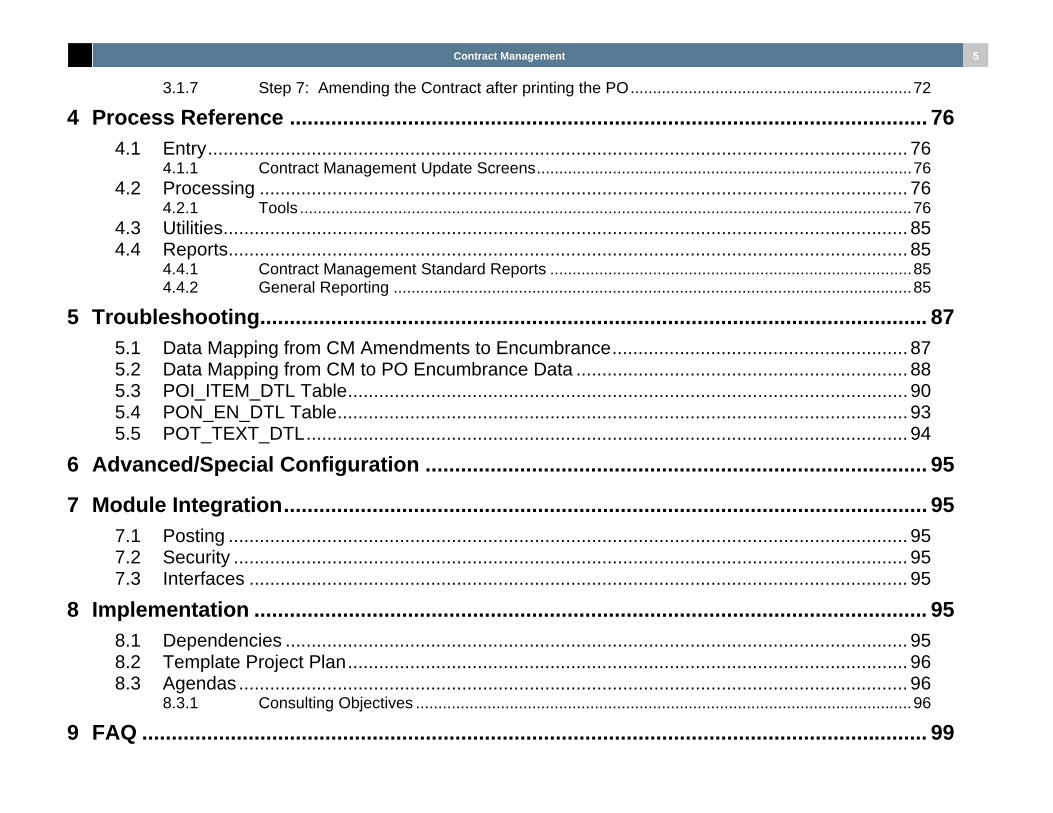
3.1.7 Step 7: Amending the Contract after printing the PO...............................................................72
4 Process Reference ............................................................................................................ 76
4.1 Entry....................................................................................................................................... 76 4.1.1 Contract Management Update Screens....................................................................................76
4.2 Processing ............................................................................................................................. 76 4.2.1 Tools .........................................................................................................................................76
4.3 Utilities.................................................................................................................................... 85 4.4 Reports................................................................................................................................... 85
4.4.1 Contract Management Standard Reports .................................................................................85 4.4.2 General Reporting ....................................................................................................................85
5 Troubleshooting................................................................................................................. 87
5.1 Data Mapping from CM Amendments to Encumbrance......................................................... 87 5.2 Data Mapping from CM to PO Encumbrance Data ................................................................ 88 5.3 POI_ITEM_DTL Table............................................................................................................ 90 5.4 PON_EN_DTL Table.............................................................................................................. 93 5.5 POT_TEXT_DTL.................................................................................................................... 94
6 Advanced/Special Configuration ..................................................................................... 95
7 Module Integration............................................................................................................. 95
7.1 Posting ................................................................................................................................... 95 7.2 Security .................................................................................................................................. 95 7.3 Interfaces ............................................................................................................................... 95
8 Implementation .................................................................................................................. 95
8.1 Dependencies ........................................................................................................................ 95 8.2 Template Project Plan............................................................................................................ 96 8.3 Agendas ................................................................................................................................. 96
8.3.1 Consulting Objectives ...............................................................................................................96
9 FAQ ..................................................................................................................................... 99

Contract Management 6
1 Overview
1.1 Introduction The use of the Contract Management subsystem is for internal tracking of the details related to a particular contract. Maintained within this subsystem are the tasks and cycle of the scope of work.When a specific type of work is to be completed by an outside contractor there is a need for review of anticipated expense versus actual expense, and the documentation related to the contractor’s credentials. Typically, each type of contract is detailed on the screens as the contractor is considered for the project. The actual expense and encumbered detail is maintained in the General Ledger/Job Ledger and Encumbrance databases.

Contract Management 7
1.1.1 Screens and Fields
CMUPCM Screen - Contract Management

Contract Management 8
Main Header Section Contract No:
The Contract Number is the key to the entire Contract Management subsystem. It uniquely identifies a Contract. When adding a new Contract in Add Mode, the user has two options for filling the Contract Number field, as follows:
a. The next-sequential Contract Number can be auto-generated from a seed value (Ctrl-T or click on the elipse ( ) to the right of the field). See the Setup section of this guide for details on how to set up a Contract Number Seed.
b. The Contract Number can be manually entered.
Regardless of how the Contract Number is created, it must be unique and is required. Contract Number is read-only in Browse Mode.
Status:
This field holds the current Status of this Contract. There are four (4) statuses that a Contract can have, as follows:
a.
NW This is a brand new Contract - the original encumbrances for this Contract have not been approved and the Contract has not yet been sent to Purchasing or pre-encumbered.
b.
AW The original encumbrances for this Contract have been approved but have not been sent to Purchasing or pre-encmbered.
c.
AS The original encumbrances for this Contract have been approved, sent to Purchasing and pre-encumbered. The original encumbrances for this Contract can no longer be modified. The Amendments tab must be used to add additional funding to this Contract.
d.
CL This Contract is complete and closed. When the PO related to this Contract is closed or the final payment is made on this contract in AP, the status will be changed by the system to CL.
The Status field is read-only. This field is maintained by the EN to PO tool and Workflow. This field is required.
Contractor ID:

Contract Management 9
Enter the ID of the MAIN Contractor associated with this Contract. This field validates to the Person Entity (PE) subsystem. This field is required.
Desc:
Enter a short description of this Contract in this field. This field is required.
PR No:
The first time that the EN to PO tool is run to create a Purchase Request in the Purchasing subsystem (and create the pre-encumbrances in the Encumbrance subsystem), the PR Number of that Purchase Request is written here. This field is maintained by the EN to PO tool and represents the original Purchase Request Number.
Type:
This field is used to hold the Contract Type. The Contract Type codes are client-specific and are defined in the CMUPCD screen with Code ID 'TYPE'. This field is required.
Acceptance Dt:
This optional field is typically used to hold the day a governing body/board approved the funding of this Contract or the date the Contractor agreed to do accept this Contract.
Original Amt:
Enter the original amount of the Contract in this field. The original encumbrances that get entered into the Encumbrance Tab will have to add up exactly to this amount. The status of the Contract will not be advanced to AW via Workflow until and unless the Original Contract Amount equals the total of the original encumbrances.
Manager:
This field is used to hold the name of the Manager responsible for the management of this Contract. Manager codes are client-specific and are defined in the CMUPCD screen with Code ID 'AREA'. This field is required.
Begin Dt:
This field is used to hold the Begin Date of this Contract. This field is required.

Contract Management 10
Amendment Total:
This field is filled by the EN to PO tool with the sum of all of the approved and encumbered Amendments associated with this Contract. This field is read-only.
Assoc Cont:
This optional field is used to hold an Associated Contract. Typically, this field is used on secondary contracts to identify the MASTER contract associated with it.
Current End Dt:
When a Contract is first entered, this field holds the original End Date of the Contract. After its original entry, the Contract's end date can be updated by Amendments via the New End Dt field on the Amendments Tab. The EN to PO tool updates this date with the New End Dt field (if filled) on the most recently-entered amendments for this Contract.
Current Maximum Total:
This field is updated by the EN to PO tool and represents the sum of Original Amt and Amendment Total fields.
Amendments:
This field is filled interactively by the system with the count of all of the approved and encumbered amendments that exist for this Contract. See the Amendments and Encumbrance Tabs for more detail.
Last Amended Dt:
This is the date of the last time this Contract was amended. Only those amendments that have been approved and processed via the EN to PO tool are considered.
Contingency Amt:
This optional field can be used to enter any contingency amounts. The amount entered in this field IS NOT encumbered. If the client needs this amount to be encumbered, they need to include it in the Original Amount of this Contract.
RFP/BID No:
This is an optional field that can be used to hold the identifier of any RFP and/or BID that was used in the creation of this Contract.

Contract Management 11
Relief of Maintenance:
If there is a warranty on the products or services associated with this Contract, then this field typically holds the date that this warranty expires.
Encumbrance Total:
This field is maintained by the system and holds the total of all of the encumbrances held in the Encumbrance Tab that have been processed by the EN to PO tool.
Contract Details Tab:
Cycle ID:
This field holds the ID, if any, of the Cycle used to track the progress of the Contract in the Track Tab of the CMUPTK screen.
DBE Actual / DBE Goal:
DBE stands for Disadvantaged Business Enterprise. In some cases, Contracts must follow a DBE Program and provide assistance to minorities, women, and other socially and economically disadvantaged individuals to enter certain industries. In this situation, typically a certain percentage of the funds associated with the Contract must be paid to a Sub Contractor that falls into one of the DBE categories. Enter the percent of funds that need to be paid to Sub Contractors falling into one of the DBE categories. DBE Actual is calculated by the system based on information entered in the Sub Contractor Tab of the CMUPTK screen and represents the actual percent being paid to Sub Contractors falling into one of the DBE categories.
Percent Complete / Percent Method To Use fields:
Method Meaning
<none> None – no percent method is specified.
M Manual – the user enters the percent complete.
V Value – system calculated as dollars paid / total contract value.
D Task Days – system calculated as days completed (according to cm_track) / total days in cm_track.

Contract Management 12
T Tasks – system calculated as number of completed tasks in cm_track / total number of tasks in cm_track.
C Calendar – system calculated as number of days since start of contract / total days in contract (start date to end date). This may need a tool or something to trigger recalculation.
Security Cd:
This optional field provides the security code that is used by the Send to PO Utility.
Comments:
This is an optional, free-form text field used to hold any comments about this Contract.

Contract Management 13
Encumbrances Tab:
Item No:

Contract Management 14
The Item Number is used to uniquely identify this encumbrance item from all of the other encumbrance items associated with this Contract. When a Purchase Request is created by the EN to PO tool, this will become the Item Number on the Purchase Request detail. The EN to PO tool will combine Amendments with Encumbrances based on Item Number. This field is required.
Fiscal Year:
This is the Fiscal Year in which this encumbrance will be effective.
Request Dt:
This is the date that the requested encumbrances need to be posted. This field is required.
Division:
Enter the Division Code associated with this particular encumbrance item.
Account:
Enter the account number or numbers (splits) against which this Item Number should be encumbered. One Item Number can have many account splits. The components of the account number that are required are GL Ledger, GL Key, GL Object, and Amount.
Description:
Enter a description of this encumbrance item. This field accepts free-form text and is optional.
Posted to PO:
This box is checked by the system when a contract has been sent to PO by the CM to PO Utility.

Contract Management 15
Amendments Tab:
Contract Management 16
Amendment Change Section
Change Order:
Each time an Amendment to a Contract is necessary, it is created in the Amendment Tab with a Change Order Number. This Change Order Number uniquely identifies this particular amendment to this Contract. One Change Order can have many line items associated with it. This field is required.
Change Desc:
Enter a short description to identify this particular Change Order.
Encumbered:
This flag is maintained by the EN to PO tool. If this box is checked, it means that the amendment represented by this particular Change Order has gone through Workflow approvals and has been processed by the EN to PO tool. The line items associated with this Change Order have been copied over to the Encumbrances Tab by the EN to PO tool. Once a Change Order has been processed by the EN to PO tool, it is read-only.
Primary Ref:
This optional, free-form text field can be used to record any internal reference number/ID, etc. that is tied to this Change Order.
Secondary Ref:
This optional, free-form text field can be used to record any secondary internal reference number/ID, etc. that is tied to this Change Order.
New End Dt:
If the Current End Date on the Contract will be affected by this amendment, enter the new end date here. It can lengthen or shorten the end date of this Contract. When the EN to PO tool is run, it will update the Current End Date on the Contract to the most recently entered New End Date (which would not necessarily be the furthest one in the future).
Approval Dt:
This is the date that this amendment was approved via the Amendment Approvals Workflow model.
Desc:

Contract Management 17
Enter a description of why this amendment was needed.
Amendment Item Section
Item No:
The Item Number is used to uniquely identify this amendment item from all of the other amendment items associated with the Change Order. The EN to PO tool will combine Amendments with Encumbrances based on Item Number. This field is required.
Fiscal Year:
This is the Fiscal Year in which this amendment will be effective.
Account:
Enter the account number or numbers (splits) against which this Item Number should be encumbered. One Item Number can have many account splits. The components of the account number that are required are GL Ledger, GL Key, GL Object, and Amount.
Desc:
Enter a description of this particular Item.

Contract Management 18
Retainage Tab:
Retain Type:
There are four (4) different retain types, as follows:

Contract Management 19
Retain Type A: The amount retained is calculated as a fixed percentage of each payment. Enter this % in the Fixed Percentage field designated below for Retain Type A.
Retain Type B: This flag allows for variable retainage amounts to be entered at the time of payment. No additional information must be entered for this type of retainage. A warning will be given to the user on the AP side when they enter a payment for this contract telling the user to retain a variable amount.
Retain Type C: This option allows ….. will be detailed more in CM Sprint 3
Retain Type D: This option allows….. will be detailed more in CM Sprint 3
Account:
This is the account number or numbers (splits) where the retainage amounts will post.
Division:
This is the division code associated with this retainage posting.
Retain Type A Section:
Fixed Percentage: (see above)
Retain Type C Section:
Fixed Percent with Ceiling: (see above)
Up to Amt:
Thereafter Amt:
Retain Type D Section:
After Percent Paid: (see above)
Retain Percent:

Contract Management 20
Retain Amt:
Comments:
This is an optional, free-form text field used to hold any comments about this retainage posting. Tasks Tab - Defining Tasks:
Task ID:

Contract Management 21
This is the unique identifier for this Task. This field is required.
Task Title:
This field is used to enter a short description of what this Task is. This is the description that the user will see when entering Tasks on the Cycles Tab and on the Track Tab on CMUPTK so it is important that it be fairly descriptive. This field is required.
Task Description:
This field can be used to give a more detailed description of this Task.
Number of Days:
This field is used to hold the estimate of how many days this Task will take to complete. The type of days is determined by the Type of Days field below.
Type of Days:
There are two (2) different types of days represented in the Number of Days field above, as follows:
a. BUS Business Days - Business Days are the days of the work week, Monday through Friday and do not include weekends.
b. CAL Calendar Days - Calendar Days include all seven (7) days of the week, Monday through Sunday.
This field is not required and an option of <none> is also available.
Pre-Task:
If there is a Task that must be completed before this Task can be started, enter its Task ID here.
Post-Task:
If there is a Task that must be completed after this Task is complete, enter its Task ID here.
Comments:

Contract Management 22
This optional field can be used to enter any additional description or information about this Task that is not already included in the Task Title or Task Description.
Contract Management 23
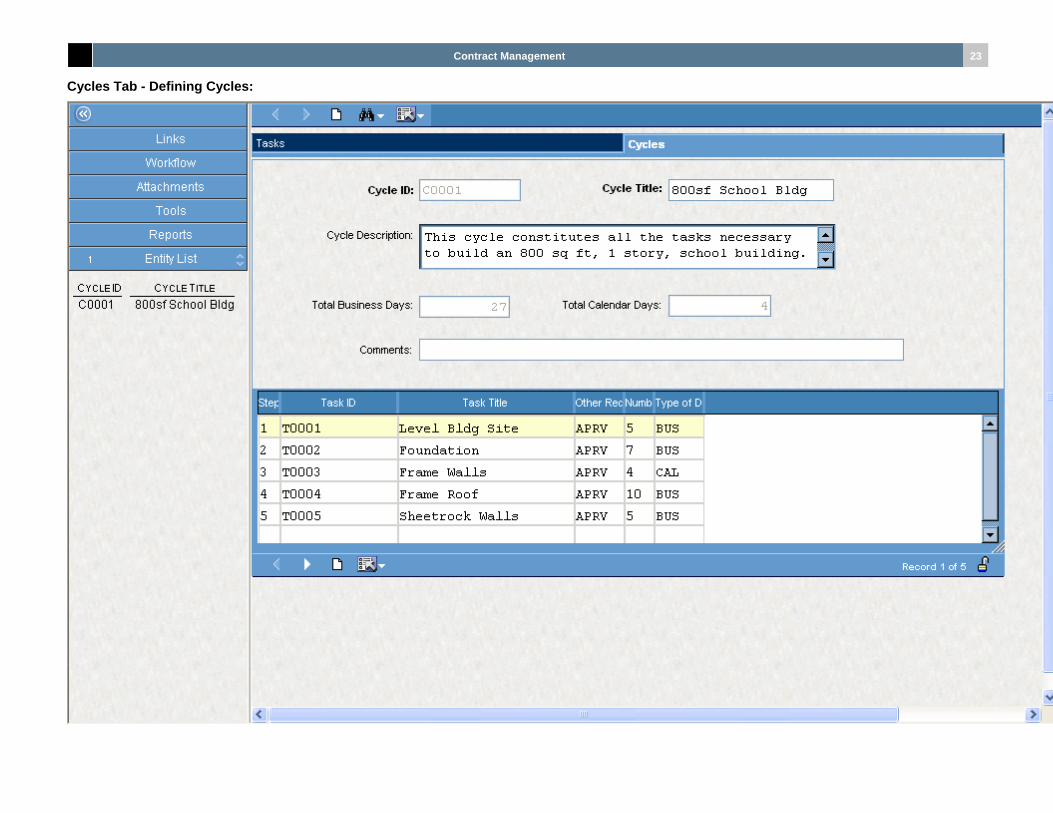
Cycles Tab - Defining Cycles:

Contract Management 24
Cycle Master Section
Cycle ID:
This is the unique identifier for this Cycle. This Cycle ID is associated with a Contract on the CMUPCM screen, Contract Details Tab. This field is required.
Cycle Title:
This is the short description of this Cycle. The Cycle title echo’s on the Contract Details Tab of the CMUPCM screen and should be fairly descriptive. This field is required.
Cycle Description:
Enter a more detailed description of the purpose/goal/end result of this Cycle.
Total Business Days:
This is the sum of the business days it will take to complete this Cycle. Only those tasks that have day estimates in business days (as opposed to calendar days) will be included in this sum. This field is automatically filled by the system.
Total Calendar Days:
This is the sum of the calendar days it will take to complete this Cycle. Only those tasks that have day estimates in calendar days (as opposed to business days) will be included in this sum. This field is automatically filled by the system.
Comments:
This optional field can be used to enter any additional description or information about this Cycle.
Cycle Detail Section
Step:
Typically Tasks must be completed in a particular order. This field is used to identify which order the Tasks should be completed in. This is a required field.

Contract Management 25
Task ID:
This is the unique identifier for a Task that was created on the Tasks Tab. This is a required field.
Number of Days:
The value in this field echos from the Tasks Tab for the Task identified in the Task ID field. This is the number of days that this particular Task is estimated to take to complete. This is a read-only field.
Type of Days:
The value in this field echos from the Tasks Tab for the Task identified in the Task ID field. This type field describes what type of days are represented in the Number of Days field above.
Other Requirement Code:
The Other Requirement Code indicates the type of approval required to indicate a task has been completed. There are two (2) different types of codes represented:
a. APRV Get Verbal Approval.
b. APRW Get Written Approval.
This field is not required and an option of <none> is also available.

Contract Management 26
CMUPTK Screen - Contract Tracking
Main Header Section:
Contract No:

Contract Management 27
The Contract Number is the key to the entire Contract Management subsystem. It uniquely identifies a Contract. Contract Number is a read-only field on CMUPTK. If you wish to create a brand new Contract, you need to do so using the CMUPCM Screen. For information on how to create a new Contract Number, see the CMUPCM Screen section of this documentation. Field is required.
Status:
This read-only field holds the current Status of this Contract. There are four (4) statuses that a Contract can have, as follows:
NW This is a brand new Contract - the original encumbrances for this Contract have not been approved and the Contract has not yet been sent to Purchasing or pre-encumbered.
AW The original encumbrances for this Contract have been approved but have not been sent to Purchasing or pre-encmbered.
AS The original encumbrances for this Contract have been approved, sent to Purchasing and pre-encumbered. The original encumbrances for this Contract can no longer be modified. The Amendments tab must be used to add additional funding to this Contract. This contract may also have Amendments.
CL This Contract is complete and closed. When the PO related to this Contract is closed or the final payment is made on this contract in AP, the status will be changed by the system to CL.
This field is maintained by the EN to PO tool and Workflow and is required.
Contractor ID:
Enter the ID of the MAIN Contractor associated with this Contract. This field validates to the Person Entity (PE) subsystem and is required.
Desc:
Enter a short description of this Contract in this field. This field is required.
Original Amt:
Contract Management 28
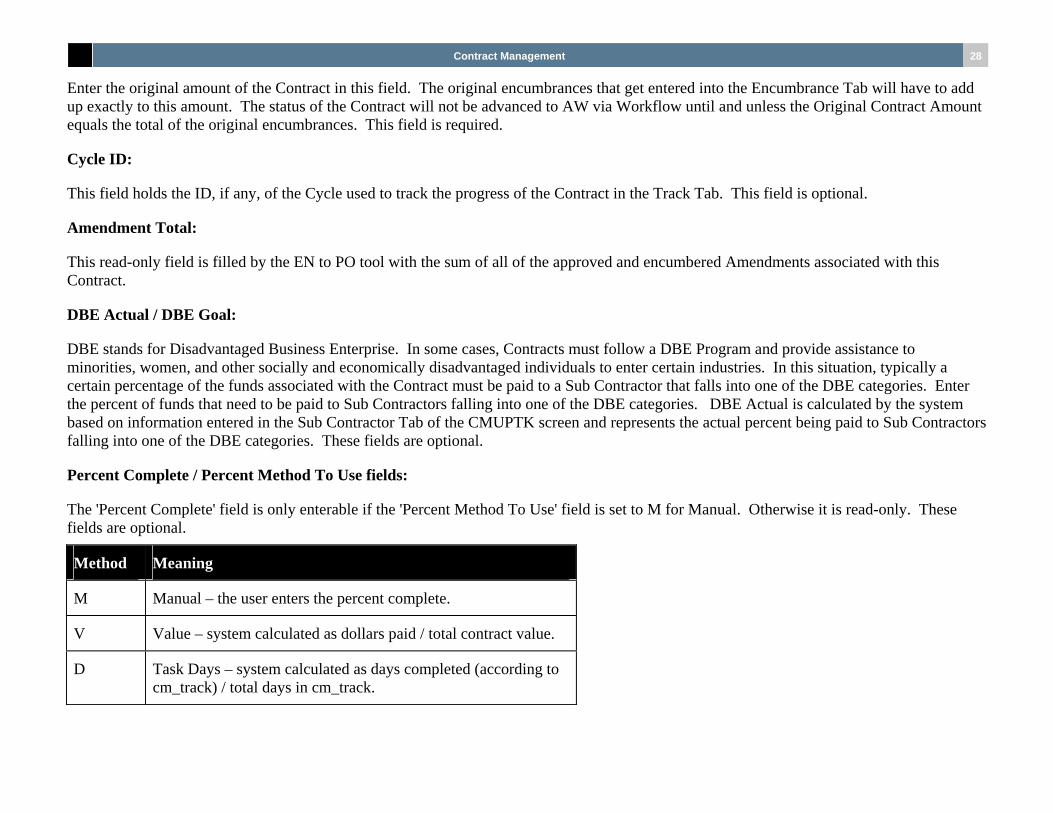
Enter the original amount of the Contract in this field. The original encumbrances that get entered into the Encumbrance Tab will have to add up exactly to this amount. The status of the Contract will not be advanced to AW via Workflow until and unless the Original Contract Amount equals the total of the original encumbrances. This field is required.
Cycle ID:
This field holds the ID, if any, of the Cycle used to track the progress of the Contract in the Track Tab. This field is optional.
Amendment Total:
This read-only field is filled by the EN to PO tool with the sum of all of the approved and encumbered Amendments associated with this Contract.
DBE Actual / DBE Goal:
DBE stands for Disadvantaged Business Enterprise. In some cases, Contracts must follow a DBE Program and provide assistance to minorities, women, and other socially and economically disadvantaged individuals to enter certain industries. In this situation, typically a certain percentage of the funds associated with the Contract must be paid to a Sub Contractor that falls into one of the DBE categories. Enter the percent of funds that need to be paid to Sub Contractors falling into one of the DBE categories. DBE Actual is calculated by the system based on information entered in the Sub Contractor Tab of the CMUPTK screen and represents the actual percent being paid to Sub Contractors falling into one of the DBE categories. These fields are optional.
Percent Complete / Percent Method To Use fields:
The 'Percent Complete' field is only enterable if the 'Percent Method To Use' field is set to M for Manual. Otherwise it is read-only. These fields are optional.
Method Meaning
M Manual – the user enters the percent complete.
V Value – system calculated as dollars paid / total contract value.
D Task Days – system calculated as days completed (according to cm_track) / total days in cm_track.

Contract Management 29
T Tasks – system calculated as number of completed tasks in cm_track / total number of tasks in cm_track.
C Calendar – system calculated as number of days since start of contract / total days in contract (start date to end date). This may need a tool or something to trigger recalculation.
Excluding option ‘M’, the system will perform the specified calculation after tabbing away from the ‘Percent Method To Use’ field and before submitting changes to the database.
Current Maximum Total:
This read-only field is updated by the EN to PO tool and represents the sum of Original Amt and Amendment Total fields.
Contingency Amt:
This field can be used to enter any contingency amounts. The amount entered in this field IS NOT encumbered. If the client needs this amount to be encumbered, they need to include it in the Original Amount of the Contract. This field is optional.
Encumbrance Total:
This read-only field is maintained by the system and holds the total of all of the encumbrances held in the Encumbrance Tab that have been processed by the EN to PO tool (post flag is checked).

Contract Management 30
Compliance Tab: This tab is used to track the compliance requirements for a Contract.

Contract Management 31
Compliance Vendor Section:
Contractor ID:
This is the PEID of the Contractor associated with these compliance items. This field is required.
Approval Date:
This read-only field is maintained by Workflow. The Workflow model used to maintain this field can be set up any way the client site would like to set it up. An example of how this field could be used is to fill it with a date stamp after someone verifies the Contractor's documentation or certification requirements. This field is optional.
Compliance Detail Section:
Comp Type:
This field is used to categorize different types of compliance items that need to be met for this Contract.
The different Compliance Type codes are user-defined in the CMUPCD screen with Code ID set to COMPTYPE. This field is required.
Payment Amt:
This field holds the amount received from the Contractor. This field is optional.
Amt Required:
This field holds the amount that is required from the Contractor. This field is optional.
Expiration Date:
This is the date that the Contractor's documentation or certification expires. This field is optional.
Named As Insured:
This check box indicates whether this institution is labeled as the insured on the policy. This field is optional.
Required:

Contract Management 32
This check box indicates whether this compliance item is required for this Contract. This field is optional.
Approved:
This check box indicates whether the requirements of this compliance item have been met. This field is optional.
Comments:
This field can be used for any comments relating to this compliance item.

Contract Management 33
Sub Contractor Tab:

Contract Management 34
Grid Mode version of Sub Contractor Tab
Non-Grid Mode version of Sub Contractor Tab

Contract Management 35
This tab is used to maintain information about Sub Contractors and also to indicate which Sub Contractors qualify as Disadvantaged Business Enterprises. This information is used by the system to calculate the DBE Actual value on the top of the CMUPCM and CMUPTK screens.
Contractor ID:
This field holds the PEID of the Sub Contractor. This field is required.
Amt:
This field holds the amount of funding for this contract that will be paid to this Sub Contractor. Changing this amount will cause a recalculation of the DBE Actual field in the master contract. This field is optional.
Desc:
This is an optional field that can be used in any way deemed appropriate such as entering a short description of the kind of services this Sub Contractor will be providing. This field is optional.
Ethnic:
If this Contractor qualifies as a DBE Contractor due to their ethnic background, then click this check box. This field is optional.
Gender:
If this Contractor qualifies as a DBE Contractor due to their gender, then click this check box. This field is optional.

Contract Management 36
Task Tracking Tab:
This tab is used to track all of the tasks that must be completed within this Contract and the status of each one. This tab can be auto-populated based on the Cycle ID (see Section ___ of this documentation for instructions on doing so). The data that populates this tab comes from the CMUPTC screen, Cycle Tab which is where a Cycle of Tasks is defined.

Contract Management 37
Step:
Typically, tasks must be accomplished in a certain order. The Step field in an optional field, but can be used to control the order in which the tasks are completed (and at the same time, what order they display on the screen).
Task ID:
This is the unique identifier for this particular task. This field validates to the CMUPTC screen, Task tab which is where Tasks are defined. This is a required field.
Begin:
This is the estimated begin date of the task identified in the Task ID field. This is an optional field.
End:
This is the estimated end date of the task identified in the Task ID field. This is an optional field.
Apprv Signoff:
This is the User ID of the CM User that signed off on this task. In other words, this is the User ID of the user who confirmed that this task has been completed. This field is automatically filled with the current User's ID by the system when the user clicks on the Complete check box. This is an optional field.
Pct Completed:
This field can be used to enter the percent of this task that has been completed. This is an optional field.
Complete:
This check box is used to indicate that this task has been fully completed. When the user checks this box, their User ID will be defaulted by the system into the Apprv Signoff field. This is an optional field.
Track Day Type:
This field is used to tell the user whether the Track Days field is referring to Business Days or Calendar Days. This is an optional field.
Track Days:

Contract Management 38
This field is used to hold the estimated number of days that this task will take to complete. This field should be used in conjunction with the Track Day Type field, which indicates if these are Business or Calendar Days, to get a more accurate estimation of how long this task will take to complete. This is an optional field.

Contract Management 39
Comments Tab:
Type:
Contract Management 40
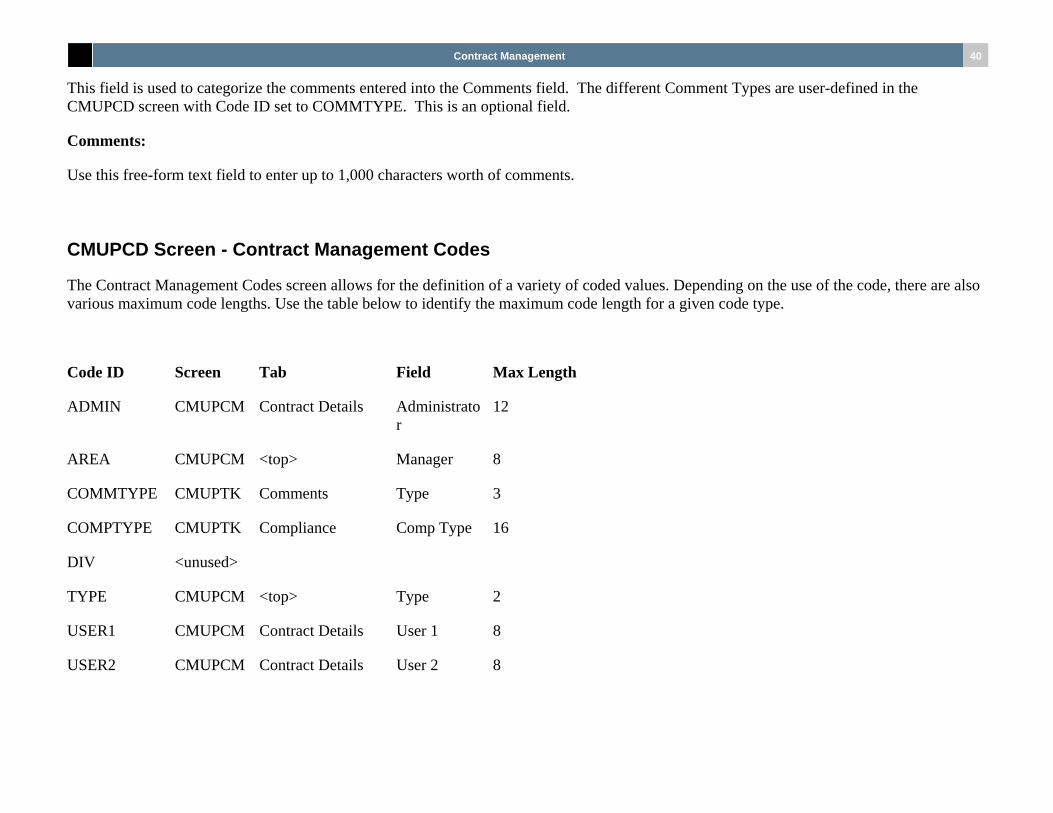
This field is used to categorize the comments entered into the Comments field. The different Comment Types are user-defined in the CMUPCD screen with Code ID set to COMMTYPE. This is an optional field.
Comments:
Use this free-form text field to enter up to 1,000 characters worth of comments.
CMUPCD Screen - Contract Management Codes
The Contract Management Codes screen allows for the definition of a variety of coded values. Depending on the use of the code, there are also various maximum code lengths. Use the table below to identify the maximum code length for a given code type.
Code ID Screen Tab Field Max Length
ADMIN CMUPCM Contract Details Administrator
12
AREA CMUPCM <top> Manager 8
COMMTYPE CMUPTK Comments Type 3
COMPTYPE CMUPTK Compliance Comp Type 16
DIV <unused>
TYPE CMUPCM <top> Type 2
USER1 CMUPCM Contract Details User 1 8
USER2 CMUPCM Contract Details User 2 8

Contract Management 41
Code ID:
This field identifies the category of the type of code that is being defined. A list of the possible Code ID’s and their respective meanings are as follows:
Code Value:
This field is a client specified value for the given Code ID.

Contract Management 42
Code Description:
This field is used to describe the Code Value for a specified Code ID.
Screen Business Rules
Inherent to every Contract Management screen are a couple base functionality features. These features are as follows:
Upon deletion of a parent table record all child records associated with the specified parent will also be deleted. (Ex. Deleting a compliance vendor from a contract on the CMUPTK screen will result in all compliance detail records sharing the same Contractor ID being deleted as well).
When creating a new record in a table, the system will automatically check to make sure that a record with the same name (primary key) does not already exist. (Ex. Attempting to create a new contract with the same contract number as another contract will result in an error message being displayed).
All other, more specific, rules are detailed on a screen by screen basis below:
CMUPCM Screen Rules that are triggered when initializing a new record
Initialize the next item number in the encumbrance tab
Initialize the next change order number in the amendments tab
Rules that are triggered prior to inserting a new record
Setting the Current Maximum Total to the Original Amount
Check to make sure that no PO exists with the same contract number
Inserting a new track record if no track records exist on a contract that has a specified Cycle ID
Check the status of the parent contract prior to allowing encumbrance records to change

Contract Management 43
Check the status of the parent contract prior to allowing amendment records to change
Disallow additions or modifications to amendment items within a change order that have already been encumbered
Check to make sure that all fields are filled out appropriately based upon the Retainage Type
Rules that are triggered after inserting a new record
Update the encumbrance account table with changes made to the account
Update the amendment account table with changes made to the account
Rules that are triggered prior to updating a record
Inserting a new track record if no track records exist on a contract that has a specified Cycle ID
Update the encumbrance account table with changes made to the account
Check the status of the parent contract prior to allowing encumbrance records to change
Check the Encumbrance Total and issues a warning if the total exceeds the Original Amount
Check the status of the parent contract prior to allowing amendment records to change
Update the amendment account table with changes made to the account
Disallow additions or modifications to amendment items within a change order that have already been encumbered
Check to make sure that all fields are filled out appropriately based upon the Retainage Type
CMUPTK Screen Rules that are triggered prior to inserting a new record
Inserting a new track record if no track records exist on a contract that has a specified Cycle ID
Rules that are triggered after inserting a new record

Contract Management 44
Calculate DBE Actual based upon the percentage of the total subcontractor amount
Rules that are triggered prior to updating a record
Inserting a new track record if no track records exist on a contract that has a specified Cycle ID
Rules that are triggered after updating a record
Calculate DBE Actual based upon the percentage of the total subcontractor amount
CMUPTC Screen Calculate the sum of the business days of all tasks within a cycle
Calculate the sum of the calendar days of all tasks within a cycle
CMUPCD Screen
1.2 Key Features The Contract Management System provides the ability to record multiple contracts within a master contract. You may specify multiple year contracts, one-time or recurring contracts, multiple levels of required approvals, and multiple vendor contracts within a master contract. The system also supports the creation of purchasing/encumbrance entries and the automatic transfer of information into the Accounts Payable module.
Create multiple vendor contracts within a master contract. Each contract may be for a single year or multiple years. Automatically transfer information from the Contract Management System into the Accounts Payable module via the approval process. Create encumbrances via the purchasing interface. Create and print purchase orders to update the Encumbrance System. Setup multiple task definitions for the creation of cycles. Each contract is associated with a predefined cycle. Each task is defined with a default number of days required. Define retainage method to be used for all payments against contract. Manage contract amendments and change orders.

Contract Management 45
1.2.1 IFAS: Contract Management The Contract Management System provides the ability to record multiple contracts within a master contract. You may specify multiple year contracts, one-time or recurring contracts, multiple levels of required approvals, and multiple vendor contracts within a master contract. The system also supports the creation of purchasing/encumbrance entries and the automatic transfer of information into the Accounts Payable module.
Major Features Create multiple vendor contracts within a master contract. Each contract may be for a single year or multiple years. Automatically transfer information from the Contract Management System into the Accounts Payable module via the approval process. Create encumbrances via the purchasing interface. Create and print purchase orders to update the Encumbrance System. Setup multiple task definitions for the creation of cycles. Each contract is associated with a predefined cycle. Each task is defined with a default number of days required. Define retainage method to be used for all payments against contract. Manage contract amendments and change orders.
Reporting Access to information is straightforward and easy. The Contract Management System includes standard reports and immediate online inquiry to any data in the system. Security- protected reports can be run at the user’s networked computer or via the Internet from any Web browser.
Standard reports available include:
Master Contracts/Amendment Information Contract/Amendment Information Master Contracts Contracts Encumbrance Detail Report Retain Calculation Information Payment/Retain Information Manager Code Report Funding Sources Report Compliance Setup Report Task Definition Report Cycle Definition Report

Contract Management 46
Accounts Payable History Report Accounts Payable Entries Sent to Open Hold Accounts Payable Entries That Need Approval Accounts Payable Entries Waiting to be Sent to Open Hold Payment Retainage Report Aging Report for Delinquent Accounts Contracts Due and Payable Master Contracts Expiring Contracts Expiring Vendor Statements
1.3 Getting Started
1.3.1 Steps in the Contract Process
Cycle/Task Creation and Tracking 1. Identify tasks needed to complete the contract. 2. Estimate number of days required to complete each task. 3. Organize tasks in sequential order. 4. Assign tasks to users/personnel. 5. Record task completion information.
Create Contract 1. General "user" creates a purchase request. 2. Retrieve PR approval and flag as "Contract." 3. Select "Contracts" for creation. 4. Record master contract information. 5. Identify internal cycle definition for each vendor contract. 6. Record vendor contract information. 7. Record contract compliance information. 8. Record funding sources.
Amend the Contract 1. Create an amendment request.

Contract Management 47
2. Approve the amendment. 3. Post and log the amendment.
Encumbrance Maintenance 1. Estimate encumbrance levels and amounts. 2. Create an encumbrance request. 3. Approve the request. 4. Post and log the encumbrance.
Create Retainage 1. Create a retainage request. 2. Approve the request. 3. Post the retainage.
Process Payments 1. Create a payment request. 2. Approve the request. 3. Post and log the payment. 4. Print the checks.
1.4 Flow Diagram Under Construction

Contract Management 48
2 Setup
2.1 Basics
2.1.1 Terms and Definitions
Miscellaneous Terms
Mask: This is the phrase used to describe a series of entries, which move you interactively through more than one entry question.
Interfund: Transactions which move information, dates, and transactions between funds.
Intrafund: Transactions which move information, dates, and transactions within a fund.
Printing and Distribution: Moves the transaction file from a temporary file to a permanent file. To change this entry you must use a credit item, such as a void check.
General Ledger Terms
GLDB: General Ledger database. The file structures that hold the budgets and transactions of a client's accounting information.
GL Side: One of two parts of the GLDB which contain one or more structural definitions of ledgers.
JL Side: One of two parts of the GLDB, which contains one or more structural definitions of ledgers. The JL Side is an optional definition. (If used you would record transactions for projects in these ledgers).
Ledger: A formal definition of an accounting structure that is supported in either the GL Side or the JL Side.
Organizational Parts
(Org.Parts): A discrete part of a Ledger account identification, which specifies some aspect of the organization, such as "fund" or division. (use mask GLUPKY).

Contract Management 49
Organizational Key
(Org.Key): Numbers or characters which stand for some used combination of values for the Organization (use mask GLUPKY).
Object Group: A code which groups like object codes into some client defined collection, such as all asset object codes or all salary and wages object codes. Object groups may be set up for reporting and/or budget controls. (Use mask GLUPOB).
Object Code: A code which represents an entry in a chart of accounts. objects are typically used to classify line items in an accounting system, but they are also used to classify assets, liabilities, fund balances, and transfers in addition to revenues and expenditures.
A unique object is created for each of the following:
bank account (assets) payroll retirement plan (liabilities) type of revenue generated type of expense incurred type of transfer in type of transfer out
Objects are generally the lowest level of classification, however, some organizations use the term object to mean the lower level (Use mask GLUPOB).
Control Key: An Org.Key which has been defined at a higher level within the Chart of accounts and typically identifies the accumulated sum of budgets for several lower level Org.Keys.
Fully Qualified Account: Input and output formats, which require the entry of all clients' defined parts of the account structure. (Org. Parts plus the Object Code.) For example, "101200-6100" {10 = Fund, 1200= Accounting Dept.} this entire entry = the Org.key. [- dash is a separator] 6100 = Object Code. See General Ledger Section 1-17 to 1-24 for more detail.
Quick Key: From the GLUPQU mask enter a short number series to enter data from a decentralized point into the system in place of the full ORG.KEY and OBJ.KEY (Example "305" for 1012005001) part of original set-up for general ledger.
User Security: From the NUUPUS mask you would establish user security priority, which screens the users read, write, and access capability to information per sub-system.
System, Function, Criteria: These are the steps performed when you enter a mask. You can identify which subsystem you want the function to perform in that system and the criteria for the data source.
Contract Management 50
Rollover: Special purpose programs that are usually written to move data from one application system to another.
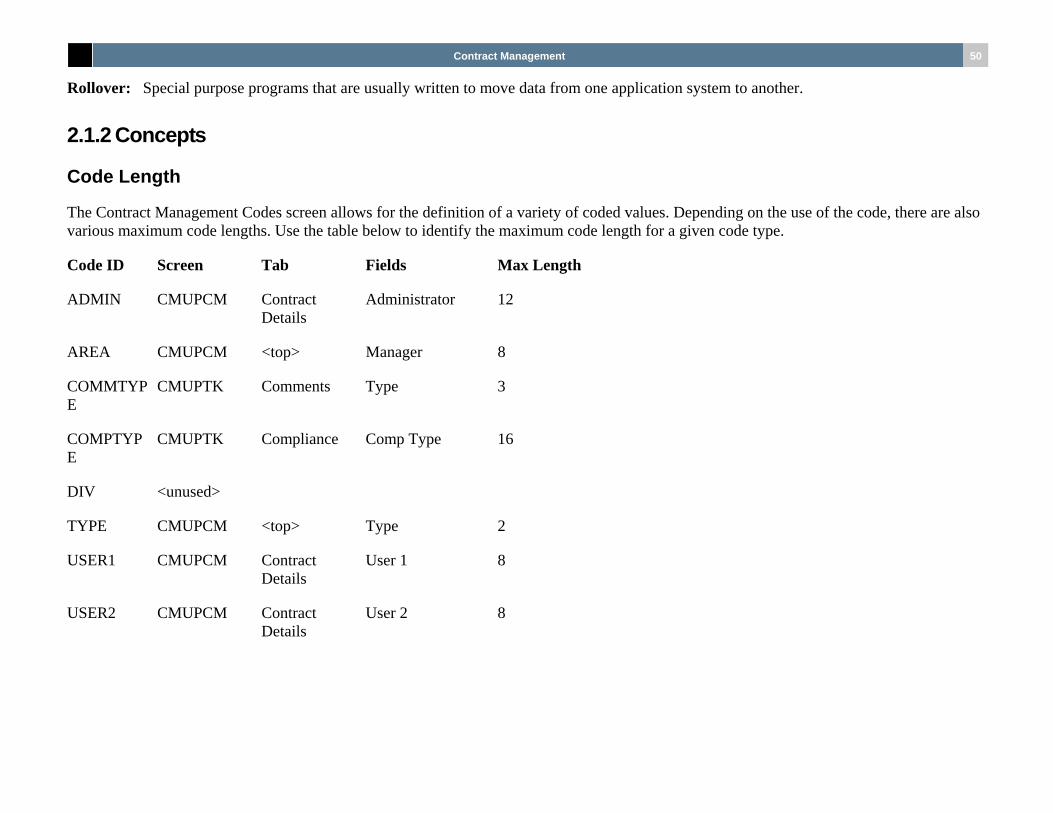
2.1.2 Concepts
Code Length
The Contract Management Codes screen allows for the definition of a variety of coded values. Depending on the use of the code, there are also various maximum code lengths. Use the table below to identify the maximum code length for a given code type.
Code ID Screen Tab Fields Max Length
ADMIN CMUPCM Contract Details
Administrator 12
AREA CMUPCM <top> Manager 8
COMMTYPE
CMUPTK Comments Type 3
COMPTYPE
CMUPTK Compliance Comp Type 16
DIV <unused>
TYPE CMUPCM <top> Type 2
USER1 CMUPCM Contract Details
User 1 8
USER2 CMUPCM Contract Details
User 2 8

Contract Management 51
2.2 Intermediate
2.2.1 Security within the Contract Management Subsystem The purpose of the Approval Matrix screen is to enable security for all other screens within the Contract Management subsystem.
You will establish an approval process which will allow each individual to review and approve the contract as needed.
Entries in this screen will dictate the order of approval or allow some individuals to enter an approval at any stage of the transaction.
These multi-level approval individuals are the support people in case someone is absent for the approval process.
Note: For more information on security, see the Nucleus user guide.
Work Order Security
The following are three tiers of entry for security related to work orders:
Nucleus (NUUPUS) TRIAD (TDUPUS) Contract Management (TDCMUP and CMAPRV)
Establishing Security 1. Screen #1 is for entry of the user approval designation. 2. Create an outline of security considerations for each type of user, conducted by the person in charge of security, will determine
security classes. Since not all organizations require the same level of security, only the individuals at each organization can determine what level of security is appropriate.
3. You must be sure which groups of people will have access to which screens. 4. You must determine the type of entry into the screens by each user. 5. You will need to establish a coded value which represents the groups of users. The coded value will be the class used throughout the
security entries and the order of the approval process. 6. The security for each specific location or department must be thoroughly analyzed prior to the coded values being set in place. 7. At the time you establish security, you should use a check-off sheet to verify that you have made the correct entries for each tier and
for each user. Make these entries to remove a user and to establish all new users. 8. Establish your all-access group first, and then move down to the next level of access. This would allow you to step through the
security one group or class at a time.

Contract Management 52
9. Be specific about the entries in the system. Consider access to screens, input of data fields, approval levels, and input of the account numbers. All of those items will need to be looked at by someone who has a through understanding of the security package.
2.3 Advanced
2.3.1 Code Tables The following code tables (examples are listed here) appear on the CMMCONTR screen and can be coded by the client:
Contract Type Example: Pre-design, Design, Engineering, New Construction Contract Area Example: Individuals name or Title Contract Manager Example: Cheryl Anthony Amendment Codes (Supplement Codes) SA1 as an example
2.3.2 Field Entries by Screen and Any Requested Changes
CMCONTR
Contract #: This screen is for detail on sub-contracts. If you do not have sub-contracts use the master contract number with an “A” to follow, which will make the number different. Down arrow will bring in the echo fields from the prior screen.
PR#: This field is gray for entry from purchasing subsystem. All other items are self-explanatory.
CMCOMPL
Records the detail on the compliance issues per contractor.
CMMCONTR
Master Contract: Establish the need for an Alpha Seed (for example, "C" for contract to distinguish this number from the purchase request and the purchase order number).
Status: Active, inactive, or hold. Use terms for which you can pull contract status for approval processing.

Contract Management 53
Short Desc: Enter a brief description
Contract Type: Code table (F1)
Contract Area: Code table (F1)
ORG.KEY: Linked to the GL account (May need to link to the JL?).
Object Codes: Linked to the GL account (May need to link to the JL?).
Original Begin Date: Enter the agenda date or a significant date for reports.
Current End Date: Decide whether or not this is required.
Original Max Amount: Enter the total general contractor contract amount.
Current Max Total: Enter the current maximum amount.
Amend Sum: Calculation field summation from the Amend and Amend1 screens.
RFP/Bid #: Enter those if you have them.
Comments: Information on the contract is for display only.
View Contracts: Enter "Y" to see individual sub-contractor details.
Determine if you need a field for retention: Enter the total retention amount on the contract for display only.
CMPO
Ties to the purchasing system. This makes the contract management system the driving subsystem for the purchase order. You still process the purchase order through the regular printing process.
CMRETAIN
Determine if you have specific amounts for retention and if so, you will need this screen.

Contract Management 54
CMPAY
PEID: Linked to the PE database.
SEPRT CHK: Needs to default to “N” for No.
Due Date: This may be used as a flag for the department to do the check run.
Separate Checks: Y/N
Total expended per vendor: Do you want this value to appear on this screen? This detail is pulled from another screen and you may need the summation to come to display here.
CMMAMEND
Determine if you need the detail here to calculate to the field on CMMCONTR.
CMAMEND1:
New reference number will be the specific date of your choice (EX: the agenda date). PR # field skip - purchasing item to echo here?
CMCOMMNT:
Enter the comments for handling the paper work and additional cycle detail as desired.
CMCYCLE:
This is used to define the cycle for the paper work and the specific people to do the items. This will provide a written permanent record.
CMTASKS:
Used for very specific task detail. This is typically used for large projects.
CMTRACK:
This is a detailed log on the dates of activity.
Contract Management 55
CMMGR:
Code table for managers who will need the contract detail.
CMTASKLK:
Definition of a specific task below object code.
CM-COPY:
If you have a contract similar to the one you are to enter, use the first contract number on the first line and enter the new contract number on the second line.
CM-TYPE:
Code table for the contract type. Keep in mind the type will be used to pull out types contract history for reports.
CMAREA: Code table for the manager's name responsible for that area of construction.
CMAPRV: Approval level screen
CMMISC: Ties this subsystem to the entries for AR and AP.
2.4 Best Practices
Contract Management 56
3 Processes
3.1 Contract Management – Tutorial 1
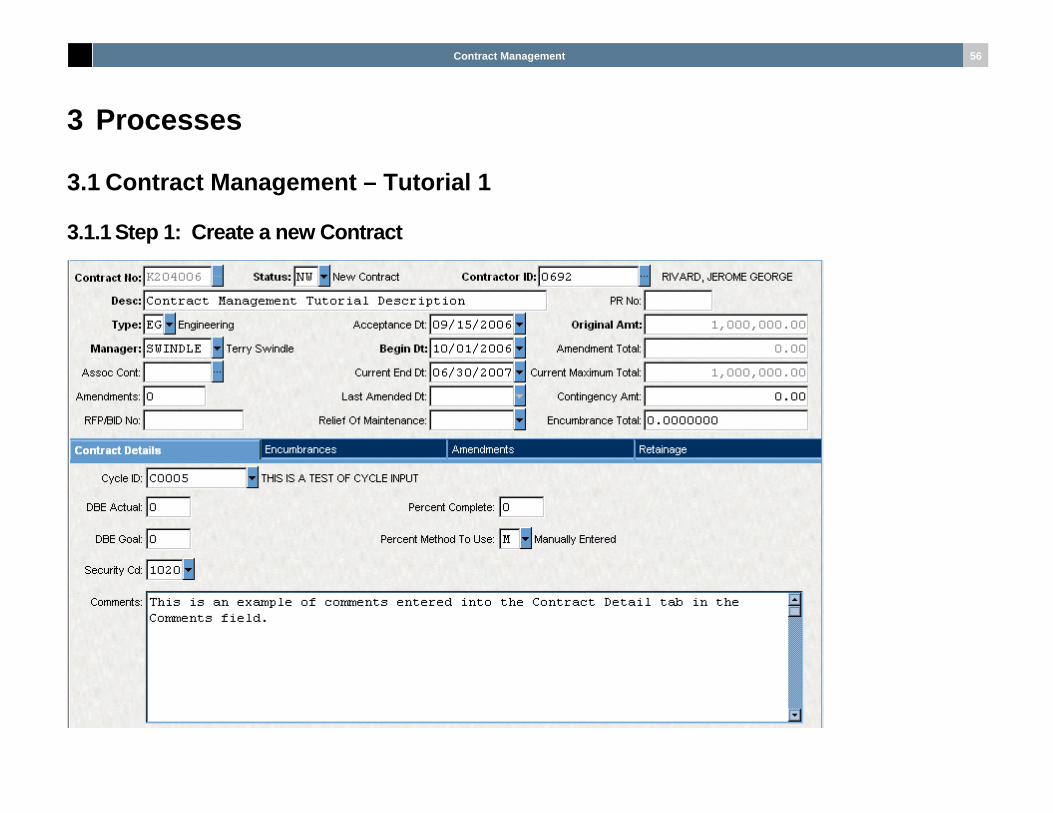
3.1.1 Step 1: Create a new Contract

Contract Management 57
Contract Detail (CMUPCM)
A new contract is created from the CMUPCM screen. In order to create a new contract certain information on the above screen is required, additional information is entered to make the contract more understandable. The fields being entered here to initially load the contract into the system are Contract No. (this can be created from a seed value by left clicking on the ellipse to the right of the contract number and clicking on the Auto ADD display) or by entering a contract number manually. Select a contactor by clicking on the ellipse for the lookup. In addition to these required fields, Type, Acceptance Date, Original Amount, Manager, Begin and End Dates are also required. This example also includes cycle ID security code Percent Method to use and comments.

Contract Management 58
3.1.2 Step 2: Create Encumbrances for the Contract
Encumbrance (CMUPCM)

Contract Management 59
Below, the 5 detail encumbrance items are listed with the associated dollar amounts
Once the contract has been created, the funds for that contract must be encumbered. The first step in this process is to enter the encumbrance information: Item Number, Fiscal Year, Date, Division, Account Number, Amount and Description. This information is entered by line to breakdown the contract into its component pieces. The above example breaks the contract down into 5 line items totaling $1,000,000, the original amount of the contract. It is normal practice to fully encumber the amount of the contract prior to running the CM to PO Tool.
3.1.3 Step 3: Completing the Approval Process In order to send the contract to the PO subsystem, it is necessary to complete the approval process. As part of the contract management/PO process the workflow engine generates a task listed item that will be included on the approver’s task list.
Click on the Task List Icon pictured above to display the task list detail.

Contract Management 60
Below is an example of a task list with contract K204006 waiting for approval.
From the Approval portion of the screen, check the box to the left of the contract being processed and click on the green check mark. You will be presented with a comment box. You may enter up to 255 characters of comments relating to the approval of this contract.
When comments, if any, have been entered, click the Submit button to activate the approval Process.

Contract Management 61
The task list is again presented, and the contract just approved is no longer on the approvals list.
Now that the approval has been successfully completed and the contract is ready to be sent to the PO subsystem via the CM to PO tool.
3.1.4 Step 4: Running the Send Contract to PO Tool The next step in the contract management process is to send the newly created contract (along with its line item general ledger accounts and dollar amounts) to the purchase order system so that the dollar amounts associated with the various accounts can be encumbered.

Contract Management 62
The following screen displays the possible tool options to be run. The option to be run at this time is the Send Contract to PO tool.
This tool is run by first selecting the desired contract to be sent to the PO sub system.
The Send Contract to PO process is initiated by positioning the cursor over the Send Contract to PO tool and left clicking the mouse. This process will display the screen shown below:
Once the Utility screen has been reviewed and the contract number has been verified as being correct, click the Run button to execute the tool.

Contract Management 63
The result of the Send Contract to PO tool being run is the display box shown below. This box shows the progress of the tool as it is running for the contract number displayed on the progress screen.
When the tool has completed the following Web Page Dialog Box will be displayed. It will contain the results of the tools operation with green check marks next to the steps that were completed successfully.

Contract Management 64
3.1.5 Step 5: Verify the Send Contract to PO Results Once the contract has been sent to the PO system there are 2 changes that will have been made to the original contract. The status of the contract will have been changed from AW (Approved and Waiting) to AS (Approved and Sent). From the Encumbrance tab of the contract screen, any encumbrance record that was present at the time the tool was run (see figure on page 2 for encumbrances on the original contract) will have the Posted to PO check box checked. See the figure below for an example of the settings after the CM to PO Tool has been run.
It is important to note that after the CM to PO Tool has been run and the contract Status and Posted To PO flag(s) updated, no changes to the encumbrance records will be allowed.
An attempt to change any field on the encumbrance record will result in the following message being displayed:
3.1.6 Step 6: Amending the Contract prior to printing the PO Amendments can be made to a Contract/Purchase Requisition prior to its being printed, or to the Contract/Purchase Order once the purchase requisition has been printed creating a Purchase Order.

Contract Management 65
Amendments consist of 2 parts, the change order describing the amendment its dates and description and the item record that contains the fiscal year account and amount information. Item records can be created bearing new unique item numbers or existing item numbers from the original encumbrance can be used. If existing item numbers are used the result will be a combination of the 2 records by item number with separate GL account and amount information.
Shown below is an example of a completed amendment/change order and item screen.

Contract Management 66
At the time the amendment is created and prior to the CM to PO Tool is run, the encumbrance screen for the contract remains the same as the last time the tool was run. See below:

Contract Management 67
It is necessary, at this time to run the CM to PO Tool to have the amendments added to the purchase request as the purchase request has not been printed to create the PO. Again the Send Contract to PO Web Dialog page is displayed
Click the Run button to send any contract changes and amendment(s) to the PO sub system. Remember: it is necessary to have the amendment approved via workflow so that the approval date on the amendment contains a valid date prior to running the utility.

Contract Management 68
When the utility has completed normally, the following Web Page Dialog will be displayed:

Contract Management 69
The results on the encumbrance tab now reflect the amendment item record just added to the purchase request.

Contract Management 70
Note that the amendment tab now shows that it has been encumbered

Contract Management 71
After printing the PO to encumber the items on the PR, the resulting display of the PR now turned PO is shown below. Note the Status is PO now that it has been printed and the Printed tab shows the employee that printed the PO and the date it was printed. The Item portion of the screen is displaying the original 5 items created on the contract as well as the 6th item, the result of the amendment created prior to the Purchase Request being printed.

Contract Management 72
3.1.7 Step 7: Amending the Contract after printing the PO Amendments can be created and added to the original contract after the original purchase request has been printed in the same manner as prior to the purchase request being printed. Below is an example of the amendment that has been created after PR printing.
This amendment shows an approval date of 11/03/2006. This approval date, typically created via the workflow approval process must be present for the updated contract/amendment information to be sent to the PO subsystem.
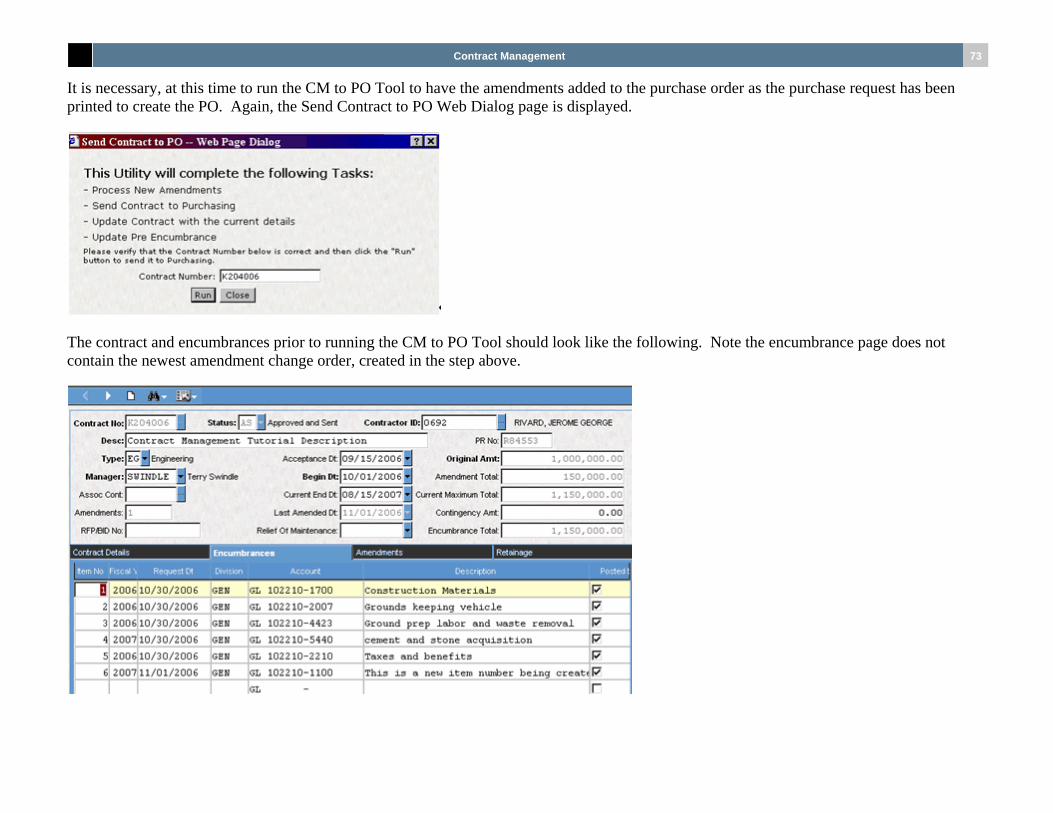
Contract Management 73
It is necessary, at this time to run the CM to PO Tool to have the amendments added to the purchase order as the purchase request has been printed to create the PO. Again, the Send Contract to PO Web Dialog page is displayed.
The contract and encumbrances prior to running the CM to PO Tool should look like the following. Note the encumbrance page does not contain the newest amendment change order, created in the step above.

Contract Management 74
Click on the Run button to send any contract changes and amendment(s) to the PO sub system. Remember: It is necessary to have the amendment approved via workflow so that the approval date on the amendment contains a valid date prior to running the utility. When the utility has completed normally, the following Web Page Dialog will be displayed.

Contract Management 75
Note that the message on the Web Page Dialog box states that the pre encumbrance step was skipped. This was due to the fact that the original PR had already been printed and the status had been changed to PO as a result. Below is the contract display showing the additional $25,000 being added to the contract and encumbrance total and the encumbrance screen showing the 7th encumbrance item created during the addition of the 2nd amendment/change order.

Contract Management 76
4 Process Reference
4.1 Entry
4.1.1 Contract Management Update Screens Contract Management Codes (CMUPCD)
Contract Management Update General Information (CMUPCM)
Contract Management Task/Cycle Definition (CMUPTC)
Contract Management Tracking (CMUPTK)
4.2 Processing
4.2.1 Tools
Data Roller
Several schema changes were added to the Contract Management subsystem. In order to bring old data into the 7i implementation of Contract Management, the data roller must be run.

Contract Management 77
Overview The data roller is a process that will need to be run from the 7i server on the command line. This process will take data from the old table structures and import it into the new table structures.
Running the Data Roller
From a command prompt, navigate to the Bi-tech bin directory. Once there, type the following command:
launcher –a BT70CM.dll –i BT70CM.CMDataMigration
You will be prompted for 2 pieces of information: the default GL ledger and the default JL ledger. There were several places in the old data structure that assumed the ledger to be the default ledger; the new system will not make that assumption, however, the defaults must be put in place.
After entering in the default ledgers, it is likely that you will receive several error messages explaining problems with the data. If you wish to export the errors to a file, you may use the following command:
launcher –a BT70CM.dll –i BT70CM.CMDataMigration > [output file name]
Where [output file name] is the name of the file you wish to output to including it’s full path. Please note that you will not see the prompt for the default ledgers, however you will still need to enter them in before the process will continue.
After all the issues listed have been resolved in the database, you can run the command again without the output file. Ideally, the result will look something like what is listed below.
C:\dev\bin>launcher -a BT70CM.dll -i BT70CM.CMDataMigration
Enter the default GL ledger: GL
Enter the default JL ledger: JL
Successfully wrote 12 records to cm_codes. 0 failed.
Successfully wrote 480 records to cm_encum_item. 0 failed.
Successfully wrote 2018 records to cm_encum_acct. 0 failed.
Successfully wrote 778 records to cm_amend_chg. 0 failed.

Contract Management 78
Successfully wrote 970 records to cm_amend_item. 0 failed.
Successfully wrote 1431 records to cm_amend_acct. 0 failed.
Successfully wrote 211 records to cm_compl_vendor. 0 failed.
Successfully wrote 6420 records to cm_compl_dtl. 0 failed.
Successfully wrote 8 records to cm_cycle_mstr. 0 failed.
Successfully wrote 15 records to cm_cycle_dtl. 0 failed.
Successfully wrote 103 records to cm_subcontractor. 0 failed.
If any failures occur, you can check the event log to see a more detailed description of why each of them failed and attempt to repair the database.

Contract Management 79
Copy Tool
The Copy Tool resides on the side tool menu of the CMUPCM screen and will allow a user to copy a contract.
To copy the contract to a new seeded contract number, select “Seed”; otherwise, a contract number can be set by entering it in the “Other” text box.

Contract Management 80
Set the Original Max Amount of the new contract by entering it in next text box. The default Original Max Amount is set to the Original Max Amount of the current contract.
To copy the comments from the original contract, check the “Copy Comments” checkbox.
Click the “Copy” button to create the new contract. In order to make multiple copies, click the “Copy” button once for each copy desired.
Any errors occurred during the copy will be displayed at the bottom in red, or if a contract was successfully copied, a green status message will be displayed with the new contract number and the number of records in each table copied.

Contract Management 81
Send to PO Utility
This tool completes following tasks:
Contract Management 82
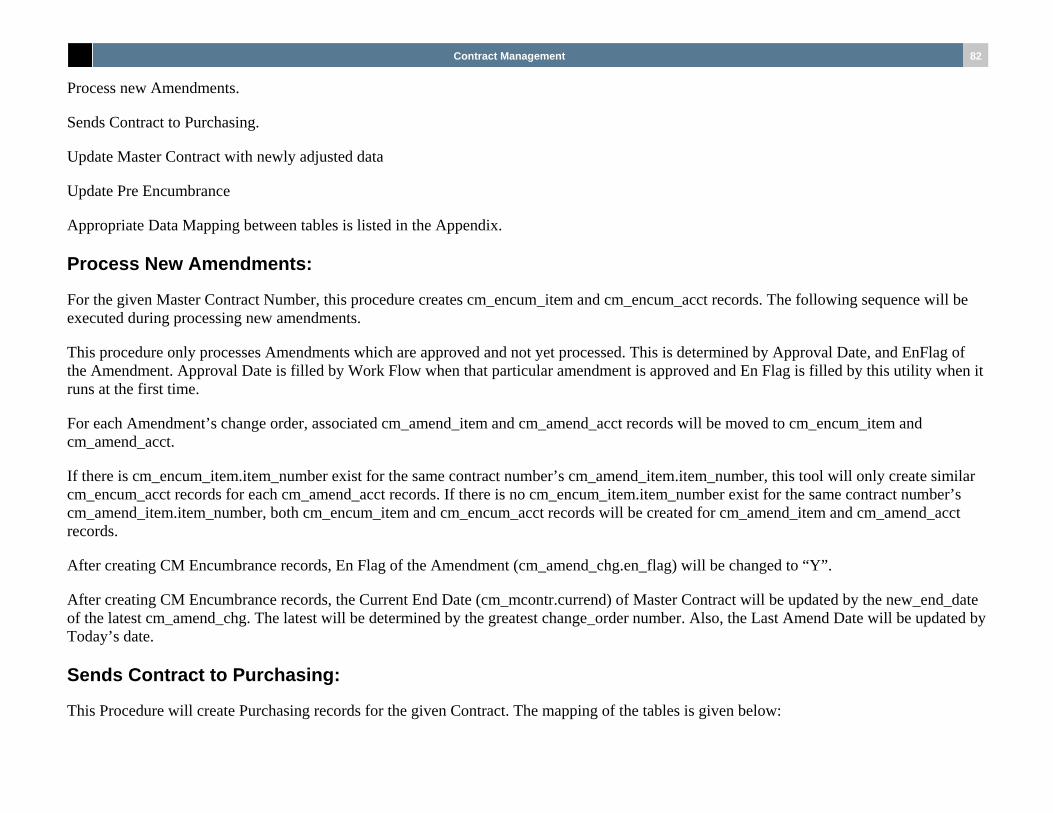
Process new Amendments.
Sends Contract to Purchasing.
Update Master Contract with newly adjusted data
Update Pre Encumbrance
Appropriate Data Mapping between tables is listed in the Appendix.
Process New Amendments:
For the given Master Contract Number, this procedure creates cm_encum_item and cm_encum_acct records. The following sequence will be executed during processing new amendments.
This procedure only processes Amendments which are approved and not yet processed. This is determined by Approval Date, and EnFlag of the Amendment. Approval Date is filled by Work Flow when that particular amendment is approved and En Flag is filled by this utility when it runs at the first time.
For each Amendment’s change order, associated cm_amend_item and cm_amend_acct records will be moved to cm_encum_item and cm_amend_acct.
If there is cm_encum_item.item_number exist for the same contract number’s cm_amend_item.item_number, this tool will only create similar cm_encum_acct records for each cm_amend_acct records. If there is no cm_encum_item.item_number exist for the same contract number’s cm_amend_item.item_number, both cm_encum_item and cm_encum_acct records will be created for cm_amend_item and cm_amend_acct records.
After creating CM Encumbrance records, En Flag of the Amendment (cm_amend_chg.en_flag) will be changed to “Y”.
After creating CM Encumbrance records, the Current End Date (cm_mcontr.currend) of Master Contract will be updated by the new_end_date of the latest cm_amend_chg. The latest will be determined by the greatest change_order number. Also, the Last Amend Date will be updated by Today’s date.
Sends Contract to Purchasing:
This Procedure will create Purchasing records for the given Contract. The mapping of the tables is given below:

Contract Management 83
cm_mcontr -> pop_pv_dtl
cm_encum_item -> poi_item_dtl
cm_encum_acct -> pon_en_dtl
cm_encum_item.enc_description -> pot_text_dtl
If multiple cm_encum_acct records exist for a given cm_encum_item, an associated poi_item_dtl and pon_en_dtl will be created. If there is only a single cm_encum_acct record for that cm_encum_item, only the poi_item_dtl record will be created.
The default PO format will be used to determine the length of the text in pot_text_dtl. If the length of enc_description for cm_encum_item is longer than the default PO format line length, multiple pot_text_dtl records will be created according to the word wrapping. This requires the tool to consider the Format Flag in POUPGN to determine if formatting is based on the ledger or not. The POUPGN record will be based on the GL ledger code of the given CM EncumItem record and if the ledger is not set in POUPGN, ‘@@’ will be used as the ledger code. If the format flag is set to ‘N’, the tool will use the PO Format value of POUPPR screen to get the PO formatting code. If that code is not set there, the tool is required to find the formatting code based on the ledger code. If the format flag is set to ‘Y’, the ledger code should be used as the formatting code. Using the formatting code, POUPFO screen should be queried to find the length of the text. This can be done by looking at the corresponding PoLen value for PoItemNo which contains the hexadecimal value of ‘28’.
At the end, the newly generated pr number will be updated in the Master Contract’s Pr Number.
If a pr number already exists for the master contract, pop_pv_dtl records will be updated instead of creating a new one. But pot_text_dtl, poi_item_dtl and pon_en_dtl records will be deleted and created according to the new data.
Update Master Contract with newly Adjusted Data:
After sending processed Amendments, and sending the contract to purchasing, there will be data that needs to be updated in relevant places.
The total of change_amount of cm_amend_item will be calculated for the given contract and that amount will be updated in cm_mcontr.amendsum.
Current max will be re calculated and updated according to the new amendsum and origmaxamt of cm_mcontr.
The status of the contract will be changed to AS (Approved and Sent).

Contract Management 84
Update Pre Encumbrance:
Newly created or updated PR will be sent to Pre Encumbrance. When sending to Pre Encumbrance, the tool will send only if the Status of Purchase Order is ‘PR’.
Using a Workflow Model to Handle Amendment approvals
Setup 1. Set up of Contract Number seed via mask NUUPCD with common code “SYNO CONTNUM”.
2. Contract Type - Contract Type codes are client-specific and are defined in the CMUPCD screen.
3. Manager Code - Manager codes are client-specific and are defined in the CMUPCD screen.
Break down the steps + any additional info. New Contract: Create Contract (contract master + contract details tab) Status = NW
Enter original encumbrances in Encumbrance Tab
Enter retainage in Retainage Tab, if any
Contract goes through approvals (Workflow) When approved Status = AW
Run EN to PO tool….. Status changes to AS and post_flag on Encumbrance records is checked.
Amendments Pull up Contract that needs amendment

Contract Management 85
4.3 Utilities Under Construction
4.4 Reports
4.4.1 Contract Management Standard Reports CM - Open Contracts
CM - Contract Compliance
CM - Cont Status
CM - Cont Amend
4.4.2 General Reporting Access to information is straightforward and easy. The Contract Management System includes standard reports and immediate online inquiry to any data in the system. Security- protected reports can be run at the user’s networked computer or via the Internet from any Web browser.
Standard reports available include:
Master Contracts/Amendment Information Contract/Amendment Information Master Contracts Contracts Encumbrance Detail Report Retain Calculation Information Payment/Retain Information
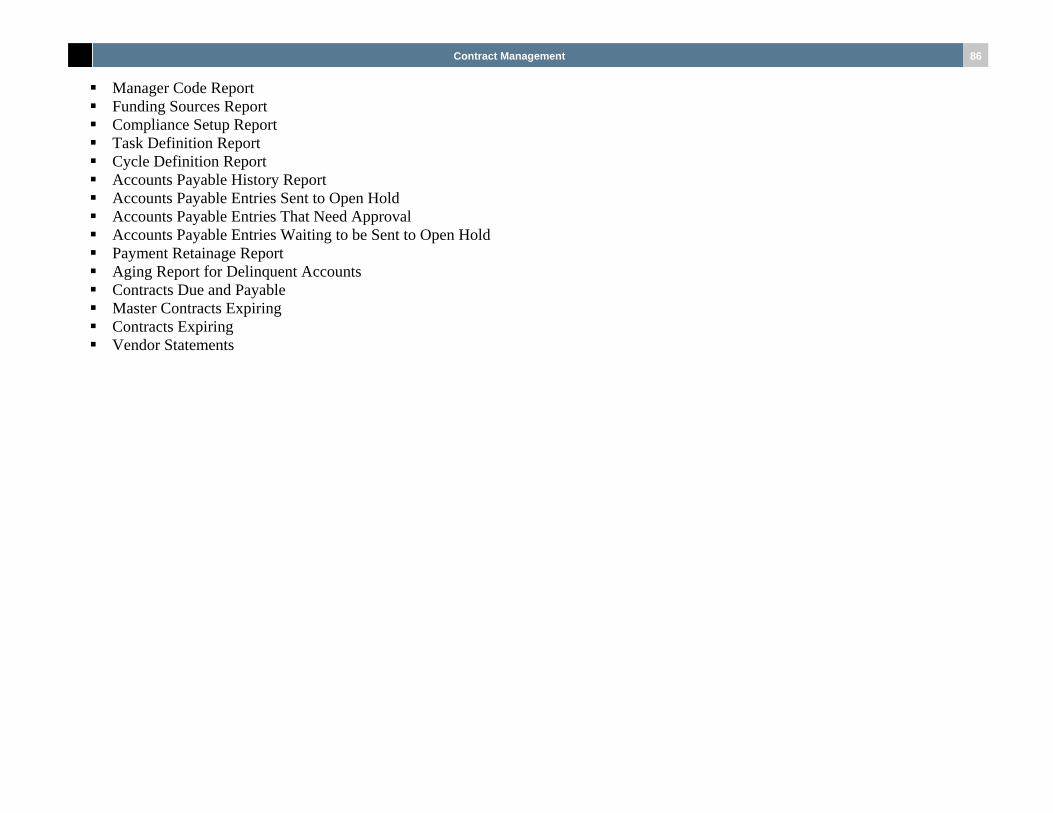
Contract Management 86
Manager Code Report Funding Sources Report Compliance Setup Report Task Definition Report Cycle Definition Report Accounts Payable History Report Accounts Payable Entries Sent to Open Hold Accounts Payable Entries That Need Approval Accounts Payable Entries Waiting to be Sent to Open Hold Payment Retainage Report Aging Report for Delinquent Accounts Contracts Due and Payable Master Contracts Expiring Contracts Expiring Vendor Statements
Contract Management 87
5 Troubleshooting
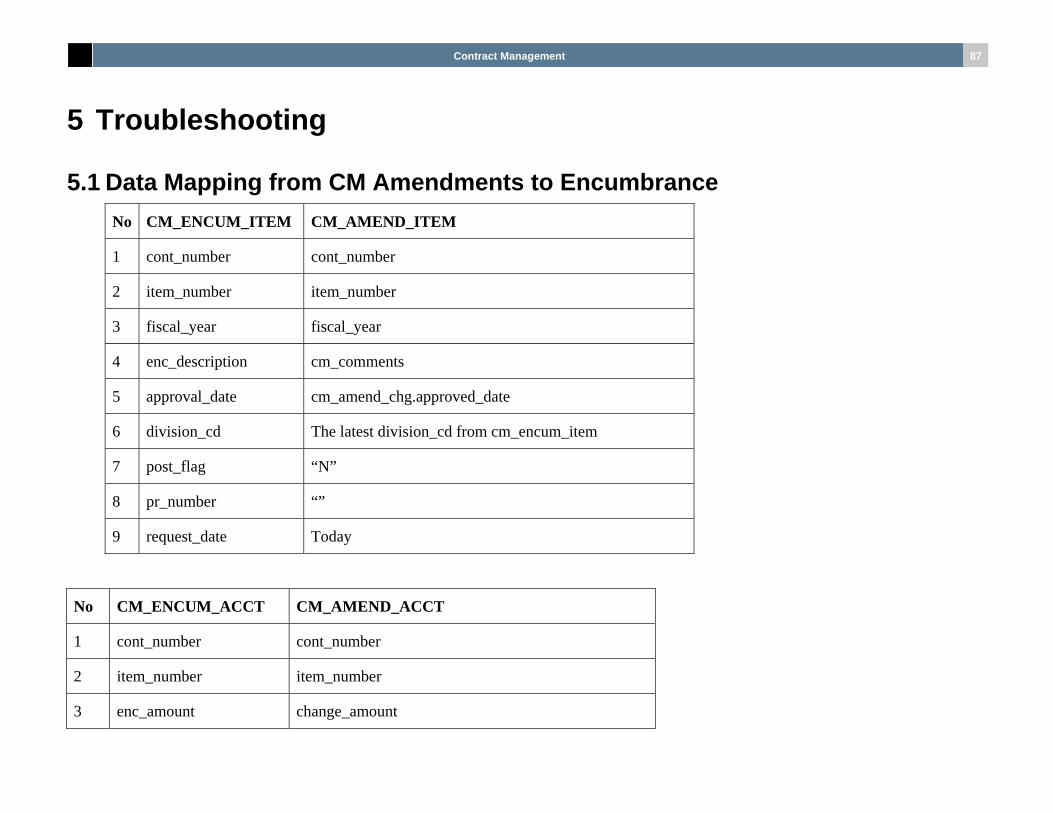
5.1 Data Mapping from CM Amendments to Encumbrance No CM_ENCUM_ITEM CM_AMEND_ITEM
1 cont_number cont_number
2 item_number item_number
3 fiscal_year fiscal_year
4 enc_description cm_comments
5 approval_date cm_amend_chg.approved_date
6 division_cd The latest division_cd from cm_encum_item
7 post_flag “N”
8 pr_number “”
9 request_date Today
No CM_ENCUM_ACCT CM_AMEND_ACCT
1 cont_number cont_number
2 item_number item_number
3 enc_amount change_amount

Contract Management 88
4 gl_gr gl_gr
5 gl_key gl_key
6 gl_obj gl_obj
7 jl_gr jl_gr
8 jl_key jl_key
9 jl_obj jl_obj
10 work_order work_order
No CM_MCONTR CM_AMEND_CHG
1 currend new_end_date
5.2 Data Mapping from CM to PO Encumbrance Data No POP_PV_DTL Fields CM Data
1 pop_pr_prefix “PR”
2 pop_pr_num If the PR Number Field in CMUPCM screen is populated use that number, else create a new PR number using seed ‘SYNO/PR.SEED’ from common code.
3 pop_po_prefix “PO”
4 pop_po_num cm_mcontr.contnum (Contract Number in the CMUPCM screen)

Contract Management 89
5 pop_pe_id cm_mcontr.peid (Contractor ID in CMUPCM screen)
6 pop_addr_cd This will be calculated. Get the Address hierarchy from short description of common code ‘POAH/ADDRESS’. Get the Address code from pe_addr_dtl for the cm_mcontr.peid. Loop through the pe_addr_dtl.pe_addr_cd to see if it is equal to any 2 letter codes of common code short description. (e.g: If common code short description is ‘BLPRR1R2’, loop through pe_addr_dtl.pe_addr_cd to see if it is equal to ‘BL’ or ‘PR’ or ‘R1’ or ‘R2’). If there is one use that, else use the pe_addr_cd. If pe_addr_cd is not defined, use “”.
7 pop_rqr_dt cm_mcontr.origbegin
8 pop_entry_dt Today
9 pop_en_flag “Y”
10 pop_contract cm_mcontr.contnum
11 pop_ship_id If cd_assoc_code01 is populated for ‘CMPO/DEFAULT’ common code setting, use that value, else default it to “”.
12 pop_bill_id If cd_assoc_code02 is populated for ‘CMPO/DEFAULT’ common code setting, use that value, else default it to “”.
13 pop_rqs_by IFAS user id
14 pop_sec_cd cm_mcontr.contmgr (From CMUPCM screen)
15 pop_status “PR”
16 pop_pedb_code “P”

Contract Management 90
17 pop_bill_addr_cd Same method as #6 (In this case it looks pe_addr_dtl address code for pop_bill_id.)
18 pop_ship_addr_cd Same method as #6 (In this case it looks pe_addr_dtl address code for pop_ship_id.)
19 pop_en_div “GEN”
20 pop_type “C”
21 pop_req_codes01 “CM”
22 pop_rqs_dt Today
23 pop_exp_dt Current End date (cm_mcontr.currend) of CMUPCM, which is updated by the latest new_end_date of cm_amend_chg during Amendment Processing.
5.3 POI_ITEM_DTL Table No POI_ITEM_DTL Fields CM Data
1 poi_pr_prefix “PR”
2 poi_pr_no cm_mcontr.prnum (PR Number on CMUPCM)
3 poi_po_prefix “PO”
4 poi_po_no cm_mcontr.contnum (Contract Number in the CMUPCM screen)
5 poi_gl_gr The first record of cm_encum_acct.gl_gr

Contract Management 91
6 poi_gl_key The first record of cm_encum_acct.gl_key
7 poi_gl_obj The first record of cm_encum_acct.gl_obj
8 poi_jl_gr The first record of cm_encum_acct.jl_gr
9 poi_jl_key The first record of cm_encum_acct.jl_key
10 poi_jl_obj The first record of cm_encum_acct.jl_obj
11 poi_wo The first record of cm_encum_acct.work_order
12 poi_pe_id “ “
13 poi_com_cd “ “
14 poi_po_item “ “
15 poi_ref_prefix “PR”
16 poi_ref_pr_no Same as poi_pr_no
17 poi_ref_item_no cm_encum_item.item_number
18 poi_amt Sum of (cm_encum_acct.enc_amount) for this cm_encum_item record
19 poi_qty 1
20 poi_term 0
21 poi_disc 0
22 poi_tax 0
23 poi_tax2 0
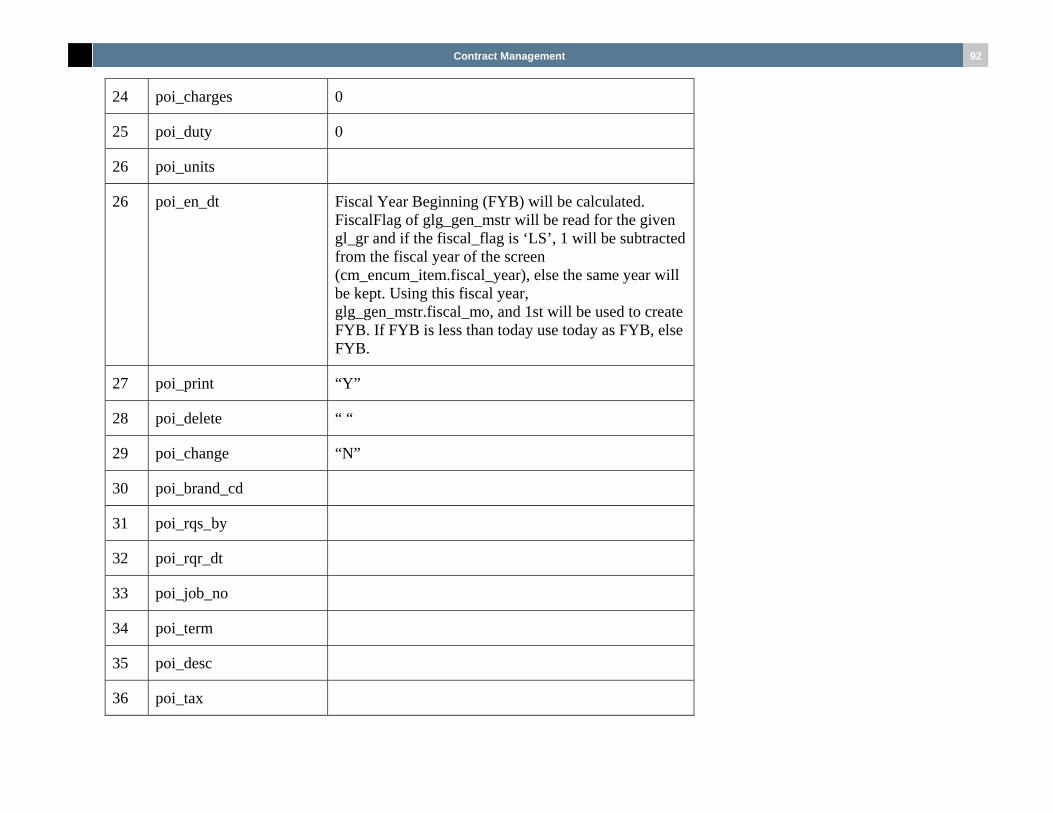
Contract Management 92
24 poi_charges 0
25 poi_duty 0
26 poi_units
26 poi_en_dt Fiscal Year Beginning (FYB) will be calculated. FiscalFlag of glg_gen_mstr will be read for the given gl_gr and if the fiscal_flag is ‘LS’, 1 will be subtracted from the fiscal year of the screen (cm_encum_item.fiscal_year), else the same year will be kept. Using this fiscal year, glg_gen_mstr.fiscal_mo, and 1st will be used to create FYB. If FYB is less than today use today as FYB, else FYB.
27 poi_print “Y”
28 poi_delete “ “
29 poi_change “N”
30 poi_brand_cd
31 poi_rqs_by
32 poi_rqr_dt
33 poi_job_no
34 poi_term
35 poi_desc
36 poi_tax

Contract Management 93
37 poi_tax_cd
38 poi_pedb_code
39 poi_pe_id
5.4 PON_EN_DTL Table No PON_EN_DTL Fields CM Data
1 pon_ref_prefix “PR”
2 pon_ref_no cm_mcontr.prnum (PR Number on CMUPCM same as pop_pv_dtl)
3 pon_item cm_encum_acct.item_number
4 pon_gl_gr cm_encum_acct.gl_gr
5 pon_gl_key cm_encum_acct.gl_key
6 pon_gl_obj cm_encum_acct.gl_obj
7 pon_jl_gr cm_encum_acct.jl_gr
8 pon_jl_key cm_encum_acct.jl_key
9 pon_jl_obj cm_encum_acct.jl_obj
10 pon_wo cm_encum_acct.work_order
11 pon_amt cm_encum_acct.enc_amount
12 pon_percent

Contract Management 94
13 pon_sort_dt
14 pon_sort_time
5.5 POT_TEXT_DTL Depending on the settings about PO format, the 70 char cm_encum_item.enc_description will be wrapped into multiple records and saved into pot_text_dtl.
No POT_TEXT_DTL Fields CM Data
1 pot_ref_prefix “PR”
2 pot_ref_pr_no cm_mcontr.prnum (Same as pop_pv_dtl)
3 pot_ref_item_no cm_encum_item.item_number
4 pot_text cm_encum.enc_description
5 pot_seq_no Sequential number, depending on the number of records. If there are more than one record, starts from 01 to 99.
6 pot_type “01”
7 pot_sort_date
8 pot_sort_time

Contract Management 95
6 Advanced/Special Configuration Under Construction
7 Module Integration
7.1 Posting Under Construction
7.2 Security Under Construction
7.3 Interfaces Under Construction
8 Implementation
8.1 Dependencies Under Construction

Contract Management 96
8.2 Template Project Plan Under Construction
8.3 Agendas
8.3.1 Consulting Objectives
Consulting Objectives
Who should Attend Consulting Objectives CM0001 – CM0025: Functional Team Members and Functional Area Specialists as needed
CF0001 000 General Overview 010 Client and Consultant Introductions 020 Contact Information 030 Identify personnel responsible for IFAS implementation 040 Review Consulting Objectives 050 IFAS documentation – Insider downloads
CM0001 000 Contract Management Overview

Contract Management 97
010 Integration Picture 020 System Process 030 System Features/Functions Demonstration
CM0005 000 Contract Management Process 020 Define Contract 030 Create Encumbrances 040 Define Retainage 050 Approval Process 060 Purchase Order Tool 070 Create Amendments before PO is printed 080 Create Amendments after PO is printed
CM0010 000 Contract Maintenance 010 CM Codes 020 CM Tracking 030 Copy Tool
CM0010 000 Optional Contract Management Process 010 Task Definition 020 Cycle Definition 030 Project Definition
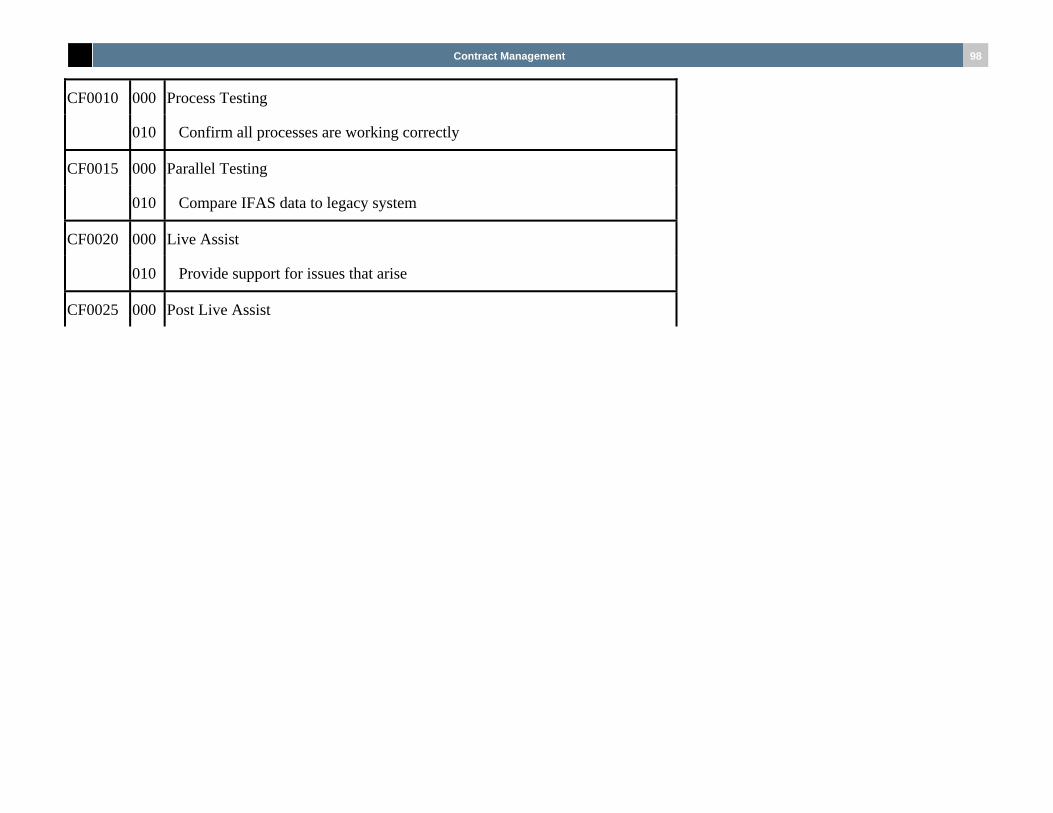
Contract Management 98
CF0010 000 Process Testing 010 Confirm all processes are working correctly
CF0015 000 Parallel Testing 010 Compare IFAS data to legacy system
CF0020 000 Live Assist 010 Provide support for issues that arise
CF0025 000 Post Live Assist

Contract Management 99
9 FAQ Under Construction