contura g2 komplettstri.kmutnb.ac.th/coi-dem/images/datasheet/datasheet_contura_g2.pdf · bration...
TRANSCRIPT

Technical Services Installation Instructions
CONTURA G2
Measuring Center


1. Selection of Installation Site andInstallation Conditions
When selecting the installation site, please make surethat the following conditions either already exist or canbe implemented there.
The system comprises the following components:
1. Coordinate measuring machine
2. Controller
3. Control console
4. Data station (peripherals)
1.1 Required Room Height
This dimension equals the sum of the height of the coor-dinate measuring machine and a minimum overheadclearance of 200 mm.
Example: Contura G2
1.2 Required Floor Surface
A cutout layout plan is included in this brochure to giveyou a quick overview of the required floor surface. Whenpreparing the space assignment plan, make sure thatyour CMM is well accessible from all sides.
Please select the installation site so that there is a distanceof at least 800 mm between the CMM and the wall.
1.3 Transport Lanes
Please check the ground-floor and upper-storey floorloading capacity of all transport lanes leading to the in-stallation site. The doorways must be at least 5 cm widerand higher than the largest packaged unit, including thetransport vehicle. The dimensions and weights of thetransport units are specified in this brochure.
1.4 Ambient Conditions
Bridge-type coordinate measuring machines are high-tech products. Their specified quality is attainable only ifyou ensure that the following conditions are met.
Permissible Storage Temperature Range
5°C to 40°CPay special attention to the storage temperature duringwinter. Avoid storing at temperatures below 5°C.
Ambient Conditions for Operational Readiness
Permissible ambient temperature: +17°C to +35°C
Permissible air humidity:40% - 60% without condensation
Sound level at installation site: <90dB
Max. altitude above sea level: for 100 - 125 V 3000 mfor 220 - 240 V 2000 m
Temperature Conditions for Operation of CMM:
The measuring uncertainty specified for your CMM canbe guaranteed if:
1. you use a measurement correction program and enterthe workpiece and CMM temperatures as well as thetemperature expansion coefficients of the workpiecematerial.
2. the following temperature conditions are observed:
Please make sure that sufficient lighting is available.
The use of sources of heat near the CMMmust be avoided wherever possible.
1.5 General Protective Measures
The CMM must be protected against dirt and foreign par-ticles (e.g. casting sand, metal filings and bore chips, oil,coolants, lubricants and soot). Deposits of materials suchas casting sand and swarf may lead to increased expensesfor cleaning and maintenance.
1.6 Vibrations at the Installation Site
The following diagram(s) show(s) the permissible floor vi-brations.
Vibrations are often caused by heavy processing machin-ery, transport vehicles (cranes or stackers) and stampingor forging machines located in adjacent rooms.
A measurement is required to determine the actual mag-nitude of local floor vibrations. You can order such a vi-bration analysis from Carl Zeiss Oberkochen. Please callor e-mail your contact person for more details.
In any case, the results must be made available to CZO forevaluation.
1.7 Floor Load
When calculating or planning any floor reinforcement(foundation etc.) which may be required, it is advisable to
Height of CMM 2800 mm
Minimum installation clearance 200 mm
Required minimum room height above floor or foundation 3000 mm
CMM TypeTemp. Range
(ºC)
Temperature Gradient
per hour(ºK/h)
per day(ºK/d)
per m(ºK/m)
CONTURA G2 18 - 22 1.0 1.5 1.0
CONTURA G2 HTG(optional)
18 - 26 1.0 1.5 1.0
Installation Instructions Page
3

consult a statics engineer who is familiar with your localfloor conditions. To determine the floor load exerted by
the CMM, see the pertaining information in this bro-chure.
0,1
1
10
100
1000
0 10 20 30 40 50
X axis horizontal
Y axis horizontal
Z axis vertical
Permissible foundation acceleration forContura G2 w. trigger probe and standard damping
Acceleration values above the curverequire an additional foundation
Acceleration [mm/ss]
Frequency [Hz]
Page
4 Installation Instructions

0,1
1
10
100
1000
0 10 20 30 40 50
X-axis horizontal
Y-axis horizontal
Z-axis vertical
Permissible foundation acceleration forContura G2 measuring with standard damping
Acceleration values above the curverequire an additional foundation
Acceleration [mm/ss]
Frequency [Hz]
Installation Instructions Page
5

2. Preparation for installation/Re-quired connections/Transport/Storage
The following preparations must be made prior to the in-stallation date:
2.1 Preparing the Floor Surface
The floor surface must be clean and the unevenness ofthe bearing surfaces must not exceed max. 25 mm.
2.2 Electric Power Supply
We recommend connecting the system to a powersource which does not supply electricity to peak-load orhigh-consumption equipment (elevators, air conditioningsystems). Due to the possibility of negative influences,avoid installing the CMM near
– High-consumption equipment(e.g. welding machines)
– High-interference (EMI) equipment(e.g. electron discharge machines).
The use of mobile telephones or walkie talkies within aradius of 3m surrounding the CMM is also prohibited.This precaution is necessary to prevent malfunctions, es-pecially in connection with data processing sys-tems.
A permanent connection (max. 16A) must be providedfor the system. Alternatively, a 3-wire CEE-form plug con-nection is also acceptable. A 5-plug multiplex outlet mustbe provided by you (the customer) for the data station.We recommend the on-site installation of a surge arrest-er, e.g. Phoenix Flashtrab FLT 25-400, as basic protectionagainst surge voltage.
We recommend making the connection as shown in thefollowing drawing, taking into account that all per-taining national regulations also must be observed.
2.3 Electric Power Supply Parameters
To ensure trouble-free data transmission between the
CMM and the data station, the line power supply mustcomply with the following specifications.
Line power supply:
– Line voltage:1/N/PE 100/110/115/120/125/230/240 VAC
– Max. voltage fluctuations: ±10 %
– Frequency: 50 or 60 Hz
– Max. frequency fluctuations: ±3.5%
– Max. power sag: 10 ms(Max. one half-wave may be missing at 50 Hz)
– Interference peaksMax. rise time at 5 ns: ± 500 VMax. rise time at 50 µs: ± 1000 V
Max. amount of heat generated:3600 kJ/h
Max. total power requirement:CMM: max. 1000 VAPeripheral workstation: max. 1000 VA
2.4 EMC
EN 61326-1 Appendix A, Class A
Warning !
This is a class A device, and may therefore cause radio in-terference in the surrounding area. In such cases, theoperator may be required to take appropriate action andbear any costs thus incurred.
2.5 Stabilizing the line voltage
If out-of-tolerance r.m.s. fluctuations of the nominal volt-age briefly occur, a line analysis must be performed.Please contact us if you have such a requirement. We willbe glad to advise you and suggest suitable measures. Inmost cases, it is sufficient to install a separate stub cablefrom the main distributor to the CMM.
L
N
PE
Proposed permanent connection (customer installation (national voltage))
C16 A
Connecting cable, min. 5 m
Connection diagram
CMM
Multiplex3-wire
Terminalbox
Multiplex outlet with5x 3-wire sockets
Peripherals:max. 1000 VA
3x 2.5 mm2 cableincluded in scope of supplyFault
currentbreaker(if re-
quired)
outlet
Page
6 Installation Instructions

2.6 Machine parameters
– Overvoltage category: ΙΙΙ
– Pollution degree: 2
– Protection class: 1
2.7 Teleservice
You will require an Internet connection for Teleservice.For more details, please refer to the "Teleservice" bro-chure.
2.8 Compressed Air Supply
Please make sure that the air pressure required to operateyour CMM is available as described below:
● Minimum pressure 6 bar, max. pressure 10 bar.
● Prefiltered air; completely free of contaminating partic-les, oil vapors and water residues.
● Air quality in compliance with ISO 8573 Part 1 Classifi-cation 4, which includes:
Par. 6.1: Max. particle size 15 µm, max. dirt particleconcentration 8 mg/m3
Par. 6.2: Max. compressed air dew point +3 °C
Par. 6.3: Max. oil concentration of 5 mg/m3
If the above air quality is not attained, it may be necessaryto add an additional downstream air filtration unit and, insome cases, a membrane dryer to the compressed air lineof the CMM. These units can be ordered from CZ. Pleaseask your contact person for more information.
Failure to comply with the above air quality spe-cifications could result in damage not coveredby your warranty.
Air consumption of CMM:
Max. 30 l/min at 5 bar (150 normal liters/min at 1 bar)
Connecting point for compressed air
A connection with a compressed air coupling for a ¼“NPT plug-in fitting is required to connect the machine tothe compressed air supply. This connection must be pro-vided by you as illustrated in the section entitled "CMMinstallation dimensions and arrangement of thesteel plates". A compressed air hose with a ¼“ NPTplug-in fitting (included in the scope of supply) must belaid and connected during installation.
When laying the connection up to the CMM, make surethat the connecting parts are readily accessible and arenot obstructed by the base of the CMM.
2.9 Transport Vehicles
Please provide a forklift with sufficient carrying capacityand fork length to unload the packaged units and trans-port them to the storage or installation site. The loadingcapacities required of these vehicles are specified on thefollowing pages.
All transport lanes and approaches should be kept openduring the entire installation and startup period to helpensure trouble-free installation.
The transport locks and braces on the CMM, pallet (ship-ping crate) and lashing straps must be returned to CZ.
Packing materials such as e.g. foils or styrofoamchips ("popcorn") are recycled by Carl Zeiss andshould be returned to CZ along with the trans-
port stops and braces if they are clean and no dirt hasbeen mixed in with them.
2.10 Unloading/Storing/Unpacking
With outdoor temperatures below 0°C, CMM assemblieswith granite guideways are not enclosed in a protectivePVC bag, but sealed air-tight along with a drying agent inan aluminum-coated foil (insulated packaging).
Unloading and transport must be performed only withtransport lugs or pallets. Be careful not to damage theinsulated packaging! Please remember that your CMMis a valuable, high-precision instrument. For this reason,you should avoid jolting or knocking the crate at all times.
Please leave the crates packed and store them in a shel-tered location as close as possible to the installation site.
Adaptation to room temperature:
Store the crates in a room with a minimum ambient tem-perature of 15° C at least 2 days before our system spe-cialist arrives. The crates may be unpacked and the insu-lated packaging may be removed only by our system spe-cialist! Please also make sure that a place suitable for de-positing the empty containers is provided.
2.11 Moving the CMM to another location
A system specialist should always be presentwhen moving the CMM to another location asa precaution to ensure that it is not damaged.
Note!
Note!
Note!
Installation Instructions Page
7

.
3. Shipping Crates and Pallets
3.1 Dimensions and Weights
The machine components are delivered on transport pallets with insulated packaging. They are delivered in ashipping crate only for air cargo and overseas shipments.
Note!
L
W
H
Shipping crate for
Crate dimensionsin mm (max.)
m3Max. tare wt. (kg) Max. gross wt. (kg)
L W HSea/air
cargo crateTruckpallet
w. sea/air cargo crate
with truckpallet
CONTURA G2X=700, Y=700, Z=600X=700, Y=1000, Z=600X=1000, Y=1200, Z=600X=1000, Y=1600, Z=600X=1000, Y=2100, Z=600
28202820287028703280
19601960226522652265
25152515251525152515
13.913.916.416.418.7
696696883883826
407407545545540
19862236317640165997
16921951285133585625
CONTURA G2 (opt. granite U-profile)Upper part, X=1000, Y=1200, Z=600Upper part, X=1000, Y=1600, Z=600Upper part, X=1000, Y=2100, Z=600
287028453330
226521102110
251525152515
16.415.117.7
852958987
555727761
309236026084
279533725857
CONTURA G2 (opt. granite U-profile)Base, X=1000, Y=1200, Z=600Base, X=1000, Y=1600, Z=600Base, X=1000, Y=2100, Z=600
180522102515
175517551755
765765740
2.53.03.3
164171209
607664
284304394
180209249
Pal box with accessories 1475 1070 1095 1.8 69 206
Controller 1100 1100 1100 1.4 90 227
Note: All values specified above are maximum values. Any values not entered were not available at the time of printing. For technical reasons thedimensions of the shipping crates (L, W and H) may deviate from the values specified here by as much as +50 mm.
Page
8 Installation Instructions

a
c
850
min. 800
min. 800
203
283
845T-T
t
2200
2450
b
CO
NT
UR
AG
2
2800
Height ofsecured
CMM assyincl. pallet
CONTURA G2
X/Y/Zmeasuring range
Net weightof CMM
Max. permissible workpiece weight
700/700/600 ca. 1280 kg 560 kg
700/1000/600 ca. 1550 kg 730 kg
1000/1200/600 ca. 2310 kg 1150 kg
1000/1600/600 ca. 2810 kg 1500 kg
1000/2100/600 ca. 5171 kg 1814 kg
= On-site air supply connection, precleaned compressed airsupply with pressure of 6-10 bar.
= Power supply ( two outlets with max. 16 A) to be installedby the customer.
= Telephone connection (ISDN)
= CMM compressed air supply connection
= CMM ↔ control connecting cable
t = Transport height without base
X/Y/Zmeasuring range
Length- a -
Length- b -
Length- c -
Length- t-
700/700/600 1430 1525920
1603700/1000/600 1430 1830
1000/1200/600 1743 2030
12251000/1600/600 1743 2430
1000/2100/600 1743 2945 1756
4. CMM Installation Dimensions and Arrangement of Steel Plates
4.1 Installation Dimensions for CONTURA G2 (all dimensions in mm, scale 1:30)
Min. overhead clearance: 200 mm
ControllerLength: ca. 756Width: ca. 575Height: ca. 700
T-T = Distance between ta-ble and bottom of probe
VASTXT probe 716
RDS probe 665
Height ofsecured CMM
assembly without pallet and
without Z tower
CONTURA G2
X/Y/Zmeasuring range
Max. cable leng.CMM ↔ control
700/700/600 ca. 3700 mm
700/1000/600 ca. 3550 mm
1000/1200/600 ca. 6300 mm
1000/1600/600 ca. 6000 mm
1000/2100/600 ca. 5700 mm
Installation Instructions Page
9

a
c
850
min. 800
min. 800
203
283
1048T-T
t
2403
b
CO
NT
UR
AG
2
2653
3003
4.2 Installation Dimensions for CONTURA G2 with opt. U-profile (all dimensions in mm, scale 1:30)
CONTURA G2 with optional U-profile
X/Y/ZMeasuring range
Net weight of CMM
Max. permissible workpiece weight
1000/1200/600 ca. 2583 kg 1150 kg
1000/1600/600 ca. 3163 kg 1500 kg
1000/2100/600 ca. 5755 kg 1814 kg
= On-site air supply connection, precleaned compressed airsupply with pressure of 6-10 bar.
= Power supply (two outlets with max. 16 A) to be installedby the customer.
= Telephone connection (ISDN)
= CMM compressed air supply connection
= CMM ↔ control connecting cable
t = Transport height without base
CONTURA G2 with optional U-profile
X/Y/ZMeasuring range
Length- a -
Length- b -
Length- c -
Length- t-
1000/1200/600 1743 2030
12001806
1000/1600/600 1743 2430
1000/2100/600 1743 2945 1959
Height ofsecured CMM
assembly without pallet and
without Z tower
Min. overhead clearance: 200 mm
ControllerLength: ca. 756Width: ca. 575Height: ca. 700
T-T = distance betw. table and lower edge of probe
VASTXT probe 919
RDS probe 868
Height ofsecured
CMM assyincl. pallet
CONTURA G2
X/Y/ZMeasuring range
Max. cable leng.CMM ↔ control
1000/1200/600 ca. 6300 mm
1000/1600/600 ca. 6000 mm
1000/2100/600 ca. 5700 mm
Page
10 Installation Instructions

4.3 Installation of Floor Stripe or Chain
The dangers posed by the CMM are impossible - or atleast difficult - for untrained personnel to recognize. Forthis reason, a restricted-access zone must be set uparound the machine to prevent damage or injury causedby untrained personnel.
The entrance to this area should be be clearly marked bya warning sign reading:
"Admittance only for authorized personnel"
and may be entered only by persons who have receivedproper training (operators).
min. 1000 min. 1000
min. 1000
min. 600
min. 200
min. 700
min. 100min. 100
min. 200
Floor marking or chain(black-and-yellow)
Controller
The back door of the controller cabinet mustbe located at least 200mm away from the wall.Moreover, the air exchange with the surround-
ing environment should not be blocked. The control cab-inet should be placed so that the rear side of thecontroller always faces away from the CMM.
CMM table (optional) with computer and printer
Note!
Installation Instructions Page
11

276
674
1070
244
CONTURA G2X=700, Y=1000
1032
219
521
822
244
CONTURA G2X=700, Y=700
1032311
773
1234
299
CONTURA G2X=1000, Y=1200
1192
389
973
1556
299
CONTURA G2X=1000, Y=1600
1192
493
1232
1971
297
CONTURA G2X=1000, Y=2100
1186
Floor load on the supports (A)
CONTURA G2
X=700, Y=700 34.8 N/cm2
X=700, Y=1000 43.1 N/cm2
CONTURA G2
X=1000, Y=1200 65.4 N/cm2
X=1000, Y=1600 81.5 N/cm2
X=1000, Y=2100 132.1 N/cm2
CONTURA G2 w. granite U-table (option)
X=1000, Y=1200 70.6 N/cm2
X=1000, Y=1600 88.2 N/cm2
X=1000, Y=2100 143.1 N/cm2
Support (A): Cast iron plate Ø 150(included in delivery)
4.4 Arrangement of the Steel Plates for Contura G2
The relative unevenness of the bearing surfaces must not exceed max. 25mm (1“)..The deviation tolerance for the center-to-center plate distance is (A) ±10 mm (all dimensions in mm)
Point of support (tilt protection only)
Page
12 Installation Instructions

144,8
344,8
544,8
744,8
100
152
58,4
700237
700
127
89
1041
1
1 2 3 4
2
3
4
1321
1189
M12 (16x)
Y
X
256 456 656 856
Y grid position
Bridge running surface
Bridge drive
X grid position
5. Dimensions of Granite Table and Fastening Hole Matrix
5.1 Measuring Table for Measuring Range of X=700, Y=700
Meas. range
Installation Instructions Page
13

144,8
344,8
544,8
744,8
944,8
1144,8
100
152
58,4
700237
1000
127
89
1346
1
1 2 3 4
2
3
4
5
6
1626
1189
M12 (24x)
Y
X
256 456 656 856
Y grid position
Bridge running surface
Bridge drive
X grid position
5.2 Measuring Table for Measuring Range of X=700, Y=1000
Meas. range
Page
14 Installation Instructions

144,8
344,8
544,8
744,8
944,8
1144,8
1344,8
100
152
58,4
1000237
1200
127
89
1545
1
1 2 3 4 5 6
2
3
4
5
6
7
1825
1492
M12 (42x)
Y
X
256 456 656 1056856 1256
Y grid position
Bridge running surface
Bridge drive
X grid position
5.3 Measuring Table for Measuring Range of X=1000, Y=1200
Meas. range
Installation Instructions Page
15

144,8
344,8
544,8
744,8
944,8
1144,8
1344,8
1544,8
1744,8
100
152
58,4
1000237
1600
127
89
1945
1
1 2 3 4 5 6
2
3
4
5
6
7
8
9
2225
1492
M12 (54x)
Y
X
256 456 656 1056856 1256
Y grid position
Bridge running surface
Bridge drive
X grid position
5.4 Measuring Table for Measuring Range of X=1000, Y=1600
Meas. range
Page
16 Installation Instructions

144,8
344,8
544,8
744,8
944,8
1144,8
1344,8
1544,8
1744,8
1944,8
2144,8
100
152
58,4
1000237
2100
127
89
2464
1
1 2 3 4 5 6
2
3
4
5
6
7
8
9
2743
1494
M12 (66x)
Y
X
256 456 656 1056856 1256
10
11
Y grid position
Bridge running surface
Bridge drive
X grid position
5.5 Measuring Table for Measuring Range of X=1000, Y=2100
Meas. range
Installation Instructions Page
17

144,8
344,8
544,8
744,8
944,8
1144,8
1344,8
125
152
58,4
1000237
1200
127
89
1545
1
1 2 3 4 5 6
2
3
4
5
6
7
1825
1492
M12 (42x)
Y
X
256 456 656 1056856 1256
Y grid position
Bridge running surface
Bridge drive
X grid position
5.6 Measuring Table with U-Profile for Measuring Range of X=1000, Y=1200
Meas. range
Page
18 Installation Instructions

144,8
344,8
544,8
744,8
944,8
1144,8
1344,8
1544,8
1744,8
125
152
58,4
1000237
1600
127
89
1945
1
1 2 3 4 5 6
2
3
4
5
6
7
8
9
2225
1492
M12 (54x)
Y
X
256 456 656 1056856 1256
Y grid position
Bridge running surface
Bridge drive
X grid position
5.7 Measuring Table with U-Profile for Measuring Range of X=1000, Y=1600
Meas. range
Installation Instructions Page
19
144,8
344,8
544,8
744,8
944,8
1144,8
1344,8
1544,8
1744,8
1944,8
2144,8
125
152
58,4
1000237
2100
127
89
2464
1
1 2 3 4 5 6
2
3
4
5
6
7
8
9
2743
1494
M12 (66x)
Y
X
256 456 656 1056856 1256
10
11
Y grid position
Bridge running surface
Bridge drive
X grid position
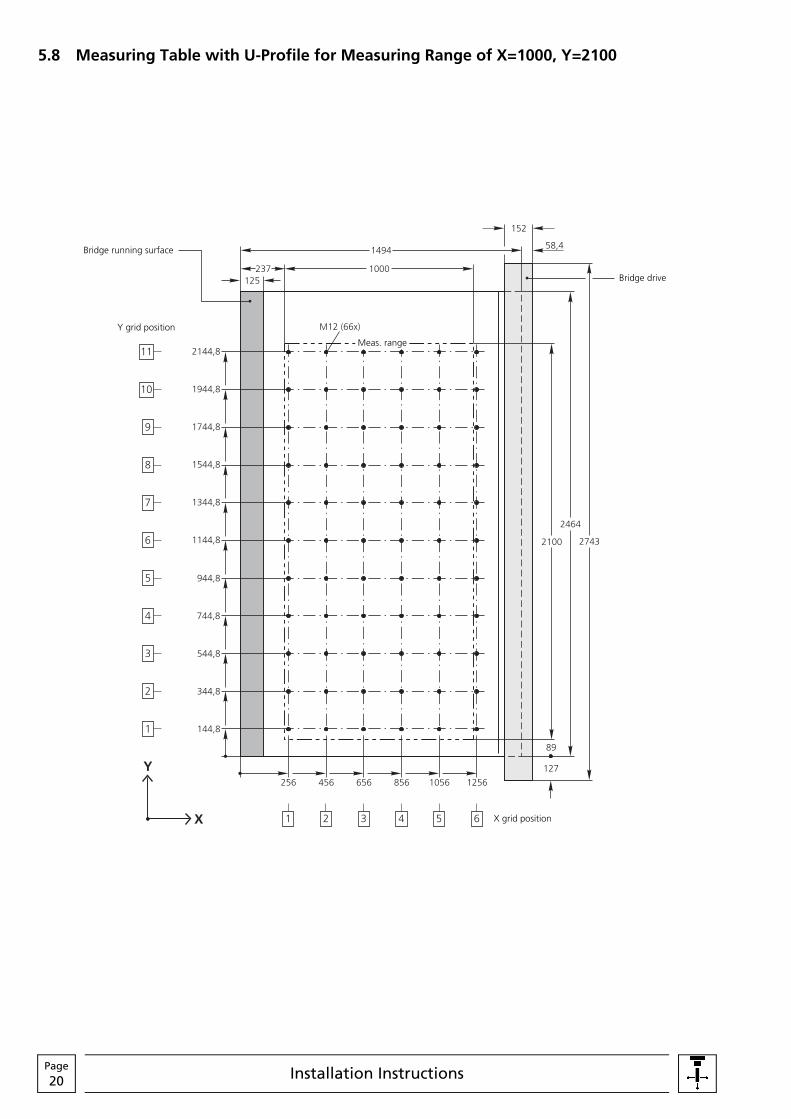
5.8 Measuring Table with U-Profile for Measuring Range of X=1000, Y=2100
Meas. range
Page
20 Installation Instructions

CONTURA G2X=700, Y=1000
CONTURA G2X=700, Y=700
CONTURA G2X=1000, Y=1200
CONTURA G2X=1000, Y=1600
CONTURA G2X=1000, Y=2100
6. Cutout Patterns for Customer Floor Plan
6.1 Cutout Patterns for Contura G2
Scale: 1:30
Controller
Installation Instructions Page
21

For editorial reasons, this page must remain empty.
Page
22 Installation Instructions

1 m
6.2 Grid for Customer Space Assignment (Layout) Plan
Don’t forget to take accessibility and min. distances into account! (scale: 1:30)
Installation Instructions Page
23

Page
24 Installation Instructions


Carl Zeiss 73446 Oberkochen
600061-1112.020 Printed in Germany IS-TD / 10.08