copyright disclaimer trademark recognition core manual v10.pdf · • consult the dealer or an...
TRANSCRIPT

LIVA CORE MINI PC USER MANUAL i
Preface
DisclaimerThe information in this document is subject to change withoutnotice. The manufacturer makes no representations or warrantieswith respect to the contents hereof and specifically disclaims anyimplied warranties of merchantability or fitness for any particularpurpose. The manufacturer reserves the right to revise thispublication and to make changes from time to time in the contenthereof without obligation of the manufacturer to notify any personof such revision or changes.
Trademark RecognitionMicrosoft, MS-DOS and Windows are registered trademarks ofMicrosoft Corp.MMX, Pentium, Pentium-II, Pentium-III, Celeron are registeredtrademarks of Intel Corporation.Other product names used in this manual are the properties of theirrespective owners and are acknowledged.
CopyrightThis publication, including all photographs, illustrations andsoftware, is protected under international copyright laws, with allrights reserved. Neither this manual, nor any of the materialcontained herein, may be reproduced without written consent ofthe author.Version 1.0

ii LIVA CORE MINI PC USER MANUAL
Federal Communications Commission (FCC)This equipment has been tested and found to comply with thelimits for a Class B digital device, pursuant to Part 15 of the FCCRules. These limits are designed to provide reasonable protectionagainst harmful interference in a residential installation. Thisequipment generates, uses, and can radiate radio frequency energyand, if not installed and used in accordance with the instructions,may cause harmful interference to radio communications. However,there is no guarantee that interference will not occur in a particularinstallation. If this equipment does cause harmful interference toradio or television reception, which can be determined by turningthe equipment off and on, the user is encouraged to try to correctthe interference by one or more of the following measures:
• Reorient or relocate the receiving antenna• Increase the separation between the equipment and the
receiver• Connect the equipment onto an outlet on a circuit
different from that to which the receiver is connected• Consult the dealer or an experienced radio/TV
technician for helpShielded interconnect cables and a shielded AC power cable mustbe employed with this equipment to ensure compliance with thepertinent RF emission limits governing this device. Changes ormodifications not expressly approved by the system’s manufacturercould void the user’s authority to operate the equipment.

LIVA CORE MINI PC USER MANUAL iii
Safety InstructionsYour system is designed and tested to meet the latest standards ofsafety for information technology equipment. However, to ensureyour safety, it is important that you read the following safetyinstructions.
Setting up your system• Read and follow all instructions in the documentation
before you operate your system.• Do not use this product near water or a heated source
such as a radiator.• Set up the system on a stable surface.• Openings on the chassis are for ventilation. Do not block
or cover these openings. Make sure you leave plenty ofspace around the system for ventilation. Never insertobjects of any kind into the ventilation openings.
• Use this product in environments with ambienttemperatures between 0°C and 40°C.
• If you use an extension cord, make sure that the totalampere rating of the devices plugged into the extensioncord does not exceed its ampere rating.
Attention during use• Do not step on the power cord or let anything rest on
top of it.• Do not spill water or any other liquid on your system.• When the system is turned OFF, a small amount of
electrical current still flows. Always unplug all power,modem, and network cables from the power outletsbefore cleaning the system.

iv LIVA CORE MINI PC USER MANUAL
• If you encounter the following technical problems withthe product, unplug the power cord and contact aqualified service technician or your retailer.• The power cord or plug is damaged.• Liquid has been spilled into the system.• The system does not function properly even if you
follow the operating instructions.• The system was dropped or the cabinet is
damaged.• The system performance changes.
The warranty does not apply to products that have beendisassembled by users.
Safety cautions and warnings
CAUTION:
Optical drive sold with this system contains a CLASS 1 LASERPRODUCT.
Optical Drive Safety Information
Invisible laser radiation when open. Do not stare into beamor view directly with optical instructions.
WARNING:Makeing adjustments or performing procedures otherthan those specified in the user’s manual may result inhazardous laser exposuer. Do not attempt to disassemblethe optical drive. For your safety, have the optical driveserviced only by an authorized service provider.
LIVA CORE MINI PC USER MANUAL v
Product disposal notice
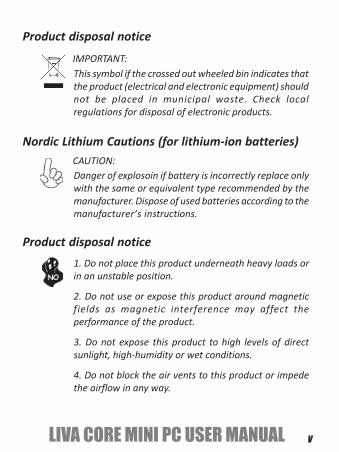
IMPORTANT:
Nordic Lithium Cautions (for lithium-ion batteries)CAUTION:
This symbol if the crossed out wheeled bin indicates thatthe product (electrical and electronic equipment) shouldnot be placed in municipal waste. Check localregulations for disposal of electronic products.
Danger of explosoin if battery is incorrectly replace onlywith the same or equivalent type recommended by themanufacturer. Dispose of used batteries according to themanufacturer’s instructions.
Product disposal notice
1. Do not place this product underneath heavy loads orin an unstable position.
2. Do not use or expose this product around magneticfields as magnetic interference may affect theperformance of the product.
3. Do not expose this product to high levels of directsunlight, high-humidity or wet conditions.
4. Do not block the air vents to this product or impedethe airflow in any way.

vi LIVA CORE MINI PC USER MANUAL
Canadian Department of CommunicationsThis class B digital apparatus meets all requirements of theCanadian Interference-causing Equipment Regulations.
Cet appareil numérique de la classe B respecte toutes les exigencesdu Réglement sur le matériel brouilieur du Canada.
The manual consists of the following:
Describes features of thePC.
page 1
page 9
Introducing the PC
Provides information onusing the BIOS SetupUtility.
About the Manual
Chapter 1
Chapter 2Using BIOS
Describes themotherboard software.
Chapter 3Using the Motherboard Software
page 39
Provides basic troubleshooting tips.
Chapter 4Troubleshooting
page 51

LIVA CORE MINI PC USER MANUAL vii
TABLE OF CONTENTS
Introducing the PC 1Introduction....................................................1Specifications..................................................2Front and Rear I/O............................................4Motherboard Components..............................6Header Pin Definition ....................................8
Chapter 1 1
Chapter 2 9Using BIOS 9
About the Setup Utility....................................9The Standard Configuration....................10Entering the Setup Utility.........................10Resetting the Default CMOS Value..........11
Using BIOS.....................................................12BIOS Navigation Keys..............................13Main Menu............................................14Advanced Menu......................................15Chipset Menu..........................................25Tweak Menu...........................................29Security Menu........................................30Boot Menu.............................................31
Preface i

viii LIVA CORE MINI PC USER MANUAL
Chapter 3 39Using the Motherboard Software 39
Installing the Windows OS.............................39Drivers auto-installing under Windows 8.1............................................................................40
Running Setup........................................41Manual Installation.......................................44ECS Utility Software (Intelligent EZUtility).............................................................44Windows 8.1 OS Recovery.............................46
Chapter 4 51Troubleshooting 51 Troubleshooting and problem solution........51
Exit Menu...............................................35Updating the BIOS..................................37

LIVA CORE MINI PC USER MANUAL 1
Chap
ter
1
Chapter 1Introducing the PC
IntroductionThank you for choosing LIVA CORE Mini PC featuring BDWY-MINI ofgreat performance and with stylish and flexible design.
This mini PC is based on Intel® Broadwell-Y platform. This latestCore-M processor is a multi-core system-on-a-chip (SoC) thatintegrates the next generation Intel® processor core, graphics,memory, and I/O interfaces into one solution. Two M.2 slots are forextending usage. It implements three USB 3.0 ports at the frontpanel, and the yellow USB 3.0 port supports EZ Charger function,and one USB 3.0 port at the rear panel.
It supports DDR3L up to 4 GB single channel soldered down memory. It also can add additional storage from M.2 SSD and USB Flash Drive.
The system is equipped with a set of I/O ports at the rear panel,including one DC_IN port (19V), one USB 3.0 port, two HDMI ports,one RJ45 LAN connector, one Audio combo jack.

2 LIVA CORE MINI PC USER MANUAL
Chapter 1
CPU/Chipset• 4GB DDR3L
- Single channel DDR3L soldered downmemory- Supports DDR3L 1600 MHz SDRAM
Memory
• 2 x M.2 slots (One supports Wireless card, the other supports 2242/2280 SSD card)
• Additional storage from M.2 SSD and USBFlash Drive
Expansion
Storage
• Intel Broadwell-Y SoC
Specifications
Note:ID design and specification may vary, please referto actual goods you purchase.
Slots
• Realtek ALC283- 2 Channel High Definition Audio Codec- 3.5 mm jack with stereo sound and mic(combo) supports for jack detection
Audio
LIVA CORE MINI PC USER MANUAL 3
Chap
ter
1
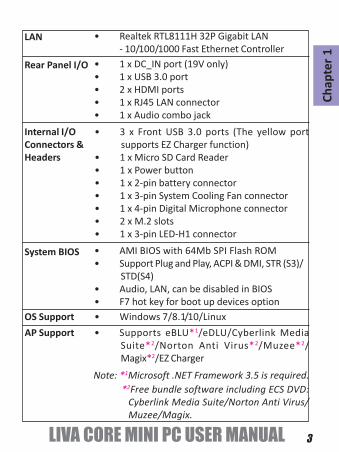
• 1 x DC_IN port (19V only)• 1 x USB 3.0 port• 2 x HDMI ports• 1 x RJ45 LAN connector• 1 x Audio combo jack
Rear Panel I/O
LAN • Realtek RTL8111H 32P Gigabit LAN- 10/100/1000 Fast Ethernet Controller
• 3 x Front USB 3.0 ports (The yellow portsupports EZ Charger function)
• 1 x Micro SD Card Reader• 1 x Power button• 1 x 2-pin battery connector• 1 x 3-pin System Cooling Fan connector• 1 x 4-pin Digital Microphone connector• 2 x M.2 slots• 1 x 3-pin LED-H1 connector
Internal I/OConnectors &Headers
System BIOS
OS Support • Windows 7/8.1/10/Linux
• Supports eBLU*1/eDLU/Cyberlink MediaSuite*2/Norton Anti Virus*2/Muzee*2/Magix*2/EZ Charger
AP Support
Note: *1Microsoft .NET Framework 3.5 is required. *2Free bundle software including ECS DVD:
Cyberlink Media Suite/Norton Anti Virus/Muzee/Magix.
• AMI BIOS with 64Mb SPI Flash ROM• Support Plug and Play, ACPI & DMI, STR (S3)/
STD(S4)• Audio, LAN, can be disabled in BIOS• F7 hot key for boot up devices option

4 LIVA CORE MINI PC USER MANUAL
Chapter 1 WARNING:Please realize that there is a certain risk involved withoverclocking, including adjusting the setting in the BIOS, orusing the third-party overclocking tools. Overclocking mayaffect your system stability, or even case damage to thecomponents and devices of your system. It should be doneat your own risk and expense. We are not responsible forpossible damage casesd by overclocking.
Front and Rear I/O
1. Power Button Use this button to power on/off thesystem.
Note:ID design and specification may vary, please referto actual goods you purchase.
2. Micro SD Care Reader You can insert the memory card to thebulid-in card reader.
Power Adapter-19V/ 65W DC Adapter
Dimension • 136 x 84 x 38mm
• FSP065-10AABA

LIVA CORE MINI PC USER MANUAL 5
Chap
ter 1
Connect the DC_IN port to the poweradapter.
You can connect the display device tothe HDMI port.
5. 19V DC_IN Port
Connect an RJ-45 jack to the LAN portfor Network connecting.
7. LAN Port
8. Combo Audio Jack(Line out & Mic in)
Connect a microphone or speaker tothe combo jack.
6. HDMI Ports*
Connect your USB 3.0 devices to theseports and enjoy EZ charger by theyellow port at the right-hand sied.
3. USB 3.0 Ports
Note: *The HDMI1 port is 1.4, and the HDMI2 portis 1.4A.

6 LIVA CORE MINI PC USER MANUAL
Chapter 1
Motherboard Components

LIVA CORE MINI PC USER MANUAL 7
Chap
ter 1

8 LIVA CORE MINI PC USER MANUAL
Chapter 1
Table of Motherboard Components
BT (Battery)
SYS_FAN
DMIC
Header Pin Definition
LABEL COMPONENTS1. SoC Intel® Broadwell-Y SoC2. USB3_1~3 Front USB 3.0 ports (USB3_3 port supports EZ Charger function)3. MICRO_SD Micro SD Card Reader4. PWR_BTN Power On/Off button5. BT1 Battery connector6. SYS_FAN 3-pin System cooling fan connector7. Memory 1~4 Single channel DDR3L soldered down memory 8. DMIC 4-pin Digital microphone connector9. M.2 Slots M.2 support wireless card and SSD card
10. LED_H1 LED light for indecating the system under power on or suspend status(white light for power on and blinking orange light for suspend)

LIVA CORE MINI PC USER MANUAL 9
Chap
ter
2
Chapter 2Using BIOS
About the Setup UtilityThe computer uses the latest “American Megatrends Inc. ” BIOSwith support for Windows Plug and Play. The CMOS chip on themotherboard contains the ROM setup instructions for configuringthe motherboard BIOS.
The BIOS (Basic Input and Output System) Setup Utility displays thesystem’s configuration status and provides you with options to setsystem parameters. The parameters are stored in battery-backed-up CMOS RAM that saves this information when the power is turnedoff. When the system is turned back on, the system is configuredwith the values you stored in CMOS.
The BIOS Setup Utility enables you to configure:
The settings made in the Setup Utility affect how the computerperforms. Before using the Setup Utility, ensure that you understandthe Setup Utility options.
This chapter provides explanations for Setup Utility options.
• Hard drives, diskette drives and peripherals• Video display type and display options• Password protection from unauthorized use• Power Management features

10 LIVA CORE MINI PC USER MANUAL
Chapter 2
The Standard ConfigurationA standard configuration has already been set in the Setup Utility.However, we recommend that you read this chapter in case you needto make any changes in the future.
This Setup Utility should be used:
• when changing the system configuration• when a configuration error is detected and you are
prompted to make changes to the Setup Utility• when trying to resolve IRQ conflicts• when making changes to the Power Management
configuration• when changing the password or making other changes
to the Security Setup
Press DEL to enter SETUP
Entering the Setup UtilityWhen you power on the system, BIOS enters the Power-On Self Test(POST) routines. POST is a series of built-in diagnostics performedby the BIOS. After the POST routines are completed, the followingmessage appears:
Press the delete key to access BIOS Setup Utility.

LIVA CORE MINI PC USER MANUAL 11
Chap
ter 2
Resetting the Default CMOS ValuesWhen powering on for the first time, the POST screen may show a“CMOS Settings Wrong” message. This standard message will appearfollowing a clear CMOS data at factory by the manufacturer. Yousimply need to Load Default Settings and Save it to reset the defaultCMOS values.Note: Changes to system hardware such as different CPU, memories,etc. may also trigger this message.
Choose the systemdefault language
BIOS Information
System Language [English]
System Date [Thu 05/14/2015]System Time [00:00:54]
:Select Screen
F1:General Help F2:Previous Values F3:Optimized Defaults F4:Save & Exit ESC:Exit
+/- : Change Opt.Enter : Select
:Select Item
Version 2.17.1246. Copyright (C) 2015 American Megatrends, Inc.
Aptio Setup Utility - Copyright (C) 2015 American Megatrends, Inc.Main Advanced Chipset Tweak Security Boot Exit

12 LIVA CORE MINI PC USER MANUAL
Chapter 2
Using BIOSWhen you start the Setup Utility, the main menu appears. The mainmenu of the Setup Utility displays a list of the options that areavailable. A highlight indicates which option is currently selected.Use the cursor arrow keys to move the highlight to other options.When an option is highlighted, execute the option by pressing<Enter>.
Some options lead to pop-up dialog boxes that prompt you to verifythat you wish to execute that option. Other options lead to dialogboxes that prompt you for information.
Some options (marked with a triangle ) lead to submenus thatenable you to change the values for the option. Use the cursorarrow keys to scroll through the items in the submenu.
The default BIOS setting for this motherboard apply for mostconditions with optimum performance. We do not suggestusers change the default values in the BIOS setup and takeno responsibility to any damage caused by changing theBIOS settings.
In this manual, default values are enclosed in parenthesis. Submenuitems are denoted by a triangle .

LIVA CORE MINI PC USER MANUAL 13
Chap
ter
2
BIOS Navigation KeysThe BIOS navigation keys are listed below:
For the purpose of better product maintenance, themanufacture reserves the right to change the BIOS itemspresented in this manual. The BIOS setup screens shown inthis chapter are for reference only and may differ from theactual BIOS. Please visit the manufacture’s website forupdated manual.
KEY FUNCTION
Scrolls through the items on a menu
+/-
F2 Previous Value
F3 Optimized Defaults
F1 General Help
ESC
Enter Select
F4 Save & Exit
Exits the current menu
Change Opt.

14 LIVA CORE MINI PC USER MANUAL
Chapter 2
Main MenuWhen you enter the BIOS Setup program, the main menu appears,giving you an overview of the basic system information. Select anitem and press <Enter> to display the submenu.
System Date & TimeThe Date and Time items show the current date and time on thecomputer. If you are running a Windows OS, these items areautomatically updated whenever you make changes to the WindowsDate and Time Properties utility.
System Language (English)This item is used to set system language.
Choose the systemdefault language
BIOS Information
System Language [English]
System Date [Thu 05/14/2015]System Time [00:00:54]
:Select Screen
F1:General Help F2:Previous Values F3:Optimized Defaults F4:Save & Exit ESC:Exit
+/- : Change Opt.Enter : Select
:Select Item
Version 2.17.1246. Copyright (C) 2015 American Megatrends, Inc.
Aptio Setup Utility - Copyright (C) 2015 American Megatrends, Inc.
Main Advanced Chipset Tweak Security Boot Exit

LIVA CORE MINI PC USER MANUAL 15
Chap
ter
2
The Advanced menu items allow you to change the settings forthe CPU and other system.
Advanced Menu
:Select Screen
F1:General Help F2:Previous Values F3:Optimized Defaults F4:Save & Exit ESC:Exit
+/- : Change Opt.Enter : Select
:Select Item
Version 2.17.1246. Copyright (C) 2015 American Megatrends, Inc.
LAN ConfigurationParameters
LAN ConfigurationPower Management SetupACPI SettingsCPU ConfigurationSATA ConfigurationUSB Configuration
Main Advanced Chipset Tweak Security Boot ExitAptio Setup Utility - Copyright (C) 2015 American Megatrends, Inc.

16 LIVA CORE MINI PC USER MANUAL
Chapter 2
LAN ConfigurationThe item in the menu shows the LAN-related information that theBIOS automatically detects.
:Select Screen
F1:General Help F2:Previous Values F3:Optimized Defaults F4:Save & Exit ESC:Exit
+/- : Change Opt.Enter : Select
:Select Item
Version 2.17.1246. Copyright (C) 2015 American Megatrends, Inc.
AdvancedAptio Setup Utility - Copyright (C) 2015 American Megatrends, Inc.
Enabled/DisabledOnboard LANController
LAN Configuration
Onboard LAN Controller [Enabled]
Onboard LAN Controller (Enabled)Use this item to enable or disable Onboard LAN 1 controller.
Press <Esc> to return to the Advanced Menu page.

LIVA CORE MINI PC USER MANUAL 17
Chap
ter
2
:Select Screen
F1:General Help F2:Previous Values F3:Optimized Defaults F4:Save & Exit ESC:Exit
+/- : Change Opt.Enter : Select
:Select Item
Version 2.17.1246. Copyright (C) 2015 American Megatrends, Inc.
AdvancedAptio Setup Utility - Copyright (C) 2015 American Megatrends, Inc.
Power Management Setup
Resume By PME [Disabled]Resume By USB [Disabled]Resume By RTC Alarm [Disabled]EUP Function [Enabled]Power LED Type [Dual Color LED]
About Resume byPCI/PCI-E/LAN/Ext .USB3.0 PME
Resume By PME (Disabled)This item specify whether the system will be awakened from powersaving modes when activity or input signal of the specifiedhardware peripheral or components is detected.Resume By USB (Disabled)This item allows you to enable/disable the USB device wakeupfunction from S3 mode.Resume By RTC Alarm (Disabled)The system can be turned off with a software command. If youenable this item, the system can automatically resume at a fixedtime based on the system’s RTC (realtime clock). Use the itemsbelow this one to set the date and time of the wakeup alarm. Youmust use an ATX power supply in order to use this feature.
Power Management SetupThis page sets up some parameters for system power managementoperation.
18 LIVA CORE MINI PC USER MANUAL
Chapter 2
EUP Function (Enabled)This item allows user to enable or disable EUP support.
Press <Esc> to return to the Advanced Menu page.
Power LED Type (Dual Color LED)This item shows the type of the Power LED.

LIVA CORE MINI PC USER MANUAL 19
Chap
ter
2
ACPI SettingsThe item in the menu shows the highest ACPI sleep state whenthe system enters suspend.
ACPI Sleep State [S3(Suspend to RAM)]This item allows user to enter the ACPI S3 (Suspend to RAM) SleepState (default).
:Select Screen
F1:General Help F2:Previous Values F3:Optimized Defaults F4:Save & Exit ESC:Exit
+/- : Change Opt.Enter : Select
:Select Item
Version 2.17.1246. Copyright (C) 2015 American Megatrends, Inc.
Press <Esc> to return to the Advanced Menu page.
ACPI Settings
ACPI Sleep State [S3 (Suspend to RAM)]
Select the highestACPI sleep state thesystem will enter whenthe SUSPEND buttonis pressed.
Aptio Setup Utility - Copyright (C) 2015 American Megatrends, Inc.
Advanced

20 LIVA CORE MINI PC USER MANUAL
Chapter 2
CPU ConfigurationThe item in the menu shows the CPU Configuration.
:Select Screen
F1:General Help F2:Previous Values F3:Optimized Defaults F4:Save & Exit ESC:Exit
+/- : Change Opt.Enter : Select
:Select Item
Version 2.17.1246. Copyright (C) 2015 American Megatrends, Inc.
CPU Configuration
Intel(R) Core(TM) M-5Y10c CPU @ 0.80GHzEM64T SupportedProcessor Speed 0800 MHzProcessor Stepping 306d4Microcode Stepping 1fProcessor Cores 2Intel HT Technology SupportedIntel VT-x Technology Supported
Hyper-Threading [Enabled]Active Processor Cores [All]Limit CPUID Maximum [Disabled]Execute Disable Bit [Enabled]Intel Virtualization Technology [Enabled]LakeTiny Feature [Enabled]CPU C3 Report [Enabled]CPU C6 Report [Enabled]CPU C7 Report [C7s]Package C State limit [AUTO]Enhanced Halt (C1E) [Enabled]
Enabled for WindowsXP and Linux (OSoptimized for Hyper-Threading Technology)and Disabled for otherOS (OS not optimizedfor Hyper-ThreadingTechnology). WhenDisabled only onethread per enabledcore is enabled.
AdvancedAptio Setup Utility - Copyright (C) 2015 American Megatrends, Inc.

LIVA CORE MINI PC USER MANUAL 21
Chap
ter
2
Intel(R) Core(TM) M-5Y10c CPU @ 0.80GHzThis is display-only field and diaplays the information of the CPUinstalled in your computer.EM64T (Supported)This item shows the computer supports EM64T or not.Processor Speed (0800 MHz)This item shows the current processor speed.Processor Stepping (306d4)This item shows the processor stepping version.Microcode Stepping (1f)This item shows the microcode stepping version.Processor Cores (2)This item shows the number of cores of the processor.Intel HT Technology (Supported)This item shows the computer supports Intel HT technology or not.Intel VT-X Technology (Supported)This item shows the computer supports Intel VT-X technology ornot.Hyper-Threading (Enabled)This item is only available when the chipset supports Hyper-thread-ing and you are using a Hyper-threading CPU.Active Processor Cores (All)This item is used to controll the active processor cores.Limit CPUID Maximum (Disabled)Use this item to enable or disable the maximum CPUID value limit,you can enable this item to prevent the system from “rebooting”when trying to install Windows NT 4.0.

22 LIVA CORE MINI PC USER MANUAL
Chapter 2
Execute Disable Bit (Enabled)This item allows the processor to classify areas in memory by whereapplication code can execute and where it cannot. When amalicious worm attempts to insert code in the buffer, the processordisables code execution, preventing damage or worm propagation.Replacing order computers with Execute Disable Bit enabledsystems can halt worm attacks, reduing the need for virus relatedrepair.Intel Virtualization Technology (Enabled)When disabled, a VMM cannot utilize the additional hardwarecapabilities provided by Vandor Pool Technology.LakeTiny Feature (Enabled)This item is used to enable or disable the LakeTiny for C stateconfiguration.CPU C3 Report (Enabled)This item is used to enable or disable CPU C3 (ACPI C2) report to OS.CPU C6 Report (Enabled)This item is used to enable or disable CPU C6 (ACPI C3) report to OS.CPU C7 Report (C7s)This item is used to enable or disable CPU C7 report to OS.Package C State limit (AUTO)This item is used to set the package C state limit.Enhanced Halt (C1E) (Enabled)Use this item to enable the CPU energy-saving function when thesystem is not running.
Press <Esc> to return to the Advanced Menu page.
LIVA CORE MINI PC USER MANUAL 23
Chap
ter
2
:Select Screen
F1:General Help F2:Previous Values F3:Optimized Defaults F4:Save & Exit ESC:Exit
+/- : Change Opt.Enter : Select
:Select Item
Version 2.17.1246. Copyright (C) 2015 American Megatrends, Inc.
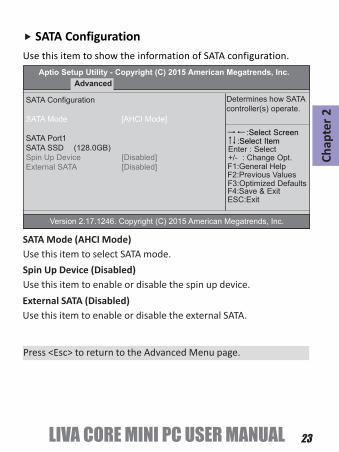
SATA ConfigurationUse this item to show the information of SATA configuration.
SATA Configuration
SATA Mode [AHCI Mode]
SATA Port1SATA SSD (128.0GB)Spin Up Device [Disabled]External SATA [Disabled]
Determines how SATAcontroller(s) operate.
SATA Mode (AHCI Mode)Use this item to select SATA mode.Spin Up Device (Disabled)Use this item to enable or disable the spin up device.
Press <Esc> to return to the Advanced Menu page.
Aptio Setup Utility - Copyright (C) 2015 American Megatrends, Inc. Advanced
External SATA (Disabled)Use this item to enable or disable the external SATA.
24 LIVA CORE MINI PC USER MANUAL
Chapter 2
:Select Screen
F1:General Help F2:Previous Values F3:Optimized Defaults F4:Save & Exit ESC:Exit
+/- : Change Opt.Enter : Select
:Select Item
Version 2.17.1246. Copyright (C) 2015 American Megatrends, Inc.
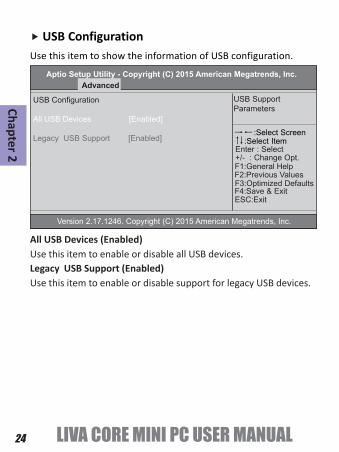
USB ConfigurationUse this item to show the information of USB configuration.
USB Configuration
All USB Devices [Enabled]
Legacy USB Support [Enabled]
USB SupportParameters
All USB Devices (Enabled)Use this item to enable or disable all USB devices.
Advanced
Legacy USB Support (Enabled)Use this item to enable or disable support for legacy USB devices.
Aptio Setup Utility - Copyright (C) 2015 American Megatrends, Inc.

LIVA CORE MINI PC USER MANUAL 25
Chap
ter
2
The chipset menu items allow you to change the settings for theSoC chip and other system.
Chipset Menu
:Select Screen
F1:General Help F2:Previous Values F3:Optimized Defaults F4:Save & Exit ESC:Exit
+/- : Change Opt.Enter : Select
:Select Item
Version 2.17.1246. Copyright (C) 2015 American Megatrends, Inc.
System Agent ConfigurationPCH ConfigurationME Configuration
System Agent (SA)Parameters
Aptio Setup Utility - Copyright (C) 2015 American Megatrends, Inc.Main Advanced Chipset Tweak Security Boot Exit

26 LIVA CORE MINI PC USER MANUAL
Chapter 2
Press <Esc> to return to the Chipset Menu page.
Scroll to this item and press <Enter> and view the following screen: System Agent Configuration
:Select Screen
F1:General Help F2:Previous Values F3:Optimized Defaults F4:Save & Exit ESC:Exit
+/- : Change Opt.Enter : Select
:Select Item
Version 2.17.1246. Copyright (C) 2015 American Megatrends, Inc.
System Agent Configuration
IGD Memory [64M]DVMT Memory [256M]
CPU SA Audio Device [Enabled]
Select DVMT 5.0Pre-Allocated (Fixed)Graphics Memorysize used by theInternal GraphicsDevice.
IGD Memory (64M)This item shows the information of the IGD (Internal GraphicsDevice) memory.DVMT Memory (256M)When set to Fixed Mode, the graphics driver will reserve a fixedposition of the system memory as graphics memory, according tosystem and graphics requirements.CPU SA Audio Device (Enabled)This item allows you to enable or disable the CPU SA Audio device.
Aptio Setup Utility - Copyright (C) 2015 American Megatrends, Inc.
Chipset

LIVA CORE MINI PC USER MANUAL 27
Chap
ter
2Press <Esc> to return to the Chipset Menu page.
Scroll to this item and press <Enter> and view the following screen: PCH Configuration
:Select Screen
F1:General Help F2:Previous Values F3:Optimized Defaults F4:Save & Exit ESC:Exit
+/- : Change Opt.Enter : Select
:Select Item
Version 2.17.1246. Copyright (C) 2015 American Megatrends, Inc.
PCH Configuration
Restore AC Power Loss [Power Off]
Audio ConfigurationAzalia HD Audio [Enabled]
Select AC power statewhen power is re-applied after a powerfailure.
ChipsetAptio Setup Utility - Copyright (C) 2015 American Megatrends, Inc.
Resotre AC Power Loss (Power Off)This item enables your computer to automatically restart or returnto ites operating status.Azalia HD Audio (Enabled)This item enables or disables Azalia HD audio.

28 LIVA CORE MINI PC USER MANUAL
Chapter 2
Scroll to this item and press <Enter> and view the following screen: ME Configuration
:Select Screen
F1:General Help F2:Previous Values F3:Optimized Defaults F4:Save & Exit ESC:Exit
+/- : Change Opt.Enter : Select
:Select Item
Version 2.17.1246. Copyright (C) 2015 American Megatrends, Inc.
Management Engine Technology Configuration
ME Control [Enabled]ME FW Version 10.0.30.1072
Enable/Disable MEFirmware
ME Control (Enabled)Use this item to enable or disable the ME control.ME FW Version (10.0.30.1072)This item shows the ME FW version.
Aptio Setup Utility - Copyright (C) 2015 American Megatrends, Inc. Chipset

LIVA CORE MINI PC USER MANUAL 29
Chap
ter
2
This page enables you to set the clock speed and system bus foryour system. The clock speed and system bus are determined bythe kind of processor you have installed in your system.
Tweak Menu
:Select Screen
F1:General Help F2:Previous Values F3:Optimized Defaults F4:Save & Exit ESC:Exit
+/- : Change Opt.Enter : Select
:Select Item
Version 2.17.1246. Copyright (C) 2015 American Megatrends, Inc.
Tweak
Intel(R) Core(TM) M-5Y10c CPU @ 0.80GHzProcessor Speed 0800 MHzMemory Frequency 1600 MHzTotal Memory 4096 MB (DDR3)
Intel(R) Core(TM) M-5Y10c CPU @ 0.80GHzThis is display-only field and diaplays the information of the CPUinstalled in your computer.Processor Speed (0800 MHz)This item shows the current processor speed.Memory Frequency (1600 MHz)This item shows the memory frequency.Total Memory (4096 MB (DDR3))This item shows the total memory.
Main Advanced Chipset Tweak Security Boot ExitAptio Setup Utility - Copyright (C) 2015 American Megatrends, Inc.

30 LIVA CORE MINI PC USER MANUAL
Chapter 2
This page enables you to set setup administrator password anduser password.
Security Menu
Administrator Password Status (Not Install)This item shows administrator password installed or not.User Password Status (Not Install)This item shows user password installed or not.
:Select Screen
F1:General Help F2:Previous Values F3:Optimized Defaults F4:Save & Exit ESC:Exit
+/- : Change Opt.Enter : Select
:Select Item
Version 2.17.1246. Copyright (C) 2015 American Megatrends, Inc.
Set AdministratorPassword
Administrator Password
Administrator Password Status Not InstallUser Password Status Not Install
System Mode state SetupSecure Boot state Not Active
Secure Boot [Disabled]
System Mode state (Setup)This item shows system mode setup or not.Secure Boot state (Not Active)This item allows you to enable or disable the secure boot state.Secure Boot (Disabled)This item is used to control the secure boot flow, it is possible only ifsystem runs in User Mode.
Main Advanced Chipset Tweak Security Boot ExitAptio Setup Utility - Copyright (C) 2015 American Megatrends, Inc.

LIVA CORE MINI PC USER MANUAL 31
Chap
ter
2
This page enables you to set the keyboard Numlock State.Boot Menu
Operation System Select (Windows 7 or other OS)This item is used to select the operation system.Launch PXE OpROM (Disabled)This item enables or disables launch PXE Option ROM.
Version 2.17.1246. Copyright (C) 2015 American Megatrends, Inc.
Windows 7 or OtherOS: Boot policy forLegacy OS
Windows 8: Bootpolicy for UEFI OSwithout CompatibilitySupport Module (CSM)
Manual: Usercustomized CSMparameters & bootpolicy.
Boot Configuration
Operation system select [Windows 7 or other OS]Launch PXE OpROM [Disabled]Launch Network OpROM [Enabled]
Fast Boot [Disabled]
Bootup Numlock State [On]Quiet Boot [Enabled]Update System BIOS [Disabled]Boot Mode Select [LEGACY]
FIXED BOOT ORDER PrioritiesBoot Option #1 [Hard Disk: SATA SSD...]Boot Option #2 [CD/DVD]Boot Option #3 [USB/Floppy]Boot Option #4 [USB CD/DVD]Boot Option #5 [USB Hard Disk]Boot Option #6 [USB Key:UFD 3.0 Sil...]Boot Option #7 [USB Lan]Boot Option #8 [Network]
Hard Disk Drive BBS PrioritiesUSB Key Drive BBS Priorities
:Select Screen
F1:General Help F2:Previous Values F3:Optimized Defaults F4:Save & Exit ESC:Exit
+/- : Change Opt.Enter : Select
:Select Item
Main Advanced Chipset Tweak Security Boot ExitAptio Setup Utility - Copyright (C) 2015 American Megatrends, Inc.

32 LIVA CORE MINI PC USER MANUAL
Chapter 2
Bootup Numlock State (On)This item enables you to select Numlock state.Quiet Boot (Enabled)This item enables or disables the quiet boot.
Boot mode select (LEGACY)Use this item to select boot mode.Boot Option #1~8These items show the boot priorities and can be used to set theboot priorities of various device categories.
Launch Storage OpROM (Enabled)This item enables or disables launch Storage Option ROM.Fast Boot (Disabled)This item enables or disables the fast boot.
Update System BIOS (Disabled)This item enables or disables to update system BIOS.

LIVA CORE MINI PC USER MANUAL 33
Chap
ter
2
Boot Option #1 (P3: SATA SSD ...)Use this item to set the system boot order.
Hard Disk Drive BBS PrioritiesThis item enables you to specify the sequence of loading theoperating system from the installing Hard Disk drive. Press <Enter>to view the submenu.
Version 2.17.1246. Copyright (C) 2015 American Megatrends, Inc.
Sets the system bootorder
Boot Option #1 [P3: SATA SSD ...]
:Select Screen
F1:General Help F2:Previous Values F3:Optimized Defaults F4:Save & Exit ESC:Exit
+/- : Change Opt.Enter : Select
:Select Item
BootAptio Setup Utility - Copyright (C) 2015 American Megatrends, Inc.

34 LIVA CORE MINI PC USER MANUAL
Chapter 2
Boot Option #1 (P3: SATA SSD ...)Use this item to set the system boot order.
USB Key Drive BBS PrioritiesThis item enables you to specify the sequence of loading theoperating system from the installing USB Key drive. Press <Enter> toview the submenu.
Version 2.17.1246. Copyright (C) 2015 American Megatrends, Inc.
Sets the system bootorder
Boot Option #1 [UFD 3.0 Silicon-Pow...]
:Select Screen
F1:General Help F2:Previous Values F3:Optimized Defaults F4:Save & Exit ESC:Exit
+/- : Change Opt.Enter : Select
:Select Item
Boot
Aptio Setup Utility - Copyright (C) 2015 American Megatrends, Inc.

LIVA CORE MINI PC USER MANUAL 35
Chap
ter
2
This page enables you to set the keyboard Numlock State.Exit Menu
Save Changes and ExitThis item enables you to exit the system setup after saving thechanges.Discard Changes and ExitThis item enables you to exit the system setup without saving anychanges.
Version 2.17.1246. Copyright (C) 2015 American Megatrends, Inc.
Exit system setup aftersaving the changes.
Save Changes and ExitDiscard Changes and ExitSave Changes and ResetDiscard changes and Reset
Save OptionsSave ChangesDiscard Changes
Restore DefaultsSave as User DefaultsRestore User Defaults
Boot OverrideP3: SATA SSDUFD 3.0 Silicon-Power 16GPMAP
:Select Screen
F1:General Help F2:Previous Values F3:Optimized Defaults F4:Save & Exit ESC:Exit
+/- : Change Opt.Enter : Select
:Select Item
Save Changes and ResetThis item enables you to reset the system setup after saving thechanges.
Aptio Setup Utility - Copyright (C) 2015 American Megatrends, Inc.Main Advanced Chipset Tweak Security Boot Exit

36 LIVA CORE MINI PC USER MANUAL
Chapter 2
Discard Changes and ResetThis item enables you to reset the system setup without saving anychanges.Save OptionsThis item enables you to save the options that you have made.Save ChangesThis item enables you to save the changes that you have made.Discard ChangesThis item enables you to discard any change that you have made.Restore DefaultsThis item enables you to restore the system defaults.Save as User DefaultsThis item enables you to save the changes that you have made asuser defaults.Restore as User DefaultsThis item enables you to restore the user defaults.Boot OverrideUse this item to select the boot device.

LIVA CORE MINI PC USER MANUAL 37
Chap
ter
2
Updating the BIOSYou can download and install updated BIOS for this motherboardfrom the manufacturer’s Website. New BIOS provides support fornew peripherals, improvements in performance, or fixes for knownbugs. Install new BIOS as follows:
1 If your motherboard has a BIOS protection jumper,change the setting to allow BIOS flashing.
2 If your motherboard has an item called Firmware WriteProtect in Advanced BIOS features, disable it. (FirmwareWrite Protect prevents BIOS from being overwritten.)
3 Prepare a bootable device or create a bootable systemdisk. (Refer to Windows online help for information oncreating a bootable system disk.)
4 Download the Flash Utility and new BIOS file from themanufacturer’s Web site. Copy these files to thebootable device.
5 Turn off your computer and insert the bootable devicein your computer. (You might need to run the SetupUtility and change the boot priority items on theAdvanced BIOS Features Setup page, to force yourcomputer to boot from the bootable device first.)
6 At the C:\ or A:\ prompt, type the Flash Utility programname and the file name of the new BIOS and then press<Enter>. Example: AFUDOS.EXE 040706.ROM
7 When the installation is complete, remove the bootabledevice from the computer and restart your computer. Ifyour motherboard has a Flash BIOS jumper, reset thejumper to protect the newly installed BIOS from beingoverwritten. The computer will restart automatically.

38 LIVA CORE MINI PC USER MANUAL
Chapter 2
Memo

LIVA CORE MINI PC USER MANUAL 39
Chap
ter
3
Installing the Windows OSThere are two ways to install the Windows OS:
1. Install Windows OS via Windows official DVD.
2. Install Windows OS via USB flash drive.a) Create an ISO file from the Windows 8.1 DVD.b) Download the Windows 7 USB/DVD Download Tool from
Microsoft and install it. Please refer to the link:
This free program from Microsoft properly formats your flash driveand then copies the contents of the Windows 8.1 installation ISOfile to the flash drive.
h t t p : / / w w w. m i c ro s o f t s t o r e . c o m /st o r e / m s u s a / h t m l /pbPage.Help_Win7_usbdvd_dwnTool.
c) Boot from the USB device that you just created to start the
Windows 8.1 installing process.
You need to change the booting priority in BIOS in order toboot from USB device. Enter into BIOS and select the Bootin menu (or press the hotkey F7), set USB drive as the firstbooting priority.
Chapter 3Using the Motherboard Software

40 LIVA CORE MINI PC USER MANUAL
Chapter 3
The auto-install DVD-ROM makes it easy for you to install thedrivers and software. The support software DVD-ROM disc loadsautomatically under Windows 8.1. When you insert the DVD-ROMdisc in the DVD-ROM drive, the auto-run feature will automaticallybring up the installation screen.
Drivers auto-installing under Windows 8.1
Displays the path for allsoftware and driversavailable on the disk.
Information:
Click the “Setup”button to select andrun the softwareinstallation program.

LIVA CORE MINI PC USER MANUAL 41
Chap
ter 3
Follow these instructions to install device drivers and software forthe motherboard:
1. Click Setup. The installation program begins:
Running Setup
The motherboard identification is located in the upper left-handcorner.
The following screens are examples only. The screens and driverlists will be different according to the motherboard you areinstalling.

42 LIVA CORE MINI PC USER MANUAL
Chapter 3
3. Check the box next to the items you want to install. Thedefault options are recommended.
5. Follow the instructions on the screen to install the items.
4. Click Next to run the Installation Wizard. An iteminstallation screen appears:
2. Click Next. The following screen appears:

LIVA CORE MINI PC USER MANUAL 43
Chap
ter 3
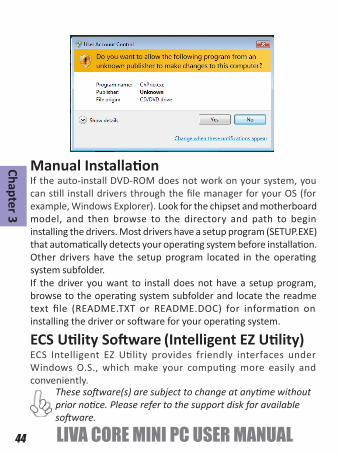
Windows 8.1 will appear below UAC (User Account Control)message after the system restart. You must select “Yes” toinstall the next driver. Continue this process to complete thedrivers installation.
Drivers and software are automatically installed in sequence.Follow the onscreen instructions, confirm commands andallow the computer to restart a few times to complete theinstallation.
Windows 8.1 will show the following screen after systemrestart, you must select “Desktop” in the bottom left toinstall the next driver.
44 LIVA CORE MINI PC USER MANUAL
Chapter 3
If the auto-install DVD-ROM does not work on your system, youcan still install drivers through the file manager for your OS (forexample, Windows Explorer). Look for the chipset and motherboardmodel, and then browse to the directory and path to begininstalling the drivers. Most drivers have a setup program (SETUP.EXE)that automatically detects your operating system before installation.Other drivers have the setup program located in the operatingsystem subfolder.
Manual Installation
If the driver you want to install does not have a setup program,browse to the operating system subfolder and locate the readmetext file (README.TXT or README.DOC) for information oninstalling the driver or software for your operating system.
ECS Intelligent EZ Utility provides friendly interfaces underWindows O.S., which make your computing more easily andconveniently.
ECS Utility Software
These software(s) are subject to change at anytime withoutprior notice. Please refer to the support disk for availablesoftware.
(Intelligent EZ Utility)
LIVA CORE MINI PC USER MANUAL 45
Chap
ter 3
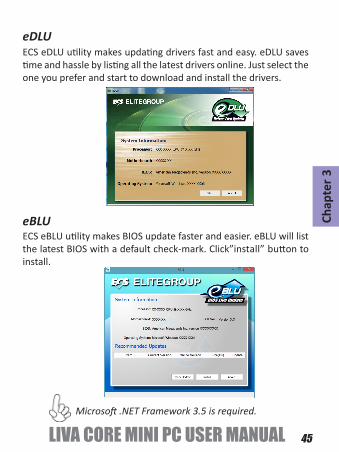
eBLUECS eBLU utility makes BIOS update faster and easier. eBLU will listthe latest BIOS with a default check-mark. Click”install” button toinstall.
eDLUECS eDLU utility makes updating drivers fast and easy. eDLU savestime and hassle by listing all the latest drivers online. Just select theone you prefer and start to download and install the drivers.
Microsoft .NET Framework 3.5 is required.

46 LIVA CORE MINI PC USER MANUAL
Chapter 3
To refresh your PC
1. Swipe in from the right edge of the screen, tap Settings, and thentap Change PC settings. (If you’re using a mouse, point to theupper-right corner of the screen, move the mouse pointer down,click Settings, and then click Change PC settings.)
2. Tap or click Update and recovery, and then tap or click Recovery.
3. Under Refresh your PC without affecting your files, tap or clickGet started.
4. Follow the instructions on the screen.
Warning:Apps you installed from websites and DVDs will be removed.Apps that came with your PC and apps you installed fromthe Windows Store will be reinstalled. Windows puts a list ofremoved apps on your desktop after refreshing your PC.
If you purchased LIVA product with OS pre-loaded and havingproblems with the system, you can try to refresh, reset or restore it.The following instructions of OS recovery are quoted from Microsoft®
website. For more detail and information, please refer to the link:http://windows.microsoft.com/en-us/windows-8/restore-refresh-reset-pc
Windows 8.1 OS Recovery

LIVA CORE MINI PC USER MANUAL 47
Chap
ter
3
1. Swipe in from the right edge of the screen, tap Settings, and thentap Change PC settings. (If you’re using a mouse, point to theupper-right corner of the screen, move the mouse pointer down,click Settings, and then click Change PC settings.)
2. Tap or click Update and recovery, and then tap or click Recovery.
3. Under Remove everything and reinstall Windows, tap or clickGet started.
4. Follow the instructions on the screen.
To reset your PCWarning:All of your personal files will be deleted and your settingswill be reset. All apps that you installed will be removed. Onlyapps that came with your PC will be reinstalled.
Note:You’ll be asked to choose whether you want to erase datequickly or thoroughly. If you choose to erase data quickly.Some data might be recoverable using special software. Ifyou choose to erase data thoroughly, this will longer but itmakes recovering data less likely.
48 LIVA CORE MINI PC USER MANUAL
Chapter 3
To restore your PC to an earlier point in timeNote:Windows automatically creates a restore point when youinstall desktop apps and new Windows updates, if the lastrestore point is older than 7 days. you can also create a restorepoint manually at any time.
1. Swipe in from the right edge of the screen, and then tap Search.(If you’re using a mouse, point to the upper-right corner of thescreen, move the mouse pointer down, and then click Search.)
2. Enter Control Panel in the search box, and tap or click ControlPanel.
3. Enter Recovery in the Control Panel serach box, and then tap orclick Recovery.
4. Tap or click Open System Restore, and then follow theinstructions.

LIVA CORE MINI PC USER MANUAL 49
Chap
ter
3
LIVA product will be reformatted to the original factoryconfiguration after repair. ECS is not liable to restore ortransfer the customer’s own responsibility to back up thedata and information stored in the hard drive before providethe defective LIVA products for repair sevice.
RMA Service for OS recoveryNote:

50 LIVA CORE MINI PC USER MANUAL
Chapter 3
Memo

LIVA CORE MINI PC USER MANUAL 51
Chap
ter
4
Chapter 4Trouble Shooting
Troubleshooting and problem solution
a) Boot up failed.
1. Use the specified adapter provided by ECS.
2. Check whether the adapter has been plugged in.
3. Check the connection between adapter and the system.
4. Check that the power button can bu push normally. If it issuccessfully power on , the green light from LED will show up.
5. If the boot up problem still exists after these checking steps, pleaseturn to local dealer or repair center for further customer service.
b) Black screen or no image is displayed on the monitor.
1. Check whether the monitor has been turned on or worksnormally on other system.
2. Check whether the system has been power on successfully.
After assembling the PC for the first time you may experience somestart up problems. Before calling for technical support or returningfor warranty, this chapter may help to address some of the commonquestions using some basic troubleshooting tips.

52 LIVA CORE MINI PC USER MANUAL
Chapter 4
3. Check the cable is securely inserted into rear IO ports(VGA/HDMI)and also at monitor side(VGA/HDMI).
4. If the display problem still exists after checking steps, please turnto local dealer or repair center for further customer service.
c) Display Error
1. Check whether the driver is correctly installed in “DeviceManager”. If there is yellow mark or unknown devices messageshown in the list, please reinstall the driver via LIVA official DriverDVD or ECS official website.

LIVA CORE MINI PC USER MANUAL 53
Chap
ter 4
d) Wire LAN connecting failed.
1. Check whether the LAN driver is correctly installed in “DeviceManager”. If there is yellow mark or unknown devices messageshown in the list, please reinstall the driver via LIVA official DriverDVD or ECS official website.
2. Ensure the LAN cable is securely inserted to the RJ45 port andthe LED light flashes normally.
3. Check IP address.
4. If the LAN connection problem still exists after these checkingsteps, please turn to local dealer or repair center for furthercustomer service.
2. Adjust the screen to the best resolution to get better usingexperience.

54 LIVA CORE MINI PC USER MANUAL
Chapter 4
1. Check whether the WLAN card driver is correctly installed in“Device Manager”. If there is yellow mark or unknown devicesmessage shown in the list, please reinstall the driver via LIVAofficial Driver DVD or ECS official website.
2. Check the WIFI in your working area is well functional and hasgood reception.
3. If the WIFI connection problem still exists after these checkingsteps, please turn to local dealer or repair center for furthercustomer service.
e) Wireless LAN connecting failed

LIVA CORE MINI PC USER MANUAL 55
Chap
ter 4
1. Check whether the audio driver is correctly installed in “DeviceManager”. If there is yellow mark or unknown devices messageshown in the list, please reinstall the driver via LIVA official DriverDVD or ECS official website.
2. After connecting the speaker or header phone, adjust audiosetting in Control panel> Hardware and sound.
f) No sound from audio combo jack
Note: Due to chipset limitation, the mic function of audio codecAL282 can be only compatibel to iPhone devices.
3. If the audio problem still exists after these checking steps, pleaseturn to local dealer or repair center for further customer service.

56 LIVA CORE MINI PC USER MANUAL
Chapter 4
Memo