corel® wordperfect® office 2020 handbook...handbook highlights what’s included? . . . . . part...
TRANSCRIPT

Handbook

Part One: Introduction 3getting started
Part Two: WordPerfect 15creating professional-looking documents
Part Three: Quattro Pro 133managing data with spreadsheets
Part Four: Presentations 183making visual impact with slide shows
Part Five: Utilities 241using WordPerfect Lightning, Address Book, and more
Part Six: Writing Tools 259checking your spelling, grammar, and vocabulary
Part Seven: Macros 273streamlining and automating tasks
Part Eight: Web Resources 283finding even more information on the Internet

Handbook highlights
What’s included? . . . . . . . . . . . . . . . . . . . . . . . . . . . . . . . . . . . . . . . . . . . . . . . . . . . . . . . . . . . . . . . . . . 3
What’s new in WordPerfect Office 2020 . . . . . . . . . . . . . . . . . . . . . . . . . . . . . . . . . . . . . . . . . . . . . . . . 11
Installation . . . . . . . . . . . . . . . . . . . . . . . . . . . . . . . . . . . . . . . . . . . . . . . . . . . . . . . . . . . . . . . . . . . . . . 11
Help resources. . . . . . . . . . . . . . . . . . . . . . . . . . . . . . . . . . . . . . . . . . . . . . . . . . . . . . . . . . . . . . . . . . . . . 5
Documentation conventions . . . . . . . . . . . . . . . . . . . . . . . . . . . . . . . . . . . . . . . . . . . . . . . . . . . . . . . . . . 6
WordPerfect basics . . . . . . . . . . . . . . . . . . . . . . . . . . . . . . . . . . . . . . . . . . . . . . . . . . . . . . . . . . . . . . . . 17
Quattro Pro basics. . . . . . . . . . . . . . . . . . . . . . . . . . . . . . . . . . . . . . . . . . . . . . . . . . . . . . . . . . . . . . . . 135
Presentations basics . . . . . . . . . . . . . . . . . . . . . . . . . . . . . . . . . . . . . . . . . . . . . . . . . . . . . . . . . . . . . . 185
WordPerfect Lightning . . . . . . . . . . . . . . . . . . . . . . . . . . . . . . . . . . . . . . . . . . . . . . . . . . . . . . . . . . . . 243
Index . . . . . . . . . . . . . . . . . . . . . . . . . . . . . . . . . . . . . . . . . . . . . . . . . . . . . . . . . . . . . . . . . . . . . . . . . . 285

Part One: Introduction
Welcome to the Corel® WordPerfect® Office 2020 Handbook! More than just a reference manual, this handbook is filled with valuable tips and insights on a wide variety of tasks and projects.
The following chapters in this introductory section are key to getting started with the software:
• What’s new in WordPerfect Office 2020 on page 11
• Installation on page 11
• Using the Help files on page 6
If you’re ready to explore specific components of the software in greater detail, see the subsequent sections in this handbook.
For an A-to-Z look at the topics covered in this manual, see the index on page 285.
What’s included?
WordPerfect Office includes the following programs:
• Corel® WordPerfect® — for creating professional-looking documents. See Part Two: WordPerfect on page 15.
• Corel® Quattro Pro® — for managing, analyzing, reporting, and sharing data. See Part Three: Quattro Pro on page 133.
• Corel® Presentations™ — for producing high-quality slide shows and drawings. See Part Four: Presentations on page 183.
In addition, WordPerfect Office provides the following:
• utilities — supplementary tools for accomplishing specific tasks quickly and easily: taking notes, storing contact information, converting and managing files, and much more. See Part Five: Utilities on page 241.
• writing tools — built-in features for improving your spelling, grammar, style, and vocabulary. See Part Six: Writing Tools on page 259.
• support for macros — tools, features, and resources that can help you streamline or automate tasks. See Part Seven: Macros on page 273.
• Web resources — product information, support materials, social media, and more. See Part Eight: Web Resources on page 283.
Not all documented features are available in all versions of WordPerfect Office. To compare versions, please visit WordPerfect.com.
Part One: Introduction 3


Help resourcesWordPerfect Office offers a wide variety of learning resources.
For centralized, categorized access to both installed resources and additional materials on the Web, you can visit the Reference Center.
For details on specific programs and features, you can use the installed Help files and the various built-in Help features.
In this chapter:
• “Using the Reference Center on page 5”
• Using the Help files on page 6
• Using the built-in Help features on page 8
Using the Reference Center
The Reference Center centralizes and categorizes the Help files and PDF resources that install with WordPerfect Office — and helps you locate additional materials on the Web.
You can access the Reference Center from within Windows, or from directly within WordPerfect Office.
You can perform a Help search, or a Web search, from directly with the Reference Center.
About Help files
Help files offer information in a separate window that you can keep displayed on top of the application window. For more information, see Using the Help files on page 6.
About PDF resources
The following PDF resources can be accessed from the Reference Center:
• handbook — electronic copy of the general-reference printed manual for the suite
• guidebook — anthology of tutorials, based on the CorelTUTOR™ Help files for the suite
• quick-reference cards — tips and insights on various topics
• user guides — detailed reference manuals, based on the main Help files for specific programs
• macro guide — programming manual, based on the Macro Help file for the suite
• content manual — catalog of installed fonts and clipart
You can access the content manual only if you’ve installed the extra content (clipart, photos, and fonts) for the software. See To install DVD extras on page 13.
To access the Reference Center
• Do one of the following:
• On the Windows taskbar, click Start All programs WordPerfect Office Reference Center.
• In WordPerfect, Quattro Pro, or Presentations, click Help Reference Center.
The Reference Center appears. Click a tab (on the left) to display the resources for that category; click any entry on the page to access that resource.
Première Partie: Introduction 5
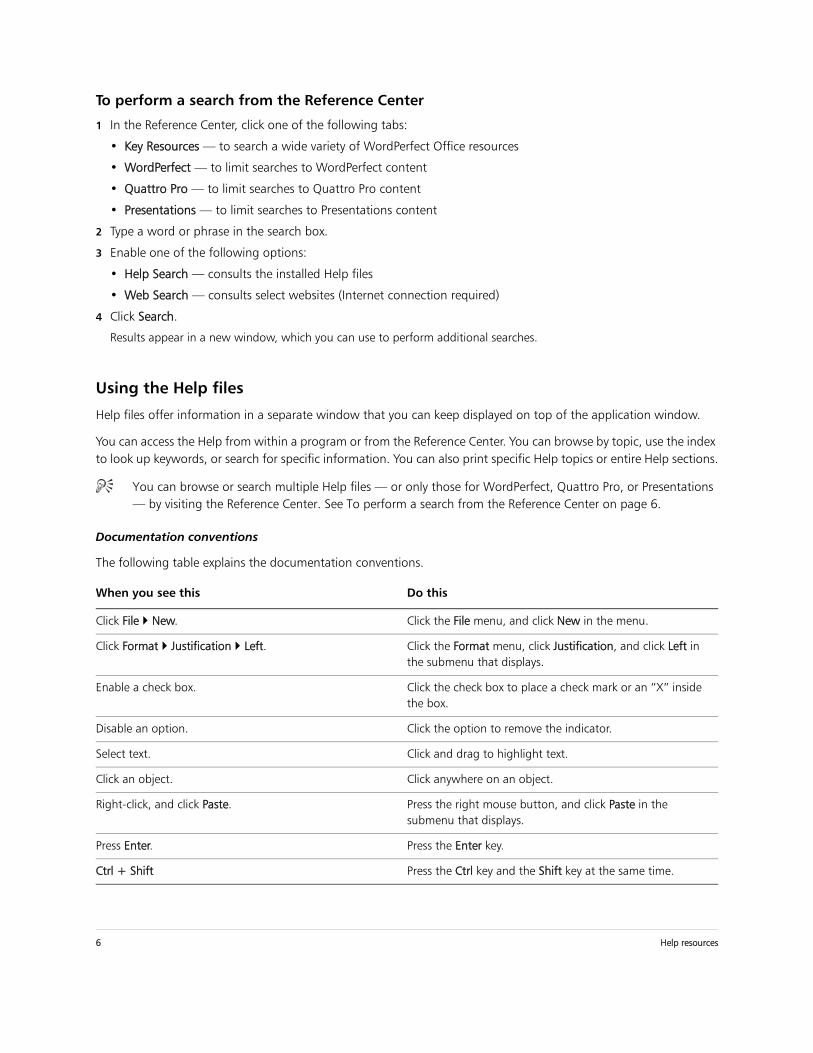
To perform a search from the Reference Center
1 In the Reference Center, click one of the following tabs:
• Key Resources — to search a wide variety of WordPerfect Office resources
• WordPerfect — to limit searches to WordPerfect content
• Quattro Pro — to limit searches to Quattro Pro content
• Presentations — to limit searches to Presentations content
2 Type a word or phrase in the search box.
3 Enable one of the following options:
• Help Search — consults the installed Help files
• Web Search — consults select websites (Internet connection required)
4 Click Search.
Results appear in a new window, which you can use to perform additional searches.
Using the Help files
Help files offer information in a separate window that you can keep displayed on top of the application window.
You can access the Help from within a program or from the Reference Center. You can browse by topic, use the index to look up keywords, or search for specific information. You can also print specific Help topics or entire Help sections.
You can browse or search multiple Help files — or only those for WordPerfect, Quattro Pro, or Presentations — by visiting the Reference Center. See To perform a search from the Reference Center on page 6.
Documentation conventions
The following table explains the documentation conventions.
When you see this Do this
Click File New. Click the File menu, and click New in the menu.
Click Format Justification Left. Click the Format menu, click Justification, and click Left in the submenu that displays.
Enable a check box. Click the check box to place a check mark or an “X” inside the box.
Disable an option. Click the option to remove the indicator.
Select text. Click and drag to highlight text.
Click an object. Click anywhere on an object.
Right-click, and click Paste. Press the right mouse button, and click Paste in the submenu that displays.
Press Enter. Press the Enter key.
Ctrl + Shift Press the Ctrl key and the Shift key at the same time.
6 Help resources

Not all documented features are available in all versions of WordPerfect Office. To compare versions, please visit WordPerfect.com.
To access the Help
1 Do one of the following:
• In WordPerfect, Quattro Pro, or Presentations, click Help Help topics.
• In the Reference Center, click a Help file.
2 Click one of the following tabs:
• Contents — to browse the Help file by topic
• Index — to browse the Help file by keyword
• Search — to search the Help file for a particular word or phrase. For more information, see To search a Help file on page 7.
To search a Help file
1 Click the Search tab in the left pane of the Help file.
2 Type a word or phrase in the search box.
For example, if you are looking for information about macros, you can type macro to display a list of relevant topics. To search for a phrase, type the phrase, and enclose it in quotation marks (for example, type “writing tools” or “file formats”).
3 Click the List topics button.
4 Choose a topic from the list that appears, and press Enter. The topic is displayed in the right pane of the Help file.
If your search results do not include any relevant topics, check the spelling of the word or phrase you typed. Note that the English Help uses American spelling (for example, “color,” “favorite,” “center,” and “customize”), so searching for British spellings (“colour,” “favourite,” “centre,” and “customise”) produce no results.
To determine the location of a displayed topic within the Help, click the Contents tab in the left pane of the Help.
You can also
Access tutorials Do one of the following:• In WordPerfect, Quattro Pro, or Presentations, click Help
CorelTUTOR.• In the Reference Center, click the Tutorials entry on the
associated program page.
Access information on macros, macro languages (such as PerfectScript™), and macro commands
Do one of the following:• In WordPerfect, Quattro Pro, or Presentations, click Help
Macro commands.• In the Reference Center, click the Macros tab, and then click
the Macro Help entry.
You can also
Search for a word or phrase in a list of topics generated by the previous search
Enable the Search previous results check box.
Help resources 7

To print Help content
You can also print a topic by right-clicking the window and clicking Print.
Using the built-in Help features
WordPerfect Office programs offer the following types of built-in Help content:
• context-sensitive Help — information, relevant to the current task, on menu commands, toolbar buttons, dialog boxes, and dialog box controls
• QuickTips™— information about menu items, or about icons and buttons on the toolbars and the Toolbox
• PerfectExpert™— assistance with everyday tasks and detailed projects
To access context-sensitive Help
Search for all forms of a word Enable the Match similar words check box.
For example, if you type “type” and enable this check box, the search results will include topics that contain the words “types” and “typing.”
Search only the titles of Help topics Enable the Search titles only check box.
Repeat a recently performed search On the search box, click the arrow that points down, and choose a word or phrase.
Combine multiple search terms Type a search term in the box. Click the flyout arrow that points to the right, and choose an operator. Type another search term in the search box, and then press Enter.
Search multiple Help files, or search for materials on the Web
See To perform a search from the Reference Center on page 6.
To Do the following
Print a section Select the section you want to print, click Print, and enable the Print selected heading and all subtopics option.
Print a topic Select the topic you want to print, click Print, and enable the Print selected topic option.
To get help for Do the following
A menu item Point to the menu item, and press F1.
A toolbar button Point to the toolbar button, press Shift + F1, and click the button.
A dialog box Click Help, or press F1.
You can also
8 Help resources
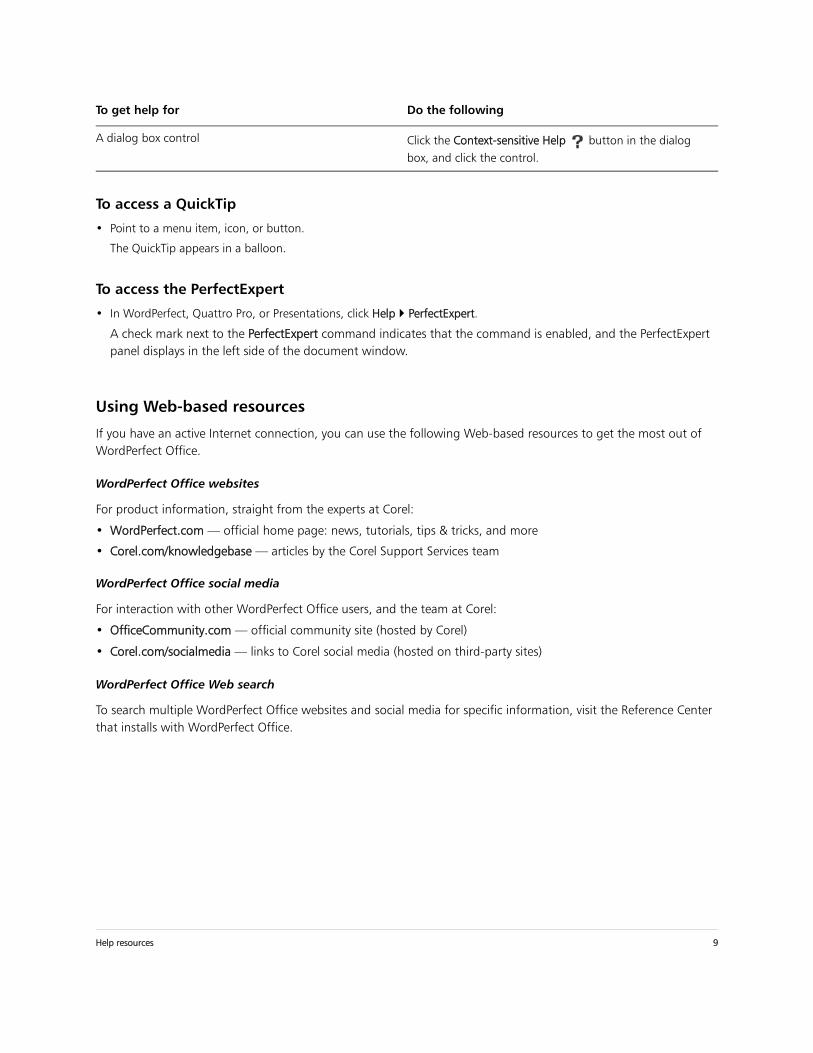
To access a QuickTip
• Point to a menu item, icon, or button.
The QuickTip appears in a balloon.
To access the PerfectExpert
• In WordPerfect, Quattro Pro, or Presentations, click Help PerfectExpert.
A check mark next to the PerfectExpert command indicates that the command is enabled, and the PerfectExpert panel displays in the left side of the document window.
Using Web-based resources
If you have an active Internet connection, you can use the following Web-based resources to get the most out of WordPerfect Office.
WordPerfect Office websites
For product information, straight from the experts at Corel:
• WordPerfect.com — official home page: news, tutorials, tips & tricks, and more
• Corel.com/knowledgebase — articles by the Corel Support Services team
WordPerfect Office social media
For interaction with other WordPerfect Office users, and the team at Corel:
• OfficeCommunity.com — official community site (hosted by Corel)
• Corel.com/socialmedia — links to Corel social media (hosted on third-party sites)
WordPerfect Office Web search
To search multiple WordPerfect Office websites and social media for specific information, visit the Reference Center that installs with WordPerfect Office.
A dialog box control Click the Context-sensitive Help button in the dialog box, and click the control.
To get help for Do the following
Help resources 9


InstallationIn this chapter:
• What’s new in WordPerfect Office 2020 on page 11
• Migrating from an earlier version on page 12
• Installing WordPerfect Office on page 12
• Registering WordPerfect Office on page 13
• Updating WordPerfect Office on page 14
What’s new in WordPerfect Office 2020
Corel WordPerfect Office 2020 offers a variety of new and enhanced features.
New! Open footnotes and endnotes for editing in a click
A new keyboard and mouse shortcut accelerates your workflow by opening a footnote or endnote for editing in just a click. Then, return to the place in the document where you were last working. For more information, see "Editing and deleting footnotes and endnotes" in the WordPerfect Help.
New! Save WordPerfect files to OpenDocument Text file format
Enhanced file format compatibility means WordPerfect files can be saved as OpenDocument Text (ODT) files.
New! Save WordPerfect files as EPUB eBooks
In a couple of clicks, save a WordPerfect document to one of the world’s most popular eBook formats, EPUB. For more information, see "To create an eBook" in the WordPerfect Help.
Enhanced! QuickWords
Enter text faster than ever thanks to an expanded list of QuickWords, which allows you to insert a whole word or phrase in a document by typing an abbreviation. For more information, see "Entering text automatically" in the WordPerfect Help.
Enhanced! PDF support
New options let you control the resolution of linked and embedded content in files published to PDF. For more information, see "To set the resolution of linked and embedded objects in a PDF file" " in the WordPerfect and Presentations Help.
Enhanced! Printing
Enhancements deliver improved printing of labels, table headers, and more.
Enhanced! Reveal Codes
The Reveal Codes window now displays codes for font attributes and text alignment features in table cells, rows, and
Installation 11

columns.
New! Set default magnification level for new Quattro Pro spreadsheets
Set the default zoom level for new spreadsheets so you can get started right away in an environment tailored to how you work best. For more information, see “Setting the default zoom level” in the Quattro Pro Help.
New! Automatically scale application controls and toolbars in WordPerfect and Quattro Pro to your system's DPI setting
Leverage your system's DPI settings to scale and optimize the usability of application controls and toolbars on high-resolution displays and laptops. In addition, Presentations and utilities offer better scaling of UI elements when working on high-DPI and high resolution displays and laptops.
Enhanced! Currency formatting in Quattro Pro
Enhanced options for default currency cell formatting let you display negative values in red or black, as well as precede them with a minus sign or enclose them in parentheses. In addition, you can use accounting formatting to align currency symbols and decimal points. For more information, see “To change the currency symbol” in the Quattro Pro Help.
Migrating from an earlier version
WordPerfect Office offers numerous features that help you transfer, or “migrate,” from an earlier version of the software.
For your convenience, many such features are offered during installation. If the setup detects an earlier version of the software, you can choose to remove that version; you can also choose to migrate customized settings, user-created templates, and user-created macros from that version. See To install WordPerfect Office from DVD on page 12.
For even more migration options, please see “Migrating from an earlier version of WordPerfect Office” in the WordPerfect Help.
Installing WordPerfect Office
The WordPerfect Office DVD lets you install WordPerfect Office, as well as any DVD extras included with your purchase.
If you downloaded the software, please refer to the installation instructions included with your purchase.
After installing WordPerfect Office, you can use the Windows® Control Panel to modify, repair, or uninstall the software.
To install WordPerfect Office from DVD
1 Close all applications.
2 Insert the WordPerfect Office DVD in the DVD drive.
If the DVD does not start automatically, do one of the following:
12 Installation
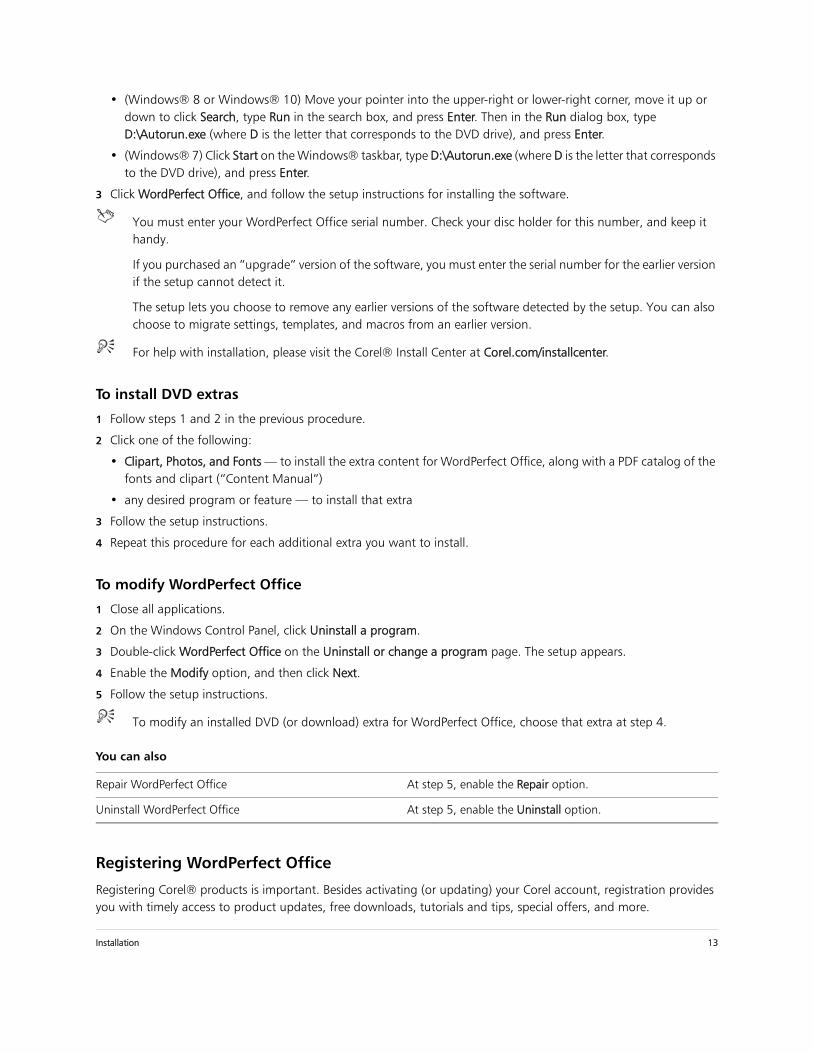
• (Windows® 8 or Windows® 10) Move your pointer into the upper-right or lower-right corner, move it up or down to click Search, type Run in the search box, and press Enter. Then in the Run dialog box, type D:\Autorun.exe (where D is the letter that corresponds to the DVD drive), and press Enter.
• (Windows® 7) Click Start on the Windows® taskbar, type D:\Autorun.exe (where D is the letter that corresponds to the DVD drive), and press Enter.
3 Click WordPerfect Office, and follow the setup instructions for installing the software.
You must enter your WordPerfect Office serial number. Check your disc holder for this number, and keep it handy.
If you purchased an “upgrade” version of the software, you must enter the serial number for the earlier version if the setup cannot detect it.
The setup lets you choose to remove any earlier versions of the software detected by the setup. You can also choose to migrate settings, templates, and macros from an earlier version.
For help with installation, please visit the Corel® Install Center at Corel.com/installcenter.
To install DVD extras
1 Follow steps 1 and 2 in the previous procedure.
2 Click one of the following:
• Clipart, Photos, and Fonts — to install the extra content for WordPerfect Office, along with a PDF catalog of the fonts and clipart (“Content Manual”)
• any desired program or feature — to install that extra
3 Follow the setup instructions.
4 Repeat this procedure for each additional extra you want to install.
To modify WordPerfect Office
1 Close all applications.
2 On the Windows Control Panel, click Uninstall a program.
3 Double-click WordPerfect Office on the Uninstall or change a program page. The setup appears.
4 Enable the Modify option, and then click Next.
5 Follow the setup instructions.
To modify an installed DVD (or download) extra for WordPerfect Office, choose that extra at step 4.
Registering WordPerfect Office
Registering Corel® products is important. Besides activating (or updating) your Corel account, registration provides you with timely access to product updates, free downloads, tutorials and tips, special offers, and more.
You can also
Repair WordPerfect Office At step 5, enable the Repair option.
Uninstall WordPerfect Office At step 5, enable the Uninstall option.
Installation 13

Registration happens after you install WordPerfect Office. Do one of the following:
• Click Help Product registration in WordPerfect.
• Wait until WordPerfect Office prompts you to register.
• Visit Corel.com/support/register on the Web.
Updating WordPerfect Office
WordPerfect Office offers a messaging service that helps keep your installation up-to-date by informing you when product updates are available. If you are a trial user, you can purchase WordPerfect Office directly from the application. To receive messages, check for updates or purchase the suite from a trial version, you require an Internet connection.
For complete information about the messaging service, you can access the Messages Help file.
To access the messaging service
• In WordPerfect, click Help Messages.
To update WordPerfect Office
• In WordPerfect, click Help Check for updates.
To modify the messaging settings
• In WordPerfect, click Help Message settings.
To purchase WordPerfect Office from within a trial
• Click Help Purchase.
To access the Messages Help file
1 On the Windows taskbar, click Start All programs WordPerfect Office Reference Center.
The Key Resources page of the Reference Center appears.
2 Click Messages Help.
14 Installation

Part Two: WordPerfect
WordPerfect is a powerful word-processing application that helps you produce newsletters, articles, reports, proposals, books, and other documents.
About WordPerfect
See the following chapters:
• WordPerfect basics on page 17
• Windows and views on page 21
• Reveal Codes on page 25
• Navigation on page 29
• Microsoft Word compatibility on page 31
Documents and templates
See the following chapters:
• Document basics on page 35
• PDF import on page 39
• Templates on page 41
Text
See the following chapters:
• Text basics on page 45
• Text selection on page 47
• Text formatting on page 49
• Text arrangement on page 55
• Text organization on page 59
Graphics
See the following chapter:
• Graphics on page 63
Editing content
See the following chapters:
• Editing basics on page 67
• Find and Replace on page 71
Design and layout
See the following chapters:
• Styles on page 75
• Page margins on page 79
Part Two: WordPerfect 15

• Page size and orientation on page 81
• Page flow on page 85
• Page columns on page 87
• Page numbering on page 91
• Headers and footers on page 95
• Footnotes and endnotes on page 99
Sharing documents
See the following chapters:
• Saving documents on page 103
• Performing simplified merges on page 112
• Printing on page 115
• Publishing to PDF on page 117
• Publishing eBooks on page 129
The WordPerfect page of the Reference Center offers extensive program help: reference topics, tutorials, tips, insights, and more. See To access the Reference Center on page 5.
16 Part Two: WordPerfect

WordPerfect basics
This chapter tells you how to perform basic operations in WordPerfect.
In this chapter:
• Starting WordPerfect on page 17
• Exploring the workspace on page 17
• Changing the workspace on page 18
• Quitting WordPerfect on page 19
Starting WordPerfect
You can start WordPerfect as you would any other Windows program.
If you start WordPerfect while the program is already running, a new instance is created. Running multiple instances of WordPerfect is useful when, for example, you need to work on multiple documents simultaneously:
• Rather than switching among document windows within WordPerfect, you can switch among WordPerfect instances in Windows.
• Rather than switching among documents at all, you can display them simultaneously across multiple monitors (if available).
To start WordPerfect
• On the Windows taskbar, click Start All Programs WordPerfect Office WordPerfect.
Exploring the workspace
In WordPerfect, the workspace (or “work area”) refers to everything within the WordPerfect application window.
The document window
The large open area is the document window.
The menu bar
The menu bar, located at the top of the workspace, just below the title bar, provides access to most of the WordPerfect commands.
The toolbars
Many menu commands can be accessed through toolbars, located below the menu bar.
This is the WordPerfect toolbar.
The property bar
The property bar is a context-sensitive toolbar that displays buttons and options related to the task you are performing. For example, when text is selected, the property bar contains only text-related commands.
Part two : WordPerfect 17

This is the property bar.
By default, the property bar is located above the document window.
The application bar
The application bar displays information about the status of the active WordPerfect document. By default, the application bar is located below the document window.
When you open a file, a document button with the name of the file appears on the application bar. You can use document buttons to quickly move between the documents. For more information about moving between documents, see Navigation on page 29.
This illustration shows items on the right side of the application bar.
Changing the workspace
WordPerfect lets you use different workspaces for creating documents. When choosing a workspace, you are specifying the toolbars, buttons, options, and menus that WordPerfect displays.
You can customize and save workspace settings, including shadow cursor settings, measurement and ruler settings, toolbar, application bar and property bar settings. Saving your workspace settings ensures they remain in effect until you change them.
To change the workspace
1 Click Tools Workspace manager.
2 Enable one of the following options:
• WordPerfect Office mode — displays the default WordPerfect workspace
• Microsoft Word mode — simulates the Microsoft® Word workspace by positioning the WordPerfect features, including toolbars, keyboards, and menu items, where you would find the equivalent features in Microsoft Word
• WordPerfect Classic mode (version 5.1) — lets you work in the familiar visual environment of Corel WordPerfect 5.1 and use its keystrokes
• WordPerfect Legal mode — exposes the WordPerfect legal features, such as tools that let you create specialized legal documents such as cases and pleadings
To save workspace settings
1 Click Tools Settings.
2 Click Environment.
3 In the Environment settings dialog box, click the Interface tab.
4 In the Save workspace area, enable one of the following options:
• Always — always saves workspace settings when quitting WordPerfect
• Never — never saves workspace settings when quitting WordPerfect
18 WordPerfect basics

• Prompt on exit — prompts you to save workspace settings when quitting WordPerfect
Quitting WordPerfect
You can quit WordPerfect, thereby closing the application along with all of the documents you have open.
To quit WordPerfect
• Click File Exit.
You are prompted to save any modified documents before quitting.
Part two : WordPerfect 19


Windows and views
In this chapter:
• Running multiple instances of WordPerfect on page 21
• Switching document views on page 21
• Changing document display settings on page 21
• Working with the ruler and ruler guides on page 22
• Using guidelines on page 23
For additional topics, please see “Viewing and navigating documents” in the WordPerfect Help.
Running multiple instances of WordPerfect
You can run multiple instances of WordPerfect — for example, if you want to work on multiple documents across multiple monitors.
To accommodate this new multiple-instance workflow, various traditional behaviors of WordPerfect have been adjusted.
• Starting WordPerfect: If you start WordPerfect while the program is already running, a new instance is created.
• Viewing documents: You can transfer an open document to a new instance of WordPerfect. See page 22.
• Template settings: You can choose to apply template changes to all instances of WordPerfect. See page 41
• Macro behavior: Macro commands that previously applied to “all documents” now apply only to those in the current instance of WordPerfect.
Switching document views
In WordPerfect, you can view documents in four ways: draft, page, two pages, and browser preview. You can also view documents with no user-interface elements.
To switch the document view
• Click View, and click one of the following:
• Draft — to hide some document elements such as footers, page breaks, margins, and watermarks
• Page — to display the document the way it will look when printed
• Two pages — to display two consecutive pages in a document side by side
• Preview in browser — to display a document in HTML format
Changing document display settings
WordPerfect lets you change document display settings in several ways. You can enlarge or reduce the page display. As well, the document window can be minimized or maximized.
You can cascade or tile multiple open documents. You can also transfer an open document to a new instance of WordPerfect.
Part two : WordPerfect 21

To enlarge or reduce the page display
1 Click View Zoom.
2 Enable one of the following options:
• Margin width — displays a complete line or block of text within a window with minimal white space to the right and left
• Page width — displays the width of the page including margins in the window
• Full page — displays all page margins in the document window
• Other — lets you enter a custom zoom percentage
To enlarge or reduce the page display, the document must be in Draft or Page view.
To minimize or maximize the document window
• Right-click the WordPerfect title bar, and click one of the following:
• Minimize
• Maximize
If you want to restore a document window to its original size, right-click the title bar, and click Restore.
To cascade multiple documents
• Click Window Cascade.
To tile multiple documents
• Click Window, and click one of the following:
• Tile side by side
• Tile top to bottom
To transfer a document to a new instance of WordPerfect
• Click Window Separate.
You can also right-click the document button on the application bar and choose Separate document.
Working with the ruler and ruler guides
The ruler is used to display page format elements, such as margins, tabs, column gutters, and indentation. The ruler has two parts: the line and the tab bar.
• The line resembles a ruler and contains graduated measurements for the area between the left and right margins.
• The tab bar, the white space in the lower part of the ruler, displays the triangular shaped tab marks.
Ruler guides are black dotted vertical lines that allow you to see where the settings for your margins and indentations are in relation to where the text displays on the page. For example, when you click a tab, the ruler guide and a box containing the tab’s settings are displayed.
22 Windows and views

To hide or display the ruler
• Click View Ruler.
A check mark beside Ruler indicates that the ruler is displayed.
To display ruler guides
1 Click Tools Settings.
2 Click Display.
3 Click the Ruler tab.
4 Enable the Show ruler guides check box.
Using guidelines
Guidelines are horizontal and vertical nonprinting lines that you can use to align tables, margins, columns, headers, and footers on a page.
To display guidelines
1 Click View Guidelines.
2 In the Display guidelines for area, enable one or more of the following check boxes:
• Tables — displays guidelines that you can drag to change the width of table columns
• Margins — displays guidelines that you can drag to change the width of margins
• Columns — displays guidelines that you can drag to change the width of columns
• Header/Footer — displays guidelines that you can drag to change the widths of headers or footers
Part two : WordPerfect 23

24 Windows and views

Reveal Codes
Formatting codes are inserted when you add text and formatting to a document.
The Reveal Codes feature gives you full control over document formatting, especially when copying and pasting text from various sources. For example, to remove bold formatting, you can turn on Reveal Codes, locate the <Bold> code, and then just drag it out of the Reveal Codes window.
You can also double-click any code in the Reveal Codes window to make advanced alterations to the settings or styles.
Codes are hidden by default; however, they can be displayed in a separate window below the active document.
This is how the text is displayed in the Reveal Codes window.
You can hide or display formatting codes. You can also change the location of the Reveal Codes window and dock it on the left, right, or bottom of the screen. New documents display the Reveal Codes window in the location that was last used. You can quickly access other Reveal Codes settings from the WordPerfect toolbar.
Dock the Reveal Codes window at the bottom, left, or right of the screen.
You can also customize the display of the codes. For example, you can specify the font style and color, and several other formatting options. In addition, you can customize the appearance of the space character within the Reveal Codes window. For example, you can set the color or use a symbol such as a diamond or bullet to separate words in the Reveal Codes window.
Part two : WordPerfect 25

The characters that separate the words in the Reveal Codes window stand out better when you apply a color and use a symbol.
To hide or display formatting codes
• Click the Reveal Codes button on the WordPerfect toolbar.
You can also display or hide the Reveal Codes window by clicking View Reveal Codes or clicking the Reveal Codes button that appears in the area where the vertical and the horizontal scrollbars meet.
To change the location of the Reveal Codes window
1 Click the Reveal Codes picker on the WordPerfect toolbar.
2 Choose one of the following options:
• Reveal Codes at left
• Reveal Codes at bottom
• Reveal Codes at right
You can also change the location of the Reveal Codes window by clicking View Dock Reveal Codes to, and choosing an option.
To customize the display of formatting codes
1 Click Tools Settings.
2 Click Display.
3 Click the Reveal Codes tab.
You can also click the Reveal Codes picker on the WordPerfect toolbar, and click Reveal Codes settings.
4 In the Format area, enable or disable any of the following check boxes:
• Wrap lines at window — to continue codes on the next line
• Show codes in detail — to display formatting information with codes
26 Reveal Codes

• Auto-display codes in Go to dialog — to display the Reveal Codes window when a code match is found in a specific section of the document
5 To customize the appearance of the space characters that separate the words in the Reveal Codes window, do any of the following:
• In the Format area, choose an option from the Show spaces as list box.
• In the Color area, open the Spaces color flyout, and click a color.
Note: You can set the color only for symbols.You can also
Change the font Click Font, and choose a font from the Face list box.
Change the font size Choose a font size from the Size list box.
Change the font color In the Color area, disable the Use system colors check box. Open the Text color flyout, and click a color.
Change the background color In the Color area, disable the Use system colors check box. Open the Background color flyout, and click a color.
Use Windows system colors In the Color area, enable the Use system colors check box.
Part two : WordPerfect 27

28 Reveal Codes

NavigationWordPerfect lets you navigate documents in several ways. You can move to a specific section of a document, or you can scroll through a document. You can also display a document from a list of open documents.
You can browse a document by insertion points, or by using a navigation control.
To move to a specific section of a document
1 Click Edit Go to.
2 Choose an option from Go to what list box.
3 Choose any applicable options from the area to the left of the list box.
4 Click Go to.
You can also access the Go to dialog box by pressing Ctrl + G.
To scroll through a document
1 On the toolbar, click the Autoscroll button.
The pointer changes to the Autoscroll arrow.
2 Move the Autoscroll arrow in the direction you want to scroll.
The scrolling speed increases if you move the arrow further away from the Autoscroll tool.
You can disable Autoscroll by clicking anywhere in the document.
To display a document from a list of open documents
• Click Window, and click the filename of the document that you want to display.
A check mark beside a document path and filename indicates the active document.
You can also display a document by clicking its button on the application bar.
To browse through insertion points in a document
• Click one of the following buttons:
• Back
• Forward
To browse by using a navigation control
1 On the vertical scroll bar, click the Browse button, and click a navigation control.
2 Click one of the following buttons:
• Previous — moves the cursor to the previous occurrence of the selected navigation control
• Next — moves the cursor to the next occurrence of the selected navigation control
Part two : WordPerfect 29


Microsoft Word compatibility
WordPerfect offers compatibility features geared towards those who are migrating to WordPerfect from Microsoft Word and those who need to exchange WordPerfect documents with Microsoft Word users.
In this chapter:
• Simulating the Microsoft Word workspace on page 31
• Sharing documents with Microsoft Word users on page 31
For additional topics, please see “Compatibility with Microsoft Word” in the WordPerfect Help.
Simulating the Microsoft Word workspace
If you recently switched from Microsoft Word to WordPerfect, you may not be familiar with the WordPerfect workspace. While there are many similarities between the two applications, you may find it easier to simulate the Microsoft Word workspace until you are accustomed to working in WordPerfect. What the Microsoft Word workspace does is position the WordPerfect features, including toolbars and menu items, where you would find the equivalent feature in Microsoft Word. It also applies Microsoft Word keyboard shortcuts to WordPerfect features, allowing you to quickly find the tools you need to create documents in WordPerfect.
If you prefer to work in the WordPerfect workspace, but you want to access the most common WordPerfect features using Microsoft Word buttons and icons, you can display the Microsoft Word toolbar. In addition, you can display the Microsoft Word Compatibility toolbar, which gives you immediate access to features, such as saving documents to Microsoft Word and publishing to PDF.
To work in the Microsoft Word workspace
1 Click Tools Workspace manager.
2 Enable the Microsoft Word mode option.
To display the Microsoft Word toolbar in WordPerfect
1 Click View Toolbars.
2 Enable one of the following check boxes:
• Microsoft Word 97
• Microsoft Word 2002
To display the Compatibility toolbar
1 Click View Toolbars.
2 Enable the Compatibility check box.
Sharing documents with Microsoft Word users
WordPerfect makes it possible for you to share WordPerfect documents with Microsoft Word users and they can share their documents with you.
Part two : WordPerfect 31

For example, to share a WordPerfect document with a Microsoft Word user, you must save the WordPerfect document as a Microsoft Word file. The saving process automatically converts the document to the Microsoft Word format.
In addition, if you receive a file created in Microsoft Word, all you need to do is open it in WordPerfect. The opening process automatically converts the file to the WordPerfect format. If you modify the same file and you want others to view the changes in Microsoft Word, then you need to save the file as a Microsoft Word file. You can specify that the default format when saving files is set to the Microsoft Word file format or you can choose to automatically save files in the same file format in which the file was opened. If you don’t specify the Microsoft Word format when saving, the file is saved as a WordPerfect file by default.
You can also insert a Microsoft Word document into a WordPerfect document.
To save a WordPerfect document as a Microsoft Word document
1 Click File Save as.
2 Choose the drive and folder where you want to save the file.
3 Type the filename in the Filename box.
4 Choose MS Word from the File type list box.
5 Click Save.
When you save a WordPerfect document as a Microsoft Word document, some of the formatting in the document may no longer display properly.
To open a Microsoft Word document
1 Click File Open.
2 Choose the drive and folder where the Microsoft Word file is stored.
If you can’t see the file, choose All files from the File type box.
3 Click the Microsoft Word file.
4 Click Open.
You can open documents created in Microsoft Word for MS-DOS versions 1.0, 1.1, 1.2, 2.0, 4.0, 5.0, and 5.5, Microsoft Word for Windows 6.0, and 7.0, and Microsoft Word 97, 2000, XP (2002), 2003, 2007, 2010, 2013, and 2016. You can also open Microsoft Word Open XML documents (.docx) and Microsoft Word Open XML Macro-enabled document (.docm).
When you open a Microsoft Word document in WordPerfect, some information in the file may not be displayed in the same way after it is converted.
To automatically save Microsoft Word files opened in WordPerfect to the Microsoft Word format
1 Click Tools Settings Files.
2 On the Document page, choose a version of the MS Word format from the Default save file format list box.
To automatically save files to their original format
1 Click Tools Settings Files.
32 Microsoft Word compatibility

2 On the Document page, enable the On save, keep document’s original file format check box.
To insert a Microsoft Word file into a WordPerfect document
1 Click Insert File.
2 Choose the drive and folder where the Microsoft Word file is stored.
If you can’t see the file, choose All files from the File type box.
3 Click the Microsoft Word file.
4 Click Insert.
Part two : WordPerfect 33


Document basics
You can create documents from scratch. You can also open existing documents — even those created in another word processor.
In this chapter:
• Understanding the parts of a document on page 35
• Creating documents on page 36
• Opening documents on page 36
Understanding the parts of a document
A WordPerfect document consists of one or more of the following components.
Template
A template is a preformatted document that can be used as a guide for creating a new document.
Every document created in WordPerfect is based on either the default template or a project template.
• When you open WordPerfect, the blank document you see is based on the default template. For information, see Default template on page 41.
• Project templates include fax cover sheets, memos, newsletters, and brochures. For information, see Project templates on page 42.
Text
Text can be typed directly into WordPerfect or imported from text editors or other word-processing applications.
For information, see Text basics on page 45.
Graphics
Graphics include shapes, drawings, pictures, and clipart.
• A shape is any object created with WordPerfect drawing tools.
• A drawing is created with Presentations menus and tools.
• A picture is a bitmap, or graphic image, that has been imported into a WordPerfect document. Pictures can be imported from storage media, photo-editing programs, or a scanner.
• Clipart images are images that can be brought into Corel applications and used as they are or edited.
For information, see Graphics on page 63.
Styles
A style is a collection of formatting attributes applied to text (characters, paragraphs, or documents) or graphics.
By formatting items with styles, you ensure consistent formatting throughout a document. Whenever you change the formatting in a style, you change the appearance of all items that use that style.
For information, see Styles on page 75.
Part two : WordPerfect 35

Macros
Macros are used to automate application tasks. For example, you can use WordPerfect macros to set margins, select a font, or create a merge file.
For information, see Part Seven: Macros on page 273.
Creating documents
You can create a document in WordPerfect by using the default template, a blank document that includes formatting elements such as margin settings, tab settings, and toolbars.
WordPerfect also includes ready-made project templates that you can open and use to create a wide range of documents, including letters, fax cover sheets, calendars, and business cards.
You can create an eBook in the EPUB format in addition to the MOBI format.
To create a document by using the default template
• Click File New.
You can also apply the default template to a new document by clicking the New blank document button on the toolbar.For more information on the default template, see page 41.
To create a document by using a project template
• Click File New from project.
For more information on project templates, see page 42.
To create an eBook
1 Click File New from project.
2 Click the Create new tab.
3 Choose [WordPerfect] from the list box.
If [WordPerfect] is not displayed in the list box, click Options, and click Refresh projects.
4 Choose eBook Publisher from the list.
5 Click Create.
For more information about creating eBooks, see Publishing eBooks on page 129.
Opening documents
You can open word-processing documents that were created in WordPerfect or in another application.
The advantage of opening — rather than importing — a document created in another application is that many of the formatting attributes in the original document (such as page size, margins, font properties, bullets, and underlining) are preserved.
36 Document basics

To open a document
1 Click File Open.
You can also click the Open button on the toolbar.
2 Choose the drive and folder where the file is stored, and choose the file.
You can also type the full path and filename in the File name list box.
3 Click Open.
The document opens in a new document window, and a corresponding button is added to the application bar. You can have up to nine documents open within the application window.
You can also
Go to the folder where an open document is stored Right-click the document button on the application bar, and choose Open containing folder.
Copy the folder path for an open document Right-click the document button on the application bar, and choose Copy full path.
Open more than nine documents at a time Split the documents across multiple instances of WordPerfect. See also To transfer a document to a new instance of WordPerfect on page 22.
Set documents accessed outside WordPerfect to open in the first available instance (rather than in a new instance)
Click Tools Settings Files. On the Document page, disable the following check box: Outside WordPerfect, open documents in new application window.
Part two : WordPerfect 37


PDF import
WordPerfect lets you import PDF files and scanned PDF files and then access and reuse the text and graphics content. For example, if you have a PDF file that was created by someone else, you can open it in WordPerfect and edit the contents.
When you import PDF files, the text formatting may appear different from that of the original PDF. You can alleviate most conversion issues if you are familiar with the two most common PDF document types: design documents and scanned documents.
Design documents
A design document is a PDF in which the layout is not necessarily based on flow — for example, a magazine advertisement. Design documents are typically created with graphics or illustration software, such as CorelDRAW.
Text strings may be individual lines across sections on the page, as opposed to a long paragraph that flows down a page. In such cases, WordPerfect provides text flows for all text strings that were saved in the graphics application when the PDF was created. The text and formatting of graphic elements are also maintained.
Images are maintained in their original file formats, as is text that is embedded in images that are not vector based.
The layout in the imported PDF may be different from the layout in the original PDF, but you can still modify text strings and create a new document without having to copy or redesign all the elements.
Scanned documents
A scanned document is a document that is read with a scanner and saved as a graphic file, such as a JPEG. Scanned documents store all information as one large image file that is not vector based.
When you import a scanned document, WordPerfect uses OCR technology to scan the document and reconstruct text strings and images. The quality of the original scanned PDF that you import affects the accuracy of what is displayed in the WordPerfect document.
To import a PDF file
1 Click File Open PDF.
2 Choose the drive and folder where the PDF document is stored.
3 Choose the file.
4 Click Open.
The Open PDF settings dialog box appears.
If the PDF document is protected by a password, type the password in the Password box. If both permission and open passwords are applied, type the permission password in the Password box.
5 In the Page range area, enable one of the following options:
• Full document
• Pages (requires you to type a page range in the box)
6 Click Open.
The PDF import dialog box appears.
Part two : WordPerfect 39

You can import the content from the PDF file without text formatting by enabling the Bring in content from original PDF without any formatting check box.
40 PDF import

Templates
A template is a preformatted document that can be used as a guide for creating a new document. Every document created in WordPerfect is based on either the default template or a project template.
In this chapter:
• Default template on page 41
• Project templates on page 42
Default template
When you open WordPerfect, the blank document you see is based on the default template—a special WordPerfect template (WPT) file that records various workspace settings.
Besides storing basic document settings (such as the default font and the default text and graphics styles), the default template also stores any customizations you make to the WordPerfect work area.
Choosing the default template
You can choose a different default template.
You can also choose an additional objects template. This is a second default template that stores objects such as keyboards, menus, template macros, toolbars, and styles that you can use in addition to or in place of those in the default template. For example, a system administrator could use an additional objects template as a network template that would overwrite a user’s default template.
Applying the current document style to the default template
You can apply the style used in the current document to the default template.
Applying template settings across multiple instances
You can choose to apply template changes across all instances of WordPerfect. This technique is especially useful for refreshing all open documents that are based on the same template.
Document, style, and compatibility settings typically affect all instances, whereas customization settings affect only the current instance (and subsequent instances). For details, please see the WordPerfect Help.
To choose a different default template
1 Click Tools Settings.
2 Click Files.
3 Click the Template tab.
4 In the Default template folder box, click the Browse button.
5 Choose the drive and folder where the template is stored.
6 Click Select.
7 In the Default template box, click the Browse button.
8 Click the template you want to use as the default template.
Part two : WordPerfect 41

9 Click Open.
To choose an additional objects template
1 Click Tools Settings.
2 Click Files.
3 Click the Template tab.
4 In the Additional template folder box, click the Browse button.
5 Choose the drive and folder where the template is stored.
6 Click Select.
7 In the Additional objects template box, click the Browse button.
8 Click the template you want to use as the additional objects template.
9 Click Open.
If you want to update the default template with styles from the additional objects template, enable the Update default template from additional objects template check box.
To use the current document style as the default
1 Click File Document Current document style.
2 Enable the Use as default check box.
To apply template changes across multiple instances
1 Click Tools Settings.
2 Click Files.
3 Click the Template tab.
4 Enable the Apply template changes to all WordPerfect windows check box.
You can apply both default-template and project-template changes across multiple instances.
Project templates
WordPerfect lets you create documents from project templates. A project template is a shell, or skeleton structure, that can consist of elements such as margins, styles, and graphics objects. You fill in the details and provide data to complete the project. WordPerfect provides an easy way to access and browse the rich collection of templates installed with the application. When you find the template you need, you can start a new document.
These are examples of project templates.
42 Templates

If you intend to use a specific template often, you can add it to the Favorites category.
You can also use the PerfectExpert, which guides you through basic tasks and helps you create detailed projects. For information, see To access the PerfectExpert on page 9.
To browse for templates
1 Click File New from template.
All preset templates provided with WordPerfect appear in the New from template dialog box.
2 Perform a task from the following table.
If WordPerfect cannot find any templates in the default installation location, you must repair the installation of WordPerfect Office.
To create a document from a project template
1 Click File New from project.
2 Click the Create new tab.
3 Choose [WordPerfect] from the list box.
If [WordPerfect] is not displayed in the list box, click Options, and click Refresh projects.
4 Choose a project template from the list.
5 Click Create.
Some WordPerfect project templates use prompts to guide you through the process of adding information to a document.
To add a project template to the Favorites category
1 Click File New from project.
2 Click the Create new tab.
3 Choose a category from the list box.
4 Choose a project template from the list.
5 Click Copy to favorites.
You can view the contents of the Favorites folder. Click File New from project. Choose [Favorites] from the list box.
To Do the following
View all categories Click Home.
View all templates in a category Click a category.
Increase or decrease the size of thumbnails Drag the Thumbnail size slider to the right or left.
Start a document from a template Choose a template, and click Open.
WordPerfect creates a new document based on the selected template.
Templates 43


Text basics
In this chapter:
• Entering text on page 45
• Inserting text on page 45
Entering text
You can enter text in the document window. You can use the shadow cursor to show where the text will be positioned.
You can also enter text in a text box so that it appears in a separate frame.
To enter text in a document window
1 Click in the document window.
2 Type text.
To enter text by using the shadow cursor
1 Click View Shadow cursor.
A check mark next to the menu command indicates that the shadow cursor is enabled.
2 Click anywhere on the page.
3 Type text.
The shadow cursor changes appearance to show how text will be aligned when you start typing. Small arrows beside the shadow cursor point in different directions when text is left-justified, centered, or right-justified.
To enter text in a text box
1 Click Insert Text box.
2 Type text.
Inserting text
You can insert text from another file.
If you have more than one document opened, you can use the application bar to insert text from one document to another document.
See also:• Cutting, copying, and pasting text and graphics on page 67• Moving text and graphics on page 68
To insert the entire text of another document
1 Click where you want to insert the text.
Part two : WordPerfect 45

2 Click Insert File.
3 Choose the drive and folder where the document is stored.
4 Choose a file.
5 Click Insert.
To insert selected text from another document
1 Select the text you want to insert.
2 Drag the selected text to the button on the application bar that displays the name of the document into which you want to insert the text, but don’t release the mouse button.
This document opens in the document window.
3 Point to where you want to insert the text, and release the mouse button.
46 Text basics

Text selection
You can select text or deselect text, a tabular column, a rectangular block of text, or a range of text.
You can also set selection options. WordPerfect lets you control the speed at which the mouse pointer moves when selecting text. For example, if you need to quickly select multiple pages of content, you can increase the scroll speed.
To select text
To deselect text
• Click anywhere outside the selected text.
To set the selection options for a document
1 Click Tools Settings.
2 Click Environment.
3 In the Environment settings dialog box, click the General tab.
4 Enable the Automatically select whole words when dragging to select text check box.
To select Do the following
A character or word Drag across a character or word.
Tip: Double-click a word to select it.
A sentence Do one of the following:• Triple-click in a sentence.• Click in a sentence. Click Edit Select Sentence.
A paragraph Do one of the following:• Quadruple-click in a paragraph.• Click in a paragraph. Click Edit Select Paragraph.
A page Click on a page. Click Edit Select Page.
A document Do one of the following:
• Press Ctrl + A.
• Click Edit Select All.
A tabular column Select the text from the first character in the tabular column to the last character in the tabular column, and then click Edit Select Tabular column.
A rectangular block of text Select the text from the upper left corner to the lower left corner of the block, and then click Edit Select Rectangle.
A range of text in a document Click Edit Select Section, choose an option from the Select list, and then type a value in the Range box.
Part two : WordPerfect 47

To set the scroll speed for selecting text
1 Click Tools Settings.
2 Click Environment.
3 In the Environment settings dialog box, click the Selection tab.
4 In the Scroll speed area, enable one of the following options:
• Low
• Medium
• High
48 Text selection

Text formatting
In WordPerfect, you can use a variety of formatting tools to control the look of text.
In this chapter:
• Modifying font settings on page 49
• Copying the text format on page 51
• Working with drop caps on page 51
• Inserting characters and symbols on page 52
• Correcting capitalization on page 52
• Correcting the spacing between words and sentences on page 53
For additional topics, please see “Formatting text” in the WordPerfect Help.
Modifying font settings
You can apply formatting to text to change the font and its attributes, such as style, size, and color.
You can also apply relative font sizes, which allows you to format text relative to the specified font size. Suppose you want to add a heading to a document that has a 12-point paragraph font. If you select the heading text and specify a large relative font size, the text displays proportionately larger than the 12-point font.
Using Corel® RealTime Preview™ lets you view text fonts and sizes before you apply them. For example, you can view text as it will display in various fonts before choosing which is the most suitable.
WordPerfect lets you format text using recent font settings, including the font and its size. You can also change the default font and font size for the active document or for all documents.
To change the font
1 Click in the document.
2 Click Format Font.
3 Click the Font tab.
4 Choose a font from the Face list.
You can also change the font color by clicking the Font color button on the property bar, and clicking a color.
You can also change the underline font style by opening the Underline picker on the property bar and clicking an underline style.
You can also
Change the font size Choose a font size from the Size list box.
Change the relative font size Click Relative size, and click a font size.
Change the font color Open the Color picker, and click a color.
Part two : WordPerfect 49

To change the font appearance
1 Select the text you want to modify.
2 Click Format Font.
3 Click the Font tab.
4 In the Appearance area, enable one or more of the following check boxes:
• Bold — applies bold formatting to the selected text
• Italic — applies italic formatting to the selected text
• Underline — applies a single underline to the selected text
• Outline — applies an outline to the selected text
• Shadow — applies a shadow to the selected text
• Small caps — applies small capitals to the selected text
• Redline — applies the color red to the selected text
• Strikeout — applies a line through the selected text
• Hidden — applies the hidden format to the selected text
You can also apply a line through selected text by clicking the Strikeout button on the Text property bar.
To change the font by using Corel RealTime Preview
1 Click in a document.
2 Open the Font face list box on the property bar, and point to a font.
Changes to the font display in the font face preview window.
3 Choose a font from the Font face list box.
You can change the font size using Corel RealTime Preview by opening the Font size list box on the property bar, viewing the font sizes in the font size preview window, and choosing a font size.
To apply a recently used font
1 Select the text you want to format.
If the Fonts toolbar is not displayed, click View Toolbars. In the Toolbars dialog box, enable the Fonts check box.
2 Click the QuickFonts™ button on the font toolbar, and choose a font from the list.
The QuickFonts list displays the 10 most recently used fonts.
To change the default font and font size
1 Click File Document Default font.
2 Choose a font from the Face list.
3 Choose a font size from the Size list box.
If you want to change the default font and font size for all new documents, click Settings, and click Set as default for all documents.
You must install a printer before you can change the default font.
50 Text formatting

If you specify a default printer font and distribute the file to others, the file may not display or print correctly if their printer doesn’t have the specified default font.
You can view the available attributes for each font by clicking the plus sign (+) to the left of a font in the Face list.
Copying the text format
You can copy the format of text and apply it to other text in a document. If you want to copy selected text, then formatting attributes, such as font, font size, and font style, are all copied. If you want to copy the heading in a paragraph, the paragraph style as well as the font and its attributes are copied.
When you copy the format of text, you automatically create a text style. Changing text that has been formatted using a text style also changes other text in the document that uses that style. For information about text styles, see Using text styles on page 75.
To copy the text format
1 Click in the text whose format you want to copy.
2 Click Format QuickFormat™.
3 Enable one of the following options:
• Selected characters — copies the format of the font and its attributes
• Headings — copies the format of the paragraph and its styles, and the font and its attributes
4 Click OK.
5 Drag the QuickFormat paintbrush pointer over the text to which you want to copy the format.
6 Click Format QuickFormat.
QuickFormat is disabled when no check mark displays beside the QuickFormat menu command.
You can also enable or disable QuickFormat by clicking the QuickFormat button.
Working with drop caps
Drop caps are letters that you can use to decorate text at the beginning of a line or paragraph.
These are examples of drop caps.
Part two : WordPerfect 51

To add or remove a drop cap
You can also add a drop cap by right-clicking in a document and clicking Drop cap.
You can also remove a drop cap by clicking the Drop cap style picker and clicking the No drop cap style.
Inserting characters and symbols
You can insert characters, such as iconic symbols, phonetic characters, and characters from other alphabets, into your document.
To insert a character or symbol
1 Click in the document where you want to insert a character or symbol.
2 Click Insert Symbol.
3 Choose a symbol type or a character set from the Set list box.
4 Choose a symbol from the Symbols list.
5 Click one of the following:
• Insert — inserts the symbol and leaves the Symbols dialog box open
• Insert and close — inserts the symbol and closes the Symbols dialog box
Depending on the font you are using, some WordPerfect characters may not display in the document window. These characters are represented by a hollow box on your screen; however, they will display and print correctly if your printer supports graphics.
You can also insert a symbol by clicking the Symbols button on the property bar and clicking a symbol.
You can also insert a character or symbol by pressing Ctrl + W.
Correcting capitalization
You can quickly change a word or selected text to all uppercase or lowercase letters, or to lowercase letters with initial caps. You can also apply sentence case capitalization to selected text so that all characters are set to lowercase except for those following end of sentence punctuation. In addition, you can correct capitalization automatically.
• When you convert text to initial capitals, the first letter of each word is capitalized, except for articles, prepositions, conjunctions, and some pronouns. If you want to specify additional capitalization exceptions, you can edit the WtVNxx.icr file (where VN is the application’s version number and xx is a language code) in Program files\Corel\WordPerfect Office\Writing tools.
To Do the following
Add a drop cap to a blank line Click in a document. Click Format Paragraph Drop cap. Type a letter.
Add a drop cap to an existing paragraph Click at the beginning of a paragraph. Click Format Paragraph Drop cap.
Remove a drop cap Click before a drop cap. Click the Drop cap style button on the property bar. In the Style area, click No drop cap.
52 Text formatting

You can change capitalization after the end of a sentence. You can specify that, when you change capitalization after the end of a sentence, the entry is automatically added as an exception item. You can also remove exception items.
To change capitalization
1 Select the text for which you want to change capitalization.
2 Click Edit Convert case, and click one of the following:
• Lowercase — changes all letters to lowercase
• Uppercase — changes all letters to uppercase
• Initial capitals — changes only the first letter of each word to uppercase
• Sentence case — capitalizes the first letter of the first word and uses lowercase for all other words
You can also change the selected text to uppercase or lowercase by pressing Ctrl + K.
To correct capitalization automatically
1 Click Tools QuickCorrect™.
2 Click the Format-As-You-Go™ tab.
3 In the Sentence corrections area, enable the Capitalize next letter after end-of-sentence punctuation check box.
Correcting the spacing between words and sentences
WordPerfect lets you correct the spacing between words and sentences. You can delete double spaces between words in a sentence, and you can convert one space between sentences to two or two spaces to one.
To automatically change double spaces between words to single spaces
1 Click Tools QuickCorrect.
2 Click the Format-As-You-Go tab.
3 In the Sentence corrections area, enable the Change two spaces to one space between words check box.
To automatically change the number of spaces between sentences
1 Click Tools QuickCorrect.
2 Click the Format-As-You-Go tab.
3 In the End of sentence corrections area, enable one of the following options:
• Change one space to two spaces between sentences
You can also
Automatically correct two initial capital letters in a sentence Enable the Correct two irregular capitals (make a second letter lowercase) check box.
Automatically correct Caps lock capitalization Enable the CapsFix check box.
Automatically correct capitalization after a period Click Exceptions. In the Do not capitalize next letter after this word box, type a word. Click Add entry. Click Close.
Part two : WordPerfect 53

• Change two spaces to one space between sentences
54 Text formatting

Text arrangement
In this chapter:
• Indenting text on page 55
• Justifying text on page 56
• Changing the spacing between lines on page 56
For additional topics, please see “Formatting paragraphs” in the WordPerfect Help.
Indenting text
Indenting arranges text on a page by moving one or more lines to the left or the right of the paragraph margin. You can indent a line or paragraph manually or you can indent lines or paragraphs using the ruler or automatically.
To move the first line of a paragraph farther to the left than subsequent lines, you can apply a hanging indent. To indent an entire paragraph one tab stop from both the left and right margins, you can apply a double indent. A double indent is often used to format lengthy quotations.
To apply a single indent to text
To apply a hanging or double indent to text
1 Click at the beginning of a paragraph.
2 Click Format Paragraph, and click one of the following:
• Hanging indent — indents all but the first line in the paragraph
• Double indent — indents the paragraph equally from both margins
You can also apply a hanging indent by clicking at the beginning of any line in a paragraph, except the first line, and pressing Tab.
To remove an indent from text
1 Click at the beginning of a line of text.
2 Press Shift + Tab.
To indent Do the following
A line of text Click at the beginning of a line of text. Press Tab.
A paragraph Click at the beginning of a paragraph. Click Format Paragraph Indent.
The first line of a paragraph using the ruler Click in a paragraph. Drag the First line indent marker to a new position on the ruler.
The first line of every paragraph automatically Click in a paragraph. Click Format Paragraph Format. In the First line indent box, type a value to specify the distance to indent.
Part two : WordPerfect 55

Justifying text
You can justify text in a document. Doing so aligns the text horizontally between the left and right margins of the page.
To justify text
1 Click in a paragraph.
2 Click Format Justification, and click one of the following:
• Left — aligns text evenly with the left margin
• Right — aligns text evenly with the right margin
• Center — centers text between the right and left margins
• Full — aligns text, excluding the last line, along both the right and left margins
• All — aligns text, including the last line, along both the right and left margins
Justification is applied to all text from the cursor location forward. If you want to apply justification to a word, line, or paragraph, you must first select the text.
You can also justify text by clicking the Justification picker on the property bar and clicking a justification.
Changing the spacing between lines
The space between lines, or the amount of white space that appears between the bottom of one line and the top of the next line, is referred to as leading.
This is an example of changing spacing between lines.
You can change the leading by changing the line spacing and changing the line height.
You can also change the spacing between paragraphs. For information, see “Adjusting paragraph spacing” in the WordPerfect Help.
To adjust the leading
1 Click in a paragraph.
2 Click Format Typesetting Word/Letter spacing.
3 Enable the Adjust leading check box.
4 Type a value in the Between lines box.
A positive value increases the leading; a negative value decreases it.
56 Text arrangement

To change the line spacing
1 Click in a paragraph.
If you want to change the line spacing of a specific section, select the text.
2 Click the Line spacing button on the property bar and do one of the following:
• Choose a preset value.
• Click Other, and type a value in the Spacing box.
change the line spacing by clicking Format Line Spacing, and typing a value in the Spacing box.
To change the line height
1 Click in the line of text where you want the line height change to begin.
If you want to limit the line height change to a specific section of text, select the text.
2 Click Format Line Height.
3 Enable one of the following options:
• Automatic — defines the line height according to the font being used
• Fixed — lets you specify the height of the line regardless of the font being used
• At least — lets you specify the minimum height of the line
Line height is determined by multiplying the current line height by the number you specify.
Part two : WordPerfect 57


Text organization
You can organize text by using bullets, numbers, or outlines.
• Bullets help to differentiate items in a list or add emphasis to selected paragraphs. You can use bullets to mark list items that have no particular order.
• Numbered lists and outlines help you organize and display information and are used to show the relationship between ideas.
In this chapter:
• Bulleted lists on page 59
• Numbered lists on page 60
• Outlines on page 61
For additional topics, please see “Using bulleted lists, numbered lists, and outlines” in the WordPerfect Help.
Bulleted lists
You can create a bulleted list in a document. You can also use QuickBullets to create lists as you type.
You can also apply a bullet format to existing text.
To create a bulleted list
1 Click in a document.
2 Click Insert Outline/Bullets & numbering.
3 Click the Bullets tab.
4 Choose a bullet style from the Bullets list.
5 Click OK.
6 Type text, and press Enter.
Perform this step for each entry in the list.
You can also create a bulleted list by opening the Bullets picker on the toolbar, and clicking a bullet format.
You can discontinue a bulleted list by pressing Backspace.
To create a bulleted list by using QuickBullets
1 Click in a document.
2 Type a QuickBullet character.
3 Press Tab.
4 Type the text, and press Enter.
Perform this step for each entry in the list.
To use QuickBullets, they must first be enabled. Click Tools QuickCorrect Format As-You-Go.
You can discontinue a bulleted list by pressing Backspace.
Part two : WordPerfect 59

To create a bulleted list from existing text
1 Select the text to which you want to apply the bullet format.
2 Click Insert Outline/Bullets & numbering.
3 Click the Bullets tab.
4 Choose a bullet style from the Bullets list.
You can also add a bullet to existing text by clicking at the beginning of a line, opening the Bullets picker on the toolbar, and clicking a bullet format.
You can type body text between list items by pressing Enter twice, and pressing the Up arrow to type on the line that begins without a bullet.
Numbered lists
You can create a numbered list in a document. You can also use QuickNumbers to create lists as you type.
You can number existing text. You can also renumber an existing numbered list.
To create a numbered list
1 Click in a document.
2 Click Insert Outline/Bullets & numbering.
3 Click the Numbers tab.
4 Choose a number style from the Numbers list.
5 Click OK.
6 Type text, and press Enter.
Perform this step for each entry in the list.
You can also create a numbered list by opening the Numbers picker on the toolbar and clicking a numbering format.
You can discontinue a numbered list by pressing Backspace.
To create a numbered list by using QuickNumbers
1 At the beginning of a new line, type a number followed by a closing parenthesis or hyphen.
2 Press Tab.
3 Type the text for the first list item, and press Enter.
For a paragraph, let the text wrap at the end of the line instead of inserting a hard return.
Perform this step for each entry in the list.
4 Press Backspace.
To use QuickNumbers, you must enable QuickBullets. Click Tools QuickCorrect Format As-You-Go.
You can discontinue a numbered list by pressing Backspace.
60 Text organization

To number existing text
1 Select the text you want to number.
2 Open the Numbering picker on the toolbar, and click a numbering format.
To renumber a list
1 Click in a list or outline.
2 Click the Set paragraph number button on the property bar.
3 Type the new number in the Paragraph number box.
The number changes, and all numbers following it are renumbered accordingly.
You can also renumber paragraphs by pressing Ctrl + Shift + F5.
If the numbering you want to change is indented from the left margin, type “?” for each indentation level in the Paragraph number box before you type the new number.
Outlines
You can apply different levels to text by creating an outline.
To create an outline
1 Click in a document.
2 Click Insert Outline/Bullets & numbering.
3 Click the Text tab.
4 From the Text list, choose an option.
5 Click OK.
6 Type text, and press Enter.
You can send an outline to Presentations for use in slide show by playing the wp_pr.wcm macro. Click Tools Macro Play, and double-click wp_pr.wcm.
Part two : WordPerfect 61


Graphics
In this chapter:
• Inserting graphics on page 63
• Sizing graphics on page 64
• Arranging graphics on page 64
For additional topics, please see “Working with graphics” in the WordPerfect Help.
Inserting graphics
You can insert clipart images into a WordPerfect document, such as those included with WordPerfect. Clipart images are images that can be brought into a WordPerfect document and edited or used as is. You can also insert pictures from the WordPerfect Office disc.
You can link to an image on disk. When you link to an image on disk, the location of the image, not the image itself is inserted into the document. This way, you can considerably reduce the size of the file, especially if the image is used in several places throughout the document.
To insert a clipart image
1 Click where you want to insert an image.
2 Click Insert Graphics/Pictures Clipart.
The Scrapbook™ opens.
3 Browse through the folders in the Scrapbook until you find the image you want to insert.
4 Select the clipart image.
5 Click Insert.
You can also insert a clipart image by dragging the image from the Scrapbook into a document.
To insert a picture from the WordPerfect Office disc
1 Insert the WordPerfect Office disc into your disc drive.
2 Click where you want to insert a picture.
3 Click Insert Graphics/Pictures From file.
4 Choose the drive and folder where the file is stored.
Pictures have a .jpg filename extension.
5 Double-click a filename.
You can also insert a picture by dragging. Enable the Shadow cursor by clicking the Shadow cursor icon on the application bar, drag across the area of the document in which you want the picture, and click Image from file in the QuickMenu.
You can preview a picture before you insert it by clicking Toggle preview , and clicking the picture filename.
Part two : WordPerfect 63

To link to an image on disk
1 Click where you want to insert a link to an image.
2 Click Insert Graphics/Pictures From file.
3 Choose the drive and folder where the file is stored.
4 Click the image you want to link to the document.
5 Enable the Image on disk check box.
6 Click Insert.
If you want to display the name of the image file, right-click the image, and click Content.
You can link to images copied from the Scrapbook by saving them to your hard disk.
Sizing graphics
You can size a graphic by dragging its handles.
To size a graphic
1 Select a graphic.
2 Drag a corner handle until the graphic is the size you want.
Arranging graphics
When two or more graphics overlap in a document, you can arrange their order by moving them in front of or behind the others in the stack. You can also move graphics behind text (like a watermark) or in front of text (like a sticky note). You can also select a graphic that is over or under another graphic.
You can group graphics so that they remain together when they are moved, sized, or edited.
You can also align and distribute graphics. For information, please see “Aligning and distributing graphics” in the WordPerfect Help.
To move a graphic by using the keyboard
1 Select a graphic.
2 Press any of the Arrow keys to move the graphic in the direction you want.
To reorder overlapping graphics
1 Right-click a graphic.
2 Click Order, and click one of the following:
• To front — moves a graphic in front of the overlapping graphics
You can also
Stretch a graphic Drag a side handle until you achieve the effect you want.
Size a graphic proportionally Hold down Shift, and drag a handle.
64 Graphics

• To back — moves a graphic behind the overlapping graphics
• Forward one — moves a graphic forward one layer
• Back one — moves a graphic back one layer
You can also reorder overlapping graphics by selecting a graphic, and clicking the Object(s) forward one button or the Object(s) back one button on the property bar.
To move a graphic behind or in front of text
1 Select a graphic.
2 Click the Graphics picker on the property bar, and click one of the following:
• In front of text — moves the selected graphic in front of the text
• Behind text — moves the selected graphic behind the text
To navigate between graphics
1 Select a graphic.
2 On the property bar, click one of the following:
• Next box — selects the next graphic box that displays in the document
• Previous box — selects the previous graphic box that displays in the document
To group graphics
1 Hold down Shift, and click the graphics you want to group.
2 Right-click one of the selected graphics, and click Group.
You can separate grouped graphics by right-clicking grouped graphics, and clicking Separate.
Part two : WordPerfect 65


Editing basics
In this chapter:
• Cutting, copying, and pasting text and graphics on page 67
• Moving text and graphics on page 68
• Undoing, redoing, and repeating actions on page 68
You can also apply comments and digital signatures to documents. For information, see “Editing basics” in the WordPerfect Help.
Cutting, copying, and pasting text and graphics
You can cut or copy text or graphics and paste them to a new location in a document.
When you cut or copy information, it is stored on the Clipboard. You can paste it in the active document, in another document, or in another application.
You can also choose a specific format when you paste information from the Clipboard into WordPerfect.You can also quickly paste unformatted text from various access points in the application – menus, the Standard toolbar, and the shortcut key.
To cut, copy, and paste text and graphics
You can also copy, cut, or paste text or graphics by clicking Copy , Cut , or Paste on the toolbar.
You can link copied content to a document by enabling the Paste link option. The changes you make to the linked content in the active file are reflected in the original file. The changes made to the original file also appear in the active file.
To paste Clipboard contents in a specified format
1 Select the text or graphic.
2 Click Edit, and click one of the following:
• Copy
• Cut
3 Click Edit Paste special.
4 Enable the Paste option.
To Do the following
Copy text or graphics to the Clipboard Select the text or graphic, and click Edit Copy.
Cut text or graphics and move to the Clipboard Select the text or graphic, and click Edit Cut.
Paste text or graphics in a document Click where you want to insert the text or graphic, and click Edit Paste.
Add a selection to the current Clipboard contents Select the text to add to the Clipboard, and click Edit Append.
Part two : WordPerfect 67

5 Choose a format from the As list.
To paste unformatted text
• Click Edit Paste unformatted text.
You can also paste unformatted text by clicking the Paste unformatted text button on the WordPerfect toolbar or pressing Ctrl + Alt + V.
Moving text and graphics
You can move text and graphics by dragging them within a document or between documents.
To move text or graphics by dragging within a document
• Select a text or graphic, and drag it to a new position.
To move text or graphics by dragging to another document
1 Click Window, and click one of the following:
• Tile top to bottom — arranges the windows so that the documents are displayed above or below one another
• Tile side by side — arranges the windows so that the documents are displayed side by side
2 Select the text or graphic, and drag it to the other document.
Undoing, redoing, and repeating actions
WordPerfect lets you undo actions one at a time, or undo a series of actions all at once. You can undo changes made to text, graphics, or tables. However, some actions, such as scrolling or saving a document, cannot be reversed. You can redo actions that you have undone. You can also repeat actions.
To undo actions
The maximum number of Undo levels is 300.
If the Undo/Redo history has not been saved with the document, you can undo and redo changes that have been made since the document was last saved.
To Do the following
Undo the last action you performed Click Edit Undo.
Undo a series of actions Click Edit Undo/Redo history, choose an action from the Undo list, and click Undo.
Set the number of Undo levels Click Edit Undo/Redo history, click Options, and type a value in the Number of undo/redo items box.
Save Undo and Redo items with a document Click Edit Undo/Redo history, click Options, and enable the Save undo/Redo items with document check box.
68 Editing basics

You can undo an action by clicking the Undo button on the toolbar.
You can undo a series of actions by clicking the drop-down arrow beside the Undo button on the toolbar.
To redo actions
You can redo an action by clicking the Redo button on the toolbar.
You can redo a series of actions by clicking the drop-down arrow beside the Redo button on the toolbar.
To repeat an action
1 Click Edit Repeat next action.
2 Type a value in the Number of times to repeat next action box.
To set this value as the default whenever you use repeat, click Use as default.
To Do the following
Redo an action that was just undone Click Edit Redo.
Redo a series of actions Click Edit Undo/Redo history, choose an action from the Redo list, and click Redo.
Part two : WordPerfect 69


Find and Replace
In this chapter:
• “Finding and replacing text”
• Finding and replacing formatting codes on page 73
Finding and replacing text
WordPerfect lets you find and replace text. You can search for words, phrases, or individual characters in a document. Once the text is found, you can replace some or all occurrences of the text with other text, or you can delete the text. You can also create a list of find-and-replace items and commit them all at once.
You can search for text that is displayed in a specific font or case. You can also highlight, and advance through, each instance of a word or phrase in a document.
You can also find and replace forms of a word. For example, you can replace forms of the word “entry” with the word “insertion.” Therefore, if the plural form, “entries,” is found, it is replaced with the word “insertions.” Furthermore, you can search for occurrences of words that are whole words, and not part of a larger word. For example, if you do a default search for the word “sum,” you will find “sum,” “summer,” and “summit.” If you do a whole-word search for the word “sum,” you will find only occurrences of the word “sum.”
You can also find and replace text in all WPD or WPT files in a folder.
To find and replace text
1 Click Edit Find and replace.
2 In the Find box, type the text you want to search for.
3 Type the replacement text in the Replace with box.
4 Click one of the following:
• Find next — finds the next occurrence of the search text
• Find prev — finds the previous occurrence of the search text
• Replace — finds and replaces the next occurrence of the search text
• Replace all — finds and replaces all occurrences of the search text
You can delete all occurrences of a text string by typing the text you want to delete in the Find box and leaving the Replace with box empty.
You can search for a word or phrase you searched for previously by choosing the word or phrase from the Find list box.
To find and replace a list of words or phrases
1 On the Workflow macros toolbar, click the Multiple find and replace button.
2 In the Find box, type the text you want to search for.
3 Type the replacement text in the Replace with box.
4 Click Add.
Part two : WordPerfect 71

5 Repeat steps 2 through 4 for each word or phrase you want to replace.
If the Workflow macros toolbar is not displayed, click View Toolbars, and enable the Workflow macros check box.
To find text in a specific font
1 Click Edit Find and replace.
2 In the Find box, type the text you want to find.
3 Click Match Font.
4 Enable the Font check box.
5 Choose a font from the Font list box.
To find and highlight text
1 On the Workflow macros toolbar, click the Highlight find and replace button.
2 In the Find box, type the text you want to find.
You can scroll through the highlighted text by clicking Previous and Next.
You can also count a specific word in a document.
If the Workflow macros toolbar is not displayed, click View Toolbars, and enable the Workflow macros check box.
To find and replace case-specific text
1 Click Edit Find and replace.
2 Click Match Case.
To find and replace a form of a word
1 Click Edit Find and replace.
2 Click Type Word forms.
To find and replace a whole word
1 Click Edit Find and replace.
2 Click Match Whole word.
You can also
Search for a font style Choose a font style from the Font style list box.
Search for a specific point size Enable the Point size check box. Type a point size in the Point size box.
Search for specific font attributes In the Attributes area, enable one or more of the attribute check boxes.
72 Find and Replace

To find and replace text in all WPD and WPT files in a folder
1 Click Tools Macro Play, and double-click ReplaceInFolder.wcm.
2 Click the Browse button, and navigate to the folder where the WPD or WPT files are stored.
3 Enable one or more of the following check boxes:
• WPD — to find and replace text in all WordPerfect documents in the folder
• WPT — to find and replace text in all WordPerfect templates in the folder
4 In the Find box, type the text you want to search for.
5 Type the replacement text in the Replace with box.
6 Repeat steps 2 through 5 for each word or phrase you want to replace.
If the Workflow macros toolbar is not displayed, click View Toolbars, and enable the Workflow macros check box.
Finding and replacing formatting codes
You can search for and replace codes in a document. For example, if you search for a font size code, all font size codes are found.
You can also search for specific codes, such as a specific font size.
To find and replace codes, you must first enable Reveal Codes.
You can also
Find and replace occurrences of a word that are not part of larger words
Enable the Whole words check box.
Include headers, footers, and other substructures, such as endnotes and equations in the find-and-replace process
Enable the Whole words check box.
Find and replace only case-specific occurrences of a word or phrase
Enable the Case sensitive check box.
Make the changes in a new version of the file, leaving the original file unchanged
Enable the Do not overwrite original (Append number to end of filename) check box.
Sample Code Represents
Bot mar Bottom margin
Font Font
Font size Font size
HAdv Horizontal advance
Just Justification
Lft Mar Left margin
Lft Mar Adj Left margin adjustment
Part two : WordPerfect 73
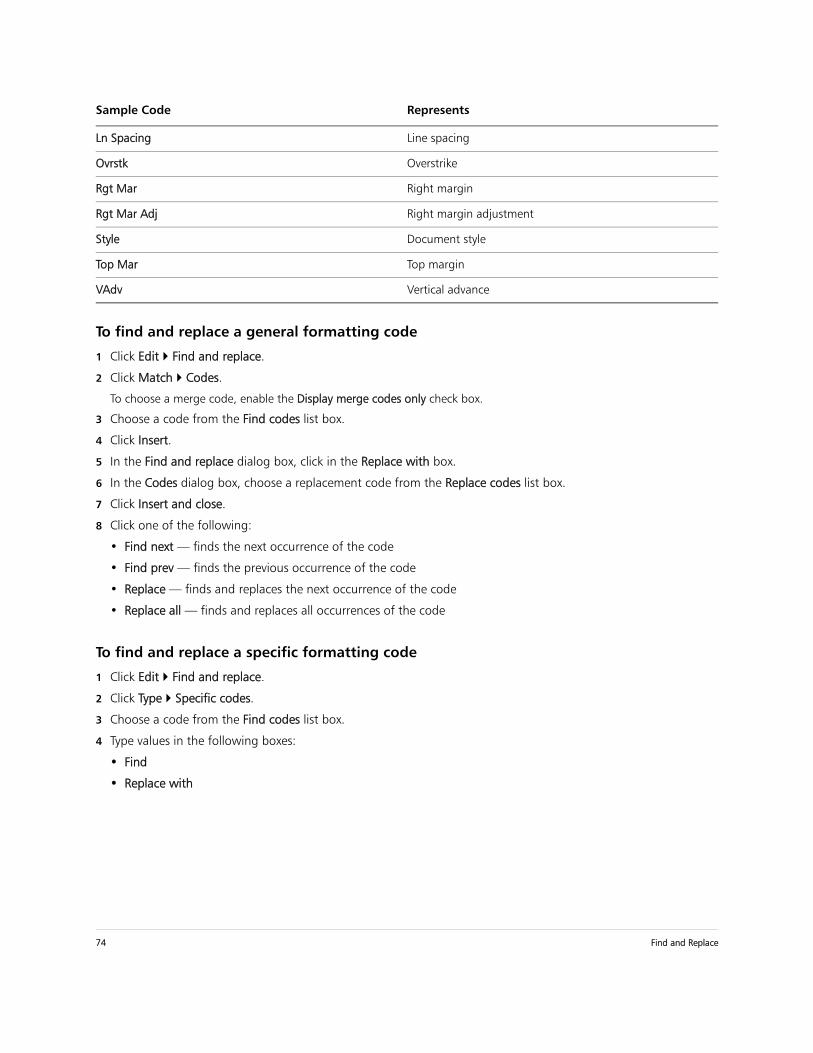
To find and replace a general formatting code
1 Click Edit Find and replace.
2 Click Match Codes.
To choose a merge code, enable the Display merge codes only check box.
3 Choose a code from the Find codes list box.
4 Click Insert.
5 In the Find and replace dialog box, click in the Replace with box.
6 In the Codes dialog box, choose a replacement code from the Replace codes list box.
7 Click Insert and close.
8 Click one of the following:
• Find next — finds the next occurrence of the code
• Find prev — finds the previous occurrence of the code
• Replace — finds and replaces the next occurrence of the code
• Replace all — finds and replaces all occurrences of the code
To find and replace a specific formatting code
1 Click Edit Find and replace.
2 Click Type Specific codes.
3 Choose a code from the Find codes list box.
4 Type values in the following boxes:
• Find
• Replace with
Ln Spacing Line spacing
Ovrstk Overstrike
Rgt Mar Right margin
Rgt Mar Adj Right margin adjustment
Style Document style
Top Mar Top margin
VAdv Vertical advance
Sample Code Represents
74 Find and Replace

Styles
A style is a collection of formatting attributes that you can apply to text or graphics.
WordPerfect provides several preset styles ready for use. You can also create your own styles.
In this chapter:
• Using text styles on page 75
• Using graphics styles on page 77
For information about list styles, variables, graphics boxes, and graphics lines, see “Working with styles” in the WordPerfect Help.
Using text styles
You can create text styles. Text styles are collections of formatting attributes that you can apply to selected text, paragraphs, or the entire document. Text styles you create are saved with the active document. You can create a QuickStyle for text. QuickStyles are styles created based on the formatting in effect at the cursor location. You can also create a QuickStyle for a paragraph.
Formatting text with styles ensures consistent formatting throughout a document. Whenever you change the formatting in a style, you change the appearance of all text that uses that style.
You can save a text style. You can also specify where to save text styles. When you save a text style, you can associate it with a specific template or with the active document only, or you can save it as a separate file. Saving a text style as a separate file is useful if you plan to use the style with a different template or on a different computer.
You can apply a style to text in a document.
You can edit a text style.
To create a text style
1 Click Format Styles.
2 Click Create.
3 In the Styles editor dialog box, type a name for the style in the Style name box.
You can create style names that contain up to 12 characters.
4 Type a description for the style in the Description box.
5 Choose a style from the Type list box.
6 Using the Styles editor toolbar and menu bar, apply any style attributes.
If you want to define what function the Enter key performs when the style is applied, choose a style from the Enter key inserts style list box.
If you want to display the codes that take effect when a style ends, enable the Show ‘off codes’ check box.
You can also
Delete a text style Click Format Styles, choose a style from the Available styles list, and click Options Delete.
Part two : WordPerfect 75

Give each style a unique name; otherwise, when you combine documents that contain a style with the same name, one style is used and the other deleted in the new document.
The Reveal Codes check box is enabled by default and displays the codes for the style attributes in the Contents box.
You can also define the style attributes by typing codes or text in the Contents box in the Styles editor dialog box.
To create a QuickStyle
1 Select the text or paragraph for which you want to create a QuickStyle.
2 Click Format Styles.
3 Click QuickStyle.
4 In the QuickStyle dialog box, type a name for the style in the Style name box.
5 Type a description for the style in the Description box.
6 Enable one of the following options:
• Character with automatic update — creates a QuickStyle for characters
• Paragraph with automatic update — creates a QuickStyle for paragraphs
To save a text style
1 Click Format Styles.
2 Click Options Save as.
3 In the Save styles to dialog box, type a filename in the Filename box.
4 In the Style type area, enable one of the following options:
• Both — includes both the styles you have created and the preset styles provided with WordPerfect
• User styles — includes only the styles you have created
• System styles — includes only the preset styles provided with WordPerfect
5 Click Options Settings.
6 In the Save new styles to area, enable one of the following options:
• Current document — associates the style with the active document
• Default template — associates the style with the default template
• Additional objects template — associates the style with an additional objects template
The Additional objects template option is available only if you have specified a second default template to use for additional objects such as keyboards, menus, template macros, toolbars, and styles.
To apply a text style
1 Click Format Styles.
2 Choose a style from the Available styles list.
3 Click Insert.
4 Type the text in the document.
76 Styles

5 Press Enter.
6 Press Backspace.
To edit a text style
1 Click Format Styles.
2 Choose a style from the Available styles list box.
3 Click Edit.
4 In the Styles editor dialog box, use the Styles editor toolbar and menus to apply any style attributes.
If you want to define what function the Enter key performs when the style is applied, choose a style from the Enter key inserts style list.
If you want to display the codes that take effect when a style ends, enable the Show ‘off codes’ check box.
Using graphics styles
You can use the preset styles included with WordPerfect or you can create your own styles.
You can create graphics styles for boxes, borders, fills, and lines. You can save a graphics style. Saving graphics styles lets you use them again in other documents or templates.
You can delete a graphics style that you have created, but you cannot delete one of the preset graphics styles provided with WordPerfect.
You can edit a graphics style to apply different formatting. When you edit a graphics style, all graphics boxes, borders, fills, and lines formatted with that style are updated.
To create a graphics style
1 Click Format Graphics styles.
2 Enable one of the following options:
• Box
• Border
• Fill
• Line
3 Click Create.
4 Type a name for the style in the Style name box.
5 Change the attributes of the graphics style.
To save a graphics style
1 Click Format Graphics styles, and enable one of the following options:
• Box
• Border
• Fill
• Line
Part two : WordPerfect 77
2 Click Options Save as, and type a name for the style in the Filename box.
The file is saved to the default template folder, as specified in Tools Settings. If none is specified, WordPerfect saves the styles where your user files are stored.
To delete a graphics style
1 Click Format Graphics styles.
2 Enable one of the following options:
• Box
• Border
• Fill
• Line
3 Choose a style from the Styles list.
4 Click Options Delete.
To edit a graphics style
1 Click Format Graphics styles.
2 Enable one of the following options:
• Box
• Border
• Fill
• Line
3 Choose a style from the Styles list.
4 Click Edit.
5 Change the attributes of the graphics style.
78 Styles

Page margins
WordPerfect lets you set margins using various methods.
You can set margins by using guidelines. Guidelines are vertical or horizontal dotted lines that are displayed on pages.
You can also set margins by using exact measurements or the ruler.
All margin settings affect the current page and subsequent pages until you change them.
To set the margins by using the margin guidelines
1 Click View Guidelines.
2 Enable the Margins check box.
3 Point to one of the following guidelines:
• left vertical dotted guideline
• right vertical dotted guideline
• upper horizontal dotted guideline
• lower horizontal dotted guideline
The pointer changes to a double-sided arrow.
4 Drag the guideline to a new position.
To set the margins by using exact measurements
1 Click in the document where you want the margin changes to start.
2 Click Format Margins.
3 Click the Page setup tab.
4 In the Document margins area, type values in any of the following boxes:
• Left — lets you specify where the left margin starts
• Right — lets you specify where the right margin starts
• Top — lets you specify where the top margin starts
• Bottom — lets you specify where the bottom margin starts
You can also set margins by clicking File Page setup.
To set the margins by using the ruler
1 Point to the Margin marker to the left or right of the ruler.
The pointer changes to a double-sided arrow.
2 Drag the Margin marker to a new location on the ruler.
You can also
Set all margins to the last margin value edited In the Document margins area, click Equal.
Set all margins to the minimum size allowed by the current printer
In the Document margins area, click Minimum.
Part two : WordPerfect 79

80 Page margins
Page size and orientation
When creating documents, you can choose the size and orientation of pages. The page size and orientation determine how a printer formats and prints pages. You can choose from preset page sizes, or you can create your own.
In this chapter:
• Preset page sizes on page 81
• Page orientation on page 81
• Custom page sizes on page 81
Preset page sizes
You can select preset page sizes.
To select a preset page size
1 Click File Page setup.
2 Click the Page setup tab.
3 From the Page definition list box, choose one of the following:
• Printer page types — lists all page size options for installed printers
• Standard page types — lists all page size options for most printers
4 Choose a page definition from the Page definition list.
5 In the Page definition applies to area, enable one of the following options:
• Current and following pages — applies the page definitions to the current and following pages
• Current page only — applies the page definitions to the current page only
Page orientation
You can specify page orientation.
To specify page orientation
1 Click File Page setup.
2 Click the Page setup tab.
3 In the Orientation area, enable one of the following options:
• Portrait — prints the document on pages that have greater length than width
• Landscape — prints the document on pages that have greater width than height
Custom page sizes
You can create a custom page size from scratch, or you can modify a preset page size. When you create a custom page size, it is added to the printer’s page size selection as a preset. Therefore, you can apply the custom size to more than one document. If you no longer require the custom or modified page sizes, you can delete the page size or
Part two : WordPerfect 81

restore the default page sizes.
In addition, you can divide a physical page into several logical pages. Dividing pages is useful when you want to create small documents, such as pamphlets, raffle tickets, or business cards.
This is an example of how you can divide pages.
To create a custom page size
1 Click File Page setup.
2 Click the Page setup tab.
3 Click Add.
4 In the Add new form dialog box, type a name for the new page size in the Name box.
5 Choose a predefined paper type from the Type list box.
6 Choose a predefined paper size from the Size list box.
If you want to create a page size definition from a nonstandard paper size, choose User defined size from the Size list box.
7 Type values in the following boxes:
• Width
• Height
8 Choose a paper source from the Source list box.
The paper source is not saved as part of the document. It must be redefined for each document.
All printers have a nonprintable zone. If information is formatted to print in this area, it will not print. To shift information out of the nonprintable zone, you must specify printing adjustments.
To modify a preset page size
1 Click File Page setup.
2 Click the Page setup tab.
3 Choose a page definition from the Page definition list.
4 Click Edit.
5 Modify any of the settings.
To delete a page size
1 Click File Page setup.
2 Click the Page setup tab.
3 From the Page definition list box, choose one of the following:
82 Page size and orientation

• Printer page types — lists all page size options for installed printers
• Standard page types — lists all page size options for most printers
4 Choose a page definition from the Page definition list box.
5 Click Delete.
When you delete a page size definition, you can no longer use that definition; a document can print with a similar page definition, but it may not be an exact match.
To restore default page sizes
1 Click File Page setup.
2 Click the Page setup tab.
3 From the Page definition list box, choose one of the following:
• Printer page types — lists all page size options for installed printers
• Standard page types — lists all page size options for most printers
4 Click Restore.
To divide a page
1 Click File Page setup.
2 Click the Layout tab.
3 In the Divide pages area, type a value in one of the following boxes:
• Columns — lets you divide a page into a specified number of columns
• Rows — lets you divide a page into a specified number of rows
Part two : WordPerfect 83

84 Page size and orientation

Page flow
You can start a new page at any point in a document.
You can make selected text or all text in a document fit a specific number of pages.
You can change the text flow in a document by using hard or soft returns. You can start a new line manually by inserting a hard return. A soft return wraps text to the next line and is inserted automatically by WordPerfect when the line extends beyond the right margin.
To force a new page
1 Click where you want to start a new page.
2 Click Insert New page.
In draft view, a new page break is displayed as a double line.
You can also force a new page by pressing Ctrl + Enter.
To make text fit a specific number of pages
1 Click in a document.
2 Click the Make It Fit button on the WordPerfect toolbar.
3 Type a value in the Desired number of pages box.
The number of pages you set must be within 50 percent of the document’s current page count.
4 In the Items to adjust area, enable any of the following check boxes:
• Left margin
• Right margin
• Top margin
• Bottom margin
• Font size
• Line spacing
5 Click Make It Fit.
You can also copyfit text by clicking in a document, clicking Format Make It Fit™, typing a value in the Desired number of pages box, choosing one or more options in the Items to adjust area, and clicking Make It Fit.
To make only a certain block of text fit, select the text.
To insert a hard return
• At the end of a line or paragraph, press Enter.
A hard return displays as an [HRt] code in the Reveal Codes window.
You can also view hard returns by clicking View Show ¶.
Part two : WordPerfect 85

To insert a soft return
• As you type, WordPerfect automatically inserts a soft return at the end of each line.
A soft return displays as an [SRt] code in the Reveal Codes window.
86 Page flow

Page columns
You can use columns to divide text vertically on a page. You can use four types of columns in documents: newspaper, balanced newspaper, parallel, and parallel with block protect.
You can add columns to documents to create newsletters, glossaries, scripts, or inventory lists. You can discontinue columns when they are complete. You can also delete columns and quickly move through columns.
You can change the appearance of columns by inserting a vertical line between the columns. This creates a visual separation between the columns.
Newspaper columns
Text in newspaper columns flows down the column to the bottom of a page or column break and starts again at the top of the next column.
Balanced newspaper columns
Balanced newspaper columns are similar to regular newspaper columns, but each column is adjusted on the page so that all columns are equal in length.
These are examples of pages with columns. The left page displays newspaper columns. The right page displays balanced newspaper columns.
Parallel columns
The parallel column text is grouped across the page in a row. The next row starts below the longest column of the previous row. Parallel columns are useful for resumes, scripts, charts, inventory lists, or lists where columns span multiple pages.
This is an example of parallel columns.
Parallel columns with block protect
Parallel columns with block protect keep each row of columns together. If a column in one row becomes so long that it moves across a page break, the entire row moves to the next page.
Part two : WordPerfect 87

This is an example of parallel columns with block protect.
To create columns
1 Click a page.
2 Click Format Columns.
3 Type a value in the Number of columns box.
4 In the Type of columns area, enable one of the following options:
• Newspaper — makes text flow down a column to the bottom of a page or column break and continues it at the top of the next column
• Balanced newspaper — adjusts newspaper columns so that columns are of equal length
• Parallel — groups columns across the page in rows, and starts subsequent rows below the longest column of the previous row
• Parallel w/block protect — keeps all rows of the columns together across page breaks
You can also apply columns to a page by clicking the Columns button on the toolbar.
To discontinue columns
1 Click where you want columns to discontinue.
2 Click Format Columns.
3 Click Discontinue.
Press Ctrl + Enter to end one column and start the next column.
To delete all columns
1 Click in the top-left corner of the first column.
2 Click Format Columns.
3 Click Discontinue.
You can also delete columns by dragging the [Col Def] code out of the Reveal Codes window.
To navigate columns
To move to Press
The top of a column Alt + Home
The last line of a column Alt + End
88 Page columns

To insert a vertical line between columns
1 Select a column.
2 Click Format Columns.
3 Click Border/Fill.
4 In the Column border/fill dialog box, click the Border tab.
5 Choose Column between from the Available border styles list.
If you want to apply the vertical line only to a selected column group, enable the Apply border to current column group only check box.
The previous column Alt + Left Arrow
The next column Alt + Right Arrow
To move to Press
Part two : WordPerfect 89


Page numbering
In this chapter:
• Numbering pages on page 91
• Changing the appearance of page numbers on page 92
• Forcing, suppressing, and stopping page numbers on page 92
For additional topics, please see “Numbering the parts of a document” in the WordPerfect Help.
Numbering pages
WordPerfect allows you to insert page numbers in a document and to choose where to position page numbers on a page. When you begin page numbering, you can also specify which number to begin with. For example, you may want the first page of a document to be labeled page 3 instead of page 1.
These are examples of various page numbering options: (top left) no page number, (top right) page number in the bottom-right corner, (bottom left) page number at the bottom center, and (bottom right) page number in the top-right corner.
You can also insert secondary page numbers, which allow you to start a new page numbering scheme in a document. For example, suppose you are creating a document in WordPerfect, but in the middle of the document, you need to add maps that were not created in WordPerfect. The WordPerfect document is 10 pages, but the maps need to be added as pages 7 and 8. To accomplish this, you can start page numbering at 1 at the beginning of the document and insert a secondary page number, number 9, on the document’s page 7. This would allow for the addition of the maps without disrupting the page numbering.
To insert page numbers
1 Click Format Page Numbering.
2 From the Position list box, choose a position for the page numbers.
3 From the Page numbering format list, choose a format for the page numbers.
To specify an alternate starting page
1 Click Format Page Numbering.
2 Click Set value.
3 In the Values dialog box, click the Page tab.
4 Type a new page number in the Set page number box.
5 Enable one of the following options:
• Always keep number the same — ensures that the number remains the same when the document is edited
Part two : WordPerfect 91

• Let number change as pages are added or deleted — lets the number change as the document is edited
When you merge a multiple-page form document, you can restart the page numbering for each merged record by enabling the Always keep number the same option.
To insert a secondary page number
1 Click Format Page Insert page number.
2 Choose Secondary page from the list.
3 Click Value/Adjust.
4 In the Values dialog box, click the Secondary tab.
5 Choose a numbering format from the Secondary page number method list box.
6 Type a value in the Set secondary page number box.
7 Click Insert.
Changing the appearance of page numbers
You can change the font size and style, which includes attributes, such as bold or italic, of page numbers.
To change the font attributes of page numbers
1 On a page, click where you want the font change to begin.
2 Click Format Page Numbering.
3 Click Font.
4 In the Page numbering font dialog box, choose a font from the Face list.
5 Choose a font size from the Size list box.
Forcing, suppressing, and stopping page numbers
By forcing a page number, you can insert a new page or make sure that a certain page in a document always has an odd or even page number.
In addition, you can suppress page numbering on one page in a document. You can also stop the page numbers so that they are removed from the entire document.
To force a page number
1 Click on the page where you want to force a page number.
2 Click Format Page Force page.
You can also
Change page number style In the Appearance area, enable one or more check boxes.
Change page number color Open the color picker, and click a color.
Change page number shading Type a value in the Shading box.
92 Page numbering

3 Enable one of the following options:
• None — numbers the page sequentially in the document. This is the default setting.
• Current page odd — inserts a blank page when necessary to make sure the current page always has an odd page number
• Current page even — inserts a blank page when necessary to make sure the current page always has an even page number
• Start new page — inserts a new page
To suppress a page number
1 Click Format Page Suppress.
2 Enable the Page numbering check box.
To stop page numbering
1 Click Format Page Numbering.
2 Choose No page numbering from the Position list box.
Part two : WordPerfect 93


Headers and footers
You can use headers and footers to display information such as titles, page numbers, dates, times, and document names.
In this chapter:
• Creating and viewing headers and footers on page 95
• Inserting items into headers and footers on page 95
• Editing headers and footers on page 96
Creating and viewing headers and footers
You can create headers and footers in a document. You can also view headers and footers in page view or two pages view.
To create a header or footer
1 Click Insert Header/Footer.
2 Enable one of the following options:
• Header A
• Header B
• Footer A
• Footer B
If you want to align the header or footer with the document margins, enable the Align with document margins check box.
3 Click Create.
4 Type the header or footer text.
You can use two different headers and two different footers on any page in a document; however, only two headers and two footers can be created on one page.
To view a header or footer
• Click View, and click one of the following:
• Page
• Two pages
Headers and footers do not display in draft view. If you want to view a header or footer, the document must be open in Page or Two pages view.
Inserting items into headers and footers
You can add a horizontal line to a header or footer to, for example, create a separation between the information in the header or footer and the document text.
You can also insert the path and filename of the active document into a header or footer.
Part two : WordPerfect 95

In addition, you can insert the date and time, or numbering, such as page, chapter, volume, or total pages, into a header or footer.
To add a horizontal line to a header or footer
1 Click where you want to add a horizontal line to a header or footer.
2 Click Insert Line Horizontal line.
To insert the filename of the active document into a header or footer
1 Click where you want to insert the filename into a header or footer.
2 Click Insert Other, and click one of the following:
• Filename
• Path and filename
If you rename the document, or move it to a different location on your computer, the header or footer updates automatically.
If the document has not been saved, a code is inserted in the header or footer. Once the document is saved, the filename will display.
To insert the date and time into a header or footer
1 Click where you want to insert the date or time into a header or footer.
2 Click Insert Date/Time.
3 Choose a format from the Date/Time formats list.
4 Click Insert.
To insert page numbering into a header or footer
1 Click where you want to insert numbering into a header or footer.
2 Click Format Page Insert page number.
3 Choose a numbering format from the Number list.
4 Click Insert.
To access more robust page-numbering options, click outside the header or footer, and then click Format Page Numbering. For more information, see Page numbering on page 91.
Editing headers and footers
WordPerfect lets you edit the text in headers and footers. You can also adjust the distance below a header or above a footer. You can suppress headers and footers so that they do not display on a page and do not print. Discontinuing a header or footer removes it from the remainder of the document.
You can also place a header or footer on odd or even pages of a document.
96 Headers and footers

To edit the text in a header or footer
1 Click Insert Header/Footer, and enable the header or footer.
2 Click Edit.
3 Make any changes to the text.
4 Click File Close.
If the document is displayed in Page view or Two pages view, you can also edit the header or footer by clicking anywhere inside the header or footer.
To adjust the distance below a header or above a footer
1 Click the Header/Footer distance button on the Header/Footer toolbar.
2 Type a value in the Distance between text and header/footer box.
To suppress a header or footer
• Click Format Page Suppress, and enable the header or footer.
To discontinue a header or footer
1 Click Insert Header/Footer, and enable the header or footer.
2 Click Discontinue.
You can also remove a header or footer from a document by dragging its associated code from the Reveal Codes window.
To place a header or footer on odd or even pages
1 Click Insert Header/Footer, and enable the header or footer.
2 Click Create.
3 Click the Header/Footer placement button on the Header/Footer toolbar.
4 Enable an option: Odd pages, Even pages, or Every page.
Headers and footers 97


Footnotes and endnotes
Footnotes and endnotes allow you to add reference information to a document, such as additional notes that accompany a topic or that provide references. Footnotes are displayed at the bottom of a page, while endnotes are found at the end of a document.
In this chapter:
• Inserting footnotes and endnotes on page 99
• Finding footnotes and endnotes on page 100
• Editing and deleting footnotes and endnotes on page 100
• Formatting footnotes and endnotes on page 101
For additional topics, please see “Working with footnotes and endnotes” in the WordPerfect Help.
Inserting footnotes and endnotes
When you insert endnotes or footnotes, a reference number or mark is inserted in the document text. That number or mark is linked to the corresponding information in the endnote or footnote.
You can display a preview of the note text by positioning your pointer over a footnote or endnote reference number.
While working with a footnote or endnote, you do not have access to all available WordPerfect functions until you return to the body of the text.
To insert a footnote
1 Click where you want the footnote reference mark to display.
2 Click Insert Footnote/Endnote.
3 Enable the Footnote number option.
If you want to restart the footnote numbering at a specific number, type the number in the Footnote number box.
4 Click Create.
5 Type the footnote text.
If you want to align the footnotes with the document margins, enable the Align with document margins check box.
6 Click File Close.
To insert an endnote
1 Click where you want the endnote reference mark to display.
2 Click Insert Footnote/Endnote.
3 Enable the Endnote number option.
4 Click Endnote placement.
5 Enable the Insert endnotes at insertion point option.
6 Click Create.
7 Type the endnote text.
If you want to align the endnotes with the document margins, enable the Align with document margins check box.
Part two : WordPerfect 99

8 Click File Close.
You can restart the endnote numbering at a specific number by typing the number in the Endnote number box. When you enable the Insert endnotes at insertion point and restart numbering option, all endnotes up to the number you’ve specified display on one page, and then a note numbering starts over with 1 on a new page.
To view the content of a footnote or endnote
• Position your pointer over a footnote or endnote reference number.
The maximum number of characters that can be displayed in the tooltip is 4000.
Preview of graphics, tables, columns, text formatting, and some special characters in footnotes and endnotes is not supported.
To disable the preview of note text, click Tools Settings, and click Display. In the Display settings dialog box, click the Document tab. In the Show area, disable the Footnote/Endnote tooltips check box.
Finding footnotes and endnotes
WordPerfect lets you find specific footnotes or endnotes in a document.
To find a footnote
1 Click Insert Footnote/Endnote.
2 Enable the Footnote number option.
3 In the Footnote number box, type the number of the footnote you want to find.
4 Click Edit.
To find an endnote
1 Click Insert Footnote/Endnote.
2 Enable the Endnote number option.
3 In the Endnote number box, type the number of the endnote you want to find.
4 Click Edit.
Editing and deleting footnotes and endnotes
You can edit footnote or endnote text.
When you delete a footnote or endnote number or mark, the note text for that footnote or endnote is automatically deleted. In addition, the footnotes and endnotes that follow are renumbered.
To edit a footnote
1 Find the footnote. See To find a footnote on page 100.
2 Edit the footnote text.
100 Footnotes and endnotes

3 Click File Close.
If you are using Page view, you can edit the footnote text by clicking in the text.
You can restore a deleted footnote number by clicking the Note number button on the property bar.
To edit an endnote
1 Find the endnote. See To find an endnote on page 100.
2 Edit the endnote text.
3 Click File Close.
If you are using Page view, you can edit the endnote text by clicking in the text.
You can restore a deleted endnote number by clicking the Note number button on the property bar.
To delete a footnote or endnote
1 Select the footnote or endnote number or mark.
2 Press Delete.
Formatting footnotes and endnotes
You can change the formatting of footnote and endnote text, as well as that of the reference mark that displays in the document text.
To specify the text and numbering styles of footnotes and endnotes
1 Click Insert Footnote/Endnote.
2 Enable one of the following options:
• Footnote number
• Endnote number
3 Click Options, and click Advanced.
4 In the Edit numbering style area, click one of the following:
• In text — lets you specify a format for all footnote or endnote numbers that display in the document text
• In note — lets you specify a format for footnote or endnote text
5 In the Styles editor dialog box, modify any attributes.
Part two : WordPerfect 101


Saving documents
By default, you can save documents in WordPerfect 6 and later format. This ensures cross-platform compatibility for documents saved in WordPerfect 6.x and later, and lets you save a document in an earlier version of WordPerfect. You can also save documents in formats other than WordPerfect, such as Microsoft Word.
You can save a single document, or you can save all documents in the current instance of WordPerfect. You can save a document to a new location. You can also save selected text or graphics in a new WordPerfect document.
You can specify a default file extension for documents you save. When you save a document for the first time, or when you use Save As to save with a different filename or to a different format, this extension is automatically added to the filename. File extensions identify the file type and are identified with a specific application.
Saving without metadata
When you save a document, it may contain information that you do not want others to see — for example, the name of your computer or a document summary. This information is known as metadata, which is data used to identify, describe, and locate electronic resources on a network.
Metadata is used to enhance the editing, viewing, filing, and retrieving of electronic documents. It is important to keep this information stored in the original document, but you can avoid sharing the metadata with others by saving a version of the document without including the metadata.
Saving automatically
WordPerfect lets you create backup copies of documents. Creating backup copies helps prevent the loss of your work if you close a document before saving it, or if a power failure occurs.
Saving to multiple formats simultaneously
WordPerfect lets you save a document to WPD, DOC, DOCX, PDF, and HTML5 at the same time.
Saving iteratively
When you save an iteration of a file, an updated version of the file is saved with a version number added to the filename. For example, if you saved the original file as Document. WPD and then save an iteration of the file, the latest version of the file is saved as Document 1.WPD. For each subsequent iterative save that you perform, the number added to the filename increases by 1, for example, Document 2.WPD and Document 3.WPD. Iterative saving is useful if you need to revert to an older version of a file, or simply to track your progress over time.
Reverting documents
You can revert a document to its last saved state.
Recovering files from backup
If the application closes down unexpectedly during a session and you haven’t saved your work, you can recover data from a backup file that contains the changes from the last time auto-backup ran. By default, the backup copy is stored in X:\Users\\AppData\Roaming\Corel\WordPerfect\VN\Backup, where X represents the drive letter and . You can change the location where backup files are created. For more information, see To set timed document backups on page 106.
You can open the backup copy, which replaces the original file with the auto-backup file, or you can save the backup
Part two : WordPerfect 103
copy as a new file. If you choose not to recover the backup file, it is erased when you quit the application.
To save a document
1 Click File Save.
2 Choose the drive and folder in which you want to save the file.
To save a file in a format other than WordPerfect, choose a file format from the File type list box.
3 Type a name in the Filename box.
To embed the fonts in the document, enable the Embed fonts using TrueDoc® check box.
4 Click Save.
If you have already saved the document, you will not be prompted to specify the drive, folder, and filename.
Embedding fonts ensures that the information for all fonts used in a document is saved with the document. You may want to embed fonts if you are using an unusual font, or if you want to ensure that the font you are using is displayed properly.
A filename cannot exceed 255 characters.
You can also save a document by pressing F3 or by clicking the Save button on the toolbar.
To save all documents in the current instance
• On the Workflow macros toolbar, click the Save all button.
If the Workflow macros toolbar is not displayed, click View Toolbars, and enable the Workflow macros check box.
To specify a default file extension for documents you save
1 Click Tools Settings, and click Files.
2 Click the Document tab.
3 Enable the Use default extension on save check box, and enter an extension.
To save a document to a new location
1 Click File Save as.
2 From the Save in list box, choose the drive and folder in which you want to store the document.
3 Click Save.
To save a document to multiple formats simultaneously
1 Click Tools Macro Play.
You can also
Save changes to a document Click File Save.
Rename a file Right-click the file, and click Rename. Type a new name in the Filename box.
104 Saving documents

2 In the Play macro dialog box, choose Save to multiple formats, and click Play.
3 In the Save file dialog box, type a name in the File name box.
4 Click Save as.
5 Enable any of the following check boxes:
• WordPerfect 6-20 (2020) (WPD)
• MS Word 2007-2016 (DOCX)
• MS Word 97/2000/2002/2003 (DOC)
• Portable Document Format (PDF)
• HTML5 (HTML)
6 Click Save.
The new files are saved to the folder containing the current document or the folder.
PDF files are output using the last PDF-publishing configuration used.
To save to DOCX, you must first manually save one file to that format by clicking File Save as, and choosing MS Word 2007-2016 from the File type list box. You only have to do this once.
To save selected text or a graphic in a new document
1 Select the text or graphic you want to save in a new document.
2 Click File Save.
3 In the Save area, enable one of the following options:
• Selected text
• Selected graphic
4 Click OK.
5 In the Save file dialog box, choose the drive and folder in which you want to save the file.
6 Type a name in the Filename box.
7 Click Save.
To save a document without metadata
1 Click File Save without metadata.
2 Choose the drive and folder in which you want to save the document.
By default, _mtd is added to the filename to identify that the file does not contain metadata.
3 Enable the Keep original document open check box.
If the Keep original document open check box is not enabled, the original document closes, and the metadata-free version remains open.
4 In the Select metadata to remove area, enable any of the check boxes.
Comment information includes the comment writer’s name and initials, and the date the comment was inserted in the document. If you want to remove both the comment text and the comment information, enable the Content and information option. If you want to remove only the comment information, enable the Information only option.
5 Click Save.
Part two : WordPerfect 105

To perform an iterative save
1 Click Tools Macro Play.
2 In the Play macro dialog box, choose Numbered save, and click Play.
To set timed document backups
1 Click Tools Settings.
2 Click Files.
3 On the Document page, enable the Timed document backup every check box.
4 Type a value in the minutes box.
To revert a document to its last saved state
• On the Workflow macros toolbar, click the Revert button.
If the Workflow macros toolbar is not displayed, click View Toolbars, and enable the Workflow macros check box.
To restore a file from backup
1 Restart WordPerfect.
The file recovery dialog box appears upon startup after a system error.
2 In the Restore Files from Backup dialog box, click one of the following buttons:
• Open — replaces your file with the auto-backup file that contains changes from the last time auto-backup ran
Tip: If your original file is locked for editing, save the auto-backup copy with a new name.
• Save As — saves the auto-backup file as a new file
• Discard — deletes the auto-backup file from the backup folder
You can also
You can also
Save backup files in a specific folder In the Backup folder box, click the Browse button. Choose the drive and folder in which you want to save backup files.
Save a backup file each time you save a document Enable the Save original document as a backup at each save check box.
Specify a folder where to restore a file In the Save As dialog box, click Browse, and locate the folder you want to save the file.
Specify a filename In the Save As dialog box, type a filename in the Filename box.
106 Saving documents

Performing merges
When you merge documents, such as to create mass mailings, you combine a form document and a data source. The merge produces varying copies of the form document, each containing information from a specific record in the data source.
For information on performing merges, see the following topics:
• Creating data for a merge on page 107
• Working with form documents for a merge on page 108
• Associating merge files on page 110
• Performing a merge on page 111
• Performing simplified merges on page 112
For additional topics, please see “Performing merges” in the WordPerfect Help.
Creating data for a merge
When you merge documents, you produce varying copies of a form document. Each copy contains specific information from a record in a data source, such as a data file, an address book, or keyboard input.
To use a WordPerfect data file as the data source, you can create either a data text file or a data table file. In both types of data files, information is organized into records and fields. For example, a record may include a name, address, telephone number, and other contact information. Each item within the record, such as name or address, is recognized as a field. It is recommended that you use no more than 512 fields per record.
When you create a data text file, each field is marked by the ENDFIELD code and each record by the ENDRECORD code.
When you create a data table file, fields and records are arranged in columns and rows. Each column contains a field. Each row contains a record.
This is an example of a data table file containing 1) records, 2) fields, and 3) field names.
You can retrieve data from other file formats to use as data files in WordPerfect. For example, you can retrieve and convert a database file, a spreadsheet file, an ODBC data source, or a text file. For information about converting files, see “Opening and previewing files” in the WordPerfect Help.
You can also use an address book as a merge data source. For information, see “Using address books in merges” in the WordPerfect Help.
When you create a data file, WordPerfect automatically inserts a Merge toolbar into the merge data file. For more information about the Merge toolbar, see “Using the Merge toolbar” in the WordPerfect Help.
Part two : WordPerfect 107

To create a data file for a merge
1 Click Tools Merge.
2 In the Merge dialog box, click Data source Create data file.
If there is text in the active document, enable one of the following options in the Data file source dialog box:
• Use file in the active window — uses the active document
• New document window — creates a new document
3 Click OK.
4 In the Create data file dialog box, type the name of a field in the Name a field box.
For example, if you are creating data for a form letter, you might include fields such as name, address, city, province, postal code, phone number, and e-mail address.
To create a data table file, enable the Format records in a table check box.
5 Click Add.
6 To organize a selected field, click any of the following:
• Replace — replaces the name of the selected field
• Delete — deletes the selected field
• Move up — moves the selected field up in the Fields used in merge list
• Move down — moves the selected field down in the Fields used in merge list
7 When you are satisfied with the field names and arrangement for your data file, click OK.
8 In the Quick data entry dialog box, type information for each field that you have created.
9 Click New record to add the completed record to your data file. Repeat steps 8 and 9 to continue adding records to your data file. Click Close, and click Yes.
It is recommended that you use no more than 512 fields per record.
Working with form documents for a merge
A form document provides the pattern and layout for a merged document. It can contain text, formatting, graphics, and merge commands. You create form documents the same way you create regular documents; however, you insert merge commands which are replaced by information from a data source during the merge. For more information about inserting merge commands, see “Using merge commands” in the WordPerfect Help.
At the top of the document window, WordPerfect inserts the Merge toolbar to give you greater control over a merge. For more information about the Merge toolbar, see “Using the Merge toolbar.”
WordPerfect lets you create a form document that you can personalize during a keyboard merge. A keyboard merge lets you enter information into the form document each time you need to send it. For more information about the KEYBOARD command, see “Reference: List of merge programming commands” in the WordPerfect Help.
You can also
Number the fields in an empty data file Click OK in the Create data file dialog box. Specify the number of fields in the Number of fields in each record box.
Add a line to a field Press Ctrl + Enter.
Move to the next field Press Tab.
108 Performing merges

You also can create a form document for labels. For information on this procedure, please see “To create a form document for labels” in the WordPerfect Help.
If you do not want to create a new series of merged documents, you can send all of the merged data to a table. After you perform the merge, all of the merged output will be formatted into a single table with each column representing a field. For information on this procedure, please see “To create a table for a merge” in the WordPerfect Help.
To create a form document for a merge or keyboard merge
1 Click Tools Merge.
2 In the Merge dialog box, click Form document Create form document.
If there is text in the active document, enable one of the following options in the Data file source dialog box, and click OK:
• Use file in active window — uses the active document
• New document window — creates a new document
3 In the Associate form and data dialog box, enable one of the following:
• Associate a data file — specifies the path and filename for the file
• Associate an address book — specifies an address book
• Associate an ODBC data source — lets you select the ODBC source to use
• No association — does not associate any data file
4 Click OK.
5 Perform an action from the following table.
To insert a field in a form document for a merge
1 On the Merge toolbar, click Insert Field.
2 Click in the form document where you want data to be filled in from a data source.
3 In the Insert field name and number dialog box, choose a field from the Field names list.
You can keep the Insert field name and number dialog box open and continue to add information and formatting to the form document.
To Do the following
Create a form document for a merge Type text, apply formatting, and insert merge commands in the form document.You can now begin inserting fields in the form document.
Create a form document for a keyboard merge Add text and formatting, and insert fields in the form document. Click where you want to insert a keyboard prompt in the form document. On the Merge toolbar, click Insert merge code, and choose Keyboard.In the Insert merge code dialog box, type a user prompt for the information to be entered and click OK.
Create a sideways text form document On the WordPerfect menu bar, click Insert Text box, insert fields in the new text box, and click Close. Right-click the text box, and click Content. Then, enable a rotation option in the Rotate text counterclockwise area, and click OK.
Part two : WordPerfect 109

4 Click Insert.
Associating merge files
Before you can merge documents, you must link a data source filename to a form document. This is called associating a data source. You can associate a data source with a form document, or you can associate a form document with a data file, such as an ODBC data source. The association is always stored in the form document.
If the data source changes, you can associate a different data file. You can also go to an associated form document from its data file or to an associated data file from its form document.
To associate a data file with a form document
1 Open a data file.
2 On the Merge toolbar, click Go to form.
3 In the Associate dialog box, click one of the following:
• Select — associates an existing form document
• Create — creates a new form document
The association is stored in the form document.
If there is no associated data file, you can select an existing data file or create a new one. For information about creating a data file, see To create a data file for a merge on page 108.
To associate a form document with a data source
1 Open a form document that has no association with a data source.
2 On the Merge toolbar, click Go to data.
3 Click one of the following:
• Select — associates a data file
• Create — creates and names a new data file or form file
• Address book — associates an address book
• ODBC — associates an ODBC data source
You can also
Change the associated data source Open a form document. On the Merge toolbar, click Insert field. Click Data source, and browse to locate a data file.
Go to the associated data file Open a form document. On the Merge toolbar, click Go to data.
You can also
Go to the associated form document Open a data file. On the Merge toolbar, click Go to form.The associated form document must be open.
110 Performing merges

To associate a form document with an ODBC data source
1 Open a form document that has no association with a data source.
2 On the Merge toolbar, click Go to data.
3 Click ODBC.
If prompted, log in to the database.
4 Choose a location from the Data source list box.
5 From the Table list box, choose a table in the database that contains the merge data.
For more information about logging in to an ODBC database, see the Help for the Microsoft SQL Server ODBC driver.
Performing a merge
When you merge documents, you combine a form document and a data source. WordPerfect provides a variety of output options for the merged documents. For example, you can save it to disk, print it, or add it to the active document.
This is an example of 1) a data source document, 2) a form document, and 3) merged documents.
You can perform a keyboard merge and add information at the time of the merge. When you perform the keyboard merge, WordPerfect pauses the merge as specified in the form document and waits for you to enter information from the keyboard.
You can create envelopes as you merge a form document (such as a letter), or you can create merged envelopes on their own. An envelope is created for each record selected in the data source. For more information about merging to envelopes, see “To merge to envelopes” in the WordPerfect Help.
You can also send each merged document as e-mail. For information, please see “To merge to e-mail” in the WordPerfect Help.
Please note that it is recommended that you use no more than 512 fields per record.
To perform a merge
1 Click Tools Merge.
2 In the Merge dialog box, click Form document, and choose the location of the form file to merge.
3 Click Data source, and choose the location of the data file to merge.
4 Click Output, and choose one of the following:
• Current document
• New document
Part two : WordPerfect 111

• Printer
5 Click Merge.
To perform a keyboard merge
1 Open a form or data file containing the KEYBOARD merge command.
2 Click Tools Merge.
3 Click Form document, and choose Current document.
4 Click Data source, and choose the location of the data file.
5 Click Output, and choose a location for the merged file.
6 Click Merge.
7 When the merge pauses at the KEYBOARD command, type the information as prompted.
8 On the Merge toolbar, click Continue.
To continue the merge to the end of the active record and ignore all other merge commands, click Quit on the Merge toolbar.
Performing simplified merges
The Mail Merge Expert is designed to simplify merging addresses with letters, labels and envelopes. It guides you step-by-step through a merge, from choosing the data source that contains the recipients‘ information (DAT file) and the form document that has the consistent content (FRM file) to outputting the merge. You can use a variety of webmail address books that are in the CSV format in a merge, but you must first convert them to a DAT file.
To perform a simplified merge
1 Click Tools Mail Merge Expert.
The Mail Merge Expert opens.
2 On the Data tab, enable one of the following data-source options:
• Merge data file (DAT) — lets you uses an existing data file by clicking the Browse button and selecting the DAT file. You can also begin creating a DAT file by clicking Create. For more information on creating DAT files, see To create a data file for a merge on page 108.
• Spreadsheet — lets you use a Quattro Pro (QPW) or Microsoft Excel (XSL or XSLX) spreadsheet as the data source.
• Corel address book — lets you use a Corel address book as a data source. You can also use a gmail.com, outlook.com, and yahoo.com webmail address book in a merge, but you must first convert it to a DAT file. For more information, see To convert an existing address book to a DAT file for a merge on page 113.
3 Choose an option for how blank lines are treated in the merged document when the corresponding field in the data source is empty:
• Remove blank line
• Leave blank line
4 If you only want to use certain records in the data source, click Select records, select a record to include in the merge, and click Add. You can choose which fields to display in the Select records dialog box by clicking Display fields, choosing the fields to display, and clicking Add.
112 Performing merges

5 Click the Form tab.
6 Enable one of the following form-document options:
• Current document — lets you use the current document as the form (FRM)
• Merge form file (FRM) — lets you use an existing form file by clicking the Browse button and selecting the FRM file
You can also begin creating a FRM file by clicking Create. For more information on creating FRM files, see To create a form document for a merge or keyboard merge on page 109.
7 In the FRM file, position your cursor where you want to insert a field in the document, choose a field, and click Insert.
You can insert multiple fields.
8 Click the Output tab.
9 Enable one of the following merge options:
• Current document — outputs the merge to the current document with a page break between records
• New document — outputs the merge to a new document with a page break between records
• New document per record — outputs the merge so that each record is a separate document. In the Format area, choose the output file format. You can choose how the output files are named by selecting a field name from the Data field name list box.
10 Choose a folder location for the merge output.
11 Click Merge.
To convert an existing address book to a DAT file for a merge
1 Click Tools Macro Play.
2 In the Play macro dialog box, select CSVtoMerge, and click Play.
3 In the Select CSV file dialog box, navigate to the folder where the CSV file is stored, and click Open.
The CSV file is converted to a DAT file.
Part two : WordPerfect 113


Printing
In this chapter:
• Printing documents on page 115
• Printing envelopes and labels on page 116
For additional topics, please see “Printing” in the WordPerfect Help.
Printing documents
WordPerfect provides numerous options for printing documents.
To print a document
1 Click File Print.
2 On the the Main page, choose a printer from the Name box.
3 In the Print range area, enable one of the following options:
• Full document — prints the entire file
• Current page — prints the page where the cursor is located
• Pages — prints the pages specified in the Pages box:A hyphen (-) between numbers defines a range of sequential pages. For example, 1-5 prints pages 1 to 5.A comma (,) between numbers defines a series of non-sequential pages. For example, 1, 5 prints pages 1 and 5 only.Any combination of hyphens and commas is supported. For example, 1-3, 5, 7, 10-12 prints the following pages: 1, 2, 3, 5, 7, 10, 11, and 12.
• Selected text — prints the selected text in the document (available only if text is selected)
• Document summary — prints only the document summary (available only if there is a document summary)
4 Click Print.
To print multiple copies
1 Click File Print.
2 On the Main page, type the number of copies you want to print in the Number of copies box.
If you want the copies collated, enable the Collate option.
3 Click Print.
To print sections of a document
1 Click File Print.
2 Click the Advanced tab.
3 Type a number or a combination of numbers in any of the following list boxes:
• Page(s)/Label(s) — prints the specified pages
• Secondary pages — prints the specified secondary pages
Part two : WordPerfect 115

• Chapters — prints the specified pages in the specified chapters
• Volumes — prints the specified pages in the specified volumes
4 Click Print.
The Volumes setting takes precedence over all other settings, followed by chapters, secondary pages, and page(s)/label(s).
Printing envelopes and labels
To print on different sizes of paper, you must select a page size definition so the printer can format and print a document as you want.
WordPerfect allows you to print different sizes of envelopes.
You can select a label size. You can also print labels.
To print an envelope
1 Click the page of a document that is set up as an envelope.
2 Click File Print.
3 Click the Main tab.
4 Click Print.
You can also print an envelope by clicking the Print current envelope button on the property bar.
To select a label size
1 Click the page where you want labels to begin.
2 Click Format Labels.
3 In the List labels for area, enable one of the following options:
• Laser printed — if you are using a laser printer
• Tractor-fed — if you are using a tractor-fed printer
• Both — if you are using a tractor-fed laser printer
4 Choose a label definition from the Labels list.
5 Click Select.
To print a label
1 Click File Print.
2 Click the Advanced tab.
3 In the Page(s)/Label(s) list box, type the number of each label or a range of labels. For example:
• To print label 3, type 3.
• To print labels 3 and 8, type 3, 8.
• To print label 3 through the end of the document, type 3-.
4 Click Print.
116 Printing

Working with PDF files
If you need to share files with others who do not have Corel WordPerfect Office installed on their computers, you can publish the files to PDF. This file format does not require the use of a particular operating system, so after downloading and installing Adobe Reader, any computer user can view, share, or print PDF files.
In this section, you’ll find these topics:
• Publishing to PDF on page 117
• Creating PDF forms on page 118
• Setting passwords for PDF files on page 124
Publishing to PDF
When you need to share files with others, you can publish them to PDF and preserve the typography, images, graphics, color, and formatting of the original file. In order to view the PDF file, the recipients of the file must have Adobe Reader or Corel WordPerfect Lightning installed on their computers.
You can also add file information, such as the author name or keywords, to the PDF file.
You can verify the compliance of a PDF file by creating a log file. The log file created for a PDF file contains details about what was done to the file to achieve compliance when the file was published. In addition, the log file lists all limitations and warnings.
To publish to PDF
1 Click File Publish to PDF.
2 Choose the drive and folder where you want to save the file.
3 Type a filename in the File name box.
4 From the PDF style list box, choose one of the following options:
• Commercial printing (Largest file size) — creates a high-quality PDF to send to a printer or digital copier
• PDF/A-1b (Level B compliance) — creates a standardized PDF file that ensures the long-term archiving of the content.
• Publishing online (Smallest file size) — creates a PDF suitable for online viewing, such as a document to be distributed by e-mail or displayed on the Web
• Publishing online and printing — creates a PDF suitable for viewing or printing on a laser or desktop printer
5 Click Save.
If you do not want the PDF file to open automatically after it is saved, disable the Open PDF after saving check box.
If you publish to a PDF/A style, the document fonts are automatically embedded in the file. Some licensed fonts are meant to be viewed only in the original document, however, and you are prohibited from redistributing the font. Therefore, before publishing to the PDF/A style, you must make sure that you can redistribute the fonts. To view the licensing information and embedding restrictions for a font, you can use a tool such as the font properties extension tool that is available for free on the Microsoft Web site.
6 Click File Publish to PDF.
Part two : WordPerfect 117

7 Click Settings.
The Publish to PDF settings dialog box appears.
8 In the Export range area, enable one of the following options:
To add file information to a PDF file
1 Click File Publish to PDF.
2 Click Settings.
The Publish to PDF settings dialog box appears.
3 Perform one or both tasks from the following table.
To change the PDF compatibility settings
1 Click File Publish to PDF.
2 Click Settings.
The Publish to PDF settings dialog box appears.
3 On the General page, choose a compatibility option from the Compatibility list box:
• Acrobat 3.0 (PDF 1.2) — creates a PDF file that is compatible with Adobe Acrobat 3.0
• Acrobat 4.0 (PDF 1.3) — creates a PDF file that is compatible with Adobe Acrobat 4.0
• Acrobat 5.0 (PDF 1.4) — creates a PDF file that is compatible with Adobe Acrobat 5.0.
• PDF/A-1b — creates a standardized PDF file that ensures the long-term archiving of the content.
PDFs that have been saved with Acrobat 5.0 can be opened in later versions of Adobe Acrobat.
To generate a log file
1 Click File Publish to PDF.
2 Click Settings.
The Publish to PDF settings dialog box appears.
3 Click the Advanced tab.
4 Enable the Generated log file check box.
If you want to change the location where the log file is stored, click Browse.
Creating PDF forms
You can create fillable PDF forms, which you can distribute to gather specific information from users. You can add form controls to a PDF form, such as text fields, check boxes, drop-down lists, list boxes, and radio buttons. The type of information that you’re seeking dictates which form controls to use.
You can also add buttons that allow users to navigate, reset, and submit the form. You can also insert a customizable
To Do the following
Add author information Type a name in the Author box.
Add keywords Type keywords in the Keywords box.
118 Working with PDF files

button. To help users enter the information you’re seeking, you can add a tooltip description that appears when the cursor is positioned over the form control.
You can define how data, especially numeric data, in a text field displays by using format masks. WordPerfect has a variety of pre-defined format masks for dates, times, percentages, and numbers. When you’re compiling the information that you’ve gathered from PDF forms, using format masks ensures that all the data from a specific text field adheres to a format that you’ve chosen. For example, users could type a date in the PDF form in several ways — using only numbers or a mixture of numbers and characters — and the format mask automatically converts the data they’ve typed to the format you specified.
When you insert a form control in a document, it’s attached to a location on a page by default. As you add or delete text before the form control, it remains in the same position on that page and moves with that page. However, you can change the position of a form control on a page.
You can attach a form control to a character in a line so that the form control moves just like any other character in the document. You can also attach a form control to a paragraph so it moves with the paragraph. As you add or delete text before the form control, it moves automatically with the character or paragraph. You can also specify an exact position for a form control within columns
You can use specific measurements to resize a form control. You can apply formatting to form-control text to change the font and its attributes, such as size, color, and alignment. You can also edit the border style and fill for a form control.
In addition, you can choose how the document text wraps around a form control. For example, you can wrap text around one or both sides of a form control.
To add text fields
1 Position the cursor where you want to insert the text field.
2 Click Insert PDF form control, and click one of the following:
• Text field — inserts a single-line text field
• Multiline text field — inserts a multiline text field
By default, multiline text fields can only accept 150 characters in WordPerfect. However, after the document is published to PDF and opened in a PDF viewer, multiline text fields can accept more than 150 characters.
You can also
Allow spell checking for user text Right-click the text field, click Properties, and enable the Enable spell checking check box.
Restrict text entry to the width of the field Right-click the text field, click Properties, and enable the Limit text entry to width of field check box.
Allow formatting of user text Right-click the text field, click Properties, and enable the Allow rich text formatting check box.
Set the comb length of a single-line text field Right-click the text field, click Properties, and enable the Comb length check box, and type a value in the characters box.
Part two : WordPerfect 119

You can also insert a text field by clicking the Insert text field or Insert multiline text field button on the Form controls toolbar. If the Form controls toolbar is not displayed, click View Toolbars, and enable the Form controls check box.
To format a text field
1 Right-click a text field, click Properties.
You can only format a single-line text field.
2 In the list of categories, click Format.
3 Choose a format from the Format list.
4 Click OK.
To create a custom format
1 Right-click a text field, click Properties.
You can only create a custom format for single-line text fields.
2 In the list of categories, click Format.
3 In the Add format area, type a name for the format in the Name box.
4 Choose the type of format you want to create from the Format type list box.
5 Type an example of the syntax you want the data to adhere to in the Format mask box.
If the format that you are creating is a number or percent format type, choose an option from the Negative number format list box.
For information about using format mask codes, see “Reference: Format mask codes in PDF forms” in the WordPerfect Help.
To add a check box
1 Position the cursor where you want to insert the check box.
2 Click Insert PDF form control Check box.
You can also insert a check box by clicking the Insert check box button on the Form controls toolbar. If the Form controls toolbar is not displayed, click View Toolbars, and enable the Form controls check box.
To add drop-down lists
1 Position the cursor where you want to insert the drop-down list.
2 Click Insert PDF form control Drop-down list.
3 Right-click the drop-down list, and click Properties.
The Properties dialog box appears.
4 Type the name of a list item in the Item box.
If you want to assign an export value to the drop-down list, type the value in the Export value box.
5 Click Add.
120 Working with PDF files

You can also insert a drop-down list by clicking the Insert drop-down list button on the Form controls toolbar. If the Form controls toolbar is not displayed, click View Toolbars, and enable the Form controls check box.
To add list boxes
1 Position the cursor where you want to insert the list box.
2 Click Insert PDF form control List box.
3 Right-click the list box, and click Properties.
The Properties dialog box appears.
4 Type the name of a list item in the Item box.
If you want to assign an export value to the item, type the value in the Export value box.
5 Click Add.
You can also insert a radio button by clicking the Insert list box button on the Form controls toolbar. If the Form controls toolbar is not displayed, click View Toolbars, and enable the Form controls check box.
To add radio buttons
• Click Insert PDF form control Radio button.
You can also insert a radio button by clicking the Insert radio button or Insert a radio button group button on the Form controls toolbar. If the Form controls toolbar is not displayed, click View Toolbars, and enable the Form controls check box.
To add command buttons
1 Click Insert PDF form control Button, and click one of the following:
• Custom button — inserts a customizable button
• Reset button — inserts a button that clears all user-entered information
• Submit button — inserts a button that sends completed form to an email address
• Next page button — inserts a button that moves to the next page
• Previous page button — inserts a button that moves to the previous page
To add a tooltip to a form control
1 Right-click a form control, and click Properties.
2 Type the tooltip text in the Tooltip box.
To change the border of a form control
1 Right-click a form control, and click Properties.
2 In the list of categories, click Appearance.
Part two : WordPerfect 121

3 In the Border/Fill area, do any of the following:
• Choose a line thickness from the Line thickness list box.
• Choose a line style from the Line style list box.
• Open the Border color picker, and choose a color.
To change the fill of a form control
1 Right-click a form control, and click Properties.
2 In the list of categories, click Appearance.
3 Open the Fill color picker, and choose a color.
To set form control text properties
1 Right-click a form control, and click Properties.
2 In the list of categories, click Appearance.
3 In the Text area, do any of the following:
• Choose a font from the Font face list box.
• Choose a font size from the Font size list box.
• Open the Text color picker, amd choose a color.
• Choose an alignment option from the Align contents list box.
To change the position of a form control on a page
1 Right-click a box, click Properties.
2 In the list of categories, click Position.
3 Choose Page from the Attach form control to list box.
4 From the From list box in the Horizontal area, choose an element from which to set the horizontal position of the form control.
5 From the From list box in the Vertical area, choose an element from which to set the vertical position the form control.
6 Type values in the following boxes:
• Horizontal — lets you specify the horizontal position of the form control
• Vertical — lets you specify the vertical position of the form control
If you want to anchor the form control to a specific page, enable the Form control stays on page check box. The form control remains on the current page even if you add or remove information before the form control.
To attach a form control to a character
1 Right-click a form control, and click Properties.
2 In the list of categories, click Position.
3 Choose Character from the Attach form control to list box.
4 Enable a line position option.
122 Working with PDF files
If you want to prevent text on other lines from printing over the form control, enable the Form control changes text line height check box.
To attach a form control to a paragraph
1 Right-click a form control, and click Properties.
2 In the list of categories, click Position.
3 Choose Paragraph from the Attach form control to list box.
4 From the From list box in the Horizontal area, choose an element from which to set the horizontal position of the form control.
5 Type values in the following boxes:
• Horizontal — lets you specify the horizontal position of the form control
• Vertical — lets you specify the vertical position of the form control relative to the top of the paragraph
If you want the form control to extend beyond table cell boundaries, enable the Form control not limited by table cell check box.
To resize a form control to specific measurements
1 Right-click a form control, and click Properties.
2 In the list of categories, click Size.
3 In the Width area, enable the Set option, and type a value in the box.
4 In the Height area, enable the Set option, and type a value in the box.
You can set the height of a form control to the line height of text in the form by clicking Match line height.
You can resize a form control to fill the width or height of a page column (from left to right margin) by enabling the Full option in the Width or Height area. A form control with Full as its height is automatically attached to the page.
To prevent form control from becoming distorted, enable the Maintain proportions option in the Width or Height area.
To wrap text around a form control
1 Right-click a form control, and click Properties.
2 In the list of categories, click Wrap text.
3 In the Wrapping type area, enable one of the following options:
• Square — wraps the text around the edges of the form control
• Contour — wraps the text around the outline of the form control
• Neither side — wraps the text above and below the form control
• Behind text — places the form control behind the text
• In front of text — places the form control on top of the text
4 In the Wrap text around area, enable one of the following options:
• Largest side — wraps the text along the side of the form control with the longest dimension
• Left side — wraps the text along the left side of the form control
Part two : WordPerfect 123

• Right side — wraps the text along the right side of the form control
• Both sides — wraps the text along both sides of the form control
Setting passwords for PDF files
You can apply a password to a PDF file to control access to the file. You can add different types of passwords to a file. You can add an open password to secure a file and prevent someone from opening it. You can also add a permission password if you want to allow the file to be opened but you want to restrict access to other tasks, such as printing or editing. If you apply only an open password, recipients of the PDF file can both open and edit the file content. If you apply a permission password, you have more control over which actions are permitted.
To maximize the security of the PDF file, you can apply both types of passwords to a PDF file concurrently. If both passwords are applied, the recipient of the file can use either password to open the file for viewing in Adobe Acrobat or Adobe Reader. For example, if you want to allow someone to edit the file in Adobe Acrobat or print the document in Adobe Acrobat or Adobe Reader, recipients must use the permission password.
To add an open password to a PDF file
1 Click File Publish to PDF.
2 Click Settings.
The Publish to PDF settings dialog box appears.
3 Click the Security tab.
4 Enable the Open password check box.
5 Type a password in Open password text box.
Passwords are not allowed in PDF files that are intended for archiving and saved with the PDF/A option.
To add a permission password to a PDF file
1 Click File Publish to PDF.
2 Click Settings.
The Publish to PDF settings dialog box appears.
3 Click the Security tab.
4 Enable the Permission password check box.
5 Type a password in the Permission password text box.
6 Perform one or more tasks from the following table.
To Do the following
Add a printing permission Choose an option from the Printing permissions list box.
Add an editing permission Choose an option from the Editing permissions list box.
Allow the copying of content Enable the Enable the copying of text, images, and other contents check box.
124 Working with PDF files

Part two : WordPerfect 125

126 Working with PDF files

Part two : WordPerfect 127


Publishing eBooks
You can publish WordPerfect documents to MOBI and EPUB, two of the most popular eBook formats.
In this section, you’ll find this topic:
• Creating eBooks on page 129
Creating eBooks
You can create an eBook by opening the WordPerfect eBook Publisher template and writing and formatting the eBook directly in the template. You can also base an eBook on an existing document by copying and pasting its content into the template.
Your eBook must have at least one chapter. Each chapter has two components: heading and content, which can be text or images. Adding a chapter forces a page break.
You can add front matter, such as a title page, copyright, or dedication. Front matter appears before the chapters in your eBook. You can also proofread your work in the eBook Publisher template.
You can add metadata to your eBook. Metadata — or publishing information — in eBooks is the same as bibliographic data in traditional books. Metadata can help eBook retailers and librarians better catalog your eBook and make your eBook more discoverable in online searches. Most metadata fields are optional, but you must give your eBook a title. You can also add a cover to your eBook.
To create an eBook
1 Click File New from project.
2 Click the Create new tab.
3 Choose [WordPerfect] from the list box.
If [WordPerfect] is not displayed in the list box, click Options, and click Refresh projects.
4 Choose eBook Publisher from the list.
5 Click Create.
6 Click Enable macros.
If you do not want to show this warning again, enable the Do not show this message again check box
7 Click Start.
If you do not want to show the WordPerfect eBook Publisher dialog box, enable the Do not show wizard when creating a new eBook check box.
8 In the New chapter dialog box, type a chapter heading.
You can now start writing the eBook. You can also copy text from an existing file. For more information, see To add text from another file on page 129.
You can start a new eBook in the eBook Publisher template by clicking the New eBook button on the template toolbar.
To add text from another file
1 Click the Open button on the template toolbar.
Part two : WordPerfect 129

2 Choose the drive and folder where the file containing the text you want to copy is stored, choose the file, and click Open.
3 Select the text, and click Edit Copy.
4 In the eBook Publisher template, position the cursor where you want to insert the text.
5 Click the Paste button on the template toolbar.
The default font in the eBook Publisher template is Georgia.
Footnotes that you copy into the eBook Publisher template appear as endnotes in the eBook. The endnote reference number and the corresponding information in the endnote are linked to one another. You can also add endnotes to your eBook. For more information, see To insert an endnote on page 99.
To insert an image in an eBook
1 Click the Insert image button on the template toolbar.
2 Choose the drive and folder where the image is stored, choose the file, and click Open.
You can use JPG, BMP, GIF, PNG, or TIFF files.
For more information about using images in WordPerfect, see Graphics on page 63.
To add a chapter
1 Position the cursor where you want to insert the chapter.
2 Click the New chapter button on the template toolbar.
3 In the New chapter dialog box, type a chapter heading.
Chapter headings are used to build the table of contents for your eBook.
A placeholder for each chapter heading appears at the beginning of the document until you publish to an eBook format.
You can also use chapters for book components that appear before or after the main content, such as a prologue, preface, foreword, epilogue, or afterword.
To add front matter
1 Click the Add front matter button on the eBook template toolbar.
2 Enable any of the following check boxes for the components you want to add:
• Title page — the first page after the cover
• Copyright — details on content copyright or other legal matters
• Dedication — warm words for your sources of inspiration
3 Click OK, and then click within any inserted component to proceed with its content.
You cannot use the Front matter dialog box to remove front matter. You must delete the content itself from your document.
130 Publishing eBooks

To proofread an eBook
• On the template toolbar, click one of the following buttons:
• Spell checker button — checks and corrects spelling
• Grammatik button — checks and corrects grammar and spelling
You can also use the thesaurus to refine your writing style by clicking the Thesaurus button on the template toolbar. The thesaurus lets you look up options such as synonyms, antonyms, and related words.
For tips on proofreading your writing, see “Proofreading documents.”
To publish to an eBook format
1 Click the Publish to eBook button on the eBook template toolbar.
If you haven’t saved the document that you are publishing to an eBook format, you must save it now.
2 In the eBook formats dialog box, enable any of the following check boxes:
• MOBI
• EPUB
3 Click Next.
4 In the Publishing information dialog box, type the eBook title in the Title box.
For best results, capitalize every word in the title and subtitle except articles, conjunctions, or prepositions unless they are the first or last word in the title.
5 If you want to add non-mandatory metadata, type in the following boxes:
• Author
• Publisher
• Subject
• Unique ID — If you want to sell your eBook through an online vendor, it must have a unique identifier. Although there are several common identifiers for eBooks you could use, International Standard Book Number (ISBN) is recommended. For more information about obtaining an ISBN for your eBook, see www.isbn-international.org. If you don’t choose a unique identifier, WordPerfect automatically assigns one based on the date and time of publishing.
• Publish date
• Description
6 Choose a language code that from the Language list box.
The language code embedded in your eBook helps optimize reading devices for the eBook language.
7 To add a cover, click the plus sign (+) next to the Cover image box, choose the drive and folder where the image is stored, choose the file, and click Open.
You can use JPG, BMP, GIF, PNG, or TIFF files. The cover image will appear as the first page in your eBook. For best results, choose an image 600 pixels wide by 800 pixels high.
8 Choose the point in your eBook that displays on opening from the Book starts at list box:
• First chapter
• Tables of contents
• Title page
Part two : WordPerfect 131

9 Click Publish.
When you first publish to MOBI, or when you click the Publisher settings button on the eBook publisher toolbar, the Publisher settings dialog box prompts you to specify the installed location of two supporting files, kindlegen.exe and KindlePreviewer.exe. These files are required to publish your document to the MOBI file format. You can download the files by clicking Auto download or Go to download site.
For information about optimizing ebook metadata, see the WordPerfect Quick Reference Card "Adding metadata to your ebooks" in the Reference Center.
132 Publishing eBooks

Part Three: Quattro Pro
Quattro Pro lets you create professional spreadsheet-based documents to help you manage data. With Quattro Pro, you can create a notebook that contains a single spreadsheet or an entire project. Quattro Pro provides all the tools you need to produce tables, financial forms, lists, databases, charts, reports, or any other type of data-oriented document.
About Quattro Pro
See the following chapters:
• Quattro Pro basics on page 135
• Navigation and display on page 139
• Microsoft Excel compatibility on page 143
Setting up Quattro Pro projects
See the following chapters:
• Notebook basics on page 145
• Spreadsheet basics on page 149
• Data entry on page 153
• Calculations on page 157
Editing and formatting spreadsheets
See the following chapters:
• Editing spreadsheets on page 161
• Formatting text on page 165
• Formatting data on page 167
• Formatting cells on page 169
Formulas and functions
See the following chapters:
• Formulas on page 173
• Functions on page 175
Charts
See the following chapter:
• Charts on page 177
Sharing Quattro Pro projects
See the following chapter:
• Sharing Quattro Pro projects on page 181
Part Three: Quattro Pro 133

The Quattro Pro page of the Reference Center offers extensive program help: reference topics, tutorials, tips, insights, and more. See To access the Reference Center on page 5.
134 Part Three: Quattro Pro

Quattro Pro basics
In this chapter:
• Starting Quattro Pro on page 135
• Understanding the components of a notebook on page 135
• Working with toolbars on page 136
• Working with the application bar on page 137
• Working with Quattro Pro Experts on page 137
• Quitting Quattro Pro on page 138
For additional topics, please see “Quattro Pro basics” in the Quattro Pro Help.
Starting Quattro Pro
Let’s begin by starting Quattro Pro.
To start Quattro Pro
• On the Windows taskbar, click Start All Programs WordPerfect Office Quattro Pro.
Understanding the components of a notebook
Notebooks, spreadsheets, and their associated elements are the core of the Quattro Pro application. Notebooks provide a way to organize many spreadsheets within the same file. There are 18,000 spreadsheets in a notebook. Each spreadsheet consists of approximately 1,000,000 rows and 18,000 columns.
Spreadsheets
A spreadsheet is an electronic ledger. It contains columns and rows in which you enter, arrange, calculate, and analyze data. In a spreadsheet, you can arrange and categorize data, perform simple math operations, and apply complex formulas. Once you enter your data in a spreadsheet, you can create a chart, add maps and graphics, or produce a report. The spreadsheet you see when Quattro Pro opens is one of thousands available in each notebook.
Objects sheet
The last sheet of every notebook is the Objects sheet. The Objects sheet displays an icon for every chart in the
Part Three: Quattro Pro 135

notebook. This sheet also displays icons for custom dialog boxes you build. You can copy, rename, and print items in the Objects sheet. The Objects sheet property bar has buttons for creating, editing, and displaying charts and for building custom dialog boxes.
Project templates
Project templates let you create a new notebook based on a pre-designed project. Many of the Quattro Pro project templates provide a basic format and structure for common spreadsheets and data entry forms. You can also create your own project templates.
Values
A value is a number, date, formula, or the result of a formula. Quattro Pro automatically determines whether data is a value or a label. As you type your data in a cell, the READY indicator on the application bar changes to LABEL or VALUE, depending on the type of data you enter.
Labels
Labels contain alphanumeric data, such as titles, phone numbers, or addresses. Quattro Pro interprets and formats labels differently than it does values. Values are calculable; labels are not.
Formulas
Formulas are mathematical equations. Formulas usually refer to numbers in other cells in order to calculate a value, such as the difference between the values in two cells or the total of values in a column. You can use mathematical functions and numbers in formulas.
Functions
Spreadsheet functions are built-in formulas that automate many of the calculations you perform in a spreadsheet. For example, @AMAINT is a spreadsheet function that calculates the accumulated interest paid on a loan after a specified number of payments. All spreadsheet functions are preceded by an @ sign.
Macros
Macros are computer scripts that automate complex or repetitive command sequences. A macro is a sequence of commands that Quattro Pro runs automatically. Macros can perform keystrokes, mouse actions, and menu commands. You can use macros to automate tasks (such as printing a standard report), enter frequently used labels with a keystroke, or build complete applications to simplify Quattro Pro tasks for other users.
Working with toolbars
Toolbars give you quick access to the features you frequently use.
The following standard toolbars come with Quattro Pro:
• Notebook — provides tools for entering and editing data
• Selection formatting — provides tools for manipulating the current selection
• Data manipulation — provides tools for working with notebook cells and selections
• Drawing tools — provides tools for drawing or inserting objects in a graphics window, and for arranging objects on a layer on top of the notebook
136 Quattro Pro basics

• Outlining tools — provides tools for grouping data in collapsible and expandable sets of information
• Auditing tools — provides tools for tracing dependent cells, precedents, and even errors in large, complex notebooks
• Review — provides tools for reviewing shared notebooks
• Experts and numeric tools — provides tools for quickly creating maps, charts, and budgets, and for performing computations
• CrossTab report — provides tools for manipulating cross-tab reports
• Visual Basic® — launches the Visual Basic Editor and Visual Basic Design Mode
To display a toolbar
1 Right-click any toolbar.
2 Click the toolbar you want to display.
To move a toolbar
1 Point to the two vertical gray lines at the left of a toolbar.
2 Drag the toolbar to a new position.
Working with the application bar
The application bar displays mode and status indicators. For example, if you press Caps lock, the application bar display shows that Caps lock is on.
The QuickCell™ feature is also displayed on the application bar. With QuickCell, you can view a selected cell on the application bar to see its updated value as you change other cells elsewhere in the spreadsheet.
To use the QuickCell feature
1 Click a cell on the spreadsheet.
2 On the application bar, click QuickCell.
Working with Quattro Pro Experts
Quattro Pro Experts guide you step by step through many spreadsheet tasks. You can access Quattro Pro Experts from a toolbar or from a menu. The following Experts are available:
• PerfectExpert — helps you quickly perform many common Quattro Pro tasks
You can also
Clear the QuickCell value Click a blank cell on the spreadsheet, and click QuickCell.
Disable QuickCell Right-click the application bar, click Customize Application bar Add new command, and drag the QuickCell button from the application bar to the spreadsheet window.
Part Three: Quattro Pro 137

• Analysis Expert — helps you make many analysis calculations, such as advanced regression, correlation, covariance, exponential smoothing, F-test, moving average, sampling, T-test, and Z-test
• Budget Expert — guides you in creating five different budget templates for both home and business use
• Consolidate Expert — lets you combine cells using statistical operators (SUM, AVG, COUNT, MIN, MAX, STD, STDS, VAR, VARS), after which you can sort the combined data
• External Data Expert — lets you easily import data from a database, such as a Paradox® or dBASE database. It also supports Query By Example (QBE) and Open Database Connectivity (ODBC).
• Map Expert — builds a map from selected cells of data
• Scenario Expert — lets you create and display groups of scenarios (data conditions and results) based on models in your notebook
• What-If Expert — lets you create tables that show the effect of changing one or two variable cells referenced in a formula
To access a Quattro Pro Expert from a toolbar
1 Right-click a toolbar, and click Experts and numeric tools.
2 From the Experts and numeric tools toolbar, click the Expert you wish to use.
You can point to a toolbar button to see a description of a particular Expert.
Quitting Quattro Pro
You can quit Quattro Pro.
To quit Quattro Pro
• Click File Exit.
If you have changed any files, you are prompted to save your work.
138 Quattro Pro basics

Navigation and display
In this chapter:
• Navigating notebooks and spreadsheets on page 139
• Working with windows and views on page 140
For additional topics, please see “Viewing and navigating notebooks and spreadsheets” in the Quattro Pro Help.
Navigating notebooks and spreadsheets
You can cycle through open notebooks. You can navigate columns and rows on a spreadsheet. You can also automatically scroll through a spreadsheet.
In addition, you can quickly navigate to the Objects sheet.
To cycle through open notebooks
• On the application bar, click the button that displays the notebook's name.
You can also move through open notebooks by pressing Shift + F6 to cycle forward or Ctrl + F6 to cycle backwards.
To navigate a spreadsheet
• Press the relevant key, as outlined in the table below.
You can also move across rows by pressing Tab.
To automatically scroll through a spreadsheet
1 On the notebook toolbar, click AutoScroll .
The cursor changes to the AutoScroll arrow.
2 Move the AutoScroll arrow in the direction you want to scroll.
The scrolling speed increases as you move the arrow farther away from the AutoScroll tool.
You can disable AutoScroll by clicking anywhere on the spreadsheet.
To go to the Objects sheet
• Click the Quick tab button at the bottom left of the notebook window.
To Do the following
Move down columns after entering data Press Enter or the Down arrow.
Move up columns after entering data Press the Up arrow.
Move across rows after entering data Press the Left arrow or Right arrow.
Part Three: Quattro Pro 139

To return to the original spreadsheet, click the Quick tab button again.
Working with windows and views
A Quattro Pro window displays a Quattro Pro file, or a file imported into Quattro Pro. While working in Quattro Pro, you can have several windows open. For example, suppose you are working with four different notebooks, each dealing with a quarterly report; you can display all four at once.
You can select which windows you want open, and how you want to view the data in those windows. In addition, there are several methods of rearranging windows on your desktop. You can also hide windows.
You can change how you view your notebook without changing the notebook itself. For example, you can use Draft view when quickly entering data, or you can use Page view when you want to change margins and see how information will fit on a printed page. You can also use Zoom to make the notebook display larger or smaller.
To select a notebook window
• On the application bar, click the button that displays the window's name.
The window with the highlighted title bar is active.
You can toggle back and forth between Quattro Pro and a non-spreadsheet window, such as the spelling checker, by pressing Alt + F6.
To arrange notebook windows
When possible, tiled windows are given equal room on the screen.
To hide a notebook window
1 Click the window.
2 Click Window Hide.
To show a hidden notebook window, click Window Show.
To select a notebook view
1 Click View.
2 Click one of the following views:
• Draft — does not display some document elements such as footers, page breaks, and margins, although they may exist in the notebook
• Page — displays your notebook pages the way they will look when printed
To Do the following
Tile windows vertically Click Window Tile top to bottom.
Tile windows horizontally Click Window Tile side by side.
Have windows overlap Click Window Cascade.
140 Navigation and display

• Page breaks — displays soft and hard page breaks
• Objects — displays the Objects sheet, the last sheet in the notebook
The view that is currently selected when you exit Quattro Pro is the view that will appear when you open Quattro Pro again.
You can drag graphics or charts while in Draft view or Page view.
To see multiple pages while in Page view, click View Zoom, and choose 50 percent (%) or less. To change margins while in Page view, drag a blue margin line to set the current margin for a column or row of pages.
To zoom in and out of a notebook
1 Click View Zoom.
2 Select a zoom level.
3 Enable the Notebook option.
The zoom level does not affect printed output.
To restore the screen to its normal display, choose 100%.
If you select one cell and choose Selection, Quattro Pro finds the boundaries of the data, then zooms only that cell.
Part Three: Quattro Pro 141

Microsoft Excel compatibility
In this chapter:
• “Simulating the Microsoft Excel workspace”
• Sharing spreadsheets with Microsoft Excel users on page 143
For additional topics, please see “Compatibility with Microsoft Excel” in the Quattro Pro Help.
Simulating the Microsoft Excel workspace
If you recently switched from Microsoft® Excel® to Quattro Pro, you may not be familiar with the Quattro Pro workspace. While there are many similarities between the two applications, you may find it easier to simulate the Microsoft Excel workspace.
In addition, you can display the Compatibility toolbar, which gives you immediate access to tools such as saving documents to Microsoft Excel and publishing to HTML.
To work in the Microsoft Excel workspace
1 Click Tools Settings.
2 Click Workspace.
3 Enable the check box beside the Microsoft Excel workspace in the available workspaces list.
Quattro Pro features, including toolbars and menus items, are rearranged to simulate where you would find their equivalents in Microsoft Excel.
To display the Compatibility toolbar
1 Click View Toolbars.
2 Enable the Compatibility toolbar check box in the Toolbar list.
Sharing spreadsheets with Microsoft Excel users
Quattro Pro makes it possible for you to share your Quattro Pro spreadsheets with Microsoft Excel users and for them to share their workbooks with you.
To save a Quattro Pro notebook as a Microsoft Excel file
1 Click File Save as.
2 Choose the drive and folder where you want to save the file.
3 Type a filename in the Filename box.
4 Choose a Microsoft Excel file type from the File type list box.
To open a Microsoft Excel workbook in Quattro Pro
1 Click File Open.
Part Three: Quattro Pro 143

2 Choose the drive and folder where the workbook is stored.
If you can’t see the file, choose All files from the File type box.
3 Double-click the workbook's filename.
You can open Microsoft Excel version 3, 5, 7, 97, 2000, 2002 (XP), 2003, 2007, 2010, 2013, and 2016 workbooks in Quattro Pro. You can also open Microsoft Excel Open XML workbooks (.xlsx) and Microsoft Excel Open XML Macro-enabled workbooks (.xlsm).
When opening Microsoft workbooks in Quattro Pro, some information may not display as it did in Microsoft Excel.
To automatically save to the Microsoft Excel format
1 Click Tools Settings.
2 In the list of categories, double-click Compatibility.
3 Choose XLS from the Default file type list box.
144 Microsoft Excel compatibility

Notebook basics
In this chapter:
• Creating and opening notebooks on page 145
• Adding and deleting spreadsheets on page 145
• Moving and copying spreadsheets on page 146
• Renaming spreadsheets on page 147
Creating and opening notebooks
When you start a new spreadsheet in Quattro Pro, you must first create a notebook. You can create a notebook from the default template or from a list of project templates:
• When you create a notebook from the default template, you must format the data yourself and perform your own calculations.
• Project templates prompt you for data and then format and calculate it automatically.
You can also open a notebook.
To create a notebook from the default template
• Click File New.
To create a notebook from a project template
1 Click File New from project.
2 Click the Create new tab.
3 Select Quattro Pro from the Categories list box.
4 Choose a project from the Projects list.
5 Click Create.
6 Use the PerfectExpert panel to modify the project.
To open a notebook
1 Click File Open.
2 Choose the drive and folder where the notebook is stored.
3 Click a filename
4 Click Open.
Adding and deleting spreadsheets
You can add or delete single or multiple spreadsheets to or from your notebook.
Part Three: Quattro Pro 145

To insert a spreadsheet
1 Click the tab of the spreadsheet you want to follow the new spreadsheet.
2 Click Insert Insert sheet.
To insert multiple spreadsheets
1 Click Insert Insert cells.
2 Enable the Sheets option in the Dimension area.
3 Enable the Entire option in the Span area.
4 Type a 3D selection in the Cells field.
For example, to insert three sheets before spreadsheet B, enter B:A3..D:A3 (it does not matter which cell you reference).
To delete a spreadsheet
1 Click a spreadsheet tab.
2 Click Edit Delete cells.
3 Enable the Sheets option.
4 Enable the Entire option.
You can also delete a spreadsheet by right-clicking a spreadsheet tab, and clicking Delete sheet.
To delete multiple spreadsheets
1 Click the first spreadsheet tab.
2 Hold down Shift while you click the last spreadsheet tab to delete.
A black line appears under the tabs.
3 Click Edit Delete cells.
4 Enable the Sheets option.
5 Enable the Entire option.
Moving and copying spreadsheets
You can move sheets within a notebook or between notebooks to reorder them by using the mouse to drag the spreadsheet tab to another location. In the same way, you can also copy spreadsheets within a notebook.
To move a spreadsheet
1 Click the tab of the spreadsheet you want to move.
2 Drag the spreadsheet tab in any direction until a sheet icon appears.
3 Move the sheet icon by dragging right or left along the row of tabs.
4 Release the mouse button when the sheet icon is where you want to place the spreadsheet.
You can also move a spreadsheet by clicking Edit Move Sheets, and specifying the sheets to move.
146 Notebook basics

To copy a spreadsheet
1 Hold down Ctrl and click the tab of the spreadsheet you want to copy.
2 Drag the spreadsheet tab in any direction until a sheet icon appears.
3 Move the sheet icon by dragging right or left along the row of tabs.
4 Release the mouse button when the sheet icon is where you want to place the spreadsheet.
You can also copy a spreadsheet by clicking Edit Select all, and then clicking Edit Copy.
Renaming spreadsheets
Each spreadsheet in a notebook has a tab at the bottom. This tab displays the name of the spreadsheet. Spreadsheets are initially named with letters of the alphabet in sequence, from A to Z, continuing from AA to AZ, up to ZZZ. You can assign a descriptive name to a spreadsheet using up to 64 characters (letters and numbers).
To rename a spreadsheet
1 Click Format Sheet properties.
2 Click the Name tab.
3 Type a descriptive name.
The Objects sheet (the last sheet in the notebook) cannot be renamed.
When you rename a spreadsheet, formulas that refer to the renamed spreadsheet adjust to use the new name.
To reassign the original name to a spreadsheet, click Reset.
You can also name a spreadsheet by double-clicking its tab.
Part Three: Quattro Pro 147

148 Notebook basics

Spreadsheet basics
In this chapter:
• Selecting cells, rows, and columns on page 149
• Inserting and deleting cells, rows, and columns on page 150
Selecting cells, rows, and columns
You can select cells individually or in rows, columns, blocks, or 3D blocks. When you select a cell, a black-bordered rectangle displays to indicate the active cell. This rectangle is called the selector.
When you need to enter cell references in dialog boxes, it is usually easier to select the cells rather than type the entire cell address. Quattro Pro lets you use the Range picker to easily select cells.
You can lock specific rows and columns of a spreadsheet so that their titles remain on the screen as you scroll. A blue line divides the locked area and the notebook data. Locked titles do not affect printing.
Finally, you can repeat titles on each spreadsheet of a printed notebook.
To select nonadjacent cells
1 Select the first group of cells.
2 Hold down Ctrl, and select additional cells.
To select a 3D block of cells
1 Select the cells on the first spreadsheet.
2 Hold down Shift, and click the tab for the last spreadsheet in the series.
A black line appears under the tabs; the same cells are now selected on all the sheets where the black line appears.
The cells remain selected only until you click elsewhere in the notebook.
To select cells from a dialog box
1 Click the Range picker .
2 Select the cells you want to appear in the edit field of the dialog box.
3 Maximize the dialog box.
You can also select cells by double-clicking the contents of the edit field.
To select a row or column
• Click the row or column heading.
To select multiple spreadsheets
1 Click the tab of the first spreadsheet to select.
Part Three: Quattro Pro 149

2 Hold down Shift while you click the last spreadsheet tab you want to include in the selection.
A black line appears under the tabs.
To lock titles on a spreadsheet
1 Select the top-left cell of the spreadsheet area you want to remain scrollable.
2 Click View Locked titles.
A blue line divides the locked area and the notebook data.
The Locked titles option is only available in Draft view.
To unlock titles, click View Locked titles again.
To repeat column titles on a printed notebook
1 Click File Page setup.
2 Click the Options tab.
3 Type the location of the column title in the Top heading box.
You can also repeat row titles by typing the location of the row title in the Left heading box.
Inserting and deleting cells, rows, and columns
You can insert cells, rows, or columns anywhere in a spreadsheet. When you insert an item, existing data is pushed down, to the right, or to the back of the notebook to make room for the new item.
When data is no longer useful, you can easily delete cells, rows, columns, or multiple rows and columns.
To insert a cell
1 Select a cell in the location where you want to insert a new cell.
2 Click Insert Insert cells.
3 Enable the Partial option in the Span area.
4 Enable one of the following options in the Dimension area:
• Rows — The selected cell will shift down and out of the way.
• Columns — The selected cell will shift to the right.
• Sheets — The selected cell will shift to the next spreadsheet.
You can also insert multiple cells. Make sure the upper-left corner of the cells you select contains the first cell entry you want shifted right, down, or back. The cells you select should be the same size as the number of cells you want to insert.
To insert a row
1 Select the row heading just below where you want the row inserted.
2 Click Insert Insert row.
150 Spreadsheet basics

You can insert multiple rows by selecting multiple row headings, and clicking Insert Insert row.
To insert a column
1 Select the column heading to the right of where you want the column inserted.
2 Click Insert Insert column.
You can insert multiple columns by selecting multiple columns headings, then clicking Insert Insert column.
To delete a cell
1 Select the cell you want to delete.
2 Click Edit Delete cells.
3 Enable the Partial option in the Span area.
4 Enable one of the following options in the Dimension area:
• Rows — The cell below the selected cell shifts up.
• Columns — The cell to the right of the selected cell shifts to the left.
• Sheets — The corresponding cell on the next spreadsheet shifts to the current spreadsheet.
You can also delete multiple cells by first selecting a block of cells.
To delete a row or a column
1 Select the row or column heading.
2 Click Edit Delete cells.
You can delete multiple rows or columns by selecting multiple headings, and clicking Edit Delete cells.
Part Three: Quattro Pro 151

152 Spreadsheet basics

Data entry
In this chapter:
• Creating labels and special characters on page 153
• Entering values on page 154
Creating labels and special characters
You can create labels in a spreadsheet which, unlike other cell data, cannot be calculated in formulas. A label can be text (address), text with numbers (145 Howard Street), or numbers seen as text (202-555-1212, a phone number). A label can begin with any letter, punctuation mark, or symbol, except the following characters:
You can insert special characters and symbols that are not on your keyboard, such as icons, phonetic characters, and characters in other languages.
To create a label
1 Click a cell.
2 Type alphanumeric characters.
3 Press Enter.
To create a label from a value
Character Description
/ forward slash
+ plus
- minus
$ dollar sign
( opening parenthesis
@ at sign
# number sign
. period
= equals
To create Do the following
Left-aligned label Type ' before a value.
Right-aligned label Type " before a value.
Centered label Type ^ before a value.
Part Three: Quattro Pro 153

You can also type an alignment character before a backslash, if you want a label to begin with a backslash, but don't want to repeat the character after it.
To insert special characters and symbols
1 Click a cell.
2 Click Insert Symbol.
3 Choose a character set from the Set list box.
4 Choose a character from the Symbols list.
5 Click Insert.
You can also insert special characters and symbols by clicking the WP characters button on the property bar.
Entering values
A value is a number, formula, date, or time. Quattro Pro determines that data is a value from the characters you type. The data type displays in the application bar.
About numbers
Numbers entered in cells can consist only of the following:
• numerals (0 to 9)
• minus sign (-) for negative numbers
• plus sign (+) for positive numbers
• currency symbols; for example, $
• one decimal point
• a trailing %
• an E for scientific notation
You can enter fractions in a cell.
About formulas
For information on entering formulas, see Formulas on page 173.
About dates and times
You can enter a date or time, including the current date, in a cell. While Quattro Pro reads dates and times as values, it applies specific formatting and calculation criteria to them depending on the date and time formats you set as defaults.
To enter a number
1 Click a cell.
2 Type a number.
3 Press Enter.
154 Data entry

For more information, see “To change the number of decimal places in a value” in the Quattro Pro Help.
To enter fractions
1 Click a cell.
2 Type a number as a decimal.
3 Press Enter.
4 Click the cell.
5 Click Format Selection properties.
6 Click the Numeric format tab.
7 Choose Fraction from the Numeric formats list.
8 Choose a type from the Fraction list.
To enter a date or time
1 Click a cell.
2 Type a date or time.
3 Press Enter.
For a list of available date and time formats, see “Default date and time formats” in the Quattro Pro Help.
To enter the current date
1 Click a cell.
2 Click Insert Date.
Quattro Pro inserts the short date format specified in the Windows Regional Settings on the Control Panel.
You can also enter the current date by clicking a cell and pressing Ctrl + D.
Part Three: Quattro Pro 155

156 Data entry
Calculations
In this chapter:
• “Creating simple equations”
• Calculating data in rows and columns on page 157
• Using preset calculations on page 158
Creating simple equations
You can perform simple mathematical operations such as 1+1 directly in a cell. Quattro Pro interprets these equations as formulas and indicates cells with formulas by adding a blue triangle to the bottom-left corner of the cell. Quattro Pro also totals values for you.
To do simple math in cells
1 Type the numbers and math operators in a cell.
For example, type 4500+450.
2 Press Enter.
Do not include commas in numbers.
To total values in a column
1 Click in the first blank cell below and one column to the left of the cells to be totaled.
2 Type total.
3 Press Enter.
This feature is not case sensitive and is language dependent.
You can also total values in a row: Click the first blank cell to the right and one row above the cells to be totaled, type total, and press Enter.
Calculating data in rows and columns
Using PerfectExpert, you can calculate data in rows and columns. For example, you can add a column, find the average of a list of figures, or find the middle value of either.
You can also perform calculations on individual cells.
Quattro Pro also lets you perform calculations on two rows or columns.
To calculate data in a single row or column
1 Click Help PerfectExpert.
2 Click Do simple math in the PerfectExpert panel.
3 Click Quick math.
Part Three: Quattro Pro 157

4 In the Select a row or column box, specify the cells to calculate.
5 Choose a math operation from the Do math list box.
6 In the Insert answer in cell box, specify the cell where you want to display the answer.
You can also specify cells by clicking the Range picker tool and selecting the cells.
To perform a calculation on each item in a row or column
1 Click Do simple math in the PerfectExpert panel.
2 Click More quick math.
3 In the Select a row or column box, specify the cells to calculate.
4 Choose a math operation from the Do math list box.
5 In the Insert answer in cell box, specify the cell where you want to display the answer.
The answer row or column must have as many cells as are in the list on which you're performing calculations.
You can also specify cells by clicking the Range picker tool and selecting the cells.
To calculate data in two rows or columns
1 Click Do simple math in the PerfectExpert panel.
2 Click 2-column quick math.
3 In the Select first row/column box, specify the cells to calculate for the first row or column.
4 In the Select second row/column box, specify the cells to calculate for the second row or column.
5 Choose a math operation from the Do math list box.
6 In the Insert answer in cell box, specify the cell where you want to display the answer.
The answer row or column must have as many cells as are in the list on which you're performing calculations.
You can also specify cells by clicking the Range picker tool and selecting the cells.
Using preset calculations
You can perform calculations quickly by using preset calculations.
You can also total cells in rows or columns. For example, you can calculate totals in a single row, or multiple rows or columns. The row or column cannot contain blank cells, and any labels in the selected cells are treated as zero values.
Calc As-You-Go™ lets you display several different running totals for cells you select; the sum, average, count, maximum value, and minimum value display on the application bar.
To perform preset calculations
1 Type values across a row or down a column.
2 Click the first blank cell after the values.
3 Open the QuickFunction flyout on the Notebook toolbar, and click a function.
158 Calculations

To total cells
To use Calc-As-You-Go
1 Select the cells on which to perform running calculations.
2 View the totals on the application bar.
To total Do the following
Cells in a row (or a column) Select the cells, along with one blank cell to the right (or
below), and click the QuickSum™ button on the Notebook toolbar.
Multiple rows (or columns) Select the cells, along with a blank column to the right (or
a blank row below), and click the QuickSum button on the Notebook toolbar.
Rows and columns for a grand total Select the cells, along with a blank column to the right and
a blank row below, and click the QuickSum button on the Notebook toolbar.
Rows or columns on multiple spreadsheets Select the rows or columns, along with a blank row and column around the data on each spreadsheet, and click the
QuickSum button on the Notebook toolbar.
Part Three: Quattro Pro 159


Editing spreadsheets
In this chapter:
• Editing cell content on page 161
• Undoing actions on page 162
• Copying and moving cells on page 162
For additional topics, please see “Editing spreadsheets” in the Quattro Pro Help.
Editing cell content
Quattro Pro lets you overwrite, replace, or edit cell content.
Quattro Pro lets you quickly find a cell and automatically replace the data it contains. You can look for data in cell formulas or cell values.
To overwrite data
1 Click a cell.
2 Press Insert.
The Typeover button on the application bar appears pressed when the typeover mode is on.
You can return to inserting data by pressing Insert.
To replace the entire contents of a cell
1 Click a cell.
2 Type a new entry.
3 Press Enter.
To edit cell contents
1 Double-click a cell.
2 Click where you want to edit.
3 Edit the cell content.
4 Press Enter.
You can move the insertion point within a cell by using the arrow keys.
To find and replace data
1 Click Edit Find and replace.
2 Type the text or value to find in the Find box.
3 Type the replacement text or value in the Replace box.
4 Type the cells to search in the Cell(s) box.
5 In the Look in area, enable one of the following options:
Part Three: Quattro Pro 161

• Formula — finds data in a formula
• Value — finds data in a value
• Condition — compares cells in the spreadsheet with any conditions specified in the Find box
6 Click one of the following buttons:
• Find next
• Previous
7 Click Replace.
Quattro Pro makes replacements from the cursor position to the end of a document, so you must position the cursor at the beginning of a document before you search.
You can replace all occurrences of the search item with the replacement text or value by clicking Replace all.
When using conditional searches, type a question mark (?) before the search condition (e.g. ? > 300).
Undoing actions
Quattro Pro lets you undo most actions in reverse order of performance. You can reinstate a change by redoing an action.
To undo an action
• Click Edit Undo.
You can also undo multiple actions by clicking the Undo flyout on the notebook toolbar.
To redo an action
• Click Edit Redo.
You can also redo multiple actions by clicking the Redo flyout on the notebook toolbar.
Copying and moving cells
You can copy or move cells by selecting the cells directly on a spreadsheet or you can copy cells by specifying the location of the cell.
To copy and paste cells
1 Select the cells to copy.
2 Click Edit Copy.
3 Select the destination cells within the active spreadsheet.
4 Click Edit Paste.
When you copy a selection of cells to a specific cell, the Clipboard uses that cell as the upper-left position of the copied information.
162 Editing spreadsheets

You can also copy a cell to the input line of another cell, a text box, another spreadsheet in the notebook, or another notebook.
To copy cells to a specified location
1 Click Edit Copy cells.
2 In the From box, specify the cells to copy.
3 In the To box, specify the destination cells.
If you copy cells containing absolute references, enable the Model copy check box.
Instead of specifying the cells you want to copy, you can press F3 and choose a named cell from the Cell names dialog box.
To move cells by cutting and pasting
1 Select the cells to move.
2 Click Edit Cut.
3 Select the destination cells within the active spreadsheet.
4 Click Edit Paste.
You can also move a cell to the input line of another cell, a text box, another spreadsheet in the notebook, or another notebook.
To move cells by dragging
1 Select a cell or cells.
2 Point to an edge of the cells until a four-way arrow displays.
3 Drag the cells to the destination area.
You can use the colored outline as a guide when you move cells.
You can copy a cell by holding down Ctrl as you drag.
Part Three: Quattro Pro 163


Formatting text
In this chapter:
• Using formatting tools on page 165
• Changing the appearance of text on page 165
Using formatting tools
Quattro Pro lets you format a spreadsheet by copying the formatting (background color, font, numeric format, and so on) of one cell to another cell or selection of cells.
You can apply a predesigned format to data.
To copy cell formatting
1 Click the cell or cells with the format you want to copy.
2 Click the QuickFormat button on the toolbar.
3 Select the cell or cells where you want to copy the formatting.
To turn off QuickFormat, click the QuickFormat button on the toolbar.
To apply a predesigned format
1 Select the cells to format.
2 Click Format SpeedFormat™.
3 Choose a format from the Formats list.
You can also apply a predesigned format by clicking the SpeedFormat button on the toolbar.
Changing the appearance of text
You can change the text in one or more cells by adjusting its font face, font size, or text color. You can also change the appearance of text.
To change the typeface, size, and color of text
1 Select the cells with text to format.
2 Click Format Selection properties.
3 Click the Cell font tab.
4 Choose a font face from the Face list.
5 Choose a font size from the Size list box.
6 Open the Color picker, and click a color.
Part Three: Quattro Pro 165

To change the properties of the text font
1 Select the cells with text to format.
2 Click Format Selection properties.
3 Click the Cell font tab.
4 Enable any of the check boxes in the Appearance area.
You can also change the text appearance by clicking the Bold , Italic , or Underline button on the property bar.
To convert text to superscript or subscript
1 Double-click a cell.
2 Select the data to change.
3 Click one of the following buttons on the property bar:
• Superscript
• Subscript
166 Formatting text

Formatting data
Numeric formats do not change cell values; they change only the way values display.
Quattro Pro uses two types of numeric formats: number formats and date/time formats.
About number formats
When you type numbers, Quattro Pro by default rounds off fractional numbers as necessary to fit in the cell. You can change the numeric format of a cell to accommodate, for example, scientific, currency, decimal, and percent formats.
In addition, Quattro Pro lets you change the number of decimal places in a value.
About date/time formats
Quattro Pro lets you format dates and times in a spreadsheet. For example, by default, Quattro Pro displays times in long form as HH:MM:SS (for example, 09:32:30), or in short form as HH:MM (for example, 09:32) when no seconds are specified, but you can change this format.
To change the number format of a cell
1 Select a cell.
2 Click Format Selection properties.
3 Click the Numeric format tab.
4 Choose one of the following formats from the Numeric formats list:
• General — to display numbers exactly as you type them (unless the column width is too narrow)
• Number — to choose a negative number and number of decimal places formats, and separate thousands with commas
• Currency — to choose a country whose currency symbol you want to use
• Scientific — to display numbers as scientific notations
• Fraction — to choose a fraction format
• Hidden — to prevent a cell from displaying its contents
• Percent — to display numbers in a percent format
• Custom — to choose a customized format
To change the number of decimal places in a value
1 Select a cell.
2 On the property bar, click the Change the number of decimal places button.
3 Type a value in the box.
4 Press Enter.
To format dates and times
1 Select a cell to format.
2 Click Format Selection properties.
Part Three: Quattro Pro 167

3 Click the Numeric format tab.
4 Click one of the following formats from the Numeric formats list:
• Date — lets you choose a date format from the Date formats options
• Time — lets you choose a time format from the Time formats options
168 Formatting data
Formatting cells
In this chapter:
• Aligning data on page 169
• Wrapping text on page 170
• Joining cells on page 170
• Resizing rows and columns on page 170
Aligning data
You can align data horizontally and vertically in a cell. The default alignment setting for numbers and formula results is right-aligned; the default setting for labels and dates is left-aligned.
You can center data across multiple cells. You can also change the orientation of text in a cell by rotating it.
To align data in a cell
1 Select a cell.
2 Click Format Selection properties.
3 Click the Alignment tab.
4 In the Horizontal alignment area, enable one of the following options:
• General — right-aligns values and left-aligns labels
• Left — left-aligns all types of data
• Right — right-aligns all types of data
• Center — centers cell data
• Indent — moves data in from the edge of a cell
5 In the Vertical alignment area, enable an option.
You can also click the Alignment button on the property bar to change horizontal cell alignment.
To center text across multiple cells
1 In the left-most cell, type the text to be centered.
2 Select the cells over which to center the text starting with the cell containing the text.
3 Click Format Selection properties.
4 Click the Alignment tab.
5 In the Horizontal alignment area, enable the Center across block option.
To rotate text
1 Click a cell with text to rotate.
2 Click Format Selection properties.
3 Click the Alignment tab.
Part Three: Quattro Pro 169
4 In the Orientation area, enable one of the following options:
• Horizontal — orients text horizontally
• Vertical — orients text vertically
• Rotated — rotates text to the degree you specify
Wrapping text
Text that displays wider than a column width overflows to the next cell when that cell is empty. If the next cell contains data, the overflow text is hidden and the text appears truncated. To fix this, you can wrap text within a cell or enter short lines of text in one cell.
To wrap text within a cell
1 Click the cell in which you want to wrap text.
2 Click the Wrap text button on the property bar.
You can also wrap text in a cell by clicking the Selection properties button on the property bar, clicking the Alignment tab, and enabling the Wrap text check box in the Cell options area.
To enter short lines of text in a cell
1 Click a cell.
2 Type a line of text.
3 Press Alt + Enter.
4 Continue typing.
5 Press Enter.
Joining cells
Quattro Pro lets you join cells to create a title across multiple cells or a vertical side bar.
To join cells
1 Drag across the cells you want to join.
2 Click Format Selection properties.
3 Click the Alignment tab.
4 Enable the Join cells check box in the Cell options area.
You can also join cells by selecting the cells to join and clicking the Join cells button on the toolbar.
Resizing rows and columns
Quattro Pro lets you change the row height in a spreadsheet. You can also change the width of a column.
170 Formatting cells

To change the row height
1 Select a cell in each row you want to resize, or select the row borders.
2 Click Format Selection properties.
3 Click the Row/column tab.
4 In the Row options area, enable the Set height option and type a value in the box.
5 Enable one of the following options:
• Points
• Inches
• Centimeters
You can also change row height by moving the pointer to the bottom edge of a row border until it changes to a double arrow, and dragging the double arrow to resize the row.
To change the column width
1 Follow steps 1 through 3 in the previous procedure.
2 In the Column options area, enable the Set width option and type a value in the box.
3 Enable one of the following options:
• Characters
• Inches
• Centimeters
You can also change column width by moving the pointer to the right edge of a column border until it changes to a double arrow, and dragging the double arrow to resize the column.
Part Three: Quattro Pro 171


Formulas
Formulas are mathematical equations that calculate a final value, such as the difference between two cells or the total of a column.
Using Quattro Pro, you can create math formulas.
You can also create text formulas. Text formulas are any formulas that have a textual result.
Quattro Pro also allows you to create logical formulas that evaluate true or false. For example, the result of the formula +C3<10 displays either 1 or 0 depending on the value of cell C3.
You can also create a formula by using the Formula Composer™.
To create a math formula
1 Type a plus sign (+) in a blank cell.
2 Type a formula.
3 Press Enter.
To view formula results as you enter the formula data, press F9.
To create a text formula
1 Type a plus sign (+) in a blank cell.
2 Type the formula using an ampersand (&) to combine text strings.
For example, +C4&"Review" enters the text in cell C4, and then the word Review.
3 Press Enter.
If you want to add a space between strings, type it inside the quotation marks. For example, +C4&" Review" enters the text in cell C4, a space, and then the word Review.
To create a formula that evaluates to true or false
1 Click a blank cell.
2 Type a formula using one of the logical operators.
3 Press Enter.
If the statement is true, a 1 displays in the cell. If the statement is false, a 0 displays.
To create a formula in the Formula Composer
1 Select a blank cell.
2 Click the Formula Composer button.
3 Enable one of the following options:
• Standard view — displays all three panes (spreadsheet function description, outline, and argument)
• Argument view — displays the outline and argument panes
• Outline view — displays only the outline pane
Part Three: Quattro Pro 173

4 Type a formula in the Expression box.
If an formula is incomplete or syntactically incorrect (for example, a spreadsheet function may be missing an argument), a red question mark icon in the outline alerts you to the error.
Expressions that cannot be expanded, such as values, display a small yellow circle to their left.
You can expand and collapse selected parts of the formula outline by clicking Expand and Collapse .
174 Formulas

Functions
Instead of composing formulas, you can use spreadsheet functions. Spreadsheet functions are a set of standard built-in formulas used to simplify complex calculations.
Quattro Pro offers more than 500 built-in spreadsheet functions. These spreadsheet functions cover a range of calculations, including database, financial, engineering, and statistical calculations. A common spreadsheet function is @SUM, which adds the cell values you reference. For example, typing @SUM(A1..A4,B1) is equivalent to typing +A1+A2+A3+A4+B1.
For documentation on the available functions for Quattro Pro, please see the Quattro Pro Functions Help (qpfn.chm).
You can enter spreadsheet functions in a cell. As you type a function, the most likely function and its syntax appear at the bottom right of the screen. The function's arguments will appear on the application bar.
Spreadsheet functions can also be used to create formulas. In a formula, the left parenthesis is red until you type the right parenthesis. Then, they both turn green.
To enter a spreadsheet function in a cell
1 Select a cell.
2 Click Insert Insert function.
3 Choose a category from the Function category list.
4 Choose a spreadsheet function from the Function list.
5 Click Next.
6 Type the arguments of the function in the relevant boxes; optional arguments appear within angled brackets (<>).
All spreadsheet functions begin with the at sign (@). When typing a spreadsheet function, you can omit the @ if it is not the first item in the formula.
Enclose arguments in parentheses.
To create a formula by using a spreadsheet function
1 Select a cell.
2 Click Insert Insert function.
3 Choose a category from the Function category list.
4 Choose a spreadsheet function from the Function list.
5 Click Next.
6 In the Expression box, type the rest of the formula.
The pane on the left shows a breakdown of the formula.
To identify a missing parenthesis or bracket, double-click the cell, and move the insertion point through the formula. When you reach an unmatched parenthesis or bracket, the character turns red.
Part Three: Quattro Pro 175


Charts
Quattro Pro lets you present data graphically by plotting it in a chart.
In this chapter:
• Understanding charts on page 177
• Creating charts automatically on page 178
• Adding titles to charts on page 178
• Adding linked data to charts on page 178
For additional topics, please see “Presenting spreadsheet data in a chart” in the Quattro Pro Help.
Understanding charts
You can create the following chart types: area (2D and 3D), bar (2D and 3D), bubble, Gantt, high/low, histogram, line (2D and 3D), mixed, pie (2D and 3D), polar, radar, scatter (2D and 3D), spectral, and surface (2D and 3D).
Plotting chart data
How Quattro Pro plots data depends on the range and values of the cells you select before you create the chart.
When a selection contains more rows than columns or an equal number of rows and columns:
• Quattro Pro plots each column as a single series.
• If the first column contains labels, the labels are placed along the x-axis.
• If the first row contains labels, the labels are used as the chart legend.
When a selection contains more columns than rows:
• Quattro Pro plots each row as a single series.
• If the first row contains labels, the labels are placed along the x-axis.
• If the first column contains labels, the labels are used as the chart legend.
Setting up chart axes
All charts except pie and doughnut charts have two references for plotting data: the x-axis and the y-axis. The x-axis is a horizontal line at the bottom of the chart pane with fixed reference points; the column labels in your data series are used for x-axis labels to explain what each data series represents. Y-axis labels show the values being represented. Depending on the data series, Quattro Pro determines the range and increment amounts of the y-axis.
There are a few exceptions to this format:
• Horizontal charts have a vertical x-axis and a horizontal y-axis. Quattro Pro reverses the axes of horizontal charts automatically.
• In XY charts (scatter diagrams), the x-axis series is data, not labels. Quattro Pro scales the x-axis to match the data.
• If the chart is a 2D bar, line, or area chart, you can assign any series to a secondary y-axis, which appears on the right side of the chart.
Part Three: Quattro Pro 177
Creating charts automatically
Creating a chart lets you represent spreadsheet data graphically. You can create a chart automatically and have all the chart options chosen for you, or you can create a chart by using the Chart Expert, which guides you through the steps of creating a chart that best suits a data set.
For information about creating specific types of charts, please see “Presenting spreadsheet data in a chart” in the Quattro Pro Help.
To create a chart automatically
1 Select the cells you want to plot.
If the surrounding cells contain explanatory labels, you can include them in the selection as the chart axis labels or the chart legend.
2 Click the Chart button on the toolbar, and choose Create QuickChart™.
3 On the spreadsheet, click where you want to insert the chart.
When you create a chart automatically, it is placed on the spreadsheet in a floating graphics window; however, you can view it on its own page.
If you want to customize the size of the chart, click and drag diagonally on the spreadsheet.
If the cells you select contain dates, you can display the dates on the x or y axes by changing the numeric format to Date.
To create a chart by using the Chart Expert
1 Click Insert Chart Use Chart Expert.
2 Follow the steps of the Expert.
Adding titles to charts
You can add a title for any numeric chart type.
To add a title to a chart
1 Click a chart.
2 Click Chart Titles.
3 Enable the Main title check box, and type a title in the box.
Adding linked data to charts
You can display the data from linked cells on a chart. This is useful when you use a chart type that shows information
You can also
Add a subtitle Enable the Subtitle check box, and type a subtitle in the box.
178 Charts

that lacks specific numeric content (for example, in a surface chart). If you select multiple cells, a linked picture of them appears on the chart. If you select a single cell, the data in that cell displays on the chart (for example, the number in the cell). The cells in the chart update with any changes you make to the data or properties of the notebook cells.
To add linked data to a chart
1 Double-click a chart.
2 Click Insert Link to cells.
3 Click and drag a rectangle on the chart where you want the data to appear.
4 Click the Pointer button next to the Select cells box in the Link cells dialog box, then choose the cell or group of cells you want to display.
5 Enable one or both of the following check boxes in the Border options section:
• Row borders
• Column borders
6 Enable one or both of the following check boxes in the Grid lines section:
• Horizontal
• Vertical
7 Enable the Maintain aspect ratio check box in the Display scaling section to match the same aspect ratio used on the notebook.
Part Three: Quattro Pro 179


Sharing Quattro Pro projects
In this chapter:
• Printing Quattro Pro projects on page 181
• Publishing Quattro Pro projects to PDF on page 181
• Publishing spreadsheet data in HTML on page 182
For additional topics, please see “Printing” and “Sharing projects” in the Quattro Pro Help.
Printing Quattro Pro projects
Quattro Pro lets you print part of a notebook, or an entire notebook.
To print the active spreadsheet or a notebook
1 Click File Print.
2 On the the Print page, choose a printer from the Name box.
3 In the Print area, enable one of the following options:
• Current sheet — prints the active spreadsheet
• Notebook — prints a notebook
4 In the Copies area, type the number of copies you want to print in the Number of copies box.
If you want the copies collated, enable the Collate option.
5 Click Print.
Publishing Quattro Pro projects to PDF
Quattro Pro lets you publish to PDF.
To publish to PDF
1 Click File Publish to PDF.
2 Choose the drive and folder where you want to save the file.
3 Type a filename in the File name box.
4 From the PDF style list box, choose one of the following options:
• Commercial printing (Largest file size) — creates a high-quality PDF to send to a printer or digital copier
• PDF/A-1b (Level B compliance) — creates a standardized PDF file that ensures the long-term archiving of the content
• Publishing online (Smallest file size) — creates a PDF suitable for online viewing, such as a document to be distributed by e-mail or displayed on the Web
• Publishing online and printing — creates a PDF suitable for viewing or printing on a laser or desktop printer
5 Click Settings, and specify any additional PDF settings in the Publish to PDF settings dialog box that appears.
For example, if you want to publish only parts of the spreadsheet to PDF, you can enable one of the following options in the Export range area of the General page:
Part Three: Quattro Pro 181

• Notebook — publishes the notebook to PDF
• Selection — publishes the selected cells to PDF
• Current sheet — publishes the selected sheet to PDF
Click OK to apply your settings and return to the Publish to PDF dialog box.
6 Click Save.
If you do not want the PDF file to open automatically after it is saved, disable the Open PDF after saving check box.
Publishing spreadsheet data in HTML
Using Quattro Pro, you can save spreadsheet ranges as Hypertext Markup Language (HTML) documents. You can also save charts as HTML documents. In addition, you can reorganize HTML documents to move or delete cell ranges.
To an HTML document you can add such information as when the document was last updated, who wrote the document and their email address, and the title of the document. You can also add hidden meta text to the HTML file which allows you to specify keywords to produce hits when performing searches on the Internet.
To save a spreadsheet range as an HTML document
1 Click File Publish to Internet.
2 In the Ranges and charts to convert area, click the Range picker and select a range of cells.
3 Click Add.
4 In the Export range as area, enable one of the following options:
• Table — exports HTML table formatting tags
• Text — exports only text, excluding HTML table formatting tags
5 Type a path and filename in the Save file box.
To save a table or chart as an HTML document
1 Click File Publish to Internet.
2 In the Ranges and charts to convert area, click Chart .
3 In the View chart dialog box, choose a chart from the Selected chart list.
4 Type a path and filename in the Save file box.
If you want to save tables or charts in an existing HTML file, enable the Insert only tables and charts into existing HTML file check box.
When using Insert only tables and charts into existing HTML file, the selected ranges are inserted into the file specified in the Save file box at the <!- -## TABLE ##- - > tag if the file contains an HTML table, or at the <!- -## CHART## - - > tag if the file contains an HTML chart. If the specified file does not contain a <!- -## TABLE ##- -> or <!- - ## CHART ##- -> tag, the selected ranges are appended to the end of the file.
182 Sharing Quattro Pro projects

Part Four: Presentations
Presentations lets you create high-quality slide shows and drawings that can include text and graphic objects. You can use Presentations to produce professional-looking project proposals, interactive demonstrations, multimedia presentations, flyers, signs, banners, and more.
About Presentations
See the following chapters:
• Presentations basics on page 185
• Microsoft PowerPoint compatibility on page 187
Setting up slide shows
See the following chapters:
• Slide-show basics on page 189
• Views on page 191
• Outlines on page 193
• Slides on page 195
• Masters on page 197
• Objects on page 201
Text
See the following chapters:
• Text basics on page 207
• Titles and subtitles on page 213
• Bulleted lists on page 217
Multimedia
• Graphics on page 221
• Bitmaps on page 223
• Shapes on page 227
• Sounds on page 231
• Movies and animations on page 233
Sharing slide shows
See the following chapters:
• Presenting slide shows on page 235
• Sharing slide shows on page 239
The Presentations page of the Reference Center offers extensive program help: reference topics, tutorials, tips, insights, and more. See To access the Reference Center on page 5.
Part Four: Presentations 183


Presentations basics
The work area in Presentations includes everything you see on your screen when you start the program.
Drawing window
The large open area is the drawing window. Depending on the view you choose, the drawing window displays one or more slides.
For information about changing the settings for your view, see Views on page 191.
Menu bar
The menu bar, which is located at the top of the work area, just below the title bar, provides access to most of the Presentations commands. Many of these commands can also be accessed through toolbars and flyouts.
Toolbars and flyouts
Toolbars and flyouts give you quick access to Presentations tools.
In this chapter:
• “Using toolbars”
• Accessing flyouts on page 185
Using toolbars
Toolbars provide quick, one-click access to commands. You can choose to display or hide the toolbars.
The Standard toolbar is displayed by default in the drawing window.
To display or hide a toolbar
1 Click View Toolbars.
2 Enable the check box beside each toolbar you want to display.
3 Disable the check box beside each toolbar you want to hide.
Accessing flyouts
Flyouts are toolbars that are accessible from a tool on another toolbar.
This is an example of a flyout.
A small black arrow at the bottom right corner of a tool button indicates that you can access a flyout from that tool.
Part Four: Presentations 185

To display a flyout
• Click the black arrow at the bottom-right of the tool button.
You can also display a flyout by clicking the tool and holding the mouse button down until the flyout is displayed.
186 Presentations basics

Microsoft PowerPoint compatibility
In this chapter:
• Simulating the Microsoft PowerPoint workspace on page 187
• Sharing files with Microsoft PowerPoint users on page 187
For additional topics, please see “Compatibility with Microsoft PowerPoint” in the Presentations Help.
Simulating the Microsoft PowerPoint workspace
If you recently switched from Microsoft® PowerPoint® to Presentations, you may not be familiar with the Presentations workspace.
While there are many similarities between the two applications, you may find it easier to simulate the PowerPoint workspace while in slide show mode, which includes toolbars and menus, until you are accustomed to working in Presentations. It allows you to quickly find the tools you need to create slide shows in Presentations.
To work in the Microsoft PowerPoint workspace
1 In Presentation slide show mode, click Tools Workspace manager.
2 Enable the PowerPoint mode option.
Sharing files with Microsoft PowerPoint users
You can share your Presentations slide shows with Microsoft PowerPoint users and they can share their files with you. To share a Presentations slide show, you must save it as a PowerPoint file. The saving process automatically converts the slide show to the PowerPoint format.
If you receive a PowerPoint file, all you need to do is open it in Presentations. The opening process automatically converts the file to the Presentations format. If you modify the file and you want others to view the changes in PowerPoint, then you need to save the file as a PowerPoint presentation. If you don’t specify the PowerPoint format when saving, the file is saved as a Presentations slide show by default.
To open a Microsoft PowerPoint with Presentations
1 Click File Open.
2 Choose the drive and folder where the PowerPoint file is stored.
If you can’t see the file, choose All files from the File type box.
3 Click the PowerPoint file.
4 Click Open.
For more information about how Presentations opens PowerPoint files, see “Notes for opening Microsoft PowerPoint files” in the Presentations Help.
To save a Presentations slide show to the PowerPoint format
1 Click File Save as.
Part Four: Presentations 187

2 Choose the drive and folder where you want to save the file.
3 Type the filename in the Filename box.
4 Choose the MS PowerPoint file format from the File type list box.
5 Click Save.
For more information about how Presentations saves PowerPoint files, see “Notes for saving Microsoft PowerPoint files” in the Presentations Help.
You can also save a Presentations slide show to the PowerPoint format by clicking the Save as PowerPoint button on the toolbar.
188 Microsoft PowerPoint compatibility

Slide-show basics
In this chapter:
• Starting Presentations on page 189
• Creating and opening slide shows on page 189
• Saving and closing slide shows on page 190
Starting Presentations
Let’s begin by starting Presentations.
To start Presentations
• On the Windows taskbar, click Start Programs WordPerfect Office Presentations.
Creating and opening slide shows
You can create a slide show from either a blank “master” or a predefined project. You can also open an existing slide show.
To create a slide show from a blank master
1 Click File New.
2 In the Master Gallery, choose a slide show from the Category list box.
3 Click a slide show master on the palette.
For more information, see Understanding masters on page 197.
To create a slide show from a predefined project
1 Click File New from project.
2 Click the Create new tab.
3 Choose Presentations from the list box.
4 Choose Presentations slide show from the list.
5 Click Create.
6 In the Master Gallery, choose a slide show from the Category list box.
7 Click a slide show master on the palette.
To open an existing slide show
1 Click File Open.
2 Choose the drive and folder where the slide show is saved.
3 Choose a filename.
4 Click Open.
Part Four: Presentations 189

Saving and closing slide shows
You can save new slide shows.When you have completed your tasks, you can close a document, and you can quit Presentations.
To save a slide show
1 Click File Save.
2 Choose the drive and folder where you want to save the file.
3 Type a filename in the Filename box.
4 Click Save.
To close a slide show
• Click File Close.
You can also
Quit Presentations Click File Exit.
190 Slide-show basics

Views
You can create, edit, and sort a slide show in three views: Slide Editor, Slide Outliner, and Slide Sorter.
You can also change the zoom level.
Slide Editor
You can use the Slide Editor to add, view, and edit the text, objects, and charts of individual slides. The Slide Editor is also used to specify slide properties for the slides in a slide show.
Slide Outliner
You can use the Slide Outliner to create an outline for a slide show. You can specify a layout, and then type the text for each slide. You can also import a WordPerfect outline.
For more information about the Slide Outliner, see Outlines on page 193.
An example of a slide displayed in the Slide Outliner.
Slide Sorter
The Slide Sorter displays thumbnail sketches of each slide in a slide show. You can select slide properties and display detailed information about the settings used for each slide in the current slide show.
For more information about the Slide Sorter, see Sorting slides on page 195.
An example of slides displayed in the Slide Sorter.
To switch between slide show views
• Click View, and click one of the following:
• Slide Editor
• Slide Outliner
• Slide Sorter
You can also change the slide show view by clicking the Slide Editor, Slide Outliner, or Slide Sorter tab on the right side of the slide show window.
Part Four: Presentations 191

To change the zoom level
To Do the following
Select a preset zoom level Click View Zoom. Enable a magnification level option.
Select a custom zoom level Click View Zoom. Type a zoom level in the Other box.
Return to the previous view Click Zoom options on the toolbar, and then click Previous view.
192 Views

Outlines
You create an outline for a slide show in the Slide Outliner. An outline is a numbered list that includes all the text found in every slide in a slide show.
You can create an outline by choosing a slide layout and typing the text for each slide. You can type the text for slide titles, subtitles, text slides, bulleted list slides, and combination slides.
This is an example of how the Slide Outliner can be used to view and create a slide.
Importing a WordPerfect outline into a Presentations slide show converts each first level paragraph number to a slide title and any second or third level paragraph numbers to text in each slide.
To create a slide show outline
1 Click View Slide Outliner.
2 Type a title in the slide show, and press Enter.
3 Type a subtitle in the slide show, and press Enter.
4 Type any text in the slide show.
5 Click Insert New slide.
6 In the New slide dialog box, click a slide layout on the Layout palette.
If you delete text, you can restore it by clicking the Undelete button on the property bar, and clicking Restore.
You can move an outline down or up one level by clicking the Previous level button or the Next level button on the property bar.
To import a WordPerfect outline
1 Click View Slide Outliner.
2 Click in the slide.
3 Click Insert File.
4 Choose the drive and folder where the file is stored.
5 Choose a filename.
6 Click Insert.
Part Four: Presentations 193

194 Outlines

Slides
In this chapter:
• Adding and removing slides on page 195
• Adding speaker notes on page 195
• Sorting slides on page 195
Adding and removing slides
You can build a slide show by adding one slide or several slides at a time. When you add a slide, it’s added immediately after the current slide. You can also delete any slides you have added.
To add a slide
1 Click Insert New slide.
2 Click a slide layout on the Layout palette.
3 Type a value in the Number to add box.
To delete a slide
1 Click a slide tab at the bottom of the slide show window.
2 Click Edit Delete slide(s).
Adding speaker notes
You can use speaker notes as cue cards for slide show presentations. You can type your own notes, or you can insert the text that appears on the slides.
To create speaker notes
1 Click Format Slide properties Speaker notes.
2 Type text in the box.
To insert text from a slide
1 Click Format Slide properties Speaker notes.
2 Click Insert text from slide.
Sorting slides
The Slide Sorter displays thumbnail sketches of each slide in a slide show. You can sort the slides in a slide show by dragging them. Once you drag a slide to a new position, the Slide Sorter reorders and renumbers each slide.
Part Four: Presentations 195

This is an example of how the Slide Sorter lets you rearrange the order of slides in a slide show.
To sort slides
1 Click View Slide Sorter.
2 Drag a slide to a new position.
You can also
Sort a range of slides Hold down Shift, click the first and last slide in the range of slides, and drag them to a new position.
Sort a range of nonconsecutive slides Hold down Ctrl, click each slide, and drag them to a new position.
196 Slides

Masters
In this chapter:
• Understanding masters on page 197
• Applying masters to slides on page 198
• Applying backgrounds and layouts to slides on page 198
For additional topics, please see “Using the Master Gallery” in the Presentations Help.
Understanding masters
Presentations provides a selection of masters to work with in the Master Gallery.
Each master is a set of professionally designed slide layouts and backgrounds that include preset objects, such as titles, bulleted lists, and charts.
This is an example of the Master Gallery.
Layouts
A layout is a slide with preset placeholders for objects such as titles, subtitles, bulleted lists, text, data charts, and organization charts. Each layout has a page format and color scheme that is consistent with the other layouts and backgrounds that are part of a master.
You can apply preset layouts from the Layout Gallery. Choosing a preset layout allows you to concentrate on the content of the slide show, rather than on the format.
The preset layouts included in Presentations are listed in the following table.
Use a To
Title layout Introduce your subject or to serve as a divider between subjects.
Bulleted list layout Summarize and reinforce major points.
Text layout Display sentences or paragraphs of text on a slide.
Organization chart layout Show the structure of positions and span of control in a business, department, agency, group, division, or office.
Data chart layout Display percentages, trends, market shares, and relational information.
Combination layout Display a bulleted list and a data chart on a slide.
Part Four: Presentations 197

Backgrounds
A background can include a border, a gradient background, and other related images.
You can apply preset backgrounds from the Background Gallery.
Applying masters to slides
Presentations provides a collection of masters in the Master Gallery.
The masters in the Master Gallery are grouped into categories. You can use a master provided with Presentations in the Master Gallery.
You can also import a master from another location on your computer.
To use a master in the Master Gallery
1 Click Format Master gallery.
2 Choose a slide show category from the Category list box.
3 Click a master on the palette.
You can also choose a master from the Master Gallery by clicking the Master gallery button on the toolbar.
To import a master from another location
1 Click Format Master gallery.
2 Click Browse button.
3 Choose the drive and folder where the master is stored.
4 Choose a filename.
5 Click Insert.
Applying backgrounds and layouts to slides
When you add a new slide to a slide show, you can apply preset backgrounds and layouts from the Background Gallery and the Layout Gallery.
For example, if you want a slideshow with a grayscale or black-and-white look, you can choose one of the printout masters available in the Master Gallery category list.
To apply a background to a slide
1 Click Format Background gallery.
2 Click the Appearance tab.
3 In the Backgrounds area, choose a background category from the Category list box.
4 Click a background on the Background palette.
If you want to apply the background to all slides in the slide show, enable the Apply selected background to all slides in slide show check box.
198 Masters

You can add up to 30 different backgrounds to a slide show.
You can also apply a background that is not in the Category list box by clicking Browse and choosing the drive and folder where the background is stored. For example, you can apply clipart as a background.
To apply a layout to a slide
1 Click Format Layout gallery.
2 Click the Appearance tab.
3 Click a layout on the Layouts palette.
You can add up to 30 different layouts to a slide show.
You can also apply a layout to a slide by opening the Select layout picker and clicking a layout.
4 In Windows Explorer or File Explorer, copy the new master file you created and navigate to
• Widescreen
Part Four: Presentations 199


Objects
All of the elements that you add to slides — including text, clipart, shapes, charts, and bitmaps — are treated as objects in Presentations.
In this chapter:
• Selecting objects on page 201
• Copying and pasting objects on page 201
• Transforming objects on page 202
• Arranging objects on page 203
• Creating SpeedLink objects on page 204
• Animating objects on page 204
For additional topics, please see “Working with objects in slide shows and drawings” in the Presentations Help.
Selecting objects
You must select an object before you can arrange, edit, or move it.
To select an object
Copying and pasting objects
You can copy an object into another slide or drawing.
To copy an object
1 Click an object.
2 Click Edit, and click one of the following:
• Cut — removes the object from the drawing or slide show window
• Copy — leaves the original object in the drawing or slide show window
You can also copy object attributes by clicking the Get attributes button on the toolbar.
To select Do the following
An object Click an object using the Selection tool.
Multiple objects Hold down Ctrl, and click the objects using the Selection
tool.
All objects in a window or slide Click Edit Select All.
Objects automatically when they are created Click View Auto select.
Part Four: Presentations 201

To paste an object
• Click Edit Paste.
You can paste only one object at a time.
You can also apply copied attributes by clicking the Apply attributes button on the toolbar.
Transforming objects
You can resize objects in slides or drawings by sizing and stretching them.
You can also flip, rotate, and skew objects in the drawing window.
To size an object proportionately
1 Click an object.
2 Drag a corner handle until the object is the size you want.
You can also size an object proportionately by holding down Alt while dragging any handle until the object is the size you want.
To stretch an object
1 Click an object.
2 Drag a side handle until you achieve the effect you want.
To flip an object
1 Click an object.
2 Click Edit Arrange Flip, and click one of the following:
• Left/Right — flips the selected object around a vertical axis
• Top/Bottom — flips the selected object around a horizontal axis
You can also flip an object by opening the Flip picker on the property bar and clicking a direction.
To rotate an object
1 Click an object.
2 Click Edit Arrange Rotate.
3 Drag a corner rotation handle.
You can also rotate an object by opening the Rotation options picker on the property bar and clicking a rotation angle.
To skew an object
1 Click an object.
2 Click Edit Arrange Rotate.
202 Objects

3 Drag a side rotation handle.
Arranging objects
You can arrange the layering of objects on slides.
As well, you can combine and group objects. You can also separate the layering of any of the combined or grouped objects on slides.
You can align a single object relative to the drawing page margins and multiple objects in relation to one another.
As well, you can evenly space three or more objects in relation to each other.
To arrange objects
1 Click an object.
2 Click Edit Arrange Order, and click a direction.
You can also arrange the order of objects by opening the Order picker on the property bar and clicking a direction.
To combine objects
1 Hold down Ctrl, and click the objects you want to combine.
2 Click Edit Arrange Combine.
You cannot combine bitmaps, text, or charts.
To group objects
1 Hold down Shift, and click the objects you want to group.
2 Click Edit Arrange Group.
If you group an object that contains a SpeedLink™ or animation, these features will be removed.
To separate objects
1 Click a grouped object.
2 Click Edit Arrange Separate objects.
To align an object
1 Click an object.
To align two or more objects at the same time, hold down Shift while clicking.
2 Click Edit Arrange Align objects, and click a direction.
You can also align an object by opening the Align picker on the property bar and clicking a direction.
You can nudge an object by selecting it, holding down Spacebar, and pressing the arrow keys in the direction you want to nudge it.
Part Four: Presentations 203

To space objects
1 Hold down Shift, and click three or more objects.
2 Click Edit Arrange Space evenly, and click one of the following:
• Left/Right — spaces objects horizontally
• Top/Bottom — spaces objects vertically
You can also space objects evenly by opening the Space picker on the property bar and clicking a direction.
Creating SpeedLink objects
You can create SpeedLink objects for slide shows, which allows you to do such things as optimize an object to launch a Web browser and go to a specific Web address or FTP site, open an application, such as WordPerfect or Quattro Pro, play a sound file, and move to another part of the slide show.
To create a SpeedLink object
1 Click an object.
2 Click Format Object properties SpeedLink.
3 Type a name in the SpeedLink name box.
If you want to make the SpeedLink object invisible, enable the Invisible while playing or printing slides check box.
4 In the Link assignment area, enable one of the following options:
• Go to — from a list box, lets you choose a slide that displays when you click the SpeedLink object during a slide show
• Action — from a list box, lets you choose the action that occurs when you click the SpeedLink object during a slide show
The cursor displays when you position it where the SpeedLink is located, even if the SpeedLink is invisible.
Animating objects
Objects or multiple objects can have animation effects applied to them.
To animate an object
1 Click an object.
To animate multiple objects, hold down Shift while clicking.
2 Click Format Object properties Object animation.
3 In the Animation type area, enable one of the following options:
• Animate object in place — animates the object in place on the slide
• Animate object across screen — animates the object by moving it across the slide
If you want to show animation in Flash format, enable the Show only Flash-enabled transitions check box.
4 Choose an animation effect from the Effects list.
5 Choose an animation direction from the Direction list.
204 Objects

6 In the Speed area, enable one of the following options:
• Fast
• Medium
• Slow
Part Four: Presentations 205


Text basics
In this chapter:
• Text objects on page 207
• Text formatting on page 208
• Text arrangement on page 209
• Text correction on page 210
For additional topics, please see “Adding and formatting text in slide shows and drawings” in the Presentations Help.
Text objects
You can create text objects by inserting text boxes and text lines. Text boxes expand in length and text lines expand in width to contain text as you type.
You can adjust the position of text in a text box. You can also move individual characters or blocks of text, and you can delete them.
To insert a text box
1 Click Insert Text box.
You can also click the Text box button on the tool palette.
2 Drag to define the text box.
You can also click in the slide show or drawing window.
3 Type text in the text box.
To insert a line of text
1 Click Insert Text line.
2 Click in the slide show or drawing window.
3 Type text.
To position text in a text box
1 Double-click a text box.
2 Click at the beginning of the text.
3 Click Format Line, and click one of the following:
• Center — centers text
• Flush right — positions text to the right
To move text
1 Double-click a text object.
2 Select the text.
Part Four: Presentations 207

3 Drag the selected text to a new position inside the selected text object.
To delete text
1 Double-click a text object.
2 Select the text.
3 Click Edit Delete.
Text formatting
You can use Corel RealTime Preview to view different font styles, sizes, and colors before you apply them to your text.
You can also format text by setting text attributes.
To preview and apply font properties
1 Double-click a text object.
2 Open the Font selection list box on the property bar, and point to a font.
The text object changes to display the font to which you’re pointing. Choose a font from the Font selection list box to apply it.
3 Open the Font size list box on the property bar, and point to a font.
The text object changes to display the font size to which you’re pointing. Choose a font from the Font size list box to apply it.
4 On the tool palette, open any of the following pickers:
• Fill pattern
• Foreground fill color
• Background fill color
Point to a pattern or color. When you pause on a color, the text in the text object displays a preview of the font color. Click a pattern or color to apply it.
To set font properties
1 Double-click a text object.
2 Select the text.
3 Click Format Font.
4 Click the Font tab.
5 Choose a font from the Face list.
You can also
Change the appearance of text In the Appearance area, enable the Bold, Italic, or Underline check box.
Change the font size Choose a font size from the Size list box.
Change the font size relative to the current size Click the Relative size picker, and click a size.
208 Text basics

You can view a list of available attributes for each font by clicking the plus sign (+) to the left of the font.
You can also change the appearance of text by clicking the Bold button, the Italic button, or the Underline button on the property bar.
Text arrangement
You can format text and text objects by adjusting the spacing between lines of text. You can also set text alignment by positioning text to the left, right, or center in relation to the sides of a text box.
You can also indent lines or paragraphs of text. You can remove any indents from text.
To set the line spacing
1 Click a text box.
2 Click Format Line Spacing.
3 Type a number in the Spacing box.
To set text alignment
1 Click a text box.
2 Click Format Justification, and click one of the following:
• Left — aligns text to the left
• Right — aligns text to the right
• Center — aligns text to the center
You can also justify text by opening the Justification picker on the property bar and clicking an alignment.
To indent text
1 Double-click a text box.
2 Click at the beginning of a line of text.
3 Click Format Paragraph, and click one of the following:
• Indent — indents the left margin of the paragraph by one tab stop
• Hanging indent — indents all but the first line of the paragraph by one tab stop
• Double indent — indents the paragraph equally from both sides
To remove an indent from text
1 Double-click a text box.
2 Click at the beginning of the line of indented text.
Change the font color Open the Color picker, and click a color.
Restore the text appearance Right-click the selected text, and click Normal.
You can also
Part Four: Presentations 209

3 Click Format Paragraph Back tab.
Text correction
You can find and replace text by searching for specific words or phrases and replacing them with other words or phrases.
You can display the text formatting codes that correspond to the line of text where the cursor is located. The codes appear in the lower-right corner of the application bar.
You can automatically correct spelling, capitalization, or spacing errors as you type.
To find and replace text
1 Double-click a text object.
To find and replace text by using the Slide Outliner, click View Slide Outliner.
2 Click Edit Find and replace.
3 Type text in the Find box.
4 Type replacement text in the Replace with box.
5 Choose a direction from the Direction list box.
6 Click one of the following:
• Replace — replaces the selected occurrence of the text
• Replace all — replaces all occurrences of the text
To display text formatting codes
1 Double-click a text object.
2 Click View Reveal Codes.
To correct words automatically as you type
1 Click Tools QuickCorrect.
2 Enable the Replace words as you type check box.
3 Click Close.
To correct capitalization and spacing automatically
1 Click Tools QuickCorrect.
2 Click Options.
3 In the Sentence corrections area, enable any of the following check boxes:
• Capitalize next letter after end of sentence punctuation
• Correct two irregular capitals (make second letter lowercase)
• Change two spaces to one space between words
In the End of sentence corrections area, you can specify how spaces between sentences are handled.
210 Text basics

In the Select quotation marks area, you can specify how quotation marks are formatted.
Part Four: Presentations 211


Titles and subtitles
In Presentations, when slides with layouts are inserted into a slide show, they are automatically created with placeholders for titles and subtitles.
In this chapter:
• Formatting titles and subtitles on page 213
• Changing the line spacing in titles and subtitles on page 214
• Adding boxes to titles and subtitles on page 214
For additional topics, please see “Working with titles and subtitles in Presentations” in the Presentations Help.
Formatting titles and subtitles
You can format the appearance of a title or subtitle by changing such attributes as the font, the font size, and the color. You can also change the font fill of a title or subtitle.
To change the font properties of a title or subtitle
1 Click a title or subtitle.
2 Click Format, and click one of the following:
• Title properties
• Subtitle properties
3 Click the Fonts tab.
4 Choose a font from the Font face list box.
5 Type a value in the Size box.
6 In the Appearance area, enable any of the following check boxes:
• Bold
• Underline
• Italic
7 In the Color area, open the Foreground picker, and click a color.
8 Open the Background picker, and click a color.
The background color is visible only if a font fill style other than the default is selected.
You can also format the appearance of a subtitle by clicking the Subtitle properties button on the property bar.
To change the font fill of a title or subtitle
1 Follow steps 1 through 3 in the previous procedure.
2 In the Appearance area, click Font properties.
3 In the Font properties dialog box, click the Fill tab.
4 In the Fill style area, click one of the following:
Part Four: Presentations 213

• Pattern
• Gradient
5 Open the Foreground picker, and click a color.
6 Open the Background picker, and click a color.
7 Click a fill style on the palette.
To change the font outline of a title or subtitle
1 Follow steps 1 and 2 in the previous procedure.
2 In the Font properties dialog box, click the Outline tab.
3 Open the Color picker, and click a color.
4 Open the Style picker, and click a line style.
5 Open the Width picker, and click a line width.
Changing the line spacing in titles and subtitles
You can specify the amount of space between the lines of text in a title or subtitle.
To change the line spacing in a title or subtitle
1 Click a title or subtitle.
2 Click Format, and click one of the following:
• Title properties
• Subtitle properties
3 Click the Spacing tab.
4 Type a value in the Line spacing box.
Adding boxes to titles and subtitles
You can add a box to a title or subtitle and choose its position, shape, and color. You can then apply pattern or gradient fills to the box to, for example, emphasize certain points in your presentation.
As well, you can apply texture or picture fills, including custom made fills, to a box.
To add a box to a title or subtitle
1 Click a title or subtitle.
2 Click Format, and click one of the following:
• Title properties
• Subtitle properties
3 Click the Box tab.
4 In the Position area, enable one of the following options:
• Above
214 Titles and subtitles
• Below
• Above and below
• Behind
5 In the Corner style area, enable one of the following options:
• Rectangle
• Rounded rectangle
• Octagon
6 In the Frame style area, choose a frame from the Type list box.
7 Open the Color picker, and click a color.
To apply a pattern or gradient fill to a title or subtitle box
1 Click a title or subtitle.
2 Click Format, and click one of the following:
• Title properties
• Subtitle properties
3 Click the Box tab.
4 In the Fill style and color area, click Properties.
5 In the Object properties dialog box, click one of the following icons:
• Pattern
• Gradient
6 Open the Foreground picker, and click a color.
7 Open the Background picker, and click a color.
8 Click a pattern or gradient on the palette.
To apply a texture or picture fill to a title or subtitle box
1 Follow steps 1 through 4 in the previous procedure.
2 In the Object properties dialog box, click one of the following icons:
• Texture
• Picture
3 Choose a texture or picture from the Category list box.
4 Click a texture or picture on the palette.
Part Four: Presentations 215


Bulleted lists
You can create bulleted lists in Presentations to effectively communicate sequential ideas within drawings and slide shows.
This is an example of a bulleted list.
In this chapter:
• Creating bulleted lists on page 217
• Changing the appearance of text in bulleted lists on page 218
• Changing the appearance of bullets in bulleted lists on page 218
• Changing the line spacing in bulleted lists on page 219
• Animating bulleted lists on page 219
For additional topics, please see “Working with bulleted lists” in the Presentations Help.
Creating bulleted lists
Keep the following points in mind when you create any type of bulleted list:
• Express a single idea on each line.
• Avoid using more than six items in a list.
• Use nouns and action verbs to start sentences.
Levels can be created within these bulleted lists.
To create a bulleted list
1 Click Insert Bulleted list.
2 Click in the slide show or drawing window.
3 Type text on the bulleted line.
4 Press Enter.
If you want to create a new level within the list, press Tab.
5 Click outside the bulleted list to return to the slide show or drawing window.
To create a new level for a bulleted list item
1 Double-click a bulleted list.
2 Click at the beginning of a list item.
3 Press Tab. The item moves down one level.
Part Four: Presentations 217

To move the item up one level, press Shift + Tab.
Changing the appearance of text in bulleted lists
You can customize the appearance of text and bullets within a bulleted list, including the font size, color, and attributes of text, and the fill and outline of font. You can also change the alignment of a bulleted list level.
To change the font properties in a bulleted list level
1 Click a bulleted list.
2 Click Format Bulleted list properties.
3 Click the Fonts tab.
To change the alignment of a bulleted list level
1 Double-click a bulleted list.
2 Click Format Bulleted list properties.
3 Click the Bullets tab.
4 Choose a list level from the list.
5 Choose a position from the Justification list box.
Changing the appearance of bullets in bulleted lists
You can change the shape of a bullet, or use a different symbol for a bullet. You can also choose to change the bullet type for all list levels and resize a bullet.
To change the shape of a bullet
1 Click a bulleted list.
2 Click Format Bulleted list properties.
3 Click the Bullets tab.
4 Choose a list level from the list.
5 Choose a bullet shape from the Bullet shape list box.
To use a different symbol as a bullet
1 Follow steps 1 through 4 in the previous procedure.
2 Choose Other from the Bullet shape list box.
3 In the Symbols dialog box, click Set, and click a symbol set.
4 Click a symbol on the Symbols palette.
5 Click Insert and close.
218 Bulleted lists

To change the bullet type for all list levels
1 Click a bulleted list.
2 Click Format Bulleted list properties.
3 Click the Bullets tab.
4 Choose a bullet type from the Bullet set (all levels) list box.
To resize a bullet
1 Follow steps 1 through 3 in the previous procedure.
2 Choose a list level from the list.
3 Type a value in the Relative size box.
Relative bullet size is calculated in relation to the current bullet size.
Changing the line spacing in bulleted lists
You can change the amount of line spacing in a bulleted list. Spacing can be adjusted between the text on the same level, between each main bullet level, and between subordinate bullet levels.
To change the line spacing in a bulleted list
1 Click a bulleted list.
2 Click Format Bulleted list properties.
3 Click the Spacing tab.
Animating bulleted lists
You can use animation as a special effect to capture your audience’s attention and reinforce the points in your presentations. For example, you can animate list items so that they move across the screen or animate them in place.
To animate a bulleted list on a bulleted list slide
1 Click Insert New slide.
2 Click the Bulleted list layout on the Layout palette, and click OK.
3 Create the bulleted list, and click Format Bulleted list properties.
4 Click the Bullet animation tab.
Part Four: Presentations 219


Graphics
In this chapter:
• Understanding graphics formats on page 221
• Inserting graphics on page 221
See also “Working with graphics and pictures” in the Presentations Help.
Understanding graphics formats
The two main types of computer graphics are vector graphics and bitmaps.
Vector graphics
Vector graphics are made of lines and curves, and they are generated from mathematical descriptions that determine the position, length, and direction in which lines are drawn.
Vector graphics are ideal for logos and illustrations because they are resolution-independent and can be scaled to any size, or printed and displayed at any resolution, without losing detail and quality. In addition, you can produce sharp and crisp outlines with vector graphics.
Bitmaps
Bitmaps, also known as raster graphics, are composed of tiny squares called pixels. Each pixel is mapped to a location in an image and has numerical color values.
Bitmaps are excellent for photographs and digital paintings because they reproduce color gradations well. Bitmaps are resolution-dependent — that is, they represent a fixed number of pixels. While they look good at their actual size, they can appear jagged or lose image quality when scaled, or when displayed or printed at a resolution higher than their original resolution.
For help working with bitmaps, see Bitmaps on page 223.
Inserting graphics
Vector graphics, such as CorelDRAW (CDR) files, are ideal for use in slide shows.
You can, however, add bitmaps in formats such as Windows bitmap (BMP) or TIFF to slide shows. For best results:
• Don't compress bitmaps or you'll lose much of the image quality.
• Bitmaps should contain at least 256 colors.
• Bitmaps should have a minimum resolution of 96 dpi for screen, 150 dpi for print.
To insert a graphic from the Scrapbook
1 Click Insert Graphics/Pictures Clipart.
2 Click one of the following tabs:
• Clipart — vector graphics
• Photos — bitmaps
Part Four: Presentations 221

3 Choose a category from the list.
4 Click a graphic on the palette.
5 Click Insert.
6 Click Close.
To insert a graphic from a file
1 Click Insert Graphics/Pictures From file.
2 Choose the drive and folder where the file is stored.
3 Choose a file.
4 Click Insert.
222 Graphics

Bitmaps
In this chapter:
• Creating and saving bitmaps on page 223
• Modifying bitmaps on page 223
• Applying special effects to bitmaps on page 225
• Converting bitmaps and vector objects on page 225
Creating and saving bitmaps
You can create new, original bitmaps by using the Bitmap Editor.
To create a bitmap
1 Click Insert Graphics/Pictures Bitmap.
2 Drag to define the bitmap frame.
3 Use the bitmap tools in the Bitmap Editor to create a bitmap.
4 Click File Close Bitmap Editor.
To save a bitmap
1 Click a bitmap.
2 Click File Save as.
3 Enable the Selected items option.
4 Click OK.
5 In the Save dialog box, choose the drive and folder where you want to save the bitmap.
6 Type a name in the Filename box.
7 Choose a graphic type from the File type list box.
WordPerfect Graphic (WPG) is the default bitmap format.
8 Click Save.
9 In the Export dialog box, choose your desired settings.
Modifying bitmaps
Modifying bitmaps in Presentations can be done with precision. You can refine small details, make drastic changes, and intensify effects on the bitmap as a whole.
To select an area of a bitmap
1 Double-click a bitmap.
2 Click Edit Select area.
3 Drag to select an area of the bitmap.
Part Four: Presentations 223

To size the frame around a bitmap
Increasing the size of the frame around a bitmap does not alter the bitmap itself; however, moving any part of the bitmap outside of the resized frame will delete that part when you close the Bitmap Editor window and return to the drawing window.
To zoom in on a bitmap
1 Double-click a bitmap.
2 Click View Zoom.
A check mark beside Zoom indicates that you have zoomed in on the bitmap.
To erase parts of a bitmap
1 Double-click a bitmap.
2 Click Insert Eraser.
3 Click Format Brush.
4 In the Brush attributes dialog box, choose a brush shape from the Brush shape list box.
5 Type a value in the Brush width box.
6 Drag to erase any part of the bitmap.
When you erase parts of a bitmap, they are replaced with the transparent color that you specify.
You can also erase a selected area of a bitmap by clicking Edit Select area, dragging to select an area of a bitmap, and clicking Edit Erase selection.
To remove a bitmap
1 Double-click a bitmap.
2 Click Edit Clear.
To resample a bitmap
1 Click a bitmap.
2 Drag the handles to resize the bitmap.
3 Click Tools Resample bitmap.
4 Click Resample.
To Do the following
Size the frame around a bitmap Double-click the bitmap, and drag the side or corner handles to resize the frame.
Size the frame around a rotated or skewed bitmap Click Tools Convert to bitmap. Click OK. Double-click the bitmap, and drag the side or corner handles to resize the frame.
224 Bitmaps

Applying special effects to bitmaps
Presentations includes a variety of special effects for bitmaps.
To apply a special effect to a bitmap
1 Double-click a bitmap.
2 Click Edit Select area.
3 Drag to select an area of the bitmap.
4 Click Tools Special effects.
5 Enable one of the following options:
• Full image — applies the special effect to the entire bitmap
• Inside area — applies the special effect inside the selected area
• Outside area — applies the special effect outside the selected area
6 Choose a special effect from the Effects list.
Click Apply to preview the effect in the After window.
Converting bitmaps and vector objects
You can convert bitmaps to vector objects — or vector objects to bitmaps.
To convert a bitmap to a vector object
1 Click a bitmap.
2 Click Tools Trace bitmap.
To convert a vector object to a bitmap
1 Click a vector object.
2 Click Tools Convert to bitmap.
3 Click Convert.
Part Four: Presentations 225


Shapes
You can enhance Presentations slides and drawings with seven categories of preset shapes.
In this chapter:
• “Drawing shapes”
• Editing shapes on page 228
Drawing shapes
Line shapes can be everything from a simple line to a polyline. You can draw lines, polylines, and curves. You can also draw closed curves and Bezier curves.
Other shapes that you can draw include basic shapes, such as rectangles and diamonds; arrow shapes; flowchart shapes, such as connectors and processes; star shapes; callout shapes; and action shapes, such as volume buttons and transition buttons.
To draw a line
1 Click Insert Shape Line shapes, and click a line shape.
2 Drag to draw the line shape.
You can also draw a precise horizontal, vertical, or diagonal line shape by holding down Shift while dragging.
You can also draw line shapes by clicking the Line shapes button on the tool palette.
To draw a polyline
1 Click Insert Shape Line shapes, and click a polyline shape.
2 Drag to draw the polyline.
3 Double-click to complete the shape.
You can transform an elliptical arc polyline shape into a circle by double-clicking the shape with the Selection tool and moving an edit point to the inside of the arc.
To draw a curve
1 Click Insert Shape Line Shapes Curve.
2 Click once in the drawing or slide show window.
3 Drag to start the curved line.
4 Click to create the first section of the curve.
5 Drag to continue the curve.
6 Double-click to complete the curve.
To draw a closed curve
1 Click Insert Shape Line shapes Closed curve.
Part Four: Presentations 227

2 Click once in the drawing or slide show window.
3 Drag to start the curved shape.
4 Click to create the first section of the curve.
5 Continue to drag and click to create the curved shape you want.
6 Double-click to complete the closed curve.
To draw a Bezier curve
1 Click Insert Shape Line shapes Bezier.
2 For each section of the curve, click to start the curved line, and drag to curve the line in another direction.
3 Double-click to finish the curve.
The distance between the control points and the node determines the height or depth of the segment that you are drawing.
You can draw a cusp in the Bezier curve by dragging from the anchor point, sizing and curving the segment, then holding down Alt and dragging in the direction that you want the next curve. You can then release Alt and size and curve the next segment.
To draw a shape
1 Click Insert Shape, and click a shape in one of the following categories:
• Basic shapes
• Arrow shapes
• Flowchart shapes
• Star shapes
• Callout shapes
• Action shapes
If you want to draw a shape from the center, hold down Alt, and click where you want to create the center of the shape.
2 Drag diagonally to draw the shape.
For more information about creating action shapes, see Creating SpeedLink objects on page 204.
You can also create a shape with equal horizontal and vertical dimensions by holding down Alt + Shift as you draw the shape.
You can also draw shapes by clicking the Basic shapes button, the Arrow shapes button, the Flowchart shapes button, the Star shapes button, the Callout shapes button, or the Action shapes button on the tool palette.
Editing shapes
You can resize the shapes you add to slides and drawings by using a glyph.
You can also change the form, angle, or direction of a line or polyline by using the edit points.
228 Shapes

To size a shape by using a glyph
1 Click a shape.
2 Drag a glyph until the shape is the size you want.
To change the shape of a line or polyline
1 Click a line or polyline.
2 Click Edit Edit points.
3 Drag the edit points until the shape is the size you want.
Edit points are specific to lines and polylines. If you want to access the edit points of a shape other than a line or polyline, you must first convert the shape to a polygon.
To convert a shape to a polygon
1 Click a shape.
2 Click Tools Convert to polygon.
To change the shape of a polygon
1 Click a polygon.
2 Click Edit Edit points.
3 Drag any of the edit points.
When you edit a polygon, it does not maintain its standard size or proportions. The shape is treated as a series of lines or polylines instead of a preset shape.
Part Four: Presentations 229


Sounds
Once you have correctly installed and set up sound hardware on your computer, you can add Wave (WAV), MPEG-1 Audio Layer-3 (MP3), and Windows Media® Audio (WMA) sound files. You can also add Musical Instrument Digital Interface (MIDI) files to slides. You can add an entire CD track or only sections of a track to slides by choosing specific starting and stopping points.
If you have a microphone and an internal sound card that supports digital audio or an external sound device that supports digital audio, you can also record any sound and add it to your slides. For more information about recording and saving sounds, consult your operating system’s Help file.
To insert a sound or MIDI file into a slide
1 Click Insert Sound.
2 Click Browse beside one of the following boxes:
• Sound
• MIDI
3 Choose the drive and folder where the sound file is stored.
4 Type a filename in the Filename box.
5 Click Open.
You can only play one MIDI and one sound file at the same time. You cannot play two sound files of the same type simultaneously.
To get the best results from the MIDI files that are included with Presentations, make sure that your system is set up correctly for your sound card.
To add an entire CD track to a slide
1 Click Insert Sound.
2 Click Browse beside the CD box.
3 In the Slide CD — Audio dialog box, type a track description in the Description box.
4 Type the number of the CD track in the Track box.
To add part of a CD track to a slide
1 Follow the previous procedure.
2 Disable the From beginning check box.
3 In the Start location area, type a value in any of the following boxes:
• Minutes
• Seconds
• Frames
4 Disable the To end check box.
5 In the End location area, type a value in any of the following boxes:
• Minutes
Part Four: Presentations 231

• Seconds
• Frames
To record a sound file
1 Click Format Slide properties Sound.
2 Click Record.
3 In the Sound dialog box, click Record.
4 Click Stop when you finish recording.
232 Sounds

Movies and animations
You can add movies to slide shows in a variety of formats, including Moving Pictures Experts Group (.mpeg), Audio Video Interleaved (.avi), QuickTime® (.mov and .qt), and Animated GIF (.gif).
Certain movie-file types require installed drivers.
To add a movie file to a slide show
1 Click Insert Movie.
To insert an animated GIF, click Insert Animated GIF.
2 Choose the drive and folder where the file is stored.
If you want to save the movie within the slide show, enable the Save movie within slide show document check box.
3 Choose a file type from the File type list box.
If you are adding an animated GIF, the file type is chosen for you.
4 Type a filename in the Filename box.
5 Click Insert.
The file size of the slide show increases greatly.
To change a movie file in a slide show
1 Right-click the movie, and click Movie properties.
Alternatively, click the Movie properties button on the property bar.
2 Click Browse beside the Movie name box.
3 Choose the drive and folder where the file is stored.
4 Choose a file type from the File type list box.
5 Type a filename in the Filename box.
6 Click Insert.
To play a movie in a slide show
• Select the movie, and click View Play movie.
Alternatively, click the Play movie button on the property bar.
You can also
Apply a movie border to the slide show Choose a border type from the Movie border list box.
Display the control panel while playing a slide show Enable the Display control panel when playing show check box.
Save the movie file within the slide show Enable the Save movie within slide show document check box.
Play the movie continuously Enable the Loop the movie for continuous play check box.
Part Four: Presentations 233

You can also
Access play settings Right-click the movie, and click Movie properties.
You can also click the Movie properties button on the property bar.
Hide the movie when it is not playing Enable the Hide movie while not playing check box.
Set the movie to play only when clicked Enable the Play movie when clicked check box.
Set the movie to play automatically Enable the Play movie check box, and type a value in the Seconds after slide transition box.
234 Movies and animations

Presenting slide shows
In this chapter:
• Playing slide shows on page 235
• Increasing the speed of slide shows on page 236
• Using the slide highlighter on page 236
• Using a wireless presenter on page 237
You can also present slide shows by working from a print-out or a PDF file. For information, see Sharing slide shows on page 239.
Playing slide shows
There are different ways to play slide shows in Presentations.
You can play a slide show by manually controlling the display of each slide.
A slide show can also be played automatically, with each slide displayed in succession and where you can control the time delay between the display of each slide.
To check the appearance, transition, sound, and so on of a slide without playing the entire slide show, you can use QuickPlay™.
You can also play portable slide shows, which play on any computer that uses the Windows operating system, even if it doesn’t have Presentations installed. For information about creating portable slide shows, see “Creating and opening slide shows” in the Presentations Help.
You can also smooth out the appearance of text when playing slide shows. See “Enabling text smoothing” in the Presentations Help.
To play a slide show manually
1 Click View Play slide show.
2 Choose a slide from the Beginning slide list box.
If you want to play the slide show continuously, enable the Repeat slide show until you press “Esc” check box.
3 Click Play.
4 Click in the slide show window to advance to the next slide or animation.
If you want to return to the previous slide or animation, right-click the slide show window, and click Previous slide.
You can also play a slide show by clicking the Play slide show button on the toolbar.
You can also return to the previous slide or animation by pressing Page up.
To play a slide show automatically
1 Click Format Slide properties Display sequence.
2 In the Display next slide area, enable the After a delay of option.
Part Four: Presentations 235

3 Type a value in the Seconds box.
4 Enable the Apply to all slides in slide show check box.
The time delay begins the second the first slide displays on the screen.
Time delays also apply to animated images. For example, if you set a two-second time delay for a slide, the first animated object automatically displays two seconds after the slide appears. The next animated object follows two seconds later, and so on. Two seconds after the last animated object displays, the show advances to the next slide.
You can also apply a different time delay to each slide in a slide show by selecting an individual slide.
To play a slide show by using QuickPlay
1 Click a tab on the bottom of the slide show window.
2 Click the QuickPlay tab on the side of the slide show window.
3 Press Esc to stop playing the slide show.
When QuickPlay reaches the end of the show, it returns to the slide show window.
You can press F5 to start playing a slide show and Esc to stop the slide show.
Increasing the speed of slide shows
You can speed up the display of a slide show by creating a QuickShow.
When you create a QuickShow, each slide in the slide show is saved as a bitmap for quicker display. Slides from a QuickShow file display on the screen with the delay time you apply. For information about delay times, see To play a slide show automatically on page 235.
To increase the speed of a slide show
1 Click View Play slide show.
2 Click Create QuickShow.
3 Enable the Use QuickShow file check box.
If you change any part of a slide show, you must re-create the QuickShow file.
QuickShow files use more memory than regular slide show files, creating a larger file.
Using the slide highlighter
During a slide show, you can emphasize points by using the slide Highlighter to circle, underline, and mark objects on a slide. The highlighting remains on the screen until the show advances to the next slide. You can erase the highlighting at any time.
To use the slide highlighter while playing a slide show
1 Click View Play slide show.
236 Presenting slide shows

2 Open the Highlighter color picker, and click a color.
3 Open the Width picker, and click a highlighter width.
4 Click Play.
5 As the slide show plays, drag to highlight areas of each slide.
To erase highlighting on the current slide
• Right-click a slide, and click Erase highlighter.
Using a wireless presenter
The application offers support for wireless presenters that are configured to function as described in the following table.
Presenter button Shortcut Function
Start/Stop F5/Esc Lets you alternate between starting or stopping a slide show
Next Page Down Lets you advance to the next transition
Previous Page Up Lets you return to the previous slide
Part Four: Presentations 237


Sharing slide shows
In this chapter:
• Printing slide shows on page 239
• Publishing slide shows to PDF on page 240
For additional topics, please see “Printing” and “Sharing projects” in the Presentations Help.
Printing slide shows
Presentations offers a variety of options for printing your slide shows.
To print a slide show
1 Click File Print.
You can also click the Print button on the toolbar.
2 On the the Main page, choose a printer from the Name box.
3 In the Print range area, enable one of the following options:
• Full document — prints the entire file
• Current view — prints only the current page or slide
• Selected objects — prints a specific object in a slide or drawing
• Slides — prints only the specified slides
• Handouts — prints handouts
• Speaker notes — prints speaker notes
• Audience notes — prints audience notes
Type a value in the Number of slides per page box, if available.
4 In the Copies area, type the number of copies you want to print in the Number of copies box.
If you want the copies collated, enable the Collate option.
5 Click Print.
Part Four: Presentations 239
Publishing slide shows to PDF
Presentations lets you publish your slide shows to PDF.
To publish to PDF
1 Click File Publish to PDF.
2 Choose the drive and folder where you want to save the file.
3 Type a filename in the File name box.
4 From the PDF style list box, choose a PDF type.
5 Click Settings, and specify any additional PDF settings in the Publish to PDF settings dialog box that appears.
Click OK to apply your settings and return to the Publish to PDF dialog box.
6 Click Save.
If you do not want the PDF file to open automatically after it is saved, disable the Open PDF after saving check box.
240 Sharing slide shows

Part Five: Utilities
WordPerfect Office provides a vast array of supplementary tools that can help you accomplish specific tasks quickly and easily.
Certain utilities described in this section are available only in certain versions of WordPerfect Office. To compare versions, please visit WordPerfect.com.
WordPerfect Lightning
Corel® WordPerfect® Lightning™ allows you to view, create, and capture content in a variety of ways. For details, see page 243.
Address Book
The Address Book is an information center that lets you store personal and business contact information. For details, see page 246.
Conversion utility
The conversion utility lets you convert files in various formats to one of five WordPerfect file formats. For details, see page 249.
File-management tools
WordPerfect Office provides two file-management tools: WordPerfect Office file-management dialog boxes (or “enhanced file dialogs”), and QuickFinder™. For details, see page 251.
Equation Editor
Equation Editor lets you insert equations in WordPerfect and Presentations. For details, see page 254.
Scrapbook
Scrapbook is a graphics utility that lets you search for and insert clipart, photo, sound, and movie files in WordPerfect, Quattro Pro, and Presentations. For details, see page 256.
TextArt
TextArt™ lets you transform words into designs. You can use TextArt in WordPerfect, Quattro Pro, and Presentations. For details, see page 258.
Printing engine
The WordPerfect Office printing engine provides a variety of printing and page-setup options for WordPerfect (see page 115), Quattro Pro (see page 181), and Presentations (see page 239).
PerfectScript utility
The PerfectScript utility lets you automate tasks by creating PerfectScript macros. For details, see page 281.
Part Five: Utilities 241

Paradox
Certain versions of WordPerfect Office include Paradox, a powerful and easy-to-use relational database program that helps you organize, track, and retrieve information. For details, please see the Paradox Help.
Third-party software
Certain versions of WordPerfect Office also include third-party software. For details on any such programs, please refer to their documentation.
The Utilities page of the Reference Center offers extensive help for the utilities included with all versions of WordPerfect Office. See To access the Reference Center on page 5.
242 Part Five: Utilities

WordPerfect Lightning
WordPerfect Lightning lets you view, capture, and reuse information and images. With WordPerfect Lightning, you have the tools you need to work with others and to capture and fine-tune your ideas.
You can use WordPerfect Lightning to take notes or to view graphics, photos, or documents saved as Microsoft Word or WordPerfect files. When it’s time to polish your work, WordPerfect Lightning integrates seamlessly with WordPerfect and Microsoft Word.
In this chapter:
• Getting started on page 243
• Using the Navigator window on page 243
• Using the Notes window on page 244
• Using the Viewer window on page 245
Getting started
When you start WordPerfect Lightning, you’ll find the Navigator window. The Navigator lets you create, store, and organize your WordPerfect Lightning notes in a familiar tree structure.
The Notes window lets you capture your ideas and reuse information from other sources.
Finally, the Viewer window lets you view Microsoft Word, WordPerfect, and image files.
To start WordPerfect Lightning
• Click Start All Programs WordPerfect Office WordPerfect Lightning.
To quit WordPerfect Lightning, click the Close button.
Using the Navigator window
The Navigator is a folder-based application in which you can organize your notes and documents. It looks very much like an instant messaging window and provides a familiar tree structure.
From the Navigator window, you can
• create, store, and access WordPerfect Lightning notes
• print and e-mail WordPerfect Lightning notes
• capture images of documents and applications appearing on-screen
To create a note
• Click the New Note button.
When closed, notes are saved automatically to the active folder in the Navigator. To open a closed note, double-click it.
To print a note, right-click it, and choose Print.
Part Five: Utilities 243

To e-mail a note, right-click it, and choose Send to Mail Recipient.
To capture an image
1 Click the arrow beside the Snapshot button, and choose an option:
• Take Snapshot to New Note
• Take Snapshot to WordPerfect
• Take Snapshot to Clipboard
2 Drag around the area that you would like to include in the image.
Using the Notes window
The Notes window is a small word-processing tool in which you can capture your ideas by typing or pasting content. It gives you access to standard word-processing features, such as fonts and font styles, bullets and numbering, text alignment, tables, and color. The Notes window even lets you insert graphics or pictures in your notes.
From the Notes window, you can
• create, print, and e-mail notes
• format note text for later reuse
• add graphics or pictures to your notes
To create a note
• Click the New Note button.
To print a note, click the Print button.
To e-mail a note, click the arrow next to the Send to button, and choose Send to Mail Recipient.
To format the text in a note
1 Drag across the text to select it.
2 Use the text-formatting controls on the toolbar.
To add an image to a note
1 Click in the note where you want to insert the image.
2 Click the Insert button, and choose Image.
3 Type the path and filename of the image in the Picture Source box.
If you don’t know the exact path and filename, you can locate the image by clicking Browse.
244 WordPerfect Lightning

Using the Viewer window
You can use the Viewer window to open and view WordPerfect and Microsoft Word (DOC, DOCX) documents. You can send a document to WordPerfect for editing, and you can print documents. You can also save documents to the Navigator or to your local hard drive.
From the Viewer window, you can
• view WordPerfect and Microsoft Word (DOC, DOCX) files
• copy and reuse text from any document that you are viewing
• easily produce images of anything appearing on-screen
• send documents to the Navigator, to WordPerfect or Microsoft Word, or to e-mail
To view a document
1 Click the Open button.
2 Choose the folder where the document is stored.
3 Choose the file type from the Files of type list.
4 Choose the file, and click Open.
To copy text from a document
1 Drag across the text to select it.
2 Click the arrow beside the Copy button, and choose an option:
• Copy to Note
• Copy to WordPerfect
• Copy to Clipboard
To capture an image in a document
• See To capture an image on page 244.
To send a document
• Click the arrow beside the Save button, and choose an option:
• Save to Notebook
• Send to Word Processor
• Send to Main Recipient
Part Five: Utilities 245

Address Book
The Address Book is an information center that lets you store personal and business contact information.
In this chapter:
• Getting started on page 246”
• Creating address books on page 246”
• Opening address books on page 247
• Sorting and filtering address book data on page 248
Getting started
You can start the Address Book from WordPerfect.
The Tree view in the left pane displays all open address books. When you select an address book format in the Tree view in the left pane, all open address books in the selected format display in the Summary view in the right pane.
To start the Address Book
• In WordPerfect, click Tools Address Book.
To quit the Address Book, click File Exit.
Creating address books
You can create multiple address books to store different types of contact information.
Address entries are the records that you create in an address book. You can create an address entry for a person, organization, or resource. You can also create a group address entry, which can contain individual, organizational, and resource address entries, as well as other group address entries.
To create an address book
1 Click File New.
2 From the Address book type list, choose one of the following:
• Address book
• MAPI
3 Type a name for the address book in the Name box.
To create an address entry
1 Click an address book in the Tree view.
2 Click Address New.
3 From the Select entry type list, choose one of the following:
• Person
• Organization
246 Address Book

• Resource
4 Click OK.
5 Type text in any of the boxes.
To edit an address entry, click Address Edit. To delete an address entry, click Address Delete.
To create a group address entry
1 Click an address book in the Tree view.
2 Click Address New.
3 Choose Group from the Select entry type list.
4 Click OK.
5 Click the Group tab.
6 Type a name for the group in the Group box.
If you want to include comments about the group, type text in the Comments box.
7 Click Add/remove members.
8 In the Add/remove members dialog box, choose a name from the Addresses list.
9 Click Add.
To remove a name from the Addresses list, click Delete.
Opening address books
You can open the address books displayed in the Tree view.
When you close an address book, it no longer appears in the Tree view. You can open a closed address book by browsing to the folder in which it is saved on your computer.
To open an address book displayed in the Tree view
1 Click File Open.
2 Choose an address book from the Previously opened books list.
To close an address book, click File Close.
To open an address book not displayed in the Tree view
1 Click File Open.
2 Click the Address book button.
3 Click the Browse button.
4 Choose the drive and folder where the address book is stored.
5 Click Select.
6 Choose an address book from the Available address books list.
7 Click OK.
8 In the Previously opened books dialog box, choose an address book from the Available address books list.
Part Five: Utilities 247

Sorting and filtering address book data
In the Summary view, each address field in an address entry is displayed in a column. You can display, hide, or sort by any address field column.
Not only can you search for an address entry, but you can filter an address book to display a specific address entry or range of entries.
To sort by an address field column
1 Click an address book in the Tree view.
2 Click View Columns.
3 In the Columns dialog box, do the following:
• Enable the check boxes for the columns you want to display.
• Disable the check boxes for the columns you want to hide.
4 Click OK.
5 Click the column title in the Summary view, and then click one of the following arrows:
• — sorts the column in ascending order
• — sorts the column in descending order
To search for an address entry
1 Click an address book in the Tree view.
2 Click Edit Find.
3 Type filter criteria in the Find box.
4 Click Find now.
To filter an address book
1 Click an address book in the Tree view.
2 Type filter criteria in the Search names box.
3 Press Enter.
248 Address Book

Conversion utility
The WordPerfect conversion utility lets you convert various types of files — such as files created in older versions of WordPerfect, or Microsoft Word files — to one of five WordPerfect file formats.
You can start the conversion utility from Windows or from the WordPerfect application window. You can then use the conversion utility to convert multiple files at a time.
Supported “Convert from” formats
You can convert from a variety of file formats:
• WordPerfect — various older versions, listed below
• Microsoft Word — DOCX (2007-2016), DOC (97 to 2003), and more
• HTM, RTF, TXT, and more
For a complete list of supported formats, please see the Conversion Utility Help.
Supported “Convert to” formats
You can convert to any of the following WordPerfect formats.
To start the conversion utility
• Do one of the following:
• In Windows, click Start All Programs WordPerfect Office Utilities Conversion Utility.
• In WordPerfect, click the Conversion Utility button on the Compatibility toolbar. If you click the button more than once, you will open multiple instances of the conversion utility.
To quit the conversion utility, click Close.
To convert files
1 In the conversion utility, click Add.
2 Choose the drive and folder in which the files you want to convert are stored.
If you can’t see the files, choose All files from the File type box.
3 Click Add all. If you want to convert the files in the folders within the folder, enable the Include subfolders check box.
To convert a single file, click the file, and then click Add.
WordPerfect format Extension
WordPerfect 6 and later WPD
WordPerfect 4.2, 5.0, 5.1, 5.2 WP
WordPerfect 2.0, 2.1, 3.0, 3.1, 3.5 Macintosh WPM
WordPerfect 5.1, 5.2 Far East WP
WordPerfect Compound File WPD
Part Five: Utilities 249

4 From the Convert to list box, choose a version of WordPerfect.
5 Click OK.
To convert a single document by opening it directly in WordPerfect, see Opening documents on page 36.
250 Conversion utility

File-management tools
WordPerfect Office provides two file-management tools:
• file-management dialog boxes, or “enhanced file dialogs”
• QuickFinder — see page 252
Using the enhanced file dialogs
The WordPerfect Office file-management dialog boxes, or “enhanced file dialogs,” let you perform many file-management tasks — and even view Web pages! — from directly within WordPerfect, Quattro Pro, and Presentations.
By default, the enhanced file dialogs are enabled. If you are more comfortable with the default Windows file-management dialog boxes, you can use them instead.
To open the enhanced file dialog
• In WordPerfect, Quattro Pro, or Presentations, click File Open.
To find a file
1 In the enhanced file dialog, choose the drive or folder in which you want to search.
2 Type the filename in the Filename box.
3 Click Find now.
To preview a file
1 In the enhanced file dialog, click the Preview button on the toolbar.
2 From the Look in list box, choose the file you want to preview.
To add a shortcut to the Favorites folder
1 In the enhanced file dialog, choose the file or folder.
2 Click Favorites Add, and click one of the following:
• Add favorite folder — adds the entire folder to the Favorites folder
• Add favorite item — adds the selected file to the Favorites folder
To view a Web page or an intranet page
1 In the enhanced file dialog, click the Web mode button.
2 In the Look in box, type http:// (or, if required, https://) followed by the URL for the Internet or intranet page you want to open.
3 Press Enter.
Part Five: Utilities 251

To disable the enhanced file dialogs
1 Do one of the following:
• In WordPerfect, click Tools Settings Files. Then, click the Document tab.
• In Quattro Pro, click Tools Settings. Then, click File options.
• In Presentations, click Tools Settings Environment. Then, click the Options tab.
2 Disable the Use enhanced file dialogs check box.
Using QuickFinder
QuickFinder has two components:
• QuickFinder Searcher — finds files within a specified search scope
• QuickFinder Manager — lets you create standard or custom Fast Search files that are required to perform Fast Searches
To start QuickFinder Searcher
• Click Start All Programs WordPerfect Office Utilities QuickFinder Searcher.
To find a file with QuickFinder Searcher
1 From the Look in list box in QuickFinder Searcher, choose the drive or folder where the file is stored.
2 In the Filename box, type a filename, word, or phrase.
You can use wildcards. An asterisk (*) represents one or more characters; a question mark (?) represents only one character.
3 Click Find now.
To stop the search at any time, click Stop find.
QuickFinder ignores special characters, such as an exclamation point (!) or an ampersand (&), when searching for content.
You can further narrow your search by choosing a file type from the File type list box and by typing the date saved in the Last modified list box.
To start QuickFinder Manager
• Click Start All Programs WordPerfect Office Utilities QuickFinder Manager.
To create a standard Fast Search file
1 In QuickFinder Manager, click the Standard fast search setup tab.
2 Click Create.
3 In the QuickFinder standard fast search dialog box, type the name of a folder in the Folder to search box.
4 Enable one of the following options:
• Automatic update every — lets QuickFinder automatically update the Fast Search file at the specified intervals
• Manual update — lets you manually update the file
252 File-management tools

5 Click Options.
6 In the QuickFinder Fast Search options dialog box, click Browse, and specify the search preferences and a secondary location for the Fast Search information file.
To search using your standard Fast Search file, select the file in QuickFinder Searcher.
To create a custom Fast Search file
1 In QuickFinder Manager, click the Custom Fast Search setup tab.
2 Click Create.
3 In the QuickFinder custom Fast Search dialog box, type a name for the Fast Search file in the Fast Search name box.
4 Enable one of the following options:
• Automatic update every — lets QuickFinder automatically update the Fast Search file at the intervals that you type in the boxes
• Manual update — lets you manually update the file
5 In the Folder to add box, type the name of a folder you want to search with the specified path.
6 Enable the Include subfolders check box.
7 Click Add, and click Options.
8 In the QuickFinder Fast Search options dialog box, specify the search preferences and a location for the Fast Search file.
To search using your custom Fast Search file, select the file in QuickFinder Searcher.
Part Five: Utilities 253

Equation Editor
You can use Equation Editor in WordPerfect and Presentations.
Creating equations
Equation Editor lets you insert preset equations — and build your own equations by inserting preset symbols and templates.
Symbols are single characters, such as logic symbols and Greek characters. A template consists of a symbol and, in some cases, writable “slots” for adding variables or other elements. For example, a fraction template provides two slots: one for the numerator and one for the denominator, separated by a line ( ).
Each equation you insert into a document is treated as one item rather than individual symbols or characters. The equation is inserted into a document inside a graphics box.
Editing equations
After creating an equation, you can manipulate it as necessary.
To insert a preset equation
1 Click where you want to insert an equation.
2 Click Insert Equation.
3 Click the Edit equation tab.
4 Click Presets. The Equation presets dialog box appears.
5 Choose an equation from the Choose a preset list.
To insert an equation template
1 Follow steps 1 to 3 in the previous procedure.
2 Choose the template, or use its corresponding shortcut key.
For a list of shortcut keys, please see the Equation Editor Help.
To insert a symbol into an equation
1 Select the equation in the document.
2 Click Edit (Open) equation object.
3 Click where you want to insert a symbol.
4 Choose a symbol, or use its corresponding shortcut key.
For a list of shortcut keys, please see the Equation Editor Help.
To edit an equation
1 Select the equation in the document.
2 Click Edit (Open) equation object.
3 Click the Edit equation tab.
254 Equation Editor

You can also
Select an element in an equation Click the beginning (or end) of the equation element, hold down Shift, and press the right arrow (or left arrow) key.
Move the selected equation element Hold down Ctrl, and press an arrow key.
Change the color of the selected equation element Click Color.
Change the style and size of the selected equation element Use the Style list box and the Size list box.
Delete the selected equation element Press Delete.
Part Five: Utilities 255

Scrapbook
Scrapbook is a graphics utility that lets you search for and insert clipart, photo, sound, and movie files in WordPerfect, Quattro Pro, and Presentations.
Understanding Scrapbook
Scrapbook does not store files but contains thumbnails that point to media files. A thumbnail is a low-resolution miniature of a graphic or icon that is represented as an item in the Scrapbook utility window. Each item contains properties, such as keywords, file paths, and location. Scrapbook can list files on a local disk drive, network drive, or media disc.
You can start Scrapbook from within WordPerfect, Quattro Pro, or Presentations.
Working with Scrapbook items
You can use Scrapbook to insert a clipart file into a document. You can also insert a photo, sound, or movie file.
You can also import files into Scrapbook.
You can search for a Scrapbook item by using criteria such as file type, keyword, or filename.
To start Scrapbook
• Click Insert Graphics/Pictures Clipart.
To quit Scrapbook, click Close.
To insert a Scrapbook file into a document
1 Choose a category from the Categories list.
2 Click a tab: Clipart, Photos, Sounds, or Movies.
3 Choose an item from the Scrapbook item window.
4 Click Insert.
5 (Quattro Pro only) Click to place the item at its default size, or click and drag to place the item and size it manually.
To import files into Scrapbook
1 Click Import clips.
2 Click Browse.
3 Choose the drive and folder where the file is stored.
4 In the Insert file dialog box, choose a filename from the list.
5 Click Open.
When you import a file, Scrapbook places a thumbnail of the file in the Scrapbook database. The thumbnail is represented as an item in the Scrapbook utility window.
256 Scrapbook

To search for a Scrapbook item
1 Click Find.
2 Choose a file type from the Scrapbook item type list box.
3 Click Find now.
You can search for Scrapbook items as often as you like, but only the last five results are displayed.
Only the last search is saved when you quit or reopen Scrapbook.
You can also
Search for a file by using keywords Type keywords in the Keywords box.
Search for a file by using a full or partial filename Type text in the Filename containing box.
Part Five: Utilities 257

TextArt
TextArt lets you transform words into designs. You can use multiple visual effects, such as font, color, and rotation options, to create professional-looking 2D or 3D images. You can use TextArt in WordPerfect, Quattro Pro, and Presentations.
Creating TextArt images
You can create a TextArt image yourself, or you can insert preset 2D and 3D images into documents.
Editing TextArt images
You can change the appearance of 2D TextArt images by using different shadow styles and colors.
You can also change the appearance of 3D Text Art images.
To create a TextArt image
1 Click Insert Graphics/Pictures TextArt.
2 Type text in the Type here box.
To insert a symbol, click Insert Symbol.
3 Choose a text shape from the Shapes list box.
If you want to choose from other shapes, click More, and click a shape.
4 Choose a font from the Font list box.
5 Choose a font style from the Font style list box.
If you want to create a 3D image, enable the 3D mode check box.
To insert a preset 2D TextArt image
1 Click Insert Graphics/Pictures TextArt.
2 Type text in the Type here box.
To insert a symbol, click Insert Symbol.
3 Click the 2D options tab.
4 Open the 2D preset picker, and click a TextArt image.
To insert a preset 3D TextArt image
1 Click Insert Graphics/Pictures TextArt.
2 Type text in the Type here box.
To insert a symbol, click Insert Symbol.
3 Click the 3D options tab.
4 Enable the 3D mode check box.
5 Open the 3D preset picker, and click a text style.
258 TextArt

Part Six: Writing Tools
WordPerfect Office includes tools that can help improve the quality of your writing. These writing tools let you correct errors in spelling and grammar, correct mistakes automatically, and help to refine your writing style.
Setting up the writing tools
If you open a file that is written in a language that is different from the writing tools you have installed, the writing tools run in the installed language. For example, suppose the English writing tools are installed and you open a Spanish file: the writing tools run in English.
If you want to use the writing tools in a different language, you may need to install the writing tools for that language by modifying your installation of the software. See To modify WordPerfect Office on page 13.
At any time, you can change the language settings for the writing tools. For details, please see “Changing the language settings” in the Help for WordPerfect, Quattro Pro, or Presentations.
Using the writing tools
WordPerfect Office offers the following writing tools:
• spelling checker — checks for misspelled words, duplicate words, and irregular capitalization. See page 261.
• grammar checker — checks for grammar, spelling, and style errors. See page 263.
• thesaurus — lets you look up synonyms, antonyms, and related words. See page 265.
• dictionary — lets you look up word definitions and spelling. See page 267.
• word lists — contain the words and phrases scanned when you proof your text using the writing tools. See page 269.
Not all writing tools are available for all languages. For a per-language breakdown of supported writing tools, please see “Reference: Using writing tools” in the Help for WordPerfect, Quattro Pro, or Presentations.
Additional resources
For more information on the writing tools, please see “Using the writing tools” in the Help for WordPerfect, Quattro Pro, or Presentations.
For advice on specific types of projects, consult the following features:
• CorelTUTOR — a Help file that offers tutorials and walkthroughs. See To access the Help on page 7.
• PerfectExpert — a built-in panel that offers assistance with everyday tasks and detailed projects. See To access the PerfectExpert on page 9.
The Writing Tools page of the Reference Center provides links to even more resources. See To access the Reference Center on page 5.
Part Six: Writing Tools 259


Spelling checker
You can use the spelling checker to check the spelling of a file. In WordPerfect and Presentations, you can also check the spelling of selected text.
You can manually edit text and then resume checking the spelling. You can also manually replace an incorrect word or phrase.
You can customize how the spelling checker checks spelling in a document. For example, you can choose how the spelling checker starts and whether it searches for misspelled words, irregular capitalization, duplicate words, and words with numbers.
The spelling checker is not to be confused with the Spell Utility, a separate program that lets you create and edit main word lists. See Customizing main word lists on page 271.
By customizing a user word list, you can store automatic replacements for words you regularly misspell. For more information, see Customizing user word lists on page 270.
To check the spelling of a file
1 Click Tools Spell checker.
2 From the Check list box (if available), choose an option.
3 Click Start.
To check the spelling of selected text
1 Select the text you want to check.
2 Click Tools Spell checker.
3 Click Start.
In Quattro Pro, you cannot check selected text.
To edit spell-checked text manually
1 Click Tools Spell checker.
2 When Spell checker stops on a word or phrase, click in the document where you want to make changes.
3 Edit the text.
Part Six: Writing Tools 261

To replace an incorrectly spelled word or phrase
1 Click Tools Spell checker.
2 When Spell checker stops, choose a word or phrase from the Replacements list.
3 Click Replace.
If Spell checker does not offer replacement words, click Skip or edit text manually in the Replace with box.
To set options for the spelling checker
1 Click Tools Spell checker.
2 Click Options.
Any options you change will be effective the next time you open the spelling checker.
You can also
Define automatic replacements Click Auto replace.
Skip an error once Click Skip once.
Skip all occurrence of an error Click Skip all.
262 Spelling checker

Grammar checker
In WordPerfect and Presentations, you can use the grammar checker (“Grammatik”) to check the grammar of a file — or of selected text.
You can manually edit text and then resume checking the spelling. You can also manually replace an incorrect word or phrase.
You can check a document for a specific type of writing by using a checking style — a preset writing style rule. For example, you can choose an advertising checking style to check advertising copy or marketing materials.
Grammatik also lets you analyze documents.
You can customize how Grammatik checks grammar in a document.
You cannot use the grammar checker in Quattro Pro.
To check the grammar of a file
1 Click Tools Grammatik.
2 From the Check list box, choose an option.
3 Click Start.
To check the grammar of selected text
1 Select the text you want to check.
2 Click Tools Grammatik.
3 Click Start.
To edit grammar-checked text manually
1 Click Tools Grammatik.
2 When Grammatik stops on a word or phrase, click in the document where you want to make changes.
3 Edit the text.
To replace a grammatically incorrect word or phrase
1 Click Tools Grammatik.
2 When Grammatik stops, choose a word or phrase from the Replacements list.
3 Click Replace.
You can also
Define automatic replacements Click Auto replace.
Skip an error once Click Skip once.
Skip all occurrence of an error Click Skip all.
Part Six: Writing Tools 263

To select a checking style
1 Click Tools Grammatik.
2 Click Options Checking styles.
3 In the Checking styles dialog box, choose a checking style.
4 Click Select.
To analyze a document
1 Click Tools Grammatik.
2 Click Options Analysis, and choose a command:
• Parse tree — for a parse tree of the current sentence
• Parts of speech — for the parts of speech in the current sentence
• Basic counts — for a basic counts report on writing style
• Flagged — for a flagged errors report on writing style
• Readability — for a readability report on the document
To set options for the grammar checker
1 Click Tools Grammatik.
2 Click Options.
264 Grammar checker

Thesaurus
You can use the thesaurus to refine your writing style.
You can replace a word with the thesaurus. When you look up a word, the thesaurus provides a short definition and a list of the lookup options selected.
The thesaurus automatically replaces a word with a suggested word, but you can also use the thesaurus to insert words.
You can customize the thesaurus to look up words or close automatically. The thesaurus can also be customized to suggest spelling suggestions for misspelled words and display multiple alternative word lists.
The thesaurus lets you customize lookup options for synonyms, antonyms, related words, related information, and cross-references. You can also look up hypernyms, hyponyms, and phrases.
To replace a word
1 Select a word.
2 Click Tools Thesaurus.
3 Click Look up.
4 In the list of categories, double-click a definition and click a word.
5 Click Replace.
To insert a word
1 Click Tools Thesaurus.
2 Type a word in the list box at the top of the Thesaurus page.
3 Click Look up.
4 In the document, click where you want to insert the word.
5 In the list of definitions, double-click a definition and click a word.
6 Click Insert.
To customize thesaurus options
1 Click Tools Thesaurus.
2 Click Options, and click one of the following:
• Auto look up
• Auto close
• Spelling assist
You can also
Look up words suggested by the thesaurus View definitions in the pane to the right of the suggested words.
Look up any word Type a word in the list box at the top of the Thesaurus page. Click Look up.
Part Six: Writing Tools 265

To customize lookup options
1 Click Tools Thesaurus.
2 Click Options, and click one of the following:
• Synonym
• Antonym
• Related words
• Is a type of
• Has types
• Is a part of
• Has parts
• Example
266 Thesaurus

Dictionary
You can use the dictionary to check word definitions and spelling. You can either look up the definition of a word or search for all occurrences of that word in the dictionary's definitions.
The dictionary lets you customize the display, lookup, and language options to conform to your working style.
You also have the option of purchasing the upgrade from the Oxford English Pocket Dictionary to the Oxford English Concise Dictionary.
To look up a word
1 Click Tools Dictionary.
If the Auto lookup feature is enabled, the dictionary will look up the selected word from the document.
2 Type a word in the box to the left of Go.
To search for a word
1 Click Tools Dictionary.
2 Choose Search from the mode list box.
3 Type a word in the box to the left of Go.
4 Click Go.
To set dictionary display options
1 Click Tools Dictionary.
2 Click Options Display.
3 In the Dictionary display options dialog box, choose a definition property from the list.
4 Choose a color from the list.
To set lookup options
1 Click Tools Dictionary.
2 Choose Look up from the mode list box.
3 Click Options, and click one of the following:
• Alphabetical — lists the closest lookup matches
• Incremental — lists only the matches containing the entire word being looked up
To set language options
1 Click Tools Dictionary.
2 Choose Look up from the mode list box.
3 Click Options, and click one of the following:
• English (US)
• English (UK)
Part Six: Writing Tools 267

To upgrade to the Oxford English Concise Dictionary
1 Click Tools Dictionary.
2 Choose Look up from the mode list box.
3 Click Options Upgrade.
Follow the instructions in the Product activation dialog box.
The Oxford English Concise Dictionary and Oxford English Pocket Dictionary are the only dictionaries available for use with WordPerfect Office.
268 Dictionary

Word lists
A word list is a list of words or phrases scanned when you proof text by using the writing tools. Writing tools scan two types of word lists: user word lists and main word lists.
Each language comes with a default user word list. You can customize user word lists by adding, deleting, or replacing words.
Main word lists are lists of specialized words used by the spell checker for a particular language, field or company.
In this chapter:
• Choosing word lists on page 269
• Customizing user word lists on page 270
• Customizing main word lists on page 271
Choosing word lists
You can choose both user word lists and main word lists to help proof a text.
You can have ten lists of each type active when you use the writing tools. The active user word lists are scanned first; if the word or phrase is not found there, the active main word lists are scanned.
For example, if you want the spelling checker to scan both the US English and the Canadian English main word lists, choose both lists. If you work in the medical profession, you can select a third-party medical word list that runs with WordPerfect writing tools.
To add a user word list
1 Click Tools Spell checker.
2 Click Options User word lists.
3 Click in the User word lists list where you want to position the new user word list.
4 Click Add list.
The filename extension for a user word list is .uwl.
When you check a document, the user word lists are scanned in the order they display in the User word lists list.
To add a main word list
1 Click Tools Spell checker.
2 Click Options Main word lists.
3 Click in the Main word lists list where you want to position the new user word list.
4 Click Add list.
You can also
Disable a user word list Disable the check box that corresponds to the user word list.
Remove a user word list Choose the user word list, and click Remove list.
Part Six: Writing Tools 269

The filename extension for a main word list is .lex or .mor.
When you check a document, the main word lists are scanned in the order they display in the Main word lists list.
Customizing user word lists
You can add a word to a user word list so that the word is not flagged as an error.
Here are examples of how you can use the Adding Words to a User Word List feature:
• If you often type incorrectly, you can define the correctly spelled word as a replacement. For example, you can specify “the” as a replacement for “hte.”
• You can replace abbreviations or acronyms with words or phrases. For example, you can define Chief Executive Officer as the replacement for the acronym CEO.
• You can define multiple alternatives for a word. For example, you can define “United States of America,” “United States,” and “U.S.A.” as replacements for the word “usa.” During a spell checking or proofreading session, you can choose which alternative phrase you want to use to replace “usa.”
To add a word to a user word list
1 Click Tools Spell checker.
2 Click Options User word lists.
3 In the User word lists dialog box, choose a user word list.
4 Type a word in the Word/Phrase box.
If you want to add a replacement word, type it in the Replace with box.
5 Click Add entry.
6 Click Close.
Click Add from the Spell checker page to add the word to the current user word list.
You can also add short phrases to a user word list.
To edit a word or phrase in a user word list
1 Click Tools Spell checker.
2 Click Options User word lists.
3 Choose the User word list that contains the word or phrase you want to edit.
4 Choose the word or phrase you want to edit.
5 Edit the word or phrase in the Replace with box.
6 Click Replace entry.
You can also
Disable a main word list Disable the check box that corresponds to the main word list.
Remove a main word list Choose the main word list, and click Remove list.
270 Word lists

If the word list you want to edit does not appear in the Word Lists box, click Add list to open the list.
To delete a word or phrase from a user word list
1 Click Tools Spell checker.
2 Click Options User word lists.
3 Choose the word list you want to edit.
4 Choose the word or phrase you want to delete.
5 Click Delete entry.
Customizing main word lists
The Spell Utility is a separate program that lets you create and edit main word lists for your business or field (such as medicine or law). You can also use the utility to merge main word lists together and to convert main word lists from previous formats.
To open the Spell Utility
• Click Start All Programs WordPerfect Office Utilities Spell Utility.
Part Six: Writing Tools 271


Part Seven: Macros
You can use macros to perform repetitive or complex tasks automatically. A macro performs a series of instructions. For example, you can create a macro that retrieves a file, gives it a new name, and saves it to another format. You can then play the macro to repeat the action.
WordPerfect Office offers tools, features, and resources for those who want to use macros to automate tasks. You can create macros in multiple ways:
• by using built-in macro features
• by using the PerfectScript utility
• by using Microsoft® Visual Basic® for Applications (VBA) 6.3
For developers who want to create more advanced automations and customizations, WordPerfect Office also offers a software development kit (SDK).
Built-in macro features
You can create macros from directly within WordPerfect, Quattro Pro, or Presentations. For a brief introduction, see the following chapters:
• WordPerfect macro features on page 275
• Quattro Pro macro features on page 277
• Presentations macro features on page 279
For more complete information, please see the main Help file for WordPerfect, Quattro Pro, or Presentations. Visit the Macros page of the Reference Center (see page 5) for easy access to the macro-related Help topics in these files.
PerfectScript utility
You can also create macros from within the PerfectScript utility, which is included with the WordPerfect Office utilities. For a brief introduction, see PerfectScript utility on page 281.
For more complete information, please see the Macro Help file or the Corel WordPerfect Office Macro Guide. Visit the Macros page of the Reference Center (see page 5) for easy access to these resources.
VBA 6.3 support
If Microsoft Visual Basic for Applications (VBA) 6.3 is installed on your computer, you can use it with WordPerfect Office. VBA is an object-oriented programming language that lets you create VBA macros to automate tasks.
VBA 6.3 is not included with WordPerfect Office.
For information on creating macros by using VBA, please see the Macro Help file or the Corel WordPerfect Office Macro Guide.
Visit the Macros page of the Reference Center (see page 5) for easy access to these resources.
Part Seven: Macros 273

WordPerfect Office SDK
The WordPerfect Office Software Development Kit (SDK) is a set of tools and resources that let you customize WordPerfect Office applications for commercial or business use.
The SDK is included only in certain versions of WordPerfect Office. To compare versions, please visit WordPerfect.com.
274 Part Seven: Macros

WordPerfect macro features
WordPerfect supports several kinds of macros:
• QuickMacros on page 275
• WordPerfect macros on page 275.
• template macros — see page 276
• PerfectScript macros — see page 276
• Visual Basic for Applications (VBA) macros — see page 276
QuickMacros
QuickMacros are temporary macros you can record without saving.
To record a QuickMacro
1 Click Tools Template macro Record.
2 Click Record without entering a macro name in the Name box.
3 Perform the task you are recording.
NOTE: WordPerfect records both the keyboard and mouse actions you make. However, you must use the keyboard instead of the mouse to position the cursor in the document window.
4 Click Tools Template macro Record to stop recording the macro.
To play a QuickMacro
1 Click Tools Template macro Play.
2 Click Play without entering a macro name in the Name box.
WordPerfect macros
WordPerfect macros are stored either in the document they apply to or in a macro library file. Use a WordPerfect macro when your task is contained within WordPerfect.
One way to create a WordPerfect macro is to record a task in WordPerfect; see “Recording, saving, and storing macros” in the WordPerfect Help. To include programming commands, or non-recordable actions, you must edit the macro after you record it; see “Editing and deleting macros” in the WordPerfect Help.
Workflow macros
WordPerfect comes with many workflow macros. You can print all open documents, count all instances of a word or phrase in a document, save documents to multiple formats, and more
See “Using macros included with WordPerfect“ in the WordPerfect Help.
Part Seven: Macros 275

Template macros
Template macros are macros attached to a template and are saved as part of that template file. They can be played only from that template and are not listed with standard macros. See “Using template macros” in the WordPerfect Help.
PerfectScript macros
PerfectScript macros are stored with a .wcm filename extension. These macros are useful if you want to interact with Quattro Pro and Presentations. See “Writing and editing macros by using PerfectScript“ in the WordPerfect Help.
VBA macros
Visual Basic for Applications (VBA) macros are saved in specific projects that use a robust version of the Visual Basic programming language. If VBA 6.3 is installed on your computer, you can access the VBA Editor from WordPerfect (Tools Visual Basic Visual Basic Editor). See “Integrating with Visual Basic for Applications” in the WordPerfect Help.
276 WordPerfect macro features

Quattro Pro macro features
There are three types of macros:
• Quattro Pro (native) macros
• PerfectScript macros — see page 278
• Visual Basic for Applications (VBA) macros — see page 278
It is important to understand all three types of macros before choosing a macro that best suits your needs. Some aspects that you can look at are the differences between the macros and the syntax of a macro.
Quattro Pro (native) macros
Quattro Pro native macros are stored in notebook cells. Use this type of macro when a task is performed within Quattro Pro.
The simplest way to create a macro is to record the keystrokes in Quattro Pro. You can play a Quattro Pro macro from the menu or by using the macro buttons on a customized toolbar.
To record a Quattro Pro macro
1 Click Tools Macro Record.
2 Enable the Quattro Pro macro option.
If you want to save the macro in an existing macro library, on the status bar, click the notebook name that contains the macro library.
3 Select the cells in which to store the macro.
4 Click OK.
5 Perform the actions in the macro.
6 Click Tools Macro Record.
For more information, see “Recording and editing Quattro Pro macros” in the Quattro Pro Help.
To play a Quattro Pro macro
1 Click Tools Macro Play.
2 Enable the Quattro Pro macro option.
3 Type the location of the macro in the Location box.
You can also play a Quattro Pro macro by pressing Alt + F2.
If the macro is in another notebook, use full linking syntax to specify the macro location (for example, [LIBRARY]A:C26).
Part Seven: Macros 277

PerfectScript macros
PerfectScript macros are stored in a .wcm file. This type of macro is useful when you want to automate tasks with several notebooks or interact with other WordPerfect Office applications, such as WordPerfect. For example, you can update Quattro Pro data in a WordPerfect report.
You can record PerfectScript macros. You can also type a macro in WordPerfect and play it in Quattro Pro. See “Recording and editing PerfectScript macros” in the Quattro Pro Help.
VBA macros
Visual Basic for Applications (VBA) lets you develop scripts that are saved within specific projects using a robust version of the Visual Basic programming language. If VBA 6.3 is installed on your computer, you can access the VBA Editor from within Quattro Pro (Tools Visual Basic Visual Basic Editor).
For more information, see “Integrating Visual Basic for Applications with WordPerfect Office” in the Quattro Pro Help.
278 Quattro Pro macro features

Presentations macro features
There are two types of macros that can be used in Presentations: PerfectScript macros and Visual Basic for Applications (VBA) macros.
PerfectScript macros
A PerfectScript macro is stored with a .wcm file extension. This macro type is useful if you want to interact with other WordPerfect Office applications, such as Quattro Pro or WordPerfect.
For more information, see “Working with PerfectScript macros” in the Presentations Help.
VBA macros
Microsoft Visual Basic for Applications (VBA) lets you develop scripts that are saved in specific projects that use VBA programming language. If VBA 6.3 is installed on your computer, you can access the VBA editor from within Presentations (Tools Visual Basic Visual Basic Editor).
For more information, see “Working with VBA macros” in the Presentations Help.
Recording and playing macros
One way to create a macro is to record and save a task in Presentations. When you record a macro, you convert actions into macro commands, which are stored and can be played back. You can then play a macro to repeat a sequence of steps for a task that you have recorded or written.
While recording or playing a macro, you can pause, resume, or stop it.
To record a macro
1 Click Tools Macro Record.
2 Choose the drive and folder where you want to save the macro.
3 Type a filename in the Filename box.
4 Click Save.
5 Perform the actions you want to record.
6 Click Tools Macro Stop.
To play a macro
1 Click Tools Macro Play.
2 Choose the drive and folder where the macro is stored.
3 Choose a filename.
4 Click Open.
Part Seven: Macros 279

To pause, resume, or stop recording or playing a macro
To Do the following
Pause or resume a macro Click Tools Macro Pause.
Stop a macro Click Tools Macro Stop.
280 Presentations macro features
PerfectScript utility
You can use the PerfectScript utility to centralize your work on PerfectScript macros in ways such as the following:
• setting the default macro folder
• setting the PerfectScript macro editor
• finding and inserting macro commands
• testing for macro errors by debugging them
To start the PerfectScript utility
• On the Windows taskbar, click Start All Programs WordPerfect Office Utilities PerfectScript.
To set the default macro folder
1 Click Tools Settings.
2 Click the General tab.
3 In the Macro box, click the Browse button.
4 Choose the drive and folder where you want to store the macro.
5 Click Select.
To set the PerfectScript editor
1 In PerfectScript, click Tools Settings.
2 Click the Edit tab.
3 In the Editor path/filename box, click the Browse button.
4 Choose the drive and folder where the editor is stored.
The PerfectScript editor is stored in the following location, where “X” is the installation drive for WordPerfect Office and VN is the version number of the application:X:\Program Files\Corel\WordPerfect Office\Programs\PSVN0.exe
5 Click Open.
To find and insert macro commands
1 Click Help Macro Command Browser.
The PerfectScript commands dialog box appears.
2 Choose a product from the Command type list box.
3 Choose items from any of the following lists:
• Commands
• Parameters
• Enumeration
4 In the Command edit box, type any additional parameters you need.
5 Click Insert.
6 Click Close.
Part Seven: Macros 281

To debug a macro step-by-step
1 Click File Debug Play.
2 Choose a macro.
3 Type a filename and path in the Listing filename box.
4 Click OK.
5 Click Debug Step into.
You may need to repeat this procedure more than once, until the macro is debugged.
To view the meaning of commands from the PerfectScript Debugger, point to a command line.
282 PerfectScript utility

Part Eight: Web Resources
If you have an active Internet connection, you can get the most out of WordPerfect Office through its Web-based resources.
In this chapter:
• Using Web-based resources on page 283
• Searching Web-based resources on page 284
Using Web-based resources
Web-based resources for WordPerfect Office include the following:
• product-information websites
• social media — see page 283
WordPerfect Office websites
For product information straight from the experts at Corel, please visit WordPerfect.com and Corel.com.
About WordPerfect.com
The official home page of WordPerfect Office, WordPerfect.com offers news, tutorials, tips & tricks, and more.
Related pages:
• WordPerfect.com/tutorials — help with new features, projects, and advanced techniques
About Corel.com
The official home page of Corel Corporation, Corel.com provides a wealth of valuable information about Corel products such as WordPerfect Office.
Related pages:
• Corel.com/knowledgebase — repository of articles written by the Corel Support Services team in response to questions by user
• Corel.com/training — information on training resources: videos, books, courseware, and more
• Corel.com/support — overview of technical-support resources
WordPerfect Office social media
For interaction with other users — and the team at Corel — you can take advantage of the following Web resources:
• the official community site for WordPerfect Office
• the social-media accounts maintained by Corel
Social media may include content in the form of a personal web log (“Blog”), forum posting or social-media commentary. Such results represent the views of the participants and do not necessarily reflect the views of Corel Corporation, or its affiliates and their respective officers, directors, employees and agents.
Part Eight: Web Resources 283
Official community site: OfficeCommunity.com
The official community site for WordPerfect Office is hosted by Corel at OfficeCommunity.com. This site provides interaction with other users through sharing experiences, asking questions, and receiving help and suggestions.
Corel social-media accounts
Corel maintains a number of social-media accounts, including product-specific accounts such as for WordPerfect Office. For an up-to-date list of these accounts, please visit Corel.com/socialmedia.
Related pages:
• Corel.com/blog — editorials by Corel executives, employees, and customers
Searching Web-based resources
To search for specific information across multiple websites and social-media accounts for WordPerfect Office, you can use the Reference Center that installs with WordPerfect Office.
Search results may include content in the form of a personal web log (“Blog”), forum posting or social-media commentary. Such results represent the views of the participants and do not necessarily reflect the views of Corel Corporation, or its affiliates and their respective officers, directors, employees and agents.
To search multiple Web resources
1 Access the Reference Center by doing one of the following:
• On the Windows taskbar, click Start Programs WordPerfect Office Reference Center.
• In WordPerfect, Quattro Pro, or Presentations, click Help Reference Center.
2 Click the Web Resources tab.
3 Type a word or phrase in the search box.
4 Click Search.
Results appear in a new window, which you can use to perform additional searches.
You can also perform a Web search (or a search of the installed Help) from the following Reference Center pages:• Key Resources• WordPerfect• Quattro Pro• PresentationsFor more information on the Reference Center, see page 5.
284 Searching Web-based resources

Index
Numerics
2D TextArtpresets 258
3D spreadsheetsblock of cells, selecting 149
3D TextArtpresets 258
A
action shapesdrawing 228
actionsredoing 68, 162
repeating 68
undoing 68, 162
additional objects templatechoosing 42
Address Bookgetting started 246
quitting 246
starting 246
using 246
address booksclosing 247
creating 246
entries, creating 246
entries, deleting 247
entries, editing 247
entries, filtering 248
entries, grouping 247
entries, searching 248
entries, sorting 248
opening 247
aligningbulleted list levels 218
cell data 169
objects 203
spreadsheet labels 153
text 56, 209
Analysis Expertunderstanding 138
animatingbulleted lists 219
objects 204
animationsusing, in slide shows 233
appendingClipboard contents 67
application barQuickCell feature 137
understanding 18
working with 137
arranginggraphics 64
notebook windows 140
objects 203
text 55
arrow shapesdrawing 228
audience notesprinting 239
audio filesusing, in slide shows 231
AVI filesusing, in slide shows 233
axes, chartsetting up 177
B
Background Galleryunderstanding 198
using 198
Index 285

backgrounds, slideBackground Gallery 198
preset 198
understanding 198
backing updocuments 106
backuprestoring files 106
balanced newspaper columnsusing 87
basic shapesdrawing 228
Bezier curvesdrawing 228
bitmap framessizing 224
bitmapsconverting from vector objects 225
converting to vector objects 225
creating 223
editing 223
erasing parts 224
exporting 223
frames, sizing 224
modifying 223
removing 224
resampling 224
saving 223
selecting areas 223
special effects 225
understanding 221
zooming 224
blank linesadding drop caps to 52
blocks of textselecting 47
bolding text 50, 166, 208
bordersform controls 121
boxessubtitle, adding 214
title, adding 214
browsing documentsinsertion points 29
navigation controls 29
Budget Expertunderstanding 138
built-in Help resources 8
bulleted listsaligning levels 218
animating 219
applying to text 59
bullet appearance 218
creating 59, 217
creating, with QuickBullets 59
font properties 218
justification of levels 218
levels, changing 218
levels, creating 217
line spacing, custom 219
preset slide layouts 197
QuickBullets, using 59
text appearance 218
using 59, 217
bulletsappearance 218
resizing 219
shape 218
symbol choice 218
type 219
buttons, toolbarHelp for 8
C
Calc-As-You-Gousing 159
calculating datain multiple rows/columns 158
in single row/column 157
in specified cells 158
with presets 158
286 Index

callout shapesdrawing 228
capitalizationafter periods, correcting 53
Caps Lock, correcting 53
changing 53
correcting 52
correcting automatically 210
initial caps, correcting 53
small caps, applying 50
Caps Lock capitalizationcorrecting 53
capturing imagesfrom Navigator 244
in Viewer window 245
cascadingdocument windows 22
notebook windows 140
case, textchanging 53
searching by 72
CD tracksadding to slides, in entirety 231
adding to slides, in part 231
cell blocks3D, selecting 149
cellsaligning data 169
centering text across 169
copying and pasting 162
copying formatting 165
copying, to specified location 163
decimal places 167
deleting 151
editing contents 161
hard returns 170
inserting 150
joining 170
moving, by cutting 163
moving, by dragging 163
numeric format 167
overwriting data 161
predesigned formatting 165
replacing contents 161
selecting 3D block 149
selecting columns 149
selecting nonadjacent 149
selecting rows 149
selecting, from dialog box 149
simple math 157
spreadsheet functions 175
text appearance 165
text wrap 170
totalling, with QuickSum 159
centeringtext 56
text, across cells 169
charactersattaching form controls to 122
inserting 52
QuickStyles, creating 76
selecting 47
chart dataplotting 177
Chart Expertusing 178
chartsaxis setup 177
creating 177
creating, with Chart Expert 178
creating, with QuickChart 178
HTML publication 182
linked data 178
subtitles 178
titles 178
types, list of 177
checking grammardocument analysis 264
entire file 263
error replacement 263
manual editing 263
options 264
selected text 263
writing styles 264
checking spellingentire file 261
Index 287

error replacement 262
manual editing 261
options 262
selected text 261
checking styles 264
circlesconverting from polylines 227
clipartinserting 63
inserting from Scrapbook 256
Clipboardappending to contents 67
copying graphics to 67
copying text to 67
cutting graphics to 67
cutting text to 67
pasting graphics from 67
pasting graphics from, in specified format 67
pasting text from 67
pasting text from, in specified format 67
pasting text from, unformatted 68
closed curvesdrawing 227
closingslide shows 190
codes, formattingdisplay options 26
displaying 26, 210
finding and replacing 73
hiding 26
working with 25
colorsfonts 49
columnscreating 88
deleting 88
discontinuing 88
guidelines, displaying 23
navigating 88
tabular, selecting 47
types of 87
working with 87
columns, spreadsheetcopying 162
data calculation, with Quick Math 157
deleting 151
inserting 151
joining 170
moving 162
repeating titles 150
selecting 149
sizing 170
totaling 157
totaling, with QuickSum 159
width, specifying 171
combination slide layouts 197
combiningobjects 203
compatibility featuresCompatibility toolbar 31, 143
Microsoft Excel 143
Microsoft PowerPoint 187
Microsoft Word 31
PDF settings 118
components, installation 13
Consolidate Expertunderstanding 138
content manualinstalling 13
understanding 5
context-sensitive Helpaccessing 8
understanding 8
conversion utilityquitting 249
starting 249
using 249
convertingbitmaps 225
vector graphics 225
288 Index
converting files 249
copyfit, automatic 85
copyingcells 162
cells, formatting of 165
cells, to specified location 163
graphics 67
objects 201
spreadsheets 147
text 67
text formats 51
Corel RealTime Previewchanging font properties 208
previewing font changes 50
correctingcapitalization 52, 210
capitalization after periods 53
Caps Lock capitalization 53
double spaces, between sentences 53
double spaces, between words 53
initial caps 53
sentence spacing 53
text 210
word spacing 53
words automatically 210
Currency numeric format 167
curvesBezier, drawing 228
closed, drawing 227
drawing 227
Custom numeric format 167
custom page sizesdeleting 82
modifying 82
customer supportWeb-based resources 9
customizingpage sizes 81
Reveal Codes display 26
toolbars 136
Undo levels 68
cuttinggraphics 67
text 67
D
dataaligning 169
calculating 157
calculating, with presets 158
charting 177
finding and replacing 161
linking, to charts 178
overwriting 161
plotting 177
data chartspreset slide layouts 197
data filescreating from address books 113
creating from CSV files 113
data files, mergeadding lines 108
creating 108
fields, navigating 108
form documents, associating 110
numbering lines 108
data sources, mergeassociating form documents 110
ODBC, associating form documents 111
data, mergecreating 107
date formatsapplying 167
Date numeric format 168
datesfooter insertion 96
header insertion 96
spreadsheet insertion, by current date 155
spreadsheet insertion, by typing 155
Index 289

debugging macros 282
decimal-place settings 167
default fontdocuments 50
default templatechanging 41
creating documents from 36
current document style 41
settings 41
settings, cascading 42
understanding 36
working with 41
deselectingtext 47
diagonal linesdrawing 227
dialog box controlsHelp for 9
dialog boxesHelp for 8
dictionarydisplay options 267
languages 267
looking up words 267
lookup options 267
upgrading 268
using 267
word searches 267
discontinuingcolumns 88
headers or footers 97
display optionsdocument 21
page 22
Reveal Codes 26
Distraction-Free viewchoosing 21
dividingpages 83
document viewsswitching 21
document windowscascading 22
entering text 45
maximizing 22
minimizing 22
tiling 22
documentationconventions of 6using 5
Web-based resources 9, 283
documentsanalyzing 264
backing up 106
capturing images in 245
columns, working with 87
components of 35
copying text, in Lightning 245
creating 36
creating, from project templates 42
display settings 21
eBook format 36
editing, basics of 67
folders, copying path 37
folders, opening 37
merging 107
metadata removal 105
navigating 29
opening 36
page display 22
PDF publication 117
printing 115
printing, sections of 115
reverting 106
saving 103
saving iteratively 106
selecting 47
sending, with WordPerfect Lightning 245
text insertion 45
Undo and Redo items, saving 68
viewing 21
viewing, in Lightning 245
zooming 22
290 Index

double indentsapplying 55
double spacescorrecting, between sentences 53
correcting, between words 53
Draft viewchoosing 21, 140
dragging settingsselecting text 47
drawingaction shapes 228
arrow shapes 228
basic shapes 228
Bezier curves 228
callout shapes 228
closed curves 227
curves 227
flowchart shapes 228
freehand shapes 227
lines 227
polylines 227
shapes 227
star shapes 228
drawingsobjects in 201
printing 239
shapes 227
text 207
drop capsadding 52
adding, to blank lines 52
adding, to paragraphs 52
removing 52
working with 51
E
eBook publication 36
eBooksadding a dedication 130
adding a title page 130
adding chapters 130
adding copyright information 130
adding front matter 130
adding metadata 131
adding text 129
inserting images 130
opening template 129
publishing 129, 131
spelling, checking 131
edit pointslines 229
polylines 229
editing documentsbasics of 67
editing PDF files 39
editing spreadsheetscopying components 162
editing cell content 161
moving components 162
undoing actions 162
effectsusing 225
embedded Help resources 8
endnotesdeleting 100
editing 100
finding 100
formatting 101
inserting 99
viewing 100
working with 99
enhanced file dialogs 251
entering text 45
envelopesprinting 116
EPUB filescreating 129
Equation Editorusing 254
equationscreating 254
editing 254
Index 291

inserting 254
simple, creating 157
symbols 254
templates 254
erasingbitmap parts 224
evaluating datatrue/false formulas 173
Excel, Microsoft 143
Experts, Quattro Pro 137
External Data Expertunderstanding 138
extra contentinstalling 13
manual 5
F
Favorites folderadding project templates 43
fields, mergeinserting 109
file formatspreserving 32
saving slide shows to 190
file-management dialogsdisabling 252
Favorites folder 251
finding files 251
opening 251
previewing files 251
using 251
Web mode 251
file-management tools 251
filenamesfooter insertion 96
header insertion 96
filesbacking up 106
converting 249
favorite 251
finding, with enhanced dialog 251
finding, with QuickFinder Searcher 252
inserting graphics from 222
managing 251
previewing 251
reverting 106
saving 103
saving iteratively 106
files, mergeassociating 110
Fillable PDFs 118
fillsform controls 122
Find and Replacecase search 72
code search 73
font search 72
highlighting text 72
in all files in a folder 73
multiple words or phrases 71
text search 71
word search 72
word-form search 72
findingcodes 73
data 161
endnotes 100
files, with enhanced dialog 251
files, with QuickFinder Searcher 252
footnotes 100
Scrapbook items 257
text 71
text, case-specific 72
text, font-specific 72
word forms 72
words 72, 73
fitting text to pages 85
flippingobjects 202
flowchart shapesdrawing 228
292 Index

flyoutsaccessing 185
displaying 186
foldersdocument, copying path 37
document, opening 37
favorite 251
fontsappearance 50
changing 165
color 49
default settings 50
finding text 72
page numbers 92
previewing 50
properties, changing 166, 208
reusing recent 50
settings for 49
size 49
size, relative 49
style 49
footerscreating 95
date insertion 96
discontinuing 97
editing 96
filenames 96
guidelines, displaying 23
horizontal lines 96
inserting content 95
page numbering 96
spacing 97
suppressing 97
time insertion 96
viewing 95
working with 95
footnotesdeleting 100
editing 100
finding 100
formatting 101
inserting 99
viewing 100
working with 99
forcingpage numbers 92
pages 85
form controlsadding check boxes 120
adding command buttons 121
adding list boxes 121
adding radio buttons 121
adding tooltips 121
attaching to characters 122
attaching to page 122
attaching to paragraph 123
borders 121
fills 122
formatting text 122
resizing, exactly 123
wrapping text around 123
form documents, mergecreating 109
data files 110
data sources 110
fields, inserting 109
ODBC data sources 111
sideways text 109
working with 108
Format-As-You-Gocapitalization settings 53
sentence-spacing settings 53
word-spacing settings 53
formattingendnotes 101
footnotes 101
paragraphs 55, 209
text 49, 207
formatting codesdisplay options 26
displaying 210
finding and replacing 73
hiding or displaying 26
searching for 74
searching for specific 74
working with 25
Formula Composercreating formulas in 173
Index 293

formulascreating, in Formula Composer 173
creating, with functions 175
math, creating 173
text, creating 173
true/false, creating 173
understanding 136
working with 173
Fraction numeric format 167
fractionsspreadsheet insertion 155
framesbitmap, sizing 224
freehand shapesdrawing 227
Front matteradding to eBooks 130
functionscreating formulas with 175
entering, in cells 175
understanding 136
working with 175
G
General numeric format 167
GIF filesanimated, adding to slide shows 233
glyphssizing shapes with 229
gradient fillssubtitle boxes 215
title boxes 215
grammar checker 263
Grammatik 263
graphicsarranging 64
clipart images 63
copying 67
cutting 67
formats, understanding 221
grouping 65
inserting 63, 221
inserting, from file 222
inserting, from Scrapbook 221
linking to 64
moving, between documents 68
moving, with keyboard 64
moving, within document 68
navigating between 65
overlapped 64
overlapping with text 65
pasting 67
pasting, in specified format 67
reordering 64
saving slides as 190
saving, to new document 105
scaling 64
selecting 65
shapes 227
sizing 64
special effects 225
stretching 64
styles, using 77
text boxes 207
understanding 35
working with 63, 221
graphics stylescreating 77
deleting 78
editing 78
saving 77
working with 77
groupinggraphics 65
objects 203
guidebook 5
guidelinesdisplaying 23
using 23
294 Index

guidelines, margin 79
H
handbook 5
handoutsprinting 239
hanging indentsapplying 55
hard returnsentering, in spreadsheet cells 170
inserting 85
using 85
headerscreating 95
date 96
discontinuing 97
editing 96
filenames 96
guidelines, displaying 23
horizontal lines 96
inserting content 95
page numbering 96
spacing 97
suppressing 97
time insertion 96
viewing 95
working with 95
Help filesaccessing 7
printing topics 8searching 7
understanding 6
Hidden numeric format 167
hidden textcreating 50
highlightingslides, during play 236
highlightserasing, from slides 237
horizontal linesdrawing 227
inserting, in headers or footers 96
HTMLpublishing to 182
I
imagescapturing, from Navigator 244
capturing, in Viewer window 245
inserting in eBooks 130
linking to 64
working with 63
importing PDF files 39
indentingfirst line of every paragraph 55
first line of single paragraph 55
line of text, single 55
paragraph, entire 55
removing indents 55
text 55, 209
text, double indents 55
text, hanging indents 55
indentsremoving, from text 209
initial capschanging capitalization 53
correcting 53
in-product Helpaccessing 7
printing topics 8searching 7
understanding 6
inserting text from file 45
installationscreating 12
modifying 13
installingextra content 13
WordPerfect Office 12
Index 295

integrated Help resources 8
Internetviewing pages 251
intranetviewing pages 251
italicizing text 50, 166, 208
J
joiningcells 170
justificationbulleted lists levels 218
text 209
justifyingtext 56
K
keyboard mergescreating form documents 109
performing 112
Knowledge Base 9, 283
L
labelsprinting 116
labels, spreadsheetaligning 153
creating 153
creating, from value 153
understanding 136
landscape orientationsetting 81
languages, dictionary 267
Layout Galleryunderstanding 197
using 198
layouts, slideLayout Gallery 198
preset 198
understanding 197
leading (text)adjusting 56
changing, in bulleted lists 219
changing, in subtitles 214
changing, in titles 214
learningWordPerfect Office 5
WordPerfect Office, Web resources 9, 283
legal featuresLegal workspace 18
levelsin bulleted lists, creating 217
Lightning, WordPerfect 243
line heightchanging 57
line spacingbulleted lists 219
changing 56
changing, by exact value 57
leading 56
line height 57
paragraphs 209
subtitles 214
titles 214
linesdrawing 227
inserting, in headers or footers 96
shaping 229
lines of textentering, in spreadsheet cells 170
inserting 207
linked dataadding, to charts 179
linkingdata, to charts 178
images 64
296 Index

listsbulleted, using 59, 217
numbered, using 59
using 59
lockingspreadsheet titles 150
log filesPDF publication 118
lowercase textchanging capitalization 53
M
macro guide 5
macroscommand browser 281
Presentations features 279
Quattro Pro features 277
understanding 36, 136
WordPerfect features 275
Mail Merge Expert 112
mail merges 107
mailings, mass 107
main word listsadding 269
customizing 271
using 269
Make It Fitusing 85
Map Expertunderstanding 138
marginsguidelines, displaying 23
guidelines, using 79
measurements, specifying 79
page setup 79
ruler markers, using 79
mass mailings 107
Master Galleryapplying masters to slides 198
Background Gallery 198
importing masters 198
Layout Gallery 198
understanding 197
using masters 198
working with 197
mastersapplying to slides 198
creating slide shows from 189
importing 198
Master Gallery 197
understanding 197
using 198
mathematical formulascreating 173
mathematical operationsdata calculation, with Quick Math 157
simple equations 157
maximizingdocument windows 22
menu barunderstanding 17
menusHelp for 8
merge datacreating 107
merge filesassociating 110
mergesdata creation 107
fields, inserting in form documents 109
file associations 110
form documents, working with 108
performing 111
simplified 112
understanding 107
mergingdocuments 107
Index 297

metadataadding to eBooks 131
saving documents without 105
Microsoft Excel compatibilityfeatures 143
file sharing 143
workspace simulation 143
Microsoft Excel filesopening 143
saving 143
saving, automatically 144
Microsoft PowerPoint compatibilityfeatures 187
file sharing 187
workspace simulation 187
Microsoft PowerPoint filesopening 187
saving Presentations slide shows as 187
Microsoft PowerPoint modeunderstanding 187
Microsoft Word compatibilityCompatibility toolbar 31
features 31
Microsoft Word toolbar 31
migration features 31
workspace simulation 31
Microsoft Word documentsinserting in WordPerfect documents 33
opening 32
saving WordPerfect documents as 32
Microsoft Word formatsaving automatically 32
Microsoft Word modeunderstanding 18
MIDI filesinserting, in slides 231
migratingWordPerfect Office 12
minimizingdocument windows 22
MOBI filescreating 129
MOV filesusing, in slide shows 233
moviesadding, to slide shows 233
changing, in slide shows 233
inserting from Scrapbook 256
playing, in slide shows 233
using, in slide shows 233
MP3 filesusing, in slide shows 231
MPEG filesusing, in slide shows 233
music filesusing, in slide shows 231
N
navigatingnotebooks 139
Objects sheet 139
open notebooks 139
spreadsheets 139
navigating documentsbrowsing through insertion points 29
browsing with controls 29
controls for 29
list of open documents 29
methods for 29
moving to specific section 29
scrolling 29
newspaper columnsusing 87
nonadjacent cellsselecting 149
notebook viewschoosing 140
notebook windowsarranging 140
cascading 140
298 Index

hiding 140
overlapping 140
selecting 140
tiling, horizontally 140
tiling, vertically 140
working with 140
notebookscomponents of 135
creating 145
creating, from project templates 145
cycling through 139
display types 140
editing 161
navigating 139
opening 145
printing 181
printing, with repeated column titles 150
repeating column titles 150
understanding 145
viewing 140
zooming 141
notescreating, from Navigator 243
creating, from Notes window 244
images in 244
text formatting 244
Number numeric format 167
numbered listscreating 60
creating, with QuickNumbers 60
QuickNumbers, using 60
renumbering 61
using 59
numberingpages 91
pages, in headers or footers 96
text 61
numbersspreadsheet insertion 154
numeric formats for spreadsheetsapplying preset, for dates/times 167
applying preset, for values 167
working with 167
O
objectsaligning 203
animating 204
arranging 203
combining 203
copying 201
flipping 202
grouping 203
pasting 202
printing 239
rotating 202
scaling 202
selecting 201
separating 203
sizing proportionately 202
skewing 202
spacing 204
SpeedLinks 204
stretching 202
text 207
transforming 202
working with 201
Objects sheetnavigating 139
understanding 135
Objects viewchoosing 141
ODBC data sourcesform documents, associating 111
open passwordsPDF files 124
openingdocuments 36
Microsoft Excel files 143
Microsoft PowerPoint files 187
Microsoft Word documents 32
notebooks 145
PDF files 39
slide shows 189
orderingobjects 203
Index 299

organization chartspreset slide layouts 197
organizingtext 59
orientation, pagesetting 81
outlinescreating 61
numbered, creating 60
renumbering 61
using 59
outlines, slide showcreating 193
importing 193
outliningtext 50
overlappingnotebook windows 140
P
Page Breaks viewchoosing 141
page definitionscreating 82
deleting 82
modifying 82
restoring 83
using 81
page numbersalternate starting page 91
appearance, changing 92
controlling 92
font attributes, changing 92
footers 96
forcing 92
headers 96
inserting 91
secondary 92
stopping 93
suppressing 93
Page viewchoosing 21, 140
pagesattaching PDF form controls to 122
columns, working with 87
display options 22
dividing 83
fitting text to 85
forcing 85
margin setup 79
numbering 91
orientation 81
printing 239
printing sections 115
selecting 47
size 81
size, custom 81
size, preset 81
Paradox 242
paragraphsattaching PDF form controls to 123
drop caps, adding 52
formatting 55, 209
indenting 55
justifying 56
line spacing 56
QuickStyles, creating 76
selecting 47
parallel columnsusing 87
parallel columns with block protectusing 87
passwordsprotecting PDF files with 124
pastingcells 162
Clipboard contents 67
Clipboard contents, in specified format 67
graphics 67
graphics, in specified format 67
objects 202
text 67
text, in specified format 67
300 Index

text, unformatted 68
pattern fillssubtitle boxes 215
title boxes 215
PDF filescompatibility settings 118
creating forms 118
file information 118
importing 39
log files 118
opening 39
passwords 124
PDF/A compliance 117
publishing 117, 181, 240
working with 117
PDF form controlsadding multiline text fields 119
adding text fields 119
creating custom formats 120
formatting text fields 120
PDF formsadding check boxes 120
adding command buttons 121
adding drop-down lists 120
adding list boxes 121
adding radio buttons 121
adding text fields 119
creating 118
creating format masks 120
PDF resources 5
Percent numeric format 167
PerfectExpertaccessing 9
Quick Math 157
understanding 8
using 137
PerfectScript macroscommands 281
debugging 282
default folder 281
editor settings 281
Presentations support 279
Quattro Pro support 278
WordPerfect support 276
PerfectScript utility 281
periods, capitalization after 53
permission passwordsPDF files 124
photosinserting from Scrapbook 256
picture fillssubtitle boxes 215
title boxes 215
picturesinserting 63
inserting, from file 222
inserting, from Scrapbook 221
working with 63, 221
playingmovies, in slide shows 233
Presentations macros 279
Quattro Pro macros 277
QuickMacros 275
slide shows 235
slide shows, automatically 235
slide shows, manually 235
slide shows, with QuickPlay 236
plottingchart data 177
polygonschanging shape 229
converting from shapes 229
polylinesconverting into circles 227
drawing 227
shaping 229
portrait orientationsetting 81
Presentationsmacro features 279
quitting 190
starting 189
work area 185
Index 301

preset calculationsperforming 158
using 158
preset page sizesdeleting 82
modifying 82
restoring 83
using 81
Preview in Browser viewchoosing 21
printingaudience notes 239
documents 115
documents, sections of 115
drawings 239
envelopes 116
handouts 239
Help topics 8labels 116
multiple copies 115
notebooks 181
notebooks, with repeated column titles 150
pages 239
slide shows and drawings 239
slides 239
speaker notes 239
spreadsheets 181
printing engine 241
project templatesdocuments from 42
Favorites, adding to 43
notebooks from 145
settings, cascading 42
understanding 136
projectscreating slide shows from 189
property barsunderstanding 17
protectingPDF files 124
publishingeBooks 36, 129
files to PDF 181, 240
HTML files 182
PDF files 117
Q
QT filesusing, in slide shows 233
Quattro Probasics 135
macro features 277
quitting 138
starting 135
Quattro Pro Expertsaccessing, from toolbar 138
list of 137
working with 137
Quattro Pro macros 277
Quick Mathusing 157
QuickBulletsusing 59
QuickCellusing 137
QuickChartusing 178
QuickCorrectcapitalization 210
capitalization settings 53
replacing words automatically 210
sentence-spacing settings 53
word-spacing settings 53
QuickFinderusing 252
QuickFinder ManagerFast Search files, custom 253
Fast Search files, standard 252
starting 252
using 252
302 Index

QuickFinder Searcherfinding files with 252
starting 252
using 252
QuickFontsreusing recent fonts 50
QuickFormatcopying cell formatting with 165
copying text formats with 51
QuickFunctionpreset calculations with 158
QuickMacros 275
QuickNumbersusing 60
QuickPlayplaying slide shows with 236
quick-reference cards 5
QuickShow filescreating 236
QuickStylescreating 76
QuickSumusing 159
QuickTime moviesusing, in slide shows 233
QuickTipsaccessing 9
understanding 8
quittingAddress Book 246
conversion utility 249
Presentations 190
Quattro Pro 138
Scrapbook 256
WordPerfect 19
WordPerfect Lightning 243
R
range of slidesprinting 239
raster graphicscreating 223
recordingPresentations macros 279
Quattro Pro macros 277
QuickMacros 275
sound clips 232
recovering files from backup 106
redline textcreating 50
Redo itemssaving with document 68
redoingactions 68
actions, single 162
Reference Centeraccessing 5
searching from 6
registering WordPerfect Office 13
renumbering lists 61
repeatingactions 68
replacingcell contents 161
codes 73
data 161
text 71, 210
text, case-specific 72
word forms 72
words 72
resampling bitmaps 224
resources, learningincluded with product 5Web-based 9, 283
Index 303
restoring files from backup 106
returns, hardusing 85
returns, softusing 85
Reveal Codesdisplay options 26
displaying 26, 210
hiding 26
using 25
revertingdocuments 106
rotatingobjects 202
text 169
rows, spreadsheetcopying 162
data calculation, with Quick Math 157
deleting 151
height, specifying 171
inserting 150
joining 170
moving 162
selecting 149
sizing 170
totalling, with QuickSum 159
ruler guidesdisplaying 23
working with 22
rulersdisplaying 23
hiding 23
indenting text with 55
working with 22
S
savingdocument changes 104
documents 103
documents to multiple formats 104
documents, all 104
documents, default extension 104
documents, to new location 104
documents, without metadata 105
files iteratively 106
files to PDF 181, 240
files, in original format 32
graphics, to new document 105
Microsoft Excel files 143
Microsoft Excel files, automatically 144
PDF files 117
slide shows 190
slides as graphics 190
text to new document 105
scalingobjects 202
Scenario Expertunderstanding 138
Scientific numeric format 167
Scrapbookfinding items 257
importing files into 256
inserting files from 256
inserting graphics from 221
quitting 256
searching for items 257
starting 256
using 256
scrolling speedselecting text 48
scrolling throughspreadsheets 139
SDK 274
searchingcodes 73
documents 71
endnotes 100
footnotes 100
Help 7
text 71
Web resources 9, 284
searching forScrapbook items 257
304 Index

secondary page numbersinserting 92
selecting3D block of cells 149
bitmap areas 223
blocks of 3D cells 149
blocks of text 47
cells, from dialog box 149
characters 47
documents 47
graphics 65
nonadjacent cells 149
notebook windows 140
objects 201
pages 47
paragraphs 47
ranges of text 47
sentences 47
spreadsheet columns 149
spreadsheet rows 149
spreadsheets 149
tabular columns 47
text 47
text, dragging settings for 47
words 47
selecting textscrolling speed 48
selectionspublishing to PDF 117
sentence spacingcorrecting 53
sentencescapitalizing automatically 210
correcting spacing 53
selecting 47
separatingobjects 203
setup, WordPerfect Office 12
shadow cursorentering text with 45
shadow textcreating 50
shapesconverting to polygons 229
drawing 227
editing 228
sizing, with glyphs 229
sharingfiles, with Microsoft Office users 143
files, with Microsoft PowerPoint users 187
sideways text form documents 109
sizes, fontchanging 49
relative 49
sizes, pagecustom 81
preset 81
skewingobjects 202
Slide Editordisplaying 191
understanding 191
Slide Outlinercreating outlines with 193
displaying 191
importing outlines with 193
understanding 191
working with 193
slide showsanimated GIFs 233
animations 233
closing 190
controlling 235
creating 189
creating, from masters 189
creating, from projects 189
highlighting 236
movies 233
objects in 201
opening 189
outlines, creating 193
outlines, importing 193
playing 235
printing 239
publishing to PDF 117
Index 305

saving 190
shapes 227
slides, managing 195
sounds 231
speaker notes 195
speeding up 236
subtitles 213
text 207
titles 213
viewing 191
zooming 192
Slide Sorterdisplaying 191
sorting slides with 196
understanding 191
working with 195
slidesadding 195
backgrounds, preset 198
CD tracks, adding in entirety 231
CD tracks, adding in part 231
deleting 195
highlighting 236
layouts, preset 198
masters 198
printing 239
recording sound clips 232
saving as graphics 190
selecting objects 201
sorting 196
sound files, inserting 231
speaker notes 195
time delays 235
small capscreating 50
social media, Corellinks to 9, 283
soft returnsinserting 86
using 85
sortingslides 196
sound clipsrecording 232
using, in slide shows 231
soundsinserting from Scrapbook 256
spacingbulleted lists 219
footers 97
headers 97
lines 209
lines of text 56
objects 204
sentences, with QuickCorrect 53
subtitles 214
titles 214
words, with QuickCorrect 53
speaker notesadding 195
creating 195
creating, from slide text 195
special charactersinserting 52
inserting, in cells 154
special effectsapplying, to bitmaps 225
using 225
SpeedFormatpredesigned formats, applying 165
speeding up slide shows 236
SpeedLink objectscreating 204
working with 204
Spell Utility 271
spelling checker 261
spreadsheet formulasworking with 173
spreadsheet functionsworking with 175
spreadsheet tabsmoving 146
306 Index

spreadsheetsadding to notebooks 145
cell layout 150
column layout 150
copying 146
data calculation, with Quick Math 157
deleting multiple 146
deleting single 146
editing 161
entering values 154
HTML publication 182
inserting multiple 146
inserting single 146
labels 153
locking titles 150
moving 146
navigating 139
numeric formats, preset 167
preset calculations 158
printing 181
publishing to PDF 117
renaming 147
repeating column titles 150
row layout 150
scrolling through 139
selecting components 149
selecting multiple 149
simple equations 157
special characters 153
symbols 153
understanding 135
star shapesdrawing 228
startingAddress Book 246
conversion utility 249
PerfectScript utility 281
Presentations 189
Quattro Pro 135
QuickFinder Manager 252
QuickFinder Searcher 252
Scrapbook 256
WordPerfect 17
WordPerfect Lightning 243
stoppingpage numbers 93
stretchingobjects 202
strikeout textcreating 50, 166
strikethrough textcreating 50, 166
stylesfont 49
graphics 77
text 75
understanding 35
working with 75
subscript textcreating 166
subtitle boxesadding 214
gradient fills 215
pattern fills 215
picture fills 215
texture fills 215
subtitles, chart 178
subtitles, slideboxes 214
font fill 213
font outline 214
font properties 213
formatting 213
line spacing 214
working with 213
superscript textcreating 166
supportregistration 13
Web-based resources 9
suppressingheaders or footers 97
page numbers 93
symbolsapplying to bullets 218
inserting 52
inserting, in cells 154
Index 307

T
tablesguidelines, displaying 23
HTML publication 182
tabular columnsselecting 47
template macros 276
templatesbrowsing 43
default template 36, 41
opening eBook Publisher 129
project templates 41
understanding 35
textadding 207
aligning 56, 209
appearance, in bulleted lists 218
appearance, in spreadsheet cells 165
arranging 55
bulleting 60
capitalization, correcting 52
case, changing 53
centering 56
centering, across cells 169
characters, inserting 52
copying 67
correcting 210
cutting 67
deleting 208
deselecting 47
drop caps 51
editing, in headers or footers 97
entering, in document window 45
entering, in text box 45
finding and replacing 71
fitting to page 85
font attributes 165, 208
font properties 166, 208
font settings 49
formatting 49, 207
formatting codes 210
formatting, copying 51
indenting 55, 209
indents, removing 209
inserting, from document 46
inserting, from file 45
justifying 56, 209
line spacing 56
moving 207
moving, between documents 68
moving, within document 68
numbering 61
organizing 59
overlapping with graphics 65
paragraph formatting 209
pasting 67
pasting, in specified format 67
pasting, unformatted 68
positioning in text boxes 207
preset slide layouts 197
replacing 210
rotating 169
saving to new document 105
selecting 47
selecting blocks of 47
selecting ranges of 47
styles, using 75
subscript 166
superscript 166
symbols, inserting 52
understanding 35
wrapping 170
text boxesinserting 207
inserting, into form documents 109
positioning text in 207
text, entering 45
text formulascreating 173
text objectscreating 207
managing 207
text stylesapplying 76
creating 75
deleting 75
editing 77
QuickStyles 76
saving 76
308 Index

using 75
TextArtcreating images 258
custom images 258
editing images 258
preset 2D images 258
preset 3D images 258
using 258
texture fillssubtitle boxes 215
title boxes 215
thesaurusinserting words with 265
lookup options 266
options for 265, 266
replacing words with 265
using 265
third-party utilities 242
tilingdocument windows 22
notebook windows, horizontally 140
notebook windows, vertically 140
time delaysapplying to slides 235
time formatsapplying 167
Time numeric format 168
timed document backups 106
timesfooter insertion 96
header insertion 96
spreadsheet insertion 155
title boxesadding 214
gradient fills 215
pattern fills 215
picture fills 215
texture fills 215
titles, chart 178
titles, columnrepeating 150
titles, slideboxes 214
font fill 213
font outline 214
font properties 213
formatting 213
line spacing 214
preset layouts 197
working with 213
titles, spreadsheetlocking 150
toolbarsdisplaying 137, 185
Help for 8hiding 185
moving 137
understanding 17, 136
using 185
working with 136
totalingcells, with QuickSum 159
columns 157
transformingobjects 202
true/false formulas 173
Two Pages viewchoosing 21
typesettingleading 56
U
underlining text 50, 166, 208
Undo itemssaving with document 68
Undo levelssetting 68
Index 309

undoingactions 68
actions, single 162
updatingWordPerfect Office 14
upgrading WordPerfect Office 13
uppercase textchanging capitalization 53
user guides 5
user word listsadding 269
adding words 270
customizing 270
deleting words 271
editing 270
using 269
utilities 241
V
valuesdecimal places, changing 167
spreadsheet insertion 154
totaling, in columns 157
understanding 136
VBA macrosPresentations support 279
Quattro Pro support 278
WordPerfect support 276
working with 273
vector graphicsunderstanding 221
vector objectsconverting from bitmaps 225
converting to bitmaps 225
vertical linesdrawing 227
video clipsusing, in slide shows 233
viewing documentsdisplay options 21
guidelines 23
in WordPerfect 21
methods for 21
navigation methods 29
Reveal Codes 25
rulers and ruler guides 22
switching views 21
with no user interface 21
viewing slide showsmethods for 191
Slide Outliner 193
switching views 191
views, notebook 140
W
WAV filesusing, in slide shows 231
Webviewing pages 251
Web resources 9
searching 284
using 283
websites, Corellinks to 9, 283
What-If Expertunderstanding 138
windows, documentcascading 22
entering text 45
maximizing 22
minimizing 22
tiling 22
understanding 17
windows, notebook 140
WMA filesusing, in slide shows 231
word listschoosing 269
310 Index

using 269
word spacingcorrecting 53
Word, Microsoft 31
WordPerfectbasics 17
default workspace 18
macro features 275
quitting 19
starting 17
WordPerfect Classic modeunderstanding 18
workspace for 18
WordPerfect Legal modeunderstanding 18
WordPerfect Lightninggetting started 243
Navigator window 243
Notes window 244
quitting 243
starting 243
using 243
Viewer window 245
WordPerfect macros 275
WordPerfect Officelearning 5
migrating 12
modifying installations 13
registering 13
setup 12
social media 9, 283
updating 14
upgrading 13
websites 9, 283
WordPerfect Office modeunderstanding 18
wordscorrecting automatically 210
finding and replacing forms of 72
finding and replacing in entire folder 73
finding and replacing whole 72
selecting 47
spacing, correcting 53
work areaPresentations overview 185
WordPerfect tour 17
workspacechanging 18
Microsoft Excel, simulating 143
Microsoft PowerPoint, simulating 187
Microsoft Word, simulating 31
settings for, saving 18
WordPerfect tour 17
wrappingtext 170
wrapping text around PDF form controls 123
writing styles 264
writing tools 259
language settings 259
setting up 259
using 259
Z
zoomingbitmaps 224
documents 22
notebooks 141
slide shows 192
Index 311

Corel® WordPerfect® Office 2020 Handbook
© 2020 Corel Corporation. All rights reserved.
Product specifications, pricing, packaging, technical support and information (“specifications”) refer to the retail English version only. The specifications for all other versions (including other language versions) may vary.
INFORMATION IS PROVIDED BY COREL ON AN "AS IS" BASIS, WITHOUT ANY OTHER WARRANTIES OR CONDITIONS, EXPRESS OR IMPLIED, INCLUDING, BUT NOT LIMITED TO, WARRANTIES OF MERCHANTABLE QUALITY, SATISFACTORY QUALITY, MERCHANTABILITY OR FITNESS FOR A PARTICULAR PURPOSE, OR THOSE ARISING BY LAW, STATUTE, USAGE OF TRADE, COURSE OF DEALING OR OTHERWISE. THE ENTIRE RISK AS TO THE RESULTS OF THE INFORMATION PROVIDED OR ITS USE IS ASSUMED BY YOU. COREL SHALL HAVE NO LIABILITY TO YOU OR ANY OTHER PERSON OR ENTITY FOR ANY INDIRECT, INCIDENTAL, SPECIAL, OR CONSEQUENTIAL DAMAGES WHATSOEVER, INCLUDING, BUT NOT LIMITED TO, LOSS OF REVENUE OR PROFIT, LOST OR DAMAGED DATA OR OTHER COMMERCIAL OR ECONOMIC LOSS, EVEN IF COREL HAS BEEN ADVISED OF THE POSSIBILITY OF SUCH DAMAGES, OR THEY ARE FORESEEABLE. COREL IS ALSO NOT LIABLE FOR ANY CLAIMS MADE BY ANY THIRD PARTY. COREL'S MAXIMUM AGGREGATE LIABILITY TO YOU SHALL NOT EXCEED THE COSTS PAID BY YOU TO PURCHASE THE MATERIALS. SOME STATES/COUNTRIES DO NOT ALLOW EXCLUSIONS OR LIMITATIONS OF LIABILITY FOR CONSEQUENTIAL OR INCIDENTAL DAMAGES, SO THE ABOVE LIMITATIONS MAY NOT APPLY TO YOU.
Corel, the Corel logo, the Corel balloon logo, WordPerfect, Lightning, Paradox, Presentations, and Quattro are trademarks or registered trademarks of Corel Corporation in Canada, the United States and/or other countries. This product and packaging includes intellectual property (including trademarks) owned, registered, and/or licensed by third parties not affiliated with Corel and used with permission. The inclusion thereof does not constitute or imply any endorsement of, or by, such third parties, or any warranty by Corel of the quality, merchantability, or fitness of any third-party products or services. Use of this product is subject to acceptance of the license agreements included in this software. Patents: www.corel.com/patent
203290

About Corel
Corel products enable millions of connected knowledge workers around the world to do great work faster. Offering some of the industry's best-known software brands, we give individuals and teams the power to create, collaborate, and deliver impressive results. Our success is driven by an unwavering commitment to deliver a broad portfolio of innovative applications – including CorelDRAW®, ClearSlide®, MindManager®, Parallels®, and WinZip® – to inspire users and help them achieve their goals.
To learn more about Corel, please visit www.corel.com.