cpms user guide - epicare
TRANSCRIPT
CPMS User Guide
Document type: Training Material
File name: Quick User Manual for CPMS
Document reference: 02112018UG-CPMS
Produced by: OpenApp
Version: 0.9
Release date: 02/11/2018

Table of Contents1. Welcome to the CPMS......................................................................................................................4CPMS Made for ERN...........................................................................................................................42. Getting Started..................................................................................................................................5
2.1. Access to CPMS........................................................................................................................52.2. Request Access to CPMS..........................................................................................................5
Sign in with an EU Login account.......................................................................................................9Choose your verification method.........................................................................................................9Register a mobile phone number for receiving verification SMS......................................................10Sign in with an EU login account using a password..........................................................................13Select "Password" as the verification method, enter your password in the "Password" field and clickon "Sign in" to proceed to the service you requested to use...............................................................13Sign in with an EU login account using the ECAS Mobile App PIN code........................................13The ECAS Mobile App prompts you to enter your PIN code............................................................13Sign in with an EU login account using the ECAS Mobile App QR code.........................................14Sign in with an EU login account using Mobile Phone + SMS.........................................................17
2.3. Logging In...............................................................................................................................222.4. CPMS Support Desk...............................................................................................................24
3. Accessing Your Applications within the CPMS.............................................................................254. CPMS system navigation...............................................................................................................26
4.1. Medical Centre (Hospital) Dashboard....................................................................................264.2. ERN Dashboard......................................................................................................................274.3. Preferences..............................................................................................................................284.4. Guest Dashboard.....................................................................................................................29
5. Patient Enrolment...........................................................................................................................305.1. Consent...................................................................................................................................32
6. Consultation Form..........................................................................................................................346.1. File Upload.............................................................................................................................38
Batch Upload.............................................................................................................................39IHE............................................................................................................................................40
6.2. Medical Image Viewers..........................................................................................................41Osimis Pro viewer background.................................................................................................41Uploaded Images.......................................................................................................................41Series picker..............................................................................................................................41Study types supported...............................................................................................................42Digital pathology viewer...........................................................................................................43
6.3. Pedigree..................................................................................................................................437. Panel & Form Layout.....................................................................................................................45
7.1. Timeline..................................................................................................................................467.2. Data Entry...............................................................................................................................47
8. Panel Workflow – Virtual Consult Process.....................................................................................488.1. Open a New Panel...................................................................................................................488.2. Open........................................................................................................................................508.3. Panel Selection........................................................................................................................51
Setting a Panel Lead..................................................................................................................51
CPMS Quick User Manual ver.9 02112018UG-CPMS Page 2

8.4. Data Completion.....................................................................................................................528.5. Assessment..............................................................................................................................528.6. Outcome..................................................................................................................................568.7. Sign-Off..................................................................................................................................578.8. Closed.....................................................................................................................................588.9. Archived..................................................................................................................................598.10. Copying Panels.....................................................................................................................59
9. Meetings.........................................................................................................................................619.1. Video conferencing requirements...........................................................................................619.2. Conflicting video applications................................................................................................629.3. Network..................................................................................................................................629.4. Create a Meeting.....................................................................................................................639.5. Join a Meeting.........................................................................................................................649.6. Meeting Summary...................................................................................................................66
10. CPMS Task-List...........................................................................................................................6811. Email Notifications.......................................................................................................................6812. Roles & Rights.............................................................................................................................69
12.1. ERN Coordinator..................................................................................................................6912.2. ERN Dispatcher....................................................................................................................71
13. Webinars.......................................................................................................................................7214. ERN Map......................................................................................................................................7315. ERN Databases/Registries............................................................................................................7416. Secure File upload........................................................................................................................7517. Appendix – Outcome Document Template...................................................................................76
CPMS Quick User Manual ver.9 02112018UG-CPMS Page 3

1. Welcome to the CPMSClinical Patient Management System, known as CPMS, is a secure web-based application tosupport European Reference Networks in the diagnosis and treatment of rare or low prevalencecomplex diseases or conditions across national borders.
CPMS Made for ERNEuropean Reference Networks (ERNs) are virtual networks involving healthcare providers acrossEurope. They aim to tackle complex or rare diseases and conditions that require highly specialisedtreatment and concentrated knowledge and resources. The first ERNs were launched in March2017, involving more than 900 highly-specialised healthcare units from over 370 hospitals in 26Member States. 24 ERNs are working on a wide range of disease areas such as rare and complexepilepsies, neurological disease, transplantation in children, etc.
CPMS Quick User Manual ver.9 02112018UG-CPMS Page 4

2. Getting Started
2.1. Access to CPMS
Access to the Clinical Patient Management System (CPMS) is strictly regulated to protect the dataprivacy rights of the patients. Only authenticated users (ECAS) can request authorisation (SAAS)from the ERN to use the CPMS. Each ERN has member Healthcare Provider centres (HCP) and itis envisaged that the users of CPMS are Health Professionals (HP) within these Healthcare Providercentres (HCPs). Guest accounts can be created at the direct request of the ERN Coordinators.
2.2. Request Access to CPMSThis document explains how to request access to CPMS. To be able to start, the first requirement isan EU login. In order to register for one first go to https://cpms.ern-net.eu/login/ and click on thelink to create an EU login.
CPMS Quick User Manual ver.9 02112018UG-CPMS Page 5

Once you arrive at the site, fill in the information in each of the boxes and click on Create anaccount at the end.
Fill in the provided form with your personal details:
• First name – Your first name cannot be empty and can contain letters in any alphabet;
• Last name – Your last name cannot be empty and can contain letters in any alphabet;
• E-mail – An e-mail address that you have access to;
• Confirm e-mail – Type your e-mail address again to make sure it is correct;
• E-mail language – The language used when EU login sends you e-mails regardless of the language used in the interface. It guarantees that you are able to understand these e-mails even if they were triggered mistakenly. EU login only sends you e-mails for validating your identity or for notifying you about security events affecting your account;
CPMS Quick User Manual ver.9 02112018UG-CPMS Page 6

• Enter the code – By entering the letter and numbers in the picture, you demonstrate that you are a human being who is legitimately creating an account. If the code is too difficult to read, click on the button with two arrows to generate a new one;
• Check the privacy statement by clicking on the link and tick the box to accept the conditions;
• Click on "Create an account" to proceed.
If the form is correctly filled in, an e-mail is sent to the address you provided in order to verify that you have access to it. After a couple of seconds, you should receive an e-mail in your mailbox. If you cannot find the e-mail, check your spam or junk folder.
Click the link in the e-mail or copy/pasteit in the address bar of your browser.
You are invited to select a password andto confirm it to make sure you did notmistype it.
The E-mail field is pre-filled and cannotbe changed.
It should contain the e-mail address youprovided previously.
CPMS Quick User Manual ver.9 02112018UG-CPMS Page 7

Type the password you want to use in the "New password" field.It must contain at least 10 characters and a combination of:
upper case letters, lower case letters, numbers and Special characters.
Select a password as long and as complex as you can in order to make your account more secure but keep in mind that you will have to remember it.
Type your password again in the "Confirm new password" and click on "Submit".
You are now authenticated.Click on "Proceed" in order to do so.
CPMS Quick User Manual ver.9 02112018UG-CPMS Page 8
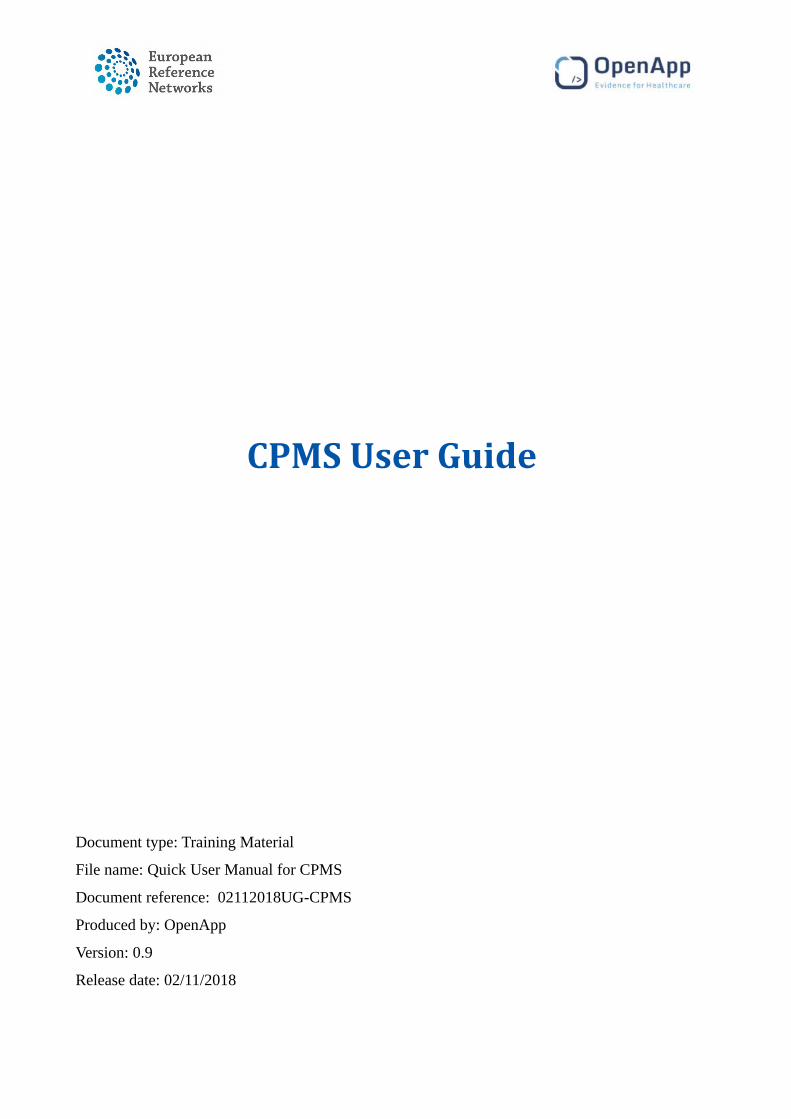
Sign in with an EU Login account
Once your EU Login account is created, you can use it to access CPMS. While accessing these services, the EU login screen will display when authentication is needed.
Enter the e-mail address you provided when creating your EU login account in the "Use your e-mail address" field and click on "Next".
Your e-mail address will automatically be remembered so that you can skip this step next time you use the same browser on the same PC.
Choose your verification method
EU login supports a variety of verification methods. Using a password is the simplest one. But CPMS uses an additional verification method. It involves using an additional device which can provide more security. This is you cellphone. The 3 different methods here below are the one used to login to CPMS.
Several verification methods require using the ECAS Mobile App. The ECAS Mobile App is an application that you can install on your mobile device from the Google Play Store (Android), the App Store (iOS) or theWindows Store (Windows Phone). You first need to initialize the application. Using the ECAS Mobile App in combination with the password provides additional security.
Please note that some verification methods might not be available while accessing some specific services.
CPMS Quick User Manual ver.9 02112018UG-CPMS Page 9

1) ECAS Mobile App PIN code – If the mobile device where your ECAS Mobile App is installed hasinternet connectivity then you can use the "ECAS Mobile App PIN Code" verification method. You willhave to enter a 4 digits PIN code into the ECAS Mobile App in order to connect to EU login. This is thePIN code that you have chosen while registering your mobile device into EU login.
2) ECAS Mobile App PIN code – If the mobile device where your ECAS Mobile App is installed hasinternet connectivity then you can use the "ECAS Mobile App PIN Code" verification method. You willhave to enter a 4 digits PIN code into the ECAS Mobile App in order to connect to EU login. This is thePIN code that you have chosen while registering your mobile device into EU login.
3) ECAS Mobile App QR code – If the mobile device where your ECAS Mobile App is installed doesnot have internet connectivity then you can use the "ECAS Mobile App QR Code" verification method.You will need to scan a QR code using the ECAS Mobile App in order to get a one-time password,which you then introduce while connecting from your PC.
4) Mobile phone + SMS – Your mobile phone allows you to connect to EU login by receiving an SMS,if your number is registered in your EU login account. In some countries, you might not receive the SMSand should rather use another verification method.
You then have to register your phone number in your EU login account:
Register a mobile phone number for receiving verifcaton SMS
Your mobile phone number needs to be registered in your EU login account in order to receive SMS to authenticate.
In order to register your mobile phone number, open a browser and go to the following URL: https://ecas.ec.europa.eu/cas
CPMS Quick User Manual ver.9 02112018UG-CPMS Page 10

Once successfully authenticated, move themouse over the gear at the top right corner todisplay the menu and select "My Account".
Click on "Manage my mobile phonenumbers".
Click on "Add a mobile phone number".
Click on "Add a mobile phone number".
CPMS Quick User Manual ver.9 02112018UG-CPMS Page 11

Enter your mobile phone number in the"Mobile phone number" field, starting with aplus sign and with the country code.
Do not include dots, parenthesis or hyphens.
When clicking "Add", a SMS is sent to yourmobile device.
The SMS contains a challenge code made ofeight characters separated with a hyphen(minus sign).
Type the challenge code you received in the"Text message challenge code" fields and clickon "Finalise".
Your mobile phone number is successfullyregistered and can now be used for
authenticating.
CPMS Quick User Manual ver.9 02112018UG-CPMS Page 12

Sign in with an EU login account using a password
Select "Password" as the verification method, enter your password in the "Password" field and click on "Sign in" to proceed to the service you requested to use.
Sign in with an EU login account using the ECAS Mobile App PIN code
Select "ECAS Mobile App PIN Code" as the verification method, enter your password in the "Password" field and click on "Sign in".
If you have more than one device with an initialised ECAS Mobile App, you are asked to select the one you would like to use.This left screen does not display if you have only initialised one device.
Click on the device using the name you provided.
EU login sends a notification to your mobile device.
Tapping on the notification triggers the launch of the ECAS Mobile App.
The ECAS Mobile App prompts you to enter your PIN code.Enter your PIN code and tap on "Authenticate".
This automatically completes the process on your PC that proceeds to the service you requested to use.
CPMS Quick User Manual ver.9 02112018UG-CPMS Page 13

Sign in with an EU login account using the ECAS Mobile App QR code
Select "ECAS Mobile App QR Code" as the verificationmethod.
Enter your password in the "Password" field and click on "Sign in".
A QR code is displayed on screen.
Start the ECAS Mobile App on a mobile device where it has been previously initialised.
Tap on "Scan QR Code".
The QR code scanner starts on your mobile device.
Point the camera of your mobile phone to your PC screen until the QR code is recognised.
CPMS Quick User Manual ver.9 02112018UG-CPMS Page 14

The ECAS Mobile App displays a one-time passwordcomposed of 8 digits.
Type the one-time password in the "code generated by your app" field and click "Sign in" to proceed to the service you requested to use.
CPMS Quick User Manual ver.9 02112018UG-CPMS Page 15

Sign in with an EU login account using On Mobile authentication
The "On Mobile" verification method is only available when browsing on a mobile device and should only be used if an ECAS Mobile App has been previously installed and initialised on that device.
Select "On Mobile Authentication" as the verification method and tap on "Sign in".
The ECAS Mobile App opens automatically and promptsyou to enter your PIN code.
Enter your PIN code and tap on "Authenticate".
ECAS sends a notification to your mobile device.
Tapping on the notification sends you back to your browser that proceeds to the service you requested to use.
CPMS Quick User Manual ver.9 02112018UG-CPMS Page 16

Sign in with an EU login account using Mobile Phone + SMS
CPMS Quick User Manual ver.9 02112018UG-CPMS Page 17
Select "Mobile Phone + SMS" as theverification method.
Enter your password in the "Password" field and entera previously registered mobile phone number in the
"Mobile phone" field, starting with a plus sign and withthe country code. Do not include dots, parenthesis or
hyphens.
When clicking "Sign in", an SMS is sent to yourmobile device. The SMS contains a challenge code
made of nine characters separated with hyphens (minussign).
Type the challenge you received in the "SMS textchallenge" fields and click on "Sign in" to proceed to the
service you requested to use.

Once the EU login has been created you are ready to request access to the CPMS. Go back to thelogin page for CPMS on https://cpms.ern-net.eu/login/. This time click on the link to requestauthorisation to use CPMS.
Once you arrive at the site click on the Request access button:
CPMS Quick User Manual ver.9 02112018UG-CPMS Page 18

On the page, that appears select CPMS in the Application box:
Once selected click on Step 2: Select an organisation, to proceed
On the Select Organization page you need to select which ERN you wish to request access for by clicking on Open next to it. *You do not need to click in the circle until the very last step when you select your healthcare provider
It is technically possible to proceed to step 3 after just selecting the ERN.
Please note that doing this will result in the request being rejected. No account can be activatedwithout selecting the Country and Healthcare Provider. Please see below:
CPMS Quick User Manual ver.8 31072018UG-CPMS Page 19

After clicking Open, you need to select which country your Healthcare Provider is located in.Again, you select this by clicking Open
Finally, you select your Healthcare provider by clicking in the small circle next to its name
Once selected you click on Step 3: select an access profile to continue
CPMS Quick User Manual ver.8 31072018UG-CPMS Page 20

On the Select access profile page you need to select which type of access profile you arerequesting. You do this by clicking in small circle next to it:
When done you click on Step 4: You can type a comment to continue
On the final page, you will see a summary of what you have selected in previous steps. Youcan write a comment to the person who is going to validate the access request. This is not
mandatory
CPMS Quick User Manual ver.9 02112018UG-CPMS Page 21

When you are ready click on Submit request access:
Clicking the Submit request access button will notify the coordinator of the ERN you requested access toand he or she will either accept or reject the request.
Once the access has been accepted you can access CPMS by going to https://cpms.ern-net.eu/login/ and selecting Login via EU login.
The acceptance process may require a few days and is manually managed. Once accepted, TheHelp desk will create your user and will be automatically notified by mail when your user iscreated and ready for use.
2.3. Logging In
The application can be accessed through web-browsers. For best experience, make sure you are using asupported browser. CPMS works to its full potentials on Google Chrome preferably latest version, orver. 64 and above. Google chrome is the most recommended web browser by which users can avail ofall CPMS technical functionalities.
However, other browsers are can still be used but NOT fully supported. There might be certaindifficulties when using some components in CPMS particularly the video conferencing technology.
• Mozilla Firefox (ver.60 and above)
• Internet Explorer (ver.11.0 or later)
• Microsoft Edge (ver.HTML 17.17134)
Note:
• Cameras and microphones have to be enabled to be accessed through the browser.
• When using devices with Mac operating system, all users are requested to access the CPMS with GoogleChrome
• Please AVOID using Safari web browser since it is NOT fully compatible with CPMS components
• Users should NOT use private browsing modes such as “incognito” on chrome whilst using the CPMS.
• Also, in your settings, turn on: JavaScript To be modified or explained (procedure to activate Java in
each supported browser).
To access CPMS Live system where only real, and authentic data are supposed to be recorded, please goto page on the web:
https://cpms.ern-net.eu
It is strongly advised to have the very last browser version available installed for a better performanceand avoid any issues..
CPMS Quick User Manual ver.9 02112018UG-CPMS Page 22

Potential users should already have or create an EU login account (which allows CPMS to validate theauthenticity of the user without having access to the user passwords). When you have an EU loginaccount (which can be used to access multiple EU information systems), click on the button “Login viaEU login” to request authorisation to use CPMS and follow the instructions, this authorisation isgranted at ERN level.
1. Click ‘Login via EU login’, to access the EU login authentication page:
Figure 1: EU login Link
CPMS Quick User Manual ver.9 02112018UG-CPMS Page 23
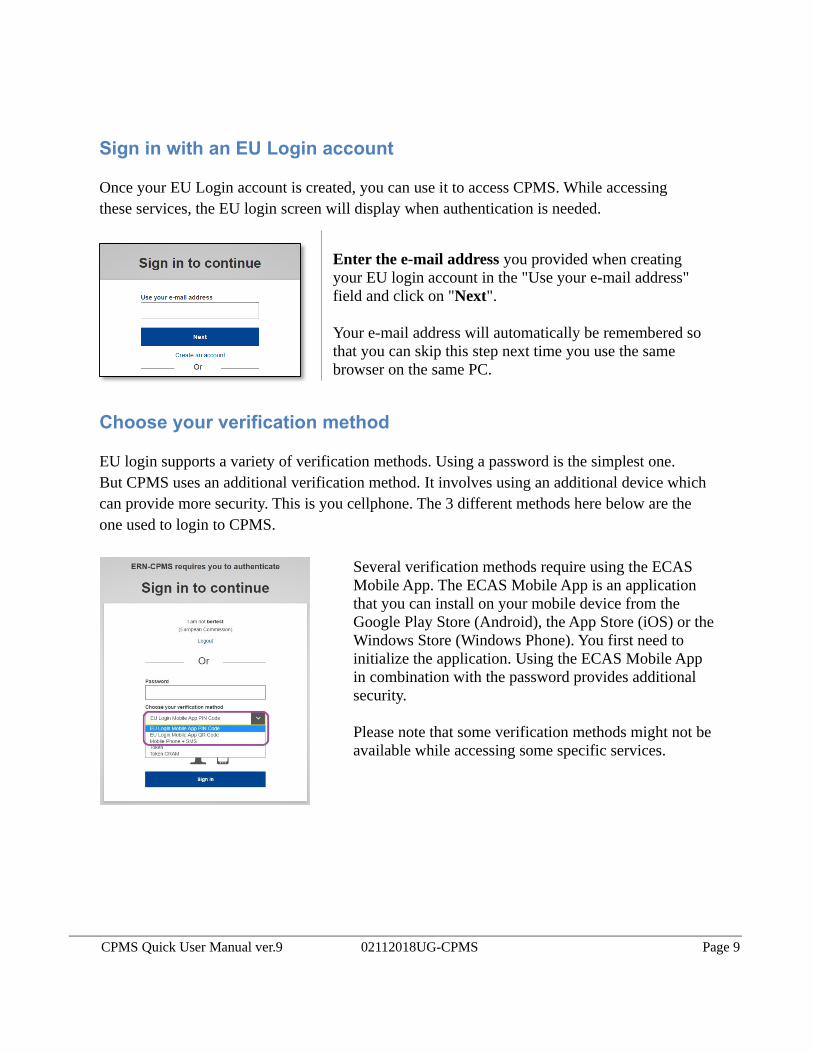
2. The user should enter their registered email, then choose a verification method that is typically a password
and another method of authentication from the drop-down menu. Please refer to the different methodsabove.
2.4. CPMS Support Desk
In case you have any technical difficulty logging into the CPMS or using any of its services, please contact thesupport team via email [email protected]. Please send your feedback, suggestions, orcomplaints to the support team.
CPMS Quick User Manual ver.9 02112018UG-CPMS Page 24
Figure 2: EU login

3. Accessing Your Applicatons within the CPMSSuccessfully logging in to the CPMS, it will direct the user to the Global Dashboard Page as displayedbelow:
1. Clicking here will always direct the user to the Global Dashboard from anywhere in the system.
2. There will always be a notification message appearing the top corner on the left hand side until usersselect their preferences in a number of thematic areas of their ERN.
3. The ‘Applications’ section lists and links the applications (ERN’s, medical centres etc.) so that the usercan access within the system.
4. The box in the middle of the Global Dashboard lists all the training materials and webinars produced forthe CPMS users
5. The top menu contains links to the user’s applications allowing for quick and easy navigation of theCPMS.
6. The documentation section contains various training materials and documents detailing the different partsof the system.
CPMS Quick User Manual ver.9 02112018UG-CPMS Page 25
Figure 3: Home Page
2
3
4 51
6

4. CPMS system navigaton
4.1. Medical Centre (Hospital) Dashboard
By clicking on a link to one of their medical centres as detailed in Section 2(4.2. ERN Dashboard), theuser can navigate to their dashboard for that centre. An example of such a dashboard is shown in Figure4 below:
1. The side menu facilitates quick navigation of the CPMS’s features, based on the user’s role.
2. The ‘Patients’ box contains links for the user to enrol a new patient to the system and to viewcurrent patients in their centre.
3. The search feature allows the user to quickly find a particular patient, based on their first name,last name, CPMS ID, panel ID and nickname.
4. The ‘Recent Activity’ section lists the latest patients to have been enrolled or to have had theirdata updated. Clicking on the patient ID will direct the user to that patient’s page.
CPMS Quick User Manual ver.9 02112018UG-CPMS Page 26
Figure 4: Medical Centre Dashboard

13 4
2
5
6
4.2. ERN Dashboard
ERNs can be accessed in a similar manner to the medical centres by clicking on the appropriate linkeither from the top menu or from the applications page. Doing so will direct the user to their dashboardfor that ERN. An example of an ERN dashboard is shown in Figure 5 below:
Figure 5: ERN Dashboard
1. Side Menu: Contains links to the features of the ERN to allow for quick and easy navigation.
2. Panels: Contains links to the panels on which the user is the Panel Lead and links to the panels that user contributes to, but does not lead.
3. Request Inbox: Contains the requests for assistance sent to the user (as ERN Coordinator orDispatcher only). Discussed further below.
4. Member Task list: Contains a list of pending tasks awaiting the user’s interaction.
5. Panel Invitations: Lists the invitations the user has to join different panels. The invitations can be accepted or declined by clicking on the link.
6. My Meetings: Lists the meetings the user is scheduled to participate in.
7. Contributing panels: Lists the panels you are contributing to. Selecting a panel will immediately open it.
CPMS Quick User Manual ver.9 02112018UG-CPMS Page 27
7
8

4.3. Preferences
In the ‘Preferences’ tab, Health Professionals must specify the thematic areas they are interested inwithin the ERN. It is mandatory in the ERN application that all active users set their preferences; if theuser does not set their preferences then they will not be able to access any of the CPMS componentsuntil their preferences are selected. This is an important step to ensure that the user is listed as anavailable Health Professionals during the Panel Selection phase (discussed below). Figure 6 belowshows an example of a preference list.
CPMS Quick User Manual ver.9 02112018UG-CPMS Page 28
Figure 6: User preferences

4.4. Guest Dashboard
As an uncommon user, Guest or an external Health Professional may be given access to enrol patientsand seek assistance from an ERN. Unlike typical users in CPMS, Guest HP will be assigned to a “GuestVirtual Centre” as virtual centre.
The “guest” Dashboard allows guest users to enrol their patients and participate in panels they createthemselves
Figure 7: Guest Dashboard
When the ERN Coordinator accepts the guest’s invitation, they assign a lead and grant them access tothe ERN dashboard as a guest. The guest will not have access to an actual Healthcare Provider (Centre)inside CPMS. Instead they will be given access to a Virtual Centre inside the ERN they requested accessto. They can enrol Patients, see a list of already enrolled patients and also any open Panels. The Guestuser can open a panel and will be part of it. Note that it is not possible for a guest user to act as the leadof a panel.
Important: A guest user is a member of CPMS for 90 days. Then if he/she is not participating to a panel,the account will be deactivated.
CPMS Quick User Manual ver.9 02112018UG-CPMS Page 29

5. Patent EnrolmentIn order to enrol a new patient for a certain medical centre, the enrolling Health Professional can clickon either of the ‘Enrol Patient’ buttons on their dashboard for the medical centre in question.
The “Enrol Patient” button will allow the Health Professional to enrol a new patient the “Patient List”button will show the list of the existing patients
CPMS Quick User Manual ver.9 02112018UG-CPMS Page 30
Figure 8: Enrol Patient Buttons

Clicking on either of these buttons will bring the user to the ‘Enrol Patient’ form shown in Figure 9.Required fields are indicated by a red field or a ‘required’ tag. These must be filled out in order for thepatient to be successfully enrolled.
Figure 9: Enrol Patient Form
CPMS Quick User Manual ver.9 02112018UG-CPMS Page 31

5.1. Consent
In order to be enrolled in the system, the patient must give consent. As can be seen in Figure 9 above,there is a checkbox, which the enrolling Health Professional must use to indicate that consent has beengiven. The consent forms are available in the local language for all Member States taking part in theERN project. User can download the consent by clicking the ‘Download Consent Model Forms’ buttonlocated on the right hand side of the consent section. Three types of consents are available on the CPMS:
• Consent for care pathway: This consent is the minimum required consent for successfulenrolment and having consultation panels on a particular patient.
• Consent for ERN databases and registries: This consent is linked directly to authorize PanelLeads to make the Pseudonymised clinical data available in low accessibility databases forauthorized users after panels have been closed and an outcome has been signed off.
• Consent to be contacted for research: This consent outlines that patients are interested to becontacted for specific research projects outside the CPMS.
CPMS Quick User Manual ver.9 02112018UG-CPMS Page 32

If a patient revokes their consent for care, all open panels for that patient must be cancelled. An errormessage to this effect will be displayed on the patient’s page to remind Health Professionals from theenrolment centre to cancel any on-going or future consultation requests for this particular patient, asshown below in Figure 10:
Figure 10: Error Message to remind the user to cancel any open panels for a patient who has revoked consent for care.
CPMS Quick User Manual ver.9 02112018UG-CPMS Page 33

6. Consultaton FormThe consultation form is the heart of the consultation process onwhich experts and specialists can collaborate to reach a consensus fordiagnosis and treatment. The Panel lead or the enrolling clinician canfill in patient’s data and attach documents, thereafter, panel memberswill be invited to review the consultation request and decide whetheror not they can participate or request more information and procedureresults to be provided for making better informed decisions.
The consultation form is composed of multiple sections where aPanel Lead or Panel Admin from the enrolment centre, can type ininformation and record findings relevant to the type of theconsultation request.
For each section, when it is selected, either a red or an orange dotappears on the right of the title. When it is fully filled in or that themandatory fields are filled in, it turns to green. When on red,mandatory fields are not filled in.
When in orange, some fields are not filled in but they are notmandatory.
Sometimes an orange status can turn to red because a field requiresanother mandatory when filled in.
The form can be only edited in the “Edit view” to allow doctors to record patient data into the form attwo stages in the workflow namely: “Open” and “Data Completion”. Whilst, during the assessmentprocess and the later stages of the workflow, the form will be displayed in view mode only beside to thetimeline.
All ERNs will be using one generic data set known at Basic Data Set in the CPMS. Then, further in thedevelopment process of the CPMS, an Extended Data Set will be developed based on the customizedneed of each ERN. It is highly expected that each ERN will have unique requirements for someconditions or specific thematic disease area.
CPMS Quick User Manual ver.9 02112018UG-CPMS Page 34

The following coding and terminology systems have been used to build the Basic Data-Set in theconsultation form:
• ICD• Orphanet Rare Disease Ontology (ORDO)• ICCC-3 based on ICD-O-3• Human Phenotype Ontology (HPO)• LOINC• MedDRA• UCUM Codes• ISO 3166-1• HGNC• EDQM Standard Terms• NCBI genomic nucleotide RefSeq Id/LRG Id• Eurostar classification for self-defined current economic status• ISCED classification• ATC (Anatomical Therapeutic Chemical)
CPMS Quick User Manual ver.9 02112018UG-CPMS Page 35

Persistent editable fields: In the rare diagnosis section, users can choose one of two options; Current orWorking diagnosis. When selecting “Working Diagnosis”, multiple differential diagnoses can be addedunderneath this option. Working diagnosis is the only section within the form that can be added duringthe assessment stage of the workflow in order to eliminate or update diagnoses during the panel life-cycle.
When clicking on “Update” button, a pop up will be displayed on the screen to enable users to editthis section.
NOTE: After any update, it is needed to click on the Save button to keep the changes!
CPMS Quick User Manual ver.9 02112018UG-CPMS Page 36

Search widget: Please note that a search widget is provided in some sections of the consultation form tohelp Health Professionals select a medical condition without prior knowledge to the coding systems suchas ICD-10, Orphanet and ICCC-3 in the diagnosis section.
Multi-check coding systems: Health professionals can pick one or more of the coding systems that areavailable in the CPMS to enter data on specific condition or procedure such as ICD-10, Orphanet andICCC-3 in the diagnosis section or MedDRA and LONIC in the surgical procedures.
Furthermore, Help text occasionally can be seen above or next to some data fields to indicate structure ortype in information in a certain format e.g. RNA Nucleotide variant description. Additionally, generalattachments can be uploaded in some sections or particularly the medical document section; thosedocuments need to be viewed in the radiology or pathology viewer.
For more information about the data-set and the coding systems (versioning, etc.), please visit thedocumentation section in the CPMS.
For more information about the data-set and the coding systems, please visit the documentation sectionin the CPMS. (The right pane on the Global Dashboard page)
CPMS Quick User Manual ver.9 02112018UG-CPMS Page 37

6.1. File Upload
Files can be uploaded to the consultation form up to, and including, the data completion stage of theconsult process (see Section 7). The upload feature is located in the ‘Medical Documents’ section of theform, as shown in Figure 11 below:
After clicking on ‘Attach Files/Images’, the user will be prompted to acknowledge that there is “noidentifiable personal data in the uploaded file(s)”. This checkbox must be ticked if the user wants toproceed. The user will then have the opportunity to upload files under the ‘Add Files’ tab as shownbelow:
CPMS Quick User Manual ver.9 02112018UG-CPMS Page 38
Figure 11: Attaching Files in the Consultation Form
Figure 12: Drag or Browse Files to Upload

The table below contains a complete list of the supported file formats:
PDF pdf
Excel xml csv xls xlsx xlsm
PowerPoint ppt pptx pptm
Word doc docx docm
Open Doc odt ods odp odc odi
Image dcm jpg jpeg bmp tiff png
Video avi flv wmv mov mp4
Sound pcm wav ogg flac mp3
Note: Currently, the formats mentioned above in the table are case sensitive. For example pdf files haveto be *.pdf not *.PDF.
Files can easily be deleted by clicking ‘delete’ next to the unwanted files in the ‘Remove Files’ tab.
Note: When a file is deleted, you cannot upload it again unless you change its name!
Batch Upload
Users can also use FTP Batch Upload via the ‘Batch Upload’ tab, which is particularly useful for largefiles exceeding one hundred megabytes.
Note:
• Batch upload requires third party software such as FileZilla or WinSCP to be installed.
• Using the FTP functionality may require higher technical competences that require priorexperience. Please ask the IT department at your organization if you experience any difficulty inusing the FTP client software.
All the instructions are provided in the pop-up modal to guide users to feed the right information into theFTP client software.
CPMS Quick User Manual ver.9 02112018UG-CPMS Page 39

IHE
CPMS supports IHE integration with hospitals that are compliant with the following IHE profiles andinterested to share documents with the CPMS:
• XCPD - Patient Discovery (ITI-5)
• XCA - Retrieve Folder List (ITI-38)
• XCA - Retrieve Document List (ITI-38)
• XCA - Retrieve Document Set (ITI-39)
• IHE ATNA (Audit Trail and Node Authentication)
• IHE-STS (Security Token Service)
Users can use the IHE integration profiles to pull documents stored in the local hospital informationsystem into the CPMS. Users in Centres availing of IHE will find an additional ‘IHE’ tab next to ‘BatchUpload’ in the Medical Documents section.
CPMS Quick User Manual ver.9 02112018UG-CPMS Page 40

6.2. Medical Image Viewers
Osimis Pro viewer background
The Osimis zero footprint HTML5 medical imaging viewer features a rich JavaScript API for displayingand working with images within HTML5 elements. It comes as a set of two plugins to the Orthanc corelibrary, which they have been specifically designed for it. The viewer is currently certified with CE-marked as a Class 1 medical device. For more information, please visithttp://www.osimis.io/en/blog/2016/10/14/plugin-osimis-pro-viewer.html
Uploaded Images
Once DICOM images have been successfully uploaded as detailed above, they can be viewed on theDICOM viewer by all panel members via the consultation form on the panel’s home page in the ERNapp. Clicking on a link for the images on the consultation form opens the viewer as shown in Figure 13below:
Series picker
Once the user has selected at least one study, the thumbnails of the series held within the study areshown either in a list or grid format. The user can toggle between the following views. In order todistinguish the series of different studies, they are assigned a colour that is also being used in theviewports. This way, the user can compare 2 or more series of different studies.
The consultation form contains a DICOM (Digital Imaging and Communications in Medicine) viewerfor the viewing, editing and sharing of medical images.
1. This section lists the series of images that are available to be viewed.
2. The user can cycle through the images in the series manually or automatically, at a frame rate oftheir choosing.
CPMS Quick User Manual ver.9 02112018UG-CPMS Page 41

3. The top menu bar contains a wide range of features such as:
• Change the viewport layout
• Invert colour
• Zoom
• Panning
• Toggle the windowing tool or apply a preset to the selected viewport.
• Toggle the magnifying glass tool.
• Annotations to measure length, area and angles (See Figure 14 below)
• Pixel probe
• Elliptical ROI
• Rectangle ROI.
• Rotate to the left/right
• Flip image – vertically and/or horizontally.
4. Allows the user to download the series.
To remove an annotation from the image, simply click and drag it off the image. This will delete thatparticular annotation.
Study types supported
The following types of exams are supported by the viewer:
CPMS Quick User Manual ver.9 02112018UG-CPMS Page 42
Figure 13: DICOM Viewer

• CT scans
• MRIs
• PET scans
• Tomography
• Ecographs
• RXs
• Dicomized Static Images
• Endoscopies
• Histopathology
Digital pathology viewer
The digital pathology viewer (also called Whole-Slide Imaging viewer // WSI viewer) comes as aseparate viewer. This plugin is based upon OpenLayers, a JavaScript framework to display dynamicmaps in any web page.
In case users are dealing with .ndpi formats, we advise you to contact the support team as they will guideyou through a conversion process to enable you upload and view this material in the viewer.
6.3. Pedigree
The pedigree tool is located in the Family History section of the Consultation form. It is used to track thepatient’s ancestry in the form of a family tree, and shows the family members who possess the geneticmutation in question, classified either as ‘affected’ or as a ‘carrier’.
CPMS Quick User Manual ver.9 02112018UG-CPMS Page 43

Figure 15 below shows the initial view of the family tree. The icons in the top right corner allow forfunctions such as zoom (in and out), full-screen view and printing of the pedigree chart. Additionally,users can export the pedigree as an image (i.e. PNG, SVG) or JSON file from the same menu.
Reminder: Currently, the formats mentioned above in the table are case sensitive. For example pdf fileshave to be *.pdf not *.PDF.
N.B for users of Internet Explorer 11. They can export the pedigree in SVG format to be viewed on the browser. They
The text boxes in the top left corner next to ‘Affected’ and ‘Carrier’ allow the user to specify thecondition in question, if required. This is to avoid confusion in cases where comorbidities have beendeclared by the patient in addition to the condition of interest.
The buttons along the bottom of the screen allow family members of the proband to be added and edited.The ‘Edit Person’ button allows the user to specify the person’s gender, whether or not they are deceasedand if they are a carrier, affected or neither. The user can also specify if the person has been tested or not,and the ‘Phenotypic Abnormality’ they have, if applicable. The ‘Relationships’ button lets the user setcertain relationships (partner, children and parents) between people in the family tree.
Figure 16 below gives an example of a pedigree chart:
CPMS Quick User Manual ver.9 02112018UG-CPMS Page 44
Figure 15: Pedigree Chart

Figure 16: Example of a Pedigree Chart
7. Panel & Form LayoutAll interactions and communication happening between Health Professionals on a particular panel canbe seen in the Timeline. The panel view shows two main elements; the Consultation Form on the lefthand side, in which the user can always see the updated data and the Timeline on the right hand side
CPMS Quick User Manual ver.9 02112018UG-CPMS Page 45

which shows near-real time transition of the panel based on the actions triggered by a Panel Member orthe Panel Lead. The workflow is extremely flexible as it allows the user to transition forward orbackwards in case edits or rectification of mistakes need to be made etc.
7.1. Timeline
On the right-hand side of the panel interface, the user can view all of the panel’s activity to date via the‘Timeline’ feature. Figure 18 gives an example of a timeline, and the accompanying text explains themain features that it incorporates.
CPMS Quick User Manual ver.9 02112018UG-CPMS Page 46
Figure 17: Panel Home Page

1. The double arrow icon allows the userto toggle the order of events betweenoldest-newest and newest-oldest.
2. The user can view when their meetingsfor that panel are due to start, and canaccess the meeting by clicking on the‘Join Meeting’ button.*
3. The timeline allows users to leavecomments on the timeline, which can beseen by all panel members.
4. Clicking on this icon brings up a biggerscreen for that particular feature. Theuser can then interact with that feature.
The Timeline is not only a chatting mechanism over the panel but rather a secure approach forexchanging messages in several modal types. It allows panel members to make comments on images,contributions and outcome documents.
*When a video meeting is set at a certain time in the future, the Join Meeting button displays acountdown before the meeting starts. The attendees won’t be able to join until the counter goes below 5minutes.
7.2. Data Entry
Data can be entered using a combination of drop-down lists, check boxes, radio buttons and Date inputfields. Here you can see a drop-down list being used. Radio buttons can also be used to select options inlists. The Date input fields (date pickers) allow quick access to the relevant date.
Red asterisks always refer to required data to be filled in a selected section before saving the form.
CPMS Quick User Manual ver.9 02112018UG-CPMS Page 47
Figure 18: Timeline of Panel

Note
Date pickers are used where an exact date is required. However, there are some instances where themonth or year are sufficient. For example, the patient records may not hold the exact date for some datafields. So it may be possible to type in the input field and record the month and year, or use the datepicker if the exact date is known. When inputting the date manually the date format must be Month/Year,or the year alone is sufficient in some instances.
8. Panel Workflow – Virtual Consult Process
8.1. Open a New Panel
To open a panel for a newly enrolled patient, any authorized Health Professional from the enrolmentcentre can simply click the ‘Open New Panel’ button (Figure 20) that they are presented with after fillingout successfully the enrolment form.
CPMS Quick User Manual ver.9 02112018UG-CPMS Page 48
Figure 19: Data Picker

If the user wishes to open a new panel for a previously enrolled patient, they can do so from the patient’spage. As discussed in Section 3.1, the user can find a patient by viewing the patient list or by using thesearch function. The ‘Open New Panel’ button is located on the right-hand side of the page, as shown inFigure 21 below.
The user will also have the option to cancel or restart any panels on which they are the panel lead. Thiscan be done by checking the box next to the Panel ID then the Button “Cancel or Restart Panel” will beactivated in red colour.
There are eight stages to the virtual consult process, which the user can easily keep track of via thetracker located just under the top menu.
CPMS Quick User Manual ver.9 02112018UG-CPMS Page 49
Figure 21: New Panel - Existing Patient
Figure 20: New Panel – New Patient

8.2. Open
The panel is considered open as soon as the consultation form has been submitted. This stage allows forthe consultation form to be viewed and edited as deemed necessary by any authorized HealthProfessional in that particular medical centre. When opening a panel, users have to enter the minimumrequired data as it appears in the “Consultation Request” section. Users can also mark the Panel as anurgent or non-urgent request as this determines the level of notifications to the Panel members in laterstages of the workflow as well as displaying the urgent panels in a separate section with a red warningtriangle symbol.
CPMS Quick User Manual ver.9 02112018UG-CPMS Page 50
Figure 22: Stages of the consult process

8.3. Panel Selecton
In the ‘Panel Selection’ stage the Panel Lead, can form the panel by inviting other Health Professionalsto join. Meetings can also be scheduled at this stage (see Section 8). Figure 23 above shows the locationof the ‘Invite Members’ and ‘Schedule Meetings’ buttons.
When forming the panel, the Panel Lead at this stage, can invite Health Professionals from a list of thoseavailable, sorted by ‘Thematic Area’ (based on ‘Preferences’ as discussed in Section 3.3). If the PanelLead is unsure of who to invite to the panel, or requires a Health Professional from a different ERN, theycan request the assistance of the co-ordinator for their ERN in the ‘Co-ordinator Assistance’ tab.
Setng a Panel mead
By default, any authorized Health Professional in a given centre, who opens a Panel, will be assigned asa Panel Lead unless otherwise, the Panel Lead role has been switched or assigned to another HP from thesame/another centre.
Below, you can read more about the access rights if either you are a Panel Lead from the enrollingcentre or you have been assigned to lead a Panel originating from another ERN centre.
Use-Case 1
A Panel Lead from the originating/enrolling centre (Panel Lead Role NOT assigned to any HP outsidethe centre):
CPMS Quick User Manual ver.9 02112018UG-CPMS Page 51
Figure 24: Panel Selection
Figure 23: Invite Members and Schedule Meeting

All Users from this centre can edit the consultation form and transition the workflow. However, the rightto sign-off the outcome document is exclusively given to the Panel Lead.
Use-Case 2
A Panel Lead has been assigned/switched to another expert in a different centre within the same ERN:
• Panel Members from the enrolling centre and the Panel Lead from the receiving centre canONLY edit the consultation form.
• The Panel Lead from the receiving centre can exclusively transition the workflow and sign offthe outcome
• No HP from the receiving centre can ever edit the consultation form or transition the workflow
• No HP from the originating centre is longer able to transition the workflow
8.4. Data Completon
In the ‘Data Completion’ stage, the clinical data is completed if not previously done so, and is availableto be viewed by the whole panel. The consultation form is also made available to be edited if necessary.
8.5. Assessment
During the ‘Assessment’ stage the Panel can all make contributions to the case, via the ‘RecordContribution’ button that replaces the ‘Invite Members’ feature. Text can be entered in the textbox andfiles can be uploaded via the ‘attach file’ feature. The Panel Member can also view the other panelmembers’ contributions by clicking on their tab.
CPMS Quick User Manual ver.9 02112018UG-CPMS Page 52
Figure 25: Panel Contributions
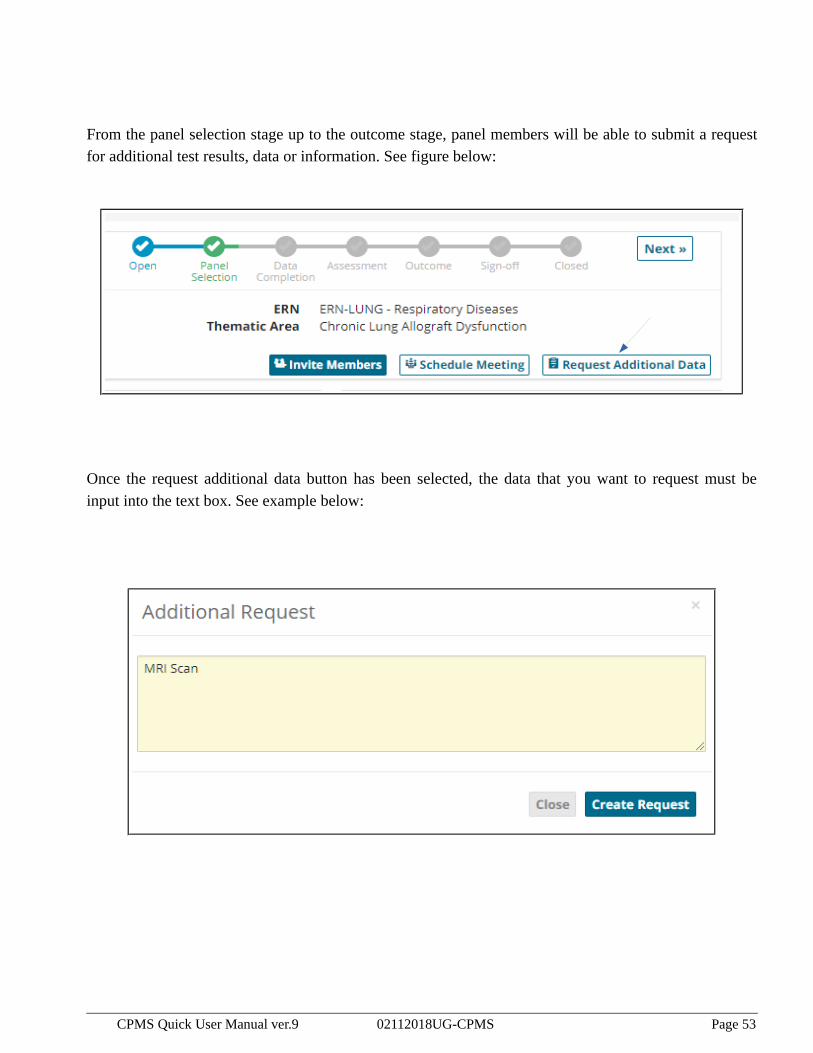
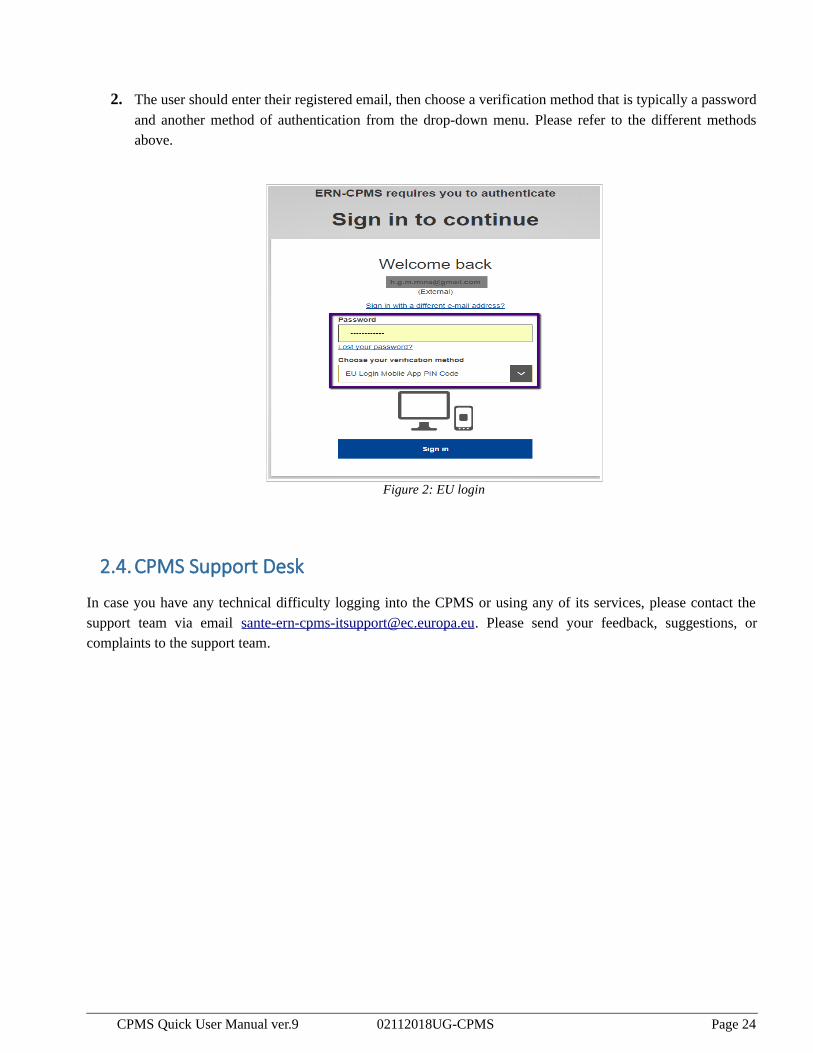
From the panel selection stage up to the outcome stage, panel members will be able to submit a requestfor additional test results, data or information. See figure below:
Once the request additional data button has been selected, the data that you want to request must beinput into the text box. See example below:
CPMS Quick User Manual ver.9 02112018UG-CPMS Page 53

Once the request has been created, it will then show up above the consultation form and also in thetimeline. See example below:
The information and the status of the request will show up once you click on it. See example below:
CPMS Quick User Manual ver.9 02112018UG-CPMS Page 54

A panel lead can then mark the request as either pending, on hold or they can mark it as complete. Theycan also enter some additional request text if they wish. See example below:
Any other additional data requests will also be stored here together. See example below:
CPMS Quick User Manual ver.9 02112018UG-CPMS Page 55

8.6. Outcome
After the assessment has been completed and the contributions have been recorded, an outcome for thepanel must be considered and decided upon. The Panel Lead also has the option to return to theAssessment stage if he/she deem it necessary, as shown in Figure 26
Figure 26: Outcome
The Panel Lead records the outcome at this stage and the rest of the panel have the opportunity to viewand comment on it.
In the Appendix of this guide, you can find the initial template of the outcome document as provided bythe contracting authority.
CPMS Quick User Manual ver.9 02112018UG-CPMS Page 56

8.7. Sign-Of
In the ‘Sign-Off’ stage, the Panel Lead confirms the outcome of the consult process. Once the outcomeis signed-off the panel can be closed, and the outcome can no longer be edited. At this state of theworkflow, all Panel Members and the Panel Lead, can export the outcome as a PDF document forpersonal record or send it over to the POC specialist or patient themselves.
1. Save Panel Outcome: This saves the outcome, but only as a draft. The outcome can still beedited, and saving here does not allow the panel to be closed.
2. Sign-off Panel Outcome: Signing-off the panel outcome will mean that it can no longer beedited, and this must be done before the panel can be closed.
CPMS Quick User Manual ver.9 02112018UG-CPMS Page 57
Figure 27: Panel Sign-Off

8.8. Closed
Once the outcome has been signed-off, the panel can be closed. Only the Panel Lead can close the paneland he/she must first complete the ‘Transition to Closed’ form shown in Figure 28 below:
CPMS Quick User Manual ver.9 02112018UG-CPMS Page 58
Figure 28: 'Transition to Closed' Questionnaire

The outcome document will be available for all panel members to view, and the Panel Lead will have theoption to make the panel available for research, as shown in Figure 29 below.
8.9. Archived
The Panel Lead can choose to Archive the panel after it is closed. This will mean the panel can only be viewed from the ‘Centre’ application by members of the centre that the patient was enrolled at, and not from the ‘ERN’ application.
8.10. Copying Panels
In order to avoid data re-entry, copying panels is a feature that provides users a functionality to copydata previously entered in older panels. In order to do this, click on the patient list and then choose apatient. See example below:
CPMS Quick User Manual ver.9 02112018UG-CPMS Page 59
Figure 29: A Closed Panel

Once the patient that needs to be copied is selected, click on copy panel. As soon as you click CopyPanel, the consultation request section is automatically selected. You can then choose what medicalimages (DICOM) or medical attachments you may or may not want to copy. See example below:
Once you choose the sections that you want to copy, click copy panel. The panel that you just copiedwill now show up at the bottom of the panel list.
CPMS Quick User Manual ver.9 02112018UG-CPMS Page 60

9. Meetngs
9.1. Video conferencing requirements
The minimum required hardware is to have a device with camera and microphone to enable youparticipate actively in video meetings on CPMS. Below are other requirements that potentially can affectthe uptake of CPMS to run smoothly within your organization.
WebRTC video technology incorporated into the CPMS can be tested on your machine via this link:https://cpms-training.ern-net.eu/video-testing
Please note the following when using video meetings:
• When using Internet Explorer, you will be requested to automatically download a Plug-in on yourbrowser.
• For sharing your screen on Google Chrome and Mozilla Firefox, users will need to enable an extension torun on the browser.
CPMS Quick User Manual ver.9 02112018UG-CPMS Page 61

9.2. Conflictng video applicatons
Please make sure that you are not using another video conferencing application (e.g. Skype,GoToMeeting, Zoom, etc.) or similar video stream through another browser or a tab in the same browser(e.g. when recording a webinar). This may cause difficulty for your device to switch on your camera andmicrophone in several applications.
9.3. Network
Video conferencing uses a variable amount of bandwidth; this variation may affect the quality displayedto the user. This may result in low quality or dropped video connections if the available bandwidth fallsbelow a reasonable threshold. The user is informed of this as clearly as possible.
Video quality dynamically adjusts based on the strength of a user's network connectivity. This is done bythe Subscriber sending feedback packets to the publisher that say, "My network quality is at 'x' level.Please adjust your published video bit-rate to accommodate my current bandwidth". The faster and morestable a Subscriber's broadband connection is, the better the video quality it will request. Thismechanism works well until a certain point. If a Subscriber's bandwidth drops below a certain threshold,or if a Publisher has very little bandwidth to upload video, behaviour can be unpredictable.
Ideally, it is recommended a minimum dedicated 350kb/s per downloaded stream, as well as 350kb/suploaded stream to maintain a stable video connection.
For Example: In a meeting of 3 participants, you will be uploading 1 stream and downloading 2 streams,so you will need around 1mb of internet bandwidth to support a stable video connection.
To check the video, next to the blue button Join Meeting, you can click on the test video link and it willperform a test to inform about your devices abilities to run it in good conditions. This test should beperformed every time before the session starts
For various resolutions and quality combinations, the bandwidth requirements are outlined below.
• Excellent - None or imperceptible impairments in media
• Acceptable - Some impairments in media, leading to some momentary disruptions
For the given qualities and resolutions, all the following conditions must met:
Quality Video Resolution @ FPS Video kbps Packet Loss
Excellent 1280x720 @ 30 > 1000 < 0.5%
Excellent 640x480 @ 30 > 600 < 0.5%
Excellent 352x288 @ 30 > 300 < 0.5%
Excellent 320x240 @ 30 >300 < 0.5%
CPMS Quick User Manual ver.9 02112018UG-CPMS Page 62
Acceptable 1280x720 @ 30 > 350 < 3%
Acceptable 640x480 @ 30 > 250 < 3%
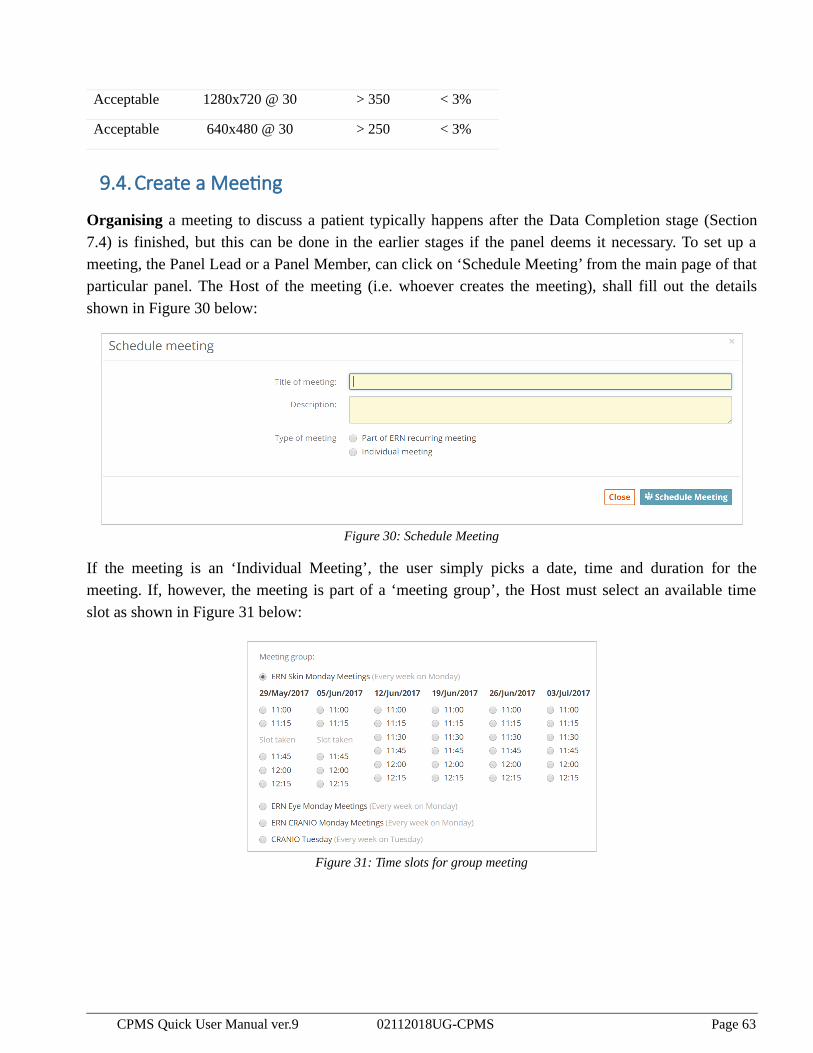
9.4. Create a Meetng
Organising a meeting to discuss a patient typically happens after the Data Completion stage (Section7.4) is finished, but this can be done in the earlier stages if the panel deems it necessary. To set up ameeting, the Panel Lead or a Panel Member, can click on ‘Schedule Meeting’ from the main page of thatparticular panel. The Host of the meeting (i.e. whoever creates the meeting), shall fill out the detailsshown in Figure 30 below:
If the meeting is an ‘Individual Meeting’, the user simply picks a date, time and duration for themeeting. If, however, the meeting is part of a ‘meeting group’, the Host must select an available timeslot as shown in Figure 31 below:
CPMS Quick User Manual ver.9 02112018UG-CPMS Page 63
Figure 31: Time slots for group meeting
Figure 30: Schedule Meeting

The Host can then invite other Health Professionals to join the meeting, including those who are not partof the panel. The Panel Lead is invited to all meetings for that particular panel by default, but the othermembers are not. By default, the Panel Lead and the Host will get the Moderator rights when joining ameeting.
9.5. Join a Meetng
When a Health Professional, is invited to a meeting, he/she must first accept or decline the invitation.The invitees will receive an email notification of the invitation and it will appear also in the footer of thePanel banner as seen below.
Additionally, more notifications on the meeting can be seen:
• In the ‘My Meetings’ section of the ERN Dashboard. (5 minutes before start button join meetingbutton isn't active (counter going down). Only below 5 minutes.
• In the Panel, via a banner as shown below:
CPMS Quick User Manual ver.9 02112018UG-CPMS Page 64
Figure 32: Invite Participants
Figure 33: Meeting Notification on the main page of the Panel

Users can test using the video meeting feature prior to the actual meeting by clicking on “Test Video”link next to the “Join Meeting” button. Nevertheless, if a user wish to test their video settings withoutlogging into the CPMS, they can use the following link: https://cpms-training.ern-net.eu/video-testing
The following features are available to use within the video environment to facilitate the interactionbetween participants and ensure efficient communication during the meeting. You can hover with themouse on the tool bar of the video to get a help-text on each functionality:
• Moderator has full control over the meeting to add/mute/remove participants
• Meeting can be recorded
• Ability to view who is connected to the meeting
• Ability to share your screen and documents
• Ability to do live streaming/webcast (e.g. for teaching)
CPMS Quick User Manual ver.9 02112018UG-CPMS Page 65
Figure 34: Meeting Interface

9.6. Meetng Summary
When a meeting has finished, the moderator should complete the following steps:
1. Update the meeting status to ‘finished’, via the ‘Time/Place’ tab (shown in Figure 32), which canbe accessed through the panel Timeline by clicking on the full-screen (arrows) icon shown inFigure 33 above. Alternatively, the status can be updated in ‘My Meetings’ by clicking edit ingeneral settings of the meeting in question, as shown in Figure 35 below:
2. Record a meeting summary via the ‘Summary’ tab, which can also be accessed via the panelTimeline.
Both the meeting Host and the Panel Lead will receive notifications reminding them that these stepsshould be completed. The notifications will appear both in the Host and Panel Lead’s Task List and onthe front page of the panel that the meeting is for, as shown in Figure 36 below.
CPMS Quick User Manual ver.9 02112018UG-CPMS Page 66
Figure 36: Meeting Summary Reminder
Figure 35: Update the Meeting Status by Clicking on 'Edit'

If the meeting has been recorded by the meeting moderator, the recorded video can be seen in a fewminutes after the meeting has been ended. This can be found by going to “My Meetings” in the ERNDashboard and access the meeting page or clicking on “Meeting Recording” in the Timeline from thePanel view.
CPMS Quick User Manual ver.9 02112018UG-CPMS Page 67

10. CPMS Task-List
The Task List in the ERN dashboard contains a list of pending tasks awaiting the user’s interaction.
Those tasks range between different activities such as:
• Respond to an invitation to a Panel
• Respond to an invitation to a meeting
• Record a Contribution in a Panel
• Record a meeting summary
• Review an Outcome document
• Check final outcome document
11. Email NotfcatonsCPMS works in synchronization with users’ emails when provided. CPMS users receive a notificationemail with a link to login when they have tasks to do in their Task-list such as accept/refuse participatingin a Panel, record a contribution, invitation to a meeting or review an outcome. This digest email will besent out at 8:00 am CET when any of the above-listed tasks appears in the Task-List.
In addition to the daily digest email, when a user is invited to take part in a virtual meeting, animmediate email will go to their email as provided.
CPMS Quick User Manual ver.9 02112018UG-CPMS Page 68

12. Roles & Rights
12.1. ERN Coordinator
In the CPMS, the ERN Coordinator is supposed to be a Health Professional working at one of the ERNcentres. ERN Coordinators will use the Key Performance Indicators of the ERN for reporting purposessuch as numbers of newly enrolled patients and open and closed panels.
A vital role of ERN Coordinators will be to receive all requests made by panel leads who seek assistancein inviting suitable members into a particular panel from within and outside their ERN. If the panel leadis not aware of other experts who can help within the same ERN or other ERNs, the ERN Coordinatorcan assist.
Inviting members from another ERN is an exclusive action to be done though the ERN Coordinator’sassistance.
The ERN Coordinator is given the right to assign a Panel Lead if needed, in order to ensure the panelworkflow is working smoothly.
The ERN Coordinator can also deal with any incoming panel requests that are not relevant to his/herERN. He/she may transfer the Panel request back to the Coordinator of the originating ERN or forwardit to another ERN Coordinator.
4 use-cases were identified when a Panel is forwarded from an ERN to another in respect to the accessrights of the Panel Lead and panel Members.
CPMS Quick User Manual ver.9 02112018UG-CPMS Page 69

Use-case 1: Panel Lead who is HP in both of Referring and Receiving ERNs
As a Panel Lead, I would like to remain the Panel Lead when the Panel if forwarded to anotherERN my HCP is part of, so that I can control the Panel workflow with the rights as Lead.
Use-case 2: Panel Lead who is HP in the referring ERN but NOT the receiving ERN
As a Panel Lead, I would like to become a Guest Member when the Panel is forwarded toanother ERN my HCP is NOT a part of, so that I can participate actively and track the updates of thepanel.
Use-case 3: Panel Member who is HP in both of Referring and Receiving ERNs
As a Panel Lead, I would like to remain a Panel Member when the Panel is forwarded to anotherERN my HCP is a part of, so that I can participate actively and track the updates of the panel.
Use-case 4: Panel Member who is HP in the referring ERN but NOT the receiving ERN
As a Panel Lead, I would like to become a Guest Member when the Panel is forwarded toanother ERN my HCP is NOT part of, so that I can actively participate and track the updates of thepanel.
The ERN Coordinator can request access for an external Health Professional to enrol a patient into aparticular ERN. Based on the requested access type, the external guest can be permitted to enrol apatient or even become a panel member to interact actively with other Health Professionals in an ERN.
Additionally, the ERN Coordinator can schedule a periodic meeting for the Health Professionals of aparticular ERN. If discussing multiple patients, the meeting can be divided into timeslots.
The ‘ERN Meetings’ section allows a co-ordinator for an ERN to establish regular meeting times forpanels within their ERN.
By clicking on ‘Create ERN meeting’, shown in the top right corner of Figure 38, the ERN co-ordinatorcan set up a new recurring meeting for their ERN. The established time slots are then available to beselected by Panel Leads when they are scheduling meetings for their panels.
CPMS Quick User Manual ver.9 02112018UG-CPMS Page 70
Figure 37: Meeting Groups

12.2. ERN Dispatcher
An ERN Coordinator can assign another user the role of ERN Dispatcher. The Dispatcher role is similarto that of the Coordinator in clinical context to process requests coming into the ERN seeking assistance.Therefore, the Dispatcher’s role might be to ease the workload of the Coordinator during busy periodsfor example, or to cover for the Coordinator when he/she is on vacation.
This role in CPMS, reflects the system flexibility and capacity to fulfil various business needs,however, this role has to be requested by the ERN Coordinators directly to the CPMS supportteam.
CPMS Quick User Manual ver.9 02112018UG-CPMS Page 71
Figure 38: Create ERN Meeting

13. WebinarsIn the ‘Webinars’ section the user can create a new webinar or upload a previously recorded one.
A webinar is mainly used for education and training purposes, and it differs from a meeting in that all ofthe users only see the presenters screen.
CPMS Quick User Manual ver.9 02112018UG-CPMS Page 72
Figure 40: Create a New Webinar
Figure 39: Webinar Section

14. ERN MapThis application allows the users to view all of the medical centres (hospitals) on the CPMS. The sidemenu allows for filtering based on specific ERNs.
CPMS Quick User Manual ver.9 02112018UG-CPMS Page 73
Figure 41: ERN Map
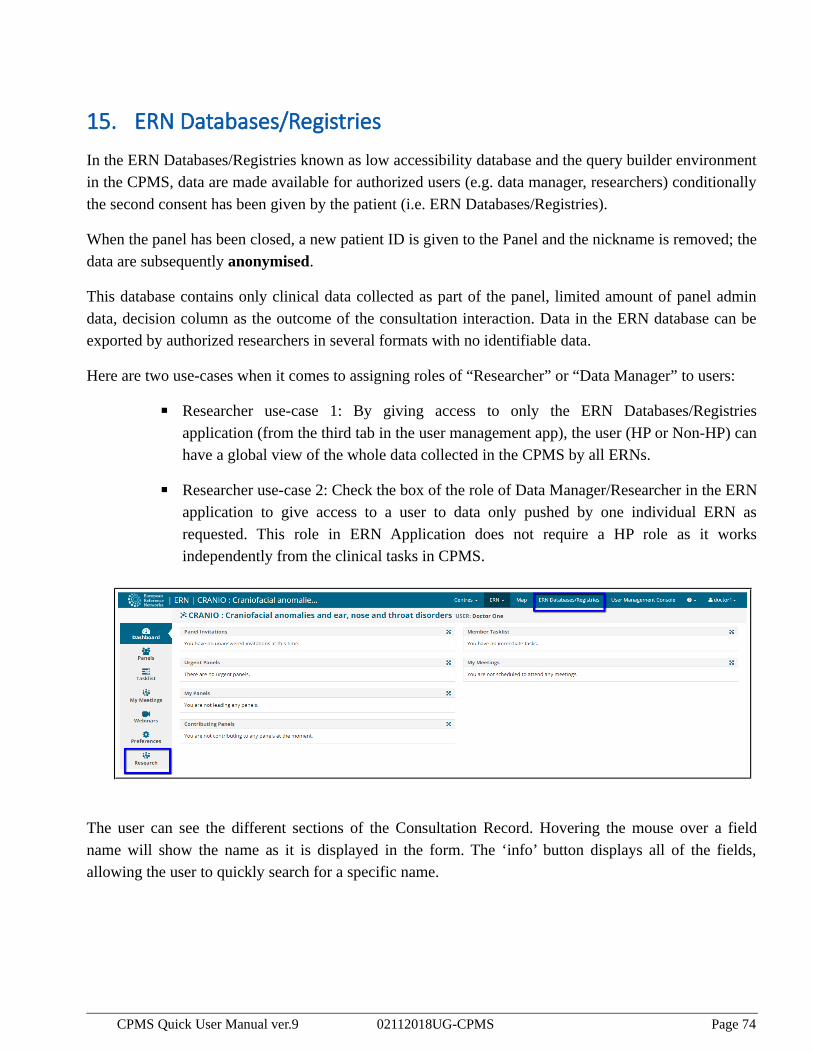
15. ERN Databases/RegistriesIn the ERN Databases/Registries known as low accessibility database and the query builder environmentin the CPMS, data are made available for authorized users (e.g. data manager, researchers) conditionallythe second consent has been given by the patient (i.e. ERN Databases/Registries).
When the panel has been closed, a new patient ID is given to the Panel and the nickname is removed; thedata are subsequently anonymised.
This database contains only clinical data collected as part of the panel, limited amount of panel admindata, decision column as the outcome of the consultation interaction. Data in the ERN database can beexported by authorized researchers in several formats with no identifiable data.
Here are two use-cases when it comes to assigning roles of “Researcher” or “Data Manager” to users:
▪ Researcher use-case 1: By giving access to only the ERN Databases/Registriesapplication (from the third tab in the user management app), the user (HP or Non-HP) canhave a global view of the whole data collected in the CPMS by all ERNs.
▪ Researcher use-case 2: Check the box of the role of Data Manager/Researcher in the ERNapplication to give access to a user to data only pushed by one individual ERN asrequested. This role in ERN Application does not require a HP role as it worksindependently from the clinical tasks in CPMS.
The user can see the different sections of the Consultation Record. Hovering the mouse over a fieldname will show the name as it is displayed in the form. The ‘info’ button displays all of the fields,allowing the user to quickly search for a specific name.
CPMS Quick User Manual ver.9 02112018UG-CPMS Page 74

The user can simply drag and drop sections containing the data they are interested in into the ‘SelectedTables’ column, and the required fields into the ‘Outputs’ column. The report can then be previewed inthe ‘Preview’ tab.
16. Secure File uploadOpenApp have developed a functionality to enable users exchange large files with CPMS support teamwhen needed. Simply, the feature provides a secure communication mechanism for users to sharematerials with the support team when investigating an issue. User have to click on “secure file upload”in the drop-down menu appearing under their login username. Users must first send an email to [email protected] so that the support issue can be followed up.
The reference number received must be included when any material is being uploaded. There is arestriction in that no identifying or personal data can be uploaded, however, there is no restriction on thenumber or size of files to be uploaded here.
CPMS Quick User Manual ver.9 02112018UG-CPMS Page 75
Figure 42: Blank Report Template
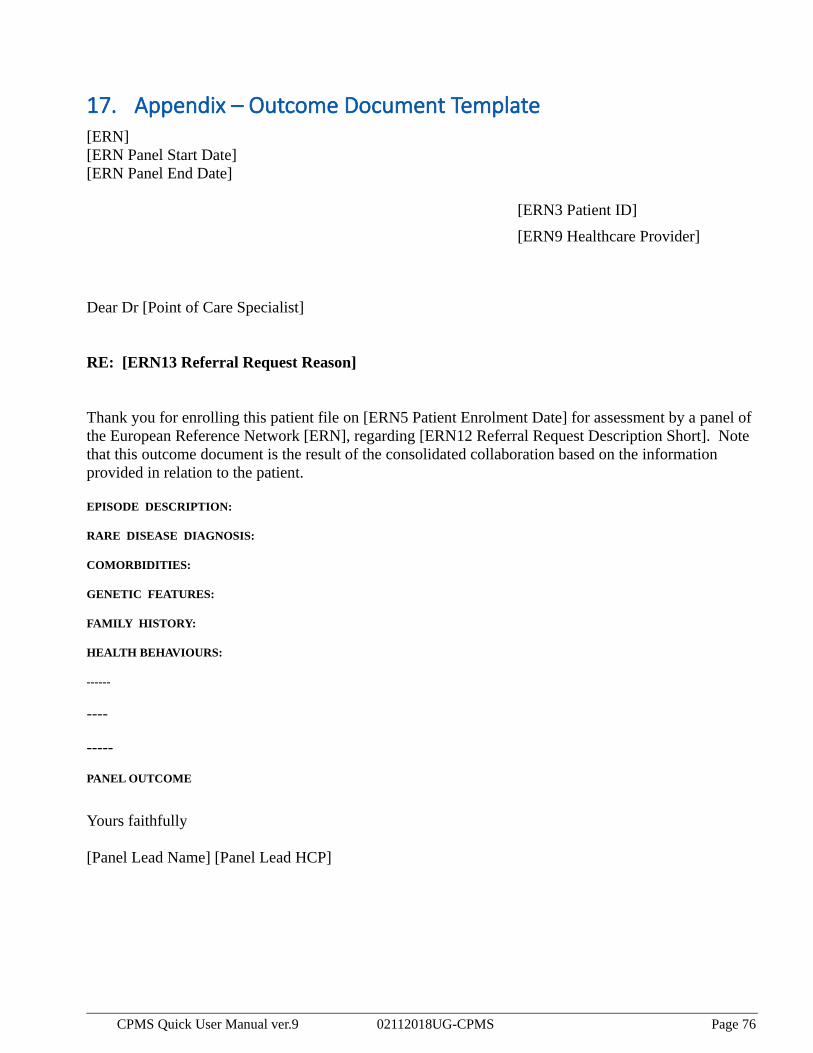
17. Appendix – Outcome Document Template[ERN][ERN Panel Start Date] [ERN Panel End Date]
[ERN3 Patient ID]
[ERN9 Healthcare Provider]
Dear Dr [Point of Care Specialist]
RE: [ERN13 Referral Request Reason]
Thank you for enrolling this patient file on [ERN5 Patient Enrolment Date] for assessment by a panel of the European Reference Network [ERN], regarding [ERN12 Referral Request Description Short]. Note that this outcome document is the result of the consolidated collaboration based on the information provided in relation to the patient.
EPISODE DESCRIPTION:
RARE DISEASE DIAGNOSIS:
COMORBIDITIES:
GENETIC FEATURES:
FAMILY HISTORY:
HEALTH BEHAVIOURS:
------
----
-----
PANEL OUTCOME
Yours faithfully
[Panel Lead Name] [Panel Lead HCP]
CPMS Quick User Manual ver.9 02112018UG-CPMS Page 76