creating and using business views - crystal books by...
TRANSCRIPT

Creating and Using Business Views
As you work with a database reporting or querying tool, such as Crystal Reports, you often find yourself facing two tasks: learning the ins and outs of the reporting or query tool itself, and learning the underlying database that you need to report or
query against. While there are usually resources (such as this book) available to help you learn the reporting or querying tool, there are probably not nearly as many comprehensive sources for information on your particular database.
Complex database designs are not unusual. It’s not uncommon to encounter databases that consist of hundreds of different tables, or tables that contain 100 or more fields. Adding to this difficulty are database designers who may attempt to ensure job security by creating table and field names that are far from intuitive. In these situations, you are either forced to look for comprehensive database documentation (which may or may not exist), or to just experiment in a haphazard manner, eventually discovering proper database table and field requirements by hook or crook.
One tool that can greatly reduce the complexity of direct database access is a dictionary or metadata tool that organizes the core database table and field structure into a much simpler and easy-to-understand organization. This middle layer can be set up to include only relevant tables, prejoin tables on their proper fields, expose only desired fields from the database, store commonly used formulas, and apply database row and column security to individual report designers and viewers to provide access to only data fields and records that they are permitted to see.
The Business Views product is the Business Objects answer to this middle-layer requirement for a Crystal Reports environment. This approach, introduced in Crystal Reports 10, replaced earlier Crystal Dictionary and Seagate Info View tools for reporting against simplified views of the database. And, Crystal Reports dynamic and cascading pick list capability is also enhanced within Business Views. By adding a shared pick list to a Business View, you obtain centralized control and sharing of pick lists available to reports in your entire organization.
NOTE NOTE Crystal Reports 2008 can also work with traditional Business Objects universes, the metadata tool from the original Business Objects product set. Using Crystal Reports with universes is discussed in Chapter 16 of the printed edition.
1

2 C r y s t a l R e p o r t s 2 0 0 8 : T h e C o m p l e t e R e f e r e n c e
Business Views OverviewYou’ll want to consider a Business Views implementation if you have any combination of complex databases and report designers who don’t want to learn all the intricacies of these databases. This combination probably describes the environment at a fairly large number of organizations, yours very possibly included. Creative use of Business Views will allow Crystal Reports designers to get access to organizational data with minimal difficulty, allowing data fields to be presented in a simple, intuitive fashion. And, Business Views also allows BusinessObjects Enterprise reports to implement row security, tailoring the set of data viewed online to just that allowed for a particular viewer. For example, you can design a single company-wide Crystal Report using a Business View and have individual departments see only their data when they view the report.
The first concept that will impact many potential Business Views users is where it’s based. While the older Crystal Dictionaries tool could be used by itself with stand-alone copies of Crystal Reports, Business Views requires installation of a member of the BusinessObjects Enterprise XI 3.0 family (BOE)—in fact, it’s integral to these tools and cannot be used without them. Each report designer who wishes to use Business Views must first log on to BusinessObjects Enterprise with a valid user ID and password. This requires your organization to consider BOE licensing and cost issues when considering whether, and how much, to rely on Business Views. And, unlike the older Crystal Dictionaries tool, Business Views and BusinessObjects Enterprise require knowledge and infrastructure within your organization to support the more complex BusinessObjects Enterprise environment (more general BusinessObjects Enterprise topics can be found in Part II of the printed edition).
Once you’ve properly installed BusinessObjects Enterprise (or, as part of the BOE planning process), you’ll want to think about where Business Views capabilities will be important for you. In some cases, more experienced report designers may prefer to bypass Business Views and report directly against the production database. In others, you may wish to provide Business Views access to simplify report design for introductory report designers. And, there may be other situations that call for Business Views use with all users to take advantage of row and column security features limiting data to that required for individual department or job functions. As with a report design project, Business Views implementation requires some forethought and planning.
And, Crystal Reports 2008 dynamic and cascading parameter pick lists also must be considered when looking at a Business Views implementation. While reports that are stored outside of BOE can maintain their own dynamic and cascading pick lists, any report that you publish to BOE that makes use of this type of pick list must use pick lists stored in a Business View.
Business Views ObjectsBusiness Views are more complex and flexible than similar tools, including older Crystal Dictionaries or Info Views. While familiarity with these older products, or metadata tools in general, will be helpful in designing Business Views, the steps involved to use the tool vary widely from other products and will take some time to become familiar with.
When you first create a Crystal Report and look for data in the repository (where Business Views are stored), you’ll find only one type of Business View object: the Business View itself. When you connect your report to the Business View, the set of fields that the Business

C r e a t i n g a n d U s i n g B u s i n e s s V i e w s 3
View exposes will appear in the Field Explorer. If the Business View includes row or column security, you’ll see a limited set of field and record data when you run the report.
However, there are many additional objects that actually go into creating the Business View:
• Data Connection This is a core connection to the actual production database. Like Crystal Reports, Business View Data Connections can be made via native database drivers, ODBC, OLE DB, and other standard Crystal connection methods.
• Dynamic Data Connection This is similar to a Data Connection but can actually encompass two or more connections to like database structures. A Dynamic Data Connection allows you to connect to multiple databases, allowing the report designer or report viewer to choose which connection to use when running the report. This is helpful for “test database/production database” environments where a report viewer may want to choose an alternate database to report against on the fly.
• Data Foundation This portion of Business Views is where much of the capability of the tool comes to light. Here, you connect one or more Data Connections or Dynamic Data Connections together to provide a combined set of database fields. You may also create formulas, SQL expressions, filters, and parameter fields to further customize your view. When complete, the Data Foundation contains a combined set of all fields (both database fields and “derived” formulas) that can be used to form your ultimate customized data view.
• Business Element This portion of Business Views equates to a “virtual” table that is ultimately exposed to the report designer. Here, you choose only those fields that you actually wish a report designer to see. You may also rename fields here to be more meaningful.
• Business View This portion, which is ultimately available to a Crystal Report designer, combines one or more Business Elements together to form the ultimate “table and field” structure available to the report designer.
• List of Values This portion contains a shared dynamic or cascading pick list that can be used among multiple parameter fields in reports stored in BOE. This pick list can be updated from the source database in real time, or can be completely or partially scheduled for update within the BOE scheduling environment. A List of Values depends on an existing Business View.
• Prompt Group This portion consists of a series of one or more dynamic or cascading pick lists from within the Business View treated as a single “prompt” unit. This can be shared among one or more reports contained within BOE. A Prompt Group depends on one or more existing Lists of Values.
Each object in Business Views is dependent upon another, and at least one of each object (except a Dynamic Data Connection) must exist before a report designer can make use of a Business View. A Business View (the object that a report designer actually uses, and the portion that List of Values and Prompt Group objects use) requires one or more Business Elements. Business Elements are based on Data Foundations. Data Foundations are made up of one or more Data Connections or Dynamic Data Connections. And, Dynamic Data Connections are based on Data Connections.

4 C r y s t a l R e p o r t s 2 0 0 8 : T h e C o m p l e t e R e f e r e n c e
Creating Business ViewsThe process of creating a Business View that can be accessed by a Crystal Reports designer or used to create a pick list involves creating many of the objects mentioned previously in a logical order. You must, for example, create at least one Data Connection before you can create a Dynamic Data Connection or a Data Foundation. You must use existing Data Connections to make up a Dynamic Data Connection. You must have at least one Data Foundation before you can create a Business Element. And, you must have one or more Business Elements to make up the final Business View. If you are creating a dynamic pick list, you must create a Business View before you can create a List of Values. And, you must have at least one List of Values before you can create a Prompt Group.
Because of this required hierarchy, you must create these individual Business View objects in the proper order. Once you’ve created them (and added them to the repository), you may then base the higher-level Business View objects on them. And, after you’ve created a variety of different Business View objects, you are free to create as many dependent objects as you need later on. For example, you may initially create four or five Data Connections to your organization’s core data sources and then use them in any variety of Data Foundations now, or in the future.
The Business View ManagerDespite the web-based nature of BOE, a Windows “thick client” application, called the Business View Manager, is used to create and maintain Business Views. The Business View Manager is installed by default when you perform a complete BusinessObjects Enterprise installation. If you need to install the Business View Manager on additional computers outside the BusinessObjects Enterprise server environment for additional Business View designers, you’ll need to perform a custom installation from the BOE program media and choose the Business View Manager from the list of available client options.
Once you’ve installed the Business View Manager (if necessary), start it by choosing the appropriate choice from the appropriate program group after clicking Start. The Business View Manager will appear, with an initial dialog box requesting you to log on to BusinessObjects Enterprise. As Business Views are an integral part of the BusinessObjects

C r e a t i n g a n d U s i n g B u s i n e s s V i e w s 5
Enterprise repository, you must supply a valid BOE Central Management Server name, user ID, password, and authentication type in order to create or modify Business Views.
NOTE NOTE Some installations of BusinessObjects Enterprise XI 3.0 may not add a Business View Manager item to the program menu. In that case, search the program drive where BOE is installed for CrystalBVM.EXE. Double-click this file to start the Business View Manager.
Once you’ve logged in to BOE, the Welcome To Business Views dialog box will appear inside the Business View Manager. This dialog box allows you to create new Business View Objects, open existing objects, and work with recently used objects (tabs in the Welcome dialog box allow you the choice). Since all Business View objects are stored in the repository, it may be helpful to display the Repository Explorer (when you initially start the Business View Manager, it is not displayed).
You may display the Repository Explorer by closing the Welcome dialog box and then choosing View | Repository Explorer from the pull-down menus. The Repository Explorer will appear, and it will continue to appear when you start the Business View Manager from this point forward. You may now either close and restart the Business View Manager to redisplay the Welcome dialog box, or just display it immediately by choosing Help | Welcome Dialog from the pull-down menus. This is illustrated in Figure 1.
NOTE NOTE Sample repository objects, including a sample Business View, can be installed by using the Tools | Install Repository Samples option from the Business View Manager pull-down menus.
If you wish to work with the Business Views Manager toolbars and pull-down menus, you may simply cancel the welcome screen (you can display it later by choosing Help | Welcome Dialog from the pull-down menus). Or, you may click one of the three tabs to create a new Business View object, open an existing object from within the repository, or choose from a list of recently used objects.
If you wish to modify or examine any existing Business View objects, you may either choose the Open or Recent tab in the initial dialog, or close the dialog and use the Business View Manager’s pull-down menus or the Repository Explorer. For example, to use the Repository Explorer to open an existing Data Connection, simply navigate the folders of the Repository Explorer until you find the Data Connection you wish to open. Double-click the Data Connection to open it inside the Business View Manager.
NOTE NOTE More detailed information on the Repository Explorer can be found later in the chapter, under “Using the Repository Explorer.”
You may have any number of different Business View objects open inside the Business View Manager at a time. Each object will display a tab with the corresponding object type icon and object name across the middle portion of the Business View Manager. Simply click the desired tab to display that particular object. If there isn’t sufficient room to display all the object tabs, left- and right-arrow icons will be enabled to the right of the tabs. Use these to display tabs that may have scrolled away. When you’re finished working with a particular object, you may click the small X to the right of the tabs and arrows to close the currently displayed object. Choices available in the Business View Manager pull-down menus and toolbar will vary, depending on the type of Business View object currently displayed.

6 C r y s t a l R e p o r t s 2 0 0 8 : T h e C o m p l e t e R e f e r e n c e
You’ll also notice several Business View Manager windows that typically appear, no matter what type of Business View object you are working on. The Object Explorer, Property Browser, and Repository Explorer windows appear within the Business View Manager. If you don’t want to see any of these windows, simply click the X in the upper right-hand corner of the desired window. You can also uncheck the window name from the View menu. If you wish to redisplay the window, simply recheck the window name in the View menu.
While these windows are initially “docked” to one side or the other of the Business View Manager, you may undock them by clicking in their title bar and dragging. The chosen window will become free-floating, whereby it can be freely moved around your screen, even outside of the Business View Manager. To redock the window, drag it back into the Business View Manager until it snaps to a border of the main window—you may need to try several times to snap the window back where you want it.
Choose new object, open existing object, or look at recently modified objects
FIGURE 1 Business View Manager welcome screen
Business Views Manager toolbar
Folder structure of CRS/BOE repositoryClick to create a new Business View object

C r e a t i n g a n d U s i n g B u s i n e s s V i e w s 7
If you click the push-pin icon next to the X in the upper right-hand corner of a window, you will shrink the window. If you move your mouse pointer away from the window, it will eventually shrink to the side of the Business View manager, only appearing as a tab. Shrinking windows allows more room for the core design portion of the Business View manager to appear. Pointing to a hidden window tab will expand the window for a few seconds, whereby you can manipulate any items within the window. When you wish the window to shrink again, simply click outside the window with your mouse and wait a few seconds. If you wish a window to reappear permanently, show the window again by pointing to its tab. Then, click the push-pin icon to show the window.
You may create a new Business View object by clicking the desired object type in the welcome screen. If you’ve closed the welcome screen, click the New button in the Business View Manager toolbar to redisplay it. You may also choose File | New from the pull-down menus, choosing the desired type of Business View object from the submenu.
Open Business View object by double-clicking in Repository Explorer
Click tab to display object
Move between tabsClick pushpin to shrink various Business View Manager windows
Point to tab to display shrunk window
Close current object

8 C r y s t a l R e p o r t s 2 0 0 8 : T h e C o m p l e t e R e f e r e n c e
Each type of Business View object is described in the following sections of this chapter. These sections illustrate a sample Business View that combines various data elements from the sample XTREME Mountain Bike database included with some earlier versions of Crystal Reports, along with other related data sources. The sample Business View illustrated in the rest of this chapter includes the following characteristics:
• Database connections to a “test” XTREME database stored on a local hard disk and to a “production” XTREME database stored on Microsoft SQL Server. When a report is created or run, the designer or viewer is given the choice of using test or production data.
• A database connection to a Microsoft Excel spreadsheet that contains sales quotas for XTREME sales staff (the standard XTREME database doesn’t contain any quota information).
• A database connection to a comma-delimited text file dividing XTREME customer states into geographic regions, such as Northwest, Southwest, and so forth. The XTREME database doesn’t include any geographic area designations.
• A filter that limits the Business View to returning USA data only.
• Column-level security that limits an employee annual salary field and employee monthly salary formula to members of the Human Resources department.
• Row-level security that limits order display to a regional sales manager’s geographic area. For example, a Western Regional Sales Manager will only be able to see orders placed by customers in the Northwest and Southwest. The National Sales Manager, however, will see orders in all regions when viewing the same report.
Data ConnectionThe first type of Business View object that you must create when starting a new Business View from scratch is a Data Connection. A Data Connection is simply a connection to a single database or data source that you can use to build on later in the Business View design process. The Data Connection will consist of a single connection to a single data source. If your entire organization’s database can be accessed via a single database connection, then you may need to create only one Data Connection for all your Business Views. However, if you want your Business View to tie together several different databases, you’ll need to create a new Data Connection for each database.
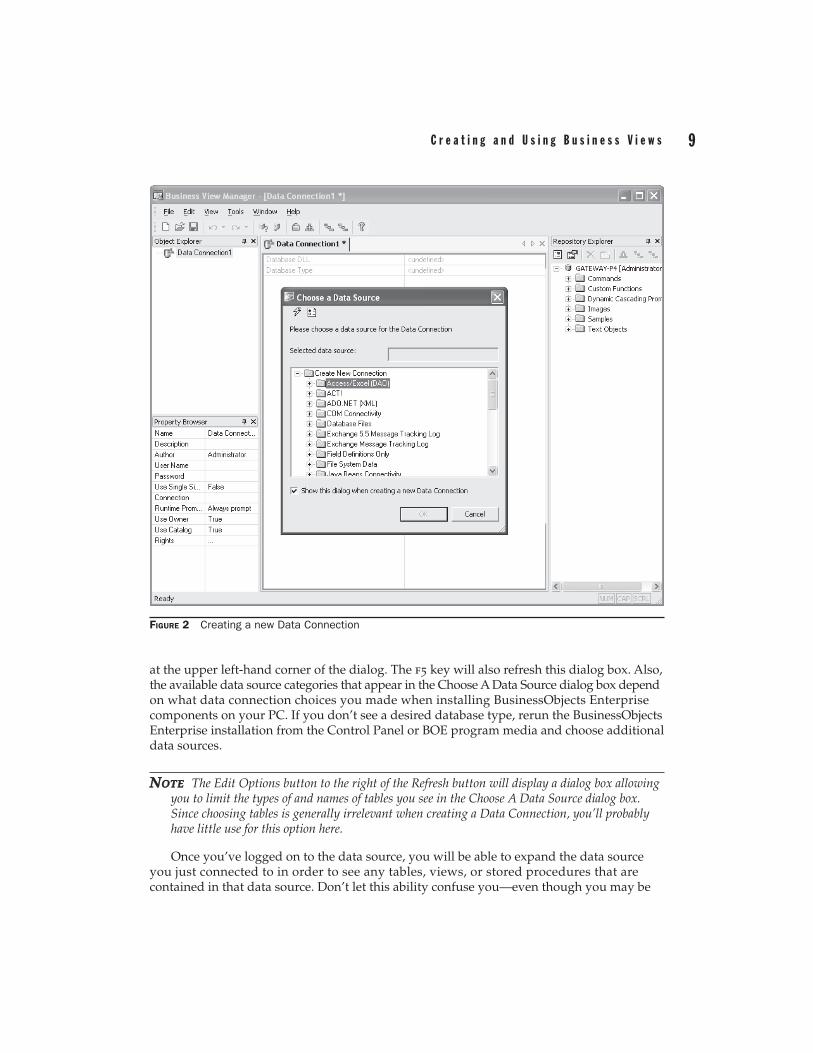
To create a new Data Connection, choose the Data Connection icon from the welcome screen when starting the Business View Manager or after clicking the New toolbar button, or choose File | New from the pull-down menus, choosing the Data Connection submenu item. The Choose A Data Source dialog will appear after a new Data Connection is displayed in the Business View Manager, as illustrated in Figure 2.
Navigate through the folder structure of this dialog box to find your desired data source (navigating this dialog box is similar to using the Crystal Reports Database Expert). Once you’ve chosen the necessary data source, you may be prompted to log on to a secure database server. Provide proper logon credentials to do so.
If you don’t find the particular data source connection you’re looking for, you may need to run a separate database utility (such as the ODBC Administrator from the Windows control panel) to create the correct data source. Once you’ve done this, you may refresh the contents of the Choose A Data Source dialog box by clicking the lightning bolt refresh button
C r e a t i n g a n d U s i n g B u s i n e s s V i e w s 9
at the upper left-hand corner of the dialog. The f5 key will also refresh this dialog box. Also, the available data source categories that appear in the Choose A Data Source dialog box depend on what data connection choices you made when installing BusinessObjects Enterprise components on your PC. If you don’t see a desired database type, rerun the BusinessObjects Enterprise installation from the Control Panel or BOE program media and choose additional data sources.
NOTE NOTE The Edit Options button to the right of the Refresh button will display a dialog box allowing you to limit the types of and names of tables you see in the Choose A Data Source dialog box. Since choosing tables is generally irrelevant when creating a Data Connection, you’ll probably have little use for this option here.
Once you’ve logged on to the data source, you will be able to expand the data source you just connected to in order to see any tables, views, or stored procedures that are contained in that data source. Don’t let this ability confuse you—even though you may be
FIGURE 2 Creating a new Data Connection

10 C r y s t a l R e p o r t s 2 0 0 8 : T h e C o m p l e t e R e f e r e n c e
able to click one of these items within the data source, you are not able to choose any individual tables, stored procedures, or views here. The Data Connection object merely is a connection to the database, and individual database elements, such as tables and views, are chosen and linked when you later include the Data Connection in a Data Foundation.
Once you’ve chosen a data source (and, you can choose only one per Data Connection object), you’ll be presented with the Set Data Connection Password dialog box. Use this dialog box to confirm the user ID and password you want the Business View to use when connecting to this data source in the future. If the database you chose is not secure (perhaps an Excel spreadsheet or unsecured Microsoft Access database), you may just cancel this dialog box. Or, if you always want the report designer or viewer to be required to specify a user ID or password whenever they use this Data Connection in a Business View, you may also cancel the dialog box.
Once you’ve specified the user ID and password, and confirmed the password, you may choose whether to prompt the report designer or viewer for the ID and password to this data source whenever the Business View is used. Note that if you choose to Never Prompt, the ID and password you specify here will be stored in the BusinessObjects Enterprise repository and the Business View user won’t have to specify the ID and password when they use the Business View.
Single Sign On CapabilityBOE includes single sign on capability with Business View Data Connections. If you check Use Single Sign On When Viewing (or set the Use Single Sign On When Viewing property to True), reports based on this data connection will not prompt a viewer for database connection information when the report is viewed in BOE. Instead, the user ID/password combination the viewer used to connect to BOE will be passed directly to the database connection. This reduces the number and frequency of ID/password requests report viewers will encounter.
Note that this single sign on capability only applies to reports viewed within the BOE InfoView web interface. Reports using associated Business Views in Crystal Reports itself will not recognize the single sign on property and will still prompt for a user ID and password, even if the id/password combination used to connect to Business View is the same as that required by the data source.

C r e a t i n g a n d U s i n g B u s i n e s s V i e w s 11
CAUTION CAUTION If you plan on using this Data Connection as part of a Dynamic Data Connection (described later in this chapter), you should make sure to choose the Never Prompt option. Otherwise, you’ll be unable to use this Data Connection object as part of a Dynamic Data Connection. Data Connections that are specified to Never Prompt for an ID and password can be further secured by setting BusinessObjects Enterprise rights. This is discussed later in the chapter, under “Setting Rights for Business View Objects.”
Once you’ve specified the data source and user ID/password settings, the Data Connection will appear inside the Business View Manager. You’ll see information pertaining to the particular data source you chose (such as the database DLL used, timeout properties, and so forth) in the center portion of the Business View Manager. An automatically generated name for the Data Connection will appear in the tab above these properties, displayed with an asterisk (the asterisk indicates that this object has not been saved to the BOE repository since being created or modified). Two boxes will appear on the left: the Object Explorer and the Property Browser.
While the Object Explorer is of limited usefulness in a Data Connection (since the Data Connection doesn’t contain any “child” objects, such as tables or fields), the Property Browser plays an important role when working with a Data Connection. Here, you may
12 C r y s t a l R e p o r t s 2 0 0 8 : T h e C o m p l e t e R e f e r e n c e
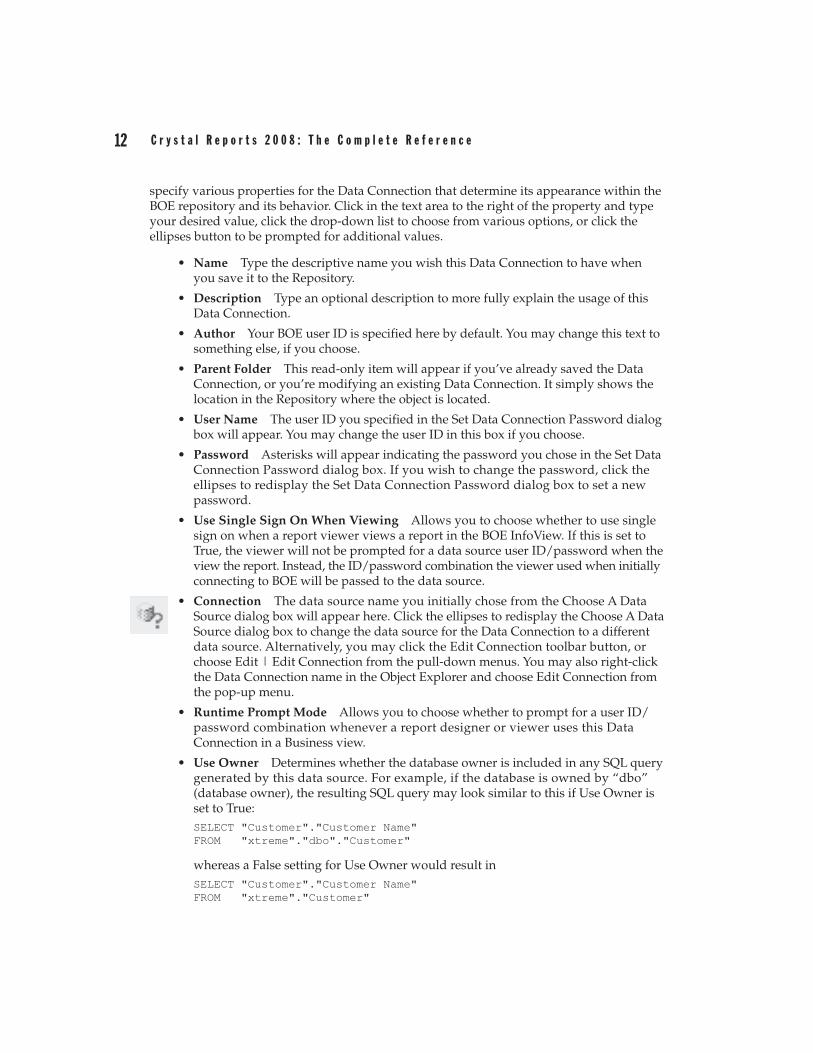
specify various properties for the Data Connection that determine its appearance within the BOE repository and its behavior. Click in the text area to the right of the property and type your desired value, click the drop-down list to choose from various options, or click the ellipses button to be prompted for additional values.
• Name Type the descriptive name you wish this Data Connection to have when you save it to the Repository.
• Description Type an optional description to more fully explain the usage of this Data Connection.
• Author Your BOE user ID is specified here by default. You may change this text to something else, if you choose.
• Parent Folder This read-only item will appear if you’ve already saved the Data Connection, or you’re modifying an existing Data Connection. It simply shows the location in the Repository where the object is located.
• User Name The user ID you specified in the Set Data Connection Password dialog box will appear. You may change the user ID in this box if you choose.
• Password Asterisks will appear indicating the password you chose in the Set Data Connection Password dialog box. If you wish to change the password, click the ellipses to redisplay the Set Data Connection Password dialog box to set a new password.
• Use Single Sign On When Viewing Allows you to choose whether to use single sign on when a report viewer views a report in the BOE InfoView. If this is set to True, the viewer will not be prompted for a data source user ID/password when the view the report. Instead, the ID/password combination the viewer used when initially connecting to BOE will be passed to the data source.
• Connection The data source name you initially chose from the Choose A Data Source dialog box will appear here. Click the ellipses to redisplay the Choose A Data Source dialog box to change the data source for the Data Connection to a different data source. Alternatively, you may click the Edit Connection toolbar button, or choose Edit | Edit Connection from the pull-down menus. You may also right-click the Data Connection name in the Object Explorer and choose Edit Connection from the pop-up menu.
• Runtime Prompt Mode Allows you to choose whether to prompt for a user ID/password combination whenever a report designer or viewer uses this Data Connection in a Business view.
• Use Owner Determines whether the database owner is included in any SQL query generated by this data source. For example, if the database is owned by “dbo” (database owner), the resulting SQL query may look similar to this if Use Owner is set to True:SELECT "Customer"."Customer Name"FROM "xtreme"."dbo"."Customer"
whereas a False setting for Use Owner would result inSELECT "Customer"."Customer Name"FROM "xtreme"."Customer"

C r e a t i n g a n d U s i n g B u s i n e s s V i e w s 13
• Use Catalog Determines whether the database name is included in any SQL query generated by this data source. For example, if the database name is “xtreme,” the resulting SQL query may look similar to this if Use Catalog is set to True:SELECT "Customer"."Customer Name"FROM "xtreme"."dbo"."Customer"
whereas a False setting for Use Catalog would result inSELECT "Customer"."Customer Name"FROM "dbo"."Customer"
If both Use Owner and Use Catalog are set to False, the result would beSELECT "Customer"."Customer Name"FROM "Customer"
NOTE NOTE The Use Owner and Use Catalog options should typically be set to True. However, when using Data Connections within a Dynamic Data Connection, these settings may need to be set to False to ensure that data sources that expose supposedly identical organizations will return identical SQL queries even if owner and database names are different.
• Rights Click the ellipses to set rights for this Data Connection. Setting Business View rights is discussed in detail later in the chapter, under “Setting Rights for Business View Objects.”
Saving the Data Connection to the RepositoryOnce you’ve set any desired properties, you should save the object to the repository. In fact, you must save new objects to the repository before you set certain properties, such as rights, or perform additional functions, such as checking dependent integrity. To save the Data Connection, click the Save button in the toolbar, press ctrl-s, or choose File | Save from the pull-down menus.
The Save As dialog box will appear, which consists of an object name text box and an embedded copy of the Repository Explorer (discussed in more detail later in the chapter, under “Using the Repository Explorer”). Choose the desired location for your Data connection by navigating to the desired folder, creating an additional folder, or selecting the root-level Central Management Server. If the name of the Data Connection isn’t appropriate, change it in the object name text box. Then, click Save to save the Data Connection to the repository.

14 C r y s t a l R e p o r t s 2 0 0 8 : T h e C o m p l e t e R e f e r e n c e
Testing Data Source ConnectivityAt any time, either before or after you’ve saved your Data Connection, you may want to double-check that the data source can be connected to successfully. By clicking the Test Connectivity button in the toolbar or choosing Tools | Test Connectivity from the pull-down menus, you can ensure that the data source name, user ID, and password you’ve supplied will connect to the data source properly. Either a message indicating a successful connection or a descriptive error message will appear.
You may also want to ensure that any changes you’ve made to existing Data Connections don’t adversely affect dependent objects. For example, if you created a Data Foundation or Business Element that depends on certain tables and fields in a Data Connection, that Data Foundation and Business Element will fail if you remove the original tables from the database the Data Connection references. More information on checking dependency can be found later in the chapter, under “Object Integrity and References.”
CAUTION CAUTION Ensure that any data sources you choose when building your Data Connections are also installed on the BusinessObjects Enterprise servers (Report Job Server, Page Server, Report Application Server, List of Values Server) that will be running the target reports or scheduling dynamic pick lists. If you use a data source when building the Business View that isn’t available on these servers, reports will fail when the BusinessObjects Enterprise viewer attempts to run them.
Recall that the sample Business View discussed earlier in the chapter will require connections to a production XTREME database on SQL Server, a test XTREME database from a local Microsoft Access database, an Excel spreadsheet containing sales quotas, and a comma-delimited text file defining geographic regions. Thus, a total of four Data Connections will need to be created to accomplish the ultimate Business View requirements:
• XTREME Server – Production A connection, via OLE DB, to a Microsoft SQL Server.
• XTREME Local – Test A connection, via ODBC, to the XTREME Sample Database 11 Access database.
• Quotas – Excel A connection, via the Access/Excel (DAO) driver, to the Excel spreadsheet containing quotas for each salesperson.
• Regions – Text File A connection, via ODBC, to a comma-delimited text file assigning a region of the country to each state.
Dynamic Data ConnectionA useful feature of Business Views is the Dynamic Data Connection. A Dynamic Data Connection allows the report designer or viewer to choose from two or more Data Connections to use whenever designing or running a report. This capability often satisfies the “test vs. production” requirement that organizations often have when running reports against multiple databases.
A Dynamic Data Connection is optional within a Business View. While you can create a Dynamic Data Connection if you want to, you don’t have to. However, because Dynamic Data Connections are based on existing Data Connections, you must create at least two or more Data Connection objects to make any use of Dynamic Data Connections.
To create a new Dynamic Data Connection, choose the Dynamic Data Connection icon from the welcome screen when starting the Business View Manager or clicking the New

C r e a t i n g a n d U s i n g B u s i n e s s V i e w s 15
toolbar button, or choose File | New from the pull-down menus, choosing the Dynamic Data Connection submenu item. The Choose A Data Connection dialog box will appear after a new Dynamic Data Connection is displayed in the Business View Manager, as illustrated in Figure 3.
The Choose A Data Connection dialog box will simply show the folder structure of the repository. Navigate through the folder structure of this dialog box to find your desired Data Connection object (only Data Connections will appear when you open repository folders). If your repository contains a large number of Data Connections, you may use dialog box filters to narrow down the list of displayed Data Connections. Right-click anywhere within the repository folder or object list and choose Advanced Filtering from the pop-up menu. The dialog box will display text boxes where you may specify a combination of object name text or author. When you click Apply, only Data Connections that include the supplied text or author names will appear. If you wish to turn off any existing filters, simply right-click and click the Advanced Filtering option again. The complete list of Data Connections will reappear.
FIGURE 3 Creating a new Dynamic Data Connection

16 C r y s t a l R e p o r t s 2 0 0 8 : T h e C o m p l e t e R e f e r e n c e
Once you’ve selected your first desired Data Connection, click Add. You can also just double-click a desired Data Connection. As you add Data Connection objects, you’ll see them appear in the middle of the Business View Manager under the Dynamic Data Connection tab (you may need to move the Choose A Data Connection dialog box out of the way to see this). Once you’ve chosen desired Data Connections, close the Choose A Data Connection dialog box.
CAUTION CAUTION Only Data Connection objects that don’t prompt for database logon credentials can be used within a Dynamic Data Connection. If you attempt to add a connection that does prompt, you’ll receive an error message. If you encounter such a connection, you’ll need to edit it within the Business View Manager and set the Runtime Prompt Mode property to Never Prompt. Then, you may add it to the Dynamic Data Connection.
Make sure that the Data Connections you are adding to your Dynamic Data Connection expose applicable database objects that are identical to the other Data Connections you add. For example, if you are planning on using the Orders, Customer, and Products tables from one Data Connection, ensure that other Data Connections also expose the same table names with the same set of relevant fields. The entire concept of a Dynamic Data Connection is to provide the exact same database organization, or “schema,” from multiple data sources.
Once you’ve chosen your Data Connections, they will appear inside the Business View Manager. An automatically generated name for the Dynamic Data Connection will appear in the tab above the Data Connections, displayed with an asterisk (the asterisk indicates that this object has not been saved to the BOE repository since being created or modified).
Delete selected connection or add new connections
Move selected connection up or down in list
Sort connection in ascending or descending order

C r e a t i n g a n d U s i n g B u s i n e s s V i e w s 17
You may discover that you either have added a Data Connection that you don’t want, or need to add additional Data Connections. To delete an existing connection, select it in the list (you may select more than one connection with ctrl-click or shift-click) and press the del key. You may also click the Delete button at the bottom of the connections list, click the Delete toolbar button, or choose Edit | Delete Data Connection from the pull-down menus.
If you need to add an additional Data Connection, click the Add button at the bottom of the connections list, click the Add toolbar button, or choose Edit | Add Data Connection from the pull-down menus. The Choose A Data Connection dialog box will reappear. Navigate through the repository folders to find the desired Data Connection or Connections to add. Or, if you already see the Repository Explorer elsewhere within the Business View Manager, you can simply drag a Data Connection object from it directly to the list of connection objects.
When the report designer or viewer uses a Business View based on a Dynamic Data Connection, they will be given the choice of Data Connections from within the Dynamic Data Connection in a pick list, similar to that of a standard Crystal Reports parameter field. Data Connections will appear in the pick list in the same order as they appear here. If you wish to change the order that connections will appear in the pick list, click the desired connection and use the up or down arrow at the top of the window to move the connection up or down in the list. You can also sort the entire list in ascending or descending order by choosing an option for the Sort drop-down list to the right of the up and down arrows.
When dealing with Dynamic Data Connections, the Object Explorer is of limited usefulness (since the Dynamic Data Connection doesn’t contain any “child” objects, such as tables or fields). However, the Property Browser plays a more important role. Here, you may specify various properties for the Dynamic Data Connection that determine its appearance within the BOE repository and its behavior. Click in the text area to the right of the property and type your desired value, click the drop-down list to choose from various options, or click the ellipses button to be prompted for additional values.
• Name Type the descriptive name you wish this Dynamic Data Connection to have when you save it to the repository.
• Description Type an optional description to more fully explain the usage of this Dynamic Data Connection.
• Author Your BOE user ID is specified here by default. You may change this text to something else, if you choose.
• Parent Folder This read-only item will appear if you’ve already saved the Dynamic Data Connection, or you’re modifying an existing Dynamic Data Connection. It simply shows the location in the repository where the object is located.
• Prompt Text Much like a Crystal Reports parameter field, a Dynamic Data Connection will prompt the report designer or viewer for their choice of Data Connection. Any text you type here will appear as prompting text to help the report viewer make the proper connection choice.
• Rights Click the ellipses to set rights for this Dynamic Data Connection. Setting Business View rights is discussed in detail later in the chapter, under “Setting Rights for Business View Objects.”

18 C r y s t a l R e p o r t s 2 0 0 8 : T h e C o m p l e t e R e f e r e n c e
TIP TIP Even if the Data Connections you add to a Dynamic Data Connection expose supposedly identical data schemas, you may encounter problems later in the Business View design process when browsing sample data or using the finished Business View in a report. This may be due to the data sources within the Dynamic Data Connection adding extra items, such as database catalog name, or database owner, to various portions of the resulting SQL statement. If you suspect this problem, edit the source Data Connections within the Dynamic Data Connection and set the Use Catalog or User Owner properties to False.
Saving the Dynamic Data Connection to the RepositoryOnce you’ve set any desired properties, you should save the object to the repository. In fact, you must save the object to the repository before you set certain properties, such as rights, or perform additional functions, such as checking dependent integrity. To save the Dynamic Data Connection, click the Save button in the toolbar, press ctrl-s, or choose File | Save from the pull-down menus. As with other Business View objects, you may use various features of the Repository Explorer within the Save As dialog box to save the Dynamic Data Connection to the repository.
You may also want to ensure that any changes you’ve made to existing Dynamic Data Connections don’t adversely affect dependent objects, such as existing Data Foundations or Business Elements. More information on checking dependency can be found later in the chapter, under “Object Integrity and References.”
Consider that one of the requirements of the sample Business View discussed earlier in the chapter is the ability to choose between a test database and a production one when designing or viewing reports. Thus, a Dynamic Data Connection containing the XTREME production connection via SQL Server and the XTREME test connection via ODBC will provide this capability.
Data FoundationOnce database connectivity has been organized with either Data Connections or Dynamic Data Connections, you’ll need to begin the process of tying the data together and determining what data elements you ultimately want report designers and viewers to be able to see. This portion of Business View design is largely carried out within a Data Foundation.
A Data Foundation is a collection of one or more tables, stored procedures, views, SQL Commands, and so forth, which make up a single set of available data. Furthermore, additional data in the form of formulas and SQL Expressions can be added to a Data Foundation. And, parameter fields can be added to prompt the report designer or viewer for variable information. These parameters can be used within Data Foundation filters and formulas to customize Data Foundation behavior. Also, the Data Foundation is where row and column security can be specified to limit the set of fields or records that a report designer or viewer sees.
As you may gather from the large number of features that are controlled by a Data Foundation, creating it can often be the most complex portion of overall Business View design. You’ll want to think carefully about what your ultimate goals for Business View design are before getting too deep into Data Foundation development. While you can always come back and edit a Data Foundation later, you’ll save time and aggravation by planning ahead before initial design.

C r e a t i n g a n d U s i n g B u s i n e s s V i e w s 19
There are some fundamental Data Foundation rules you should keep in mind when planning Business View design:
• Every table or data element must be “linkable” Even though you can add more than one Data Connection or Dynamic Data Connection to a Data Foundation, all tables you add to a single Data Foundation from any of these connections must be able to be linked to another table. Just as when designing a Crystal Report directly against multiple data sources, any mismatched data types or non-matching field contents will render tables un-linkable. The Data Foundation must ultimately be able to return a single record consisting of fields from all tables added to it. Therefore, all tables must be able to be properly linked.
• Your ultimate Business View must be based on a single Data Foundation The “all tables must be linked” caveat at the Data Foundation level may cause you to attempt to link un-linkable data higher up in the Business View hierarchy. For example, may you have one Data Foundation that includes a base table with separate first and last name fields. You may create a formula within the Data Foundation to concatenate them into a single combined field, expecting to be able to link the formula to a combined first/last name field in another Data Foundation when you eventually create the top-level Business View object. However, when you attempt to create the Business View, you’ll receive an error message if you attempt to add data from multiple Data Foundations. This is a core limitation of the Business View product. So, while you can create multiple Data Foundations in the repository for various Business View requirements, you may only include data from a single Data Foundation when you create a top-level Business View object.
To create a new Data Foundation, choose the Data Foundation icon from the welcome screen when starting the Business View Manager or clicking the New toolbar button, or choose File | New from the pull-down menus, choosing the Data Foundation submenu item. The Choose A Data Connection dialog box will appear after a new Data Foundation is displayed in the Business View Manager, as illustrated in Figure 4.
The Choose A Data Connection dialog box will simply show the folder structure of the repository. Navigate through the folder structure of this dialog box to find your desired Data Connection or Dynamic Data Connection object (only Data Connections or Dynamic Data Connections will appear when you open repository folders). If your repository contains a large number of connections, you may use dialog box filters to narrow down the list of displayed connections. Right-click anywhere within the repository folder or object list and choose Advanced Filtering from the pop-up menu. The dialog box will display text boxes where you may specify a combination of object name text or author. When you click Apply, only connections that include the supplied text or author names will appear. If you wish to turn off any existing filters, simply right-click and click the Advanced Filtering option again. The complete list of connections will reappear.
Once you’ve selected your desired Data Connection or Dynamic Data Connection, click OK. You can also just double-click a desired Connection. If you choose a Dynamic Data Connection, you’ll be prompted to pick which Data Connection from within it to use for the Data Foundation design process. The Insert Data Tables dialog box will now appear, as shown in Figure 5.

20 C r y s t a l R e p o r t s 2 0 0 8 : T h e C o m p l e t e R e f e r e n c e
FIGURE 4 Creating a new Data Foundation
Set Data Tables view settings
FIGURE 5 The Insert Data Tables dialog box
Refresh list of database objectsClick to add additional connection

C r e a t i n g a n d U s i n g B u s i n e s s V i e w s 21
Click plus signs, as necessary, to expand the database connection to see available tables, views, and stored procedures. Choose one or more database items (you may ctrl-click or shift-click to choose more than one item) and click Add to add them to the Data Foundation. You may also just double-click a desired item. As you add them, you’ll see the items appear inside the Business View Manager (you may need to move the Insert Data Tables dialog box out of the way to see them).
If you wish to add an additional Data Connection or Dynamic Data Connection, click Add Connection. This will display the Choose A Data Connection dialog box, where you may navigate through the repository folder structure to look for additional connections. If you choose an additional Dynamic Data Connection, you’ll be prompted to pick which connection to use. Once you choose the additional connection, the Insert Data Tables dialog box will appear with the new connection appearing as another category with a plus sign. Click the plus sign to choose database items from the new connection.
If, for some reason, the database connection you are using may change while the Insert Data Tables dialog box is being displayed, you may refresh the list of database items by pressing the f5 key, clicking the Refresh button above the list of tables, or right-clicking in the dialog box and choosing Refresh from the pop-up menu. Any changes to the database will be reflected in the dialog box.
You may also wish to customize display of the Insert Data Tables dialog box. By using options in the Database Explorer Options dialog box, you can choose to limit display to certain types of database items (just tables and views, for example, or all types of database items); only include tables that match a table name or owner character pattern; choose whether to list tables by name, description, or both; and sort table names alphabetically. Display this dialog box by clicking the Edit Options button above the list of tables, or right-clicking in the dialog box and choosing Options from the pop-up menu. After making choices in this dialog box, you’ll need to click the Refresh button to redisplay the Insert Data Tables dialog box with the changes.
Once you’ve chosen your tables and closed the Insert Data Tables dialog box, you’ll see all chosen database items inside the Business View Manager. An automatically generated name for the Data Foundation will appear in the tab above the Data Connections, displayed with an asterisk (the asterisk indicates that this object has not been saved to the repository since being created or modified).

22 C r y s t a l R e p o r t s 2 0 0 8 : T h e C o m p l e t e R e f e r e n c e
Saving the Data Foundation to the RepositoryWhile you may still have many options to choose within the Data Foundation, you may want to save it to the repository fairly quickly after choosing the first set of tables. To save the Data Foundation, click the Save button in the toolbar, press ctrl-s, or choose File | Save from the pull-down menus. The Save As dialog box will appear, where you may use options similar to those for other Business View objects to save the Data Foundation.
You may also want to ensure that any changes you’ve made to the Data Foundation don’t adversely affect dependent objects, such as existing Business Elements or Business Views. More information on checking dependency can be found later in the chapter, under “Object Integrity and References.”
While other Business View objects may be relatively simple to manipulate or modify, there is a lot more to the Data Foundation portion of Business Views than may initially meet the eye. Once you’ve chosen an initial set of tables, there is still much to be done:
1. Additional tables may be required, or existing tables may need to be removed. You may also want to change the initial data source that a table is based on, if you have multiple data sources with the same table. You may also need to set the alias name for a table, particularly if you have added two tables with the same name from different connections.
2. You’ll need to link all your tables on one or more common fields. You may also need to change link and join types for various table links.
3. You may want to add customized data to your Data Foundation by way of formulas, custom functions, or SQL Expressions.
4. If you want to prompt report designers or viewers for variable information that can affect filters or formulas, you can create parameter fields. You may then use the parameter fields in other portions of the Data Foundation.
5. You can create filters that limit the Data Foundation to a certain set of records. Filters can either be “hard-coded” (such as setting the Country equal to USA) or based on parameters.
6. Row and column security can be set within a Data Foundation, limiting the set of fields or records that are available when reports are designed or run. This row and column security is based on filters and field rights, both being controlled via BusinessObjects Enterprise user and group security.
Working with Connections and TablesWhile earlier discussions in this section revolved around choosing a single Data Connection or Dynamic Data Connection and picking tables, you may often need to add more tables from the first, or additional, connections. You may also need to remove tables that you added by mistake or no longer need.
Adding Additional Tables and Connections If you need to add additional tables from an already-existing connection, or add more connections and add tables from them, redisplay the Insert Data Tables dialog box that appeared when you first created the Data Foundation. You may do this by clicking the Insert Data Tables toolbar button, by choosing Insert | Insert Data Tables from the pull-down menus, or by right-clicking the Tables category of the Object
C r e a t i n g a n d U s i n g B u s i n e s s V i e w s 23
Explorer window and choosing Insert Data Tables from the pop-up menu. The Insert Data Tables dialog box (shown previously in Figure 5) will appear.
For example, the sample Business View described throughout the chapter requires data from two XTREME sample databases (provided by a Dynamic Data Connection), and an Excel spreadsheet and comma-delimited text file (each provided by its own Data Connection). So, the Data Foundation used in this sample Business View will require a Dynamic Data Connection and two Data Connections to all be added to the Data Foundation. Various tables from the XTREME Dynamic Data Connection, as well as a single table each from the Excel and text file connection, will be added to the Data Foundation.
TIP TIP The Referenced Data Connections window provides the same capabilities as the Insert Data Tables dialog box, but appears inside the Business View Manager alongside other windows. If you prefer to use this option, choose View | Referenced Data Connections from the pull-down menus.
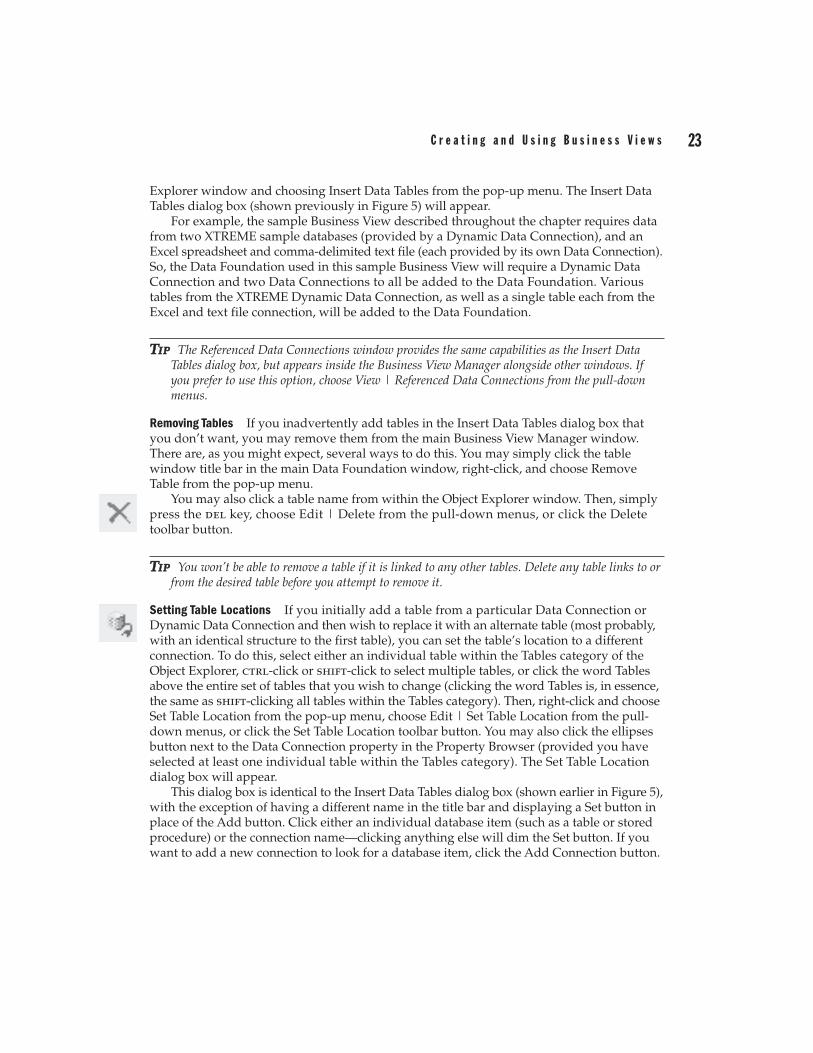
Removing Tables If you inadvertently add tables in the Insert Data Tables dialog box that you don’t want, you may remove them from the main Business View Manager window. There are, as you might expect, several ways to do this. You may simply click the table window title bar in the main Data Foundation window, right-click, and choose Remove Table from the pop-up menu.
You may also click a table name from within the Object Explorer window. Then, simply press the del key, choose Edit | Delete from the pull-down menus, or click the Delete toolbar button.
TIP TIP You won’t be able to remove a table if it is linked to any other tables. Delete any table links to or from the desired table before you attempt to remove it.
Setting Table Locations If you initially add a table from a particular Data Connection or Dynamic Data Connection and then wish to replace it with an alternate table (most probably, with an identical structure to the first table), you can set the table’s location to a different connection. To do this, select either an individual table within the Tables category of the Object Explorer, ctrl-click or shift-click to select multiple tables, or click the word Tables above the entire set of tables that you wish to change (clicking the word Tables is, in essence, the same as shift-clicking all tables within the Tables category). Then, right-click and choose Set Table Location from the pop-up menu, choose Edit | Set Table Location from the pull-down menus, or click the Set Table Location toolbar button. You may also click the ellipses button next to the Data Connection property in the Property Browser (provided you have selected at least one individual table within the Tables category). The Set Table Location dialog box will appear.
This dialog box is identical to the Insert Data Tables dialog box (shown earlier in Figure 5), with the exception of having a different name in the title bar and displaying a Set button in place of the Add button. Click either an individual database item (such as a table or stored procedure) or the connection name—clicking anything else will dim the Set button. If you want to add a new connection to look for a database item, click the Add Connection button.

24 C r y s t a l R e p o r t s 2 0 0 8 : T h e C o m p l e t e R e f e r e n c e
Choose the new table or connection you want to use and click Set (you can also just double-click the new table or connection). If you selected multiple tables in the Object Explorer before setting location, or chose a single table and then clicked a connection name, only the source connection will change for all the tables—the Business View Manager will look for tables with identical names in the new connection. An error message will appear if matching tables aren’t found. If you selected a single table before setting location, and then choose a different single table, Set Table Location will replace the first table with the one just chosen.
Once you set new table locations, you’ll be asked if you wish to verify the database. If you reply Yes, the core database will be read in order to display any field name or data type changes in the Business View Manager. You may also wish to do this without changing a table location if the core database schema changes through normal maintenance. Do this by choosing Tools | Verify Database from the pull-down menus, or clicking the Verify Database toolbar button. Any changes to the underlying data tables will be reflected in the Object Explorer and the Data Foundation linking diagram window.
If you verify the database and discover that even moderate changes have been made to the underlying data structure of the database, you should probably check the integrity of any dependent objects within the Business View. For example, if Business Element and Business View objects are dependent upon the field names and data types that have now changed, you may need to modify them to accommodate the core database changes. See “Object Integrity and References” later in the chapter for details.
NOTE NOTE If field names have changed between the two tables, you’ll be prompted to map new field names to existing fields. This is necessary to ensure that any field names that have changed can be “connected” to existing fields that may already be used in the Data Foundation. The Map Database Fields dialog box displayed in the Business View Manager is identical in appearance and behavior to that displayed in Crystal Reports. Look in Chapter 15 of the printed edition for more information.
Setting Table Aliases As a general rule, when you add a database item (table, stored procedure, view) to a Data Foundation, it is stored and displayed with the name it was given when the database was designed. There are two potential issues with using this predefined item name: (1) The name may not be intuitive or easy to understand, and (2) another table with the same name may be added from a different connection. The solution to either of these problems is to use an alias for the table.
An alias is simply a different name that refers to the original table in the connection. By assigning an alias, table names may be easier to understand or may differentiate multiple tables with the same core database name (such as a lookup table that needs to be added to the Data Foundation multiple times). The first opportunity to change a table’s alias will be presented you when you attempt to add a table to the Data Foundation with the same name as an existing table. A message box will indicate the duplicate table name, giving you the option to rename the incoming table or cancel the table addition. If you choose to rename the table, the Rename Table dialog box will ask you to specify a new table name.

C r e a t i n g a n d U s i n g B u s i n e s s V i e w s 25
You may set the alias for an existing table (if the name is confusing, for example) by selecting it in the Object Explorer. Then select the Table Alias property in the Property Browser and type in a new table name.
TIP TIP Setting table aliases in the Data Foundation is largely beneficial only to the Business View designer. The actual “table” names that the report designer will see are determined when you create Business Elements (covered later in the chapter).
Linking Tables Once you’ve added tables from the various Data Connections to the Data Foundation, you must link all the tables together. As discussed at the beginning of the Data Foundations section, a core requirement of a Data Foundation is that all tables must be linked on at least one common field. By linking tables together, each table will “follow” another as records are read, returning combined records with matching fields from all linked tables to the report designer or viewer.
Linking tasks are accomplished when viewing the Linking Diagram screen in the Business View Manager. If you don’t see the Linking Diagram screen, click the Linking Diagram tab at the bottom of the center Business View Manager window (other tabs may appear for formulas, parameter fields, and so forth). Once the Linking Diagram screen is displayed, you may choose linking options either from the Linking Diagram pull-down menu, from various toolbar buttons, or by right-clicking in the Linking Diagram window and choosing options from the pop-up menus.
NOTE NOTE Table linking concepts in Business Views are almost identical to linking concepts in Crystal Reports. Look in Chapter 15 of the printed edition for table linking concepts, steps, and fine points. Only linking features not common to Crystal Reports will be covered in detail in this chapter.
Use steps similar to those discussed in Chapter 15 of the printed edition to link tables. For example, you can simply drag and drop from the desired field in one table to the desired field in another to draw a link line. If your database design lends itself to automatic linking (either by field name or by key), you may choose the Smart Linking By Name or Smart Linking By Key choices to link automatically. To change options for an individual link, click the link line, right-click, and choose link-related options from the pop-up menu.
While most linking features are similar or identical to those in Crystal Reports, a few differences exist in Business Views:
• Locate Table If you have added a moderate to large number of tables to your Data Foundation, it may be difficult to locate the table in the Linking Diagram window. The Locate Table option displays a dialog box listing all tables that you’ve added. Choose this option by choosing Linking Diagram | Locate Table in the pull-down menus, with the Locate Tables toolbar button, or by right-clicking in the Linking Diagram window and choosing Locate Table from the pop-up menu. Click a table name in the dialog box to highlight the table in the Linking Diagram window. Once you’ve finished, click Done to close the Locate Table dialog box.

26 C r y s t a l R e p o r t s 2 0 0 8 : T h e C o m p l e t e R e f e r e n c e
• Fetch Table Indexes In Crystal Reports, tables in the Database Expert Links tab show colored arrows next to indexed fields. In Business Views, however, you must specifically request that indexes be read before index arrows appear in the Linking Diagram window. Choose Linking Diagram | Fetch Table Indexes to perform this step. If the database driver you used to create the Data Connections supports exposed indexes, and your database has been indexed on several fields, you’ll see colored arrows appearing next to indexed fields in the Linking Diagram window. If you’d like to see a legend that indicates the significance of the colors of the arrows, choose Index Legend from the Linking Diagram pull-down menu or from the pop-up menu you’ll see after right-clicking in the Linking Diagram window.
• Select Visible Tables If you added many tables to your Data Foundation, it may be difficult for you to navigate all of them in the Linking Diagram window. If you would prefer that a limited set of tables be visible for certain linking choices, you can choose which tables appear or don’t appear in the Business View Manager. Do this by choosing Linking Diagram | Select Visible Tables from the pull-down menus or by clicking the Select Visible Tables toolbar button. The Choose Visible Tables for Linking Diagram dialog box will appear. Either select individual tables, click the Select All button to select all tables, or click Clear to deselect all tables. When you click OK, those tables that were selected will appear in the Linking Diagram window while those that weren’t selected won’t appear.

C r e a t i n g a n d U s i n g B u s i n e s s V i e w s 27
• Change Linking View By default, the Business View Manager shows an individual window consisting of both the table name and all fields in the table, for each table within the Linking Diagram window. This is typically appropriate when you are initially linking tables, as you can see individual table fields for dragging and dropping links. However, you may prefer a more compact view that shows only table names without all fields. Display this alternate view by choosing Linking Diagram | Change Linking View from the pull-down menus, by clicking the Change Linking View toolbar button, or by right-clicking in the Linking Diagram window and choosing Change Linking View from the pop-up menu. A more concise view showing just table names without fields and associated link lines will appear. To return to the original tables-with-fields view, simply choose the Change Linking View option again.

28 C r y s t a l R e p o r t s 2 0 0 8 : T h e C o m p l e t e R e f e r e n c e
TIP TIP The Allow Table Joins Override property will appear in the Property Browser when you select the Data Foundation name in the Object Explorer. If you set this property to True, you will be able to modify table linking already set in the Data Foundation when you create a Business View. If you leave this option set to False, the linking you choose in the Data Foundation will always be enforced in any Business Views based on this Data Foundation.
Continuing with the XTREME Business View example discussed earlier in the chapter, the XTREME Dynamic Data Connection (based on the two XTREME Mountain Bike Data Connections), the Quotas Data Connection (based on the Excel spreadsheet), and the Regions Data Connection (based on the comma-delimited text file) should be added to the Data Foundation. Tables will be linked on common fields.
Using Formulas, Custom Functions, and SQL ExpressionsOne of the main benefits of a “metalayer” tool such as Business Views is the ability to precreate custom calculations and logic to provide to report designers. This ability allows you to create organization-specific calculations, custom fields, and other special data elements specific to your reporting requirements. These custom fields can be added to the Business View to appear alongside regular database fields. As far as the report designer is concerned, these custom fields are just another available field to drag and drop onto the report.
Two different types of custom fields can be created and placed in your Data Foundation: Formulas and SQL Expressions. Both can be used to create custom calculations, specially formatted fields, and complex logical expressions. The main difference is that formulas are ultimately evaluated and calculated by the report they’re placed in, whereas SQL expressions make use of Structured Query Language functions from your database server and are processed and calculated by the server before being sent back to the report. Typically, there are many more available functions and operators you can use with formulas. However, because SQL expressions are evaluated on the database server, you’ll often find improved database query performance when using SQL expressions in filters and other record selection situations. Also, because SQL Expressions are server-based, you can use them to link to other tables in the Business Views Manager.
NOTE NOTE Creating formulas and SQL expressions in Business Views is almost identical to creating them in Crystal Reports. Detailed information on formula creation can be found in Chapter 4 of the printed edition. Detailed information on SQL expressions can be found in Chapter 15 of the printed edition. Because of these similarities, only formula and SQL expressions differences between Crystal Reports and Business Views will be highlighted in this chapter.
Creating Formulas To create a new formula in your Data Foundation, right-click the Formulas category of the Object Explorer and choose Insert Formula from the pop-up menu. You can also choose Insert | Insert Formula from the pull-down menus, or click the Insert Formula toolbar button. The Formula Editor will appear in the middle portion of the Business View Manager. Use the Formula Editor field, function, and operator boxes, as well as the formula text box, to create your formula.

C r e a t i n g a n d U s i n g B u s i n e s s V i e w s 29
Creating SQL Expressions To create a new SQL expression in your Data Foundation, right-click the SQL Expressions category of the Object Explorer and choose Insert SQL Expression from the pop-up menu. You can also choose Insert | Insert SQL Expression from the pull-down menus, or click the Insert SQL Expression toolbar button. Because a SQL expression is processed by the database server, it is limited to including fields from a single database connection (unlike a formula, which can include fields that cross database boundaries). Accordingly, you’ll be prompted to choose which Data Foundation connection to use for the SQL Expression. Once you make that choice, the SQL Expression Editor will appear in the middle portion of the Business View Manager. Use the SQL Expression Editor field, function, and operator boxes, as well as the formula text box, to create your SQL expression.

30 C r y s t a l R e p o r t s 2 0 0 8 : T h e C o m p l e t e R e f e r e n c e
CAUTION CAUTION In order to create a SQL Expression, the Data Connection you choose must be based on a SQL Database or a connection via ODBC, as these connections make use of Structured Query Language. Other types of connections, such as “native” PC-style databases or proprietary data connections that don’t use SQL, won’t be available for use with a SQL Expression.
With either a formula or a SQL expression, you can check for proper syntax by clicking the Check button in the Editor toolbar. You may click Apply to save the contents of the formula or SQL expression to the Data Foundation. To give the formula or SQL expression a meaningful name in the Data Foundation, select the Name text box in the Property Browser when the formula or SQL expression is selected in the Object Explorer. Then, type in an appropriate name and click outside the Name property to save the change. Make sure you save the Data Foundation itself with the Save toolbar button or File | Save menu option to ensure that your new formula or SQL expression is actually saved to the repository with the remainder of the Data Foundation.
One exciting feature of the Business View Manager is the ability to link to other tables on a SQL expression. This improves the ability to link to other data sources that may not

C r e a t i n g a n d U s i n g B u s i n e s s V i e w s 31
contain exactly the same type of data. For example, if one table contains separate first and last name fields, while the other contains a combined first/last field, you can create a SQL expression in the first table that concatenates the first and last name fields together. Then, by selecting True for the Show in Linking Diagram property that appears for the SQL Expression in the Property Browser, you can return to the Linking Diagram and link the SQL expression to another table. SQL expressions will appear with a small icon next to them inside the source table.
CAUTION CAUTION Creating SQL expressions when using Dynamic Data Connections may be problematic, as SQL expression syntax changes depending on the database and database driver used. For example, if you include a database from Microsoft Access via ODBC and one from SQL Server via OLE DB in a Dynamic Data Connection, the data source you choose when first editing the Data Foundation will determine the syntax for SQL expressions. If you then attempt to use the SQL expression after choosing a different data source, the expression may fail because of the different SQL syntax used by the alternate database.
Importing and Using Custom Functions Custom functions are reusable pieces of formula language code that are available to every formula in your Data Foundation (they cannot be used in a SQL expression). Because they are stored in the BusinessObjects Enterprise repository, they can also be centrally maintained. If a particular piece of business logic that a custom function exposes needs to be changed, a single change in the repository will propagate the change through all formulas created using the custom function.
Before you can use a custom function in a Data Foundation formula, you must first import the custom function into the Business View Manager from the repository. Do this by choosing Insert | Import Custom Function from the pull-down menus, right-click the Custom Function category of the Object Explorer and choose Import Custom function from the pop-up menu, or click the Import Custom Function toolbar button. The Choose Custom Functions dialog box will appear.

32 C r y s t a l R e p o r t s 2 0 0 8 : T h e C o m p l e t e R e f e r e n c e
Select the custom function you want to add and click Add. You may select as many custom functions as you’d like and click Add (although, you can only click one at a time). When finished, close the Choose Custom Functions dialog box. You’ll now notice that the custom functions you chose appear in the Custom Functions category of the Object Browser, as well as the Custom Functions category of the Function tree in the Formula Editor (you’ll see the Formula Editor when creating or editing a formula). If any of the custom functions you import refer to additional custom functions, they’ll be imported automatically and you’ll also see them appear in custom function lists. To use a custom function in a formula, simply double-click the custom function name in the Formula Editor function tree to add the function to your formula. Then, supply any necessary arguments.
NOTE NOTE Complete information on creating custom functions in Crystal Reports and adding them to repository can be found in Chapter 5 of the printed edition. Also, if you would like to use sample custom functions that are included with BusinessObjects Enterprise, choose Tools | Install Repository Samples from the Business View Manager pull-down menus to install sample custom functions to the repository.
Editing and Deleting Formulas, Custom Functions, and SQL Expressions Once you’ve added a formula or SQL expression to the Data Foundation, you may later decide to edit it or delete it. To edit an existing formula or SQL expression, simply double-click it from within the appropriate category of the Object Explorer. You can also single-click the desired formula or SQL expression and choose Edit | Edit Formula or Edit | Edit SQL Expression from the pull-down menus. You can also right-click in the Object Browser and choose Edit from the pop-up menu. To rename a formula or SQL expression, select it in the Object Explorer and change

C r e a t i n g a n d U s i n g B u s i n e s s V i e w s 33
the Name property in the Property Browser. You may also add a description for the object in the Property Browser, if you so desire.
To delete a formula, SQL expression, or custom function, select it in the Object Browser and press the del key. You may also right-click the desired object and choose Delete from the pop-up menu. Or, simply select the object and click the Delete toolbar button. If you attempt to delete a formula or SQL expression that is used in other formulas or SQL expressions, or if you attempt to delete a custom function that is used in a formula, you’ll receive an error message. Remove the reference to the object from any other object before attempting to delete it. Also, if you attempt to delete a custom function that is being referenced by another custom function, you’ll encounter an error message.
As you add formulas and SQL Expressions to your Data Foundation, you’ll notice that the Linking Diagram and editors used for each formula and SQL expression all take up the same window in the middle of the Business View Manager. Notice, also, that a tab appears at the bottom of this center window for each formula and SQL expression, as well as for the Linking Diagram. You may click a tab to display that particular object in the Business View Manager. If more tabs appear than can be shown at one time, click the arrow buttons to the left of the tabs. To remove a tab for a formula or SQL expression, click the small X to the left of the first tab or in the upper right-hand corner of the window—double-clicking the formula or SQL expression from the Object Explorer will redisplay it. You cannot close the Linking Diagram window with the X button.
Click a tab to view the objectNavigate among tabs
Close a tab
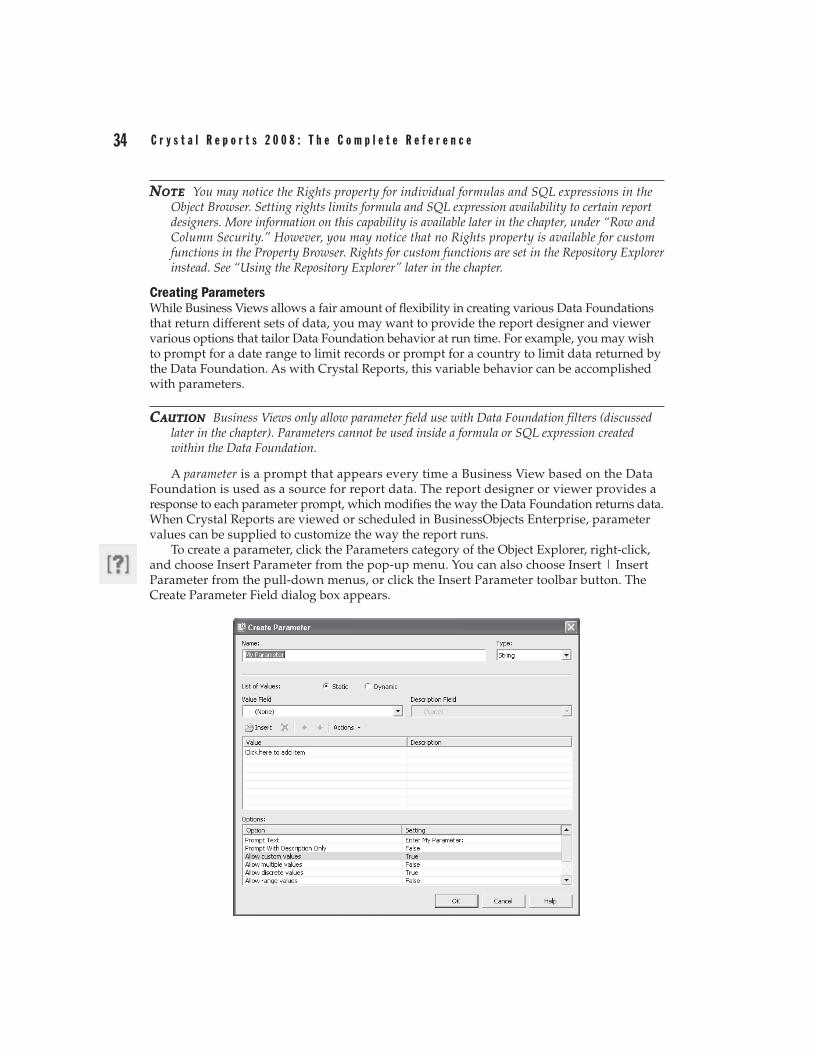
34 C r y s t a l R e p o r t s 2 0 0 8 : T h e C o m p l e t e R e f e r e n c e
NOTE NOTE You may notice the Rights property for individual formulas and SQL expressions in the Object Browser. Setting rights limits formula and SQL expression availability to certain report designers. More information on this capability is available later in the chapter, under “Row and Column Security.” However, you may notice that no Rights property is available for custom functions in the Property Browser. Rights for custom functions are set in the Repository Explorer instead. See “Using the Repository Explorer” later in the chapter.
Creating ParametersWhile Business Views allows a fair amount of flexibility in creating various Data Foundations that return different sets of data, you may want to provide the report designer and viewer various options that tailor Data Foundation behavior at run time. For example, you may wish to prompt for a date range to limit records or prompt for a country to limit data returned by the Data Foundation. As with Crystal Reports, this variable behavior can be accomplished with parameters.
CAUTION CAUTION Business Views only allow parameter field use with Data Foundation filters (discussed later in the chapter). Parameters cannot be used inside a formula or SQL expression created within the Data Foundation.
A parameter is a prompt that appears every time a Business View based on the Data Foundation is used as a source for report data. The report designer or viewer provides a response to each parameter prompt, which modifies the way the Data Foundation returns data. When Crystal Reports are viewed or scheduled in BusinessObjects Enterprise, parameter values can be supplied to customize the way the report runs.
To create a parameter, click the Parameters category of the Object Explorer, right-click, and choose Insert Parameter from the pop-up menu. You can also choose Insert | Insert Parameter from the pull-down menus, or click the Insert Parameter toolbar button. The Create Parameter Field dialog box appears.

C r e a t i n g a n d U s i n g B u s i n e s s V i e w s 35
Give the parameter a name (the default “My Parameter” name probably isn’t appropriate) and choose a type. Optionally, create a static or dynamic/cascading pick list in the List Of Values section. You may also make choices in the Options section, where you can add set length limits for string parameters, set range limits for numeric parameters, and so forth. When you are finished creating the parameter, click OK on the Create Parameter Field dialog box. The parameter will now appear within the Parameters category of the Object Explorer. You are now able to use the parameter in a Data Foundation filter (discussed later in the chapter).
NOTE NOTE Creating parameters in Business Views is almost identical to creating them in Crystal Reports. Detailed information on parameter creation can be found in Chapter 13 of the printed edition. Because of these similarities, only parameter differences between Crystal Reports and Business Views will be highlighted in this chapter.
Using Dynamic and Cascading Pick Lists With Data Foundation Parameters Dynamic and cascading pick lists can be used with Data Foundation parameter fields, the same as they can with Crystal Reports parameter fields. To do this, begin by selecting the Dynamic radio button in the List Of Values section. However, unlike Crystal Reports parameter fields, Data Foundation dynamic/cascading pick lists must be based on another Business View in the repository (they cannot be based on fields within the Data Foundation they’re contained in). You may either create new List of Values and Prompt Group objects for a dynamic pick list, or choose existing objects already in the repository (steps for creating these objects are discussed later in this chapter).
To base a dynamic or cascading pick list on existing objects in the repository, click the Existing radio button in the Choose A Data Source section. Then, choose the desired choice for your pick list from the adjacent drop-down list. Choose either an existing List of Values entry, or a Prompt Group underneath an existing List of Values entry.

36 C r y s t a l R e p o r t s 2 0 0 8 : T h e C o m p l e t e R e f e r e n c e
If no appropriate List of Values or Prompt Group exists in the repository, you may create new objects to populate the dynamic/cascading pick list you wish to associate with your Data Foundation parameter field. To do this, click the New radio button in the Choose A Data Source section. Then, click the Select Business View button to display the Select Business View dialog box (in essence, a folder view of the repository). Navigate through repository folders until you find the Business View you wish to use as the data source for your pick list (note that you cannot use any Business Views based on the Data Foundation that contains the parameter field you are currently working with—you must choose a separate Business View).
Once you’ve chosen a Business View that contains desired fields to populate your pick list, choose the desired field for the pick list in the Value column in the middle of the dialog box. If you wish to choose a matching description field, make that choice in the Description column. Then, click the Parameters column to attach the parameter field you are working on to the pick list fields you’ve just chosen. When you are finished defining your new dynamic pick list, click OK to save the new parameter field in the Data Foundation. The Business View Manager will prompt you for a repository location to store the List of Values and Prompt Group objects that will be created. Either choose the Central Management Server itself (to store the objects in the “top level”), choose an existing folder, or create and choose a new folder. The List of Values object that contains the pick list, and the Prompt Group object that contains the prompting text and associated properties, will be saved to that location.
CAUTION CAUTION If you later delete the List of Values or Prompt Group objects used in a dynamic pick list, or any dependent objects (such as the Business View the pick list objects are based on), you’ll receive a cryptic error message when you attempt to edit the parameter field. Once you clear the error, the dynamic pick list will no longer appear in the Edit Parameter dialog box.
Editing and Deleting Parameters Once you’ve added a parameter to the Data Foundation, you may later decide to edit or delete it. To edit an existing parameter, simply double-click it from within the appropriate category of the Object Explorer. You can also right-click in the Object Browser and choose Edit Parameter from the pop-up menu. The Edit Parameter dialog box (identical to the dialog you used when you created the parameter) will appear, where you may make changes to the parameter. To rename a parameter, select the parameter in the Object Explorer and change the Name property in the Property Browser.

C r e a t i n g a n d U s i n g B u s i n e s s V i e w s 37
To delete a parameter, select it in the Object Browser and press the del key. You may also right-click the parameter name and choose Delete from the pop-up menu. Or, simply select the object and click the Delete toolbar button. If you attempt to delete a parameter that is used in a filter, you’ll receive an error message. Remove the parameter from all filters before attempting to delete it.
TIP TIP You can create parameters either when creating a Data Foundation, or when creating a Business Element (covered later in the chapter). The difference is that parameters you create in a Data Foundation will appear in all Business Elements that use the Data Foundation, whereas parameters created at the Business Element level will only appear in that one Business Element.
Creating FiltersIt is a rare report that benefits from including every record in an entire database. In fact, inadvertently including every database record may result in excessive network traffic, shortage of temporary disk space on your computer, and, at the very least, a useless report of gigantic proportions. While Crystal Reports that are based on Business Views can make use of the Select Expert and the Crystal Reports record selection formula, limiting records to a meaningful set at the Business View level not only avoids “runaway” reports but allows only a limited set of data that’s pertinent to the Business View to be returned to the report. In addition, the creation of Data Foundation filters is the cornerstone of Business Views row-level security that limits report data based on BusinessObjects Enterprise user and group settings.
A filter (sometimes referred to as a “Business Filter” in Business Views documentation) is a limit placed on records that are returned from the database. Filters can take the form of “only customers in the USA,” “only orders placed within the {?Order Date Range} parameter,” and so forth. Filtering is a basic requirement of virtually all database query and reporting tools. You may create as many filters within a Data Foundation as you’d like, applying one or more of them to individual BusinessObjects Enterprise users or entire groups of users.
NOTE NOTE While the filter process in Business Views is different from the Crystal Reports Select Expert, basic filtering and record selection concepts are the same. Get more detailed information on general record selection concepts by reading Chapter 3 in the printed edition.
To create a filter, click the Filters category of the Object Explorer, right-click, and choose Insert Filter from the pop-up menu. You can also choose Insert | Insert Filter from the pull-down menus, or click the Insert Filter toolbar button. The filter window fills the middle of the Business View Manager, as shown in Figure 6.
Begin by choosing the field you want to use for the first (or only) part of your filter from the top portion of the filter window. Add it to the filter text box by either double-clicking it, dragging and dropping it to the filter text box, or selecting it and clicking the Add Selected Tree Item To Filter button from the filter toolbar (located in the middle of the filter window). The field will be added to the filter text box with an “is any value” criterion chosen by default.
Select the field in the filter text box. A drop-down list of available comparisons will appear below the filter text box. Click it to choose from the available comparison operators, such as

38 C r y s t a l R e p o r t s 2 0 0 8 : T h e C o m p l e t e R e f e r e n c e
equal to, less than, and so forth. Based on the comparison choice you make, additional drop-down/text box combinations will appear to the right of the comparison drop-down. Click the drop-down arrow to browse sample data for the field. If you wish to base this filter on a parameter, choose it from the drop-down list (only parameters that match the data type of the filter field will appear in the list). Or, you may just type in your desired comparison value (such as USA) in the list. Once you’ve completed this first filter “expression,” you may either click the Check Filter Validity button to ensure that the filter meets proper syntax requirements, or click the Apply button to finalize choices you made for this expression.
Add Boolean operators and parentheses
FIGURE 6 Creating a Business View fi lter
Specify filter name
Check for proper filter syntaxDelete selected portion of filterPick field to filter on
Choose from available comparisons
Select sample data from drop-down list
C r e a t i n g a n d U s i n g B u s i n e s s V i e w s 39
If you only require a single filter expression, you are now finished creating the filter. Give your filter an appropriate name by typing it in the Name property text box in the Property Browser. However, if you need to create a compound filter that contains more than one expression connected with an AND or OR Boolean operator, click the desired AND or OR Boolean operator from the filter toolbar. The word AND or OR will appear after your first filter expression in the filter text box.
Then, repeat the steps described previously to add an additional field to the filter text box and choose a comparison choice and value for it. You may add additional AND or OR Boolean operators and additional field criteria as many times as necessary to create your desired compound filter. You may even reference another filter within this filter. As an existing filter ultimately results in a True or False value, you will simply add the existing filter to this filter connected with a Boolean AND or OR—no comparison operation will be available for the existing filter. If you initially add an AND operator and wish it to, instead, be an OR (or vice versa), simply click the desired operator and click the Toggle And/Or Operator toolbar button.
If you wish to remove any portions of the filter in the text box (such as a particular field/comparison expression or Boolean operator), simply select it in the filter text box. Then, press the del key or click the Delete toolbar button from the filter toolbar.
As the default “order of operations” for Boolean operators is from left to right as they’re encountered in the filter text box, you may wish to force the evaluation of one or more expressions before the rest of the filter by surrounding the expression or expressions with parentheses. As you cannot type any text directly into the filter text box, you must place the cursor in the text box where you wish to place a single left or right parenthesis, and then click the left or right parenthesis button in the filter toolbar. If you wish to place a left-right parentheses combination around multiple expressions, you may select the expressions, including the Boolean operators, by shift-clicking each expression and Boolean operator that you wish to surround with parentheses. When all the desired expressions are highlighted, click the double-parentheses toolbar button.
Once you’ve finalized your filter, click the Check Filter Validity button to ensure that it is syntactically correct—any errors will be noted in a message. Click the Apply button to finalize the filter. Then, give the filter a meaningful name by typing it in the Name property in the Property Browser. If you wish to create additional filters within the Data Foundation, simply create a new filter using steps discussed previously. You may add as many different filters to the Data Foundation as you desire, assigning each to a BusinessObjects Enterprise user or group of users via rights assignment (discussed later in the chapter, under “Row and Column Security”).
CAUTION CAUTION You may be confused when you create a filter, but find that it doesn’t affect any data that ultimately comes from the Business View. This, very probably, is because the filter has not been applied by setting rights for the filter. Steps to apply the filter by setting rights are discussed later in this chapter.
If you create multiple filters and apply them all to a Data Foundation, Business Views applies a logical OR among the filters. While this is an understandable requirement to properly allow row security within a Business View, it will often give you results that are far different from multiple selection criteria added to the Crystal Reports Select Expert, which

40 C r y s t a l R e p o r t s 2 0 0 8 : T h e C o m p l e t e R e f e r e n c e
uses a logical AND between criteria. If you wish to apply a logical AND to multiple criteria, add multiple expressions to one filter and apply an AND operator between the expressions within the one filter.
As with any other Business View object, you’ll most probably want to save the entire Data Foundation after you create filters. Click the Save toolbar button, or choose File | Save from the pull-down menus to save the updated Data Foundation.
TIP TIP You can create filters either when creating a Data Foundation, or when creating a Business Element (covered later in the chapter). The difference is that filters you create in a Data Foundation will appear in all Business Elements that use the Data Foundation, whereas filters created at the Business Element level will only appear in that one Business Element. Also, in some cases, you may need to create filters at the different levels to achieve proper combinations of filters for correct row security.
Row and Column SecurityOne of the most exciting features of Business Views is row and column security. Row security allows filtering to be applied to database records “on the fly” to specific BusinessObjects Enterprise users or groups. For example, when viewing a sales report, the Western Region Sales Manager can be limited to seeing only orders in the Northwest and Southwest. When viewing the same sales report, the National Sales Manager can view orders in all regions. The beauty of row security is that two different reports with two different sets of record selection aren’t required to accomplish this. Row security applies the extra filters at run time to all reports based on the Business View supplying the row security. Row security is provided in Business Views by creating filters (described earlier in the chapter) and applying those filters selectively to certain BusinessObjects Enterprise users and groups.
Column security allows data from certain fields within a data source to be available only to specific BusinessObjects Enterprise users or groups. For example, when viewing an employee roster report, the HR Manager will be able to see data in the Annual Salary and Monthly Salary fields, along with other employee fields. When any other user views the same employee roster report, the Annual Salary and Monthly Salary fields will display null values, while other employee fields will still display the proper contents. While column security doesn’t prohibit a user from adding fields to reports at design time, no data will ever appear in those fields if the user isn’t granted the field’s right via column security. Column security is provided in Business Views by selecting individual fields in the Object Browser and limiting their rights.
NOTE NOTE You can set row and column security with field limits and filters either when creating a Data Foundation, or when creating a Business Element (covered later in the chapter). The difference is that security you specify in a Data Foundation will apply to all Business Elements that use the Data Foundation, whereas security settings at the Business Element level will only appear in that one Business Element.
Setting Row Security Business Views row security is accomplished by defining Data Foundation filters, and then applying those filters to the desired BusinessObjects Enterprise users or

C r e a t i n g a n d U s i n g B u s i n e s s V i e w s 41
groups. First, define an appropriate filter to limit records as desired (as discussed earlier in the chapter, under “Creating Filters”). For example, if you wish to limit records for the Western Regional Sales Manager to only orders placed by Northwest and Southwest customers, create a filter that limits records where “Region = ‘Northwest’ OR Region = ‘Southwest’” (you may create a filter where Region “is one of” Northwest and Southwest).
Once the filter has been defined, it must be applied to one or more BusinessObjects Enterprise users or user groups. Otherwise, the filter will never have any effect on a Business View. To apply a filter to a BOE user or group, you must first save the filter and save the Data Foundation. Then, set rights for the filter from within the Business View Manager. Begin by expanding the Filters category of the Object Browser. Notice that Full Data Access and No Data Access filters appear, even though you didn’t create them. These filters, as their names imply, provide full access and no access to records from the Data Foundation. You may apply these built-in filters to users and groups to allow or deny broad access to Data Foundation records.
NOTE NOTE Defining actual BusinessObjects Enterprise user and user groups is accomplished in the BusinessObjects Enterprise Central Management Console. More information on general BusinessObjects Enterprise administration can be found in Part II of the printed edition.
To apply filters (either your own or Full Data Access/No Access) to BOE users or groups, begin by selecting the filter that you wish to apply. Then, click the Edit Rights toolbar button, choose Edit | Edit Rights from the pull-down menus, or right-click the selected filter and choose Edit Rights from the pop-up menu. You can also select the Rights property in the Property Browser and click the ellipses button. The Edit Rights dialog box will appear, as shown in Figure 7.
FIGURE 7 Edit Rights dialog box
Add users or groups to the list Preview net rights
CRS/BOE users and groups Check to apply or not apply the filter
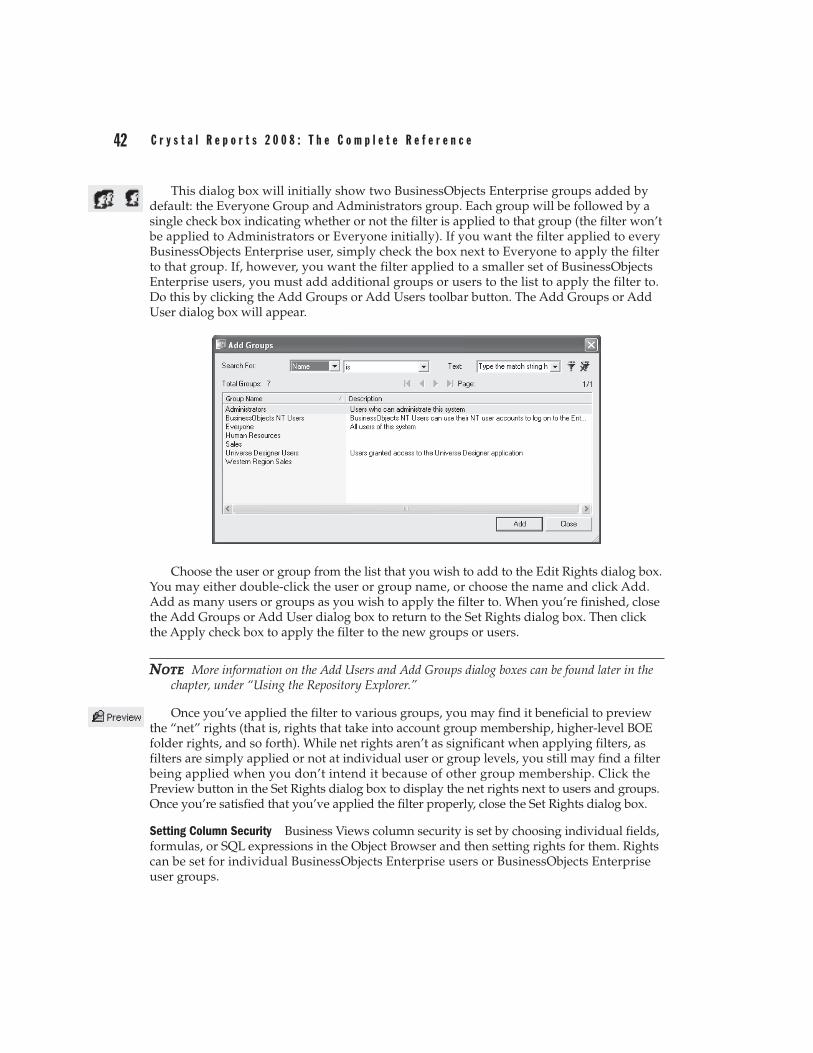
42 C r y s t a l R e p o r t s 2 0 0 8 : T h e C o m p l e t e R e f e r e n c e
This dialog box will initially show two BusinessObjects Enterprise groups added by default: the Everyone Group and Administrators group. Each group will be followed by a single check box indicating whether or not the filter is applied to that group (the filter won’t be applied to Administrators or Everyone initially). If you want the filter applied to every BusinessObjects Enterprise user, simply check the box next to Everyone to apply the filter to that group. If, however, you want the filter applied to a smaller set of BusinessObjects Enterprise users, you must add additional groups or users to the list to apply the filter to. Do this by clicking the Add Groups or Add Users toolbar button. The Add Groups or Add User dialog box will appear.
Choose the user or group from the list that you wish to add to the Edit Rights dialog box. You may either double-click the user or group name, or choose the name and click Add. Add as many users or groups as you wish to apply the filter to. When you’re finished, close the Add Groups or Add User dialog box to return to the Set Rights dialog box. Then click the Apply check box to apply the filter to the new groups or users.
NOTE NOTE More information on the Add Users and Add Groups dialog boxes can be found later in the chapter, under “Using the Repository Explorer.”
Once you’ve applied the filter to various groups, you may find it beneficial to preview the “net” rights (that is, rights that take into account group membership, higher-level BOE folder rights, and so forth). While net rights aren’t as significant when applying filters, as filters are simply applied or not at individual user or group levels, you still may find a filter being applied when you don’t intend it because of other group membership. Click the Preview button in the Set Rights dialog box to display the net rights next to users and groups. Once you’re satisfied that you’ve applied the filter properly, close the Set Rights dialog box.
Setting Column Security Business Views column security is set by choosing individual fields, formulas, or SQL expressions in the Object Browser and then setting rights for them. Rights can be set for individual BusinessObjects Enterprise users or BusinessObjects Enterprise user groups.

C r e a t i n g a n d U s i n g B u s i n e s s V i e w s 43
To apply column security to a desired field, formula, or SQL expression, expand the desired field category in the Object Browser and select the desired field within the category. Then, click the Edit Rights toolbar button, choose Edit | Edit Rights from the pull-down menus, or right-click the selected field and choose Edit Rights from the pop-up menu. You can also select the Rights property in the Property Browser and click the ellipses button. The Edit Rights dialog box will appear, as shown in Figure 8.
As with the Set Rights dialog box used for applying filters, this dialog box will initially show two BusinessObjects Enterprise groups added by default: the Everyone group and the Administrators group. Each group will be followed by a View Field Data check box indicating whether or not the field’s data is available to that group (the right will indicate “Inherited” initially). Clicking the check box will cycle through three possible choices: Inherited, Granted, or Denied. If you specifically want to deny the field to everyone, click the check box next to Everyone until it indicates Denied (this is of limited usefulness, as this will automatically prevent everyone in BOE from viewing field contents).
More likely, you’ll want the field to be available to a certain set of BOE users or groups and not available to everyone else. Therefore, you must add additional groups or users to the list to set rights for. Do this by clicking the Add Groups or Add Users toolbar button. The Add Groups or Add User dialog box will appear.
Choose the user or group from the list that you wish to add to the Edit Rights dialog box. You may either double-click the user or group name, or choose the name and click Add. Add as many users or groups as you wish to set rights for. When you’re finished, close the Add Groups or Add User dialog box to return to the Edit Rights dialog box. Then click the View Field Data check box to cycle through the three choices for each new group or user.
While setting row security is a simple matter of applying or not applying a filter, setting column security is complicated by the concept of inheritance. Inheritance regards the ability of BOE users and groups to “inherit” rights from higher-level groups, or settings made at the Central Management Server “top folder” level. For example, the rules of inheritance might cause a problem when applying column security to the HR Manager user.
FIGURE 8 The Edit Rights dialog box
Add users or groups to the list Preview net rights
CRS/BOE users and groups Check to cycle through various choices

44 C r y s t a l R e p o r t s 2 0 0 8 : T h e C o m p l e t e R e f e r e n c e
If you have previously explicitly denied rights to the field for the Everyone group, you would be unable to grant rights to the field for the HR Manager even if you explicitly granted the right for the HR Manager user. This is because the HR Manager is automatically a member of the Everyone group and explicit denial takes precedence, via inheritance, over explicit granting. The solution is to not explicitly grant or deny the right to the Everyone group, but to explicitly grant it to the HR Manager user. By not explicitly granting the right to the Everyone group, everyone still won’t be able to see the field’s contents, as not explicitly granting a right automatically denies it. However, because the Everyone group is not explicitly denied the right, the HR Manager will be able to see the field’s contents if explicitly granted it, as the rules of inheritance don’t consider an unspecified right at a higher group level to be explicitly denied.
The Preview button, which shows net rights for a user or group, is more helpful when setting column security than when setting row security. By clicking this button, you’ll see the net rights assigned to users or groups after taking inheritance into account. Take the previous example of explicitly denying a field’s right to the Everyone group, but then explicitly granting it to the HR Manager. Notice that the Preview button shows that the HR Manager still won’t have rights to the field because of inheritance.
However, if you leave the Everyone group unspecified and grant the right to the HR Manager, you’ll notice that everyone still can’t see the field’s contents, but the HR Manager can. This results from the rules of inheritance.

C r e a t i n g a n d U s i n g B u s i n e s s V i e w s 45
If you think the concepts of inheritance can be a bit confusing, you may be right. While inheritance is designed to make administration of user and group rights simpler, it can also cause confusion. Get more information on the rules of inheritance later in the chapter, under “Using the Repository Explorer.”
Once you’re satisfied that you’ve applied proper rights to the field, close the Set Rights dialog box. You may receive a warning indicating that you should check other fields that may be related to the field you just set rights for. For example, even if you limit the Salary database field to the HR Manager, sensitive information still may be available to other report viewers if you have used the Salary field elsewhere in a formula or SQL expression. Ensure that all fields, formulas, and SQL expressions that require column security are specifically addressed using the Edit Rights dialog box.
TIP TIP It goes without saying that testing your row and column security model is of utmost importance. Often, because of the idiosyncrasies of the Business View Manager (the OR logical connection between multiple Data Foundation filters and rules of inheritance are examples), you may not initially achieve the row or column security you anticipate after your first attempt. For example, you may need to create different filters at both the Data Foundation and Business Element levels to achieve proper combinations for correct row security. You should use Crystal Reports or BusinessObjects Enterprise to test your row and column security model to ensure that data limits do apply to users that should have limits, and that users who shouldn’t be limited, in fact, are not.
Continuing toward the sample XTREME Business View discussed earlier in the chapter, two filters will need to be created. The first will limit order dates to a value supplied by a date range parameter field and will be applied to all users. While the second filter to limit customer regions to the Northwest or the Southwest used to apply row security to the Western Region Sales Manager may be done here, it will probably need to be done at the Business Element level, due to the Boolean OR value applied between multiple Data Foundation filters. Furthermore, column security will be set so that only the HR Manager has rights to the Salary field from the Employee table, as well as the Monthly Salary formula (which divides the Salary field by 12).
Business ElementAs you discovered if you read through much of the previous section on creating Data Foundations, a great deal of the data “abstraction,” calculation, and security application is done at the Data Foundation level. However, you may have noticed that unwieldy field names couldn’t be changed. You may also have noticed that you had no way of limiting the Data Foundation’s set of exposed fields—if you added a table, all fields were available in the Data Foundation (even if you apply column security, a field will still appear inside Crystal Reports even if no data will appear for the field). And, you probably noticed that fields were still organized within their core database tables—you couldn’t group fields from different tables together in a more logical fashion.
The Business Element object within your overall Business View allows you to organize your data to your liking. A Business Element is simply a smaller set of fields from an underlying Data Foundation. Business Elements determine what set of “virtual tables” ultimately appear

46 C r y s t a l R e p o r t s 2 0 0 8 : T h e C o m p l e t e R e f e r e n c e
in Crystal Reports when a report designer makes use of your Business View. So, even if your underlying Data Foundation consists of 15 different physical database tables that expose 150 fields, you can set up three Business Elements to show 35 significant fields from the Data Foundation in three more logical organizations. Business Elements provide the ability to include any field in any Business Element regardless of what original table it came from, as well as giving the field a more appealing name. When you have created your various Business Elements, you simply add one or more of them to Business View objects (discussed later in the chapter) to determine which set of tables will appear in Crystal Reports.
There are several core concepts to keep in mind when creating Business Elements:
• A Business Element must be based on a Data Foundation. If you have yet to create any Data Foundations in the BOE repository, you will be unable to create any Business Elements.
• A Business Element can only be based on a single Data Foundation. If you wish to include fields from more than one Data Foundation in a single Business Element, you will find that you are unable to do so. You will need to modify one of the Data Foundations to add additional fields that you wish to use in the Business Element.
There are two different ways of creating Business Elements: by creating them manually within the Business View Manager’s typical user interface, or by using the Business Element Wizard to create them via a step-by-step process. As is often the case, you gain more control over individual portions of the Business Element by using the Business View Manager manual method, but you can create multiple Business Elements more quickly using the wizard. You may want to try a combination of methods, perhaps creating a core set of Business Elements quickly with the wizard, and then making any granular modifications to them manually with the Business View Manager itself.
Creating a Business Element ManuallyTo create a new Business Element, choose the Business Element icon from the welcome screen when starting the Business View Manager or clicking the New toolbar button, or choose File | New from the pull-down menus, choosing the Business Element submenu item. The Choose A Data Foundation dialog box will appear after a new Business Element is displayed in the Business View Manager, as illustrated in Figure 9.
The Choose A Data Foundation dialog box will simply show the folder structure of the repository. Navigate through the folder structure of this dialog box to find your desired Data Foundation object (only Data Foundations will appear when you open repository folders). If your repository contains a large number of foundations, you may use dialog box filters to narrow down the list of displayed connections. Right-click anywhere within the repository folder or object list and choose Advanced Filtering from the pop-up menu. The dialog box will display text boxes where you may specify a combination of object name text or author. When you click Apply, only foundations that include the supplied text or author names will appear. If you wish to turn off any existing filters, simply right-click and click the Advanced Filtering option again. The complete list of foundations will reappear.

C r e a t i n g a n d U s i n g B u s i n e s s V i e w s 47
Once you’ve selected your desired Data Foundation, click OK. You can also just double-click a desired foundation. The Insert Business Fields dialog box will now appear.
FIGURE 9 Creating a new Business Element

48 C r y s t a l R e p o r t s 2 0 0 8 : T h e C o m p l e t e R e f e r e n c e
Click plus signs, as necessary, to expand the available tables, formulas, and SQL expression categories. Choose one or more fields (known as “Business Fields” in Business Views documentation) that you wish to add to this Business Element. You may ctrl-click or shift-click to choose more than one field. Click Add to add them to the Business Element. You may also just double-click a desired field to add it. As you add them, you’ll see the items appear inside the Business View Manager (you may need to move the Insert Business Fields dialog box out of the way to see them). If you add a field that duplicates a field name already added to the Business Element, you’ll be given the opportunity to change its name (also known as an alias) as to not conflict with another field. Once you’ve added all your desired fields, close the Insert Business Fields dialog box.
TIP TIP The order in which you insert fields from the Insert Business Fields dialog box will be the same order fields appear in when you use the Business Element in a Business View, and eventually in Crystal Reports. This may be deceptive, as fields in the Business View Manager appear in sorted order regardless of the order you inserted them. As you can’t reposition fields in a different order, ensure you place them into the Business Element in the correct order if you have a preference. In Crystal Reports, you have the choice of viewing Field Explorer fields in the order they appear in the Business View, or in alphabetical order.
Once you’ve added fields, the middle of the Business View Manager will show the Fields List. This simply shows a list of fields you’ve added to your Business Element, including the field name, data type, field length, source field from the Data Foundation, and any description provided by the Data Foundation or underlying database. You may change the sort order of the Fields List by clicking a column heading. Both ascending and descending sort orders are available for the columns.
Arrow indicates ascending or descending sort Click column heading to sort fields

C r e a t i n g a n d U s i n g B u s i n e s s V i e w s 49
Notice that an additional Field Structure tab appears next to the Fields List tab at the bottom of the window. Clicking this will display a different view of Business Element fields known as the Field Structure. Initially this is simply the same set of fields as seen in the Fields List view. However, if you drag one field and drop it onto another, the field you dragged will be placed below the field you dropped onto and indented to create a hierarchy.
This capability is of little use when creating Business Elements for use with Crystal Reports, but it may be useful when creating Business Elements for multidimensional or OLAP types of data cubes (Business Views does not currently create these types of data structures). To reset the field structure so that no field hierarchies exist, choose Edit | Reset Field Structure from the pull-down menus, right-click the Business Element name in the Object Browser and choose Reset Field Structure from the pop-up menu, or click the Reset Field Structure toolbar button. Fields will reappear in the original order of the Business Element with no hierarchy shown.
One of the first Business Element capabilities you’ll probably want to take advantage of is the ability to rename fields, or set a field’s alias. By renaming a field, you can make the ultimate Business View more meaningful and intuitive by eliminating confusing field names from the original data source. Expand the Object Explorer’s Fields category and select the field you want to rename. Then, simply click the Name property in the Property Browser and type in a new field name. When you click outside of the Name property, the new name you typed will appear throughout the Business View Manager. If you are curious what the original source field name is for the newly aliased field, view the Fields List in the middle of the Business View Manager. The Source Data Field column will indicate the original field name for the aliased field. You will also notice the original field name in the Source Data Field property in the Property Browser.
As with any other Business View object, you’ll most probably want to save the entire Business Element as you progress. Click the Save toolbar button, or choose File | Save from
Hierarchy created by dragging and dropping fields

50 C r y s t a l R e p o r t s 2 0 0 8 : T h e C o m p l e t e R e f e r e n c e
the pull-down menus to save the updated Data Foundation. If you have not saved the Business Element previously, you’ll be asked to confirm a name and folder location in the repository.
Adding and Deleting FieldsOnce an initial set of fields has been added to your Business Element, it’s a foregone conclusion that you’ll want to delete some existing fields or add new fields from the Data Foundation. To delete a field, just select it in the Object Browser (you can’t delete fields from the Fields List or Fields Structure windows). Then, press the del key, right-click the field and choose Delete from the pop-up menu, or click the Delete toolbar button.
Inserting a new field from the Data Foundation is equally simple. Choose Insert | Insert Business Fields from the pull-down menus, right-click the Fields category of the Object Browser and choose Insert Business Fields from the pop-up menu, or click the Insert Business Fields toolbar button. The Insert Business Fields dialog box will reappear. Choose additional fields to add to your Business Element.
Using the Referenced Data Foundation Window Another way of adding fields, as well as filters, from the underlying Data Foundation is by displaying the Referenced Data Foundation window. Choose View | Referenced Data Foundation from the pull-down menus. The window will appear as another explorer-like window attached to the right side of the Business View Manager.
Expand the various categories of the Data Foundation to see available fields. Add a field to the Business Element by dragging and dropping it from the Referenced Data Foundation window to the Object Explorer, the Fields List, or the Fields Structure (you can drop filters only onto the Filters category of the Object Explorer, and parameters cannot be dropped at all). When you’re finished, you may close the Referenced Data Foundation window by clicking the small X in the upper right-hand corner.
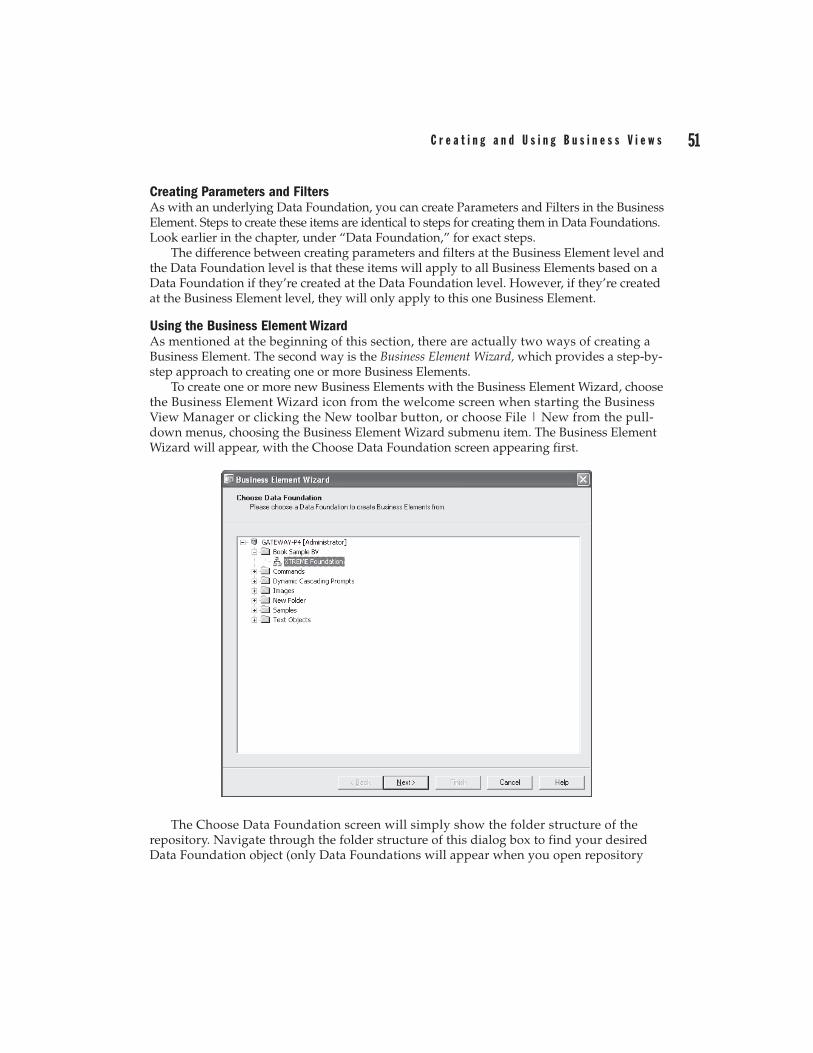
C r e a t i n g a n d U s i n g B u s i n e s s V i e w s 51
Creating Parameters and FiltersAs with an underlying Data Foundation, you can create Parameters and Filters in the Business Element. Steps to create these items are identical to steps for creating them in Data Foundations. Look earlier in the chapter, under “Data Foundation,” for exact steps.
The difference between creating parameters and filters at the Business Element level and the Data Foundation level is that these items will apply to all Business Elements based on a Data Foundation if they’re created at the Data Foundation level. However, if they’re created at the Business Element level, they will only apply to this one Business Element.
Using the Business Element WizardAs mentioned at the beginning of this section, there are actually two ways of creating a Business Element. The second way is the Business Element Wizard, which provides a step-by-step approach to creating one or more Business Elements.
To create one or more new Business Elements with the Business Element Wizard, choose the Business Element Wizard icon from the welcome screen when starting the Business View Manager or clicking the New toolbar button, or choose File | New from the pull-down menus, choosing the Business Element Wizard submenu item. The Business Element Wizard will appear, with the Choose Data Foundation screen appearing first.
The Choose Data Foundation screen will simply show the folder structure of the repository. Navigate through the folder structure of this dialog box to find your desired Data Foundation object (only Data Foundations will appear when you open repository

52 C r y s t a l R e p o r t s 2 0 0 8 : T h e C o m p l e t e R e f e r e n c e
folders). If your repository contains a large number of foundations, you may use dialog box filters to narrow down the list of displayed connections. Right-click anywhere within the repository folder or object list and choose Advanced Filtering from the pop-up menu. The wizard will display text boxes where you may specify a combination of object name text or author. When you click Apply, only foundations that include the supplied text or author names will appear. If you wish to turn off any existing filters, simply right-click and click the Advanced Filtering option again. The complete list of foundations will reappear.
Once you’ve selected your desired Data Foundation, click Next. The Create Business Elements screen will appear within the wizard, as shown in Figure 10.
Click plus signs, as necessary, to expand the available tables, formulas, and SQL expression categories in the left From Data Foundation list. Select the items you’d like to add to the right Business Elements list. You can choose an individual field, formula, or SQL expression. You can also choose entire tables. You can even choose all tables by just clicking the Tables category
Rename selected Business Element or field
FIGURE 10 The Create Business Elements screen
Select Data Foundation objects to add to Business Element
Add selected or all Data Foundation objects to Business Elements
Select field or entire Business Element to delete or rename
Delete selected or all Business Element items
Add a new Business Element

C r e a t i n g a n d U s i n g B u s i n e s s V i e w s 53
before you click the right arrow. You may ctrl-click or shift-click to choose more than one object.
Click the right arrow to add the selected objects to the Business Elements list. You may also just double-click a desired field to add it (only fields can be double-clicked; tables cannot). The type of object you selected in the From Data Foundation list determines the type of object that appears in the Business Elements list. If you choose an entire table, the table will become a separate Business Element in the Business Elements list, with all its fields appearing underneath. If you choose one or more fields, they will simply be copied to the Business Elements list within the currently selected Business Element. If you click the Tables category and click the right arrow, or click the double-right arrow, all tables will be copied as individual Business Elements with their fields appearing underneath.
TIP TIP The order in which you see fields in the Business Elements list will be the same order fields appear in when you use the Business Element in a Business View, and eventually in Crystal Reports. As you can’t reposition fields in a different order in the Business Elements list, ensure you place them into this list in the correct order if you have a preference. In Crystal Reports, you have the choice of viewing Field Explorer fields in the order they appear in the Business View, or in alphabetical order.
Once you’ve created Business Elements and fields in the Business Elements list, you may use the left arrows or the Delete button above the Business Elements list to remove either entire Business Elements or individual fields. Just select the Business Elements or fields (you can shift-click and ctrl-click in this list, too) that you wish to delete and click the left arrow or Delete button to remove them.
If you prefer to manually create an entire Business Element, just click the New Business Element toolbar above the Business Elements list. A new Business Element with an automatically generated name will be added to the Business Elements list. Select it and then add individual fields from the From Data Foundation list.
To rename either entire Business Elements or individual fields, select the desired Business Element or field in the Business Elements list. Then, click Rename. The Business Element or field name will be placed into edit mode. Simply type in a new name and click outside the object. The selected object will take on the new name (you’ll be given an error if you attempt to assign a name that already exists).
Once you’ve designed your Business Elements and added and renamed all pertinent fields, click Next. The wizard will display the Save to Repository screen, showing the folder structure of the repository (this screen is similar to the Repository Explorer, discussed later in the chapter). Navigate through the folder structure to see any existing Business Elements already in the repository (only Business Elements will appear when you open repository folders). If your repository contains a large number of elements, you may use dialog box filters to narrow down the list of displayed elements. Right-click anywhere within the repository folder or object list and choose Advanced Filtering from the pop-up menu. The wizard will display text boxes where you may specify a combination of object name text or author. When you click Apply, only elements that include the supplied text or author names
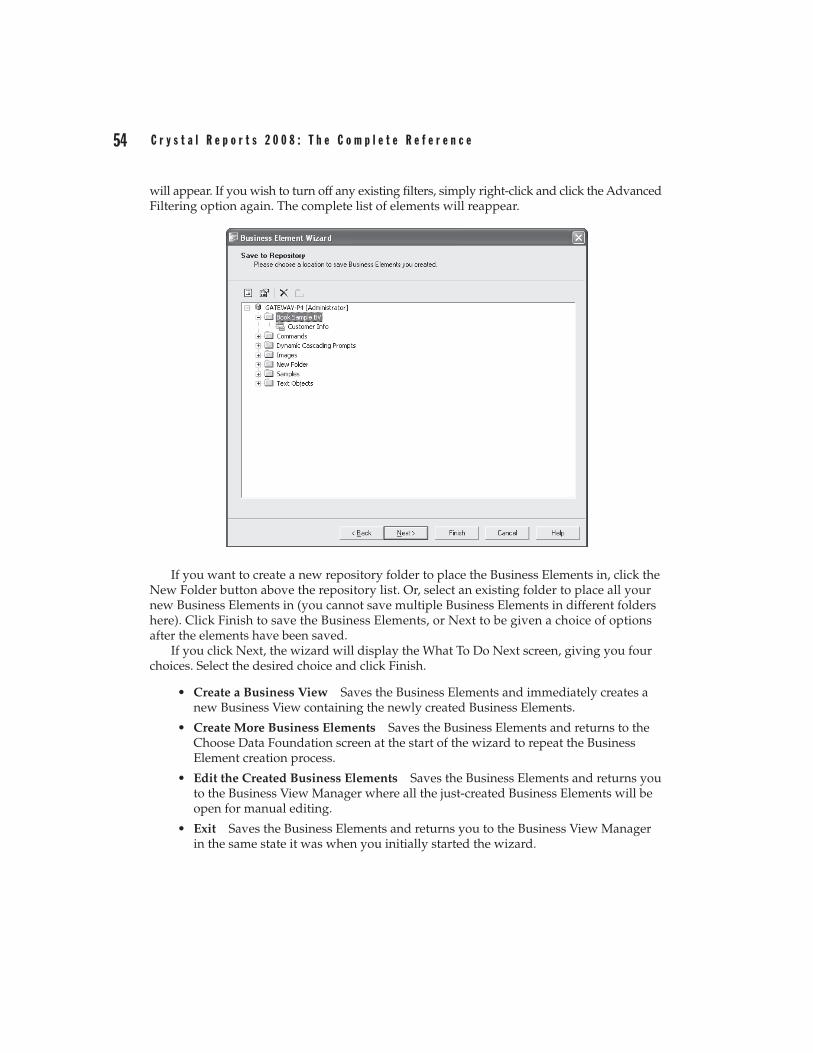
54 C r y s t a l R e p o r t s 2 0 0 8 : T h e C o m p l e t e R e f e r e n c e
will appear. If you wish to turn off any existing filters, simply right-click and click the Advanced Filtering option again. The complete list of elements will reappear.
If you want to create a new repository folder to place the Business Elements in, click the New Folder button above the repository list. Or, select an existing folder to place all your new Business Elements in (you cannot save multiple Business Elements in different folders here). Click Finish to save the Business Elements, or Next to be given a choice of options after the elements have been saved.
If you click Next, the wizard will display the What To Do Next screen, giving you four choices. Select the desired choice and click Finish.
• Create a Business View Saves the Business Elements and immediately creates a new Business View containing the newly created Business Elements.
• Create More Business Elements Saves the Business Elements and returns to the Choose Data Foundation screen at the start of the wizard to repeat the Business Element creation process.
• Edit the Created Business Elements Saves the Business Elements and returns you to the Business View Manager where all the just-created Business Elements will be open for manual editing.
• Exit Saves the Business Elements and returns you to the Business View Manager in the same state it was when you initially started the wizard.

C r e a t i n g a n d U s i n g B u s i n e s s V i e w s 55
CAUTION CAUTION It’s advisable to examine existing Business Elements in the repository before you save a large number of Business Elements from the wizard, in case any existing elements have the same name as elements the wizard will try to save. The wizard will save elements until it encounters a duplicate name. It will then present an error message. However, if you click the Back button and delete or rename the offending element, you may receive additional errors if you try to save again. This is because the first set of elements that didn’t have duplicate names may have been saved the first time.
Row and Column SecurityAs with Data Foundations, you can set row and column security settings at the Business Element level. Steps are the same as they are for Data Foundations: creating filters and applying them to BusinessObjects Enterprise users or user groups, and selecting individual fields and setting rights for them by user or group.
The difference between setting row and column security at the Business Element level and the Data Foundation level is that Data Foundation row and column security affects all Business Elements based on the foundation, whereas security set at the Business Element level affects only that particular Business Element. One important issue to remember is that you can’t turn off existing row and column security supplied by the Data Foundation in the Business Element. For example, even if you apply a “Full Data Access” filter to the Everyone group within the Business Element (you’ll need to copy the Full Data Access filter to the Business Element from the Referenced Data Foundation window), any more restrictive filters applied at the Data Foundation level will still apply to the Business Element. Also, setting a View right for a field in a Business Element will not give access to that field if it has been

56 C r y s t a l R e p o r t s 2 0 0 8 : T h e C o m p l e t e R e f e r e n c e
restricted at the Data Foundation level. However, you can create additional row and column security at the Business Element level that is not provided at the Data Foundation level.
Steps to creating row and column security by way of filters and field rights is the same with Business Elements as it is with Data Foundations. Look in the “Data Foundation” section under “Row and Column Security” for information on the process.
Continuing the discussion of the XTREME sample Business View discussed throughout the chapter, several Business Elements are created containing a limited set of relevant data from the XTREME Data Foundation. In particular, XTREME Customer Info, XTREME Order Info, and XTREME Sales Rep Info Business Elements are created. Relevant fields and formulas are added to these Business Elements, being renamed as appropriate. Existing row and column security from the Data Foundation will be used, propagating the order date range filter and salary column security to the Business Element. However, because of the way Business Views applies multiple filters at the Data Foundation level, the row security setting limiting the Western Region Sales manager to Northwest and Southwest may need to be moved from the Data Foundation to this Business Element.
Business ViewThe ultimate goal of the entire Business View design process is the actual Business View object itself. This is the only object that will appear when you connect to the repository with Crystal Reports. This object is what exposes the set of virtual tables to the report designer, including all row and column security, renamed fields, and so forth. Because you add existing Business Elements to a Business View, you’ll need to make sure you’ve created one or more Business Elements before attempting to create the Business View.
To create a new Business View, choose the Business View icon from the welcome screen when starting the Business View Manager or clicking the New toolbar button, or choose File | New from the pull-down menus, choosing the Business View submenu item. The Insert Business Elements dialog box will appear after a new Business View is displayed in the Business View Manager, as illustrated in Figure 11.
The Insert Business Elements dialog box will simply show the folder structure of the repository. Navigate through the folder structure of this dialog box to find your desired Business Element objects (only Business Elements will appear when you open repository folders). If your repository contains a large number of elements, you may use dialog box filters to narrow down the list of displayed connections. Right-click anywhere within the repository folder or object list and choose Advanced Filtering from the pop-up menu. The dialog box will display text boxes where you may specify a combination of object name text or author. When you click Apply, only elements that include the supplied text or author names will appear. If you wish to turn off any existing filters, simply right-click and click the Advanced Filtering option again. The complete list of elements will reappear.
Select Business Elements that you want to appear as tables within your Business View. You may just double-click a Business Element to add it to the Business View, or select the element and click Add. Business Elements will be added to the Business View window in the Business View Manager (you may need to move the Insert Business Elements dialog box to see them). Once you’ve finished adding desired Business Elements, close the Insert Business Elements dialog box.

C r e a t i n g a n d U s i n g B u s i n e s s V i e w s 57
There are very few properties in the Property Browser that you can change when editing a Business View. If you click the Business View name at the top of the Object Explorer, the following properties will appear in the Property Browser:
• Name Type the descriptive name you wish this Business View to have when you save it to the repository.
• Description Type an optional description to more fully explain the usage of this Business View.
• Author Your BOE user ID is specified here by default. You may change this text to something else, if you choose.
• Business Element Filter Combination This property allows two choices: AND and OR. Since individual Business Elements that make up the Business View can have their own filters, you may choose how to apply the filters together to get a final set of returned records. If you choose AND, a Boolean AND operator will be used when applying all the filters in the included Business Elements—a record will have to meet all the filter requirements to be returned. If you choose OR, a Boolean OR operator will be used and a record will only have to meet any one of the filter requirements to be returned.
FIGURE 11 Creating a new Business View
58 C r y s t a l R e p o r t s 2 0 0 8 : T h e C o m p l e t e R e f e r e n c e
• Rights Click the ellipses to set rights for this Business View. Setting Business View rights is discussed in detail later in the chapter, under “Setting Rights for Business View Objects.”
By default, the list of Business Elements you added to the Business View appears in the middle window of the Business View Manager. If you find that more detail on certain Business Elements might be handy to view, you may view individual field detail for a selected Business Element in the middle window as well. Just double-click the desired Business Element in the Object Explorer, or right-click the desired Business Element and choose Show Business Element Detail from the pop-up menu. An additional tab will be added to the middle Business View Manager window showing fields within the chosen Business Element. You can navigate among multiple tabs, including closing Business Element detail tabs, with the arrow buttons and X button at the bottom of the middle window.
As with any other Business View object, you’ll most probably want to save the entire Business View object as you progress. Click the Save toolbar button, or choose File | Save from the pull-down menus to save the updated Data Foundation. If you have not saved the Business View previously, you’ll be asked to confirm a name and folder location in the repository.
Inserting and Deleting Business ElementsOnce an initial set of Business Elements has been added to your Business View, you may later decide to delete some existing Business Elements, or add new Business Elements from the repository. To delete an element, just select it in the Object Browser (you can’t delete elements from the middle Business View window). Then, press the del key, right-click the element and choose Delete from the pop-up menu, or click the Delete toolbar button.
Inserting a new Business Element from the repository is equally simple. Choose Insert | Insert Business Elements from the pull-down menus, right-click the Business Elements category of the Object Browser and choose Insert Business Elements from the pop-up menu, or click the Insert Business Elements toolbar button. The Insert Business Elements dialog box will reappear. Choose additional elements to add to your Business View. You may also expand folders in the Repository Explorer and simply drag a Business Element from the repository to the middle Business Elements list. The element will be added to the Business View.
CAUTION CAUTION A core requirement of Business Views is that all Business Elements added to a single Business View must be based on the same Data Foundation. If you attempt to add elements from different foundations, an error message will result. If you find that you need to add Business Elements to a single Business View that aren’t based on the same Data Foundation, you’ll need to edit the Data Foundation and Business Elements to add the additional data items. If this is not possible (due to “un-linkable” data, for example), you may want to consider creating Crystal Reports subreports based on the different Business Views.
Overriding Data Foundation LinkingIf you look closely at the Business View Manager menus while editing a Business View object, you may notice the Linking Diagram pull-down menu, as well as a few toolbar buttons that relate to table linking. However, you may also notice that the toolbar button and all options on the pull-down menu are dimmed.

C r e a t i n g a n d U s i n g B u s i n e s s V i e w s 59
If the Business View designer so desires, a Business View object can be set to override any table linking that is set in the underlying Data Foundation. This may be handy, for example, if you wish to create two separate Business Views based on the same Business Elements but change table linking within each Business View to return a different set of records.
The first requirement to override Data Foundation Linking is to set the Allow Table Joins Override property to True in the Data Foundation itself. If necessary, edit the Data Foundation that the Business Elements are based on and change this property in the Property Browser. Then, save the updated Data Foundation to the repository.
When you re-edit the Business View, you’ll now notice that the Linking Diagram | Override Linking pull-down menu option is enabled. If you choose it,
a Link Override window and tab will appear in the middle of the Business View Manager. When you display the Link Override window, you’ll see the underlying tables that make up the Data Foundation the Business View is based on. All the remaining options on the Linking Diagram pull-down menu, as well as link-related toolbar button, will now be enabled.
Use techniques described in the Data Foundation section of this chapter, as well as in Chapter 15 of the printed edition, to change table linking for this Business View object. If

60 C r y s t a l R e p o r t s 2 0 0 8 : T h e C o m p l e t e R e f e r e n c e
you later decide you wish to return to table linking stored in the Data Foundation, simply choose Linking Diagram | Revert Linking from the pull-down menus. After a confirmation message, linking will revert to that stored in the underlying Data Foundation.
Using the Rights Test ViewSince so many different forms of security (including row and column security) can apply to the Business View object, the Rights Test View dialog box can be used to check a variety of rights for chosen BusinessObjects Enterprise user IDs. The Rights Test View can show if the current Business View object is even able to be used by the user, and if so, what row and column security will be applied.
Display the Rights Test View dialog box by choosing Tools | Rights Test View from the pull-down menus, by right-clicking the Business View name in the Object Explorer and choosing Rights Test View from the pop-up menu, or by clicking the Rights Test View toolbar button. The Rights Test View dialog box will appear, as shown in Figure 12.
Select a BusinessObjects Enterprise User ID to test for rights. You may click the User Name drop-down list at the top of the dialog box and choose any user ID that has been used recently for a rights test. If the desired ID isn’t in the list, click Select User. The Add User dialog box will appear showing all user IDs in BusinessObjects Enterprise. Use the dialog box to choose the desired user and then close the dialog box. The user ID will then appear in the User Name list.
The first indication will be whether or not the chosen user can even use the Business View. If not, the Business View Visible text will indicate False and nothing else will appear
Filter indicates row security applied
FIGURE 12 Rights Test View dialog box
Select previously viewed user ID
Choose new user IDIndicates whether Business View is available
“X” over field name indicates column security applied

C r e a t i n g a n d U s i n g B u s i n e s s V i e w s 61
in the dialog box. If the Business View is visible for the user, a list of Business Elements will appear in the box, each displaying a plus sign. Click the plus sign to see individual fields within the Business Element.
If any column security is applied for this chosen user, you’ll see red X indicators displayed next to field names that are unavailable to this user ID. Furthermore, row security will be indicated by the Final Filter Text displayed at the bottom of the dialog box. Because row security can be affected by different Business Elements and fields, you may redisplay any row security filters for a limited set of fields or Business Elements by un-checking the check boxes next to certain fields or Business Elements and clicking Apply. The updated row security filter (if any) based on just the checked fields and elements will appear in the Final Filter Text area.
When finished, simply close the Rights Test View dialog box. Wrapping up the XTREME sample Business View, then, simply consists of adding the three previously created XTREME Business Elements into the single Business View object and saving it to the repository. The XTREME Business View is now ready to be used with Crystal Reports.
Creating Business View-Based Pick ListsOne of the exciting features of Crystal Reports 2008 and BusinessObjects Enterprise is dynamic and cascading pick lists. A dynamic pick list, when used in conjunction with report-based and Business View-based parameter fields, allows a drop-down list of available parameter field values to be populated from the database in real time. An extension of a dynamic pick list is a cascading pick list, which allows a relationship to be set up among multiple pick lists where one pick list restricts the next. For example, a Sales Rep pick list may query the database in real time to gather the current set of employed sales reps. When a specific sales rep is chosen in the first pick list, the second Order Number pick list will query the database in real time for current order numbers, but it will only show order numbers that belong to the sales rep chosen in the first pick list.
In Crystal Reports versions prior to XI, only static pick lists were available (pick lists that contained a fixed set of sample values that were not derived from the database in real time). While static pick lists remain as an option in version 2008, dynamic and cascading pick lists are a long sought-after feature that greatly increases the flexibility of Crystal Reports and its associated enterprise products.
While Crystal Reports 2008 can create reports that contain individual dynamic and cascading pick lists and use those reports outside of BusinessObjects Enterprise, reports published to BOE must make use of pick lists contained in the BOE repository. This is an important concept to keep in mind when planning a BOE implementation, as you’ll want to coordinate pick list creation to avoid duplicate efforts and uncoordinated creation of excessive pick lists in the repository.
NOTE NOTE Business Objects documentation refers to various portions of dynamic and cascading pick lists as “Lists of Values” (the actual values retrieved from the database that appear in the drop-down list) and “Prompt Groups” (the series of one or more drop-down boxes that make up a dynamic or cascading pick list). However, the printed edition of this book refers to these items more generically as Pick Lists, an industry-standard term for drop-down lists that a report viewer can choose from.

62 C r y s t a l R e p o r t s 2 0 0 8 : T h e C o m p l e t e R e f e r e n c e
There are two general ways of creating dynamic/cascading pick lists in BOE. First, if you publish a report to BOE that contains dynamic or cascading pick lists that were created in the report before it was published, the pick lists will automatically be converted to Business View–based pick lists. Or, you may create dynamic or cascading pick lists directly in the Business View Manager and then use them in existing or new reports (you may even use Business View–based pick lists in reports that will not be published to BOE).
Publishing Crystal Reports with Pick ListsThe first way of creating dynamic/cascading pick lists in BOE is to publish an existing pick list–based Crystal Reports 2008 report not currently contained with BOE (referred to in Crystal documentation as an “unmanaged” report) to the Central Management Server. Because of the requirement for any report stored in BOE (referred to in Crystal documentation as a “managed” report) to use dynamic/cascading pick lists based on Business Views, publishing a report will automatically create necessary pick list objects in the repository when the report is created.
Consider a report that contains a cascading pick list consisting of a sales rep/order number combination described earlier in this report section. In this particular scenario, the cascading pick list consists of two different drop-down lists (what Business Objects refers to as a “List of Values”), combined together to populate one parameter field (the two related drop-down lists are combined in what Business Objects refers to as a “Prompt Group”) . The sales rep pick list consists of the Employee ID field as the actual value, with the Employee Last Name selected as the description. The order number pick list is based on the Order ID field and accepts multiple values. The cascading pick list’s data is provided by a SQL Command that only returns sales rep/order number combinations for orders placed in 2004.
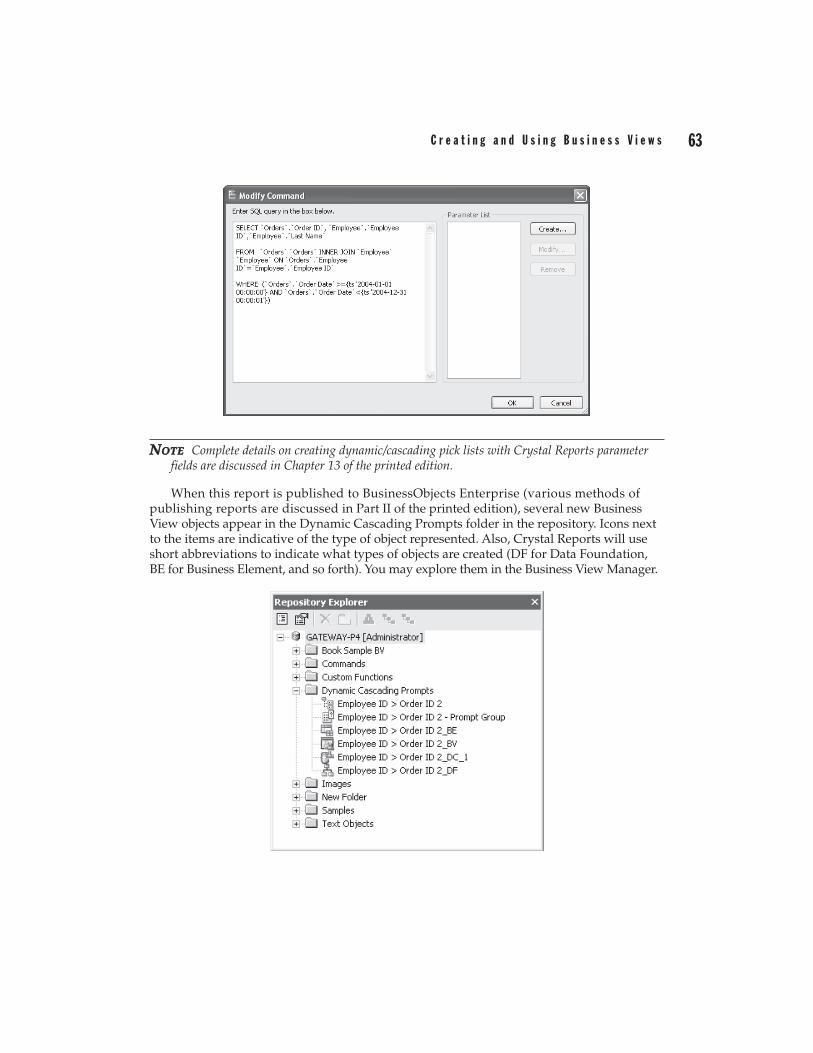
C r e a t i n g a n d U s i n g B u s i n e s s V i e w s 63
NOTE NOTE Complete details on creating dynamic/cascading pick lists with Crystal Reports parameter fields are discussed in Chapter 13 of the printed edition.
When this report is published to BusinessObjects Enterprise (various methods of publishing reports are discussed in Part II of the printed edition), several new Business View objects appear in the Dynamic Cascading Prompts folder in the repository. Icons next to the items are indicative of the type of object represented. Also, Crystal Reports will use short abbreviations to indicate what types of objects are created (DF for Data Foundation, BE for Business Element, and so forth). You may explore them in the Business View Manager.

64 C r y s t a l R e p o r t s 2 0 0 8 : T h e C o m p l e t e R e f e r e n c e
You’ll notice components that are discussed earlier in this chapter: a Data Connection, Data Foundation, Business Element, and Business View. These items are all required to supply a data source for the pick lists. You’ll also notice two additional components not yet discussed: a List of Values and a Prompt Group (definitions for these types of objects are discussed earlier in this section).
The Data Connection consists of the same data source as the report that was published (ODBC connection, OLE DB connection, and so forth). The Data Foundation mirrors the tables and joins that exist in the report. The Business Element includes fields that were used in the original SQL Command that populated the pick list in the original report. And, the Business View simply contains the Business Element that populates the pick list.
The two additional components determine the actual data that appears in the drop down lists (the List of Values component) and the way the drop-down lists appear (the Prompt Group component). You may view or edit the objects the same way you do any other Business View item from the repository (double-clicking them in the Repository Explorer is one way). The List of Values exhibits the “cascading” nature of the pick list, exposing the Employee ID field first, followed by the Order ID field. And, the Prompt Group specifies the prompting text, adds the Last Name description to the Employee ID, and designates the Order ID as accepting multiple values.
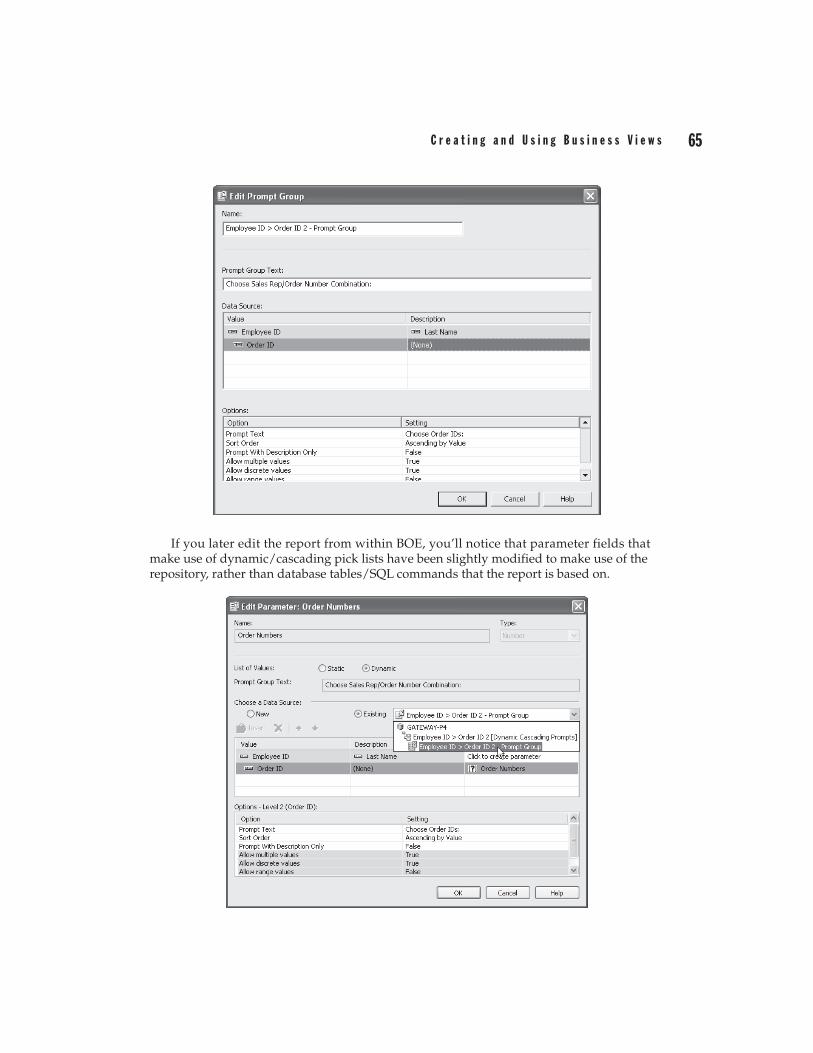
C r e a t i n g a n d U s i n g B u s i n e s s V i e w s 65
If you later edit the report from within BOE, you’ll notice that parameter fields that make use of dynamic/cascading pick lists have been slightly modified to make use of the repository, rather than database tables/SQL commands that the report is based on.

66 C r y s t a l R e p o r t s 2 0 0 8 : T h e C o m p l e t e R e f e r e n c e
While this method of creating Business View–based pick lists may be preferable (you may be more familiar with Crystal Reports than the Business View manager, for example), there are several issues to be familiar with:
• You may not have proper rights in the BOE system to create the various components that make up the pick list. In this case, you’ll receive errors when you attempt to publish the report to BOE and the pick lists won’t be created.
• An unchecked number of report designers publishing myriad reports to BOE may result in a large number of pick list objects in the Dynamic Cascading Prompts folder of the repository. While Crystal Reports will look for existing pick lists in the repository that exactly match that of reports being published (and will just connect to the existing lists rather than creating new ones), even a slight difference from an existing list will cause a large number of new Business View objects to be created for the new report.
If you are planning on allowing publication of reports containing dynamic/cascading pick lists, you may wish to carefully coordinate procedures to ensure minimal pick list duplication. You may also want to consider creating pick lists in the Business View Manager and instructing report designers to use existing lists, rather than creating new ones (creating pick lists in the Business View Manager is discussed next and using existing repository pick lists in reports is discussed later in the chapter).
Creating Pick Lists in the Business View ManagerAnother way of making Business View–based dynamic/cascading pick lists available to report designers is to create them directly in the repository using the Business View Manager (dynamic/cascading pick lists in the repository can be used by reports not published to BOE, and must be used by reports published to BOE). Once these have been created in the Business View Manager, they are available to everyone who can connect to the BOE system.
Because BOE-based pick lists use Business Views as their source of data, you must first have available a completed Business View component before you create the pick list. If you don’t have a suitable Business View available, perform steps described earlier in the chapter to create all necessary Business View pieces. The Business View object itself is what’s used to populate a pick list, so you must create all necessary Business View elements, including the Business View object itself.
While there are two components in the repository that make up a dynamic/cascading pick list (the List of Values and the Prompt Group), only the List of Values can be created directly in the Business View Manager. Prompt Groups are created when you make use of a dynamic/cascading pick list when creating a parameter field in a Data Foundation or Business Element, or in Crystal Reports.
To create a new List of Values, choose the List Of Values icon from the welcome screen when starting the Business View Manager or clicking the New toolbar button, or choose File | New from the pull-down menus, choosing the List Of Values submenu item. The Select Business View dialog box will appear. Navigate through various repository folders until you find the desired Business View (only Business View objects will appear in the dialog box). Once you’ve made the choice, the Create List Of Values dialog box will appear, as illustrated in Figure 13.

C r e a t i n g a n d U s i n g B u s i n e s s V i e w s 67
Begin by navigating through the available Business Elements in the Available Fields list. Select the desired field in the list and click the right arrow to add the field to the List of Values fields list on the right of the dialog box. You may add more than one field if you would like multiple fields to act as pick list data sources (when you create a parameter field, you may choose just one field to act as the pick list—you needn’t use all fields). However, if you want to use the fields for a cascading pick list, you must add fields in the order of the “cascade” (for example, you’ll add the Employee # field first, followed by the Order # field if you want to display a cascading pick list that limits order numbers to those taken by the chosen employee).
If you want to add a description field (perhaps a text field that matches a numeric field that you added to the List of Value Fields list), select the field to match the description with in the List of Value Fields list. Then, choose the matching description field form the Description Field drop-down list. You may also choose to sort the pick list in ascending or descending order by making the appropriate radio button choice.
You may also make one or two choices toward the bottom of the dialog box. While the 300-second setting for Oldest On-Demand Data is typically adequate, you may want to
FIGURE 13 Create List Of Values dialog box
Supply List of Values nameChoose from Business View fields
Multiple fields will create cascading hierarchy
Choose description field for selected list of value field
Choose how long to cache data for subsequent pick list views
Choose server to process pick list database queries

68 C r y s t a l R e p o r t s 2 0 0 8 : T h e C o m p l e t e R e f e r e n c e
change to a higher or lower number, depending on how “fluid” the database is that the pick list is based on is and on how long a database query to fill the pick list may run. The first time this pick list is used, the database will be queried and the values from the database will be stored in memory on the BOE system. Any subsequent requests for the same pick list within this time period specified here will be supplied from memory, rather than being requeried from the database. If your system administrator has configured more than one server system to process pick list queries, you will be able to choose from various servers in the Default Servers drop-down list (although you’ll probably most often want to just leave the First Server option chosen).
When you’ve completed the Create List Of Values dialog box, click OK to save the list of values. The Select A Folder dialog box will appear. Select an existing folder or create and then select a new folder to store the List of Values in. The pick list will be stored in the repository. You may now use the pick list with a parameter field created in another Data Foundation or Business Element, or in Crystal Reports (described later in the chapter).
Scheduling Pick ListsAnother advantage of using BOE-based pick lists instead of those based solely on report data sources, is the ability to schedule the pick lists to be populated by a batch process at regular intervals. This may be handy when you design pick lists against large database tables. These pick lists may return large numbers of values, or they may require a large, slow query to run on the database server every time a pick list needs to be populated in real time. This can increase the workload on the database server, as well as slowing pick list generation for report viewers when they run reports based on dynamic/cascading pick lists.
By scheduling a pick list to be populated during a batch process, the slow query can run, perhaps, during off-hours when the database will not be as heavily impacted. The values in the pick list are stored in the BOE system and displayed in the pick lists much faster than if the underlying query is run every time a pick list is displayed. This both reduces database load and increases response time for report viewers. Furthermore, the Business View Manager allows pick lists to be partially scheduled. For example, if you wish the Sales Rep portion of a cascading pick list to be refreshed with a nightly database query, with the Order Number portion of the cascade always running in real time, you may make this choice when you schedule.
TIP TIP Scheduling of pick lists obviously reduces the real-time availability of pick list values. When scheduling pick lists, choose a schedule interval that will not unduly burden the database, but will still provide a reasonably “fresh” set of values from the database.
To schedule a pick list, select it in the Repository Explorer within the Business View Manager. Choose Schedule List Of Values from the pop-up menu. If the pick list contains multiple fields (perhaps it has been designed to support a cascading pick list), you may specify how many levels in the pick list to schedule. For example, in the previously described scenario, you can choose to schedule only the Sales Rep portion of the pick list, or both the Sales Rep and Order Number portions. Once you’ve made this choice (and you won’t be presented it if the pick list consists of a single field), the Schedule dialog box will appear.

C r e a t i n g a n d U s i n g B u s i n e s s V i e w s 69
Use this dialog box to choose how often to refresh (or schedule) the values for the pick list. Various scheduling intervals will appear in the Run Report drop-down list. Based on the selection you make in this drop-down, the rest of the dialog box will change, allowing you to specify, for example, the number of days to separate schedules, and the time to run the refresh. If this pick list is based on a Business View that requires database logon credentials to be supplied (the Always Prompt property is set to True in the pick list Business View’s underlying Data Connection), then click Database Logon and supply valid database credentials to use when refreshing the pick list. And, if the pick list’s Business View is based on a parameterized Data Foundation or Business Element, click Parameter Values to supply desired parameter values. Once you’ve made desired choices, click OK to schedule the pick list refresh process.
NOTE NOTE Unlike other scheduling options discussed in Part II of the printed edition, pick lists will only retain a single “instance” from the last schedule. Any time a new pick list refresh runs, the previous pick list is discarded.
The pick list will be added to the Central Management Server’s schedule to be run at the desired interval. When the pick list is used in a parameter field, values from the last scheduled refresh will appear in the drop-down list, rather than values queried from the database in real time. To check the status of the scheduled pick list (or, to stop the schedule and return to a real time pick list), edit the List of Values object in the Business View Manager. The status of the latest schedule (success or failure) will appear in the Schedule Status box.
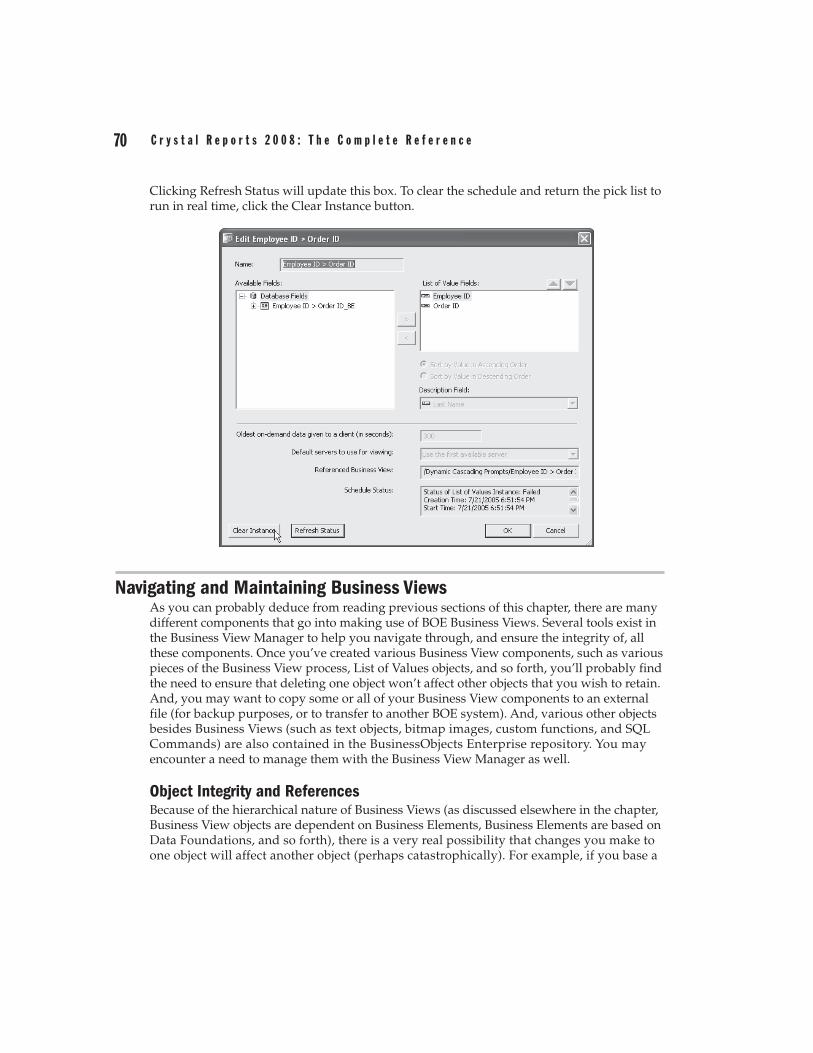
70 C r y s t a l R e p o r t s 2 0 0 8 : T h e C o m p l e t e R e f e r e n c e
Clicking Refresh Status will update this box. To clear the schedule and return the pick list to run in real time, click the Clear Instance button.
Navigating and Maintaining Business ViewsAs you can probably deduce from reading previous sections of this chapter, there are many different components that go into making use of BOE Business Views. Several tools exist in the Business View Manager to help you navigate through, and ensure the integrity of, all these components. Once you’ve created various Business View components, such as various pieces of the Business View process, List of Values objects, and so forth, you’ll probably find the need to ensure that deleting one object won’t affect other objects that you wish to retain. And, you may want to copy some or all of your Business View components to an external file (for backup purposes, or to transfer to another BOE system). And, various other objects besides Business Views (such as text objects, bitmap images, custom functions, and SQL Commands) are also contained in the BusinessObjects Enterprise repository. You may encounter a need to manage them with the Business View Manager as well.
Object Integrity and ReferencesBecause of the hierarchical nature of Business Views (as discussed elsewhere in the chapter, Business View objects are dependent on Business Elements, Business Elements are based on Data Foundations, and so forth), there is a very real possibility that changes you make to one object will affect another object (perhaps catastrophically). For example, if you base a

C r e a t i n g a n d U s i n g B u s i n e s s V i e w s 71
series of Business Elements and Business Views on a certain set of tables and fields in a Data Foundation, and then remove them from the Data Foundation, the dependent Business Elements and Business Views will cease to work properly.
There are three different options available throughout the Business View Manager to check for these possibilities: Show Dependent Objects, Show Referenced Objects, and Check Dependent Integrity. Show Dependent Objects and Show Referenced Objects are always available, while Check Dependent Integrity is available for every object type except a Business View, List of Values, and Prompt Group. The choices are available from the Tools pull-down menu, as well as via toolbar buttons.
TIP TIP You can also make use of these options from within the Repository Explorer. Select the desired object within the repository and click the appropriate toolbar button. More information on the Repository Explorer appears later in this chapter.
Showing Dependent and Referenced ObjectsDependent objects are those that depend on the current object you have selected or are editing. For example, if you are editing a Data Connection, virtually every object “above” the connection in the Business View hierarchy (Dynamic Data Connections, Data Foundations, Business Elements, and Business Views) relies on it. Conversely, referenced objects are objects that the object you have selected or are editing references in one form or another. For example, if you have selected a Business View in the Repository Explorer, at least one Business Element, Data Foundation, and Data Connection (perhaps more) will be referenced by it.
To show dependent objects for a selected object, choose the Show Dependent Objects menu option or toolbar button. The Dependent Objects dialog box will appear, showing the hierarchy of dependent objects. Click plus signs to see the different objects within the repository that depend on the object you originally selected.
To show referenced objects for a selected object, choose the Show Referenced Objects menu option under the Tools menu or toolbar button. The Referenced Objects dialog box

72 C r y s t a l R e p o r t s 2 0 0 8 : T h e C o m p l e t e R e f e r e n c e
will appear, showing the hierarchy of referenced objects. Click plus signs to see the different objects within the repository that are referenced by the object you originally selected.
Checking Dependent IntegrityWhile the steps just described will show you a list of dependent or referenced objects, they don’t necessarily indicate that all objects that depend on, or are referenced by, each other are actually “whole.” The situation described previously where Business Elements and Business Views may reference fields or tables that have been removed from an underlying Data Foundation is an example that won’t be exposed by just showing references or dependencies. To avoid this situation, you need to check to see that all the tables, fields, and other internal elements that are passed back and forth among different Business Views objects are contained in all objects.
To check dependent integrity for a selected object, choose the Check Dependent Integrity menu option or toolbar button. The various dependent objects will be checked to ensure that all referenced fields and tables are accounted for. If no problems are found, a message will so indicate. If, however, tables or fields are missing that are expected in other objects, a dialog box indicating the problem will appear.
CAUTION CAUTION The Check Dependent Integrity feature will not detect a mismatch between a Data Connection and other objects further up the Business View hierarchy. If you encounter data errors in other Business View objects, ensure that the Data Connection that the objects are based on is properly returning the required tables and fields.
Exporting and Importing Business ViewsOnce you have gone about the steps of creating the individual objects that make up your Business Views, you may wish to export them for use in another BOE system (perhaps you have test and production systems), or export them to keep as an extra backup. The Business View Manager allows entire Business View object hierarchies to be exported to XML format and re-imported later.

C r e a t i n g a n d U s i n g B u s i n e s s V i e w s 73
To export an existing Business View, choose Tools | Export from the pull-down menus. The Export dialog box will appear. The Select Business Views To Export box on the left side of the dialog shows the repository folder structure. Navigate through the folder structure of this dialog box to find your desired Business View objects (Business Views, Lists of Values, Prompt Groups, and Crystal Reports repository objects will appear when you open repository folders). If your repository contains a large number of Business Views, you may use dialog box filters to narrow down the list of displayed Business Views. Right-click anywhere within the repository folder or object list and choose Advanced Filtering from the pop-up menu. The dialog box will display text boxes where you may specify a combination of object name text or author. When you click Apply, only Business Views that include the supplied text or author names will appear. If you wish to turn off any existing filters, simply right-click and click the Advanced Filtering option again. The complete list of Business Views will reappear.
As you can export more than one Business View, select as many as you wish to export, clicking the right arrow after each. If you determine that you’ve added Business Views that you don’t want to export, select the desired Business View in the Selected Business View list and click the left arrow.
Type an XML path and filename to store the exported Business Views in the XML Filename box at the top of the dialog. If you prefer to navigate to a particular folder, click Choose XML. Check the Export Security Information check box at the lower left of the dialog to export any row and column security settings and object rights along with the Business View objects (for safety, any embedded Data Connection passwords are not exported). And, checking the Preserve Folder Structure check box will export folder information from the repository along with Business View Objects.

74 C r y s t a l R e p o r t s 2 0 0 8 : T h e C o m p l e t e R e f e r e n c e
Click OK when you are ready to export the selected Business Views. A message will appear once the export is complete. Examining the exported XML file illustrates the way Business View objects are stored in the repository.
Importing Business Views back into the repository is similarly straightforward. Choose Tools | Import from the pull-down menus. The Import dialog box will appear, showing the repository folder structure in the middle. Note that even though plus signs exist, you will only see subfolders if you click them—no actual existing Business View objects will appear. Click the folder you want to import the Business Views into, or click New Folder to create a new folder.

C r e a t i n g a n d U s i n g B u s i n e s s V i e w s 75
Type the source XML path and filename containing the Business Views you want to import in the XML Filename text box. If you’d prefer to navigate to the file, click Choose XML. Check the Preserve CUID When Importing Objects check box at the bottom of the dialog to use the same BusinessObjects Enterprise unique identifier numbers used when the Business Views were exported. This is important if you are planning on using existing Crystal Reports with the imported Business Views, as the Business View unique identifiers are stored with the reports. The Overwrite If CUID Exists option will overwrite any existing Business View objects with the same unique ID. And, checking the Merge Folder Security option will combine folder security settings between the folders that the original Business Views were in and the destination folder you choose to import the objects (if there is a conflict between settings, the settings already existing in the destination folder in the repository will take precedence).
Finally, if you need to import the Business Views into a different BusinessObjects Enterprise system than you logged on to when you first started the Business View Manager, click Choose Repository. A new BusinessObjects Enterprise logon dialog will appear, where you can choose a different Central Management Server, user ID, password, and authentication type. Once you’ve specified all necessary information, click OK.
TIP TIP Exporting is not limited to Business Views objects. Other Crystal Reports objects stored in the repository (such as bitmaps, text objects, and so forth) can be exported and imported using these steps.
Using the Repository ExplorerWhen you first start the Business View Manager, you’ll initially see the Repository Explorer window appear on the right. As you continue to edit Business View objects with the Business View Manager, the Repository Explorer always appears (unless you shrink it with the push-

76 C r y s t a l R e p o r t s 2 0 0 8 : T h e C o m p l e t e R e f e r e n c e
pin button, or turn it off from the View menu). Also, when you are prompted to save an object to the repository, you’ll see an embedded version of the Repository Explorer in the Save dialog box.
Because Business Views is such an integral part of BusinessObjects Enterprise and the repository, you’ll find it helpful to understand how to make best use of the Repository Explorer. Also, because you can specify Business View object rights from the Repository Explorer, as well as when editing the object, it’s helpful to know how to make these settings.
Navigating the Repository ExplorerNotice that the folder structure of the repository is exposed in the Repository Explorer: your BOE Central Management Server name appears at the top of the folder hierarchy, with top-level folders appearing below them. If you click the plus-sign next to a folder, it expands to show any subfolder or repository objects within it. Notice an additional folder labeled Custom Functions. This is the dedicated folder within the repository where all custom functions created in Crystal Reports are held. You’ll also find a Dynamic Cascading Prompts folder dedicated to storing pick lists created when publishing Crystal Reports with dynamic/cascading pick lists based on report fields.
Notice that, at least initially, you see all folders and all object types (even though not applicable to Business Views) in the repository. You may choose to apply a filter to limit objects shown, or choose options to limit the Repository Explorer to certain types of objects. To apply filters to limit the objects displayed in the explorer, click the Advanced Filtering toolbar button. You can also right-click anywhere within the repository folder or object list and choose Advanced Filtering from the pop-up menu. The Repository Explorer will display text boxes where you may specify a combination of object name text or author. When you click Apply, only repository objects that include the supplied text or author names will appear. If you wish to turn off any existing filters, simply click the Advanced Filtering toolbar button again, or right-click and click the Advanced Filtering option again. The complete list of objects will reappear.
You may also limit the types of repository objects that appear. For example, if you are working exclusively with Business Views for the time being, you may not wish to see text objects, bitmaps, or other Crystal Report–related objects in the Repository Explorer. To change view settings, click the Change View Settings toolbar button. You can also right-click anywhere within the repository folder or object list and choose Change View Settings from the pop-up menu. The View Settings dialog box will appear.

C r e a t i n g a n d U s i n g B u s i n e s s V i e w s 77
Uncheck repository object types that you prefer not to see. You may also choose how to sort objects in the Repository Explorer. Once you’ve made your choices, click OK. The Repository Explorer will reappear with your new settings taking effect.
There are additional options for working with the Repository Explorer. The first option you have is to delete objects or folders from the repository. Simply choose the desired object or folder and press del. Or, right-click the object or folder and choose Delete from the pop-up menu. You can also click the Delete toolbar button. If the object you attempt to delete is not referenced by any other objects, you’ll see a simple confirmation request. However, if you attempt to delete a folder or a Business View object that is referenced elsewhere, you’ll see a more elaborate dialog box indicating what else will be deleted if you proceed. Click Yes if you’re sure you want to delete the objects.
CAUTION CAUTION Deleting objects from the repository is permanent—you can’t undo such a deletion. It goes without saying that you should have a regular program in your organization to back up the Central Management Server database in case you need to restore any inadvertently deleted repository objects.
You may also desire to create a new folder within the repository to store Business View objects, or objects added from within Crystal Reports. You may either create a folder directly below the Central Management Server (known as a top-level folder), or a subfolder within a top-level folder. In fact, you can create subfolders in subfolders. The key is what you have selected in the Repository Explorer before you click New Folder. If you select the Central Management Server, you will create a top-level folder. If you select an existing top-level folder or a subfolder, you will create a subfolder within the selected folder.
Once you’ve selected the desired location for your new folder, right-click and choose New Folder from the pop-up menu. Or, click the New Folder toolbar button. A new folder will be created with the name “New Folder.” You’ll be placed into edit mode on the New Folder name—type the desired name for the new folder and click outside it to save the new name.

78 C r y s t a l R e p o r t s 2 0 0 8 : T h e C o m p l e t e R e f e r e n c e
To rename an existing folder or object, select it. Then, simply hold your mouse button down for a few seconds until the object enters edit mode. You can also right-click an object and choose Rename from the pop-up menu. Or, select an object and press f2. The object will be placed into edit mode. Type a new name for the object (remembering that you can’t use the same name as another object of the same type in the same folder) and click outside the object to save the new name.
And finally, you may choose to move or copy either individual repository objects, or entire repository folders, from one place to another in the Repository Explorer. Simply select the object or folder you want to move, hold your mouse button down, and drag it on top of another folder (or the Central Management Server itself to make it a “top-level” folder or object). If you wish to copy an object rather than move it, hold the ctrl key down when you drag. Once you drop the object in its new location, the Repository Explorer will show the new organization immediately. Note that if you attempt to move or copy a folder or object to a location that already has an object of the same name and type, you’ll either receive an error message, or be warned that the move or copy will overwrite the existing object.
NOTE NOTE The last three toolbar buttons are used to view dependent and referenced Business View objects, as well as to check dependent integrity for the selected Business View object. Discussions of these options appear earlier in the chapter.
Setting Rights for Business View ObjectsAlthough this chapter has already discussed applying row and column security via field and filter rights, you also have the ability to specify rights at the Business View object level. For example, you may prefer that only a limited set of BusinessObjects Enterprise users or groups see a Business View when opening Crystal Reports. Or, perhaps you want to allow several members of your organization to design Business Views, but only the HR group to have access to the HR Information System Data Connections. By setting rights for the Business View object or the Data Connection object, you can control who can see, modify, or set security for various objects.
Not only can you set rights at the object level, but also at the folder and Central Management Server levels. When you set rights at a higher level, they are automatically inherited at lower levels. For example, you may set a certain set of rights at a Business Views folder level to have them “trickle down” to any Business View objects within the folder. This inheritance model (at least in theory) can simplify your administrative tasks by reducing the amount of rights setting that you have to accomplish throughout the repository.
You can set rights on Business View objects in two places within the Business View Manager:
1. When editing a Business View object, by selecting the object name in the Object Explorer and clicking the ellipses button next to the Rights property in the Property Browser.
2. By clicking the object in the Repository Explorer, right-clicking, and choosing Edit Rights from the pop-up menu.
Once you’ve made this choice, the Edit Rights dialog box will appear, as illustrated in Figure 14.

C r e a t i n g a n d U s i n g B u s i n e s s V i e w s 79
You’ll see a list of BusinessObjects Enterprise groups and users and their existing set of rights (initially, you’ll see just the Administrators and Everyone group here). Note that, depending on the type of object, three or four different rights can be set for each user or group:
• View The ability to use the object within a Business View
• Edit The ability to modify and delete the object
• Set Security The ability to change repository security settings for the object using this dialog box
• Data Access The ability to view the set of data coming from this data source
Further, if you cycle through the available options for each right by clicking the check box, you’ll notice that a right can be granted, denied, or inherited. Granting the right explicitly gives that right to the chosen group or user. Denying the right explicitly takes the right away from the chosen group or user. And, allowing the right to be inherited will grant or deny the right based on higher-level security settings.
If you wish to specifically grant or deny rights to additional groups or users, you’ll need to add the group or user to the list by clicking the Add Groups or Add Users button in the Edit Rights dialog box toolbar. These buttons will display an additional Add Groups or Add User dialog box showing all BusinessObjects Enterprise groups or users (to actually create additional BOE groups or users, you must use other BOE administrative tools, such as the
List of groups and users and associated rights
Type in group or user name and click button to find group or user
Delete selected user or group from list
Displays list of CRS/BOE groups or users to add to rights list
Preview “net” rights for groups and users
FIGURE 14 The Edit Rights dialog box

80 C r y s t a l R e p o r t s 2 0 0 8 : T h e C o m p l e t e R e f e r e n c e
Central Management Console—you can’t add these here). Use this dialog box to choose an additional group or user to add to the Edit Rights dialog box.
Once the additional groups or users you’ve added appear in the Edit Rights dialog box, you can grant or deny rights to that group or user by clicking the appropriate check boxes. If you wish to remove a group or user that you previously set rights for, simply select the user or group and click the Delete button in the toolbar.
Because of inheritance from upper-level folders, you may ultimately not assign the set of rights you expect. To understand what rights are ultimately given, you may want to see the set of “net” rights, which take inheritance into account. Do this by clicking the Preview button in the toolbar. The list of users and groups will change, showing the actual combination of rights that result from explicit settings and inheritance. If you need to change any rights, click Preview again to return the list to its “editable” state.
Once you’ve set rights for all necessary groups and users, just click OK to close the Edit Rights dialog box. If you are editing a Business View object, you should save the object to ensure that the new rights settings are saved to the repository. Click the Save toolbar button or choose File | Save from the Business View Manager pull-down menus.
NOTE NOTE A more thorough discussion of repository rights, including the rules of inheritance, can be found in Chapter 18 of the printed edition.
Clear any filter to show all users or groups
Double-click a group or user or click Add to add it to the Edit Rights dialog
Filter the list of groups or users based on criteria
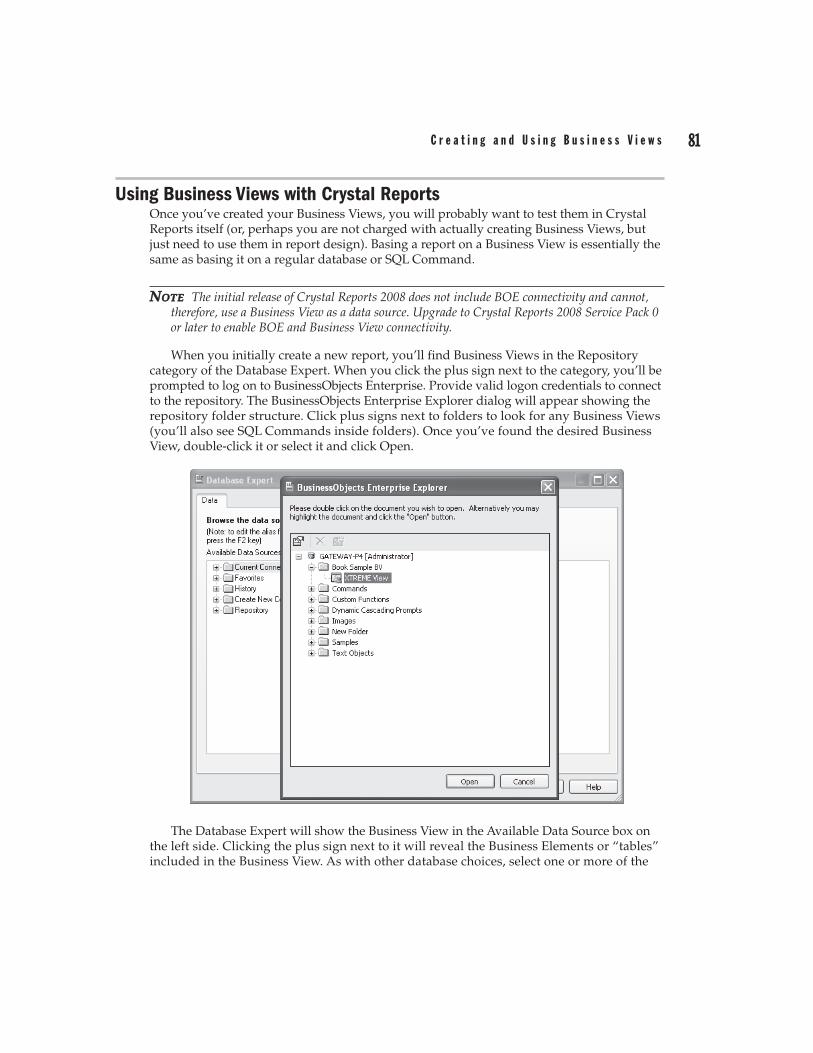
C r e a t i n g a n d U s i n g B u s i n e s s V i e w s 81
Using Business Views with Crystal ReportsOnce you’ve created your Business Views, you will probably want to test them in Crystal Reports itself (or, perhaps you are not charged with actually creating Business Views, but just need to use them in report design). Basing a report on a Business View is essentially the same as basing it on a regular database or SQL Command.
NOTE NOTE The initial release of Crystal Reports 2008 does not include BOE connectivity and cannot, therefore, use a Business View as a data source. Upgrade to Crystal Reports 2008 Service Pack 0 or later to enable BOE and Business View connectivity.
When you initially create a new report, you’ll find Business Views in the Repository category of the Database Expert. When you click the plus sign next to the category, you’ll be prompted to log on to BusinessObjects Enterprise. Provide valid logon credentials to connect to the repository. The BusinessObjects Enterprise Explorer dialog will appear showing the repository folder structure. Click plus signs next to folders to look for any Business Views (you’ll also see SQL Commands inside folders). Once you’ve found the desired Business View, double-click it or select it and click Open.
The Database Expert will show the Business View in the Available Data Source box on the left side. Clicking the plus sign next to it will reveal the Business Elements or “tables” included in the Business View. As with other database choices, select one or more of the

82 C r y s t a l R e p o r t s 2 0 0 8 : T h e C o m p l e t e R e f e r e n c e
Business Elements and add them to the Selected Tables list on the right. When finished adding Business View tables, click OK to close the Database Expert.
NOTE NOTE Even though you will see the individual tables in the Links tab in the Database Expert after adding multiple Business View tables, you won’t be able to actually link the tables together. You’ll see link lines drawn between the table names, not particular field names. Linking is handled automatically within the Business View.
When the Field Explorer is displayed, you’ll notice that the Business View tables you chose will appear just like a regular database table. Clicking plus signs next to the tables will reveal the fields from within the Business View. Drag and drop them to the report just like regular database fields.
Even though the Business View may already apply filters or row security, you may still create your own record selection using the Select Expert, just as you would with a regular database connection. Most other report design capabilities also exist with Business Views, such as formatting and formula creation (you may not be able to create SQL Expressions, however).

C r e a t i n g a n d U s i n g B u s i n e s s V i e w s 83
CAUTION CAUTION Crystal Reports presents two important Business View limitations that you should be aware of. First, you cannot mix any other data sources in a report that’s based on a Business View. Attempting to add any additional data sources to a Business View–based report will result in an error message. Second, once you base a report on a Business View, you can’t change the report to be based on to a non–Business View data source with the Set Datasource Location option. You’ll only be able to change the report to work with a different Business View.
Row and Column SecurityOne of the benefits of using Business Views with Crystal Reports is row and column security. Row security will limit your reports to only the database records applicable to you. For example, when viewing a sales report, the Western Region Sales Manager is limited to only seeing orders in the Northwest and Southwest. When viewing the same sales report, the National Sales Manager can view orders in all regions. The beauty of row security is that two different reports with two different sets of record selection aren’t required to accomplish this. Row security applies the extra filters at run time to all reports based on the Business View supplying the row security. So, you can design a single report that will return different sets of records automatically based on the BusinessObjects Enterprise user ID.
If row security is assigned to the Business View you’ve based your report on, you may see different records than another user. For example, the exact same report based on the sample XTREME Business View discussed earlier in the chapter will return a complete set of regional customers to the National Sales Manager:

84 C r y s t a l R e p o r t s 2 0 0 8 : T h e C o m p l e t e R e f e r e n c e
while returning only Northwest and Southwest customers to the Western Region Sales Manager.
Column security allows data from certain fields within a Business View to be hidden to certain BusinessObjects Enterprise users. For example, when viewing an employee roster report, the HR Manager will be able to see data in the Annual Salary and Monthly Salary fields, along with other employee fields. When any other user views the same employee roster report, the Annual Salary and Monthly Salary fields will display null values, while other employee fields will still display the proper contents. The one issue with column security to be aware of is that, even if you aren’t granted the rights to see fields, you’ll still be able to drag them onto your report. When you preview the reports, however, you’ll see nothing in them.
For example, the exact same report based on the sample XTREME Business View discussed earlier in the chapter will display salary data for employees when viewed by the HR Manager:

C r e a t i n g a n d U s i n g B u s i n e s s V i e w s 85
while showing null values for the fields when viewed by any other user.

86 C r y s t a l R e p o r t s 2 0 0 8 : T h e C o m p l e t e R e f e r e n c e
TIP TIP One Crystal Reports feature you may find handy is the Current CE User Name special field. This will print the BusinessObjects Enterprise user name on the report. Choose it from the Special Fields category of the Field Explorer.
Disconnecting View SecurityYou may encounter a potential problem if you wish to send a Crystal report developed against a Business View to a Crystal Reports user who is not connected to the same BusinessObjects Enterprise system, or who doesn’t have BOE in their organization at all. This issue is compounded when row and column security are involved with the report, as there will be no BOE user ID to base security on when the report is opened by the other user.
The solution to this problem is to disconnect view security from the report when saving it. First, ensure that the File | Save Data With Report option is turned on. Otherwise, the non-CE report viewer won’t be able to see anything but the report’s Design tab. Then, choose File | Save As and specify a new filename for the report. Notice the Disconnect View Security check box at the bottom of the dialog box.
When the report is saved, it will be disconnected from the Business View. The report can be opened and viewed, but no longer refreshed. Also, you cannot reconnect a report to a Business View that has been disconnected in this manner.
CAUTION CAUTION Be aware that if you have row and column security settings that permit you to see sensitive data, such as salaries, the sensitive data will be saved with the report when you disconnect view security. Other report viewers will see this data when they open the report, even though they won’t be able to refresh the report.
Using Business View–Based Pick Lists in ReportsAs discussed earlier in the chapter, an advantage of a centralized BusinessObjects Enterprise system is shared pick lists. The dynamic/cascading pick list capability of Crystal Reports 2008

C r e a t i n g a n d U s i n g B u s i n e s s V i e w s 87
is further enhanced by the ability to share these pick lists in the repository. Once you create a shared pick list (either by publishing a Crystal Report to BOE or by creating a List of Values object based on a Business View—both discussed earlier in this chapter), you may then make use of it with Crystal Reports parameter fields. Even if you are not planning on publishing your report to BOE, you may still prefer to use a shared pick list. And, if you are planning on publishing your report, you must use a shared pick list (even if you create a report-based dynamic/cascading pick list, it will be converted to a Business View–based pick list when you publish the report, as discussed earlier).
Once one or more shared pick lists are available in the repository, it’s a fairly simple process to make use of them in a Crystal Report. First, ensure you are logged on to the desired BOE system by displaying the Crystal Reports Repository Explorer. The Repository Explorer can be displayed by clicking the Repository Explorer button in the standard toolbar, or by choosing View | Repository Explorer in the pull-down menus. Click the Logon button in the explorer to log on to BOE. Once you have logged on, you may close the Repository Explorer to regain screen space, if you’d like. Or, if you’ve already logged on to BOE to use a Business View as a report data source, you won’t need to use the Repository Explorer.
Begin by creating a parameter field as you normally would (complete discussion of creating Crystal Reports parameter fields is contained in Chapter 13 of the printed edition). Give the parameter field a name. While you may wish to choose a data type, you don’t have to—the dynamic pick list you use in BOE will determine the data type automatically. Choose to create a dynamic pick list by clicking the Dynamic radio button in the List Of Values section. To use a Business View–based pick list, click the Existing radio button in the Choose A Data Source section. The drop-down list next to the Existing radio button will then expand. The name of the BOE Central Management Server you logged on to earlier will appear, with a list of all shared pick lists appearing underneath it.
List of Values contains pick list data
Prompt Group includes parameter field properties, such as Prompting Text

88 C r y s t a l R e p o r t s 2 0 0 8 : T h e C o m p l e t e R e f e r e n c e
NOTE NOTE Dialog boxes illustrated in this chapter reflect Crystal Reports XI. However, Crystal Reports 2008 uses similar dialog boxes with similar Business View options.
You’ll notice two different types of entries in the drop-down list: List of Values and Prompt Groups (both defined earlier under “Creating Business View–Based Pick Lists”). The List of Values entry (which you may have created earlier in the Business View Manager) contains the values that will appear in the drop-down pick list. Any Prompt Group entries below the List of Values (there can be one or more Prompt Groups, or none, depending on parameter fields that have been created against the List of Values so far), will include existing parameter field options, such as Prompting Text and settings for Allow Multiple Values and Allow Range Values.
If you wish to use an existing Prompt Group for your parameter field (perhaps you created other parameter fields against this pick list earlier and wish to reuse the settings you made for the earlier parameter field), choose the desired prompt group from the Existing drop-down list. If you wish to define your own options for the parameter field, just choose the List of Values object from the Existing drop-down list. If the List of Values contains more than one data field, you’ll see multiple rows in the Value/Description/Parameters table (perhaps the List of Values was designed to accommodate a cascading pick list). Determine which of these rows you wish to attach to your parameter field by clicking the Parameters column in the desired row. Crystal Reports will add a parameter field name that consists of the name you initially gave your parameter field, followed by the name of the pick list field you chose (you may rename your parameter field back to its original name after you save it). If multiple parameter fields happen to be defined because you click the Parameters entry for multiple rows, you may click the entry again until the “Click to create parameter” message returns—no additional unwanted parameter fields will be created.
If you wish to customize any additional parameter field behavior, such as Allow Multiple Values or Prompting Text, make desired choices in the Options section of the Create New Parameter dialog box. Note that if you make any changes to these entries (or, if this is the first time you’ve created a parameter field with the List of Values entry), an additional Prompt Group containing the options you’ve chosen will be created in the BOE repository underneath the original List of Values—the next time you create a parameter using the same pick list, you’ll find the additional Prompt Group in the drop-down list.
Click OK to create the parameter field with the pick list from the repository. If Crystal Reports renamed the parameter field inappropriately, you may rename it in the Field Explorer using the rename toolbar button, right-click options, or by holding the mouse button down for a second or two while selecting the parameter field name. When you refresh the report, you’ll be prompted for the parameter field and the dynamic/cascading pick list will show you appropriate values in the drop-down list.
If you wish to publish the report to BusinessObjects Enterprise, you may do so (techniques for publishing are covered in Part II of the printed edition). However, if you choose not to publish the report and just save it on your hard disk or a network drive, the pick list will still be connect to BOE. The next time you open the report, you will be prompted to log on to BOE before the report appears.