cs11-l current transformer - campbell scientific
TRANSCRIPT

CS11 Current Transformer
Revision: 1/19 Copyright © 2001 – 2019 Campbell Scientific, Inc.

Limited Warranty “Products manufactured by CSI are warranted by CSI to be free from defects in materials and workmanship under normal use and service for twelve months from the date of shipment unless otherwise specified in the corresponding product manual. (Product manuals are available for review online at www.campbellsci.com.) Products not manufactured by CSI, but that are resold by CSI, are warranted only to the limits extended by the original manufacturer. Batteries, fine-wire thermocouples, desiccant, and other consumables have no warranty. CSI’s obligation under this warranty is limited to repairing or replacing (at CSI’s option) defective Products, which shall be the sole and exclusive remedy under this warranty. The Customer assumes all costs of removing, reinstalling, and shipping defective Products to CSI. CSI will return such Products by surface carrier prepaid within the continental United States of America. To all other locations, CSI will return such Products best way CIP (port of entry) per Incoterms ® 2010. This warranty shall not apply to any Products which have been subjected to modification, misuse, neglect, improper service, accidents of nature, or shipping damage. This warranty is in lieu of all other warranties, expressed or implied. The warranty for installation services performed by CSI such as programming to customer specifications, electrical connections to Products manufactured by CSI, and Product specific training, is part of CSI's product warranty. CSI EXPRESSLY DISCLAIMS AND EXCLUDES ANY IMPLIED WARRANTIES OF MERCHANTABILITY OR FITNESS FOR A PARTICULAR PURPOSE. CSI hereby disclaims, to the fullest extent allowed by applicable law, any and all warranties and conditions with respect to the Products, whether express, implied or statutory, other than those expressly provided herein.”

Assistance Products may not be returned without prior authorization. The following contact information is for US and international customers residing in countries served by Campbell Scientific, Inc. directly. Affiliate companies handle repairs for customers within their territories. Please visit www.campbellsci.com to determine which Campbell Scientific company serves your country.
To obtain a Returned Materials Authorization (RMA) number, contact CAMPBELL SCIENTIFIC, INC., phone (435) 227-9000. Please write the issued RMA number clearly on the outside of the shipping container. Campbell Scientific’s shipping address is:
CAMPBELL SCIENTIFIC, INC. RMA#_____ 815 West 1800 North Logan, Utah 84321-1784
For all returns, the customer must fill out a “Statement of Product Cleanliness and Decontamination” form and comply with the requirements specified in it. The form is available from our website at www.campbellsci.com/repair. A completed form must be either emailed to [email protected] or faxed to (435) 227-9106. Campbell Scientific is unable to process any returns until we receive this form. If the form is not received within three days of product receipt or is incomplete, the product will be returned to the customer at the customer’s expense. Campbell Scientific reserves the right to refuse service on products that were exposed to contaminants that may cause health or safety concerns for our employees.

Safety DANGER — MANY HAZARDS ARE ASSOCIATED WITH INSTALLING, USING, MAINTAINING, AND WORKING ON OR AROUND TRIPODS, TOWERS, AND ANY ATTACHMENTS TO TRIPODS AND TOWERS SUCH AS SENSORS, CROSSARMS, ENCLOSURES, ANTENNAS, ETC. FAILURE TO PROPERLY AND COMPLETELY ASSEMBLE, INSTALL, OPERATE, USE, AND MAINTAIN TRIPODS, TOWERS, AND ATTACHMENTS, AND FAILURE TO HEED WARNINGS, INCREASES THE RISK OF DEATH, ACCIDENT, SERIOUS INJURY, PROPERTY DAMAGE, AND PRODUCT FAILURE. TAKE ALL REASONABLE PRECAUTIONS TO AVOID THESE HAZARDS. CHECK WITH YOUR ORGANIZATION'S SAFETY COORDINATOR (OR POLICY) FOR PROCEDURES AND REQUIRED PROTECTIVE EQUIPMENT PRIOR TO PERFORMING ANY WORK.
Use tripods, towers, and attachments to tripods and towers only for purposes for which they are designed. Do not exceed design limits. Be familiar and comply with all instructions provided in product manuals. Manuals are available at www.campbellsci.com or by telephoning (435) 227-9000 (USA). You are responsible for conformance with governing codes and regulations, including safety regulations, and the integrity and location of structures or land to which towers, tripods, and any attachments are attached. Installation sites should be evaluated and approved by a qualified engineer. If questions or concerns arise regarding installation, use, or maintenance of tripods, towers, attachments, or electrical connections, consult with a licensed and qualified engineer or electrician.
General • Prior to performing site or installation work, obtain required approvals and permits. Comply
with all governing structure-height regulations, such as those of the FAA in the USA. • Use only qualified personnel for installation, use, and maintenance of tripods and towers, and
any attachments to tripods and towers. The use of licensed and qualified contractors is highly recommended.
• Read all applicable instructions carefully and understand procedures thoroughly before beginning work.
• Wear a hardhat and eye protection, and take other appropriate safety precautions while working on or around tripods and towers.
• Do not climb tripods or towers at any time, and prohibit climbing by other persons. Take reasonable precautions to secure tripod and tower sites from trespassers.
• Use only manufacturer recommended parts, materials, and tools.
Utility and Electrical • You can be killed or sustain serious bodily injury if the tripod, tower, or attachments you are
installing, constructing, using, or maintaining, or a tool, stake, or anchor, come in contact with overhead or underground utility lines.
• Maintain a distance of at least one-and-one-half times structure height, 20 feet, or the distance required by applicable law, whichever is greater, between overhead utility lines and the structure (tripod, tower, attachments, or tools).
• Prior to performing site or installation work, inform all utility companies and have all underground utilities marked.
• Comply with all electrical codes. Electrical equipment and related grounding devices should be installed by a licensed and qualified electrician.
Elevated Work and Weather • Exercise extreme caution when performing elevated work. • Use appropriate equipment and safety practices. • During installation and maintenance, keep tower and tripod sites clear of un-trained or non-
essential personnel. Take precautions to prevent elevated tools and objects from dropping. • Do not perform any work in inclement weather, including wind, rain, snow, lightning, etc.
Maintenance • Periodically (at least yearly) check for wear and damage, including corrosion, stress cracks,
frayed cables, loose cable clamps, cable tightness, etc. and take necessary corrective actions. • Periodically (at least yearly) check electrical ground connections.
WHILE EVERY ATTEMPT IS MADE TO EMBODY THE HIGHEST DEGREE OF SAFETY IN ALL CAMPBELL SCIENTIFIC PRODUCTS, THE CUSTOMER ASSUMES ALL RISK FROM ANY INJURY RESULTING FROM IMPROPER INSTALLATION, USE, OR MAINTENANCE OF TRIPODS, TOWERS, OR ATTACHMENTS TO TRIPODS AND TOWERS SUCH AS SENSORS, CROSSARMS, ENCLOSURES, ANTENNAS, ETC.

i
Table of Contents PDF viewers: These page numbers refer to the printed version of this document. Use the PDF reader bookmarks tab for links to specific sections.
1. Introduction ................................................................ 1
2. Precautions ................................................................ 1
3. Initial Inspection ........................................................ 1
4. QuickStart .................................................................. 1
5. Overview .................................................................... 3
6. Specifications ............................................................ 4
7. Installation ................................................................. 5
7.1 Data Logger Connections .....................................................................5 7.2 Programming ........................................................................................6
7.2.1 ACPower() Instruction ..................................................................7 7.2.2 Millivolt Burst Measurements.......................................................8 7.2.3 CR300 Series ................................................................................9 7.2.4 CR200X Series ..............................................................................9
7.3 Multiplier ........................................................................................... 10
Appendices
A. Importing Short Cut Code Into CRBasic Editor ... A-1
B. Example Programs ................................................ B-1
B.1 ACPower() Example ........................................................................ B-1 B.2 Millivolt Burst Measurement and Multiplexer Sample Program ..... B-2 B.3 CR300-Series Example .................................................................... B-3 B.4 CR200(X)-Series Example ............................................................... B-4
C. Theory of Operation .............................................. C-1
C.1 Typical Electrical Circuit ................................................................. C-1 C.2 Current Transformer Description ..................................................... C-2 C.3 Converting a Milliamp Signal to a Millivolt Signal ......................... C-3 C.4 Using a CR300-Series or CR200(X)-Series Datalogger .................. C-4 C.5 Multiple AC-Wire Passes Through the CS11 .................................. C-5

Table of Contents
ii
Figures 5-1. Top (right) and bottom views of the CS11 Current Transformer .........4 7-1. AC load wire installed in CS11 ............................................................5 7-2. CS11 schematic ....................................................................................6 7-3. Graph of a CS11 waveform ................................................................ 10 C-1. Generator schematic ......................................................................... C-1 C-2. Schematic of generator with current transformer ............................. C-1 C-3. Schematic of current transformer with the AC wire......................... C-2 C-4. CS11 with the AC wire .................................................................... C-2 C-5. Magnetic flux schematic .................................................................. C-2 C-6. Windings schematic ......................................................................... C-3 C-7. Adding 1250 mV creates positive output ......................................... C-4 C-8. CS11 measurement range ................................................................. C-4 C-9. CS11 with the AC wire making two passes through the CS11 ........ C-5
Tables 7-1. CS11 Wire Color, Function, and Data Logger Connection ..................6 7-2. Measurement Range, Maximum Amperage, and Amperage
Resolution (one pass only) ................................................................8 B-1. Wiring for ACPower Example ......................................................... B-1 B-2. Wiring for Multiplexer Example ...................................................... B-2 B-3. Wiring for CR300-Series Program ................................................... B-3 B-4. Wiring for CR300-Series Program ................................................... B-4 C-1. Passes, Multiplier, and Voltage Range ............................................. C-5
CRBasic Examples B-1. CR1000X Program Using ACPower Instruction ............................. B-1 B-2. CR1000X Program Reading 32 CS11 Current Transformers .......... B-2 B-3. CR300 Program Measuring the CS11 .............................................. B-3 B-4. CR200(X) Program to Measure the CS11 ........................................ B-4

1
CS11 Current Transformer
1. Introduction The CS11 detects and measures the current along an AC wire using the magnetic field that is generated by that current. The sensor outputs a millivolt signal allowing it to be directly connected to our data loggers. The CS11 is recommended for measurements that do not require high accuracy, such as motor or generator load condition monitoring, efficiency studies, intermittent fault detection, and rough submetering.
This manual provides information only for CRBasic data loggers. For retired Edlog data logger support, see an older manual at www.campbellsci.com/old-manuals.
2. Precautions • READ AND UNDERSTAND the Safety section at the front of this
manual.
• Care should be taken when opening the shipping package to not damage or cut the CS11 cable jacket. If damage to the cable is suspected, consult with a Campbell Scientific support and implementation engineer.
• Working with live electrical equipment is dangerous! The user is responsible for ensuring all wiring conforms to local safety regulations and that the enclosure is labeled accordingly.
3. Initial Inspection Upon receipt of the CS11, inspect the packaging and contents for damage. File any damage claims with the shipping company. Immediately check package contents against the shipping documentation. Contact Campbell Scientific about any discrepancies.
4. QuickStart A video that describes data logger programming using Short Cut is available at: www.campbellsci.com/videos/cr1000x-datalogger-getting-started-program-part-3. Short Cut is an easy way to program your data logger to measure the sensor and assign data logger wiring terminals. Short Cut is available as a download on www.campbellsci.com. It is included in installations of LoggerNet, PC200W, PC400, or RTDAQ.
The following procedure also shows using Short Cut to program the sensor.
1. Open Short Cut and click Create New Program.
2. Double-click the data logger model.
NOTE

CS11 Current Transformer
2
3. In the Available Sensors and Devices box, type CS11 or locate the sensor in the select Sensors | Miscellaneous Sensors folder. Double-click CS11 Current Transformer. The default line frequency is 60 Hz. This can be changed by clicking the Line frequency (Hz) box and selecting 50 Hz. Type the Maximum expected rms current (A).
4. Click the Wiring tab to see how the sensor is to be wired to the data logger. Click OK after wiring the sensor.
5. Repeat steps three and four for other sensors.

CS11 Current Transformer
3
6. In Output Setup, type the scan rate, meaningful table names, and Data Output Storage Interval.
7. Select the output options.
8. Click Finish and save the program. Send the program to the data logger if the data logger is connected to the computer.
9. If the sensor is connected to the data logger, check the output of the sensor in data display in LoggerNet, PC400, RTDAQ, or PC200W to make sure it is making reasonable measurements.
5. Overview The CS11 (FIGURE 5-1) uses CR Magnetic’s CR8459 Current Transformer to detect the current along an AC wire using the magnetic field that is generated by that current. The CS11 is external to the AC-wire jacket and has no direct electrical connection to the system.

CS11 Current Transformer
4
FIGURE 5-1. Top (right) and bottom views of the CS11 Current Transformer
The CS11 was designed to be compatible with most of the data loggers.
6. Specifications Features:
• Ideal applications include motor or generator load conditions, efficiency studies, intermittent fault detection, and rough submetering
• Sensor is external to the wire jacket and has no direct electrical connection to the system
• Compatible with Campbell Scientific CRBasic data loggers: CR200(X) series, CR300 series, CR6 series, CR800 series, CR1000, CR1000X series, and CR3000
Measurement Ranges: 0.15 to 200 A (0.15 to 125 A for CR200X)
Frequency: 50 and 60 Hz
Insulation Resistance: 100 MΩ @ 500 Vdc
High Potential: 2000 V
Rated Current: 200 A, 125 A (CR200X series, CR300 series)
Storage Temperature: –25 to 70 °C
Operating Temperature: –25 to 55 °C
Case Material: Polypropylene Resin
Construction: Epoxy Encapsulated
CS11 Current Transformer
5
Accuracy with 10 Ω Burden Max. (resistive): Typically ±1% of actual value with provided
multiplier
Dimensions Outer Diameter: 4.8 cm (1.89 in) Inner Diameter: 1.9 cm (0.75 in) Height: 1.7 cm (0.67 in)
Multiplier: iMult = 200 A/1000mV = 0.2
7. Installation If you are programming your data logger with Short Cut, skip Section 7.1, Data Logger Connections (p. 5), and Section 7.2, Programming (p. 6). Short Cut does this work for you. See Section 4, QuickStart (p. 1), for a Short Cut tutorial.
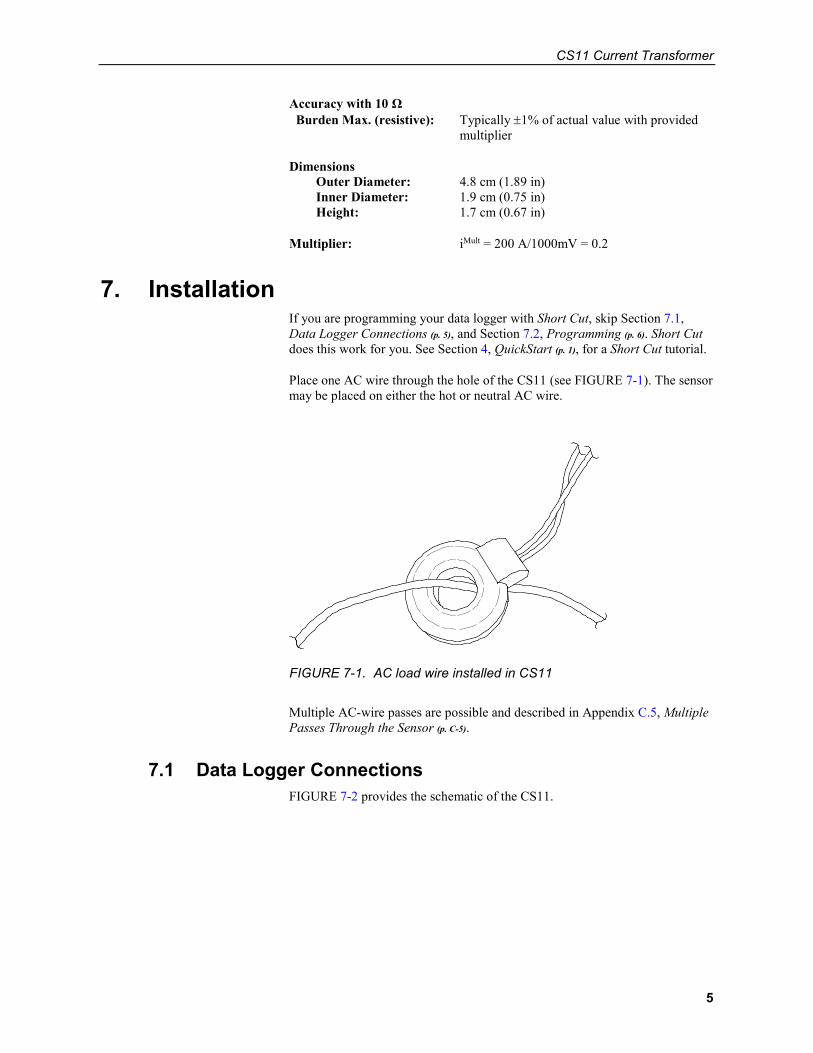
Place one AC wire through the hole of the CS11 (see FIGURE 7-1). The sensor may be placed on either the hot or neutral AC wire.
FIGURE 7-1. AC load wire installed in CS11
Multiple AC-wire passes are possible and described in Appendix C.5, Multiple Passes Through the Sensor (p. C-5).
7.1 Data Logger Connections FIGURE 7-2 provides the schematic of the CS11.

CS11 Current Transformer
6
FIGURE 7-2. CS11 schematic
TABLE 7-1 provides CS11 connections to the data logger. When using the ACPower() CRBasic instruction, another sensor, a potential transformer, is required in addition to the CS11 sensor to obtain all of these measurements and values. If the potential transformer is used, its signal wire needs to be connected to a data logger single-ended terminal and its reference wire needs to be connected a data logger analog ground terminal. Refer to Section 7.2.1, ACPower() Instruction (p. 7), for more information.
TABLE 7-1. CS11 Wire Color, Function, and Data Logger Connection
CS11 Wire Color Function
CR300-Series or CR200(X)-Series
Connection Terminals
All Other Data Logger Connection Terminals
White Signal SE (single-ended, analog input)
U configured for single-ended analog input1, SE
(single-ended, analog input)
Black Signal Reference ⏚ (analog ground) ⏚ (analog ground)
Red Voltage
Excitation or Ground
VX or EX ⏚ (analog ground)
Clear Shield ⏚ (analog ground) ⏚ (analog ground) 1 U terminals are automatically configured by the measurement instruction.
7.2 Programming Short Cut is the best source for up-to-date data logger programming code. If your data acquisition requirements are simple, you can probably create and maintain a data logger program exclusively with Short Cut. If your data acquisition needs are more complex, the files that Short Cut creates are a great source for programming code to start a new program or add to an existing custom program.

CS11 Current Transformer
7
Short Cut cannot edit programs after they are imported and edited in CRBasic Editor.
A Short Cut tutorial is available in Section 4, QuickStart (p. 1). If you wish to import Short Cut code into CRBasic Editor to create or add to a customized program, follow the procedure in Appendix A, Importing Short Cut Code Into CRBasic Editor (p. A-1). Programming basics for most CRBasic data loggers are provided in the following sections. Complete program examples for select CRBasic data loggers can be found in Appendix B, Example Programs (p. B-1).
To monitor the amperage of an alternating current circuit, the program must take many samples from the CS11 sensor to capture the waveform over a specified time, and then calculate the average energy under the curve. There are many methods to do this, depending on the data logger, the untapped programming capacity, and other factors. Typically the ACPower() or VoltSE() CRBasic instructions are used.
7.2.1 ACPower() Instruction Most CRBasic data loggers can use the ACPower() instruction to measure the CS11. This instruction is not available for the CR300-series or CR200(X)-series dataloggers.
The ACPower() instruction measures the voltage, frequency and amperage of an AC load, then calculates the phase angle, harmonic distortion of both the voltage and the current, as well as the real power of the load. To obtain all of these measurements and values, a potential transformer is required in addition to the CS11 sensor. The data logger measures the current of the CS11 and measures voltage signal and frequency of the potential transformer.
If a potential transformer is not used, the ACPower() instruction will provide amperage, but the other values returned will show up as NAN (not a number) or another inaccurate value.
Syntax
ACPower ( DestAC, ConfigAC, LineFrq, ChanV, VMult, MaxVrms, ChanI, IMult, MaxIrms, RepsI )
The DestAC parameter is variable array with a length of 7. Use option 1 for the ConfigAC. LineFrq is typically 50 or 60 Hz. ChanV is the single-ended terminal in which the potential transformer is connected. The VMult parameter is the potential transformer multiplier represented as input volts per output mV. A typical value is 115 V/333 mV (or 0.345345). The MaxVrms parameter is the expected maximum rms (root mean square) voltage to measure. The data logger uses VMult and MaxVrms to calculate which input range to use for the voltage measurement. ChanI is the single-ended terminal in which the potential transformer is connected. The calculation for the IMult parameter is in Section 7.3, Multiplier (p. 10). Refer to TABLE 7-2 for the MaxIrms. The data logger uses IMult and MaxIrms to calculate which input range to use for the current measurement.
NOTE

CS11 Current Transformer
8
7.2.2 Millivolt Burst Measurements Refer to Section 7.2.1, ACPower() Instruction (p. 7), if using a potential transformer. Refer to Section 7.2.3, CR300 Series (p. 9), or Section 7.2.4, CR200X Series (p. 9), if using these data loggers.
For most CRBasic data loggers, amperage can be monitored by making millivolt burst measurements then calculating rms. The millivolt burst measurements are made by using the VoltSE() instruction with multiple reps on the same channel (negative value for terminal number). The StdDevSpa() instruction calculates rms. Section 7.3, Multiplier (p. 10), provides information about calculating the multiplier that is applied to the rms value. TABLE 7-2 shows the maximum amperage for each data logger, depending on the range code in the VoltSE() instruction.
Program must be run in the pipeline mode on CRBasic data loggers.
When using these instructions, it is important to measure complete cycles. If 100 measurements are taken during a 0.1 second time period, the result will be five complete cycles for a 50 Hz waveform or six complete cycles for a 60 Hz waveform.
Do not average the waveform reading in the data table nor use the 60 Hz or 50 Hz noise rejection in the VoltSE() instructions in the program. Doing so would result in an incorrect zero amperage reading.
TABLE 7-2. Measurement Range, Maximum Amperage, and Amperage Resolution (one pass only)
VoltSE Voltage Range (mV)
Maximum Amps (MaxIrms)
Amperage Resolution
2.5 0.5 0.000133
5 1 0.000067
7.5 1.5 0.000400
10 2 0.000133
15 3 0.000200
20 4 0.000134
25 5 0.001334
50 10 0.000666
200 40 0.002660
250 50 0.013340
500 100 0.006660
1000 200 0.013320
NOTE
CAUTION

CS11 Current Transformer
9
TABLE 7-2. Measurement Range, Maximum Amperage, and Amperage Resolution (one pass only)
VoltSE Voltage Range (mV)
Maximum Amps (MaxIrms)
Amperage Resolution
2500 2001 0.1334001
5000 200 0.066600 1 The maximum amperage for the CR200(X)-series and CR300-series datalogger is 125.
7.2.3 CR300 Series With the CR300X-series dataloggers, the CRBasic program uses the ExciteV() instruction to create a positive reference output that the CR300-series dataloggers can measure. The CS11 is measured with the VoltSE() instruction with a range of mV2500, an integration of 4000, and an offset of –1250.
Do not average the waveform reading in the data table nor use the 60 Hz or 50 Hz noise rejection in the measurement instructions in the program. Doing so would result in an incorrect zero amperage reading.
7.2.4 CR200X Series The CR200X-series datalogger program uses an ExciteV() instruction to create a positive reference output that the CR200X-series can measure.
The recommended programming method for CR200X-series dataloggers (where the scan interval is limited to once per second) is to place the VoltSE() instruction within a loop. A 25-sample loop produces almost two cycles of a 60 Hz waveform, and a 30-sample loop produces almost two cycles of a 50 Hz waveform (FIGURE 7-3). The average energy under the curve is calculated using the RMSSpa() instruction. Section 7.3, Multiplier (p. 10), provides information about calculating the multiplier that is applied to the rms value.
CAUTION

CS11 Current Transformer
10
25 Samples of Amperage on CR200X Datalogger (60 Hz) or 30 Samples of Amperage on CR200X Datalogger (50 Hz)
25 samples of Amperage on CR200 datalogger
-80 -60 -40 -20
0 20 40 60 80
1 3 5 7 9 11 13 15 17 19 21 23 25
Instanteneous Amps
mV CS11-L waveform
FIGURE 7-3. Graph of a CS11 waveform
7.3 Multiplier Use Equation 1 to calculate the multiplier that is applied to the RMS value.
m = C • n2/n1 • (1/R) • (1 V/1000 mV) Equation 1
Where, C = a correction constant
If a correction constant of 1 is assumed, then the equation can be solved from the above information.
m = 1 • 2000/1 • (1/10) • (1/1000) = 0.2 multiplier

A-1
Appendix A. Importing Short Cut Code Into CRBasic Editor
This tutorial shows:
• Importing a Short Cut program into a program editor for additional refinement
• Importing a wiring diagram from Short Cut into the comments of a custom program
Short Cut creates files, which can be imported into CRBasic Editor. Assuming defaults were used when Short Cut was installed, these files reside in the C:\campbellsci\SCWin folder:
• .DEF (wiring and memory usage information) • .CR2 (CR200(X)-series datalogger code) • .CR300 (CR300-series datalogger code) • .CR6 (CR6-series datalogger code) • .CR8 (CR800-series datalogger code) • .CR1 (CR1000 datalogger code) • .CR1X (CR1000X-series datalogger code) • .CR3 (CR3000 datalogger code) • .CR5 (CR5000 datalogger code)
Import Short Cut code and wiring diagram into CRBasic Editor:
1. Create the Short Cut program following the procedure in Section 4, QuickStart (p. 1). Finish the program. On the Advanced tab, click the CRBasic Editor button. The program opens in CRBasic with the name noname.CR_. Provide a name and save the program.
Once the file is edited with CRBasic Editor, Short Cut can no longer be used to edit the program it created.
2. The program can now be edited, saved, and sent to the data logger.
3. Import wiring information to the program by opening the associated .DEF file. By default, it is saved in the c:\campbellsci\SCWin folder. Copy and paste the section beginning with heading “–Wiring for CRXXX–” into the CRBasic program, usually at the head of the file. After pasting, edit the information such that an apostrophe (') begins each line. This character instructs the data logger compiler to ignore the line when compiling. You can highlight several lines of CRBasic code then right-click and select Comment Block. (This feature is demonstrated at about 5:10 in the CRBasic | Features video.)
NOTE

B-1
Appendix B. Example Programs
B.1 ACPower() Example This program uses a potential transformer and the ACPower() instruction. Although this is a CR1000X program, other data loggers are programmed similarly. TABLE B-1 provides wiring for the program.
TABLE B-1. Wiring for ACPower Example
CS11 Wire Color Function CR1000X
Potential Transformer Signal SE1 Potential Transformer Reference ⏚ (analog ground)
White CS11 Signal SE2 Black CS11 Signal Reference ⏚ (analog ground) Red CS11 Ground ⏚ (analog ground)
Clear CS11 Shield ⏚ (analog ground)
CRBasic Example B-1. CR1000X Program Using ACPower Instruction
'CR1000X Series Datalogger 'CS11_with_ACPower_Instruction.CR1 PipeLineMode 'must be pipeline mode Public Batt_volt Public Array1(7) Alias Array1(1) = Real_Power Alias Array1(2) = Frequency Alias Array1(3) = Voltage Alias Array1(4) = Amperage Alias Array1(5) = Phase_Angle Alias Array1(6) = V_Harm_Ratio Alias Array1(7) = I_Harm_Ratio PreserveVariables 'to store values between power cycles DataTable (AmpTable,True,-1) DataInterval (0,1,Min,10) Totalize (1,Real_Power,IEEE4,False) Average (1,Frequency,FP2,False) Average (1,Voltage,FP2,False) Average (1,Amperage,FP2,False) Maximum (1,Phase_Angle,FP2,False,False) Maximum (1,V_Harm_Ratio,FP2,False,False) Maximum (1,I_Harm_Ratio,FP2,False,False) EndTable BeginProg Scan (500,mSec,0,0) Battery (Batt_volt) '0.2 multiplier for the CS11 (200Amps/1000mV=0.2) ACPower (Array1(),1,60,1,0.345345,120,2,.2,200,1) CallTable (AmpTable) NextScan EndProg

Appendix B. Example Programs
B-2
B.2 Millivolt Burst Measurement and Multiplexer Sample Program
This program uses the CR1000X and an AM16/32-series multiplexer to read 32 CS11 Current Transformers. Although this program is for the CR1000X, other data loggers are programmed similarly. TABLE B-2 provides wiring for the program.
TABLE B-2. Wiring for Multiplexer Example
CR1000X AM16/32B (2x32 mode) CS11 12V 12V G G C4 RES C5 CLK
⏚ (signal ground) COM ODD H
SE2 COM ODD L
⏚ COM
High Channels 1H – 24H White Low Channels 1L – 24L Black Red, Clear
CRBasic Example B-2. CR1000X Program Reading 32 CS11 Current Transformers
'CR1000X program to measure rms current PipeLineMode 'must be pipeline mode Const num_samples = 100 '6 waveforms for 60 Hz, 5 waveforms for 50 Hz Const NumSensors=32 'Number of Sensors on the Mux MUX in 2X32 Mode ***** 'Sensor wired to Low on each of the 32 channels. 'Odd Low on Mux wired to SE2 on data logger Public Amps(NumSensors) 'the line current Public i, Batt_Volt Public Amp_mult Dim i_sig (num_samples) 'to hold the burst measurements, each 100 samples long PreserveVariables 'to store values between power cycles DataTable (AmpTable,True,-1) DataInterval (0,1,Min,10) Maximum (NumSensors,Amps,IEEE4,False,False) Average (NumSensors,Amps,FP2,False) EndTable BeginProg Amp_mult = 0.2 '0.2 multiplier for the CS11 Scan (10,Sec,0,0) Battery (Batt_volt) 'Turn AM16/32 Multiplexer On PortSet(C4,1) i=0 SubScan(0,uSec,NumSensors) 'Switch to next AM16/32 Multiplexer Channel PulsePort(C5,10000) i=i+1 VoltSe (i_sig (1), num_samples,mV5000,-2, True, 1000, 0, 1.0, 0)
Appendix B. Example Programs
B-3
StdDevSpa (Amps(i), num_samples, i_sig (1)) Amps(i) = Amps(i) * Amp_mult 'put in amps If Amps(i) <= 0.15 Then Amps(i) = 0 NextSubScan 'Turn AM16/32 Multiplexer Off PortSet(C4,0) CallTable (AmpTable) NextScan EndProg
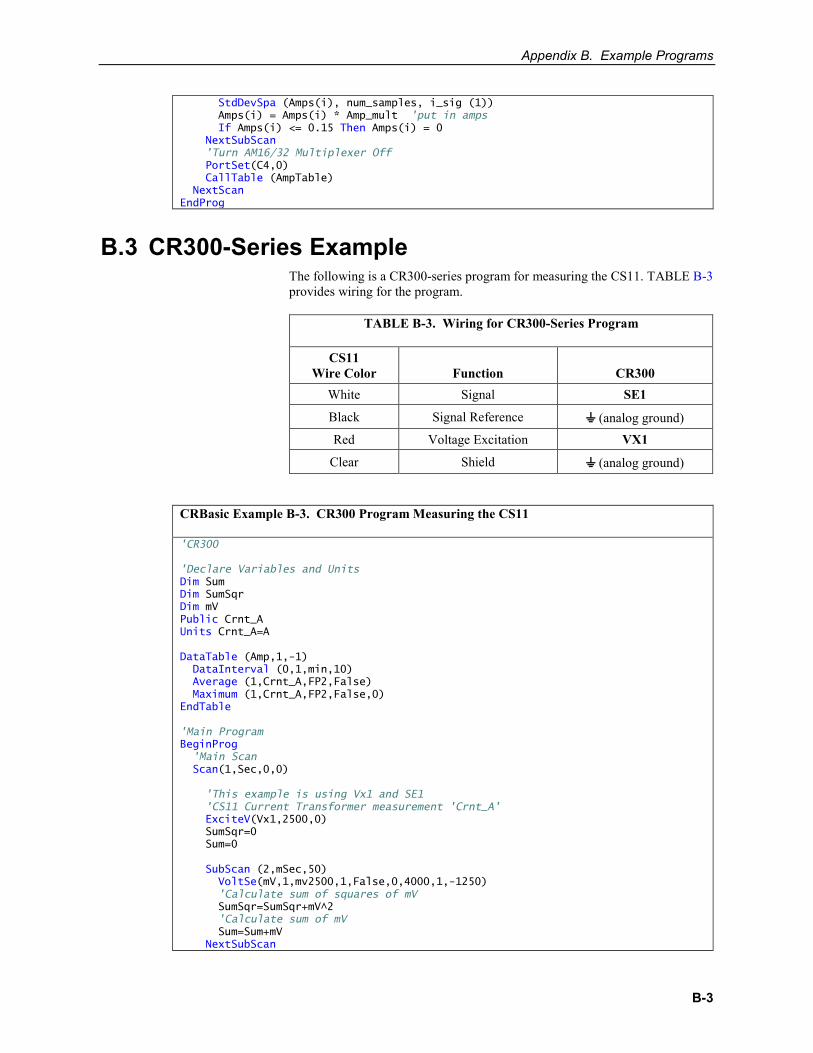
B.3 CR300-Series Example The following is a CR300-series program for measuring the CS11. TABLE B-3 provides wiring for the program.
TABLE B-3. Wiring for CR300-Series Program
CS11 Wire Color Function CR300
White Signal SE1
Black Signal Reference ⏚ (analog ground) Red Voltage Excitation VX1
Clear Shield ⏚ (analog ground)
CRBasic Example B-3. CR300 Program Measuring the CS11
'CR300 'Declare Variables and Units Dim Sum Dim SumSqr Dim mV Public Crnt_A Units Crnt_A=A DataTable (Amp,1,-1) DataInterval (0,1,min,10) Average (1,Crnt_A,FP2,False) Maximum (1,Crnt_A,FP2,False,0) EndTable 'Main Program BeginProg 'Main Scan Scan(1,Sec,0,0) 'This example is using Vx1 and SE1 'CS11 Current Transformer measurement 'Crnt_A' ExciteV(Vx1,2500,0) SumSqr=0 Sum=0 SubScan (2,mSec,50) VoltSe(mV,1,mv2500,1,False,0,4000,1,-1250) 'Calculate sum of squares of mV SumSqr=SumSqr+mV^2 'Calculate sum of mV Sum=Sum+mV NextSubScan

Appendix B. Example Programs
B-4
ExciteV(Vx1,0,0) 'Calculate standard deviation and scale measurement Crnt_A=SQR((SumSqr-(Sum^2/50))/50)*0.2 'Filter out low end noise when amperage is near zero If Crnt_A<0.2 Then Crnt_A=0 CallTable (Amp) NextScan EndProg
B.4 CR200(X)-Series Example The following is a CR200(X)-series program for measuring the CS11. TABLE B-4 provides wiring for the program.
TABLE B-4. Wiring for CR300-Series Program
CS11 Wire Color Function CR300
White Signal SE1
Black Signal Reference ⏚ (analog ground) Red Voltage Excitation VX1
Clear Shield ⏚ (analog ground)
CRBasic Example B-4. CR200(X) Program to Measure the CS11
'CR200 Series Datalogger 'Program name: CS11Manual60Hz.cr2 Const Samples = 25 '25 samples for 2 waves of 60 Hz 'Const Samples = 30 '30 samples for 2 waves of 50 Hz Public Crnt_A Public mV(Samples) Dim Counter DataTable (Amp,1,-1) DataInterval (0,1,min) Average (1,Crnt_A,False) Maximum (1,Crnt_A,False,0) EndTable BeginProg Scan (1,Sec) ExciteV (Ex1,mV2500) For Counter = 1 To Samples VoltSe (mV(Counter),1,1,1.0,-1250) Next ExciteV (Ex1,mV0) RMSSpa (Crnt_A,(Samples-0),mV(1)) Crnt_A=Crnt_A*0.2 'Multiplier for sensor If Crnt_A<0.15 Then 'Eliminate noise below 0.15 amps. Crnt_A = 0 EndIf CallTable Amp NextScan EndProg

C-1
Appendix C. Theory of Operation
C.1 Typical Electrical Circuit An example of a typical electrical circuit is a generator that provides energy in the form of a 60 Hz sine wave. The energy is carried from the point of generation to the point of consumption via two wires. The generator creates an electrical load that lights up the light bulb (see FIGURE C-1).
FIGURE C-1. Generator schematic
To determine the consumption (amps) of the load, a way is needed to measure what is passing through the wires.
A sensor is added to the circuit to measure the amperage going through the circuit (see FIGURE C-2 through FIGURE C-4). This sensor is called a CT or Current Transformer. The CS11 is a current transformer.
FIGURE C-2. Schematic of generator with current transformer

Appendix C. Theory of Operation
C-2
FIGURE C-3. Schematic of current transformer with the AC wire
FIGURE C-4. CS11 with the AC wire
C.2 Current Transformer Description A current transformer is a special kind of transformer that transfers energy from one side to another through magnetic fluxes (see FIGURE C-5).
FIGURE C-5. Magnetic flux schematic

Appendix C. Theory of Operation
C-3
The formula for a transformer is as follows (Equation A):
i1 • n1 = i2 • n2 Equation A
Where i = amps and n = number of turns or windings
And where n1 is the primary winding and n2 is the secondary
With the current transformer, the primary coils or windings are minimized to avoid removing power out of the circuit, but still have a signal large enough to measure (see FIGURE C-6).
FIGURE C-6. Windings schematic
A small amount of current is transferred to the secondary coil.
Find the current induced on the secondary windings by solving for i2:
i2 = i1 • n1/n2 Equation B
For example: The CS11 current transducer has an n2 value of 2000 windings. If 20 amps pass through the primary winding, the following amperage is produced on the secondary winding:
i2 = 20 • (1/2000) = 0.01 amp on secondary winding
C.3 Converting a Milliamp Signal to a Millivolt Signal After the current is transformed from one level to another level, the amperage signal must be converted to a voltage signal so that the data logger can measure it.
Use Ohm’s Law (Equation C) to convert amperage to voltage:
E = I • R (E = Volts, I = Amps, R = Ohms) Equation C
For example: Using the previous example:
E = 0.01 amps • R

Appendix C. Theory of Operation
C-4
The CS11 contains a 10-ohm burden (shunt) resistor (R=10 ohm). Therefore, E is:
E = 0.01 amps • 10 ohms = 0.1 volts (or 100 mV)
From these calculations, it can be determined if a better resolution on the measurement is needed. The Range Code can be lowered to 250 mV for some data loggers.
C.4 Using a CR300-Series or CR200(X)-Series Datalogger
The CS11 consists of a CR Magnetic’s CR8459 Current Transducer with a 10-ohm burden resistor incorporated into its cable. The resistor allows most of our data loggers to measure it.
The voltage range of the CR300-series and CR200X-series dataloggers require a voltage excitation to shift the measurement range (see FIGURE C-7 and FIGURE C-8).
FIGURE C-7. Adding 1250 mV creates positive output
FIGURE C-8. CS11 measurement range

Appendix C. Theory of Operation
C-5
C.5 Multiple AC-Wire Passes Through the CS11 You can pass the AC wire multiple times through the CS11 to amplify the amperage signal of the AC wire (FIGURE C-9). However, the data logger program needs a different multiplier and the VoltSE() instruction needs a different measurement range (TABLE C-1).
TABLE C-1. Passes, Multiplier, and Voltage Range
Passes Multiplier VoltSE
Voltage Range
2 0.1 x2 4 0.05 x4 5 0.04 x5 8 0.025 x8
10 0.02 x10 20 0.01 x20
FIGURE C-9. CS11 with the AC wire making two passes through the CS11

Campbell Scientific Worldwide Offices
Australia Location: Garbutt, QLD Australia Email: [email protected]
Website: www.campbellsci.com.au
Germany Location: Bremen, Germany Email: [email protected]
Website: www.campbellsci.de
Brazil Location: São Paulo, SP Brazil
Email: [email protected] Website: www.campbellsci.com.br
South Africa Location: Stellenbosch, South Africa
Email: [email protected] Website: www.campbellscientific.co.za
Canada Location: Edmonton, AB Canada
Email: [email protected] Website: www.campbellsci.ca
Southeast Asia Location: Bangkok, Thailand Email: [email protected]
Website: www.campbellsci.asia
China Location: Beijing, P. R. China
Email: [email protected] Website: www.campbellsci.com.cn
Spain Location: Barcelona, Spain Email: [email protected]
Website: www.campbellsci.es
Costa Rica Location: San José, Costa Rica
Email: [email protected] Website: www.campbellsci.cc
UK Location: Shepshed, Loughborough, UK
Email: [email protected] Website: www.campbellsci.co.uk
France Location: Antony, France
Email: [email protected] Website: www.campbellsci.fr
USA Location: Logan, UT USA
Email: [email protected] Website: www.campbellsci.com
Please visit www.campbellsci.com/contact to obtain contact information for your local US or international representative.