cscope curriculum developer directions
TRANSCRIPT

GPISD Technology Training Manual Page 1of 14
CSCOPE Curriculum Developer

CSCOPE Curriculum Developer Directions
Web Address: http://gpisd.nerdeveloper.net
Login: Employees will login with the first part of their email address. For example, john.doe from [email protected] . The first time you login, your password will be gpisd. It will prompt you to create your own password, and you will continue to use the new password you created for future access. For security reasons, please do not use gpisd. If your name is not in the system, please contact your principal.
Curriculum Elements: a dropdown menu containing the curriculum areas.
Home: Click on the Home icon to return to the homepage.
Quick Search: The Quick Search icon will allow you to search the Developer in a number of ways.
Tech Support: Tech Support is an area that you can send the Curriculum Developer technical support staff a message with technical questions. Curriculum questions cannot be addressed in this area.
Unit Maps:
Under Curriculum Elements, choose Unit Maps. Unit Maps have yellow backgrounds while lesson plans have white backgrounds.
GPISD Technology Training Manual Page 2of 14

Search by Grade, Subject, and Course, if applicable. High school teaches will search for Unit Maps by choosing HS instead of by grade level. Grade level searches on the high school level will not produce Unit Maps for many subject areas.
You will see a list of Unit Maps after your search.
Click on the Unit Map you wish to view. You can always go back to the list of Unit Maps by clicking on View Map.
GPISD Technology Training Manual Page 3of 14

After clicking on the unit, the following page will appear. It will show Concepts and Key Understandings. These are the overarching ideas or generalizations that could apply to all grade levels or all subject areas. These are the central focus of the lesson and are non-negotiable. Notice the numbers beside the concepts. The numbers will be used throughout the Unit Map to refer back to the Concepts and Key Understandings.
Click on Select Unit Elements.
GPISD Technology Training Manual Page 4of 14
We sill access the different elements of the Unit Map by clicking on Select Unit Elements. A dropdown menu will appear showing the various parts of the plan.

Some of the menu items within the Unit Elements include:
Guiding Questions: These are designed to be prompts and intellectual probes. Some questions may have: C: conceptual P: philosophical F: factual. Some of the questions will have the numbers of the concepts beside them.
For example, 003EL11 is third grade, ELA, TEK11. On TAKS tested grades, there will be a flashing red that designates the TEK could be included on the TAKS test. The TAKS indicators are in bold red font.
Student Performance Indicators: Not every lesson will have a performance indicator; however, all the lessons together will meet the performances. Performance is the way we have evidence of learning. It is not a test or quiz. It’s a concrete piece of work. These can be flexible based on teacher preference; however, be careful to create student performance indicators that are written at the same Bloom’s Taxonomy level as the student performance indicator in the unit. The performance indicators are written to correspond with TAKS. Sequence of Lessons: An effective sequence of activities represents the best sequence and flow of instruction and should include a motivating element, supportive elements, and a culminating element. The sequence of activities should lead the students systematically from where they are to the desired learning. The activities serve as the ultimate guide for the experiences necessary to attain specific knowledge and skills identified in the TEKS. They must be intentional, carefully planned, and executed. The lesson activities are flexible. Teachers can choose to use the lessons in the unit, or they can create their own. If you use the lesson activities in the Developer, you will not want to change the sequence of the lessons; however, you can change the pacing of the lessons to meet your students’ needs. The sequence number will determine the order in which the activities appear in your lesson.
The Lesson Framework: The attachments are activities that support the lesson. The “Lesson Framework” attachment in each of the lessons will give you step-by-step details for the lessons. Instructional procedures are listed including background information, teacher talk, equipment, safety concerns, and more. The lesson framework includes the Five Es: Engagement, Exploration, Explanation, Elaboration, and Evaluation.
GPISD Technology Training Manual Page 5of 14

The Five Es Instructional Model: (http://www.miamisci.org/ph/lpintro5e.html)
Engage: The Engage lesson should be designed to “hook” the student or engage them in the learning. It provides a focus. In this stage, students make connections between past and present learning experiences.
Explore: In the Exploration stage the students have the opportunity to get directly involved with the lesson and materials. As they work together in teams, students build a base of common experience that assists them in the process of sharing and communicating.
Explain. The third stage, Explain, is the point at which the learner begins to put the abstract experience through which she/he has gone into a communicable form. Created works such as writing, drawing, video, or tape recordings are communications that provide recorded evidence of the learner's development, progress and growth.
Elaborate: In stage four, Elaborate, the students expand on the concepts they have learned, make connections to other related concepts, and apply their understandings to the world around them. Evaluate: The Evaluation stage is an on-going diagnostic process that allows the teacher to determine if the learner has attained understanding of the concepts, knowledge, and skills. Evaluation and assessment can occur throughout the instructional process.
Critical Content – The students will know: The “Critical Content” is what the students will know after completing the lesson. This is a non-negotiable part of the Unit Plan.
Key Skills and Processes: The “Key Skills and Processes” are what the students will be able to do after completing the unit.
Required Resources/Materials for Teachers and Students: Everything you will need for the lesson will be listed here. Web addresses will be included and updated regularly.
Teacher Instructional Vocabulary: The instructional vocabulary will provide a common language between all teachers and students across grade levels and subject areas.
Attachments: The attachments may be lesson frameworks, handouts, rubrics, worksheets, graphic organizers, and more. The attachments are listed here and under the “Lesson Activities.”
Unit Misconceptions: Unit misconceptions will be a broad overview of the unit and identify any misconceptions the teachers may or may not have regarding the teaching of the units.
Unit Webcast Links: Webcasts are online tutorials/lessons/resources that will support the teacher in teaching the unit.
Unit Benchmark Assessment Links:
Printing the Entire Unit Map: To print the entire Unit Map, click on the printer icon next to “Options.”
Collaborative Feedback: Provide the Collaborative with feedback on the curriculum by clicking on the “Collaborative Feedback” icon.
GPISD Technology Training Manual Page 6of 14
Lesson Plans:
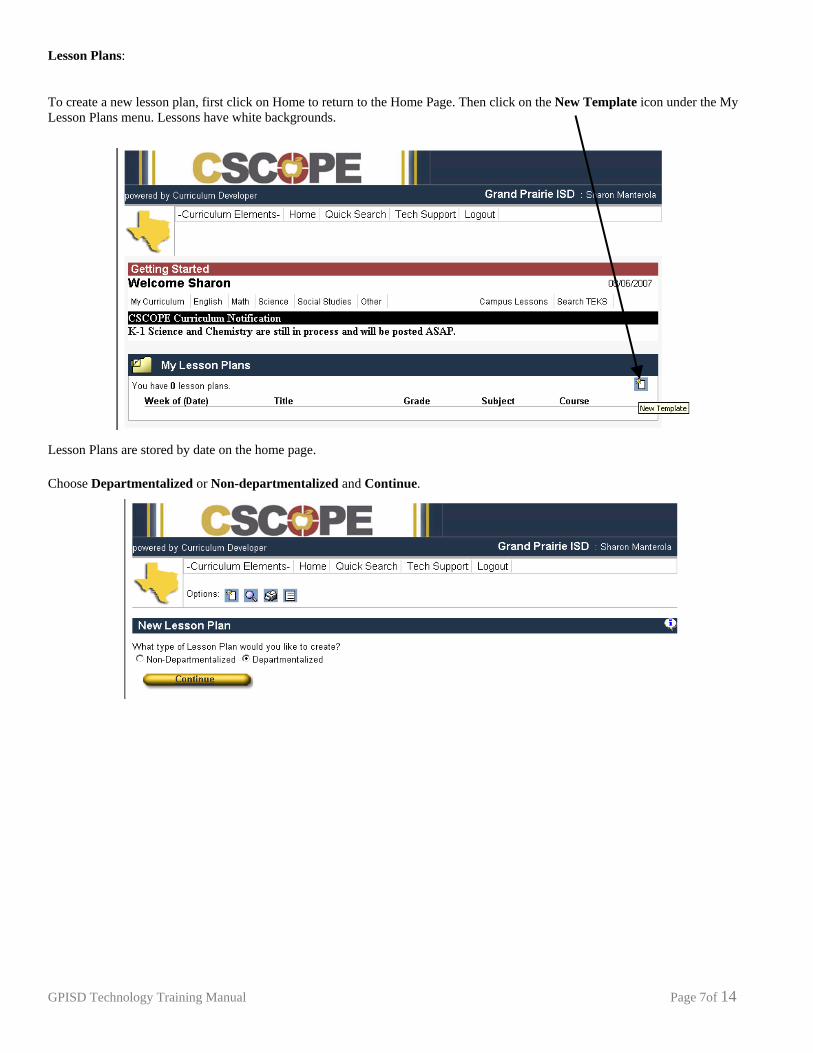
To create a new lesson plan, first click on Home to return to the Home Page. Then click on the New Template icon under the My Lesson Plans menu. Lessons have white backgrounds.
Lesson Plans are stored by date on the home page. Choose Departmentalized or Non-departmentalized and Continue.
GPISD Technology Training Manual Page 7of 14
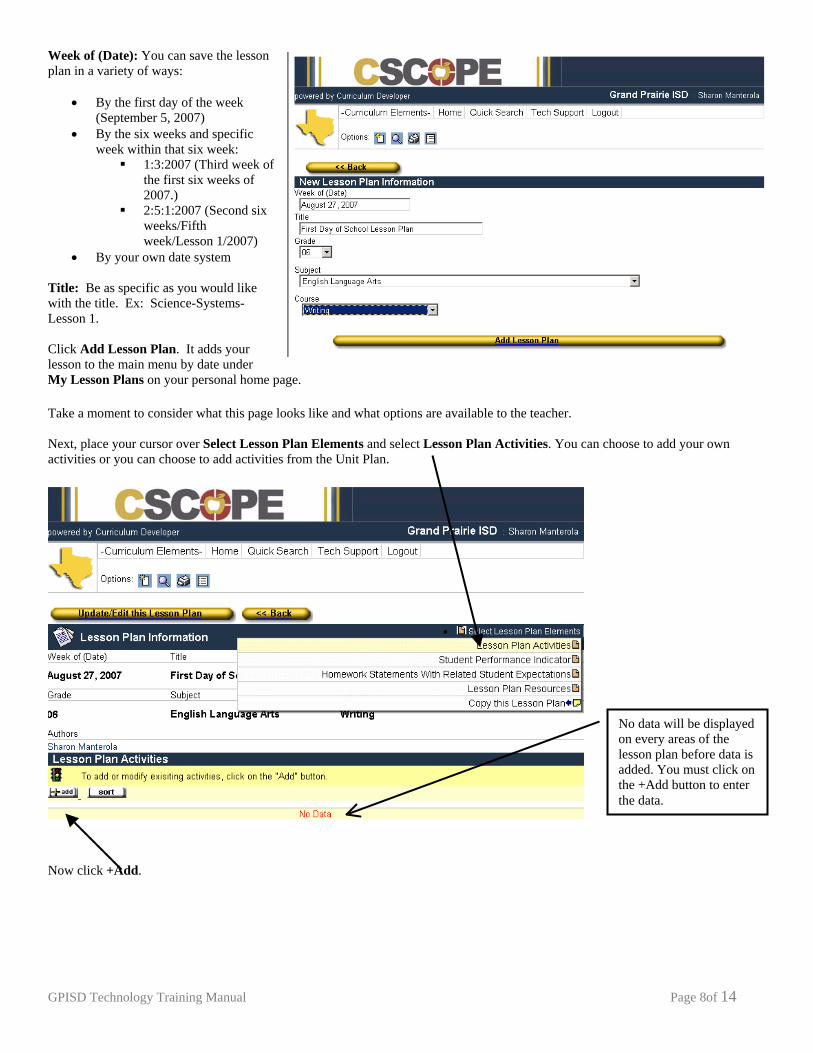
Week of (Date): You can save the lesson plan in a variety of ways:
GPISD Technology Training Manual Page 8of 14
• By the first day of the week
(September 5, 2007) • By the six weeks and specific
week within that six week: 1:3:2007 (Third week of
the first six weeks of 2007.)
2:5:1:2007 (Second six weeks/Fifth week/Lesson 1/2007)
• By your own date system Title: Be as specific as you would like with the title. Ex: Science-Systems-Lesson 1. Click Add Lesson Plan. It adds your lesson to the main menu by date under My Lesson Plans on your personal home page. Take a moment to consider what this page looks like and what options are available to the teacher. Next, place your cursor over Select Lesson Plan Elements and select Lesson Plan Activities. You can choose to add your own activities or you can choose to add activities from the Unit Plan.
No data will be displayed on every areas of the lesson plan before data is added. You must click on the +Add button to enter the data.
Now click +Add.

Note that any existing data is displayed at the bottom of your screen at this point.
GPISD Technology Training Manual Page 9of 14

Pulling Lesson Activities from the Unit Plan: When you click on the Unit to pull in lesson activities, it will look like the window below. Select the Lessons you want to add by clicking in the Select box. Then click on Add Selected Lesson.
Check the Lessons you want to include in your lesson plan. The sequence number is the order the activities will be taught. The sequence number is added automatically as you select the activities.
GPISD Technology Training Manual Page 10of 14
Scroll down to Add Selected Lesson and click the icon to add the lesson to your home menu.
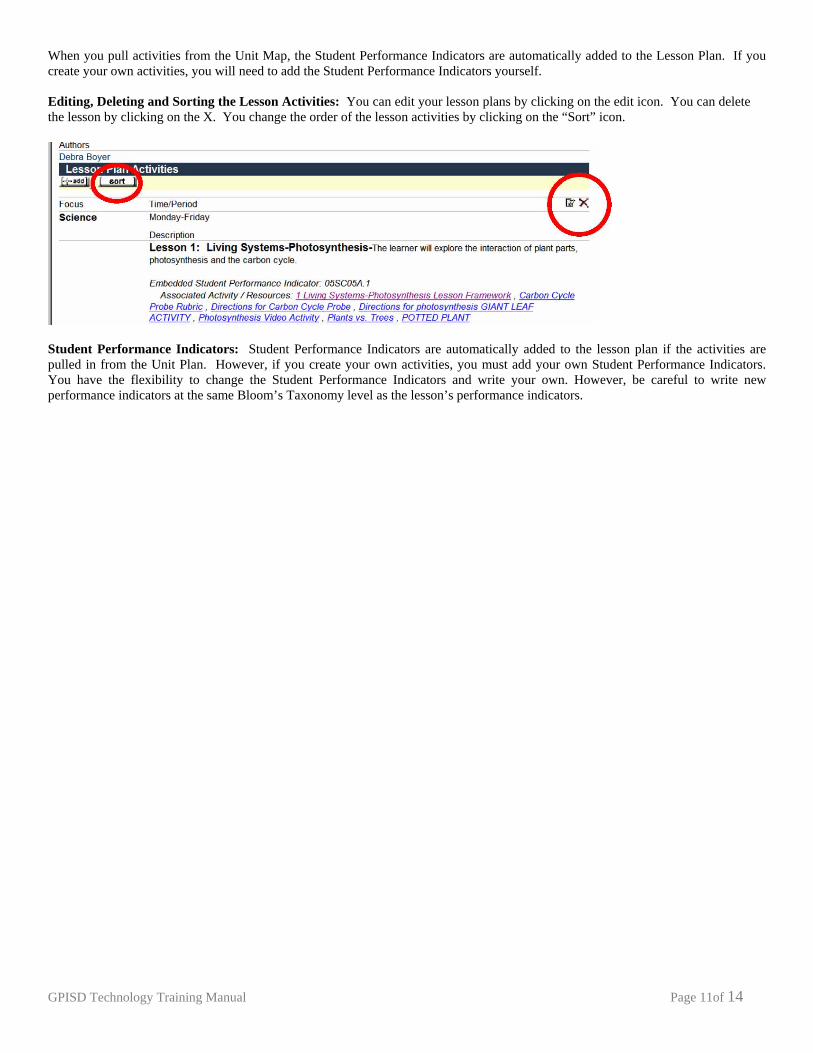
When you pull activities from the Unit Map, the Student Performance Indicators are automatically added to the Lesson Plan. If you create your own activities, you will need to add the Student Performance Indicators yourself.
Editing, Deleting and Sorting the Lesson Activities: You can edit your lesson plans by clicking on the edit icon. You can delete the lesson by clicking on the X. You change the order of the lesson activities by clicking on the “Sort” icon.
Student Performance Indicators: Student Performance Indicators are automatically added to the lesson plan if the activities are pulled in from the Unit Plan. However, if you create your own activities, you must add your own Student Performance Indicators. You have the flexibility to change the Student Performance Indicators and write your own. However, be careful to write new performance indicators at the same Bloom’s Taxonomy level as the lesson’s performance indicators.
GPISD Technology Training Manual Page 11of 14

Lesson Plan Resources: You can add your own resources, web page addresses, etc. here.
Copy This Lesson Plan: You can use the “Copy This Lesson Plan” feature to share a copy of your lesson plan with another
teacher.
Printing Lesson Plans: To print the entire Lesson Plan, click on the printer icon beside the “Options” icon.
GPISD Technology Training Manual Page 12of 14

Campus Lessons: You can search for lessons from other campuses by clicking on “Select Campus.”
The campuses are numbered as: CHS 001 LV 105 RHS 002 AR 106 CJHS 041 CV 107 WPJH 043 RH 108 GH 101 GIS 110 SL 104 CIS 111 Archiving or Deleting Lessons: From the homepage, click on a lesson plan you want to archive or delete. Click on the Update/Edit This Lesson Plan. The “Archive This Record” feature will let you keep old lesson plans but not delete them. They will not appear in your active set of lesson plans on the homepage.
GPISD Technology Training Manual Page 13of 14

Adding or Removing a Teacher as an Author of the Lesson Plan: You can add a new teacher as the author of the lesson plan. Anyone listed as an author can edit the plan or add to it. However, if the added teacher deletes the plan, then it will be deleted from all teachers’ plans. It is best to use the “Copy This Lesson Plan” feature under “Select Lesson Plan Elements.” You can remove a teacher from the plan by clicking the “Remove” square and then clicking on “Update Author Information.”
GPISD Technology Training Manual Page 14of 14