custom dressform from paper packing tape
DESCRIPTION
A useful dress makers form made on the cheapTRANSCRIPT

http://www.instructables.com/id/Custom-Dressform-from-Paper-Packing-Tape/
Home Sign Up! Explore Community Submit
All Art Craft Food Games Green Home Kids Life Music Offbeat Outdoors Pets Photo Ride Science Tech
Packing Tape Dressformby stijky on January 2, 2008
Table of Contents
License: Attribution Non-commercial Share Alike (by-nc-sa) . . . . . . . . . . . . . . . . . . . . . . . . . . . . . . . . . . . . . . . . . . . . . . . . . . . . . . . . . . . . . . . . . . . . . . . . . . . . . 2
Intro: Packing Tape Dressform . . . . . . . . . . . . . . . . . . . . . . . . . . . . . . . . . . . . . . . . . . . . . . . . . . . . . . . . . . . . . . . . . . . . . . . . . . . . . . . . . . . . . . . . . . . . . . . . . . . 2
step 1: What you need . . . . . . . . . . . . . . . . . . . . . . . . . . . . . . . . . . . . . . . . . . . . . . . . . . . . . . . . . . . . . . . . . . . . . . . . . . . . . . . . . . . . . . . . . . . . . . . . . . . . . . . . . 2
step 2: Cut the Dry Paper Tape . . . . . . . . . . . . . . . . . . . . . . . . . . . . . . . . . . . . . . . . . . . . . . . . . . . . . . . . . . . . . . . . . . . . . . . . . . . . . . . . . . . . . . . . . . . . . . . . . . 3
step 3: Tape the Torso . . . . . . . . . . . . . . . . . . . . . . . . . . . . . . . . . . . . . . . . . . . . . . . . . . . . . . . . . . . . . . . . . . . . . . . . . . . . . . . . . . . . . . . . . . . . . . . . . . . . . . . . . 3
step 4: Tips for Taping Shapes . . . . . . . . . . . . . . . . . . . . . . . . . . . . . . . . . . . . . . . . . . . . . . . . . . . . . . . . . . . . . . . . . . . . . . . . . . . . . . . . . . . . . . . . . . . . . . . . . . . 5
step 5: Draw Guidelines . . . . . . . . . . . . . . . . . . . . . . . . . . . . . . . . . . . . . . . . . . . . . . . . . . . . . . . . . . . . . . . . . . . . . . . . . . . . . . . . . . . . . . . . . . . . . . . . . . . . . . . . 7
step 6: Remove the shell . . . . . . . . . . . . . . . . . . . . . . . . . . . . . . . . . . . . . . . . . . . . . . . . . . . . . . . . . . . . . . . . . . . . . . . . . . . . . . . . . . . . . . . . . . . . . . . . . . . . . . . 8
step 7: Seal the back up, finish the edges . . . . . . . . . . . . . . . . . . . . . . . . . . . . . . . . . . . . . . . . . . . . . . . . . . . . . . . . . . . . . . . . . . . . . . . . . . . . . . . . . . . . . . . . . . . 9
step 8: Stuff the inside and or Decorate (Optional) . . . . . . . . . . . . . . . . . . . . . . . . . . . . . . . . . . . . . . . . . . . . . . . . . . . . . . . . . . . . . . . . . . . . . . . . . . . . . . . . . . . . 10
step 9: Mount the form onto a base . . . . . . . . . . . . . . . . . . . . . . . . . . . . . . . . . . . . . . . . . . . . . . . . . . . . . . . . . . . . . . . . . . . . . . . . . . . . . . . . . . . . . . . . . . . . . . . 10
Related Instructables . . . . . . . . . . . . . . . . . . . . . . . . . . . . . . . . . . . . . . . . . . . . . . . . . . . . . . . . . . . . . . . . . . . . . . . . . . . . . . . . . . . . . . . . . . . . . . . . . . . . . . . . . . . 12
Advertisements . . . . . . . . . . . . . . . . . . . . . . . . . . . . . . . . . . . . . . . . . . . . . . . . . . . . . . . . . . . . . . . . . . . . . . . . . . . . . . . . . . . . . . . . . . . . . . . . . . . . . . . . . . . . . . . 13
Comments . . . . . . . . . . . . . . . . . . . . . . . . . . . . . . . . . . . . . . . . . . . . . . . . . . . . . . . . . . . . . . . . . . . . . . . . . . . . . . . . . . . . . . . . . . . . . . . . . . . . . . . . . . . . . . . . . . . 13

http://www.instructables.com/id/Custom-Dressform-from-Paper-Packing-Tape/
License: Attribution Non-commercial Share Alike (by-nc-sa)
Intro: Packing Tape DressformMake a custom dressform, display mannequin, body double, cast, or a big pinata with some help and a little paper gum tape. You could also use this technique to makepaper casts of other body parts, objects, or people!
I got the basic directions and idea from here: http://www.taunton.com/threads/pages/t00002.aspBut since they didn't really go into that much detail, I've made an Instructable (my first! yippee!) since I was originally looking for one here anyway.
Making the dress form is pretty easy, and only took us about 2 hours to complete.
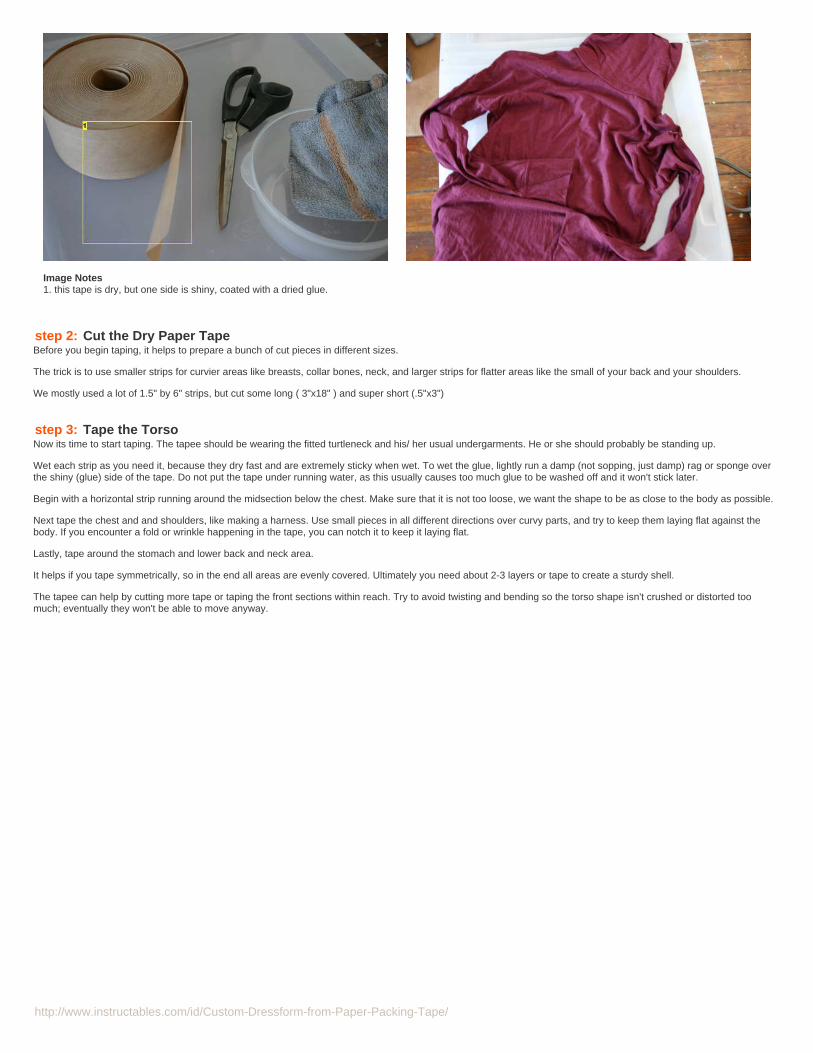
step 1: What you needYou will need:
- a roll of kraft paper gum tape (its the kind with dry glue on one side)I got mine relatively cheaply at Staples. To make my form (I am a size 4), we used less than half the roll, if you are larger, you will need a bit more tape.
If you can't find the paper tape, I think you can also use duct tape, but you will need a few rolls to make the layers stiffer since it is flexible. The beauty of using the papertape is that it shapes itself after drying like instant paper mache strips. And later on you can put pins through it without lots of sticky residue getting on your sewing pins.
- scissors (make sure they can cut through fabric)
- a rag or sponge to wet the tape, maybe a bowl to hold a little water (or just do it by the sink, and keep the rag damp)
- an old turtleneck or fitted t-shirt that you are willing to sacrifice to this projectThe shirt should be as close fitting as possible and not too thick or textured. Crew neck or turtleneck are ideal, and the length should not be too short. If you don't have aturtleneck or longer shirt, don't fret, it is easy to extend the length of the form to cover your hips and neck.
- hairdryer
- marker
- someone to help you
Optional:
- a hanger (to make a hanging dressform)
- old pillow or polyfil to stuff it when finished, or a bag of packing peanuts, packing foam or a few cans of spray foam (if you want to stuff/coat the inside for reinforcement-not necessary since it holds itself in shape but maybe it keeps the thing more durable)
- old lamp base, tripod or music stand (to make a standing dressform)
http://www.instructables.com/id/Custom-Dressform-from-Paper-Packing-Tape/
Image Notes1. this tape is dry, but one side is shiny, coated with a dried glue.
step 2: Cut the Dry Paper TapeBefore you begin taping, it helps to prepare a bunch of cut pieces in different sizes.
The trick is to use smaller strips for curvier areas like breasts, collar bones, neck, and larger strips for flatter areas like the small of your back and your shoulders.
We mostly used a lot of 1.5" by 6" strips, but cut some long ( 3"x18" ) and super short (.5"x3")
step 3: Tape the TorsoNow its time to start taping. The tapee should be wearing the fitted turtleneck and his/ her usual undergarments. He or she should probably be standing up.
Wet each strip as you need it, because they dry fast and are extremely sticky when wet. To wet the glue, lightly run a damp (not sopping, just damp) rag or sponge overthe shiny (glue) side of the tape. Do not put the tape under running water, as this usually causes too much glue to be washed off and it won't stick later.
Begin with a horizontal strip running around the midsection below the chest. Make sure that it is not too loose, we want the shape to be as close to the body as possible.
Next tape the chest and and shoulders, like making a harness. Use small pieces in all different directions over curvy parts, and try to keep them laying flat against thebody. If you encounter a fold or wrinkle happening in the tape, you can notch it to keep it laying flat.
Lastly, tape around the stomach and lower back and neck area.
It helps if you tape symmetrically, so in the end all areas are evenly covered. Ultimately you need about 2-3 layers or tape to create a sturdy shell.
The tapee can help by cutting more tape or taping the front sections within reach. Try to avoid twisting and bending so the torso shape isn't crushed or distorted toomuch; eventually they won't be able to move anyway.

http://www.instructables.com/id/Custom-Dressform-from-Paper-Packing-Tape/
Image Notes1. First tape around under the chest2. Second, tape the chest and shoulders
Image Notes1. weaving strips in different directions makes the shell stronger later

http://www.instructables.com/id/Custom-Dressform-from-Paper-Packing-Tape/
step 4: Tips for Taping ShapesI already mentioned about using short thin strips to cover rounded areas like the chest, some other areas you should watch out for are the dips by the collarbone, areabetween the shoulder blades in the back, around the waist (lovehandles?), and underarms to shoulders...
To keep the integrity of a depression area, push the tape into the valley part first, then smooth outward letting the edges of the strips fall where they may.
I used a V- shape pattern to tape the back between the shoulder blades.
If you notice an area tenting too much, don't be afriad to cut it off (just the tape, not the shirt) and re-tape that area with smaller pieces.
Having the tape overlap in all different directions will create a stronger contoured shell.
You might also want to create "spines" (such as a cross shape over the front and back) to support the entire structure more.
To create extensions (say, if you are using a crew neck shirt instead of a turtleneck) use a vertical strip, tape to the inside of the shirt with the sticky side out. Then fold itover onto itself so that the ends are sandwiching the shirt but the tape sticks out to the length you need the form to cover. Space these extension prongs a few inchesapart, and then tape them together using the same method (folding the tape over onto itself, but sandwiching the tape next to it).
Use a hair dryer to dry any pieces that are still wet.

http://www.instructables.com/id/Custom-Dressform-from-Paper-Packing-Tape/
Image Notes1. V-pattern weaving the strips over the shoulder blades
Image Notes1. tape small pieces in different directions over the chest and other curvedareas
Image Notes1. spines

http://www.instructables.com/id/Custom-Dressform-from-Paper-Packing-Tape/
Image Notes1. the bottom was extended beyond the shirt hem using folded strips of tape2. neck extension- I used strips spaced apart, with one strip horizontally toremember the diameter, then completed this area after the shell was removed toavoid being choked
step 5: Draw GuidelinesIf you are making a dress form for sewing, now is when you want to use a marker to draw your own waistline, hips-line, shoulder line, center line, etc on the form.
You can use a ribbon or string to measure the line.
Now is also a funny time to add tattoos.

http://www.instructables.com/id/Custom-Dressform-from-Paper-Packing-Tape/
Image Notes1. uh oh... this form is the holiday edition for my mom
step 6: Remove the shellUsing the scissors that can cut through fabric, carefully cut through the center of the back, vertically.You are cutting through the paper tape AND the shirt underneath (which is now a part of your dressform). Be careful not to cut the person or their undergarments byaccident.
They should be able to wiggle out of the shell without bending it too much. If you were using a long sleeved shirt it might help to get a third person to help pull the sleevesforward.

http://www.instructables.com/id/Custom-Dressform-from-Paper-Packing-Tape/
Image Notes1. We are using kitchen scissors, since this turtleneck was on the thicker side.
step 7: Seal the back up, finish the edgesUsing several short fat strips, carefully join the cut line together. If you want to avoid excessive tape buildup along the back, you can also seal from the inside.
NOTE: If you are making a hanging dressform using a rigid hanger, insert the hanger and affix it to the underside of the shoulders before sealing the back. The hanginghook sticks up through the neck hole.
After the split line is sealed, finish the bottom and neck edges by folding strips of tape over from the outside to the inside. You can trim the sleeves off and do the same tothose, or knot them and shove them inside the form.
Image Notes1. folding strips over the edge to reinforce and even out the bottom

http://www.instructables.com/id/Custom-Dressform-from-Paper-Packing-Tape/
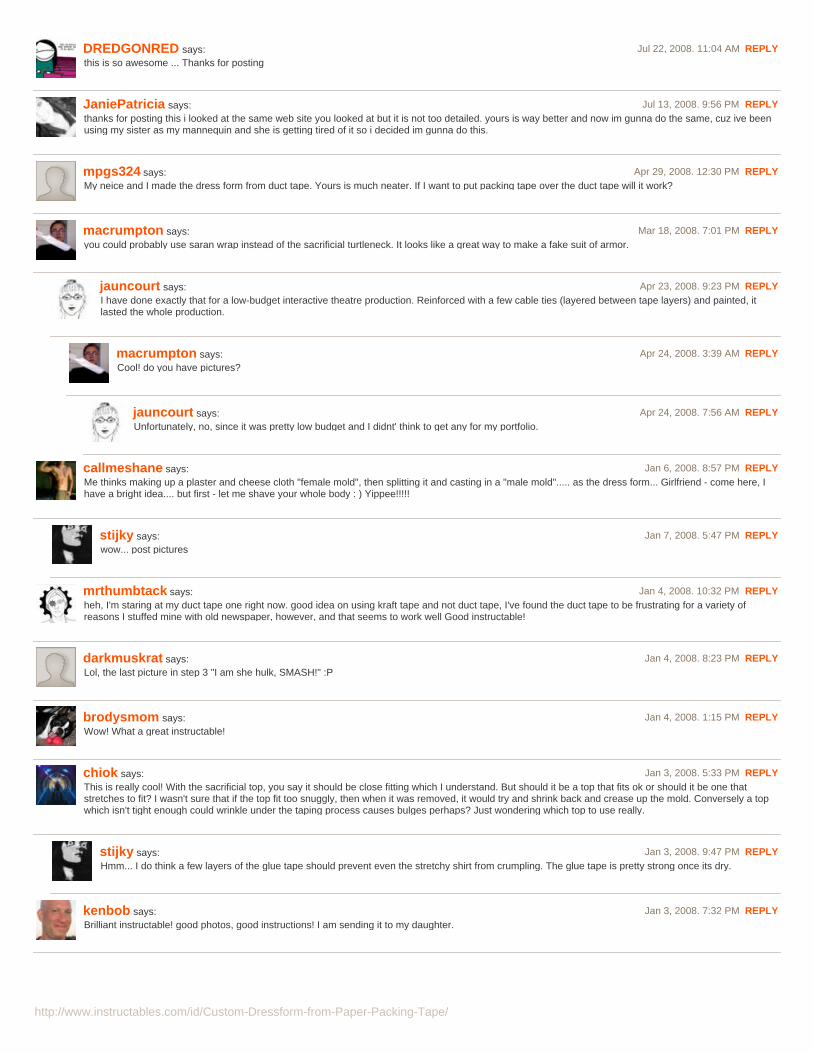
step 8: Stuff the inside and or Decorate (Optional)The form should be stiff enough to not collapse, but you can stuff the inside if you want to make it sturdier.
Things that should work include: packing peanuts (in a bag, unless you seal off the bottom and armholes, fill through the neck, then seal), polyfil, old pillows, packingfoam... see the next step for details on how I stuffed and mounted mine.
I am using a layer of insulation spray foam to coat about 1" on the inside (so pins will hold better). If you do this, just spray one section at a time, let it dry and set for a fewhours, then flip the form over and do the other section.
You could also shellac the outside if you wanted to seal it, or decoupage, collage, paint, spraypaint, whatever... its not necessary, but if you are using this as a displaymannequin decorating it could be really nice. I might decoupage some newspaper and lace onto mine.
Alternately you can stretch and attach a sweater/ knit shirt over the paper form to create a better surface for pinning fabric.
Image Notes1. this stuff takes about 24 hrs to dry completely
step 9: Mount the form onto a baseI am going to hang mine on a collapsible music stand, but you could permanently mount your dressform on an old lamp base, or music stand (probably easier toaccomplish if the inside is stuffed).
Or just hang it.
Or (if the bottom edge is straight enough) the form should be strong enough to stand upright by itself.
Tada! You have cloned yourself a double.

http://www.instructables.com/id/Custom-Dressform-from-Paper-Packing-Tape/
Image Notes1. This music stand is good to use because I can adjust the height.
Image Notes1. hanger is taped on the inside to the neck and the back of the shoulders. Wirehangers are good because you can bend them to fit the contour and width ofthe shoulders
http://www.instructables.com/id/Custom-Dressform-from-Paper-Packing-Tape/
Image Notes1. tape to seal off the neck2. after filling the upper section with styrofoam, tape that section horizontallyacross the inside3. styrofoam, packed in but not so tight it pushes the form out of shape. I usedstyrofoam so that pins will hold better. you could also use polyfil or cloth to stuffthis part. Alternately, stuff the outer-inner layer with the above materials, andfinish the core with crumpled newspaper4. old pillow stuffing, wrapped around the music stand5. music stand is wedged in but not permanently attached, this way I can still useit later for music...
Image Notes1. pasted a print on for decoration... its like my surrogate tattoo
Related Instructables
Headless Bridefrom Duct Tapeby ModMischief
Duct TapeDressform byMredria
'Carol' from'Where the wildthingsare'(Movie)Costume byaliking
Godzilla/T-RexCostume bycreatrope
How To Make AHeadless MarieAntoinetteHalloweenCostume byconnielim_2000
Makea Dress from aButton-DownShirt byemattrose
Lana's MarieAntoinette(slideshow) bykoalalana
How to Make aPapier MacheHead Puppet bytracy.workman

http://www.instructables.com/id/Custom-Dressform-from-Paper-Packing-Tape/
Advertisements
Comments34 comments Add Comment
stijky says: Jan 14, 2010. 3:28 PM REPLY Hey this exact method was in LIFE magazine on Jan 9, 1939! Check outPage 52 (from google books)
aliking says: Nov 9, 2009. 11:50 AM REPLYHey, wanted to thank you for this one. I've referrenced your Instructable in mine: http://www.instructables.com/id/Carol-from-Where-the-wild-things-areMovie-Co/
Ieatbabiez says: Sep 7, 2009. 11:26 AM REPLYThank you for posting this! It will help when I make clothing and will make for an interesting art project....:D
djenabab says: Aug 5, 2009. 12:14 AM REPLYI would like to do one of legs. I have a hosiery business and I think it would be fun to do one for legs with feet. Any suggestions? Victoria
Ieatbabiez says: Sep 7, 2009. 11:25 AM REPLYI would follow the same steps and use hose instead of the turtleneck....I hope I helped ;D
bootkidz says: Sep 5, 2009. 12:17 AM REPLYvery cost effective
jtmcdole says: Aug 26, 2009. 7:50 PM REPLYI know I'm a little late to the party on this, but I just wanted to say thanks for the refresher course! I saw this at the 2008 Dragon*Con in Atlanta (lots of greatcraft panels for costuming). I'm planning on doing just an upper torso and left arm for an armor project I've been working on, should help with patterns. Tip:Draw a straight line down the back and then draw some horizontal lines crossing it. Cut on the line and when you put it back together, align the horizontalmarks.
StrangeCupATea says: Aug 14, 2009. 11:38 AM REPLYThis is excellent! I'm starting to redesign second-hand clothing as a business and this is a perfect, solution for achieving a "standardized" sizing for mygarments! Thanks for you great guide!
stennett says: Jun 21, 2009. 11:16 AM REPLYI made one for my wife's lower torso (to make pants) using the black Gorilla tape as it's thicker and stiffer. The form still wasn't as stiff as we liked. Nor was itshaped or sized right...it was a bit big due to the thickness of the tape. To fix both these problems I filled it with the self-expanding foam you can get at thehardware store and then I removed the duct tape "mold". The duct tape came off perfect due to the tissue paper we had wrapped around her before we laiddown the duct tape. I then stuck a broom handle into it and mounted it to the ceiling. We then put two pairs of thick tights on it and voila!...a pant form that wedidn't have to spend $300 for. Probably around $40. If anyone wants pictures I can post them.
flashstick says: Mar 1, 2009. 4:16 PM REPLYThank you so much for posting this! It's going to save me about $129...
KendallM says: Jan 15, 2009. 1:06 AM REPLYThis seems REALLY awesome. I can't wait to try it. I may tape my husband first lol! I'll let you know how it goes!
finfan7 says: Oct 25, 2008. 11:49 PM REPLYThis would be a very interesting way to make stage armour. It also looks so much better than the old caranwrap and scotch tape, far smoother.
oddmuffin14 says: Aug 20, 2008. 1:46 PM REPLYReally great instructable. I'm sad I didn't find it last year; it would've made my school paper projects so much easier. But I'll definitely be using it in the future!
http://www.instructables.com/id/Custom-Dressform-from-Paper-Packing-Tape/
DREDGONRED says: Jul 22, 2008. 11:04 AM REPLYthis is so awesome ... Thanks for posting
JaniePatricia says: Jul 13, 2008. 9:56 PM REPLYthanks for posting this i looked at the same web site you looked at but it is not too detailed. yours is way better and now im gunna do the same, cuz ive beenusing my sister as my mannequin and she is getting tired of it so i decided im gunna do this.
mpgs324 says: Apr 29, 2008. 12:30 PM REPLYMy neice and I made the dress form from duct tape. Yours is much neater. If I want to put packing tape over the duct tape will it work?
macrumpton says: Mar 18, 2008. 7:01 PM REPLYyou could probably use saran wrap instead of the sacrificial turtleneck. It looks like a great way to make a fake suit of armor.
jauncourt says: Apr 23, 2008. 9:23 PM REPLYI have done exactly that for a low-budget interactive theatre production. Reinforced with a few cable ties (layered between tape layers) and painted, itlasted the whole production.
macrumpton says: Apr 24, 2008. 3:39 AM REPLYCool! do you have pictures?
jauncourt says: Apr 24, 2008. 7:56 AM REPLYUnfortunately, no, since it was pretty low budget and I didnt' think to get any for my portfolio.
callmeshane says: Jan 6, 2008. 8:57 PM REPLYMe thinks making up a plaster and cheese cloth "female mold", then splitting it and casting in a "male mold"..... as the dress form... Girlfriend - come here, Ihave a bright idea.... but first - let me shave your whole body : ) Yippee!!!!!
stijky says: Jan 7, 2008. 5:47 PM REPLYwow... post pictures
mrthumbtack says: Jan 4, 2008. 10:32 PM REPLYheh, I'm staring at my duct tape one right now. good idea on using kraft tape and not duct tape, I've found the duct tape to be frustrating for a variety ofreasons I stuffed mine with old newspaper, however, and that seems to work well Good instructable!
darkmuskrat says: Jan 4, 2008. 8:23 PM REPLYLol, the last picture in step 3 "I am she hulk, SMASH!" :P
brodysmom says: Jan 4, 2008. 1:15 PM REPLYWow! What a great instructable!
chiok says: Jan 3, 2008. 5:33 PM REPLYThis is really cool! With the sacrificial top, you say it should be close fitting which I understand. But should it be a top that fits ok or should it be one thatstretches to fit? I wasn't sure that if the top fit too snuggly, then when it was removed, it would try and shrink back and crease up the mold. Conversely a topwhich isn't tight enough could wrinkle under the taping process causes bulges perhaps? Just wondering which top to use really.
stijky says: Jan 3, 2008. 9:47 PM REPLYHmm... I do think a few layers of the glue tape should prevent even the stretchy shirt from crumpling. The glue tape is pretty strong once its dry.
kenbob says: Jan 3, 2008. 7:32 PM REPLYBrilliant instructable! good photos, good instructions! I am sending it to my daughter.

http://www.instructables.com/id/Custom-Dressform-from-Paper-Packing-Tape/
nagutron says: Jan 3, 2008. 10:28 AM REPLYNice Instructable! The photos are really clear. From your finished photo, it looks like the dress form is just a bit wider than you are. I wonder if it would makesense to take the thickness of the shell into account by cutting a narrow strip out of the back before you re-seal the form. About three times the thickness ofthe form (1/2"-1"?) should do it.
jessyratfink says: Jan 3, 2008. 1:21 PM REPLYMine was larger than me, too. I made one out of duct tape last year and it turned out quite bloated. I think I might try the packing tape, though. Duct tapejust wasn't stiff enough! I also used a very thin shirt, and it didn't hold up that well. Any pressure and the form crumpled. :P
stijky says: Jan 3, 2008. 11:22 AM REPLYThat is a really good idea. Like I said, its important that the shirt underneath is also as thin as possible and smooth. Also, If I did this again, I wouldremove the collar and bottom hem from the shirt before taping because they did create lumps (not sure if you can see that in the photo). One couldprobably also cut the form down the sides instead of the back center, shave 1/2" from each cut then reseal the two halves that way.
Myself says: Jan 5, 2008. 7:27 AM REPLYOr you could use this form as a negative mold, because the inside is where it's most accurate, and cast a positive shape inside it. Wrapping thevictim in plastic wrap, then applying the tape over that, would leave a smoother layer inside that the fill material might release easily from. For fillmaterial, I'm picturing a concretion using expanding foam insulation as binder and packing peanuts as aggregate to contribute bulk. Maybe entireplastic bottles or something could be used up the middle to fill the central volumes. Cardboard tube from the center of a carpet roll, perhaps? (It'sapproximately neck-sized and would make a nifty core!) That's obviously the subject of a separate instructable, but it would be hilarious to use asingle mold to make a bunch of clones. :) Leave one in your cubicle at work and see how long it takes anyone to notice...
Kiteman says: Jan 3, 2008. 11:45 AM REPLYA really excellent first Instructable!
The photos and directions are clear and accessible enough that even a sewing numpty like myself is tempted to have a go.
I think this would make an excellent replacement for the breastplate of my superhero costume - roll on next Hallowe'en!
(almost forgot: +)
GorillazMiko says: Jan 2, 2008. 4:46 PM REPLYAt first I didn't know what this was..but then I was like ohhhhhhhhhh! Hahahah. Good Instructable, good pictures. :-)