d-302887 rev 0 powermaxcomplete partition ii quick guide · pdf filethe system configuration...
TRANSCRIPT

D-302887 1
PowerMaxComplete Panel Fully Supervised Wireless Alarm Control System Quick Guide
1. INTRODUCTION
Welcome to PowerMaxComplete wireless alarm system. This guide provides step by step information that will help you to easily install and run the system and to perform basic configuration changes.
The system configuration is shown in figure 1.
KEYFOBTRANSMITTER
UP TO 8WIRELESSREMOTE
COMMANDERS
EMERGENCYPENDANT
TRANSMITTERS
WIRELESSDETECTORS
(UP TO 28 UNITS)INSTALLED IN
THE PROTECTEDPREMISES
SMOKEDETECTOR
UNIVERSALPERIMETER
PROTECTIONDETECTOR
DOOR ORWINDOW
OPEN/CLOSEDETECTOR
MOTIONDETECTOR
FLOODDETECTOR
LOCALCOMPUTER
(OPTION)
HARD WIREDDETECTOR
CO / GASDETECTOR
CENTRAL MONITORINGSTATIONS
PUBLICTELEPHONEEXCHANGE
4 PRIVATETELE-
PHONES
TEL. LINE
USERCOMPUTER
2-WAY KEYFOBTRANSMITTER
A COMBINATION OF UP TO 8
INTERNET
ROUTER
TEMPERATUREDETECTOR
AWAY
UP TO 2KEYPADDEVICES
GSMTELEPHONEEXCHANGE
TEL
CENTRALMONITORING
STATION
SMS
INTERNETGPRS
WIRELESSSIRENS
SITE INTERNALSIREN ORSTROBE
SITE EXTERNALSIRENS
UP TO 8PROXIMITY
TAGS
WIRED REMOTE
SPEECH BOX
Figure 1 - System Configuration

2 D-302887
2. BACK-UP BATTERY INSERTION
Front unit
Battery cable
Figure 2 - Battery Insertion
3. MOUNTING ON A WALL
Back unit
Mark 4 drilling points on mounting surface31
Releasescrews
4Drill 4 holes and insert wall anchors
5Fasten the back unit with 4 screws
Figure 3 - Mounting on a Wall

D-302887 3
4. WIRING
PHONE WIRING IN NORTH AMERICA
RJ-31XCORD
HOUSEPHONESRJ-31X
8-POSITIONRJ-31X PLUG
BROWN
GRAY
GRN
REDLINE
FROMSTREET
1 2 3 4
567
RJ-31X JACK
GRAY
BROWN
GREEN
RED
Note: For whole house line seizure with DSL service present on the phone line, you must install a filter. It is suggested to use the DSL alarm filter model manufactured by Excelsus Technologies, or equivalent. This filter simply plugs into the RJ31X jack and allows alarm reporting without breaking the internet connection.
ZONE 29 & SIREN WIRING
MAGNETIC CONTACTOR ANY OTHER
CONTACT(NOT A DETECTOR)
SITE EXTERNAL SIRENMG ELECTRONICS
MG441PDS OR SIMILARSIREN
(6-12VDC, 150mA max.)AlarmN.C.
2.2 kΩ
Figure 4 - Wiring
4 D-302887
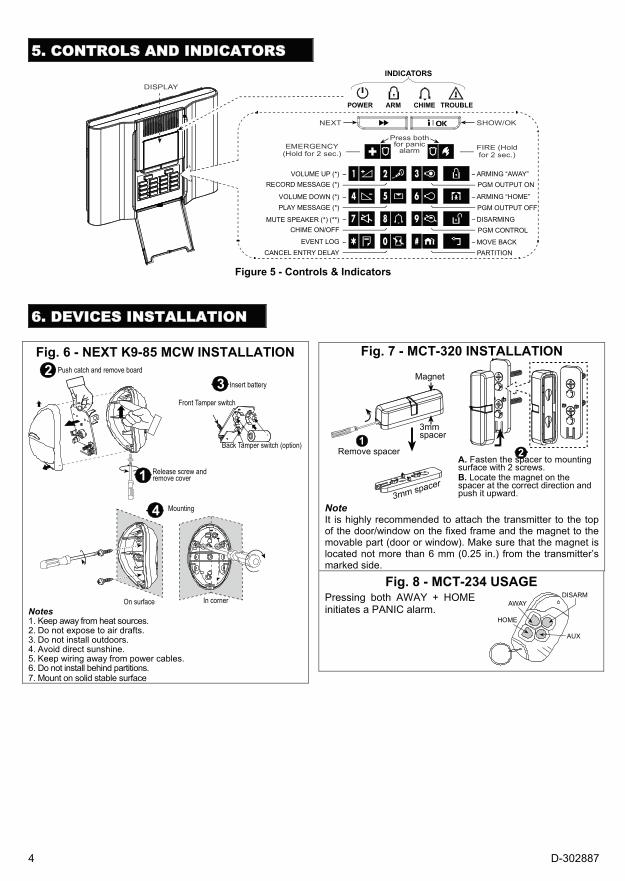
5. CONTROLS AND INDICATORS
VOLUME UP (*)
EMERGENCY(Hold for 2 sec.)
PLAY MESSAGE (*)VOLUME DOWN (*)
CHIME ON/OFFMUTE SPEAKER (*) (**)
EVENT LOGCANCEL ENTRY DELAY
RECORD MESSAGE (*)
ARM TROUBLECHIMEPOWER
PGM OUTPUT ON
PGM OUTPUT OFF
PGM CONTROL
PARTITION
ARMING “AWAY”
ARMING “HOME”
DISARMING
MOVE BACK
FIRE (Holdfor 2 sec.)
Press bothfor panic
alarm
SHOW/OKNEXT
INDICATORSDISPLAY
Figure 5 - Controls & Indicators
6. DEVICES INSTALLATION
Fig. 6 - NEXT K9-85 MCW INSTALLATION
On surface In corner
1
2 Push catch and remove board
3 Insert battery
Front Tamper switch
Back Tamper switch (option)
Release screw andremove cover
4 Mounting
Notes 1. Keep away from heat sources. 2. Do not expose to air drafts. 3. Do not install outdoors. 4. Avoid direct sunshine. 5. Keep wiring away from power cables. 6. Do not install behind partitions. 7. Mount on solid stable surface
Fig. 7 - MCT-320 INSTALLATION
21
Remove spacer
Magnet
3mmspacer
A. Fasten the spacer to mountingsurface with 2 screws.B. Locate the magnet on thespacer at the correct direction andpush it upward.
Note It is highly recommended to attach the transmitter to the top of the door/window on the fixed frame and the magnet to the movable part (door or window). Make sure that the magnet is located not more than 6 mm (0.25 in.) from the transmitter’s marked side.
Fig. 8 - MCT-234 USAGE Pressing both AWAY + HOME initiates a PANIC alarm.
DISARMAWAY
AUX
HOME

D-302887 5
7. DEFINING ZONE TYPE, NAME, CHIME ZONES & PARTITION You can assign a type and name to each of the system's wireless & wired zones.
Resultant DisplayAction(s)
4.
5.
6.
7.
8.
9.
10.
Enter zone # (01 to 29)(e.g. 05)
Select zone type with
5. 24h SILENT
select zone name with
twice
twicePress
Press
Press
Press
Press
Press
and press
and press
3. DEFINE ZONES
ZONE No: - -
ZONE No: 05
Z05: TYPE _
Z05: NAME -
Z05: FRONT DOOR
(e.g. 24h SILENT)
(e.g. FRONT DOOR)
Black box means that a wirelessdevice is already enrolled to thezone. No dark box means thatthe zone is free.
Black box means that a zone typeis defined. No black box meansthat no zone type is defined.
2.
Enter installer code(9999 by default)
3.
Enteringinstallermenu
3 times1. INSTALLER MODEPress
Press ENTER CODE - - - -
1. NEW INSTL CODE
11. Press Z05: CHIME
12. Press
select zone chimefeature with
(e.g. MELODY CHIME)twiceand press Z05: PARTITION
13. Enter zone # (e.g. 05)and press Z05: P1 P2 P3select partition #1, 2 or 3by key 1, key 2 or key 3,respectively (e.g. 2)
twiceand press Z05: P1 P2 P3
8. PIEZO SIREN ENABLE/DISABLE
Resultant DisplayAction(s)
2.
1.
3.
4.
5.
3 times
Select Siren On ( )or Off ( ) with
PIEZO SIREN ON
Enter into installermenu (see par. 8)
23 times
Press
Press
Press
and press
4. DEFINE PANEL
01: ENTRY DELAY 1
24: PIEZO SIREN
Black box means thatthe siren is enabled
** The default setting is PIEZO SIREN ON .

6 D-302887
9. DEFINING EXIT DELAY Resultant DisplayAction(s)
2.
1.
3.
4.
5.
6. Select delay with
Enter into installermenu (see par. 8)
3 timesPress
2 timesPress
Press
Press
and press
4. DEFINE PANEL
01: ENTRY DELAY 1
03: EXIT DELAY
EXIT DELAY 60 S
03: EXIT DELAY
*
* The default EXIT DELAY time is 60 S.
10. DEFINING ENTRY DELAY 1/2 Resultant DisplayAction(s)
2.
1.
4.
5.
6.
7.
8.
Select delay with
and press
Select delay with
and press 02: ENTRY DELAY 2
3.
3 timesPress
Press
Press
Press
Press
Enter into installermenu (see par. 8)
4. DEFINE PANEL
01: ENTRY DELAY 1
Entry dly1 30 s
01: ENTRY DELAY 1
02: ENTRY DELAY 2
Entry dly2 60 s
*
* The default ENTRY DELAY 1 time is 30 S.
**
** The default ENTRY DELAY 2 time is 60 S.

D-302887 7
11. SETUP FOR GPRS/BB – NO PHONE LINE (STEP 1) DO NOT make any program changes in “DEFINE COM” other than those shown on this instructions unless necessary.
Notes: 1. Before continuing, remove power (AC and battery) and install a SIM card provisioned for GPRS data service. 2. Request a SIM card phone number from your SIM supplier if you wish to have the ability to ARM / DISARM via text
messaging or program from the central station receiver.
2. ENTER CODE
4.
5.
6.
8.
Resultant DisplayAction(s)
3 times1. INSTALLER MODEPress
Press
Press
Press
Press
2:GPRS/BB
disable
Press9.
10.
1:PSTN/GSM
Press GPRS REPORT
11. Press GPRS APN
7. GPRS REPORT
12.
13. Enter Access Point Name(APN)
airnet1
Press twice14.
5. DEFINE COMM.
<OK> TO EXIT15. Press
3. 1. NEW INST CODE
4 timesPress
once
Enter installer code(9999 by default)
once
once
Press once
once
enable
Press once
once
twice
3 times
Example: Seaguard SIM = airnet1(Key #8 = scroll symbols up, Key #2 = scroll symbols down)(Key #5 = Toggle Uppercase / Lowercase)
GPRS APN
Press once16. READY 12:00PM
once

8 D-302887
12. SETUP FOR C.S. REPORTING – NO PHONE LINE (STEP 2)
2. ENTER CODE
4.
5.
6.
8.
Resultant DisplayAction(s)
3 times1. INSTALLER MODEPress
Press
Press
Press
Press
3:C.S. REPORTING
Press9.
10.
1:PSTN/GSM
Press cellular
11. Press
7. REPORT EVENTS
12.
13. IP RCVR 1
Press once14.
5. DEFINE COMM.
15. Enter Primary Receiver IPAddress
3. 1. NEW INST CODE
4 timesPress
once
Enter installer code(9999 by default)
once
twice
Press once
once
Press once
once
once
000.000.000.000
Press twice16. IP RCVR 1
1ST RPRT METHOD
disable
once
cellular
1ST RPRT METHOD
Press 8 times
Example: S&W Primary IP Address (069.074.192.027)
18. 000.000.000.000
20.
21.
22.
24.
once17. Press
Press
Press
Press
Press
PSTN
Press25.
26.
LINE FAIL REPORT
Press PSTN
27. Press
23.
28.
IP RCVR 2twicePress
once
9 times
once
Press once
4 times
Press once
once
once
don’t report
once
<OK> TO EXIT
IP RCVR 2
069.074.192.027
19. Enter Backup Receiver IPAddressExample: S&W Backup IP Address (208.017.225.027)
5 minutes
don’t report
READY 12:00PM
208.017.225.027

D-302887 9
13. SETTING USER CODES You can program a security code for yourself and additional 7 codes for other system users.
2. ENTER CODE
4.
5.
6.
8.
Enteringuser settings
menu
Resultant DisplayAction(s)
2 times1. USER SETTINGSPress
Press
Press
Press
Press
USER CODE 1 1 1 1 1
USER CODE 1 6 8 5 4
Press9.
10.
USER CODE 1
USER CODE 2
Press USER CODE 2
11. Press USER CODE 2 0 0 0 0
7. Enter 4 digit codee.g. 6854 USER CODE 1 6 8 5 4
12. Enter 4 digit codee.g. 2351 USER CODE 2 2 3 5 1
13. Press ACCESS TO PART
Pressfor the other user codes (3-8)and act as in steps 11-15
as required16.
SET USER CODES
SET USER CODES17. Press
Enter master user code(1111 by default)
3. SET BYPASS
4 timesPress
(The user code is 1111 by default)
14. Press U02: P1 P2 P3select partition by pushbuttons 1, 2 and 3 (forpartition 1&3 enter 13)
U02: P1 P2 P3
15. Press twice USER CODE 2
14. GPRS DIAGNOSTICS
Resultant DisplayAction(s)
2.
1.
oncePress ENTER CODE:
3 timesPress INSTALLER MODE
4.
5.
6.
Press
Press GPRS CONN. TEST
WL SENSORS TEST
7. PLEASE WAIT...
10.DIAGNOSTICS
3. 1. NEW INST CODE
6 timesPress
Enter installer code(9999 by default)
once
3 times
Press once NOTE: PANEL RSSI MUST BE “GOOD” OR “STRONG” (NOT “POOR”) VISONIC HAS EXTERNAL GSM ANTENNAS AVAILABLE (IN 10' OR 20' LENGTHS )
10 D-302887
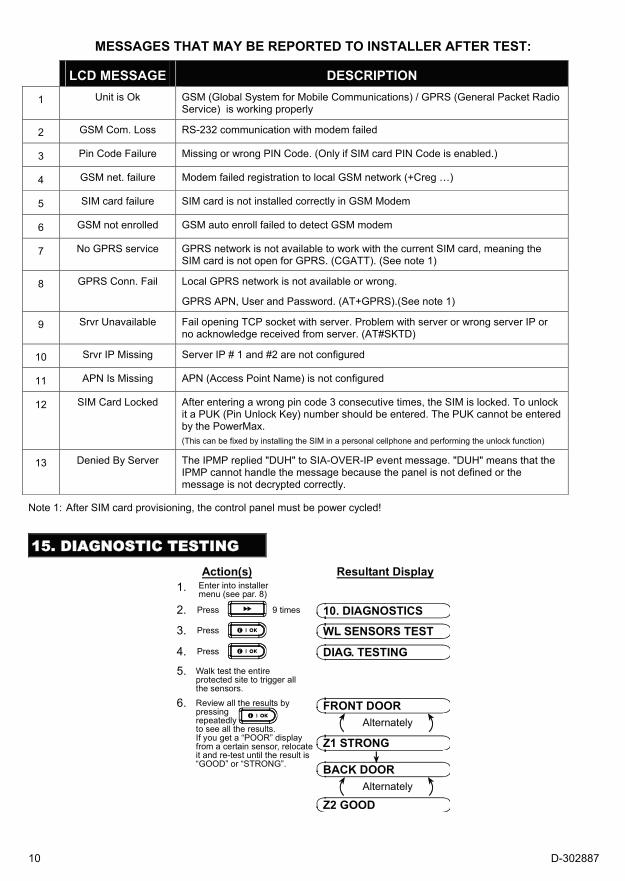
MESSAGES THAT MAY BE REPORTED TO INSTALLER AFTER TEST:
LCD MESSAGE DESCRIPTION
1 Unit is Ok GSM (Global System for Mobile Communications) / GPRS (General Packet Radio Service) is working properly
2 GSM Com. Loss RS-232 communication with modem failed
3 Pin Code Failure Missing or wrong PIN Code. (Only if SIM card PIN Code is enabled.)
4 GSM net. failure Modem failed registration to local GSM network (+Creg …)
5 SIM card failure SIM card is not installed correctly in GSM Modem
6 GSM not enrolled GSM auto enroll failed to detect GSM modem
7 No GPRS service GPRS network is not available to work with the current SIM card, meaning the SIM card is not open for GPRS. (CGATT). (See note 1)
8 GPRS Conn. Fail Local GPRS network is not available or wrong.
GPRS APN, User and Password. (AT+GPRS).(See note 1)
9 Srvr Unavailable Fail opening TCP socket with server. Problem with server or wrong server IP or no acknowledge received from server. (AT#SKTD)
10 Srvr IP Missing Server IP # 1 and #2 are not configured
11 APN Is Missing APN (Access Point Name) is not configured
12 SIM Card Locked After entering a wrong pin code 3 consecutive times, the SIM is locked. To unlock it a PUK (Pin Unlock Key) number should be entered. The PUK cannot be entered by the PowerMax. (This can be fixed by installing the SIM in a personal cellphone and performing the unlock function)
13 Denied By Server The IPMP replied "DUH" to SIA-OVER-IP event message. "DUH" means that the IPMP cannot handle the message because the panel is not defined or the message is not decrypted correctly.
Note 1: After SIM card provisioning, the control panel must be power cycled!
15. DIAGNOSTIC TESTING Resultant DisplayAction(s)
2.
1.
4.
5.
Enter into installermenu (see par. 8)
9 timesPress
Press
Walk test the entireprotected site to trigger allthe sensors.
10. DIAGNOSTICS
DIAG. TESTING
6. Review all the results bypressingrepeatedlyto see all the results.If you get a “POOR” displayfrom a certain sensor, relocateit and re-test until the result is“GOOD” or “STRONG”.
FRONT DOORAlternately
Z1 STRONG
BACK DOORAlternately
Z2 GOOD
3. Press WL SENSORS TEST

D-302887 11
16. PSTN REPORTING TO CENTRAL STATION
2. ENTER CODE
4.
5.
6.
Resultant DisplayAction(s)
3 times1. INSTALLER MODEPress
Press
Press
Press 3:C.S. REPORTING
disable
Press8.
9.
1:PSTN/GSM
Press
10. Press
7. REPORT EVENTS
11.
Press once12.
5. DEFINE COMM.
<OK> TO EXIT13. Press
3. 1. NEW INST CODE
4 timesPress
once
Enter installer code(9999 by default)
once
twice
Press once
Press once
once
once
twice
1ST RPRT METHOD
Press once14. READY 12:00PM
once
1ST REPORT METHOD
PSTN
PSTN
For PSTN / phone line reporting, no other changes are necessary.

12 D-302887
VISONIC LTD. (ISRAEL): P.O.B 22020 TEL-AVIV 61220 ISRAEL. PHONE: (972-3) 645-6789, FAX: (972-3) 645-6788 VISONIC INC. (U.S.A.): 65 WEST DUDLEY TOWN ROAD, BLOOMFIELD CT. 06002-1376. PHONE: (860) 243-0833, (800) 223-0020. FAX: (860) 242-8094 VISONIC LTD. (UK): UNIT 6 MADINGLEY COURT CHIPPENHAM DRIVE KINGSTON MILTON KEYNES MK10 0BZ. TEL: (0870) 7300800 FAX: (0870) 7300801 PRODUCT SUPPORT: (0870) 7300830 VISONIC GmbH (D-A-CH): KIRCHFELDSTR. 118, D-40215 DÜSSELDORF, TEL.: +49 (0)211 600696-0, FAX: +49 (0)211 600696-19 VISONIC IBERICA: ISLA DE PALMA, 32 NAVE 7, POLÍGONO INDUSTRIAL NORTE, 28700 SAN SEBASTIÁN DE LOS REYES, (MADRID), ESPAÑA. TEL (34) 91659-3120, FAX (34) 91663-8468. www.visonic-iberica.es INTERNET: www.visonic.com © VISONIC LTD. 2010 PowerMaxComplete Quick Guide D-302887 (Rev. 0, 10/10)