d-users guide for supportdesk - house-on-the-hill · the-hill software ltd. acknowledges the use of...
TRANSCRIPT

User’s Guide for
SupportDesk
House-on-the-Hill Software Ltd
SupportDesk Green

Software Copyright © 1993-2007 House-On-The-Hill Software Ltd.
All Rights Reserved.
Manual Copyright © 1993-2007 House-On-The-Hill Software Ltd.
All Rights Reserved.
House-On-The-Hill Software Ltd. disclaims any liability for any damage including but not limited to corruption of data whether arising directly or indirectly from the use of software originated by House-On-Hill Software. All House-On-The-Hill Software programs are supplied 'as is' and House-On-The-Hill Software Ltd. does not warrant that the operation of the program will be uninterrupted or error free or that program defects will be corrected.
Windows and MS-DOS are registered trademarks of Microsoft Corporation. House-On-The-Hill Software Ltd. acknowledges the use of other trademarks in this manual and respects the rights of the holders.

User's Guide for SupportDesk D-i
Contents
1 About this Document .............................................................................................1 1.1 Organisation of the Documentation.............................................................................................1 1.2 How to Use this Documentation..................................................................................................1
2 Call Menu.................................................................................................................3 2.1 Adding and Maintaining Calls......................................................................................................4 2.2 Notes ........................................................................................................................................16 2.3 Finding a Call ............................................................................................................................18
3 Quick Calls ............................................................................................................19 3.1 Adding Quick Calls....................................................................................................................19 3.2 Creating Calls from Quick Calls ................................................................................................19
4 KnowledgeBase....................................................................................................21 4.1 Viewing KnowledgeBase Records ............................................................................................22 4.2 Adding and Updating KnowledgeBase......................................................................................22
5 Activities................................................................................................................25 5.1 Adding Activities........................................................................................................................25 5.2 Activity Reminders ....................................................................................................................28
6 Product Menu........................................................................................................30 6.1 Adding and Maintaining Products .............................................................................................30 6.2 Product Versions.......................................................................................................................34
7 Customer Menu ....................................................................................................36 7.1 Adding and Maintaining Customers ..........................................................................................37
8 Inventory ...............................................................................................................42 8.1 Processing Inventory ................................................................................................................42
9 Contacts ................................................................................................................48 9.1 Processing Contacts for Customers..........................................................................................48
10 Suppliers .............................................................................................................51 10.1 Processing Suppliers ..............................................................................................................51
11 Contracts.............................................................................................................53 11.1 Processing Contracts..............................................................................................................53
12 Campaign Management .....................................................................................56 12.1 Viewing Campaigns at the Main Window................................................................................56 12.2 Adding Campaigns..................................................................................................................56
13 Sales Opportunities............................................................................................62 13.1 Sales Opportunity Details........................................................................................................62 13.2 Sales Opportunity, Conclusion Tab.........................................................................................68

D-ii User's Guide for SupportDesk
14 Purchase Orders.................................................................................................69 14.1 Processing Purchase Orders ..................................................................................................69
15 Statistics and Graphics......................................................................................73 15.1 Statistics .................................................................................................................................74 15.2 Graphics .................................................................................................................................80 15.3 Frequency Tab........................................................................................................................81 15.4 Trend Analysis Tab .................................................................................................................82
16 Report Menu........................................................................................................84 16.1 Report Designer......................................................................................................................84 16.2 Adding and Maintaining Designer Reports..............................................................................85 16.3 Crystal Reports Library ...........................................................................................................90
17 Noticeboard.........................................................................................................93 17.1 Updating the Noticeboard .......................................................................................................93
18 Index .......................................................................................................................i

User's Guide for SupportDesk D-1
1 About this Document
1.1 Organisation of the Documentation
The SupportDesk documentation is supplied in both printed and online form, although these have differences in terms of presentation and appearance. It aims to give you an overview of the product and detailed operating instructions for its various operations.
The complete documentation is provided in four parts. For the help text, these will appear as separate modules. In the case of the printed manuals, each will have an identifying letter that will prefix the page numbers for easy identification of the part.
The different parts and their intended use are:
� A. Getting Started is provided for the Administrator and has an overview of SupportDesk. It also gives a brief introduction to setting up SupportDesk. Anyone who has just installed SupportDesk should familiarise themselves with its content before attempting to create any data.
� B. Using SupportDesk is intended for all SupportDesk users. It covers standard features of SupportDesk and describes standard processing that is generally available.
� C. Administrator’s Guide is aimed specifically at those with Supervisor privilege and therefore have unrestricted access to SupportDesk and all its records. It describes how to set up maintain data and how to undertake other processing to monitor and control SupportDesk.
� D. User’s Guide (this document) is provided for general users of SupportDesk who undertake specific tasks each day. It tells you how to update various records, log and progress calls and produce certain reports.
A separate document is also supplied for the intranet-based WebServer application.
1.2 How to Use this Documentation
If you are a new user you may read through the supplied documentation — either in its printed or online format — to establish SupportDesk’s structure and features. Subsequently, you may need information in order to undertake a specific task or to achieve a particular aim. In these cases, you will refer to a relevant topic to find required details.
You should also look at the document entitled Using SupportDesk, which covers the standard processing features that are common to the application. The “Help Menu” chapter tells you how to use the online help.
Both the printed and online versions of the documentation have a table of contents so that you can locate the topic you require. They additionally have an index so that you can look for particular words and phrases.

D-2 User's Guide for SupportDesk
Note: The input of general text data is often self-apparent and, if so, is not covered in this documentation. The significance and use of other fields are described.

User's Guide for SupportDesk D-3
2 Call Menu
You will raise a call as a result of input from a customer that requires some form of action. This could be a fault found in a product or possibly a request for more information. The call probably also relates to a product, but it is not necessary to attribute a particular product or customer to a call. A unique reference is generated for the call.
A call consists of two main parts:
� a header form that describes the call’s main attributes. This is the initial customer related incident or piece of correspondence, which requires some sort of response.
� a number of attached note items. These record the subsequent conversations, phone calls, letters, etc. that occur in order to resolve the original call. The process of adding notes could be concluded when the solution has been found and dispatched to the customer.
A call can be automatically generated from incoming e-mail or could be logged via the WebServer option.
You can copy the subject and solution to the KnowledgeBase for future recall. At this time, you could also close the call. You may be obliged to enter a ‘Reason for Closure’ if this option has been set at the Company Configuration dialogue. The Supervisor is able to remove closed calls, archiving them to history.
Normally, you cannot amend notes once they have been saved, to prevent subsequent ‘doctoring’ of the call history. Similarly, you can view archived calls but cannot update them.
The owner of a call is the login who originated the call details. However, the call may be assigned to someone else for processing. You can find and allocate the best person for the job, based on their recorded expertise. The supervisor, owner and assignee are the only logins allowed to update a call and its notes, unless a login has been given special privileges.
The main window displays the calls you are allowed to view in the current folder. The symbols in the left margin indicate the status of the calls. Colours may be set to further highlight the state of calls or identify other record types.
Activities can automatically be added to a new call when it is created (activities and rules are defined by a Supervisor at the Service Level Management dialogue, described in the Administrator’s Guide). For example, you could have an activity targeting a first response to the customer. You can also add activities during the life of the call.
Files can also be attached to the call and defaults (described in the Administrator’s Guide) can be set for the pull down lists at the call dialogue. You can opt to have the customer, contact and product fields automatically filled as you type by switching on Autofill at the Options menu (described in the Using SupportDesk guide).
The following actions are available from the Call menu:

D-4 User's Guide for SupportDesk
New:
to add a call. You can also click the Call icon at the main window or choose New: from the toolbar or right-click menu when calls are listed.
Open: to update a call.
All calls that you can access are included in the call list at the main window. However, if there are many calls and you are unsure of the required one, select Open: to enter details to find matching calls.
Delete: to delete closed calls that have been archived.
ReOpen for a closed call, if further processing is required.
Action to set a call’s action date and time to now, indicating that immediate action is due.
Go To: to start the list of calls at the main window with one that has a specific reference.
Enter or select a required reference (leading zeroes are not necessary) and click OK. If a call with this reference exists, the list starts at this call.
Print: outputs details of calls listed at the main window. Two versions are available:
� Short prints one line per call showing summary information as displayed at the main window
� Long produces a separate call report for each call.
Job Sheet produces a report that is suitable for handing to an engineer to deal with a fault for the currently selected call. You can produce the same report by clicking the Job Sheet button after opening a call.
Print All Job Sheets provides job sheet reports for all calls available at the main window.
Publish: outputs a summary of all listed calls in html format. You can choose the name and location of this file.
Publish Call creates a html format file, with a specified name and location, showing details for the call that is currently highlighted.
Export outputs a text file containing comma-separated values for the calls listed at the main window. The records have the same layout as the corresponding calls and notes import records (see the Administrator’s Guide). Choose the name and location of the output file.
2.1 Adding and Maintaining Calls
If you are using folders, a new call is entered into the current call folder. The reference of the call will reflect the rules for the folder. Default values for the call can also be defined for the folder.
User's Guide for SupportDesk D-5
You can switch to other folders using the Explorer panel. For more information, refer to “Folder Management” in the Administrator’s Guide.
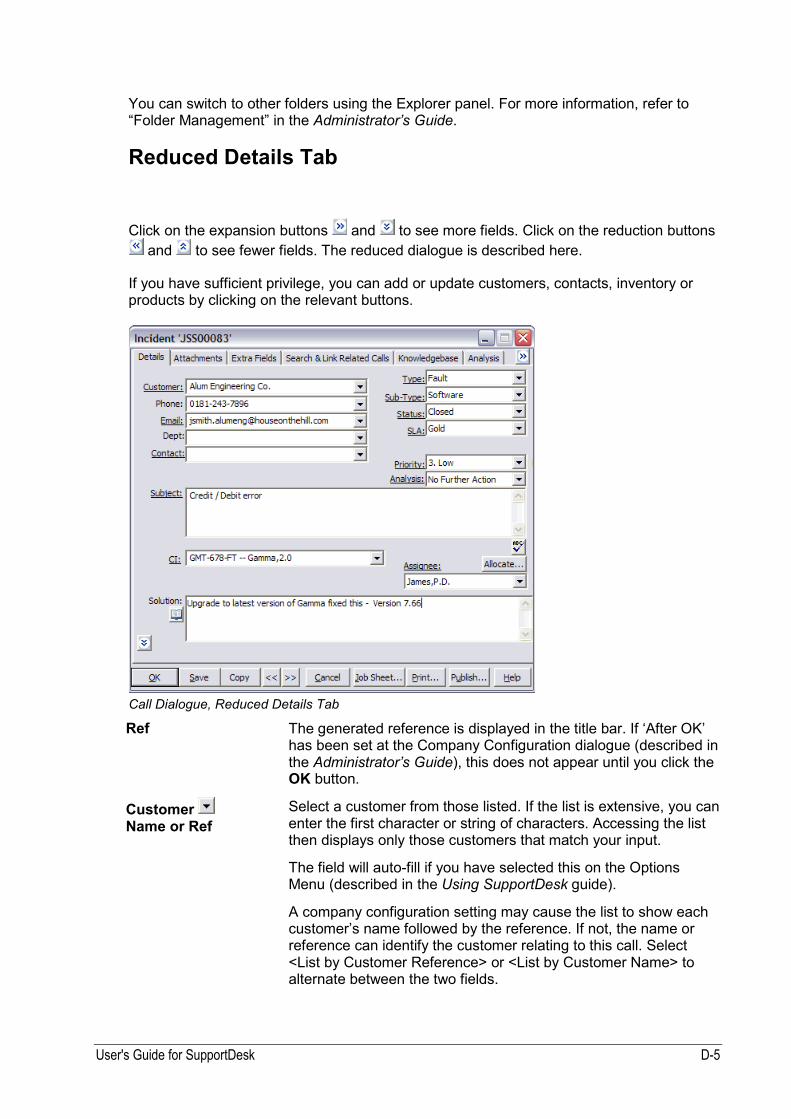
Reduced Details Tab
Click on the expansion buttons and to see more fields. Click on the reduction buttons
and to see fewer fields. The reduced dialogue is described here.
If you have sufficient privilege, you can add or update customers, contacts, inventory or products by clicking on the relevant buttons.
Call Dialogue, Reduced Details Tab
Ref The generated reference is displayed in the title bar. If ‘After OK’ has been set at the Company Configuration dialogue (described in the Administrator’s Guide), this does not appear until you click the OK button.
Customer Name or Ref
Select a customer from those listed. If the list is extensive, you can enter the first character or string of characters. Accessing the list then displays only those customers that match your input.
The field will auto-fill if you have selected this on the Options Menu (described in the Using SupportDesk guide).
A company configuration setting may cause the list to show each customer’s name followed by the reference. If not, the name or reference can identify the customer relating to this call. Select <List by Customer Reference> or <List by Customer Name> to alternate between the two fields.

D-6 User's Guide for SupportDesk
When you have selected your customer, any news about this customer is then displayed.
Note: Click the Customer label to add, update or display the customer.
Phone The ‘Customer Phone 1’ entry is displayed from the customer record. If you subsequently select a customer contact, the contact’s ‘Phone 1’ entry is displayed instead. Enter an alternative number from those listed.
For those with the Telephony optional add-on, clicking the label will telephone the customer or contact.
E-Mail The entry works in a similar way to the Phone item, showing the e-mail address of the specified contact or, if none is available, the company’s e-mail address. Enter an alternative address from those listed.
Clicking the label starts an e-mail message for this address, providing you have the Mail optional add-on.
Dept This entry identifies the department making the call. Any entries you make are added to the list.
Contact Select a contact from those listed for the customer or, if a group contact, for any customers within the same group. If you have not selected a customer, all the contacts are listed. You can also enter a new name.
Note: Click the Contact label to add, update or display the contact.
Subject
Enter a brief description of the call; the text defaults to the first eighty characters of the first note.
Later, if you decide to add the solution of this call to KnowledgeBase, the subject field is copied to the KnowledgeBase problem.
If your login record specifies that automatic spell checking is required, text input to the Subject and Solution fields is always checked. Otherwise, click the button to check the text.
Quick Calls is a handy feature allowing you to create a routine call from details that have been saved previously. You might select a quick call to record that a customer has posed a ‘frequently asked question’ where you have the solution readily available.
Click the Subject label to display a list of previously created quick calls and select from the list. The details from the quick call will populate your new call fields.
Use <Add to Quick Calls> to record the details of the current call as a quick call for future retrieval.
To find out more on how to create Quick Calls, refer to page 19.

User's Guide for SupportDesk D-7
Product Name or Ref
Use the Name or Reference to identify the product relating to this call. Select <List by Product References> or <List by Product Names> to alternate between the two fields.
Select a product and version from those listed.
Note: Click the Product label to add, update or display the products.
The system may have been configured by a Supervisor to list the customer’s inventory. In this case, the serial number of the inventory is also shown.
Note: In this case, click the Product label to add, update or display inventory. For an ITIL environment, the term ‘configuration item’ (or CI) will be used instead of ‘inventory’.
If you have not selected a customer, the full list of products appears. Otherwise, you can choose <List All Customer’s Inventory> to see products for all customers, not just for the current customer’s inventory or products.
Categories Type, Sub-Type, Status, SLA, Urgency, Priority and Analysis.
These fields operate in the same fashion. Select the entry required from those listed for each of the category codes. Click the associated label to view and possibly update the category record.
The Urgency category only applies if you have the optional ITIL pack installed. It is generally combined with SLA (which may be referred to as ‘Impact’ for internal users) to determine the relative priority of equipment. For example, a payroll server is vital when a payroll run is due but has a lower priority at other times.
If selection is by product rather than inventory and the selected product has a Group/Type set, only Type categories that have a matching or blank product will be listed here.
If you have selected a customer, product or inventory item where a Service Level Agreement has been specified, the SLA category defaults to this setting.
Categories may have an associated action or warning time. The least time that has been set on any of the selected category codes
is used to calculate default action and warning dates. You can only see these date fields with the expanded call dialogue.
Selecting a status of ‘Closed’ automatically marks the call as closed. The Closed check box then becomes ticked. Similarly, changing status from ‘Closed’ resets the Closed check box.
Analysis The list can be used for post-closure analysis, although you can select analysis at any time.
Assignee Click on the pull down list and assign the call to a person or group. The call is included in the call list for the assignee.

D-8 User's Guide for SupportDesk
Notes: Click the Assignee label to display the login’s details. Supervisors can amend the login. You can assign the call to a group login. The call is listed for all members of the group until it is assigned to a specific login. Groups are set up at the Login Details dialogue and added to using Resource Allocation records.
Allocate If a Supervisor has entered Resource Allocation records, you can click the Allocate button for a list of people appropriate for handling this call, showing their associated knowledge rating. Refer to Resource Allocation (described in the Administrator’s Guide) for further information.
Solution Enter here any solution or useful information relating to the conclusion of this call. You can copy the solution from one of the notes using the Solution button at the Notes dialogue.
If your login record specifies that automatic spell checking is required, text input to the Subject and Solution fields is always checked and this button does not appear. Otherwise, click the button to check the text.
If you decide to add this call’s solution to KnowledgeBase using the KnowledgeBase button, the Solution field is copied to the KnowledgeBase solution.
Click the Copy button to copy the current call as a new call with another reference. All other details are copied except for the notes, activities and customer selections.
The More button on new calls creates another new call, bringing forward the customer selections. This allows for the swift input of many calls.
Use the Job Sheet: button to produce a call report in a format suitable for handing to an engineer.
Expanded Details Tab
Click on the expansion buttons and to see more call fields. Click on the reduction
buttons and to see fewer fields. The additional fields are described here.

User's Guide for SupportDesk D-9
Call Dialogue, Expanded Details Tab
Open Date & Time The date the call was input into the system is displayed here. You may amend the date and time if you have the required privilege (see Configuration in “Adding and Maintaining Logins” in the Administrator’s Guide).
Elapse Time Displays the elapsed time since the call was entered, which is updated automatically and takes into consideration any stoppage time. Amending the open and close dates and times effects the elapse time. The work calendar on the Company Configuration dialogue (described in the Administrator’s Guide) determines elapsed time calculations.
If you select an SLA category that has its own calendar, this calendar is used in place of the company calendar.

D-10 User's Guide for SupportDesk
Close Date & Time
Selecting a status of ‘Closed’ results in the call being closed. You must be authorised to do this. Today’s date is entered into this field.
At the main window, closed calls are marked by a tick in the margin and can be archived by a Supervisor. Reopen the call by selecting a different status.
With the E-Mail option enabled, mail messages can automatically be sent when the call is closed. The recipients are determined by the e-mail templates in use.
Response Date &
Time
Indicate when a response to the call is required. This may be based on the service level. If no response is made by this time, a breach is reported by the call monitor and escalator.
Warning Date & Time
The warning date is calculated using the smallest warning period on the call’s categories. This time is added to the current date and time, conforming to the rules set by the calendar (from either company configuration or SLA category). When the call’s warning period has been exceeded, it is highlighted and marked with a warning bell icon in the margin at the main window. You can overwrite the warning date.
Action Date & Time
The action date is calculated in the same manner as the warning date, but using the smallest action period. You can overwrite the action date.
You can refresh the main window to list calls in action date order. Calls that exceed their action date can be highlighted with a colour and identified by an adjacent yellow exclamation mark in the margin at the main window.
Note: Clicking any of the Date labels displays the calendar.
Click to select a date relative to today (such as <Next Day>) or a listed time (available at 15-minute intervals).
Raised By This entry defaults to the name of the login initially entering the call. You may be allowed to select another login from the list of those available.
Note: You can display or amend the login details if you are a Supervisor.
Start Work Click the button to record the time being worked on the call. This starts the timer, creates a work item on the Activities tab and changes the button to Stop Work. Click this button once the work is completed — the elapsed time is then recorded.

User's Guide for SupportDesk D-11
Notes Tab This tab displays the complete history of the call, covering replies given and relevant comments. For each notes line, the date, author and status are displayed.
Create an entry by clicking the Add... button or double-click an existing entry to amend it. You can use the Delete button to delete lines that have just been added. (Suitably configured logins can amend and delete history at any time.)
The update of notes is covered on page 16.
Activities Tab This tab lists the activities set against this call. Activities may be created automatically when a new call is raised. This is achieved at the Service Level Management dialogue and is determined by a supervisor.
Use the buttons to Add another activity or Delete the highlighted entry. The Done! button flags the highlighted activity as having been completed. Double-clicking on a selected entry opens the existing activity. Activities are covered on page 25.
Inventory Tab Use this tab to list the inventory for the customer. If allowed, you can update the inventory by double-clicking an existing entry or clicking the Add or Delete buttons. Refer to “Inventory” on page 42 for more information.
Click Select to identify an inventory item for the call. This is then shown in the Product field.
Contracts Tab Any support contracts to which the customer subscribes are listed here.. You can click:
� Add to create a further contract (refer to “Processing Contracts” on page 53)
� Expand to view the inventory covered by a selected contract
� Select to identify a contract for the call. It is displayed on the lower tab bar.
Classify Tab Here you can access KnowledgeBase entries to find any recorded problems that have relevance to this call.Double-click the KnowledgeBase entry or click to list available topics and then repeat to list sub-topics and entries within those sub-topics. Any Blank headings will list entries that have no topic or sub-topic.
Click:
� Open for a selected item to access the KnowledgeBase entry (refer to “Adding and Updating KnowledgeBase” on page 22 for a description of processing).
� Select if the call is similar to the KnowledgeBase entry. In this case, the solution from the KnowledgeBase is used for this call, providing you confirm the action. The entry’s topic and sub-topic are also copied to the call, for analysis purposes.
Changes Tab Any changes to fields that are marked for auditing (through the Data Dictionary) are listed here.

D-12 User's Guide for SupportDesk
Attachments Tab
Use this tab to attach documents to the call. The selected file is copied to the attach sub-directory.
Refer to “Common Processing” in the “SupportDesk Features” chapter of the Using SupportDesk guide for a description of this tab.
Extra Fields Tab
Extra fields can be defined for calls by a Supervisor using Setup | Extra Fields (as described in the Administrator’s Guide).
This tab is also described at “Common Processing” in the “SupportDesk Features” chapter of the Using SupportDesk guide. Other set fields are also available. These are described below.
Call Dialogue, Extra Fields Tab
Entry Medium Use the check boxes to specify the medium by which the call was reported. Calls added via the WebServer option automatically tick the Web box.
Your Ref Enter a reference the customer wishes to log with the call. You can trace calls using the customer’s own reference at the Open Call dialogue and with the Search dialogue (described in the Using SupportDesk guide).

User's Guide for SupportDesk D-13
Cost If the customer has been marked for charging, then the cost associated with any selected category or action is displayed here. You can overwrite the figure.
If you change a category or action to one with a different associated cost, you are prompted to authorise the change in the cost value. Costs can be accumulated in the Report Designer.
Internal Tick this box if this call is not to be visible to WebGuest users via the WebServer.
Clicking this tab displays a separate screen.
Call Dialogue, Related Calls
This screen is provided so that you can link to this call any others that are related. They may, for example, all be reported incidents that result from the same underlying problem. Linking them will help to resolve the problem and means that you can process and close them together.
Note: If you are processing a call and identify related calls, which are then linked to it, the original call is then classed as the ‘parent’ while each linked one is deemed to be a ‘child’. Multiple links are possible so a call can be a child of one call and a parent to several others.
The screen shows two lists of calls:
� Linked Calls are ones that you have already linked to the current call and may be in any folder. Parent linked calls may be shown initially but you can choose to see child linked calls instead.

D-14 User's Guide for SupportDesk
� Unlinked Calls are others in the current folder that are available for linking. Select another folder to list unlinked calls in that folder.
You can use the Search field to filter the list of unlinked calls. Enter text to the field or select from the pull-down list and then click the Refresh button. Change the selection to include All, Open or Closed calls or click Search Archive or Search Live for relevant calls.
The text defaults to the customer reference (to list other calls for the same customer). You can select other details from the pull-down list, including the subject of the call, or can enter you own search string.
Click the arrow buttons to transfer calls:
all unlinked calls to linked calls.
the single, selected unlinked call to linked.
a selected linked call to unlinked.
all linked calls become unlinked.
to link any unlinked records that have the same subject, so that they become child calls to this call.
You can also click:
� Create New Linked Parent/Child Call to create a further call (at the Call Screen) and link it to the current one. This may provide a link to many related incidents.
� Close Linked Records to close the current call and all those that are linked to it (children only), once the common problem is resolved. In this case, you should indicate the solution when prompted.
The solution text will be applied to all the linked calls and they will all be marked as closed. These calls can then be archived.
When processing is complete, click Close to exit the screen and return to the current call.
KnowledgeBase Tab
Use this tab to search the KnowledgeBase and identify records relating to the subject of the current call. The keywords in the KnowledgeBase records are scanned for matches with the text in the call subject field. The results are listed.
You can also make your own search by entering keywords and clicking the Search Keywords button.
Double click an entry to see the full KnowledgeBase record. Click the Copy Solution button to copy the solution for the KnowledgeBase record to the solution for the current call.

User's Guide for SupportDesk D-15
Call Dialogue, KnowledgeBase Tab
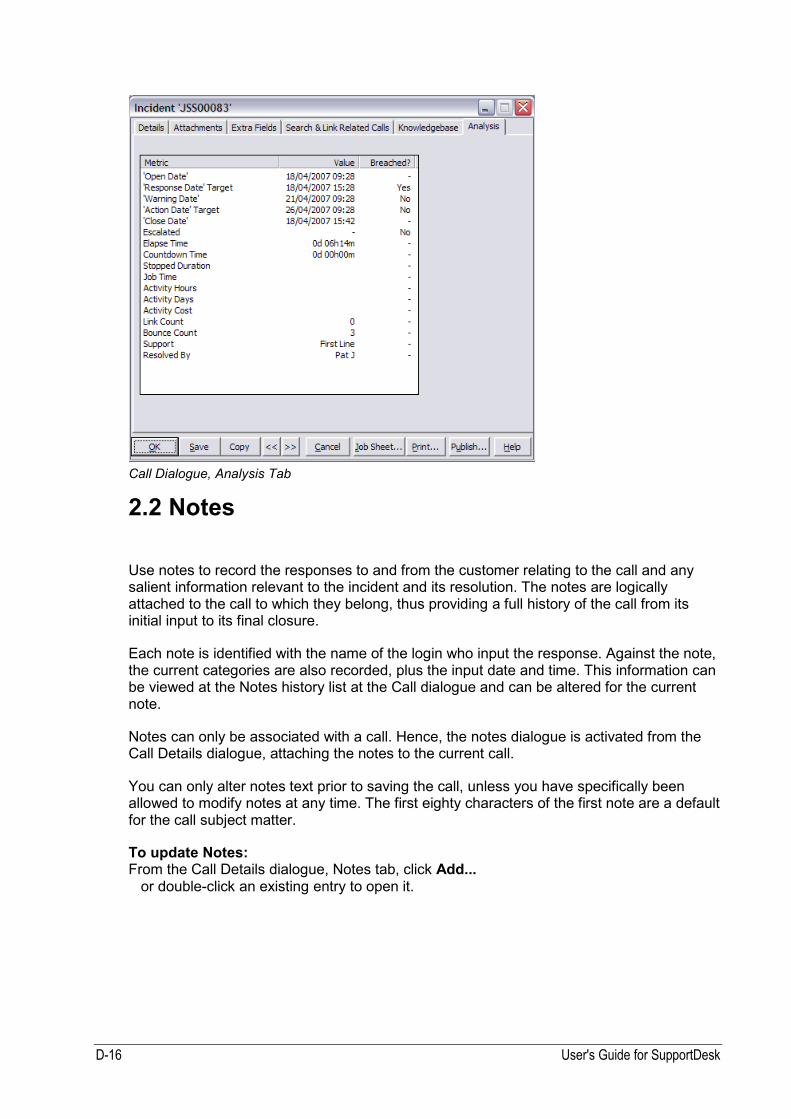
Analysis Tab
Use the analysis tab to obtain a summary of call information. The display:
� summarises date information for the call
� highlights if response, warning or action dates have been breached and if the call has been escalated
� shows the time elapsed so far and the time left before the required action date and time
� indicates if the clock has been stopped on the elapsed time calculation (you may choose to stop the clock on a category status such as ‘Waiting Parts’ using the Category, Workflow & Actions tab)
� includes the total job cost entered on notes and a summary of activity costings relating to this call
� shows a count of the number of linked calls
� counts the number of times the call has been reassigned (the bounce count)
� displays the support level of the assignee (first, second or third)
� indicates if resolved and by whom.
D-16 User's Guide for SupportDesk
Call Dialogue, Analysis Tab
2.2 Notes
Use notes to record the responses to and from the customer relating to the call and any salient information relevant to the incident and its resolution. The notes are logically attached to the call to which they belong, thus providing a full history of the call from its initial input to its final closure.
Each note is identified with the name of the login who input the response. Against the note, the current categories are also recorded, plus the input date and time. This information can be viewed at the Notes history list at the Call dialogue and can be altered for the current note.
Notes can only be associated with a call. Hence, the notes dialogue is activated from the Call Details dialogue, attaching the notes to the current call.
You can only alter notes text prior to saving the call, unless you have specifically been allowed to modify notes at any time. The first eighty characters of the first note are a default for the call subject matter.
To update Notes: From the Call Details dialogue, Notes tab, click Add... or double-click an existing entry to open it.

User's Guide for SupportDesk D-17
Note Dialogue
Call The sequence number of the call and the associated note are displayed for information.
Author This entry defaults to the person who composed the note. You can select someone else from the pull-down list.
Type
Status
Priority
SLA
All these entries are categories that you can apply to the note. They default to the settings for the call but you can select a different category from each pull-down list. If you have the appropriate authority, you can also click the corresponding button to view and update the category details.
Date & Time The entries default to the current date and time but you may be able to alter them (depending on your login set up).
Internal The default setting is determined through Company Configuration, indicating if customers can normally see notes through the WebServer. Ensure the box is ticked if this note is not to be available to the customer or is unticked if it provides reply or advice information that the customer should see.
Job Time Enter a job time in hours and minutes. The accumulated job time is shown on the Call, Analysis tab.
Text area Input any information regarding the call to the free-format area. For example, you may wish to record a summary of a telephone conversation held with the customer about the problem or may indicate that the incident has been resolved and a response to the customer has been sent.
If automatic spell-checking is selected on your login record, any input text is checked when you end input here. Otherwise, click the spell checker button to verify the text.

D-18 User's Guide for SupportDesk
Click:
� Copy to copy the note text to the clipboard.
� Paste to put the copied text into the note text of another call.
� Call Solution to copy the note text to the solution field in the call
� Mail: to mail the text of the note to the contact e-mail address (or the customer e-mail address if the contact e-mail address is not supplied).
2.3 Finding a Call
Clicking Open... at the Call menu, provides an input screen.
Open Call Dialogue
1. Ref 2. Select from the list or enter the reference of the call you wish to view or update. If the call is not included in your call list then you have query access only.
3. Customer’s Own
Ref
4. You can also track down a call using the reference supplied by your customer, this reference must have been entered in the field ‘Customer’s Own Ref’ on the Call, Extra Fields tab. Select from the list or enter the required customer’s reference. The first call with this customer reference is opened.
Note: If you are not allowed to modify the call, you can only view the call details.

User's Guide for SupportDesk D-19
3 Quick Calls
You can use quick calls to build up a portfolio of common call styles, providing a swift way of completing the call details.
Quick calls can be created ‘on the fly’ from an existing call or by entering the quick call directly in to the quick calls folder.
Use the quick call subject to identify the quick call. The subjects are listed in the pull down at the main window tool bar and you can select them in the call dialogue. It is advisable to keep the list to a manageable size so that you can locate a repeat issue quickly.
You can create calls from quick calls in two ways:
� by selecting a quick call from the pull down list at the main window. This creates a new call substituting all the information saved in the quick call.
� by starting a new call and clicking the Subject label. A list of quick calls is presented and you simply select from the list. Again, the information held on the quick call is substituted in to the new call.
There is no archive folder for quick calls but you may close redundant quick calls. A Supervisor can delete closed quick calls using the Call menu
Use the Call Monitor option to schedule quick calls on a regular basis.
3.1 Adding Quick Calls
You can create a quick call from an existing call by clicking the Subject label and selecting <Add to Quick Calls>. The details of the current call are used to populate the new quick call. You can also add quick calls directly into the quick calls folder.
Open the quick calls folder using the Quick Calls entry in the Explorer panel.
Then start a new call by clicking on <New>.
All the fields and buttons are as described for calls in the previous chapter. If you include activities on the quick call, they are automatically added when you create a call from the quick call. Selecting a folder for a quick call means that the call is only available when the folder is current.
3.2 Creating Calls from Quick Calls
You can create a call by clicking on the down arrow of the quick calls pull down list at the main window and selecting an entry (the subject of the quick calls is used to identify the entries). Select the required item and a new call is started with the details from the quick
D-20 User's Guide for SupportDesk
call substituted. Change any information as required and click OK to save the new call or Cancel to discard it.
You can also substitute the quick call information while entering a new call by clicking the Subject label. Again, the fields in the call will be populated by the details held on the quick call.

User's Guide for SupportDesk D-21
4 KnowledgeBase
The KnowledgeBase database is a repository of problems with their solutions and associated keywords. You can also categorise the KnowledgeBase records by class and sub-class.
Use KnowledgeBase records to provide quick solutions to reported problems where the situation has been previously recorded. You can create a call record, to acknowledge the customer call, directly from the KnowledgeBase record that provided the solution.
The KnowledgeBase records can be updated from:
� a call, where you can add KnowledgeBase record. Clicking a button transfers you to the KnowledgeBase Entry dialogue with keyword, problem and solution text substituted. You can alter the fields and can further classify the KnowledgeBase record using the topic and sub-topic fields.
� a call, when it is closed. A company configuration setting can be made to automatically add the solution of closed calls to the KnowledgeBase.
� the main window — while viewing KnowledgeBase records you can open the highlighted record or enter a new one; the KnowledgeBase Entry dialogue appears so that you can enter your information.
� the Database menu — you can load KnowledgeBase records from closed calls in the current view. A KnowledgeBase record is created from each closed call that contains a subject and solution.
When listing KnowledgeBase records at the main window, the records are displayed in the order entered. You can filter them using the Select and Find facilities available on the View menu. Adjust the listed fields using Fields from the Options menu.
If you find a KnowledgeBase record that is the correct response to your customer call, select New Call: from the right-click menu to create a call (or use the New Call button on the KnowledgeBase Entry dialogue). The problem and solution are carried forward to the new call. You then only need to complete customer and product details.
You can also use the right mouse button to delete KnowledgeBase records, providing that you are allowed to do this.
You can reference KnowledgeBase when interrogating a call. Use the KnowledgeBase tab to list records that relate to the call’s problem or the Classify tab to find suitable KnowledgeBase records by topic and sub-topic classifications.

D-22 User's Guide for SupportDesk
4.1 Viewing KnowledgeBase Records
List KnowledgeBase records at the main window by selecting the KnowledgeBase entry in the Explorer panel or by clicking the KnowledgeBase icon.
Refer to “Changing the Appearance of the SupportDesk Window” and “Use of the Right Mouse Button” in the “SupportDesk Features” chapter in the Using SupportDesk guide for information about processing at the main window.
4.2 Adding and Updating KnowledgeBase
To activate the KnowledgeBase dialogue:
� from the main window, while viewing KnowledgeBase records use your right mouse button to create new or open existing records.
� from the Call dialogue, click on the KnowledgeBase button. When creating KnowledgeBase records from a call, the problem and solution are carried forward to the subject and solution fields. Text from the subject is extracted to create keywords.
It is advisable for the keywords field to contain useful words for future filtering of the KnowledgeBase records. The KnowledgeBase records are searched for display at the Call dialogue, KnowledgeBase tab. Records are displayed where there is a match between the words in the call subject and the KnowledgeBase keywords.

User's Guide for SupportDesk D-23
Details Tab
KnowledgeBase Entry Dialogue
Keywords Enter or amend the keywords of the problem shown here. These are used to filter the KnowledgeBase records when they are shown on the Call dialogue, KnowledgeBase tab. Records are displayed where there is a match between words in the call subject and the KnowledgeBase keywords.
A list of available keywords is shown on the right. Click any that you want to use and then click the <<Select button to add them in alphabetical order. You can also type keywords directly and these are included in the list for selection.
Remove a keyword by deleting from the field or by deselecting it at the list and clicking <<Select again.
Topic
Sub-Topic
Use these entries to classify the KnowledgeBase record so that it can be more easily selected later. A pull down list is created from topics and sub-topics that are already entered on KnowledgeBase records. You may, for example, classify a record with a topic of ‘Hardware’ and a sub-topic of ‘Printer’.
Product
Customer
Select from the pull-down lists if you only want to see a KnowledgeBase entry that relates to a specific product or customer.

D-24 User's Guide for SupportDesk
Problem Describe the problem here. This entry relates to the problem field on the call. If you create a KnowledgeBase record from the call, the problem is substituted here. Similarly, if you create a call from the KnowledgeBase record, the problem is copied to the problem field.
Solution Detail any advice or technical tip that is a solution to the problem. This field relates to the solution field on the call record and is used as a default, as described for ‘Problem’ above.
If automatic spell-checking is selected on your login record, any input text is checked when you end input here. Otherwise, use the spell checker button to verify the text.
Archive Tick if this KnowledgeBase record is no longer used.
Internal Leave unticked if this KnowledgeBase record is to be visible via the WebServer.
FAQ Tick the box if the problem and its solution occur regularly. This causes it to appear in the ‘Frequently Asked Questions’ section of WebServer as well as the KnowledgeBase.
Web Hits Indicates how many times the KnowledgeBase entry has been viewed through the WebServer
Resolutions This is the number of times the entry has been used for the successful resolution of a call.
URL To make direct links to other web sites; for example, www.borland.com. Click the URL label to access the site.
Click the available buttons:
Copy Paste
to transfer the solution between entries via the clipboard.
Raise New Call: to create a call from the current KnowledgeBase record, with the problem and solution fields carried forward to the call problem and solution fields. The Call Details dialogue is then loaded so that you can enter further details for the call.
Mail: to activate mail client software and send a copy of the KnowledgeBase record. This button is only available if the E-Mail add-on is in operation.
Attachments Tab
Use this tab to attach documents to the KnowledgeBase record. You might attach a zip file that contains the latest release that should be issued to resolve this problem. Attached files are copied to the attachkb sub-directory.
Refer to “Common Processing” in the “SupportDesk Features” chapter of the Using SupportDesk guide for a description of this tab.

User's Guide for SupportDesk D-25
5 Activities
You can list activity records at the main window, in the order they were entered, by clicking the Activities icon in the Explorer panel.
Refer to “Changing the Appearance of the SupportDesk Window” and “Use of the Right Mouse Button” in the “SupportDesk Features” chapter of the Using SupportDesk guide for information about processing at the main window.
5.1 Adding Activities
You can add activities, as reminders of related tasks or events that need to take place, to the following records: customers, contacts, inventory, contracts, calls and sales opportunities. The types of activity you can record are defined using the Service Level Management dialogue (described in the Setup chapter in the Administrator’s Guide).
To list the activities for any of these records, select the Activities tab. Use the adjacent buttons to Add a new activity or Delete the highlighted entry. The Done! button marks the selected activity as being completed. Double-click to Open an existing entry and show the activity details.
You can also create activities by selecting New: from the right-click menu while listing activities at the main window.
Activity Details
Activity Dialogue, Details Tab

D-26 User's Guide for SupportDesk
Type Select from the list the type of activity you wish to record. The list is defined by a Supervisor at the Service Level Management dialogue. Click the Type label to access the selected type record.
Duration The expected duration will default to the value set on the activity category. Making an alternative selection from the lists can alter the time.
Scheduled Date & Time
This date and time are calculated by adding the ‘Action Within Date & Time’ on the selected activity category to the current date and time, conforming to the rules set by the Company Configuration Calendar (described in the Administrator’s Guide). You can overwrite the calculated values. Click on the Scheduled Date label to show the calendar.
Internal Tick the box if details of the activity are not to be available to WebGuest users via WebServer.
Comms An email address may be shown, obtained from the related call, customer or contact record. You can enter a different address to which details of the activity are to be sent.
SLA If a service level applies for the customer, product or inventory item, it will be shown here. You can choose another for the activity.
Detail This entry defaults to the description entered on the selected activity category but you can add and change text.
Use the Spell Checker button to check the spelling.
Scheduled For This field normally defaults to the login entered in the ‘Assign To’ field on the activity category. If this has not been completed, your login name is used instead. You can select an alternative from those listed.
Click the Scheduled For label to access the record for the selected login.
Reminder Date & Time
This date and time are calculated by adding the ‘Warning After Date & Time’ on the selected activity to the current date and time, conforming to the rules set by the Company Configuration Calendar (found on the Setup menu). You can overwrite the calculated values. Click on the Reminder Date button to show the calendar.
Don’t Remind Again
Tick if you do not want reminders to pop up when the reminder time has expired.
Customer
Contact
Inventory
Product
If the activity is created from a customer, contact, inventory (referred to as CI in an ITIL environment) or product record, the corresponding reference is shown here. Select an alternative from those listed. Click a label to access the selected record.

User's Guide for SupportDesk D-27
Supplier The supplier name can be brought forward from the activity category. You can select any supplier from the list to identify who supplies the activity. Click the Supplier label to access the selected record.
Source This entry identifies the source of the activity, such as a particular call. Click the button to view the record and possibly update it.
A Campaign Response button appears on Marketing Campaign follow up activities to increment the number of responses counter on the associated campaign. The button only affects the counter once. After you click OK, it is removed.
Activity Costings and Conclusion
Activity Dialogue, Costings & Conclusion Tab
Creation Date & Time These fields default to today’s date and time.
Completion Date & Time
Enter the date and time the activity was completed. Alternatively, click the Completion Date label or the Completed check box to insert the current date and time.
Completed Tick to flag the activity as being completed. The current date and time are substituted into the Completion Date and Time fields.
Archive The entry is automatically ticked when Completed is ticked, providing that automatic archiving is selected through company configuration. Untick this box if you want the activity to remain in the live list. Archived activities are listed at the main window when you view archived records.
Conclusion
Enter any concluding comments. You can check the spelling using the Spell Checker button.
Scheduled By Displays the login who originally entered the activity.

D-28 User's Guide for SupportDesk
Expected/Actual Elapse Time
These values are calculated and displayed when the activity is complete. The Expected Elapse Time is the difference between the creation and scheduled dates and times, while the Actual Elapse Time is the difference between the creation and completion dates and times.
Budget The budget figure from the selected activity category is displayed here. You can alter the value.
Percentage Enter a figure to reflect the percentage of the budget realised.
Actual Enter the actual value achieved.
Job Costing Input the number of hours or days to be charged to the activity. If there is a rate set for the appropriate activity category, customer or product, it is shown and used to calculate the total cost. Otherwise, you can enter a rate. Costs relating to call records are shown on the Analysis tab of the Call dialogue.
Activity Attachments
Use this tab to attach documents to the activity, such as a detailed description of a procedure. Refer to “Common Processing”, within the “SupportDesk Features” chapter of the Using SupportDesk guide, for information about this form.
5.2 Activity Reminders
When the reminder date and time have expired for an outstanding activity, a reminder is issued. This appears as a pop-up window on the scheduled login’s screen. If there is no reminder date entered, the scheduled date is used instead.
The reminder shows the activity type and detail along with the date and time by which the activity should be completed.
You can click the activity reference to access the original activity record.
Activity Reminder Pop-up
To clear the pop-up, click the Don’t Remind Me Again button or click Remind Me Again in after rescheduling the reminder for a later time by selecting the required period. Click Done! if the activity has been completed.

User's Guide for SupportDesk D-29
Using Activities to Record Job Costs
You can set hourly and daily cost rates by:
These rates vary depending on:
Customer whom the work is being done for
Login who is doing it
Product what is being worked on
Activity what is being done.
When you complete an activity, you can specify the time that is to be charged. The cost rate to be used depends on what is available, since activities are undertaken for specific customers and products, and by assigned logins.
The different cost rates are applied in the sequence they are listed above and take preference over lower-level costs. Thus, if a cost rate is set for the customer, this is always used. Failing this, the login rate is used, if present, otherwise the product, then the activity.
If no rates are set for any of the records, they can be input for the activity against which the time is booked. The total cost of each activity can therefore be calculated.
Standard reports will be available to provide job costing information. Additionally, you can develop your own reports to produce cost analyses with a required format and content.

D-30 User's Guide for SupportDesk
6 Product Menu
All items that are supported through the help desk must be created as products within SupportDesk. You will therefore add further products as they occur.
It is likely that your product range is continuously being reviewed and updated. Consequently, SupportDesk maintains various versions for a product so that you can record products that have been released and also those that are currently under development.
There is no reason why you should limit yourself to recording only saleable products. Against a product and version you may assign a status that can be used to indicate the development or release level reached. For example, status can be used to indicate ‘Prototype version only’, ‘Released to Quality Assurance for testing’, ‘No longer maintained’; etc.
To list Product records at the main window, expand the Configuration Management entry in the Explorer panel and then click Products. You must have at least Support level privilege to do this.
Refer to “Changing the Appearance of the SupportDesk Window” and “Use of the Right Mouse Button” in the Using SupportDesk guide for information about processing at the main window.
At the Product menu, choose:
New: to create a product record. You can also select New: from the toolbar or right-click menu when products are listed at the main window.
Open: to display a list of products and select one to edit. You can also double-click a product listed at the main window to access it.
Delete: to clear a selected product and all its versions. Double-click a listed product or select it and click Delete. You are warned if it is referenced by a customer or call and must confirm the action.
Print: Publish:
to print or publish a summary report of all products, showing the fields listed at the main window.
6.1 Adding and Maintaining Products
Process the Product Details dialogue to enter product information and define the versions of the product. You can also use the tabs to interrogate and analyse calls relating to the product.

User's Guide for SupportDesk D-31
Details Tab
Product Details Dialogue, Details Tab
Ref Enter a unique reference for the product. It will be generated for you or default to the first part of the name, depending on system configuration.
Status To hold a release status for the product. If this is ‘Audited’, it has been set automatically as a result of auditing the product (see the “PC Audit” chapter in the Administrator’s Guide).
Group/Type Select the relevant product group or type for this product or enter one that does not exist. When entering a call, only Type categories that have a matching or blank product group will be available for selection, ensuring that only appropriate ones are listed.
Licences Enter the number of logins licensed for this product. The Auditor will use this number to check if there are too many logins for a product (refer to the “PC Audit” chapter in the Administrator’s Guide).
Rate per Hour/Day Indicate the cost rate for support of this product. This rate is used in preference to any set for an activity category but can be overridden by login and customer rates. Refer to “Using Activities to Record Job Costs” on page 29 for a description of job costing.
Service Level Select a service level that should be attained for the product. Service levels are set up at the Service Level Management dialogue (described in the Administrator’s Guide). When calls are created for this product, the level category on the call defaults to this setting.

D-32 User's Guide for SupportDesk
Folder All available folders are listed and you can click on and highlight those appropriate for this product.
The product is only listed at the Call dialogue when one of these folders is being used. Products with no specific folder are always listed.
Contract Number
Supplier
Select the appropriate contract and supplier from the pull-down lists. Click the associated button if you need to see more details.
If you select a contract and the product is subsequently included in a customer’s inventory, the contract information is carried through to the inventory.
Stock Control Tick the box if details are to be entered for asset management purposes.
Number in Stock Number Used/Sold
The opening stock is input initially. As products are issued, the stock level is reduced and the usage is increased.
Reorder Limit An order for stock of the product is required once the balance falls to this level.
Reorder Amount Enter the number to be ordered, once the reorder limit is reached, to restore the balance to the necessary level.
E-Mail If a call is raised against this product, a message is sent to the address entered here. Leave blank if this is not required
Assignee Choose a person to whom a call received in respect of this product is to be assigned automatically. This may be whoever logs the call (<Login>) or can be blank.
File Name Enter an executable name that is associated with the product. This is loaded automatically by PC Auditor.
Price To record the price of the product. The field is used by Sales Opportunities and Purchase Orders.
Currency If the price is not in the home currency, select the appropriate one from values previously entered on other records.
Archive Tick to archive the product.
Internal Tick the box if this product is not to be available to a customer via the WebServer, otherwise leave unticked.
The version list shows all versions of the product. You can select the New: button to create a further version, Open: to update an existing one, or Delete: to clear a version. You must confirm a deletion and are warned if customers or calls refer to the version.
Refer to “Product Versions”, on page 34, for description of versions.

User's Guide for SupportDesk D-33
Attachments Tab
Use this tab to attach documents to the product, such as a product specification or instruction sheet. Attached files are copied to the attachp sub-directory.
Refer to “Common Processing” in the Using SupportDesk guide for a description of processing.
Extra Fields Tab
A Supervisor can define extra fields for products by using Setup | Extra Fields. This is described in the Administrator’s Guide and also more generally at “Common Processing” in the Using SupportDesk guide.
Search Related Calls Tab
This tab lists the calls in the current folder that relate to the product being interrogated. Processing is described at “Common Processing” in the Using SupportDesk guide.
Analysis Tab
Use the Analysis tab for a summary of call information relating to the product under interrogation.
The display gives totals for the number of calls that:
� are currently open
� are currently closed
� have been opened today
� have been closed today
� have exceeded their action date
� are owned by the login
� are assigned to the login.

D-34 User's Guide for SupportDesk
Product Details Dialogue, Analysis Tab
6.2 Product Versions
When a product is developed, various versions of it may be released. To accommodate this, SupportDesk has the ability to hold multiple versions for a product. A customer call can then be related not only to a product but its version as well.
You can create product versions by clicking the New... button at the Product Details window. To update an existing product version, highlight the version and then click Open: at the Product Details window.

User's Guide for SupportDesk D-35
Product Version Details Dialogue
Version Enter a unique version reference.
Price This field holds the current price of the version. It is used by Sales Opportunities and Purchase Orders.
Currency If not priced in the home currency, select the appropriate one from values previously entered on other records.
Internal Leave this box unticked if you wish this product version to be visible to WebGuests via the WebServer.
Archive Tick to archive this product version. Archived versions do not appear in live data lists.

D-36 User's Guide for SupportDesk
7 Customer Menu
Any user of a product may be recorded as a customer in SupportDesk. You need not restrict yourself to simply recording customers who have purchased products.
As your customers may have more than one product or product version, SupportDesk allows the customer's inventory to have multiple entries of the same product. At the Company Configuration dialogue a switch can be set that will list the selected customer's inventory at the Call dialogue rather than the full product list.
If you are using SupportDesk as an internal IT Helpdesk, the SupportDesk customers will in fact be the users you are supporting. In this situation you are likely to be using the PC Auditor module to log PC inventory, in terms of hardware and Windows software.
You can use SupportDesk to register any problems encountered during the development of a new product or version, by treating the Quality Assurance department as a customer within SupportDesk. The queries, suggestions and problems encountered by the ‘Customer’ when evaluating the product can then be recorded as a call in SupportDesk. Assigning the Development Team as users of the system should ensure that areas of the product under question are addressed.
Similarly, you could enter the details of potential customers and use Marketing Campaigns and Sales Opportunities to ensure that all sales correspondences are recorded and dealt with. Thus, being able to monitor the sale’s progress.
For those with the WebServer option, you can set up a customer contact as a WebGuest via the Customer or Contacts dialogue.
You can list customer records at the main window by expanding the Configuration Management entry in the Explorer panel and then clicking Customers. You must have at least Support level privilege to do this.
You can strike a letter key to start the display with records where the customer name commences with that letter.
Refer to “Changing the Appearance of the SupportDesk Window” and “Use of the Right Mouse Button”, in the Using SupportDesk guide, for information about processing at the main window.
At the Customer menu, choose:
New: to create a customer record. You can also select New: from the toolbar or right-click menu when customers are listed at the main window.
Open: to display a list of customers and select one to edit. You can also double-click a customer listed at the main window to access it.

User's Guide for SupportDesk D-37
Delete: to clear a selected customer record plus all its inventory and contacts. Double-click a listed customer or select it and click Delete. You are warned if the customer has outstanding calls and must confirm the action.
Note: Instead of deleting a customer you can mark it as archived. This retains the record but removes it from the list of live customers to the archive folder.
Print: Publish:
to print or publish a summary report of all customers. The fields reported are those listed at the main window.
Inventory Contacts
to maintain inventory or contacts for the customer.
7.1 Adding and Maintaining Customers
Use the Customer Details dialogue to enter customer name, address and communication details. You can also use the tabs to interrogate and analyse calls relating to the customer. Use the lower tabs to associate activities, inventory and contact information with the customer.
Details Tab

D-38 User's Guide for SupportDesk
Customer Details Dialogue, Details Tab
Reference Enter a unique reference for the customer. It will be generated for you or default to the first part of the name, depending on the system configuration.
Dept/Group To group like customers for reporting. If a customer is part of a group and any of its contacts are identified as group contacts, they can be selected as contacts for any customer within the group.
Location Here you can enter or select an indication of the customer’s whereabouts (such as a sales or delivery region).
Zip/Postcode For the address’s postal or zip code.
Currency For overseas companies, enter the currency in which amounts are stated.
Phone 1 Phone 2
The customer’s main telephone number is displayed at the call dialogue when the customer has been selected and an alternative number can also be input here. For those with the Telephony optional add-on, clicking either label will use the indicated number to telephone the customer.
E-Mail For those with the E-Mail optional add-on, click the E-Mail label to e-mail the customer at this address.
No Automatic E-Mails
Tick the box if automatic e-mails should not be sent to this customer.
E-Template Select an email template or create one by clicking the label. New call email messages to this customer have the format and content set through the template.
Mobile Enter a mobile phone number for the customer.
Contract Number If the customer has a service contract, select it from the pull-down list. In this case, the expiry date, service level and fee may be inserted automatically from the contract.
Expiry Date Enter the date of termination of any maintenance agreement. The field is displayed at the Call dialogue when the customer is selected. If the date has expired a message pops up as a reminder.
If a contract is selected, its expiry date is shown. You can change the date for this customer.
SLA This pull down lists the SLA categories. Select a default level for the customer. When calls are created for this customer, the SLA category defaults to this setting. This feature is useful for recording and acting upon service level agreements.
An SLA may be obtained from a specified contract but can be changed for this customer. Click the button to view service level details.
Fee This field can be used to record a renewal fee. Any fee set for a selected contract will be shown as default but a different fee may be applied to this customer.

User's Guide for SupportDesk D-39
Folders All available folders are listed and you can click on and highlight those for this customer.
The customer is only included in the customer list at the Call dialogue when the selected folder is one of those chosen here. Customers with no specific folders are always included in the Call dialogue customer pull down. Calls are inserted into the current folder.
Title This applies if the customer is a person rather than an organisation. If so, enter or select their title.
Type Analyse the customer by entering or selecting a type.
Acc Mgr Enter or select the name of the person who is handling this customer’s account.
Market Enter or select a market area for the customer. This could either be a region or industry sector
Website Clicking the WebSite label will automatically connect to the URL you specify here.
Serial # This field may be populated by the LDAP or Audit options, when the customer record is used to hold equipment details, such as a PC. An alternative value can be entered.
Assignee Choose a person to whom a call received in respect of this customer is to be assigned automatically. This may be blank if no-one is to be assigned.
Sub-tabs are available:
Details Enter descriptive text plus any latest news on this customer. The latter is displayed when the customer is selected at the Call dialogue. You can also set flags:
� Archive — tick to archive the customer. � Web Enabled — tick for this customer to be visible via the WebServer.
� Internal — tick if the customer being supported is internal. � Charge — tick if you wish to record charges for this customer. When calls are raised for this customer, a cost will be recorded, taken as the price entered against a selected category.
� Support Calls — tick the box if the customer has pre-paid for a number of support calls.
� Calls Left — if a new customer has pre-paid support calls, the number defaults from the Company Configuration record (described in the Administrator’s Guide) but you can override this value. The number is reduced as calls are logged.
� Rate per Hour/Day — indicate the support cost rates for this customer. If set, these rates override all other rates. Refer to “Using Activities to Record Job Costs” on page 29 for a description of job costing.

D-40 User's Guide for SupportDesk
Activities This sub-tab lists the activities set against this customer. The buttons can be used to Add another activity or Delete the highlighted entry. The Done! button flags the highlighted activity as having been completed. Double-clicking on the selected entry can open an existing activity. Activities are covered on page 25.
Inventory This sub-tab lists the inventory logged against this customer and contact. The buttons can be used to Add another item of inventory or Delete the highlighted entry. Double-clicking on the selected entry opens the Inventory detail. Inventory is covered on page 42.
The type pull-down in the right-hand corner can be used to filter the inventory listed. This is particularly useful for inventory loaded by the Audit module. Refer to the “PC Audit” chapter in the Administrator’s Guide.
Contacts This sub-tab lists the contacts for this customer. The buttons can be used to Add another contact or Delete the highlighted entry. Double clicking on the selected entry opens the contact. The topic of Contacts is covered on page 48.
Contracts Any contracts placed for the customer are listed here, showing details for each one. You can add and delete contracts and can click Expand for a selected contract to list, at the Inventory tab, the inventory covered by it.
Changes Through the Data Dictionary (described in the Administrator’s Guide) you can specify where auditing of field changes is required. If any customer fields are marked for auditing and changes are made to them for this customer, details are listed here. Each entry shows the fields changed, when and by whom, and the old and new values.
Click the Make WebGuest button to add the customer to the list of WebGuest logins. This gives the customer remote access to SupportDesk via the Internet. You are transferred to the Login Details dialogue (described in the Administrator’s Guide). This button is only available to Supervisor logins.
Attachments Tab
Use this tab to attach documents to the customer, such as a product specification or instruction sheet. Attached files are copied to the attachc sub-directory.
Refer to “Common Processing” in the “SupportDesk Features” chapter of the Using SupportDesk guide for a description of this tab.
Extra Fields Tab
Extra fields can be defined for customers by a Supervisor using Setup | Extra Fields. This is also described in the Setup Menu chapter of the Administrator’s Guide and at “Common Processing” in the “SupportDesk Features” chapter of the Using SupportDesk guide.
User's Guide for SupportDesk D-41
Search Related Calls Tab
This tab displays a separate screen that lists the calls in the current folder that relate to the customer being interrogated. Processing is covered at “Common Processing” in the “SupportDesk Features” chapter of the Using SupportDesk guide.
Analysis Tab
Use the Analysis tab for a summary of call information relating to the customer under interrogation.
The dialogue has been described on page 33.

D-42 User's Guide for SupportDesk
8 Inventory
Inventory refers to the products that a customer has and which are covered through the SupportDesk. All inventory must therefore first be set up as a product and then linked to a customer that has it installed.
Note: In an ITIL environment, the term ‘configuration item’ (or CI) will be used instead of ‘inventory’.
8.1 Processing Inventory
You can list inventory records, in customer order, at the main window. To do this, expand Configuration Management in the Explorer panel and then click Inventory . You can only do this if you have at least Support level privilege. Double-click any entry to view the details.
Refer to “Changing the Appearance of the SupportDesk Window” and “Use of the Right Mouse Button”, in the “SupportDesk Features” chapter of the Using SupportDesk guide, for information about processing at the main window.
You can also access a customer’s inventory from the Inventory tab of the customer or call record. Double-click an existing entry or click the Add: button to create inventory for the customer.
Input is over four tabbed forms.
Change Management
This feature is only available if you have the optional ITIL pack installed. In this case, you can select several pieces of equipment that require the same action and create a change request for them. This creates activities for each one so that the work is progressed. To do this:
1. Ensure the Change Management folder is selected in the Explorer panel.
2. Select Inventory at the Explorer panel to list CI items.
3. Highlight the CI items that are to be changed.
4. Choose New Change Request from the right-click menu.
5. Enter a description for the change request and click OK.
6. A call form is displayed so that you can enter details to create the change request. When you save the call, it will have an activity created for each selected CI item and can then be progressed as a normal call.

User's Guide for SupportDesk D-43
Asset Management
If you have the PC Audit feature (described in the Administrator’s Guide) installed, the inventory screen has an Asset Management menu. This generally applies if you operate an internal IT help desk so you can access individual PCs. Click:
� System Info to view the html record created when the PC was audited so you can see the software installed there.
� Take Control to access the PC and operate it remotely.
� Ping to test the connection to the PC.
Details Tab
Inventory Details dialogue, Details tab

D-44 User's Guide for SupportDesk
Id Depending on a company configuration setting, this number may be generated automatically or you can enter an identifying reference for the inventory, such as the asset tag number. This field can be made mandatory via the data dictionary. In this case, in an ITIL environment, it must also be unique. It can be referenced when logging a call.
Customer The customer is defaulted when adding inventory via customer details, otherwise you must select a customer. For existing inventory, if you choose a different customer, this will cause the inventory to be transferred.
Product Details
Product For new inventory, this field is empty.
If you have opened an existing inventory item, the product and version are displayed here.
Select the required product and version combination from the pull down list. Click the Product label to change or add the product details (see “Adding and Maintaining Products” on page 30).
All the remaining fields are optional and should be completed as required
Type The type set for the product.
Dept Identify the department that owns the item.
Serial # This field is displayed at the Call dialogue and can be used to identify the inventory item.
Asset # You may enter a number that is used to identify equipment in a register. The equipment may have a physical tag with the number or this may be held electronically.
Status
Analysis
Lists are created from the status and analyses of existing inventory. In an ITIL environment, status is used to indicate the item’s relative reliability.
Customer and Supplier Service Details
These details apply if there are service contracts between your company and the customer for support of the inventory item; also with a third party who provides the support. Input for the two types of contract is similar.

User's Guide for SupportDesk D-45
Contract No For a new entry, you can either:
� select the appropriate contract from the pull-down list. You can then choose to bring forward details and, if so, they are automatically inserted into the other fields.
� click the Contract No. label with no contract specified to create one (as specified at “Processing Contracts” on page 53).
� just enter a number and other details that only apply here. This data will not affect the contracts database.
If there are existing entries you can choose to change them for this contract. Click the Contract No. label to view and possibly update the standard contract details (refer to “Processing Contracts” on page 53).
Note: If you update a contract, this affects all inventory to which it relates.
Supplier For the supplier contract, you can select a supplier from the pull-down list, create a supplier record, or just enter a name, in the same way as for contracts. Click the Supplier label to create or update a supplier record.
Purchase or Start/Expiry Date
Indicate the periods covered by each contract. Click any date label to select from a calendar or the arrow button to set a date relative to today. You can also increment set dates by one month or a year to move them forward.
If the customer service contract has expired a message pops up as a reminder.
SLA/Service Level Select a service level that should be attained for the inventory item or use the one from the Contract record. SLAs are set up at the Service Level Management dialogue (described in the Administrator’s Guide). When calls are created for this inventory item, the SLA category on the call defaults to this setting. You can click the SLA/Service Level label to display the SLA category.
Fee/Cost Enter the fee paid by the customer to cover the contract period or the cost of the service provided by the supplier.
Period The start and expiry dates you have input will determine the length of the contract. However, for a customer contract, you can also enter a separate cover period.
A list is created from the periods of existing inventory.
Code This may be used for budget purposes.
Order/Invoice No. For a supplier contract, you may enter the number of purchase orders and invoices raised in respect of the contract.
Installation Details
Start/End Date These dates indicate when the inventory is being installed. It is therefore ready for use after the end date. Click either label to select from a calendar or the arrow button to set a date relative to today.

D-46 User's Guide for SupportDesk
Audit Date This date may be set automatically through the Audit module when the item is audited. Otherwise, you can enter or select a date.
Operation Status This field is available in ITIL environments to indicate the item’s availability. It may be in use, available for spares, etc.
Location
Building
Floor
Room
For these four fields, a pull down list is created from the text entered against existing inventory. They can be used to note the whereabouts of a product.
Contact The person to contact regarding this product. Select a contact from the pull down list of customer contacts or enter a new name. Click the Contact button to view or update the details.
Sub-tabs are available:
Details Here you can enter any required Narrative text. Tick the Archive box if the inventory item no longer applies for the customer. Tick Primary Item if this is the main inventory item for the customer and so is used as default for new call records.
Activities Any activities recorded for the inventory are listed. The buttons can be used to Add another activity or Delete the highlighted entry. The Done! button flags the highlighted activity as having been completed. Double-clicking on a selected entry opens the existing activity. Activities are covered on page 25.
Depreciation
With Finance or ITIL options, you can enter or select the depreciation details for the asset:
� Depr. Type — Choose to depreciate using a straight line or declining balance method, or if no depreciation applies.
� Percent Per Year — Indicate the percentage to be written off each year.
� Asset Life (Years) — Set the expected life of the asset.
� Salvage Value — Enter any expected value at the end of the asset’s life.
� Cost Centre — Depreciation costs will be charged against the cost centre
Click Calc. and depreciation values will be calculated over the life of the asset and saved here for future reference.
Changes Any changes to fields that are marked for auditing (through the Data Dictionary) are listed here.

User's Guide for SupportDesk D-47
Other Tabs
Processing of the remaining tabs is described at “Common Processing” within the “SupportDesk Features” chapter of the Using SupportDesk guide.
Attachments Tab Use this tab to attach documents to the inventory, such as a product specification or installation report. Attached files are copied to the attachcp sub-directory.
Extra Fields Tab The extra fields defined for inventory can be used here.
Search Related Calls Tab
This tab lists the calls in the current folder that relate to the inventory being interrogated.
Search & Link CIs This tab appears if you have the optional ITIL pack so you can link related inventory items. Processing is the same as when linking related calls.

D-48 User's Guide for SupportDesk
9 Contacts Every customer may have several contacts and full details of each one will be maintained. For those with the WebServer option, you can set up a customer contact as a WebGuest via the Customer or Contacts dialogue.
9.1 Processing Contacts for Customers
You can, providing you have at least Support level privilege, list contacts by customer at the main window. To do this, expand Configuration Management in the Explorer panel and then click Contacts. Double-click any entry to view the details.
Refer to “Changing the Appearance of the SupportDesk Window” and “Use of the Right Mouse Button” in the “SupportDesk Features” chapter of the Using SupportDesk guide for information about processing at the main window.
You can also access a customer’s contacts from the Contacts tab of the customer record. Double-click an existing entry or click the Add: button to create contacts for the customer.
Input is over four tabbed forms.
Details Tab
Contact Dialogue, Details Tab

User's Guide for SupportDesk D-49
Customer The customer is defaulted when a contact is added via the customer details, otherwise you must select the customer. For existing contacts, if you select a different customer, this will cause the contact to be transferred.
Dept/Group A list is created from the departments or groups of existing contacts.
Location Displayed at the Call dialogue when this contact is selected.
Address You can copy the customer name and address using the Inherit Customer Details button.
Post/Zip code The address’s postal or zip code.
Primary Contact Tick the box if this is the customer’s main contact. If so, the contact will appear by default against new calls for the customer.
Group Contact Indicate if the contact works at group level. If so, when processing a call, the contact can be selected for any customer that has the same group entered.
Archive Tick the box if the contact no longer applies.
Phone 1/2 Mobile IP Phone
If entered, the first number is displayed at the Call dialogue when the contact is selected. You can also enter alternative, mobile and IP numbers. For those with the Telephony optional add-on, click the appropriate label to phone the contact.
E-Mail For those with the Mail option, click the E-Mail label to e-mail the contact at the entered address.
Channel Select, from the pull-down list, the normal method of contacting the person. Your choice will require that the relevant contact details are entered (such as a mobile telephone number for contact by SMS).
Service Level Select a service level that should be attained for the contact. Service levels are set up at the Service Level Management dialogue. When calls are created for this contact, the SLA category on the call defaults to this setting. Click the label to access the SLA record.
Assistant If the contact has an assistant, enter their name. This person could be an alternative if the main contact is unavailable.
Time Zone Indicate if the person is located in a different time zone. This may prevent contact being attempted at inappropriate times.
Expiry Date Indicate when any associated service contract is due to expire.
Contact Details Sub-tabs
Activities Tab This sub-tab lists the activities set against this contact. The buttons can be used to Add another activity or Delete the highlighted entry. The Done! button flags the highlighted activity as having been completed. Double-clicking on a selected entry opens the existing activity. Activities are covered on page 25.

D-50 User's Guide for SupportDesk
Inventory Tab This sub-tab lists the inventory logged against the contact. The buttons can be used to Add another item of inventory or Delete the highlighted entry. Double-clicking on the selected entry opens the inventory detail. Inventory is covered on page 42.
Profile Tab Use this sub-tab to list the available profiles and select those that are appropriate for this contact. Contact classifications can be created by Supervisor logins from the Setup menu (described in the Administrator’s Guide), or by using the Explorer margin icon. The profiles are used by marketing campaigns to target appropriate contacts.
Changes Tab Any changes made to fields that are marked for audit through the Data Dictionary are listed here.
Click the Make WebGuest: button to add the contact to the list of WebGuest logins. This gives the contact remote access to SupportDesk via the Internet. You are transferred to the Login details dialogue. This button is only available to Supervisor logins.
Other Tabs
Features of the remaining tabs are described at “Common Processing” in the “SupportDesk Features” chapter of the Using SupportDesk guide.
Attachments Tab Use this tab to attach documents to the contact. Attached files are copied to the attachcc sub-directory.
Extra Fields Tab The extra fields defined for contacts can be used here.
Search Related Calls Tab
This tab lists the calls in the current folder that relate to the contact being interrogated.

User's Guide for SupportDesk D-51
10 Suppliers
The supplier database records details of all suppliers that you deal with on a regular basis. You can indicate the appropriate supplier when creating product, activity and contract records, and can also place purchase orders with specific suppliers. You can identify ‘one-off’ suppliers when creating these records, although these will not appear on the supplier database.
10.1 Processing Suppliers
You can view suppliers at the main window, providing you have at least Support level privilege. To do this, expand Purchasing in the Explorer panel and click Suppliers.
You can:
� click the right mouse button (described in the “SupportDesk Features” chapter of the Using SupportDesk guide) to add, edit and delete suppliers
� add and edit suppliers when entering other related data (such as purchase orders and products).
Input is over three tabbed forms.
Details Tab
Supplier Details dialogue, Details tab
Contact Indicate the person who is normally contacted at this supplier.

D-52 User's Guide for SupportDesk
Address Input the full address, including the post code.
Phone Fax E-Mail
Enter the indicated contact details for the supplier. If you have the Telephony option installed, clicking the Phone label will dial the number. Similarly, clicking the E-Mail label starts an e-mail message providing you have the Mail optional add-on. If so, and a specific email template is set up for supplier details, this is used for the message.
WebSite Clicking the WebSite label will automatically connect to the URL you specify here.
Archive Only tick the box if the supplier is no longer active and can be removed from the live database.
Other Tabs
Processing of the remaining tabs is described at “Common Processing” within the “SupportDesk Features” chapter of the Using SupportDesk guide.
Attachments Tab Use this tab to attach documents to the supplier, such as a copy of your terms and conditions. Attached files are copied to the attachsu sub-directory.
Extra Fields Tab The extra fields defined for suppliers can be used here.

User's Guide for SupportDesk D-53
11 Contracts
A contract may be placed with a supplier to cover support that the supplier provides or be available to customers for support that they receive. Each contract may be for a fixed period, provide a particular level of service and have a stated cost.
You can link contracts to specific products. If such products are then selected as part of a customer’s inventory, the contract details are carried through to the inventory.
11.1 Processing Contracts
To list contracts at the main window, expand Purchasing in the Explorer panel and click on Contracts. You must have at least Support level privilege to do this.
Refer to “Changing the Appearance of the SupportDesk Window” in the “SupportDesk Features” chapter of the Using SupportDesk guide for information about processing at the main window. Click the right mouse button (described in the “SupportDesk Features” chapter of the Using SupportDesk guide) and then choose New: to create a contract or Open: to access a selected contract.
Input is over four tabbed forms.
Details Tab
Contract Details dialogue, Details tab

D-54 User's Guide for SupportDesk
Contract No. A unique number to identify the contract, which may be generated automatically.
Start/Expiry Date If the contract has a fixed term, enter the appropriate dates. In each case, clicking the label will access the calendar.
Service Level Indicate the level of service that the contract is to provide. This relates to a category that identifies the terms of the SLA.
Type Enter or select a classification for the contract. The pull-down list shows previous entries.
Cost Input the cost of the contract for the defined period. This amount is charged for a customer contract or paid for a supplier contract.
Budget Cost/Code Enter a required figure and charge code here.
Notice Days Enter the number of days’ notice required when terminating the contract.
Terms
Status
These entries can be used for any purpose, such as payment terms for the contract charge and whether it is active.
Support Calls Tick the box if the contract covers a number of pre-paid support calls.
Calls Left For a new contract, the number defaults from the Company Configuration record but you can override this value. When this contract is assigned to a customer, the number is set as the number of pre-paid support calls. It is then reduced as calls are logged against this contract.
Archive Check the box if the contract is no longer available and can be archived.
External Contract Indicate if the contract covers service provided by a supplier. If the box is unticked, this will be a customer contract.
Supplier If this is an external contract, select the appropriate supplier from the pull-down list. You can click the Supplier label to access the supplier record and either create or amend details.
Customer
Contact
Product
Select the customer to which the contract applies, any person who is normally contacted and a particular product that is covered.
If you have changed any details for an existing contract, click the Update Items Covered button to apply the changes to all inventory items or customers that are covered by the contract.
The Activities sub-tab lists the activities recorded against the contract. Use the buttons to Add another activity or Delete the highlighted entry. The Done! button flags the highlighted activity as completed. Double-clicking a selected entry opens the existing activity (activities are covered on page 25).

User's Guide for SupportDesk D-55
Attachments Tab
Use this tab to attach documents to the contract, such as a copy of your terms and conditions. Attached files are copied to the attachco sub-directory.
Refer to “Common Processing”, within the “SupportDesk Features” chapter of the Using SupportDesk guide, for information about this form.
Extra Fields Tab
The extra fields defined for contracts can be used here. These are also described at “Common Processing” within the “SupportDesk Features” chapter of the Using SupportDesk guide.
Items Covered Tab
Contract Details dialogue, Items Covered tab
This form lists the inventory and customers that reference this contract. Any changes to the contract will therefore affect all these records. Double-click an entry to see its detail.

D-56 User's Guide for SupportDesk
12 Campaign Management
The Campaign Management tool is provided so that you can use the information held in the customer, contact and inventory databases to drive marketing campaigns. Extract this data to create form letters, e-shots or to be published on the Web.
The Campaign Management dialogue consists of a number of tabs:
� firstly define the campaign, giving it a title, description and possibly recording the expected outcome
� use the second tab to declare the rules for the extraction. Particular field values on the customer, contact and inventory records can be tested. For example, you could extract all the contacts classified as ‘Primary Contact’ where the customer is in London. (For further information on classifying Contacts, refer to the Administrator’s Guide).
� the third dialogue lists the results of the extraction. You can then decide whether to go back and fine-tune the rules or move on to the next tab, Run Campaign, where you can decide the form the output should take.
12.1 Viewing Campaigns at the Main Window
List campaign records at the main window by expanding CRM in the Explorer panel and clicking Marketing Campaigns. You must have the CRM option and access to Marketing Campaigns to see these records.
Refer to “Changing the Appearance of the SupportDesk Window” and “Use of the Right Mouse Button” in the “SupportDesk Features” chapter of the Using SupportDesk guide for information about processing at the main window.
12.2 Adding Campaigns
You can add campaigns while listing campaigns at the main window. Choose New: from the right-click menu to enter the details of a new campaign. Use the series of tabs to produce the campaign output. Each tab has a Copy button so that you can create a campaign that is based on a previous one.

User's Guide for SupportDesk D-57
Definition Tab
Campaign Management, Definition Tab
Campaign Id Displays the unique campaign identification number.
Title This a mandatory field to give the campaign a title.
Activator The list shows the available logins. If you:
� leave the field blank, any login with access to Campaign Management can run the campaign
� select a specific login, only that login can actually update and run the campaign.
Planning & Feedback Enter the following optional fields as required.
Launch Date Defaults to the date the campaign was created.
Status Code
These entries are used for analysis.
Budget Cost Sales
Enter required values in these three fields.
Number of Contacts Displays the number of contacts extracted on the last run of the campaign.
Number of Responses
You can create follow up activities on the Run Campaign tab. On these generated activities, there is an extra button — Campaign Response. Click this button to increment the number of responses for the related campaign. You can only do this once.
Expected Results Optionally enter the number of responses you expect to receive.
Archive Tick the box to archive the campaign.

D-58 User's Guide for SupportDesk
Rules Tab
Use this tab to define the rules for extracting the contact-related records.
If you test on two different values for the same field, the Boolean rule applied will be ‘Or’.
For example:
Or
Customer:Market = North West
Customer:Market = North East.
There are two exceptions to this rule; these are when testing the Contact:Classification or a date. In this case ‘And’ will be applied.
For example:
And
Customer:Expiry Date >= 01/7/01
Customer:Expiry Date <= 31/7/01
This is useful if your extraction is to be based on a date range.
The rule between different fields is ‘And’.
For example:
And
Contact:Classification = Sales
Inventory:Product <> Gamma.
Add rules using the selection boxes and the Add Rule button.
Campaign Management, Rules Tab
Campaign Criteria The rules that are currently defined are listed here.
Field Select from the list the field for which you want to create a rule. The field name is prefixed by the record name.
Operator Select from the list the most appropriate operator:
= equal

User's Guide for SupportDesk D-59
<> not equal
< less than
<= less than or equal
> greater than
>= greater than or equal
like for example, Consult will find Consulting and Consultancy
not like thus, selecting a town/city not like London will omit both London and Londonderry.
The operators available depend on the field selected.
Value Enter a value to be tested or select one from the list.
Include Customers with no Contacts
Tick the box if you want to consider customers that have no associated contact record.
Click Add Rule to add the rule to the list of campaign criteria and Delete Rule to remove a highlighted rule.
Data Extraction Tab
This tab simply lists the results of the extraction. After viewing and possibly amending them, you can choose to continue and run the campaign or return to the Rules tab to redefine the rules.
Campaign Management, Data Extraction Tab

D-60 User's Guide for SupportDesk
Run Campaign Tab
Use this tab when you wish to produce the output. You need to select at least one of the Output check boxes. Click the Run Campaign button to perform the extract.
Campaign Management, Run Campaign Tab
Publish Tick the box to publish your results as an HTML file. This loads your default web browser software so that you can view the results.
E-Mail Indicate if email messages are to be sent to all selected customers. If so, you can select a template to use for the message or click the EMail button to define the format and contents.
In the template, the variable fields are of the format <campaign:field name> where the field name is an extracted merge field. The available field names can be found in CRM Word.txt referred to below.
Word If ticked, the results are merged with a Word document. Click the Browse: button to select the required one.
By default, you will be taken to the SupportDesk Template directory where a number of supplied documents are listed. You can amend these to suit your own requirements or can add documents.
Once you click the Run Campaign!!! button, the selected file is opened in Word and you can select Tools | Mail Merge to complete the merge. The merge file is called CRM Word.txt (in the SupportDesk Template directory) and provides data for the Word merge document. Use Insert Merge Field to add fields from this file to your Word document.

User's Guide for SupportDesk D-61
Export Tick to export the extract file as comma separated value text.
Follow-up Activities
Select an activity for each of the Contacts extracted. Use the View Follow-up Activities button to see the activities created.
Campaign Management, SQL (Testing Only) Tab
If the data extracted for the campaign is not as expected, this may be due to the SQL generated by your rules being incorrect. You can view and possibly alter the SQL before running again.
Campaign Management, SQL (Testing Only) Tab
Sample Templates
Word merge documents are provided in the templates sub-directory. They output e-mails, faxes, letters and labels and are provided as examples of the types of output that can be produced. You can add other templates with different formats.

D-62 User's Guide for SupportDesk
13 Sales Opportunities
You can only access Sales Opportunities if you have the CRM option and this access area ticked on your login details (see Logins chapter in the Administrator’s Guide).
Sales opportunities are an aid to tracking potential sales information and managing sales schedules. Use the information held within the customer and product databases to keep track of these sales opportunities. You can analyse your trends and evaluate your pipeline history.
The various sales stages are defined using categories (covered in the Setup chapter in the Administrator’s Guide). A number of defaults are supplied but you can change them to suit your own requirements.
You can log the sales opportunities and can allocate a current sales stage to each one, along with other salient information such as products or the sales account manager. The opportunities can be analysed; for example, you can discern the likelihood of achieving completion or can interrogate levels reached by the sales team.
Attach activities to sales opportunities to give the team reminders of tasks to progress. If a sale is realised, the products logged against the sale can automatically become part of the customer’s inventory.
13.1 Sales Opportunity Details
Expand CRM in the Explorer panel and click Sales Opportunities to list current records at the main window.
Refer to “Changing the Appearance of the SupportDesk Window” and “Use of the Right Mouse Button” in the “SupportDesk Features” chapter of the Using SupportDesk guide for information about processing at the main window.
Input is over several tabs.
Details Tab
Here you can input information about a particular sales lead.
The first part of the dialogue displays the data relating to the prime contact for the sale. Other contacts are selected using the Contacts tab.
At the central area you can enter summary information for the current sale status.
Use the Purchases tab to identify the items involved in the prospective sale along with prices and any discount figures. The fields at the bottom of the dialogue will provide summary totals and allow you to enter a percentage likelihood of realising this sale.
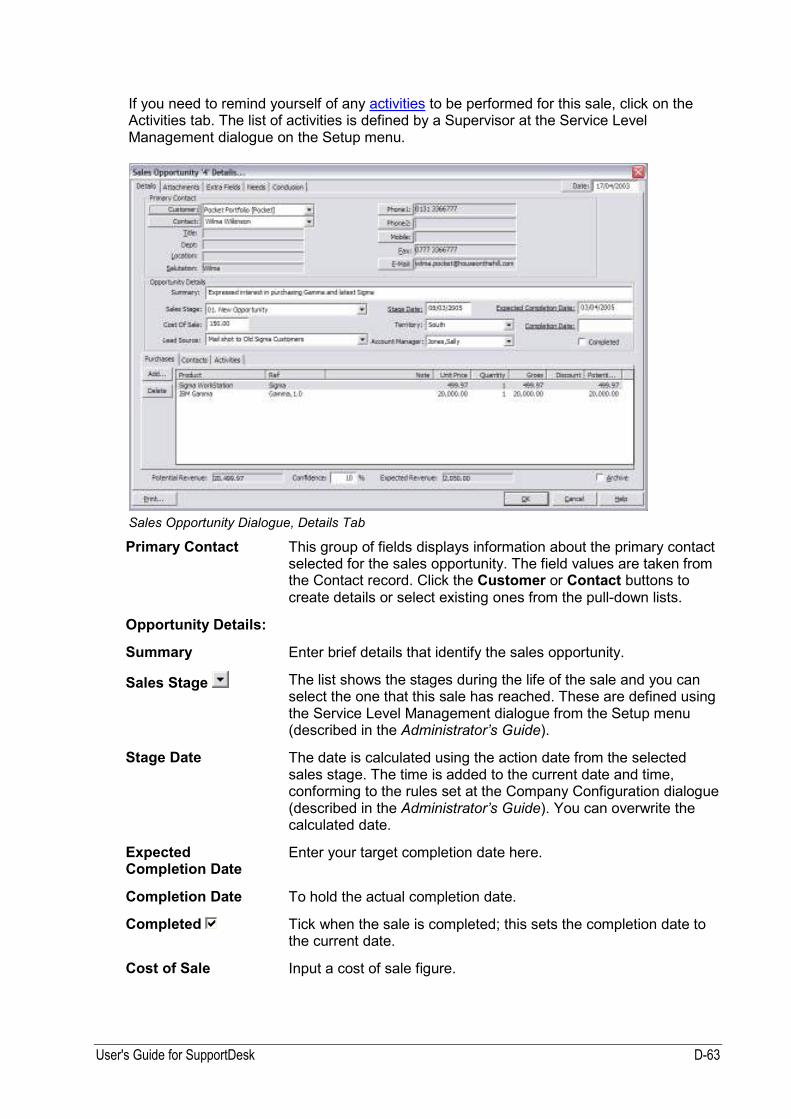
User's Guide for SupportDesk D-63
If you need to remind yourself of any activities to be performed for this sale, click on the Activities tab. The list of activities is defined by a Supervisor at the Service Level Management dialogue on the Setup menu.
Sales Opportunity Dialogue, Details Tab
Primary Contact This group of fields displays information about the primary contact selected for the sales opportunity. The field values are taken from the Contact record. Click the Customer or Contact buttons to create details or select existing ones from the pull-down lists.
Opportunity Details:
Summary Enter brief details that identify the sales opportunity.
Sales Stage The list shows the stages during the life of the sale and you can select the one that this sale has reached. These are defined using the Service Level Management dialogue from the Setup menu (described in the Administrator’s Guide).
Stage Date The date is calculated using the action date from the selected sales stage. The time is added to the current date and time, conforming to the rules set at the Company Configuration dialogue (described in the Administrator’s Guide). You can overwrite the calculated date.
Expected Completion Date
Enter your target completion date here.
Completion Date To hold the actual completion date.
Completed Tick when the sale is completed; this sets the completion date to the current date.
Cost of Sale Input a cost of sale figure.

D-64 User's Guide for SupportDesk
Territory The list shows the territories entered against the logins. It defaults to the territory of the Account Manager.
Lead Source Select from the list the marketing campaign that has generated this sales lead.
Account Manager The entry defaults to the current login but you can select a different one.
Potential Revenue This field displays the total potential revenue, calculated by summing all the potential values for the products in the sales opportunity.
Confidence Enter a percentage to reflect the likelihood of achieving the sale. A default figure is brought forward from the selected sales stage category.
Expected Revenue This figure is the confidence rating applied to the potential revenue.
Archive Tick the box if the opportunity is to be archived.
Click the Print: button to print a sales opportunity report using current information.
Purchases Tab
Use this tab to identify the products that are involved in the sale. Click Add to add a product or double-click an existing one to display the Purchase Details dialogue. You can then make selections and enter values relating to this potential purchase item.
Sales Opportunity, Purchase Details
Product Select a product from those listed.
Note Enter a note that you wish to record regarding this purchase item. The text will appear on the quotation.

User's Guide for SupportDesk D-65
Unit Price This unit price defaults to the one on the selected product but can overwritten.
Quantity Enter the number of items expected to be sold.
Gross This calculated figure is displayed as unit price x quantity.
Discount Enter any discount amount here.
Potential Revenue This calculated figure is displayed as the gross amount less the discount.
Contacts Tab
This tab lists the customer contacts for this sale. Double-click an entry to display the Contact Details.
Use the buttons as follows:
Select presents the Select Contacts dialogue so that you can choose a new contact to add to the list.
Remove clears the highlighted contact from the list.
Primary flags the selected contact as the prime one for the sale.
At the Select Contacts dialogue, all the contacts are listed in alphabetical order. Choose a customer so that the list only shows contacts for that customer. Highlight a contact and click OK to select and add a new contact to the sales opportunity list, or use the Add New Customer/Contact button to create a contact record at the Contact Details dialogue (described on page 48).
Sales Opportunity, Select Contacts

D-66 User's Guide for SupportDesk
Activities Tab
This tab lists the activities set against this sales opportunity. Use the buttons to Add another activity or Delete the highlighted entry. The Done! button flags the highlighted activity as completed. Double-clicking a selected entry opens the existing activity (activities are covered on page 25).
Attachments Tab
Use this tab to attach documents to the sales opportunity, such as a report files that detail the sale progress. Attached files are copied to the attachop sub-directory.
Refer to “Common Processing” in the “SupportDesk Features” chapter of the Using SupportDesk guide for a description of this tab.
Extra Fields Tab
Extra fields can be defined for sales opportunities by a Supervisor using Setup | Extra Fields. This is described in the “Setup Menu” chapter of the Administrator’s Guide and also at “Common Processing” in the “SupportDesk Features” chapter of the Using SupportDesk guide.
Needs Tab
Use the needs tab to record arguments for the sale and to produce a quotation for the prospect.

User's Guide for SupportDesk D-67
Sales Opportunity Dialogue, Needs Tab
Problem Identify the problem areas that this sale will resolve for the prospect. Alternatively, you could highlight potential pitfalls in the sale process.
Solution Indicate the benefits to the prospect of this purchase or provide possible solutions to the above problems.
Value Identify for the prospect the advantageous aspects of the purchase.
Potential Revenue The figure from the Details tab is shown for information.
Discount Enter any further discount amount.
Shipping The default figure for shipping is obtained from the Company Configuration dialogue but you can alter it.
Tax Shipping? Tick the box only if tax is calculated on the shipping value.
Tax The sales tax is calculated based on the tax rate supplied at the Company Configuration dialogue (described in the Administrator’s Guide). The rate is applied to revenue less discount plus shipping (if the latter is indicated).
Total The total is calculated (revenue – discount + shipping + tax) and displayed.
Quotation Enter a reference for a sales quotation.
Click the Print Quotation: button to produce a quotation using the current information.

D-68 User's Guide for SupportDesk
13.2 Sales Opportunity, Conclusion Tab
Here you can enter concluding comments for the sale and transfer the sale details over to the Helpdesk.
Conclusion Enter your concluding comments.
Result Select a result from those listed or enter a new code.
Click the Transfer Purchases to Helpdesk button to transfer the products that are identified on the Details tab to the inventory of the customer record. In order for this transfer to take place, the sales opportunity must be marked as Completed on the Details tab and the selected result on this tab must be Win.
The following information is carried forward:
Product Reference Opportunity Reference Completion Date Note (from Purchase Details) Quantity (from Purchase Details) Quotation Reference (from Needs tab)

User's Guide for SupportDesk D-69
14 Purchase Orders
The processing of purchase orders normally applies when you use SupportDesk for internal support. In this case, you will order and install products for specific users (that is, customers).
14.1 Processing Purchase Orders
To view purchase orders at the main window, expand Purchasing in the Explorer panel and then click Purchase Orders.
You can alter the displayed details, as described at “Changing the Appearance of the SupportDesk Window” in the “SupportDesk Features” chapter of the Using SupportDesk guide. Click the right mouse button at the list and then choose New: to create a purchase order, or Open: or Delete: for a selected one.
Input is over three tabbed forms.
Details Tab
Purchase Order Details dialogue, Details tab

D-70 User's Guide for SupportDesk
PO Number The next available number is generated automatically if this is specified through Company Configuration, described in the Administrator’s Guide, but you can change to another number that is not already used.
Raised By
Authorised By
Indicate who is responsible for raising and authorising the purchase order. The lists show customers by default in each case since orders will normally be placed by internal users that you support. You can choose instead to show logins or the contacts for every customer.
For Attention Select from the list the name of the person who will receive the ordered goods. Again, since you are placing the order for an internal user, the list default to customers. The ‘Ship To’ address will reflect your selection.
Ship To Bill To
For a new purchase order, both entries will default to your company’s name and address (input through Company Configuration). You can change them if the delivery or invoice addresses are different.
Archive Only tick the box if the purchase order is no longer active and can be archived.
Date Raised The date defaults to today but can be changed.
Date Authorised Date Required Date Received
Enter the indicated dates when the relevant event has occurred.
Status Select or input the appropriate status for the order. This may be changed as the order progresses. The list shows previous entries to this field.
Supplier The normal procedure is to select an existing supplier from those listed. This then populates the various fields for the supplier although you can change the details for this purchase order only. To alter the supplier details generally, click the Name button to access the supplier record.
If the supplier record has not been created, enter the details here and then click the Name button to update the supplier record. Alternatively, click the Name button and input data directly to the supplier record.
If you enter or change details here without accessing the supplier record, they apply only to this purchase order and are not held on the supplier database.
Order lines
The Purchases sub-tab lists the products covered by the order. You can choose Add: to insert a line, Delete to remove a product from the order, and double-click an existing entry to change its details.
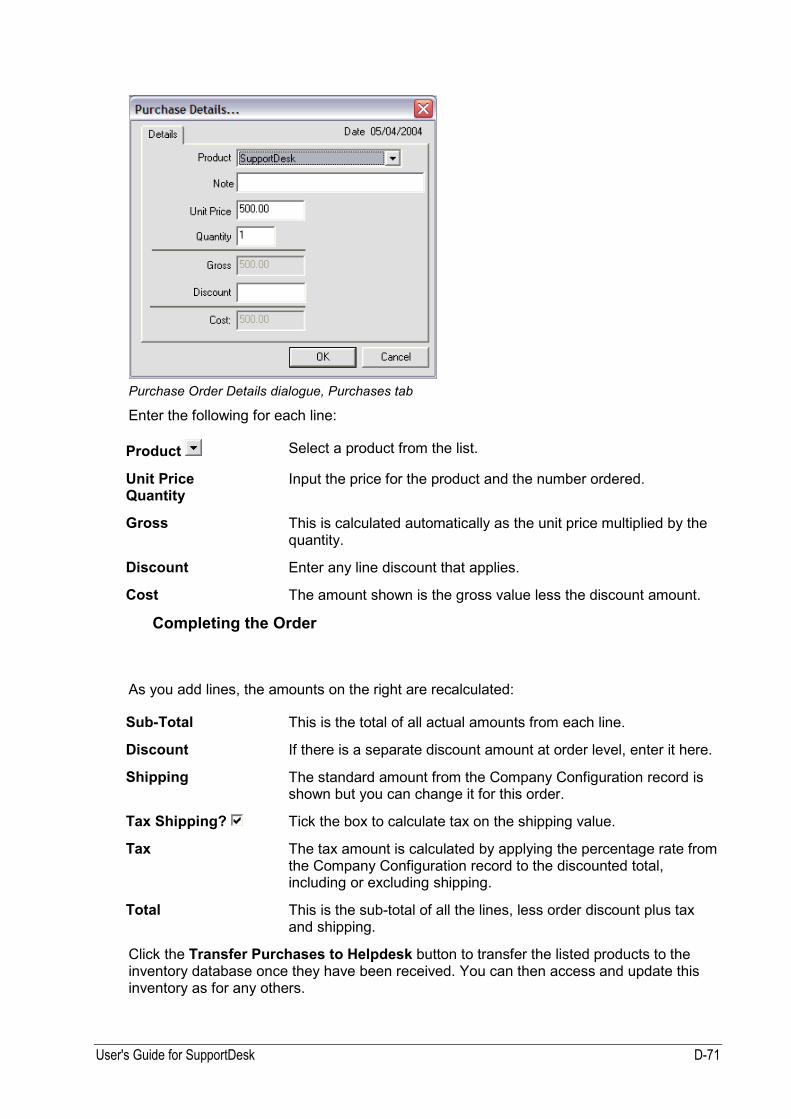
User's Guide for SupportDesk D-71
Purchase Order Details dialogue, Purchases tab
Enter the following for each line:
Product Select a product from the list.
Unit Price Quantity
Input the price for the product and the number ordered.
Gross This is calculated automatically as the unit price multiplied by the quantity.
Discount Enter any line discount that applies.
Cost The amount shown is the gross value less the discount amount.
Completing the Order
As you add lines, the amounts on the right are recalculated:
Sub-Total This is the total of all actual amounts from each line.
Discount If there is a separate discount amount at order level, enter it here.
Shipping The standard amount from the Company Configuration record is shown but you can change it for this order.
Tax Shipping? Tick the box to calculate tax on the shipping value.
Tax The tax amount is calculated by applying the percentage rate from the Company Configuration record to the discounted total, including or excluding shipping.
Total This is the sub-total of all the lines, less order discount plus tax and shipping.
Click the Transfer Purchases to Helpdesk button to transfer the listed products to the inventory database once they have been received. You can then access and update this inventory as for any others.

D-72 User's Guide for SupportDesk
Attachments Tab
Use this tab to attach documents to the purchase order, such as a copy of your terms and conditions. Attached files are copied to the attachpo sub-directory. Refer to “Common Processing” in the “SupportDesk Features” chapter of the Using SupportDesk guide for a description of this tab.
Extra Fields Tab
Extra fields can be defined for purchase orders by a Supervisor using Setup | Extra Fields. This is described in the “Setup Menu” chapter of the Administrator’s Guide.
This tab is also described at “Common Processing” in the Using SupportDesk guide.

User's Guide for SupportDesk D-73
15 Statistics and Graphics
You can only use the Statistics menu while viewing calls, to produce information about those calls. The calls tabulated are subject to any filter currently in effect. The company name and department specified on the Company Configuration dialogue (described in the Administrator’s Guide) are taken as the first report heading along with today’s date.
You can choose:
� Performance Reporting to generate statistical reports. � Graphics to output charts. � Call Information (refer to “Processing the Call Information Box” in the “Using SupportDesk” chapter of the Using SupportDesk guide).
Use the following buttons to view Statistics and Graphics.
Turn to first page
Turn back a page
Current page number and total number of pages
Turn to next page
Turn to last page
Print report
Export/Mail report
Changes the magnification level of the displayed graphic.
Total number of non-zero table entries
Whilst extracting data, the precentage and number of records processed are shown.

D-74 User's Guide for SupportDesk
15.1 Statistics
Performance Reporting dialogue
When outputting performance reports, determine what is required:
Report Choose the type of report you require. Those available are described next.
Analyse By This does not apply to all reports and generally defaults to analysing by customer when it does. Other selections depend on the type of report.
Across Category Selection only applies to the Call Frequency Report and the Service Level Monitor. Choose the category to analyse.
Date Range In the case of the Call Activity Report and Open Balance Report only, choose to analyse all calls or only those for a selected period.
Analyse Across All Folders
Tick to analyse across all folders or leave unticked for calls in the current one only.
Analyse Across Live and Archived
If ticked, both live and archived calls are included. Leave unticked for only calls in the live folder.
Skip Report Title Modification
Leave the box unticked if you want to enter a title for the report or tick it to use the standard title.
Output to Indicate if the report is to be output to the default printer, as an html file or is displayed in a separate window.
Click Run to create the report. If you have chosen not to skip the title modification, you can change the standard title

User's Guide for SupportDesk D-75
Statistics Call Frequency Report
The report tabulates the number of calls according to the table headings selected. The report heading depends on what you choose to analyse by and the category (for example, ‘Customer by Type’):
Analyse By
Assignee Contact Customer Department
Product Product Group/Type Product Version Raised By Subject
Across Category
Analysis Priority SLA Status Type Urgency
Example:
Customer by Priority lists, on the left-hand side of the table, all the customers by reference. Across the top, the priorities are listed. In each table entry are shown the number of calls for each combination. Separate graphs are provided by type and for customer by type.

D-76 User's Guide for SupportDesk
Call Frequency Report, Customer by Priority
Statistics Call Monitor Report
The report tabulates the number of calls by priority within the heading selected. The report heading is the selected analysis method by priority.
In the body of the report, the number of calls for each priority within the selected analysis method is summed. The date and reference of the oldest call within each priority are given, plus the maximum, minimum and average elapsed times.
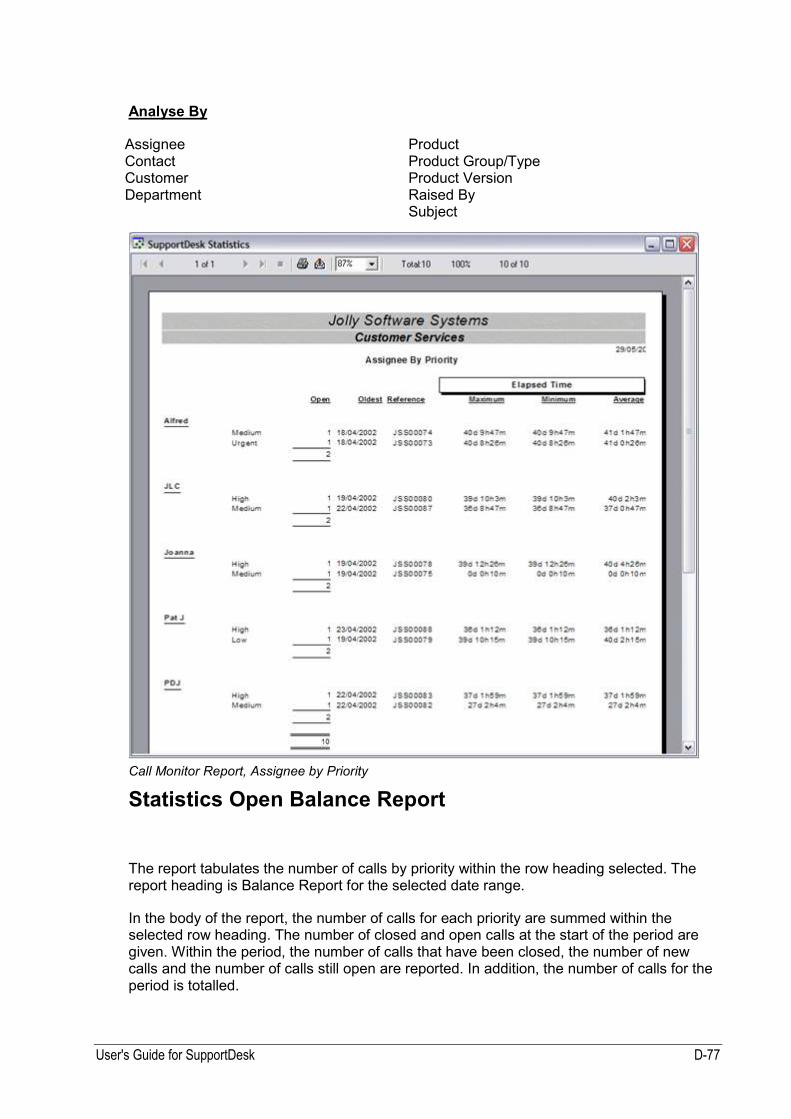
User's Guide for SupportDesk D-77
Analyse By
Assignee Contact Customer Department
Product Product Group/Type Product Version Raised By Subject
Call Monitor Report, Assignee by Priority
Statistics Open Balance Report
The report tabulates the number of calls by priority within the row heading selected. The report heading is Balance Report for the selected date range.
In the body of the report, the number of calls for each priority are summed within the selected row heading. The number of closed and open calls at the start of the period are given. Within the period, the number of calls that have been closed, the number of new calls and the number of calls still open are reported. In addition, the number of calls for the period is totalled.

D-78 User's Guide for SupportDesk
Analyse By
Assignee Contact Customer Department
Product Product Group/Type Product Version Raised By Subject
Date Range
All Calls This Month This Quarter
This Week This Year Today
Open Balance Report, Customer This Month
Statistics Call Activity Report
The report tabulates the number of calls taken within the selected periods.
In the body of the report, for each period, the number of new calls taken is summed. The number of calls still open and the number that are now closed are also given. In addition,

User's Guide for SupportDesk D-79
for each period the number of calls that met and breached any service level agreement are printed, along with average elapsed times. The bar chart shows graphically the number of calls taken in the periods.
Date Range
All Calls Daily Monthly
Quarterly Weekly Yearly
Call Activity Report, Weekly
Statistics Service Level Monitor
The report tabulates the number of calls logged in each month for each priority, within the selected breakdown.
Calls resolved within the action date set on the call are considered as having met the specified SLA target and are summed on the second row.

D-80 User's Guide for SupportDesk
Using the number of calls logged for each month and the number of calls resolved within target, a figure reflecting the percentage service target achieved is calculated for each month.
Analyse By
Consolidated Total Customer Department
Department/Product Product SLA
Service Level Monitor, By Customer
15.2 Graphics
Use Graphics to obtain a visual representation of the call breakdown in the current view. Refer to the start of this chapter for a description of the tool bar buttons on the output.
You can choose between Frequency and Trend Analysis tabs.
To activate the Graphics dialogue: From the Statistics menu, click Graphics:
Or click on the Graphics icon in the Explorer panel.

User's Guide for SupportDesk D-81
15.3 Frequency Tab
Graphics Dialogue, Frequency Tab
Calls Choose from All Calls Calls Closed Today Calls Opened Today
Calls to Action Today Closed Calls Open Calls
By Choose from Analysis Assignee Contact Customer Department Group/Type
Priority Product Raised By SLA Status Subject Type
Analyse Across Live and Archived
If ticked, both live and archived calls are included. Leave unticked for only calls in the live folder.
Analyse Across All Folders
Tick to analyse across all folders or leave unticked for calls in the current one only.
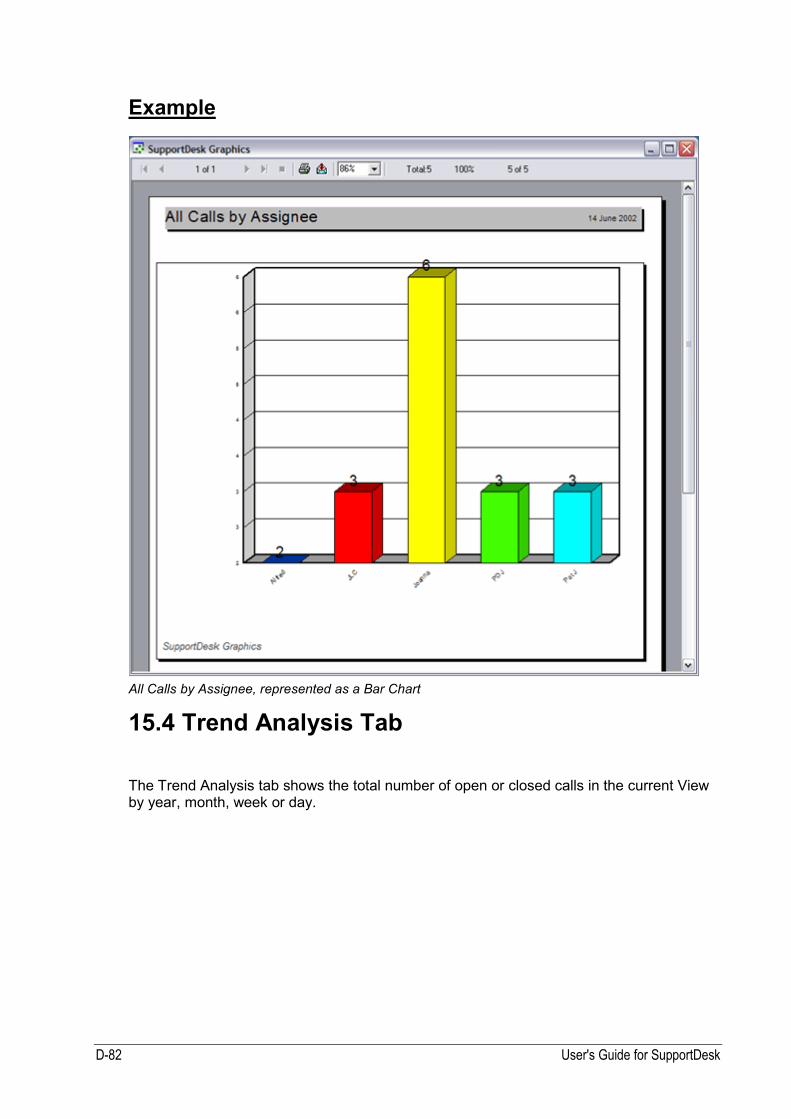
D-82 User's Guide for SupportDesk
Example
All Calls by Assignee, represented as a Bar Chart
15.4 Trend Analysis Tab
The Trend Analysis tab shows the total number of open or closed calls in the current View by year, month, week or day.

User's Guide for SupportDesk D-83
Graphics Dialogue, Trend Analysis Tab
Calls Choose from All Calls Closed Calls
Open Calls
Trends Choose from Daily Analysis Monthly Analysis Quarterly Analysis
Weekly Analysis Yearly Analysis
Analyse Across Live and Archived
If ticked, both live and archived calls are included. Leave unticked for only calls in the live folder.
Analyse Across All Folders
Tick to analyse across all folders or leave unticked for calls in the current one only.

D-84 User's Guide for SupportDesk
16 Report Menu
The Report Menu provides two separate types of report. They are ones that have been developed using SupportDesk’s own Report Designer and those produced via the Crystal Reports application.
Through the Report Designer you can filter and sort records by various means. Once you have saved a report, it can be recalled and run at any time.
16.1 Report Designer
This option lists reports that have been developed using the SupportDesk Report Designer.
These reports may be ones that have been supplied as standard with SupportDesk or which you have developed. You can select reports for output or can edit them, create others or delete those that are no longer needed.
To access the Report Designer choose Quick Reports from the Report menu.
Report Designer dialogue
User's Guide for SupportDesk D-85
Existing reports are listed. Tick the ‘Private’ box to see only those reports that you have developed for your own use or untick it to also see those that are generally available.
Click:
New: to create a report format.
Open: to edit the format for a selected report.
Delete: to clear a report that is no longer needed, providing you are authorised to do this.
Copy: creates a report based on a selected report. The new report is added to the list and is initially titled ‘Copy of <original title>’. You should therefore open the report to change the title and other details.
Preview: to view the report on screen. The only available action is then to close the view.
Print: to print the selected report. Depending on its definition, you may be prompted to select records to be reported on (such as one or several customers).
Publish: outputs the report as a file in html format. You can choose the name and location of this file. Field widths for the output are set through the HTML tab of the Data Dictionary dialogue (described in the Administrator’s Guide).
Export: creates a text file containing comma separated values. Select the name of the file and where it is to be output. On completion, you can choose to browse the file contents using the Notepad text editor.
Field widths for the output are set through the Data Dictionary dialogue (refer to the Administrator’s Guide).
Crystal Reports Library
to list the report formats defined using this application (see page 90).
16.2 Adding and Maintaining Designer Reports
When you create a report, some fields are already entered. The title will default to a report number, where the number reflects the number of reports already created, and the database will default to Calls. Fields are included for you and the sort is by customer. However, you can change all these settings.
Input is over several tabbed forms.

D-86 User's Guide for SupportDesk
Records Tab
Report Designer Dialogue, Records tab
Title Enter the text that is to appear at the top of the report. This field is used to identify existing reports when they need to be updated or run again.
Database Choose the database that is to be reported on.
Customer Specific
Select a customer if only that customer can use the report through the WebServer.
Folder Identify the call folder that provides data for the report. This may be <Current Folder> and so uses the one that is currently selected, or be one that you specify.
Table You may want to base the report on live or archived records or both, or choose <Current> to use whichever type is selected.
Internal Tick the box if the report is not to be available to a WebGuest accessing via the WebServer.
Private Tick to keep the report for your own use. Reports marked as private can only be opened or deleted by you. Public reports can be used by anyone.
When updating a report, you can only change this setting for reports you have created.
Fields The lists of fields to include all operate in the same fashion and you will use them to filter the records appearing in the report. The available entries depend on the database chosen.
Click the corresponding All button to select all the entries; subsequently clicking an individual entry deselects it. Similarly, click the corresponding None button to deselect all the entries.

User's Guide for SupportDesk D-87
Use the <Blank> entries to select records that have no value for this particular field. For example, if you select priority <Blank>, calls with no set priority are considered for the report. Records meeting the highlighted selection criteria are included in the report.
Categories The category group name (SLA, priority, status, type or action) prefixes each code.
Customers Use the entry <Customer> when creating a report for Web Guest logins. Web Guests created from the Contact Details dialogue are associated with their customer. Selecting <Customer> restricts the call selection to the Web Guest’s customer.
Products Products are listed with their versions.
Logins Logins can only report on their own calls unless they are allowed to view all calls. You can use the <Login> entry to create a report for individual users who have logged in.
Owned by Assigned to
Use these check boxes to differentiate between calls assigned to or owned by a login.
Prompt? Tick the box against any of the four lists to cause entries to be selected at report run time. If so, when the report is run, a list box appears for each of the marked subsets in turn so that you can select the values required.
Date Range Tab
Report Designer Dialogue, Date Range tab
These entries operate as described for the Date Range dialogue in the “View Menu” chapter of the Using SupportDesk guide. The default is date raised for all dates.

D-88 User's Guide for SupportDesk
Sort Order Tab
Report Designer Dialogue, Sort Order tab
Sort by The fields to be used for sorting must be listed here in the required order of priority. Use the arrow buttons to make your selection from the list of available fields. The available fields will relate to the selected database.
When choosing your sort fields, you should consider the other parameters you have supplied for the report. For example, if you have selected the calls for one customer, there is no point including customer as a sort key field as there will never be a change of customer.
The first sort field is used as a sub-heading to break up the report. The other sort fields are only printed if they have also been specifically included in the detail line.

User's Guide for SupportDesk D-89
Fields Tab
Report Designer Dialogue, Fields tab
You make your selection from the alphabetical list of ‘Available Report Fields’. Use the arrow buttons to transfer the fields to the ‘Fields in Report’ list. Extra fields defined are included in the list in their alphabetical position.
The width, heading and alignment of the highlighted field can be adjusted at the Data Dictionary dialogue (described in the “Setup Menu” chapter of the Administrator’s Guide).
Tick the Include Internal Notes box if any call notes that are marked for internal use only are to be included in the report.
Format Tab
Report Designer Dialogue, Format tab
Report Options Use the check boxes to specify page throw and sub totalling.

D-90 User's Guide for SupportDesk
Page Feeds Tick to have a page throw after a change of the primary sort key (this is the first entry in the Order box).
Primary Sub Totals
Tick to sum records within each primary sort key. If the call fields elapsed time, cost and job time are included in the report, they are also summed.
Secondary Sub Totals
As above, except apply to secondary sort field.
Grand Total Tick to state the number of records and totals of sub-total fields.
Skip Sort Heading To ignore the heading break at change of primary sort key.
Skip Page & Date To not print the page and date heading at the top of each page.
Skip Co. & Dept. Tick to not print the company name and department name heading at the top of each page.
Skip Title Tick to not print the report title in the heading at the top of each page.
Multiple Lines Tick to print large fields, such as subject, in a block. The width of the block is determined by the width set on the Report Tab in the Data Dictionary.
Fonts Click any of the Fonts buttons to transfer to the standard Windows font dialogue. You can change the fonts for Page No & Date, Co. Name & Dept, Title and Detail Lines. The changes made are global settings and affect all reports.
Orientation Select either of the radio buttons Portrait or Landscape.
On completion, click OK to save the report and return to the main SupportDesk window.
16.3 Crystal Reports Library
Process this option to view a list of reports developed using the Crystal Report application. You can:
� select reports to preview and print
� add and modify reports using Crystal Reports Version 8.5
� delete any reports that are not needed.
To print a report from the library: From the Report menu, click on Crystal Library...

User's Guide for SupportDesk D-91
Crystal Reports Library Dialogue
Database and Report The reports are grouped by database and you can select one from the list. You can Add, Modify or Delete the reports in the list using the buttons.
Heading Sub-Heading Title
Where appropriate, these entries appears on the first three lines of the report. They default, respectively, to the name and department from the Company Configuration dialogue and to the report title. You can change the defaults for the current session.
Date Range For appropriate reports, input is enabled here. Select the required option from the list to filter the records included in the report.
Click the Print Preview: button to view the report on your screen or Print: to print the selected report. Use Custom Designer Call Reports: to transfer to the Report Designer list of reports (refer to page 84).

D-92 User's Guide for SupportDesk

User's Guide for SupportDesk D-93
17 Noticeboard
Use this feature to send messages to other SupportDesk logins. You can post a message to the noticeboard for all or just one login.
You can, for example:
� send out a request for help or information on a tricky problem
� ask everyone to log out of SupportDesk if you want to perform network maintenance.
The Automatic Escalation and Call Notification module (described in the Administrator’s Guide) can post messages to the private noticeboard. These inform the owner and assignee of calls where the warning or action times have been exceeded.
There are three boards for notices:
� the Public noticeboard holds messages that have been sent to everyone
� the Private noticeboard holds messages that have been sent to you personally. New private notices are displayed at the main window as a visual alert.
� the Sent Items noticeboard contains a copy of notices sent by you.
17.1 Updating the Noticeboard
To activate the Noticeboard dialogue: At the main window, while viewing noticeboard records, use the right mouse button to create records or open existing ones.
List noticeboard records at the main window by expanding the Noticeboard entry in the Explorer panel.

D-94 User's Guide for SupportDesk
Details Tab
Noticeboard Dialogue
To The entry defaults to blank so that all other logins will have the message posted on their noticeboards. Select one login from the list if that person is to be the sole recipient of the message.
Task Completed Tick the box if you have finished with the noticeboard message. Completed messages are marked with a tick in the margin at the main window.
Internal If this box is ticked, the message will not be available to WebGuests on WebServer.
Date Time
Identify when the message was posted.
Subject Input a summary of the note.
Topic Enter or select a topic as a means of analysing messages. A list is built up from the topics entered against existing notices. You could use the Find feature to filter noticeboard records on like topics.
Message Enter the full message here.
Use the Spell Check button to check the spelling of subject and message text.
News Item Tick the box if the message is to be posted as a news item to appear on the WebServer.

User's Guide for SupportDesk D-95
Show News From/Until
In the case of a news item, indicate when the message is to be published.
Call Select and highlight a call if you want to associate a call with the message. Click the Open button to access the call record (see page 4).
URL Enter, if required, a link to a website where further information may be obtained.
Attachments Tab
Use this tab to attach documents to the note.

User's Guide for SupportDesk D-i
18 Index
A
About this Document 1 Action date 10 Activities 25–28, 25 adding 25 Archive 27 calls 3, 11 contact 49 contracts 54 Costings and Conclusion 27 customer 40 inventory 46 Listing Records 25 Reminders 28 sales opportunities 66
Activities Tab 66 Activity Attachments 28 Activity Costings and Conclusion 27 Activity Details 25 Activity Reminders 28 Adding Activities 25 Adding and Maintaining Calls 4 Adding and Maintaining Customers 37 Adding and Maintaining Designer Reports 85
Adding and Maintaining Products 30 Adding and Updating KnowledgeBase 22 Adding Campaigns 56 Adding Quick Calls 19 Analysis 7 Analysis Tab 15, 33, 41 Archive activities 27 customer 39 Product 32
Asset management 32, 43 Assignee 32, 39 Attach documents 40 Attachments 52 Attachments Tab 12, 24, 33, 40, 55, 66, 72, 95
Authorised Purchase Order 70 Autofill 3
B
Blank entries 87 Bounce count 15
C
Calendar 9 Call action 4 action date 10 activities 3, 11 assignee 7 classify 11 closed 10 contracts 11 customer list 5 customer's own call reference 12 delete 4 Details 3–16 documents 12 export 4 extra fields 12 finding records 4 job sheet 4 News 39 print summary 4 publish report 4 publish summary 4 reopen 4 solution 8 subject 6 update 4
Call Menu 3 Calls left 54
Campaign Management 56 Campaign Management, SQL (Testing Only) Tab 61
Campaigns 56–61 adding 56 listing records 56
Category 7 Change Management 42 Chargeable time 29 Classify call 11 Closed calls 10 Communications channel preferred 49
Completing the Order 71 Contact Activities 49
Contacts 6, 46, 48 Contacts Tab 65 Contracts 53 activities 54
Contracts Listing Records 53 Contracts, call 11 Copy call 8 Cost rate 29

D-ii User's Guide for SupportDesk
Creating Calls from Quick Calls 19 Crystal Reports 90 Crystal Reports Library 90 Customer 36–41 activities 40 Archive 39 charging 13 Charging 39 Details 36–41 folder 39 Listing Records 36 Maintenance Expiry 38 news 6 News 39 Reference 38 service level agreements 7 Service Level Agreements 38 telephone number 6 Telephone Number 38
Customer Menu 36
D
Data Extraction Tab 59 Date Range Tab 87 Definition Tab 57 Details Tab 23, 31, 37, 43, 62, 69, 94 Display activities 25 campaigns 56 Customers 36 noticeboard 93 Products 30 sales opportunities 62
Documents 12, 24, 28, 33, 47, 50, 55, 66, 72, 95
E
Elapsed Time 28 E-Mail 24, 49 Escalator 93 Expanded Details Tab 8 Expiry date 49 Export calls 4 Extra fields sales opportunities 66
Extra Fields customers 40 product 33
Extra Fields Tab 12, 33, 40, 55, 66, 72
F
FAQ 24
Field changes 40 Fields Tab 89 Finding a Call 18 Finding records 4 Folder customer 39 product 32
Format Tab 89 Frequency Tab 81 Frequently asked question 24
G
Graphics 80–83, 80
H
How to Use this Documentation 1
I
Internal note 17 Inventory 36, 42 activities 46 Maintenance Expiry Date 45 Serial Number 44 Service Level 45
Inventory Listing Records 42 Items Covered Tab 55
J
Job Costing 28 Job Costs 29 Job sheet 4 Job Sheet 8
K
KnowledgeBase 21–24, 21 documents 24 overview 21
KnowledgeBase Entry, Attachments Tab 43, 62, 69, 94
KnowledgeBase Tab 14
L
Licences 31
M
Main window viewing noticeboard 93 viewing purchase orders 69 viewing sales opportunities 62

User's Guide for SupportDesk D-iii
Main Window Viewing activities 25 viewing campaigns 56 Viewing Contracts 53 Viewing Customers 36 Viewing Inventory 42 Viewing Products 30 Viewing suppliers 51
Marketing Campaigns See Campaigns
N
Needs Tab 66 New user 1 Notes 16, 16 Noticeboard 93–95 adding and updating 93 listing records 93
O
Opening stock 32 Order lines 70 Organisation of the Documentation 1 Other Tabs 47, 50, 52
P
Preferred communications channel 49 Pre-paid support calls 54 Preview report 85 Primary contact 49 Private reports 85 Problem, underlying 13 Process Contract 53 Inventory 42 purchase order 69 supplier 51
Processing Inventory 42 Processing Purchase Orders 69 Product 7, 25–35 Archive 32 Details 30–34 folder 32 Licences 31 Listing Records 30 Reference 31 Service Level 31
Product Menu 30 Product version 34–35 Archive 35
Product Versions 34 Prompt for reports 87 Publish
call report 4 call summary 4
Purchase Orders 69 Purchase orders listing records 69 Purchases Tab 64
Q
Quick calls adding 19
Quick Calls 56, 19 Creating Calls from 19
R
Record time worked 10 Records Tab 86 Reduced Details Tab 5 Reorder 32 Reply 16 Report designer 84
Report Designer 84 adding call reports 85 updating call reports 85
Report Menu 84 Resolutions 24 Resource Allocation 8 Rules Tab 58 Run Campaign Tab 60
S
Sales opportunities activities 66 listing records 62
Sales Opportunities 62–68, 62 Sales Opportunity Details 62 Sales Opportunity, Conclusion Tab 68 Sample Templates 61 Search Related Calls Tab 33, 41 Service contract 38 Service level 7 Service Level 31, 38, 45, 49 Shipping, calculate tax on 67 Sort Order Tab 88 Standard reports 84 Start work 10 Statistics 73–80, 74 Call Activity Report 78 Call Frequency Report 75 Call Monitor Report 76 Open Balance Report 77 Service Level Monitor 79
Statistics and Graphics 73

D-iv User's Guide for SupportDesk
Statistics Call Activity Report 78 Statistics Call Frequency Report 75 Statistics Call Monitor Report 76 Statistics Open Balance Report 77 Statistics Service Level Monitor 79 Stock control 32 Stop work 10 Suppliers 51 Suppliers Listing Records 51 Support Calls 39, 54
T
Tag number 44 Tax on Shipping 67 Telephony Option 6, 38 Template 38 Time to charge 29 Time Zone 49 Timer 10 Trend Analysis Tab 82
U
Underlying problem 13 Updating the Noticeboard 93 Usage 32 User Web Guest 87
Using Activities to Record Job Costs 29
V
Viewing Campaigns at the Main Window 56 Viewing KnowledgeBase Records 22
W
Warning Date 10 Web hits 24 WebGuest logins 40
WebServer calls 13 Customers 39 KnowledgeBase 24 product versions 35 Users 50
Work, start and stop 10