da1931ct cat-5 to vga + audio receiver … video and audio signals over twisted pair (cat-5) type...
TRANSCRIPT
SPECIAL APPLICATION
MANUAL PART NUMBER: 400-0199-003
CAT-5 TO VGA + AUDIO
RECEIVER
USER’S GUIDE
DA1931CT
SPECIAL APPLICATION
400-0199-003 1
TABLE OF CONTENTS
Page
PRECAUTIONS / SAFETY WARNINGS ..............2GENERAL..........................................................2INSTALLATION .................................................2CLEANING.........................................................2FCC / CE NOTICE..............................................2
ABOUT YOUR DA1931CT ...................................3
TECHNICAL SPECIFICATIONS...........................3
PRODUCT DESCRIPTION ..................................4
APPLICATION DIAGRAM ....................................5DIAGRAM 1: TYPICAL CONFIGURATION ........5DIAGRAM 2: RJ-45 PINOUT ..............................6DIAGRAM 3: INTERNAL VIEW .........................7DIAGRAM 4: DIP SWITCH SETTINGS..............8
INSTALLING YOUR DA1931CT...........................9
OPERATION ........................................................9VIDEO EQUALIZATION.....................................9
TROUBLESHOOTING GUIDE ...........................10LED IS NOT RED .............................................10LED IS NOT GREEN........................................10NO SOUND......................................................10NO REMOTE IMAGE .......................................10RECEIVING DISPLAY QUALITY IS POOR ......11
ALTINEX POLICY ..............................................11LIMITED WARRANTY/RETURN POLICY ........11CONTACT INFORMATION..............................11

SPECIAL APPLICATION
400-0199-003 2
PRECAUTIONS / SAFETY WARNINGS 1Please read this manual carefully before using your DA1931CT. Keep this manual handy for future reference. These safety instructions are to ensure the long life of your DA1931CT and to prevent fire and shock hazard. Please read them carefully and heed all warnings.
1.1 GENERAL
• Qualified ALTINEX service personnel, or their authorized representatives must perform all service.
1.2 INSTALLATION
• To prevent fire or shock, do not expose this unit to rain or moisture. Do not place the DA1931CT in direct sunlight, near heaters or heat radiating appliances, or near any liquid. Exposure to direct sunlight, smoke, or steam can harm internal components.
• Handle the DA1931CT carefully. Dropping or jarring can damage the unit.
• Do not pull the cables that are attached to the DA1931CT.
1.3 CLEANING
• Clean only with a dry cloth. Never use strong detergents or solvents, such as alcohol or thinner. Do not use a wet cloth or water to clean the unit. Do not open the unit to clean.
1.4 FCC / CE NOTICE
• This device complies with part 15 of the FCC Rules. Operation is subject to the following two conditions: (1) This device may not cause harmful interference, and (2) this device must accept any interference received, including interference that may cause undesired operation.
• This equipment has been tested and found to comply with the limits for a Class A digital device, pursuant to Part 15 of the FCC Rules. These limits are designed to provide reasonable protection against harmful interference when the equipment is operated in a commercial environment. This equipment generates, uses, and can radiate radio frequency energy and, if not installed and used in accordance with the instruction manual, may cause harmful interference to radio communications. Operation of this equipment in a residential area is likely to cause harmful interference in which case the user will be required to correct the interference at his own expense.
• Any changes or modifications to the unit not expressly approved by ALTINEX, Inc. could void the user’s authority to operate the equipment.

SPECIAL APPLICATION
400-0199-003 3
ABOUT YOUR DA1931CT 2
DA1931CTCAT-5 TO VGA + AUDIO RECEIVERThe DA1931CT provides a means of receiving computer video and audio signals over twisted pair (CAT-5) type cable when used together with an ALTINEX Twisted Pair Video Transmitter, such as the DA1930CT.
The DA1931CT is compact and easy to use. The DA1931CT is able to receive one of the video sources, such as VGA, Component Video, S-Video or C-Video along with Stereo Audio transmitted over the CAT-5/6 cable from the DA1930CT or equivalent Transmitter.
The DA1931CT provides both Audio and Video outputs. The DA1931CT offers a female 15-pin HD output for RGBHV/YPbPr signals, a 4 pin Mini-Din connector for S-Video and an RCA connector for Composite Video Output. A 5 pin terminal block is available for balanced stereo output and a 3.5mm jack is used for unbalanced stereo output.
The unit also offers hardware Video Equalization for transmission lengths up to 400 feet. The Video Equalization work in conjunction with the Video Equalization on the transmitter. There is also a Signal Detect feature which shows when an input signal is present.
TECHNICAL SPECIFICATIONS 3FEATURES/DESCRIPTION DA1931CT
GENERALInputs Video/AudioAltinex CAT-5/6 Twisted Pair Standard RJ-45
OutputsRGBHV/YPbPr 15 Pin HDS-Video 4 Pin Mini DINComposite Video RCA femaleStereo Audio – unbal. 3.5mm femaleStereo Audio – balanced 5 Pin Terminal Block
Compatibility VGA through UXGA, Stereo Audio, C-Video, S-Video
Table 1. DA1931CT General
MECHANICAL DA1931CTMaterial 0.1” AlFinish ALTINEX GreyTop Panel Lexan OverlayHeight (inches) 5.28in (134mm)Width (inches) 4.29in (109mm)Depth (inches) 0.98in (25mm)Weight (pounds) 1.0lb (0.45kg)Ship Weight (pounds) 1.6lbs (0.73kg)T° Operating 10°C-40°CT° Maximum 50°CHumidity 90% non-condensingMTBF (calculations) 40,000 hrs
Table 2. DA1931CT Mechanical
ELECTRICAL DA1931CTInputCAT-5/6 Twisted Pair Input
Video/Sync/Audio Signals Altinex Standard
Output Video SignalsRGBHV/YPbPr - Video 75 OhmsRGBHV - Sync 10 kOhms/TTLS-Video 75 OhmsComposite Video 75 OhmsOutput Audio SignalsGain at 1 KHz- Balanced +6dB +/- 10%Gain at 1 KHz- Unbal. 0dB +/- 0.5dBAmplitude Matching(difference Left to Right) 10% maximum
Frequency Response 20Hz-18KHz (+/-0.5dB)PowerExternal Adapter (included) 9V DC, 1ATable 3. DA1931CT Electrical
SPECIAL APPLICATION
400-0199-003 4
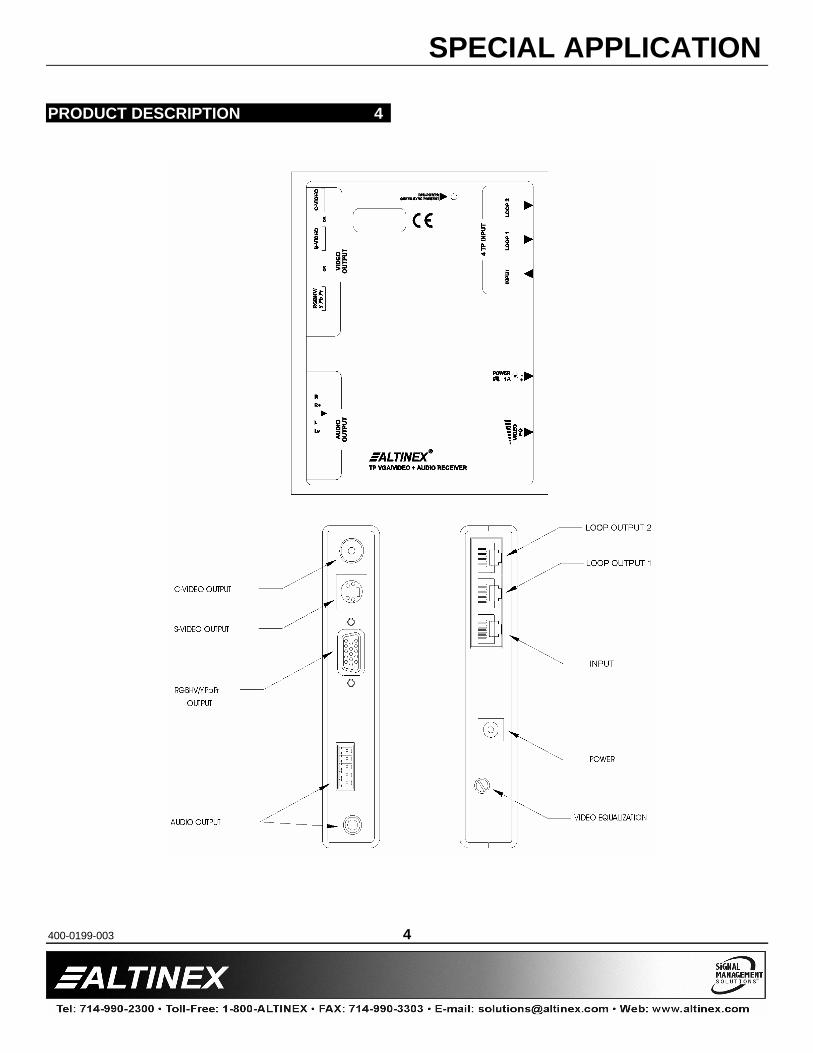
PRODUCT DESCRIPTION 4
SPECIAL APPLICATION
400-0199-003 5
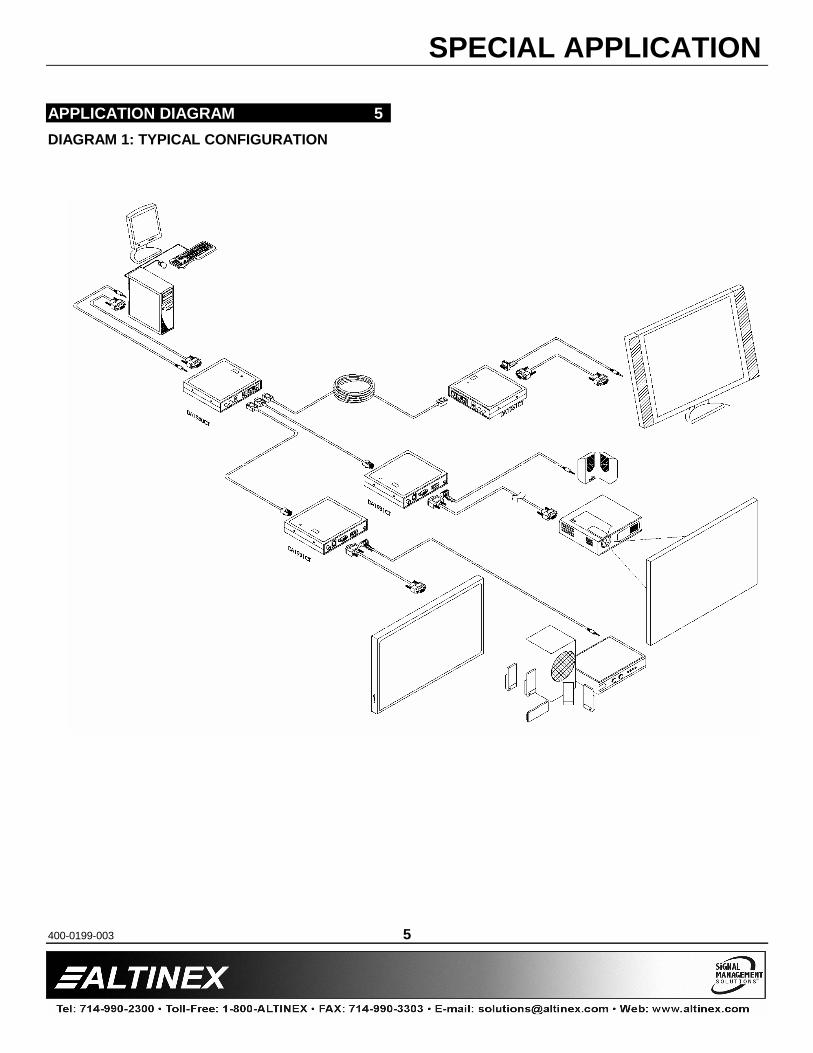
APPLICATION DIAGRAM 5DIAGRAM 1: TYPICAL CONFIGURATION
SPECIAL APPLICATION
400-0199-003 6
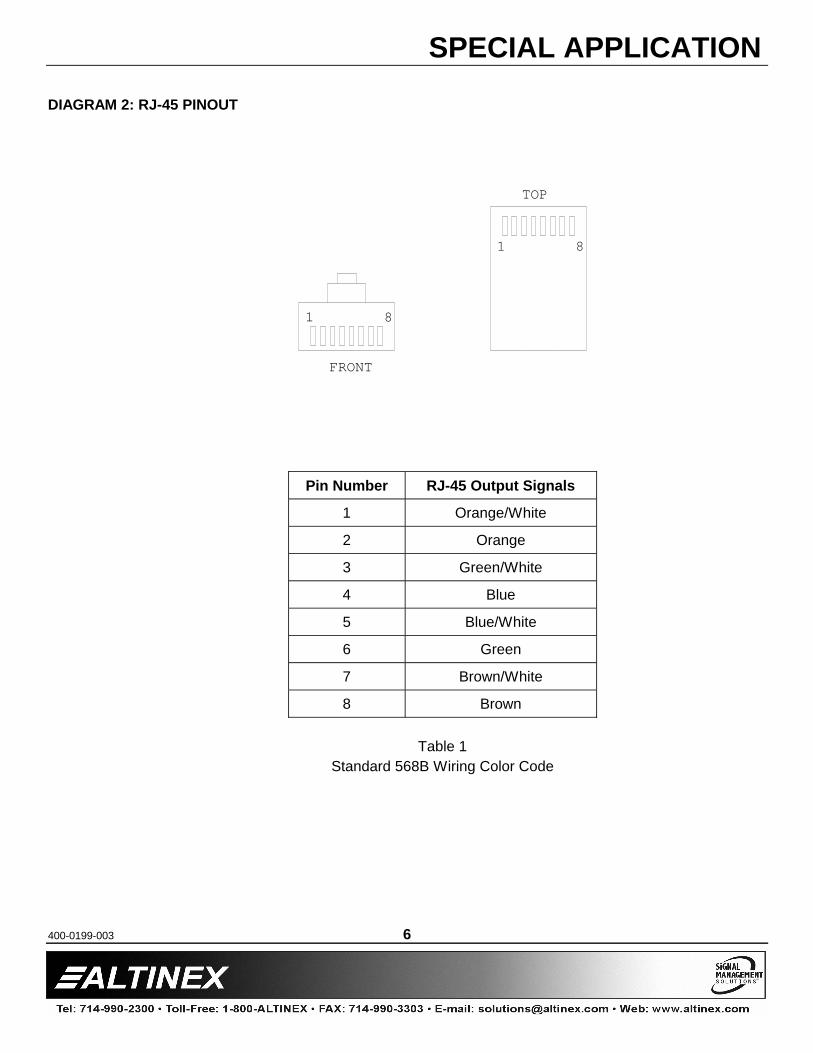
DIAGRAM 2: RJ-45 PINOUT
1 8
FRONT
1 8
TOP
Pin Number RJ-45 Output Signals
1 Orange/White
2 Orange
3 Green/White
4 Blue
5 Blue/White
6 Green
7 Brown/White
8 Brown
Table 1Standard 568B Wiring Color Code

SPECIAL APPLICATION
400-0199-003 7
DIAGRAM 3: INTERNAL VIEW
VGA + AUDIO TO CAT-5 RECEIVER
OUTPUTRCAC-VIDEO
POWER SUPPLY
OUTPUT5P TBBALANCEDSTEREO AUDIO
OUTPUT15PIN VGARGBHV/Y Pb Pr
HOR
R1+R1-
L1+
RIGHT
L1-
LEFT
SYNCPROCESSING
AUDIOSEPARATOR
LP
LP LP
LP
--++
OUTPUT3.5mmUNBALANCEDSTEREO AUDIO
LUMA
BLUE
RED
GREEN
CHROMASIGNALDETECT
SYNC ON GREEN
OUTPUT4PIN MINI DINS-VIDEO
LOOP2PORTRJ 45CAT5
PAIR 4
PAIR 2
PAIR 3
PAIR 2LOOP1PORTRJ 45CAT5
PAIR 1
PAIR 4
PAIR 3
INPUTPORTRJ 45CAT5
PAIR 4
PAIR 1
PAIR 2
PAIR 3
PAIR 1
POWER2.5mm9V, 1A
POWER
VER
EQH/W
SPECIAL APPLICATION
400-0199-003 8
DIAGRAM 4: DIP SWITCH SETTINGS
R74
C80
C9
R93R105
P3
C96
C85
R92 C83
C81
R90
C84 R104
R91
U4 C12
R87
R86
C82
R89
U3
C94
C25
C49
U21
R32R107
C21
C22
C92
R29
R30
C11
C45
R103
R51C93
C46
C47C99
R96
R102
R106
R101
U6C17
C37
U5
R99C107
R100 R97
C106C15
C67
U2 U23
C112R84C33
R88
R85 C14 C71
C69C10
C114R67
R110
R109
R108
C38C30R95
C13
C79
C95C98 R98
C42
R52C70
C113U22C40
C74C39TP2
C102
C43
C97C16R94
R83
R82
C18
TP1U26 R27
U10
R63
R46
C41
C27
DA1931
C24
R54
C91
P4
U20
U27
C19
C20
CUT
x2 x1
U17
C90
C86C109C77
C111
C48
C59
R48R71
VIDEO GAIN
SW3
C55
R58
R31
C58 R60
R64 R12C117C28
C56
R49U11
C57C62 R61
R35
J1 C1
C78
C87
C108ON V-
ON V+
ON H-
ON H+
x2 SOG
R56R59
C63
R53R72
R73
R11
R9P2 R10
C119C75
R43R55
R65
C66C60
U12
R62C61
C29R14
C4
R19
R44R66
C64
R57U13
C65
C72 Q4
U8
C76 C44R16
P6
R50
R28
R45
SW1
x1
C31
U16 C36R68R69
R36
C23
C34
C53
C35 C51
C54C89
C50
U14
C103R118
C105
U18
R22
R23
C7C73
P5C8
D2
C115-6V U19
C110D1
R8R7
R39
R40
P8
C118
R117
C116
U7R37P9
L1
R13R21R1R2
C2R24
R42
CUTRED
R26 CUTCUT
R3
R25C3
R38R47
P11R15
R4
P10
GREENC5 C6
U9R33R41
P13 P12P1
CUTBLUE
R17
R6R5
C26C120
R34
R114
U25
C101
D5C1
00
R113
R80C68P7 U1
C52R81C32
U15
R116
C104
R115 RECEIVER
285-0382-001LED1R1
12
OGI
AUDIO
AUDIO
RGBHV/
S-VIDEO
C-VIDEO
VIDEO EQ
POWER
INPUT
YPbPr
LOOP1
LOOP2
C35
C64R9
R10R59R56
SOG
R50
x2
R45
SW1
x1
ON H
+ON
H-
ON V
+ON
V-
U161 2 3 4 5 6
ON
OFF
SW1
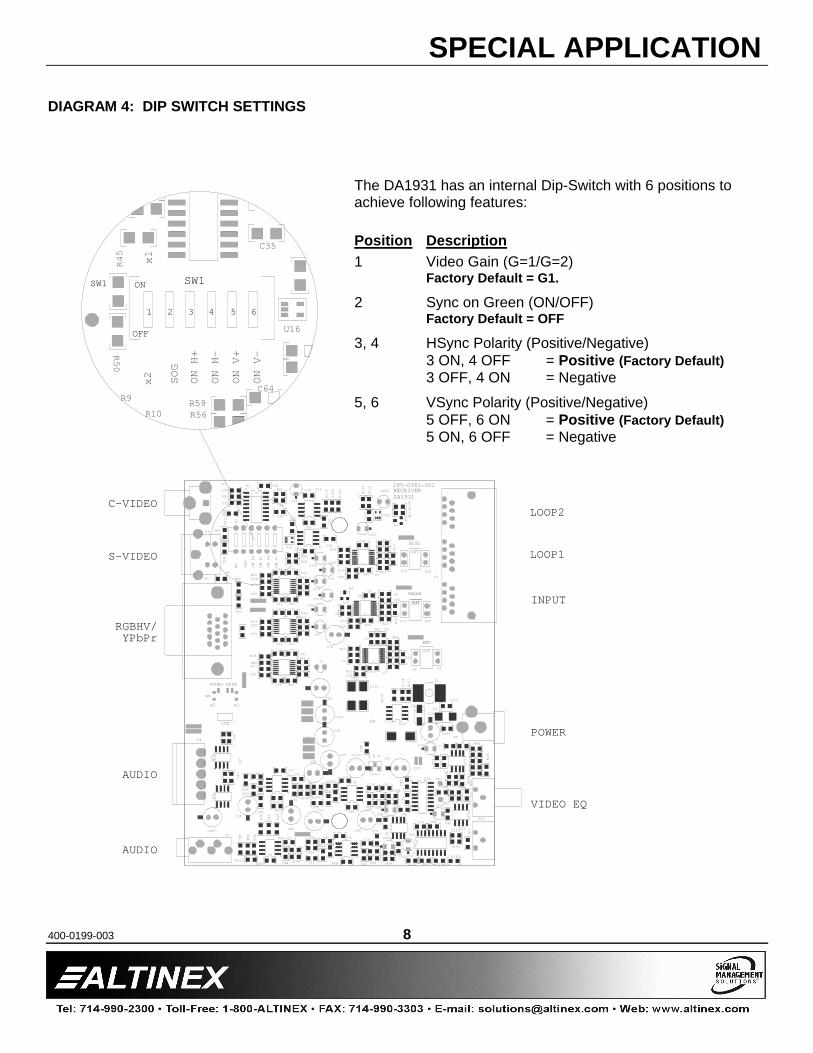
The DA1931 has an internal Dip-Switch with 6 positions to achieve following features:
Position Description1 Video Gain (G=1/G=2)
Factory Default = G1.
2 Sync on Green (ON/OFF)Factory Default = OFF
3, 4 HSync Polarity (Positive/Negative)3 ON, 4 OFF = Positive (Factory Default)3 OFF, 4 ON = Negative
5, 6 VSync Polarity (Positive/Negative)5 OFF, 6 ON = Positive (Factory Default)5 ON, 6 OFF = Negative
SPECIAL APPLICATION
400-0199-003 9
INSTALLING YOUR DA1931CT 6Step 1. Determine the settings required for Gain,
Sync On Green, Horizontal Sync Polarity and Vertical Sync Polarity. If necessary to change the factory defaults, open the unit and set the switches per DIAGRAM 4 on page 8.
Step 2. Plug the 9V power adapter into an AC outlet and then connect the other end to the POWER input jack on the DA1931CT.
Step 3. Verify the LED near the top of the unit is illuminated RED indicating power is applied.
Step 4. Connect the CAT-5/6 cable from the video output of the CAT-5 Transmitter to the CAT-5 Input port on the DA1931CT.
Step 5. Verify the power LED at the top of the unit changes to GREEN, indicating a SYNC signal has been detected.
Step 6. Connect the stereo audio output from the DA1931CT to the audio receiving device.
Step 7. Connect the receiving monitor to the applicable DA1931CT Video Output connector, either RGBHV/YPbPr, S-Video or C-Video depending on the input type to the transmitter.
Step 8. Verify the picture quality on the receiving monitor is equivalent to the quality as displayed on the local monitor at the transmitter. If the quality of the image is poor or non-existent, it may be necessary to adjust the Video Equalization on the DA1931CT and/or DA1930CT. See the OPERATION section that follows for details.
OPERATION 7The DA1931CT requires only one adjustment to be made for optimal performance. Video Equalization is required for long cable lengths and may be adjusted to fine tune the video display.
7.1 VIDEO EQUALIZATIONVideo Equalization is provided to fine tune the displayed image on the remote display. Typically, for short cable runs the equalization will be set to near minimum. Cable lengths up to 400 feet will require near maximum equalization.
The equalization adjustments on the DA1931CTReceiver and DA1930CT Transmitter work together to provide equalization for maximum cable lengths. For example, for cable runs less than 50 feet, both equalization settings may be set to approximately minimum, since on the short distances no equalization is required. Where as cable runs of 400 feet will see equalization settings at about the three-quarter position.
SPECIAL APPLICATION
400-0199-003 10
TROUBLESHOOTING GUIDE 8We have carefully tested and have found no problems in the supplied DA1931CT. However, we would like to offer suggestions for the following:
8.1 LED IS NOT REDThe LED should be ON and RED when power is applied and there is no video signal present. If the LED is ON and GREEN, the unit is receiving power and a SYNC signal.
Cause 1: No AC power.Solution: Verify the adapter is plugged into a
working AC outlet and that the outlet has power.
Cause 2: Adapter is not plugged into DA1931CT.
Solution: Verify the DC power plug coming from the AC adapter is plugged all the way into the DA1931CT.
Cause 3: The DA1931 has a problem.Solution: If there is AC power to the adapter
and the LED still does not turn on, the DA1931CT or the power adapter may require service. Call ALTINEX at (714) 990-2300.
8.2 LED IS NOT GREEN
Cause 1: There is no power.Solution: Disconnect the video input from the
DA1931CT and verify the LED is ON and RED indicating power is present. Reconnect the computer's video output. If the LED is still not GREEN see Cause 2.
Cause 2: There is no Sync signal.Solution: Verify the computer output is
operating correctly by connecting it directly to a monitor. If the display is good, call ALTINEX at (714) 990-2300.
8.3 NO SOUND
Cause 1: The source has a problem.Solution: Check the source and make sure
that there is a signal present and all source connections are correct. If the source is working and there is still no sound, see Cause 2.
Cause 2: The volume is too low.Solution: Increase the AUDIO GAIN toward
maximum. If there is still no sound present, see Cause 3.
Cause 3: Cable connections are incorrect.Solution: Make sure that cables are properly
connected. Also, make sure that the continuity and wiring are good. If there is still no sound, see Cause 4.
Cause 4: The receiving device has a problem.
Solution: Make sure the receiving device has power and is turned ON. If there is still no sound, please call Altinex at (714) 990-2300.
8.4 NO REMOTE IMAGE
Cause 1: The source has a problem.Solution: Check the image on the local
monitor and verify the quality is good. If the local image is good, see Cause 2.
Cause 2: Video equalization required.Solution: Adjust the VIDEO EQUALIZATION
on the DA1931CT. Long cable runs may require adjustment on both the DA1930CT and the DA1931CT.
In general, cable runs less then 50 feet require little or no video equalization and should be set to minimum. Cable runs up to 400 feet will require maximum equalization on both the transmitter and receiver.
SPECIAL APPLICATION
400-0199-003 11
8.5 RECEIVING DISPLAY QUALITY IS POOR
Cause 1: The source has a problem.Solution: Check the image on the local
monitor and verify the quality is good. If the local image is good, see Cause 2.
Cause 2: Video equalization required.Solution: Adjust the VIDEO EQUALIZATION
on the DA1931CT. Long cable runs may require adjustment on both the DA1930CT and the DA1931CT. If the image is still not correct, call ALTINEX at (714) 990-2300.
ALTINEX POLICY 99.1 LIMITED WARRANTY/RETURN POLICY
Please see the Altinex website at www.altinex.com for details on warranty and return policy.
9.2 CONTACT INFORMATION
ALTINEX, INC592 Apollo street
Brea, CA 92821 USA
TEL: 714 990-2300
TOLL FREE: 1-800-ALTINEX
WEB: www.altinex.com
E-MAIL: [email protected]