datalink configuration guide datalink -...
TRANSCRIPT

DDaattaaLLiinnkk IInnssttaallllaattiioonn GGuuiiddee
DDaattaaLLiinnkk CCoonnffiigguurraattiioonn GGuuiiddee
RReevviissiioonn 33 33//2244//22000033


DDaattaaLLiinnkk CCoonnffiigguurraattiioonn GGuuiiddee
RReevviissiioonn 33 33//2244//22000033

DocSTAR DataLink Workbook

DocSTAR DataLink Workbook
Table of Contents
IInnttrroodduuccttiioonn.......................................................................................................................................................................................................................................... 11 Requirements ................................................................................................................ 1 Information that may be needed:................................................................................... 1
OOLLEE--DDBB,, OODDBBCC,, aanndd MMiiccrroossoofftt DDaattaa AAcccceessss CCoommppoonneennttss ((MMDDAACC)) .................................................... 22 Microsoft Data Access Components Overview ............................................................. 2 ActiveX Data Objects (ADO) ......................................................................................... 2 OLE DB ......................................................................................................................... 2 Open Database Connectivity (ODBC)........................................................................... 2
CCrreeaattiinngg DDSSNN’’ss................................................................................................................................................................................................................................ 33 Create a DSN for use with Microsoft Access................................................................. 5 Create a DSN for use with Microsoft Excel Spreadsheets. ........................................... 7 Create a DSN for use with Delimited Text Files ............................................................ 8
CCrreeaattiinngg DDaattaaLLiinnkkss .............................................................................................................................................................................................................. 1111 Create a New DataLink to use the Access Database.................................................. 12 Create a new DataLink for Microsoft Excel Spreadsheets .......................................... 17 Create a new DataLink for Text documents ................................................................ 20
CCrreeaattee aa TTeemmppllaattee ffoorr DDooccSSTTAARR .................................................................................................................................................................. 2222 Exercises..................................................................................................................... 31

DocSTAR DataLink Workbook

DocSTAR DataLink Workbook Page 1
Introduction
DocSTAR DataLink is an optional software module that replicates selected data from an external database, and stores them in its own database. That data can then be used to make sure that you file documents consistently. It verifies that the data used to file documents matches the data in another external database. DataLink can also be used to add additional indexing data to the DocSTAR document by using one lookup field that matches data in the external database. DataLink will verify or extract information from a database, spreadsheet, text document, or other data source as long as there is an ODBC driver and adequate information about logging into and locating the right information. This is done on a manual or pre-defined scheduled basis but it is not real-time. The information that is extracted is used for the purpose of adding index information to a document being filed at the time of filing only. The document index information will not be updated after being filed if the DataLink information is updated. For this reason it is recommended that the data being extracted is as static as possible (eg. A customer name is likely to stay the same for a long time whereas their address or phone number may not).
Requirements DocSTAR system running version 3.1 or later ODBC driver or OLE-DB Provider installed and configured for your target database.
Information that may be needed: 1. Database type. 2. Username / password to the database. 3. Drivers to the external database. 4. Connection strings to the database. 5. Database structure. 6. Tables and fields containing data to be imported. 7. Can the data be exported to excel or text files?

DocSTAR DataLink Workbook Page 2
OLE-DB, ODBC, and Microsoft Data Access Components (MDAC)
Microsoft Data Access Components Overview The Microsoft® Data Access Components (MDAC) are the key technologies that enable Universal Data Access. Data-driven client/server applications deployed over the Web or a LAN can use these components to easily integrate information from a variety of sources, both relational (SQL) and nonrelational. These components include Microsoft® ActiveX® Data Objects (ADO), OLE DB, and Open Database Connectivity (ODBC).
ActiveX Data Objects (ADO) Microsoft ActiveX Data Objects (ADO is the strategic application programming interface (API) to data and information. ADO provides consistent, high-performance access to data and supports a variety of development needs, including the creation of front-end database clients and middle-tier business objects that use applications, tools, languages, or Internet browsers. ADO is designed to be the one data interface needed for single and multi-tier client/server and Web-based data-driven solution development. The primary benefits of ADO are ease of use, high speed, low memory overhead, and a small disk footprint. ADO provides an easy-to-use interface to OLE DB, which provides the underlying access to data. ADO is implemented with minimal network traffic in key scenarios, and a minimal number of layers between the front end and data store—all to provide a lightweight, high-performance interface.
OLE DB OLE DB is the Microsoft strategic system-level programming interface to data across the organization. OLE DB is an open specification designed to build on the success of ODBC by providing an open standard for accessing all kinds of data. Whereas ODBC was created to access relational databases, OLE DB is designed for relational and nonrelational information sources, including mainframe ISAM/VSAM and hierarchical databases; e-mail and file system stores; text, graphical, and geographical data; custom business objects; and more.
Open Database Connectivity (ODBC) The Microsoft Open Database Connectivity (ODBC) interface is an industry standard and a component of Microsoft® Windows® Open Services Architecture (WOSA). The ODBC interface makes it possible for applications to access data from a variety of database management systems (DBMSs). ODBC permits maximum interoperability—an application can access data in diverse DBMSs through a single interface. Furthermore, that application will be independent of any DBMS from which it accesses data. Users of the application can add software components called drivers, which create an interface between an application and a specific DBMS.
DocSTAR DataLink Workbook Page 3
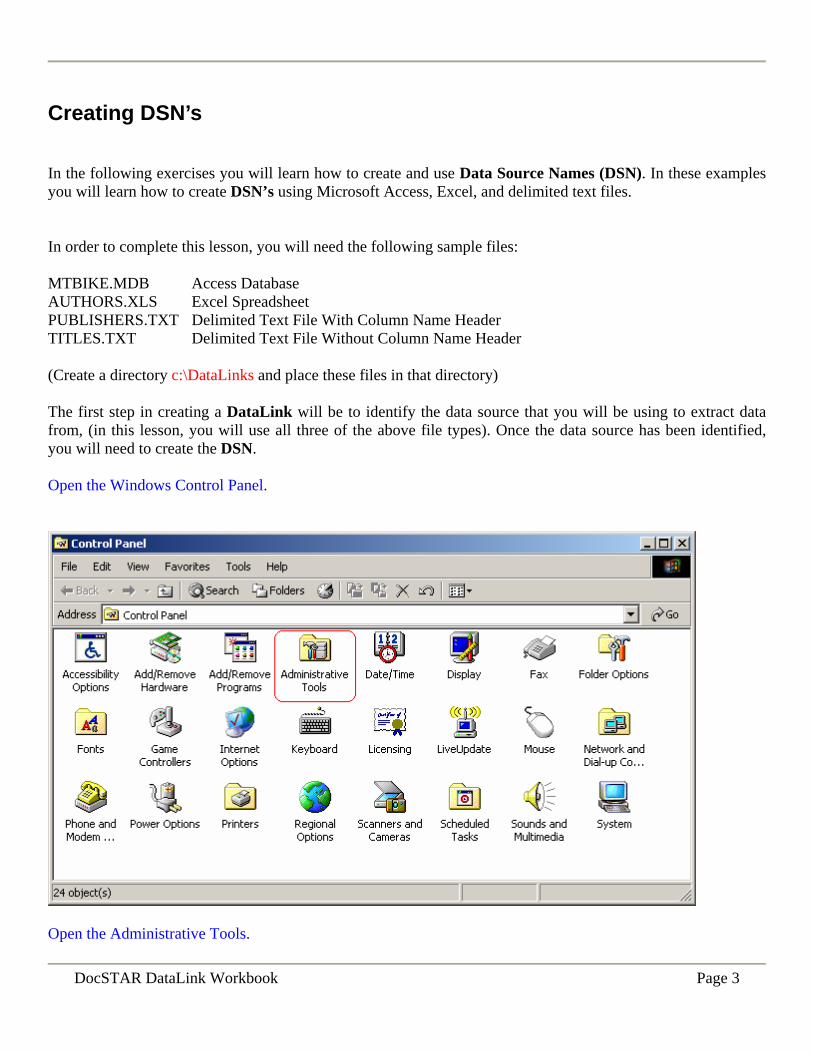
Creating DSN’s
In the following exercises you will learn how to create and use Data Source Names (DSN). In these examples you will learn how to create DSN’s using Microsoft Access, Excel, and delimited text files. In order to complete this lesson, you will need the following sample files: MTBIKE.MDB Access Database AUTHORS.XLS Excel Spreadsheet PUBLISHERS.TXT Delimited Text File With Column Name Header TITLES.TXT Delimited Text File Without Column Name Header (Create a directory c:\DataLinks and place these files in that directory) The first step in creating a DataLink will be to identify the data source that you will be using to extract data from, (in this lesson, you will use all three of the above file types). Once the data source has been identified, you will need to create the DSN. Open the Windows Control Panel.
Open the Administrative Tools.

DocSTAR DataLink Workbook Page 4
Open the Data Source Manager and select the “System DSN” tab.
Click “ADD” to create a new DSN.

DocSTAR DataLink Workbook Page 5
Create a DSN for use with Microsoft Access. (Under the System DSN tab)
Select the Microsoft Access Driver. **Note there are other access drivers for other languages.
Name the DSN “Access” Click “Select” to choose the folder C:\Datalinks Select MTBike.mdb as the database to be used and click “OK” **This location can either be a mapped drive or UNC path.

DocSTAR DataLink Workbook Page 6
*Note* If a login name and password are needed click the “Advanced” button
In this case a username and password are not needed.

DocSTAR DataLink Workbook Page 7
Create a DSN for use with Microsoft Excel Spreadsheets. (Under the System DSN tab)
Choose the Microsoft Excel Driver. **Note there are other excel drivers for other languages.
Name the DSN “Excel” Configure the Microsoft Excel DSN for a specific spreadsheet. Click “Select Workbook” to choose the location where your spreadsheet is located.
DocSTAR DataLink Workbook Page 8
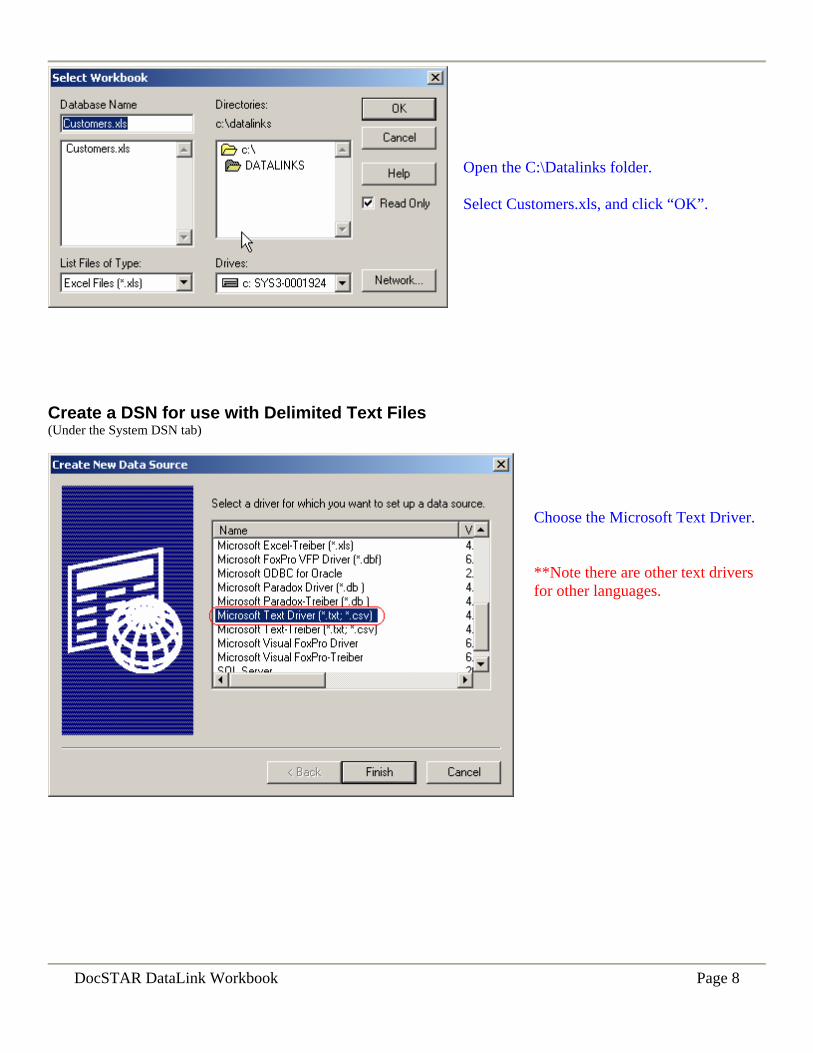
Open the C:\Datalinks folder. Select Customers.xls, and click “OK”.
Create a DSN for use with Delimited Text Files (Under the System DSN tab)
Choose the Microsoft Text Driver. **Note there are other text drivers for other languages.

DocSTAR DataLink Workbook Page 9
Remove the “Use Current Directory” checkbox, Click “Select Directory” and select C:\Datalinks as the directory. **This location must be a “drive letter path, a UNC path will not work! Click “Options” for more options.
Click on “Define Format” to configure a Text File with Column Name Headers.

DocSTAR DataLink Workbook Page 10
Select “customers.txt” Place a “Check” in “Column Name Header” checkbox. Select Format: “CSV Delimited” Click “Guess” to import column headers from the text file.
Depending on the type and format of the text file, other choices are available.
DocSTAR DataLink Workbook Page 11
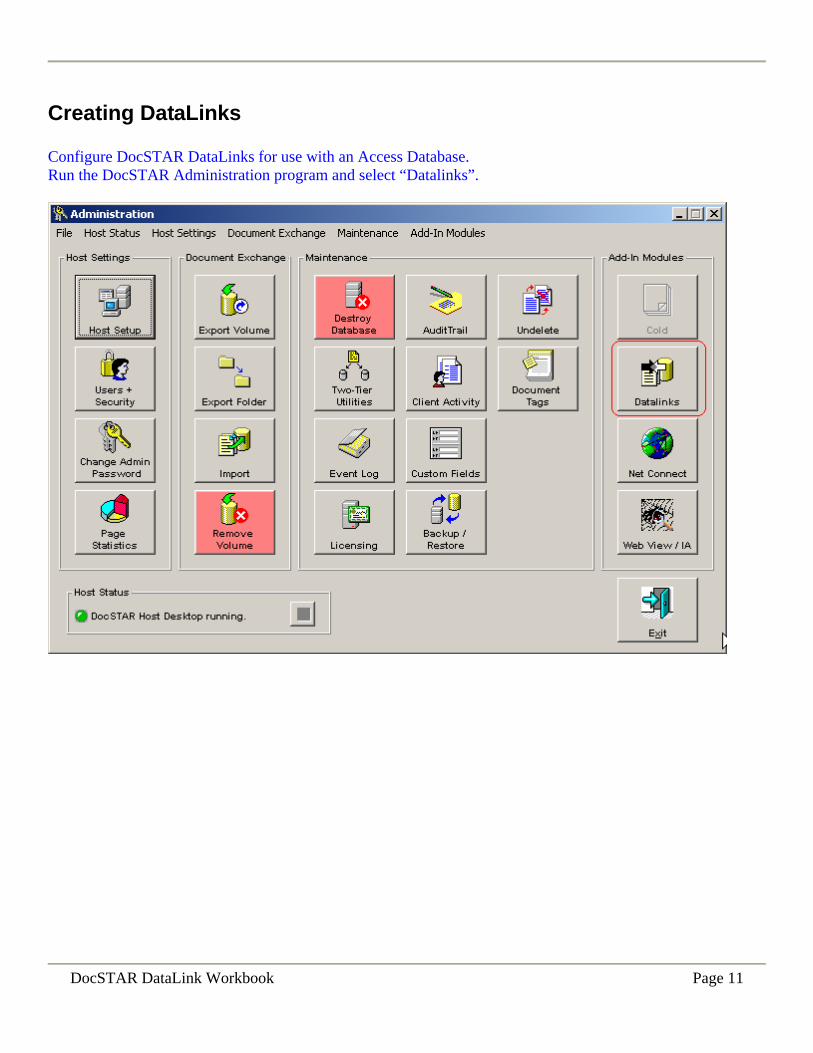
Creating DataLinks Configure DocSTAR DataLinks for use with an Access Database. Run the DocSTAR Administration program and select “Datalinks”.

DocSTAR DataLink Workbook Page 12
Create a New DataLink to use the Access Database Click “New”.
Type “Access” to name the DataLink “Access” Click “Build” to build a connection string.

DocSTAR DataLink Workbook Page 13
Select the “Connection” tab to configure the DataLink.
Select Access as the data source. Select C:\DATALINKS\MTBike as the initial catalog to use.

DocSTAR DataLink Workbook Page 14
Click “OK” and notice that the Connection String is now filled in.
Write a SQL statement to select the Data needed, (notice [] brackets around field names with spaces). Click “Save”. This will save the data link. Data is not moved into the DataLink until the update button is pressed or the update schedule is met.

Page 15 DocSTAR DataLink Workbook
Enter the SQL: Select [account#], contactfirstname, contactlastname, companyname, [invoice #], purchaseordernumber, from customers, orders This SQL statement will look for data in two separate tables, (customers and orders), for use with the DataLink.
If you are having trouble writing your SQL, use WINSQL to test and experiment with SQL statements. In this case select access as the data source, with no username or password.

DocSTAR DataLink Workbook Page 16
Enter the SQL statement and click on the green arrow to “Run”
Sample data from above SQL statement.
DocSTAR DataLink Workbook Page 17
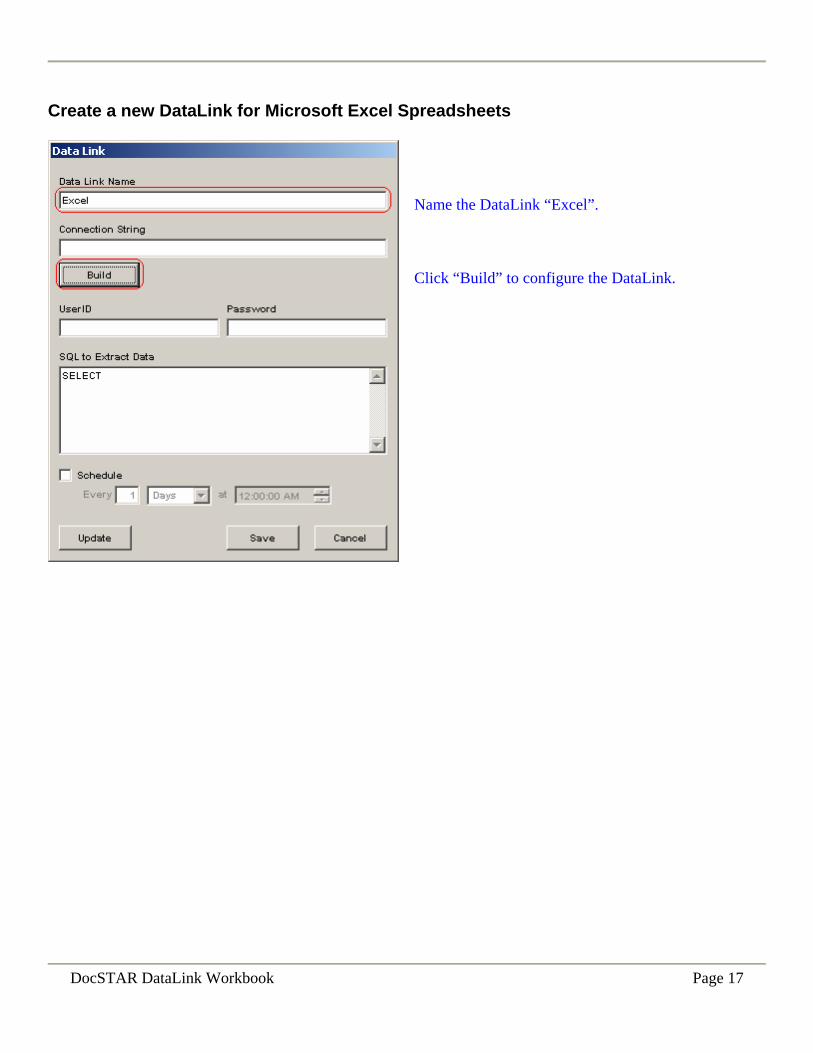
Create a new DataLink for Microsoft Excel Spreadsheets
Name the DataLink “Excel”. Click “Build” to configure the DataLink.

DocSTAR DataLink Workbook Page 18
Select Excel as the data source name. Select C:\DATALINKS\CUSTOMERS as the initial catalog to use:

DocSTAR DataLink Workbook Page 19
Write the SQL statement to select the correct data to be used. Enter the SQL: Select * from Customers This SQL will select all data from customers.xls.

DocSTAR DataLink Workbook Page 20
Create a new DataLink for Text documents
Name the DataLink “Text”, and select “Text” as the DSN. Select C:\Datalinks as the “Initial Catalog”.

DocSTAR DataLink Workbook Page 21
Notice that the Connection String has been filled in. Write the SQL statement to select the data. This statement must indicate the correct text document. Enter the SQL: Select * from customers.txt This SQL will select all data from the file customers.txt.

DocSTAR DataLink Workbook Page 22
Create a Template for DocSTAR Setup a Template in DocSTAR 3.2, click “New” and add one barcode action:
Click “Edit Region, and define a region around the “account # barcode. Select “Add to Keywords” for the Destination.
DocSTAR DataLink Workbook Page 23
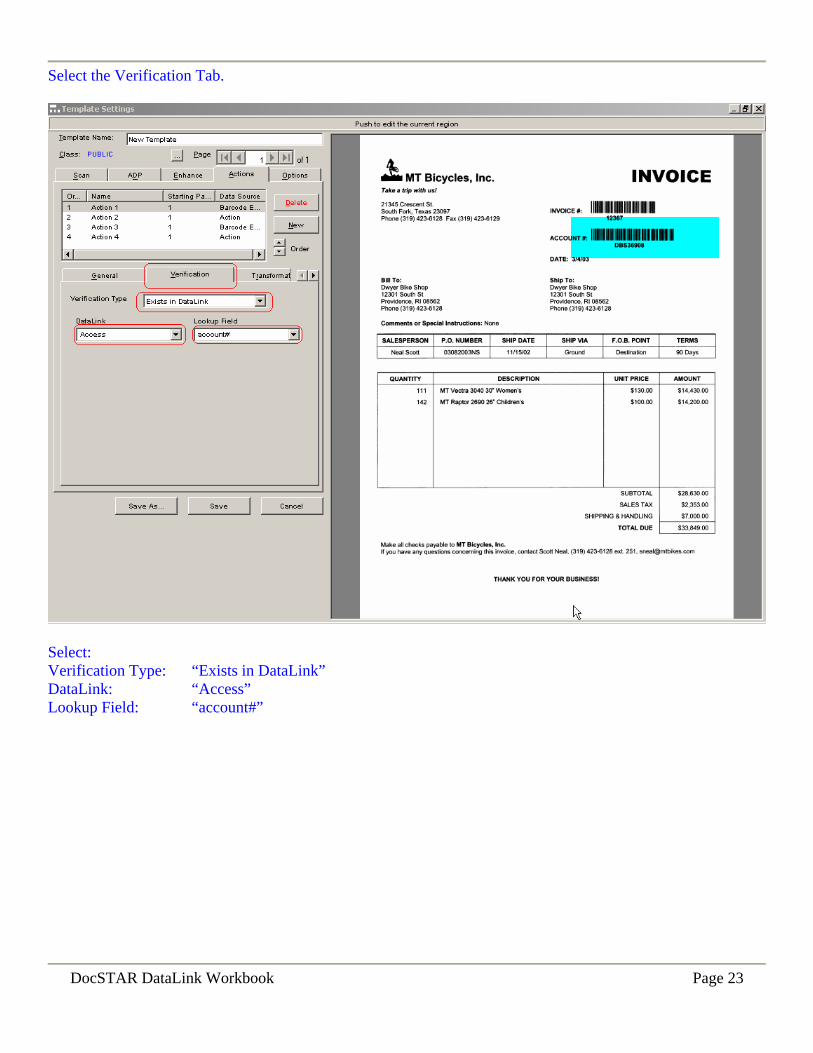
Select the Verification Tab.
Select: Verification Type: “Exists in DataLink” DataLink: “Access” Lookup Field: “account#”

DocSTAR DataLink Workbook Page 24
Under the “General Tab” click “New and create Action2.
Select: Datasource: “Other Action” Source Action: “Action 1” Destination: “Replace Title”

DocSTAR DataLink Workbook Page 25
Select the Verification Tab.
Select: Verification Type: “Exists in DataLink” DataLink: “Access” Lookup Field: “account#”

DocSTAR DataLink Workbook Page 26
Select the Transformation tab.
Select: Transform Type “DataLink” DataLink “Access” Lookup Field “account#” Click the “Add Field button, and add companyname, contactfirstname, and contactlastname. (Add a space between each field)

DocSTAR DataLink Workbook Page 27
Under the “General Tab” click “New”, create Action 3.
Select: Data Source: “Barcode Engine” Click “Edit Region”, and define an area around the “Invoice #” barcode. Destination: “Add to Keywords”.

DocSTAR DataLink Workbook Page 28
Select the Verification Tab.
Select: Verification Type: “Exists in DataLink” DataLink: “Access” Lookup Field: “invoice #”

DocSTAR DataLink Workbook Page 29
Select the “General Tab” and click “New”, create Action 4.
Select: Data Source: “Other Action” Source Action: “Action 3” Destination: “Add to Keywords”

DocSTAR DataLink Workbook Page 30
Select the Transformations Tab.
Select: Transform Type: “DataLink” DataLink: “Access” Lookup Field: “invoice # Click the “Add Field” button, and add purchaseordernumber and invoice #. (Add a space between each field) Click “Save” to save this template, and run your invoices to see the automatic indexing that is done!

DocSTAR DataLink Workbook Page 31
Exercises Create new templates using the Excel and Text data links. **Note Only the Customers table was exported to the excel and text files. Only data in these fields will be available for DataLink excercises. Create a new DataLink and template for a SQL Server Database.