david rankin’s 5-minute sketching recipe for...
TRANSCRIPT
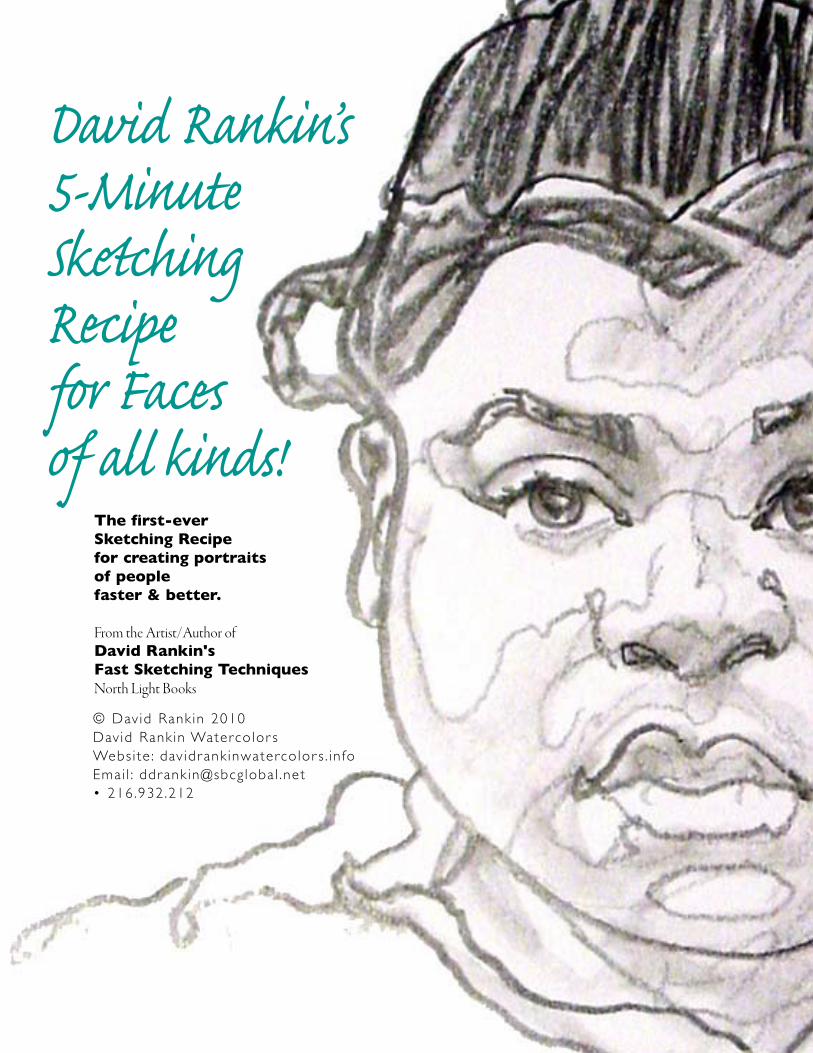
David Rankin’s 5-Minute Sketching Recipefor Faces of all kinds!
The first-ever Sketching Recipefor creating portraits of peoplefaster & better.
From the Artist/Author ofDavid Rankin's Fast Sketching TechniquesNorth Light Books
© David Rank in 2010Dav id Rank in Waterco lor sWebs i te : dav idr ank inwaterco lor s . in foEmai l : ddr ank in@sbcg loba l .net • 216 .932 .212
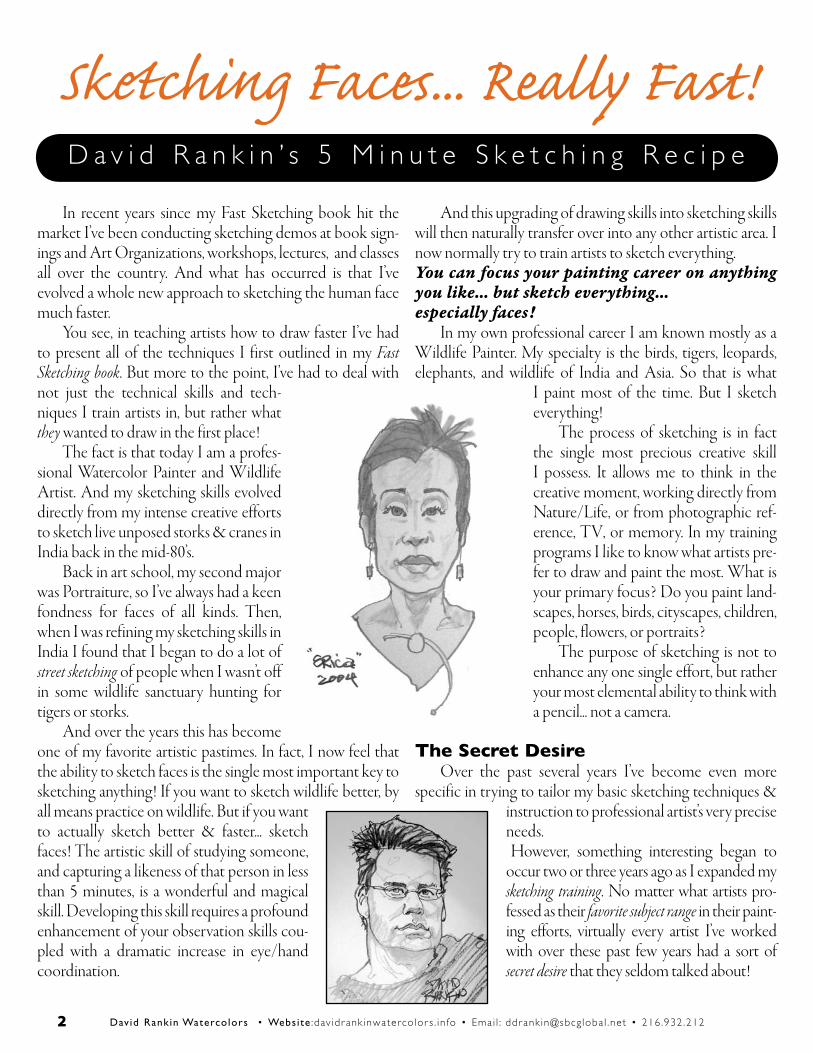
In recent years since my Fast Sketching book hit the market I’ve been conducting sketching demos at book sign-ings and Art Organizations, workshops, lectures, and classes all over the country. And what has occurred is that I’ve evolved a whole new approach to sketching the human face much faster. You see, in teaching artists how to draw faster I’ve had to present all of the techniques I first outlined in my Fast Sketching book. But more to the point, I’ve had to deal with not just the technical skills and tech-niques I train artists in, but rather what they wanted to draw in the first place! The fact is that today I am a profes-sional Watercolor Painter and Wildlife Artist. And my sketching skills evolved directly from my intense creative efforts to sketch live unposed storks & cranes in India back in the mid-80’s. Back in art school, my second major was Portraiture, so I’ve always had a keen fondness for faces of all kinds. Then, when I was refining my sketching skills in India I found that I began to do a lot of street sketching of people when I wasn’t off in some wildlife sanctuary hunting for tigers or storks. And over the years this has become one of my favorite artistic pastimes. In fact, I now feel that the ability to sketch faces is the single most important key to sketching anything! If you want to sketch wildlife better, by all means practice on wildlife. But if you want to actually sketch better & faster... sketch faces! The artistic skill of studying someone, and capturing a likeness of that person in less than 5 minutes, is a wonderful and magical skill. Developing this skill requires a profound enhancement of your observation skills cou-pled with a dramatic increase in eye/hand coordination.
And this upgrading of drawing skills into sketching skills will then naturally transfer over into any other artistic area. I now normally try to train artists to sketch everything. You can focus your painting career on anything you like... but sketch everything... especially faces! In my own professional career I am known mostly as a Wildlife Painter. My specialty is the birds, tigers, leopards, elephants, and wildlife of India and Asia. So that is what
I paint most of the time. But I sketch everything! The process of sketching is in fact the single most precious creative skill I possess. It allows me to think in the creative moment, working directly from Nature/Life, or from photographic ref-erence, TV, or memory. In my training programs I like to know what artists pre-fer to draw and paint the most. What is your primary focus? Do you paint land-scapes, horses, birds, cityscapes, children, people, flowers, or portraits? The purpose of sketching is not to enhance any one single effort, but rather your most elemental ability to think with a pencil... not a camera.
The Secret Desire Over the past several years I’ve become even more specific in trying to tailor my basic sketching techniques &
instruction to professional artist’s very precise needs. However, something interesting began to occur two or three years ago as I expanded my sketching training. No matter what artists pro-fessed as their favorite subject range in their paint-ing efforts, virtually every artist I’ve worked with over these past few years had a sort of secret desire that they seldom talked about!
D a v i d R a n k i n ’ s 5 M i n u t e S k e t c h i n g R e c i p e
Sketching Faces... Really Fast!
David Rankin Watercolors • Website :dav idr ank inwaterco lor s . in fo • Emai l : ddr ank in@sbcg loba l .net • 216 .932 .2122
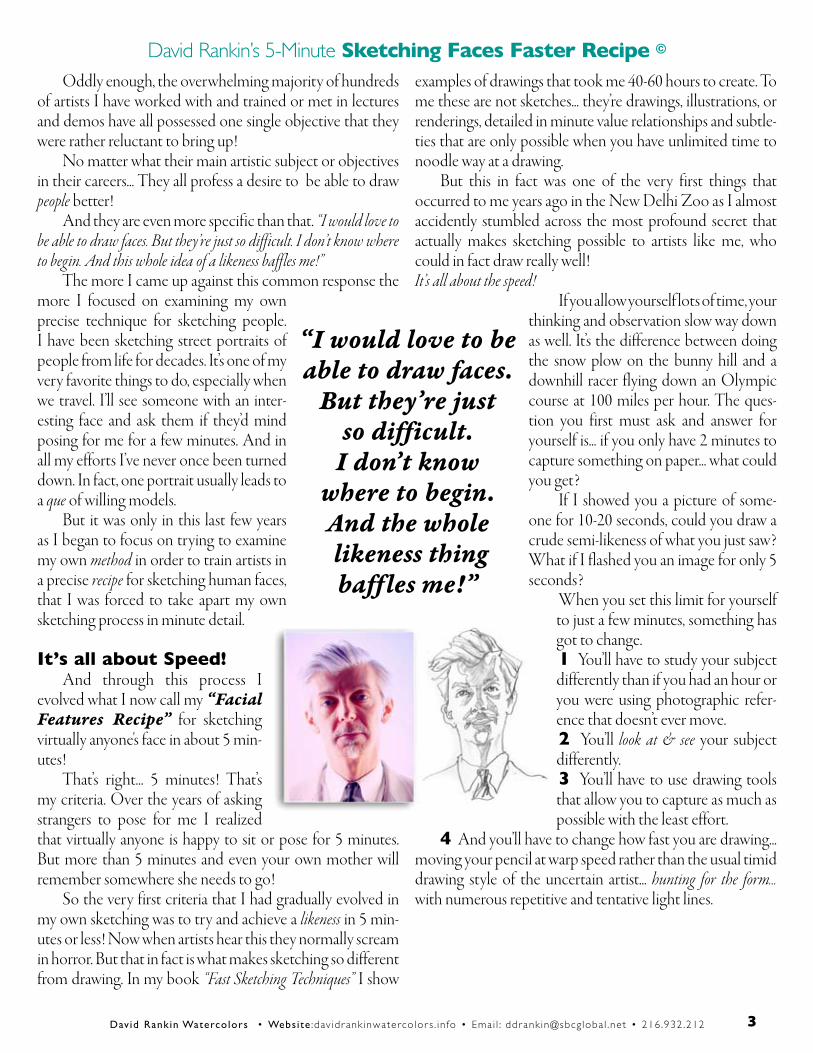
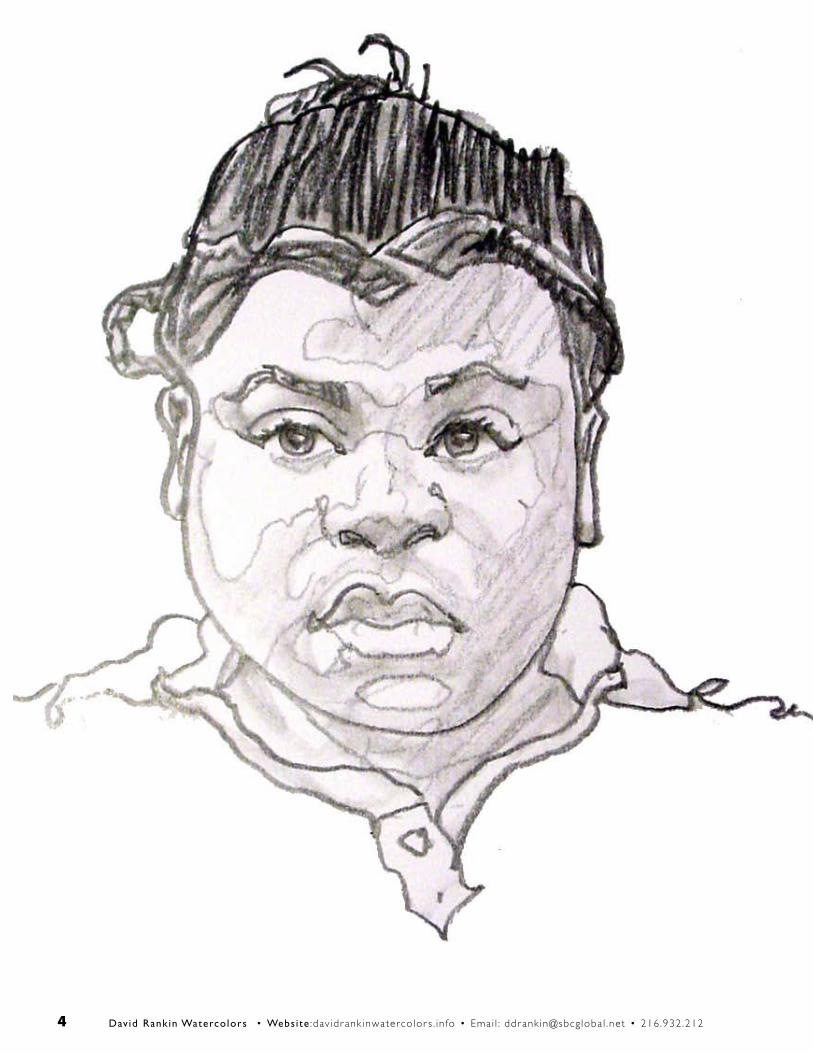
Oddly enough, the overwhelming majority of hundreds of artists I have worked with and trained or met in lectures and demos have all possessed one single objective that they were rather reluctant to bring up! No matter what their main artistic subject or objectives in their careers... They all profess a desire to be able to draw people better! And they are even more specific than that. “I would love to be able to draw faces. But they’re just so difficult. I don’t know where to begin. And this whole idea of a likeness baffles me!” The more I came up against this common response the more I focused on examining my own precise technique for sketching people. I have been sketching street portraits of people from life for decades. It’s one of my very favorite things to do, especially when we travel. I’ll see someone with an inter-esting face and ask them if they’d mind posing for me for a few minutes. And in all my efforts I’ve never once been turned down. In fact, one portrait usually leads to a que of willing models. But it was only in this last few years as I began to focus on trying to examine my own method in order to train artists in a precise recipe for sketching human faces, that I was forced to take apart my own sketching process in minute detail. It’s all about Speed! And through this process I evolved what I now call my “Facial Features Recipe” for sketching virtually anyone's face in about 5 min-utes! That’s right... 5 minutes! That’s my criteria. Over the years of asking strangers to pose for me I realized that virtually anyone is happy to sit or pose for 5 minutes. But more than 5 minutes and even your own mother will remember somewhere she needs to go! So the very first criteria that I had gradually evolved in my own sketching was to try and achieve a likeness in 5 min-utes or less! Now when artists hear this they normally scream in horror. But that in fact is what makes sketching so different from drawing. In my book “Fast Sketching Techniques” I show
examples of drawings that took me 40-60 hours to create. To me these are not sketches... they’re drawings, illustrations, or renderings, detailed in minute value relationships and subtle-ties that are only possible when you have unlimited time to noodle way at a drawing. But this in fact was one of the very first things that occurred to me years ago in the New Delhi Zoo as I almost accidently stumbled across the most profound secret that actually makes sketching possible to artists like me, who could in fact draw really well! It’s all about the speed!
If you allow yourself lots of time, your thinking and observation slow way down as well. It’s the difference between doing the snow plow on the bunny hill and a downhill racer flying down an Olympic course at 100 miles per hour. The ques-tion you first must ask and answer for yourself is... if you only have 2 minutes to capture something on paper... what could you get? If I showed you a picture of some-one for 10-20 seconds, could you draw a crude semi-likeness of what you just saw? What if I flashed you an image for only 5 seconds? When you set this limit for yourself
to just a few minutes, something has got to change. 1 You’ll have to study your subject differently than if you had an hour or you were using photographic refer-ence that doesn’t ever move. 2 You’ll look at & see your subject differently. 3 You’ll have to use drawing tools that allow you to capture as much as possible with the least effort.
4 And you’ll have to change how fast you are drawing... moving your pencil at warp speed rather than the usual timid drawing style of the uncertain artist... hunting for the form... with numerous repetitive and tentative light lines.
“I would love to be able to draw faces.
But they’re just so difficult.
I don’t know where to begin. And the whole likeness thingbaffles me!”
David Rankin’s 5-Minute Sketching Faces Faster Recipe ©
David Rankin Watercolors • Website :dav idr ank inwaterco lor s . in fo • Emai l : ddr ank in@sbcg loba l .net • 216 .932 .212 3
David Rankin Watercolors • Website :dav idr ank inwaterco lor s . in fo • Emai l : ddr ank in@sbcg loba l .net • 216 .932 .2124
Instead of making things
disappear... we make them... Appear!
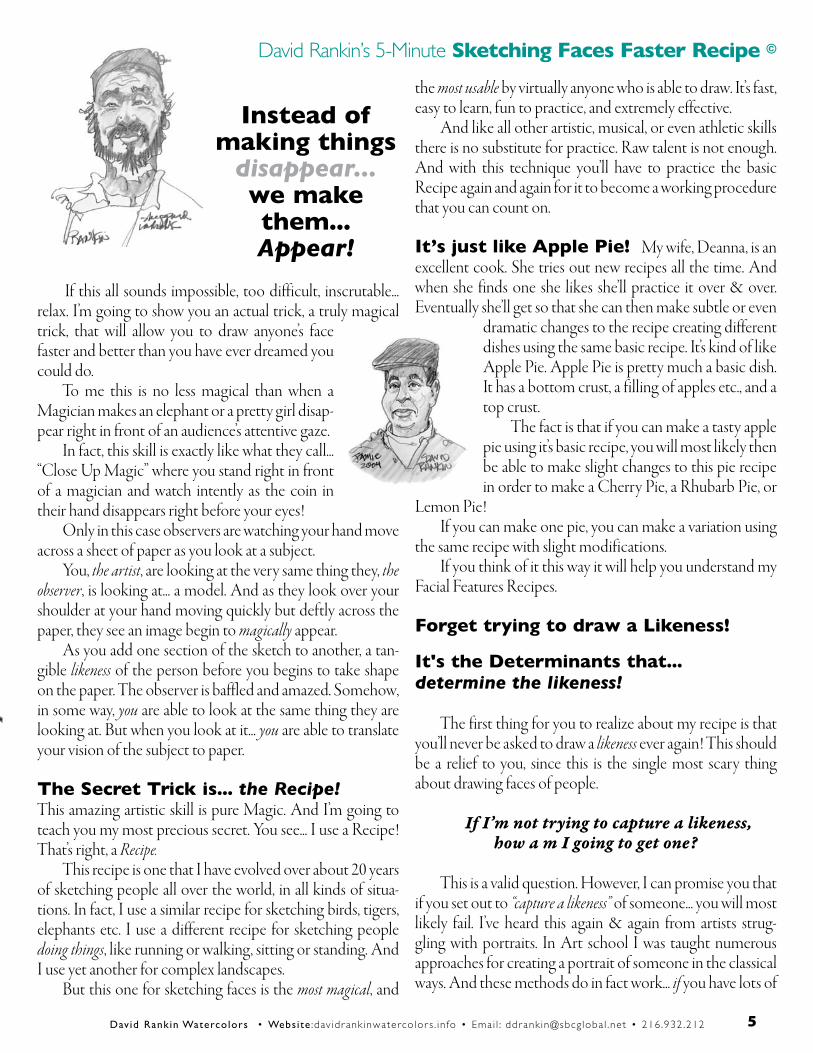
If this all sounds impossible, too difficult, inscrutable... relax. I’m going to show you an actual trick, a truly magical trick, that will allow you to draw anyone’s face faster and better than you have ever dreamed you could do. To me this is no less magical than when a Magician makes an elephant or a pretty girl disap-pear right in front of an audience’s attentive gaze. In fact, this skill is exactly like what they call... “Close Up Magic” where you stand right in front of a magician and watch intently as the coin in their hand disappears right before your eyes! Only in this case observers are watching your hand move across a sheet of paper as you look at a subject. You, the artist, are looking at the very same thing they, the observer, is looking at... a model. And as they look over your shoulder at your hand moving quickly but deftly across the paper, they see an image begin to magically appear. As you add one section of the sketch to another, a tan-gible likeness of the person before you begins to take shape on the paper. The observer is baffled and amazed. Somehow, in some way, you are able to look at the same thing they are looking at. But when you look at it... you are able to translate your vision of the subject to paper.
The Secret Trick is... the Recipe! This amazing artistic skill is pure Magic. And I’m going to teach you my most precious secret. You see... I use a Recipe! That’s right, a Recipe. This recipe is one that I have evolved over about 20 years of sketching people all over the world, in all kinds of situa-tions. In fact, I use a similar recipe for sketching birds, tigers, elephants etc. I use a different recipe for sketching people doing things, like running or walking, sitting or standing. And I use yet another for complex landscapes. But this one for sketching faces is the most magical, and
the most usable by virtually anyone who is able to draw. It’s fast, easy to learn, fun to practice, and extremely effective. And like all other artistic, musical, or even athletic skills there is no substitute for practice. Raw talent is not enough. And with this technique you’ll have to practice the basic Recipe again and again for it to become a working procedure that you can count on.
It’s just like Apple Pie! My wife, Deanna, is an excellent cook. She tries out new recipes all the time. And when she finds one she likes she’ll practice it over & over. Eventually she’ll get so that she can then make subtle or even
dramatic changes to the recipe creating different dishes using the same basic recipe. It’s kind of like Apple Pie. Apple Pie is pretty much a basic dish. It has a bottom crust, a filling of apples etc., and a top crust. The fact is that if you can make a tasty apple pie using it’s basic recipe, you will most likely then be able to make slight changes to this pie recipe in order to make a Cherry Pie, a Rhubarb Pie, or
Lemon Pie! If you can make one pie, you can make a variation using the same recipe with slight modifications. If you think of it this way it will help you understand my Facial Features Recipes.
Forget trying to draw a Likeness!
It's the Determinants that... determine the likeness!
The first thing for you to realize about my recipe is that you’ll never be asked to draw a likeness ever again! This should be a relief to you, since this is the single most scary thing about drawing faces of people.
If I’m not trying to capture a likeness, how a m I going to get one?
This is a valid question. However, I can promise you that if you set out to “capture a likeness” of someone... you will most likely fail. I’ve heard this again & again from artists strug-gling with portraits. In Art school I was taught numerous approaches for creating a portrait of someone in the classical ways. And these methods do in fact work... if you have lots of
David Rankin’s 5-Minute Sketching Faces Faster Recipe ©
David Rankin Watercolors • Website :dav idr ank inwaterco lor s . in fo • Emai l : ddr ank in@sbcg loba l .net • 216 .932 .212 5

time and your model doesn’t move. It’s just that they do not work in less than 5 minutes! We have to remember that the goal here is to define a fully tested working method for creating a portrait sketch of anyone... in only a few minutes! As I examined my own working method that I had been using effectively for many years, I began to realize that I in fact was following a rather unconscious but precise proce-dure for sketching both people and animals. This was an epiphany of sorts for me to realize. And once I realized how I myself was able to sketch people’s faces so quickly, I was then able to take it apart piece by piece, step by step. And once I did this I then tried it out on artists in my classes to see if it was both understandable and effective. Remember... I am all about verifiable reproducible results. When an artist tells me they can draw a face in 3-5 minutes... I say... Prove it! In my classes, demos, and workshops I regularly demon-strate my ability to draw anyone's face, with a visible tangible similarity... a likeness... in only a few minutes! It’s magical! It’s a wonderful artistic skill to possess. And yes... I promise you that if you practice this Recipe correctly that you will rapidly upgrade your drawing skills to sketching skills. And I promise you that you too will be able to draw people’s faces faster, better, and more effectively than you have ever dreamt possible. It’s magical yes. But it’s trainable as well. I’ve even tried it with people who profess to not being able to draw a straight line with a ruler.
How is this Possible! What I discovered years ago was that when I was draw-ing, or rather... sketching faces, I myself was not looking for a likeness at all. Instead, I discovered that what I was actually doing was seeing my subject in a unique way. Over the years of trying to speed up my drawing skills I had unconsciously evolved an approach that focused on very tiny details in a subject’s face. ForgetContourDrawing! ThisisNotContourDrawing! Instead of trying to draw a contour of a whole head or face, I discovered that I was actually looking at tiny subtle parts of my subject’s features looking for simple shapes and gradually assembling a sketch like a puzzle. And what I’ve evolved is a way of developing a sketch of a face, any face, any age, any race... by merely going through this visual sketching recipe that builds one shape at a time.
This overall recipe is actually several smaller recipes put together. And they are all based on the visual study and iden-tification of about 30-40 visual determinants that I look for in any face.
Practice A Generic Face First! Now I am assuming that if you’ve paid good money for a magazine like this that you have some basic interest and probably at least some drawing talent. Maybe you are very good at drawing and love to draw animals, or children, or flowers. It really doesn’t matter what you like to draw. In fact maybe you don’t really know how good you can draw. But you’d like give it a try? In any case the process here is quite simple and enjoy-able... but very precise. The idea is to practice building a generic face first, using my basic Facial Features Recipes. Do not begin by trying to draw a specific person... this will in fact slow down your progress. Instead, what you are trying to do is to learn the recipe, the flow of observation points, from one determinant to another. It’s like learning to play specific notes on a piano. Once you learn which notes are what, and where they are on the key-board, you can then make music. With this unique recipe you are learning a very precise
David Rankin’s 5-Minute Sketching Faces Faster Recipe ©
David Rankin Watercolors • Website :dav idr ank inwaterco lor s . in fo • Emai l : ddr ank in@sbcg loba l .net • 216 .932 .2126
working method for building a generic face using this recipe. Once you’ve learned the recipe, it’s unique sequence, and the specific focal points or determinants to study along the way, you can build a generic sketch of a face. Then you have to practice the recipe until you can do it easily and fast, working from one set of determinants to the next in sequence. And... once you’ve practiced this recipe using no visual reference, just making up a face, using the recipe alone, then it’s time to practice by applying the recipe to a photograph.
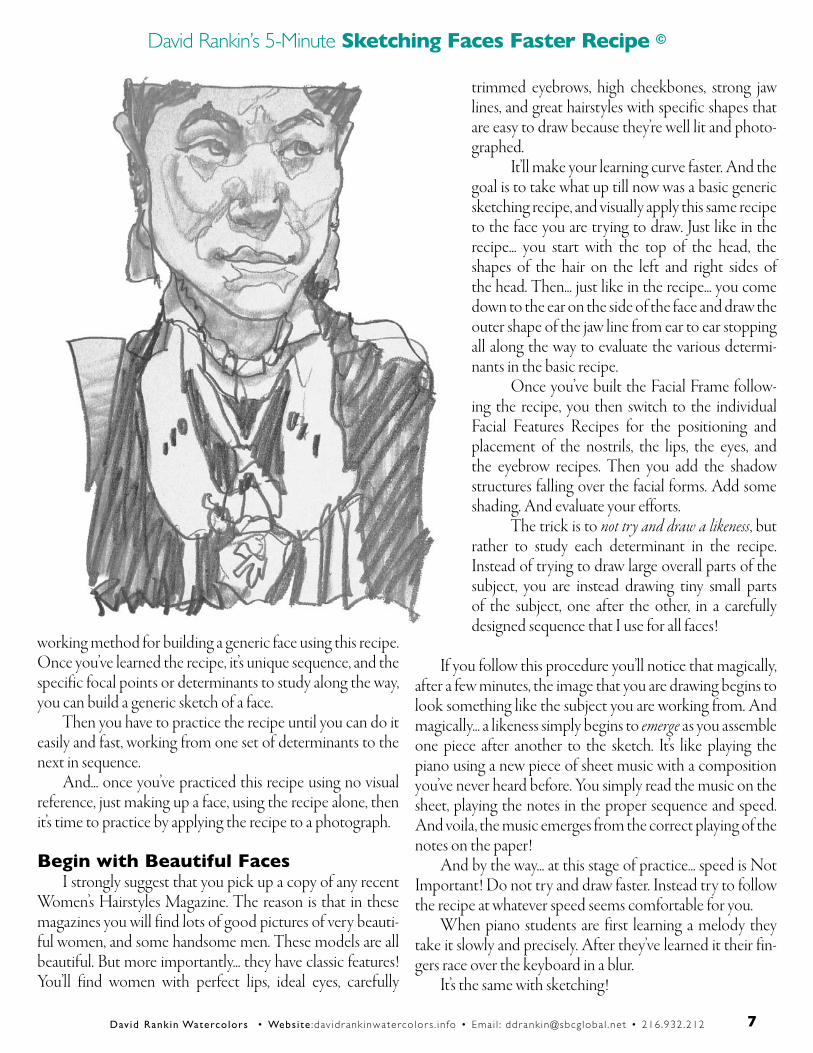
Begin with Beautiful Faces I strongly suggest that you pick up a copy of any recent Women’s Hairstyles Magazine. The reason is that in these magazines you will find lots of good pictures of very beauti-ful women, and some handsome men. These models are all beautiful. But more importantly... they have classic features! You’ll find women with perfect lips, ideal eyes, carefully
trimmed eyebrows, high cheekbones, strong jaw lines, and great hairstyles with specific shapes that are easy to draw because they’re well lit and photo-graphed. It’ll make your learning curve faster. And the goal is to take what up till now was a basic generic sketching recipe, and visually apply this same recipe to the face you are trying to draw. Just like in the recipe... you start with the top of the head, the shapes of the hair on the left and right sides of the head. Then... just like in the recipe... you come down to the ear on the side of the face and draw the outer shape of the jaw line from ear to ear stopping all along the way to evaluate the various determi-nants in the basic recipe. Once you’ve built the Facial Frame follow-ing the recipe, you then switch to the individual Facial Features Recipes for the positioning and placement of the nostrils, the lips, the eyes, and the eyebrow recipes. Then you add the shadow structures falling over the facial forms. Add some shading. And evaluate your efforts. The trick is to not try and draw a likeness, but rather to study each determinant in the recipe. Instead of trying to draw large overall parts of the subject, you are instead drawing tiny small parts of the subject, one after the other, in a carefully designed sequence that I use for all faces!
If you follow this procedure you’ll notice that magically, after a few minutes, the image that you are drawing begins to look something like the subject you are working from. And magically... a likeness simply begins to emerge as you assemble one piece after another to the sketch. It’s like playing the piano using a new piece of sheet music with a composition you’ve never heard before. You simply read the music on the sheet, playing the notes in the proper sequence and speed. And voila, the music emerges from the correct playing of the notes on the paper! And by the way... at this stage of practice... speed is Not Important! Do not try and draw faster. Instead try to follow the recipe at whatever speed seems comfortable for you. When piano students are first learning a melody they take it slowly and precisely. After they’ve learned it their fin-gers race over the keyboard in a blur. It’s the same with sketching!
David Rankin’s 5-Minute Sketching Faces Faster Recipe ©
David Rankin Watercolors • Website :dav idr ank inwaterco lor s . in fo • Emai l : ddr ank in@sbcg loba l .net • 216 .932 .212 7
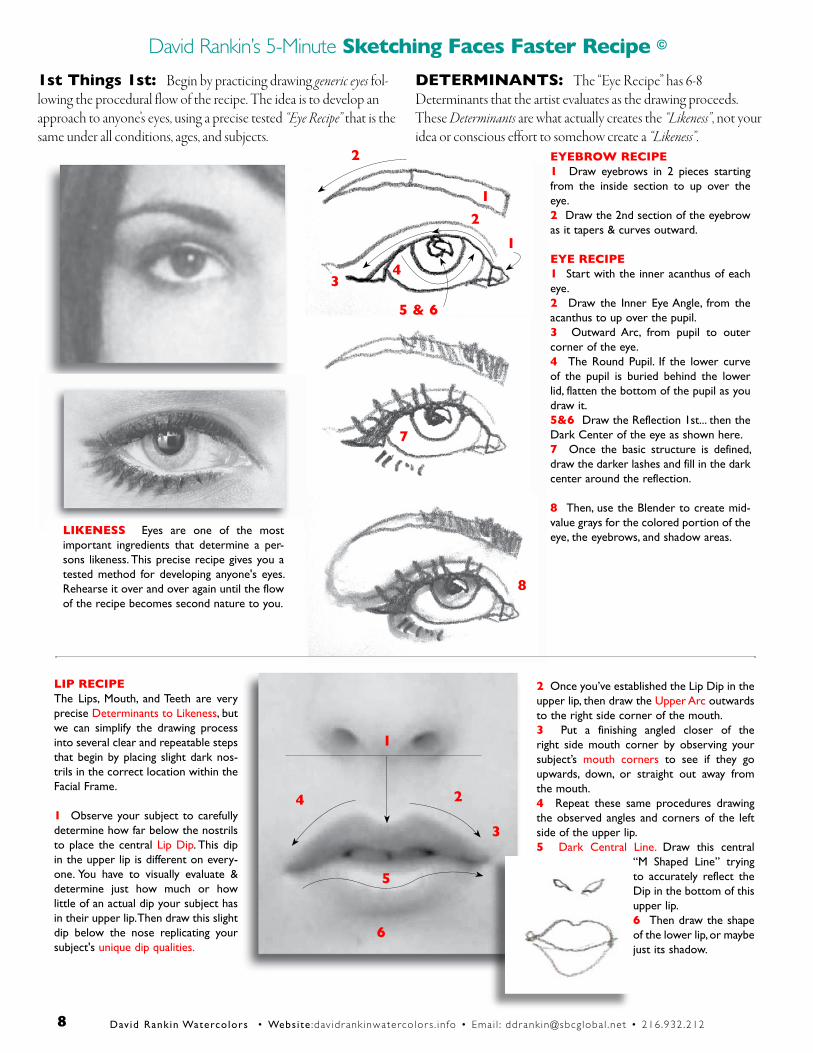
EYEBROW RECIPE 1 Draw eyebrows in 2 pieces starting from the inside section to up over the eye.2 Draw the 2nd section of the eyebrow as it tapers & curves outward.
EYE RECIPE1 Start with the inner acanthus of each eye.2 Draw the Inner Eye Angle, from the acanthus to up over the pupil.3 Outward Arc, from pupil to outer corner of the eye.4 The Round Pupil. If the lower curve of the pupil is buried behind the lower lid, flatten the bottom of the pupil as you draw it.5&6 Draw the Reflection 1st... then the Dark Center of the eye as shown here.7 Once the basic structure is defined, draw the darker lashes and fill in the dark center around the reflection.
8 Then, use the Blender to create mid-value grays for the colored portion of the eye, the eyebrows, and shadow areas.
LIP RECIPEThe Lips, Mouth, and Teeth are very precise Determinants to Likeness, but we can simplify the drawing process into several clear and repeatable steps that begin by placing slight dark nos-trils in the correct location within the Facial Frame. 1 Observe your subject to carefully determine how far below the nostrils to place the central Lip Dip. This dip in the upper lip is different on every-one. You have to visually evaluate & determine just how much or how little of an actual dip your subject has in their upper lip. Then draw this slight dip below the nose replicating your subject's unique dip qualities.
2 Once you’ve established the Lip Dip in the upper lip, then draw the Upper Arc outwards to the right side corner of the mouth. 3 Put a finishing angled closer of the right side mouth corner by observing your subject’s mouth corners to see if they go upwards, down, or straight out away from the mouth. 4 Repeat these same procedures drawing the observed angles and corners of the left side of the upper lip.5 Dark Central Line. Draw this central
“M Shaped Line” trying to accurately reflect the Dip in the bottom of this upper lip.6 Then draw the shape of the lower lip, or maybe just its shadow.
1
7
8
1
2
3
4
5
6
1
2
3
5 & 6
1st Things 1st: Begin by practicing drawing generic eyes fol-lowing the procedural flow of the recipe. The idea is to develop an approach to anyone’s eyes, using a precise tested “Eye Recipe” that is the same under all conditions, ages, and subjects.
DETERMINANTS: The “Eye Recipe” has 6-8 Determinants that the artist evaluates as the drawing proceeds.These Determinants are what actually creates the “Likeness”, not your idea or conscious effort to somehow create a “Likeness”.
LIKENESS Eyes are one of the most important ingredients that determine a per-sons likeness. This precise recipe gives you a tested method for developing anyone's eyes. Rehearse it over and over again until the flow of the recipe becomes second nature to you.
David Rankin’s 5-Minute Sketching Faces Faster Recipe ©
David Rankin Watercolors • Website :dav idr ank inwaterco lor s . in fo • Emai l : ddr ank in@sbcg loba l .net • 216 .932 .212
2
4
8
David Rankin Watercolors • Website :dav idr ank inwaterco lor s . in fo • Emai l : ddr ank in@sbcg loba l .net • 216 .932 .212
David Rankin’s 5-Minute Sketching Faces Faster Recipe ©
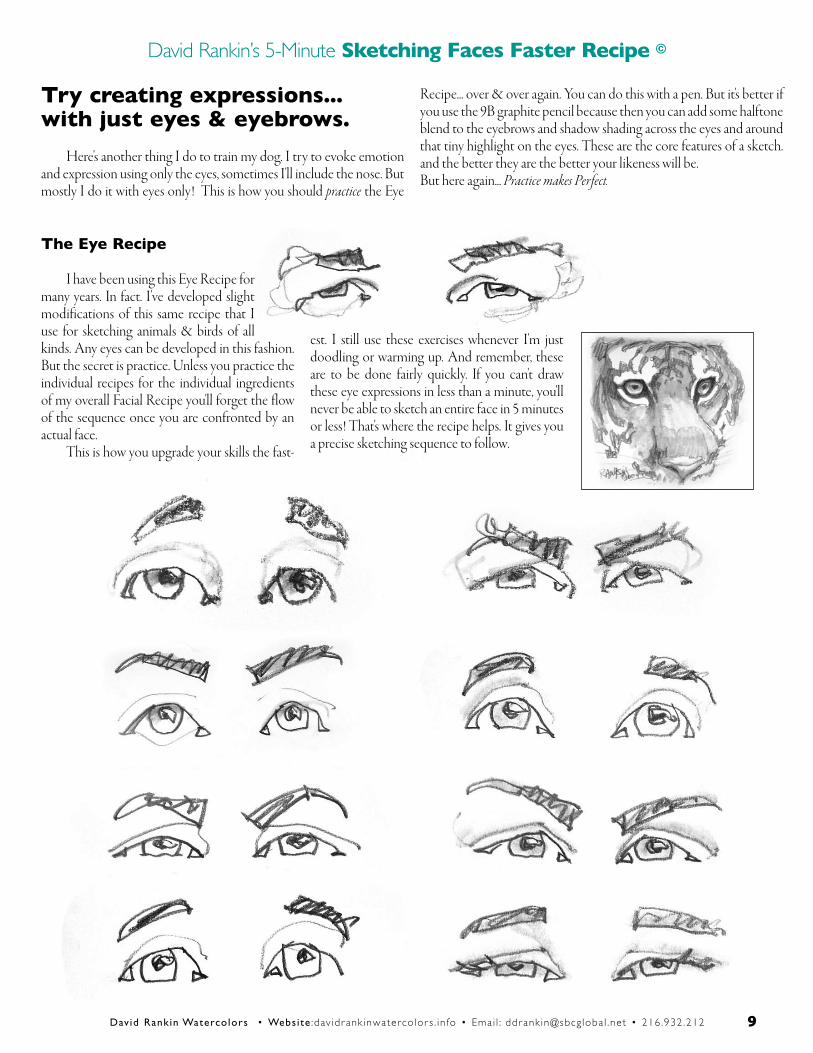
Try creating expressions...with just eyes & eyebrows.
Here's another thing I do to train my dog. I try to evoke emotion and expression using only the eyes, sometimes I'll include the nose. But mostly I do it with eyes only! This is how you should practice the Eye
Recipe... over & over again. You can do this with a pen. But it's better if you use the 9B graphite pencil because then you can add some halftone blend to the eyebrows and shadow shading across the eyes and around that tiny highlight on the eyes. These are the core features of a sketch. and the better they are the better your likeness will be. But here again... Practice makes Perfect.
The Eye Recipe
I have been using this Eye Recipe for many years. In fact. I've developed slight modifications of this same recipe that I use for sketching animals & birds of all kinds. Any eyes can be developed in this fashion. But the secret is practice. Unless you practice the individual recipes for the individual ingredients of my overall Facial Recipe you'll forget the flow of the sequence once you are confronted by an actual face. This is how you upgrade your skills the fast-
est. I still use these exercises whenever I'm just doodling or warming up. And remember, these are to be done fairly quickly. If you can't draw these eye expressions in less than a minute, you'll never be able to sketch an entire face in 5 minutes or less! That's where the recipe helps. It gives you a precise sketching sequence to follow.
9
David Rankin’s 5-Minute Sketching Faces Faster Recipe ©
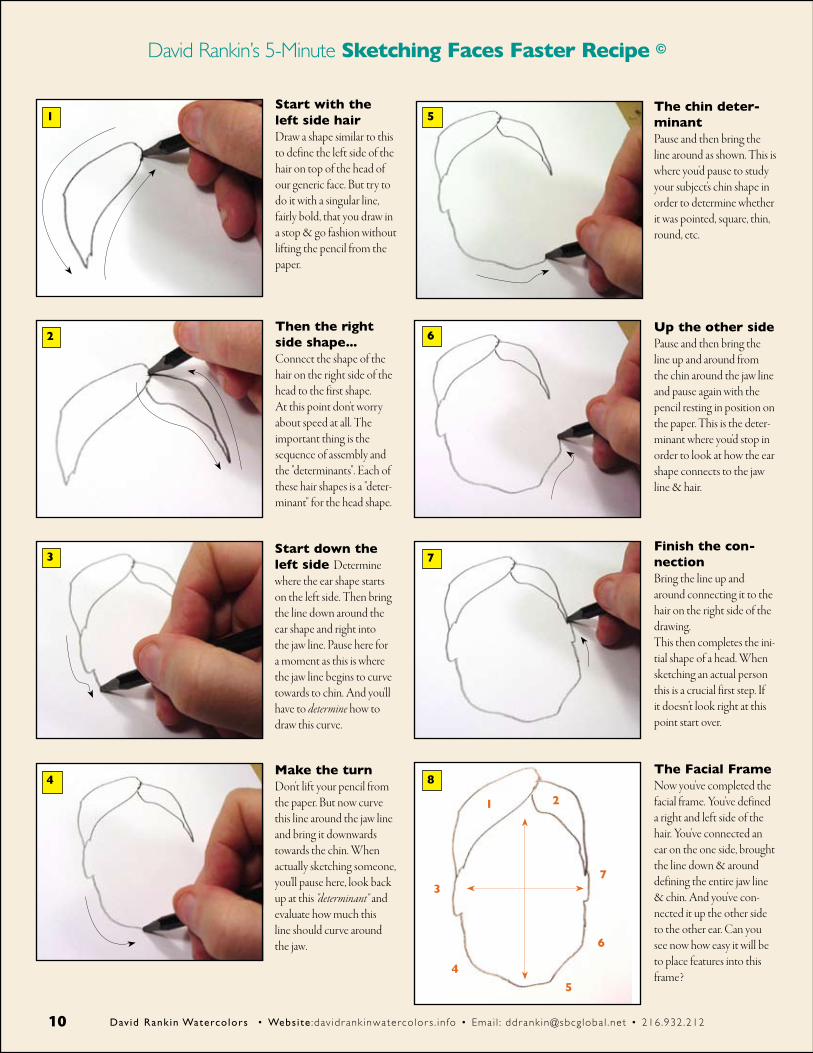
Then the right side shape...Connect the shape of the hair on the right side of the head to the first shape.At this point don't worry about speed at all. The important thing is the sequence of assembly and the "determinants". Each of these hair shapes is a "deter-minant" for the head shape.
Start down the left side Determine where the ear shape starts on the left side. Then bring the line down around the ear shape and right into the jaw line. Pause here for a moment as this is where the jaw line begins to curve towards to chin. And you'll have to determine how to draw this curve.
Make the turn Don't lift your pencil from the paper. But now curve this line around the jaw line and bring it downwards towards the chin. When actually sketching someone, you'll pause here, look back up at this "determinant" and evaluate how much this line should curve around the jaw.
Start with the left side hairDraw a shape similar to this to define the left side of the hair on top of the head of our generic face. But try to do it with a singular line, fairly bold, that you draw in a stop & go fashion without lifting the pencil from the paper.
The chin deter-minantPause and then bring the line around as shown. This is where you'd pause to study your subject's chin shape in order to determine whether it was pointed, square, thin, round, etc.
Up the other sidePause and then bring the line up and around from the chin around the jaw line and pause again with the pencil resting in position on the paper. This is the deter-minant where you'd stop in order to look at how the ear shape connects to the jaw line & hair.
Finish the con-nectionBring the line up and around connecting it to the hair on the right side of the drawing. This then completes the ini-tial shape of a head. When sketching an actual person this is a crucial first step. If it doesn’t look right at this point start over.
The Facial FrameNow you've completed the facial frame. You've defined a right and left side of the hair. You've connected an ear on the one side, brought the line down & around defining the entire jaw line & chin. And you've con-nected it up the other side to the other ear. Can you see now how easy it will be to place features into this frame?
1
2
5
6
73
4 8
1 2
3
4
5
6
7
David Rankin Watercolors • Website :dav idr ank inwaterco lor s . in fo • Emai l : ddr ank in@sbcg loba l .net • 216 .932 .21210
David Rankin’s 5-Minute Sketching Faces Faster Recipe ©
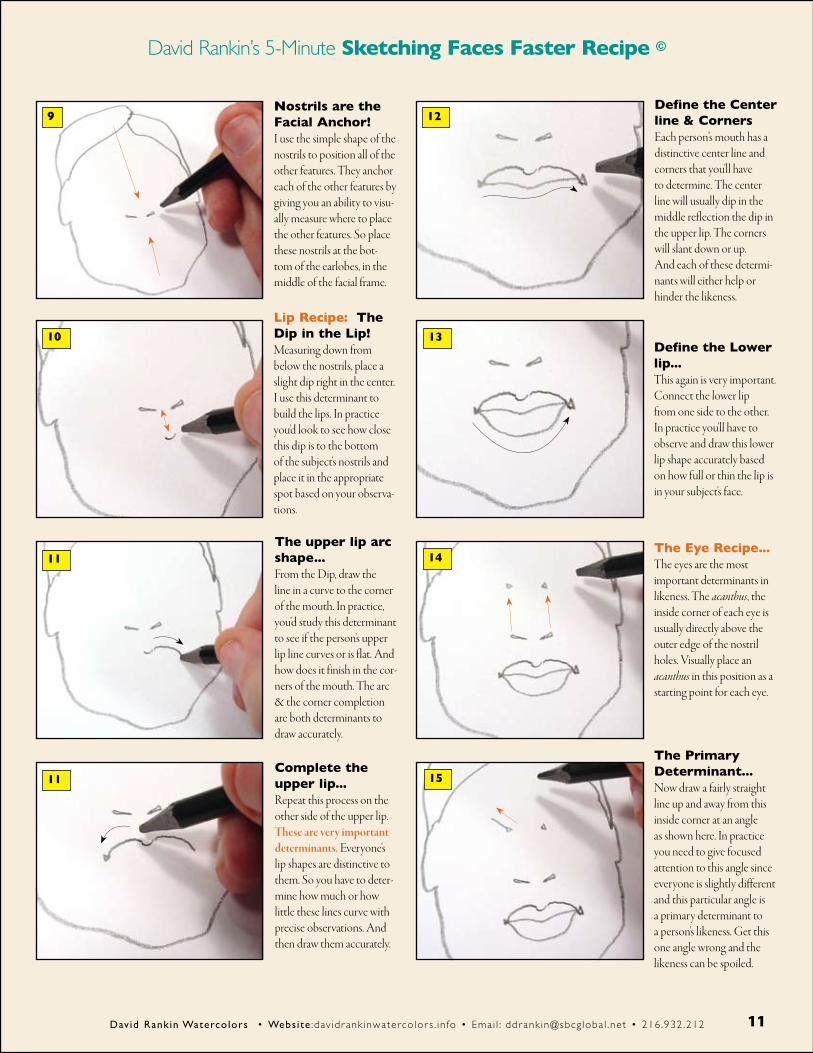
Nostrils are the Facial Anchor!I use the simple shape of the nostrils to position all of the other features. They anchor each of the other features by giving you an ability to visu-ally measure where to place the other features. So place these nostrils at the bot-tom of the earlobes, in the middle of the facial frame.
9
Lip Recipe: The Dip in the Lip!Measuring down from below the nostrils, place a slight dip right in the center. I use this determinant to build the lips. In practice you'd look to see how close this dip is to the bottom of the subject's nostrils and place it in the appropriate spot based on your observa-tions.
10
11The upper lip arc shape...From the Dip, draw the line in a curve to the corner of the mouth. In practice, you'd study this determinant to see if the person's upper lip line curves or is flat. And how does it finish in the cor-ners of the mouth. The arc & the corner completion are both determinants to draw accurately.
11Complete the upper lip...Repeat this process on the other side of the upper lip. These are very important determinants. Everyone's lip shapes are distinctive to them. So you have to deter-mine how much or how little these lines curve with precise observations. And then draw them accurately.
12
13
14
15
Define the Center line & CornersEach person’s mouth has a distinctive center line and corners that you'll have to determine. The center line will usually dip in the middle reflection the dip in the upper lip. The corners will slant down or up. And each of these determi-nants will either help or hinder the likeness.
Define the Lower lip...This again is very important. Connect the lower lip from one side to the other. In practice you'll have to observe and draw this lower lip shape accurately based on how full or thin the lip is in your subject's face.
The Eye Recipe...The eyes are the most important determinants in likeness. The acanthus, the inside corner of each eye is usually directly above the outer edge of the nostril holes. Visually place an acanthus in this position as a starting point for each eye.
The Primary Determinant...Now draw a fairly straight line up and away from this inside corner at an angle as shown here. In practice you need to give focused attention to this angle since everyone is slightly different and this particular angle is a primary determinant to a person's likeness. Get this one angle wrong and the likeness can be spoiled.
David Rankin Watercolors • Website :dav idr ank inwaterco lor s . in fo • Emai l : ddr ank in@sbcg loba l .net • 216 .932 .212 11

David Rankin’s 5-Minute Sketching Faces Faster Recipe ©
The Arc of the Upper Lid This also is a primary determinant of likeness. Once you've established the correct angle, draw an arc outward to indicate the line of the upper lid from the center of the eye to the outer corner. Finish the ends off with a slight lash angle based on observations of your subject.
The other eye... In our test recipe here we're not concerned about specific accuracy since we're making a generic face rather than trying to sketch a particular person. So simply create another eye starting from the inside corner angle trying to match the angles in each eye.
Finish the arc... Complete the other eyelid with the outer arc finished off as shown. When you use this recipe on a real subject you need to pay close atten-tion to these determinants since very often people's eyes have slight differences that will effect "likeness".
The Round Part... Draw the round part of the eye as shown here... with a flat bottom edge. This is how eyes look most of the time with the colored portion of the eye buried slightly behind the lower lid. Then, if your sketch is as big as mine, draw a highlight on the surface of the eye.
16The Dark Center... This is a subtle trick I've developed to create more naturalistic eyes quickly. If you draw the highlight first, you can then work the dark center around the highlight. If your sketch is too small this won’t be possible.
The Eyebrow Recipe... Most people's eyebrows consist of 2 parts... a wider tapered part arcing from the inside to the outside, and a smaller wrap-over portion that tapers off and away. When sketching, if you get into the habit of creating all eyebrows in 2 pieces like this it will help a great deal.
2nd tapered por-tion...The shape, value, lift & arc, thickness or thinness, angle, & taper of eyebrows are strong determinants in like-ness. They can help identify mood in the subject, and for our practice recipe, position the inside corner of the eye-brows just above the inside corner acanthus of the eyes.
Recipe Alignment...For our practice recipe align these elements as shown. But remember that when sketching someone you'll have to pay close attention to the variations in align-ment that your subject's face presents. You will look for the recipe's determinants and then sketch the varia-tions as seen before you.
20
21
22
22
17
18
19
David Rankin Watercolors • Website :dav idr ank inwaterco lor s . in fo • Emai l : ddr ank in@sbcg loba l .net • 216 .932 .21212

David Rankin’s 5-Minute Sketching Faces Faster Recipe ©
The Basic RecipeIf you've followed along thus far, hopefully you've created a drawing of a face that looks similar to mine. If you think of this as a sort of facial sketching formula, a construc-tion recipe, you can then apply this same recipe to all faces of any age, sex, color, etc. Remember... everyone has a head, a nose, 2 eyes, 2 eyebrows, 2 lips, a chin and a jaw. Instead of drawing generic lines and shapes you look for, and draw, specific determinants as you see them in your subject.
Darken the hair Once you've established the basic recipe using fairly strong line work it's time to provide some value in the hair and connect the head to a neck, shoulders, body.Draw a fairly strong scumble of lines into the hair shapes and develop the neck etc. as shown.
Shadows under the noseWe're going to imply an overhead light source in our practice recipe. So lightly define a shadow structure as shown here using a light pencil pressure so that these lines are not as dark as the main facial features.
The Shadow Structure This is where the sketch really comes to life, taking on a light source and creating surface volume in the facial structure. And with this technique it is extremely easy and very fast! But now we need to ease up on the pencil pressure a bit, creat-ing slightly lighter line work that begins to define the shape of the shadows on the face. Define the crease in the eyelid above the eye and below the eyebrow. This determinant will be different on everyone.
24
25
26
27
28
Shadows under the eyebrowsLightly define a shape to the shadow areas under the brows down to the crease above the eye.
Shadow StructureDefining the shadow areas allows us to actually define facial structure with the shading, establishing the illusion of a light source. When you actually are draw-ing someone specific, these shaded areas will become extremely important to the impact of the sketch.
ShadingDo the shading with your blending tool carefully. Remember that you are defining the light that is falling over the face. Use the blending tool like a paint brush and create mid-valued grays into these areas.
28
29
30
David Rankin Watercolors • Website :dav idr ank inwaterco lor s . in fo • Emai l : ddr ank in@sbcg loba l .net • 216 .932 .212 13

David Rankin’s 5-Minute Sketching Faces Faster Recipe ©
Practicing the Recipe In the beginning this recipe will can tend to look a bit cartoonish. This is because we are using it to practice the recipe rather than create a more realistic sketch of someone. Think of this like how musicians learn to play new music scores or instruments. At first the effort is to just get the notes in the proper order, sequence, speed, and emphasis. This requires hours of practice. By simply practicing drawing a face following this precise recipe sequence, you will embed the recipe into your artistic hand~eye coordi-nation skills. Once you can draw a generic face... change its sex. Study the sketches to the right. I did these in a Training Workshop demonstrating this recipe. These were each sketched in less than 2 minutes following the recipe precisely. I did the man first without a mustache but then added it to show how just one element can alter the overall image. Then to demonstrate how versatile this recipe is, I sketched the girl. Can you see how amazingly similar the 2 sketches are in their major elements? What then makes one a girl and the other a boy? Well first off... the hair. By simply giving the girl long sweeping hair that begins to identify her as feminine. But look at the lips & nose. They're almost identical! It's just the mustache which identifies the masculine features. Now look at the eyes. They too are almost identical... or are they? In fact, the darker eyebrows help strengthen the male features. The lighter eyebrows help deliver a softer more feminine feel to the girl. But notice how just that tiny touch of a few longer eyelashes helps deliver a more feminine look. By practicing this recipe like this, making sketches of dozens of faces, over & over, some men... some women, you'll gain great confidence and skill. Note... if you can't sketch a generic face using this recipe... you'll never be able to sketch a real person that looks like anything accurate.
Taking the dog for a Walk! Once you practice using no reference, it's then time to test your skills on pictures of people. But don't think you can bypass the 1st stage of practice where you simply train the recipe into your head and hand. Here is a collection of tiny pen sketches that I do when I travel. These usually take me only 30-60 seconds and I'm simply taking my dog for a walk. My "dog" is my specific skill. It needs to be cared for. I take it out and exercise it. I am con-stantly testing myself by trying to capture some-thing quickly and accurately. And a simple ball point pen is perfect for lightening fast sketches where only the simplest shapes are identified.
David Rankin Watercolors • Website :dav idr ank inwaterco lor s . in fo • Emai l : ddr ank in@sbcg loba l .net • 216 .932 .212
45º Scumble in shadows I use a 45˚ scumble of lines in shadows and darker areas rather than haphazard line work. this 45˚ angle helps add a subtle pleasing organization to a sketch . I don't mean for hair. It's for most other darker areas though.
14

David Rankin’s 5-Minute Sketching Faces Faster Recipe ©
David Rankin Watercolors • Website :dav idr ank inwaterco lor s . in fo • Emai l : ddr ank in@sbcg loba l .net • 216 .932 .212
Putting your skills to the test As you proceed you will see rapid improvement in your sketching skills. They'll become easier, faster, and more enjoyable the more you practice. Although I am a profes-sional watercolor painter... it is this sketching skill that I have gradually developed which is one of my most precious and satisfying artistic experiences. I value it on an equal level with my best painting skills. It's just that important. And as soon as you feel comfortable with your skills... take them on the road. Here are 3 sketches I did of real people in real situations using this same recipe.
Notice how much of the charm of these sketches is because of the use of the soft-tipped blender. It's great for creating these shadow areas where harder edges would ugly-up the sketch!
Both of these sketches were done in Kashmir. These tribal shepherds in the Himalayas have striking features with these light hazel eyes. Neither sketch took more than 5 minutes. And the girl was a departure from my basic portrait sketch; which is usu-ally face-on with no broad smiles. Smiles cannot be held for any length of time. My objective with the girl was to capture this lovely quality of bounced light which was illuminating her face in the bright mid-day light in the markets of Leh. Remember... the goal of sketching is Not to create a photographic accuracy. For that... take a Photo! A sketch is intensely personal. It hopefully can capture something intrinsic about the subject... something deep and emotional... something artistic!
15
David Rankin Watercolors • Website :dav idr ank inwaterco lor s . in fo • Emai l : ddr ank in@sbcg loba l .net • 216 .932 .212
David Rankin’s 5-Minute Sketching Faces Faster Recipe ©
But how to get there...? How to get confident enough to sketch from live subjects, in natural settings, and under normal circumstances? And how to work quickly without getting sloppy? And how to create something that looks anything like the person in front of you? These are all great questions. But then add one more. How to do this in 5 minutes or less?
The secret is practicing the recipe in private, in the quiet seclusion of your artistic studio space where you can make mistake after mistake until you see real improvement. Remember... with me it's not about whether you can talk or look artsy. It's... can you deliver the goods on command? Can you actually demonstrate that you have trained your dog, your skills, so that they are visible and tangible.
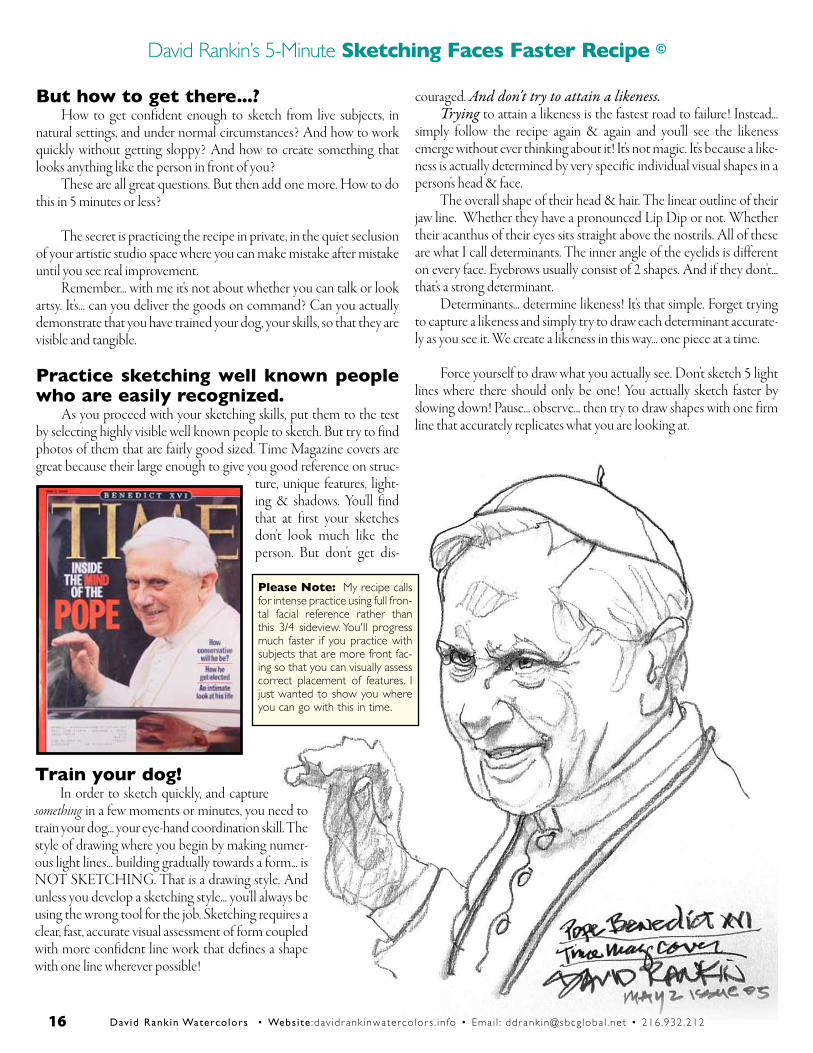
Practice sketching well known people who are easily recognized. As you proceed with your sketching skills, put them to the test by selecting highly visible well known people to sketch. But try to find photos of them that are fairly good sized. Time Magazine covers are great because their large enough to give you good reference on struc-
ture, unique features, light-ing & shadows. You'll find that at first your sketches don't look much like the person. But don't get dis-
couraged. Anddon'ttrytoattainalikeness. Trying to attain a likeness is the fastest road to failure! Instead... simply follow the recipe again & again and you'll see the likeness emerge without ever thinking about it! It's not magic. It's because a like-ness is actually determined by very specific individual visual shapes in a person's head & face. The overall shape of their head & hair. The linear outline of their jaw line. Whether they have a pronounced Lip Dip or not. Whether their acanthus of their eyes sits straight above the nostrils. All of these are what I call determinants. The inner angle of the eyelids is different on every face. Eyebrows usually consist of 2 shapes. And if they don't... that's a strong determinant. Determinants... determine likeness! It's that simple. Forget trying to capture a likeness and simply try to draw each determinant accurate-ly as you see it. We create a likeness in this way... one piece at a time.
Force yourself to draw what you actually see. Don't sketch 5 light lines where there should only be one! You actually sketch faster by slowing down! Pause... observe... then try to draw shapes with one firm line that accurately replicates what you are looking at.
Train your dog! In order to sketch quickly, and capture something in a few moments or minutes, you need to train your dog... your eye-hand coordination skill. The style of drawing where you begin by making numer-ous light lines... building gradually towards a form... is NOT SKETCHING. That is a drawing style. And unless you develop a sketching style... you'll always be using the wrong tool for the job. Sketching requires a clear, fast, accurate visual assessment of form coupled with more confident line work that defines a shape with one line wherever possible!
Please Note: My recipe calls for intense practice using full fron-tal facial reference rather than this 3/4 sideview. You'll progress much faster if you practice with subjects that are more front fac-ing so that you can visually assess correct placement of features. I just wanted to show you where you can go with this in time.
16