dcrum bp - amd application installation process v1 2 october 2015 version 1.1 author antoine...
TRANSCRIPT

Date 2 October 2015
Version 1.1
Author Antoine Buffotot
Redactor Antoine Buffotot
DCRUM 12.x – AMD application installation process

Contents
1. Purposes of this document ---------------------------------------------------------------------------------------------------- 3
2. Prerequisites --------------------------------------------------------------------------------------------------------------------- 4
3. Process flowchart --------------------------------------------------------------------------------------------------------------- 4
4. Step 1: Installation of the missing packages for RedHat 6 --------------------------------------------------------------- 6
5. Step 2: Standard AMD installation ------------------------------------------------------------------------------------------ 7
6. Step 3: AMD installation using online repo -------------------------------------------------------------------------------- 7
7. Step 4: AMD installation using RedHat distribution DVD --------------------------------------------------------------- 8
Installation for AMD version 12.0 ---------------------------------------------------------------------------------------------- 8
Installation for AMD version 12.1 or later ------------------------------------------------------------------------------------- 9
8. AMD installation using local repository ------------------------------------------------------------------------------------ 9
Step 5: Installation of the tool « createrepo » with “yum” ----------------------------------------------------------------- 11
Step 6: Installation of the tool « createrepo » with RPM files ------------------------------------------------------------ 11
Step 7: Creation of the local repository with “createrepo” ---------------------------------------------------------------- 11
Step 8: AMD Installation with the local repo ------------------------------------------------------------------------------- 12

1. Purposes of this document In some case, the AMD server is installed without using the kickstart file provided by Dynatrace. This file allows to install the OS with the necessary RedHat packages. That’s why if the kickstart is not used during the RedHat installation some packages are not present and the AMD application can’t be installed.
This document presents all the possible steps for installing an AMD application in server with RedHat 6.x 64 installed. In this document, it will be seen the standard installation (with OS installed with kickstart) and the AMD installation with missing packages.
The process is pictured with a flowchart starting from the OS installed to the AMD probe installed and configured.
To have more details on the AMD probe installation, consult the distribution documentation “DCRUM_AMDInstall.pdf” chapters 5, 6 and 7.

2. Prerequisites • Access to the RedHat server with ssh client tool, example putty
• Access to the RedHat server with ftp client tool, example putty
• Have the root account
• Have the AMD installation binary
• Have the RedHat distrib DVD with license
3. Process flowchart The following flowchart presents the steps for installing the AMD application from the OS installation depending of the situation and the available materials.
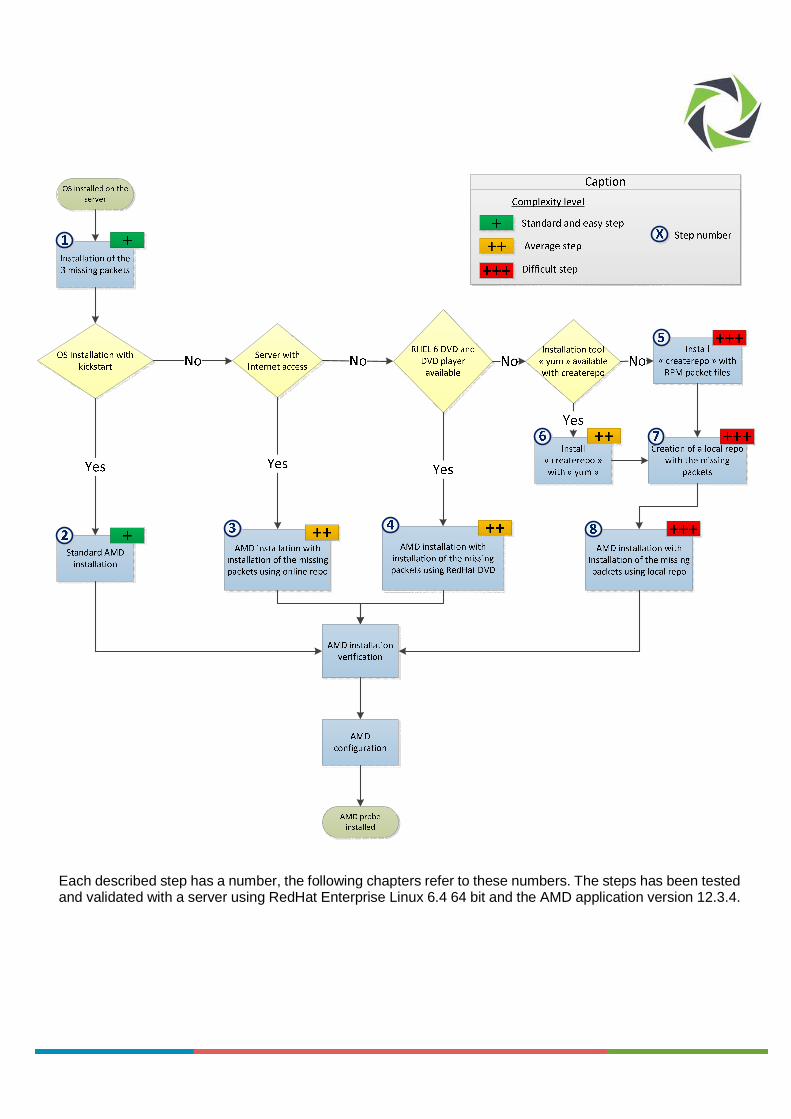
Each described step has a number, the following chapters refer to these numbers. The steps has been tested and validated with a server using RedHat Enterprise Linux 6.4 64 bit and the AMD application version 12.3.4.

4. Step 1: Installation of the missing packages for RedHat 6
Context:
While installing an AMD probe in the server using RedHat 6.x OS, additional packages have to be installed prior to the application installation. This step is mandatory for any type of AMD installation.
Prerequisites:
The additional packages are:
• java-1.7.0-oracle-1.7.0.51-1jpp.1.el6_5.x86_64.rpm
• perl-XML-Simple-2.18-6.el6.noarch.rpm
• xerces-c-3.0.1-20.el6.x86_64.rpm
These 3 packages are not present in the RedHat 6.x distribution DVD, they have to be downloaded from Internet.
Operations:
For the installation, the “rpm” command can be used and an order has to be followed.
1. java-1.7.0-oracle-1.7.0.51-1jpp.1.el6_5.x86_64.rpm
2. perl-XML-Simple-2.18-6.el6.noarch.rpm
3. xerces-c-3.0.1-20.el6.x86_64.rpm
The following commands will install the additional packages:
Next steps:
After these commands and the installations done, the AMD can be installed in the RedHat 6.x. Depending of the OS installation, please follow the appropriate steps using the diagram.
rpm -Uvh java-1.7.0-oracle-1.7.0.51-1jpp.1.el6_5.x86_64.rpm rpm -Uvh perl-XML-Simple-2.18-6.el6.noarch.rpm rpm -Uvh xerces-c-3.0.1-20.el6.x86_64.rpm

5. Step 2: Standard AMD installation Context:
This step explains how to install directly the AMD application after the OS was previously installed with the kickstart and the additional packages was installed (Step 1).
Prerequisites:
• OS RedHat installed with kickstart
• 3 additional packages installed (Step 1)
• Copy of the AMD installation binary (Depending of the AMD version and SSL engine used, different binary versions can be used)
• AMD installation binary executable
Operations:
The following command will install the application AMD:
If the kickstart file wasn’t used to install the RedHat, this method can’t be used and some missing packages must be installed. The following chapters explain how to install the AMD application in that condition.
Next steps:
After the operations, the AMD application is installed. It is recommended to verify that the AMD works fine. Then, it is possible to start the initial configurations.
6. Step 3: AMD installation using online repo Context:
This step explains how to install the AMD application after the OS was previously installed without the kickstart (potential missing dependencies) and the additional packages was installed (Step 1). The missing dependencies will be installed using online repository.
Prerequisites:
• 3 additional packages installed (Step 1)
• Copy of the AMD installation binary (Depending of the AMD version and SSL engine used, different binary versions can be used)
• AMD installation binary executable
• AMD server connected to Internet
• RedHat license installed in the server and subscribed to the RedHat network
Operations:
An option for the AMD installation binary is available in order to install the missing dependencies using online repository before installing the AMD application.
./upgrade-amd-XXXX -amdos6-x86_64-ndw-12-XXXX -b001.bin

The following command will install the missing packages:
The following command will install the AMD application:
Next steps:
After the operations, the AMD application is installed. It is recommended to verify that the AMD works fine. Then, it is possible to start the initial configurations.
7. Step 4: AMD installation using RedHat distribution DVD
Context:
This step explains how to install the AMD application after the OS was previously installed without the kickstart (potential missing dependencies) and the additional packages was installed (Step 1). The missing dependencies will be installed using RedHat DVD 6.X.
Prerequisites:
• 3 additional packages installed (Step 1)
• Copy of the AMD installation binary (Depending of the AMD version and SSL engine used, different binary versions can be used)
• AMD installation binary executable
• RedHat 6.X DVD or iso-file inserted or connected to the server (ready to be mounted)
Operations:
Depending on the AMD version, the installation operations are different.
Installation for AMD version 12.0
If you are installing the application AMD version 12.0, a specific command option is available when using the binary for installing the missing packages using the RedHat DVD
The following command will install the missing packages:
The following command will install the AMD application:
./upgrade-amd-XXXX -amdos6-x86_64-ndw-12-XXXX -b001.bin --install-deps-from-net
./upgrade-amd-XXXX -amdos6-x86_64-ndw-12-XXXX -b001.bin
./upgrade-amd-XXXX -amdos6-x86_64-ndw-12-XXXX -b001.bin --install-deps-from-media
./upgrade-amd-XXXX -amdos6-x86_64-ndw-12-XXXX -b001.bin

Installation for AMD version 12.1 or later
If you are installing the application AMD version 12.1 or later, the command option using local repo is available when using the binary for installing the missing packages. But in that case, the RedHat DVD used as the local repository has to be mounted.
The first operations is to mount the DVD distribution, for example to the rep. /mnt:
When the operation finish, the DVD distribution can be unmounted by using the dedicated command:
The following command will install the missing packages
The following command will install the AMD application:
Next steps:
After the operations, the AMD application is installed. It is recommended to verify that the AMD works fine. Then, it is possible to start the initial configurations.
8. AMD installation using local repository If you don’t have the RedHat DVD or you can’t access the DVD player of the server, to install the missing dependencies you have to define and use a local repository using the RedHat DVD files. The next chapters explain how to install “createrepo” then define a local repository with it and how to install the AMD application using the local repository.
Context:
These steps explain how to install the AMD application after the OS was previously installed without the kickstart (potential missing dependencies) and the additional packages was installed (Step 1). The missing dependencies will be installed using a local repository with the “Packages” folder of the RedHat DVD.
mount /dev/cdrom /mnt
umount /mnt
./upgrade-amd-XXXX -amdos6-x86_64-ndw-12-XXXX -b001.bin --install-deps-from-url file:///mnt/Server
./upgrade-amd-XXXX -amdos6-x86_64-ndw-12-XXXX -b001.bin

The first task is to install the tool “createrepo”: Step 5 and Step 6.
Prerequisites:
• 3 additional packages installed (Step 1)
• Copy of the AMD installation binary (depending of the AMD version and SSL engine used, different binary versions can be used)
• AMD installation binary executable
• Possibility to copy files and folder into the server
• Launching the following command checking which dependencies are missing
With the output :
Operations:
The first operation is to copy the “Packages” folder of the RedHat DVD. This folder is located in the root of the
./upgrade-amd-XXXX -amdos6-x86_64-ndw-12-XXXX -b001.bin --list-missing-deps

DVD and contains the RPM files of RedHat. It can be placed wherever in the AMD file system.
Then, the tool “createrepo” will be used for the creation of the local repository. First, it must be installed. Depending of the RedHat installation, the process is different.
Step 5: Installation of the tool « createrepo » with “yum”
If during the OS installation “yum” was installed, the installation of “createrepo” will be straight forward.
The following command will install the tool “createrepo”
Step 6: Installation of the tool « createrepo » with RPM files
In the case where the tool « yum » is not available or “createrepo” can’t be installed with it, you can install “createrepo” directly by using « rpm » files. These files are available in the RedHat distribution DVD. So you have to copy them in the server and then install them manually.
The 3 following commands will install directly “createrepo”. The installation order must be respected.
Output:
Next steps:
After these steps, “createrepo” is working and can be used to create the local repository using the “Packages” folder: Step 7.
Step 7: Creation of the local repository with “createrepo”
Context:
This step explains how to install the AMD application after the OS was previously installed without the kickstart (potential missing dependencies) and the additional packages was installed (Step 1). The missing dependencies will be installed using a local repository with the “Packages” folder of the RedHat DVD.
Prerequisites:
• 3 additional packages installed (Step 1)
• Copy of the AMD installation binary (depending of the AMD version and SSL engine used, different binary versions can be used)
yum install createrepo
rpm -ivh --aid deltarpm-3.5-0.5.20090913git.el6.x86_64.rpm rpm -ivh --aid python-deltarpm-3.5-0.5.20090913git.el6. x86_64.rpm rpm -ivh --aid createrepo-0.9.9-22.el6.noarch.rpm
• AMD installation binary executable
• “Package” folder of the RedHat copied in the server
• Tool “createrepo” installed and working (Step 5 or Step 6)
Operations:
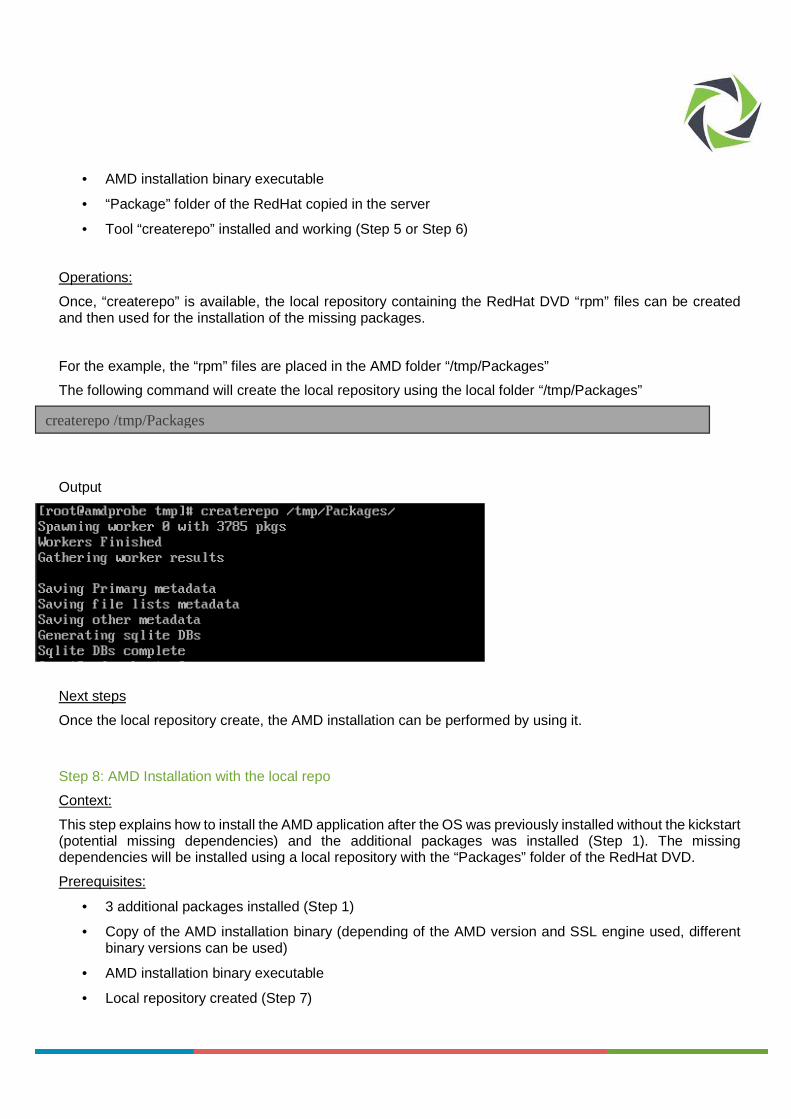
Once, “createrepo” is available, the local repository containing the RedHat DVD “rpm” files can be created and then used for the installation of the missing packages.
For the example, the “rpm” files are placed in the AMD folder “/tmp/Packages”
The following command will create the local repository using the local folder “/tmp/Packages”
Output
Next steps
Once the local repository create, the AMD installation can be performed by using it.
Step 8: AMD Installation with the local repo
Context:
This step explains how to install the AMD application after the OS was previously installed without the kickstart (potential missing dependencies) and the additional packages was installed (Step 1). The missing dependencies will be installed using a local repository with the “Packages” folder of the RedHat DVD.
Prerequisites:
• 3 additional packages installed (Step 1)
• Copy of the AMD installation binary (depending of the AMD version and SSL engine used, different binary versions can be used)
• AMD installation binary executable
• Local repository created (Step 7)
createrepo /tmp/Packages

Once the local repository is created, it can be used for the installation of the missing packages. An option is available in order to install the packages before the application installation.
The following command will install the missing packages. For the example, the local repository uses the folder “/tmp/Packages” (see Step 7)
The following command will install the AMD application:
Next steps:
After the operations, the AMD application is installed. It is recommended to verify that the AMD works fine. Then, it is possible to start the initial configurations.
./upgrade-amd-XXXX -amdos6-x86_64-ndw-12-XXXX -b001.bin --install-deps-from-url file:///tmp/Packages/
./upgrade-amd-XXXX -amdos6-x86_64-ndw-12-XXXX -b001.bin