demo overview: identity-driven security -...
TRANSCRIPT
Demo Guide Identity-Driven Security
Identity-Driven SecurityDemo Track
1

Demo Guide Identity-Driven Security
This document is provided “as-is”. Information and views expressed in this document, including URL and other Internet Web site references, may change without notice. You bear the risk of using it. This document does not provide you with any legal rights to any intellectual property in any Microsoft product. You may copy and use this document for your internal, reference purposes.
© 2016 Microsoft. All rights reserved.
2
Demo Guide Identity-Driven Security
ContentsDemo Overview: Identity-Driven Security......................................................................................................4
Scenarios and Features..............................................................................................................................4Intended Audience..................................................................................................................................... 4Length........................................................................................................................................................ 5Demo Personas.......................................................................................................................................... 5Demo Prerequisites.................................................................................................................................... 5
One-Time Demo Environment Setup.......................................................................................................5Protect at the Front Door...............................................................................................................................6
Pre-Demo Steps......................................................................................................................................... 6Respond to Advanced Threats with Risk-based Policies and Monitoring.....................................................6Mitigate Admin Risk with Privileged Identity Management.........................................................................6Demo Reset Steps...................................................................................................................................... 8
Protect Data Against User Mistakes...............................................................................................................9Pre-Demo Steps......................................................................................................................................... 9Discover Cloud Apps in Use and Control Them with Policy.........................................................................9Protecting Data On-Premises or in the Cloud...........................................................................................14Prevent Data Leakage with Mobile Apps..................................................................................................16Demo Reset Steps....................................................................................................................................16
Detect Attacks Before They Cause Damage................................................................................................17Pre-Demo Steps.......................................................................................................................................17Detect Advanced Threats On-premises with ATA.....................................................................................17Detect Advanced Threats targeting cloud apps with Microsoft Cloud App Security..................................19
Appendix 1: One Time Demo Environment Setup........................................................................................20Configure Demo Persona and Administrator Settings...............................................................................20
Add Your Authentication Phone and Email (for MFA verification) to Hero User:.....................................20Grant Appropriate Product Licenses to Global Admin user and other Demo Personas:..........................20
Configure Information Protection Policies and Labels...............................................................................20Update and Add Sub-Labels..................................................................................................................21Create Credit Card Data Policy..............................................................................................................21Create Social Security Number Policy....................................................................................................21
Appendix 2: Demo Persona Remapping Matrix............................................................................................21
3

Demo Guide Identity-Driven Security
Demo Overview: Identity-Driven SecurityEmployee interactions between users, devices, apps, and data have increasingly become more complex with transition to mobility and cloud, generating new blind spots for IT. At the same time, the sophistication of attack vectors continues to increase. Many companies only have traditional, single-point solutions from different vendors to address these challenges. What they need is identity-driven security that offers a holistic approach to address the increasing number of security challenges in this mobile-first, cloud-first era.Organizations need:
An identity-driven mobility and security solution that protects enterprises across devices and apps both in the cloud and on-premises, offers risk-based, adaptive policies, and provides powerful access management
Visibility and discovery tools that offer insight into the complex interaction across users, devices, apps, and data in the cloud
Data control resources that protect corporate data from user mistakes and prevent data loss
Sophisticated threat protection capabilities that identify cybersecurity attackers before they cause damage
Identity-driven security is central to an overall Enterprise Mobility + Security (EMS) strategy. Now you can protect at the front door with advanced risk-based conditional access, provide Just-In-Time administration privileges, discover Shadow IT cloud apps and get visibility when identities are leaked, identify and stop cyber-attacks against on-premises assets with Microsoft Advanced Threat Analytics (ATA), and protect critical company data across popular cloud applications including Salesforce, Box, Dropbox, ServiceNow, and Office 365.
Scenarios and FeaturesThis demo guide will cover the following technical scenarios listed below. Please note some scenarios are available as PowerPoint click through demos only as these require a lot of setup to perform live using your demo environment.Scenario & Value Prop Technical Scenario Demo Resources/LinksProtect at the Front DoorSafeguard your resources at the front door with innovative and advanced risk-based conditional accesses
Azure AD Identity Protection Click-thru Guide
Mitigate Admin Risk with Privileged Identity Management
Deep Dive GuideClick-thru Guide
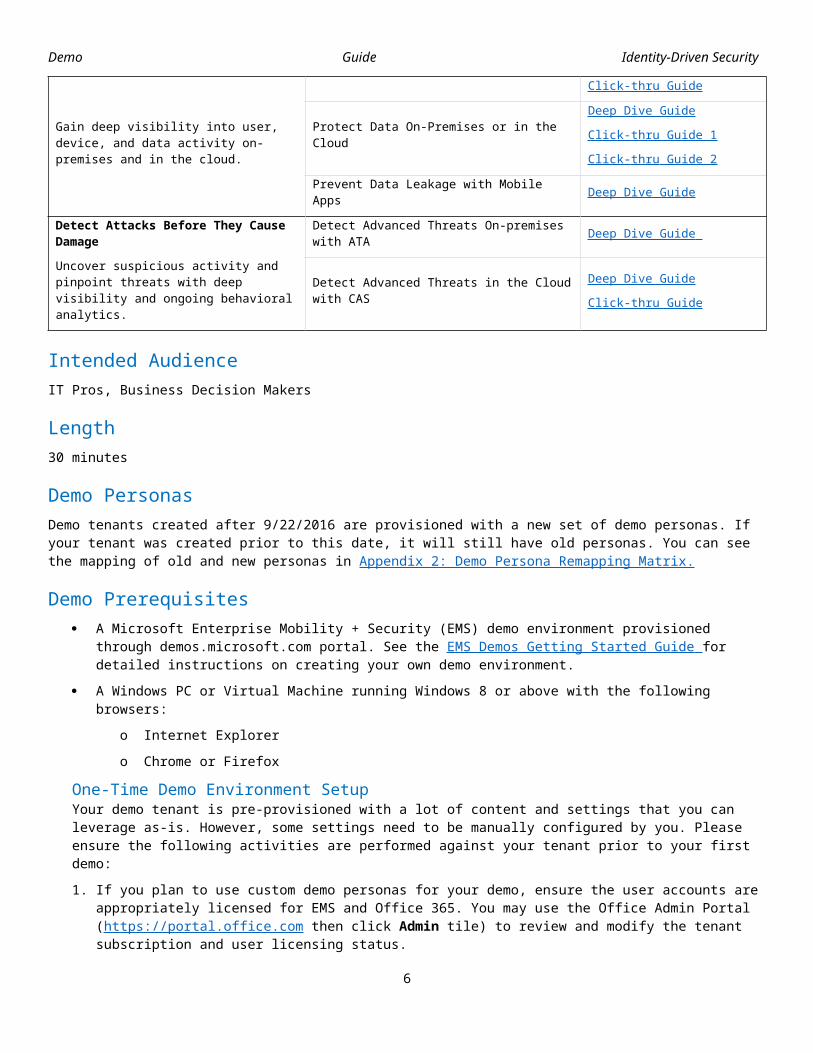
Protect Data Against User MistakesGain deep visibility into user, device, and data activity on-premises and in the cloud.
Discover Cloud Apps in Use and Control Them with Policy
Deep Dive GuideClick-thru Guide
Protect Data On-Premises or in the CloudDeep Dive GuideClick-thru Guide 1Click- thru Guide 2
Prevent Data Leakage with Mobile Apps Deep Dive GuideDetect Attacks Before They Cause DamageUncover suspicious activity and pinpoint threats with deep visibility and ongoing
Detect Advanced Threats On-premises with ATA Deep Dive Guide
Detect Advanced Threats in the Cloud with CAS
Deep Dive Guide
4

Demo Guide Identity-Driven Security
behavioral analytics.Click-thru Guide
Intended AudienceIT Pros, Business Decision Makers
Length30 minutes
Demo PersonasDemo tenants created after 9/22/2016 are provisioned with a new set of demo personas. If your tenant was created prior to this date, it will still have old personas. You can see the mapping of old and new personas in Appendix 2: Demo Persona Remapping Matrix.
Demo Prerequisites A Microsoft Enterprise Mobility + Security (EMS) demo environment provisioned through
demos.microsoft.com portal. See the EMS Demos Getting Started Guide for detailed instructions on creating your own demo environment.
A Windows PC or Virtual Machine running Windows 8 or above with the following browsers:o Internet Explorero Chrome or Firefox
One-Time Demo Environment SetupYour demo tenant is pre-provisioned with a lot of content and settings that you can leverage as-is. However, some settings need to be manually configured by you. Please ensure the following activities are performed against your tenant prior to your first demo:1. If you plan to use custom demo personas for your demo, ensure the user accounts are
appropriately licensed for EMS and Office 365. You may use the Office Admin Portal (https://portal.office.com then click Admin tile) to review and modify the tenant subscription and user licensing status.
2. Review, and if necessary, execute the scenario-specific pre-demo setup steps specified at the beginning section of each demo.
Periodic Demo Environment SetupThe Cloud App Security scenarios documented in this guide are dependent on logs and user activities that need to be revived/refreshed periodically to ensure your environment is equipped with up-to-date log reports and alerts. We recommend that you re-provision certain demo contents every 1-2 months.To re-provision Cloud App Security demo contents:1. Browse to http://emstestsite-uat.azurewebsites.net/CASForm (no authentication is required).2. Fill in your demo tenant information (tenant name and global admin password), then click Next.3. Once we validate your tenant, click Run Now.
We will send an email to your tenant’s Global Admin user (admin@<tenant>.onmicrosoft.com) when the re-provisioning is done.
5
Demo Guide Identity-Driven Security
Protect at the Front DoorPre-Demo StepsPrior to each demo, ensure the following setup steps have been performed in your demo tenant/device. Detailed instructions are provided in the Appendix section.1. Prepare a browser session for administrator experience:
a. Launch Internet Explorer or Edge browser in InPrivate mode.b. Log in to the Azure Portal (https://portal.azure.com) as the Global Admin.
Respond to Advanced Threats with Risk-based Policies and Monitoring This demo shows how organizations can use Azure AD Identity Protection to mitigate and secure against identity threats, protecting the organization with risk-based conditional access.Currently this scenario is only available as a PowerPoint Click-thru Deck.
Mitigate Admin Risk with Privileged Identity ManagementWith Azure AD Privileged Identity Management, you can manage, control, and monitor access within your organization. This includes access to resources in Azure AD and other Microsoft online services like Office 365 or Microsoft Intune. This demo shows how a Global Administrator can grant a super user elevated access for a limited period.Note: Please ensure you’ve initialized Privileged Identity Management experience in your demo tenant, as detailed in the Appendix, before performing this demo.Talk Track Click ThroughThe Azure AD Privileged Identity Management console in the Azure Portal provides important information such as:
Alerts that point out opportunities to improve security
The number of users who are assigned to each privileged role
The number of eligible and permanent admins Ongoing access reviews
Contoso has a number of permanent Global Admins. They have full access and control over the directory and the Office 365 tenant all the time. That leaves Contoso compromised and open to malicious attacks all the time.
With Privileged Identity Management Contoso can decide who should have permanent access and who should just have temporary access when required. Isaiah does not need permanent admin access so the admin sets him to eligible.
Eligible admins are users that need privileged access now and then, but not every day. The role is inactive until Isaiah needs access, then he completes an activation process and becomes an
1. Click the Azure Portal tab (https://portal.azure.com).2. In the Azure Management Portal left navigation, click
More Services, and then select Azure AD Privileged Identity Management (Preview).
3. Click Manage privileged roles.4. Point to Alerts and Role Summary.
5. Under Role summary, click the Global Administrator role.
6. In the Global Administrator blade, click Isaiah Langer.
7. On the right, click Make Eligible.
6
Demo Guide Identity-Driven Security
Talk Track Click Through
active admin for a predetermined amount of time.
The admin can also configure the nature of the admins access, how long it lasts and any notification or if additional authentication is needed. Note that for certain high privileged roles, MFA is always enabled.
When Isaiah needs higher privileges for a specific task, he can go in to the Privileged Identity Management in the Azure portal and request activation for the access role. Any type of admin can use Azure AD Privileged Identity Management to activate.
First, Isaiah is prompted to verify his identity using Multi-Factor Authentication.
Isaiah can now activate the request. Role activation is customizable. In the PIM settings, Isaiah can determine the length of the activation and provide a business justification.
Isaiah is auto-approved for the requested access with an expiration time for that permission.
Using Azure AD Privileged Identity Management, the admin can track changes in privileged role assignments and role activation history. The admin can see Isaiah just requested access as a Global Administrator. This information can be critical for auditing and forensic investigations.
8. In the Global Administrator blade top navigation, click Settings.
9. Move the Maximum Activation duration slider to the left, to 0.5 hours.
10. Set email Notifications to Enable.11. Click Save.
12. In the upper right of the browser, click admin@<Tenant>, then click Sign out.
13. Browse to the following URL: https://outlook.office365.com/ to view Isaiah Langer’s email.
14. Sign in as IsaiahL@<Tenant>.onmicrosoft.com (using your tenant password, located within the details section of your tenant on demos.microsoft.com).
15. Open the email from Microsoft Azure Alerts for Activating Global Administrator.
16. Click on the Azure Portal link in the email.17. In the Azure Portal, click More Services > then
Azure AD Privileged Identity Management.18. Click Activate my roles.19. Click Global Administrator.20. Click Verify your identity before proceeding.21. Click Verify my identity.Note: If Isaiah Langer has not yet been set up for MFA, you will be prompted to set up phone verification. Complete the setup by following the instructions to register your phone for MFA.22. Respond to the phone verification.23. In the Azure Portal, return to the Global
Administrator Role Activation Details blade:a. In the left navigation, click More Services,
and then select Azure AD Privileged Identity Management (preview).
b. Click Activate my roles.c. Click Global Administrator.
24. In the top navigation, click Activate.25. In the Reason for role activation text box, type
Year end financials.26. Click OK.27. Click Activate my roles.28. On the Global Administrator tile, point to Access
valid till.29. Sign out of Azure portal.30. Sign in to the Azure portal as
admin@<Tenant>.onmicrosoft.com.31. On the Dashboard, click the Azure AD Privileged
7
Demo Guide Identity-Driven Security
Talk Track Click Through
Identity Management tile.32. Click on Manage privileged roles.33. On the Activity dashboard, click Audit history.34. Indicate the business justification enter above, which
is displayed in the Reasoning column.
Demo Reset StepsPerform these steps after each demo presentation to ensure re-usability of this demo environment:
1. Disable MFA requirement for Emily Braun.2. Reset MFA service settings:
a. Under Trusted IPs, remove the IP address from the text box.b. Under the Remember multi-factor authentication, Days before a device must re-
authenticate: to 14.c. Uncheck Allow users to remember multi-factor authentication on devices they
trust.d. Save changes.
3. Reset MFA and location based access rules for Office 365 SharePoint Online:a. Select the Require multi-factor authentication rule.b. Set Enable Access Rules to to OFF c. Save changes.d. Set IsaiahL back to a permanent Global Administrator.
8

Demo Guide Identity-Driven Security
Protect Data Against User MistakesPre-Demo Steps
Follow these steps prior to each demo presentation to ensure a smooth and speedy demo experience:NOTE: A non-domain joined PC or a Windows VM is required to show the RMS and information protection demos using Office client applications.
1. On your PC, launch a new browser session and log in to your tenant’s Cloud App Security portal (https://portal.cloudappsecurity.com) as Global Admin (admin@<Tenant>.onmicrosoft.com and your tenant password).
2. Open a new browser tab (in the same session) and browse to your tenant’s SharePoint home page (https://<Tenant>.sharepoint.com).
3. Navigate to the RMS Demo Library and download the following files to your demo PC:a. Customer Accounts.docxb. Q3_Product_Strategy.docx
4. Make a backup copies of the downloaded files locally (e.g. in a subfolder).5. Open and prepare the downloaded files:
a. Double-click Customer Accounts.docx to open it in Word.b. If prompted, sign in to Rights Management add-in as Isaiah Langer
(IsaiahL@<Tenant>.onmicrosoft.com and your tenant password).c. If necessary, sign in to Office as Isaiah Langer with the same credentials.d. If prompted, click Enable Editing.e. In File Explorer, double-click Q3_Product_Strategy.docx to open in Word.f. If prompted, click Enable Editing.g. Minimize Word.
Discover Cloud Apps in Use and Control Them with PolicyThis demo shows how organizations can use Cloud App Security to discover cloud applications in use, apply policy to tune discovery and detect anomalous user behaviors with cloud applications.Talk Track StepsIntroducing Microsoft Cloud App SecurityAs an IT professional to Executive Officer of any business, ask yourselves these questions when referencing cloud apps: Do you know how many cloud apps your users may be using? Do you know if customers Personally Identifiable Information (PII) are located on these apps? Do you know if these apps are secure or not?Now to introduce you to Microsoft’s Cloud App Security. This newly added, cloud-delivered service does not just apply to Microsoft specific cloud applications but also third party cloud apps as well. The vision behind Cloud App Security is to empower businesses of all sizes with:
1. Switch to the Cloud App Security browser tab (where you’re logged in as admin@<tenant>.onmicrosoft.com).
9

Demo Guide Identity-Driven Security
Talk Track Steps Visibility: the ability to discover &
investigate Control: the ability to control data in
cloud apps Protection: the ability to detect threats
and investigateWe'll look at how you can gain deeper visibility, stronger controls and enhanced security for your cloud apps with this new service. General DashboardThe Dashboard provides an overview of your cloud security status.The service provides a wide set of capabilities for securing cloud applications, allowing companies to discover, investigate, control and protect their data in the cloud.Discover Cloud Apps in Use and Control Them with PolicyMoving on to the discovery dashboard.The Discovery Dashboard provides a detailed overview of all cloud apps being used in the organization. It identifies all users and IP addresses accessing the application. It also conducts a risk assessment for more than 13,000+ cloud apps and automated risk score for each app based on 60+ parameters.
Since the data is collected via logs, through firewalls and proxies, there is no need to deploy additional agents. Log upload can also be automated.
As you can see the company has over 100 cloud apps. If you scroll down, you can also see top services used and top risky services. You can also see if the apps being used are sanctioned or unsanctioned.Discovered AppsTo drill down, let’s click on discovered apps:Here you see all of the discovered apps in the organization. You can see all sanctioned (approved by my organization) and unsanctioned apps. You can easily filter based on the name, activity time frame or the risk score associated with the application. You can also filter by a category: for instance, cloud storage apps.You can also drill down on a specific app. For this, let’s look at Box. With a simple drill down here is the risk assessment and risk score for
2. On the Top Navigation Bar, click Discover.3. Click Cloud Discovery dashboard.
4. On the Cloud Discovery Navigation Bar, click Discovered apps.
5. Scroll down until you see the Categories section in the Left Navigation Bar.
6. Under Categories, click Cloud storage to filter only Cloud storage apps.
7. Scroll up to the top of the page.8. Under the Score column, click Box’s score, 9.Note: Do not click on the Box label itself (this will take you to a different page, described later).
10

Demo Guide Identity-Driven Security
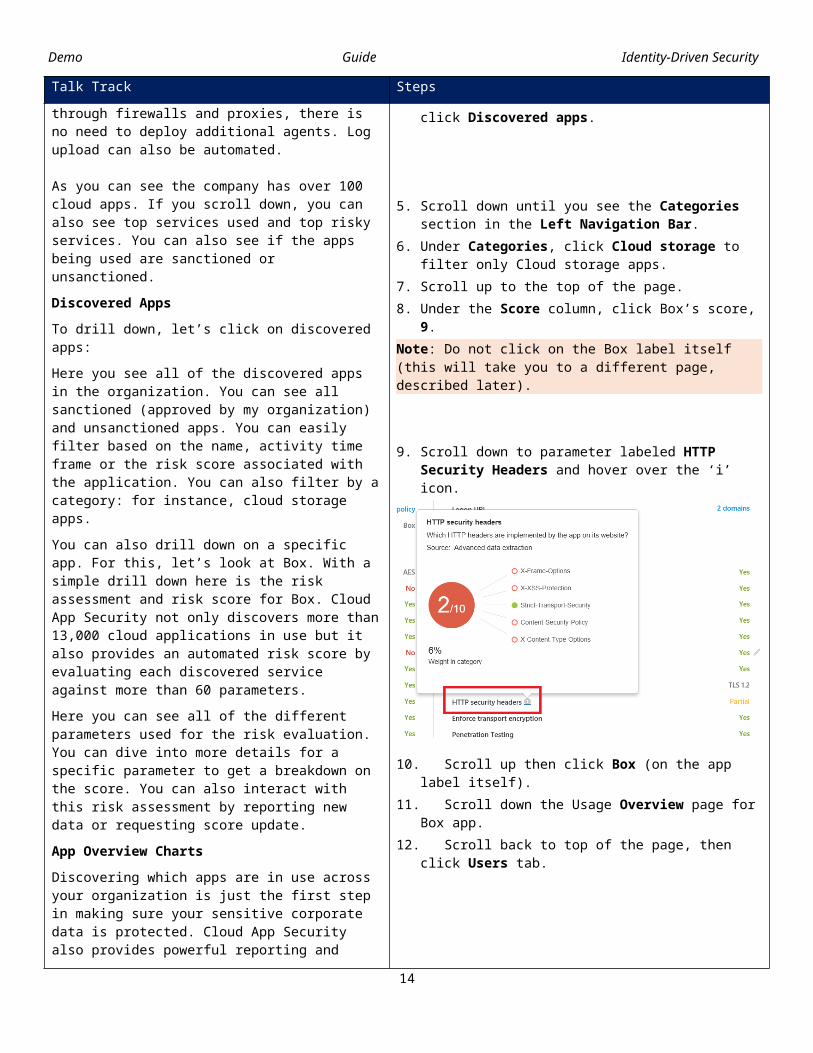
Talk Track StepsBox. Cloud App Security not only discovers more than 13,000 cloud applications in use but it also provides an automated risk score by evaluating each discovered service against more than 60 parameters. Here you can see all of the different parameters used for the risk evaluation. You can dive into more details for a specific parameter to get a breakdown on the score. You can also interact with this risk assessment by reporting new data or requesting score update.App Overview ChartsDiscovering which apps are in use across your organization is just the first step in making sure your sensitive corporate data is protected. Cloud App Security also provides powerful reporting and analytics capabilities for you to gain the complete context of your cloud usage: such as the breakdown of usage, app activity or we can delve into specific users or IPs.Once you sanction an app, you can gain granular visibility into that app. You also have the ability to see all activities across all apps and can easily apply filters to this log.
Policies for DiscoveryThe behavior of application discovery can be configured using policies. This enable you to fine-tune the applications discovered and the associated risk level to your organization.Creating an app discovery policyApp discovery policies enable you to set alerts that notify you when new apps are detected within your organization.
You can configure the policy from scratch or use a template as a starting point. There are a number of predefined templates that generate alerts based on user behavior, such as upload volume, or app type, such as online meeting apps.Cloud Discovery Anomaly DetectionCloud App Security searches all the logs in your Cloud Discovery for anomalies. For example, when a user who never used Dropbox before suddenly uploads 600 GB to Dropbox, or when there are a lot more transactions than usual on a particular app. By default, the Anomaly detection policy is enabled, so it's not necessary to
9. Scroll down to parameter labeled HTTP Security Headers and hover over the ‘i’ icon.
10. Scroll up then click Box (on the app label itself).11. Scroll down the Usage Overview page for Box
app.12. Scroll back to top of the page, then click Users
tab.
13. On the Top Navigation Bar, click Control > Policies.
14. Click Create policy.15. Click App discovery policy.16. Click on the Policy template drop down menu,
and scroll down the list of available policy templates.
17. Click Cancel.18. On the Filtering Bar, click on the Type drop
down menu.19. Select Cloud Discovery anomaly detection
policy.20. Click outside of the drop down menu to minimize
it. 21. On the far right side of the Cloud Discovery
anomaly detection policy, click on the Settings icon (the gear icon).
11

Demo Guide Identity-Driven Security
Talk Track Stepsconfigure a new policy for it to work, but you can fine-tune which types of anomalies you want to be alerted about in the default policy.Detecting Advanced Threats in the Cloud You know that employees can make a simple mistake and make a file link viewable by the public. This type of mistake can turn into a costly security incident. Thanks to Cloud App Security you can now see and govern all files in the cloud, with a very powerful and easy to use query engine. It also provides all the information that you need to perform a detailed investigation by showing you who the owner(s) and collaborator(s)are of the file. It can also show you the folder hierarchy, inspects the content and provides easy mitigation options. For example, you can sort by access level and find all public files. Here you see all files and folders viewable to the external users.File-Level InvestigationLet’s review 2 different scenarios regarding file-level violations, to an existing policy that is currently in place. Within these scenarios, the following topics about policies will be covered 1) allow you to authorize legitimate files and 2) how to take action against suspicious/costly file violations.For this, you will go to the Control menu at the top navigation bar and click on policies:Within Cloud App Security, there is a very wide set of policies available to configure. You can either use out of the box policies or build and customize your own.Let’s filter the policies to find the file level policies.The file-level policy you will be looking at is the PII compliance policy. The purpose of this policy is to identify files containing personally identifiable information that are publicly shared and also providing options for investigation and remediation. Let’s click on this policy, to see if there are any files violating this policy.Now that you are viewing the results of our investigation for the PII compliance policy, you can see that there are 4 files currently violating this policy.Let’s investigate the Customer Data.xlsx file. To dive deeper into this file, all you need to do is
22. Scroll to the bottom of the Cloud Discovery anomaly detection policy.
23. On the Top Navigation Bar, click Investigate > Files.
24. On the filter bar, click the ACCESS LEVEL drop down menu.
25. Click External.
26. On the Top Navigation Bar, click Control.27. Click Policies.
28. On the filter bar, click the TYPE drop down menu 29. Click File Policy.
30. Click File containing PII detected in the cloud policy.
12
Demo Guide Identity-Driven Security
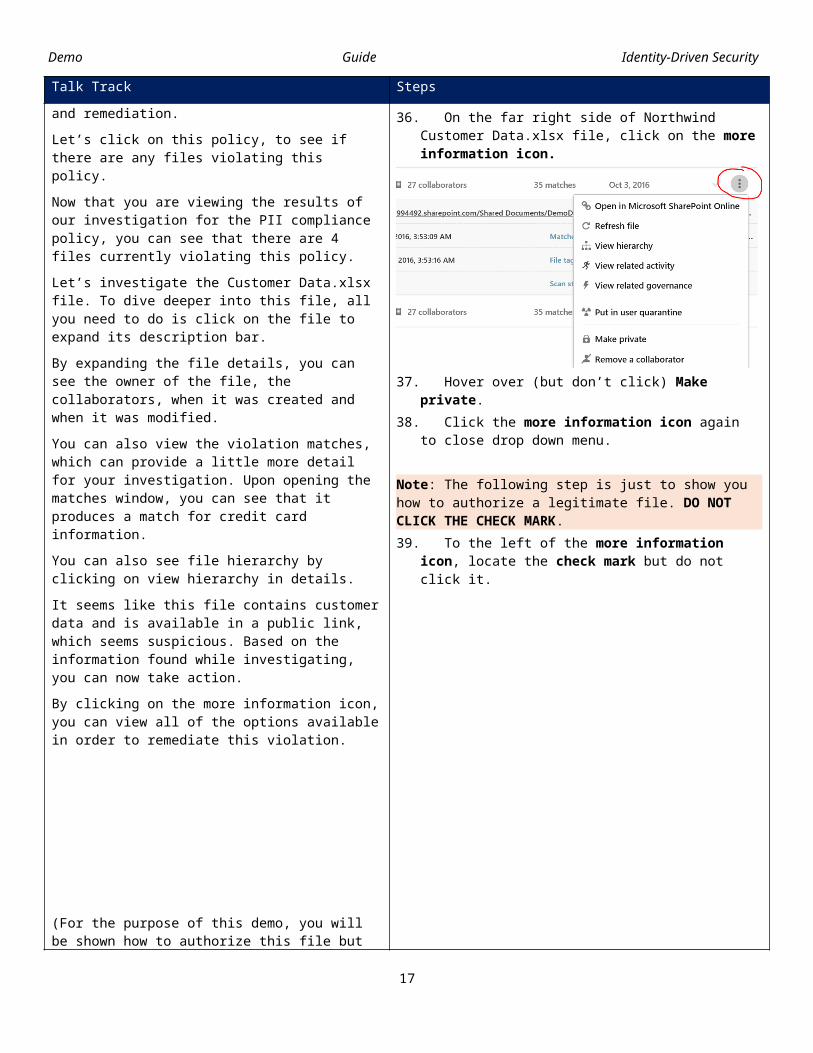
Talk Track Stepsclick on the file to expand its description bar.By expanding the file details, you can see the owner of the file, the collaborators, when it was created and when it was modified. You can also view the violation matches, which can provide a little more detail for your investigation. Upon opening the matches window, you can see that it produces a match for credit card information.You can also see file hierarchy by clicking on view hierarchy in details.It seems like this file contains customer data and is available in a public link, which seems suspicious. Based on the information found while investigating, you can now take action. By clicking on the more information icon, you can view all of the options available in order to remediate this violation.
(For the purpose of this demo, you will be shown how to authorize this file but DO NOT click the check mark.)If you have determined that this file isn’t violating this policy (test data or non-PII information) you can take further action and authorize this file, which will remove it from the Unauthorized Violations filter.
31. Click on the Northwind Customer Data.xlsx file to expand the view.
32. Under the Content matches count column for the Northwind Customer Data.xlsx file, click 35 matches.
33. Click Close to dismiss Content matches window.
34. Below the file name, click View hierarchy.35. Click Done to exit.36. On the far right side of Northwind Customer
Data.xlsx file, click on the more information icon.
37. Hover over (but don’t click) Make private.38. Click the more information icon again to close
drop down menu.
Note: The following step is just to show you how to authorize a legitimate file. DO NOT CLICK THE CHECK MARK.39. To the left of the more information icon, locate
the check mark but do not click it.
Protecting Data On-Premises or in the CloudMicrosoft’s Azure Information Protection helps you classify and label your data at the time of creation. Protection (encryption + authentication + use rights) can then be applied to sensitive data. Classification labels and protection are persistent, traveling with the data so that it’s identifiable and protected at all times – regardless of where it’s stored or with whom it’s shared. The interface is simple and intuitive and does not interrupt your normal working experience. You also have deep visibility and control over shared data.With Azure Information Protection, users can:
13
Demo Guide Identity-Driven Security
Classify data based on sensitivity and add labels—manually or automatically. Encrypt sensitive data and define usage rights when needed. Apply protection easily without interrupting their normal course of work. See what’s happening with your shared data to gain more control over it.
Note: Please ensure you’ve configured Information Protection policies in your demo tenant, as detailed in Appendix, before performing this demo.Talk Track StepsContent Based Automatic Classification The data in this document includes social security numbers; data that Isaiah should treat with the highest confidentiality.In the Azure portal, an administrator can apply predefined patterns, such as “Credit card numbers” or “USA Social Security Numbers” as a condition for automatic classification. Alternately, they can use text patterns and regular expressions to define a custom string or pattern. With Azure Information Protection, data classification and protection controls are integrated into Office and other common applications. This integration provides simple one-click options to secure data that users are working on. The Information Protection add-in shows the sensitivity for this document has not been set. The document has no policy associated with it yet.When Isaiah saves the document, Information Protection automatically classifies the document through a policy that his organization created in the Azure Management portal. The policy detected the social security numbers in the document so the notification is automatically labeled as Social Security Numbers. The Information Protection bar shows the sensitivity is now set to Social Security Numbers.The policy also added a watermark indicating the document is confidential. At the bottom, a footer also indicates it’s a confidential document.Azure Information Protection next protects the document. The file details show that a Rights Management template is applied, encrypting the document.All of this was done automatically when Isaiah saved the file with no input from him. Azure Information Protection has classified, labelled, and protected this document all in one step.
1. Restore Word app to reveal the Customer Accounts.docx file.
2. In the SSN column, point to Social Security Numbers.
3. On the Ribbon, in the Protection group, point to the Protect icon.
4. On the grey Information Protection bar, point to the classification label: Sensitivity: Not Set.
5. In the top left, on the Quick Access Toolbar, click the Save icon.
6. On the yellow Information Protection bar, point to The file was automatically labeled as Social Security Numbers.
7. On the gray Information Protection bar, point to the classification label, Sensitivity: Social Security Numbers.
8. On the document background, point to the watermark, Confidential.
9. In the footer, point to the classification label, Sensitivity: Confidential.
10. On the Ribbon, click File and point to the yellow boxed Protect Document notification.NOTE: You must set the RMS template AND run the demo from a non-domain joined machine or a Windows 10 VM to see Protect Document enabled.
14

Demo Guide Identity-Driven Security
Talk Track Steps
11. Close Customer Accounts.docx.User Initiated Classification With Azure Information Protection, Isaiah can choose to manually label a document with a classification himself. He can then apply visual markings and control who has access to that content through Rights Management templates and permissions.Isaiah opens the Q3 Product Strategy document. The Information Protection bar shows the sensitivity is not currently set. Anyone can open this document and see the contents.Isaiah can set the sensitivity to include everyone in his company or just to a particular group of employees, restricting who can see the document.He selects Finance Only so only appropriate colleagues can see the data.This adds the Secret watermark and a sensitivity footer.He can also see the document is protected by a Rights Management template, so this document is encrypted and those without permission to see the document cannot view it. Classification and protection information travels with the data. This ensures the data is protected at all times, regardless of where it is stored, who it is shared with, or which devices it is running on, iOS, Android, or Windows.
1. In Word, switch to the document Q3_Product_Strategy.docx.
2. On the Information Protection bar, point to the classification label, Sensitivity: Not Set.
3. On the Information Protection bar, click Secret and point to the sub-labels.
4. Click Finance Only.5. On the Information Protection bar, point to the
classification label, Sensitivity: Secret-Finance Only.
6. On the document background, point to the watermark, Secret.
7. In the document footer, point to the classification label, Sensitivity: Secret.
8. On the Ribbon, click File and point to the yellow boxed Protect Document notification.
9. Close Q3_Product_Strategy.docx.
Prevent Data Leakage with Mobile AppsNote: The Managed Mobile Productivity demos are being developed. This section will be updated with the appropriate scenarios when they are available.
Demo Reset StepsFollow these steps to reset the demo at the conclusion of each presentation:
1. Close all files.2. Navigate to the Demo Deliverable backups and copy new versions to the File Manager location used
in the demo.
15

Demo Guide Identity-Driven Security
Detect Attacks Before They Cause DamagePre-Demo StepsPrior to each demo, follow these steps to ensure a smooth presentation:1. Browse to the static ATA demo site, located at https://atademoui.azurewebsites.net/.2. Browse to your demo tenant’s CAS administration site, located at https://portal.cloudappsecurity.com.3. Login as: admin@<tenant name>.onmicrosoft.com with your tenant password (located within the
details section of your tenant on demos.microsoft.com).
Detect Advanced Threats On-premises with ATAThis demo shows how organizations can use Advanced Threat Analytics to view alerts from threats and suspicious activity in the corporate environment.Talk Track StepsMicrosoft Advanced Threat AnalyticsMicrosoft Advanced Threat Analytics or ATA, is an on-premises product, that helps IT protect their enterprise from advanced targeted attacks by automatically analyzing, learning and identifying normal and abnormal entity behavior. Entity can be a user, a device or simply a resource in the network.Using deep packet inspection technology, ATA analyzes all Active Directory traffic. It can also collect relevant events from SIEM, Windows Event logs and DNS servers.The constant reporting of traditional security tools and sifting through them to locate the important and relevant alerts can get overwhelming. Instead, ATA provides an easy to consume, simple to drill down, social media feed-like report helping IT to focus on what is important fast. Presenting this quantity of data as a timeline gives you the power of perspective, and insight into who’s accessing what, when they’re accessing it, and how they’re accessing that data.Event TimelineHere’s an event indicating suspicion of identity theft based on abnormal behavior of a user. ATA provided an alert as this user activity deviated from this user’s normal behavior. With ATA, these alerts happen once suspicious activities are contextually aggregated to its own behavior, as well as to the other entities in its interaction map. So multiple events were used and correlated to detect it. Four in this case. ATA also compared this user’s behavior to all the
Note: The ATA demo suggested here will be performed using a static web site with limited functionality. For a more functional ATA demo, please connect to https://atademo in the Microsoft CorpNet or use a locally hosted ATA Center demo virtual machine.1. Browse to the static ATA demo site, located at
https://atademoui.azurewebsites.net/ (no login is required).
2. Dismiss the orange bar across the top that reminds this site is a static demo environment.
3. Scroll down the page to 11:54 PM “Suspicion of Identity Theft based on Abnormal Behavior”.
4. Point mouse to the bulleted list of 4 suspected behaviors.
5. Click on 6 Abnormal computers.6. Hover mouse over EXTVENDOR-TS (last item on
the Abnormal Computers list).
16
Demo Guide Identity-Driven Security
Talk Track Stepsother users in his interaction map, in order to avoid any reduce false positive or negative alerts.Let’s take a look at the list of abnormal devices that contributed to this alert. The user, a full-time employee, suddenly logs on to an external vendor terminal server, raising suspicion. It is even more suspicious that the user did so outside of their normal working hours. This is another behavioral aspect that ATA tracks.Suspicious Activity ProfileWe begin the investigation process by clicking on the External Vendor Terminal Server, taking us to the profile view.We then get to see the attack timeline from the Terminal Server’s perspective, by clicking on the Suspicious activities tab.As with many attacks, this one begins with a reconnaissance phase where we see the attacker attempting to guess usernames. Ultimately, the attacker(s) succeeded and guessed three different accounts, one of them being the User’s account. In the next phase of the attack, we will clearly see the attacker attempting a brute force attack including them guessing the user’s password.Once the Users account was compromised, we can see the user behaving abnormally. With the list of alerts prior to this, we have sufficient evidence to conclude that this user’s credentials are now compromises. Eventually we see the attacker attempting to elevate their privilege to a domain administrator account, possibly their ultimate goal.In this instance the attack was detected by ATA with the help of data provided by a third party SIEM solution which was configured to forward Windows security events to ATA – in this case a SIEM solution. The third-party software was already collecting these events, so no additional configuration was required there beyond the event forwarding itself.All of ATA’s detection algorithms are self-learning, allowing it to detect suspicious activities from the first minute it’s deployed, without the need to configure or tweak rules, baselines, or thresholds; you simply plug it in and off it goes. Also you can configure ATA to send an event to
7. Click on the EXTVENDOR-TS label to go to the terminal profile view page.
8. Click the Suspicious Activities tab.
9. Scroll down the bottom of the timeline, then up slightly to Reconnaissance Using Account Enumeration.
10. Scroll up to Brute Force Attack Using LDAP Simple Bind.
11. Under Attacked Accounts, click on the picture of Michael Dubinsky to view his User Profile Page.
12. Click Suspicious activities tab.13. Click Back (browser navigation) twice to return to
Timeline.
14. Scroll up to Suspicion of Identity Theft based on Abnormal Behavior.
15. Scroll up to Identity Theft Using Pass-the-Ticket Attack.
16. Scroll up to Remote Execution Attempt Detected.
17
Demo Guide Identity-Driven Security
Talk Track Stepsyour SIEM system for each suspicious activity with a link to the specific event on the attack timeline.In summary, ATA uses machine learning in its deterministic and detection engine to establish an understanding of the normal patterns of behavior for both users and entities, and it’s that unique capability that allows us to provide timely and accurate alerts across a huge variety of attack vectors.
Detect Advanced Threats targeting cloud apps with Microsoft Cloud App SecurityThis demo shows how organizations can leverage the Cloud App Security alert center for threat detection, and privileged accounts and compliance violations.Talk Track StepsAlertsVisibility and controls are not enough if not coupled with a powerful detection engine that can provide insights and alerts.The alerts center gathers alert of a wide variety of categories, including threat detection, privileged accounts and compliance violations.Let’s see how Cloud App Security helps you detect anomalies and prevent threats.To do this you will go to the “Alerts” menu. The alerts center gathers all the red flags identified by Cloud App Security including anomaly and threat detection compliance violations and privileged accounts.Cloud App Security advanced machine learning heuristics learns how each user interacts with each SaaS app and through behavioral analysis, assesses the risk in each transaction.Here you can see a user who has triggered an anomaly alert by uploading a large amount of content to YouTube. You can take a look at the details of the activity and take action to mitigate any threats right away.As you have seen, Microsoft Cloud App Security is a comprehensive solution for gaining deeper visibility, stronger controls and enhanced security for your cloud apps. I would like to emphasize - We not only support Microsoft cloud apps. We are committed to help you secure third party cloud apps as well.
1. Browse to https://portal.cloudappsecurity.com2. Login as: admin@<tenant>.onmicrosoft.com.
3. On the Top Navigation Bar, click Alerts.
4. If you see an alert labeled Cloud Discovery anomaly detection, click on it.
18
Demo Guide Identity-Driven Security
Talk Track Steps
Note: Please refer to the Appendix to learn how you can initiate Cloud Discovery anomaly detection alerts in your demo tenant.5. Review the contents of the alert Description.
19

Demo Guide Identity-Driven Security
Appendix 1: One Time Demo Environment SetupNote: These activities need to be performed only once per demo tenant. You may have performed some or all of these steps against your environment in preparation for another demo, in which case you may skip these steps.
Configure Demo Persona and Administrator SettingsThe recommended demo personas to use for performing demos in this guide, unless otherwise stated:
Administrator scenarios: admin@<tenant>.onmicrosoft.com / password: your tenant password End user scenarios (Hero User): Isaiah Langer, IsiahL@<tenant>.onmicrosoft.com / your tenant
password
Add Your Authentication Phone and Email (for MFA verification) to Hero User:1. Open a new browser session in InPrivate mode (<CTRL>+Shift+P).2. Log in to your demo tenant’s Azure admin portal https://manage.windowsazure.com/ as the
global administrator, admin@<Tenant>.onmicrosoft.com (corporate account) and your tenant password.
3. In the list of ALL ITEMS, locate and click on your tenant’s directory name, labeled as Contoso <TENANT>.
4. Click USERS to view the list of all directory users.5. Locate and click on Isaiah Langer (IsaiahL@<Tenant>.onmicrosoft.com) in the directory.6. In the WORK INFO page, scroll down to Authentication Contact Info, then fill in the following
info:a. Authentication Phone: (provide your actual, real world mobile phone number)b. Authentication Email: (provide your actual, real world email address)
7. Click Save.Grant Appropriate Product Licenses to Global Admin user and other Demo Personas:8. In the same browser session, while logged in as tenant Global Admin user, browse to
https://portal.office.com.9. Click the Admin tile.10. Go to Users > Active Users.11.Scroll down the list of users and review the STATUS column. Most of the users should already
be licensed for EMS and Office 365.12. Locate and click on the global admin user (admin@<Tenant>.onmicrosoft.com) line item.13. If the user isn’t granted EMS license, click Edit under Product licenses, then assign Office 365
Enterprise E5 and Enterprise Mobility + Security licenses.14. Locate any other custom demo personas you intend to use in the demo and ensure they are
licensed appropriately.
Configure Information Protection Policies and LabelsNOTE: A non-domain joined PC or a Windows VM is required to show the RMS and information protection demos using Office client applications.
1. Browse to https://portal.azure.com/signin/index/?Microsoft_Azure_InformationProtection=true.
20

Demo Guide Identity-Driven Security
2. In the left navigation, click Browse then select Azure Information Protection.3. In the list of labels, click Confidential.4. On the right, in the Select RMS Template drop-down, select Contoso <Tenant> -
Confidential.5. At the top, on the Label blade, click Save.6. In the list of labels, click Secret.7. Set Select RMS Template to Contoso <tenant> - Confidential.8. On the Label blade, click Save and close the blade.Update and Add Sub-Labels9. To the left of the Secret label, click the triangle to expand the row.10. Click on My Group to open the blade for the label.11. Change the Label name to External Permitted.12. Click out of the Label name text box and on the Label blade, click Save, and then close the
blade.13. On the right of the Secret label row, click the ellipsis and select Add a sub-label.14. Set the Label name to Finance Only.15. On the Label blade, click Save and close the blade.16. Click on the ellipsis on the right of the Secret label row.17. Select Add a sub-label.18. Set the Label name to HR Only.19. Click out of the Label name text box and on the Label blade click Save, and then close the
blade.20. On the right of the Secret label row, click the ellipsis and select Add a sub-label.21. Select Add a sub-label.22. Set the Label name to Legal Only.23. Click out of the Label name text box and on the Label blade, click Save, and then close the
blade.Create Credit Card Data Policy1. In the list of labels, click on the Credit Card Data label.2. Set Select RMS Template to Contoso <Tenant> - Confidential.3. On the Label blade, click Save and close the blade.Create Social Security Number Policy1. In the list of labels, click on the Social Security Numbers label.2. Set Select RMS Template to Contoso <Tenant> - Confidential.3. On the Label blade, click Save and close the blade.4. Return to the Azure Information Protection blade, click Save and then click Publish.5. When prompted, click Yes.
Initialize Azure AD Privileged Identity Management (PIM)1. Sign in to the Azure Management Portal (https://portal.azure.com) as
admin@<Tenant>.onmicrosoft.com.2. In the left navigation, click More Services >, then Azure AD Privileged Identity Management.3. Click on the link, Azure AD Privileged Identity Management at the bottom of the blade.
21

Demo Guide Identity-Driven Security
4. In the list of Results, click Azure AD Privileged Identity Management.5. At the bottom of the Azure AD Privileged Identity Management blade, click Create.6. If prompted to verify identity with MFA, click Verify my identity.7. Follow the prompts to set up and verify using Multi-Factor Authentication (MFA) using phone
verification.8. Repeat steps 2 through 5 (ending with click Create) to actually provision the Privileged Identity
Protection service.9. Wait a few seconds while the PIM service initializes and discovers privileged identities in your
tenant. 10. On the Discover privileged roles blade click Next.11. On the CONVERT USERS TO ELIGBLE blade click NEXT.12. On the REVIEW CHANGES blade click OK.
Cloud App Security: Additional Information/ReferencesUsing the following link, navigate to the Microsoft Technet article about Cloud App Security:https://technet.microsoft.com/en-us/library/mt668458.aspx
Appendix 2: Demo Persona Remapping MatrixIf your tenant was created prior to 9/22/2016, use the mapping below to find the demo persona used in this guide to the demo persona in your tenant (e.g. use GarthF instead of IsaiahL).
Old Account Name First Name Last Name New Account Name First Name Last NameAlexD Alex Darrow AlexW Alex WilberAllieB Allie Bellew DebraB Debra Berger
AnneW Anne Wallace PattiF Patti FernandezAzizH Aziz Hassouneh PradeepG Pradeep Gupta
BelindaN Belinda Newman JoniS Joni ShermanBonnieK Bonnie Kearney ChristieC Christie ClineDavidL David Longmuir AllanD Allan Deyoung
DorenaP Dorena Paschke JohannaL Johanna LorenzFabriceC Fabrice Canel EnricoC Enrico CattaneoGarretV Garret Vargas NestorW Nestor WilkeGarthF Garth Fort IsaiahL Isaiah LangerJanetS Janet Schorr AdeleV Adele VanceJulianI Julian Isla IrvinS Irvin Sayers
JunminH Junmin Hao LeeG Lee GuKariF Kari Furse EmilyB Emily BraunKatieJ Katie Jordan MeganB Megan BowenMollyD Molly Dempsey LynneR Lynne RobbinsPavelB Pavel Bansky BenW Ben WaltersRobinC Robin Counts HenriettaM Henrietta MuellerRobY Rob Young GradyA Grady ArchieSaraD Sara Davis LidiaH Lidia HollowayTonyK Tony Krijnen DiegoS Diego Siciliani
22

Demo Guide Identity-Driven Security
ZrinkaM Zrinka Makovac MiriamG Miriam Graham
23