denture fabrication: a lost art part 1 of 2 · the complete denture is difficult to create and the...
TRANSCRIPT

SUPPLEMENT TO PENNWELL PUBLICATIONS
EARN
3 CECREDITS
This course was written for dentists, dental hygienists, and assistants.
PUBLICATION DATE: FEBRUARY 2019
EXPIRATION DATE: JANUARY 2022
Denture Fabrication: A Lost ArtPart 1 of 2A peer-reviewed article written by Ian Shuman, DDS, AFAAID, MAGD
EARN
3 CECREDITS
Denture Fabrication: A Lost ArtPart 1 of 2
EDUCATIONAL OBJECTIVESAt the conclusion of this educational activity, participants will achieve the following:1. Understand current trends in the denture market2. Know how to identify the various reasons for an ill-fitting denture3. Be able to discuss options available for interim denture comfort4. Understand the steps involved in denture fabrication
ABSTRACTThere are more than 40 million edentulous people in the United States alone, many of whom are denture wearers. However, these patients may have worn or damaged dentures and continue to function. This is partly due to acceptance and adaptation of an edentulous mouth and/or past difficulties with new den-tures. Some patients use dentures only in situations where esthetics are neces-sary. Unfortunately, these patients may also go to a dentist who believes that the complete denture is difficult to create and the fully edentulous patient dif-ficult to treat. This course will attempt to educate the dentist and team as to many steps required to treat an edentulous patient with a removable denture.
Go Green, Go Online to take your course
www.DentalAcademyofCE.comQUICK ACCESS CODE 15342
This educational activity was developed by PennWell’s Dental Group with no commercial support.
This course was written for dentists, dental hygienists and assistants, from novice to skilled.
Educational Methods: This course is a self-instructional journal and web activity.
Provider Disclosure: PennWell does not have a leadership position or a commercial interest in any products or services discussed or shared in this educational activity nor with the commercial supporter. No manufacturer or third party has had any input into the development of course content.
Requirements for Successful Completion: To obtain 3 CE credits for this educational activity you must pay the required fee, review the material, complete the course evaluation and obtain a score of at least 70%.
CE Planner Disclosure: Laura Winfield, CE Coordinator does not have a leadership or commercial interest with products or services discussed in this educational activity. Laura can be reached at [email protected]
Educational Disclaimer: Completing a single continuing education course does not provide enough information to result in the participant being an expert in the field related to the course topic. It is a combination of many educational courses and clinical experience that allows the participant to develop skills and expertise.
Image Authenticity Statement: The images in this educational activity have not been altered.
Scientific Integrity Statement: Information shared in this CE course is developed from clinical research and represents the most current information available from evidence based dentistry.
Known Benefits and Limitations of the Data: The information presented in this educational activity is derived from the data and information contained in reference section. The research data is extensive and provides direct benefit to the patient and improvements in oral health.
Registration: The cost of this CE course is $59.00 for 3 CE credits.
Cancellation/Refund Policy: Any participant who is not 100% satisfied with this course can request a full refund by contacting PennWell in writing.
PennWell designates this activity for 3 continuing educational credits.
Dental Board of California: Provider 4527, course registration number CA# 03-4527-15342“This course meets the Dental Board of California’s requirements for 3 units of continuing education.”
The PennWell Corporation is designated as an Approved PACE Program Provider by the Academy of General Dentistry. The formal continuing dental education programs of this program provider are accepted by the AGD for Fellowship, Mastership and membership maintenance credit. Approval does not imply acceptance by a state or provincial board of dentistry or AGD endorsement. The current term of approval extends from (11/1/2015) to (10/31/2019) Provider ID# 320452.
PennWell is an ADA CERP recognized provider
ADA CERP is a service of the American Dental Association to assist dental professionals in identifying quality providers of continuing dental education. ADA CERP does not approve or endorse individual courses or instructors, nor does it imply acceptance of credit hours by boards of dentistry.
Concerns or complaints about a CE provider may be directed to the provider or to ADA CERP at www.ada.org/goto/cerp.

www.DentalAcademyOfCE.com 3
D E N T A L A C A D E M Y O F C O N T I N U I N G E D U C A T I O N
INTRODUCTION: THE CURRENT STATE OF DENTURES“Many dentists refuse to take full denture cases because of the poor end results obtained. Poor end results invariably make a dental practice unpleasant and unprofitable. The conscientious dentist hesitates to charge a fee for service that he feels will fall far short of the patient’s expectations. Therefore, many dentists consider the denture patient an economic liability.”1 This current sentiment was eloquently stated by Ewell Neil, DDS, in 1941, at a time when dental schools required numerous units of complete denture fabrication to graduate and state dental boards required demonstration of complete denture fabrication on a live human patient. Today, there are dental schools that have virtually eliminated complete denture fabrication from their curriculua,2 and most state boards no longer require pro-ficiency in complete dentures to receive a license. It then becomes simple to realize why denture fabrication is becoming a lost art.
THE PREDICTABLE DENTURE: THINK ‘FULL RECONSTRUCTION’To truly understand what fabricating a denture involves, it is noth-ing less than full reconstruction and should be treated as such. According to the American College of Prosthodontists: “In general, any dental treatment that affects all teeth in the mouth is called full-mouth reconstruction or full-mouth rehabilitation.”3 What fol-lows is a simplified guide to some of the many clinical steps needed for complete denture fabrication.
CONSULTATIONBecause the majority of our denture patients are older, they may have been treated at a time when the practice of dentistry was unpleasant. The wholesale removal of teeth followed by dentures that were expected to last a lifetime was considered the norm. This patient population can be provided with superior treatment by simply taking the time to listen to their chief complaints. Avoid the temptation of thinking of a solution to their problems during discussions, but instead, truly listen to what they have to say. Once the conversation has allowed the patient to do more than 95% of the talking, and you do 100% of the listening (with a sprinkle of your questions thrown in for clarity), you will find the answers you seek. In nearly all cases, the patient will “speak” their diagnosis. This pro-cess is also known as active listening. “Active listening involves the listener observing the speaker’s behavior and body language.4 Hav-ing the ability to interpret a person’s body language lets the listener develop a more accurate understanding of the speaker’s message.”5
It perhaps goes without saying that part of any new edentulous patient’s care requires radiographs. There are countless patients who have undiagnosed problems present and could be treated once identified with proper radiographs. A panoramic radiograph or CBCT is the easiest solution to this need. One particular area of focus is the amount of bone available for potential implant place-ment, and this should always be an option discussed with the patient for either current or future treatment.
HIGHLY ACCURATE PRIMARY IMPRESSIONS The most critical step in denture fabrication is making a perfect
primary impression. Errors in the earliest stages of denture fab-rication will compound, creating a cascade of problems in both the treatment timeline and the final denture. Capturing anatomic details as accurately as possible will provide a solid foundation for success. There are many methods for capturing these details, including hydrocolloid and impression compound.6
One method that is specifically designed for this purpose is an irreversible hydrocolloid base/wash with universal edentulous trays in a variety of sizes ( figure 1; AccuDent System 1 Impression System, Ivoclar North America Inc). This system provides a highly accurate starting point with absolute extension into all necessary anatomical areas. Because the hydrocolloid may overextend into the vestibular areas, this technique is ideal for creating the initial study model.
SIMPLE STUDY MODELSHydrocolloid impressions require immediate pouring, as these materials will dry, shrink, and harden over time. Pouring the ideal study model can be simplified without the need for traditional hot wax boxing and beading. In the lower impression, fill the lingual area with a wet paper towel. Then, mix a small amount of regular alginate, place it on the wet paper towel, and smooth with a wet gloved finger. Once set, pour up both the upper and lower impres-sions with stone and allow to overflow the entire periphery and
Figure 1: A lower edentulous arch and a lower hydrocolloid impression of the same
arch.
Figure 2: Trim the periphery of the model, leaving approximately 2 mm of land area
around the borders.
4 www.DentalAcademyOfCE.com
D E N T A L A C A D E M Y O F C O N T I N U I N G E D U C A T I O N
border areas. Do not invert the impressions. Once the stone has set, wrap each impression using boxing wax. The wax will stick to itself, avoiding the need for melting. Then, fill the impressions to the brim of the wax. Once set, remove the wax and the models from the impressions and trim the models, leaving about 2 mm of land area (the nonanatomical extension of the plaster base) at the borders ( figure 2).
CUSTOM TRAYSWith the highly detailed study/presentation model created from the AccuDent impression, a very accurate custom tray can then be fabricated either in-office or at an outside lab. The in-office tech-nique includes different devices and materials. One in-office sys-tem that is rapid and easy to use uses composite resin sheets that, once trimmed and formed to the desired shape, are then light cured (Triad, Dentsply Trubyte). The trays should be adjusted, allowing approximately 2 mm of space between the tray and the vestibu-lar periphery. Using a familiar material, polyvinyl siloxane (PVS), an impression is made with a heavy body PVS. Border molding should be done at this time, ensuring that there are no overexten-sions. Once set, the impression is removed, inspected, rinsed, and dried. Next, the impression is relined with a light-bodied PVS wash to capture fine details. These impressions are poured and trimmed in exactly the same manner as the study models. It is important to use a denser gypsum so that the final model does not degrade with the removal of the record base or during travel from your office to the laboratory and during waxing and processing of the final den-ture. Record bases with wax rims are then fabricated on these final models. This can be handled in-office, again using the Triad sys-tem, or sent to the lab.
INTERIM COMFORTIn most cases, patients will be transitioning from their old ill-fitting dentures to new well-fitting dentures, and this can result in disas-ter. A common complaint with new dentures is: “I feel like I have a
mouth full of teeth” or “These dentures are too big for me.” What is commonly and erroneously done is the sudden replacement of old dentures with collapsed occlusal vertical dimension (OVD) and/or ill-fitting bases with new dentures that are created with a cor-rected OVD and well-fitting bases. This is difficult to get used to and requires a smoother transition over time. The best method for avoiding these problems is to make a reversible correction in the existing denture or with a duplicate of the existing denture. Either method will allow your patient to better adapt to their new denture.
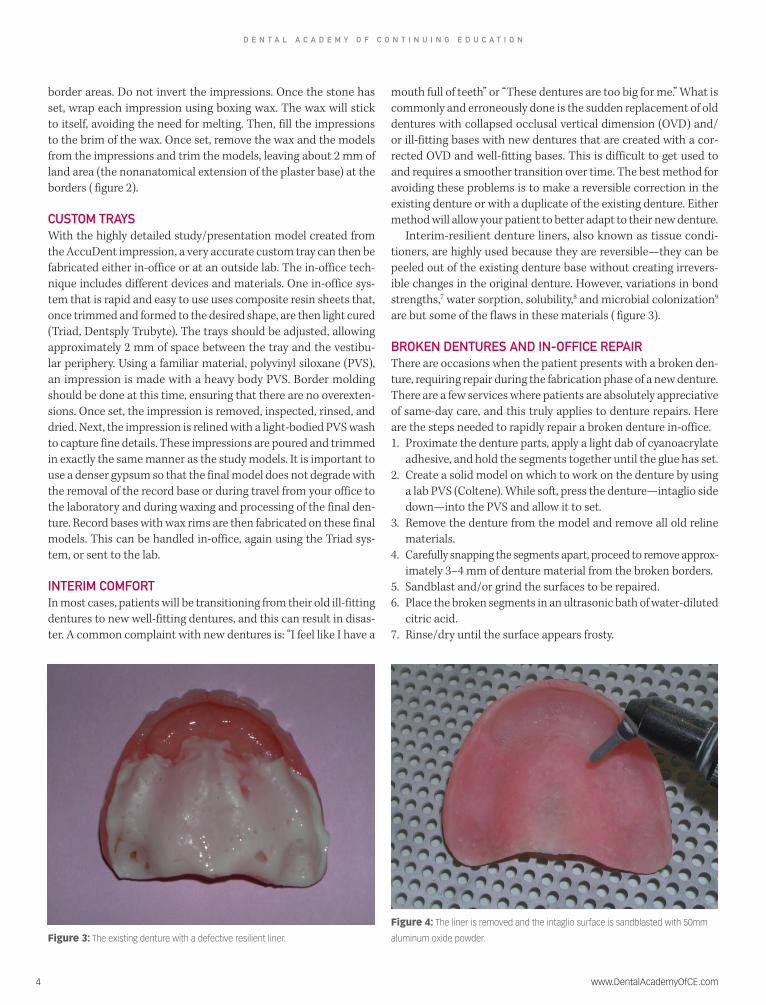
Interim-resilient denture liners, also known as tissue condi-tioners, are highly used because they are reversible—they can be peeled out of the existing denture base without creating irrevers-ible changes in the original denture. However, variations in bond strengths,7 water sorption, solubility,8 and microbial colonization9 are but some of the flaws in these materials ( figure 3).
BROKEN DENTURES AND IN-OFFICE REPAIRThere are occasions when the patient presents with a broken den-ture, requiring repair during the fabrication phase of a new denture. There are a few services where patients are absolutely appreciative of same-day care, and this truly applies to denture repairs. Here are the steps needed to rapidly repair a broken denture in-office.1. Proximate the denture parts, apply a light dab of cyanoacrylate
adhesive, and hold the segments together until the glue has set. 2. Create a solid model on which to work on the denture by using
a lab PVS (Coltene). While soft, press the denture—intaglio side down—into the PVS and allow it to set.
3. Remove the denture from the model and remove all old reline materials.
4. Carefully snapping the segments apart, proceed to remove approx-imately 3–4 mm of denture material from the broken borders.
5. Sandblast and/or grind the surfaces to be repaired. 6. Place the broken segments in an ultrasonic bath of water-diluted
citric acid. 7. Rinse/dry until the surface appears frosty.
Figure 4: The liner is removed and the intaglio surface is sandblasted with 50mm
aluminum oxide powder.Figure 3: The existing denture with a defective resilient liner.
www.DentalAcademyOfCE.com 5
D E N T A L A C A D E M Y O F C O N T I N U I N G E D U C A T I O N
8. Place the denture segments back on the model, making sure to press the parts until they are firmly and fully seated.
9. Using a denture repair acrylic ( Jet, pink shade) and a powder/liquid sprinkle technique, apply the material along the trough between the broken segments, slowly filling until there is slightly more material than required. Finish and polish.
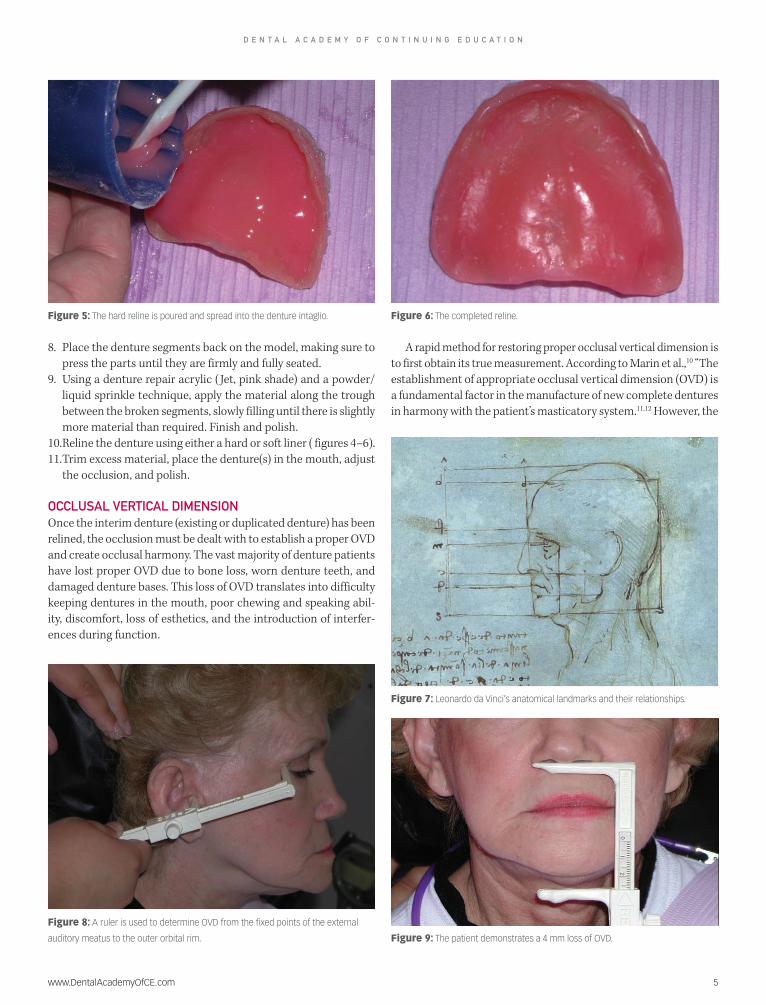
10. Reline the denture using either a hard or soft liner ( figures 4–6).11. Trim excess material, place the denture(s) in the mouth, adjust
the occlusion, and polish.
OCCLUSAL VERTICAL DIMENSIONOnce the interim denture (existing or duplicated denture) has been relined, the occlusion must be dealt with to establish a proper OVD and create occlusal harmony. The vast majority of denture patients have lost proper OVD due to bone loss, worn denture teeth, and damaged denture bases. This loss of OVD translates into difficulty keeping dentures in the mouth, poor chewing and speaking abil-ity, discomfort, loss of esthetics, and the introduction of interfer-ences during function.
A rapid method for restoring proper occlusal vertical dimension is to first obtain its true measurement. According to Marin et al.,10 “The establishment of appropriate occlusal vertical dimension (OVD) is a fundamental factor in the manufacture of new complete dentures in harmony with the patient’s masticatory system.11,12 However, the
Figure 9: The patient demonstrates a 4 mm loss of OVD.
Figure 6: The completed reline.
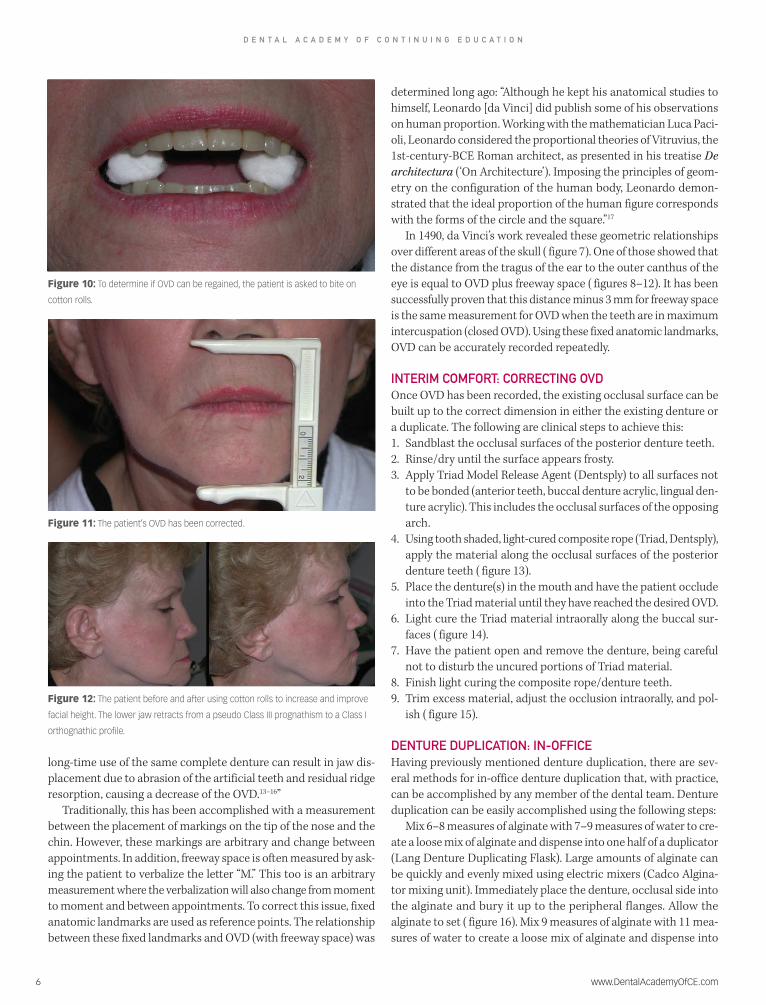
Figure 7: Leonardo da Vinci’s anatomical landmarks and their relationships.
Figure 8: A ruler is used to determine OVD from the fixed points of the external
auditory meatus to the outer orbital rim.
Figure 5: The hard reline is poured and spread into the denture intaglio.
6 www.DentalAcademyOfCE.com
D E N T A L A C A D E M Y O F C O N T I N U I N G E D U C A T I O N
long-time use of the same complete denture can result in jaw dis-placement due to abrasion of the artificial teeth and residual ridge resorption, causing a decrease of the OVD.13–16”
Traditionally, this has been accomplished with a measurement between the placement of markings on the tip of the nose and the chin. However, these markings are arbitrary and change between appointments. In addition, freeway space is often measured by ask-ing the patient to verbalize the letter “M.” This too is an arbitrary measurement where the verbalization will also change from moment to moment and between appointments. To correct this issue, fixed anatomic landmarks are used as reference points. The relationship between these fixed landmarks and OVD (with freeway space) was
determined long ago: “Although he kept his anatomical studies to himself, Leonardo [da Vinci] did publish some of his observations on human proportion. Working with the mathematician Luca Paci-oli, Leonardo considered the proportional theories of Vitruvius, the 1st-century-BCE Roman architect, as presented in his treatise De architectura (‘On Architecture’). Imposing the principles of geom-etry on the configuration of the human body, Leonardo demon-strated that the ideal proportion of the human figure corresponds with the forms of the circle and the square.”17
In 1490, da Vinci’s work revealed these geometric relationships over different areas of the skull ( figure 7). One of those showed that the distance from the tragus of the ear to the outer canthus of the eye is equal to OVD plus freeway space ( figures 8–12). It has been successfully proven that this distance minus 3 mm for freeway space is the same measurement for OVD when the teeth are in maximum intercuspation (closed OVD). Using these fixed anatomic landmarks, OVD can be accurately recorded repeatedly.
INTERIM COMFORT: CORRECTING OVDOnce OVD has been recorded, the existing occlusal surface can be built up to the correct dimension in either the existing denture or a duplicate. The following are clinical steps to achieve this: 1. Sandblast the occlusal surfaces of the posterior denture teeth.2. Rinse/dry until the surface appears frosty. 3. Apply Triad Model Release Agent (Dentsply) to all surfaces not
to be bonded (anterior teeth, buccal denture acrylic, lingual den-ture acrylic). This includes the occlusal surfaces of the opposing arch.
4. Using tooth shaded, light-cured composite rope (Triad, Dentsply), apply the material along the occlusal surfaces of the posterior denture teeth ( figure 13).
5. Place the denture(s) in the mouth and have the patient occlude into the Triad material until they have reached the desired OVD.
6. Light cure the Triad material intraorally along the buccal sur-faces ( figure 14).
7. Have the patient open and remove the denture, being careful not to disturb the uncured portions of Triad material.
8. Finish light curing the composite rope/denture teeth. 9. Trim excess material, adjust the occlusion intraorally, and pol-
ish ( figure 15).
DENTURE DUPLICATION: IN-OFFICEHaving previously mentioned denture duplication, there are sev-eral methods for in-office denture duplication that, with practice, can be accomplished by any member of the dental team. Denture duplication can be easily accomplished using the following steps:
Mix 6–8 measures of alginate with 7–9 measures of water to cre-ate a loose mix of alginate and dispense into one half of a duplicator (Lang Denture Duplicating Flask). Large amounts of alginate can be quickly and evenly mixed using electric mixers (Cadco Algina-tor mixing unit). Immediately place the denture, occlusal side into the alginate and bury it up to the peripheral flanges. Allow the alginate to set ( figure 16). Mix 9 measures of alginate with 11 mea-sures of water to create a loose mix of alginate and dispense into
Figure 10: To determine if OVD can be regained, the patient is asked to bite on
cotton rolls.
Figure 11: The patient’s OVD has been corrected.
Figure 12: The patient before and after using cotton rolls to increase and improve
facial height. The lower jaw retracts from a pseudo Class III prognathism to a Class I
orthognathic profile.

www.DentalAcademyOfCE.com 7
D E N T A L A C A D E M Y O F C O N T I N U I N G E D U C A T I O N
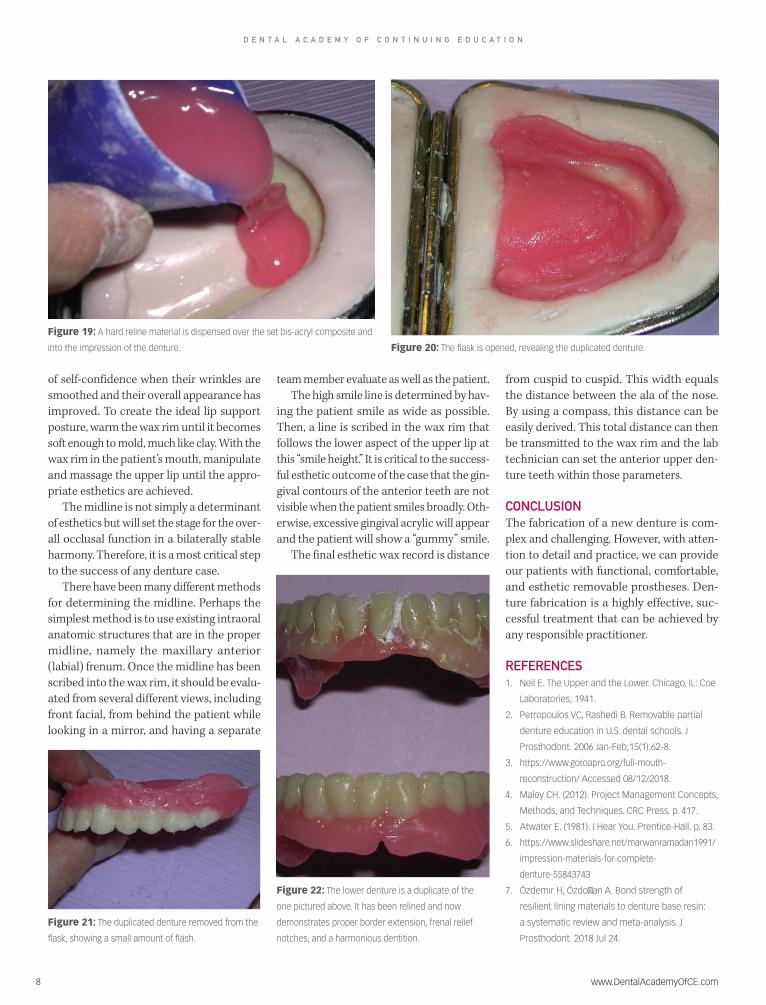
the intaglio of the denture and the unfilled half of the duplicating device ( figure 17). Close the flask and allow the newly mixed alginate to set. Open the flask and remove the denture, careful not to tear the surround-ing alginate. Dispense a bis-acryl self-cure composite (Luxatemp, Zenith/DMG) into the impression of the denture teeth up to the cervical areas of the teeth and allow to set (approximately 2 minutes; figure 18). Mix 8-10 measures of fast-setting, low-heat-generating denture base material (Rebase II, Tokuyama Dental, USA), and dispense over the set bis-acryl composite and into the impression of the denture ( figure 19).
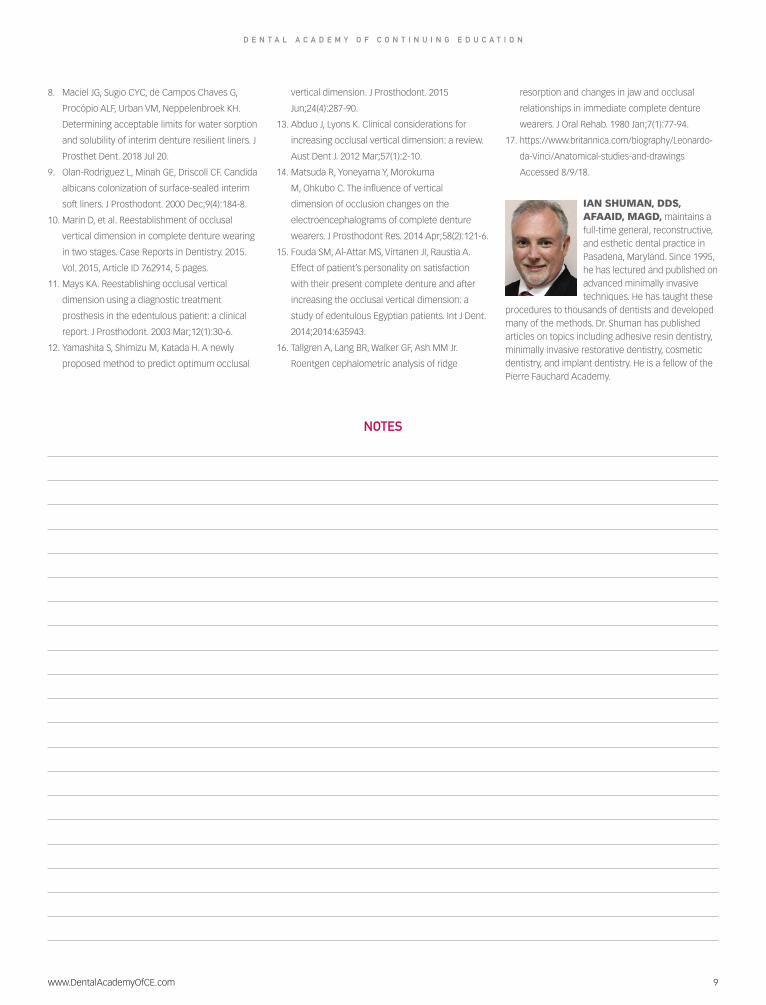
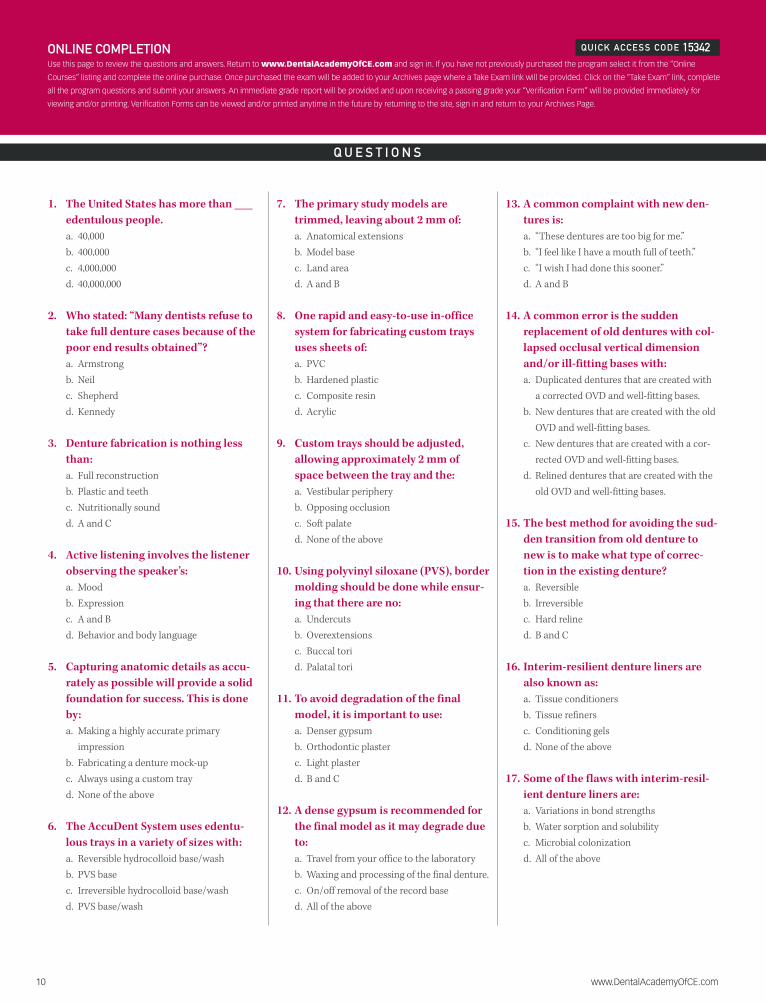
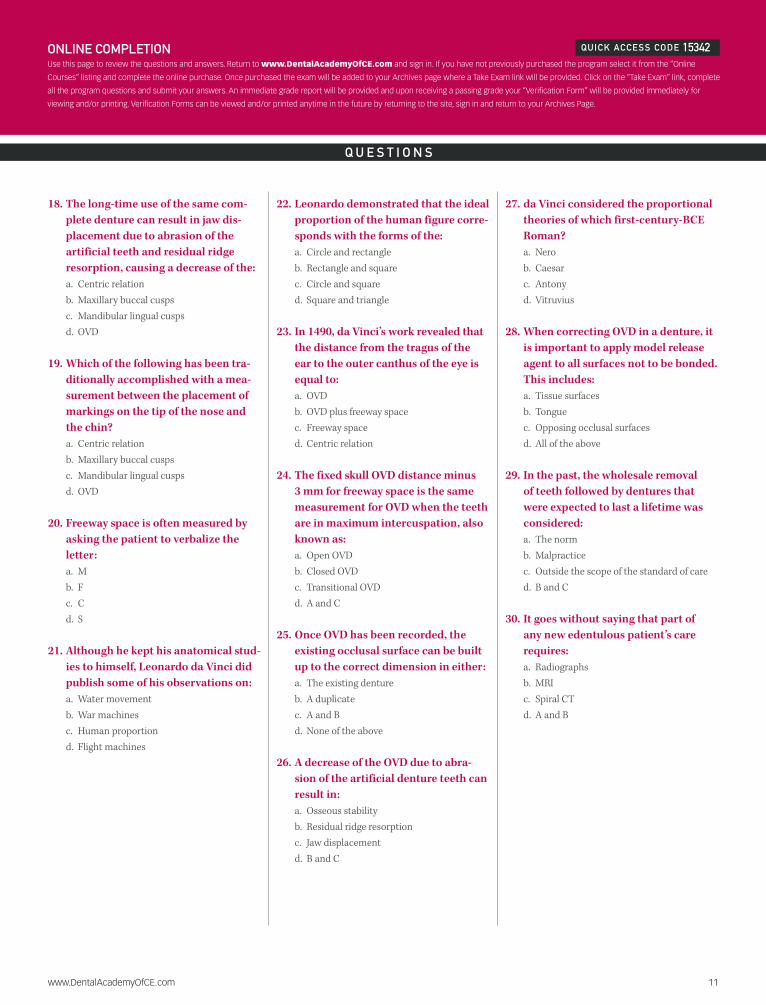
Close the duplicating flask and allow to set approximately 10 minutes. Open the flask and remove the duplicated denture ( figures 20 and 21). Trim excess flash and any sharp edges. Reline the duplicated denture intra-orally, using the same hard reline material (Rebase II, Tokuyama Dental USA), and, once set, trim, polish, and adjust the occlusion as needed ( figure 22).
MEASUREMENTS AND DATABecause a denture is a full reconstruction with many missing cues from the lost den-tition, it requires numerous measurements. These include the resting upper lip line,
determining the midline, the high smile line, cuspid-to-cuspid distance, occlusal vertical dimension, centric relation, and anterior tooth selection based on facial dimensions and posterior tooth selection based on the angle of articulator eminence. Like all reconstructions involving maxillary ante-rior teeth, dentures require anterior esthet-ics as a beginning point. Once this has been recorded, the remainder of the wax rim fab-rication follows this record and easily falls into place.
In general, the older the patient, the less incisal tooth that will appear at the resting upper lip position. A good rule of thumb is to allow the incisal edges of the upper cen-tral incisors to rest 0.5 mm above the resting upper lip line. More than this and the “bunny rabbit” look will appear. To streamline this process, waxing in the two central incisor teeth in the wax rim can save a tremendous amount of time. It will allow you to estab-lish a number of measurements including esthetics, midline, resting lip line, smile line, and some phonetics.
Lip support is a record that is not only critical to the profile of the patient but also provides the patient with a renewed level
Figure 13: Composite is placed along the occlusal surface of the posterior denture teeth and the patient is asked
to bite until they reach the correct OVD.
Figure 14: The composite is immediately light cured.
Figure 18: A bis-acryl self-cure composite is injected
into the impression of the denture teeth up to the
cervical areas.
Figure 17: Alginate is spread into the intaglio of the
denture and the unfilled half of the duplicating flask
(not shown).
Figure 16: An existing denture is duplicated. The
occlusal side of the denture is rapidly placed into the
alginate up to the flanges in a denture duplicating flask.
Figure 15: Excess material is trimmed and the occlusion is adjusted and polished.
8 www.DentalAcademyOfCE.com
D E N T A L A C A D E M Y O F C O N T I N U I N G E D U C A T I O N
of self-confidence when their wrinkles are smoothed and their overall appearance has improved. To create the ideal lip support posture, warm the wax rim until it becomes soft enough to mold, much like clay. With the wax rim in the patient’s mouth, manipulate and massage the upper lip until the appro-priate esthetics are achieved.
The midline is not simply a determinant of esthetics but will set the stage for the over-all occlusal function in a bilaterally stable harmony. Therefore, it is a most critical step to the success of any denture case.
There have been many different methods for determining the midline. Perhaps the simplest method is to use existing intraoral anatomic structures that are in the proper midline, namely the maxillary anterior (labial) frenum. Once the midline has been scribed into the wax rim, it should be evalu-ated from several different views, including front facial, from behind the patient while looking in a mirror, and having a separate
team member evaluate as well as the patient. The high smile line is determined by hav-
ing the patient smile as wide as possible. Then, a line is scribed in the wax rim that follows the lower aspect of the upper lip at this “smile height.” It is critical to the success-ful esthetic outcome of the case that the gin-gival contours of the anterior teeth are not visible when the patient smiles broadly. Oth-erwise, excessive gingival acrylic will appear and the patient will show a “gummy” smile.
The final esthetic wax record is distance
from cuspid to cuspid. This width equals the distance between the ala of the nose. By using a compass, this distance can be easily derived. This total distance can then be transmitted to the wax rim and the lab technician can set the anterior upper den-ture teeth within those parameters.
CONCLUSIONThe fabrication of a new denture is com-plex and challenging. However, with atten-tion to detail and practice, we can provide our patients with functional, comfortable, and esthetic removable prostheses. Den-ture fabrication is a highly effective, suc-cessful treatment that can be achieved by any responsible practitioner.
REFERENCES1. Neil E. The Upper and the Lower. Chicago, IL: Coe
Laboratories; 1941.
2. Petropoulos VC, Rashedi B. Removable partial
denture education in U.S. dental schools. J
Prosthodont. 2006 Jan-Feb;15(1):62-8.
3. https://www.gotoapro.org/full-mouth-
reconstruction/ Accessed 08/12/2018.
4. Maley CH. (2012). Project Management Concepts,
Methods, and Techniques. CRC Press. p. 417.
5. Atwater E. (1981). I Hear You. Prentice-Hall. p. 83.
6. https://www.slideshare.net/marwanramadan1991/
impression-materials-for-complete-
denture-55843743
7. Özdemır H, Özdoğan A. Bond strength of
resilient lining materials to denture base resin:
a systematic review and meta-analysis. J
Prosthodont. 2018 Jul 24.
Figure 22: The lower denture is a duplicate of the
one pictured above. It has been relined and now
demonstrates proper border extension, frenal relief
notches, and a harmonious dentition.
Figure 19: A hard reline material is dispensed over the set bis-acryl composite and
into the impression of the denture. Figure 20: The flask is opened, revealing the duplicated denture.
Figure 21: The duplicated denture removed from the
flask, showing a small amount of flash.
www.DentalAcademyOfCE.com 9
D E N T A L A C A D E M Y O F C O N T I N U I N G E D U C A T I O N
NOTES
8. Maciel JG, Sugio CYC, de Campos Chaves G,
Procópio ALF, Urban VM, Neppelenbroek KH.
Determining acceptable limits for water sorption
and solubility of interim denture resilient liners. J
Prosthet Dent. 2018 Jul 20.
9. Olan-Rodriguez L, Minah GE, Driscoll CF. Candida
albicans colonization of surface-sealed interim
soft liners. J Prosthodont. 2000 Dec;9(4):184-8.
10. Marin D, et al. Reestablishment of occlusal
vertical dimension in complete denture wearing
in two stages. Case Reports in Dentistry. 2015.
Vol. 2015, Article ID 762914, 5 pages.
11. Mays KA. Reestablishing occlusal vertical
dimension using a diagnostic treatment
prosthesis in the edentulous patient: a clinical
report. J Prosthodont. 2003 Mar;12(1):30-6.
12. Yamashita S, Shimizu M, Katada H. A newly
proposed method to predict optimum occlusal
vertical dimension. J Prosthodont. 2015
Jun;24(4):287-90.
13. Abduo J, Lyons K. Clinical considerations for
increasing occlusal vertical dimension: a review.
Aust Dent J. 2012 Mar;57(1):2-10.
14. Matsuda R, Yoneyama Y, Morokuma
M, Ohkubo C. The influence of vertical
dimension of occlusion changes on the
electroencephalograms of complete denture
wearers. J Prosthodont Res. 2014 Apr;58(2):121-6.
15. Fouda SM, Al-Attar MS, Virtanen JI, Raustia A.
Effect of patient’s personality on satisfaction
with their present complete denture and after
increasing the occlusal vertical dimension: a
study of edentulous Egyptian patients. Int J Dent.
2014;2014:635943.
16. Tallgren A, Lang BR, Walker GF, Ash MM Jr.
Roentgen cephalometric analysis of ridge
resorption and changes in jaw and occlusal
relationships in immediate complete denture
wearers. J Oral Rehab. 1980 Jan;7(1):77-94.
17. https://www.britannica.com/biography/Leonardo-
da-Vinci/Anatomical-studies-and-drawings
Accessed 8/9/18.
IAN SHUMAN, DDS, AFAAID, MAGD, maintains a full-time general, reconstructive, and esthetic dental practice in Pasadena, Maryland. Since 1995, he has lectured and published on advanced minimally invasive techniques. He has taught these
procedures to thousands of dentists and developed many of the methods. Dr. Shuman has published articles on topics including adhesive resin dentistry, minimally invasive restorative dentistry, cosmetic dentistry, and implant dentistry. He is a fellow of the Pierre Fauchard Academy.
10 www.DentalAcademyOfCE.com
Q U E S T I O N S
ONLINE COMPLETIONUse this page to review the questions and answers. Return to www.DentalAcademyOfCE.com and sign in. If you have not previously purchased the program select it from the “Online
Courses” listing and complete the online purchase. Once purchased the exam will be added to your Archives page where a Take Exam link will be provided. Click on the “Take Exam” link, complete
all the program questions and submit your answers. An immediate grade report will be provided and upon receiving a passing grade your “Verification Form” will be provided immediately for
viewing and/or printing. Verification Forms can be viewed and/or printed anytime in the future by returning to the site, sign in and return to your Archives Page.
QUICK ACCESS CODE 15342
1. The United States has more than ___ edentulous people. a. 40,000b. 400,000c. 4,000,000d. 40,000,000
2. Who stated: “Many dentists refuse to take full denture cases because of the poor end results obtained”?a. Armstrongb. Neilc. Shepherdd. Kennedy
3. Denture fabrication is nothing less than:a. Full reconstructionb. Plastic and teethc. Nutritionally soundd. A and C
4. Active listening involves the listener observing the speaker’s: a. Moodb. Expressionc. A and Bd. Behavior and body language
5. Capturing anatomic details as accu-rately as possible will provide a solid foundation for success. This is done by:a. Making a highly accurate primary
impressionb. Fabricating a denture mock-upc. Always using a custom trayd. None of the above
6. The AccuDent System uses edentu-lous trays in a variety of sizes with:a. Reversible hydrocolloid base/washb. PVS basec. Irreversible hydrocolloid base/washd. PVS base/wash
7. The primary study models are trimmed, leaving about 2 mm of: a. Anatomical extensionsb. Model basec. Land aread. A and B
8. One rapid and easy-to-use in-office system for fabricating custom trays uses sheets of:a. PVCb. Hardened plastic c. Composite resind. Acrylic
9. Custom trays should be adjusted, allowing approximately 2 mm of space between the tray and the: a. Vestibular peripheryb. Opposing occlusionc. Soft palated. None of the above
10. Using polyvinyl siloxane (PVS), border molding should be done while ensur-ing that there are no:a. Undercutsb. Overextensionsc. Buccal torid. Palatal tori
11. To avoid degradation of the final model, it is important to use: a. Denser gypsumb. Orthodontic plasterc. Light plasterd. B and C
12. A dense gypsum is recommended for the final model as it may degrade due to:a. Travel from your office to the laboratoryb. Waxing and processing of the final denture. c. On/off removal of the record based. All of the above
13. A common complaint with new den-tures is:a. “These dentures are too big for me.”b. “I feel like I have a mouth full of teeth.”c. “I wish I had done this sooner.”d. A and B
14. A common error is the sudden replacement of old dentures with col-lapsed occlusal vertical dimension and/or ill-fitting bases with: a. Duplicated dentures that are created with
a corrected OVD and well-fitting bases.b. New dentures that are created with the old
OVD and well-fitting bases.c. New dentures that are created with a cor-
rected OVD and well-fitting bases.d. Relined dentures that are created with the
old OVD and well-fitting bases.
15. The best method for avoiding the sud-den transition from old denture to new is to make what type of correc-tion in the existing denture? a. Reversibleb. Irreversiblec. Hard relined. B and C
16. Interim-resilient denture liners are also known as: a. Tissue conditionersb. Tissue refinersc. Conditioning gelsd. None of the above
17. Some of the flaws with interim-resil-ient denture liners are:a. Variations in bond strengthsb. Water sorption and solubilityc. Microbial colonizationd. All of the above
www.DentalAcademyOfCE.com 11
Q U E S T I O N S
ONLINE COMPLETIONUse this page to review the questions and answers. Return to www.DentalAcademyOfCE.com and sign in. If you have not previously purchased the program select it from the “Online
Courses” listing and complete the online purchase. Once purchased the exam will be added to your Archives page where a Take Exam link will be provided. Click on the “Take Exam” link, complete
all the program questions and submit your answers. An immediate grade report will be provided and upon receiving a passing grade your “Verification Form” will be provided immediately for
viewing and/or printing. Verification Forms can be viewed and/or printed anytime in the future by returning to the site, sign in and return to your Archives Page.
QUICK ACCESS CODE 15342
18. The long-time use of the same com-plete denture can result in jaw dis-placement due to abrasion of the artificial teeth and residual ridge resorption, causing a decrease of the:a. Centric relationb. Maxillary buccal cusps c. Mandibular lingual cuspsd. OVD
19. Which of the following has been tra-ditionally accomplished with a mea-surement between the placement of markings on the tip of the nose and the chin? a. Centric relationb. Maxillary buccal cusps c. Mandibular lingual cuspsd. OVD
20. Freeway space is often measured by asking the patient to verbalize the letter:a. Mb. Fc. Cd. S
21. Although he kept his anatomical stud-ies to himself, Leonardo da Vinci did publish some of his observations on: a. Water movementb. War machinesc. Human proportiond. Flight machines
22. Leonardo demonstrated that the ideal proportion of the human figure corre-sponds with the forms of the: a. Circle and rectangleb. Rectangle and squarec. Circle and squared. Square and triangle
23. In 1490, da Vinci’s work revealed that the distance from the tragus of the ear to the outer canthus of the eye is equal to: a. OVDb. OVD plus freeway spacec. Freeway spaced. Centric relation
24. The fixed skull OVD distance minus 3 mm for freeway space is the same measurement for OVD when the teeth are in maximum intercuspation, also known as:a. Open OVDb. Closed OVDc. Transitional OVDd. A and C
25. Once OVD has been recorded, the existing occlusal surface can be built up to the correct dimension in either:a. The existing dentureb. A duplicatec. A and Bd. None of the above
26. A decrease of the OVD due to abra-sion of the artificial denture teeth can result in:a. Osseous stabilityb. Residual ridge resorptionc. Jaw displacementd. B and C
27. da Vinci considered the proportional theories of which first-century-BCE Roman?a. Nerob. Caesarc. Antonyd. Vitruvius
28. When correcting OVD in a denture, it is important to apply model release agent to all surfaces not to be bonded. This includes: a. Tissue surfacesb. Tonguec. Opposing occlusal surfacesd. All of the above
29. In the past, the wholesale removal of teeth followed by dentures that were expected to last a lifetime was considered: a. The normb. Malpracticec. Outside the scope of the standard of cared. B and C
30. It goes without saying that part of any new edentulous patient’s care requires:a. Radiographsb. MRIc. Spiral CTd. A and B
Customer Service 800-633-1681
1. 2. 3. 4. 5. 6. 7. 8. 9. 10. 11. 12. 13. 14. 15.
16. 17. 18. 19. 20. 21. 22. 23. 24. 25. 26. 27. 28. 29. 30.
For IMMEDIATE results, go to www.DentalAcademyOfCE.com to take tests online.
QUICK ACCESS CODE 15342 Answer sheets can be faxed with credit card payment to
918-212-9037.
Payment of $59.00 is enclosed. (Checks and credit cards are accepted.)
If paying by credit card, please complete the following: MC Visa AmEx Discover
Acct. Number: ______________________________
Exp. Date: _____________________
Charges on your statement will show up as PennWell
If not taking online, mail completed answer sheet to PennWell Corp.
Attn: Dental Division, 1421 S. Sheridan Rd., Tulsa, OK, 74112
or fax to: 918-212-9037
AGD code: 670
ANSWER SHEET
Denture Fabrication: A Lost Art Part 1 of 2
Name: Title: Specialty:
Address: E-mail:
City: State: ZIP: Country:
Telephone: Home ( ) Office ( )
Lic. Renewal Date: AGD Member ID:
Requirements for successful completion of the course and to obtain dental continuing education credits: 1) Read the entire course. 2) Complete all information above. 3) Complete answer sheets in either pen or pencil. 4) Mark only one answer for each question. 5) A score of 70% on this test will earn you 3 CE credits. 6) Complete the Course Evaluation below. 7) Make check payable to PennWell Corp. For Questions Call 800-633-1681
PLEASE PHOTOCOPY ANSWER SHEET FOR ADDITIONAL PARTICIPANTS.COURSE EVALUATION and PARTICIPANT FEEDBACK
We encourage participant feedback pertaining to all courses. Please be sure to complete the survey included with the course. Please e-mail all questions to: [email protected].
INSTRUCTIONSAll questions should have only one answer. Grading of this examination is done manually. Participants will receive confirmation of passing by receipt of a verification form. Verification of Participation forms will be mailed within two weeks after taking an examination.
COURSE CREDITS/COSTAll participants scoring at least 70% on the examination will receive a verification form verifying 3 CE credits. The formal continuing education program of this sponsor is accepted by the AGD for Fellowship/Mastership credit. Please contact PennWell for current term of acceptance. Participants are urged to contact their state dental boards for continuing education requirements. PennWell is a California Provider. The California Provider number is 4527. The cost for courses ranges from $20.00 to $110.00.
PROVIDER INFORMATIONPennWell is an ADA CERP Recognized Provider. ADA CERP is a service of the American Dental association to assist dental professionals in identifying quality providers of continuing dental education. ADA CERP does not approve or endorse individual courses or instructors, nor does it imply acceptance of credit hours by boards of dentistry.
Concerns or complaints about a CE Provider may be directed to the provider or to ADA CERP at www.ada.org/cotocerp/
The PennWell Corporation is designated as an Approved PACE Program Provider by the Academy of General Dentistry. The formal continuing dental education programs of this program provider are accepted by the AGD for Fellowship, Mastership and membership maintenance credit. Approval does not imply acceptance by a state or provincial board of dentistry or AGD endorsement. The current term of approval extends from (11/1/2015) to (10/31/2019) Provider ID# 320452
RECORD KEEPINGPennWell maintains records of your successful completion of any exam for a minimum of six years. Please contact our offices for a copy of your continuing education credits report. This report, which will list all credits earned to date, will be generated and mailed to you within five business days of receipt.
Completing a single continuing education course does not provide enough information to give the participant the feeling that s/he is an expert in the field related to the course topic. It is a combination of many educational courses and clinical experience that allows the participant to develop skills and expertise.
CANCELLATION/REFUND POLICYAny participant who is not 100% satisfied with this course can request a full refund by contacting PennWell in writing.
IMAGE AUTHENTICITYThe images provided and included in this course have not been altered.
© 2018 by the Academy of Dental Therapeutics and Stomatology, a division of PennWell
PUBLICATION DATE: FEBRUARY 2019
EXPIRATION DATE: JANUARY 2022
EDUCATIONAL OBJECTIVES1. Understand current trends in the denture market;
2. Know how to identify the various reasons for an ill-fitting denture
3. Be able to discuss options available for interim denture comfort
4. Understand the steps involved in denture fabrication
COURSE EVALUATION1. Were the individual course objectives met?
Objective #1: Yes No Objective #2: Yes No
Objective #3: Yes No Objective #4: Yes No
Please evaluate this course by responding to the following statements, using a scale of Excellent = 5 to Poor = 0.
2. To what extent were the course objectives accomplished overall? 5 4 3 2 1 0
3. Please rate your personal mastery of the course objectives. 5 4 3 2 1 0
4. How would you rate the objectives and educational methods? 5 4 3 2 1 0
5. How do you rate the author’s grasp of the topic? 5 4 3 2 1 0
6. Please rate the instructor’s effectiveness. 5 4 3 2 1 0
7. Was the overall administration of the course effective? 5 4 3 2 1 0
8. Please rate the usefulness and clinical applicability of this course. 5 4 3 2 1 0
9. Please rate the usefulness of the supplemental webliography. 5 4 3 2 1 0
10. Do you feel that the references were adequate? Yes No
11. Would you participate in a similar program on a different topic? Yes No
12. If any of the continuing education questions were unclear or ambiguous, please list them.
______________________________________________________________________________
13. Was there any subject matter you found confusing? Please describe.
______________________________________________________________________________
14. How long did it take you to complete this course?
______________________________________________________________________________
15. What additional continuing dental education topics would you like to see?
______________________________________________________________________________