department of veterans affairs care registry user guide 4 june 2015 1. introduction the department...
TRANSCRIPT

Department of Veterans Affairs
Breast Care Registry (BCR)
User Guide
June 2015
BCR Software Version 2.0

Breast Care Registry User Guide i June 2015
Revision History
Date Revision Description Author
06/09/2015 2.0 Revisions after stakeholder feedback M Abreu
05/26/2015 1.0 Initial Version M Abreu

Breast Care Registry User Guide ii June 2015
Table of Contents
1. Introduction ........................................................................................ 4
1.1. Purpose ............................................................................................................ 4
1.2. Overview ........................................................................................................... 4
1.3. Project References .......................................................................................... 5
Information ............................................................................................... 5 1.3.1.
Coordination ............................................................................................ 6 1.3.2.
Help Desk ................................................................................................. 6 1.3.3.
1.4. Acronyms and Abbreviations ......................................................................... 6
2. System Summary ............................................................................... 7
2.1. System Configuration ...................................................................................... 7
2.2. Data Flows ........................................................................................................ 9
2.3. User Access Levels ......................................................................................... 9
2.4. Contingencies and Alternate Modes of Operation ...................................... 10
3. Getting Started ................................................................................. 11
3.1. Logging On ..................................................................................................... 11
3.2. System Menu .................................................................................................. 11
3.3. System Navigation ......................................................................................... 12
3.4. Report Navigation .......................................................................................... 12
3.5. Changing User ID and Password.................................................................. 13
3.6. Exit System .................................................................................................... 13
3.7. Known Caveats and Exceptions ................................................................... 13
4. Standard Reports ............................................................................. 14
4.1. All Mammograms / Abnormal ....................................................................... 14
4.2. Mammograms Due ......................................................................................... 15
4.3. Ordered Pending ............................................................................................ 18
4.4. Breast Biopsies / Surgeries .......................................................................... 21
4.5. Breast Cancer ................................................................................................ 23
5. Aggregate Reports ........................................................................... 25
5.1. All Mammograms w/BI-RADS Distribution .................................................. 25
All Mammograms w/BI-RADs Distribution by Facility ........................ 26 5.1.1.
5.2. Mammogram Compliance ............................................................................. 28
Mammogram Compliance by Facility ................................................... 31 5.2.1.
Mammogram Compliance by Age ........................................................ 32 5.2.2.
Mammogram Compliance by Race....................................................... 33 5.2.3.
5.3. Breast Cancer ................................................................................................ 34
Breast Cancer by Facility ...................................................................... 36 5.3.1.

Breast Care Registry User Guide iii June 2015
5.4. Mammograms Follow-Up Compliance ......................................................... 37
Mammogram Follow-Up Compliance by Facility ................................ 39 5.4.1.
6. Ad Hoc Reporting Dashboard ......................................................... 41
7. VISN / Facility Search ...................................................................... 46
8. Patient Details .................................................................................. 48
9. Administration.................................................................................. 50
10. Troubleshooting ............................................................................... 53

Breast Care Registry User Guide 4 June 2015
1. Introduction The Department of Veterans Affairs (VA) Breast Care Registry (BCR), formerly known as
Breast Cancer Clinical Case Registry (BCCCR), was established to provide a registry of
information about breast cancer screening, test results, treatment, and follow-up for clinical care
and population surveillance of breast care. The registry provides a user interface for clinicians
and coordinators to analyze and report BCR patient health metrics and data.
BCR Version 2.0 enhances the existing BCR by completing the implementation of initial
requirements; repairing legacy defects; ensuring report consistency; ensuring comprehensive
data ingestion and accuracy from identified data sources; and deploying a fully functional
national release of the registry. The enhanced BCR provides the Women’s Health Services of the
Veterans Health Administration (VHA) with the ability to determine areas of improvement for
the timely and quality care of Veterans, and to enhance the VHA’s capacity to monitor long-term
outcomes of BCR patients within Women’s Health Services.
1.1. Purpose
The purpose of this user guide is to familiarize users with the features and navigational elements
of the enhanced BCR application.
1.2. Overview
BCR v2.0 is a Web-based intranet registry application, residing within the Converged Registries
Solution (CRS) architectural framework. Figure 1 depicts the following data flow and system
logic:
1) The provider documents patient care encounters and enters the data into the
Computerized Patient Record System/Veterans Health Information Systems and
Technology Architecture (CPRS/VistA).
2) The patient data is securely stored in the Corporate Data Warehouse (CDW). This CDW
data is also compiled from feeds from corresponding Regional Data Warehouse (RDW)
and Veterans Integrated Service Network (VISN) Data Warehouse (VDW) sources.
3) At regular intervals, the BCR database (residing within CRS) extracts data specific to the
breast care patient cohort from CDW.
4) The BCR Dashboard provides BCR users with quality patient data, including patient
details and standard, aggregate and ad hoc reports. Depending on user permissions, data
is available at the national, regional and local levels, allowing providers to evaluate
effective treatment, quality care, scheduling, and planning for their specific cohort.

Breast Care Registry User Guide 5 June 2015
Figure 1: Enhanced BCR Data Flow and System Diagram (Conceptual)
1.3. Project References
The formal documentation for the enhanced BCR is located in the Technical Service Project
Repository (TSPR) project notebook:
http://tspr.vista.med.va.gov/warboard/anotebk.asp?proj=1746&Type=Active#Documentation
Information 1.3.1.
Listed below are the points of contact for BCR administration, troubleshooting and information:
• Sally Haskell, MD, BCR Business Owner and Deputy Chief Consultant for Women’s
Health Services: [email protected]
• Yvette Williams, MD, Consultant, Women’s Health Services:
• Caitlin Cusack, MD, OIA Health Informatics: [email protected]
• Christine Jasien, HR&D Database Manager, Atlanta: [email protected]
• Drew Prescott, Registries Program Manager: [email protected]

Breast Care Registry User Guide 6 June 2015
Coordination 1.3.2.
The organizations that require coordination for BCR include the Registries Sustainment team,
Women’s Health Services, and the Austin Information Technology Center (AITC).
Security measures are upheld by AITC. The schedule of coordination activities is the timeframe
of the BCR enhancements warranty and BCR sustainment activities.
Help Desk 1.3.3.
Help desk services are provided by the National Service Desk (NSD).
Calls to the NSD should state that the user is working with the Converged Registries Solution
and the Breast Care Registry. The NSD will then direct the trouble ticket to AITC, who will use
established procedures to direct the problem to the CRS sustainment team.
1.4. Acronyms and Abbreviations
Table 1. Acronyms and Abbreviations
Term Meaning
AITC Austin Information Technology Center
BCCCR Breast Cancer Clinical Case Registry
BCR Breast Care Registry
BI-RADS Breast Imaging Reporting and Data System
CDW Corporate Data Warehouse
CPRS Computerized Patient Record System
CPT Current Procedural Terminology
CRS Converged Registries Solution
ICD International Classification of Diseases
NSD National Service Desk
PACT Patient Aligned Care Team
RDW Regional Data Warehouse
TSPR Technical Service Project Repository
VA Department of Veterans Affairs
VDW VISN Data Warehouse
VHA Veterans Health Administration
VISN Veterans Integrated Service Network

Breast Care Registry User Guide 7 June 2015
Term Meaning
VistA Veterans Health Information Systems and Technology Architecture
WAN Wide Area Network
2. System Summary The user interface for the enhanced BCR is a standard Web interface that provides optimized
reporting tools with a variety of filtering and sorting capabilities, including the following features:
• BCR Dashboard
• BCR Standard Reports
• BCR Aggregate Reports
• BCR Ad Hoc Reporting Dashboard
• VISN/Facility Search
These features are described in detail in this User Guide.
2.1. System Configuration
The enhanced BCR utilizes the VA Wide Area Network (WAN), with a communications
interface to transfer records as appropriate. The One VA Enterprise WAN is depicted in the
figure below.

Breast Care Registry User Guide 8 June 2015
Figure 2: One VA Enterprise WAN
The VHA Data Warehousing Visual Architecture figure shown below depicts the interface
relationship between BCR and CDW.

Breast Care Registry User Guide 9 June 2015
Figure 3: BCR and CDW Interface Relationship
2.2. Data Flows
The BCR data flow and system logic is described in Section 1.2.
2.3. User Access Levels
The enhanced BCR allows access to authenticated users on the CRS platform, consisting of BCR
clinicians, support personnel for setup, and skilled administrators for installation and updates.
The intended users of BCR are described in the table below.
Table 2. User Access Levels
Intended User(s) System
Proficiency Background / Experience
Technical Support / Maint
Expertise
Access Privileges
VHA Office of Women’s Health Services
High High Low Full
Clinicians Varies Varies Low Varies
BCR Local Administrators Varies Varies Low Varies
BCR System Administrators High High High Full
CRS further provides for the following three layers of access:

Breast Care Registry User Guide 10 June 2015
• Enterprise Access: To be granted to users requiring reports and information on an
enterprise level. Enterprise access will also include access to the VISN local levels.
• VISN Access: To be granted to users requiring reports and information on a VISN-
specific level. The access will be restricted to reports and information from that user’s
assigned VISN. VISN level access will also include local level functionality for sites
within the VISN.
• Local Level: To be granted to users requiring reports and information on a local level.
Users with local access will be restricted to reports and information for their assigned
location. Local users will not have access to VISN or enterprise reports or information.
Local level is the most restrictive level of access.
For BCR, privileges are delegated by facility, VISN, and national levels. For example, a local
level user in Atlanta will be able to view the aggregate data for the Atlanta facility only, but a
BCR system administrator will be able to view facility, VISN, and national data.
2.4. Contingencies and Alternate Modes of Operation
Continuity of operations in the event of an emergency, disaster, or accident is handled by AITC
procedures.

Breast Care Registry User Guide 11 June 2015
3. Getting Started
3.1. Logging On
BCR is a Web-based intranet registry that allows access to authenticated users on the CRS
architectural platform. No separate login procedure is required once the user has been given
access to the BCR intranet site application.
BCR requires Internet Explorer (IE) versions 6.0 or higher.
3.2. System Menu
The BCR Dashboard is the main page, providing a menu of selections that allow providers to
generate a variety of reports, including standard reports, aggregate reports, ad hoc (custom)
reports, and VISN or facility-specific searches. The Dashboard also allows searching for specific
patients.
Figure 4: BCR Dashboard

Breast Care Registry User Guide 12 June 2015
3.3. System Navigation
As a Web-based application, BCR provides easy browser-based navigation between reports and
pages.
• To generate a report, click the corresponding link on the BCR Dashboard.
• To return to the BCR Dashboard from any other page, click the Reporting link at the top
of the page.
Navigation is also aided by the breadcrumb trail at the top of each report. Click the desired level
to navigate between reporting levels (or click Reports to go back to the Dashboard).
Clicking the browser Back and Next buttons will navigate back and forth between to the
previous and next page.
3.4. Report Navigation
Upon generating a report, BCR allows easy navigation between report pages.
Use the Previous and Next buttons to go back and forth between pages sequentially, or
click the desired page number to open it.
Click the First and Last buttons to jump to the first or last page.
To set the number of rows to display on one page, make the selection from the Page Size list:

Breast Care Registry User Guide 13 June 2015
3.5. Changing User ID and Password
As a Web-based VA intranet registry application, users log in with their VA network credentials.
User IDs and passwords are not administered by BCR, and thus no specific procedures for
changing the User IDs and passwords are required.
3.6. Exit System
• To exit the system, simply close the browser window.
3.7. Known Caveats and Exceptions
Known caveats and exceptions include the following:
• BCR is currently unable to differentiate the data within individual facilities for VISN 2
and VISN 23. The data from these facilities roll up at the VISN level only and cannot be
provided at the facility level.
• As of May 2015, System for Mammography Results Tracking (SMART) Health Factor
data for follow-up care is not available. Information about follow-up actions will be
available in BCR with CPRS version 31, planned for release in 2016.
• Regional data in VDW/RDW may not always align with national data in CDW, and so
patient data discrepancies are possible. Such discrepancies should be reported to BCR
Administrators.
Breast Care Registry User Guide 14 June 2015
4. Standard Reports Standard reports allow BCR users to run searches and generate reports about specific patient
cohorts based on the desired criteria. Standard reports also provide the ability to view individual
patient information.
Patient Eligibility: BCR includes all Veterans and non-Veterans who have actively been seen
within the last 3 years, excluding males who have no mammography data and female non-
Veterans who have no mammography data.
Ethnicity: The Hispanic ethnicity includes all Hispanic patients, including those identified as
Hispanic Black, Hispanic White, and Hispanic/Latino.
4.1. All Mammograms / Abnormal
This report allows providers and coordinators to search for patients with both normal and
abnormal mammograms, and to view details of results and follow-up care.
To run an All Mammograms / Abnormal report
1. Click All Mammograms / Abnormal on the BCR Dashboard.
2. Select the following filters:
• VISN: Select the VISN from the drop-down list
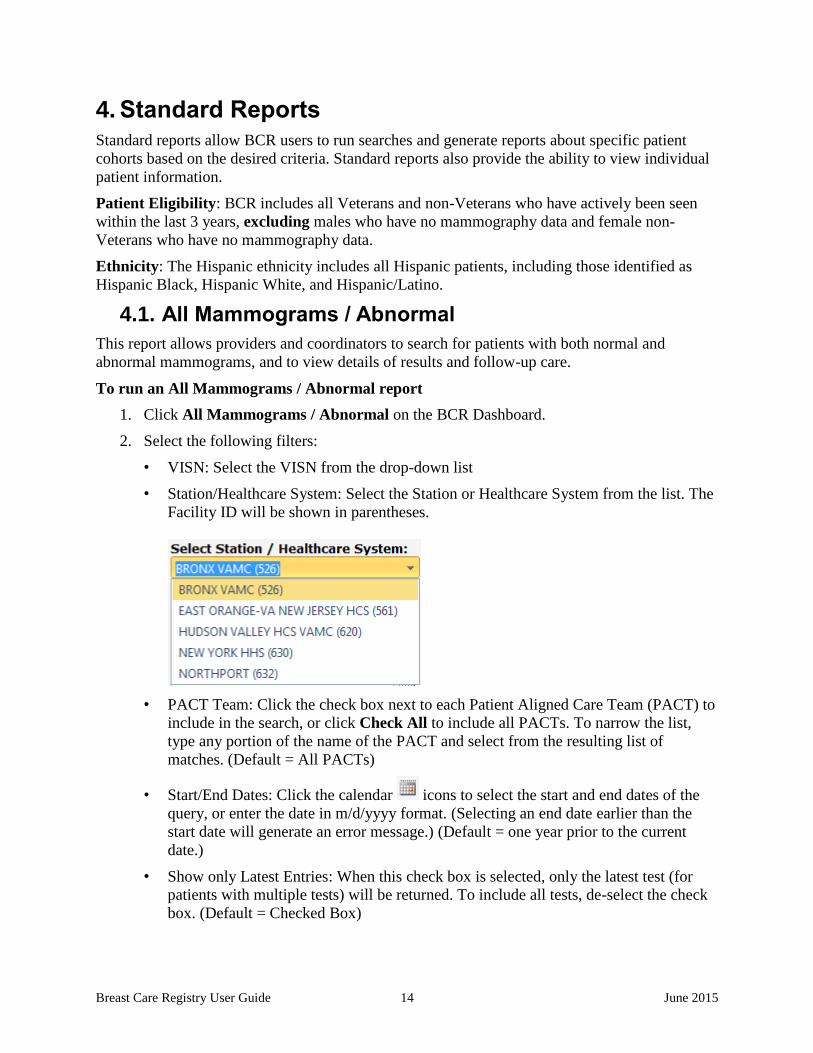
• Station/Healthcare System: Select the Station or Healthcare System from the list. The
Facility ID will be shown in parentheses.
• PACT Team: Click the check box next to each Patient Aligned Care Team (PACT) to
include in the search, or click Check All to include all PACTs. To narrow the list,
type any portion of the name of the PACT and select from the resulting list of
matches. (Default = All PACTs)
• Start/End Dates: Click the calendar icons to select the start and end dates of the
query, or enter the date in m/d/yyyy format. (Selecting an end date earlier than the
start date will generate an error message.) (Default = one year prior to the current
date.)
• Show only Latest Entries: When this check box is selected, only the latest test (for
patients with multiple tests) will be returned. To include all tests, de-select the check
box. (Default = Checked Box)

Breast Care Registry User Guide 15 June 2015
• Show Only Mammograms: Click this check box to view only mammograms. When
de-selected, ultrasounds and MRIs are displayed in addition to mammograms.
(Default = Unchecked Box)
• BI-RADS Codes: Select the desired Breast Imaging Reporting and Data System (BI-
RADS) codes (1 – 6) to include in the search. (Default = All Items Checked)
• Age Restriction: Select the desired age range. (Default = All)
• Patient Name: Enter the first or last name of the patient, or any portion of the name.
• Gender: Select the gender. (Default = All)
• Race: Select the race. (Default = All)
• Provider Name: Enter the first or last name of the provider, or any portion of the
name.
• Follow-Up Action (available in 2016, see Section 3.7): Select from the list to include
only patients with a follow-up action, only those with no follow-up action, or All.
(Default = All)
3. After setting filters, click Run Report. (To reset the filters and begin a new search, click
Reset.)
Viewing the report
The resulting report will display the results of the search in a grid format. The data can be
exported to different file formats, including Excel, CSV, PDF, or Word.
• To export, click the Export button that corresponds to the desired file format. Type a
name for the report (or keep the default name) and click OK.
The report can be sorted by column in ascending or descending order by clicking the up or down
arrow in the column.
• To view mammogram impression notes, hover the cursor over the Impression link.
• To view detailed patient information, click Details. For more information about the
patient details screen see Section 8.
4.2. Mammograms Due
This report allows providers and coordinators to search for patients who are due for
mammograms.
To run a Mammograms Due report
1. Click Mammograms Due on the BCR Dashboard.

Breast Care Registry User Guide 16 June 2015
2. Select the following filters:
• VISN: Select the VISN from the drop-down list
• Station/Healthcare System: Select the Station or Healthcare System from the list. The
Facility ID will be shown in parentheses.
• PACT Team: Click the check box next to each PACT to include in the search, or
click Check All to include all PACTs. To narrow the list, type any portion of the
name of the PACT and select from the resulting list of matches. (Default = All
PACTs)
• Due In: Select the desired time period when the patient’s mammogram is due.
(Default = Current)
The Custom Date Range selection will bring up Start and End date fields. Use the
calendar icons to select the dates, or enter the dates in d/m/yyyy format.
(Selecting an end date earlier than the start date will generate an error message.)
• Age Restriction: Select the desired age range. (Default = All)
• Mammogram Type: Select the type of mammogram, i.e., Screening, Diagnostic,
Undetermined, or All. (Default = All)

Breast Care Registry User Guide 17 June 2015
Technical Notes used in Evaluating Mammogram Type
If an order exists for the mammogram, the current procedural terminology (CPT)
code of the order is evaluated by the following:
• If code = (77052, 77057, G0202): The type is “Screening”
• If code = (77051, 77055, 77056, G0204, G0206): The type is “Diagnostic”
If an order does NOT exist the following criteria is used:
• Under the (40-74) age range, patient should not be "required" - diagnostic
WHEN ((Age < 40) AND (Mammogram Most Recent Screen Frequency IS
NOT NULL)) THEN 'Diagnostic'
• Above (74) age range, patient should not be "required" to have a mammogram
more frequently than 2 years – diagnostic
WHEN ((Age > 74) AND ((Mammogram Most Recent Screen Frequency <>
'2Yr' OR Mammogram Most Recent Screen Frequency IS NOT NULL)))
THEN 'Diagnostic'
• If patient's last BI-RADS was 3 or greater – diagnostic
WHEN ((Age BETWEEN 40 and 74) AND BI-RADS Score >= 3) THEN
'Diagnostic'
• If patient in age range, has a screening frequency less than 1Yr - diagnostic
WHEN ((Age BETWEEN 40 and 74) AND (Mammogram Most Recent
Screen Frequency < '1Yr' THEN 'Diagnostic'
• If patient is male THEN ‘Diagnostic’
ELSE 'Screening'
• Patient Name: Enter the first or last name of the patient, or any portion of the name.
• Gender: Select the gender. (Default = All)
• Provider Name: Enter the first or last name of the provider, or any portion of the
name.
3. After setting filters, click Run Report. (To reset the filters and begin a new search, click
Reset.)
4. To reset the filters and begin a new search, click Reset.
Viewing the report
The resulting report will display the results of the search in a grid format. The data can be
exported to different file formats, including Excel, CSV, PDF, or Word.
• To export, click the Export button that corresponds to the desired file format. Type a
name for the report (or keep the default name) and click OK.
The report can be sorted by column in ascending or descending order by clicking the up or down
arrow in the column.
Breast Care Registry User Guide 18 June 2015
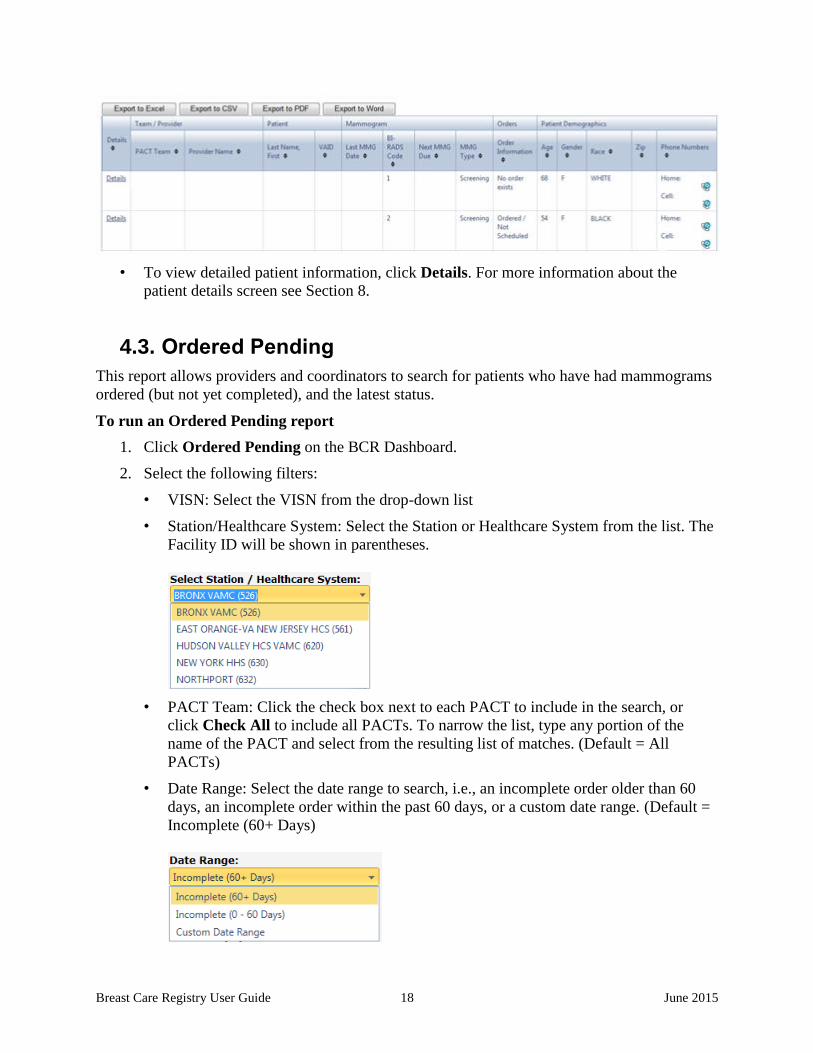
• To view detailed patient information, click Details. For more information about the
patient details screen see Section 8.
4.3. Ordered Pending
This report allows providers and coordinators to search for patients who have had mammograms
ordered (but not yet completed), and the latest status.
To run an Ordered Pending report
1. Click Ordered Pending on the BCR Dashboard.
2. Select the following filters:
• VISN: Select the VISN from the drop-down list
• Station/Healthcare System: Select the Station or Healthcare System from the list. The
Facility ID will be shown in parentheses.
• PACT Team: Click the check box next to each PACT to include in the search, or
click Check All to include all PACTs. To narrow the list, type any portion of the
name of the PACT and select from the resulting list of matches. (Default = All
PACTs)
• Date Range: Select the date range to search, i.e., an incomplete order older than 60
days, an incomplete order within the past 60 days, or a custom date range. (Default =
Incomplete (60+ Days)

Breast Care Registry User Guide 19 June 2015
The Custom Date Range selection will bring up Start and End date fields. Use the
calendar icons to select the dates, or enter the dates in d/m/yyyy format.
(Selecting an end date earlier than the start date will generate an error message.)
• Show only Latest Entries: When this check box is selected, only the latest test ordered
(for patients with multiple tests ordered) will be returned. To include all
mammograms ordered, de-select the check box. (Default = Checked Box)
• Age Restriction: Select the desired age range. (Default = All)
• Mammogram Type: Select the type of mammogram, i.e., Screening, Diagnostic,
Undetermined, or All. (Default = All)
Technical Notes used in Evaluating Mammogram Type
If an order exists for the mammogram, the CPT code of the order is evaluated by the
following:
• If code = (77052, 77057, G0202): The type is “Screening”
• If code = (77051, 77055, 77056, G0204, G0206): The type is “Diagnostic”
If an order does NOT exist the following criteria is used:
• Under the (40-74) age range, patient should not be "required" - diagnostic
WHEN ((Age < 40) AND (Mammogram Most Recent Screen Frequency IS
NOT NULL)) THEN 'Diagnostic'
• Above (74) age range, patient should not be "required" to have a mammogram
more frequently than 2 years – diagnostic
WHEN ((Age > 74) AND ((Mammogram Most Recent Screen Frequency <>
'2Yr' OR Mammogram Most Recent Screen Frequency IS NOT NULL)))
THEN 'Diagnostic'
• If patient's last BI-RADS was 3 or greater – diagnostic
WHEN ((Age BETWEEN 40 and 74) AND BI-RADS Score >= 3) THEN
'Diagnostic'
• If patient in age range, has a screening frequency less than 1Yr - diagnostic
WHEN ((Age BETWEEN 40 and 74) AND (Mammogram Most Recent
Screen Frequency < '1Yr' THEN 'Diagnostic'
• If patient is male THEN ‘Diagnostic’
ELSE 'Screening'
• Patient Name: Enter the first or last name of the patient, or any portion of the name.
• Gender: Select the gender. (Default = All)
• Provider Name: Enter the first or last name of the provider, or any portion of the
name.

Breast Care Registry User Guide 20 June 2015
3. After setting filters, click Run Report. (To reset the filters and begin a new search, click
Reset.)
Viewing the report
The resulting report will display the results of the search in a grid format.
Technical Notes:
BI-RADS Code: No Score – Source <source name> is shown when a
mammogram/test comes in from a non-Radiology source. In these cases there will not
be an accompanying BI-RADS score.
Ordered Desired Date: The “Order Start Date” (in CDW), which is the date the
physician recommended the test to occur.
Order Information:
If No Order Exists ==> 'No order exists'
If Order Status = 'PENDING' ==> 'Ordered / Not Scheduled'
If Order Status = 'SCHEDULED' AND the Order Start Date Time is not more than 2
months in the past ==> 'Ordered / Scheduled' with date and location
If Order Status = 'SCHEDULED' AND the Order Start Date Time IS more than 2
months in the past ==> 'Ordered / Scheduled' with date and location
If None of the Above (Hold, Active) ==> Display 'Hold' or 'Active'
If Order Status = 'SCHEDULED' OR 'ACTIVE' OR 'PENDING' AND the Order Start
Date Time is more than 2 months in the past THEN "Order Overdue"
Incomplete Order = Order date more than 2 months past
The data can be exported to different file formats, including Excel, CSV, PDF, or Word.
• To export, click the Export button that corresponds to the desired file format. Type a
name for the report (or keep the default name) and click OK.
The report can be sorted by column in ascending or descending order by clicking the up or down
arrow in the column.
• To view detailed patient information, click Details. For more information about the
patient details screen see Section 8.

Breast Care Registry User Guide 21 June 2015
4.4. Breast Biopsies / Surgeries
This report allows providers and coordinators to search for patients who have had biopsies and/or
other surgical procedures, and to view results and follow-up care.
To run a Breast Biopsies / Surgeries report
1. Click Breast Biopsies / Surgeries on the BCR Dashboard.
2. Select the following filters:
• VISN: Select the VISN from the drop-down list
• Station/Healthcare System: Select the Station or Healthcare System from the list. The
Facility ID will be shown in parentheses.
• PACT Team: Click the check box next to each PACT to include in the search, or
click Check All to include all PACTs. To narrow the list, type any portion of the
name of the PACT and select from the resulting list of matches. (Default = All
PACTs)
• Start/End Dates: Click the calendar icons to select the start and end dates of the
query, or enter the date in m/d/yyyy format. (Selecting an end date earlier than the
start date will generate an error message.) (Default = one year prior to the current
date)
• Biopsy vs Surgery: Select the type of procedure to include in the search, i.e., only
biopsies, only surgeries, or All. (Default = All)
• Procedure Code: Type the CPT or International Classification of Diseases (ICD-9)
code into the text field.
• Patient Name: Enter the first or last name of the patient, or any portion of the name.
• Age Restriction: Select the desired age range. (Default = All)
• Gender: Select the gender. (Default = All)
• Race: Select the race. (Default = All)
• Provider Name: Enter the first or last name of the provider, or any portion of the
name.
• Follow-Up Action (available in 2016, see Section 3.7): Select from the list to include
only patients with a follow-up action, only those with no follow-up action, or All.
(Default = All)

Breast Care Registry User Guide 22 June 2015
3. After setting filters, click Run Report. (To reset the filters and begin a new search, click
Reset.)
Viewing the report
The resulting report will display the results of the search in a grid format. The data can be
exported to different file formats, including Excel, CSV, PDF, or Word.
• To export, click the Export button that corresponds to the desired file format. Type a
name for the report (or keep the default name) and click OK.
The report can be sorted by column in ascending or descending order by clicking the up or down
arrow in the column.
• To view report details if available, hover the cursor over the Report link.
• To view pathology details if available, hover the cursor over the Pathology link.
• To view tumor registry information if available, hover the cursor over the Tumor
Registry Data link.
• To view detailed patient information, click Details. For more information about the
patient details screen see Section 8.

Breast Care Registry User Guide 23 June 2015
4.5. Breast Cancer
This report allows providers and coordinators to search for patients who have had a breast cancer
diagnosis, and to view details of diagnosis and follow-up care.
To run a Breast Cancer report
1. Click Breast Cancer on the BCR Dashboard, under Standard Reports.
2. Select the following filters:
• VISN: Select the VISN from the drop-down list
• Station/Healthcare System: Select the Station or Healthcare System from the list. The
Facility ID will be shown in parentheses.
• PACT Team: Click the check box next to each PACT to include in the search, or
click Check All to include all PACTs. To narrow the list, type any portion of the
name of the PACT and select from the resulting list of matches. (Default = All
PACTs)
• Start/End Dates: Click the calendar icons to select the start and end dates of the
query, or enter the date in m/d/yyyy format. (Selecting an end date earlier than the
start date will generate an error message.) (Default = one year prior to the current
date)
• Patient Name: Enter the first or last name of the patient, or any portion of the name.
• Age Restriction: Select the desired age range. (Default = All)
• Gender: Select the gender. (Default = All)
• Race: Select the race. (Default = All)
• Provider Name: Enter the first or last name of the provider, or any portion of the
name.
• Follow-Up Action (available in 2016, see Section 3.7): Select from the list to include
only patients with a follow-up action, only those with no follow-up action, or All.
(Default = All)
3. After setting filters, click Run Report. (To reset the filters and begin a new search, click
Reset.)

Breast Care Registry User Guide 24 June 2015
Viewing the report
The resulting report will display the results of the search in a grid format. The data can be
exported to different file formats, including Excel, CSV, PDF, or Word.
• To export, click the Export button that corresponds to the desired file format. Type a
name for the report (or keep the default name) and click OK.
The report can be sorted by column in ascending or descending order by clicking the up or down
arrow in the column.
• To view the specific breast cancer diagnosis, hover the cursor over the Breast Cancer
Dx link.
• To view BRCA gene information, hover the cursor over the BRCA Status link.
• To view pathology details if available, hover the cursor over the Pathology link. To view
Tumor Registry data (obtained from the VA Central Cancer Registry) if available, hover
the cursor over the Tumor Registry Data link.
• To view additional information about treatment, including chemotherapy medication,
radiation therapy, or hormone therapy, hover the cursor over the corresponding treatment
link.
• To view detailed patient information, click Details. For more information about the
patient details screen see Section 8.

Breast Care Registry User Guide 25 June 2015
5. Aggregate Reports Aggregate reports allow BCR users to view statistical summaries and overviews of patient
information filtered by the desired criteria. Reports can be further refined to view statistical
information by facility, race, and age. Aggregate reports also provide the ability to view
individual patient information.
Patient Eligibility: BCR includes all Veterans and non-Veterans who have actively been seen
within the last 3 years, excluding males who have no mammography data and female non-
Veterans who have no mammography data.
Ethnicity: The Hispanic ethnicity includes all Hispanic patients, including those identified as
Hispanic Black, Hispanic White, and Hispanic/Latino.
5.1. All Mammograms w/BI-RADS Distribution
This aggregate report allows providers and coordinators to review BI-RADS scores for
mammogram reports by VISN and facility.
To run an All Mammograms w/BI-RADS Distribution report
1. Click All Mammograms w/BI-RADS Distribution on the BCR Dashboard.
2. Select the following filters:
• VISN: Select the VISN from the drop-down list. Multiple VISNs can be selected, as
well as all VISNs.
• Start/End Dates: Click the calendar icons to select the start and end dates of the
query, or enter the date in m/d/yyyy format. (Selecting an end date earlier than the
start date will generate an error message.) (Default = one year prior to the current
date)
• Age Restriction: Select the desired age range’ (Default = All)
• Gender: Select the gender. (Default = All)
• Race: Select the race. (Default = All)
3. After setting filters, click Run Report. (To reset the filters and begin a new search, click
Reset.)
Viewing the report
The resulting report displays the results of the search in a grid format. The information includes
the name of each facility and VISN, and the total mammograms performed at each facility.
The grid also lists the breakdown of results by BI-RADS score (0 – 6), and the percentage of
mammograms that the facility performs in relation to other facilities in the same VISN.
A bar graph also displays the breakdown of BI-RADS codes. Hover the cursor over a code to
view additional details.

Breast Care Registry User Guide 26 June 2015
The data can be exported to different file formats, including Excel, CSV, PDF, or Word. The
report can be sorted by column in ascending or descending order by clicking the up or down
arrow in the column.
• To export, click the Export button that corresponds to the desired file format. Type a
name for the report (or keep the default name) and click OK.
• To view the patient list for the facility, click View More (requires the appropriate user
permissions).
All Mammograms w/BI-RADs Distribution by Facility 5.1.1.
The All Mammograms w/BI-RADS Distribution page also allows users to view information
specific to each facility.
To run an All Mammograms w/BI-RADS Distribution by Facility report
1. Click the View More link in the Details column for the desired facility.
2. Select the following filters:
• Start/End Dates: Click the calendar icons to select the start and end dates of the
query, or enter the date in m/d/yyyy format. (Selecting an end date earlier than the

Breast Care Registry User Guide 27 June 2015
start date will generate an error message.) (Default = one year prior to the current
date)
• PACT Team: Click the check box next to each PACT to include in the search, or
click Check All to include all PACTs. To narrow the list, type any portion of the
name of the PACT and select from the resulting list of matches. (Default = All
PACTs)
• Show only Latest Entries: When this check box is selected, only the latest test (for
patients with multiple tests) will be returned. To include all tests, de-select the check
box. (Default = Checked Box)
• Show Only Mammograms: Click this check box to view only mammograms. When
de-selected, ultrasounds and MRIs are displayed in addition to mammograms.
(Default = Unchecked Box)
• BI-RADS Codes: Select the desired BI-RADS codes (1 – 6) to include in the search,
or click. (Default = All Items Checked)
• Age Restriction: Select the desired age range. (Default = All)
• Patient Name: Enter the first or last name of the patient, or any portion of the name.
• Gender: Select the gender. (Default = All)
• Race: Select the race. (Default = All)
• Provider Name: Enter the first or last name of the provider, or any portion of the
name.
• Follow-Up Action (available in 2016, see Section 3.7): Select from the list to include
only patients with a follow-up action, only those with no follow-up action, or All.
(Default = All)
3. After setting filters, click Run Report. (To reset the filters and begin a new search, click
Reset.)
Viewing the report
The resulting report will display the results of the search in a grid format. The data can be
exported to different file formats, including Excel, CSV, PDF, or Word.
• To export, click the Export button that corresponds to the desired file format. Type a
name for the report (or keep the default name) and click OK.
The report can be sorted by column in ascending or descending order by clicking the up or down
arrow in the column.

Breast Care Registry User Guide 28 June 2015
• To view detailed patient information, click Details. For more information about the
patient details screen see Section 8.
5.2. Mammogram Compliance
This aggregate report allows providers and coordinators to review mammogram compliance rates
by VISN and facility.
In BCR, the age limits for “compliance” are only applicable for women between the ages of 50
and 74. Data is captured for men and women outside of this age range as well, but this data is not
included in the compliance reports.
The criteria for Compliant, Non-Compliant, and Not Applicable are as follows:
Compliant:
• Non-deceased women between the ages of 50 and 74
-And-
• Do not have one of more of the following:
o Bi-Lateral Mastectomy
o Terminal Health Factor
o Mammogram Exclusion Health Factor
-And-
• Have had a mammogram performed within the last 2 years
Non-Compliant:
• Non-deceased women between the ages of 52 and 74 (women between the ages of 50 –
51 are still in window for their first mammogram, and so are considered compliant)
-And-
• Do not have one of more of the following:
o Bi-Lateral Mastectomy
o Terminal Health Factor

Breast Care Registry User Guide 29 June 2015
o Mammogram Exclusion Health Factor
-And-
• Have not had a mammogram performed in the last 2 years.
Not Applicable:
• Women outside of the 50 – 74 age range
-Or-
• Have one of more of the following:
o Bi-Lateral Mastectomy
o Terminal Health Factor
o Mammogram Exclusion Health Factor
-Or-
• Are deceased
Table 3. Mammogram Compliance Matrix
Patient Age Mammogram Completed?
Compliance?
50 Yes Yes
50 No Yes
51 Yes Yes
51 No Yes
52 – 74 Yes Yes
52 – 74 No No
75 or > N/A N/A
To run a Mammogram Compliance report
1. Click Mammogram Compliance on the BCR Dashboard.
2. Select the following filters:
• VISN: Select the VISN from the drop-down list. Multiple VISNs can be selected, as
well as all VISNs.
• Current or Historical Data: Select the type of data to search, i.e., Current (default,
signifying compliance rates to date), or Historical (snapshots of compliance data for
the indicated month and year). (Default = Current)
• Age Restriction: Select the desired age range. (Default = All)
• Race: Select the race. (Default = All)
3. After setting filters, click Run Report. (To reset the filters and begin a new search, click
Reset.)

Breast Care Registry User Guide 30 June 2015
Viewing the report
The resulting report displays the results of the search in a grid format. The information includes
total number of patients (applicable and not applicable), as well as the total number and
percentage of compliant and non-compliant patients.
A bar graph also displays the breakdown of compliance rates by facility. Hover the cursor over a
facility to view additional details about that facility.
The data can be exported to different file formats, including Excel, CSV, PDF, or Word. The
report can be sorted by column in ascending or descending order by clicking the up or down
arrow in the column.
• To export, click the Export button that corresponds to the desired file format. Type a
name for the report (or keep the default name) and click OK.
• To view the list of patients for the facility, click View More (requires the appropriate
user permissions).

Breast Care Registry User Guide 31 June 2015
Mammogram Compliance by Facility 5.2.1.
The Mammogram Compliance page also allows users to view information specific to each
facility.
To run a Mammogram Compliance by Facility report
1. Click the View More link in the Details column for the desired facility.
2. Select the following filters:
• Compliance Status: Select All , Yes (compliant), No (non-compliant) or N/A.
(Default = All)
• Age Restriction: Select the desired age range. (Default = All)
• Race: Select the race. (Default = All)
3. After setting filters, click Run Report. (To reset the filters and begin a new search, click
Reset.)
Viewing the report
The resulting report will display the results of the search in a grid format. The data can be
exported to different file formats, including Excel, CSV, PDF, or Word. The report can be sorted
by column in ascending or descending order by clicking the up or down arrow in the column.
• To export, click the Export button that corresponds to the desired file format. Type a
name for the report (or keep the default name) and click OK.
• To view the list of patients for the facility, click Details (requires the appropriate user
permissions).

Breast Care Registry User Guide 32 June 2015
Mammogram Compliance by Age 5.2.2.
The Mammogram Compliance page also provides the ability to review compliance rates by age.
To create a Mammogram Compliance by Age report
1. Click the Mammogram Compliance by Age link under Additional Views.
2. VISN: Select the VISN. Multiple VISNs can be selected, or all VISNs.
3. Click Run Report. (To reset the filters and begin a new search, click Reset.)
Viewing the report
The resulting report displays compliance rates broken down by age. The data can be exported to
different file formats, including Excel, CSV, PDF, or Word.
• To export, click the Export button that corresponds to the desired file format. Type a
name for the report (or keep the default name) and click OK.
Clicking on a column header will sort the results by that category.
• Click the View More link to view compliance rates by facility, as described in Section
5.2.1.
Breast Care Registry User Guide 33 June 2015
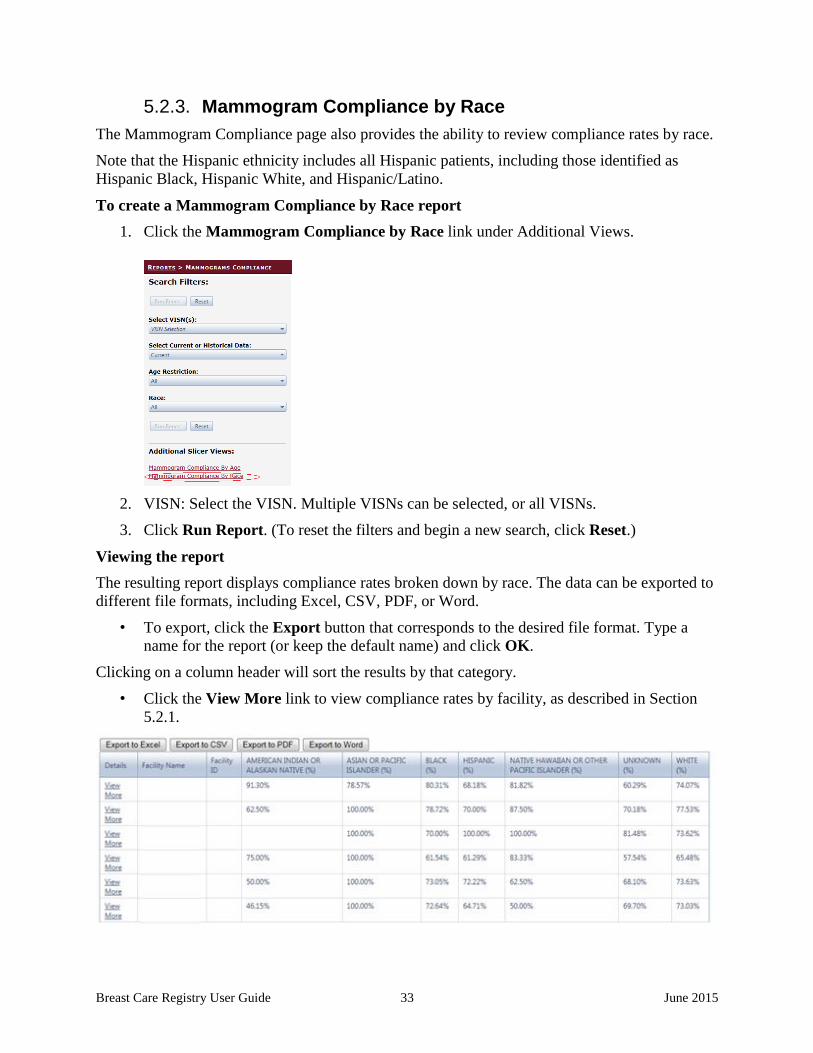
Mammogram Compliance by Race 5.2.3.
The Mammogram Compliance page also provides the ability to review compliance rates by race.
Note that the Hispanic ethnicity includes all Hispanic patients, including those identified as
Hispanic Black, Hispanic White, and Hispanic/Latino.
To create a Mammogram Compliance by Race report
1. Click the Mammogram Compliance by Race link under Additional Views.
2. VISN: Select the VISN. Multiple VISNs can be selected, or all VISNs.
3. Click Run Report. (To reset the filters and begin a new search, click Reset.)
Viewing the report
The resulting report displays compliance rates broken down by race. The data can be exported to
different file formats, including Excel, CSV, PDF, or Word.
• To export, click the Export button that corresponds to the desired file format. Type a
name for the report (or keep the default name) and click OK.
Clicking on a column header will sort the results by that category.
• Click the View More link to view compliance rates by facility, as described in Section
5.2.1.
Breast Care Registry User Guide 34 June 2015
5.3. Breast Cancer
This aggregate report allows providers and coordinators to review the number of patients with a
breast cancer diagnosis by VISN and facility.
To run a Breast Cancer report
1. Click Breast Cancer on the BCR Dashboard, under Aggregate Reports.
2. Select the following required filter:
• VISN: Select the VISN from the drop-down list. Multiple VISNs can be selected, as
well as all VISNs.
3. Select the following additional filters:
• Age Restriction: Select the desired age range. (Default = All)
• Gender: Select the gender. (Default = All)
• Race: Select the race. (Default = All)
4. After setting filters, click Run Report. (To reset the filters and begin a new search, click
Reset.)
Viewing the report
The resulting report displays the results of the search in a grid format. The information includes
the name and ID of each facility, as well as patient counts for breast cancer diagnosis.
The data can be exported to different file formats, including Excel, CSV, PDF, or Word. The
report can be sorted by column in ascending or descending order by clicking the corresponding
column header.
• To export, click the Export button that corresponds to the desired file format. Type a
name for the report (or keep the default name) and click OK.
• To view the list of patients for the facility, click View More (requires the appropriate
user permissions).

Breast Care Registry User Guide 35 June 2015
A bar graph also displays the breakdown of breast cancer diagnosis by facility. Hover the cursor
over a facility to view additional details about that facility.

Breast Care Registry User Guide 36 June 2015
Pie charts indicate breast cancer diagnosis by age and race. Hover the cursor over a category to
view additional details about that demographic.
Breast Cancer by Facility 5.3.1.
The Breast Cancer page also allows users to view information specific to each facility.
To run a Breast Cancer by Facility report
1. Click the View More link in the Details column for the desired facility.
2. Select the following filters:
• Age Restriction: Select the desired age range. (Default = All)
• Gender: Select the gender. (Default = All)
• Race: Select the race. (Default = All)
• New Diagnosis: Select the diagnosis type, i.e., Yes (diagnosed within the last 12
months), No (not diagnosed within the last 12 months) or All. (Default = All)
3. After setting filters, click Run Report. (To reset the filters and begin a new search, click
Reset.)
Viewing the report
The resulting report will display the results of the search in a grid format. The data can be
exported to different file formats, including Excel, CSV, PDF, or Word. The report can be sorted
by column in ascending or descending order by clicking the corresponding column header.
• To export, click the Export button that corresponds to the desired file format. Type a
name for the report (or keep the default name) and click OK.
• To view detailed patient information, click Details.

Breast Care Registry User Guide 37 June 2015
5.4. Mammograms Follow-Up Compliance
This aggregate report allows providers and coordinators to view information about whether
follow-up action and patient communication has occurred for all mammogram results.
See Section 5.2 for information on the criteria used to determine compliance.
To run a Mammograms Follow-Up Compliance report
1. Click Mammograms Follow-Up Compliance on the BCR Dashboard.
2. Select the following filters:
• VISN: Select the VISN from the drop-down list. Multiple VISNs can be selected, as
well as all VISNs.
• Start/End Dates: Click the calendar icons to select the start and end dates of the
query, or enter the date in m/d/yyyy format. (Selecting an end date earlier than the
start date will generate an error message.) (Default one year prior to the current date)
• Race: Select the race (Default = All).
3. After setting filters, click Run Report. (To reset the filters and begin a new search, click
Reset.)
Viewing the report
The resulting report displays the results of the search in a grid format. The information includes
the name and ID of each facility, as well as patient counts and percentages for compliance and
non-compliance with follow-up.
The data can be exported to different file formats, including Excel, CSV, PDF, or Word. The
report can be sorted by column in ascending or descending order by clicking the corresponding
column header.
• To export, click the Export button that corresponds to the desired file format. Type a
name for the report (or keep the default name) and click OK.
• To view the list of patients for the facility, click View More (requires the appropriate
user permissions).
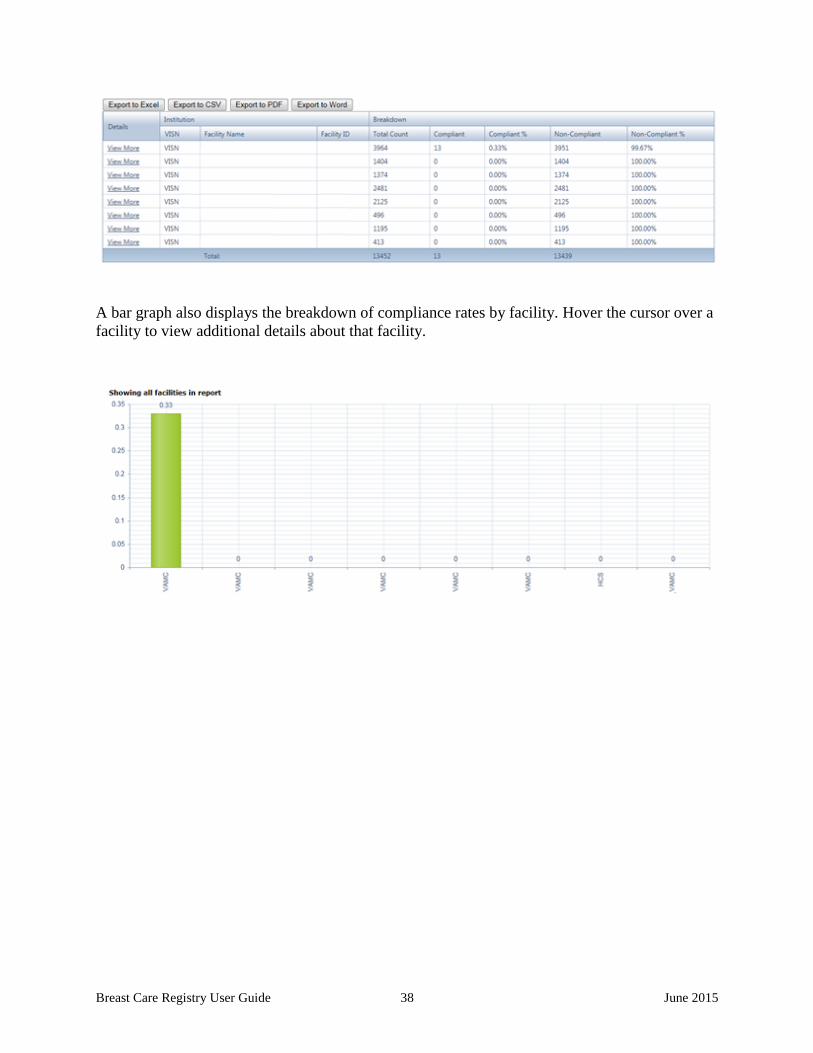
Breast Care Registry User Guide 38 June 2015
A bar graph also displays the breakdown of compliance rates by facility. Hover the cursor over a
facility to view additional details about that facility.

Breast Care Registry User Guide 39 June 2015
Mammogram Follow-Up Compliance by Facility 5.4.1.
The Mammogram Follow-Up Compliance page also allows users to view mammogram
compliance follow-up information by facility.
To run a Mammogram Follow-Up Compliance by Facility report
1. Click the View More link in the Details column for the desired facility.
2. Select the following filters:
• Start/End Dates: Click the calendar icons to select the start and end dates of the
query, or enter the date in m/d/yyyy format. (Selecting an end date earlier than the
start date will generate an error message.) (Default = one year prior to the current
date)
• Race: Select the race (Default = All).
• Follow-Up Information: Select the type of patient follow-up action taken. (Default =
All)
3. After setting filters, click Run Report. (To reset the filters and begin a new search, click
Reset.)
Viewing the report
The resulting report will display the results of the search in a grid format. The data can be
exported to different file formats, including Excel, CSV, PDF, or Word.
• To export, click the Export button that corresponds to the desired file format. Type a
name for the report (or keep the default name) and click OK.
The report can be sorted by column in ascending or descending order by clicking the
corresponding column header.
• To view information about follow-up notifications or actions taken, hover the cursor over
the link to display the note as a tooltip.
• To view detailed patient information, click Details.

Breast Care Registry User Guide 40 June 2015
Breast Care Registry User Guide 41 June 2015
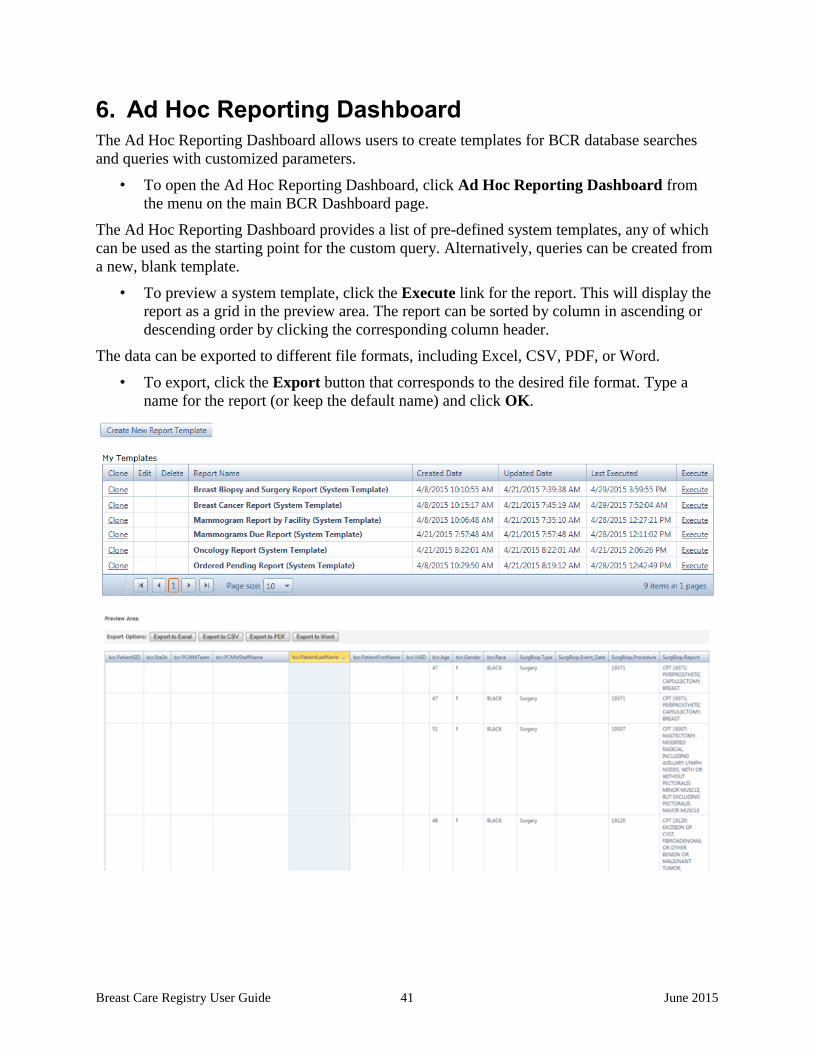
6. Ad Hoc Reporting Dashboard The Ad Hoc Reporting Dashboard allows users to create templates for BCR database searches
and queries with customized parameters.
• To open the Ad Hoc Reporting Dashboard, click Ad Hoc Reporting Dashboard from
the menu on the main BCR Dashboard page.
The Ad Hoc Reporting Dashboard provides a list of pre-defined system templates, any of which
can be used as the starting point for the custom query. Alternatively, queries can be created from
a new, blank template.
• To preview a system template, click the Execute link for the report. This will display the
report as a grid in the preview area. The report can be sorted by column in ascending or
descending order by clicking the corresponding column header.
The data can be exported to different file formats, including Excel, CSV, PDF, or Word.
• To export, click the Export button that corresponds to the desired file format. Type a
name for the report (or keep the default name) and click OK.

Breast Care Registry User Guide 42 June 2015
To create a report template
1. Click the Clone link for the corresponding system template.
-or-
Click the Create New Report Template button.
This will open the BCR Ad Hoc Report Template Creation System.
2. Click Next and type a name for the new template.
3. Click Next to select the columns to include in the report.
• The Available Columns list shows the columns available for inclusion in the
report.
• The Selected Columns list shows the columns that are currently selected for
inclusion in the report.

Breast Care Registry User Guide 43 June 2015
• To add columns to the Selected list, go to the Available list and select the desired
columns. Use the Ctrl or Shift key to select multiple columns. To add the selected
items, click the To Right button. Alternatively, to add all available items, click
the All To Right button.
• To remove columns from the Available list, go to the Available list and select the
columns to remove. Use the Ctrl or Shift key to select multiple columns. To remove
the selected items, click the To Left button. Alternatively, to remove all items
(thereby clearing the Selected Columns list), click the All to Left button.
• To move the position of an item in either list, select the item and click the Move Up
or Move Down buttons.
4. With the columns selected and placed in the desired order, click Next. This will open the
Filter Creation page. This page allows users to apply filters using conditional statements
and SQL operators.
5. Select the patient grouping method.
• If the first option is chosen, only patients that match each criterion will be
displayed in the final report.
• If the second option is chosen, all patients will be displayed in the final report, but
specific columns will be blank (null) if they don’t match the criteria.
6. Select the desired operator: AND, OR, Not And (NAND), or Not Or (NOR). This logic
gate will be applied to the conditional statements that follow it.

Breast Care Registry User Guide 44 June 2015
7. Click the Add Statement button to add a conditional statement. By default, the
conditional statement will apply to the first item that was selected in the Column
Selection page.
8. Click the down arrow to select the field to be filtered. The available fields depend on the
columns selected in the Column Selection page.

Breast Care Registry User Guide 45 June 2015
9. Click the down arrow to select the conditional operator.
10. Type or select the conditional value. Refer to the list of “Selected Column Filter
Instructions” for the expected format.
11. Repeat steps 7 – 10 to add conditional statements that will be evaluated by the selected
logical operator.
• To create a new group of operators / conditional statements, click the New
Group button and repeat steps 6 – 10 for the new group.
12. With the filters defined as desired, click Apply Filters.
13. Click Next to preview the report. This will display the report as a grid.
• To make the template public click the Use as Public Template check box.
This will make the template available and visible to all BCR users. Keep the
check box de-selected to make it private.
14. Click Next to exit the BCR Ad Hoc Report Template Creation System.
Upon returning to the Ad Hoc Dashboard, the newly created template will be visible in the My
Templates list. Unlike the system templates, a user-created template can be edited or deleted by
the user who created it. The template can also be cloned and viewed by others if set to Public.
• To view / export the report, click the Execute link.

Breast Care Registry User Guide 46 June 2015
7. VISN / Facility Search This utility allows the user to view information about a specific facility within a VISN, and to
run a subsequent patient search for patients in that facility.
To run a facility/patient search
1. Click VISN / Facility Search in the BCR Dashboard, under Utilities.
2. Select the facility from the drop-down list.
This will display general information about the facility.

Breast Care Registry User Guide 47 June 2015
3. Type the name (first or last), VAID or Social Security Number, or any portion of this
information, into the search text field and click the Search icon.
This will display the search results.
4. To view patient details, click Select.
Breast Care Registry User Guide 48 June 2015
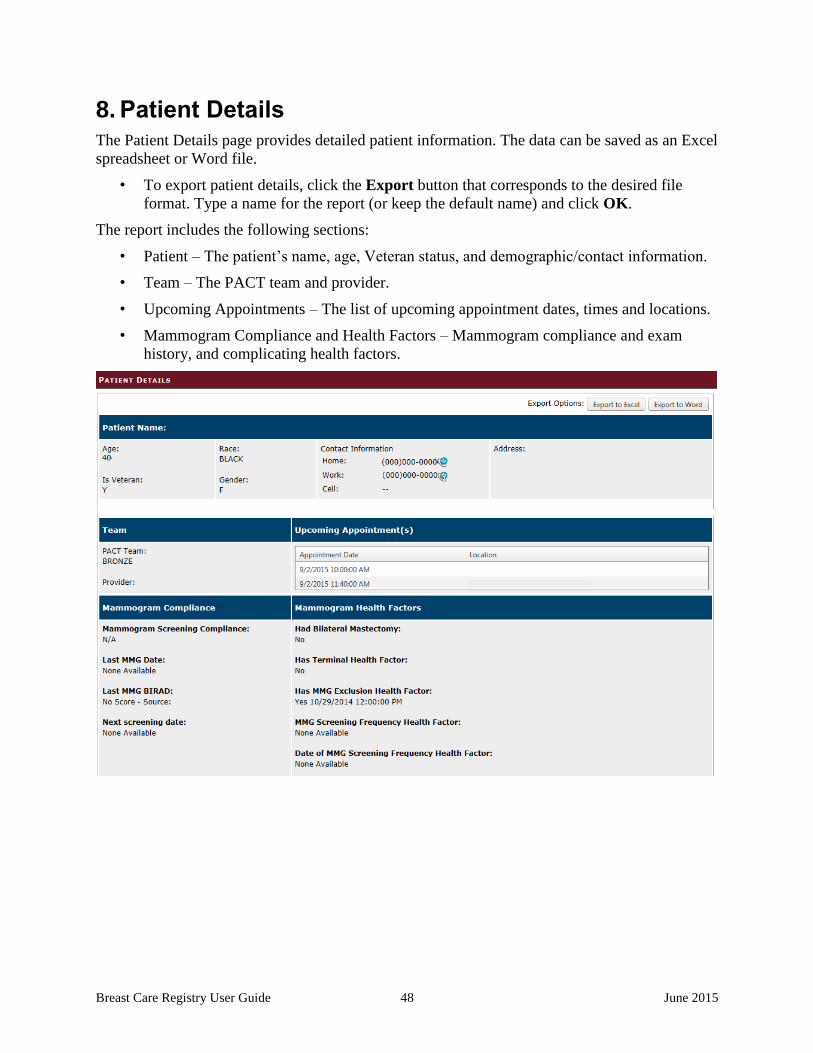
8. Patient Details The Patient Details page provides detailed patient information. The data can be saved as an Excel
spreadsheet or Word file.
• To export patient details, click the Export button that corresponds to the desired file
format. Type a name for the report (or keep the default name) and click OK.
The report includes the following sections:
• Patient – The patient’s name, age, Veteran status, and demographic/contact information.
• Team – The PACT team and provider.
• Upcoming Appointments – The list of upcoming appointment dates, times and locations.
• Mammogram Compliance and Health Factors – Mammogram compliance and exam
history, and complicating health factors.

Breast Care Registry User Guide 49 June 2015
Depending on the report type and reporting source, additional information will be displayed, such as
radiology information, BCR diagnosis, co-morbidities, and treatment history.
Breast Care Registry User Guide 50 June 2015
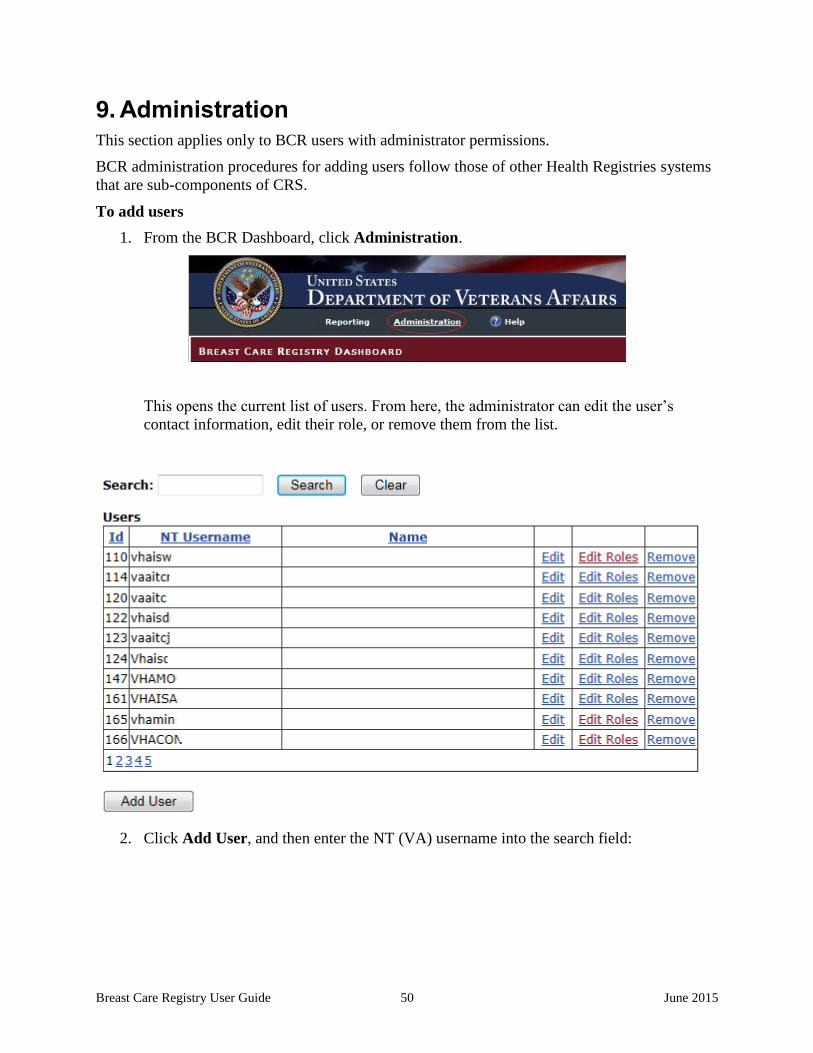
9. Administration This section applies only to BCR users with administrator permissions.
BCR administration procedures for adding users follow those of other Health Registries systems
that are sub-components of CRS.
To add users
1. From the BCR Dashboard, click Administration.
This opens the current list of users. From here, the administrator can edit the user’s
contact information, edit their role, or remove them from the list.
2. Click Add User, and then enter the NT (VA) username into the search field:

Breast Care Registry User Guide 51 June 2015
3. Enter the user’s domain, full name, first and last name, and any other desired information
into the text fields, and click Save to add the user. Click Close to return to the user list.
To view or edit user roles
1. Click Edit Roles.
2. Patient Metadata Access: Select Administrator or Facility User.
3. Select the facilities the user will have access to. Use the Ctrl or Shift key to multi-select.

Breast Care Registry User Guide 52 June 2015
4. Dashboard Reporting Defaults: To grant the user National (Enterprise) access, select the
National check box. To grant the user VISN-level access, select the VISN check box.
5. Select the VISNs the user will have access to, using the Ctrl or Shift key to make multiple
selections.

Breast Care Registry User Guide 53 June 2015
6. BCR Reporting Facility: To grant the user access to one or more reporting facilities,
select the Reporting Facility check box and select the facility, or use the Shift or Ctrl
key to select multiple facilities.
7. Click Save to save the changes. Click Close to return to the user list.
10. Troubleshooting As a VA intranet Web site, BCR troubleshooting procedures will usually involve contacting the
BCR network administrators or the NSD.
Calls to the NSD should state that the user is working with the Converged Registries Solution
and the Breast Care Registry. The NSD will then direct the trouble ticket to AITC, who will use
established procedures to direct the problem to the CRS sustainment team.