designing a rescue robot with ai techniques to …
TRANSCRIPT

DESIGNING A RESCUE ROBOT WITH AI
TECHNIQUES TO NAVIGATE A LOCATION
A report submitted to department of Computer Science Engineering, BRAC
University in fulfillment of the requirements for thesis work
Fahim Al Hasnaeen - 09201004
Tasmia Tabassum - 07210002
September 1, 2013

Page 2 of 21
Declaration
We do hereby declare that the thesis titled “Designing a Rescue Robot with AI Techniques to Navigate a
Location” is submitted to the Department of Computer Science & Engineering of BRAC University in
fulfillment of the Bachelor of Science in Computer Science & Engineering. This is our original work and
was not submitted elsewhere for the award of any other degree or any other publication.
Date: 01-09-13
Supervisor:
__________________________________
Abu Mohammad Hammad Ali
__________________________
Fahim Al Hasnaeen
Student ID: 09201004
__________________________
Tasmia Tabassum
Student ID: 07210002

Page 3 of 21
Abstract
This report presents the study on a stair-climbing robot which is manually controlled using radio
frequency (RF). RF control implements the use of wireless technology to propagate data. The robot is
able to receive and send command signal between the robot and the controller by using the RF signal. The
motors are attached to two wheels through two shafts. This report includes the artificial intelligence, sonar
sensors, reed switch, and the circuitry used to conduct the stair-climbing robot.

Page 4 of 21
Acknowledgements
It is our privilege to thank Abu Mohammad Hammad Ali, Lecturer of the CSE (Computer Science &
Engineering) department for rendering us his knowledge and giving the opportunity of practical exposure
through this report.

Page 5 of 21
Table of Contents
ABSTRACT ................................................................................................................................... 3
ACKNOWLEDGEMENTS ......................................................................................................... 4
TABLE OF CONTENTSTABLE LIST ....................................................................................... 5
FIGURE LIST ................................................................................................................................ 6
TABLE LIST .................................................................................................................................. 7
I INTRODUCTION ............................................................................................................... 8
II PRÉCIS .................................................................................................................................. 8
III ARTIFICIAL INTELLIGENCE ......................................................................................... 9
IV SONAR SENSORS............................................................................................................ 10
V POTENTIOMETER ........................................................................................................... 11
VI REED SWITCH .................................................................................................................. 11
VII WIRELESS COMMUNICATION .................................................................................. 12
VIII CIRCUITRY ........................................................................................................................ 18
IX CONCLUSION .................................................................................................................. 21
X REFERENCES..................................................................................................................... 21

Page 6 of 21
Figure List
Figures Page
Figure 3.1 Sensors sensing the objects at front measuring the heights ................................................................ 9
Figure 4.1 The time period for the signals of host (dark line) and PING (grey line) respectively ................. 11
Figure 6.1 Labeled diagram of the different parts in a reed switch.. ................................................................. 12
Figure 7.1 Timing base decode................................................................................................................................ 16
Figure 7.2 Sampling based decode.. ....................................................................................................................... 17
Figure 8.1 Pin configurations of controller circuit.. .............................................................................................. 18
Figure 8.2 Pin configurations of the robot’s Sensor circuit.. ............................................................................... 19

Page 7 of 21
Table List
Table Page
Table 1.1 4-bits command received from HT12D ................................................................................................. 20

Page 8 of 21
I Introduction
Both Natural Disasters like earthquakes and terrorist attacks cause buildings to collapse with several
victims inside them. Furthermore a building on fire also might have victims inside. In almost all of these
cases the people trying to rescue the people inside these buildings take the risk and put their lives on the
line, but don’t know where to look for the victims and turns out the rescuer into a victim as well. For such
reasons we are developing this robot so that victims can be rescued without anyone else getting into
danger. The robot is able to climb over obstacles and staircases. Most robots have highly sophisticated
and costly things in them like laptops or android smartphones, for which losing the robot means losing a
lot of money. We developed the robot in a cost effective way so that losing it will not be as costly. What
is more the robot is fully autonomous because of its Artificial Intelligence programming. It is able to
detect obstacles on its own and be aware of its surrounding and its circuitry as well. All the while
communicating with a computer wirelessly, which is kept far away from danger.
II Précis
The main aim of this project was to design and develop stairs climbing remote control robot in which
radio frequency (RF) signal is used. With the RF control, the movement of the robot is much easier and
not too limited because it is not attached to a wire. The objectives of this project are as follows:
1. To develop the robot to detect climbable obstacles.
2. To be able to measure the angles of its arms and tail.
3. To detect the motor whether it is spinning or not.
4. Establishing wireless transmission using radio frequency (RF) signal.
5. Using Artificial Intelligence (AI) to sense autonomously and becoming aware of its environment.
As for the result, all of the objectives were successfully done.
Page 9 of 21
III Artificial Intelligence (AI)
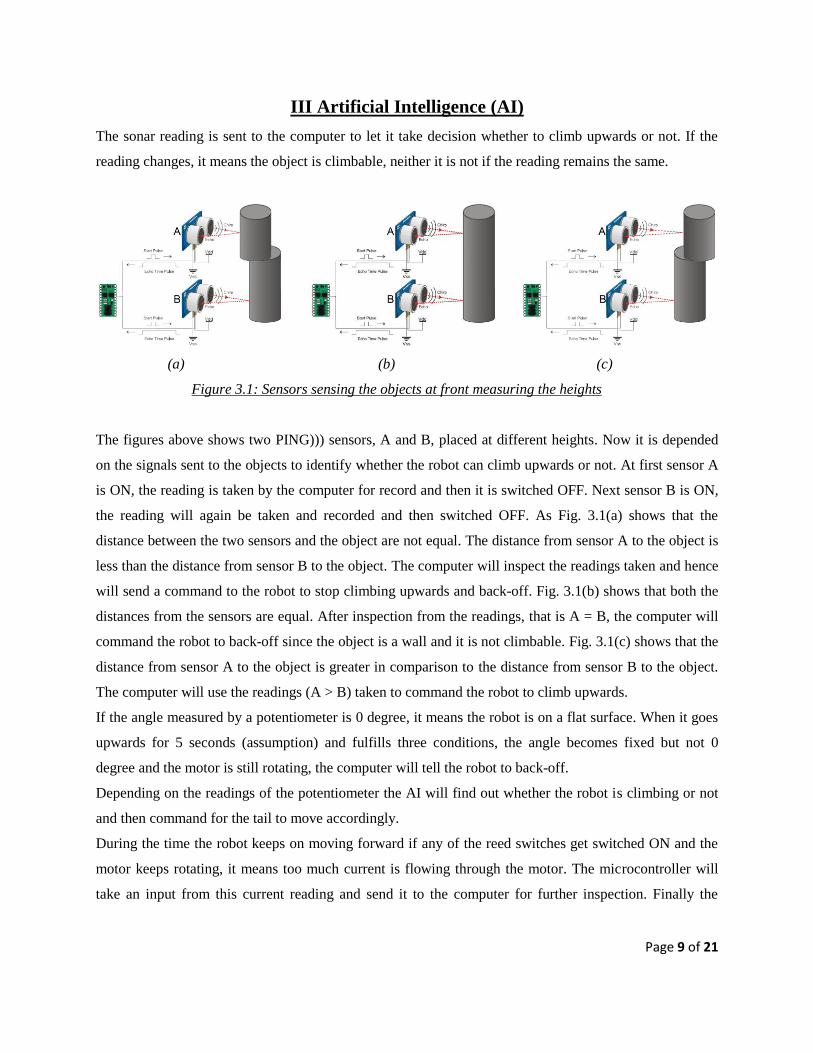
The sonar reading is sent to the computer to let it take decision whether to climb upwards or not. If the
reading changes, it means the object is climbable, neither it is not if the reading remains the same.
(a) (b) (c)
Figure 3.1: Sensors sensing the objects at front measuring the heights
The figures above shows two PING))) sensors, A and B, placed at different heights. Now it is depended
on the signals sent to the objects to identify whether the robot can climb upwards or not. At first sensor A
is ON, the reading is taken by the computer for record and then it is switched OFF. Next sensor B is ON,
the reading will again be taken and recorded and then switched OFF. As Fig. 3.1(a) shows that the
distance between the two sensors and the object are not equal. The distance from sensor A to the object is
less than the distance from sensor B to the object. The computer will inspect the readings taken and hence
will send a command to the robot to stop climbing upwards and back-off. Fig. 3.1(b) shows that both the
distances from the sensors are equal. After inspection from the readings, that is A = B, the computer will
command the robot to back-off since the object is a wall and it is not climbable. Fig. 3.1(c) shows that the
distance from sensor A to the object is greater in comparison to the distance from sensor B to the object.
The computer will use the readings (A > B) taken to command the robot to climb upwards.
If the angle measured by a potentiometer is 0 degree, it means the robot is on a flat surface. When it goes
upwards for 5 seconds (assumption) and fulfills three conditions, the angle becomes fixed but not 0
degree and the motor is still rotating, the computer will tell the robot to back-off.
Depending on the readings of the potentiometer the AI will find out whether the robot is climbing or not
and then command for the tail to move accordingly.
During the time the robot keeps on moving forward if any of the reed switches get switched ON and the
motor keeps rotating, it means too much current is flowing through the motor. The microcontroller will
take an input from this current reading and send it to the computer for further inspection. Finally the

Page 10 of 21
computer will check whether the motor can rotate anymore or not and henceforth will send command to
the robot as to back-off or keep moving forward.
IV Sonar Sensors
The word "sonar" is an abbreviation for "SOund, NAvigation, and Ranging". Sonar consists of a
transmitter, transducer, receiver, and display. An electrical impulse from a transmitter is converted into a
sound wave by the transducer. When this sound wave strikes an object, it rebounds. This echo strikes the
transducer, which converts it back into an electric signal, which is amplified by the receiver and sent to
the display. The time variation is displayed on the read out of the sonar screen device by means of
flashing lights. Since the speed of sound in air is constant (approximately 343 meters per second), the
time lapse between the transmitted signal and the received echo can be measured and the distance to the
object determined.
Example: Let’s assume that the time variation is 5 seconds and that the speed of sound in air is 343m/s.
The distance to the object would be: (343 m/s * 5 seconds)/2 = 857.5 m.
For this project, the two PING))) sensors are placed at 10 inches from each other to detect climbable
obstacles. The PING))) sensors will then send signals to measure the distance of the obstacle and act
accordingly.
The PING))) sensor detects objects by emitting a short ultrasonic burst and then "listening" for the echo.
Under control of a host microcontroller (trigger pulse), the sensor emits a short 40 kHz (ultrasonic) burst.
This burst travels through the air at about 1130 feet per second, hits an object and then bounces back to
the sensor. The PING))) sensor provides an output pulse to the host that will terminate when the echo is
detected; hence the width of this pulse corresponds to the distance to the target. Figure 4.1 shows the time
period for both the signals.

Page 11 of 21
Figure 4.1: The time period for the signals of host (dark line) and PING (grey line) respectively
V Potentiometer
The angles of the arms and tails are measured using a potentiometer. The shaft is attached to the movable
parts. According to the shaft’s movement, the resistance of the potentiometer varies. Then by using the
potential divider rule, the voltage across the potentiometer is divided and these voltage readings are taken
to the microcontroller to the ADC module. After that this ADC reading is sent to the computer. This way
the computer discover the angle of the arms and tail and determine whether the robot is successfully
climbing or not. If it is successful, the robot will proceed on doing so, otherwise it will return and search
for some other device or object to climb.
VI Reed Switch
A reed sensor is a device built using a reed switch with additional functionality like ability to withstand
higher shock, easier mounting, additional intelligent circuitry, etc. When a magnetic force is generated
parallel to the reed switch, the reeds become flux carriers in the magnetic circuit. The overlapping ends of
the reeds become opposite magnetic poles, which attract each other. If the magnetic force between the
poles is strong enough to overcome the restoring force of the reeds, the reeds is drawn together. Figure
6.1 below shows the names of the different parts of a reed switch labeled.

Page 12 of 21
Figure 6.1: Labeled diagram of the different parts in a reed switch
The motors have current ratings according to which the wire is turned or the coil is made across the reed
switch’s body. If the current going to the motor exceeds than its normal value, the reed switch will get
turned ON and the microcontroller will take an input from it. This reading will again be sent to the
computer. If the computer finds out that the motor cannot rotate, the robot is called to back-off.
VII Wireless Communication
In this part, we had used 2-way communication by means of RF transmitter-receiver, sort of like a 2G
communication. We take all the readings from the sensors, forming a string. The string is then passed on
to another ARDUINO, which is connected to the computer, through the RF transmitter. Following the
computer processes the string accordingly and resends what the robot should do next, through the
ARDUINO on its side. The bits were sent using the encoder, HT12E, and were received by the decoder,
HT12D, of the robot. Succeeding HT12D passed on to the PIC16F877A, which does the work of
switching the motor on or off consequently.
Reading is taken from the SONAR and POT to form a string. Then by the help of ARDUINO’s virtual
wire, library, ARDUINO UNO passes the string with the hybrid of Manchester and Checksum encoding
through the RF transmitter directly via a radio spectrum to the RF receiver, which is connected to an
ARDUINO MEGA-2560. It then decodes the input of ARDUINO UNO to check whether the string is
correct or not. After getting the string correctly, it is passed on to the computer through the usb-serial
port. The computer then reads the data and determines the next thing for the robot to do. The robot then
sends a word (4-bit) through the encoder, HT12E, and RF transmitter back to the robot by using radio
spectrum again. The RF receiver receives the bits and HT12D decodes the data. After that it sends the
word to PIC18F877A. This cycle continues in a manner of two-way handshaking until any one of the
connections are lost.
Page 13 of 21
The string consists of 4 integer values each separated by commas. The first is the reading from the
topmost PING))), second the bottom PING))), third and fourth are the angles of the arm and tail
respectively. The fifth one is a Boolean, if the motor is overloaded or not.
Since we are using the same radio frequency, only one set of transmitter-receiver can be on at a time as
multiple sets can cause interference. So we alternately turn on one set at a time.
Manchester Encoding
Encoding is the process of adding the correct transitions to the message signal in relation to the data that
is to be sent over the communication system. The first step is to establish the data rate that is going to be
used. Once this is fixed, then the mid-bit time can be determined as ½ of the data rate period. In our
example we are going to use a data rate of 4 kHz. This provides a bit period of 1/f = 1/4000 = 0.00025s or
250 µs. Dividing by two gives us the mid-bit time (which we will label “T”) of 125 µs. Now we use this
to encode a data byte of 0xC5 (11000101b). The easiest method to do this is to use a timer set to expire or
interrupt at the T interval. We also need to set up a method to track which ½ bit period we are currently
sending. Once we do this, we can easily encode the data and output the message signal.
1. Begin with the output signal high.
2. Check if all bits have been sent, If yes, then go to step 7
3. Check the next logical bit to be coded
4. If the bit equals “1”, then call ManchesterOne(T)
5. Else call ManchesterZero(T)
6. Return to step 2
7. Set output signal high and return
Implementation of ManchesterOne(T)
1. Set the output signal low
2. Wait for mid-bit time (T)
3. Set the output signal high

Page 14 of 21
4. Wait for mid-bit time (T)
5. Return
Implementation of ManchesterZero(T)
6. Set the output signal high
7. Wait for mid-bit time (T)
8. Set the output signal low
9. Wait for mid-bit time (T)
10. Return
These easy routines will provide an output at the microcontroller pin that exactly encodes the data into a
Manchester message signal at the desired data rate. The accuracy of the data rate and duty cycle depends
on the accuracy of the clock source and the method used to create the wait times.
Manchester Decoding
Decoding is where most people attempting to work with Manchester have questions. There are several
ways to approach this and each has unique benefits. This section will describe how to implement two
different methods. To start we will look at the steps that are needed for either methodology.
1. The data rate clock must be either known or discovered (we will assume a known value)
2. We must synchronize to the clock (distinguish a bit edge from a mid-bit transition)
3. Process the incoming stream and recover the data using the previous two steps
4. Buffer or store this data for further processing.
This provides the basic outline for how we will perform Manchester decoding. All that remains is to
implement this in software. As mentioned, we have two different options for consideration. One is based
on timing while the other utilizes sampling.

Page 15 of 21
Timing Based Manchester Decode
In this approach we will capture the time between each transition coming from the demodulation circuit.
The Input Capture function on a micro-controller is very useful for this because it will generate an
interrupt, precise time measurements, and allow decision processing based on the elapsed counter value.
1. Set up timer to interrupt on every edge (may require changing edge trigger in the ISR)
2. ISR routine should flag the edge occurred and store count value
3. Start timer, capture first edge and discard this.
4. Capture next edge and check if stored count value equal 2T (T = ½ data rate)
5. Repeat step 4 until count value = 2T (This is now synchronized with the data clock)
6. Read current logic level of the incoming pin and save as current bit value (1 or 0)
7. Capture next edge
a. Compare stored count value with T
b. If value = T
i. Capture next edge and make sure this value also = T (else error)
ii. Next bit = current bit
iii. Return next bit
c. Else if value = 2T
i. Next bit = opposite of current bit
ii. Return next bit
d. Else
i. Return error
8. Store next bit in buffer
9. If desired number of bits are decoded; exit to continue further processing
Page 16 of 21
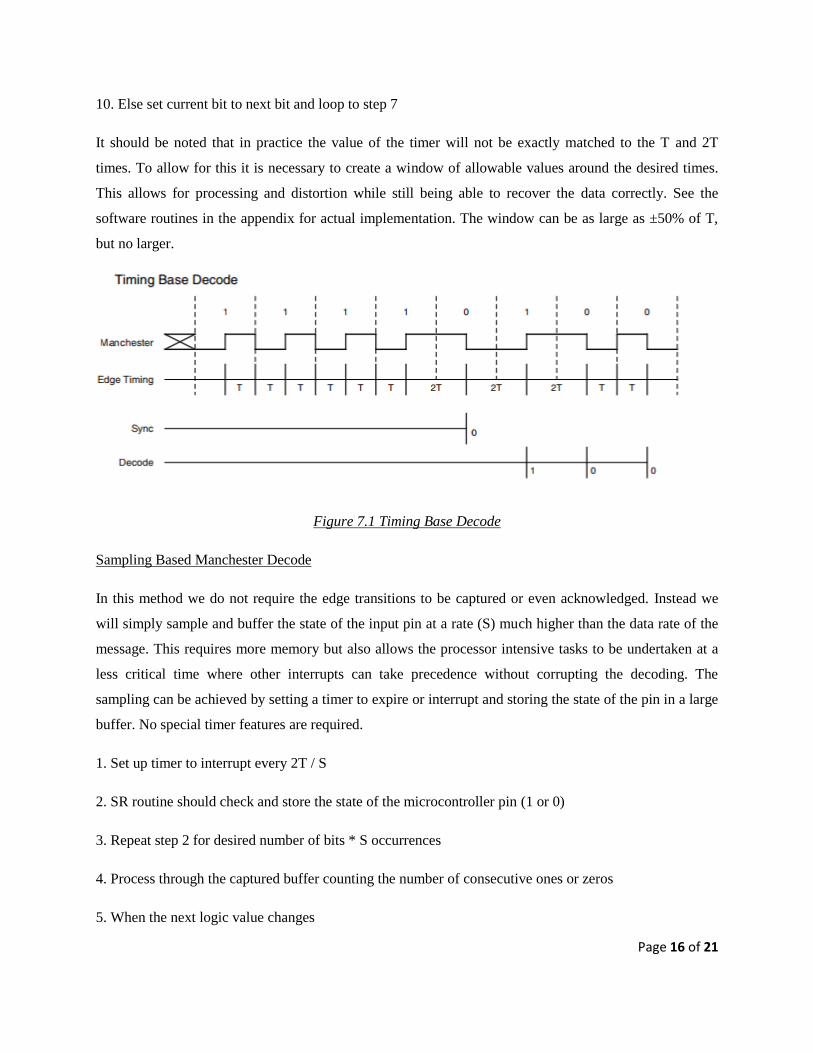
10. Else set current bit to next bit and loop to step 7
It should be noted that in practice the value of the timer will not be exactly matched to the T and 2T
times. To allow for this it is necessary to create a window of allowable values around the desired times.
This allows for processing and distortion while still being able to recover the data correctly. See the
software routines in the appendix for actual implementation. The window can be as large as ±50% of T,
but no larger.
Figure 7.1 Timing Base Decode
Sampling Based Manchester Decode
In this method we do not require the edge transitions to be captured or even acknowledged. Instead we
will simply sample and buffer the state of the input pin at a rate (S) much higher than the data rate of the
message. This requires more memory but also allows the processor intensive tasks to be undertaken at a
less critical time where other interrupts can take precedence without corrupting the decoding. The
sampling can be achieved by setting a timer to expire or interrupt and storing the state of the pin in a large
buffer. No special timer features are required.
1. Set up timer to interrupt every 2T / S
2. SR routine should check and store the state of the microcontroller pin (1 or 0)
3. Repeat step 2 for desired number of bits * S occurrences
4. Process through the captured buffer counting the number of consecutive ones or zeros
5. When the next logic value changes

Page 17 of 21
a. Check if count >= (S/2); Then skip to step 6
b. Else reset count and loop to step 4
6. Set current bit = logic value in buffer currently pointed too
7. Reset count and count to the next logic change
a. Compare count with (S/2)
b. If count < (S/2)
i. Reset and count to next logic change
ii. Make sure count also < (S/2)
iii. Next bit = current bit
iv. Store next bit in data buffer
c. Else if count >= (S/2)
i. Next bit = opposite of current bit
ii. Store next bit in data buffer
d. Else
i. Return error
8. Loop to step 7 until completely through captured data
9. Exit for further data processing
Figure 7.2 Sampling Based Decode
For Checksum all the number of ones are added to a value and that is passed as the tail of the packet.

Page 18 of 21
VIII Circuitry
ARDUINO MEGA-2560 is used as the base of the controller-side circuitry, figure 8.1 shown below. It
communicates with the computer using the usb-serial port. Then to control the robot’s movements, it
sends a word (4-bits) through an encoder, HT12E. This IC encapsules the word and sends it over the RF
spectrum. This circuit also receives data from the robot, but this time directly from the receiver.
Figure 8.1: Pin configuration of the controller circuit
The potentiometer measures the angle between the obstacle and the robot. This help the SONARs to
detect the obstacle’s distance from the robot. The reed switch detects whether the motors are overloaded
or not. These switches are connected to the digital input-output ports. The reading is sent to the computer
through the RF transmitter of the ARDUINO UNO. The potentiometers are connected to the analog
inputs and the SONARs are also connected to the digital input-output ports.

Page 19 of 21
Figure 8.2: Pin configuration of the robot’s Sensor circuit
The PIC16F877A microcontroller takes the 4-bit input from HT12D according to a pre-decided table. For
each combination there are commands. The microcontroller follows the command in order to switch on
the pins. The pins that are switched on are all connected to relays which turn the motor accordingly. The
relays are used to drive the motors to supply 12V to go forward or backward according to the instructions.
The microcontroller will get burnt if 12V is supplied directly to it, since it can work under 5V only. So we
used the microcontroller to drive the relays first, then these relays were used to drive the motors.
Microcontroller turn the motors according to the table (Table 1.1) of commands (4-bits) received from the
HT12D.

Page 20 of 21
B3 B2 B1 B0 Wheel Command Tail Command
0 0 0 0 Nothing Nothing
0 0 0 1 Move Forward Nothing
0 0 1 0 Move Back Nothing
0 0 1 1 Move Left Nothing
0 1 0 0 Move Right Nothing
0 1 0 1 Nothing Move Up
0 1 1 0 Move Forward Move Up
0 1 1 1 Move Back Move Up
1 0 0 0 Move Left Move Up
1 0 0 1 Move Right Move Up
1 0 1 0 Nothing Move Down
1 0 1 1 Move Forward Move Down
1 1 0 0 Move Back Move Down
1 1 0 1 Move Left Move Down
1 1 1 0 Move Right Move Down
1 1 1 1 Circle Nothing
Table 1.1 4-bits command received from HT12D

Page 21 of 21
IX Conclusion
The robot is called stair-climbing robot from the fact that it is designed to cope with stairs, very rough
terrain, and is able to move fast on flat ground. To sum up, the main concern of this paper is to design a
rescue robot that is capable to go into areas unreachable and risky for rescuers to find and help rescue
people. PIC16F877A and an ARDUINO UNO is used in this robot in order to control the direction (right,
left, forward and reverse) using two DC motors in both sides of the robot each and one in the tail. The
microcontroller is the brain of the stair-climbing robot. The overall system worked successfully. The RF
module (transmitter and receiver) is used in order to make the system wireless. Overall benefits of rescue
robots to these operations include reduced personnel necessities, reduced weariness, and access to
unreachable areas.
References
1. http://www.parallax.com/tabid/768/productid/92/default.aspx
2. http://en.wikipedia.org/wiki/Reed_switch
3. http://www.reed-sensor.com/Notes/General_Reed_Switch_Theory.htm
4. http://en.wikipedia.org/wiki/Potentiometer
5. http://www.engineersgarage.com/electronic-components/rf-module-transmitter-receiver
6. http://letslearnelectronics.blogspot.in/2012/07/lets-go-wireless-basic-circuit-for.html
7. https://docs.google.com/viewer?a=v&q=cache:6wQjLd9CrzgJ:thusithamabotuwana.files.wordpre
ss.com/2013/01/principles_and_applications_of_sonar.pdf+&hl=en&pid=bl&srcid=ADGEEShY
a_GWGYNiN0te79lCBG1e0rOc17v0rL0jSFnRQfN0lYXy-
fvcq15k4m6OeQoRXdKFibb1DqZmzWJfEnL7lKQUkzbsN9AB4wyUP_TFrAbOyaSyL8pzR6e
wG7u85GVY3P2mbSCd&sig=AHIEtbTJrEzZYcxJUtbY3zqcDsC0hZbItA
8. http://zone.ni.com/devzone/cda/pub/p/id/1446#toc2
9. www.parallax.com/dl/docs/prod/acc/28015-PING-v1.3.pdf
10. http://www.nesweb.ch/downloads/doc9164.pdf
11. http://letsmakerobots.com/node/12336