digicon bimdrive™ user manual · digicon takes no responsibility nor incurs any liability for any...
TRANSCRIPT

Digicon BIMdrive™
User Manual

2
BIMdrive© software is developed by:
Digicon Information Inc. 12207 – 58 Street NW Edmonton, Alberta, Canada T5W 3X6
Internet Outlet: http://www.spex.ca/
BIMdrive© is distributed in Canada by:
Spex.ca, a marketing alliance between Digicon and Construction Specifications Canada (CSC)
Sales: 800-610-7732 (SPEC)
Support: 800-610-7732 (SPEC)
E-mail: [email protected]
Internet: http://www.spex.ca/
Note:
The content of this document may be changed by Digicon without any preceding notice.
Digicon takes no responsibility nor incurs any liability for any errors occurring in this User Manual, nor for usage of the BIMdrive software. Refer to Digicon’s Licence Agreement.
Initial Release 1.1: July 2011 Release 4.0.0: July 2014
Copyright© 2011-2014. All rights reserved, including World rights and Electronic rights. Canada copyright held by Digicon Information Inc, Edmonton, Alberta. No part of this publication may be reproduced without written permission from the author and publisher (Digicon), nor may any part of this publication be reproduced, stored in a retrieval system, or copied by mechanical photocopying, recording, or other means known or hereafter invented, or by all means and processes known and hereafter invented, without written permission of the author and publisher.

Digicon BIMdrive Page i
Table of Contents Installing the program 3
Computer Minimum Requirements ..................................................................................... 3 Hardware Requirements ........................................................................................ 3 Software Requirements ......................................................................................... 3
Installation of Digicon BIMdrive......................................................................................... 3 Overview ............................................................................................................... 3 Acquiring the Software .......................................................................................... 3 Running the Setup Program ................................................................................... 4 Activating BIMdrive ............................................................................................. 4
Network Installations ........................................................................................................... 5 Installing Network License Manager Service ........................................................ 5 Installing BIMdrive Clients ................................................................................... 5 Configuring Master, Office and Project Specifications ......................................... 5
Configuring Master Specifications and Standards ............................................................... 6 Accessing Master Specs from Cloud Server ......................................................... 6 Accessing Office Master Specs from Local Drive ................................................ 7 Configuring Local Standards Database ................................................................. 7
Starting the program ............................................................................................................ 8 The Future ............................................................................................................................ 8
Next Steps.............................................................................................................. 8 Uninstall............................................................................................................................... 9 Support................................................................................................................................. 9
Introduction 10
Concept | The Digicon BIMdrive Approach ...................................................................... 10 Data Relationships ............................................................................................... 10 Merging BIM Materials and Paragraphs ............................................................. 11
Concept | Digicon BIMdrive as a Working Tool ............................................................... 11 Concept | User Interface..................................................................................................... 12 Concept - Document / Database ........................................................................................ 12 What are BIMdrive Advantages? ....................................................................................... 13
Quick Start 13
Getting to Work ................................................................................................................. 13 Starting a Project................................................................................................................ 14 Copying Sections to the Project ......................................................................................... 14 Editing a Section ................................................................................................................ 15
Inserting a paragraph ........................................................................................... 20 Select from an option........................................................................................... 18 Hide unwanted paragraphs .................................................................................. 15
Set View Settings ............................................................................................................... 15 Selecting Objects to Specify .............................................................................................. 16 Inserting blank options....................................................................................................... 18 Print Preview the Project ................................................................................................... 21 Export to PDF .................................................................................................................... 22
Digicon Information Inc. July 2014 Table of Contents

Digicon BIMdrive Page ii
Reference 22
Welcome Tab ..................................................................................................................... 22 Getting Around .................................................................................................................. 23 View | Options ................................................................................................................... 23
Proofing ............................................................................................................... 25 End of Section ..................................................................................................... 26
Creating a New Project ...................................................................................................... 26 Editing the Project Specification Sections ......................................................................... 28 Paragraph Numbering ........................................................................................................ 32 Text Indenting and Margins ............................................................................................... 34
Default Indent ...................................................................................................... 34 Themes............................................................................................................................... 34 Colour Settings .................................................................................................................. 35 Header Layout and Format ................................................................................................ 36 Footer Layout and Format ................................................................................................. 36
Editing the Footer ................................................................................................ 36 Table of Contents ............................................................................................................... 37 Comparing Sections ........................................................................................................... 37 Copying Sections ............................................................................................................... 37
Copying From All Sections and Office Master Tabs .......................................... 38 Copying using the Copy Toolbar Icon................................................................. 38
Unlocking Sections ............................................................................................................ 38 Importing External Files .................................................................................................... 38
Word DOCX Import ............................................................................................ 39 Specnique Import ................................................................................................ 39 Backup Import ..................................................................................................... 39
Publishing the Project ........................................................................................................ 39 Printing and Exporting the Project ...................................................................... 39 Print Settings ....................................................................................................... 39 Save and Send Options ........................................................................................ 40
Backups ............................................................................................................................. 41 Help ................................................................................................................................... 41
Digicon Information Inc. July 2014 Table of Contents

Installing the program
Computer Minimum Requirements
Hardware Requirements • A Microsoft Windows compatible computer with minimum 1.5 GHz microprocessor • A graphic card compatible with Microsoft Windows, minimum 800 x 600 pixel resolution • Minimum 2 MB internal memory (RAM). • Windows compatible mouse • Minimum 20 MB hard disk space for the software, plus space for specification data.
Software Requirements • Minimum Microsoft Windows XP, Vista, 7, 8 (32-bit and 64-bit supported). • Microsoft .NET 4.0 (installed with BIMdrive) • The installer of the software must have “Administrator” file security rights. BIMdrive users
themselves do not require administrator rights. • File Security:
- Users require read/write access to the software folder and folders where project files will be kept.
- Master specification database files require read access (write security is not required). - Installers: Administrative user rights are required to install BIMdrive software.
Installation{xe "Installation"} of Digicon BIMdrive
Overview Digicon BIMdrive installation involves the following basic steps:
• Acquire the software and the Master Specification databases from Spex.ca, • Run the BIMdrive Setup program (on client computers), • Activate the software, • Install the Master Specifications database files,
Acquiring the Software BIMdrive is provided to subscribers primarily via the Spex.ca internet web site (http://www.spex.ca); When requested, customers may be provided with a CD-ROM{xe "CD-ROM"} (at a nominal cost) for installation of the software.
BIMdrive Installing the program • 3
Users may download from their subscription accounts, or may download the BIMdrive Demo (the licensed version is the same as the demo which has been activated). The BIMdrive Demo provides complete functionality, with the following exceptions:
• The Demo includes only BrandedSPEC sections; CMS must be purchased with the licensed version of the software,
• Printing a project will include a 'BIMdrive Demo' watermark,
• Only 5 sections may be added to a project.
In all other ways, BIMdrive is fully functional – it works exactly as the licensed version of the software.
Once the software has been downloaded (or the CD-ROM is inserted into the CD-ROM drive), you run the setup routine.
Running the Setup Program Digicon BIMdrive must be installed at each workstation. In a network environment, BIMdrive allows simultaneous clients to access a single project file, and clients may share Master Specification and Office Master database files.
• Log on to the client computer as administrator or user with administrator privileges. • Browse your download folder (where the BIMdrive software was downloaded), or browse the
CD-ROM drive (when a CD-ROM is provided) for the “BIMdrive Setup” software and double-click the program icon.
o NOTE: Some versions of BIMdrive installer include two files; setup.exe and installerbimdrive.msi. It is CRITICAL that users run the ‘Setup.exe’ file, in order to check for and install minimum required software components.
• The Setup program will then prompt you through the installation.
The software will be installed and the following subfolders will be created:
"\BIMdrive\” (by default, this is the “C:\Program Files\BIMdrive” folder)
Once installed, proceed to the section Activating BIMdrive.
Activating BIMdrive When running BIMdrive for the first time, a window will appear requesting Activation. To continue in Demo mode, simply skip the Activation step (Demo versions allow 15 executions or 15 days). To activate BIMdrive:
• Click the Activate button,
• Next to the window labelled “Hardware Key”, click the “Copy to Clipboard” button.
• Open an e-mail message, and paste the clipboard contents into the message (Control-V, or Edit|Paste). Email the code to Digicon at [email protected].
• When an activation code is received, click the Enter Product Key button, and paste the activation code into the window. Click “Validate”.
• NETWORK VERSION: Network versions of BIMdrive also require the network server location. Click “Enter Network Server Location” button, and add the server IP address (or computer name) and port number (default port is “1313”).
BIMdrive Installing the program • 4

Network Installations BIMdrive is multi-user software; users may share Master Specification Office Master and project database files.
Installing Network License Manager Service The following steps will enable IT managers to install BIMdrive license manager software onto a corporate network. This software runs as a service, distributing licenses to any clients that are able to communicate with the server.
- Create a folder on the server to hold the License Server software - Download the “Hardware Key Generator” from the Spex.ca web site. Unzip and copy the
program to the new folder. - Execute the hardware key generator EXE program (use ‘RunAsAdministrator’ mode) from the
server. Capture the hardware key, and paste it into an e-mail addressed to [email protected]. - Spex.ca will e-mail deliver a ZIP archive containing the License Server software; copy these files
to the new folder. - Test the server by executing the LicenseserverApp.exe program (using RunAsAdministrator). If
successful, you will see a window that says “Listening on: http://*:1313”. Close this window and install the service next.
- Open a Command Line window in RunAsAdministrator mode. - Type: LicenseServiceApp.exe action=install - Then start the service by typing: LicenseServiceApp.exe action=start
After this procedure, the license server should be running. Proceed to Installing BIMdrive Clients.
The network license manager software can be stopped in from the Services app, or by typing in the command line window: LicenseServiceApp.exe action=stop. To uninstall, type: LicenseServiceApp.exe action=uninstall.
Installing BIMdrive Clients Install BIMdrive as instructed in “Installation of BIMdrive”.
In order to activate BIMdrive, Spex.ca will send an activation code (Product Key) which is paired to the network license server software. When the client is activated, you will require two steps:
- From the Licensing window, Click “Enter Network Server Location” button, and enter the server IP and port number (default port is 1313).
- Click “Enter Product key” button, and paste the activation code received from Spex.ca. click “Validate” to complete the process.
- If the window does not disappear (signalling successful activation), there may be a problem with communication over the default port between the client and the server.
Configuring Master, Office and Project Specifications To configure BIMdrive to share a Master Specification or Office Master folder over a local area network (LAN), network administrators should perform the following procedure:
• Create a “master specification” folder on the server, and provide read-only file security access to the BIMdrive users. Copy the master specification database files to this folder.
• Office Master databases require read/write access to users authorized to create or update the Office Master.
BIMdrive Installing the program • 5

• Go to each client, and install BIMdrive using the installation program and activation instructions from step 1 above.
• At each client, run BIMdrive. In the “View Settings” menu, select “Master Specification” or "Office Master Specification" and change these values to reflect the shared database folder in the previous step.
Configuring Master Specifications and Standards Once installed, each client computer must be configured to access master specifications. Master specifications can be accessed from a cloud server or a local (or network) drive. These specifications are made available to BIMdrive users via the “All Sections” and “Office Master” tabs. Configure these tabs as follows.
Accessing Master Specs from Cloud Server By default, the following master specifications are available to subscribers over the internet from a cloud server.
• brandedSPEC Sections (free to everyone; available with Demo) • Canadian Master Specification (CMS) (available by subscription) • National Master Specification (NMS) (available by subscription)
To configure BIMdrive to access these databases, perform the following:
• Select the ‘File | Options’ menu (or select View Settings tab in the Welcome tab)
BIMdrive Installing the program • 6

• At the Master Specification Database Location textbox; select “Digicon Server” as the type, and click the ‘Change’ button.
• Click “Change Login” button to enter your login and password (provided by Spex.ca with your BIMdrive purchase).
• When you click OK, you should see a list of accessible specifications (typically brandedSPEC and “Digicon CMS Master” or “Digicon NMS Master”. Select one, and click OK.
When the “All Sections” tab is selected, you will see the sections available from the cloud server.
Accessing Office Master Specs from Local Drive To configure BIMdrive to access your Office Master specifications:
- Select the ‘File | Options’ menu (or select View Settings tab in the Welcome tab) - At the Office Master Database Location texbox, select “File” as the type, and click the ‘Change’
button. - Browse to the folder where your office master database is stored, and click on the BDB database
file you wish to use. Click OK to complete the process.
Configuring Local Standards Database BIMdrive automatically uses standards issued with its commercial master specifications. When BIMdrive sections are downloaded and used, the latest standards citations are included. However, when users modify the standards, the modifications are stored locally. This step configures BIMdrive to store the local Standards database in a known location.
To configure the local Standards Database Location, click File | Options (or select View Settings tab in the Welcome tab), and use the “New” or “Change” buttons to create a new standards database, or to change the location of an existing database.
BIMdrive Installing the program • 7

Use the “Update” button to automatically compare local standards to Digicon’s database. Conflicts will be displayed, and users will be allowed to accept or reject changes.
Starting the program Starting from the Taskbar / Start Menu
• Click Start | Programs. • Select BIMdrive from the Digicon BIMdrive group.
Starting from Shortcut{xe "shortcut"}
• A Shortcut is created on the Desktop during setup. • Double- click on the Shortcut to start.
The Future
Next Steps BIMdrive's first published version is designed to be a giant leap forward, with the integration of meta-data (knowledge) into CMS text, and exposing that knowledge to serve the specifier users of the software.
Over the next few years, BIMdrive is planned to evolve into a comprehensive building process and materials knowledge centre. Future expansion plans include integration with BIM applications including CAD files, parametric knowledge checking (checking for missing, inappropriate or duplicate
BIMdrive Installing the program • 8

requirements), management of products and product manufacturers, detailed project management reports, and much more.
Uninstall To remove BIMdrive client software from your computer:
• Open the Windows Control Panel. • Select Add / Remove Programs (Windows XP) or Programs and Features (Vista/Windows
7/Windows 8). • Select BIMdrive in the list of programs • Select Uninstall • Follow prompts.
To uninstall the Network Server License Service, refer to Installing Network License Manager Service.
Support Digicon{xe "Digicon "} provides telephone support to current subscribers, through the Spex.ca storefront. Contact us by phone, e-mail or mailed letter.
Digicon Information Inc. 12207- 58 Street NW Edmonton, AB T5W 3X6
Tel: 800-610-7732 Fax: 855-495-9052 E-mail [email protected] Internet http://www.spex.ca/
BIMdrive Installing the program • 9

Introduction
Concept | The Digicon BIMdrive Approach Welcome to the first and finest Canadian-made specification software for building information models (BIM). This section of the BIMdrive User Manual is intended to communicate some of the unique intricacies of BIMdrive to you, in order to maximize your experience with the software.
Although BIMdrive offers basic text editing functionality, it is not 'just another' text editor software. BIMdrive has been constructed to:
• Allow users to identify and specify the types of products and their properties, using a BIM-like interface,
• Enable the software to check and validate some actions of the users, in order to warn of potential conflicting or omitted requirements within the specification,
• Greatly improve the speed and accuracy of the specification preparation process, • Prepare project management reports that are capable of being generated from data contained
in the specification.
BIMdrive can be said to be BIM software, but it is not a 3-dimensional (3D) computer aided drafting (CAD) program; a common misconception in the construction industry. BIM drafting software programs specialize in quantification of virtual models; that is, they identify the presence of building elements, their components, and in particular their geometry and geospatial position.
BIMdrive specializes in the identification of building material 'types' required for a project, and identifies the 'required' properties of those types to a level of detail normally expected at the design documentation phase. BIMdrive is intended to communicate directly with 3D CAD software, in order to enable the model objects to pre-assemble a project specification in a semi-automated way.
Specifiers who use BIMdrive must begin to visualize the project in a BIM context. Building elements are virtual 'objects' that must be specified, and those objects are specified by identifying and quantifying the relevant properties of those objects. Some examples are simple:
An object: Steel Door
A property: Thickness
A value: 37 mm
In this example, we have specified a Steel Door whose thickness is 37 mm.
Data Relationships Most specifiers understand that an indented paragraph in a specification commonly identifies some property of the object that is described in the parent paragraph. Traditionally, we commonly specify properties about an object in a given subparagraph without making a specific reference to the object it applies to; its parent object. We refer to this concept as an 'implied' relationship; that is, indenting a paragraph implies that the text is only intended to apply to the object being described in the parent
BIMdrive Introduction • 10

paragraph. Since BIMdrive understands what kind of data exists in its text, it can warn users who attempt to violate this concept by in-denting or out-denting paragraph levels.
Specialization Relationships BIMdrive can also model relationships between objects. One example of this concept is the 'specialization' relationship (that an object is a more special, or specific, version of another). The objects in a specialized relationship are normally expressed as parent and child. An example of specialization includes:
Parent: Door
Child: Steel Door
In BIMdrive, objects which have parents "inherit" the properties of the parent (since it is a more specific type, it follows that all properties which are attached to door are assumed to apply to steel doors). For example, if all Doors are specified to be 750 mm wide, then it follows that Steel Doors are also required to be 750 mm wide.
Component Relationships Extending this theory a bit more, objects which are assembled to form a complex object can be said to be Components of the complex object. In our Steel Door example, the door handle and hinges are objects with specification requirements, and they may be considered Components of the Steel Door. Another indication of the Component is that it is never required on its own; it is only required when the parent exists.
This relationship is important to specifiers because if you remove the Steel Door, the specification for its components should also be removed. Because BIMdrive stores this knowledge, users can be warned when potential 'omissions' such as this may arise during the specification editing process.
Showing Relationships Most relationships in BIMdrive can be communicated to readers of the specification through the use of hierarchical paragraph levels. That is, for an object being described in a given paragraph, all sub-paragraphs will contain text which describes properties or components of that object.
You may also realize that some objects may have components or properties that are not displayed by indented subparagraphs. BIMdrive is also able to model these relationships. If a given property applies to two or more objects, BIMdrive keeps track of them and will never offer to delete a property unless no other objects have references to it. This concept is referred to as 'referential integrity' (the integrity of the references between data in the specification).
Merging BIM Materials and Paragraphs BIMdrive's specialty is blending these two worlds, enabling users to interface with the project using materials and material hierarchies, or by editing the paragraph text, at the user's discretion. Future editions of BIMdrive will enable the BIM model to automate or semi-automate the identification of material requirements, negating the need for the user to do it.
Concept | Digicon BIMdrive as a Working Tool The goal of BIMdrive is to provide users with the capability to:
• produce construction documents with professional quality technically and aesthetically, using a single page layout to suit the project and the company profile,
BIMdrive Introduction • 11

• provide the ability to visually construct documents and offer an overview of the entire specification at a glance,
• be suitable for projects of any size and type, using database text from SPEX.CA CMS or any of Digicon’s BIMdrive prepared master specifications databases (or specially BIMdrive customized office master databases),
• handle stressful, fast-track situations where several users are working together near the project deadline,
• work with the specifications through the various project stages from concept to bid documents and beyond (including specification revisions and addenda),
• utilize the speed and flexibility advantages offered by database information storage, while providing the ease and familiarity of a word processing interface,
• adapt to the dynamic conditions of the construction process.
BIMdrive has also been designed to edit multi-lingual specifications, using the National Master Specification (NMS) as a basis. In BIMdrive, you can ‘toggle’ between the English and French versions of a project specification. We are able to offer this functionality because paragraphs in NMS are “paired” (for every English description, there is a French description). This feature should be invaluable to users who must provide specifications in both languages.
These have been the primary goals in the development of the BIMdrive program. Some features we’ve built into BIMdrive to achieve them include:
• common commands are available from the same window, and have a shortcut on the keyboard, context-sensitive menu (right mouse click) or a button on the toolbar,
• all MS Window’s fonts are available for use; company and project information can be inserted into headers and footers if desired,
• the ability to build a specification by point-and-click on the subjects you want to specify, • data storage based on a professional and time-tested database ({xe "database"} engine using
Microsoft SQL Server CE, or Microsoft Access) format. Databases store and display large amounts of data quickly and reliably.
• The ability to check and report on cross-references between project sections.
Concept | User Interface The primary goal for designing the user interface in Digicon BIMdrive is:
• easy to learn and get started, especially with previous experience in Microsoft Windows {xe "Windows"} and its most common programs (Windows {xe "Explorer"}, Explorer, Microsoft Word{xe "Word"}, WordPerfect{xe "WordPerfect"}, etc.),
• fast and effective to use, yet very powerful, • visual control and overview (avoiding complex commands to remember).
With these goals in mind, BIMdrive has been designed with a "MS Office 2010" look and feel.
Digicon BIMdrive utilizes these principles to such an extent that it will still be considered modern even after years of use.
Concept - Document / Database A specification document is stored as one file with extension .bdb.{xe "bdb"} - (BDB = BIMdrive Data Base). Whereas most users associate the term “document” with Word or Excel, a BIMdrive document is actually a database file.
BIMdrive Introduction • 12

Why is a Database format desirable? • Multiple access by users, • Speed of editing and section navigation (manipulating large portions of the whole
specification), • User-interface enhancements (such as drop-down option lists), • Linking and link integrity (cross-referencing within a specification), • Text is always saved automatically. • Building Models (BIM) uses a database to store project data; BIMdrive was built to interface
with BIM databases.
Storing specification text in a database allows us to intelligently link related text together, and link text to the materials and properties that they describe so that they can be associated with BIM elements. This concept allows us to provide links between Section references and the Section text, to allow users to globally toggle between Inch-Pound or Metric units of measurement, and to produce detailed and accurate project management reports which would not be possible using word processing files.
What else is significant? It means there is no need to save your document when you exit the program; each Section is saved automatically whenever you close it. BIMdrive also contains a configurable automated save feature.
What are BIMdrive Advantages? Digicon BIMdrive is a totally new concept for developing specification bid documents – including the potential for direct linking to a BIM database of 3D drawings. BIMdrive is compatible with all of Digicon’s master specification documents, and several new enhancements are already under development.
Professional tools must be easy to use The concept of writing directly onto a sheet of paper has been very well received, as well as adherence to user interface standards working with Microsoft Word, Windows Explorer etc. We have kept this goal in mind, and improved it to be even more visual in BIMdrive. There are context-sensitive menus available using the right mouse button. In addition, many specification sections can be open at the same time, allowing editors to coordinate their work across many sections at once.
Quick Start
Getting to Work This reference guide was developed to allow specification writers to begin using BIMdrive as soon as possible. These few steps will get you started on the recommended procedure for creating and editing a project specification using BIMdrive.
Please complete the steps for Installing BIMdrive before starting this section.
BIMdrive Quick Start • 13

Starting a Project Your First BIMdrive Project
Select the “Create a new project” icon to get started (or select File | New | New Project from the menu).
Enter a project file name and establish the project save location.
The project name will now appear at the top of the window title bar. The “Project Sections” tab will appear empty, but not for long. Let’s add sections to our new project from our Master Specification database.
Copying Sections to the Project Demo copies of BIMdrive will have access to brandedSPEC sections (sections created for manufacturers); CMS or NMS subscribers may have access to those sections. This quick start process will assume we’re going to copy a brandedSPEC section to our new project.
Open the ‘All Sections’ window by moving the mouse over the All Sections tab on the left side. If you can’t find this tab, you can also open the All Sections window by selecting “View | All Sections” from the toolbars.
BIMdrive Quick Start • 14

Select a section from the list of BrandedSPEC sections available, and click the “Go” button to add the section to our sample project. Now you can close the All Sections window (click the pin icon).
To open the section, select the “Project Sections” tab, where you should find the newly copied section. Select the section 07 72 24 – Sloped Roof Vents and click “Edit” button to open it.
Set and Select View Settings Now that our section is open, we can review the ‘View’ settings.
Show/Hide Specifier Notes Master specs published by Spex.ca all include ‘specifier notes’ (shown in blue non-numbered paragraphs). These can be globally hidden or shown using the View | Show SpecNotes function.
Show/Hide Hidden Paragraphs As we edit in BIMdrive, paragraphs which are deemed inapplicable will be ‘hidden” from view. This is a departure from Word, and the benefit is that they can always be added back in. Users can choose to see these hidden paragraphs, or not, using the Show Hidden Paragraphs button.
For demonstration purposes, please select “Show Hidden Paragraphs”, so that you can see how BIMdrive works.
Display Metric BrandedSPEC sections, as well as CMS sections, have both inch-pound and metric units of measure. The Display Metric view setting enables or disables metric units (this has no effect on NMS sections, which are only published in metric).
BIMdrive Quick Start • 15

Editing a Section
Selecting Objects to Specify We recommend starting the editing process by reviewing and selecting checkbox items from the “Objects” list.
To see how this works, de-select “Retrofit Roof Vent” from the list of Types. Notice how the paragraph 1.1.2 has been ‘hidden’ and the other paragraphs renumber. If you scroll down, you will find other paragraphs related to Retrofit Roof Vents in Part 2 and Part 3 that have been hidden.
Go ahead and experiment by selecting Types, Components and Properties as you might for a project.
Notice that some names have sub-properties (click on the arrow to open/expand to reveal more checkboxes). In those cases, the sub-properties refer to text that only applies to its parent object.
Over-riding Hidden Paragraphs As we saw from the last step, selecting checkboxes in the Objects list will pre-edit the section. If you review the section and find that you disagree with a change (a paragraph was hidden that should be activated), you can over-ride BIMdrive’s setting using the checkboxes adjacent to the paragraphs.
BIMdrive Quick Start • 16

On the right side of the window, re-select the checkbox next to the hidden paragraph created from the last step.
The first thing you’ll notice is that the paragraph is now ‘active’ (not hidden). In addition, the Objects list item for Retrofit Roof Vent is coloured in. This means that a sub-property of the Type “Retrofit Roof Vent” has been turned on by the user, and BIMdrive forces the selection of the parent object. If you expand the Retrofit Roof Vent (as shown above), you will see that the property “Section Includes” has been turned on, but all of the other properties are off.
This situation does not reflect reality; instead, it might have been more appropriate to include Retrofit Roof Vents, but exclude the paragraph for Section Includes (for people who prefer not to include such statements in their specification).
BIMdrive Quick Start • 17

Select from an option As you look at the editing window on the right hand side, you may notice purple coloured text; these are ‘optional’ text, from which you can select one or more options. In this section, select the ‘asphalt shingle’ text in paragraph 1.1.1.
Notice that metal roofing is another option to include; you can select one, the other, or both. If both are selected, BIMdrive automatically inserts “and” between them. This feature can be edited, to prevent multiple values, or to separate them using ‘or’ rather than ‘and’; to see this, refer to the section of this manual #Modify Options.
BIMdrive Quick Start • 18
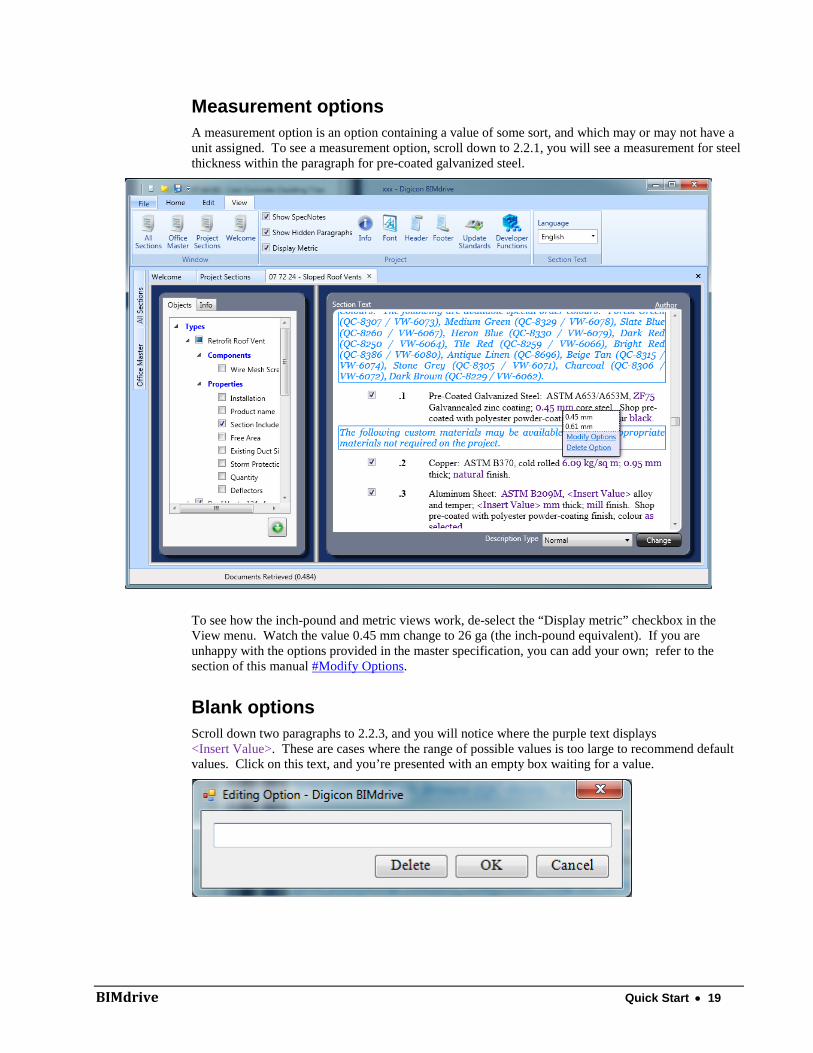
Measurement options A measurement option is an option containing a value of some sort, and which may or may not have a unit assigned. To see a measurement option, scroll down to 2.2.1, you will see a measurement for steel thickness within the paragraph for pre-coated galvanized steel.
To see how the inch-pound and metric views work, de-select the “Display metric” checkbox in the View menu. Watch the value 0.45 mm change to 26 ga (the inch-pound equivalent). If you are unhappy with the options provided in the master specification, you can add your own; refer to the section of this manual #Modify Options.
Blank options Scroll down two paragraphs to 2.2.3, and you will notice where the purple text displays <Insert Value>. These are cases where the range of possible values is too large to recommend default values. Click on this text, and you’re presented with an empty box waiting for a value.
BIMdrive Quick Start • 19

Custom editing By now, you may be asking yourself, “What if I want to add my own clause?” BIMdrive is fully editable. The right-side window may be edited very much like Word. You can edit the text that is already there, or add new paragraphs as you feel necessary.
Inserting a paragraph To insert a new paragraph, simply press Enter key in the preceding paragraph before your new paragraph; a new numbered paragraph is created at the same level as the preceding one. If the new paragraph is intended to be a sub-paragraph to the previous one, you can demote the paragraph by putting the cursor at the start and pressing Tab key (or use the Increase button on the Edit toolbar). The number will change to match it’s level in the numbering list.
Insert a page break You can insert a page break, or other types of paragraphs by right-clicking an existing paragraph and selecting “Insert paragraph above” or “Insert paragraph below”. This will present the user with an optional window with the following options:
Select “Page Break” and a page break code will be inserted; forcing a page break to occur at print time.
Note that you can insert other paragraph types using this process, such as your own SpecNotes and new Article titles.
BIMdrive Quick Start • 20

Editing the header BIMdrive projects have a single, common header. To edit the header, select Header from the View ribbon. The header window works like a table; you specify rows and columns, and fill in the cells with section or project information. Section information is indicated using the ‘variables’ indicated.
For this demo, specify 3 rows and 2 columns; this corresponds to the CSC/CSI PageFormat standard. The resulting window should look like this:
Click the “Apply” button and proceed to the next step, to see how the header looks in a Print Preview.
Print Preview the Project After you’re done editing the section, you may wish to ‘preview’ the final product.
BIMdrive Quick Start • 21

Export to PDF
Reference
Welcome Tab
The welcome screen has been created with the user experience in mind. From here you can quickly access most of the basic editing functions.
The Welcome tab is where you can perform common functions; reset program settings, open existing projects, or create new projects. These functions are also available from the 'File' menu.
The Project Sections tab is where sections may be browsed in a project (this tab is empty when no project is loaded).
The Master Specification is available from the dockable tab labeled "All Sections", and the Office Master database is available from the "Office Master" tab. These tabs are "fly-out" tabs that appear when the mouse is hovered over. By default, they appear on the left side of the BIMdrive interface, but they can be dragged to the top, right, bottom, or undocked (floating) by using the mouse to drag them into position. The following screenshot shows the master specifications window in 'floating' on top of BIMdrive.
BIMdrive Reference • 22

Getting Around BIMdrive has been designed to enable users to effectively manage the many tabs and windows that may be required to do the job; a Welcome tab with icons for commonly-used functions, a Project Sections tab to list the sections included in your project, a Master Specifications tab to display the master specification (and office master specifications).
All of the tabs and windows used by BIMdrive may be moved, shown, or hidden. If you find a tab that you need is hidden, click the appropriate toolbar icons in the View menu to display it.
If you wish to move any windows or tabs, just grab and drag the tab with your mouse. Tabs and windows may be dragged to the left, top, bottom, right, or left in a floating position (on top of the primary BIMdrive window). Alternatively, the master specification tabs may be added to BIMdrive's primary tabbed interface.
View | Options The “BIMdrive Options” dialogue box allows users to specify the location of master specification databases, and other software preferences.
The “BIMdrive Options” dialog box can also be accessed by selecting the View Settings icon at the Welcome screen or navigating to Options in the File menu.
BIMdrive Reference • 23

General The default left menu selection is “General”.
Database Locations Input the folder location where the BIMdrive Master Specification Database is stored, and if referencing the Digicon Server, indicate the database name.
If you wish to maintain an Office Master, indicate the location in the Office Master Database Location field. If you do not have an Office Master database you can create a new one by clicking the New button. When you click "New", you may select from two file types:
Office masters may be stored as Microsoft Access and Sql Server Compact (SQLCE) database file types. SQLCE is the default and preferred format; use Access when the office master will be stored on a network drive where read/write access is NOT available to the user.
*NOTE* If BIMdrive does not have complete access to the folder, read/writes to the database will fail. If you are unsure please contact your network administrator.
Users can hold multiple Master Specification databases and Office Master databases in the same folder, but the program may only access one of each during any given session. Opening an office master section, and then changing where the office master is pointing to in the program may produce undesired results.
BIMdrive Reference • 24

Proofing Place a checkmark in the box to use the automatic spell check feature.
BIMdrive Reference • 25

End of Section These options allow a level of automated customization most specification writers have not had in the past. Font, background colour and various options for text justification are available.
Creating a New Project Select the “Create a new project” icon to get started (or select File | New | New Project from the menu).
Enter a project file name and establish the project save location.
The project name will now appear at the top of the window title bar. The “Project Sections” tab will appear empty, but not for long. Let’s add sections to our new project from our Master Specification database.
BIMdrive Reference • 26

Adding Sections from a Master Specification Select “View” from the top menu, then “All Sections”. The “All Sections” tab will appear and present your Master Specification in a tree view of available MasterFormat Divisions. Click “ ” to expand any Division to view available sections within each Division.
Once the desired sections have been selected, select “Add to Project” list item and click the “Go” button. Sections will be copied from the All Sections master into the project.
These procedures can also be done to copy sections from an Office Master specification, but selecting the “Office Master” database in the View menu, or from the side fly-out tab.
Check off sections required to compile the complete project… Sections may be added and deleted at any time during preparation of the project.
BIMdrive Reference • 27

Editing the Project Specification Sections Section Viewing and Editing The project list of sections can be viewed when fully expanded. Select a section by checking the box. Users may preview the section in its current form, and as it will be printed, by selecting the “View” button. By selecting the “Edit” button, the section editing window appears.
Manipulating the Objects The selected section, or multiple sections if more than one is checked, will open in new tab(s). Each section tab is divided into two panes, the “Objects” pane and the “Section Text” pane. The "Section Text" pane operates most similarly to Word and offers the User a variety of ways to editing the text to suit the project parameters. In the captured image below, the “Objects" pane identifies the various Types, Components, and Properties of the elements contained in the specification section. Expanding the options will reveal the tree view for various criteria.
NOTE: The “Show Hidden Paragraphs” check box (located in the “View” menu). You can select this option to help you visualize how manipulating the elements in the Objects pane influences the specification text.
Check the box to activate the section for either “View”, “Edit”, “Delete” or “Add to Office Master” options.
BIMdrive Reference • 28

Let’s assume that the project design parameters require the provision of Submission procedures. This product is now inactive in the section. In the “Objects” pane, the check box adjacent to the Closeout submittals is not selected, and as such, all the text associated with Submission procedures in the “Section Text” pane is struck out.
New tabs
Not selected
BIMdrive Reference • 29

Check the box to activate this element within the specification text. Notice the text associated with Closeout Submittals is now active within the section text.
Selecting Options Scrolling through the Section Text pane, you may notice various places where there is a selection of one or more ‘optional’ text; these options are highlighted as purple text. Clicking on these options reveals one or more optional numerical or text values to choose from. Choosing two or more options is possible in some cases, and those values are automatically separated by an 'and' or 'or' statement. Users can also choose to delete the option altogether (NOTE: You cannot undo a delete option, but you can create a new option in its place.)
BIMdrive Reference • 30

There are examples of blank options; these are designated as “<Insert Value>”. When you click on these options, BIMdrive will display a blank window ready for you to type in a value. These types of options appear when the variety of values is too wide to limit in a short list.
Modify Options Users can modify how options react by using the Modify Option menu; you can control whether 2 or more options are allowed, if they should be separated by 'and' or 'or', and if the option is a measurement value with units, you may create or modify the units.
Section editing is complete when all the project design parameters identified by this section have been established. The same approach to editing each of the project’s sections is required, until a complete project specification is realized.
Modify/Delete options
BIMdrive Reference • 31

Paragraph Numbering Paragraph numbering in BIMdrive is automated, much like the Word documents published by Digicon. The numbering style is configurable using the Multilevel List menu.
First, select the style to modify from the drop-down list, then adjust the font formatting options. You can always reset the formatting to the original preferred Digicon defaults by using the 'Reset' button. It is not necessary to apply each style one at a time; you can change multiple headings and click OK when finished.
The List Library toolbar button and menu allow users to choose one of the defaults, or define a custom Multilevel List style.
When the “Define New Multilevel List” menu is opened, the number style, font, and alignment can all be adjusted.
BIMdrive Reference • 32

BIMdrive Reference • 33

From here, we can change the font and styling of any level of paragraph. First, select the style to modify from the drop-down list, then adjust the font formatting options. You can always reset the formatting to the original preferred Digicon defaults by using the 'Reset' button. It is not necessary to apply each style one at a time; you can change multiple headings and click OK when finished.
Text Indenting and Margins
Default Indents Text in BIMdrive defaults to standard settings recommended by the CSC/CSI PageFormat standard. Generally, Part and Article titles begin at the left margin, and successive paragraphs are indented in 0.5 inch increments. While it is best to use the “Multilevel List” function described earlier to control indenting, these commands can be used to ‘promote’ or ‘demote’ paragraphs to different levels. There are a variety of toolbar icons in the Edit menu for changing indents:
Edit | Decrease Clicking the ‘Decrease’ icon decreases (or promotes) the selected paragraph. A level 2 paragraph will be promoted to a level 1 paragraph. A level 1 paragraph would be promoted to an Article heading (in this case, the user is warned). Decreasing an article title has no effect.
Edit | Increase Clicking the ‘Increase’ icon increases (demotes) the selected paragraph. Warnings are issued if you attempt to demote an Article title or Part title. Instead, Part and Article titles should always be created or deleted independently.
Edit | Decrease All Clicking the Decrease All button will decrease all paragraphs at the selected level. By itself, this button should always be used descrease sub-paragraphs as well.
Edit | Increase All Clicking the Decrease All button will decrease all paragraphs at the selected level. BEWARE, this control does not automatically increase sub-paragraphs; the result is that sub-paragraphs will carry the same level as the increased paragraphs.
Themes BIMdrive uses “skins” to control the overall look and feel of its Windows. The Theme toolbar menu is located on the Home tab. The default is “Office Blue”, but you can select any of the other options to suit your preference. Changes to the theme are reflected in the program instantly.
BIMdrive Reference • 34

Colour Settings This toolbar button, located in the Home tab, controls the colour of the non-enforceable text (that is, SpecNotes), and allows for users to establish user-defined “colours” that can be applied to normal BIMdrive paragraphs for a particular purpose. Colour Settings does NOT influence font colours; only foreground, background and border colours.
The image below shows default colours for Normal, Advisory (Spec Note) and Environmental Spec Notes. These can be modified to suit your preference.
Custom 1 through Custom 5 exist so that users may ‘tag’ or identify using designated colours for a specific purpose. The Custom # names may also be renamed accordingly.
Example: To designate paragraphs that require review by a sub-consultant, simply name one of the Custom tabs “Acoustic Review”. Apply the colour to paragraphs in the project (using the Description Type menu at the bottom of any Section tab). The sub-consultant could then be instructed to review the designated paragraphs.
BIMdrive Reference • 35

Header Layout and Format Editing the Header BIMdrive allows Users substantial header/footer manipulation and propagates the project header/footer to all sections in the project. Headers and footers are constructed and formatted as if they are in tables (that is, they have rows and columns).
To create a new header, select ‘Header’ toolbar button from the View ribbon. Headers are formatted like tables; where indicated, select at least 1 row and 1 column (most CSC or CSI formatted headers will require 2 columns and 3 rows; NMS formatted headers use 3 columns and 3 or 4 rows).
Once the header ‘grid’ is created, type text into the grid as you wish to see the text inside the header. For section number and title (which changes for each section), use the variables SECTION# and SECTIONNAME. To display the current page number, use the variable PAGE#. You can format these settings using the font toolbar buttons across the top.
Footer Layout and Format
Editing the Footer BIMdrive allows ‘optional’ footers to be configured for the project. Typically, footers contain copyright notices, page numbers, or any other text. Configuring the footer is exactly the same as the header; refer to Editing the Header.
Use these “text codes” in the header/footer to have BIMdrive add variable data
The header/footer can be modified to use CSC or NMS formatting conventions
BIMdrive Reference • 36

Table of Contents In BIMdrive, the Table of Contents is a 'live' document that continually changes as the project sections change. Rather than a static document, the Table of Contents is a special document that is always generated at 'publication' time (when the project is printed or exported).
To view the Table of Contents at any point in time, click the "Print" menu, and display a print preview.
Comparing Sections When published master specifications are updated, users may wish to compare their projects – or more appropriately, their Office Master databases with the new
This image shows that the section on the left includes a paragraph that does not appear in the section on the right. (Note the paragraph colour, and the change descriptions on the bottom left corner of the window). You would select ‘Update Left Document’ if you chose not to keep the paragraph, or “Update Right Document” if you wish the new paragraph to be added. Note that you cannot update a ‘Master’ spec; you can only update project sections and Office Master sections.
Copying Sections Sections may be copied in a variety of ways:
• Between master/office master and project, • Between projects, and • Between the Digicon cloud server and local database files.
You can copy sections by one of two methods: By browsing the All Sections or Office Master tabs, and using the “Add to Project” function, or by using the ‘Copy’ button on the Home toolbar ribbon.
BIMdrive Reference • 37

Copying From All Sections and Office Master Tabs Normally, users copy sections into their projects individually or in batches. To do this:
• Select the tab containing the database you wish to copy FROM • Select checkboxes next to the sections (or Divisions) you wish to copy to your project, • Select “Add to Project” from the listbox at the bottom of the tab, and click the Go button to
execute the copy command.
If copying from the All Sections tab, you also have the ability to select “Add to Office master”, if you wish to copy a section directly from the All Sections master to your office master.
If the All Sections or Office Master tabs do not show the master database you want, you change the database that is loaded using the “Database Location” instructions in the File | Options window.
Copying using the Copy Toolbar Icon By selecting “Copy” icon from the Home ribbon will display the following window, which will enable sections from the left (source) database to the right (target) database. Each side may be designated as a local database (a file on your computer or network), or remote database (a Digicon cloud server). In the following example, a section is being copied from the CMS Master database on the cloud server to a local Sample Project database.
Unlocking Sections When BIMdrive opens a section in a database, the section is ‘locked’ to prevent other users from making simultaneous changes to the same text. If an unanticipated event such as a power outage were to occur, and BIMdrive closes before it is able to release the section being edited, users may find that the section they had open has been “locked” when they open the project database.
To gain access to the locked section, click the “Unlock” icon in the Home tab, select the section you wish unlocked and enter the password “yias” (yes, I am sure).
Importing External Files BIMdrive can import the following file types:
BIMdrive Reference • 38

- Word DOCX (Word 2007 and higher) - Specnique files* - Backup files
Consider the following parameters when attempting to import each file type.
Word DOCX Import BIMdrive will attempt to import any DOCX files, however users will have much greater success importing options and measures from the original document, if they have been formatted to Digicon’s standard. In essence, we recommend:
- Parts are formatted as “Heading 1” style, and Article titles as “Heading 2” style, - Paragraphs be hierarchical starting with Heading 3 style to Heading 9, - Specifier notes be applied with a style named “SpecNote”, - Section numbers put into the ‘Keywords’ document property, - Section name put into the ‘Title’ document property.
Specnique Import BIMdrive will natively import Specnique (*.SPQ) specification files. However, caution must be exercised, and the resulting imported text checked against the original text. In some cases, Specnique text was stored in encrypted data fields which are unreadable to BIMdrive. The most dependable solution is to engage Digicon to export the original Specnique project file to a Word document, then import the Word document to BIMdrive.
Backup Import BIMdrive automatically saves project data as you work. If you feel that BIMdrive has corrupted the project database, you may attempt to import the Backup database into a clean copy.
Publishing the Project
Printing and Exporting the Project Once a project has been completed, it would normally be 'published' for use. Most users will want to publish in some form of commonly used, preferably permanent (non-editable) file format.
Users may choose to print the project to paper, or export the project file to various file formats; including Microsoft XPS, Microsoft Word and Adobe PDF.
NOTE: Digicon highly recommends that its users publish project specifications in a non-editable format (such as PDF). Specifications are contract documents; publishing in PDF helps prevent others from editing the text (potentially exposing the author to liability, if the changes cause a problem). Export to Word only if directed to by your client, and ensure that you have an archive record of the text that was delivered – in order to document unauthorized changes.
Print Settings The File | Print menu enables users to preview a print job, and adjust the print settings. By default, when you select File | Print, the default Print Setting is “No Selection”. Users can select:
- Print All Pages (print the entire specification) - Custom Selection (BIMdrive allows you to select the sections to be included in the print)
BIMdrive Reference • 39

- Table of Contents (this selection should be used when ONLY a Table of Contents is desired)
Once you click the ‘Print’ button
In the Print menu, there are three primary commands:
Print: Sends the currently specified print job to the printer selected.
Printer: Enables users to select the desired printer.
Settings: Enables users to print only some of the sections in a project, or enable or disable the Table of Contents in the print job.
Save and Send Options When a project is complete, select "Save and Send" from the File menu for a variety of options.
Send Using Email This function automatically attaches the file type to a blank e-mail message (using your default e-mail software). You can then address and send the specification to a recipient.
Exporting
Create an XPS Document: This function creates a read-only file containing the specification (XPS is a Microsoft standard, similar to Acrobat PDF).
Export to Word: This function will automatically export each section to a DOCX file format on the default project folder. Any changes to headers or other formatting changes after this export must be made manually in Microsoft Word. Alternatively, you can use Digicon’s SpecMacros software to edit Word formatted specifications.
Create PDF Document: This function will create a single project PDF file, with Sections pre-bookmarked for convenience.
BIMdrive Reference • 40

Backups As a database software, BIMdrive automatically saves changes to a section any time the section is closed after editing. In addition, there is an automatic timed save feature that users can set to prevent the loss of editing changes to a section during a power outage or other factor. Refer to Settings for information about how to set or adjust the automatic save function.
Help This BIMdrive manual is your best bet for assistance using the software. In BIMdrive itself, the File | Help menu contains information useful for finding out what versions you have, and where to find help.
You can use the "Contact Us" icon in this window to send e-mail to Digicon Support ([email protected]).
The Help menu also contains "About" information, such as the date and version of BIMdrive, and the version and publication date of the Master Specification that is loaded.
BIMdrive Reference • 41