digital soil mapping using...
TRANSCRIPT

CyberSoLIM Tutorial
Page 1 of 13
Digital Soil Mapping Using CyberSoLIM
CyberSoLIM provides a heuristically driven, visually assisted, high performance computing
enabled cyber environment for digital soil mapping. In this illustration, we use CyberSoLIM to
construct a digital soil mapping model for predicting silt content (%) in top soil in a study area in
Anhui Province, China.
Study Area:
A region of 5,900km
2 in the southern Anhui Province, China
Data:
Field samples with soil silt content measurements
Environmental data (Precipitation, Temperature, Parent material, Elevation and other derived
topographic environmental variables)
Operation Environment:
Browser supporting HTML5, such as Google Chrome, IE 10, Opera, Fire Fox, etc.
Operation Procedure:
Step 1: Sign up an account and login to EGC
A) Start your web browser (Chrome here) and enter http://159.226.110.183:8080/egc/ to get to
the EGC login page. If you already have an account, you can just login to EGC by entering
your email address and the password.
CyberSoLIM Tutorial
Page 2 of 13
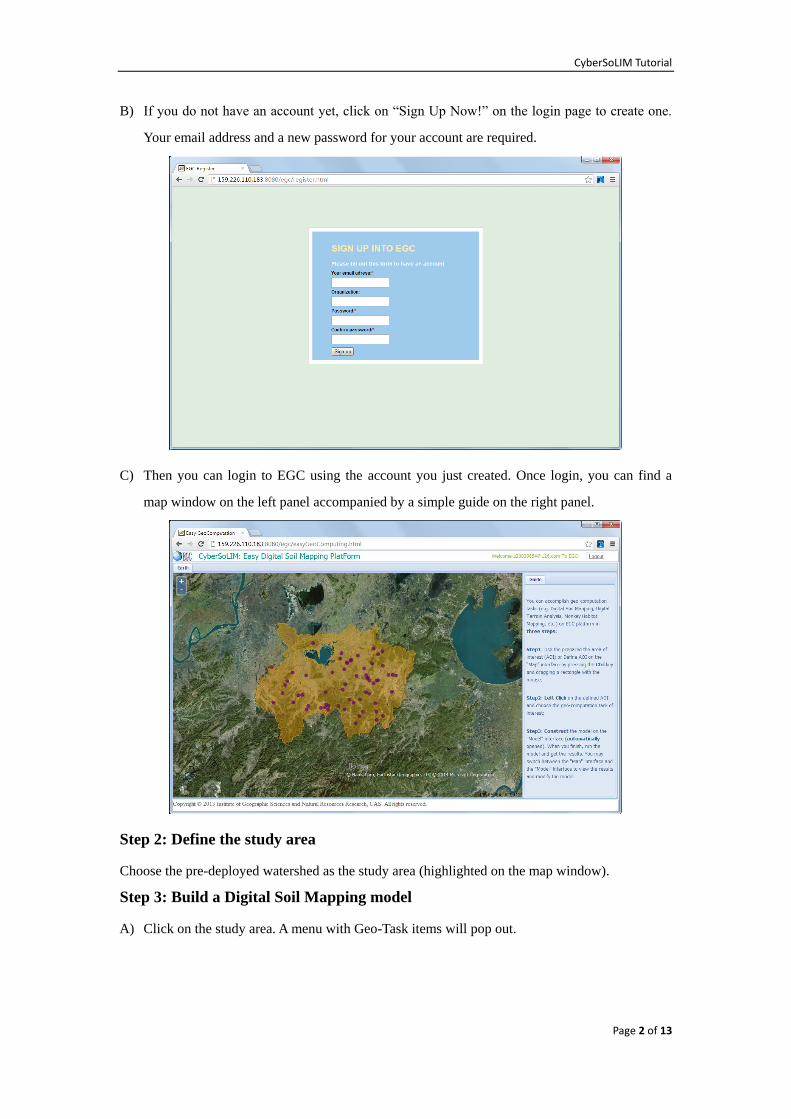
B) If you do not have an account yet, click on “Sign Up Now!” on the login page to create one.
Your email address and a new password for your account are required.
C) Then you can login to EGC using the account you just created. Once login, you can find a
map window on the left panel accompanied by a simple guide on the right panel.
Step 2: Define the study area
Choose the pre-deployed watershed as the study area (highlighted on the map window).
Step 3: Build a Digital Soil Mapping model
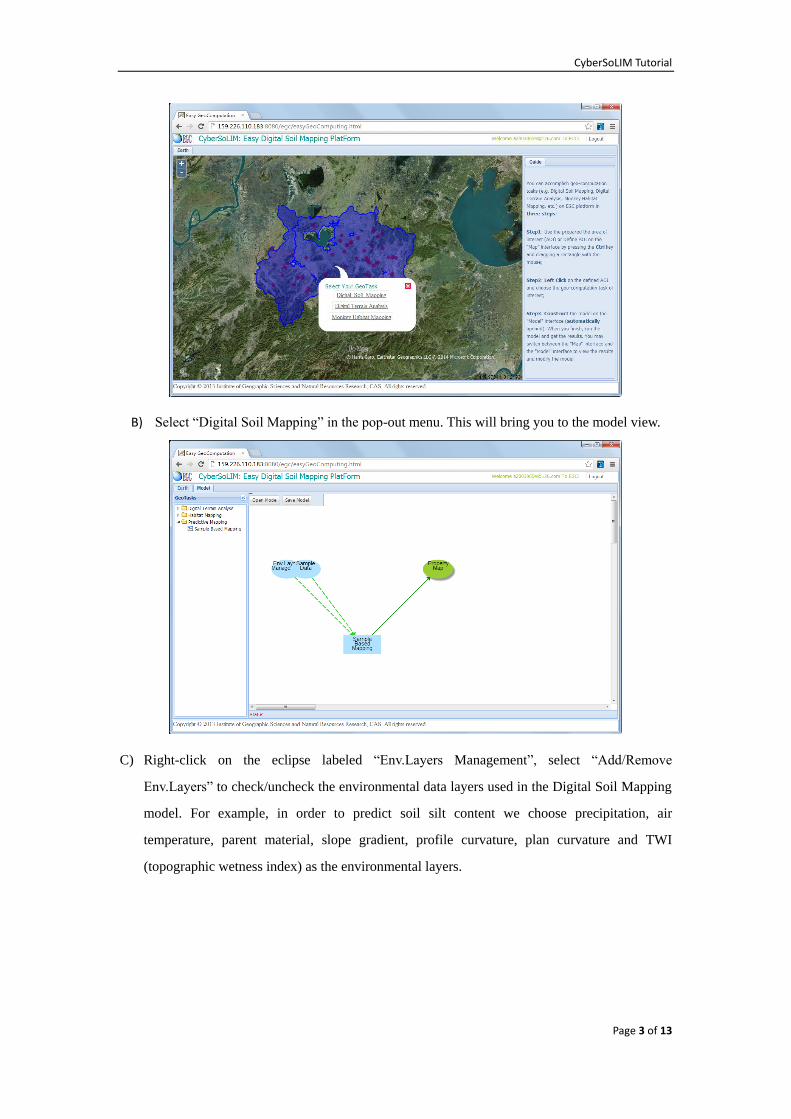
A) Click on the study area. A menu with Geo-Task items will pop out.
CyberSoLIM Tutorial
Page 3 of 13
B) Select “Digital Soil Mapping” in the pop-out menu. This will bring you to the model view.
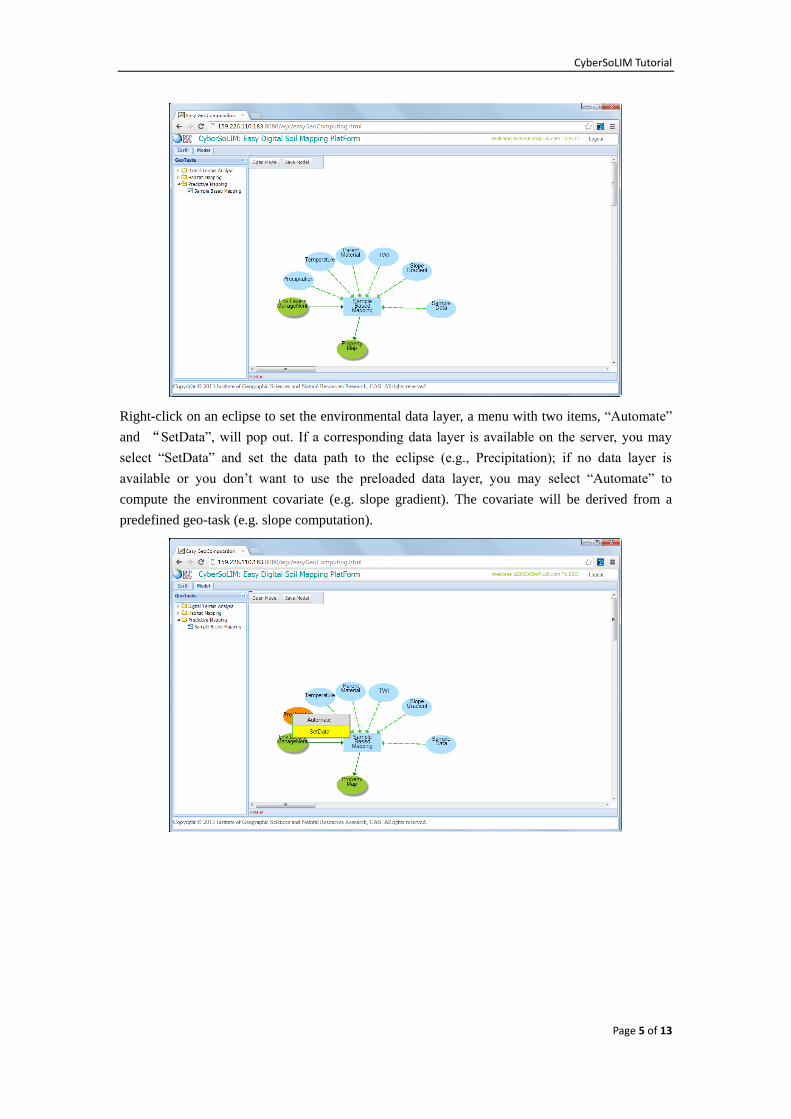
C) Right-click on the eclipse labeled “Env.Layers Management”, select “Add/Remove
Env.Layers” to check/uncheck the environmental data layers used in the Digital Soil Mapping
model. For example, in order to predict soil silt content we choose precipitation, air
temperature, parent material, slope gradient, profile curvature, plan curvature and TWI
(topographic wetness index) as the environmental layers.

CyberSoLIM Tutorial
Page 4 of 13
D) Click “OK”, several eclipses labeled with the environmental layers you selected will be added
to the model.
CyberSoLIM Tutorial
Page 5 of 13
Right-click on an eclipse to set the environmental data layer, a menu with two items, “Automate”
and “SetData”, will pop out. If a corresponding data layer is available on the server, you may
select “SetData” and set the data path to the eclipse (e.g., Precipitation); if no data layer is
available or you don’t want to use the preloaded data layer, you may select “Automate” to
compute the environment covariate (e.g. slope gradient). The covariate will be derived from a
predefined geo-task (e.g. slope computation).

CyberSoLIM Tutorial
Page 6 of 13

CyberSoLIM Tutorial
Page 7 of 13
CyberSoLIM Tutorial
Page 8 of 13
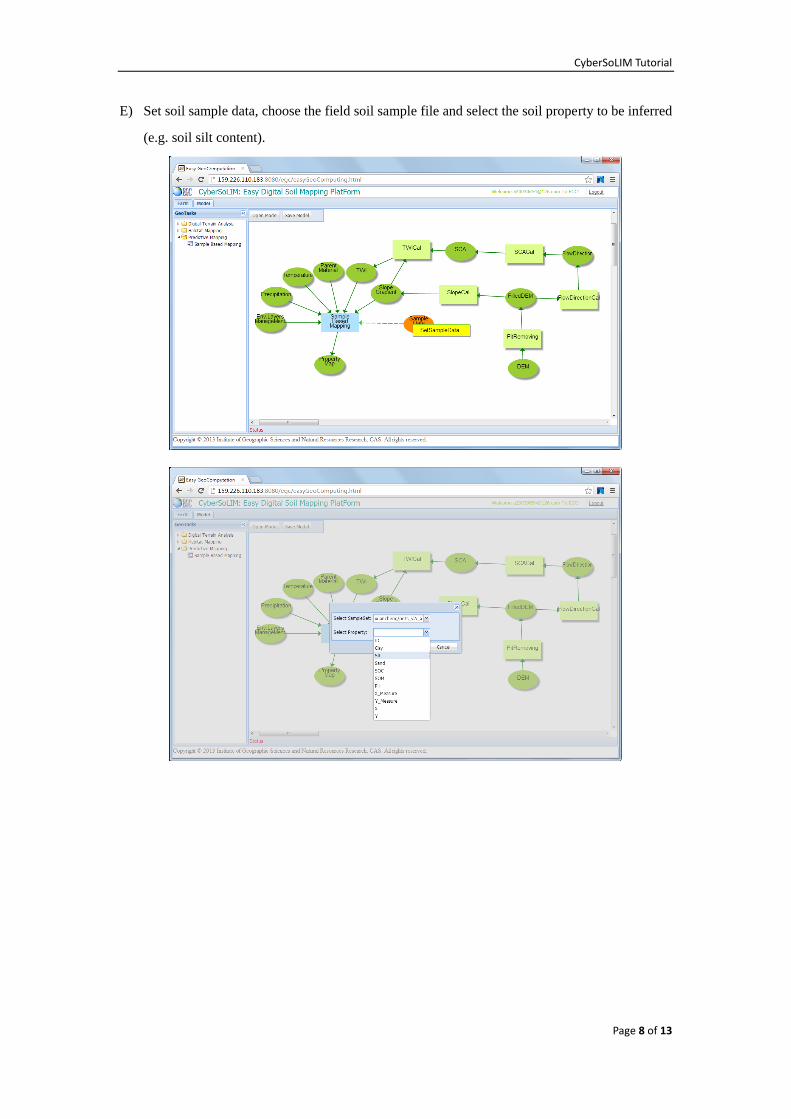
E) Set soil sample data, choose the field soil sample file and select the soil property to be inferred
(e.g. soil silt content).
CyberSoLIM Tutorial
Page 9 of 13
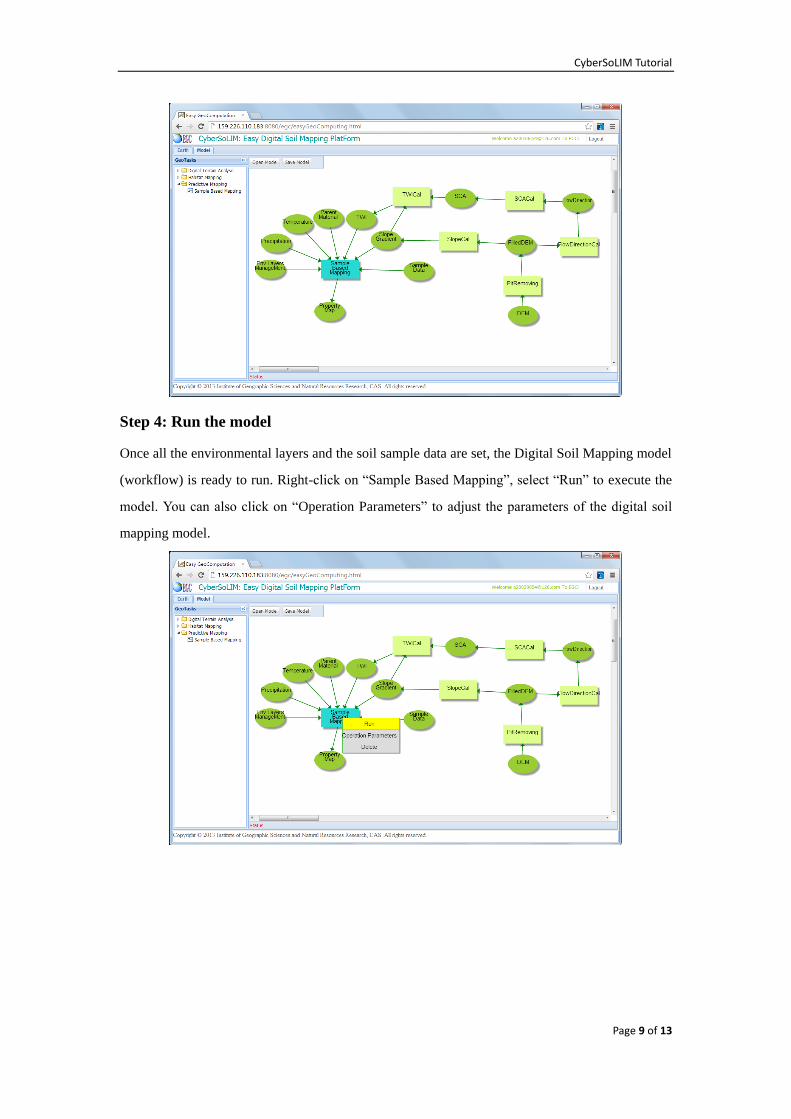
Step 4: Run the model
Once all the environmental layers and the soil sample data are set, the Digital Soil Mapping model
(workflow) is ready to run. Right-click on “Sample Based Mapping”, select “Run” to execute the
model. You can also click on “Operation Parameters” to adjust the parameters of the digital soil
mapping model.

CyberSoLIM Tutorial
Page 10 of 13
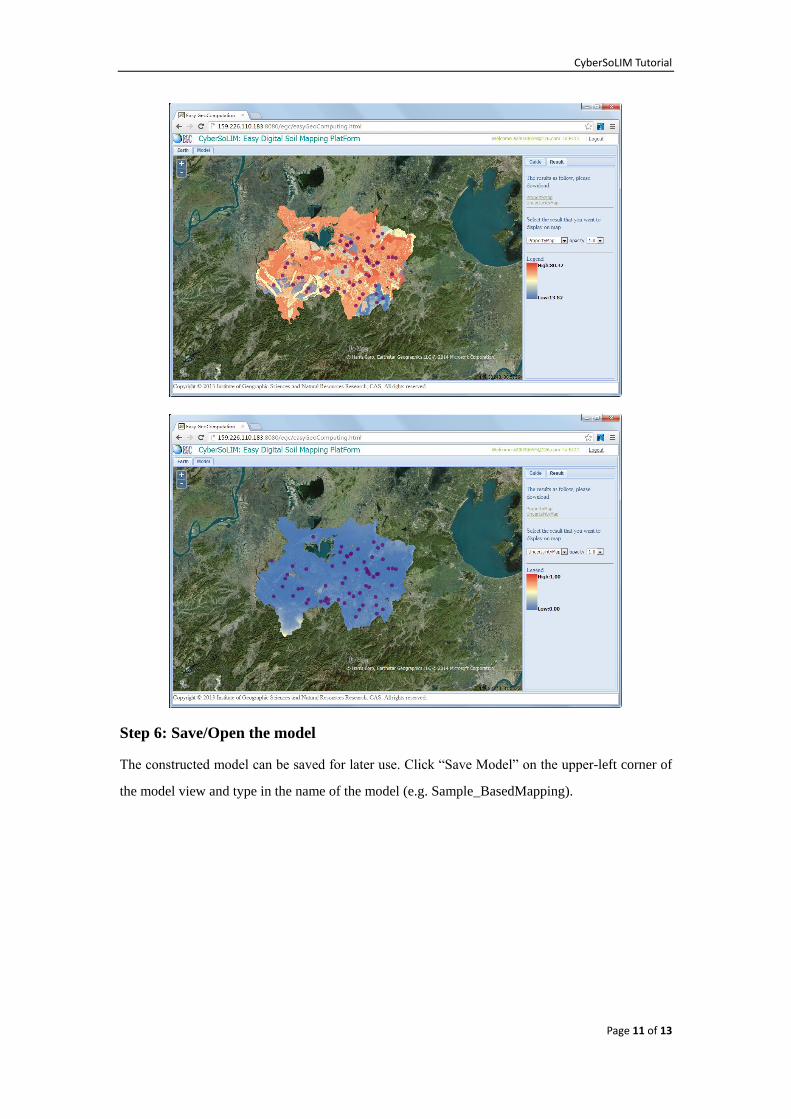
Step 5: View soil property map and uncertainty map
Once the model run is finished, soil property maps will be automatically overlaid to the map. You
can view the uncertainty map by selecting Uncertainty Map in the drop down list. You can also
adjust opacity of the layer by choosing a different value in the opacity drop down list. The
predicted soil property map and the uncertainty map can be downloaded in ascii format.
CyberSoLIM Tutorial
Page 11 of 13
Step 6: Save/Open the model
The constructed model can be saved for later use. Click “Save Model” on the upper-left corner of
the model view and type in the name of the model (e.g. Sample_BasedMapping).

CyberSoLIM Tutorial
Page 12 of 13
A previously saved model can be loaded for use. Click “Open Model” on the upper-left corner of
the model view. In the pop-up window select a model from model list, and click “OK”.
The previously constructed model will be displayed on the model view panel and can be used
directly.

CyberSoLIM Tutorial
Page 13 of 13