do more with less, eto api’saucache.autodesk.com/au2012/sessionsfiles/1664/2453/... · web...
TRANSCRIPT

Do more with Less, ETO API’sIshwar Nagwani – Autodesk India Pvt. Ltd
CP1664Engineer-to-order (ETO) systems, also known as sales force automation, are becoming increasingly popular. The ETO cannot be implemented without customization. The learning curve is steep due to lack of documentation and active blogs. This class focuses on creating smart designs, understanding Intent events, and creating rapid custom controls that can be tested in the Autodesk® Inventor® browser pane before implementing in a custom UI framework
Learning Objectives
At the end of this class, you will be able to: Create Intent AddIns with UI
Use Client Graphics in your designs
Use Events effectively
Add Dimensions Smartly
Call Methods from an External DLL
Test your DLL’s with ETO server using Batch process
About the SpeakerIshwar has solid 25 years of experience in customizing CAD products, be it AutoCAD, MDT, AutoCAD Mech, Inventor and ETO. With hardcore manufacturing background Ishwar was involved in customizing the manufacturing, design and drafting processes. Ishwar was also visiting CAD faculty to colleges teaching CAD/CAM. Ishwar took many classes for ADN developers in Singapore and Korea on Inventor API's.
Ishwar has successfully implemented complex projects for large corporations like Lockheed, Mammoth and Criterion furniture, to name a few.
Ishwar has certification in Industrial Automation from NITIE(National Institute of Industrial Engineering) . Recently Ishwar also completed Executive General Management Programme from IIT business school SJSOM along with his busy work [email protected]

Do more with Less, ETO API’s
Create ETO Addins with UI
What is ETO Addin?The ETO Addin is C# or VBA .NET Class Library project, to which we add a custom control. The UI is added to custom control. The custom control from Addin can be hosted in Inventor browser pane.
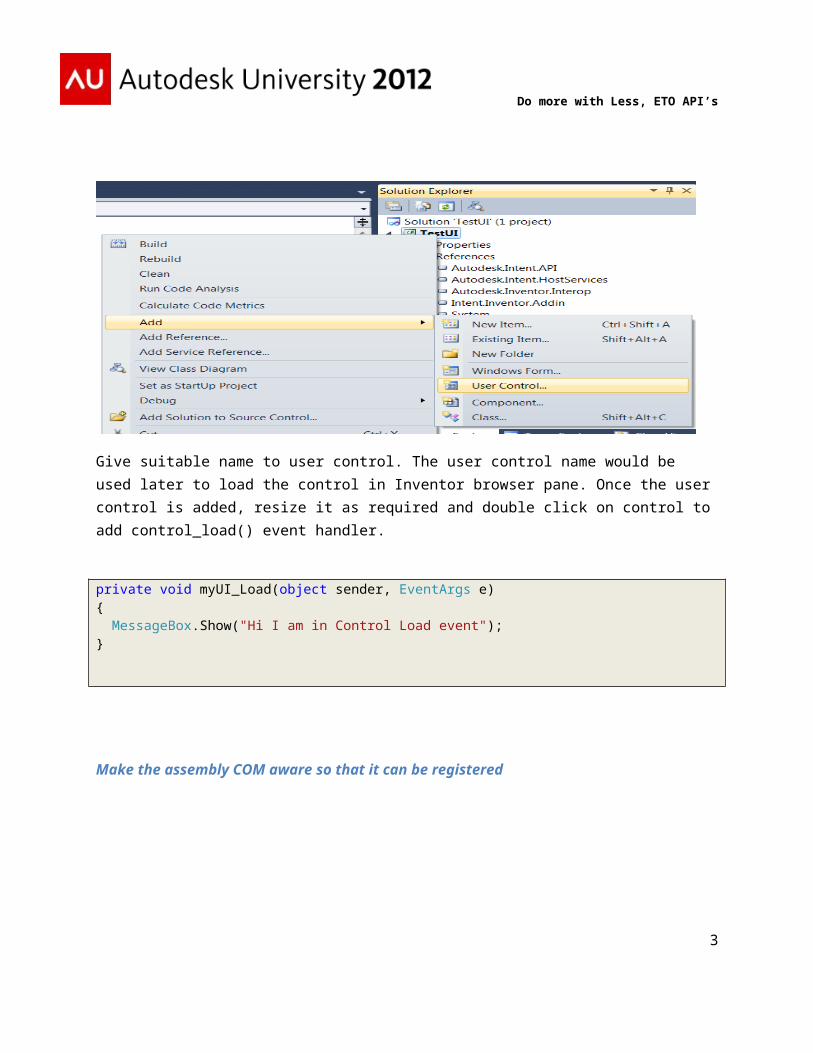
Add a custom controlTo Add a custom control right click on project and select “Add->User Control”
2
Do more with Less, ETO API’s
Give suitable name to user control. The user control name would be used later to load the control in Inventor browser pane. Once the user control is added, resize it as required and double click on control to add control_load() event handler.
private void myUI_Load(object sender, EventArgs e){ MessageBox.Show("Hi I am in Control Load event");}
Make the assembly COM aware so that it can be registered
3

Do more with Less, ETO API’s
What references should be added to access ETO .NET API?
The next step is to add reference files from ETO \Bin folder. Right click on “References” and select “Add Reference”.
Select the following dll files:
1. C:\Program Files\Autodesk\Inventor ETO Components 2012\Bin\Autodesk.Intent.API.dll2. Autodesk.IntentBase.dll3. Autodesk.Intent.HostServices.dll4. Autodesk.IntentSession.dll5. Autodesk.Inventor.Interop.dll6. Intent.Inventor.Addin.dll
Important: Set the Copy Local attribute to False for all above references.
Add the directives
Add the following directives:
using Inventor;using Autodesk.Intent;using Autodesk.Intent.HostServices;using Autodesk.Intent.IntentInventor;using Autodesk.Intent.IntentInventor.Automation;
4
Do more with Less, ETO API’s
Initialize class level variables
Declare the class level variables for Inventor Application and Root Part objects and Initialize them.
using System;using System.Collections.Generic;using System.ComponentModel;using System.Drawing;using System.Data;using System.Linq;using System.Text;using System.Windows.Forms;
using Inventor;using Autodesk.Intent;using Autodesk.Intent.HostServices;using Autodesk.Intent.IntentInventor;using Autodesk.Intent.IntentInventor.Automation;
namespace TestUI{ public partial class myUI : UserControl { // Define class level variables here Part _rootPart = null; IHostAPI _hostAPI = null; Inventor.Application _inventorApplication = null;
public myUI() { InitializeComponent(); }
private void myUI_Load(object sender, EventArgs e) { MessageBox.Show("Hi I am in Control Load event");
_rootPart = IntentAPI.Instance.ActiveRoot; _hostAPI = IntentSession.IntentAPI.HostAPI as IHostAPI ; _inventorApplication = _hostAPI.HostApplication;
} }}
5
Do more with Less, ETO API’s
Build the DLL
Build the project. Setup the Post Build event to register the DLL. This way we can avoid additional batch file to register the DLL.
6

Do more with Less, ETO API’s
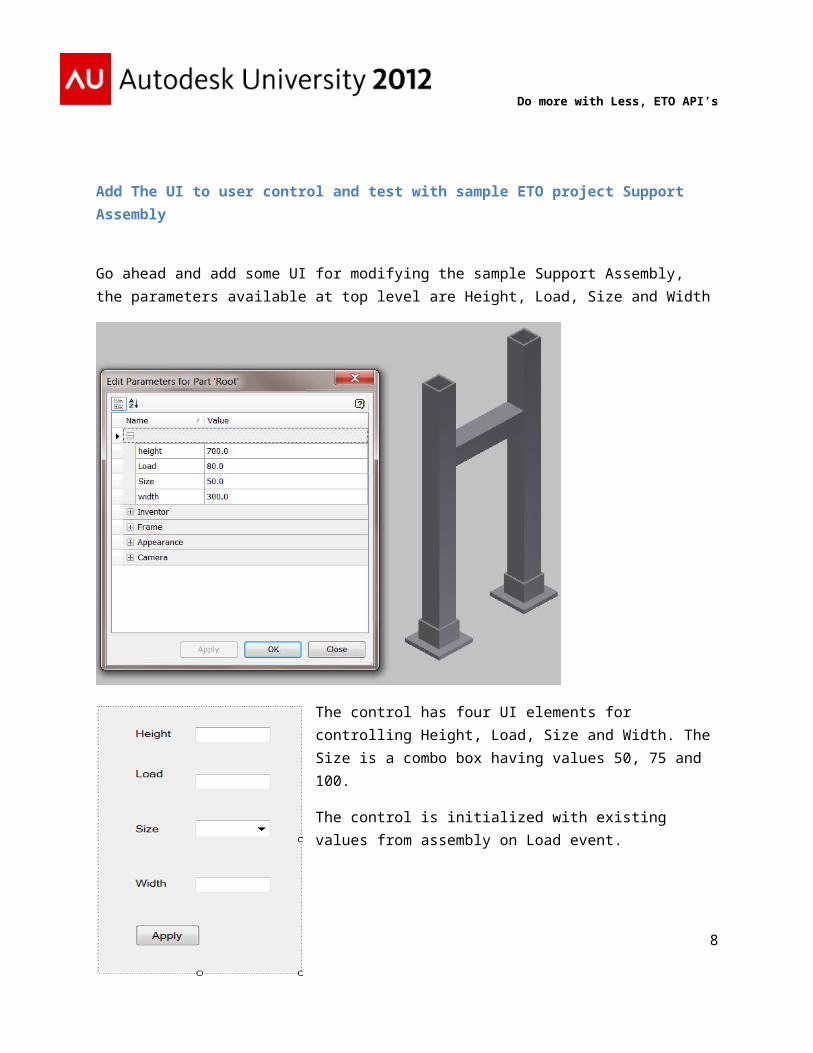
Add The UI to user control and test with sample ETO project Support Assembly
Go ahead and add some UI for modifying the sample Support Assembly, the parameters available at top level are Height, Load, Size and Width
The control has four UI elements for controlling Height, Load, Size and Width. The Size is a combo box having values 50, 75 and 100.
The control is initialized with existing values from assembly on Load event.
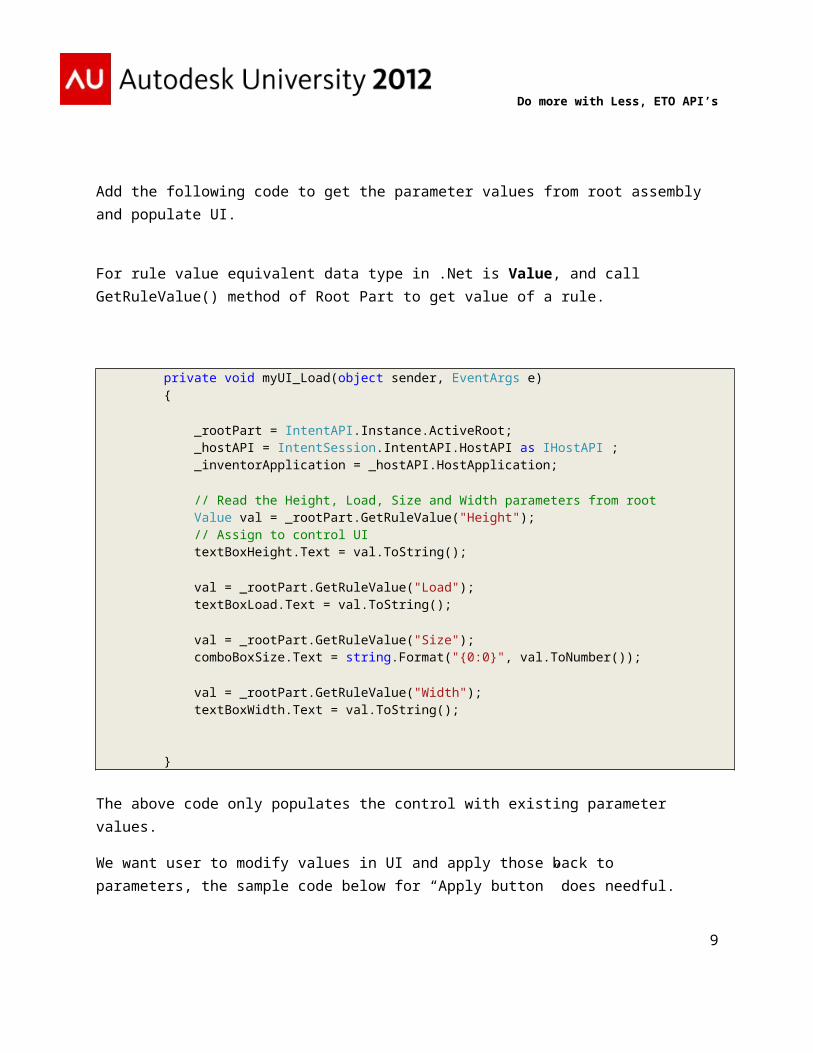
Add the following code to get the parameter values from root assembly and populate UI.
For rule value equivalent data type in .Net is Value, and call GetRuleValue() method of Root Part to get value of a rule.
7
Do more with Less, ETO API’s
private void myUI_Load(object sender, EventArgs e) {
_rootPart = IntentAPI.Instance.ActiveRoot; _hostAPI = IntentSession.IntentAPI.HostAPI as IHostAPI ; _inventorApplication = _hostAPI.HostApplication;
// Read the Height, Load, Size and Width parameters from root Value val = _rootPart.GetRuleValue("Height"); // Assign to control UI textBoxHeight.Text = val.ToString();
val = _rootPart.GetRuleValue("Load"); textBoxLoad.Text = val.ToString();
val = _rootPart.GetRuleValue("Size"); comboBoxSize.Text = string.Format("{0:0}", val.ToNumber());
val = _rootPart.GetRuleValue("Width"); textBoxWidth.Text = val.ToString();
}
The above code only populates the control with existing parameter values.
We want user to modify values in UI and apply those back to parameters, the sample code below for “Apply button” does needful.
private void buttonApply_Click(object sender, EventArgs e) { // Apply values from UI to parameters/rules _rootPart.SetRuleValue("Height", Value.ValueFromObject(Convert.ToDouble(textBoxHeight.Text))); _rootPart.SetRuleValue("Load", Value.ValueFromObject(Convert.ToDouble(textBoxLoad.Text))); _rootPart.SetRuleValue("Size", Value.ValueFromObject(Convert.ToDouble(comboBoxSize.Text ))); _rootPart.SetRuleValue("Width", Value.ValueFromObject(Convert.ToDouble(textBoxWidth.Text)));
// simulate the pressing of signal light to update the model _hostAPI.IntentAPI.ActiveModel.Render();
}
8
Do more with Less, ETO API’s
Load the custom control in Inventor Browser Pane
Use the following VBA macro to load the custom control after opening the Support Assembly.
Sub loadctl() ‘The first argument can be any name, the second is AssemblyName.ControlName Call ThisApplication.ActiveDocument.BrowserPanes.Add("TestUI", "TestUI.myUI")End Sub
Add the leg assembly through UI
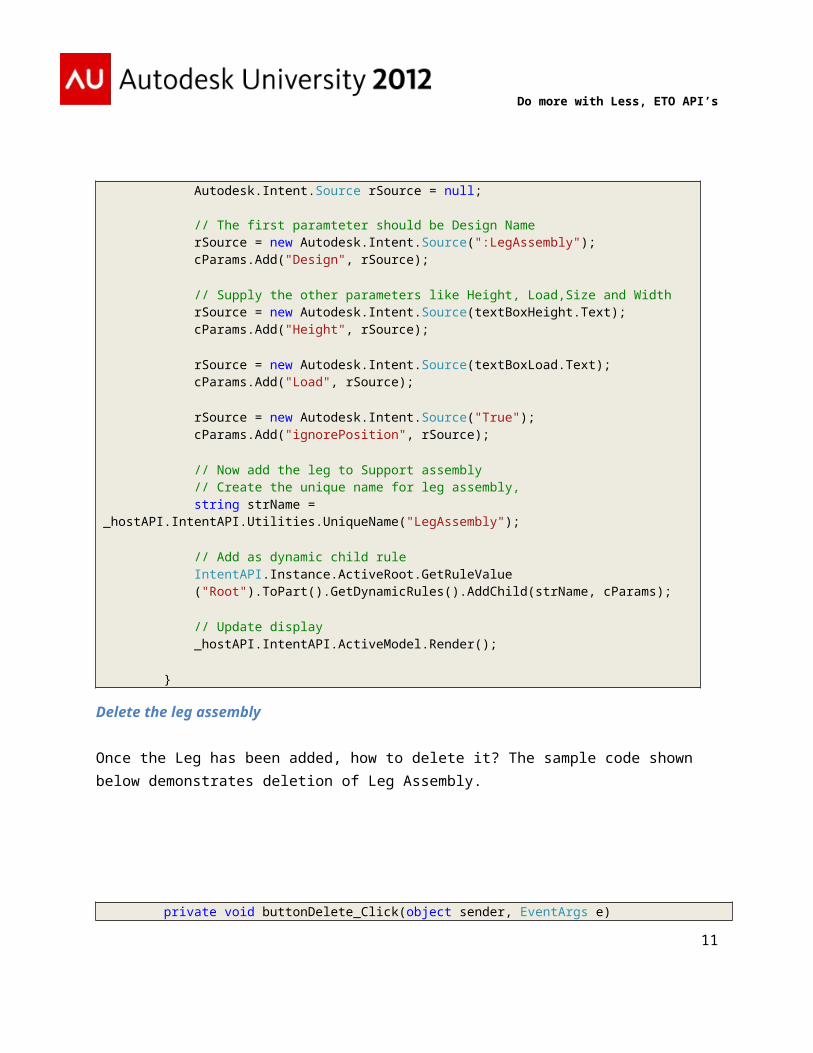
Let us add the leg assembly design in Support Assembly through UI, add one more button “Insert Leg” on control. See the sample code below, the design and parameter values are supplied using source and parameter name.
private void buttonInsertLeg_Click(object sender, EventArgs e) { // Create parameters and define source object Autodesk.Intent.Parameters cParams = new Autodesk.Intent.Parameters(); Autodesk.Intent.Source rSource = null;
// The first paramteter should be Design Name rSource = new Autodesk.Intent.Source(":LegAssembly"); cParams.Add("Design", rSource);
// Supply the other parameters like Height, Load,Size and Width rSource = new Autodesk.Intent.Source(textBoxHeight.Text); cParams.Add("Height", rSource);
rSource = new Autodesk.Intent.Source(textBoxLoad.Text); cParams.Add("Load", rSource);
rSource = new Autodesk.Intent.Source("True"); cParams.Add("ignorePosition", rSource);
// Now add the leg to Support assembly // Create the unique name for leg assembly, string strName = _hostAPI.IntentAPI.Utilities.UniqueName("LegAssembly");
// Add as dynamic child rule IntentAPI.Instance.ActiveRoot.GetRuleValue ("Root").ToPart().GetDynamicRules().AddChild(strName, cParams);
// Update display
9

Do more with Less, ETO API’s
_hostAPI.IntentAPI.ActiveModel.Render();
}
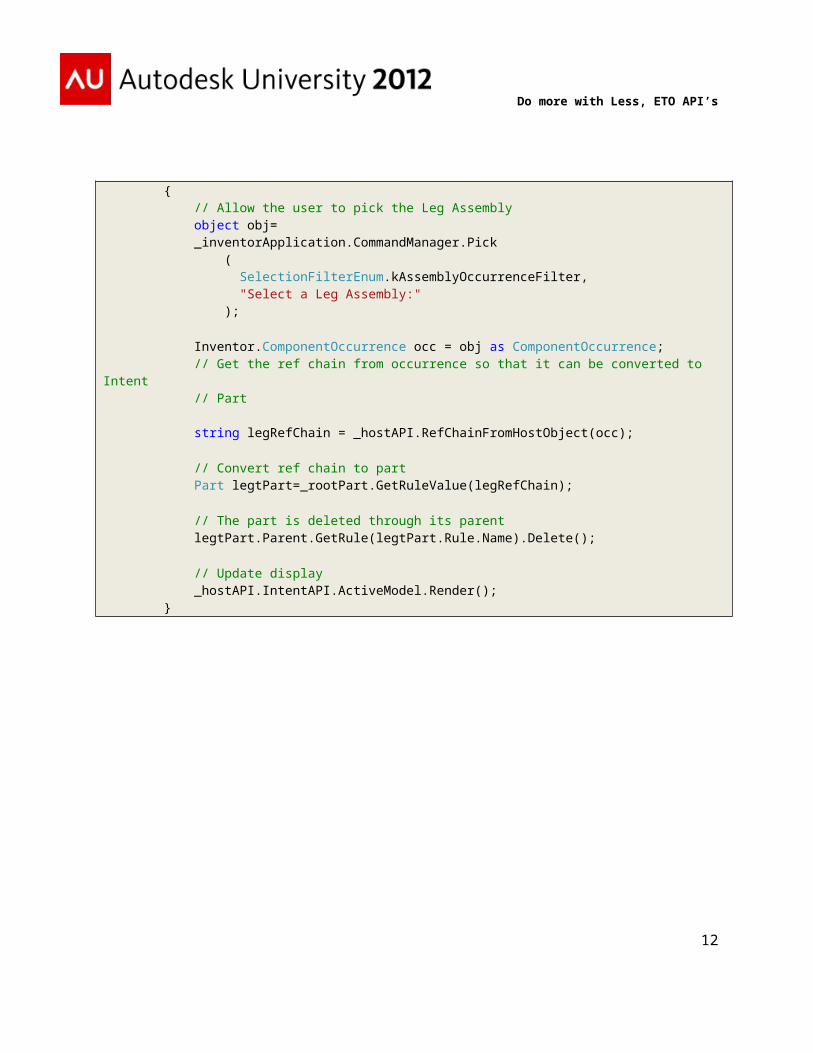
Delete the leg assembly
Once the Leg has been added, how to delete it? The sample code shown below demonstrates deletion of Leg Assembly.
private void buttonDelete_Click(object sender, EventArgs e) { // Allow the user to pick the Leg Assembly object obj= _inventorApplication.CommandManager.Pick ( SelectionFilterEnum.kAssemblyOccurrenceFilter, "Select a Leg Assembly:" );
Inventor.ComponentOccurrence occ = obj as ComponentOccurrence; // Get the ref chain from occurrence so that it can be converted to Intent // Part
string legRefChain = _hostAPI.RefChainFromHostObject(occ);
// Convert ref chain to part Part legtPart=_rootPart.GetRuleValue(legRefChain);
// The part is deleted through its parent legtPart.Parent.GetRule(legtPart.Rule.Name).Delete();
// Update display _hostAPI.IntentAPI.ActiveModel.Render(); }
10
Do more with Less, ETO API’s
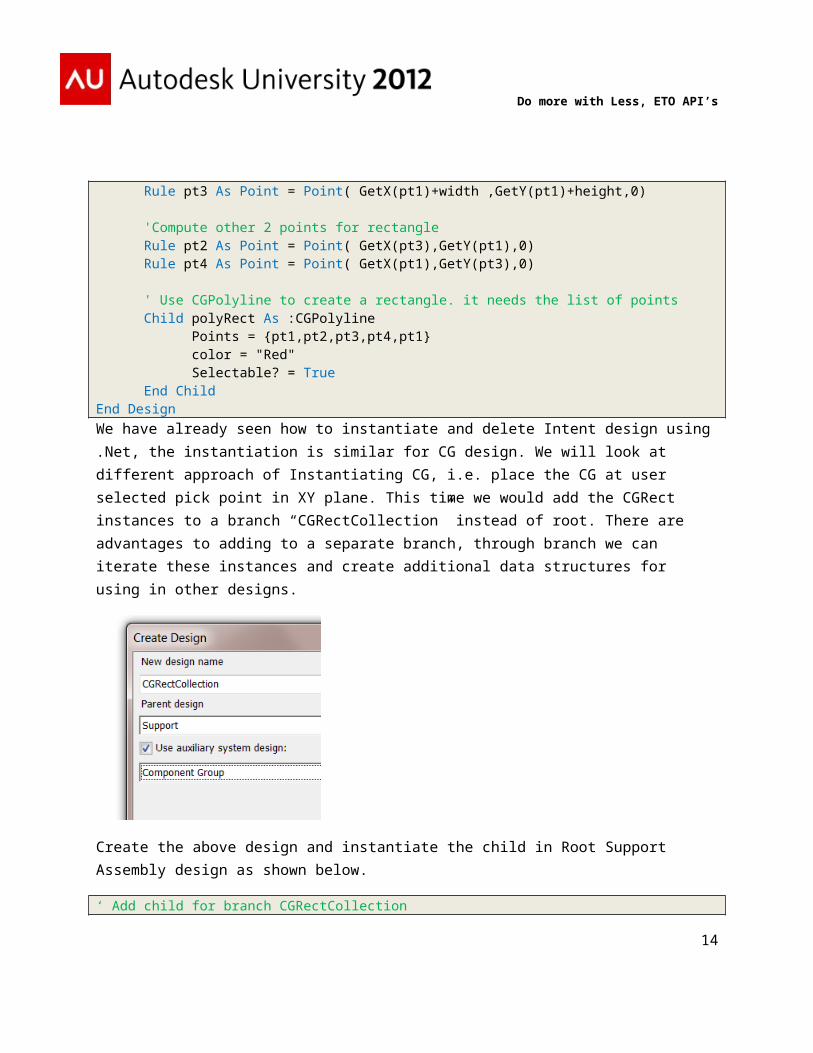
How to use client graphics and do the interactionThe Client Graphics(CG) primitives were introduced in ETO 5.1. We can create the designs using CG primitives like lines, arcs, polylines, cylinder and cones etc.
Create a new CG design
In auxiliary system put IvComponentGroup
Add the following to CGRect design
Design CGRect : SupportRoot IvComponentGroupParameter Rule width As Number =100Parameter Rule height As Number =100
Rule pt1 As Point = Point(0,0,0)Rule pt3 As Point = Point( GetX(pt1)+width ,GetY(pt1)+height,0)
'Compute other 2 points for rectangleRule pt2 As Point = Point( GetX(pt3),GetY(pt1),0)Rule pt4 As Point = Point( GetX(pt1),GetY(pt3),0)
' Use CGPolyline to create a rectangle. it needs the list of pointsChild polyRect As :CGPolyline
11
Do more with Less, ETO API’s
Points = {pt1,pt2,pt3,pt4,pt1}color = "Red"Selectable? = True
End ChildEnd DesignWe have already seen how to instantiate and delete Intent design using .Net, the instantiation is similar for CG design. We will look at different approach of Instantiating CG, i.e. place the CG at user selected pick point in XY plane. This time we would add the CGRect instances to a branch “CGRectCollection” instead of root. There are advantages to adding to a separate branch, through branch we can iterate these instances and create additional data structures for using in other designs.
Create the above design and instantiate the child in Root Support Assembly design as shown below.
‘ Add child for branch CGRectCollection
Child CGRectColl As :CGRectCollection
End Child
12

Do more with Less, ETO API’s
You would now see a CGRectColl in Intent Tree
13
Do more with Less, ETO API’s
Add CGRect Instance and Setup the Mouse Events for addingAdd the new class “ClsMouseEvents” to your project, the final class with mouse interaction events setup looks as shown below.using System;using System.Collections.Generic;using System.Linq;using System.Text;
namespace TestUI{ class ClsMouseEvents {
// Define class level variables private Inventor.Application _inventorApplication = null; private Inventor.InteractionEvents _interactionEvents; private Inventor.MouseEvents _mouseEvents; private Boolean _bpicking = false;
// For storing picked point public Inventor.Point _insPoint;
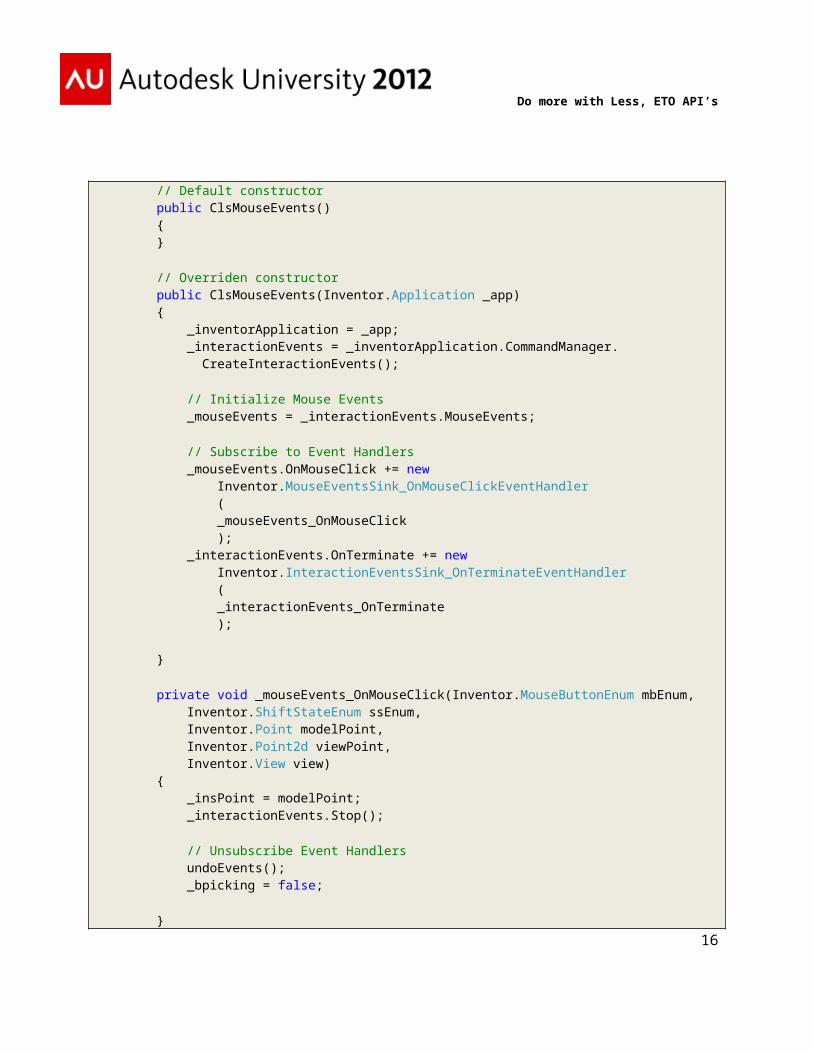
// Default constructor public ClsMouseEvents() { }
// Overriden constructor public ClsMouseEvents(Inventor.Application _app) { _inventorApplication = _app; _interactionEvents = _inventorApplication.CommandManager. CreateInteractionEvents();
// Initialize Mouse Events _mouseEvents = _interactionEvents.MouseEvents;
// Subscribe to Event Handlers _mouseEvents.OnMouseClick += new Inventor.MouseEventsSink_OnMouseClickEventHandler ( _mouseEvents_OnMouseClick ); _interactionEvents.OnTerminate += new Inventor.InteractionEventsSink_OnTerminateEventHandler ( _interactionEvents_OnTerminate );
}
14

Do more with Less, ETO API’s
private void _mouseEvents_OnMouseClick(Inventor.MouseButtonEnum mbEnum, Inventor.ShiftStateEnum ssEnum, Inventor.Point modelPoint, Inventor.Point2d viewPoint, Inventor.View view) { _insPoint = modelPoint; _interactionEvents.Stop();
// Unsubscribe Event Handlers undoEvents(); _bpicking = false;
}
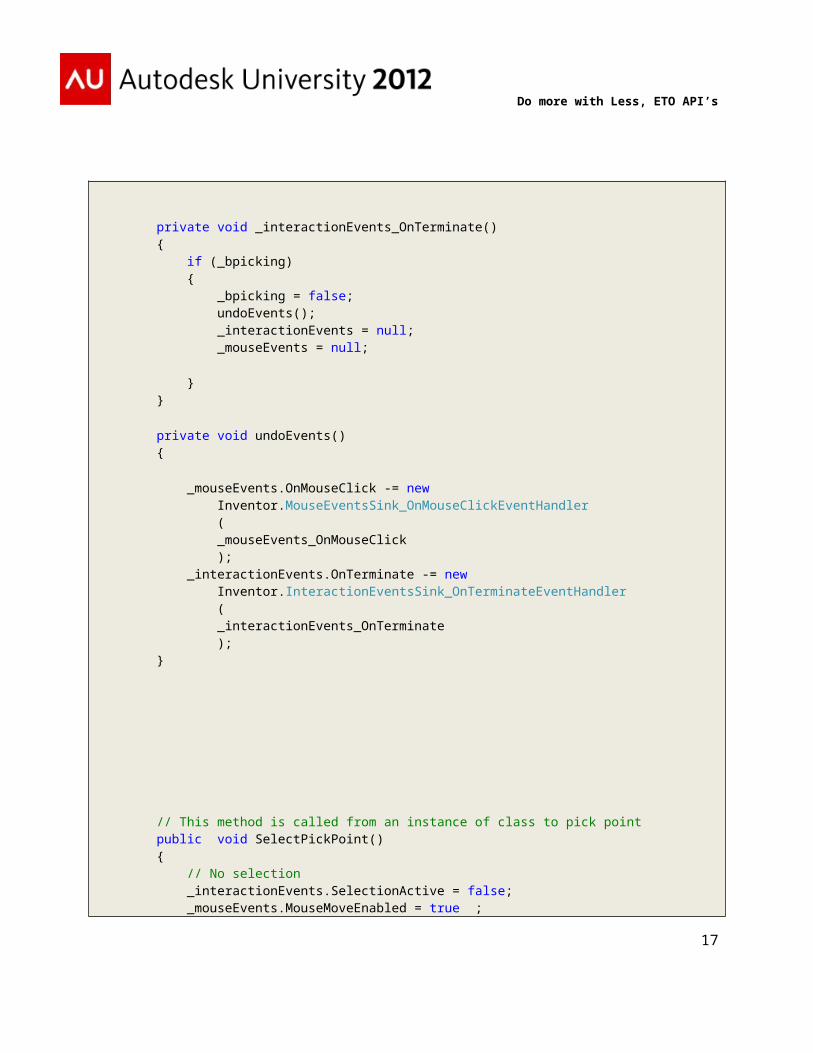
private void _interactionEvents_OnTerminate() { if (_bpicking) { _bpicking = false; undoEvents(); _interactionEvents = null; _mouseEvents = null;
} }
private void undoEvents() {
_mouseEvents.OnMouseClick -= new Inventor.MouseEventsSink_OnMouseClickEventHandler ( _mouseEvents_OnMouseClick ); _interactionEvents.OnTerminate -= new Inventor.InteractionEventsSink_OnTerminateEventHandler ( _interactionEvents_OnTerminate ); }
// This method is called from an instance of class to pick point
15
Do more with Less, ETO API’s
public void SelectPickPoint() { // No selection _interactionEvents.SelectionActive = false; _mouseEvents.MouseMoveEnabled = true ; _bpicking = true; _interactionEvents.Start(); while (_bpicking) { System.Windows.Forms.Application.DoEvents(); }
}
} // End of class}
Now add the button “Add CGRect” to UI so that CGRect instance can be placed at selected point. The sample code below instantiates the class ClsMouseEvents and calls public method SelectPickPoint(). Also the view is switched to plan before mouse interaction begins.
private void buttonAddCGRect_Click(object sender, EventArgs e) { // Switch to Plan View PlanView();
// Create the Instance of Mouse Events Class ClsMouseEvents mouseEvents = new ClsMouseEvents(_inventorApplication); mouseEvents.SelectPickPoint();
// Get selected point Inventor.Point startPt = mouseEvents._insPoint;
// Place the CGRect at picked point Autodesk.Intent.Parameters cParams = new Autodesk.Intent.Parameters(); Autodesk.Intent.Source rSource;
rSource = new Autodesk.Intent.Source(":CGRect"); cParams.Add("Design", rSource);
16
Do more with Less, ETO API’s
// Conver the mouse point units to MM or INCH depending on document units if( _inventorApplication.ActiveDocument.UnitsOfMeasure.LengthUnits == UnitsTypeEnum.kMillimeterLengthUnits ) { // Convert mouse coordinates to MM rSource = new Autodesk.Intent.Source ("point(" + startPt.X * 10 + "," + startPt.Y * 10 + "," + "0)" ); } else { // Convert mouse coordinates to INCH rSource = new Autodesk.Intent.Source ("point(" + startPt.X /2.54 + "," + startPt.Y / 2.54 + "," + "0)" ); } cParams.Add("pt1", rSource); string strName = _hostAPI.IntentAPI.Utilities.UniqueName("CGRect"); IntentAPI.Instance.ActiveRoot.GetRuleValue ("Root").ToPart().GetDynamicRules().AddChild(strName, cParams); _hostAPI.IntentAPI.ActiveModel.Render();
}
private void PlanView() { // Get active camera Inventor.Camera camera; camera = _inventorApplication.ActiveView.Camera; camera.ViewOrientationType = ViewOrientationTypeEnum.kFrontViewOrientation; // Apply the changes to the view. camera.ApplyWithoutTransition();
}
17

Do more with Less, ETO API’s
Delete CGRect instance
The CGRect instance is composed of CGPolyline which when selected through Inventor API returns object of type GraphicsNode. The GraphicsNode object should be converted to RefChain using IHostAPI.RefChainFromHostObject() method, and from Refchain get Intent part using rootPart.GetRuleValue(). The CGRect object is obtained by getting Parent of part got from GraphicsNode as depicted in figure below.
The sample below demonstrates the selection and deletion of a CGRect instance.
private void buttonDeleteCGRect_Click(object sender, EventArgs e) { // Allow the use to pick the CGRect instance object obj = _inventorApplication.CommandManager.Pick ( SelectionFilterEnum.kAllEntitiesFilter, "Select CGRect:" ); // Handle on object of Type GraphicsNode GraphicsNode grNode = obj as GraphicsNode; if (grNode != null) { // Get the Refchain of primitive string cgrectRefChain=_hostAPI.RefChainFromHostObject(grNode); // Get Intent Part from ref chain of primitive Part cgrectPart = _rootPart.GetRuleValue(cgrectRefChain); // Get Parent Part (CGRect) cgrectPart = cgrectPart.Parent; // Delete the CGRect if (cgrectPart != null) { cgrectPart.Parent.GetRule(cgrectPart.Rule.Name).Delete();
18

Do more with Less, ETO API’s
} // Update display _hostAPI.IntentAPI.ActiveModel.Render(); } }
Move the CGRect
Finally we would see how to move a CGRect instance using InteractionGraphics. Moving the CGRect needs selection, Mouse events and InteractionGraphics. Go ahead and add the class “ClsMouseMoveEvents”.
When a CGRect object is selected and inspected through VBA, it has DisplayName which is similar to Reference Chain of that object.
Paste the following code in class.
using System;using System.Collections.Generic;using System.Linq;using System.Text;
using Inventor;using Autodesk.Intent;using Autodesk.Intent.IntentInventor.Automation;
namespace TestUI{ class ClsMouseMoveEvents { // Define class level variables private Inventor.Application _inventorApplication = null; private Inventor.InteractionEvents _interactionEvents;
19

Do more with Less, ETO API’s
private Inventor.MouseEvents _mouseEvents; private Boolean _bpicking = false;
// For storing picked point public Inventor.Point _insPoint;
// Required for interactionGraphics private GraphicsNode _graphicsNode; private ClientGraphics _clientGraphics; private InteractionGraphics _interactionGraphics; private Inventor.Point _basePt;
// Default constructor public ClsMouseMoveEvents() { } // Overriden constructor public ClsMouseMoveEvents(Inventor.Application _app) { _inventorApplication = _app; _interactionEvents = _inventorApplication.CommandManager. CreateInteractionEvents();
// Initialize Mouse Events _mouseEvents = _interactionEvents.MouseEvents;
// Subscribe to Event Handlers _mouseEvents.OnMouseClick += new Inventor.MouseEventsSink_OnMouseClickEventHandler ( _mouseEvents_OnMouseClick ); _mouseEvents.OnMouseMove += new Inventor.MouseEventsSink_OnMouseMoveEventHandler ( _mouseEvents_OnMouseMove ); _interactionEvents.OnTerminate += new Inventor.InteractionEventsSink_OnTerminateEventHandler ( _interactionEvents_OnTerminate );
}
20

Do more with Less, ETO API’s
private void _mouseEvents_OnMouseClick(Inventor.MouseButtonEnum mbEnum, Inventor.ShiftStateEnum ssEnum, Inventor.Point modelPoint, Inventor.Point2d viewPoint, Inventor.View view) { _insPoint = modelPoint; _interactionEvents.SelectionActive = false; _interactionEvents.Stop();
// Unsubscribe Event Handlers undoEvents(); _bpicking = false;
}
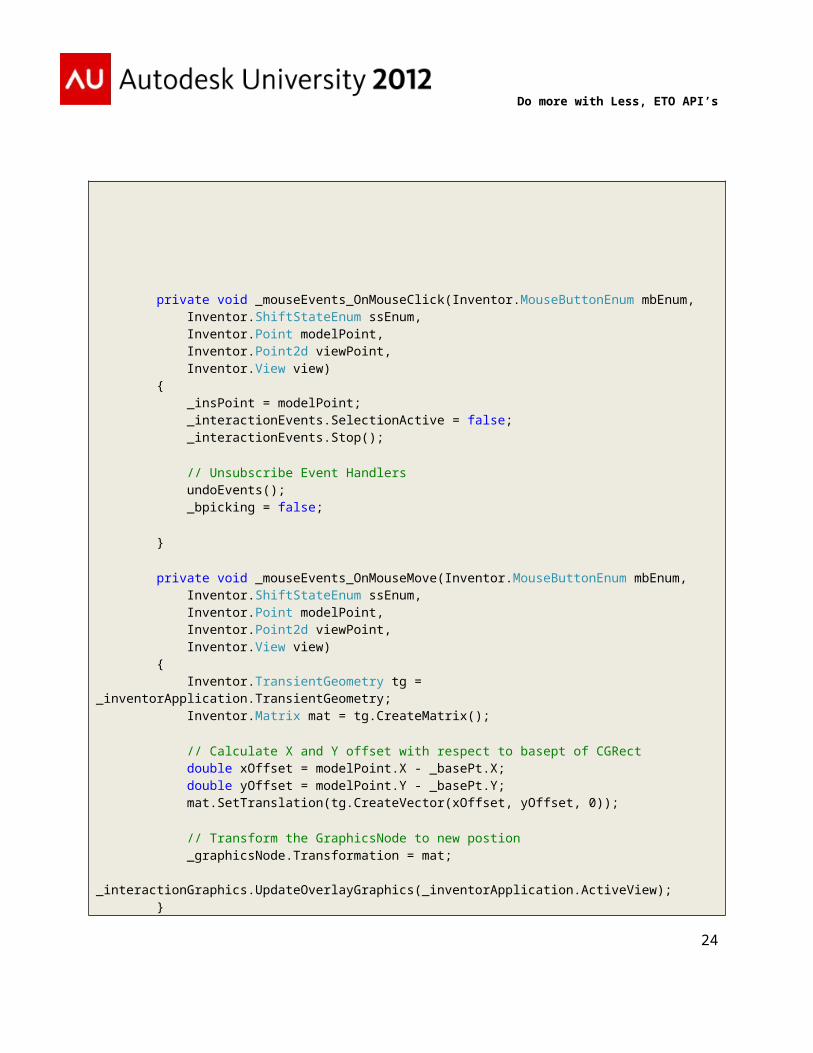
private void _mouseEvents_OnMouseMove(Inventor.MouseButtonEnum mbEnum, Inventor.ShiftStateEnum ssEnum, Inventor.Point modelPoint, Inventor.Point2d viewPoint, Inventor.View view) { Inventor.TransientGeometry tg = _inventorApplication.TransientGeometry; Inventor.Matrix mat = tg.CreateMatrix();
// Calculate X and Y offset with respect to basept of CGRect double xOffset = modelPoint.X - _basePt.X; double yOffset = modelPoint.Y - _basePt.Y; mat.SetTranslation(tg.CreateVector(xOffset, yOffset, 0));
// Transform the GraphicsNode to new postion _graphicsNode.Transformation = mat; _interactionGraphics.UpdateOverlayGraphics(_inventorApplication.ActiveView); }
21

Do more with Less, ETO API’s
// This is public method which is invoked from instance of this class public void MoveCGRect ( Inventor.GraphicsNode grNode, string cgrectRefChain, Inventor.Point basePt ) {
// Assign CGRect basept to class _basePt _basePt = basePt;
// Set up interaction events _interactionGraphics = _interactionEvents.InteractionGraphics; _clientGraphics = _interactionGraphics.OverlayClientGraphics;
_graphicsNode = _clientGraphics.AddNode(1);
// Collect all graphics Node with same ref chain Inventor.ObjectCollection grNodesColl = _inventorApplication. TransientObjects. CreateObjectCollection(Type.Missing);
ClientGraphics clientGraphics = grNode.Parent;
// Get the position of "." in ref chain, after "." is name of CG child // for e.g. Root.CGRectColl.CGRect_1.polyRect int pos = cgrectRefChain.LastIndexOf(".");
// Get ref chain without CG child anme string nodeName = cgrectRefChain.Substring(0, pos);
// The CGRect could have been made using muliple CG Entities // like Lines, Arcs , Circles and Text grNodesColl.Add(grNode);
IHostAPI hostAPI = IntentSession.IntentAPI.HostAPI as IHostAPI;
// Check if CGRect is made of multiple CG Entities and // add them to grNodesColl
22

Do more with Less, ETO API’s
foreach (GraphicsNode grn in clientGraphics) { string sname = hostAPI.RefChainFromHostObject(grn); pos = sname.LastIndexOf("."); if (string.Compare (sname.Substring(0, pos),nodeName,true ) == 0) { grNodesColl.Add(grn); } }
// Add the object from grNodesColl to OverlayClientGraphics // These objects will be dragged during mouse move foreach (GraphicsNode grn in grNodesColl) { if (grn[1] is CurveGraphics) { CurveGraphics cgr = grn[1] as CurveGraphics; CurveGraphics cgr_temp = _graphicsNode.AddCurveGraphics(cgr.Curve);
} else if (grn[1] is TextGraphics) { TextGraphics tgr = grn[1] as TextGraphics;
TextGraphics tgr_temp = _graphicsNode.AddTextGraphics(); tgr_temp.Text = tgr.Text; tgr_temp.FontSize = tgr.FontSize; tgr_temp.Anchor = tgr.Anchor; tgr_temp.HorizontalAlignment = tgr.HorizontalAlignment; tgr_temp.VerticalAlignment = tgr.VerticalAlignment; } }
_interactionGraphics.UpdateOverlayGraphics(_inventorApplication.ActiveView);
_interactionEvents.SelectionActive = false; _mouseEvents.MouseMoveEnabled = true; _bpicking = true;
_interactionEvents.Start();
while (_bpicking) { System.Windows.Forms.Application.DoEvents(); }
23
Do more with Less, ETO API’s
} // End of MoveRect
private void _interactionEvents_OnTerminate() { if (_bpicking) { _bpicking = false; undoEvents();
} } private void undoEvents() { _mouseEvents.OnMouseClick -= new Inventor.MouseEventsSink_OnMouseClickEventHandler ( _mouseEvents_OnMouseClick ); _mouseEvents.OnMouseMove -= new Inventor.MouseEventsSink_OnMouseMoveEventHandler ( _mouseEvents_OnMouseMove ); _interactionEvents.OnTerminate -= new Inventor.InteractionEventsSink_OnTerminateEventHandler ( _interactionEvents_OnTerminate );
_interactionEvents = null; _mouseEvents = null;
} }// End of class}
Now add the button “Move CGRect” and paste the following code to instantiate the above Class ClsMouseMoveEvents and invoke the method MoveCGRect() button event handler.
private void buttonCGRectMove_Click(object sender, EventArgs e) { // Switch to Plan View PlanView();
// Allow the use to pick the CGRect instance object obj = _inventorApplication.CommandManager.Pick ( SelectionFilterEnum.kAllEntitiesFilter, "Select CGRect:" );
24

Do more with Less, ETO API’s
// Handle on object of Type GraphicsNode GraphicsNode grNode = obj as GraphicsNode; if (grNode != null) { // Get the Ref chain of CG Primitive string cgrectRefChain = _hostAPI.RefChainFromHostObject(grNode);
// Get Intent Part corresponding to CG Primitive Part cgrectPart = _rootPart.GetRuleValue(cgrectRefChain); cgrectPart = cgrectPart.Parent; // CGRect instance
//Move the CGReect if (cgrectPart != null) { // Get the insertion point of Intent children Autodesk.Intent.Point pt1 = cgrectPart.GetRuleValue("pt1").ToPoint();
// Instantiate through overridden construct ClsMouseMoveEvents mouseMoveEvents = new ClsMouseMoveEvents (_inventorApplication );
// Convert MM or Inch document units to CM double mfac = 0.1; if (_inventorApplication.ActiveDocument.UnitsOfMeasure.LengthUnits == UnitsTypeEnum.kInchLengthUnits) { mfac = 2.54; } Inventor.Point basePt = _inventorApplication.TransientGeometry. CreatePoint(pt1.X * mfac, pt1.Y * mfac, 0); mouseMoveEvents.MoveCGRect ( grNode, cgrectPart.RefChain.ToString() , basePt );
// We have the user selected point Inventor.Point pickPoint = mouseMoveEvents._insPoint;
// The selected point should be converted back to MM or INCH // depending on document units mfac = 10; if (_inventorApplication.ActiveDocument.UnitsOfMeasure.LengthUnits == UnitsTypeEnum.kInchLengthUnits) {
25

Do more with Less, ETO API’s
mfac = 1/2.54; }
// Assign the user selected point to "pt1" parameter rule. Value val = new Value(); val.SetFromPoint(new Autodesk.Intent.Point(pickPoint.X * mfac, pickPoint.Y * mfac, 0));
cgrectPart.SetRuleValue("pt1", val); } // Update the model _hostAPI.IntentAPI.ActiveModel.Render();
} }
At this point our UI control looks as shown below.
26

Do more with Less, ETO API’s
Using Intent Events
We saw how to use selection and mouse events which are specific to Inventor API. The Intent also has Events. The Intent has events for simple rules and child rules. Below is list of simple Rule events.
Each action is specified as a list in "plist format" (alternating names and values). The first field (name) is always action, followed by one of the following:
allowModify? Event occurs prior to the modification of a dynamic rule. The handler is a Boolean method that specifies whether the modification is to be allowed or not. If it returns True, then the modification proceeds. If it returns False, then the modification is cancelled.
preModify Event that happens prior to the modification. The handler can see the previous value of <ruleName>. The handler is a method that returns a list of actions to be performed.
postModify Event that happens just after the modification. The handler can see the previous value of <ruleName>. The handler is a method that returns a list of actions to be performed.
allowDelete? Event occurs prior to the deletion of a dynamic or modifiable rule. The handler is a Boolean method that specifies whether the deletion is to be allowed or not. If it returns True, then the deletion proceeds. If it returns False, then the deletion is cancelled.
preDelete Event that happens just prior to the deletion. If the rule was a Child rule, this event happens prior to the 'deleteSelf' events. The handler can see the current value of <ruleName>. The handler is a method that returns a list of actions to be performed.
postDelete Event that happens just after the deletion. If the rule was a Child rule, this event happens after all of the 'deleteSelf' events. The handler can not access the value of <ruleName>, unless the deletion exposes an underlying 'default' design-rule. The handler is a method that returns a list of actions to be performed.
27

Do more with Less, ETO API’s
Similarly we have following Child Rules
preCreateSelf Event happens just after the part is created. Obviously the part has to be created in order for its event-handler to run! The handler is a method that returns a list of actions to be performed.
postCreateSelf Event happens after preCreateSelf event. The handler is a method that returns a list of actions to be performed.
allowDeleteSelf? The handler is a Boolean method. If it returns False, then the child is not deleted, nor are any of the modifications underneath, if any. If the deletion is disallowed, no error or other notification happens to the caller — it appears to the caller as if the deletion succeeded, but in fact the part is still there.
preDeleteSelf Event happens just before the child-rule is deleted, and prior to the deletion of any dynamic/modified rules underneath the child. The handler is a method that returns a list of actions to be performed.
postDeleteSelf Event happens after all dynamic/modified rules underneath this child have been deleted, and just before the rule is deleted. So the child is still there, but stripped of all lower level dynamic rules. The handler is a method that returns a list of actions to be performed.
28

Do more with Less, ETO API’s
What actions are supported in event handlers
CreateDynamicRule creates an "Any" type rule, on any part, with any name, with any formula. Required fields are: part which specifies the parent (owner) of the new rule, name which is the name of the new rule and must be an Intent Name, and formula which is the formula for the new rule. The formula must be a string, even if it's a simple constant such as a number.
CreateDynamicPart creates a Child rule. Required fields are: part which specifies the parent (owner) of the new rule, name which is the name of the new rule and must be an Intent Name. Following those required fields are the parameters and formulas of the new child rule, including the 'design' pseudo-parameter. The parameters must be Names. But the formulas, of course, are strings.
DeleteDynamicRule deletes any dynamic rule (or dynamic “modifying” rule). Required fields are: part which specifies the parent (owner) of the rule to be deleted, and name which is the name of the rule to be deleted. Note that if the deleted rule is a child rule, all dynamic/modified rules underneath will also be deleted, and any relevant event handlers will be recursively fired.
Based on above modify the existing CGRect Design to test some of the rule and child events.
Let us add preModify and postModify events for width rule. For child rule let us add postCreateSelf. In postCreateSelf handler we would change the color of CGRect to yellow, i.e. after the CGRect is instantiated , the color is changed to yellow.
The rules for which the event handlers are added should be declared with keyword uncached, otherwise events are only fired very first time.
The new rule for color is added to design so that corresponding event handlers can be added. The modified lines are highlighted with yellow and new additions with cyan.
29

Do more with Less, ETO API’s
The updated CGRect design with events is given below.
Design CGRect : SupportRoot IvComponentGroup
Uncached Parameter Rule width As Number =100Uncached Parameter Rule height As Number =100
Parameter Rule pt1 As Point = Point(0,0,0)Parameter Rule color As String = "Red"
Rule pt3 As Point = Point( GetX(pt1)+width ,GetY(pt1)+height,0)
'Compute other 2 points for rectangleRule pt2 As Point = Point( GetX(pt3),GetY(pt1),0)Rule pt4 As Point = Point( GetX(pt1),GetY(pt3),0)
' Use CGPolyline to create a rectangle. ' it needs the list of points
Child polyRect As :CGPolylinePoints = {pt1,pt2,pt3,pt4,pt1}color = Me.colorSelectable? = True
End Child
' Simple Rule event HandlersMethod width_preModify() As List
COM_msgbox(stringValue(width))Return {}
End Method
Method width_postModify() As ListCOM_msgbox(stringValue(width))Return {}
End Method
Method postCreateSelf() As List'Modify the color after CGRect is created
30
Do more with Less, ETO API’s
Return { _{ :action , :createDynamicRule, _
:part , self(), _ :name , :color, _
:formula ,stringvalue("Yellow") _} _
}
End MethodEnd Design
Add Dimensions Smartly
The creation of drawing views with proper scale is well established process. The confusion arises when one wants to dimension the views. Typically following two approaches are used.
1. Add dimensions using Named entities, this involves additional work of naming entities which are involved in dimensioning. The problem can be that those entities may not appear in drawing view, as there can be overlapping drawing curves.
2. The other common approach involves use of work points, which works fine even for complex models.
The focus would be around 2nd approach to demonstrate some techniques to create dimensions quickly and with better clean placement.
31

Do more with Less, ETO API’s
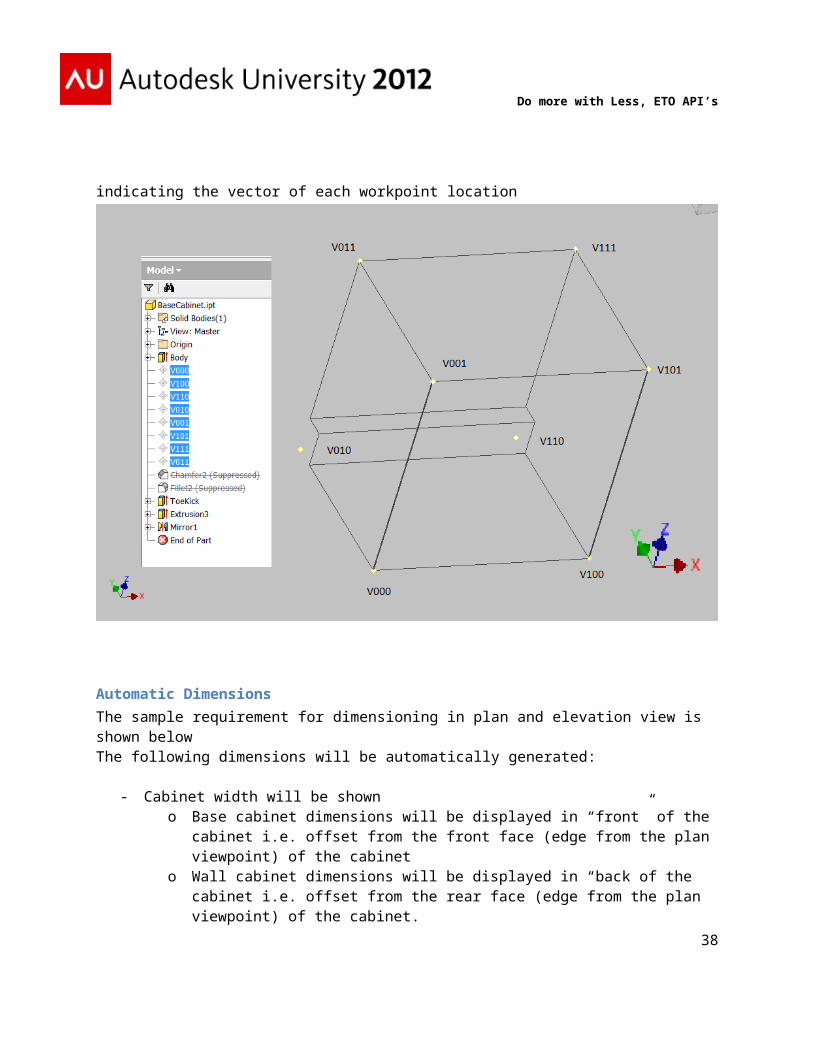
As an example I have taken a cabinet, it could be base or wall cabinet. The cabinet contains the work points named logically to by indicating the vector of each workpoint location
Automatic DimensionsThe sample requirement for dimensioning in plan and elevation view is shown belowThe following dimensions will be automatically generated:
- Cabinet width will be showno Base cabinet dimensions will be displayed in “front” of the cabinet i.e. offset from
the front face (edge from the plan viewpoint) of the cabineto Wall cabinet dimensions will be displayed in “back of the cabinet i.e. offset from
the rear face (edge from the plan viewpoint) of the cabinet.o Location: The dimension will be pulled a default distance from the cabinets.
- Cabinet Depth will be shown.o The dimension will be shown per cabinet, ON the cabinet “box”. For base
cabinets the text of the dimension will be pulled closer to the front of the cabinet, for wall cabinets the text will be pulled toward the rear.
32
Do more with Less, ETO API’s
o The dimension location from the right edge of the cabinet will be offset further for wall than for base cabinets. Exact values will be determined during development. NOTE – these won’t always be sufficient to avoid overlaps.
Dimensioning in Plan ViewWe would be using workpoints V001 and V101 for base cabinets and workponts V011 and V111 for wall cabinets. These are workpoints placed on top face of cabinets.
The Intent design below gets all base cabinets and calculate dimension placement point for width each base cabinet in plan view.
Rule getBaseCabinets As List Dim cabs As List={}
Dim dimData As List = {} For Each v In topView.Model.Room.Cabinets.Children
If v.isKindOf?(:rcCabinetmixin) Then' If it does not contain "Wall"
'then it is base cabinetDim pos = StringPosition _
(stringValue(partDesign(v)),"Wall")
If pos = 0 Then 'It is base cabinet Dim pt1 = topView.workpointLocation(v,"V001")
33

Do more with Less, ETO API’s
Dim pt2 = topView.workpointLocation(v,"V101") ' Calculate the midpoint
Dim cpt = Interp(pt1, pt2, 0.5) ' Get the vector between points
Dim vec = pt2-pt1 ' Make it a unit vector
vec = unitize(vec)Dim per = Perpendicular(vec)' Re-calculate center point on opp side
' of per vectorcpt = cpt + per * (-10)
' Build the cabs list dimData={v,cpt}
cabs = cabs + {dimData}End If
End IfNextReturn cabs
End Rule
Similarly the Intent design shown below gets all wall cabinets and calculate dimension placement point for width each base cabinet in plan view.
Rule getWallCabinets As List Dim cabs As List={}
Dim dimData As List = {} For Each v In topView.Model.Room.Cabinets.Children
If v.isKindOf?(:rcCabinetmixin) Then' If it does not contain "Wall"
' then it is base cabinetDim pos = StringPosition _
(stringValue(partDesign(v)),"Wall")
If pos > 0 Then 'It is wall cabinet Dim pt1 = topView.workpointLocation(v,"v011")
34

Do more with Less, ETO API’s
Dim pt2 = topView.workpointLocation(v,"V111")Dim cpt = Interp(pt1, pt2, 0.5)Dim vec = pt2-pt1vec = unitize(vec)Dim per = Perpendicular(vec)
' Calculate the point at an offset in ' direction of per vector
cpt = cpt + per * 10 ' Build the cabs list
dimData={v,cpt}cabs = cabs + {dimData}
End IfEnd If
NextReturn cabs
End Rule
Once the dimension placement data is available for base and wall cabinets, the following two child rules which are part of planviewsheet design places the cabinet width dimensions.
Child baseCabDimWidth As _ (If length(getBaseCabinets) >0 Then _ :IvLinearDimension Else _ :nulldesign ) , Quantity = length(getBaseCabinets)
entity1 = "V001" entity2 = "V101"
part1 = nth(1,nth(child.index,getBaseCabinets)) part2 = nth(1,nth(child.index,getBaseCabinets))
' Convert the center point to sheet co-ordinates textOrigin = iv_viewToSheet _
( topView, nth(2,nth(child.index,getBaseCabinets))) view = topView
35

Do more with Less, ETO API’s
dimType=:aligned
End Child
Child wallCabDimWidth As _ (If length(getWallCabinets) >0 Then _ :IvLinearDimension Else :nulldesign ) , Quantity = length(getWallCabinets)
entity1 = "V011" entity2 = "V111" part1 = nth(1,nth(child.index,getWallCabinets)) part2 = nth(1,nth(child.index,getWallCabinets))
' Convert the center point to sheet co-ordinates textOrigin = iv_viewToSheet _
( topView, nth(2,nth(child.index,getWallCabinets))) view = topView dimType=:aligned
End Child
36
Do more with Less, ETO API’s
Dimensioning in Elevation View
In the elevation view for base cabinets the workpoints V010 and V110 are used for width and V010 and V011 are used for depth as shown below.
Similarly for wall cabinets the workpoints V111 and V011 are used for width and V010 and V011 are used for depth as shown below.
For elevation view we use different approach to pick up only cabinets which fall in line of view direction.
The rule allcabs below collects all cabinets
Rule allcabs As List allcabs = {} For Each ch In TreeIterator(model) If isKindOf?(ch,:rccabinetmixin) Then
allcabs = allcabs + {ch}End If
Next End Rule
37
Do more with Less, ETO API’s
The rule below collects only cabinets which are perpendicular to view direction and also segregates them as base and wall cabinets list.
Rule cabinetstodim As ListDim basecabinetstodim As List = {}Dim wallcabinetstodim As List = {}For Each cab In cabsinview
If cab.cabinetfrontvector = viewvec*unitz ThenIf StringPosition
(stringValue(partDesign(cab)), "Wall") = 0 Thenbasecabinetstodim = basecabinetstodim + {cab}
Elsewallcabinetstodim = wallcabinetstodim + {cab}
End IfEnd If
NextReturn {basecabinetstodim,wallcabinetstodim}
End Rule
The above rule returns a list of two sub-lists, each for base and wall cabinets. The rule BaseCabinets_DimData below collects the dimension data as name value pair list so that it can be directly passed to additionalParameters parameter of linear dimension child.
Rule BaseCabinets_DimData As List'Required for section viewsectionView.modelSelfDim dimsdata As List = {}For Each cab In First(cabinetstodim)
'Hor dimDim pt2 As Point = sectionView.workpointLocation(cab,"V110")Dim pt1 As Point = sectionView.workpointLocation(cab,"V010")Dim cpt As Point = iv_viewToSheet _
(sectionView,MidPoint(pt1,pt2)) + Vector(0,-.25,0) 'Ver dim
Dim pt3 As Point = sectionView.workpointLocation(cab,"V010")Dim pt4 As Point = sectionView.workpointLocation(cab,"V011")Dim cvpt As Point = iv_viewToSheet _
(sectionView,MidPoint(pt3,pt4)) + Vector(-.1,-.05,0)dimsdata = dimsdata + _
{{:part1,cab,:part2,cab,:entity1,"V010", _ :entity2,"v110",:textorigin,cpt}, _ {:part1,cab,:part2,cab,:entity1,"V010", _ :entity2,"v011",:textorigin,cvpt} _
}NextReturn dimsdata
End Rule
38

Do more with Less, ETO API’s
The value returned by above rule is used in child IvLinearDimension below to put width and depth dimensions on base cabinets.
The child rule gives error during compile, the error can be ignored.
Child BaseCab_Dims As :IvLinearDimension, _ Quantity = length(BaseCabinets_DimData)
view = sectionView dimType=:aligned additionalparameters = nth(child.index,basecabinets_dimdata)
End Child
39

Do more with Less, ETO API’s
Calling Methods from an External DLL
In case of ETO server which does not support AddIns and is headless, the UI typically is ASP application. There can be a requirement to use .Net API, how to handle such situation? The Intent can call public instance and static methods in class project.
The sample Class Library project contains one public instance method and static method.
using System;using System.Collections.Generic;using System.Linq;using System.Text;
namespace ExternalDll{ public class ClassTest { // Instance Method public string ReturnString() { return "Hi from external DLL instance method"; } public static string ReturnStringStatic() { return "Hi from external DLL static method"; }
}}
Copy the DLL to \Design Files folder. The two methods can be called from Intent rules as shown below. The static methods can be called in ETO 2013 and onwards.
Uncached Rule callInstanceMethod As StringDim obj As Any=New externalDll.ClassTest()Return obj.ReturnString()
End Rule
Uncached Rule callStaticMethod As _
40

Do more with Less, ETO API’s
String=externalDll.ClassTest.ReturnStringStatic()
Tips and Techniques Ref findinplist Examples from projects modelself override
41