document resume, ce 031 222 morse, david t.; may, … · for your first job otthe. ... want a...
TRANSCRIPT

DOCUMENT RESUME,
ED 218.432 CE 031 222
AUTHOR Morse, David T.; May, Theodore R.TITLE Engine Tune-up Service. Unit 6: Emission Control
Systems. Posttests. Automotive MechanicsCurriculum. . .
INSTITUTION Florida State Univ., Tallahassee. Career EducationCenter. ..._
SPONS.AGiNCY Florida State Dept. of Education), Tallahassee. Div.of Vocational Education.
PUB DATE Mar 78NOTE 77p.; For related documents see CE 031 208-?21 and CE
. 033 108-109. .
EDRS PRICE MF01/PC04 Plus Postage.DESCRIPTORS *Auto Mechanics; *Engines; Postsecondary Education;
.
Pretests Posttest's; Secondary Education; *Trade andIndustrial Education
IDENTIFIERS *Automotive Tune Up; Emission Control; *Emission. -. r
Control Systems.
ABSTRACTThis book of posttests is designed to accompany the
Engine Tune-Up Service Student Guide for Unit 6, Emission Control'Systems,-available separately as CE 031 220. Focus df the posttestsis inspecting, testing, and servicing emission control systems. Onemultiple choice posttest is provided that covers the sevenperformande-objectives contained in' the unit. (No answer keys areprovided.) (YLB)
P'
Alp
********.*********t***************************************************** Reproductions supplied by-EDRS are the best that can,be made *
* from the original document. * k
********/4*************************************************************.

' Written by David T. Morse and Theodore R. May
THE AUTOMOTIVE MECHANICS CURRICULUM TEAM
llearrligteader. Roger L. RichardsonInstructional Designers, Ludy Goodson, Roger L. RichardsonMeasurement and Evaluation Specialist. David T MorseAutomotive Mechanics Curriculum Design Specialist. E. Miles Bacon_Subject Matter Specialist Theodore 113 MayEditor' Linda- HarkeyGraphic Designer: John S MatlockResearch Librarian- Marsha T Paddock
CAREER EDUCATION CENTER, FLORIDA'STATE UNIVERSITY
Direcior. Robert ...LathropInformation Services Division Coordinator Margaret WinklerProduction Division Coordinator Mary Ann KiddEditorial Division Coordinator Dolores'FilsOn--Visual Communications Division Coordinator Lynn RogersDiffusion and Dissemination Division Coordinator Mary K PriceArt Director William J Kidd
PRODUCTION
Proof reading'and Traffic Supervisor. Ann yentaProofreaders Alice Lawyer, Susan Flefning,- Sam Harrison, Becky GoffCopy Staff Betty Willard, Agnes Padgett, Sylvia finKellIllustrators Julian Key, Cheryl McMaboa Frank, Rbbert SwansonArt Production Supervisor Bob BurgunProduction Assistants Hollis Bli§S, Lmda Dodson, Dan Haskin
it

' Written by David T. Morse and Theodore R. MayTHE AUTOMOTIVE MECHANICS CURRICULUM TEAM
1aneader. Roger L. RichardsonInstructional Designers: Ludy Goodson, Roger L RichardsonMeasurement and Evaluation Specialist. David T. MorseAutomotive Mechanics Curriculum Design Specialist E Miles Bacon_Subject Matter Specialist Theodore Ii MayEditor Linda-HarkeyGraphic Designer: John S MatlockReserarch Librarian: Marsha T Paddock
CAREER EDUCATION CENTER, FLORIDA'STATE UNIVERSITY
Director. RobertiLathropInformation Services Division Coordinator Margaret WinklerP,roduCtion Division Coordinator. Mary Ann KiddEditorial Division Coordinator Dolores' FilsonVisual Communications Division Coordinator Lynn RogersDiffusion and Dissemination Division Coordinator Mary K PriceArt Director William J Kidd
PRODUCTION
Proofreading and Traffic Supervisor. Ann yentaProofreaders Alice Lawyer, Susan FleiningT Sam Harrison,'Becky GoffCopy Staff Betty Willard, Agnes Padgett, Sylvia finKetIllustrators Julian Key, Cheryl McMation.Frank: Rbbert SwansonArt Production Supervisor. Bob BurgunProduction Assistants Hollis Bir`s, Linda Dodson, Dan Haskin
v
3

t."
POSTTESTUNIT 6
Vb.
Directions: Read the first question carefully After selecting yotk answer, record the answer on youranswer sheet in-the 'space provided.
, . , - . ., .
Next, Turn to the question listed in parentheses at the end of your answer Fir, example, ifyour choice says (go to #14);you.would answer question 14.next.Each time you answer a question, be sure to write dow9 on your'answer sheet BOTH thequestion number and your answer. Continue working through the test until you reach theend.- , .You will be jumping from question to question, and will not have to answer all the
.t ,,quesiors_.
DO NOT MARK ON THIS TEST.
A
2
V

14
t4
ira.... I
4
,., 1
___...
-.) ,
i. Situatibn: You work as a tune-up specialist at a large dealership. For your first job otthe day,
the service manager has assigned you to work on a 1975 Plymouth Valiant. The owner does not
want a complete tune-up, since the secondary wiring, distributor cap, and rotor have recently been
replaced. However, the owner has complained of high full consumption, infeased oil con -
sumption, and generallVpoor perVrmance. The engine is a 225 CID 6-cylinder with electronic
ignition. The vehicle is equipped with an automatic transmission.
You should first:
a. Crank the engine to hear how it runs (go to #81)b. Hook up an engine analyzer (go to #52)c. Hook up an HC-CO tester (go to #35)d. 'Perform a spark intensity test at the coil (go to #70)
e. Test the PCV valve (go to #133)f. Overhaul the carburetor (go,to #62)'g. Adjust the carburetor idle mixtu(e and speed (go to #57)
h. Replace the charcoal canister filter element (go to #235)
I. Visually inspect the engine compartment (go to #47)
2. After the specified length of time, thibattery voltage is 11.2 v Now you should'
a. Illiplace the battery (go to #178)b. Replace the ignitiorfpoints and condenser (go to #209)
c. Checkihe ignitionspypass circuit (go to #161)
d Charge thd'battery to #240)e. Check the engine timing (go to #5) . ,
3. Next you should:
a. Hook up-an engine analyzer (go to #107)
b. Hook up an HC-CO tester (go to #186)c Adjust the carburetor idle speed and mixture (go to #121)
d. Replace the charcoal canister filter, element (go-to #157)
/
1, V
is
C
So

4
,!..
4. The federal automotive emissions standards are as follows:
Mode' years Emission levels1968-69 ' HC-275 Off
C04-1.5% , :
1970-71 HC-4.6 grams/vehic4 mile ifCO -47 grims/vehicle mile)
197 HC-3.4 grarpsaehicle mileCO-39 grantsfrehicle mile
-61973-74 --,,.....41' HC-3,4 grams/vehicle mile.0- CO-,-39 grams/vehicle mile
4NOx-3.0 gramstvehicle mile
k.q
1975 HC-70.46 gramdvehicle mileCO-4.7 grams/vehicle mileNOx-3.0 grains/vehicle mile
You should.now:
a. Use thespecification HC*,275 ppm; CO: 1.5% (go to #181)b. Use the specifications HC: 275 ppm; CO: 0.3% (go to #181)c Use ihspecifications'HC..46 grams/vehicle mile, CO. 4.7 grams/vehicle mile (go to #189)d. Check the vehicleiemission control decal in the engine compartment (go to #71)e. Check a techrrIt% service manual (go to #150)f. Check the HC-CO tester manual (go to #84)
5. Here are the directions for timing this engine.
Ignition timing must be checkecl with ie engine at specified hot (slow) idle,speed with the trans-missiOn in .neutral and the distributor vacuum, advance hose disconnected and plugged at thedistributor.
. . .
If you forgot to remove and plug the distributor vacuum advance hose, your timing readings would,
be:
a. More advarfced than the propeudading (go to #82)b: More retarded, than the propeueading (go to #82)c. t different from the proper reading (go to #82).
6. Aft r removing the carbdretor from the engine and placing it.on a stand, you should.
a. Remove the throttlebody (go to #167)b.. Remove the choke 'linkage (go to #213)e. -Remove the mairi body (go to #152)
d: Remove the tloat bowl gover (go to #31)
3o

7. Here is the superimposed pattern you obtain*
KV a
25 50.KV
20
15
10
5
0
. .
). .,
. t a
r / .
./..."'"' .
/ ,
.
. .
.4,
. .
r . , . .
.... .
. .
...
.
.. .
..,_...._.,.........,
_,PC):1'I\ .,y
40
30
20
10
0
45 40 35 30, 25 020 15 ,.is,
10 5 8 CYL
90 80 70 60 50 , 40 30 20 10 _ 4 CYL
i toi.
60' 55 50 45 40 35 30 25 20 15 10 5 S CYL
You should now.
a. Check the c act points for alignment (go to #209)b Check the eCV system (go to #133)c. Ch k the exhaus emissions level (go to #35)
t the-carbur for i,d1e speed and mixture (go to #57)k the spark plugs (go to #243)k the secondary ignilion circuit (go to #70)
erhaul the carburetor (go to #62)
8. hat range on the,HC-CO tester would you select?
a. Low range (go to #206)High range (go to #95)
d Ad]e Chf Che
4
F
i.
)
o. -
-2.

V.
9. The proper adjustment of the distributor body,to change the ignition timing from 0° to TDC is toturn The distributor body.
. -
a. In the same direction as the rotor rotation (go to #222)b. In the opposite direction of the rotor rotation (go to #26)
10. The technical service manual shows a specification of 0.3% CO No HC specification is given.Now you should.
a. Check the HC-CO tester operating' manual (go to #226)b Check the emissions control decal in the engine compartment (go to #173)c. Ignore the HC"reading and use the specification CO. 0 3% (go to #257)
)11 No "higher" and "lowe r" speeds are listed in the technical service manual You sho uld nowa Use a speed drop of 80 RPM for-adjusting the idle mixture b to #222)b. Adjust the idle mixture for maximum RPM (go to #19)c Hook up an engine analyzer (go to #52)d. Hook up an exhaust gas analyzer (go to #35)e. Simply adjust idle speed and ignore the idle mixture (go to #26)
12. The HC-CO reading you obtain is (high scale selected)
HYDROCARBON
Now you should.
r CARBON MONOX C)E
a. Tell the service manager thaf you have finished the job (go to #279)b. Check the spark plugs (go to #149)c. Check'the carburetor idle mixture (go to #211)
. , d. Check the air cleaner (go to #261)
13. What other part of the automobile would you check?
4 a. The ignition timing (go to #198)b. The carburetor.(go to #62)c. The evaporative emissions control system (go to #180)d. The exhaust gas with an HC -C= ester (go to #35)e The engine performance with a gine analyzer (go to #73)
14. The tester operating manual refeof the tester probe. You should now'
a Check the vehicle emission control decal (go to #205)b Insert the tester probOinto the vehicle tailpipe (go to #222)
Insert the tester probe into the access plug in the exhaust pipe (go to #189).Insert the tester probe info the Snorkel of the air cleaner assembly (go to #26)
u to the. vehicle emission control decal for exact placement
5 8
0,

stb.
15. Here is the display jialtern y6u obtain on the oscilloscope:
KV, /KV25 50
20
15
10
5
c..
40
30
20
0
45 40 35 30 25 20 15 10 5 8 CYL
90 80 , 70 60 50 49 k 30 20 10 4 CYL
1
1 1 t 1. .0
60 55, 50 45 40 35 30 25 20 , 15 10 5 6 CYL
You should now:
a. Check the engine compression (go to #64)b. Check the PCV system (go to #188)c. Check the air-cleaner (go to #214)
d. Tell your service manager that you have finished the job (go to #279)
16. The engine idle RPM does not change after the hose is clamped off. You should now
a. Clean the crankcase inlet air cleaner (go to #175)
b Replace the crankcase inlet 4it cleaner (go to #218)
c. Clean the PCV valve (go4o #66)d. Replace the PCV valve (go to #183)e. Check another part of the automobile (go to #13)
6

'I 4
17. The air pump is part of what emissions control System?
a. TIC (go to #222)b. OSAC (go to #189)c. PCV (go to #26)d. AIR (go to #1'12)
18. Here is the raster pattern you obtain:KV25-
4
20
15
10
t
1 '
a
y.
- 45 40 35'90 8G 70I' tlso. 55. 'DO 45
You should now:
I
40
KV50
40
30
20.
10'
014-
25 20 15 10 5 8 CYO50
ij40 30 20
I I
10 4 CYO
I I 10
35 30 25 20 15 10 5 6CYL
a; Checkthe PCV system (go to #133)b. Adjust the carburetor idle speed and mixtu go to #57)c. Check the spark plugs (go to #243)d. ChecIZ the exhaust emissions level (go to #3e. Overhaul the carburetor (go to #62)
rt

t
I..
19. Turniog thesyle mixture screw in will:
a. Lean the mixture (go to #251)b. Richen the mixture (go to #251)
,20. Here is the HC-CO readings you obtain (high scale selected):.
1
*
,
HYDROCARBON
Ns
CARBON MONOXIDE-,...00
.., You should:
_ -a. Replace the PCV valve (go to #45)b. Continue to check the PCV system (go to #277),c. Clean the-PCV valve (go to #66)d. Check some other part of the automobile (go to #109)
21.i- ,There is no.spark when you crank the engine. You should next
a Replace the coil (go to #60)b. Replace the ignition points and condenser (go to #209)c. Check the timing (go to #5)d. Checkthe battery (go to #136)e. Replace the spark plugs (go to #243) . . sf. Check the ignition bypass circuit (go to #161). .
22. The results of the wet compression test are:
4.
t
t
41
.
CYL NO.
.
1 . 2 3
.
4 5 6
* ,'COMPRESSION
.125 125 130
.
1300 125 1'20t
You should: 4.
a. Install the spark plugs and torque to specifications (go to #88)b. Note that the piston rings need replacement (go t #222)c. Note that the intake valves need replacement (go to #189)d, ,Note that the exhaust valves need replacement (go to #26)
23. The carburetor air clegr is in very good condition, it looks alAst new. Now you should check.
, a. The PCV system (go to #238) .
b. The engine compression (go to #64)
,I.
II
V
1
a
I.
..,

24. Here is one portion of the technical service manual description of servicing the crankcase ven-'tilation system:
SYSTEM CHECKING .
With the engine at idle RPM, remove the ventilator valve from the rocker cover. ff the valve, is not ,
plugged, a hissing noise will be heard as air passes through the valve, and a strong vacuum shouldbe evident when a finger is placed over the.valve inlet.
You should check the PCV syStem by using:
a. A tachometer (go to #166)b. A PCV tester (go to #160).c An HC -CO tester (go to #273)d. The hand method (go to #120)
25. The idle specifications are:Idle speed (RPM)
Models Man. trans. Auto. Trans.
III 6-.cyl 800 750
You should set the idle speed at:
a. 750 RPM (go to #228)b. 800 RPM (go to #228) -
c. The slowest speed at which the engine will idle (go to #189)d. The fastest speed at which the engine will Ole (go to #26) ,
.)26. Which of the following conditions might be responsible for the poor performance deicribed in
question number 1?
a. A defective air pump (do to #279)b. A defective catalytic converter (go to #279)c. A thermostatic air cleaner always open to unheated air (go to #279)d. A clogged PCy valve (go to #279)e. A defective evaporative emissions con(-olsystem (go to #279)
. ,27. After you have overhauled the carburetor, x.oh should check:
a. The engine performance with an engine analyzer (go to #107)b. The exhaust emissions with a HC-C.0 tester,(go to #35)c. .The carburetor idle mixture and speed (go to #197)d. The charcoal canister filter element (go to #132)
28. The manufacturer's specifications state that the ignition timing and idle RPM S' hould be properlyset prior to taking any HC-00 readings,' You should now.
a. Check the idle RPM (go,to #83)b Check the ignition timing (go to #59)c. Take an HC-CO reading (go to #92)
.9 14

t r
29. Spark plug specifications areas follows:
Gap .035 inches;Torque 10 ft-lbs.Type Champion BL 13Y
What type of spark plug should you install?
a. B 11Y (go to #94)b. BL 13Y (go to #94)c. RBL, 15Y (go to #9'4)d. RBL 17Y (go to #222)
30. At idle speed, what should be present at this fitting?
a. A weak vacuum (go to #9,9)b. A Strong vacuum (go to#99)c. A weak flow of air (go to #224)0. A strong flow of air (go to #224)
31. After removing and disassembling the float bowl'cover, you should:
a. Remove the choke linkage (gO to,#87)b. Remove the throttle body (go to #87)c. *Remove the mairibody (go to #87)d.. Placethe carburetor in a suitable cleaning solvent-(go to #245)
32. After.replacing 'the PCV valve, you should:
a. Check the PCV valve operation (go to #236)b. Check another part of the automobile (go to #
33. The engine is hard to start, and once stalled, rough..results in some hesitation, but it is fairly smo should:
a. 'Hook up an engine analyzer (goto #52)b. Hook up an HC-CO tester (go to #35).o. Perform a spark intensity test at the coil (go tod. Test the PCV valve (go to #133)e. Overhaul the carburetor (go to #62)f. .Adjust the carburetatidle speed and mixture (go to #57)
34 What tool(s) should be used to remove and replace the charcoal canister filter ement?
a. Needle-nose pliers (go to #68)b. A screwdriver (go to #68)c. Vise-grip pliers (go to #68)d. A screwdriver and needle-node piters (go to #68)e. No tools are necessary (go to #68)
35. What source could you consult for, recommended lf-CO specifications for this vehiqle?
I.
t.
k acceleration of the thr
a. The manufacturer's shop manuaj (go to #93) ,
b. A techniceRservice manual (go to #54)c. The HC-CO tester operating manual (go to #84)d. The federal guidelines for vehicle emissions (go to #4)e. The emissions control deCal in the vehicle engine compartment (go to #4)
3
Lr-

*/
' 36. rou obtain the following display patterh on the oscilloscope:
KV25
15
5
0
-41
s-.
101011,10;1,-11inor45 4090 80
I r r60 55 50
Now you should:
a. Hook up an HC-CO tester (go to #190)b. Check the engine timing (go to #5)c. Adjust the carburetor idle speed and mixture (go to #65)d. Tell the service manager you have finished the job (go to #279)
37. After the HC-CO tester probe is inserted, warm up the machine. Next you should:
a. Pull a spark plug wire (go to #189)b. Note the present HC and CO levels (go to #58)c. Remove the PCV valve and plug it (go to #201)d. Remove the drankcase inlet air cleaner'and plug it (go to #20)
KV50
40
30
20'
lot
0
35 .30 25 20 15 10 5 8 CYL70 60 SO 40 30 20 10 4 CYL
I.1
I I 1 i 1 IA 10
45 40 35 30 25 -20 15 10 5 6 CYL
fit

40,
38. There is no spark when you crank the engine. Next you should:
a Check th ie gnition bypass circuit (go to #161)
b. Replace the ignition points and condenser (go to it209) ,
c. Replace, the spark plugs (go to #243).d. 'Check the battery (go to #136)e. Replace thp coil (go to #60)f. Check the timing (go to #5)
39. In order to quickly check the performance of tie PCV valve, yoif would remove the hose or fitting
at
a. Point a (go to #118) .
b. Point b (go to #126)c. Point c (go to #278)d. Point d (go to #278)
12
I
e

er removing the carburetor, you notice no clogs in the PCV passages. When installing 'thearburefor, you would tighten thecarburetor hold-down nuts in:
a. Sequence a (go to #227) ,b. Sequence b (go to #227)
41. The emissions control decal in the-engine compartment lists idle CO as 0.3%. No HC specificationis given. You should next:
a. Use the speoificationS HC: 275 ppm; CO: 0.3% (go to #181)b. Use the Specifications HC: 500ppm; CO: 0.3% (go to #181)c. Use the specification's HC: 200 ppm, CO: 0.3% (go to #181)d. Ignore the HC,reading and use the CC) specification of 0.3% (go to #181)
- 442. When the engine is cranked, there is a full, blue spark from the end of the wire to the engine blOck.
`(o6 should:
a. Hook up arrengirte analyzer (go to #52)b: Replace the contat points'and condenser (go to #209)c. Check the spark pltigs (go to #243)d. Overhaul the carburetor (go to #62)e. Hook up an HG=00 tester (go to #35)f. Test the PCV valve (go to #133).
43.. After charging and installing the battery, you should:
a. Check the engine timing (go to #5)b. Check the ignition bypass circuit (go to #48)c. Hook up areengjne analyzer #52)d. Hook up an HC-00 tester ( to #3e. Check the PCV Valve (go to #13?)f. "Adjust the Carbbiator.(go to #57)g., Replace the spark plugs (go to #243)
1 rt13 4- t )
Ek

ti
-
44. After adjustingetor idle mixture for lowest emissions, the HC-CO reading is (high scale
seleCted):
.01
HyOROCARB=N
Now yoU should:
a. Check the ignition system (go to #139)b. RAd test the vehicle (6o to #279)G. Correct theAigh HC reading(go to #279)d. Correct the low HC reading (go to #279)e. Tell the service manager that you have finished the job (go to #279)
45. After reOla6ing the PCV valve, you should:,
a. Clink another part of the automobile (go to #220)b. Check the PCV valve operation (go to #121)
4e: Here is the 'reading you obtain:
CARBON tVONOXiDE
ju
4'HYDROCARBON CARBON PVCCNJOICE
This reading means:
a. The engine is in need of an overhaul (go to #222)b. The engine needs no further repair (go to #189)c. The HG level is too high (go to #92)d. The CO *fel is too high (go to #92)e. Both the HC and CO levels are too high (go to #92)
14
h
1

A
47.' The engine compartment is dirty. All hoses appeal to be'ound and the belts are fairjy tight. The'battery cable damps are firmly attached. You should next:
a. Replace the clarcoal canister filter element (go tO#235)b. Adjust the carburetoridle mixture and eed (go to #57)c: Overhaul the carburetor (go td. Test the PCV valve (go to #133)e. Perform a spark intensity test at the coil (go to #70) 'Jf. Hook up an HC-CO tester (go to #35)
. g. Hook up an engine analyzer (go to #52)h. Crank the engine to hear how it runs (go to #81)
48. Once you have verified that the ignition bypass circuit is good, you would
a. Check the engine timing (go to #5)go. Hook up an engine analyzer (go to #52)
c Adjust the carburetor (go to #57)d. Hook uan HC-CO tester (go to #35)e. Tell the service manager that you have finished the job (go to #222)f.. Rep ce the spark plugs (go to #243)g. Ch 1( the PC\Pvalve (go to #133)
'49. There is Imost no vacuum present, and no noise can be heard at this fitting You should now
a. Continue to check the PCV system (go to #192) k"big Replace the PCV valve (go to #231)c. Clean the PCV valve (go to #66)d. Check another part of the automobile (go to #222)
50. The technical service manualtfers you to the vehicle emission control decal for exact placementof the tester piobe. You should now:
a. Insert the probe into the vehicle tail pipe (go to #222)b. Ins t the p ?obe into the access plug in the exhaust pipe (go to #189) .
c. In rt the probe into the sn r el o r cleaner assembly (go tot6)d. Con ult the vehicleiemission control deca (go to #104)
1
51. The HC level remains unchanged, and the COS -vel drops slightly. Now you should
Replace the PCV valve (go to #45)b. Continue to check the PCV system (go to #277)c. Replace the carburetor air cleaner (go to #222)d. Replace the PCV inlet filter (go to #189)e. Replace the crankcase inlet air filter (golo #26)
52. After properly hooking up the engine analyzer, you should select a.
-a. Raster pattern (go to #18)b. Display pattern (go to #169)
Superimposed patterrr(go to #7)
4,

53. The specific gravity readings are 1.260, 1.260, 1.270, 1.260, 1.260, and 1.260. Now you should*
a." Replace the battery (go to #178)b. ,Charge the battery (go to 1240)c. Check the ignition timing (go to #5)d. Replace the spark plugs (go to #243)e. Replace the ignition points and condenser (go to #209)f. Check the ighition bypass circuit (go to #161)g. Replace the coil (go to #60)
54. , The technical service manual shows a specification of 0 3% CO No HC specification is given Youshould now
a. Check the emissions control dadal in the engine compartment (go to #71)
b. Check the HC-CO tester operating.manual (go to #84)
c Check the federal guidelines for vehicle emissions (go to #4)d Hook up the HC-CO tester (go to #181)
55. After carefully pouring water around likely leaks and listenirlg, you cannot detect any vacuumleaks. Next you should.
a Check the engine compartment (go to #64)b Check the air cleaner (go to #23)c. Check the PCV valve (go to #238)d Adjust the carburetor mixture (go to #125)
56. In order to remove the spark plug wires from tlie spark plugs, you should
a. Remove each wire by.pulling in a straight direction (go to #129)b. Grab each wire andyank hard (go to #129)c. Twist the wire boot and then pull the wire of (g(i/o #129)
Specifications are given for engine idle speed, but the manufacturer specifies that engine idlemixture should be adjusted with the aid of an infrared tester. You should now
a. Adjust the idle mixture using the "lean drop" method (go to #11)
b. Adjust the idle mixture for maximum engine RPM (go to #19)c. Hookup an exhaust gas analyzer (go to #35)d. Hook up an engine analyzer (go to #52)e. Simply adjust the idle RPM and ignore the idle mixture (go to #251).
16

58. You made a 'note of the present HC ar)d CO levels. NovLy_ou should remove and plug the PCV lineorport at:
. .
4
a, Point a (go to #234)b. Point b (go to #187)
Point c (go to #239)d. point d (go to #51)
59. The manufacturer lists the timing specifications as TDC. After checking with a timing light, younote that the engine is set at 0°. You should next:
a. Check the idle RPM (go to #203)b. Adjust the timing to specifications (go to #9)c. Take an HC-CO reading (go to #924d. Set the point dwell (go to #26)
60. To dOudercheck your diagnosis of a defective coil, you votuld check the. 'a. Primary resistance (go to #108)b. SeCondary resistance (go to #108)c. Current (coil) draw (go to #108)d. Ballasfresistance (go to #1.08)
61. The PCV tester will not fit into the opening. Now you should:
a. Check the PCV system by the HC-CO tester method (go to #273)b. Check the PCV system by the tachometer method (go to #166)
//c 'Check some other part Of the automobile (go to #13)d.-,.Replace the defective tester with anew one (go to #189)e. ConeUlt the PCVAester instruction manual (go to #148)

tI
, zt'
62. The cyburetor serial numbers are listed in the techrticaf service manual as:
CHRYSLER CoRP.
(225-").*
Holley Carlluretor No.'
Application
Federal
yglifornia . .
The vehicle is a non-eapforniamobile is'
z,`
Man. Transmission Auto. Transmission
R-7017a:R-737'9A . . .... R-7018A '
R-7019A . . ..... . , . R-7020A
automobile. The carburetor serial number for this particular auto-
a R-7017A or R-7379A (go to #262)b. R-7018A (go to #262)c. R-7019A (go to #262)d R-7020A (dO to #262)
fa, 63. Here is the reading you obtain:
9'9
4
HYDROCARBON
4
cAREaoni Allboxioe
This reading mans.a. 'The er4,gine is in need of an overhaul (go to #222)
b. The.engine needs no further repair (go to #189)
c. The HC level isloo high (go to 02)d. The CO level is too high (go to #92)e. Both ttv HCnd CO levels are too high (go to #92)
I-
'
18'

64. When you remove the spark plugs, yogi notice that they look like this:
7 '
You should:
a. Obtain new spark plugs before checking the compr4ssion (go to #96) .4ib. Clean the spark plugs before checking the compression (go to #96)c. Proceed with chedking the compresion (go to #96)
65. The vehicle manufacturer specifies thit idle mixture adjustments should be made with the aid ofan infrared tester. You should next:
a. Hook up an HC-CO'tester(go to #190)b. Adjust the idle mixture by the "lean drop-" method (go to #222)c. Adjust the idle mixture for maximum engine. RPM (go to #189)
66. What material would you use to lean the PCV valve9a. Catturetor cleaner solvent go to #222Tb. Silicone spray (go to #222c. Cleaning solvent (go to #222)d. Detergent andwater (go to #222)e. Manifold heat control spray (go to #222)
19

67. Here is the display
KV .
25
- ,
20
15
10
5
4
tern you obtain on the oScilloscope:KV50
4
40
30
20
10
0
45 40 35 30 25 20 15 10 5 8 CYL-
Peo 811 70 60 50 40 30 20 -10 4 CYL.-
' t II 1. 1 I
I1
I1 1
1
1 I I Io
60 55 50 45 40 35 30 25 20 15 10 5 6 CY L
You should now:
a. Adjust the contact point dwell (go to #209) 1
b. 'Check the carburetor idle mixture (go to #44),
c. Tell the service manager that you have finished the job (go to #279)
d. Road test the vehicle (go to #279)
68. Normally~ how often should you change the charcoal canister filter elemept9
a. Every 6 months or 6,000 miles (go to #114)e a tnit'.es.(go_to. #1.J.4)..
c, Every 24 months or 24,000 miles (go to #114)
d. , Each time the.oil is changed (go to #114)
20.

69. When the hose is removed, there is an increase in idle RPM. Now you should. *41'1.
a. Replace the PCV valve (go to #183)b. - Clean the PCV valve (go to jt66)c. ContiQue to check the PCV system (go to #150d. Check arlother part of the automobile (go to #13)
70. In order to perform a spark intensity test at the coil, you would need to:
a. Remove and9ro.und the center wire from the distributor cap (go to #f55)b. Remove and ground the primary battery lead to the coil (go to #223)c Remove the center wire from the, distributor cap and hold it about 1/4 inch away from the
engine"block (go to #42)d. Remove th center wire from the coil and hold it about 1/4 inch away from the engine block (go
to #21)
71. The emissions control decal in the engine compartment lists idle C as 0.3°/,,,No HC specificationis given. You should now:
a. Check the HC-CO tester manual (go to #97)b. Check a technical service manual (go to #143)c. t4se the specifications HC: 500 ppm; CO: 0.3% (go to #181)d. Use the specifications HC:.275 ppm; CO: 0.3% (go to #181)e. Use the specifications HC: 200 ppm; CO: 0.3% (go tc? #181)f. Ignore the HC reading and use the CO specification.of 0.3% (go to #181)
72. The carburifetor air cleaner looks almost new. Now youThould check the:s
a. PCV system (go to #39)b. HC-CO reading (go to #98)c. Ignition system (go to #200)
4
21
.

V
/1r
.
I.I
J
73. You obtain the fbllowing raster pattern on the oscilloscope:....o
. .
KV,25.
-
,_,..,..1.
q- 20
15
. 10
5
0
.a,
:."".
.
. ..
. .
i I 4 s
f f ', TV"
i A
r y r " IA/W*----
45 \ 40 3590 80 70
30 25 20 15
60 50 40 30
iI 1
1 i f iI l
II i
60 50 45 40 35 30 25 20
Now you should:
a. Check the concho of the spark plugs (go to #243)b. Check the carburetoefdle mixture (go to #121)
c. Replace the ignition coil (go to #189)d. Check the. engine timing (go to #198)e. Check the exhaust gas with an HC-CO tester (go to #35)
f. Tell the service manager that you have finished the job (go to #279)
KV50
40 '' ' .
e30
20
10
0
10 5 8 CYL20 10 4 CYL
1I t
1 I15 10 5 6 CY L
22
..
0.

74. These are the specification's given ior the carburetor adjustments:Accelerator Float Fast Idle Vacuum Choke UnloaderPump Setting Setting CaM Setting Setting Setting2 7/32" 5/64" ..080" .090" .250" 4
± 1132Irrorder to check the fast idle cam setting, you should use:a. A steel rule (go to #23Q)b. A drill bir(go to #230)c. Calipers (go to #230)d. A wire gauge (go tp #230),
75. The HC-CO tester manual gives the-following information:.When properly tuned, vehicles made since 1971 can have CO- levels below 1% and HC levels
`below 200 ppm Refer to the manufacturer's specifications, which are usually found on a stickerunder the hood.Now you should:
a. Use ihe specifications HC: 300 ppm; CO i 1% (go to #165)b Cheek the emissions control decal in the engine compartment (go to #250)c. Use the srtecifications HC: 200 ppm, CO: 0.5% (go to #165)
76. After adjusting The carburetor idle mixture for the lowest emission, your HC-CO reaping is (highscale selected):
",41715`? ,urZO.nitc104°W*,431/r.
1
isseOPIOCARE20N CARBON rVONOXtDE.
You should now:
a. Check the PCV system (go to #153)b. Check for vacuum leaks (go to #222)c. Tell the service manager that you have finished thejob,:(go to #279)d. Road test the vehicle (go to#279)
77. When the hose is clamped off, with the engine at idle speed, thereis no change in RPM. Youshould next:
a. Clean the PCV valye (go to #66)b. Replace the PCV valve (go to #183)c. Continue to check the PCV system (go to #156)d. Check another part of the automobile (go to #13)
23
I

78. The battery has ar ampere-hour rating of 70 and a cold-cranking rating of 440 amps. Next you
would perforin the high discharge test, using a load of:
a. 70 amps (go to #2)b. 120 amps (go to #195)
1rd c. 210 amps (go to #276)d. 440 amps (go to #124),
79. Mdst of the spark plugs loak like this:
t
You should now:
a. Install. new spark plugs (go to #264)b. Cleah and install the spark plugs (go to #264)
80. At idle speed, what should be present at this fitting?
a. A strong flow-of air (go to #258)b. A strong vacuum (go to #49) 40'c. A weak flow of aid (go Ao
d. A weak vacuun'{go to #49)-
81. The engine is hard.to start, and once started, the engine idle is rough. Quick acceleration of the
thrdttle results in some hltitation, but the acceleration is fairly smooth. Now you should:
a. Hook up an engine analyzer (go to #52)
b.. Hookup an HC-CO tester (go to #35)
.c. Perform a spark intensity test at the coil (go to #70)d. Test the PCV value (go to #133)e; Overhaul the carburetor (go to #62)
Adjust the carburetor idle speed and mixture (go to #57)
g! Replace e charcoal canister filter element (go to #235)a
24,
13)

82. The timing specifications for this engine are TDC. Here isThe timing you observe.
41,
You should now..
a. Adjust the distributor body in the direction of the rotor rotation (go to #233)b. Adjust the distributor body in the opposite direction of the rotor rotation (go to #249)c. Leave the distributor body as it is.(go to #111)d. Adjust the ignition contact points (go to #209)
83. The idle speed specifications are:
ModelsIdle speed (RPM)
Man. Trans.
All 6-cyl 800
You should set the idle speed at:
d. 750 RPM (go to #270)b. 800 RPM (go to #270)c. The slowest speed at which the engine will idle,(do to #26)d. The fastest speed at which the engine will idle (go to #222)
4
25 28
Auto. Trans.750

84. The HC-CO tester manual gives two sets of specifications: , 4
Suggested GO/NO-GO Specifications (MeaSure*HC and CO at idle RPM and at 2,500 RPM.)
Emission controlled vehicles:HC less than 400 ppm,C0 less than 3%
.--
14oncontrolled vehicles:HC less than 900 ppm, CO less than 6%
, -. A
1971 and newer vehicles, when properly tuned, can have CO levels below 1°4, and HC levels
below 200 ppm. Refer to manufacturer's specifications, which are usually found on a sticker
under the hood.
Now you should:
a. Use the specifications HC: 400 ppm; CO: 3`)/0 (go to #181)b. Use the specifications HC: 900 ppm; CO: 6% (go to #222)
c. Use the specifications HC: 200 ppm; CO: 1% (go to #181)
d. Use the specifications HC:.200 ppm; CO: 0.3% (go to #181)
e. Check the emissions control decal in the engine compartment (go to #71)
85. To remove the old filter element, you should work at:
)
, Ala. End a (go to #105)b End b (go to #105)
r
a
b
.
-,.
4 t
86. TheCO percentage is listed as 0.3% for this vehicle on the emissions control decal You should
next., , - .
a. Ignore the HC reading and use the specification CO. 0.3% (go to,#165)
b Check the .11C-60 tester werating manual (go to #170)c. Use the specifications HC: 1,000 ppm; CO: 0.3% (go to #165)
87. After the carburetor is completely disassembled, you should:
a. Immerse the parts in a suitable cleaning solvenr(go to #127)
b. Inspect parts for wear and damage (go to #127),
88. Net you should:a. Recheck the HC-CO reading (go to #106)b. Road test the vehicle (go to #279)
,.
c. Check the ignition system (go to #139) .
d. Tell the service managerthat you have finished the job (go to #271)tv
2326
4*
.
t
z,

e
89. The manufacturer'S specifications state that ignition timing and idle RPM should be properly setprior to ting any HC-CO reattngs. Now you should:a. Oheck,thp, ignition timing (go to #101)b. Check the idle RPM ( aiiito #116)c. Take-ah'HC-OOfeading (go to #92)
90. Your HC-CO reading is (high Kale selected):
1-tYDROCARIBCN CARBON IVII
,
You should now: ,
a. Tell the'service manager that you-have finish-ed the job (go to #279)b. Check the'carburetor idle mixture (go to #130)c Replabe the catalytic,converter (go to #222)d. Check the OSAC system (go to #189)
F.)
27

91. You obtain the following display pattern on the oscilloscope:
KV KV
25
20
15
,10
'5
A'
4690
1
60
You should now:
50
40
30
20
10
0
4080
, 35*10
2550`1
2040
1
1530
,1020
II
510
I
8 CYL4 CYL
-I55 50' 45 40
I35
i30
i25 20
. 1-
15
. I10
a. 1
5
0
6 CYL
a, Check.the eXhadSt with an HC-CO tester (go to #12)b. A,djustthe carburetor idle speed and mixture (go to #231)c. Check the condition of the spark plugs (go to #149)
d, Replace the charcoal canister filter element (go to #222)
4
O28
1

t
92: High CO feadings'along with normal HC readings indicate:
a. A vacuum leak (go to #189)b. Low compression (go to #189)c. A rich idle mixture (go to #189)d. A lean idle mixture (go to #189)e. Poor ignition performance (go to #189)
931 The manufacturer specifies idle CO as 0.3% for this vehicle. No HC specification is giVen. Nowyou should:
a. Check a technical service manual (go to #54)b. Check the HC-CO tester operating manual (go to #84)c. Check the emissions control decal in the engine compartment (go to #71)d. Check the federal guidelines for vehicle emissions (go to #4)e. Hook up the HC-CO tester (go to #181)
94. After you have installed and properly torqued the spark plugspu should:
a. Hook up an engine analyzer (go to #36)b. Hook up an HC-CO tester (go to #190)c. .Check the engine timing (go to #5)d. Adjust the carburetor idle speed and mixture (go to #65)e. Tell the service manager that you have finished the job (go to #279)
95. Here is the reading you obtain:
3
1.
HYDROCARBON CARBON MCC \OXIDEJ
This reading means:
a. The engine is in need of arLoverhaul.(go to #26)b. The engine needs no further repair (go to #189)
The HC level is too high (goltkp162)d. 'The CO level is too high (go;to #225)e. Both the HC and CO levels are toaligh (go to #252)
29 1 2

t
.4
. ,
.96. The manufgcturer specifies a minimum reading of 100 psi with a maximum variation of 25 psibetween cylinders. The dry compression readings are:
4
CYL NO. ' 1 2 4 5 6
COMPRESSION 125 120 0 130 125 120
You should next:,
a: Perferrn ithe wet compression test,(gdto #131)b. Install the spark plugs and torque to specifications (go to #263)
97. The HC-CO tester manual states that vehicles equipped with\,emission control equipment made
since 1971 can be tuned to have HC levels of less than 200' ppm and CO levels of less than 1%
Now you should:
a. Ignore the HC reading and use the CO specification of 0.3% (go to #181)
b. Use the specifications I-1C: 200 ppm; CO: 1% (go to #181)
.c. Use the specifications HC: 200 ppm; CO: 0 3% (go to #181)
98. Here is the HC-CO reading you obtain (high scene selected):
HY5ROCARBCN
You should now:
a. Adjust the idle mixture (go to #76)b. Check the PCV system (go to #39)c. Check the ignition system (go to #200)d. Check for vacuum leaks (go to #222)
cAReas, MONOXIDE
e
99. There is almost no vacuumpresent, and no noise can be heard at this fitting. You,stiould next
a. Check another part of the automobile (go to #13)b.. Clean the PCV valve (go to #66)c. Replace the PCV valve (go-to #183)d. Continue to check the PCV system (go to #210)
30
33 ../
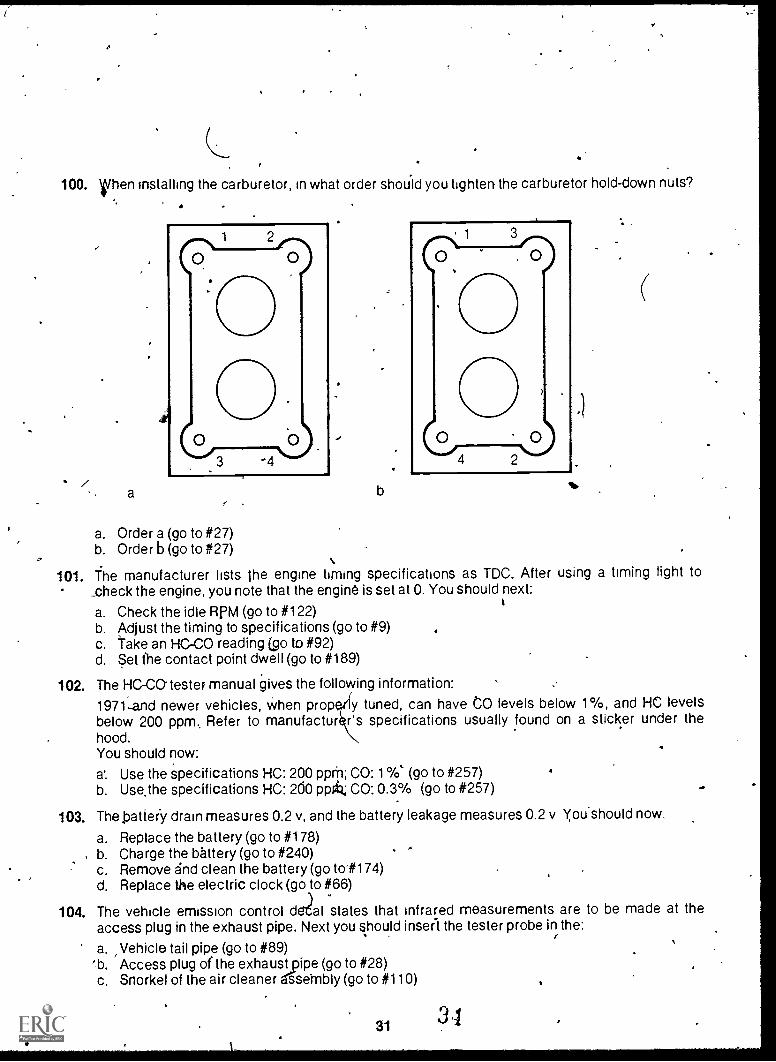
100. Vhen rnstalling the carburetor, in what order should you tighten the carburetor hold-down nuts?
/a
a. Order a (go to #27)b. Order b (go to #27)
101. The manufacturer lists the engine timing specifications as TDC. After using a timing light to.check the engine, you note that the engine is set at 0. You should next:
a. Check the idle Rpm (go to #122)b. Adjust the timing to specifications (go to #9)c. Take an HC-CO reading (go to #92)d. Set (he contact point dwell (go to #189)
102. The HC-CO tester manual gives the following information:
1971-and newer vehicles, when prop y tuned, can have CO levels below 1%, and HC levelsbelow 200 ppm, Refer to manufactur r's specifications usually found on a sticker under thehood.You should now:
a. Use the specifications HC: 200 ppm; CO: 1O/0` (go to #257)b. Use,the specifications HC: 200 ppk; CO: 0.3% (go to #257)
103. TheDatter-y drain measures 0.2 v, and the battery leakage measures 0.2 v You should now.
a. Replace the battery (go to #178)b. Charge the battery (go to #240)c. Remove and clean the battery (go toll 74)d. Replace the electric clock (go to #66)
104. The vehicle emission control dal states that infrared measurements are to be made at theaccess plug in the exhaust pipe. Next you should insert the tester probe in the:
4
a. Vehicle tail pipe (go to #89)'b. Access plug of the exhaustpipe (go to #28)c. Snorkel of the air cleaner asernbly (go to #110)
31 31

DV
ti
105. What tool(s) would you. select to remove and replace the charcoal canister filter element from thecanister assembly?
a. Screwdrivers(go to #275)b. A screwdriver and needle-nose pliers (go to #275)c. Vise-grip plieis (go to #275)d. Needle-nose pliers (go to #275)e. No tools are necessary (go to #275)
106. Here is the HC-CO reading you obtain (high scale selected):
HYDROCAREON
3
Next you should:
a. Check the ignition system (go to #279)b. Read test the vehicle (go to #279)c. Tell the service manager that you have finished the job (go to #279)d. Correct the high HC reading (go to 279)e. Correct the high CO reading (go to #279)
tae
.c)e
SPAN SETzEF.6 SET 96 CO
CAR93N IVONOXIDE
4
a
32
3
3

4
107. Here is the display pattern you obtain:
KV25
20
15
10
5
0
cz
9
i C
*
,GO R,
a
.
fa
...
KV50 )
40
30
,
20
10
0
45 40 , . 35 30 -: 25 20 15 10 5 8 CYL99 -8Q 70 60 ., 50 40 30 20 10 4 CYL,
Ii
I1
I . I1 I i II1
I1 I I I 1 I 0
60 55 50 45 40 35 30 25 20 15 10 5 g CYL
You should now:.,_
a. Check the spark plugs (go to #243),b. Adjust the carburetorlidle speed and mixture (go to #197).c. Check the secondary ignition circtiit (go to #70) ,
t. 41 d. Check the exhaust emissibris lever(go to #35),,,k
r,
f33
o.

108. After replacing the coil, you should:
a. Adjust the carburetor (go to #57)b. Check the engine timing (go to #5)c. Hook up an HC-CO tester (o to #35)d. Hook up ao engine analyzer (go to #52)e. Check the PCV valve(go to #133)
109. What other part of the automobile would you check?
a. The carburetor (go to #62)b. The evaporative emission control system (go to #180)c. The engine performance using an engine analyzer (go to #73)
d. 1-0e exhaust gas wfth`an HC-CO tester (go to #95)
110. Here is the HC-CO reading you obtain (high rangeselected):
1-1YOROCARBON CARBON MONOXIDE
This reading means:
a. The engine is in need of an overhaul (go to #222)b. The engine needs no further repair (go to #222)
c. The HC-CO tester is in need of repair (go to #189)'d. The HC level is too high (go to #222)e. The CO level is too high (go to #26)f. Both the NC and CO levels are too high (go to #222)
111: Next you should:a: Check the PCV valve (go to #133)b. Adjust )the carburetor (go to #57)c. Hook up an engine analyzer (go to #52)d. Hook up an HC-CO tester (go to #35)
112. The vehicle is not equipped with an air pump. What might ybu check or adjust?
a. The engine compression (go to #64)b. The air cleaner (go to #23)c. The carburetqr idle mixture (go to #125)d. The PCV system (go to #238)
113. After replacing the PCV valve, you should:
a. Tell the service manager that you have finished the job (go to #279)
b. Check the HC-CO levels again (go to #106)c. Road test the vehicle (go to #279)
3437

W
114. After replacing the charcoal canister fildr element, you should:
a. Overhaul the corburetor (go tb #62)b. Hook up an engine analyzer (go to #52)c. Crank the engine to hear how it runs (go to #33)d. Test the PCV valve (go to #133)e. Hook up an NC-CO tester (go to #35) .
f. Perform a spark intensity test at the coil (go to #70)
115. There is no spark when you Crank-the engine. Now you should:
a. Replace the spark plugs (gb to #243)b. Check the timing (go to #5)c. Replace the' coil (go to #60)d. Check the ignition bypass circuit (go to #161)e. Check tfie batter- o tcit136).--,f. Replace e6nitidri anetoondepser (go to #209)
116. The Idle spec! calone': :617
Idle speed (RPM)Models Man. Trans. Auto. Trans.All 6-cyl 800 750You should set the idle speed at:
a. 750 RPM (go to #217)b.. 800 RPM (go to #217)c. The slowest speed at which the engine will idle (go to #189)d: The fastest speed at which the vehicle will idle (go to #26)
O
117. The tester. operating manual refers you to the vehicle emission control decal for exact plac mentof the tester probe. You should now:
a. Consult the vehicle emission control decal (go to #104)b. Insert the probe into the vehicle tail pipe (gb to #222)c. Insert,theprobe into the access plug in the exhaust pipe (go to #189)d. Insert the probe into the snorkel of the air cleaner assembly (go to #26)
118: At idle speed, what should be present at this fitting?
a. A weak vacuum (go 0 #241)b. A strong vacuum (go to #241)c. A weak flow of air (go to #134)d. A strong flow of air (go to #134)
119. itYay pour liquid around obvious spots with the engine at idle, but you 'notice no leaks. Now youshould:
ti
a. Check the ignition system (go to #185)b. Check the engine compression (go to #135)c. Install a new PCV valve (go to #189)
0
35
0

120. To test the PCV valve by hand, you should remove the hOse or fitting at:
a. point a (go to #30)b. Point b (go to #145)c. Point c (go to #269)d. Point d (go to #191)
Web
c.
121. The technical service manual states that all idle mixture adjustments should be made with the aidof an infrared tester. You should now:
a. Hook up an HC-CO tester (go to #186)b. Adjust the idle mixture by the "lean rop" method (go to #26)c. Adjust the idle mixture for best engine PM (go-to #189)
122. The idle specifications are:
ModelsAll 6-cyl
You should set the idle speed at:
a. 750 RPM (go to #144)b. 800 RPM (go to #144)c. The slowest speed at whichthe engine will idle (go to #222)d.. The fastest speed at which the engine will idle (go to #189).
Idle Speed (RPM)
Man. Trans. Auto. Trans.
800 750q
.
36

'sr
)
b
o
123. What materials should be used for cleaning-the hoses?
a. Detergent and water (go to #189),b. Gasoline (go to #222)c. 'Cleaning solvent (go to #259)d. Combustion chamber Conditioner (go to #259)e. Carburetor cteaner solvent (go to #259)
124. Therneasbred battery voltage is 7.4 v. You should now:
a. Replace the ignition points and condenser (go to #209)b. Check the ignition bypass circuit (go to #161)c. Check the engine timing (go to #5)d. Replace the battery (go to #178)
Charge the-battery (go to #240)
125. ter adjusting the carburetor idle mixture for the lowest emissions, your HC-CO reading is (highscale se cted):
,............,
a
I
f-4YORCCARBON CARBON MONcxoE
This reading means that:
a. The engine is now operating Within specifications (go to #222)b. The HC reading is too.high (go to #267)c. The CO reading is too high (go to #267)d. Both the HC and CO readings are too high (go to #267) .,
126. The engine speed increases considerably after you remove the hose. You shpuld 'next.a. Replace the PCV valve (go to #158)b. Continue to check the PCV system (go to #271)c. Check another part of the automobile (go tcr#189)d. Clean the PCV valve (go to itt6)
127. After cleaning, drying, and properly reassembling all carburetor parts, using new parts asrequired, you should:
a. Make final adjustments to the carburetor (go to #74)b. Install the carburetor (go to #100)
37

I
4
ft
0
128. The PCV tester will not fit into the opening.bu should now:
a. Consult the PCV tester instruction manual (go to #148)b. Replace the defective tester with a new one (go to #189)o. Check some other part of ttie automobile (go to #1'3),d. Check the PCV 'system using a tachometer (go to #166)e. Check the PCV system by the HC-CO tester method (go to #273)
129: After removing the spark plug wires, yoti should:
a. Crank the engine and watch for the spark (go to #268)b. Hold the center wire from the coil about 1/4 inch away from the engine block (go to #21)c. Hold the spark plug wire from the number 1 cylinder about 1/4 inch away from the engine
block (go to #115)
130. After adjusting ttlie carburetor idle mixture for lowest emissions, your HC-CO reading is (high
scale selected):
HYDROCARBON
4,You should next:
,a. Correct *thebigh HO level (go to #279)b. Correct the high CO level (go to f279)p. Road test the vehicle (go to #279)d. Check the ignition (go to #279)e. Tell the service manager that you have finished the job (go to #279)
CARBON MONO X ICE
438
I.
*
OrIs..
,

131. The results of the wet compression test area- .
go
... . I
CYL NO. 1 2,
3 4 5.
6
COMPRESSION . 125 125 , 130 130 125 120
You should now: It
a. Note that the exhaust valves need replacement (go to #26)b. Note that the intake valves need replacement (go to #189)c. Note that the piston rings heed replacement (go to #222)
ter $ d. lhstall the spark plugs and torque to specifications (go to #263)
132. To replace the charcoal canister filter element, you must:
a. Disassemble the charcoal canister (go to #193) ' .
b. Remove the charcoal canister from its mounting bracket (go to #193)c. Remove the canister purge line (go to #193)d. -Remove the carburetor air cleaner assembly (go to #193)
133. How should you test the PCV valve?
a. By hand (go to #120)b. Use a tachOmeter (go to #166)-c, Use a PCV tester (go to #160)d. Use an HC-CO tester (go to.#273) .
e. Consult a technical service manual for directions (go to #244)
Or. 134. There is a very weak flow of air at this fitting. You should next:
%.
a. Clean the PCV valve (go to #66)b. Check some other part of the automobile '(go to #189)c. Continue to check the PCV system (go to #271)
'd. Replace the PCV valve (go to #158)
,.
z"
, I.
4
. Ar
1
39 ,
.
.,,
F9

c.,
4
P"
'135. While you are removing the spark ;Slugs, you notice that they look like thiS:
4
You should
a. Clean the spark plugs before checking the compression (go to #171)b. Obtain new spark plugs before checking the compression (go to #171)c. Proceed with checking the compression (go to #171) ,
136. 10 order to check the battery, you wotild:
a. Check the specific gravity (go to #53)b. Check the battery capacity (go to #78)c. Turn on the vehicle headlights and crank the engine tgo to #202)d. Measure the amount of battery leakage and battery drain (go to #103)
137. The HC and CO levels remain unchanged. You should now:
a. Clean the PCV valve (go to #66)b. Continue to check thePCV system (go to #244)c. Replace the PCV valve (go to /M)'d. Check some other part of the automobile (go to #254)
ft -..
4 34
,,
..:
1
.

;
a
138. ,With.the engina,at idle, the PCI)/ tester reading looks like this:
w:
a. Replacethe, Ses (g to #189)Jo. Replace the cren se inletaii: cleaner (go to #229)c! Replace the PCV va ve go toll 83)d. Continue to check-thaTCV systata (go to #210)'';
4
a
C
V
41
ti
A
4
1.4
71,
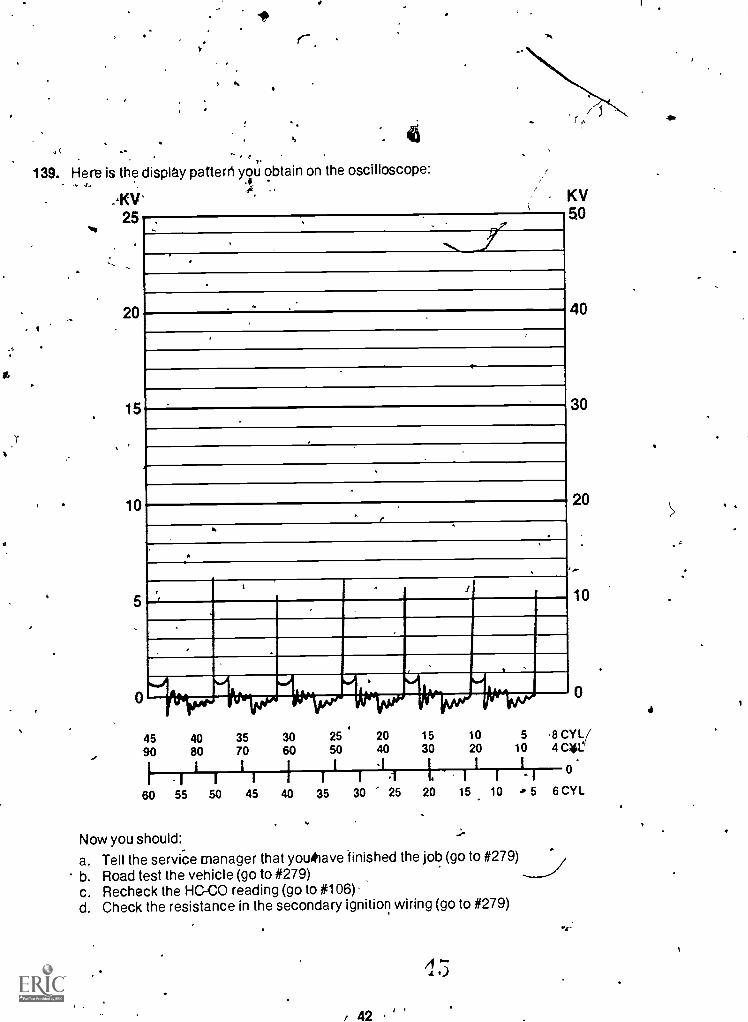
139. Hera is the display patterri you obtain on the oscilloscope:_4.
.KV'25
20
15
10
5
0 litlpolectivivlpAnfor'
KV50
40
30
20
10
0
45 40 35 30 25 20 15 10 5 8 CYLi90 80 70 60 50 40 30 20 10 4 C4,12
I I I 1.1I.
I I1 1 1 I I I 1 .1 1 1
0
60 55 50 45 40 35 30 25 20 15 10 0 5 6 CYL
Now you should:
a. Tell the service manager that youitiave finished the job (go to #279)b. Road test the vehicle (go to #279)c. Recheck the HC-CO reading (go to #106)d. Check the resistance in the secondary ignition wiring (go to #279)
42
4

I.
Aro
140. You obtain the following raster pattern on the oscilloscope:
AP
. KV .,
, 25
, 20
-is
10
4590
I II
II
I I I1
II
I III
II 0
. I60 55 50 45 40 35 30 25 20 15 10 5 6 CYL
.. .
KV50
40
30
20
10
c0
40 35 30 25 20 15 10 5 8 CYL80 70 60 -50 40 30 20 10 4 CYL
t,
You should now:
a. Adjust the timing (go to #26)b. Check the carburetor (go to #62)c. Check the exhaust gas with an HC-CO tester (go to #35)d. Replace the charcoal qnister'in the evaporative emissions control system (go to #222)
43
_.........
.,
k
1411 After installing the spark plugs, you should: q
a. Check the carburetor idle mixture (go to #130)b. Check the HC-CO readings (go to #90)c. Tell the service manager that you have finished the job (go to #279)
142. The manufacturer lists.the engine timing specifications as TDC. After checking with a tirAng light,you notice that the engine timing is set at 0°'. You should now:
a. Adjust the timing to specifications (go to #9)b. Adjust the contact point dwell (go to #209)c. Take an HC-CO reading (go to #98) -d. Adjust the engine idle speed (go to #179)
.
143. The technical service manual shows a specification of 0.3% CO. No HC specification is givenNow you should:
a. Use the specifications HC: 500 ppm; CO: 0.3% (go to #181)O. Use the specifications.HC: 275 ppm; CO: 0.3% (go to #181)c. Ignore the HC reading and use the specification CO: 0.3% (go to #181)d. Consult the HC-CO tester manual (go to #97)
,144. What range .on the HC-CO tester wotildyou selqct?
a.. High range (go to #63) - -b. Low range (go to #46) .., .
145. After you remove the hose, the engine speed increases noticeably. You should'
a. Replace the hose (go to #164)b. Replace the PCV valve (go to #183)c. Continue checking the PCV system (go to #210) ,d. Check some other-part of the automobile (go to #13)
, ,146. The amount of voltage appearing at the coil primary terminal can easily exceed:
a. 10 v (go to #189)b. 100 v (go to #189)c. 10,000 v (go to #189)d. 25,000 v (go to #189)
147. After adjusting the engine idle speed, you should:
a. Overhaul the carburetor (go to #62)b. Hook up an exhaust gas analyzer (go to #35)c. Hook up an engine analyzer (go to #52)d. Replace the charcoal canister filter element (go to #235)
t4
44
A "A i
J
;
4
r.

.. (
0,
1 I
'148. The PCV tester instruction manual specifies that the tester should be inserted in the rocker cover
at the crankcase inlet air filter hole. ....
You should attach the tester at:
*
i
a. Point a (go to #26)b. Point b (go to #189)c. Point c (go to #222)d. Point d (go to #138)
45'
C
k
...

6
. 46
. 149. Most of the spark plugs look like this:
. .,
You should now.
a. Glean 'awl install the spark plugs (go to #141)b. Install new spark plugs (go to #141) $
-4PI
a
.c.
.150. The technical service manual, gives a specificatwn of 0.3% CO., No HC 'cation is given
You should now:
a. Use the specifications HC: 275 ppm; CO: 0.3% (go to #181)b. Use the specifications HC: 400 ppm; CO: 0.3% (go to #181)c. Use the specifications HC: 275 ppm; CO: 1.5% (go fo #92)d. Check the HC-CO tester manual (go to #84)e. Check the emissions control decal in the engine compartment (go to #41)
151. The hoses are in failly good shape, and do not appear to be clogged. Now you would-
a. ,Check another part of the automobile (go to #13)b. Check the carburetor passages (go to #194)0 Replace the PCV valve (go to #183)
----N, cc. Clean and reinstall the hoses (go to #123)6
152. After removing th6 main body, you should:
a. Remove the throttle15. Remove the floatc. Remove the chd. Place the carb
ody (go to #87)cover (go-to #87)
lc-age (go to #87)retor in a suitable cleaning solvent (go to #245)
464 13

153., `boy note the present HC and CO leyels.r.
With an engine at idle, you would remove and plug the PCV line Pat:
a. Point a (go to #256)b. Pclint b (go to #256)c. Point c (go to #222)
-` d. Point d ( go to #189)
154. Once-tizetIC-COteater probe is inserted, you warm up the machine. Now you should.
a. Pull a spark plug wire (go to #189)b. Adjust the engine idle speed to specifications (go to #207)c. Remove the carburetor air cleaner assembly (go to #207)
155. After you have disabled the ignition by grounding the center wire from the distributor cap, youshould:
a. Remove the center wire from the coil and hold It about 1/4 inch away from the engine block(go to #21)
b. Remove all the spark plug wires from the spark plugs (go to #56)c. Remove the spark plug wire from the number 1 cylinder and hold it about 1/4 inch away from
the engine block (go to #115)d. CranIthe engine and watch for ththspark (go to #268)
e
47
rt)

.
156. What other part of the PCV system should you check?
a. The hoses (go to #151)b. The crankcase inlet air cleaner(go to #182)c. The carburetor (go to #208)
157. In order to replace the charcoal canister filter element, you must:
a. Remove the canister purge line (go to #85)b. Remove the carburetor air cleaner assembly (go to #85)c. Disassemble the ch rcoal canister (go to #85)d. Remove the charco I canister from its mounting bracket (go to #85)
158. After replacing the PC valve, the HC-CO reading is (high scale selected):.
HyOROCAREOSJ
Next you should:
a. Adjust the idle mixture (go tof44)b. Check the ignition system (go to #67)c. Tell the service manager that you have finished the job (go to #278)
159. Next you should:a. Clean the PCV valve (go to #66)b. Replace the PCV valve (go to #183)c. Check another part of the automobile (go to #13)
CARBON rs/ONOXICE

.160. Where would you attach the PCV tester?
,.
r
a
a. At point a (go to #128)b. At point b (go to #61)c. At point c (go to #61)d. At point d (go to #138)
161. The ignition ballast resistor specifications are:
. Ballast resistorCoil side (at 70-80° F) 0.5-0.6 ohMsControl unit side (at 70-80° F) 4.75-5.75 ohms
The proper amount of resistance for the bypdts circuit should be:
a. 0 ohms (go to ft48)\--b. About 0.5 ohms (go to #26)
c. About 5 ohms (§o to #189)d. More than 20,000 ohm's (go to #222) i
..........,......1...-16r1.. To correct the high HC level, you should;
a. Adjust the carburetor mixture (go to #125)b. Check the PCV valve (go to #2385c. Check the air cleaner (go to #28)d. Check for vacuum leaks (go to #55)e. Check the engine compression (go to #64)
49 5.2
V
..,

163. At idle speed, what should be present at this fitting?a. A weak vacuum (go to #49)
'AA strong vacuum (go to #49) .
c. v?eak.flow of air (go to #258)d.AVr ng.flow of air (go to #258)
164. After replacing the vac um hose, you should:
a. Replace the PCV valve'(go to #183)b.' Check-some other part of the automobile (go to #13)c. Continue to check the PCV system (g0 to #210)
165. To hook up the HC-CO tester on this vehiCle, you must:
a. , Insert the tester probe into the vehicle taH pipe (go to #89)b. Insert the tester probe into the access plug in the exhaust pipe (go to #272)c. Insert the tester probe into the snorkel of the air cleaner (go to #110)ci. Consult the technical service manual for probe placement (go to #212)e. Consult the HC-CO tester manual for probe placement (go to #14)
166. To test the PCV valve with a tachometer, you must:
a. Clamp off the hos4t point a (go, to #77)b. Clamp off the hose at point b (go to #265)c. Remove the hose at point a (go to #69)d. Remove the hose at point b (go to #246)
50
53

Z
167. After removing the throttle body, you should:
a. Remove the float bowl cover (go to #87)b. Remove the choke linkage (go to #87) V
C. Remove the main body (go to #87) ---,d. Place the carburetor into a suitable cleaning solvent (go to #245)
168. The manufacturer lists the engine timing specification.as TDC. After using a timing light to checkthe engine, you note that the engine timing is set at 0°. You should now:
..
a. Adjust the timing to specifications (go to #9)b. Take an HC-CO reading (go to #144)c: Set the contact point dwell.(go to #189)
i169. Hereis the display pattern you obtain ( 5 KV scale selected):
KV25 50
KV
20
15
.10
5
0
4 rr1.
p1
40
30
20
10
0
45 40 35 30 25' 20 15 10 5 8 CYL90 8Q 70 60' . 50 40 30, 20 10 4 CYL
I ' I I II
I 1 ,0
I. - 1 I 1 . 1. 1 I I I 1 T60 - 55 50 45 40 35 ,30 25 20. 15 10' Ft 6CYL
51

,
O
Now you should:
a. OverhaUl the carburetor (go to #62)b. Check the exhaust emissions level (go to #35)c. Check the 'gnitiovircuit (go to #70)d. Check the am (go to #133)e. Check the Oa ugs (go to #243)f. Adjust the carburetor idle speed and mixture (go to #57)0.,
470. The HC-CO tester manual states that correctly tuned vehicles made since.1971 can have CO- levels below 1.% angiFIC levels below 200 ppm. You shouldnow:
,
a. Use the specifications HC: 200 ppm; CO: 1% (go to #165)b. Use the specifications HC: 200 ppm; CO: 0.3% (go ti) #165)c.nore the HC reading and use the specification CO: 1% (go to #165) 'd. Ignore the HC reading and use the specification CO: 0.3% (go to #165)
0171. The dry compression readings are::k
,, . ..
' CYL NO. 1 2 t 4. 5
COMPRESSION 125 120 130 130 425 c 12
/ . ..
nufacturer specifies.a minimum reading of 100 psi with a maximum variation 25-psi
we n cylinderS.
You ould nOw:
a. PerVrm the wet compression test (go-to #22)
b. In'stlit the spark pfugs and torque to specifications (go. to #88).
172. A strong, hissing noise can .hearcLat affil;PCV valve (removed from ,the rocker cover) with,t .
engine at idle. A strong vacuu also presynt:You should now:
a. Ins the PCV fitting into ocker,coVer and check another system on the vehicle (go to #3)
b. Rep ce ttte PCV, it another one (go to #3) 'tt
173. The. emissions trol° decal if) the engine compartMent lists idle CO as 0.3%, Na HC
speci given. You should new: .
a. Use the specifications HC: 590 ppm; 0O:0.3% (go to #257)""b; Use the'specifications HC: 200 pp O: 0.3% (go to #257)c. ignore the HC reading land use ffie specification CO: 0.3% (go to'#257)
Checilthe FIC-CO tester manual (go to #102)
17e ,After removing, cleaning, checking, and replacing the a y, you Auld:
a. Check:the engine timing-(go to #5)b. Ghgck the PCV velVe (go to #133)c. Replace the spark plugsMo to #243)d. .Adjust the carburetor (go to 157)e. Nook up an HC-CO tester (go to #35)
Hook up an engine"analyzer (go to #52)
. 52
A
as.

o
C 1,
'V\
175. What should you use to clean the crankcase inlet air cleane4.
a. Carburetor cleaner solvent (go to #196)b. Combustion charnber conditioner (go tp #26)c. Detergent and water (gOto #189)d. Cleaning solvent (go to #204)e.. Silicone spray (go to #222)
176. To remove the old filter element, you would work at:
a
b
a. End a (go to #34)b. End lo'(go to #34)
177. Air removing the PCV valve, you shake it back and forth. No noises can be heard This means'
a. The PCV valve is defective (go to #113)b. The PCV valve is good (go to #26)c. You should check another part of the automobile (go to #222)
178. A new, fully charged battery should havepeeific gravity readings of about.
a. 1.280 (go to #26),b. 1.300 (go to #26) ,
h c. 1.350 (go to #26).d. 2.000 (go to #26)
179. Thelale specifications are:
Idle Speed (RPM)
Models Man. Trans. Auto. Trans.
All 6-cyl 800 750
You should set the idle speed at:
a. 800 RPM (go to #98) , ,
b. 750 RPM (go to #98) ,. .
c. The fastest speed at which the engine will idle (go to #189)rThe slowest speed at which the engine will idle (go to #26)
53
5:;
3.

4
180. The hoses in the evaporative emission control system are in good condition. Now you should.
a. Replace the charcoal canister filter element (go to #235)-b. Check the exhaust gas with an HC- CWester (go to #35)
c. Check the engine performance with an engine analyzer (go to #73)d. Tell the service manager that you have finished the job (go to #279)
181k In order to hook up the HC-CO tester to this vehicle, you would:
a. Insert the tester probe into the vehicle's tail pipe (go to #89)b. Insert the tester probe into the access plug in the exhaust pipe (go to #28)c. Insert the tester probe into the snorkel of the air cleaner assembly (go to #110)d. Consult a technical service manual for_proper placement of the tester probe (go to #50)e. Consult the HC-.00 tester knanu orproper placement of the tester probe (go to #-117)
182. Yo check the crankcase inlet a eaner, yo should:
a Remove it and hold a piece of paper ag inst it (go to #247)b. Remove italid hold a piece of paper against the crankcase hole (go to #255)c. Clarrip off the hose connected to it (go to #16)d. Simply clean the crankcase inlet air cleaner (go to #175)
183. After replacing the PCV valve, you should:
a. Check another part of the automobile (go to #3)b. Check the PCV valve operation (go to #172)
184. The technical service manual refers you to the vehicle emission control label in the enginecompartment. The emission control decal specifies that all infrared samples are torbe taken infront of the catalytic converter. You should insert the HC-CO tester probe in.
a The tail pipe (go to #222)b. The exhaust pipe (go to #37)
cJ
54
0 .1

, .185. The engine nalyzer shows the following raster pattern:
. v- .4
--T
09
'KV'
--T
25
20
-15
10
ISO
KV50
45 40 3590 80 10
*30
20
10
0
a 4'
30 25 20 15. 10 " °5 8 CY60 50 40 30 20 10 4 CYL
II
II
1 I 1
I1 t
1
I I 1I
1 1o
1
60 '55 50 45 40 35 30 25 20 15 10 5 6 CYL
You should next: , )a. Check the spark plugs (go to #149)b. .,Check-the carburetor idle mixture (go to #211).c. Road test the vehicle (go to #279)d Tell the service manager that you have finished the job (go to #279)
55
ryt_J .
yr

i186. Where would you insert the HC-CO tester probe on the vehicle?
a. In the elta ust pipe (go to #154)15. In the tail pipe (go to #222)c. You cannot say without checking a technical service manual (go to #215)
187. The HC and CO levels remain unchanged. Now you should:
a. Clean the PCV valve (go to #66)b. Replace the PCV valve (go to #45)c. Continue to check the PCV system (go to #277)d Check some other part of the automobile (go to #109)
188. To test the PCV system with the HC-Co tester, you must 'remove and plug the PCV line atD
,
,.
,. INOI.1
:
a. Point a (go to. #137)b. Point b (go to #137)c. Point c (go to #222)d "Point d (go 0426)
41 t.
189. Which of the following conditiOns might be responsible for the high fuel consumption describedin
question number 1?
a. Ignition dwell incorrectly set (go to #279)b. A defective air pump pressure-relief valve (go to' #279)
c. A thermostatic air cleaner always open to unheated air (NI to #279)
d. A defective catalytic converter (go to #279) -
e. A nlalfunctibning automatic choke electric assist (go to #279)
4
56 r: 11td 0

, --
J190. what source should you check for the HC-CO specifications for this vehicle?
a. A technical service manual (go to #260)b. The HC-CO tester operatirig manual (go to #75)c. The emissions control decal in the engine compartment (go to #219)ci.` The manufacturer's shop manual (go to #266) .
191. After removing the fitting, You should check for a:
a. Weak flow of air (go-ta_#224)__b. Strong flow of air (go to #224)c Weak vacuum (go to #99) . -
d. Strong vacuum (go to #99)
192. After removing the PCV valve, you shake it back and forth. No noises can be heard. Now youshouly,-, ' . , .
a. dean the PCV valve (go to #66)b Replace the PCV valve (go to #231)c. Check another part of the automobile (go to #189)
4-
193. To remove the old filter element, you should work at:
I-
a End a (go to #242)b End b (go to #242)
194. You would check the-PCV passages for clogs by
a. Overhauling the carburetor (go to #62)b. inserting a drill bit into the carburetor PCV passages (go to #208)c Removing the carburetor (go to #40)d. Looking into the carburetor PCV passages (go to #227)
195. The Measured battery voltage is 10.7 v You' hould now
a. Check the ignition bypass circuit (go to #161)b. Replace the ignition points and condenser (go to #209)c Replace the battery (go to"#178)d. Charge the battery (go to #240)e. Check the engine timing (go to #5)
r-
a
57
.

196. Next you should:
a. Clean the PCV valve (go to #189)b. Replace the PCV valr to #189)c. Check another part of re automobile (go to #189)
197. The manufacturer lists specifications for engine idle speed, but states that the idle mixtureshould be adjusted with the aid of art infrared tester. You should now:
a. Hookup an engine analyzer (go to #52)b. Hook up an exhaust gas analyzer (go to #35)
, c. Change the charcoal canister filter element (go to #132)d. Simply adjust idle speed and ignore idle mixture (go to #26)
198. Timing specifications are given as TDC. The timing is presently set at 0°. You should now
a. Advance the timing to specifications (go to #189)b. Riffrd the timing tb specifications (go to #26) t,
c. Check the carburetor (go to #62)d. Check the exhaust gas with an HC-CO tester (go to #35)e. Check the engine performance with an engine analyzer (go to #140)
199. After you remove the hose, the engine speed increases. You should next:
a. Clean the PGV valve (go to #66)b. Replace the PCV valve (go to #231)c. Continue to check the PCV system (go to #192)d. Check another part of the automobile (go to #26)
58

200. Here is the display pattern you obtain on the oscilloscope:
KV KV25
20
15
10
5
0
1
50
40
30
20
10 .
0
45 40 35 30 25 20 15 10 5 8 CYL90 80 70 60 50 40 30 20 10 4 CYL
I
I i II II
1 1 o vI I t I I I60 55 50 45 40 35 30 25 20 15 10 5 6 CYL
No you should:: ell th'e service manager that you have finished the job (go to #279). Adjust the idle mixture (go to #76)
c. Check the PCV system (go to #39)d. Check for vacuum leaks (go to #189)
59

201. Here is the HC-CO reading you obtain (highscale selected):
)--4YoRocAReoN CARBON MONOXOE
/MP
You should now
a. Clean the PCV valve (go to #66)b. Continue to check the PCV system (go to #277)c. Replace the PCV valve (go to #45) -d. Check some other part of the automobile (go to #109)
202. The headlights dim slightly as the engine is cranked. The cranking motor speed is,good Now you
should:
a, "Replace the battery (go to #178)b. Charge the battery (gb to #240)c. Replace the cal (go to #60)d. Replace the ignition points and condenser (go to #209)e. Check the timing (go to #5)f. Check the ignition bypass circuit (go to #16p,g. Replace the spark plugs (go to #243)
203. The idle specifications are:
Idle speed (RPM)
Models Man. Trans. Auto. Trans.
All 6-cyl 800 750
You should set the idle speed at:
a. 750 RPM (go to #8)s. b. 800 RPM (go to #8)
c. The fastest speed at which the engine will idle (go to #222)d. The slowest speed at which the engine will idle (go to #189)
204. After cleaning the crankcase inlet air filter, you should:
a. Install it (go to #159)b. Wet it in motor oil and install it (go to 4159)
I")utJ
60

a N
%
205. The vehicle emission control decal states that infrared measurements are to be made at the I.access plug in the exhaust pipe. Now you should: ,.
a. Insert the tester probe into the vehicle tail pipe (go to #89) .,
b. Insert ihe tester probe into the access plug of the exhaust pipe (go to #272)c. Insert the tester probe into the snorkpl of thp air cleaner assembly (go to #110)
206. Here is the reading you obtain:-.'.
HYDROCARBON
k
CARBON MONOXIDE ' \
This reading means:
a. You need to check the reading on the high-range,scale again (go to #95)b. The HC level is too high*(go to #162)
4-c. The CO level is too high (go to #225)d. Both the HC and CO levels are too high (go to #252)
207. What source Could you consult for recommended HC-CO specifications for this vehicle?a. The emi%ions control decal in the engine compartment (go to #173)b. The HC-CO tester operating manual (go to #226)c. A technical service manual (go to #10)d. The Manufacturer's shop manual (go to #237)
208. No clogs are found when the carburetor PCV passages are checked with a drill bit. Now youshould check:
a. The hoses (go.to #151)b. The crankcase inlet air cleaner (go to #182)c. Another part of the automobile (go to #13)
209. Oops' TAere are no points or condenser inside' the distributor. Instead, there is a reluctor andpickup coil. Next you should:, .a. Replace the reluctor and pickup coil,(go to #222)b. Adjust the air gbp between the reluctor and pickup coil (go to #222)c. Measure the ignition dwell (go to #222)d. Replace the distributor cap and check something else (go to #222)
61 .

210. After removing the PCV valve, you shake it back and forth. No noises can be heard. Now youshould:
a. Clean the PCV valve (go to #66) -
b. Replace the PCV valve (go to #183)c. Continue to check the PCV system (go to #151)
Check another part of the automobile (go to #13)
211. After adjusting the,carburetor igla-mixture for the lowest emissions, your HC-CO reading is,(highscale selected):
HYDROCARBON CARBON MONOXIDE
You should now: -
a. Tell the service manager that you have finished the job (go to #279)b. Check the spark plugs (go to #79)c. Check the ignition system (go to #221)
212. The technical service manual refers you to the vehicle emission control decal for exactplaCement.pf the tester probe. You should now:
a. Insert the tester probe into the snorkel of the air cleaner assembly (go to #222)
b. Insert the tester probe into the access plug on the exhaust pipe (go to #189)
c. Insert the tester probe into the vehicle tail pipe (go to #26)d. Consult the vehicle emission control decal (go to #205)
213. After removing the choke linkage, you should:
a. Remove the main body (go to #87)b. Rem bye the t le body (go to #87)c. Remove the 'boat bowl cover (go to #87)d. Place the carburetor in a suitable cleaning solvent (go to #245)
214. The PCV filter and the carburetor air cleaner are both in very good condition Next you should.
a. Check thee PCV system 43 to #188)b. Check the engine compression (go to #64)6. Check another bait of the automobile (go to #254)d. Tell the service manager that you have finished the job (go to #279)
u62

215. The technical service manual refers you to the vehicle emission control decal in the enginecompartment. The emission control decal specifies that all infrared samples are to be taken infront of the catalytic converter. You should insert the HC-CO tester probe in the:a. Exhaust pipe (go to #154)b. Tail pipe (go to #189)
216. After replacing the charcoal canister filter element, you should:a. Hook up an engine analyzer (go to #107)b. Hook up an HC-CO/tester (go to #35)c. Tell the service manager that you have finished the job (go to #279)
217. After setting the engine idle speed, you should check the:a. Engine timing (go to #168)b. HC-CO reading (go to #144)c. Contact point dwell (go to #209)
218. After replacing the crankcase inlet air cleaner, you should:a. Cfwk,.-the hoses (go to 51)b. Checkile,,,carburetor passages (go to #194)c. Check another part of the automobile (go to #13)d. Replace the PCV valve (go to #183)
6
219. The emissions control decal in the engine compartment lists idle CO as 0.3%. No HCspecification is given. Next you should:
a. Check the HC-c0 tester manual (go to #170)b. Use the specifications HC: 500 ppm; CO: 0.3% (go to #165)c. Use the specifications HC: 275 ppm; CO: 0.3% (go to #165)d. Use the specifications HC: 200 ppm; CO: 0.3% (go to #165)
-Ignore the HC reading and use the CO specification of 0.3% (go to #165)
220. Next you should:a. Hook up an engine analyzer,(go to #91)b. Check the HC-0010els (go to #12)c. Adjust the carburetor idle speed and mixture (go to #231) -
d. Replace the charcoal Canister filter element (go to #26)
7
63
--;\t..1 0

221. The engine analyzer shows this raster pattern:
I?.
k
It
KV KV
25
20
15
10
'45 40 , 35 3080 80 70 60
} I .I I I I I
60 55 50 45 40
50
40
30
20
10
0
25501
.2040
1
15 1030 20
11
510
I
8 CYL4 CYL
1
351
30I
25I 1
20 15
1
101
5
0
6 CYL .
-
You shbuld now:
a. Check the spark plugs (go to #79)b. Tell the service manager that you have finished the job (go to #279)
c. Road test the vehicle (go to #279)
L
64

222. Which of the following conditions might be responsible for the increased oil consumption '
described in question'number 1?
a. Defective spark plugs (go to #279)b. Incorrect ignition timing (go to #279)c. Defective PCV valve (go to #279)d. Carburetor mixture incorrectly set (go to #279)
*e. Defective evaporative emissions control system (go to #279)
223. After you have grounded the primary battery lead to the coil, you should.
a. Crank the epgine and watch for the spark (go to #268) 'b. Remove all the spark plug wires from the spark plugs (go to #56) .
c. Remove the center wire from the distributor cap and hold it about 1/4 inch away from theengine block (go to #115)
.
d. Remove the center wire from the coil and hold t1 about 1/4 inctraway from the engine 'block (goto #21)
I,
/
4224. There is a very weak flow'of air at this fitting. You should next: .
a. Reple the PCV valve (go to #183)b. Continue to check the PCV system (go to #210)c. Check some other part of the automobile (go to #13)d. Clean the PCV valve (go to #66)
225. To correct the high CO level, you should:
a. Check the engine compression (go to #64)b. Check for vacuum leaks (go to #55)c. Check the air cleaner (go to #23)d. Check-the PCV valve (go to #238)e. Adjust the carburetor idle mixture (go to #125)
226. The HC-CO tester manual gives the following information:
When properly tuned, 1971 and newer vehicles can have CO levels below 1%, and HC levelsbelow 200 ppm. Refer to manufacturer's specifications usually fOund on a sticker under thehood.
You should now:
a. Use the specifications HC: 200 ppm; CO: 1°i° (go to #257)b. Use the Specifications HC: 200 ppm; CO: 0.3% (go to #257)c. Check the emissions control decal in the vehicle engine compartment (go to #173)
227. Since you noted no clogs in the passages, you should now:
a. Clean the PCV valve (go to #66)b. Replace the PCV valve (go to #183)c. Clean the PCV hoses (go to #123)d. Check some other part of the automobile (go to #13)
228. After setting the idle sped, you should check the:a. HC-CO reading (go to #98)b. Engine-timing (go to #253)c. Contact point dwell (go to #209)
65
I
ar

b
2g., After cleaning the crankcase inlet air filter, you should:
a. Wet it with kerosene and install it (go to #218)b. Wet it with gasoline an'&ins'tall it (go to #92)c. Wet it with motor oil and install it (go to #218)d. Install it without wetting it (go to #218)
. -
230: The instructions for adjusting the carburetor pump setting are:
With throttle-in curb idle Position, pump stroke shourd meet specifications. Measure distancefrom-vacuum passage casting to outer edge of hole in pump rod. If necessary to 5liust, open or
close "U" bend in rod.To make this adjustment, you would use a:
a. Carburetor linkage bending tool (golo #100)b. ,Pair of pliers.(go to #100)c. `Cafburetor power valve tool (go to #100)d. bit (go to #189)e. Set of calipers (go to #100)
'
231. After replacingdhe PCV valve, the HC-CO reading is (high scale selected):
1-iyoRocri3oNf
Next-OU would check the: ora_ Ignition system (go to #185)
r4
t#5,5fragine compression (go to/W5)c. Engine far vacUum'leaks"(go to #119)
4
O
CARBON MONOXCE
. 232. The manufacturer lists the engine timing specifications as TDC. Aftercheck the engine, you note that the.engine.is set.at 0°. You would then:
a. Adjust the contact point dwell.(go to #189)b. Adjust the timing to specifications (go to #9)c. Take a4H9-CO reading (go to #8)
Ow* 66
pa
using a timing light to
a
S
O
4
233. After finishing with the engtne.timing, you should: .
a. Adju4s' ttie,carburetor(go to #222)b. Check the PCVvalve (go to #222) ,
c... HMI( up an HC-CO tester (go to4222)d. Mogi( up.an engine analyzer (go to #222)e. Write up the ticket for your work and tell the service manager that you have finished (go to
#279).-'
234. The HC and CO levels remain unchanged. You should now:
a. Check some other part of the automobile (go to #109)b. Fftlace the PCV valve (gO teo.#45)c. Continue to check the PCV system (go to #277). ..
d. Clean IN PCV valve (go to #66)V
25:; In order to replace the charcoal anister tiller element, you must:
a. Di ssemble he charcoal c iSter(go to #176)b. 'Re the ca for air cl ner assembly (go to #176)c. Rep e the canister purge line (go to #176)d. Remove the charcoal canister from its mounting bfacket (go to #176) .L
4236. A strong, hissing noise cap be heard at the PCV valve (removed from the ocker cover) with the
engine at idle. A strong vacuum is present. You would next:
a. insert the PCV valve into the rocker and check the HC-CO level (go to # 2)b. Repl ce the PCV valve with another one and check the HC-CO level (go o #12)
.
237. The manufacturer specifies CO at idle of 0.3% for this vehicle. No HC specification is given NowIyou should:
a. Us,e the specifications HO: 500 ppm; CO: 0.3% (go to #257)b. Use the sPecifications HC: 275 ppm; CO: 0.3% (go to #257)c. Use the specifications HC: 200 ppm; CO: 0.3% (go to #257)d. Ignorethe HC reading and use the specification-Q0: 0.3% (go to #257)e. Check the HC-CO tester manual (go to #226)f. Check the emissions control decal in the engine compartmeN.(go to #173)
A
O
771)
-4
V

r .
.238. To quickly check the.performance of the PCV valve, you should remove the hose or fitting at
I
a Point a (go to #163)- b. Point b (go,to #199)
c. Point c (go to #248)d. poiht d (go to #80) P"
239. The HC level remains unchanged. The CO level drops slightly. You should now
a. Replace the carburetor air cleaner (go to #24b. Replace the PCV inlet filter (go to #189)c. Replace the crankcase inlet air cleaner (go to #26)d. Continue to cVeck the PCV system (g9 to #277)
-e.' Replace the PCV valvAigo to #45)f Clean the PCV valve (`'-to #66)
240. The linpere-houf rating is 70. The cold-cranking rating it'440 ar Ks hat slow-charging ratewouldyou setect
a. 5 amps (go .#4.3)b. 31 amps (go to #222)c. 50 amps (go to #189)d. 70 amps (go to #26)
4
-fS. 68 711
ri

241. There is almost no vacuum present, and no noise can be heard at this fitting. You should now.
a. Continue to check the PCV system (go to #271)b. Replace the PCV valve (go to #158)c. Clean the PCV valve (go to #66)d. Check another part of the automobile (go to #189)
242. What tool(s) would you select to remove and replace the charcoal canister filter element from thecanister assembly.?
a, Vise-grip pliers (go to #216)b. A screwdriver (go to #216)P. Needle-nose pliers (go to #216)d. A screwdriver and needle-riose pliers (go to #216)e No toolsare necessary (go to #216)
243. After removing the spark plugs, you notice that they all look like this-
You would now
a Clean all the Spakk.,plugis and install them (go to #94)b Replace all the spark plugs (go to #29)..
244. After removing the PCV valve, you shake.it back and forth. No rattling can be heard. Now youshould.
a Check some other part of the automobile (go to #254)b Replace the PCV valve (go to #32)c Clean the PCV valve (go to #66)
69

7
ae
245. The proper way to dry a carburetor that has been soaking in solvent is to clip it in:
a. Gasciline and allow it to air-dry (go to #189)b. Water and blow-dry with an air gun (go to #189)c. Kerosene and blow-dry with an air gun (go to #189)
246. When the hose is removed, there is no change inidle RPM. You would next
a. Check another part of the automobile (go to #13)b. Continue to check the PCV system (go to #156.)c. Clean the PCV valve (go to #66)d Replace the PCV valve (go to #183)
247. After the engine has idled for about one minute, there is no vacuum at the crankcase inlet aircleaner. Next you should:
a Replace ,the PCV valve (go to #183)i9 Clean the PCV valve (go to #66)o Clean the crankcase inlet air cleaner (go to #175)d. Replace the crankcase inlet ait cleaner (go to #218)e. Check another part of the automobile (go to #13)
248. At the idle speed, what should be present at this fitting'?
a. A weak flow of air. (go to #258)b A strong flow of air (go to #258)c A weak vacuum (go to #49)d. A strong vacuum (ge to #49)
249. After completing all timing adjustments, you should*
a. Hook up an HC-CO tester (go to #26)Hook up an engine analyzer (go to #26)
dust the carburetor (go to #22): k the PCV valve (go to #26)
e. -oaGtest the vehicle (go to #26)
250. The emissions control decal in the engine compartment gives a CO specification of 0 3% No HC
specification is given. You should now:
a. Use the specifications HC: 200 ppm; CO: 1°/0 (go to #165)
b Use the specifications HC: 200 ppm; CO: 0.3% (go to #165)
c. Ignore the HC reading and use the specification CO:;0.3% (go to #165)
251. the idle specifications are:ldlgpeed (RPM)
Models ffan. Trans. Auto. Trans.
All 6-cyl '800 750
You should set the idle speed at:
a. 750 RPM (go to #147jb. 800 RPM (go to #147)c. The slowest speed at which the' eligine.will idle (go to #189)d. The fastest speed at which the engine will idle (go to #26)
70
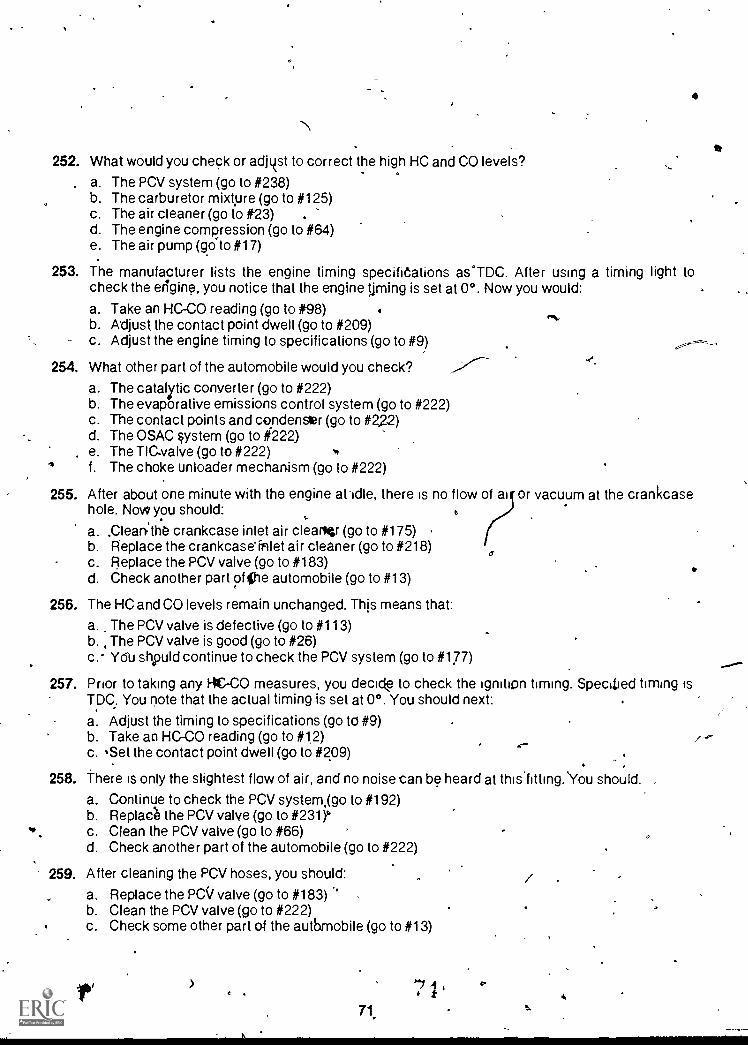
252. What would you check or adjtet to correct the high HC and CO levels?
a. The PCV system (go to #238)b. The carburetor mixture (go to #125)c. The air cleaner (go to #23)d. The engine compression (go to #64)e. The air pump (go to #17)
253. The manufacturer lists the engine timing specifitations as'TDC. After using a timing light tocheck the erigine, you notice that the engine timing is set at 0°. Now you would:
a. Take an HC-CO reading (go to #98)b. Adjust the contact point dwell (go to #209)c. Adjust the engine timing to specifications (go to #9)
254. What other part of the automobile would you check?
a. The catalytic converter (go to #222)b. The evaporative emissions control system (go to #222)c. The contact points and condenger (go to #222)d. The OSAC §ystem (go to #222)e. The TIC-valve (go to #222)f. The choke unloader mechanism (go to #222)
255. After about one minute with the engine at-idle, there is no flow of ai or vacuum at the crankcasehole. Now you should:
a. .ClearCthe crankcase inlet air clearw (go to #175)b. Replace the crankcase'irilet air cleaner (go to #218)c. Replace the PCV valve (go to #183)d. Check another part of iihe automobile (go to #13)
256. The HC and CO levels remain unchanged. This means that:
a. The PCV valve is defective (go to #113)b. The PCV valve is good (go to #26)c. Ydu shpuld continue to check the PCV system (go to #177)
257. Prior to taking any 14C-CO measures, you decd to check the ignition timing. Specified timing isTDC. You note that the actual timing is set at 0°. You should next:
fl%
a
a. Adjust the timing to specifications (go to #9)b. Take an HC-CO reading (go to #12)c. Set the contact point dwell (go to #209)
258. there is only the slightest flow of air, and no noise can be heard at this.fitting.'You should.
a. Continue to check the PCV system,(go to #192)b. Replace the PCV valve (go to #231)°c. Clean the PCV valve (go to #66)d. Check another part of the automobile (go to #222)
259. After cleaning the PCV hoses, you should:
a. Replace the PCV valve (go to #183)b. Clean the PCV valve (go to #222)c. Check some other part of the automobile (go to #13)
71.
/

260. The technical service manual shows a specification of 0.3% CO. No HC specification is givenYou should now:
a.' Check the emissions control decal in the engine compartment (go to #86)b. Check the HC-CO tester operating manual (go to #1.70)c. Ignore the HC specification and use CO: 0.3% (go to #165)d. Use the specifications HC: 500 ppr'n; CO: 0.3% (go to #165)
261. The carburetor air cleaner and the PCV filter are in very good condition Next you should
a. Check the carburetor idle mixture (go to #211)b. Check the spfark plugs (go to #149)c Tell the service manager that you have finished the job (go to #279)
262. Before removing the carburetor from the engine forgyerhaul, it is a good idea to
a ° pisable the ignition (go to #6)b. Remove the battery ground cable clamp (go to #6)c Remove the throttle linkage and vacuum hoses (go to #6)d. Remove the PCV valve (go to #6)
263. Next you should check the:HC-CO reading (go to '#98)
b Ignition system (go to #200)c PCV system (go to #39)d Carburetor air-cleaner igo to #72)
264. After installing the spark plugs, u should.
a Checli the HC-CO reading #130)b Tell tlie service manager t y have finished the job (go to #279)c. Road test the vehicle (go to #279)
265. When the hose is clamped off, with the engine at idle speed, there i$ no change in RPM Youshould now:
a. Clean the PCV valve (go to #66)b. Check another part of the,automobile (go to #13)c. Replace the PCV valve (go to #183)d. Continue to check the PCV system (go to #156)
266. The manufacturer specifies an idle co of 0.3%-for this vehicle flo HC specifications are givenNow you should: ,, ,
a. Check the emissions control decal in the engine compartment (go to #86)b. Hook up the HC-00 tester (go to #165)
'1c. Check the HC-CO tester operating manual (gam #170)
267. What would yaw check or adjust to correct tle high reading?
a. The PCV stern (go to #188)
c. The engin compression (go to #64).,-..N'b. The air c aner (go to #274)
4 d. The ignition system (go to #15)
72

268. Where should the spark appear if you have correctly prepareXtr the spark intensity test at thecoil?
a. At the distributor end of the coil-to-distributorhigh-tension lead (go'to #38)
c. ..)b. At the number one spark plug (go to #38)
P
. At the coil primary terminal (go to #146) - ,d. At the coil high-tension terminal (go to #38) .
269. After you have removed the hose, you should check for a:i.a Weak vacuum (go to #99)
b. Strong vacuum (go to #99)c Weak flow of air (go to #224)d Strong flow of air (go to #224)
270. After setting the idle speed, you should check the
a Contact point dwell (go to #209)b HC-CO reading (go to #8)c Engine timing (go to W32) .
\
271. After removing the PCV valve, you shake it back and forth. No noises can be heard. Now youshould' ------/a. Clean the PCV valve (go to #66) trb. Replace the PCV valve (go to #158)c Check another part of the automobile -(g #26)
272. The manufacturer's specifications state that ignitiorr timing and idle RPM should be properly setprior to taking any HC-CO readings. Now you would* e
a. Check the idle RPM (go to #25)b. Check the ignition timing (go to #142)c, Take an HC-CO reading (go to #92)
273. Where would you insert the HC-CO tester probe on the automobile?
a. In the tail pipe (go to #37)b. In the exhaust pipe (go to #37)-c You cannot say without checking a technical servicl manual (cc t(-_, as 8..;
274. The carburetor air cleaner is 19 very good condition The PCV flit---.1 is . .3r) in yooc c ,ndion Nowyou should check
.a The ignition system (go to #15)b. The PCV system (go to #188)c The engine compression (go to #64) ,d Another part of the automobile (go to #254)
,275. After replacing the charcoal canister filter element, you should:
. a Hook up an engine analyzer (go to #91)b Hook up an HC-CO tester (go to #186)c Tell the service manager that you have finished the job (go to #279)
73
0 i

1
/
276. After the specified length of time, the battery voltage is 10.07.-Ct you should:
a.. Charge the battery (go to #240)b. Replace the battery (go to #178)c. Check the engine timing (go to #5)d. Check the ignition bypass circuit (go to #161)e. Replace the ignition points and condenser (go to #209)
277. You remove the PCV valve and shake it back and forth. No noises can be heard. Now you would'
a. 'Clean the PCV valve (go to #66),b. Replace the PCV valve (go to #45)c. Check some other part of the automobile (go to #109)
278. At idle speed, what shqtd be present at this fitting?
a. A weak vacuum (go to #241)b. A strong vauum (go to #241)c. A weak fl9w of air (go to #134)d. A strong flow of air (7 to #134)
279. STOP. You have completed this activity. Give this test and your answer sheet to yotir instructor
I.44
fr.
i
1
e 1
74
a