docusign connector · 2017-09-15 · run the docusign retriever service ... it will help you...
TRANSCRIPT
Square 9 Softworks Inc. · 127 Church Street · New Haven, CT 06510 (+1) 203-789-0889 email: [email protected]
DocuSign® Connector
Setup and User Guide
127 Church Street, New Haven, CT 06510
O: (203) 789-0889 | E: [email protected] www.square-9.com

Square 9 Softworks Inc. · 127 Church Street · New Haven, CT 06510
(+1) 203-789-0889 email: [email protected]
DocuSign®Connector
Setup and User Guide
Copyrights, Legal Notices, Trademarks, and Servicemarks
© Copyright 2017 Square 9® Softworks – All rights reserved. No part of this work may be reproduced or transmitted in
any form or by any means whatsoever, without written permission of Square 9 Softworks unless such copying is
expressly permitted by Federal copyright law. For information regarding permissions, contact: Square 9 Softworks Inc.,
127 Church Street, New Haven, CT 06510, USA, [email protected].
September 2017 edition
Publication subject to change without notice, Square 9 Softworks assumes no liability for any damages incurred
directly or indirectly from errors, omissions, or discrepancies between the actual software you install and/or the
contents of this publication or any other accompanying publication.
GlobalSearch, GlobalCapture, and GlobalAction are registered trademarks of Square 9 Softworks. All other products
and devices listed in this document are trademarks or registered trademarks of their respective companies and are
hereby acknowledged.
Microsoft, Windows, Word, Excel, PowerPoint, SQL Server, and Exchange are trademarks and service marks of
Microsoft, Inc., registered in the United States and other countries, and are the property of Microsoft, Inc.
Google is a trademark of Alphabet, Inc., registered in the United States and other countries, and is the property of
Alphabet, Inc.
Mongo and MongoDB are registered trademarks of MongoDB, Inc. registered in the United States and other
countries, and are the property of MongoDB, Incorporated.

DocuSign Guide Table of Contents i
Table of Contents
How to Use This Guide ................................................................................................................................................. 1
Purpose .................................................................................................................................................................................................................... 1
Audience .................................................................................................................................................................................................................. 1
Organization ........................................................................................................................................................................................................... 1
Conventions Used in this Guide .................................................................................................................................. 2
Icons .......................................................................................................................................................................................................................... 2
Typographic Conventions ................................................................................................................................................................................. 2
Writing Conventions ........................................................................................................................................................................................... 2
Help and Support ................................................................................................................................................................................................. 2
Introduction to DocuSign ............................................................................................................................................ 3
Overview .................................................................................................................................................................................................................. 3
Set Up DocuSign Access .................................................................................................................................................................................... 3
Set up a DocuSign Template ....................................................................................................................................... 5
Send a GlobalSearch Document for Signature .......................................................................................................... 9
Initial Steps ............................................................................................................................................................................................................. 9
Draw Signature Box Option ............................................................................................................................................................................. 9
Use DocuSign Template Option ................................................................................................................................................................... 10
Process Completed (Signed) Documents ................................................................................................................. 12
Run the DocuSign Retriever Service ........................................................................................................................................................... 12
DocuSign Retriever Configuration File Setup ......................................................................................................................................... 13
Appendix A: Create/Install an SSL Certificate .......................................................................................................... 14
Request a Certificate ......................................................................................................................................................................................... 14
Install the Certificate (2012/IIS 8 and 2012R2/IIS 8.5) ......................................................................................................................... 16
Assign the SSL Certificate to a Web Site ................................................................................................................................................... 17
Install the Certificate (2012/IIS 8 and 2012R2/IIS 8.5) Multiple Certificates using Server Name Indication (SNI) ....... 19
Assign the SSL Certificate to a Web Site ................................................................................................................................................... 21

DocuSign Guide About this Guide 1
How to Use This Guide
Purpose The DocuSign Connector Setup and User Guide provides instructions for using your Square 9 to DocuSign®
connector. It will help you understand the steps needed to connect to and use your secure DocuSign e-
signature service.
Audience GlobalSearch end users that will use DocuSign should read this guide to learn how to send documents to
recipients via DocuSign for secure e-signatures.
GlobalSearch administrators should read this guide to understand the DocuSign features they will need to
configure, implement, and support.
Organization This guide is organized into three sections as follows:
Section I: Conventions Used in this Guide
A quick reference to the meanings of the icons, typographic conventions, and writing
conventions that might appear in this guide.
Section II: Introduction to DocuSign
Overview of what DocuSign is, what it can do, and how GlobalSearch users can integrate with it.
Section III: Use DocuSign with GlobalSearch
Step-by-step instructions for sending a GlobalSearch document for signature via DocuSign.
2 About this Guide DocuSign Guide
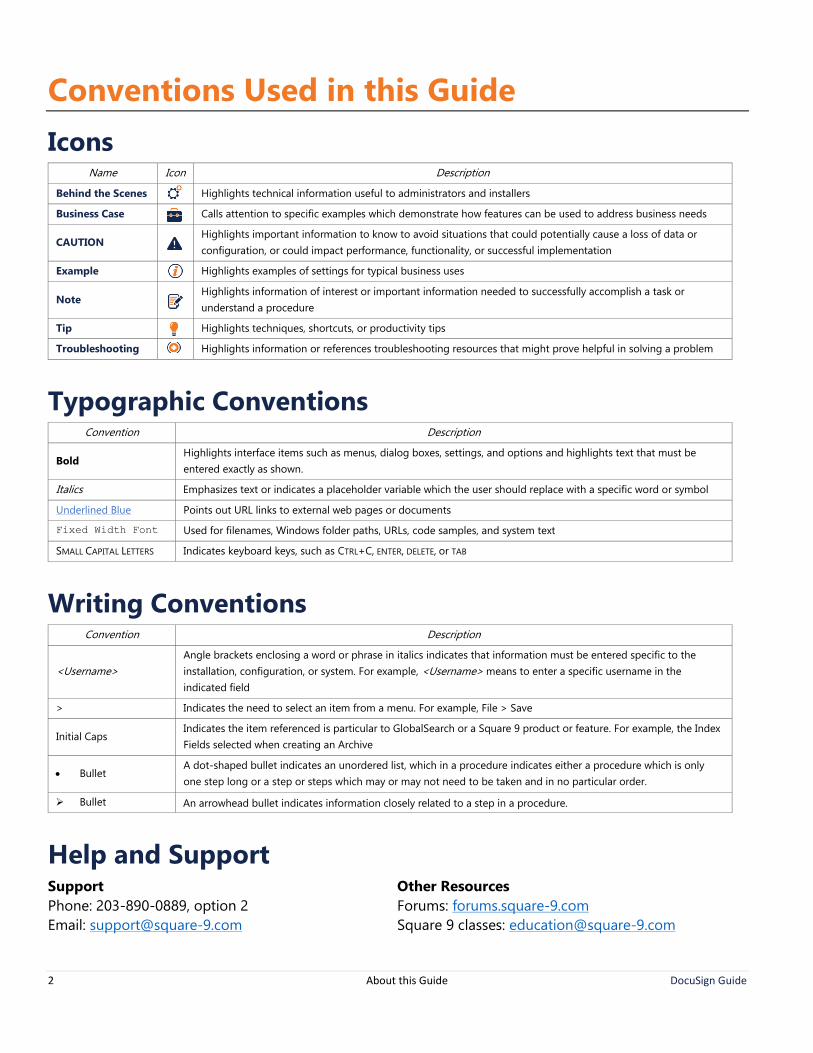
Conventions Used in this Guide
Icons Name Icon Description
Behind the Scenes Highlights technical information useful to administrators and installers
Business Case Calls attention to specific examples which demonstrate how features can be used to address business needs
CAUTION Highlights important information to know to avoid situations that could potentially cause a loss of data or
configuration, or could impact performance, functionality, or successful implementation
Example Highlights examples of settings for typical business uses
Note Highlights information of interest or important information needed to successfully accomplish a task or
understand a procedure
Tip Highlights techniques, shortcuts, or productivity tips
Troubleshooting Highlights information or references troubleshooting resources that might prove helpful in solving a problem
Typographic Conventions Convention Description
Bold Highlights interface items such as menus, dialog boxes, settings, and options and highlights text that must be
entered exactly as shown.
Italics Emphasizes text or indicates a placeholder variable which the user should replace with a specific word or symbol
Underlined Blue Points out URL links to external web pages or documents
Fixed Width Font Used for filenames, Windows folder paths, URLs, code samples, and system text
SMALL CAPITAL LETTERS Indicates keyboard keys, such as CTRL+C, ENTER, DELETE, or TAB
Writing Conventions Convention Description
<Username>
Angle brackets enclosing a word or phrase in italics indicates that information must be entered specific to the
installation, configuration, or system. For example, <Username> means to enter a specific username in the
indicated field
> Indicates the need to select an item from a menu. For example, File > Save
Initial Caps Indicates the item referenced is particular to GlobalSearch or a Square 9 product or feature. For example, the Index
Fields selected when creating an Archive
Bullet A dot-shaped bullet indicates an unordered list, which in a procedure indicates either a procedure which is only
one step long or a step or steps which may or may not need to be taken and in no particular order.
Bullet An arrowhead bullet indicates information closely related to a step in a procedure.
Help and Support Support Other Resources
Phone: 203-890-0889, option 2 Forums: forums.square-9.com
Email: [email protected] Square 9 classes: [email protected]
DocuSign Guide Introduction to DocuSign 3
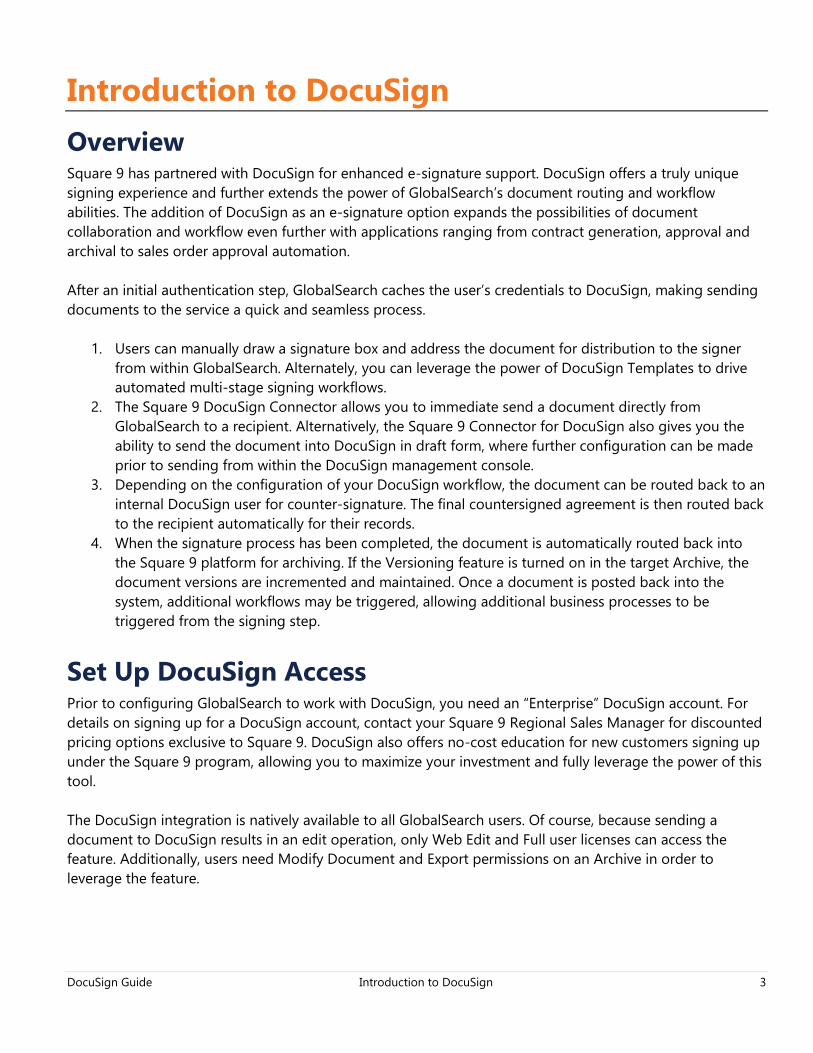
Introduction to DocuSign
Overview Square 9 has partnered with DocuSign for enhanced e-signature support. DocuSign offers a truly unique
signing experience and further extends the power of GlobalSearch’s document routing and workflow
abilities. The addition of DocuSign as an e-signature option expands the possibilities of document
collaboration and workflow even further with applications ranging from contract generation, approval and
archival to sales order approval automation.
After an initial authentication step, GlobalSearch caches the user’s credentials to DocuSign, making sending
documents to the service a quick and seamless process.
1. Users can manually draw a signature box and address the document for distribution to the signer
from within GlobalSearch. Alternately, you can leverage the power of DocuSign Templates to drive
automated multi-stage signing workflows.
2. The Square 9 DocuSign Connector allows you to immediate send a document directly from
GlobalSearch to a recipient. Alternatively, the Square 9 Connector for DocuSign also gives you the
ability to send the document into DocuSign in draft form, where further configuration can be made
prior to sending from within the DocuSign management console.
3. Depending on the configuration of your DocuSign workflow, the document can be routed back to an
internal DocuSign user for counter-signature. The final countersigned agreement is then routed back
to the recipient automatically for their records.
4. When the signature process has been completed, the document is automatically routed back into
the Square 9 platform for archiving. If the Versioning feature is turned on in the target Archive, the
document versions are incremented and maintained. Once a document is posted back into the
system, additional workflows may be triggered, allowing additional business processes to be
triggered from the signing step.
Set Up DocuSign Access Prior to configuring GlobalSearch to work with DocuSign, you need an “Enterprise” DocuSign account. For
details on signing up for a DocuSign account, contact your Square 9 Regional Sales Manager for discounted
pricing options exclusive to Square 9. DocuSign also offers no-cost education for new customers signing up
under the Square 9 program, allowing you to maximize your investment and fully leverage the power of this
tool.
The DocuSign integration is natively available to all GlobalSearch users. Of course, because sending a
document to DocuSign results in an edit operation, only Web Edit and Full user licenses can access the
feature. Additionally, users need Modify Document and Export permissions on an Archive in order to
leverage the feature.

DocuSign Guide Set up a DocuSign Template 5
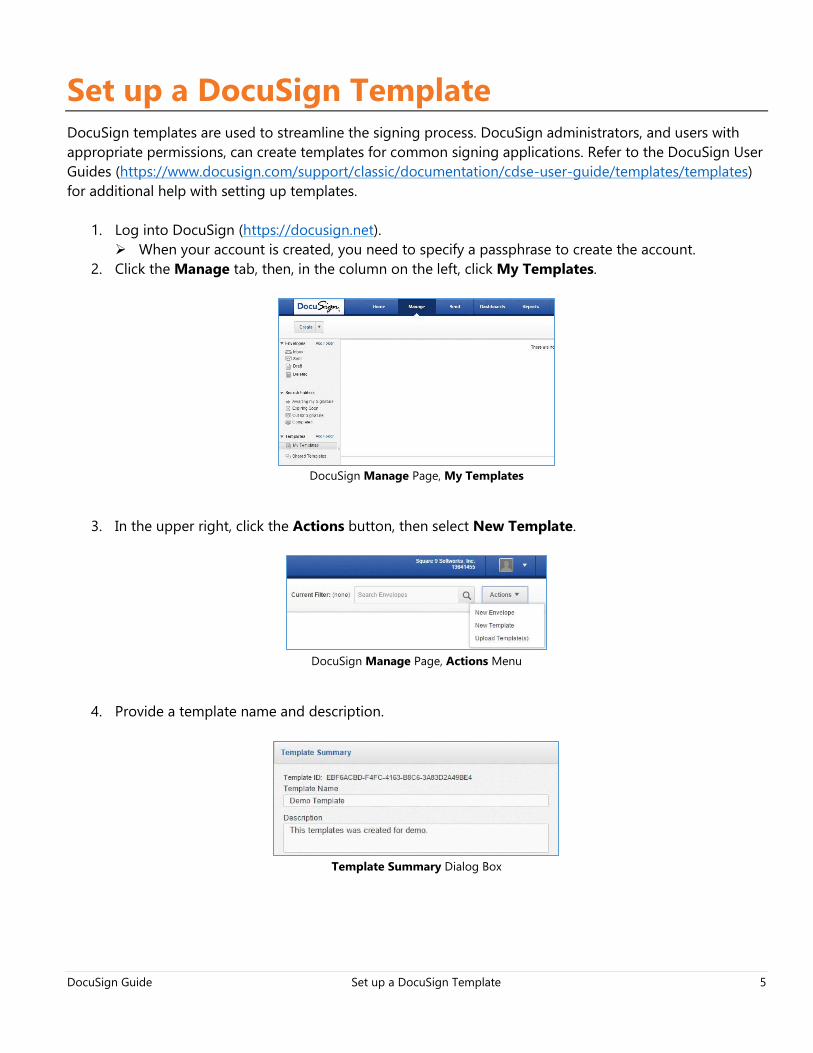
Set up a DocuSign Template DocuSign templates are used to streamline the signing process. DocuSign administrators, and users with
appropriate permissions, can create templates for common signing applications. Refer to the DocuSign User
Guides (https://www.docusign.com/support/classic/documentation/cdse-user-guide/templates/templates)
for additional help with setting up templates.
1. Log into DocuSign (https://docusign.net).
When your account is created, you need to specify a passphrase to create the account.
2. Click the Manage tab, then, in the column on the left, click My Templates.
DocuSign Manage Page, My Templates
3. In the upper right, click the Actions button, then select New Template.
DocuSign Manage Page, Actions Menu
4. Provide a template name and description.
Template Summary Dialog Box

6 Set up a DocuSign Template DocuSign Guide
5. Upload a clean version of the document you wish to use of the template.
Documents for Signature Dialog Box
6. In the Recipients and Routing section, create two Roles.
Roles are displayed in the GlobalSearch interface, so they should be clearly named.
a. Click Add Signer, then enter a Role name in the new line.
b. Click Add Signer again.
i. In the Order field in the new line, change the value to 2.
ii. In the Email field, enter your email address.
iii. In the Name field, enter your name.
Recipient and Routing Dialog Box
7. Complete the remaining field on the form with email subject and body text, and complete the
remaining settings appropriately.
Email Message Dialog Box
8. In the lower left, click the Next button.
DocuSign Guide Set up a DocuSign Template 7
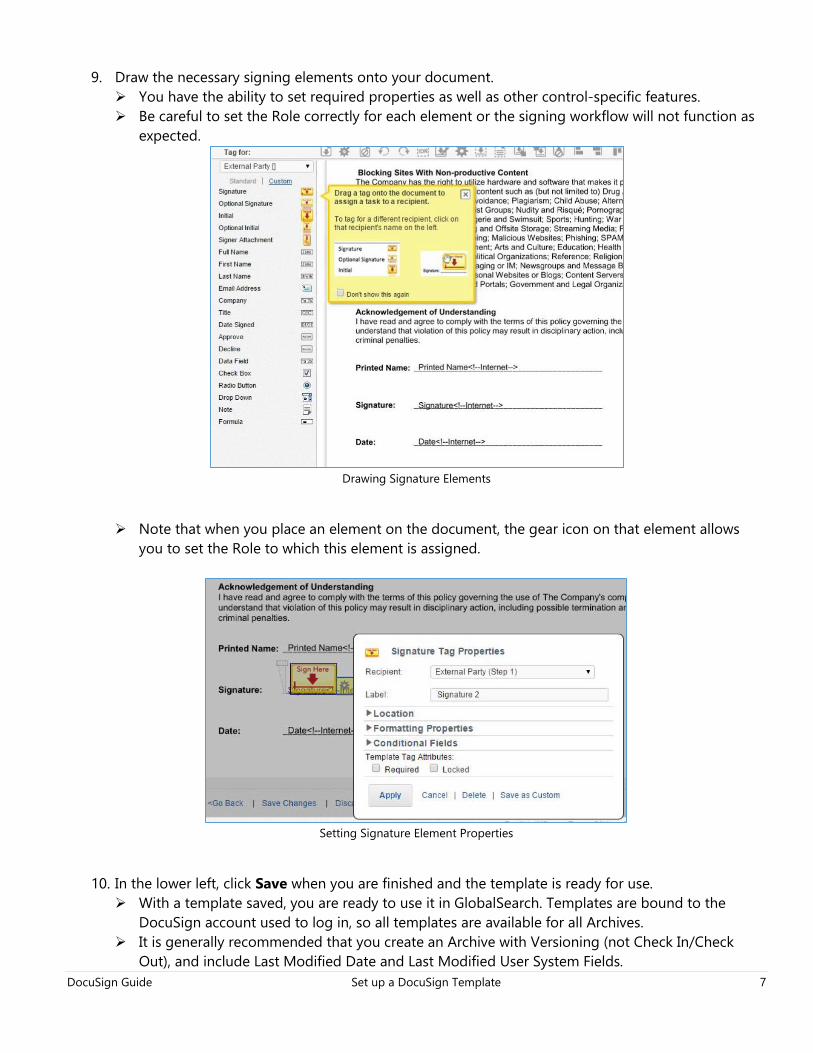
9. Draw the necessary signing elements onto your document.
You have the ability to set required properties as well as other control-specific features.
Be careful to set the Role correctly for each element or the signing workflow will not function as
expected.
Drawing Signature Elements
Note that when you place an element on the document, the gear icon on that element allows
you to set the Role to which this element is assigned.
Setting Signature Element Properties
10. In the lower left, click Save when you are finished and the template is ready for use.
With a template saved, you are ready to use it in GlobalSearch. Templates are bound to the
DocuSign account used to log in, so all templates are available for all Archives.
It is generally recommended that you create an Archive with Versioning (not Check In/Check
Out), and include Last Modified Date and Last Modified User System Fields.
8 Set up a DocuSign Template DocuSign Guide
Templates can also be shared among users by exporting them from one DocuSign account and
importing them to another, but you must make sure that the signing rules are forwarding to the
correct email accounts if you do this.

DocuSign Guide Send a GlobalSearch Document for Signature 9
Send a GlobalSearch Document for Signature
Initial Steps 1. Open any document within the GlobalSearch browser client.
2. From the Actions menu in the Document Viewer, choose Send to DocuSign.
Authentication to DocuSign is only required once. Encrypted authentication credentials are
cached by the browser and used for future interactions from GlobalSearch. If you don’t have
credentials stored or the browser cache is cleared, GlobalSearch prompts you for your DocuSign
login credentials.
DocuSign Login
3. Once authentication is complete, in the Send to DocuSign dialog box, choose either Draw
Signature Box or Use DocuSign Template.
Send to DocuSign
Draw Signature Box Option The Draw Signature Box option is used for ad-hoc signing only. Use it to draw a signing region directly on
the document in GlobalSearch. This region is passed into DocuSign as a signature tag on the document.
Once the signing region is drawn on the document, GlobalSearch prompts you for the signer’s details. For
ad-hoc requests, the recipient’s name and email address are required to initiate the transaction.
You can send the document immediately or send it to DocuSign as a draft. If Create Draft is enabled in the
Send to DocuSign dialog box, you have the opportunity to edit what DocuSign refers to as an Envelope in
10 Send a GlobalSearch Document for Signature DocuSign Guide
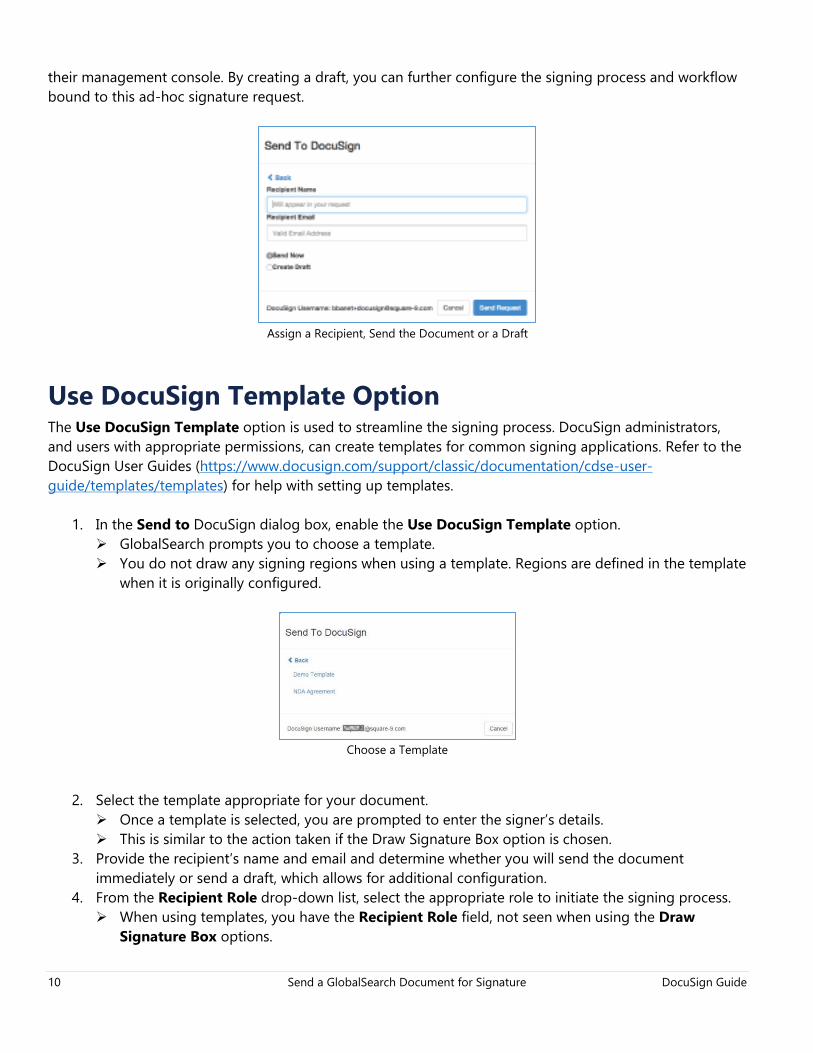
their management console. By creating a draft, you can further configure the signing process and workflow
bound to this ad-hoc signature request.
Assign a Recipient, Send the Document or a Draft
Use DocuSign Template Option The Use DocuSign Template option is used to streamline the signing process. DocuSign administrators,
and users with appropriate permissions, can create templates for common signing applications. Refer to the
DocuSign User Guides (https://www.docusign.com/support/classic/documentation/cdse-user-
guide/templates/templates) for help with setting up templates.
1. In the Send to DocuSign dialog box, enable the Use DocuSign Template option.
GlobalSearch prompts you to choose a template.
You do not draw any signing regions when using a template. Regions are defined in the template
when it is originally configured.
Choose a Template
2. Select the template appropriate for your document.
Once a template is selected, you are prompted to enter the signer’s details.
This is similar to the action taken if the Draw Signature Box option is chosen.
3. Provide the recipient’s name and email and determine whether you will send the document
immediately or send a draft, which allows for additional configuration.
4. From the Recipient Role drop-down list, select the appropriate role to initiate the signing process.
When using templates, you have the Recipient Role field, not seen when using the Draw
Signature Box options.

DocuSign Guide Send a GlobalSearch Document for Signature 11
The Role is used to initiate the signing process. In multi-step approvals, normally the first Role in
the list begins the signing workflow.
Choose to Send Now or Save as Draft
Once the document is sent to DocuSign, no further action is taken from GlobalSearch until the
signing workflow has been completed and DocuSign acknowledges a completed envelope.
The DocuSign service informs your GlobalSearch server of the signing, the GlobalSearch server
then updates the document in the system with the signed version (which is why we recommend
the Archive be set up with the Versioning feature), and sends you a notification via email.
12 Process Completed (Signed) Documents DocuSign Guide
Process Completed (Signed) Documents
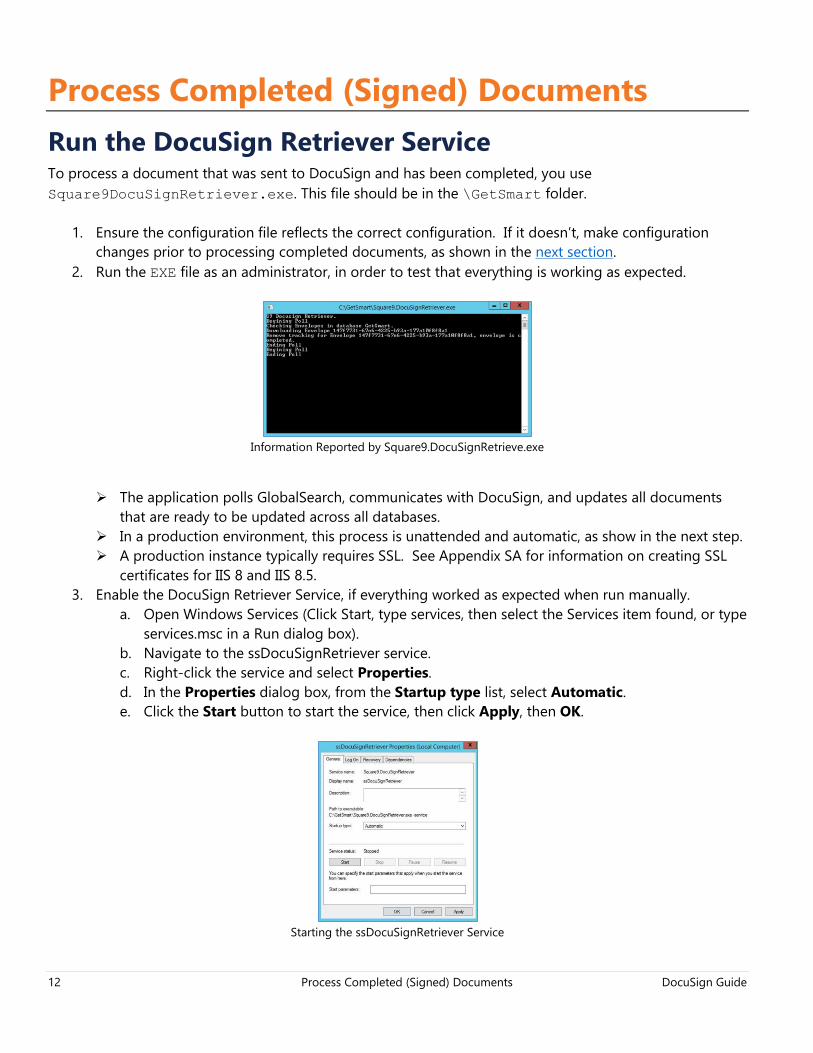
Run the DocuSign Retriever Service To process a document that was sent to DocuSign and has been completed, you use
Square9DocuSignRetriever.exe. This file should be in the \GetSmart folder.
1. Ensure the configuration file reflects the correct configuration. If it doesn’t, make configuration
changes prior to processing completed documents, as shown in the next section.
2. Run the EXE file as an administrator, in order to test that everything is working as expected.
Information Reported by Square9.DocuSignRetrieve.exe
The application polls GlobalSearch, communicates with DocuSign, and updates all documents
that are ready to be updated across all databases.
In a production environment, this process is unattended and automatic, as show in the next step.
A production instance typically requires SSL. See Appendix SA for information on creating SSL
certificates for IIS 8 and IIS 8.5.
3. Enable the DocuSign Retriever Service, if everything worked as expected when run manually.
a. Open Windows Services (Click Start, type services, then select the Services item found, or type
services.msc in a Run dialog box).
b. Navigate to the ssDocuSignRetriever service.
c. Right-click the service and select Properties.
d. In the Properties dialog box, from the Startup type list, select Automatic.
e. Click the Start button to start the service, then click Apply, then OK.
Starting the ssDocuSignRetriever Service
DocuSign Guide Process Completed (Signed) Documents 13
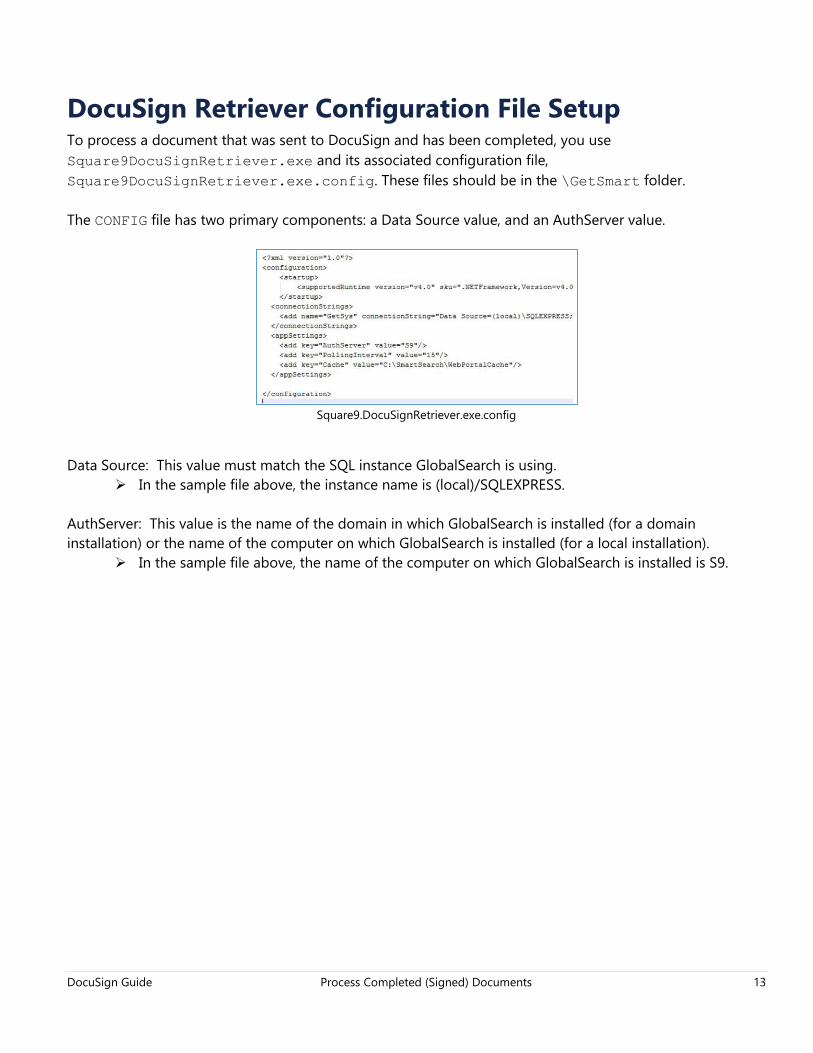
DocuSign Retriever Configuration File Setup To process a document that was sent to DocuSign and has been completed, you use
Square9DocuSignRetriever.exe and its associated configuration file,
Square9DocuSignRetriever.exe.config. These files should be in the \GetSmart folder.
The CONFIG file has two primary components: a Data Source value, and an AuthServer value.
Square9.DocuSignRetriever.exe.config
Data Source: This value must match the SQL instance GlobalSearch is using.
In the sample file above, the instance name is (local)/SQLEXPRESS.
AuthServer: This value is the name of the domain in which GlobalSearch is installed (for a domain
installation) or the name of the computer on which GlobalSearch is installed (for a local installation).
In the sample file above, the name of the computer on which GlobalSearch is installed is S9.
14 Appendix A: Create/Install an SSL Certificate DocuSign Guide
Appendix A: Create/Install an SSL Certificate
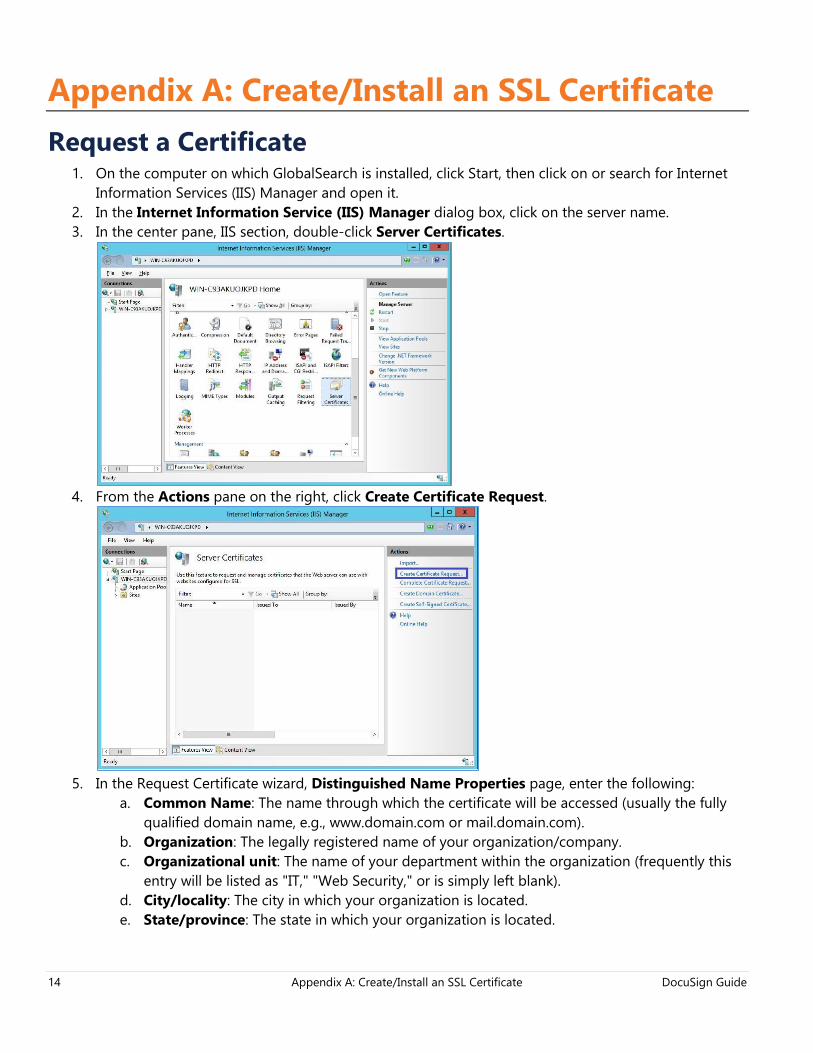
Request a Certificate 1. On the computer on which GlobalSearch is installed, click Start, then click on or search for Internet
Information Services (IIS) Manager and open it.
2. In the Internet Information Service (IIS) Manager dialog box, click on the server name.
3. In the center pane, IIS section, double-click Server Certificates.
4. From the Actions pane on the right, click Create Certificate Request.
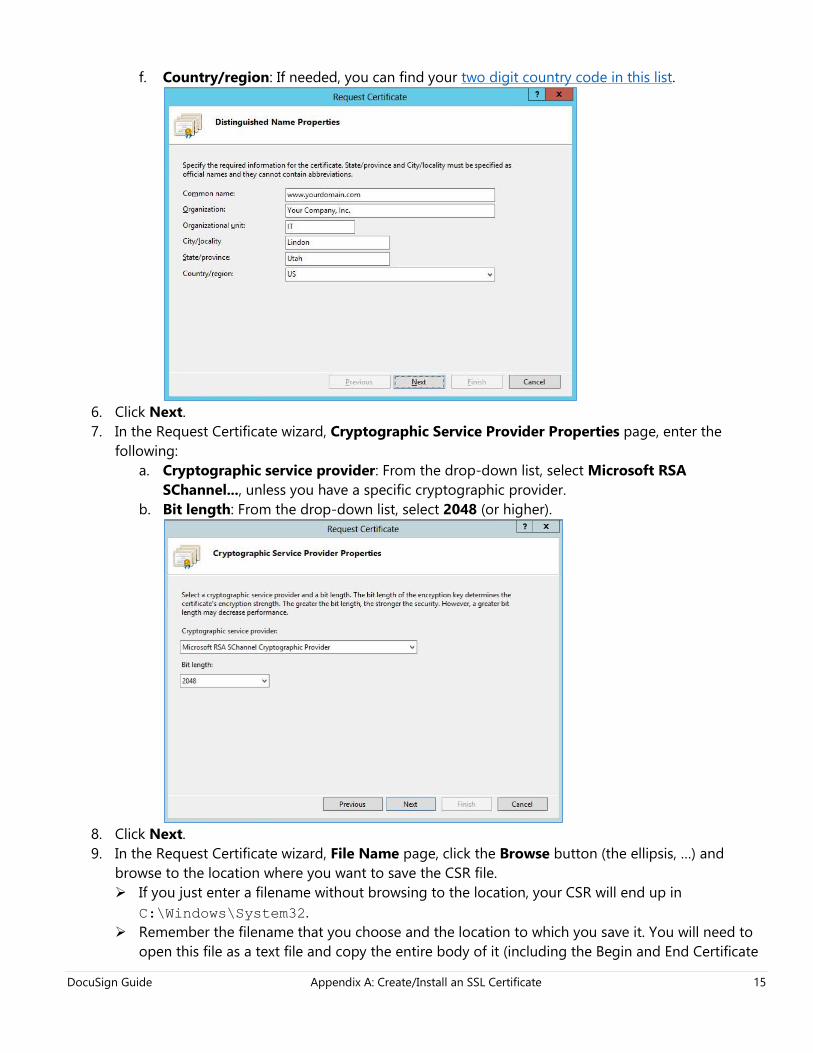
5. In the Request Certificate wizard, Distinguished Name Properties page, enter the following:
a. Common Name: The name through which the certificate will be accessed (usually the fully
qualified domain name, e.g., www.domain.com or mail.domain.com).
b. Organization: The legally registered name of your organization/company.
c. Organizational unit: The name of your department within the organization (frequently this
entry will be listed as "IT," "Web Security," or is simply left blank).
d. City/locality: The city in which your organization is located.
e. State/province: The state in which your organization is located.
DocuSign Guide Appendix A: Create/Install an SSL Certificate 15
f. Country/region: If needed, you can find your two digit country code in this list.
6. Click Next.
7. In the Request Certificate wizard, Cryptographic Service Provider Properties page, enter the
following:
a. Cryptographic service provider: From the drop-down list, select Microsoft RSA
SChannel..., unless you have a specific cryptographic provider.
b. Bit length: From the drop-down list, select 2048 (or higher).
8. Click Next.
9. In the Request Certificate wizard, File Name page, click the Browse button (the ellipsis, …) and
browse to the location where you want to save the CSR file.
If you just enter a filename without browsing to the location, your CSR will end up in
C:\Windows\System32.
Remember the filename that you choose and the location to which you save it. You will need to
open this file as a text file and copy the entire body of it (including the Begin and End Certificate

16 Appendix A: Create/Install an SSL Certificate DocuSign Guide
Request tags) into the online order process when prompted.
10. Click Finish.
After you receive your SSL Certificate from DigiCert, you can install it.
Install the Certificate (2012/IIS 8 and 2012R2/IIS 8.5) 1. On the web server you are securing, open the ZIP file containing your certificate.
2. Save the file named your_domain_name.cer to the desktop of the web server you are securing.
3. Click Start, then click on or search for Internet Information Services (IIS) Manager and open it.
4. In the Internet Information Service (IIS) Manager dialog box, click on the server name.
5. In the center pane, IIS section, double-click Server Certificates.
DocuSign Guide Appendix A: Create/Install an SSL Certificate 17
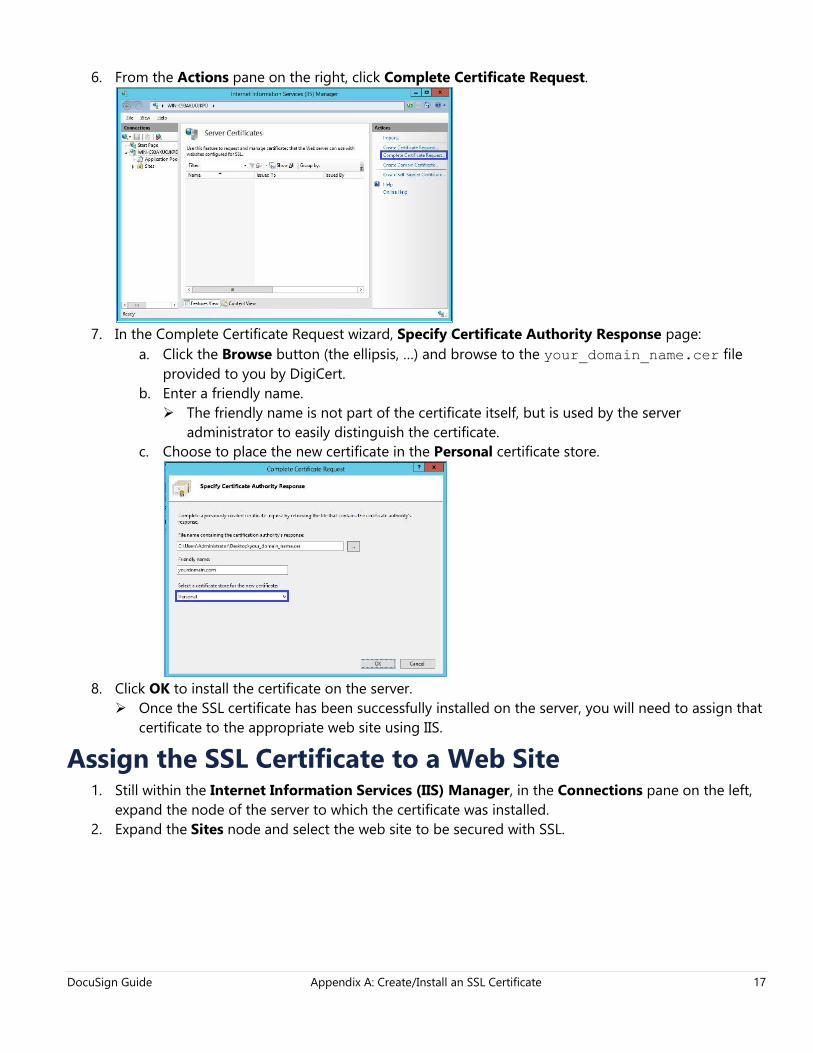
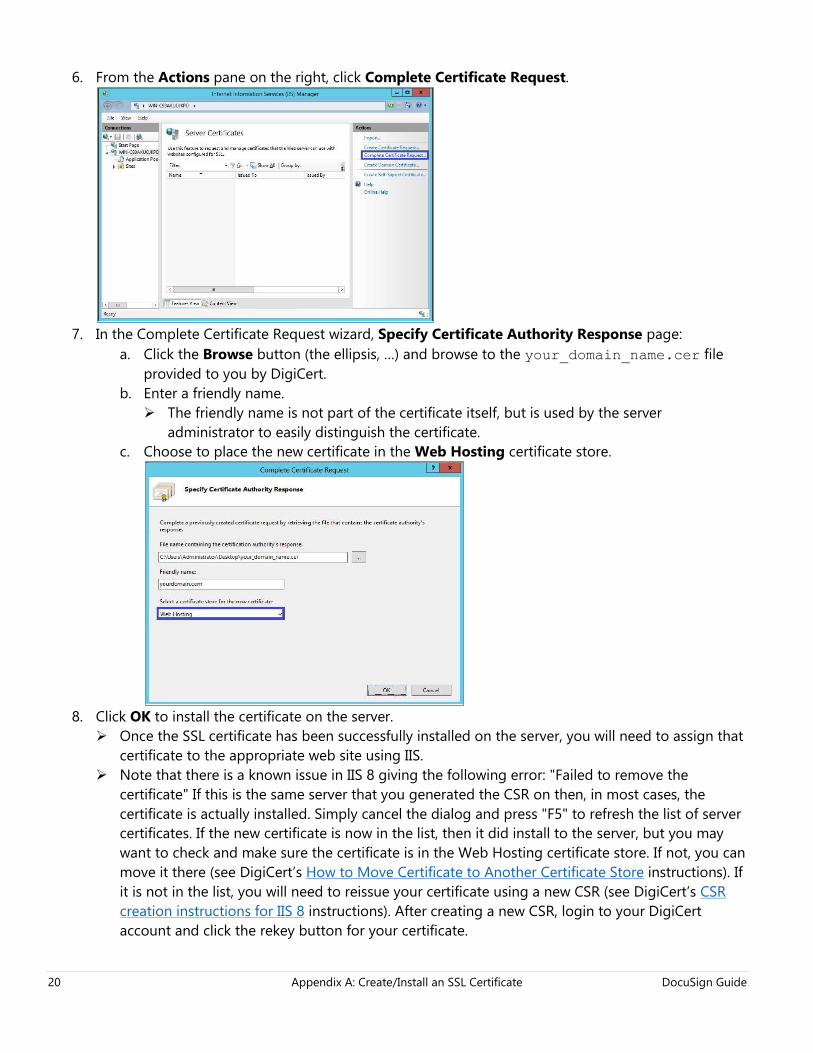
6. From the Actions pane on the right, click Complete Certificate Request.
7. In the Complete Certificate Request wizard, Specify Certificate Authority Response page:
a. Click the Browse button (the ellipsis, …) and browse to the your_domain_name.cer file
provided to you by DigiCert.
b. Enter a friendly name.
The friendly name is not part of the certificate itself, but is used by the server
administrator to easily distinguish the certificate.
c. Choose to place the new certificate in the Personal certificate store.
8. Click OK to install the certificate on the server.
Once the SSL certificate has been successfully installed on the server, you will need to assign that
certificate to the appropriate web site using IIS.
Assign the SSL Certificate to a Web Site 1. Still within the Internet Information Services (IIS) Manager, in the Connections pane on the left,
expand the node of the server to which the certificate was installed.
2. Expand the Sites node and select the web site to be secured with SSL.
18 Appendix A: Create/Install an SSL Certificate DocuSign Guide
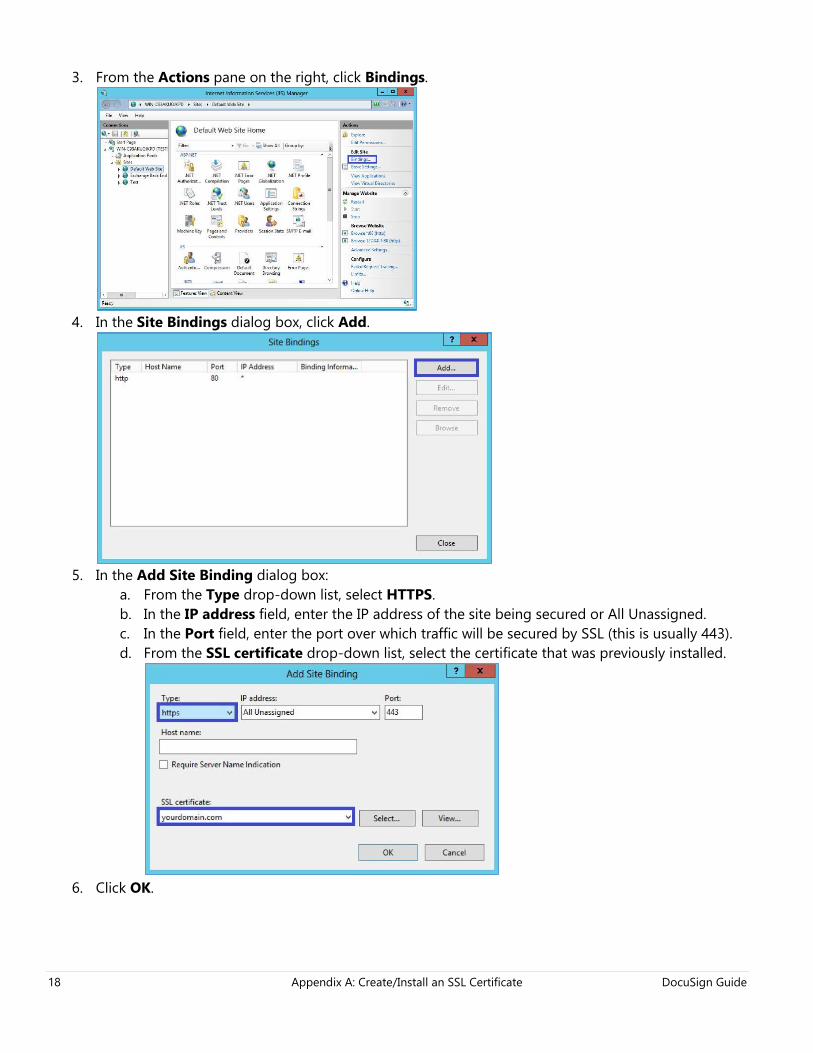
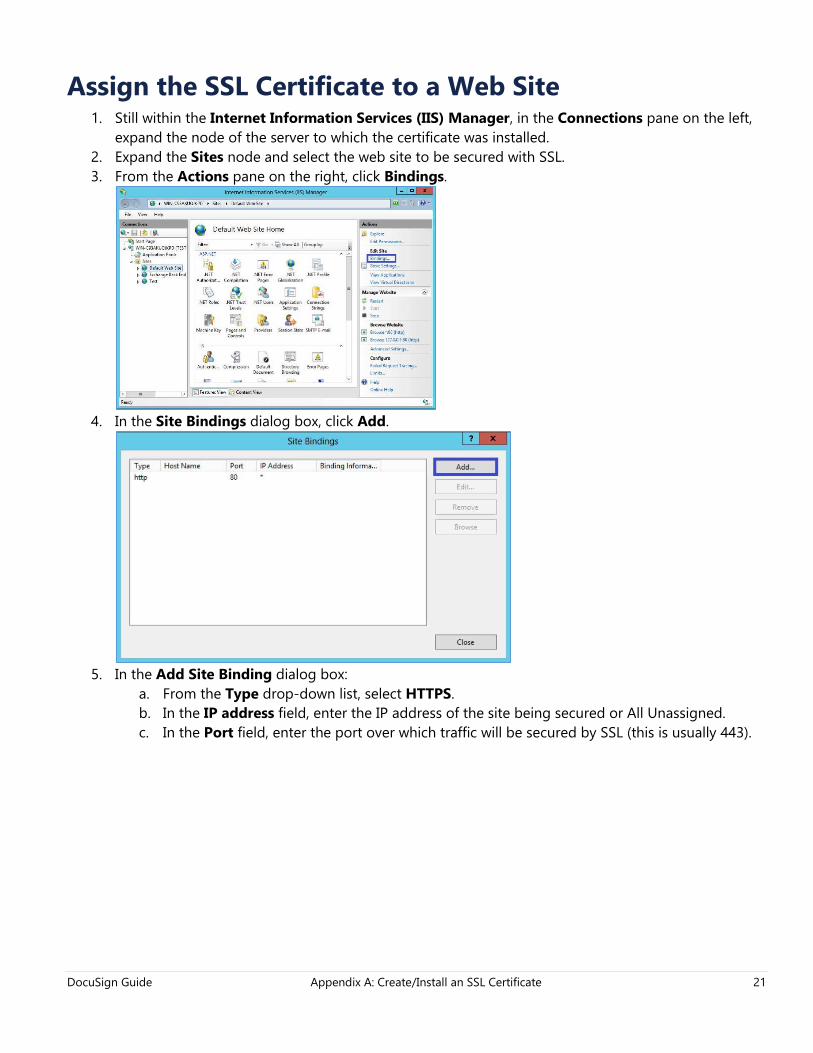
3. From the Actions pane on the right, click Bindings.
4. In the Site Bindings dialog box, click Add.
5. In the Add Site Binding dialog box:
a. From the Type drop-down list, select HTTPS.
b. In the IP address field, enter the IP address of the site being secured or All Unassigned.
c. In the Port field, enter the port over which traffic will be secured by SSL (this is usually 443).
d. From the SSL certificate drop-down list, select the certificate that was previously installed.
6. Click OK.

DocuSign Guide Appendix A: Create/Install an SSL Certificate 19
Your SSL certificate is now installed, and the web site configured to accept secure connections.
Install the Certificate (2012/IIS 8 and 2012R2/IIS 8.5)
Multiple Certificates using Server Name Indication (SNI) 1. On the web server you are securing, open the ZIP file containing your certificate.
2. Save the file named your_domain_name.cer to the desktop of the web server you are securing.
3. Click Start, then click on or search for Internet Information Services (IIS) Manager and open it.
4. In the Internet Information Service (IIS) Manager dialog box, click on the server name.
5. In the center pane, IIS section, double-click Server Certificates.
20 Appendix A: Create/Install an SSL Certificate DocuSign Guide
6. From the Actions pane on the right, click Complete Certificate Request.
7. In the Complete Certificate Request wizard, Specify Certificate Authority Response page:
a. Click the Browse button (the ellipsis, …) and browse to the your_domain_name.cer file
provided to you by DigiCert.
b. Enter a friendly name.
The friendly name is not part of the certificate itself, but is used by the server
administrator to easily distinguish the certificate.
c. Choose to place the new certificate in the Web Hosting certificate store.
8. Click OK to install the certificate on the server.
Once the SSL certificate has been successfully installed on the server, you will need to assign that
certificate to the appropriate web site using IIS.
Note that there is a known issue in IIS 8 giving the following error: "Failed to remove the
certificate" If this is the same server that you generated the CSR on then, in most cases, the
certificate is actually installed. Simply cancel the dialog and press "F5" to refresh the list of server
certificates. If the new certificate is now in the list, then it did install to the server, but you may
want to check and make sure the certificate is in the Web Hosting certificate store. If not, you can
move it there (see DigiCert’s How to Move Certificate to Another Certificate Store instructions). If
it is not in the list, you will need to reissue your certificate using a new CSR (see DigiCert’s CSR
creation instructions for IIS 8 instructions). After creating a new CSR, login to your DigiCert
account and click the rekey button for your certificate.
DocuSign Guide Appendix A: Create/Install an SSL Certificate 21
Assign the SSL Certificate to a Web Site 1. Still within the Internet Information Services (IIS) Manager, in the Connections pane on the left,
expand the node of the server to which the certificate was installed.
2. Expand the Sites node and select the web site to be secured with SSL.
3. From the Actions pane on the right, click Bindings.
4. In the Site Bindings dialog box, click Add.
5. In the Add Site Binding dialog box:
a. From the Type drop-down list, select HTTPS.
b. In the IP address field, enter the IP address of the site being secured or All Unassigned.
c. In the Port field, enter the port over which traffic will be secured by SSL (this is usually 443).
22 Appendix A: Create/Install an SSL Certificate DocuSign Guide
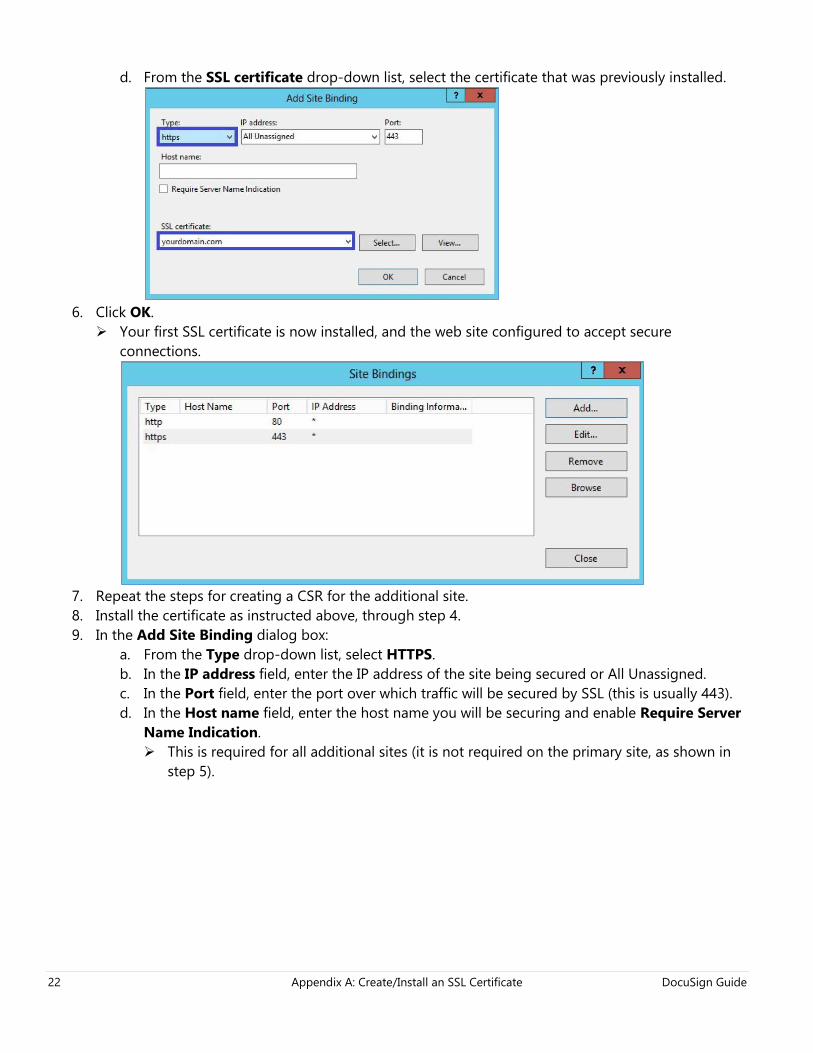
d. From the SSL certificate drop-down list, select the certificate that was previously installed.
6. Click OK.
Your first SSL certificate is now installed, and the web site configured to accept secure
connections.
7. Repeat the steps for creating a CSR for the additional site.
8. Install the certificate as instructed above, through step 4.
9. In the Add Site Binding dialog box:
a. From the Type drop-down list, select HTTPS.
b. In the IP address field, enter the IP address of the site being secured or All Unassigned.
c. In the Port field, enter the port over which traffic will be secured by SSL (this is usually 443).
d. In the Host name field, enter the host name you will be securing and enable Require Server
Name Indication.
This is required for all additional sites (it is not required on the primary site, as shown in
step 5).
DocuSign Guide Appendix A: Create/Install an SSL Certificate 23
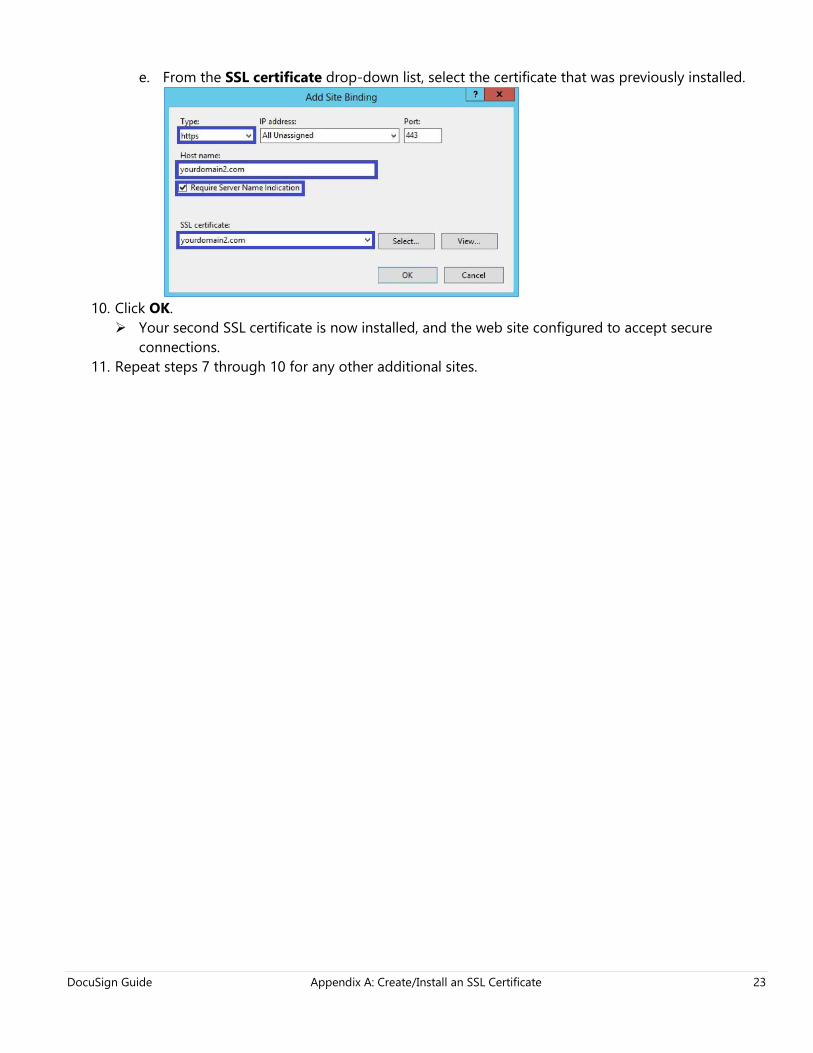
e. From the SSL certificate drop-down list, select the certificate that was previously installed.
10. Click OK.
Your second SSL certificate is now installed, and the web site configured to accept secure
connections.
11. Repeat steps 7 through 10 for any other additional sites.