download file - 10zig.com
TRANSCRIPT

Unified Write Filter Configuration
In Windows Embedded Standard 8, Unified Write Filter (UWF) protects volumes from write operations. UWF intercepts write actions and redirects them to overlay storage. With UWF, you can do stateless operations by creating a protected OS image, and you reduce the wear on flash media. UWF supports RAM- and disk-based overlays. Both types of overlay discard all changes on restart. UWF also provides the ability to perform dynamic protection, which means adding and removing volumes at run time.
One of the important features of UWF is intelligent filtering, which enables specified files and folders as well as certain registry keys to be persisted, while protecting the rest of the volume. The list of these specified files, folders, and registry keys is known as the exclusion list. You can use intelligent filtering to persist changes to an antivirus signature file or to a directory such as a user’s Documents folder within the protected volume. You can also use intelligent filtering to persist a registry key, such as the Domain Secret key, in a protected system.
You can configure UWF at run time by using either of the following methods:
UWF manager, a command-line configuration utility (Uwfmgr.exe).
UWF Windows Management Instrumentation (WMI) provider that uses WMI properties andinterfaces for scripting.
UWF manager provides many options and configuration tasks that do not exist in Enhanced Write Filter (EWF) manager or File-based Write Filter (FBWF) manager, such as adding registry exclusions and adding volumes. UWF manager syntax is very different from both EWF manager and FBWF manager, because it categorizes configuration into six high-level parameters to simplify configuration and avoid parameter or argument overloading.
Lab Exercise Purpose In this lab exercise, you will learn how to configure UWF at run-time by using UWF manager (Uwfmgr.exe).
Prerequisites Important Most UWF configuration commands are executed when the next restart happens, so the system must be restarted for the command to take effect.
To perform the steps in this lab exercise, the following hardware and software are required:
Hardware that meets Standard 8 requirements. An installed Standard 8 image that includes UWF.
10ZiG TechnologyEMEA [email protected]+44(0) 116.214.8650
AMERICAS [email protected]
UNIFIED CONFIGURATION TOOL GUIDE
INTRODUCTION
The Unified Configuration Tool (UCT) is a Microsoft Management Console (MMC) snap-in which enables local and remote management of Lockdown and Branding features installed on a Windows Embedded Standard 8 device. UCT supports configuring settings for Keyboard Filter, Dialog Filter, Unified Write Filter, and Custom Shell Launcher all from a single graphical interface making configuration of Windows Embedded devices more accessible to a wider audience spanning embedded developers to IT pros.
STEP 1: INSTALL UCT AND CONNECT TO YOUR DEVICE
You can either install UCT directly on your device, or you can install it on your computer and then connect remotely to your device. Your device must be connected to a network if you want to use UCT remotely to configure your device. If you install UCT on your computer, you also need to configure your device for remote management.
HARDWARE REQUIREMENTS
The computer or device must meet or exceed the following requirements:
1 GHz 32-bit or 64-bit processor 1 GB of operating system memory (32-bit system) or 2 GB of operating system memory (64-bit system) 2 GB of free hard drive space for complete installation
SOFTWARE REQUIREMENTS
The computer or device must meet or exceed the following requirements:
It must be running one of the following operating systems:o Windows 7o Windows 8o Windows Embedded Standard 8
It must have the following software installed:o .NET Framework 2.0 on Windows 7o .NET Framework 4.0 or higher on Windows 8 and Windows Embedded Standard 8o Microsoft Management Console (MMC)
To install UCT
1. On the Windows Embedded Standard 8 Toolkit disk, run EmbLockSetup_x86.msi for 32-bit computers anddevices, or EmbLockSetup_amd64.msi for 64-bit computers and devices.
2. In the installation wizard, follow the instructions.3. Click Start, type Unified, and then under Programs, click Unified Configuration Tool.
To configure your device for remote management

Note By default, UWF is disabled and there are no protected volumes, files, or folders in the exclusion list.
For more information, see Media and Requirements in the Standard 8 documentation.
Step 1: Ensure that your device will start and perform well after UWF is enabled In this step, you will change system settings that can prevent your device from starting after UWF is enabled or that can cause poor performance.
1. On the embedded device, open a command prompt as an administrator. For Windows Shell, to opena command prompt, do the following:
a. In Windows Explorer, navigate to \Windows\System32,right-click cmd.exe, and then clickRun as Administrator.
b. Accept the User Account Control (UAC) prompt.
2. To change UWF so that it does not prevent your device from starting, at the command prompt, typethe following command:
bcdedit /set {current} bootstatuspolicy ignoreallfailures
3. To disable indexing service, type the following command:
sc config cisvc start= disabled
4. To disable Prefetch/SuperFetch services, type the following command:
sc config sysmain start= disabled
5. To disable system restore, run the following Visual Basic script:
strComputer = "."
Set objWMIService = GetObject("winmgmts:" _
& "{impersonationLevel=impersonate}!\\" _
& strComputer & "\root\default")
Set objItem = objWMIService.Get("SystemRestore")
errResults = objItem.Disable("")
10ZiG TechnologyEMEA [email protected]+44(0) 116.214.8650
AMERICAS [email protected]
Step 2: Protect a volume on a Standard 8 system In this step, you will use UWF to protect a volume on a Standard 8 system.
1. On the embedded device, open a command prompt as an administrator. For Windows Shell, to opena command prompt, do the following:
a. In Windows Explorer, navigate to \Windows\System32, right-click cmd.exe, and then clickRun as Administrator.
b. Accept the UAC prompt.
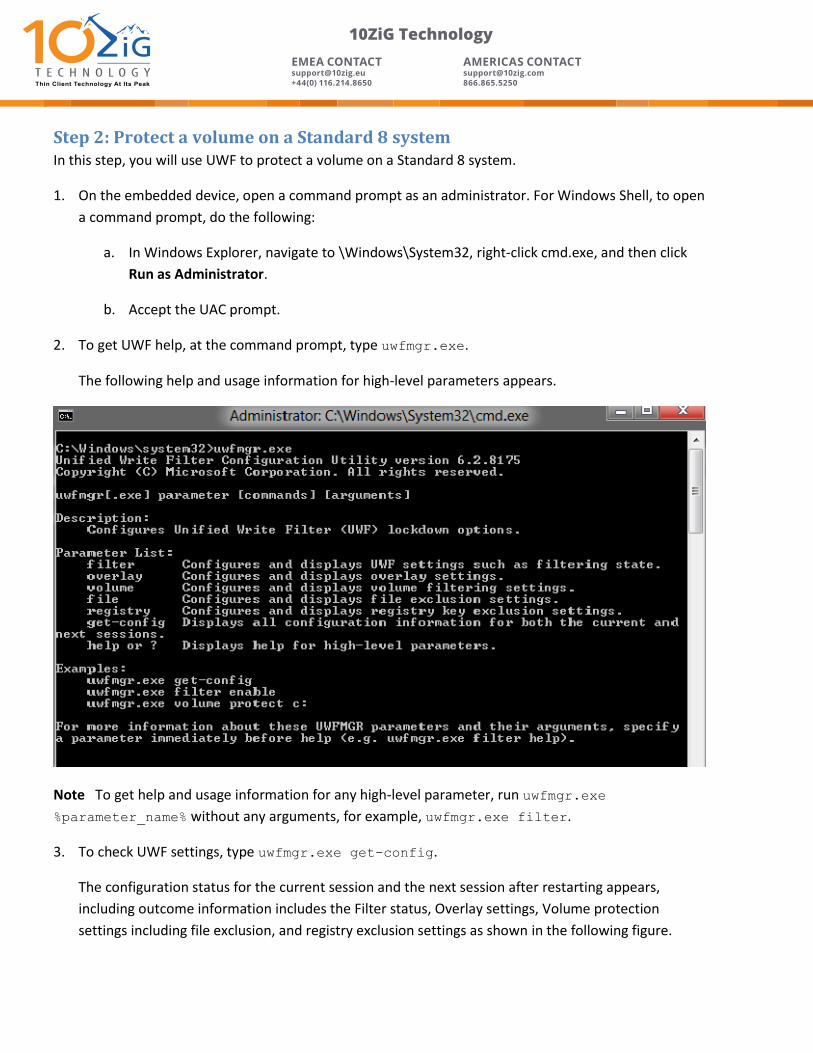
2. To get UWF help, at the command prompt, type uwfmgr.exe.
The following help and usage information for high-level parameters appears.
Note To get help and usage information for any high-level parameter, run uwfmgr.exe%parameter_name% without any arguments, for example, uwfmgr.exe filter.
3. To check UWF settings, type uwfmgr.exe get-config.
The configuration status for the current session and the next session after restarting appears,including outcome information includes the Filter status, Overlay settings, Volume protectionsettings including file exclusion, and registry exclusion settings as shown in the following figure.
10ZiG TechnologyEMEA [email protected]+44(0) 116.214.8650
AMERICAS [email protected]
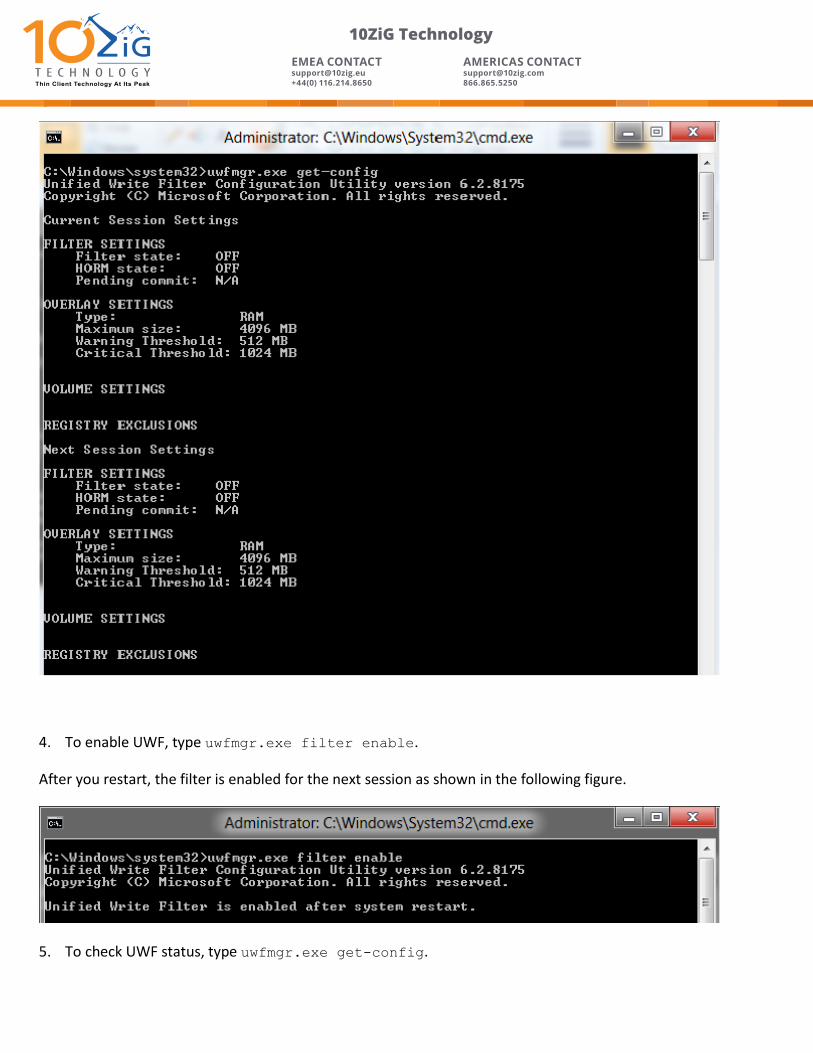
4. To enable UWF, type uwfmgr.exe filter enable.
After you restart, the filter is enabled for the next session as shown in the following figure.
5. To check UWF status, type uwfmgr.exe get-config.
10ZiG TechnologyEMEA [email protected]+44(0) 116.214.8650
AMERICAS [email protected]

6. To protect a volume with UWF, type uwfmgr.exe volume protect C:.
Note This command adds only volumes that exist in the system.
After you restart, the volume is added to the list of protected volumes in the next session, as shownin the following figure.
7. To check UWF status, type uwfmgr.exe get-config.
10ZiG TechnologyEMEA [email protected]+44(0) 116.214.8650
AMERICAS [email protected]

8. Restart the system.
10ZiG TechnologyEMEA [email protected]+44(0) 116.214.8650
AMERICAS [email protected]

Step 3: Add file and registry exclusions to a UWF-protected Standard 8 system In this step, you will add file and registry exclusions to a UWF-protected Standard 8 system.
1. On the embedded device, open a command prompt as an administrator. For Windows Shell, to opena command prompt, do the following:
a. In Windows Explorer, navigate to \Windows\System32,right-click cmd.exe, and then clickRun as Administrator.
b. Accept the UAC prompt.
2. To create sample folders and files to exclude, do the following:
a. At the command prompt, type the following commands:
md C:\aa\documents
md C:\mydir
notepad.exe C:\mydir\myfile.txt
b. Save the text file and then close Notepad.
Note Uwfmgr.exe does not support adding files and folders that do not exist yet to the exclusion list.
3. To add file and folder exclusions, do the following:
a. At the command prompt, type the following commands:
uwfmgr.exe file add-exclusion C:\mydir\myfile.txt
uwfmgr.exe file add-exclusion C:\aa\documents
Note To add an exclusion for a file or a folder that includes a space in the path, enclose the path in quotation marks, for example, "c:\My Files".
After you restart, the specified files and directories are added to the exclusion list in the next session as shown in the following figures.
10ZiG TechnologyEMEA [email protected]+44(0) 116.214.8650
AMERICAS [email protected]

b. To check file exclusion status, type uwfmgr.exe file get-exclusions.
4. To add a registry key exclusion, do the following:
a. At the command prompt, typeuwfmgr.exe registry add-exclusion HKLM\Software\MySoftware\MyApp.
Note To add exclusion for a registry key that includes a space, enclose the registry keyname in quotation marks.
After you restart, the specified registry key is added to the exclusion list in the next session as shown in the following figure.
b. To check the registry exclusion status, type uwfmgr.exe registry get-exclusions.
10ZiG TechnologyEMEA [email protected]+44(0) 116.214.8650
AMERICAS [email protected]
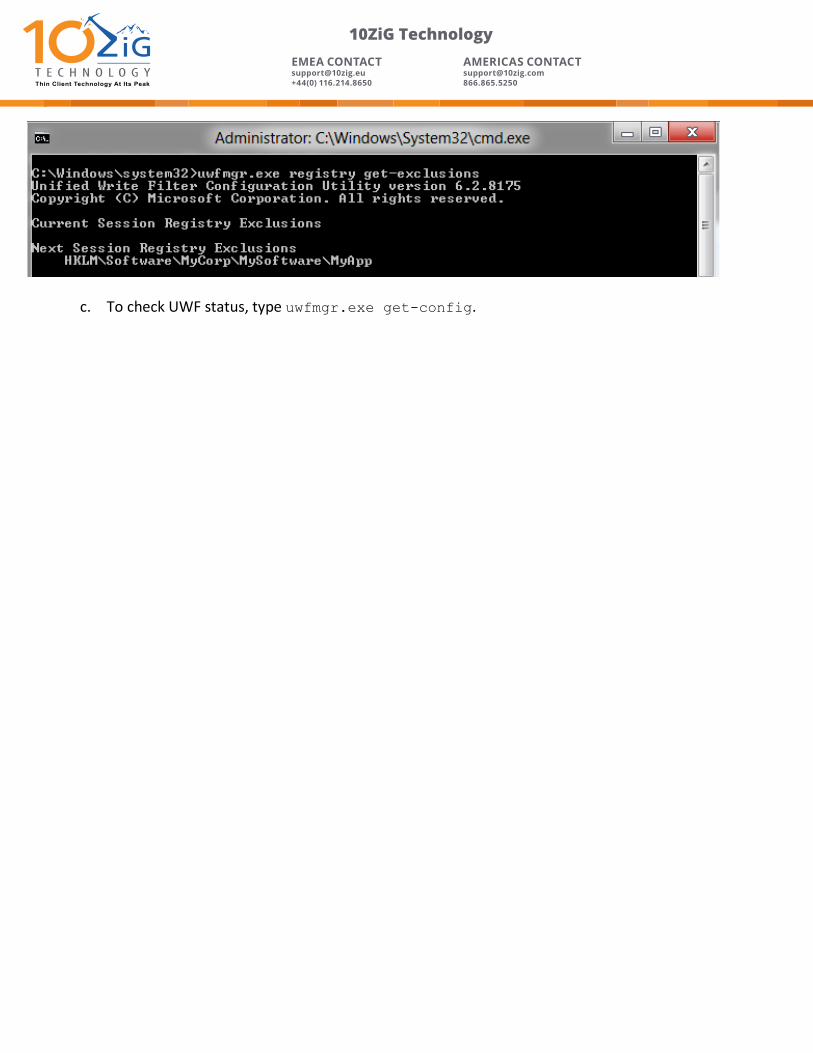
c. To check UWF status, type uwfmgr.exe get-config.
10ZiG TechnologyEMEA [email protected]+44(0) 116.214.8650
AMERICAS [email protected]

5. Restart the system.
10ZiG TechnologyEMEA [email protected]+44(0) 116.214.8650
AMERICAS [email protected]

Step 4: To configure a UWF overlay for a protected Standard 8 system In this step, you will configure a UWF overlay or a cache for a protected Standard 8 system.
1. On the embedded device, open a command prompt as an administrator. For Windows Shell, to opena command prompt, do the following:
a. In Windows Explorer, navigate to \Windows\System32,right-click cmd.exe, and then clickRun as Administrator.
b. Accept the UAC prompt.
2. To configure the UWF maximum overlay size, do the following:
Note To change maximum overlay size, you must first disable UWF in the current session.
a. At the command prompt, type uwfmgr.exe overlay set-size 2048.
After you restart, the maximum size is set to 2048 MB in the next session, as shown in thefollowing figure.
b. To check the overlay settings status, type uwfmgr.exe overlay get-config.
3. To configure the UWF overlay warning threshold, typeuwfmgr.exe overlay set-warningthreshold 1024.
10ZiG TechnologyEMEA [email protected]+44(0) 116.214.8650
AMERICAS [email protected]

After you restart, the threshold is set to 1024 MB in the next session, as shown in the following figure.
4. To configure the UWF overlay critical threshold, typeuwfmgr.exe overlay set-criticalthreshold 1500.
After you restart, the threshold is set to 1500 MB in the next session, as shown in the following figure.
5. To display the UWF overlay consumption, type uwfmgr.exe overlay get-consumption.
The current overlay consumption displays, as shown in the following figure.
6. To display the UWF overlay available space, type uwfmgr.exe overlay get-consumption.
The current overlay consumption displays, as shown in the following figure.
10ZiG TechnologyEMEA [email protected]+44(0) 116.214.8650
AMERICAS [email protected]

7. To change the overlay type, do the following:
Note To change the overlay type, you must first disable UWF in the current session. To changeoverlay type to DISK mode, the overlay maximum size must be at least 1024M.
a. To change overlay type from RAM to DISK, type uwfmgr.exe overlay set-type DISK.
b. To verify that the overlay type will be DISK in the next session after you restart, typeuwfmgr.exe overlay get-config.
10ZiG TechnologyEMEA [email protected]+44(0) 116.214.8650
AMERICAS [email protected]

Step 5: To configure HORM for a Standard 8 system In this step, you will configure Hibernate Once/Resume Many (HORM) for a Standard 8 system.
1. On the embedded device, open a command prompt as an administrator. For Windows Shell, to opena command prompt, do the following:
In Windows Explorer, navigate to \Windows\System32,right-click cmd.exe, and then clickRun as Administrator.
Accept the UAC prompt.
2. To enable hibernation on your device, type powercfg /h on.
3. To enable Unified Write Filter (UWF) on your device, type uwfmgr filter enable.
4. To protect all volumes on your device, type uwfmgr volume protect all.Note DVD RW Drive and Floppy Drive throws an expected error that can be safely ignored.
5. To restart your device to enable UWF, type shutdown /r/t 0.
6. After your system restarts, to verify the UWF changes that you have made on your device, typeuwfmgr get-config.
10ZiG TechnologyEMEA [email protected]+44(0) 116.214.8650
AMERICAS [email protected]


7. To enable HORM on your system, type uwfmgr filter enablehorm.Note Remove all file and registry exclusions before you enable HORM.
8. (Optional) In Control Panel, set the Power Option “When I press the power button” to avoiddisplaying the Command Prompt when resuming from hibernation, or use a script to close thecommand prompt on startup.
9. To hibernate the system one time to create an initial hibernation file at the command prompt, typeshutdown /h.
10. Press the power button to wake the system from hibernation.11. After the system starts from hibernation to create an initial hibernation file, to shut down and
restart the system, type shutdown /r /t 0.
12. When HORM is enabled, you cannot change the UWF configuration. To make changes, you mustfirst disable HORM. To disable HORM, type uwfmgr filter disablehorm.
13. To restart the system to finish disabling HORM, type shutdown /r /t 0.
10ZiG TechnologyEMEA [email protected]+44(0) 116.214.8650
AMERICAS [email protected]

The system will restart normally with HORM disabled.
Conclusion After completing this lab exercise, you will be able to do the following:
Enable or disable a UWF filter.
Add or remove volume protection.
Add or remove a file and folder exclusion.
Add or remove a registry key exclusion.
Display overlay usage status and adjust its configuration.
Configure and enable HORM on your device.
10ZiG TechnologyEMEA [email protected]+44(0) 116.214.8650
AMERICAS [email protected]