
CHORUS NTL TVThe possibilitiesU
SE
R’S
MA
NU
AL

3
Contents
1. Introduction 5 What are the benefi ts of Digital TV and the MediaBox? 5 About the instructions 5 Smart Card 6
2. The Remote Control 7 Overview of the buttons on the Remote Control 7 Setting up the Remote Control 8 Replacing batteries 9
3. Basic Functions 10 Put the MediaBox on standby and switching on 10 Changing channels 10 The Mini TV Guide 10 Channel surfi ng using the Mini TV Guide 1 1 Extra programme information 1 1 Favourite channels 12 Pausing live TV 13
4. Using Menus 14
Calling up the main menu 14
Using menus 14
5. TV Guide 16
TV Guide menu 16 All channels 16 Blocking channels 17 Setting reminders 18 Setting favourites 19
6. Digital Video Recorder 20
Recording programmes 20 Instant recording 20 Recording using the TV Guide 20 Recording at a set time 2 1 Settings 22 Summary of scheduled recordings 22 Resolving overlaps 23 Programme playback 23 Slow motion 24
7. Digital Radio 25
Calling up the radio menu 25 All radio channels 25 Favourites 26 Screensaver 26
8. Settings 27
Calling up Settings menu 27 PIN settings 27 Incorrect PIN code entered 30 Preference settings 30 TV settings 3 1

4
Appendices
Appendix 1. Frequently Asked Questions 32
Appendix 2. Remote Control Setting Codes 35
Appendix 3. Addresses and telephone numbers 39

5
1
Introduction
Digital TV brings the future into your home. You can enjoy improved picture and sound quality, a TV Guide and much more. Digital TV is received via the MediaBox.This manual helps you to get the most out of your MediaBox and answers the questions you might have.
What are the benefi ts of Digital TV and the MediaBox?• Razor-sharp picture and perfect sound quality.• More TV channels. In addition to the existing channels offered, you can select
from additional Digital TV channels.• More radio stations. In addition to the existing radio stations offered via cable,
you also receive dozens of digital radio stations.• Always a TV guide to hand. ‘TV Guide’ is an easy-to-use programme guide that
you can view on the screen, so that you always have all programme information to hand.
• Special settings such as blocking channels with a PIN code.• You are prepared for the future. We regularly update the MediaBox with new
features. We keep you up-to-date about new features and new interactive services through www.upc.ie.
Chapter 1. Introduction
Extra benefi ts of the MediaBox - DVR• Pause live TV and continue to watch it later on (buffer of around 2.5 hours).• Record over 65 hours of programs and watch them at your convenience.• Schedule recordings easily using the TV Guide.• Easily set recording of your regular programs each week.
About the instructionsThese instructions are intended as information and reference for use for the MediaBox Digital Video Recorder. Use the installation manual available on the website www.upc.ie or the Quick Guide for installation.
Important instructions for using the MediaBox• Always read the safety regulations carefully prior to using Digital TV. They can
be found inside the MediaBox packaging.• Never change connections to the MediaBox while it is connected to the plug
socket.• Put the MediaBox on standby when you are not using it. Use the button on
the Remote Control or on the front of the MediaBox. That way, the MediaBox is always connected to the network so that digital television services can be kept up-to-date. The light (LED) on the front of the MediaBox is red when it is on standby.
• Look after the instructions and installation manual carefully, so that you can look up important information about the Digital TV quickly. If you do lose the manual, it can be downloaded from www.upc.ie, or you can contact Chorus/NTL Customer Service, freephone number 1908 (available 9 a.m. to 10 p.m. Monday to Saturday, 10 a.m. to 10 p.m. Sunday).
6
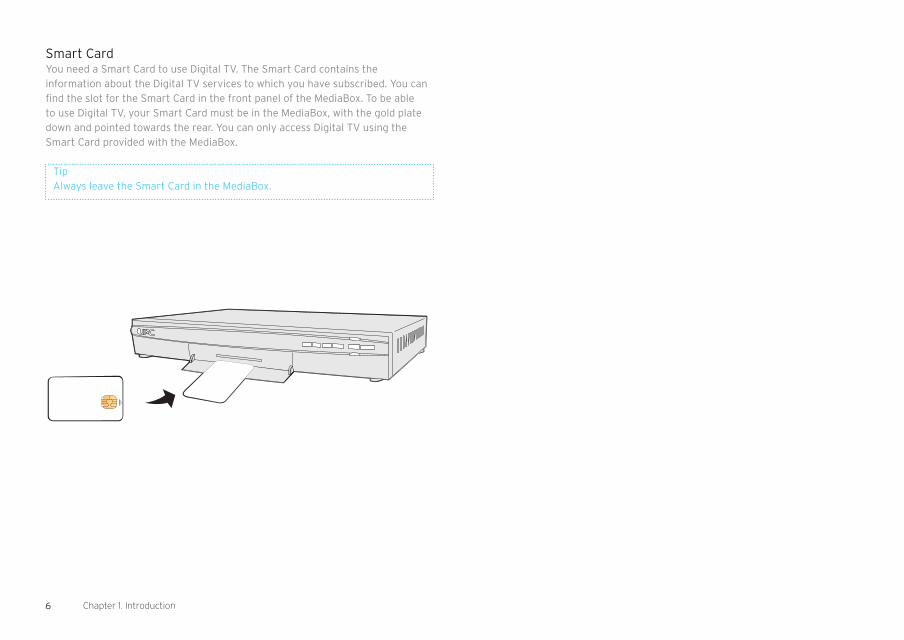
Smart Card You need a Smart Card to use Digital TV. The Smart Card contains the information about the Digital TV services to which you have subscribed. You can fi nd the slot for the Smart Card in the front panel of the MediaBox. To be able to use Digital TV, your Smart Card must be in the MediaBox, with the gold plate down and pointed towards the rear. You can only access Digital TV using the Smart Card provided with the MediaBox.
TipAlways leave the Smart Card in the MediaBox.
Chapter 1. Introduction
7
2
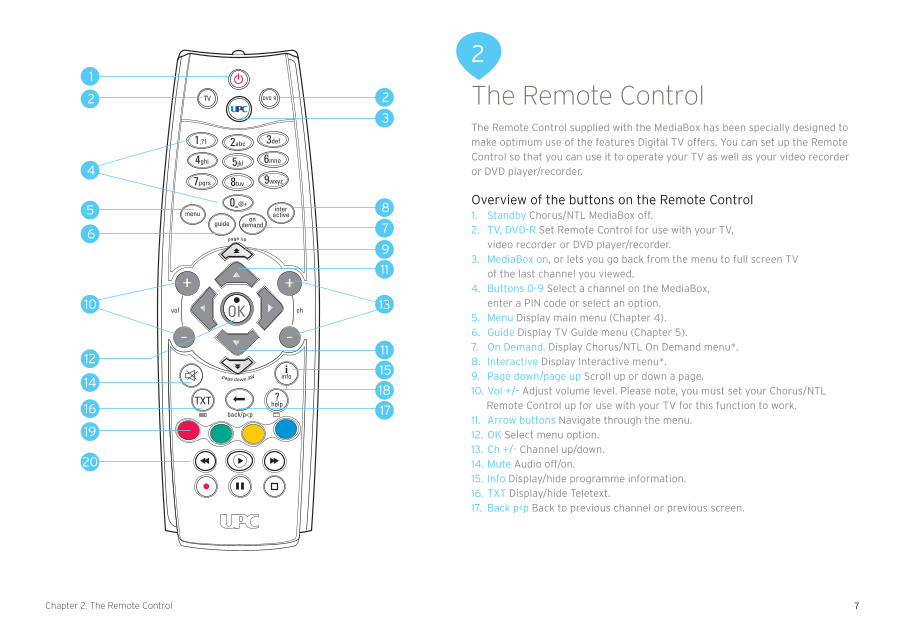
The Remote ControlThe Remote Control supplied with the MediaBox has been specially designed to make optimum use of the features Digital TV offers. You can set up the Remote Control so that you can use it to operate your TV as well as your video recorder or DVD player/recorder.
Overview of the buttons on the Remote Control1. Standby Chorus/NTL MediaBox off.2. TV, DVD-R Set Remote Control for use with your TV, video recorder or DVD player/recorder.3. MediaBox on, or lets you go back from the menu to full screen TV
of the last channel you viewed.4. Buttons 0-9 Select a channel on the MediaBox,
enter a PIN code or select an option.5. Menu Display main menu (Chapter 4).6. Guide Display TV Guide menu (Chapter 5).7. On Demand. Display Chorus/NTL On Demand menu*.8. Interactive Display Interactive menu*.9. Page down/page up Scroll up or down a page.10. Vol +/- Adjust volume level. Please note, you must set your Chorus/NTL
Remote Control up for use with your TV for this function to work.11. Arrow buttons Navigate through the menu.12. OK Select menu option.13. Ch +/- Channel up/down.14. Mute Audio off/on.15. Info Display/hide programme information.16. TXT Display/hide Teletext.17. Back p<p Back to previous channel or previous screen.
20
19
16
14
12
10
6
5
4
2
1
2
3
8
7
9
11
11
15
18
17
13
Chapter 2. The Remote Control
8
18. ? help. Displays information on the screen about the most frequently used buttons on your Remote Control.
19. Coloured buttons Select the coloured button on your screen.20. Buttons for operating the recording and live TV functions of your Mediabox,
as well as your video recorder or DVD player.
*This feature is not currently available. Please check the website www.upc.ie for updates on
the availability of this feature.
Please note! you must set your Remote Control up beforehand for use with your video recorder or DVD player.
Setting up the Remote ControlYou can set up the Remote Control so that you only need to use one Remote Control for all of your equipment. The Remote Control will need to be set up once so that it can be used with your TV and your video recorder or DVD player/recorder. You can fi nd a list of the most common makes in the back of this manual.
TipA full list of setting codes can be found at www.upc.ie
1. Look for the setting code for your device on pages 35-38. There is a list with 4-digit setting codes for each kind of device (TV, video recorder or DVD player/recorder. Most makes are listed with several setting codes. You may need to try several of the setting codes for your make of device. Start by setting up the Remote Control for your TV.
Please note!It is possible that more than one setting code is listed for your kind of TV, video recorder or DVD player/recorder. If that is the case, try the various setting codes one after the other until one of them works. If the particular TV, video recorder or DVD player/recorder make that you own is not listed, use the information under ‘Search for setting code automatically’ opposite on this page.
2. Press to put the Remote Control in TV mode (to set up the video recorderor DVD player/recorder you use .
3. Press and simultaneously. Wait until the light on your Remote Controllights up twice and then release the buttons.
4. Enter the 4-digit setting code using number buttons to on the Remote Control. You have 20 seconds to enter the number. on the Remote Control will light up twice once the fourth number has been
entered to indicate that the code has been accepted. If the does not light up you need to try another setting code for your make of device by following the same step 1 - 4 again.
5. Press to see whether the device that you are setting switches off. If it does not switch off, repeat the above step 1 - 4.
6. If the device you have set switches off when you press , check that other functions such as Channel +/- work. If they do, your remote is now set up to work with this device. Search for setting code automaticallyIf the particular TV, video recorder or DVD player/recorder make you have is not given in the setting codes lists, or the setting codes given do not work, use the following information.
• Switch on the piece of equipment which you want to set up the Remote Control.• To set up the remote for your TV, press and then release it again (use to
search for the setting code for your video recorder or DVD player/recorder).• Press and simultaneously. Wait until lights up twice on the Remote
Control and then release the buttons.• Then press , and consecutively. on the Remote Control lights
up twice.• Point the Remote Control towards your TV and press .• Point the Remote Control towards your TV. Press [ch ] on the Remote Control
repeatedly until your TV switches off (each time you press [ch ], the Remote Control sends an ‘off’ signal to your TV corresponding to a particular setting code). Once the setting code that belongs to your TV has been found, your TV switches off. If you are trying to set up your video recorder or DVD player/recorder, your video recorder or DVD player/recorder will switch off when the correct code has been found.
Chapter 2. The Remote Control

9
Please note!You might have to press [ch ] several times before you fi nd the correct setting code and your TV switches off. It may take around 15 minutes before you fi nd your code using the ‘Searching setting code’ function. Continue to point the Remote Control towards your TV while you search for the setting code.
Replacing batteriesThe Remote Control is supplied with two new AA/LR6 alkaline batteries. If the Remote Control is no longer working or not working properly, that probably means that you need to replace the batteries:• Open the fl ap on the back of the Remote Control.• Insert two new batteries as per the graphics on the battery slot and close the battery slot with the fl ap.
Please note!Never use a mixture of old and new batteries, or a mixture of different kinds of batteries (e.g. standard and alkaline).
TipYou can switch the MediaBox on standby. The MediaBox can be switched on using [ch ] on the front of the MediaBox. When the MediaBox is switched on, you can change channels using [ch ] and [ch ] on the front of the MediaBox. You use to put the MediaBox on standby.
Chapter 2. The Remote Control
• Press as soon as your TV (or other device) has switched off to save the setting code.
10
3
3
Basic Functions
After you have connected the MediaBox, you can use the Remote Control to operate the basic functions of your TV. These relate to frequently used functions such as put on standby and switching on, changing channels and adjusting the volume. You will also get to know the useful Mini TV Guide. You can use it to retrieve information about the programme you are watching, to look up a new programme and to change channels.
Put the MediaBox on standby and switching on• Press on the Remote Control to switch on the MediaBox.• Press to put on standby the MediaBox.You can also switch on the MediaBox using buttons [ch ] and [ch ] and put it on standby using on the front of the MediaBox.
Changing channelsThere are various methods to change channels quickly using the Remote Control.
Surfi ngYou can switch quickly between consecutive channels using [ch ] and [ch ].• Press [ch ] once to go from channel 1 to channel 2.• Press [ch ] once to go from channel 2 to channel 1. You can also switch
quickly between consecutive channels using and on the front of the MediaBox.
Selecting channel numberYou can also use the number buttons if you want to go straight to a particular channel.• Press to switch to channel 105.
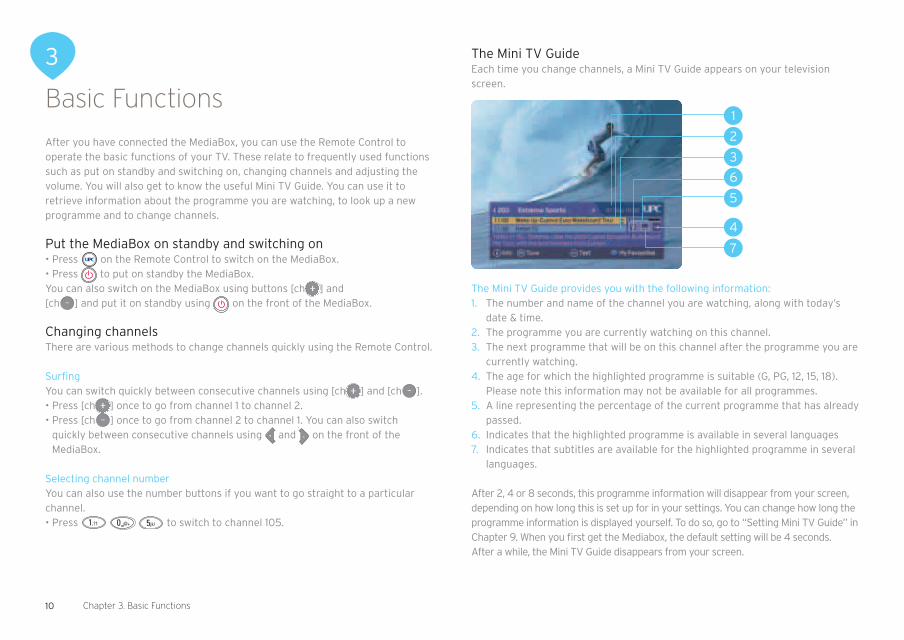
The Mini TV GuideEach time you change channels, a Mini TV Guide appears on your television screen.
The Mini TV Guide provides you with the following information:1. The number and name of the channel you are watching, along with today’s date & time.2. The programme you are currently watching on this channel.3. The next programme that will be on this channel after the programme you are
currently watching.4. The age for which the highlighted programme is suitable (G, PG, 12, 15, 18).
Please note this information may not be available for all programmes.5. A line representing the percentage of the current programme that has already passed.6 . Indicates that the highlighted programme is available in several languages7 . Indicates that subtitles are available for the highlighted programme in several languages.
After 2, 4 or 8 seconds, this programme information will disappear from your screen, depending on how long this is set up for in your settings. You can change how long the programme information is displayed yourself. To do so, go to “Setting Mini TV Guide” in Chapter 9. When you fi rst get the Mediabox, the default setting will be 4 seconds.After a while, the Mini TV Guide disappears from your screen.
6
5
4
2
7
Chapter 3. Basic Functions
1
11
You can set how long the programme information is displayed yourself. To do so, go to ‘Setting Mini TV Guide’ on page 30.
Please note!The Mini TV Guide you see when changing channels using [ch ] and [ch ] disappears automatically after 2,4 or 8 seconds, depending on your settings. When you call up the programme information bar using , it does not disappear automatically. Press to tune to the channel highlighted in the programme information bar. Alternatively, you can press on or to remove the programme information bar without changing channels.
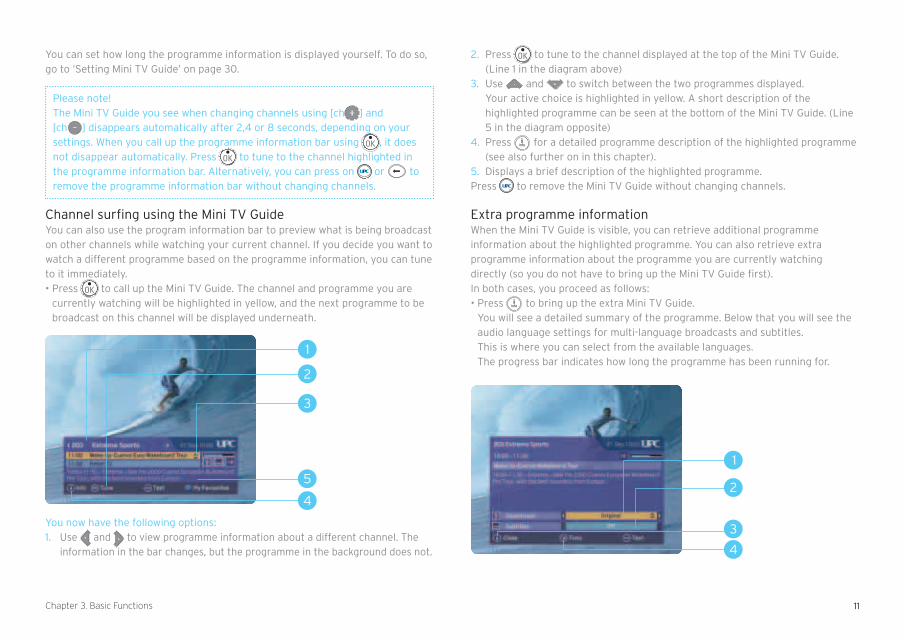
Channel surfi ng using the Mini TV GuideYou can also use the program information bar to preview what is being broadcast on other channels while watching your current channel. If you decide you want to watch a different programme based on the programme information, you can tune to it immediately.• Press to call up the Mini TV Guide. The channel and programme you are
currently watching will be highlighted in yellow, and the next programme to be broadcast on this channel will be displayed underneath.
You now have the following options:1. Use and to view programme information about a different channel. The
information in the bar changes, but the programme in the background does not.
3
1
2
2. Press to tune to the channel displayed at the top of the Mini TV Guide. (Line 1 in the diagram above)
3. Use and to switch between the two programmes displayed. Your active choice is highlighted in yellow. A short description of the highlighted programme can be seen at the bottom of the Mini TV Guide. (Line 5 in the diagram opposite)
4. Press for a detailed programme description of the highlighted programme (see also further on in this chapter).
5. Displays a brief description of the highlighted programme.Press to remove the Mini TV Guide without changing channels.
Extra programme informationWhen the Mini TV Guide is visible, you can retrieve additional programme information about the highlighted programme. You can also retrieve extra programme information about the programme you are currently watching directly (so you do not have to bring up the Mini TV Guide fi rst). In both cases, you proceed as follows:• Press to bring up the extra Mini TV Guide.
You will see a detailed summary of the programme. Below that you will see the audio language settings for multi-language broadcasts and subtitles. This is where you can select from the available languages. The progress bar indicates how long the programme has been running for.
4
3
1
2
4
Chapter 3. Basic Functions
5
12
You now have the following options:1. This is the Soundtrack option. You can use and to change the
Soundtrack language. If you wish to move down to the Subtitles option (see number 2 on the diagram on the previous page), you can use and . The only language currently available is English, but please check the Chorus/NTL website for updates.
2. This is the Subtitles option. You can use button and button to switch the subtitles on or off. This option is only available if the programme is being broadcast with subtitles see page 30.
3. Press to exit the screen. You return to the Mini TV Guide or to the programme you were watching.
4. Press to tune to the channel displayed in the extra programme information.
TipYou can also access a number of the functions directly via the MediaBox without using the Remote Control.
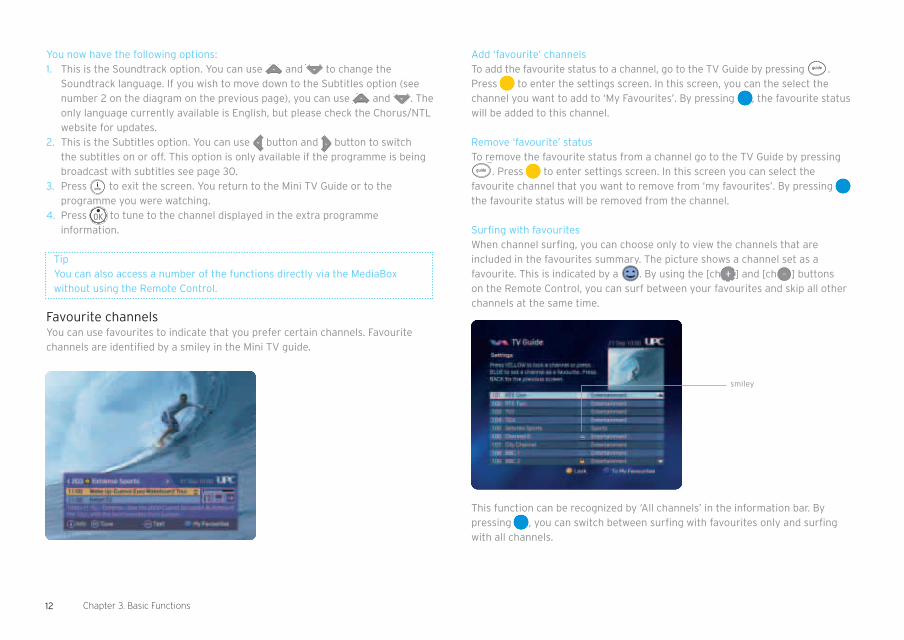
Favourite channelsYou can use favourites to indicate that you prefer certain channels. Favourite channels are identifi ed by a smiley in the Mini TV guide.
Surfi ng with favouritesWhen channel surfi ng, you can choose only to view the channels that are included in the favourites summary. The picture shows a channel set as a favourite. This is indicated by a . By using the [ch ] and [ch ] buttons on the Remote Control, you can surf between your favourites and skip all other channels at the same time.
Chapter 3. Basic Functions
smiley
Add ‘favourite’ channels To add the favourite status to a channel, go to the TV Guide by pressing . Press to enter the settings screen. In this screen, you can the select the channel you want to add to ‘My Favourites’. By pressing , the favourite status will be added to this channel.
Remove ‘favourite’ status To remove the favourite status from a channel go to the TV Guide by pressing
. Press to enter settings screen. In this screen you can select the favourite channel that you want to remove from ‘my favourites’. By pressing the favourite status will be removed from the channel.
This function can be recognized by ‘All channels’ in the information bar. By pressing , you can switch between surfi ng with favourites only and surfi ng with all channels.
13
Please note!The automatic recording setting lasts for 150 minutes and does not take up any of the 65 hours of recording capacity.
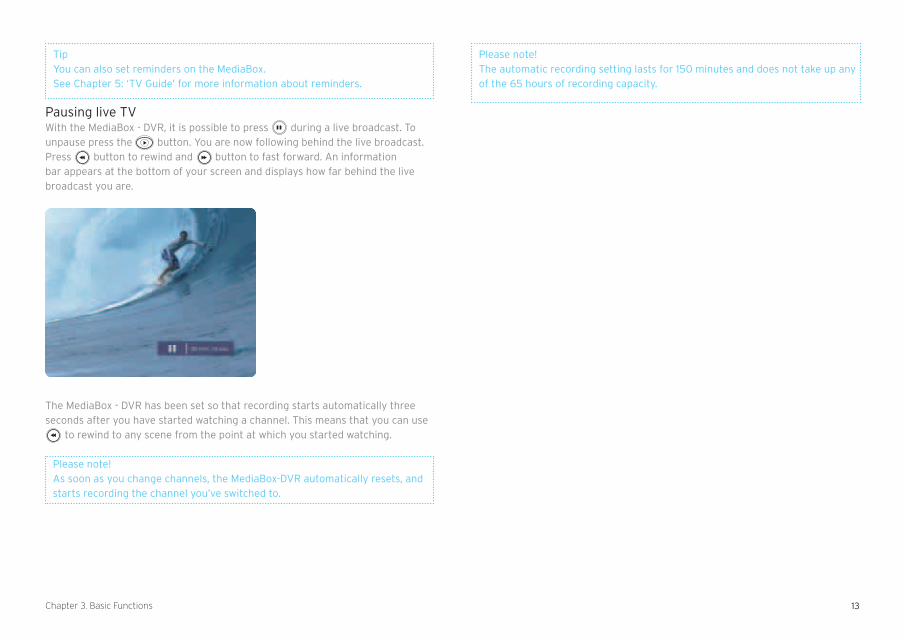
The MediaBox - DVR has been set so that recording starts automatically three seconds after you have started watching a channel. This means that you can use
to rewind to any scene from the point at which you started watching.
Please note!As soon as you change channels, the MediaBox-DVR automatically resets, and starts recording the channel you’ve switched to.
Pausing live TVWith the MediaBox - DVR, it is possible to press during a live broadcast. To unpause press the button. You are now following behind the live broadcast. Press button to rewind and button to fast forward. An information bar appears at the bottom of your screen and displays how far behind the live broadcast you are.
Chapter 3. Basic Functions
TipYou can also set reminders on the MediaBox. See Chapter 5: ‘TV Guide’ for more information about reminders.

14
4
Using menus
Menus are used for the additional features the MediaBox offers. These menus are screens with a number of options you can select using the Remote Control. Before exploring the additional features, it is useful to know how to call up the main menu and to familiarize yourself with a number of basic operations that recur in a large number of menus.
Calling up the main menuPress to call up the main menu.• TV Guide: The user-friendly television guide. Here you will see an overview of all
the services and settings available for Digital TV.• Digital Radio: A wide selection of digital music stations.• On Demand: For ordering various programs including movies.*• Interactive Services: For playing games.*• Settings: For setting your preferences.• Digital Video Recorder: For setting up the DVR.
Chapter 4. Using menus
You can always do the following in any menu:• Using , and , you can select from the various options.
The active choice is always highlighted.• By pressing , you go to the screen of your highlighted choice. You now arrive
in a new menu.• By pressing , you exit the menu display. You return to the television screen.
Using menusWe shall use an example screen to demonstrate a number of basic operations.
Selecting an option in a list:• Most menus contain a number of bars with text, of which one is always highligh-
ted. The highlighted bar is the active option. You can select a different bar using and ; in menu overviews you can also use and . Sometimes the
bar itself contains several options (such as the top bar of the example screen). When you select a different option, the yellow highlighting will move.
• Press to confi rm a highlighted selection in a list or a menu overview. You will now reach a new menu screen or tune to the channel you have selected.
* This feature is currently not available. Please check the website www.upc.ie for updates on the availability of this feature.”
15
• Selecting an option using a colored key:If you see text in the bottom of the menu with a colored dot in front of it( , , or ), then you can perform the action described in the text by pressing the button with the corresponding color on the Remote Control. You may well already be familiar with this from Teletext, where there is colored text at the bottom of the screen enabling you to go quickly to the corresponding page.
• Back one screen: Press to go to the previous screen.• Retrieve more information: Press to retrieve more information about a
selected programme.• Returning to the TV programme. Press to exit the menu and return to the
television screen.
TipBrief information is often given at the top of the menu screens. Lists often use arrows to indicate which buttons ( , , and ) you must use to select a different option.
Chapter 4. Using menus

16
The settings option will allow you set favourites, lock channels or view a summary of your favourites.The category you selected is now highlighted.
• Press to confi rm your choice. You will now see a list of channels and programs that can be watched now
• Press to return to the TV Guide menu.• Press to return to the TV programme.
All channelsTV Guide gives you a full listing of programs that can now be watched on Digital TV channels via the ‘All channels’ screen. In the ‘All channels’ screen, you can tune to the programme of your choice, lock access to certain channels or choose to view the schedule available now and in the future on a particular channel.
Calling up ‘All channels’ screen• Select the ‘All channels’ category in the TV Guide menu for a full listing of all
channels and programs that can be watched at that time. If you select another category in the Chorus/NTL Guide menu (e.g. Sports), it will only bring up the listings for channels in that category. (see also ‘Calling up TV Guide menu’).
Chapter 5. TV Guide
5
TV Guide
TV Guide provides you with fast access to a listing of the programsyou can watch on the channels offered on Digital TV. You can call upa channel list containing all the programs that can be watched at this time. You can also obtain a listing per channel of the programs that may be watched later or on one of the following days. You can use programme information to retrieve more information about the programs in the listings.
TV Guide menu• Press to view the TV Guide channel categories or press
, then select ‘Guide’ in the main menu and press . You will now see a menu with channel categories.
You now have the following options:• Select what you want to do using , , and or using , . View the Chorus/NTL Guide of all channels, or channels based on the cate gories in the navigation options. You can also view the summary of all planned recordings and reminders in My TV Agenda.

17
On this channel
1. Select a programme using and . You can view other channels using and .2. Press to return to the TV Guide with all channels and programme listing.3. Press to scroll back a day.4. Press to scroll forward a day. • Press to return to the previous screen. • Press for detailed programme information.
Blocking channelsIf you wish to do so, you can block certain channels, for example because you do not want your children to watch them. To block channels, go to the TV Guide fi rst of all by pressing . Then press to go to the ‘Settings’ screen. In this screen, you select the channel you want to block and then you press . You will be prompted to enter your PIN code, and click OK. A will appear beside the channel to indicate that the channel has been blocked. The default PIN code is 0000.
How to unblock a channel:To unlock a channel, follow the instructions above to get to the Settings menu. Then select the channel you want to unlock, press , enter the PIN code when prompted and press . The will now disappear from beside the channel to indicate that the channel has been unblocked.
3
2
4
1
Chapter 5. TV Guide
The ‘All channels’ screen gives you the following options:1. You can select a channel using and (see also the information on the screen). The selected channel is highlighted. A short description of the programme being broadcast on that channel appears at the bottom of
the screen. You can view the programs on the highlighted channel using and . More information about the selected programme will then appear at the bottom of the screen.
2. Press to view which programs can be watched during the rest of the day and over the next few days on the highlighted channel (see page 17 for more details).
3. Press to zoom in. The text will become larger. By pressing again, you will zoom out again.4. Press to scroll forward a day.5. Press to tune to a channel you have selected.6. Press to return to the TV Guide menu.7. Press for a detailed description of the selected
programme.8. Press to exit the menu and return to the television screen.A is used to indicate that the channel has been blocked. This channel may only be watched once a PIN code has been entered. The default PIN code is 0000.
3
2
4
1

18 Chapter 5. TV Guide
Reminders via the Mini TV GuideYou can also set reminders via the Mini TV Guide. If you are surfi ng using [ch ] and [ch ] on the Remote Control, you can set a reminder for a program-me by selecting the next programme using . The reminder will be set when you press .
Setting remindersYou can set reminders in 3 ways: via the TV Guide, via the channel guide or via the Mini TV Guide.
Setting reminders via the TV GuideGo to the TV Guide by pressing on the Remote Control. Then press to go to the listing of all channels. To set the reminder of a programme, select the programme and press .
Setting reminders via the channel
1. Select a programme using and . You can view other channels using and .2. Press to return to the channel and programme listing.3. Press to scroll forward a day.4. Press to scroll back a day.5. Press to return to the previous screen.6. Press for detailed programme information.7. You can also set reminders here by selecting a programme and pressing .
3
2
4
1
19
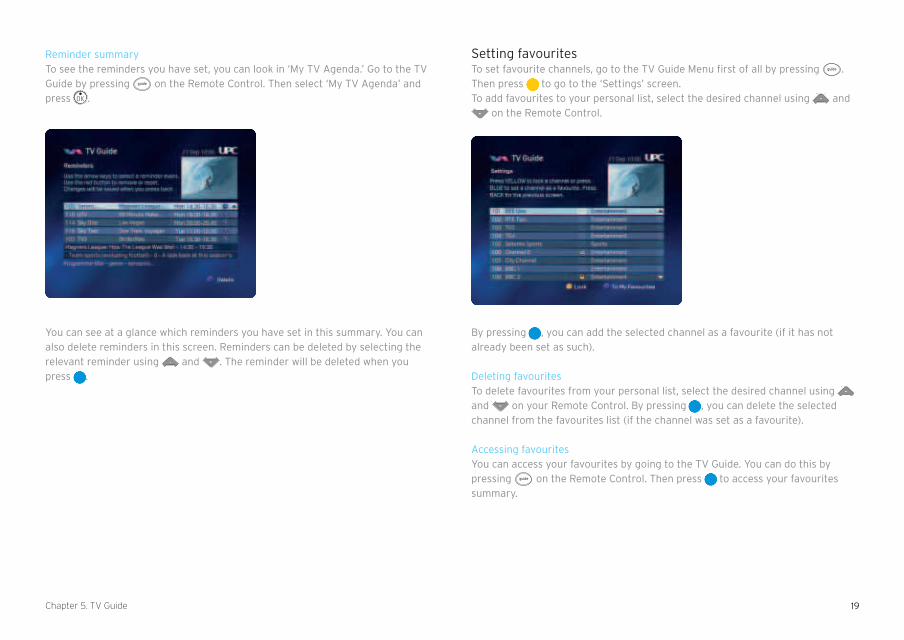
Setting favouritesTo set favourite channels, go to the TV Guide Menu fi rst of all by pressing . Then press to go to the ‘Settings’ screen. To add favourites to your personal list, select the desired channel using and
on the Remote Control.
By pressing , you can add the selected channel as a favourite (if it has not already been set as such).
Deleting favouritesTo delete favourites from your personal list, select the desired channel using and on your Remote Control. By pressing , you can delete the selected channel from the favourites list (if the channel was set as a favourite).
Accessing favouritesYou can access your favourites by going to the TV Guide. You can do this by pressing on the Remote Control. Then press to access your favourites summary.
Chapter 5. TV Guide
Reminder summaryTo see the reminders you have set, you can look in ‘My TV Agenda.’ Go to the TV Guide by pressing on the Remote Control. Then select ‘My TV Agenda’ and press .
You can see at a glance which reminders you have set in this summary. You can also delete reminders in this screen. Reminders can be deleted by selecting the relevant reminder using and . The reminder will be deleted when you press .

20
To stop the recording, press . All recorded programs can be looked up in the recordings list. You can read how this list works on page 23.
Please note!You can view other channels using [ch ] and [ch ] whilst recording. The programmed recording simply continues.
Recording using the TV GuideYou can also schedule future recordings using the MediaBox - DVR. If you select a programme you want to record in the TV Guide by using the and , you can easily record it by pressing the button.
If you want to record a programme that has already started, the MediaBox - DVR will start recording immediately.
Chapter 6. Digital Video Recorder
6
Digital Video Recorder
The MediaBox - DVR has a built-in hard disk with a recording capacity of over 65 hours (160 GB).
Recording programsYou can record and watch programs whenever you like using the MediaBox - DVR.The MediaBox - DVR provides three different recording methods:• instant recording of a programme you are watching;• recording of a programme via the TV Guide;• recording of a programme at a set time.
Instant recordingYou can record a channel instantly by pressing the record button . You will then be asked to confi rm the end time of the recording. The default time that will be displayed is the scheduled end time of the programme you are recording. If you want to change the end time of the recording, you can set the recording to stop for example 5 or 10 minutes after the end of the programme using . Press
to start recording.
As soon as recording starts, ‘OK’ will light up in red on the frontpanel of your MediaBox - DVR.

21
If you want to record a future programme, the MediaBox - DVR will automatically record the programme once it starts being broadcast.
TipSee page 16 for instructions on how to use the TV Guide.
Recording at a set timeTo programme the MediaBox - DVR manually to record a programme, you use ‘Set Advanced Memo.’
Press on the Remote Control and select Digital Video Recorder. You can set a future recording under ‘Set Advanced Memo.’
Use and to select the menu item.
1. Memo type The default value is ‘Record Memo’. You can use and to change the value to ‘My Memo’.2. Channel number Enter the 3-digit channel number on which the programme you want to record is being broadcast using the number buttons on the Remote Control.
For example: 101 for RTE One.3. Day Enter the day on which the programme is to be recorded. For example: Satur-
day. You can use and to change the value of this menu item.4. Start time Enter the desired start time of the recording using the number buttons on the Remote Control. You must enter the time in a 24-hour format e.g. 07.00.5. End time Enter the desired end time of the recording using the number buttons on the
Remote Control. You must enter the time in a 24-hour format e.g. 07.00.6. Recurrence Enter how often you want to repeat the recording. You can select from values
Once, Daily, Weekly or Mon to Fri. You can use and to change the value of this menu item.
2
1
3
4
5
6
Chapter 6. Digital Video Recorder

22
SettingsPrograms may start earlier or fi nish later than indicated in the TV Guide. To avoid missing the end of a programme that is to be recorded, you can specify under
followed by ‘Digital Video Recorder’ and then ‘Settings’ whether you want a recording from the TV Guide to start 1, 5 or 10 minutes earlier by default and to stop 1, 5 or 10 minutes later by default. To change the time, use and . Press
to confi rm.
Summary of scheduled recordingsAll of the programs you have identifi ed as needing recording can easily be found in the menu ‘My TV Agenda’.Press and go to the ‘Digital Video Recorder’ section.
You will fi nd a summary of all future scheduled recordings under ‘My TV Agenda.’
1. The red bar indicates the recording-capacity percentage still available on the MediaBox - DVR.
2. The indicates that you are currently recording a programme.3. A indicates that scheduled recordings overlap.
2
1
3
This setting only works for future recordings of programmes based on the TV Guide. Manually-set recordings will not automatically start earlier or later as per these settings. In addition, immediate recordings selected from the TV Guide will not start earlier as per these settings.
Please note!If the MediaBox - DVR is on standby and a scheduled recording starts, the Me-diaBox - DVR will record the programme anyway.
TipPrograms you record may run on for longer than scheduled in the TV Guide. Choose to start and stop recording up to a maximum of 10 minutes earlier and later respectively.
Chapter 6. Digital Video Recorder

23
Resolving overlapsAs the MediaBox - DVR only permits you to record one programme at a time, scheduled recordings must not overlap. If your recordings overlap, this will be indicated with a .
The MediaBox - DVR will fi nish the fi rst recording before starting a new one by default. Therefore, where overlaps exist, the beginning of the later programme might not be recorded.
Use and to select the overlapping programme you want to cancel. To resolve the overlap, you can simply press the and this will prompt you to delete the programme you have selected.
The scheduled recording will be deleted when you press .
Programme playbackMediaBox - DVR enables you to record programs and watch them simultaneously. You can also playback the recording straight away without stopping recording. So you can watch the fi rst part of a programme while the second part is being recorded.You can fi nd a summary of all of your recorded programs in the Digital Video Re-corder menu under ‘My programs.’ Press on the Remote Control. Then select the Digital Video Recorder menu item using and and press . You will then see the screen below.
Use the arrow buttons to select the ‘My programmes’ menu item and then press .
Chapter 6. Digital Video Recorder
24
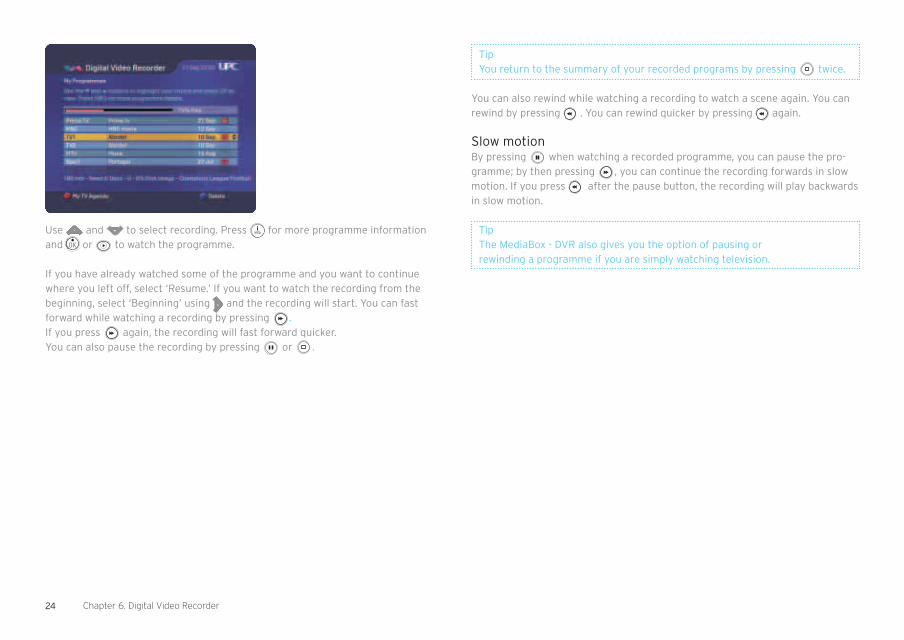
TipYou return to the summary of your recorded programs by pressing twice.
You can also rewind while watching a recording to watch a scene again. You can rewind by pressing . You can rewind quicker by pressing again.
Slow motionBy pressing when watching a recorded programme, you can pause the pro-gramme; by then pressing , you can continue the recording forwards in slow motion. If you press after the pause button, the recording will play backwards in slow motion.
TipThe MediaBox - DVR also gives you the option of pausing or rewinding a programme if you are simply watching television.
Use and to select recording. Press for more programme information and or to watch the programme.
If you have already watched some of the programme and you want to continue where you left off, select ‘Resume.’ If you want to watch the recording from the beginning, select ‘Beginning’ using and the recording will start. You can fast forward while watching a recording by pressing .If you press again, the recording will fast forward quicker.You can also pause the recording by pressing or .
Chapter 6. Digital Video Recorder
25
7
Digital Radio
Digital Radio gives you access to a large number of digital radio channels that you can listen to on your TV or sound system (only if you have connected your sound system to the MediaBox). The menu gives you fast access to a listing of the radio channels you can listen to. You can put your favourite radio channels in a special list.
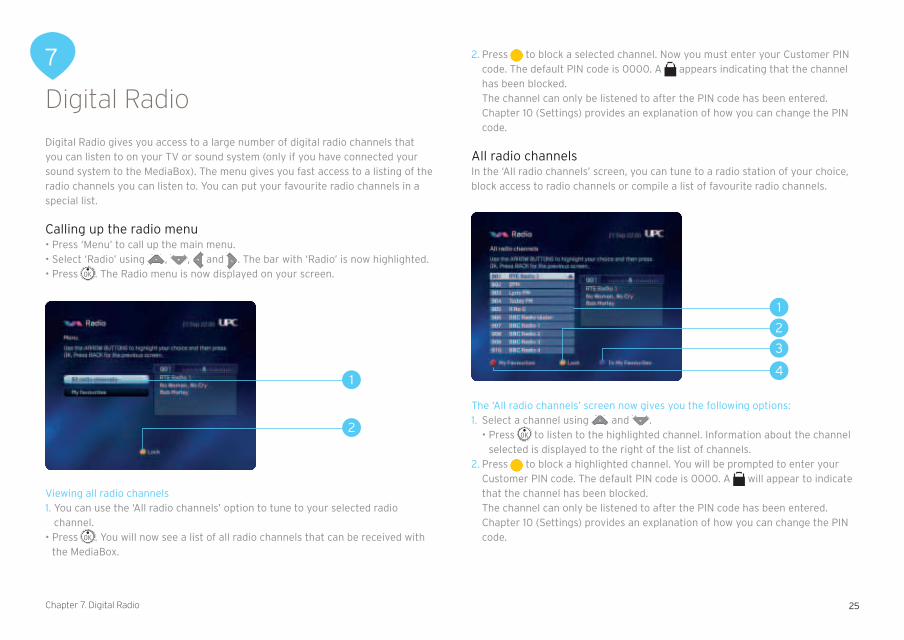
Calling up the radio menu• Press ‘Menu’ to call up the main menu.• Select ‘Radio’ using , , and . The bar with ‘Radio’ is now highlighted.• Press . The Radio menu is now displayed on your screen.
Viewing all radio channels1. You can use the ‘All radio channels’ option to tune to your selected radio
channel.• Press . You will now see a list of all radio channels that can be received with
the MediaBox.
1
All radio channelsIn the ‘All radio channels’ screen, you can tune to a radio station of your choice, block access to radio channels or compile a list of favourite radio channels.
The ‘All radio channels’ screen now gives you the following options:1. Select a channel using and . • Press to listen to the highlighted channel. Information about the channel
selected is displayed to the right of the list of channels.2. Press to block a highlighted channel. You will be prompted to enter your
Customer PIN code. The default PIN code is 0000. A will appear to indicate that the channel has been blocked.
The channel can only be listened to after the PIN code has been entered. Chapter 10 (Settings) provides an explanation of how you can change the PIN
code.
2
1
3
2. Press to block a selected channel. Now you must enter your Customer PIN code. The default PIN code is 0000. A appears indicating that the channel has been blocked.
The channel can only be listened to after the PIN code has been entered. Chapter 10 (Settings) provides an explanation of how you can change the PIN
code.
2
4
Chapter 7. Digital Radio

26 Chapter 7. Digital Radio
3. Press to add a selected channel to ‘Favourites.’ Channels you add to ‘Favourites’ are put in a separate list that you can retrieve in the Radio menu. 4. To go straight to ‘Favourites’ from the current screen, you press (see also
‘calling up favourites’ below). • Press to return to the Radio menu. • Press to watch TV. You return to the channel your TV was tuned to when
you went to the Radio menu.
FavouritesBy compiling a favourites list, you will always have the radio channels you enjoy listening to close at hand. You compile a favourites list in the ‘All radio channels’ screen (see also ‘All radio channels’).
Compiling favourites list• Select the station you want to add to your favourites list in the ‘All radio chan-
nels’ screen using and . Press to add the highlighted station to your favourites list.
Calling up favouritesYou call up your list of favourite radio channels via the Radio menu (see also ‘Cal-ling up Radio menu’).You can block radio channels in ‘My Favourites’ screen as well as delete favourites from the list if required.• Select ‘My Favourites’ in the Radio menu. You will see the list of favourite channels you have selected.
2
1
3
4
The ‘All radio channels’ screen now gives you the following options:1. Select a channel using and . • Press to listen to the highlighted channel. Information about the channel
selected is displayed to the right of the list of channels.2. Press to block a highlighted channel. You will be prompted to enter your
Customer PIN code. The default PIN code is 0000. A appears indicating that the channel has been blocked. The channel can only be listened to after the PIN code has been entered. Chapter 10 (Settings) provides an explanation of how you can change the PIN code.
3. Press to delete a favourite channel from the list.4. Press to go to the ‘All radio channels’ screen and to add a favourite channel
if desired. • Press to return to the Radio menu. • Press to watch TV. You return to the channel your TV was tuned to when
you went to the Radio menu.
ScreensaverTo protect your TV from the static tuner display, a screensaver (protection from screen burn) appears on your screen after a little while (5 minutes). The screen-saver disappears when you press a button on the Remote Control.

27Chapter 8. Settings
8
Settings
You can set all kinds of preferences for using Digital TV in the Settings menu. You can, for example, set PIN codes for blocking certain channels and services’ and specify the kind of TV you have (‘normal’ or ‘widescreen’).
Calling up Settings menu• Press on the Remote Control. The main menu is now displayed on your
screen.• Select ‘Settings’ using , , and . The ‘Settings’ bar is highlighted.• Press . The Settings menu is now displayed on your screen.
PIN settingsYou can set a four-fi gure PIN code to block access to certain channels and servi-ces by anyone who does not know the PIN (for example, your children). You can set PIN code protection for:• Access to certain channels, whereby blocked channels are identifi ed by a • Programmes with an age-classifi cation rating (G, PG, 12, 15, 18).
That way, you can prevent your children from watching programs they are too young for.
Calling up PIN settings menuPIN settings are changed under the ‘PIN settings’ option in the Settings menu.• Bring up the Settings menu on your screen (see ‘Calling up Settings menu’)• Select ‘PIN settings’ using , , and . The ‘PIN settings’ bar is
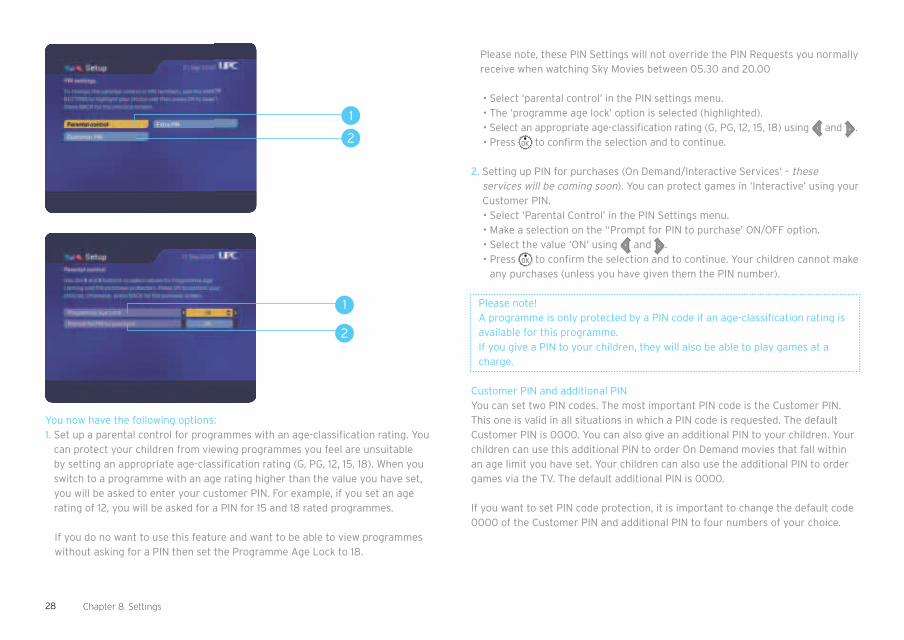
highlighted.• Press .• Now you must enter the Customer PIN. The default Customer PIN is 0000.Select ‘OK’ and press .The PIN settings menu is now displayed on your screen.The ‘parental control’ option has already been selected (highlighted).
28
Please note, these PIN Settings will not override the PIN Requests you normally receive when watching Sky Movies between 05.30 and 20.00
• Select ‘parental control’ in the PIN settings menu. • The ‘programme age lock’ option is selected (highlighted). • Select an appropriate age-classifi cation rating (G, PG, 12, 15, 18) using and . • Press to confi rm the selection and to continue.
2. Setting up PIN for purchases (On Demand/Interactive Services‘ – these services will be coming soon). You can protect games in ‘Interactive’ using your Customer PIN.
• Select ‘Parental Control’ in the PIN Settings menu. • Make a selection on the “Prompt for PIN to purchase’ ON/OFF option. • Select the value ‘ON’ using and . • Press to confi rm the selection and to continue. Your children cannot make
any purchases (unless you have given them the PIN number).
Please note!A programme is only protected by a PIN code if an age-classifi cation rating is available for this programme.If you give a PIN to your children, they will also be able to play games at a charge.
Customer PIN and additional PINYou can set two PIN codes. The most important PIN code is the Customer PIN. This one is valid in all situations in which a PIN code is requested. The default Customer PIN is 0000. You can also give an additional PIN to your children. Your children can use this additional PIN to order On Demand movies that fall within an age limit you have set. Your children can also use the additional PIN to order games via the TV. The default additional PIN is 0000.
If you want to set PIN code protection, it is important to change the default code 0000 of the Customer PIN and additional PIN to four numbers of your choice.
Chapter 8. Settings
You now have the following options:1. Set up a parental control for programmes with an age-classifi cation rating. You
can protect your children from viewing programmes you feel are unsuitable by setting an appropriate age-classifi cation rating (G, PG, 12, 15, 18). When you switch to a programme with an age rating higher than the value you have set, you will be asked to enter your customer PIN. For example, if you set an age rating of 12, you will be asked for a PIN for 15 and 18 rated programmes.
If you do no want to use this feature and want to be able to view programmes without asking for a PIN then set the Programme Age Lock to 18.
2
1
2
1

29Chapter 8. Settings
Please note!Select a different number combination for the Customer PIN and the extra PIN!
Changing PIN codeThe default PIN code is 0000. The default PIN code is changed in the PIN settings menu.Select ‘Customer PIN’ in the PIN settings menu using , , and to change the Customer PIN and ‘Additional PIN’ to change the additional PIN.Press . You will now see the screen for changing the PIN code.
2
1
You proceed as follows:1. Enter a new PIN code.2. Confi rm your new PIN code by entering it again. • Press to save the new Customer PIN. • Press to cancel the change.3. Press again when prompted if you are saving your new Customer PIN.
You want:No protection.
To prevent your children from watching programmes that are not age-appropriate.
Required settings:- Set age limit to 18.- PIN code for purchases OFF.
- PIN code for purchases ON.- Edit Customer PIN and additional
PIN.- Do not give the additional PIN to
your children.- Set age limit (G, PG, 12, 15, 18).- Edit Customer PIN and additional
PIN.
List of PIN settingsThe table below lists the most important PIN settings.
PIN requests for Sky Movies.
Sky Movies require you to enter a PIN to watch movies at certain times as part of their
commitment to prevent your children from watching a movie that they are too young to view.
You will be asked for your PIN to watch any movie on a Sky Movie channel between 0530hrs
and 2000hrs if the movie rating is for age 12 or above. You will not be required to enter a PIN
outside of these hours. You will be asked for the PIN every time you switch to a new Movies
channel, and you will be asked for the PIN every time you return to a Movies channel you
have watched previously.
You will never be asked to enter your PIN when watching Sky Family, as all movies on this
channel are certifi ed for general viewing. Please note, you can not over-ride this feature by
changing the settings on the Parental Control in the Settings menu. However, if you wish to
add additional PIN protection outside of the hours above, you can use the Parental Control
settings to give your children extra protection.
30 Chapter 8. Settings
Incorrect PIN code enteredYou can enter a wrong PIN code three consecutive times. On the fourth time, the PIN code will be blocked. You can try again after 15 minutes have elapsed.
Preference settingsYou can set how long the programme information banner is displayed when you change channels, as well as setting the time for your programme reminders to pop-up. The language options for movies and programmes are not currently functional. However, this may change in the future. Please check the website www.upc.ie regularly for updates.
Calling up Preference settings menu• Bring up the Settings menu on your screen (see ‘Calling up Settings menu’).• Select ‘Preference settings’ using , , and .
The ‘Preference settings’ bar is highlighted.• Press .
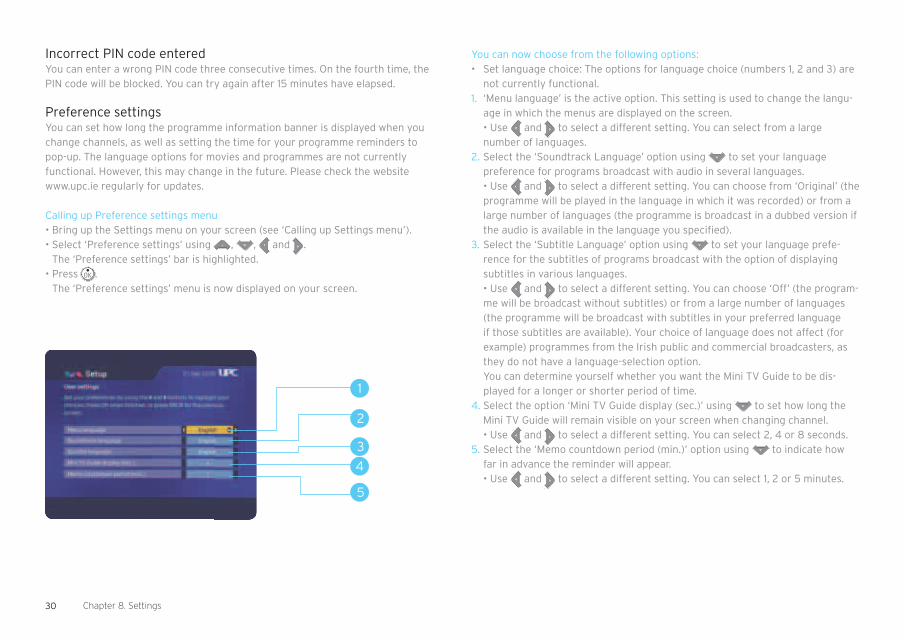
The ‘Preference settings’ menu is now displayed on your screen.
3
2
4
1
5
You can now choose from the following options:• Set language choice: The options for language choice (numbers 1, 2 and 3) are
not currently functional.1. ‘Menu language’ is the active option. This setting is used to change the langu-
age in which the menus are displayed on the screen. • Use and to select a different setting. You can select from a large
number of languages.2. Select the ‘Soundtrack Language’ option using to set your language
preference for programs broadcast with audio in several languages. • Use and to select a different setting. You can choose from ‘Original’ (the
programme will be played in the language in which it was recorded) or from a large number of languages (the programme is broadcast in a dubbed version if the audio is available in the language you specifi ed).
3. Select the ‘Subtitle Language’ option using to set your language prefe-rence for the subtitles of programs broadcast with the option of displaying subtitles in various languages.
• Use and to select a different setting. You can choose ‘Off’ (the program-me will be broadcast without subtitles) or from a large number of languages (the programme will be broadcast with subtitles in your preferred language if those subtitles are available). Your choice of language does not affect (for example) programmes from the Irish public and commercial broadcasters, as they do not have a language-selection option.
You can determine yourself whether you want the Mini TV Guide to be dis-played for a longer or shorter period of time.
4. Select the option ‘Mini TV Guide display (sec.)’ using to set how long the Mini TV Guide will remain visible on your screen when changing channel.
• Use and to select a different setting. You can select 2, 4 or 8 seconds.5. Select the ‘Memo countdown period (min.)’ option using to indicate how
far in advance the reminder will appear. • Use and to select a different setting. You can select 1, 2 or 5 minutes.
31Chapter 8. Settings
TV settingsDigital TV is suitable for normal and widescreen TVs. The type of television only needs entering once. That way, you can make optimum use of the possibilities of your TV, whether it is a normal TV or a widescreen TV.
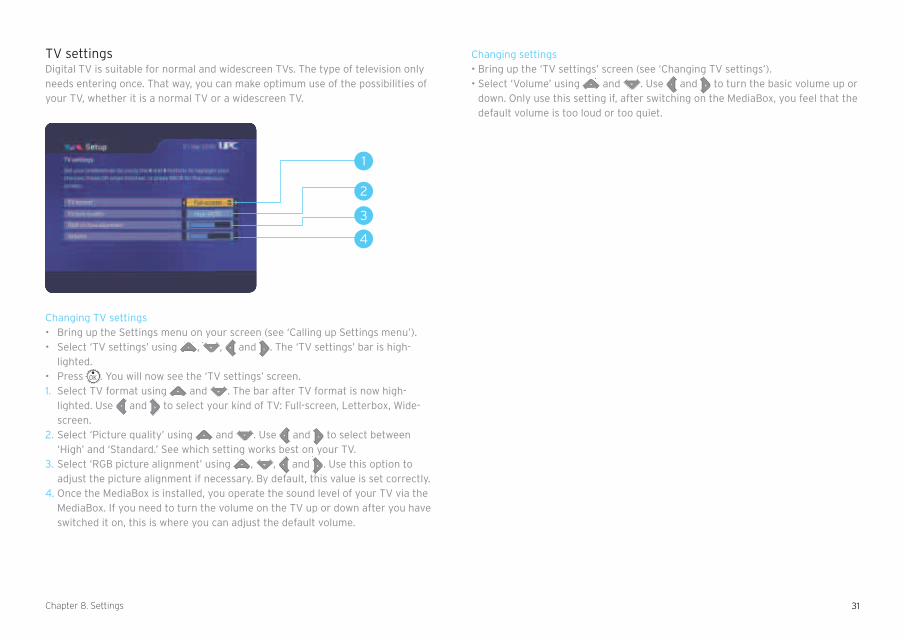
Changing TV settings• Bring up the Settings menu on your screen (see ‘Calling up Settings menu’).• Select ‘TV settings’ using , , and . The ‘TV settings’ bar is high-
lighted.• Press . You will now see the ‘TV settings’ screen.1. Select TV format using and . The bar after TV format is now high-
lighted. Use and to select your kind of TV: Full-screen, Letterbox, Wide-screen.
2. Select ‘Picture quality’ using and . Use and to select between ‘High’ and ‘Standard.’ See which setting works best on your TV.
3. Select ‘RGB picture alignment’ using , , and . Use this option to adjust the picture alignment if necessary. By default, this value is set correctly.
4. Once the MediaBox is installed, you operate the sound level of your TV via the MediaBox. If you need to turn the volume on the TV up or down after you have switched it on, this is where you can adjust the default volume.
3
2
4
1
Changing settings• Bring up the ‘TV settings’ screen (see ‘Changing TV settings’).• Select ‘Volume’ using and . Use and to turn the basic volume up or
down. Only use this setting if, after switching on the MediaBox, you feel that the default volume is too loud or too quiet.

32 Appendix 1. Frequently asked questions
Appendix 11
Frequently asked questions1. Can I start using Digital TV straight after installing the MediaBox?
Once the MediaBox has been installed and activated, you can start watching
TV immediately and familiarizing yourself with the benefi ts of Digital TV. You
will experience high (digital) picture and sound quality. You also have more TV channels
and additional radio stations at your disposal. The TV Guide, the electronic programme
guide, means that you always have a TV guide to hand. With the arrival of the MediaBox,
you can use special TV settings, such as setting up a child lock for programs your children
are not allowed to watch.
2. How does the Remote Control work?
The Remote Control supplied with the MediaBox has been specially designed to make
optimum use of the features Digital TV offers. In addition, you can use it to operate your
television, video recorder or DVD player/recorder. You will fi nd more information about
using the Remote Control and a detailed explanation of the buttons in the Quick Guide
you received with your Chorus/NTL Mediabox.
3. Can I also use the Remote Control for my TV or other equipment?
The Remote Control can be used to operate your TV and DVD player/recorder
or video recorder. The Remote Control is set for use with your MediaBox by default.
To use the Remote Control with your TV and DVD player/recorder or video recorder, you
must set the Remote Control for use with these pieces of equipment. Once you have set
the Remote Control for use with your TV, you can turn the volume of digital TV and radio
programs up or down using the Remote Control. If you do not set the Remote Control, you
can only turn the volume up or down using your TV’s Remote Control. You can read how
to set the Remote Control for use with other equipment in the user manual.
4. My Remote Control no longer works.
If the Remote Control no longer works properly, that probably means that the
batteries need replacing. The Remote Control and the MediaBox need to see
each other for the Remote Control to work properly; therefore, there should not
be anything preventing a clear line of sight between them.
5. The volume of Digital TV is quieter than the volume of the analog channels from the
standard Radio/TV package. How can I turn up the volume?
You can set up the Chorus/NTL Digital TV volume to be louder or quieter through the
Settings menu under the ‘TV Settings’ option.
6. The volume buttons on the Remote Control do not work. I am unable to turn programs up
or down. What should I do now?
To be able to use the Remote Control to turn Digital TV programs up or down, it needs to
be set for use with your TV. If you do not set the Remote Control, you can only turn the
volume up or down using your TV’s Remote Control. You can read how to set the Remote
Control for use with other equipment in the user manual.
7. The TV picture is highly pixelated or you see the ‘Signal loss’ screen.
If the cable network suffers from noise or signal loss (which may have different causes),
this might be visible as blocks (pixels) on the your TV screen. The signal the
MediaBox is receiving at that time is too weak. If you continue to see the blocks or if a
screen appears stating “Signal loss: There appears to be no signal,” it is important,
fi rst of all, that you check the coax cabling between the wall socket and the MediaBox.
It is important for the quality of the digital TV signal that you use the cabling
we have supplied or other cabling that meets the C12 standard (C12 stands for Coax 12; this
cable meets the attenuation (loss) and external radiation requirement). If you use your
own distributors/amplifi ers, remove them and connect the MediaBox directly
to the wall socket (WS). If you want to enable several TVs in your home to receive the
analog TV signal, use the RF Out output on the Media Box. If the TV picture
remains highly pixelated after you have checked your cabling, or if the screen stating:
“Signal loss: There appears to be no signal” does not disappear, please contact NTL/
Chorus Customer Service, freephone number 1908 (available 9 a.m. to 10 p.m. Monday to
Saturday, 10 a.m. to 10 p.m. Sunday).
8. The MediaBox is hanging. I can’t do anything anymore.
One reason your MediaBox might be hanging is that the device is busy downloading new
information. In that event, the text “Software Download in Progress” appears on your screen.
The message disappears from your screen as soon as the MediaBox has downloaded the
information and you can use your Digital TV services once again. If the MediaBox continues to
hang and/or the ‘Software Download in Progress’ screen does not appear, it may help to unplug
the MediaBox temporarily. If, after that, the MediaBox still does not work, please contact our
Customer Service, on freephone number 1908 (available 9 a.m. to 10 p.m. Monday to Saturday,
10 a.m. to 10 p.m. Sunday).
33Appendix 1. Frequently asked questions
9. I have the Mediabox and a screen comes up requesting the city code. What should I do
now?
In this screen, you need to enter the city code that corresponds to the city/county in
which you live. You can fi nd the city code in the installation manual, or on the sticker
attached to your Quick Guide by the installer.
10. I have run through the installation and 150 channels have been found, but I am not able to
watch all of them. What should I do now?
The number of channels you are able to watch depends on the subscription you have
taken out. For some channels, an extra subscription is required. If you are interested,
please contact our Customer Service on freephone number 1908 (available 9 a.m. to 10
p.m. Monday to Saturday, 10 a.m. to 10 p.m. Sunday).
11. The message: “Installation is now being completed. This may take 15 minutes...” is
displayed. What should I do now?
This screen indicates that installation is being completed; you should always wait for
15 minutes. If the MediaBox still gives the same message after 15 minutes, please contact
our Customer Service on freephone number 1908 (available 9 a.m. to 10 p.m. Monday to
Saturday, 10 a.m. to 10 p.m. Sunday).
12. I see the message: “Signal loss: There appears to be no signal....” What should I do now?
This message indicates that the signal your MediaBox is receiving is too weak
or that it is not receiving one at all.
Check whether your MediaBox is in fact connected straight to your wall
socket, without any equipment, distributors or amplifi ers in between that are not from
Chorus/NTL. If nothing resolves the problem, please contact our Customer Service on
freephone number 1908 (available 9 a.m. to 10 p.m. Monday to Saturday, 10 a.m. to 10 p.m.
Sunday).
13. I have completed the installation but the picture is very poor. What should I do now?
A poor picture can be caused by many things. Would you describe the interference as:
• Lines, noise, black and white, specks, faint or faded picture:
This is a fault stemming from the cabling from your MediaBox to your TV or other
external equipment. Check this cabling for defects or loose plugs and replace these
cables. It is also possible that the picture format is not set correctly in the Settings/TV
settings menu.
• Black, static, pixelated image:
This is a fault caused by a problem in the signal being sent to the MediaBox. This could
be due to poor or loose cabling but also due to a fault in our network. Check whether
the cable from your wall socket is connected directly to your MediaBox, without any
equipment, distributors or amplifi ers in between that are not from Chorus/NTL. If
nothing resolves the problem, please contact our Customer Service on freephone
number 1908 (available 9 a.m. to 10 p.m. Monday to Saturday, 10 a.m. to 10 p.m. Sunday).
14. I want to tune to a channel from the TV Guide channel listing and get the message
“Channel not accessible.”
All channels available from Digital TV can be viewed in the TV Guide channel
listing, including the ones to which you do not subscribe. You can only tune to the
channels to which you have subscribed. You must subscribe to some channels in order to
be able to view them. If you want to subscribe to additional channels, you can phone
Chorus/NTL on lo-call number 1890 920 624 (calls should be charged at the local rate of
your telephone provider).
15. I want to tune to a channel I subscribe to and the TV screen is black.
Unfortunately, channel interference sometimes occurs, interfering with the ability
to receive a channel. Please contact our Customer Service on freephone number 1908
(available 9 a.m. to 10 p.m. Monday to Saturday, 10 a.m. to 10 p.m. Sunday).
16. Channel surfi ng is not very quick.
Changing channels takes about half a second longer on digital television than on analog
television.
17. Lost or forgotten PIN code?
The default PIN code is 0000 but you have the option of changing it. It may happen that
you change your PIN code and then lose it or forget it. To reset your PIN code, please
contact our Customer Service on freephone number 1908 (available 9 a.m. to 10 p.m.
Monday to Saturday, 10 a.m. to 10 p.m. Sunday).
18. Must I leave the MediaBox on standby if I am not watching TV?
New software is regularly downloaded to the MediaBox via the cable
network. You also receive new services via these software downloads. To receive the
new software (and new services), it is important that you put the MediaBox
on standby when you are not using it and do not unplug it.
34 Appendix 1. Frequently asked questions
19. What do I need to pay attention to when connecting the MediaBox?
It is important that you connect your MediaBox directly to the wall socket without
any equipment, distributors or amplifi ers in between that are not from Chorus/NTL. The
MediaBox must also have suffi cient space around it to allow proper ventilation.
20. I have several TVs at home. Can I enable them to receive Digital TV as well?
Unfortunately this is not possible; you can only enable one TV to receive the digital
signal. By using a distributor that you install on the aerial (RF) output, you can distribute
your ‘normal’ analog TV signal to other TVs in your home.
21. I have just connected the MediaBox but I can’t see a picture. What should I
do now?
Check whether the MediaBox is connected to the 230 V mains voltage.
Check whether you have connected the MediaBox to your TV correctly and whether you
have selected the correct channel.
22. How do I connect the MediaBox?
An installer will do the fi rst time installation and activation for you. You can fi nd out how
to do future resetting or installation in the installation manual on www.upc.ie or
with the Quick Guide provided with the MediaBox.
23. My kids were trying to watch a movie this afternoon, but couldn’t because I was out doing
the shopping. Why did this happen?
If they were trying to watch a movie on between 05.30 and 20.00 which has an age
rating of 12 or above, Sky Movies will always ask for a PIN. You will know what the age
rating of a fi lm on any of the Sky Movie channels is by looking at the right hand side of
the programme information banner. The best solution is to get an adult to enter the PIN
for them. Alternatively, you can tell them the PIN, but please be conscious that this
means they can access all movies, irrespective of their age rating.
We also suggest that you check the Parental Settings on the PIN Settings menu in order
to ensure that you have not set an age classifi cation rating for viewing TV. If you have,
this will request the user to enter a PIN in order to watch programmes which have
an equal or higher age classifi cation (provided this classifi cation is given by the channel
provider). You can disable this by setting the Programme Age rating to 18, but please be
conscious that this means they can access all programmes on all channels, irrespective of
their age rating.
24. I recorded a programme a few months ago, but when I went to watch it today, I got a
message saying “This programme was recorded from a channel to which you are no
longer subscribed. Please remove this programme from your library or renew your
channel subscription to view it.”?
One of the implications of this is that you must maintain your subscription to a package
in order to watch a recording of a programme that was recorded from a channel in that
same package. For example, if you’ve recorded a movie from Sky Family when you had a
subscription to the Sky Movies package, and want to watch it 6 months later, you must
still have a subscription to the Sky Movies package. If you don’t maintain this
subscription, you will not be able to watch the recording.
It is important to note that this applies for all NTL/Chorus packages i.e. Select, Max,
Choice, Sky Movies, Sky Sports, Setanta Sports and all other premium channels. You
must also maintain a subscription to the exact same package in order to continue viewing
recordings from channels on that package i.e. if you recorded a movie while subscribed to
just Sky Movies, and you are now subscribed to Sky Movies & Sky Sports, you will not be
able to view the recording.

35
Appendix 22
List of Setting Codes: Remote ControlThis chapter contains a list of setting codes for setting up your Remote Control for use with your TV and video recorder or DVD player/recorder. The most common makes are included in this list. Chapter 2 (The Remote Control) contains a description of how you can set up the Remote Control for use with your TV and video recorder or DVD player/recorder.
TV setting codesAiko 0039, 0067, 0586, 0246, 0401, 0065, 0463, 0102, 0391, 0221, 0294, 0247
Aiwa 0735, 0731, 1946, 1938
Akai 0391, 0238, 0401, 1567, 0067, 0463, 0775, 0221, 0065, 0039, 0102, 0248, 0744, 0193,
0546, 0745, 0632, 0586, 0611, 0510, 0247, 0661, 0246, 0294, 0478, 0208, 0407, 0636, 1067,
1938, 0503, 0678, 0842
Alba 0039, 0448, 0400, 0265, 0401, 0698, 0067, 0586, 1067, 0385, 0248, 0246, 0277, 0193,
0517, 0611, 0066, 1698, 0609, 1938, 0744, 0473
Amstrad 0207, 0039, 0546, 0294, 0401, 0248, 0067, 0586, 0463, 0442, 0392, 1067, 0678,
0611
Anasonic 0400, 0067, 0586, 0039, 0698, 0404, 0193, 0322, 0132, 0441, 0289, 0277, 1467,
0042, 0458, 0134, 1698
Aristona 0586, 0067, 0042
Audiosonic 0039, 0067, 0404, 0586, 0139, 0744, 0745, 0247, 0400, 0367, 0294, 0248, 0516,
0458
Bang & Olufsen 0595, 0117, 0305
Beko 0516, 0065, 0458, 0744, 0400, 0448, 0067, 1067, 0586, 0636, 0745
Bestar Daewoo 0404
Blaupunkt 0221, 0565, 0225, 0478, 0485, 0200, 0066
Bush 0698, 0248, 0193, 0039, 0066, 0067, 0401, 0265, 0312, 0385, 0393, 0404, 0294, 0391,
1067, 0517, 0238, 0247, 0644, 0647, 0728, 0611, 0586, 0744, 1930, 1938, 1698
Clatronic 0067, 0400, 0401, 0744, 0248, 0294, 0586, 0247, 0277, 0039, 0132, 0350, 0609,
0678, 0636
Condor 0350, 0067, 0586, 0400, 0246, 0039, 0312, 0132, 0277, 0448, 0441, 0193
Appendix 2. List of setting codes: Remote Control
Crown 0039, 0400, 0516, 0067, 0586, 0517, 0744, 0636, 0745, 0451, 0448, 0609, 0238, 0369
Daewoo 0664, 0404, 1939, 0529, 0691, 0067, 0586, 0039, 0246, 0248, 0247, 0481, 1167,
1932, 1938, 0910
Dansai 0067, 0586, 0294, 0062, 0065, 0246, 0039, 0066, 0247, 0238
Decca 0102, 0546, 0067, 0586, 0247, 1167, 0651, 1938
Dual 0574, 0247, 0067, 0586, 0289, 0382, 0424, 0193, 0561, 1167, 0661
Elbe 0465, 0268, 0289, 0392, 0322, 0400, 0193, 0067, 0586, 0248, 0221, 0441, 0640, 0247,
0546, 0391, 0660
Emerson 0207, 0744, 0208, 0117, 0277, 0067, 0586, 0401, 0100, 0312, 0350, 0391, 1939, 0516,
0400, 0193, 0351
Ferguson 0655, 0317, 0365, 0268, 0139, 0590, 0067, 0586, 0065, 0134, 0138, 0391, 0578
Fidelity 0193, 0542, 0393, 0067, 0586, 0401, 0442, 0561, 0246, 0294, 0574, 1938, 0391
Finlux 0135, 0134, 0067, 0586, 0744, 0376, 0247, 0102, 0193, 0546, 0745, 0100, 0117, 0132,
0441, 0661, 0522, 0510, 0659, 0503, 0448, 0636, 0651
Firstline 0067, 0586, 0404, 0698, 0744, 0193, 0039, 0351, 0246, 0277, 1939, 0132, 0247,
0441, 0574, 0561, 0268, 0102, 0265, 0238, 0391, 1067, 1698, 0838
Fisher 0134, 0247, 0066, 0238, 0400, 0585, 0075, 0117, 0187, 0391, 0193, 0574, 0102
Fujitsu 0236, 0102, 0132, 0247, 0193, 0039, 0382, 0713, 0067, 0586, 0391, 0289, 0883
Fujitsu General 0039, 0247, 0236, 0193
Goldstar 0067, 0039, 0400, 0320, 0062, 0407, 0247, 0208, 0277, 0246, 0586, 0193, 0391,
0139, 0393, 0636, 0074, 0744, 0745
Goodmans 0664, 0404, 0067, 0529, 0586, 1067, 0698, 1939, 0066, 0294, 0102, 0546,
0039, 0320, 0517, 0401, 0265, 0065, 0510, 0590, 0062, 0247, 0365, 0248, 0481, 1938, 0609,
0660, 0691, 1930, 1698
Granada 0067, 0586, 0256, 0386, 0042, 0075, 0102, 0138, 0238, 0247, 0066, 0369, 0546,
0503, 0365, 0590, 0193, 0393, 0578
Grandin 0067, 0586, 0039, 0193, 0640, 0744, 0745, 0698, 0404, 0350, 0312, 0248, 0485,
0609, 1067, 1698, 0895
Grundig 0538, 0565, 0225, 0221, 0517, 0100, 0736, 0067, 0586, 0617, 0039, 0066, 0473,
0400, 1938, 0660
Hanseatic 0067, 0586, 0529, 0193, 0391, 0322, 0574, 0312, 0424, 0350, 0664, 0458, 0400,
0691, 0039, 0247, 0117, 0407, 0744, 0838
Hauppauge 0067, 0586
Hitachi 1255, 0066, 0386, 0074, 0138, 0503, 0193, 0608, 0226, 0247, 0062, 0224, 0546,
0102, 0511, 0529,
0067, 0586, 0139, 0393, 0578, 0749, 0664, 0774, 0208, 1167, 0135, 0522, 1511, 0391, 0542,
0510, 0827, 1075, 0659, 1067, 0914, 1606, 1179
Hitachi Fujian 0138
Hypson 0067, 0586, 0744, 0745, 0294, 0247, 0312, 0485, 0268, 1938, 0698, 1698
36 Appendix 2. List of setting codes: Remote Control
Hyundai 0067, 0895, 0586, 0736, 1182
Interfunk 0067, 0586, 0042, 0117, 0542, 0305, 0193, 0391, 0400, 0139, 0277
Intervision 0312, 0247, 0485, 0067, 0401, 0407, 0478, 0516, 0400, 0424, 0517, 0248, 0132,
0193, 0294, 0277, 0039, 0586
ITT Nokia 0391, 0578, 0193, 0503, 0510, 0376, 0238, 0369, 0636, 0640, 0661, 0393
JVC 0683, 0066, 0713, 0401, 0248, 0636, 0448, 0761, 0123
Karcher 0067, 0586, 0451, 0400, 0640, 0193, 0312, 0132, 0294, 0744, 0636
Kendo 0640, 0067, 0586, 0193, 0542, 0400, 0407, 0393, 0458, 0441, 0132, 0265, 0277, 0392
Kenwood 0135
Kneissel 0067, 0400, 0640, 0441, 0404, 0529, 0586, 0465, 0289, 0322, 0268, 0392, 1938
Lenco 0067, 0039, 0193, 0404, 0586, 0134
LG 0067, 0400, 0039, 0407, 0062, 0247, 0586, 0744, 0246, 0320, 0193, 0208, 0636, 0139,
0728, 0745, 0859, 1667, 1176, 1178
Lifetec 0067, 0039, 0404, 0698, 0542, 0685, 1067, 1167, 0586, 0248, 0294, 1698, 0713
Loewe 0542, 0663, 0067, 0586, 0685, 0400, 0117, 0322, 0392, 0820, 0546
Luxor 0224, 1193, 0320, 0393, 0510, 0522, 0391, 0238, 0386, 0578, 0193, 0376, 0503, 1067,
0247, 0661
Matsui 0067, 0586, 0517, 0039, 0265, 0207, 0041, 0385, 0102, 0066, 0247, 0401, 0463,
0473, 0393, 0609, 0485, 0193, 0546, 0065, 0238, 0075, 0225, 0221, 0365, 0744, 0574,
1938, 1067, 0659
Medion 0067, 0698, 0542, 0586, 1167, 0728, 0838, 1938, 1067, 1467, 1930, 1698, 0275
Melectronic 0376, 0067, 0542, 0139, 0277, 0135, 0134, 0404, 0039, 0247, 0510, 0522, 0246,
0441, 0193, 0317, 0586, 0664, 0391, 0221, 0225, 0691
Metz 0225, 0565, 0477, 0221, 0397, 0418, 0776, 0067, 0117, 0586, 0305, 0617, 0698, 1067, 1698
Mitsubishi 0138, 0123, 0542, 0067, 0208, 0117, 0066, 0565, 0586, 0721, 0238, 1067
Multitech 0039, 0393, 0516, 0067, 0400, 0586, 0247, 0246, 0277, 0132, 0294
NEC 0200, 0617, 1200, 1300, 0066, 0350, 0485, 0039, 0404, 0247, 0067, 0586, 0041, 0734,
0275, 0529, 1734, 0801, 0691
Neckerman 0067, 0221, 0400, 1535, 0586, 0193, 0448, 0117, 0277, 0247, 0441, 0350, 0393,
0542
Neufunk 0067, 0039, 0586, 0640, 0248, 0312, 0744
Nikkai 0102, 0248, 0067, 0586, 0247, 0294, 0062, 0065, 0367, 0246, 0039, 0066
Nokia 0391, 0193, 0510, 0578, 0522, 0503, 0369, 0238, 0404, 0661, 0636, 0376, 0350,
0640, 0139
Orion 0067, 0385, 0586, 0685, 0744, 0265, 0473, 0207, 0350, 0041, 0039, 0351, 0132,
0294, 0442, 0546, 0561, 0574, 1946, 1938, 0910
Otto Versand 1535, 0066, 0123, 0542, 0067, 0586, 0565, 0225, 0574, 0221, 0391, 0265,
0139, 0256, 0277, 0350, 0247, 0039, 0312, 0458, 0546
Palladium 0400, 0067, 0221, 1535, 0448, 0586, 0277, 0117, 0193, 0247, 0441, 0685, 0393,
0660, 0744, 1167
Panasonic 0680, 1680, 0138, 0256, 0391, 0397, 0546, 0067, 0586, 0193, 0578, 1340, 0883
Philips 0586, 0067, 0268, 0042, 0221, 0117, 0453, 0404, 0802, 0039, 1786
Pioneer 0196, 0041, 0067, 0200, 0586, 0453, 0458, 0400, 0391, 0139, 0193, 0317, 0516,
0542, 0790
Pionier 0400, 0516
Proline 0067, 0586, 0655, 0664, 0660, 0441, 0042, 0351, 0102, 0651
Protech 0067, 0586, 0247, 0039, 0277, 0132, 0294, 0448, 0367, 0698, 0312, 0193, 0516,
1067, 1698
Quelle 0067, 1535, 0041, 0139, 0542, 0565, 0574, 0221, 0391, 0062, 0066, 0247, 0277, 0100,
0134, 0135, 0698, 0586, 0187, 0225, 0294, 0320, 0376, 0451, 0039, 1698
Radiotone 0039, 0067, 0586, 0458, 0400, 0609, 0448, 0442, 0678, 0698, 0294, 1067, 1698
Samsung 0648, 0617, 0067, 0208, 0586, 0039, 0123, 0247, 0478, 0512, 0400, 0294, 0246,
0320, 0674, 0090, 0062, 0102, 0238, 0712, 0193, 0655, 0842
Sanyo 0238, 0187, 0322, 0066, 0041, 0400, 0369, 0102, 0246, 0247, 0134, 0075, 0585,
0039, 0574, 0193, 0067, 0138, 0586, 0516
Schneider 1167, 0067, 0586, 0042, 0574, 0424, 0382, 0289, 0247, 0277, 0401, 0391, 0248,
0698, 1067, 0193, 0678, 0744, 1939, 1938, 1698
SEG 0067, 0586, 1067, 1467, 0698, 0247, 0517, 0039, 0193, 0294, 0664, 0066, 0132, 0277,
0392, 0246, 0248, 1939, 1698, 1193
Seleco 0236, 0393, 0289, 0392, 0193, 0441, 0703, 0401, 0066, 0294, 0376, 0465
Sharp 0123, 1223, 0187, 0066, 0521, 0683, 0286, 0546, 0790, 0848
Siemens 0221, 0565, 0225, 0187, 0062, 0067, 0586, 0391
Sony 1535, 1681, 0041, 0066, 0132, 0383, 0067, 0586, 0187, 0864
Tandberg 0397, 0441, 0139, 0367, 0226, 0392, 0391, 0193
Teac 0728, 0542, 0067, 1467, 1067, 0586, 0698, 0485, 0247, 0736, 0294, 0574, 1939, 0208,
0039, 0442, 0312, 0448, 0785, 0200, 0744, 1698, 1754, 1179, 1785
Telefunken 0655, 0590, 0139, 0617, 0728, 0528, 0317, 0365, 0226, 0067, 0586, 0516, 0744
Teletech 0067, 0586, 0698, 0039, 0277, 0367, 1067, 1698
Thomson 0655, 0590, 0317, 0139, 0365, 0226, 0067, 0586
Toshiba 0065, 0090, 0538, 0066, 0100, 0132, 1538, 0247, 0139, 0748, 0225, 0221, 0648,
1946, 1938, 0039, 0728, 0067
Triumph 0207, 0546, 0376, 0586, 0067
Universum 0376, 0135, 0565, 0225, 0503, 0391, 0277, 0522, 0510, 0400, 0448, 0041, 0542,
0066, 0187, 0062, 0100, 0193, 0294, 0134, 0067, 0586, 0451, 0441, 0320, 1535, 0698, 0574,
0247, 0139, 0392, 0367, 0207, 0661, 0039, 1067, 1467, 0200, 1698
Vestel 0067, 0193, 0247, 0586, 0698, 1067, 1698, 1193
Waltham 0247, 0386, 0448, 0317, 0067, 0586, 0698, 0139, 1067, 1698
Yamaha 0680, 0827

37Appendix 2. List of setting codes: Remote Control
Video setting codesAiwa 0337, 0030, 0378, 0382, 0067, 0772, 0764, 0071, 1167, 0062
Akai 0067, 0136, 0345, 0672, 0071, 0050, 0382, 0270, 0378
Alba 0308, 0102, 0382, 0050, 0030, 0345, 0378, 0111
Amstrad 0030, 0308, 0102
Anasonic 0030
Aristona 0111, 0176
Audiosonic 0308
Bang & Olufsen 0529
Beko 0134
Bestar 0308, 0050
Blaupunkt 1592, 0256, 0111, 0064
Bush 0102, 0308, 0345, 0382, 0030, 0378, 0111, 0672, 0772
Clatronic 0050, 0102, 0030
Condor 0050, 0308
Crown 0067, 0308, 0102, 0510, 0050
Daewoo 0308, 0672, 0667, 0874, 0378, 0382, 0075, 0050
Dansai 0102, 0308
Decca 0030, 0071, 0111, 0097, 0378, 0382
Dual 0071, 0111, 0308, 0030, 0378
Elbe 0308, 0068
Emerson 0102, 0075, 0030
Ferguson 0071, 0350, 0351, 0030, 0308
Fidelity 0030, 0102, 0270, 0462, 0382
Finlux 0030, 0111, 0134, 0072
Firstline 0102, 0378, 0073, 0067, 0075, 0072, 0308, 1167
Fisher 0077, 0134, 0068, 0050
Fujitsu 0030
Fujitsu General 0067
Goldstar 0067, 0510, 0030
Goodmans 0030, 0102, 0270, 0308, 0067, 0050, 0111, 0378, 0667, 0382, 0672
Granada 0134, 0078, 0111, 0270, 0067, 0256, 0072, 0030
Grandin 0102, 0067, 0050, 0030, 0308
Grundig 0111, 0377, 0379, 0256, 0350, 0378, 0102, 0382, 0772, 0064
Hanseatic 0067, 0308, 0111, 0068
Hitachi 0072, 0196, 0071, 0030, 0270, 0111, 0134, 0414, 0623
Hypson 0102, 0308, 0382, 0030, 0067, 0510
Interfunk 0111, 0134
Intervision 0030, 0308, 0067, 0378
ITT Nokia 0078, 0582
JVC 0071 0097, 0414, 0516
Karcher 0308
Kendo 0136, 0345, 0378, 0102, 0067, 0308
Kenwood 0071, 0068
Kneissel 0382, 0378, 0067, 0308
Lenco 0308
LG 0067, 0510, 0030, 0308, 1167
Lifetec 0378
Loewe 0111, 1592, 0256, 0067
Luxor 0136, 0073, 0102, 0134, 0077, 0078, 0345
Matsui 0378, 0067, 0270, 0382, 0030, 0772
Medion 0378, 0382
Melectronic 0030, 0067, 0068
Metz 1592, 0256, 0377, 0111, 0067, 0866, 0867
Mitsubishi 0073, 0097, 0111, 0510, 0030, 0672
Multitech 0067
NEC 0071, 0068, 0097, 0134, 0067, 0308, 1167
Neckerman 0071, 0111
Neufunk 0067
Nikkai 0050, 0102, 0308
Nokia 0134, 0136, 0345, 0071, 0308, 0270, 0078, 0072, 0111, 0582
Orion 0382, 0378, 0379, 0772
Otto Versand 0111
Palladium 0102, 0345, 0067, 0071, 0270, 0378, 0462
Panasonic 1592, 0256, 0866, 0867
Philips 0111, 0176, 1311, 0414, 0623, 1299
Pioneer 0097, 0111, 0072, 1833
Proline 0030, 0308, 0350, 0672, 0351
Protech 0111, 0308
Quelle 0111
Samsung 0270, 0462, 0650
Sanyo 0134, 0077, 0078, 0097
Schneider 0102, 0030, 0067, 0111, 0308, 0270, 0176, 0072, 0382, 0672
SEG 0102, 0270, 0308, 0672, 0111, 0667
Seleco 0071, 0414, 0050, 0067
Sharp 0078, 0067, 0599
38 Appendix 2. List of setting codes: Remote Control
Siemens 0067, 0134, 0111, 0176, 0350, 0377
Sony 0064, 0062, 0136, 1062
Tandberg 0308
Teac 0102, 0071, 0030, 0308, 0672, 0067, 0111, 0337, 0623, 0667, 0874
Telefunken 0672, 0071, 0350, 0351, 0414, 0524, 0308
Teletech 0102, 0308, 0030
Thomson 0350, 0752, 0351, 0071, 0097, 0414, 0524, 0308
Toshiba 0075, 0071, 0414, 0073, 0111, 0772, 0382, 1038
Universum 0030, 0111, 0270, 0067, 0136, 0378, 0134
Yamaha 0071
DVD player/recorder setting codesAiwa 0671, 0725, 1942, 0899, 1166, 0563
Akai 0820, 0809, 0818, 0796, 0720, 0746, 0914, 0743, 0882, 0735, 1113, 1145, 1229, 1725, 1166
Alba 0747, 0729, 0743, 0753, 0763, 0725, 0760, 0813, 0569, 0702, 1170, 1081
Amstrad 0743
Anasonic 0861
Audiosonic 0720, 1953
Bang & Olufsen 1055
Blaupunkt 0747
Bush 0743, 0725, 0863, 1725, 0760, 0861, 0729, 0720, 0719, 0747, 0546, 0848, 0909, 0914,
0753
Clatronic 0818, 0809, 0848, 0702
Crown 0800, 0681, 0720
Daewoo 0735, 0862, 0863, 0800, 0744, 1948, 0900, 0902, 1171, 1199
Dansai 0800, 0777, 0813, 1145
Decca 0800
Dual 0695, 0681, 0743, 0760, 0861, 0813, 0809, 0820
Emerson 0621, 0735
Ferguson 0681
Finlux 0771, 0800, 0813, 0621, 0702, 0781, 1177
Firstline 0829, 0899, 0681
Fisher 1949
Goldstar 0621, 0771
Goodmans 0681, 1034, 0820, 0720, 0813, 0753, 0848, 0909, 0863, 2037, 0743, 0760, 1251
Grandin 0746, 1284, 0702
Grundig 0725, 0805, 0569, 0681, 0735, 0820, 0743, 0700, 0753, 1725, 2076, 1034, 1760,
1950
Hanseatic 0771, 0813, 1183
Hitachi 0694, 0695, 0603, 0809, 1950, 0887, 2024, 0743
Hyundai 0813, 1048, 0880, 0796, 1258, 2076
JVC 0653, 0588, 1931, 1970, 1194, 0569, 0533, 0897
Karcher 0813
Kendo 0729, 0743, 0861
Kenwood 0564, 0520, 0767
Lenco 0729, 0681, 0800, 0848, 0743, 1059, 0861
LG 0621, 0771, 1936, 0899, 2013, 2032
Lifetec 0681, 0861
Loewe 0569, 0771
Luxor 1034, 0743, 1760, 0760, 1275
Matsui 0681, 0743, 0702, 0725, 0914, 1760
Medion 0861, 0813, 0681, 0746, 0909, 0660, 2042, 2037
Metz 0601, 0555, 0743
Mitsubishi 0743
NEC 0899, 0722, 0621, 1948
Neufunk 0695
Nikkai 1953
Palladium 0725, 0809
Panasonic 0520, 1938, 1935, 1040, 1041
Philips 0569, 0676, 0915, 0533, 1941, 0705, 1842, 1188
Pioneer 0601, 1995, 0661, 0555, 1841
Proline 0681, 0702, 0820, 1034, 0863, 1945
Samsung 0603, 0774, 1962, 1958, 0850, 1105, 0520
Sanyo 0700, 0725, 0820, 1949, 0903
Schneider 0813, 0861, 0809, 0735, 0818, 0743, 0681, 0820, 1183, 1131
SEG 0695, 0743, 0798, 0914, 0902, 0793
Sharp 0660, 0782, 0725
Sony 0563, 1663, 1563, 2011, 1100, 1933, 0802, 1964, 1163, 1063, 0603, 1099
Tandberg 0743
Teac 0747, 0771, 0546, 0601, 0722, 0798, 0621, 0820, 1227, 1960, 1965, 0863
Telefunken 0820, 1113, 0819, 0818
Teletech 0743
Thomson 0581, 0552
Toshiba 0533, 1075, 2018, 2036
Universum 0771, 0743, 0621, 0809, 1948, 1943, 1257, 0820
Vestel 0743, 2024
Yamaha 0569, 0676, 0520

39Appendix 3. Addresses and telephone numbers
Appendix 33
Addresses and telephone numbers
For ChorusBy e-mail:[email protected] for Sales [email protected] for Customer Services and account [email protected] for Careers information By telephone:SALES: LoCall 1890 940 624Monday - Friday 9am to 8pmSaturday 9am to 5pm CUSTOMER SERVICES: LoCall 1890 417 888 or Freephone 1908 (if calling from abroad please dial +353 61 272120)Billing Enquiries: Monday - Friday 9am to 6pmService Enquiries: Monday - Saturday 9am to 10pm and Sunday 10am to 10pmBank Holiday Opening Hours: 10am to 10pm
For NTLBy e-mail:[email protected] for Sales [email protected] for Customer Services and account [email protected] for Careers information By telephone:SALES: LoCall 1890 940 624Monday - Friday 9am to 8pmSaturday 9am to 5pm
CUSTOMER SERVICES: Freephone 1800 321 321 or Freephone 1908Account & Billing Queries: Monday - Friday 9am to 6pmFaults & General Queries: Monday - Saturday 9am to 10pm and Sunday 10am to 10pmBank Holiday Opening Hours: 10am to 10pm
Chorus/NTL Customer ServiceIf you still have any questions after reading this manual or if you encounter any unforeseen circumstances during or after installation, you may also contact Chorus/NTL Customer Service for technical support on freephone number 1908
(available 9 a.m. to 10 p.m. Monday to Saturday, 10 a.m. to 10 p.m. Sunday).
WebsiteYou may visit our website for additional information about the possibilities offered by Digital TV, plus information about Chorus/NTL Broadband Internet and Chorus/NTL Telephony. For more information and questions concerning Digital TV, please visit:www.upc.ie
NTL Communications (Ireland) Limited is a registered company (Registration Number 32156) with a registered offi ce at Building P2, East Point Business Park, Dublin 3, Ireland.Chorus Communication Limited is a registered company (Registration Number 324246) with a registered offi ce at Limerick Enterprise Development Park, Roxboro Road, Limerick, Ireland.

40
This product incorporates copyright protection technology that is protected by U.S. patents and other intellectual property rights. Use of this copyright protection technology must be authorized by Macrovision, and is intended for home and other limited viewing uses only unless otherwise authorized by Macrovision. Reverse engineering or disassembly is prohibited.


