
Orientation Configurationadapting to orientation changes

Orientation
There are 7 possible orientations recognized by iOS:
UIDeviceOrientationUnknown,
UIDeviceOrientationPortrait,
UIDeviceOrientationPortraitUpsideDown,
UIDeviceOrientationLandscapeLeft,
UIDeviceOrientationLandscapeRight,
UIDeviceOrientationFaceUp,
UIDeviceOrientationFaceDown

Using Orientations
You can restrict which orientations your app will recognize
Restrictions can be for the entire app
or they can be for particular views
Apple has different “recommendations” for different devices
for iPad it is recommended that you always allow all orientations
for iPhone/iPad touch allow landscape modes only if it works for your app
for iWatch/wearables: we’ll see

Specifying Orientations
at the app level
Specifying Orientations
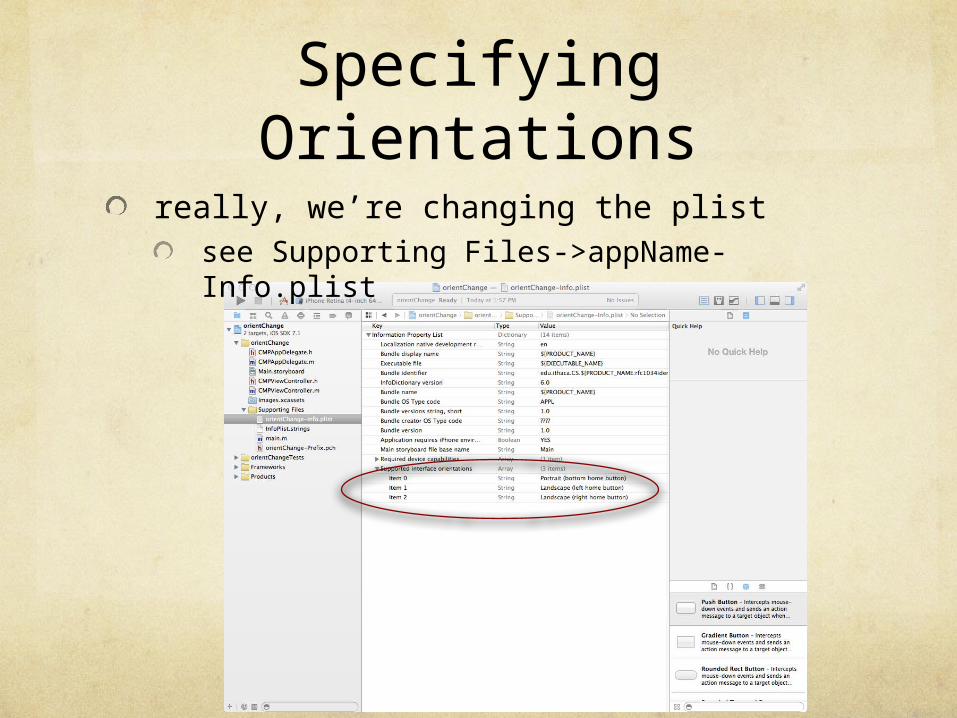
really, we’re changing the plist see Supporting Files->appName-Info.plist

Specifying Orientations
per viewController specification: put this method in the viewController.m file.
Must specify allowed orientations
-(NSUInteger)supportedInterfaceOrientations {
return UIInterfaceOrientationLandscapeLeft | UIInterfaceOrientationLandscapeRight;
}

Specifying Orientations
Orientation choices:UIInterfaceOrientationLandscapeLeft UIInterfaceOrientationLandscapeRightUIInterfaceOrientationMaskPortraitUIInterfaceOrientationMaskPortraitUpsideDown
Or combination choices:UIInterfaceOrientationMaskAllButUpsideDown UIInterfaceOrientationMaskAllUIInterfaceOrientationMaskLandscape
Specifying Orientations
Interface Orientation vs Device OrientationDevice depends on how the user is holding
Cannot choose to accept it (the user changes it by how she holds the device)
Interface you can choose to observer or not

Constraints
can specify constraints if turn on autolayout
Select the storyboard in the Project Navigator
Click on the File Inspector then click on the Use Auto Layout checkbox
It should be on by default
This enables you to “pin” components via the Editor->Pin menu
Auto Layout tutorial: XCode 5 Auto Layout tricks

Constraints
Create an interface that looks like this. Use blue dashed guidelines to line the buttons up.

Constraints
Run. Change to landscape. Get this.

Constraints
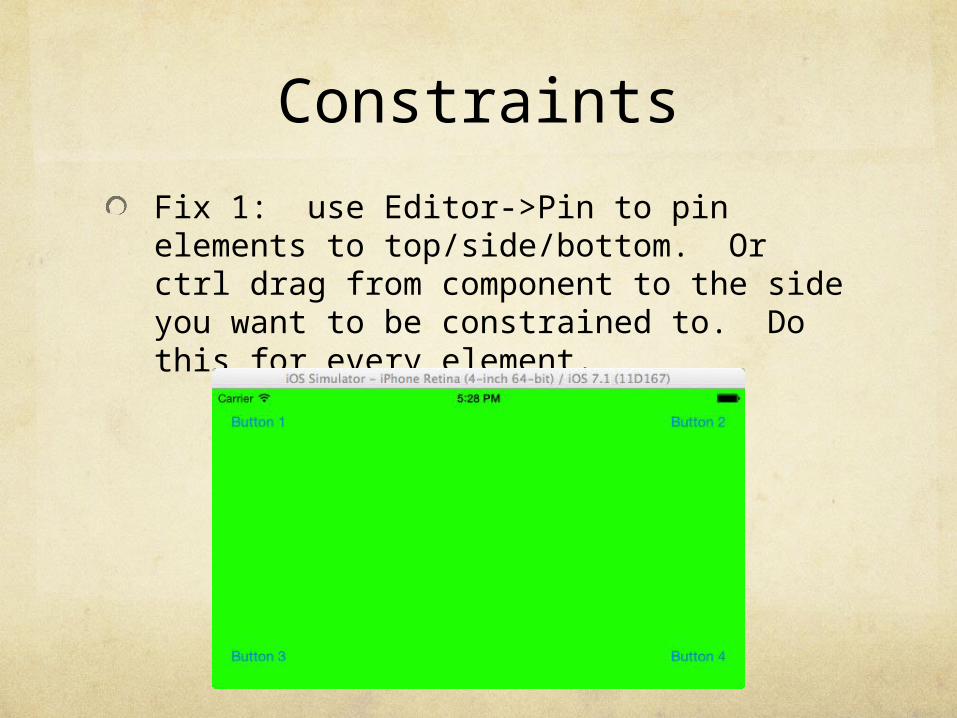
Fix 1: use Editor->Pin to pin elements to top/side/bottom.
Or ctrl drag from component to the side you want to be constrained to.
Do this for every element.
See this in the document outline:
Constraints
Fix 1: use Editor->Pin to pin elements to top/side/bottom. Or ctrl drag from component to the side you want to be constrained to. Do this for every element.

Constraints
Now add a button as at right.add left and top constraints
run
This constraint is the problem!

Constraints
Delete the constraint to top.ctrl-drag to left side
choose Center Vertically in Container
Fixed!

Aligning
At the bottom of the view is a bar of layout controls.
Similar to the Edit menu item
Align
Pin Resolve Auto Layout Issues
Resizing Behavior
Apply Retina 3.5-inch Form Factor

Aligning
Add 3 text boxes and place as below
make sure the boxes are offest
and they are different widths

Aligning
select all three textfields
click on the Align button
check “Bottom Edges”
click on “Add 2 Constraints” button

Aligning
select all three textfields
click on the Pin button
check “Equal Widths”
click on “Add 2 Constraints” button

Aligning
select leftmost textfieldmake sure it is the recommended distance from left border (blue dotted line)
ctrl-drag to left border and choose “Leading Space to Container”
ctrl-drag to top border and choose “Leading Space to Top Layout Guide”

Aligning
select all rightmost textfieldmake sure it is the recommended distance from right border (blue dotted line)
ctrl-drag to right border and choose “Trailing Space to Container”

Aligning
Choose the “Resolve Auto Layout Issues” button.
Click on “Update All Frames in View Controller”
Result is not quite correct!

Aligning
Move 2nd text box to center (use the dotted center alignment line)
Ctrl-drag from Text 1 box to Text 2 box and choose “Horizontal Spacing”
Ctrl-drag from Text 2 box to Text 3 box and choose “Horizontal Spacing”
Update all Frames in View Controller again

Aligning
Run.
Change orientations.

Other Methods
In code.
(void)willAnimateRotationToInterfaceOrientation:(UIInterfaceOrientation) interfaceOrientation duration:(NSTimeInterval)duration { if (interfaceOrientation == UIInterfaceOrientationPortrait || interfaceOrientation == UIInterfaceOrientationPortraitUpsideDown) { button1.frame = CGRectMake(20, 20, 125, 125); button2.frame = CGRectMake(175, 20, 125, 125); button3.frame = CGRectMake(20, 168, 125, 125); button4.frame = CGRectMake(175, 168, 125, 125); button5.frame = CGRectMake(20, 315, 125, 125); button6.frame = CGRectMake(175, 315, 125, 125); } else { button1.frame = CGRectMake(20, 20, 125, 125); button2.frame = CGRectMake(20, 155, 125, 125); button3.frame = CGRectMake(177, 20, 125, 125); button4.frame = CGRectMake(177, 155, 125, 125); button5.frame = CGRectMake(328, 20, 125, 125); button6.frame = CGRectMake(328, 155, 125, 125); }}
we change the button position and size based on the orientation
button1, button2, etc are IBOutlets to the buttons
Other Methods
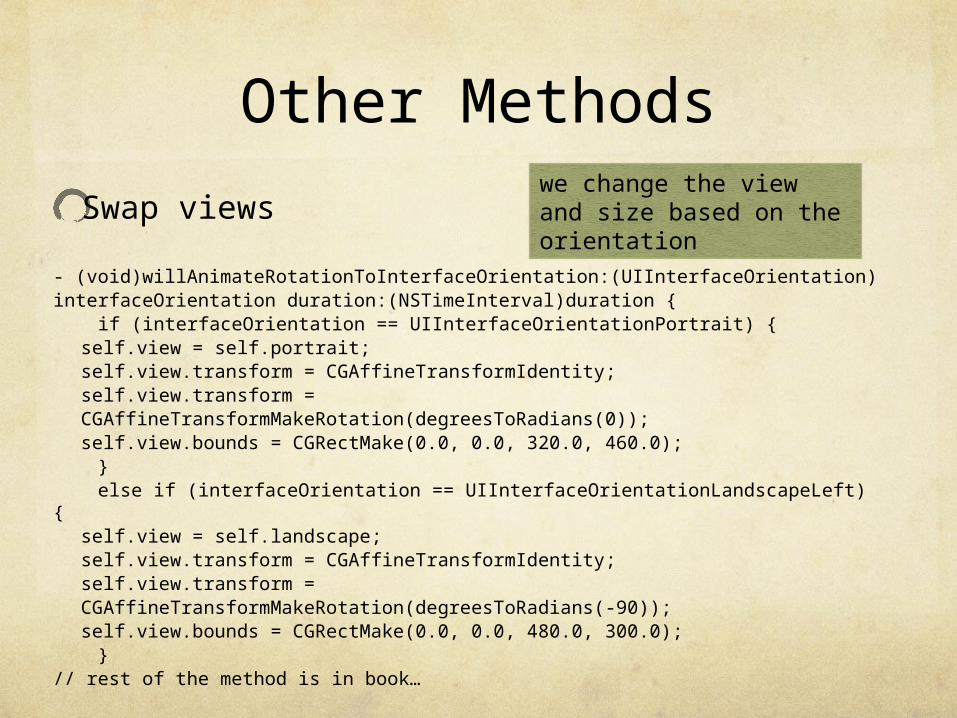
Swap views
- (void)willAnimateRotationToInterfaceOrientation:(UIInterfaceOrientation)interfaceOrientation duration:(NSTimeInterval)duration { if (interfaceOrientation == UIInterfaceOrientationPortrait) {
self.view = self.portrait;self.view.transform = CGAffineTransformIdentity;self.view.transform =CGAffineTransformMakeRotation(degreesToRadians(0));self.view.bounds = CGRectMake(0.0, 0.0, 320.0, 460.0);
} else if (interfaceOrientation == UIInterfaceOrientationLandscapeLeft) {
self.view = self.landscape;self.view.transform = CGAffineTransformIdentity;self.view.transform =CGAffineTransformMakeRotation(degreesToRadians(-90));self.view.bounds = CGRectMake(0.0, 0.0, 480.0, 300.0);
}// rest of the method is in book…
we change the view and size based on the orientation


