
03 kg
2526
2627
28
J+E
DETALHAMENTO INTERNO
PASSO 1
PASSO 2
REF.8420 GR ADVANCED
R
04PÇS
F
06PÇS
Prepare as peças 07 utilizando as ferragens (M,G,R e H)Prepare as peças 12 utilizando as ferragens (F e R).
D
10PÇS
18PÇS
G
08PÇS
J
29
LISTA DE ACESSÓRIOS E FERRAGEM
Nº TEKA MAT.
PRIMA QTDE
MDPMDPMDPMDPMDPMDPMDPMDPMDPMDPMDPMDPMDPMDPMDPMDPMDPMDPMDPMDPMDPMDPMDPMDPMDPMDPMDP
DURATDURAT
010202040202010101010101010101010101010102020203020402025
MEDIDAS
2180x360x12300x88x12300x88x12300x300x12360x300x12300x88x122180x448x121355x448x12900x395x121355x360x121355x448x12680x395x121606x88x122068x88x12395x445x121355x88x121355x88x122180x448x122180x360x12364x88x12360x300x12300x300x121994x302x152080x452x15442x200x12350x100x12400x88x12424x355x32005x414x3
0102030405060708091011121314151617181920212223242526272829
CEDRO
8420.788420.66
CRU8420.788420.788420.668420.788420.788420.788420.788420.788420.788420.788420.788420.78
CRU8420.668420.788420.78
CRU8420.788420.788420.788420.788420.788420.068420.068420.438420.43
8420.828420.79
CRU8420.828420.828420.798420.828420.828420.828420.828420.828420.828420.828420.828420.82
CRU8420.798420.828420.82
CRU8420.828420.828420.828420.828420.828420.068420.068420.438420.43
DESCRIÇÃO DA PEÇA / Description / Descripción
LISTA DE PEÇAS / Pieces List / Lista de Piezas
ACCESSORIES AND HARDWARE / ACCESORIOS Y EQUIPOS
TABELA COR DESCRIÇÃO CÓDIGO
CDTKBRCD INTBRTK INTBRFL
CEDROTEKABRANCOCEDRO INT.BRANCOTEKA INTERNABRANCOFLORAL
79660682
78
43
INSTRUÇÃO MONTAGEM PRODUTO CUIDADO PARA CONSERVAÇÃO E LIMPEZA DO MÓVEL
Não molhar o móvel e não expor em lugar úmido
O peso máximo de carga informado refere-se a objetos distribuido de maneira uniforme sobre toda área de contato da peça
kg
12
34
56
Separe as peças e acessórios de maneira organizada
Não expor o móvel próximo de fontes de calor.
Não usar produtos abrasivos.
Limpe com flanela limpa e seca.
Intructions to Assembly / Instrucciones de montaje Care to conservation and clean / Cuidados de limpieza
Separate parts and accessories in way organized Separe las piezas y accesorios de manera organizada
Forrar o chão com o papelão das embalagens.
Cover the floor with the cardboard
Cubra el suelo con la embalaje de cartón
É necessário 02 pessoa para montar o produto It is necessary one person to assembly
És necesário una persona para asamblar
Set maximum weight load refers to objects distributed uniformly over the entire contact area of the workpiece.
Conjunto de carga máxima de peso se refiere a objetos distribuidos uniformemente sobre toda el área de contacto de la pieza de trabajo.
Do not wet the mobile and do not expose in a wet place
No moje el producto y no exponer en un lugar húmedo
Do not expose the mobile near heat sources no exponga cercano de fuentes de calor
No utilice productos abrasivos.
Do not use abrasive products.
Clean with dry cloth
Limpieza con un paño limpio y seco
DETALHAMENTO EXTERNO DETALHAMENTO INTERNO Outer detail / Detalle externo Inside detail / Detalle interno
H
04PÇS
P
05PÇS
COLOR/COLORES DESCRIPTION/DESCRIPCIONCODE/CODIGO
CEDARTEAKWHITECEDAR WITHWHITETEAK WITHWHITE FLORAL
CEDROTECABLANCOCEDRO INT.BLANCOTECA INTERNABLANCOFLORAL
LATERAL ESQUERDARODAPÉ LATERAL FRONTALRODAPÉ LATERAL TRASEIROPRATELEIRACHAPÉU LATERALVISTA LATERAL FRONTALDIVISÓRIA ESQUERDABASETAMPO GAVETEIROBASE MALEIROCHAPÉUDIVISÓRIA GAVETABATENTE TRASEIROBATENTE FRONTALPRATELEIRA CENTRALRODAPÉ TRASEIRO CENTRALRODAPÉ FRONTAL CENTRALDIVISÓRIA DIREITALATERAL DIREITATRAVA RODAPÉBASE LATERAL MÓVELPRATELEIRA MÓVELPORTA LATERALPORTA CENTRALFRENTE GAVETALATERAL GAVETACONTRA FUNDOFUNDO GAVETAFUNDO
TEAK/TECA CEDAR/CEDRORAW MATERIAL MEASURES QTTY
STEP 1 PASO 1
PASSO 3
M
04PÇS
O produto deve ser a montado por um profissional qualificadoThe product must be assembly by a professionalEl producto debe ser assemblado por un professinal calificado
Ferramentas necessárias (não fornecidas)
Not include tools / No herramientas
B
09PÇS
R
M
H
H
G
G
DICA:Ordem de fixação das corrediças M+G e R+H.
Tip: slider fix order: M + G & R + HOrden para fijar las correderas M + G & R + H
07
12
24 23
29
29
29
29
232324 24 24
02
21 08
17
12
25
250401
07 07
13 14
15
18
2102
04
2222
10
110605
0605
0404
Parafuso -4,5x20Screw / Tornillo
D
Prego - 10x10Nail / Clavo
I
90PÇS
Cavilha - 6x30 madeiraDowel / Clavija
Parafuso 4,5x45Screw / Tornillo
A
08PÇS 10PÇS
C
02PÇS
Puxador 320mm Handle / Manija
R
F
50PÇS
Parafuso -3,5x12Screw / Tornillo
E
74PÇS
Parafuso -3,0x12Screw / Tornillo
Dobradiça metalHinge / Bisagra
J
18PÇS
Cantoneira Corner / Esquinero
O
01PÇ
QSache cola 20gGlue / Goma
10PÇS
18PÇS
05PÇS
P
13PÇS
Kit corrediça 350 mm metalSlider / Correderal
01PÇ
Kit Pé PVCFoot kit / kit piés
T
78PÇS
B
G
08PÇS
Parafuso -4,0x14Screw / Tornillo
H
04PÇS
Suporte prateleira plásticoShelf support / estante
04PÇS
MK
Suporte U - AbertoOppened support / soporte abierto
04PÇS 08PÇS
L
04PÇS
DistanciadorSpacer / Espaciador
UBastão de alumínio 400mmStick / Bate
01PÇ
S Bastão de alumínio 1350mmStick / bate
Perfil H 1980mm Frame / perfilo
N
01PÇ
V LogomarcaLogo
Parafuso -6,0x12Screw / Tornillo
Parafuso -3,5x28Screw / Tornillo
W
01PÇ
Prepare as peças 23 e 24 utilizando as ferragens (J,E,Pe D).
E
36PÇS
Fixar as peças 02,03,04,05 e 06 na peça 01 utilizando ferragem (B).
01
04
03
04
05
06
02
Fixar a peça 07 nas peças 2,3,4,5 e 6 utilizando ferragem (B).
09
19
R
F
Colocar 3º parafuso no furo oblongo da corrediça.Put the 3rd screw in the sliderPonga el tercer tornillo en lacorredera
F
F
R
P
D
D
D
D
P
05
06
04
04
02
03
07
B
B
BB
BB
B
B
B
BB
B
B
B
B
B
B
09PÇS
Repetir o processo por três vezesRepeat the process 3 timesRepita 3 veces el proceso
Repetir o processo por duas vezesRepeat 2 timesRepita 2 veces
Suporte U - Fechadou Support / U soporte
WARDROBE / ROPERO
LEFT SIDEFRONT SIDE SHAPEBACK SIDE SHAPESHELFSIDE HATFRONT SIDE VIEWLEFT DIVISIONBASEDRAWER COVERLUGGAGE BASEHATDIVISORY DRAWERBACK FRAMEFRONT FRAMECENTRAL SHELFCENTRAL BACK SHAPECENTRAL FRONT SHAPERIGHT DIVISIONRIGHT SIDELOCKOUTMOBILE SIDE BASEMOBILE SHELFSIDE DOORCENTRAL DOORDRAWER FRONTSIDE DRAWERBACKGROUNDDRAWER BACKGROUNDBACKGROUND
LADO IZQUIERDOZOCALO LATERAL FRONTALZOCALO LATERAL TRAZEROREPISATOPO LATERALVISTA LATERAL FRONTALREPISA IZQUIERDABASETAMPO CAJONERABASE MALETEROTOPOREPARTO DE CAJONCUADRO TRAZEROCUADRO DELANTEROREPISA CENTRALZOCALO TRAZERO CENTRALZOCALO DELANTERO CENTRALREPARTO DE DERECHALADO DERECHOLOCK ZOCALOBASE LATERALL MOVILREPISA MÓVILPUERTA LATERALPUERTA CENTRALFRENTE CAJÓNCAJÓN LATERALCONTTAFONDOFONDO DE CAJÓNFONDO
Prepare the piece 7 using the tools (M,G,R & H).Prepare rhe pieces 12 using the tools (F & R)Prepare the pieces 23,24 using (J,E,P & D)
Prepare la pieza 7 usando (M,G,R & H).Prepare la pieza 12 usando (F & R)Prepare las piezas 23,24 usando (J,E,P & D)
STEP 2
PASO 2
Fix the 02,03,04,05 & 06 iin the 01 using (B).
Fije las 02,03,04,05 y 06 en la 01 usando (B).
STEP 3
PASO 3
Fix the 07 in the 2,3,4,5 & 6 using (B).
Fije la 07 en las 2,3,4,5 y 6 usando (B).
PASSO 5
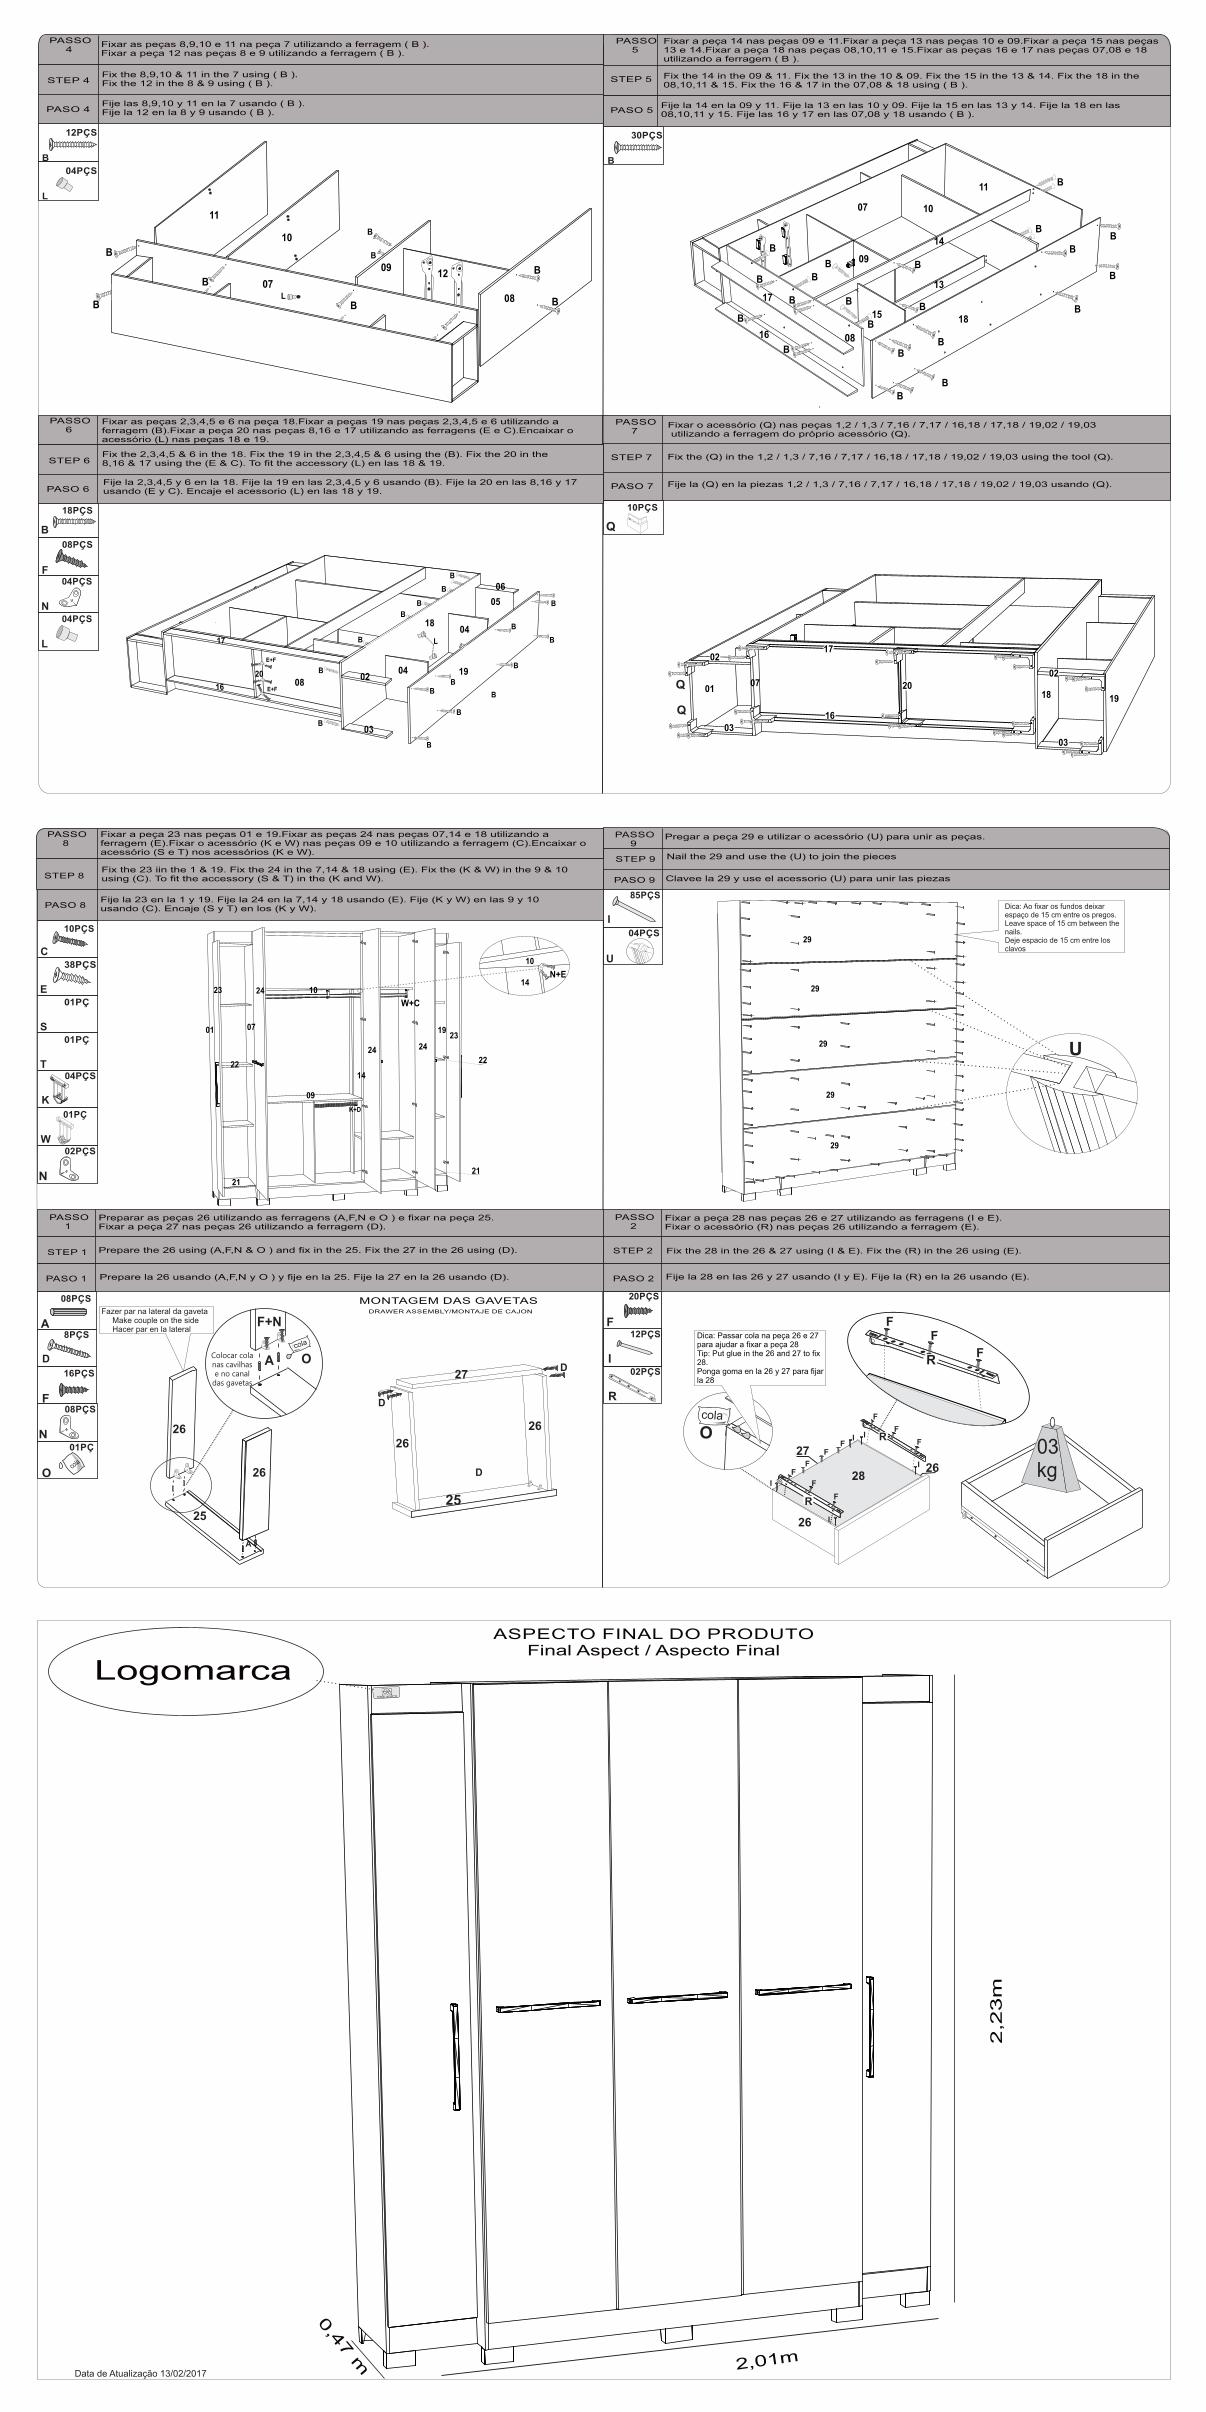
ASPECTO FINAL DO PRODUTO Final Aspect / Aspecto Final
Fixar a peça 14 nas peças 09 e 11.Fixar a peça 13 nas peças 10 e 09.Fixar a peça 15 nas peças 13 e 14.Fixar a peça 18 nas peças 08,10,11 e 15.Fixar as peças 16 e 17 nas peças 07,08 e 18 utilizando a ferragem ( B ).
PASSO 6
PASSO 7
PASSO 8
PASSO 2
Fixar a peça 23 nas peças 01 e 19.Fixar as peças 24 nas peças 07,14 e 18 utilizando a ferragem (E).Fixar o acessório (K e W) nas peças 09 e 10 utilizando a ferragem (C).Encaixar o acessório (S e T) nos acessórios (K e W).
Data de Atualização 13/02/2017
PASSO 1
PASSO 9
MONTAGEM DAS GAVETAS
Pregar a peça 29 e utilizar o acessório (U) para unir as peças.
F
20PÇS
Preparar as peças 26 utilizando as ferragens (A,F,N e O ) e fixar na peça 25.Fixar a peça 27 nas peças 26 utilizando a ferragem (D).
O
D
8PÇSA
08PÇS
Colocar colanas cavilhase no canal
das gavetas
cola
A O
A
26
25
F+N
D
D
D
Fixar a peça 28 nas peças 26 e 27 utilizando as ferragens (I e E). Fixar o acessório (R) nas peças 26 utilizando a ferragem (E).
I
12PÇS
R
02PÇS
PASSO 4
B
12PÇS
N
04PÇS
F
16PÇS
W
01PÇ
I
85PÇS
Fixar as peças 2,3,4,5 e 6 na peça 18.Fixar a peças 19 nas peças 2,3,4,5 e 6 utilizando a ferragem (B).Fixar a peça 20 nas peças 8,16 e 17 utilizando as ferragens (E e C).Encaixar o acessório (L) nas peças 18 e 19.
N
08PÇS
01PÇ
Logomarca
26
26
26
25
27
Fixar as peças 8,9,10 e 11 na peça 7 utilizando a ferragem ( B ).Fixar a peça 12 nas peças 8 e 9 utilizando a ferragem ( B ).
B
30PÇS
Q
10PÇS
04PÇS
U
STEP 9
PASO 9
DRAWER ASSEMBLY/MONTAJE DE CAJON
STEP 1
PASO 1
STEP 2
PASO 2
B
18PÇS
F
08PÇS
10
11
0912
08
07
1920
03
0204
04
05
06
Dica: Ao fixar os fundos deixar espaço de 15 cm entre os pregos.Leave space of 15 cm between thenails.Deje espacio de 15 cm entre losclavos
29
29
29
29
29
21
2222
21
2,2
3m
2,01m
0,4
7 m
K
04PÇS
C
10PÇS
08
17
16
B
B
LB
B
B
B
B
B
B
B
B
B
B
B
E+F
E+F
Fixar o acessório (Q) nas peças 1,2 / 1,3 / 7,16 / 7,17 / 16,18 / 17,18 / 19,02 / 19,03 utilizando a ferragem do próprio acessório (Q).
Q
Q
38PÇS
1024
0701
23
14
24 24
2319
U
K+D
W+C
L
04PÇS
B
B
B
14
13
15 18
11
10
BB
B
B
B
B
B
B
B
B
B
B
B
B
B
09
08
B
17
16
B
B
B
B
B
07
18
L
B
B
B
B
B
B
B
B
B
L
04PÇS
0107
18 19
02
03
16
17
20
02
03
E
09
01PÇ
S01PÇ
T
N+E
N
02PÇS
F
R
F
F
F
F
I
F
F
F
F
F
26
26
R
R
28
27 03kg
I
I
I
I
cola
Dica: Passar cola na peça 26 e 27 para ajudar a fixar a peça 28Tip: Put glue in the 26 and 27 to fix28.Ponga goma en la 26 y 27 para fijarla 28
O
Fazer par na lateral da gavetaMake couple on the sideHacer par en la lateral
F
F
10
14
STEP 4
PASO 4
Fix the 8,9,10 & 11 in the 7 using ( B ).Fix the 12 in the 8 & 9 using ( B ).
Fije las 8,9,10 y 11 en la 7 usando ( B ).Fije la 12 en la 8 y 9 usando ( B ).
STEP 5
PASO 5
Fix the 14 in the 09 & 11. Fix the 13 in the 10 & 09. Fix the 15 in the 13 & 14. Fix the 18 in the 08,10,11 & 15. Fix the 16 & 17 in the 07,08 & 18 using ( B ).
Fije la 14 en la 09 y 11. Fije la 13 en las 10 y 09. Fije la 15 en las 13 y 14. Fije la 18 en las 08,10,11 y 15. Fije las 16 y 17 en las 07,08 y 18 usando ( B ).
STEP 6
PASO 6
Fix the 2,3,4,5 & 6 in the 18. Fix the 19 in the 2,3,4,5 & 6 using the (B). Fix the 20 in the 8,16 & 17 using the (E & C). To fit the accessory (L) en las 18 & 19.
Fije la 2,3,4,5 y 6 en la 18. Fije la 19 en las 2,3,4,5 y 6 usando (B). Fije la 20 en las 8,16 y 17usando (E y C). Encaje el acessorio (L) en las 18 y 19.
STEP 7
PASO 7
Fix the (Q) in the 1,2 / 1,3 / 7,16 / 7,17 / 16,18 / 17,18 / 19,02 / 19,03 using the tool (Q).
Fije la (Q) en la piezas 1,2 / 1,3 / 7,16 / 7,17 / 16,18 / 17,18 / 19,02 / 19,03 usando (Q).
STEP 8
PASO 8
Fix the 23 iin the 1 & 19. Fix the 24 in the 7,14 & 18 using (E). Fix the (K & W) in the 9 & 10using (C). To fit the accessory (S & T) in the (K and W).
Fije la 23 en la 1 y 19. Fije la 24 en la 7,14 y 18 usando (E). Fije (K y W) en las 9 y 10usando (C). Encaje (S y T) en los (K y W).
Nail the 29 and use the (U) to join the pieces
Clavee la 29 y use el acessorio (U) para unir las piezas
Prepare the 26 using (A,F,N & O ) and fix in the 25. Fix the 27 in the 26 using (D).
Prepare la 26 usando (A,F,N y O ) y fije en la 25. Fije la 27 en la 26 usando (D).
Fix the 28 in the 26 & 27 using (I & E). Fix the (R) in the 26 using (E).
Fije la 28 en las 26 y 27 usando (I y E). Fije la (R) en la 26 usando (E).


