
v.1.0
Ultracom for Android (2.X.X >)
Printable user manual

2
Table of contents
1. General...................................................................................................................................................................................................................................... 3
1.1 General info .................................................................................................................................................................................................................... 3
1.2 Ultracom subscription and additional services ............................................................................................................................................................... 3
1.3. Operator settings ........................................................................................................................................................................................................... 3
1.4. Appstore and mobile device requirements .................................................................................................................................................................... 3
2. Downloading the application .................................................................................................................................................................................................... 4
3. Registering the application........................................................................................................................................................................................................ 4
4. Ordering and activating a subscription...................................................................................................................................................................................... 4
5. Adding a tracking device to the application .............................................................................................................................................................................. 5
5.1. Device search ................................................................................................................................................................................................................. 5
5.2. Ultracom R10 ................................................................................................................................................................................................................. 5
5.3. Dog-GPS/Novus .............................................................................................................................................................................................................. 6
5.4. Ultracom application ...................................................................................................................................................................................................... 7
5.5. Avius ............................................................................................................................................................................................................................... 8
5.6. Avius SEARCH ................................................................................................................................................................................................................. 9
5.7. Tracker LIVE .................................................................................................................................................................................................................... 9
6. Map view................................................................................................................................................................................................................................. 10
6.1. Top menu and icons ..................................................................................................................................................................................................... 11
6.2. Bottom menu and icons ............................................................................................................................................................................................... 11
7. Locating the device and application ........................................................................................................................................................................................ 12
7.1. Menus and changing the tracking interval on Ultracom R10, Dog-GPS and Novus ...................................................................................................... 12
7.2. Menus and changing the tracking interval on Ultracom Avius ..................................................................................................................................... 13
7.3. Ultracom application and Tracker/ Pointer device menu ............................................................................................................................................. 13
7.4. Other device specific selections ................................................................................................................................................................................... 13
8. Main menu functions .............................................................................................................................................................................................................. 15
8.1. Devices and adding a device ......................................................................................................................................................................................... 16
8.2. Recently used devices .................................................................................................................................................................................................. 16
8.3. Landmarks and map tools ............................................................................................................................................................................................ 16
8.4. Drawing collections ...................................................................................................................................................................................................... 17
8.5. Application settings ...................................................................................................................................................................................................... 17
8.7. Order/ activate -function ............................................................................................................................................................................................. 19
8.8. About application ......................................................................................................................................................................................................... 19
9. Other functions ....................................................................................................................................................................................................................... 19
9.1. Reset AviusLINK (host device Bluetooth release) ......................................................................................................................................................... 19
9.2. Ultracom R10 factory reset .......................................................................................................................................................................................... 19
9.3. Transferring the app to another mobile device ............................................................................................................................................................ 20
9.4. Changing Ultracom Novus and Dog-GPS main user ...................................................................................................................................................... 20
9.5. Device list filtering (favorites, active devices etc.) ........................................................................................................................................................ 20
9.6. Backing up and restoring device and markings list ....................................................................................................................................................... 21
9.7. Editing and deleting devices from the device list ......................................................................................................................................................... 21
9.8. Adding a demo ............................................................................................................................................................................................................. 21

3
1. General
1.1 General info
Some features and functions may differ depending on the operating system, software version,
country of use and the used mobile/tracking device.
The user manual may contain errors and is subject to change at any time.
You may consult our technical service for support: [email protected]
This user manual is updated on August 30th, 2018.
1.2 Ultracom subscription and additional services
Ultracom subscription: There are three different types of Ultracom subscriptions available
for the application: 1 month, 3 months and 12 months. Without a valid subscription you can
use the map, track AVIUS device, track GSM/GPS based devices with SMS and locate your
own position.
Server functions, like sharing your location or the positioning data of your devices are not
available without a valid subscription.
Tracker/ Pointer cross tracking: Tracker- and Pointer- device cross tracking via data.
Cross tracking requires an active Ultracom subscription.
1.3. Operator settings
The mobile subscription used for the mobile device must be able to use data and SMS-
messages. Please check the suitability of your mobile subscription from your operator. If a prepaid SIM -card is used, please check that there is enough paid balance on the SIM -card.
1.4. Appstore and mobile device requirements
A valid Google account is required to download the application. Mobile devices user manual, or the mobile device manufacturer will advise you about creating a Google account.
After installation the application is an unregistered version and it must be registed. Application is registered and locked to the user’s mobile phone number. The application can
be transferred to another phone number if necessary.
Minimum required Android version is 4.0 Ice Cream Sandwich. Ultracom Avius VHF-tracking device requires Bluetooth Low Energy (BLE) support from the
mobile device and also minimum Android version of 5.0 Lollipop.

4
2. Downloading the application
1. Open the Google Play Store on your mobile device.
2. In the search field type Ultracom and click “search”.
3. Tap Ultracom -icon on the list.
4. Tap “Install”. Read and accept the terms of use by tapping “Accept’”.
5. Your mobile device will download and install the application automatically.
6. Click “Open” or find the application icon on the mobile device application list and start
the application.
3. Registering the application
1. Application will ask your permission to use the phones functions. Allow all the
permissions that the application request. The application will be registered to your
mobile phone number. When the application prompts for registration, select “Yes”.
2. Select the region where application will be used and enter the mobile phone number
(number must be the same where the application will be used)
3. Accept the terms and conditions, tap “Register” on the bottom of the screen.
4. To complete your registration the application requests you to enter the security code
that was sent to you by SMS. Enter the security code and finalize the registration by
tapping “Confirm”.
5. Application will inform that your registration is complete. To confirm this, tap ’OK’
6. The application will change to a map view and you can start using the application.
If you skipped the registration, the application will ask you to registrate every time you start
using the application. Unregistered application will function with limited features.
Registered application will have a free subscription for two weeks. After the free period, you
can make a subscribtion directly in the application, at an authorized Ultracom retailer or in
Ultracom webshop. For more information on ordering and activating subscriptions. For more
info see chapter 4.
4. Ordering and activating a subscription
A subscription can be purchased directly in the application, from your retailer or you can buy
a subscription in the Ultracom webshop.
Tap the “UC”-icon on the upper left corner of the map view to open the main menu. Select
“Order/Activate” on the main menu.
Select “order method” from the drop-down menu:
- Activation code: enter the activation code from your subscription card. The card will
redeem you the the subscription indicated on the card (1 month, 3 months or 12
months).
- Order an invoice by SMS: select the product in the drop-down menu. After selection,
tap “Proceed” and you will receive payment instructions via SMS. After your payment,
the service will be activated after 1-3 bank days.

5
- Pay now online: select the product in the drop-down menu. After selection, tap
“Proceed” and the application will transfer you to the mobile payment website. You will
find more information of the payment methods on the site.
5. Adding a tracking device to the application
At first make sure that the trackin device has been set-up according to the user manual of
the device.
The following device options are available in the application:
5.1. Device search
Open the main menu on the top left corner by tapping on the “UC”-icon. Select “Add device…”
on the menu. On the device type menu, select “Device search”.
You may search the device by device ID or by telephone number. This function is supported
by Ultracom R10, Novus and Dog-GPS. Novus and Dog-GPS can be found with device search -
function only if the device has sent location data to the server (you are tracking a friend’s
device).
With Ultracom R10 when you enter the device ID on to the field and tap “Search”, if it is the
first-time-use of the device the password will not be asked. However, if the device has been
used before and you are adding your friend’s R10, the application will ask for device
password.
5.2. Ultracom R10
Open the main menu on the top left corner by tapping on the “UC”-icon. Select “Add device…”
and from the list select “Ultracom R10”.
Enter the Device ID -number to the indicated field and tap “search”. If the device is added for
the first time, the application will not ask you for a password. If the device has been in use
before and you are adding a friends R10 device, then the application will ask for the
password. You will find the device’s ID -number on the first page of the R10 user manual or
under the collar part of the device on a sticker.
When adding the device for the first time, the application will ask you to input information on
the device.
Details information fields are:
o Name: you can enter a name for the device. Tap on the field and write a name
for your device.
o Icon: you can select an icon for the device. To find more icon options, tap on
the icon.
o Master Password: you can define a master password for the device. If a user
knows the ID number and the master password, he may change the tracking
interval and other settings of the device. However, in the master-level you the
user cannot add, delete or change the device admins. Admin user is the owner
of the device who is fully entitled to all functions of the device. The first admin is
the user that first adds the R10 device to the application.

6
o Visitor Password: you can define a visitor password for the device. If a user
knows the ID number and the visitor password, the user may track the device,
but not change any of the device settings.
Optional information fields are:
o Tel. number: you can enter the telephone number of the device. This will
enable the call function (bark listening) for the device. Note that if your device
came with the Ultracom GlobalSIM, the SIM-card number can be found on the
first page of the user manual. The Ultracom GlobalSIM number is input in the
+45 format.
o Visible: selected mode defines if the device is shown on the map. This option is
useful if you wish to remove the device temporarily from the map view.
o Color of the route – selection defines the color of the route.
o Barklimit: number defines how many barks the bark calculator must register
before the device will interpret that the dog is barking. Too high barklimit may
cause a situation where the device is not reacting quickly enough to a dog bark.
Too low barklimit may cause a situation where the device is too sensitive to
barks and ground vegetation touching the collar may be interpreted as barking.
Standard setting (2) is the recommended setting.
o Track size: the number defines how many waypoints will be drawn on the map.
If you enter a greater figure the pathline will be drawn from a longer period and
when the figure is smaller the pathline will be from a shorter time.
o Favorite: you can select your device to be a favorite on the devices list. Devices
can be filtered according to the favourites, activity etc.
Admin info fields are:
o Admin phone 1,2 and 3: you can add up to two other admin users for the
device. Admin user can always call the device (if the phone number has been
defined). Admin user can also add more admins and change all the settings on
the device. Admin user is usually the owner of the device.
When you have entered all the required data, tap “Save” on the top of the screen. Application
will return to devices view. Return to the map view and tap on the red “Paw”-icon on the
lower left part of the map view.
5.3. Dog-GPS/Novus
Open the main menu on the top left corner by tapping on the “UC”-icon. Select “Add device…”
and select “Dog-GPS/Device” on the list.
Details information fields are:
o Type: device type (device type is already defined).
o Phone: enter the device’s mobile phone number in an international format.
o Password: give the device a preferred password.
o Name: give the device a preferred name.
o Icon: Set an icon for the device. You may browse the icons by tapping the icon.

7
Optional information fields are:
o Visible: selected mode defines if the device is shown on the map. This option is
useful if you wish to remove the device temporarily from the map view.
o Tracking mode: defines the standard mode of operation, when in the map view
the ’paw’ icon is tapped. With “Data” -option an extra single data tracking
location request is made. With “SMS” -option one text message location is made.
o Color of the route – selection defines the color of the route.
o Barklimit: number defines how many barks the bark calculator must register
before the device will interpret that the dog is barking. Too high barklimit may
cause a situation where the device is not reacting quickly enough to a dog bark.
Too low barklimit may cause a situation where the device is too sensitive to
barks and ground vegetation touching the collar may be interpreted as barking.
Standard setting (5) is the recommended setting.
o Track size: the number defines how many waypoints will be drawn on the map.
If you enter a greater figure the pathline will be drawn from a longer period and
when the figure is smaller the pathline will be from a shorter time period.
o Favorite: you can select your device to be a favorite on the devices list. Devices
can be filtered according to the favourites, activity etc.
When you have entered all the required information, tap “Save” on the top of the screen.
Application will ask you to define the access point name (APN). If you are adding your friend’s
tracking device select “Cancel”. If you are adding your own device select “Set APN”.
In the opening view, tap on the “select network” selection and choose the operator of the
SIM-card of your tracking device. If you can’t find the correct operator, you can always write
the operator APN on the area that is under the selection menu.
Send the settings to the device by tapping on the “Send request” selection. Application will
return to “Devices” -view. Go back in the map view by tapping the added device.
The application will confirm the access point name to be changed and the device tracking will
start.
5.4. Ultracom application
Open the main menu on the top left corner by tapping on the “UC”-icon. Select “Add device…”
and select “Application” on the list.
Details information fields are:
o Type: device type is selected automatically (Ultracom application)
o Phone number: enter the telephone number of the application to be tracked in
an international format.
o Name: write a descriptive name for the application that you are going to track.
o Icon: select an icon for the application to be tracked. You may browse the icons
by tapping on the icon.
Optional information fields are:
o Visible: selected mode defines if the tracked application is shown on the map.
This option is useful if you wish to remove the tracked application temporarily
from the map view.
8
o Color of the route – selection defines the color of the route.
o Track size: the number defines how many waypoints will be drawn on the map.
If you enter a greater figure the pathline will be drawn from a longer period and
when the figure is smaller the pathline will be from a shorter time.
o Favorite: you can select that the application you are adding to be a favorite on
the devices list. Devices can be filtered according to the favourites, activity etc.
When all the required information is added, tap “Save” on the top right corner.
Application will return to the device list. Return to the map view and the application you are
tracking appears on the map.
5.5. Avius
Open the main menu on the top left corner by tapping on the “UC”-icon. Select “Add device…”
and select “Avius” on the list.
Details information fields are:
o Type: device type is automatically selected (Avius)
o Device ID: enter the device ID number of your Avius collar. You can find the
device ID from the Avius user manual’s first page or under the collar part of the
Avius by sliding the collar part off from the device.
o Name: write a name for the device to be tracked
o Icon: select an icon for the device to be tracked. You can tap the icon and
browse by swiping the icons.
o Device password: when adding a new Avius device, the password should be
left as default (0000). You can change the password later from the info-menu.
Optional information fields are:
o Visible: selected mode defines if the device is shown on the map. This option is
useful if you wish to remove the device temporarily from the map view.
o Color of the route – selection defines the color of the route.
o Barklimit: number defines how many barks the bark calculator must register
before the device will interpret that the dog is barking. Too high barklimit may
cause a situation where the device is not reacting quickly enough to a dog bark.
Too low barklimit may cause a situation where the device is too sensitive to
barks and ground vegetation touching the collar may be interpreted as barking.
Standard setting (5) is the recommended setting.
o Track size: the number defines how many waypoints will be drawn on the map.
If you enter a greater figure the pathline will be drawn from a longer period and
when the figure is smaller the pathline will be from a shorter time.
o Favorite: you can select your device to be a favorite on the devices list. Devices
can be filtered according to the favourites, activity etc.
When you have entered the required information, tap on the “save” button on the top right
corner of the screen.
The application will return to the “Devices” view. Return on the map view by tapping on the
“Back” button.

9
When adding the host device for the first time, the application will ask if you have Avius host
device in use. Select ’Yes’ and the mobile device will ask for a permission to make a Bluetooth
connection. Select ’Yes’ and the application will look for the Avius host devices nearby. When
the application finds your Avius host device, select it from the list. If the application does not
open automatically the host device search, you can start search by selecting “AviusLink”
(small Avius host device icon, more information can be found on chapter 6.1)
Note! Device pairing should be done with no other Avius host devices in use nearby!
Accept the Bluetooth connection request by clicking “ok”. Connection is made between the
mobile phone and the Avius host device.
If you wish to share the tracking information, turn the device tracking on by tapping on the
“Tracking on/off”-icon (see more information in chapter 6.1.). When the tracking is on, the
tracking information will be sent to the server where other users who know the device’s ID
number and password can track the device in 30 sec. interval.
AviusLINK can be turned off and on by tapping “AviusLINK” -icon.
5.6. Avius SEARCH
Open the main menu on the top left corner by tapping on the “UC”-icon. Select “Add
device…”. Select “AviusSEARCH” on the list. Set the Avius collar and the Avius host device
next to each other so that the antennas on the devices cross each other. Application will ask
the name of the Avius device to be added. Enter the name and tap “Start” from the top right
corner.
Application will start an Avius host device search. Application will ask a permission to use the
mobile phone Bluetooth connection. Tap “Accept” and the application will start to search
Avius host devices nearby. Select your Avius host device on the list.
Application will add the device on the “Devices” -list. Device will be added with standard
settings.
Note! Device pairing should be done with no other Avius host devices in use nearby!
If you wish to share the tracking information, turn the device tracking on by tapping on the
“Tracking on/off”-icon (see more information can be found on chapter 6.1.). When the
tracking is on, the tracking information will be sent to the server where other users who know
the device’s ID number and password can track the device in 30 sec. interval.
Check the other Avius settings and options and their definitions in chapter 5.5.
5.7. Tracker LIVE
Open the main menu on the top left corner by tapping on the “UC”-icon. Select “Add device…”
and select “TrackerLive” on the list.
Details information fields are:
o Type: defaut setting is Tracker LIVE.
o Share name: enter the device share name. Ask the share name from the
Tracker or Pointer device owner.
o Name: write a name for the device to be tracked.

10
o Icon: select an icon for the device to be tracked. You can click the icon and
browse by swiping the icons.
o Viewer password: give the device a viewer’s password. You will get the
password from the device owner.
Optional information fields are:
o Visible: selected mode defines if the device is shown on the map. This option is
useful if you wish to remove the device temporarily from the map view.
o Color of the route – selection defines the color of the route.
o Barklimit: number defines how many barks the bark calculator must register
before the device will interpret that the dog is barking. Too high barklimit may
cause a situation where the device is not reacting quickly enough to a dog bark.
Too low barklimit may cause a situation where the device is too sensitive to
barks and ground vegetation touching the collar may be interpreted as barking.
Standard setting (5) is the recommended setting.
o Track size: the number defines how many waypoints will be drawn on the map.
If you enter a greater figure the pathline will be drawn from a longer period and
when the figure is smaller the pathline will be from a shorter time.
o Favourite: here the device can be defined as a favourite. Devices and
applications can be filtered in the list by popularity, activity etc
When you have entered the required information, tap on top right corner on the “Save”
selection. The application will return to “Devices” view. Return to the map view from the
upper left corner.
Application will search for the added device from the Tracker server. Device should be found
in about one-minute. If a notice “Device not found” appears after one minute, check the
settings and make sure the device is turned on.
6. Map view
In application map view you can see the devices location,
route and you can modify the general settings of the
device.
- To move the map, drag your finger in the direction
you want to move the map.
- To zoom in and zoom out pinch two of your fingers
together or spread your fingers apart.
Note! Only the active devices are shown on the map view.
The upper right corner of the screen shows the metric
amount between the indicated markers. By tapping the red
arrow on the right side of the screen you select different
map scales.

11
6.1. Top menu and icons
On the top left side of the screen is the main menu button. Main menu is opened by tapping
on the “UC” icon.
AviusLINK on/ off: this option will turn the AviusLINK on. Avius link is required to
establish a Bluetooth contact with the Avius host device.
Tracking on/off: this option turns the tracking on, on the GSM- based devices
(R10, Novus, Dog-GPS). This also turns on the Avius location sharing.
Own location on/off: turn your own location on. User’s location status is
shown on the lower right corner of the screen with its own icon. When own location
is set on, your travelled distance and speed appear on the top bar of the map view.
All of the symbol colors are the following:
- Grey, function is off
- Yellow, function is starting up or the desired function cannot be finalized
without user’s action (for example mobile device GPS receiver is off, server
connection is not available, device’s GPS is not on or Avius host device is off.
- Green, connection is on and the function in use
6.2. Bottom menu and icons
In the applications bottom menu you find the controlling options for the device.
You can lock the tracking for the device by tapping on the “paw” -icon. A small
white lock appears inside the paw to indicate that the map view is locked to the
selected device. You can unlock the view by moving the map with your finger to
any direction.
In the middle of the bottom menu is the device name and on the right side is the speed of the
device, time of the latest tracking information (hours, minutes and seconds from last received
location update) and your own, or the cursor’s distance from the selected device. When the
dog starts to bark, then the bark calculator’s information is also shown on the bottom bar.
12
By tapping on the bottom bar, you can see the the quick-functions and settings of the
selected device. You find more information of the device specific selections starting from
chapter 7.
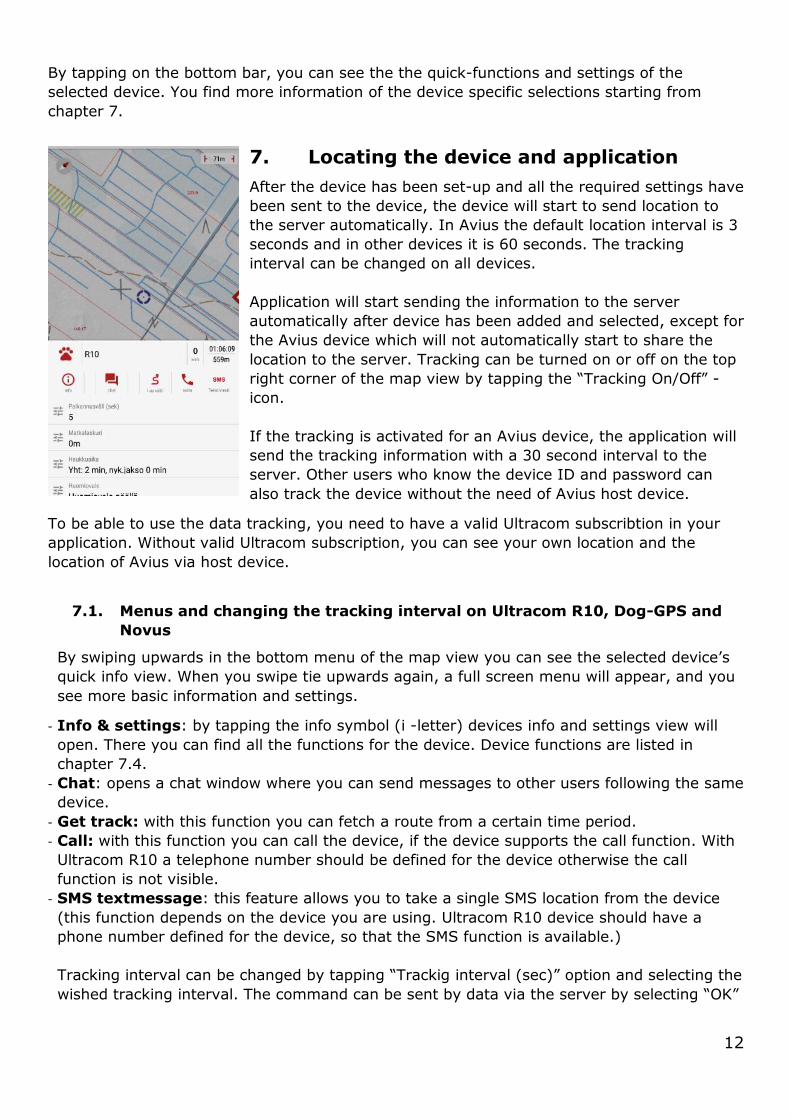
7. Locating the device and application
After the device has been set-up and all the required settings have
been sent to the device, the device will start to send location to
the server automatically. In Avius the default location interval is 3
seconds and in other devices it is 60 seconds. The tracking
interval can be changed on all devices.
Application will start sending the information to the server
automatically after device has been added and selected, except for
the Avius device which will not automatically start to share the
location to the server. Tracking can be turned on or off on the top
right corner of the map view by tapping the “Tracking On/Off” -
icon.
If the tracking is activated for an Avius device, the application will
send the tracking information with a 30 second interval to the
server. Other users who know the device ID and password can
also track the device without the need of Avius host device.
To be able to use the data tracking, you need to have a valid Ultracom subscribtion in your
application. Without valid Ultracom subscription, you can see your own location and the
location of Avius via host device.
7.1. Menus and changing the tracking interval on Ultracom R10, Dog-GPS and
Novus
By swiping upwards in the bottom menu of the map view you can see the selected device’s
quick info view. When you swipe tie upwards again, a full screen menu will appear, and you
see more basic information and settings.
- Info & settings: by tapping the info symbol (i -letter) devices info and settings view will
open. There you can find all the functions for the device. Device functions are listed in
chapter 7.4.
- Chat: opens a chat window where you can send messages to other users following the same
device.
- Get track: with this function you can fetch a route from a certain time period.
- Call: with this function you can call the device, if the device supports the call function. With
Ultracom R10 a telephone number should be defined for the device otherwise the call
function is not visible.
- SMS textmessage: this feature allows you to take a single SMS location from the device
(this function depends on the device you are using. Ultracom R10 device should have a
phone number defined for the device, so that the SMS function is available.)
Tracking interval can be changed by tapping “Trackig interval (sec)” option and selecting the
wished tracking interval. The command can be sent by data via the server by selecting “OK”
13
or directly as a text message by selecting “SMS”. Note that SMS commands may be
expensive depending on the pricing of your mobile phone subscription.
Info menu is opened by tapping in the ’info’-icon on the side of the menu. All functions are
further explained in chapter ”7.4 Other device-specific options”.
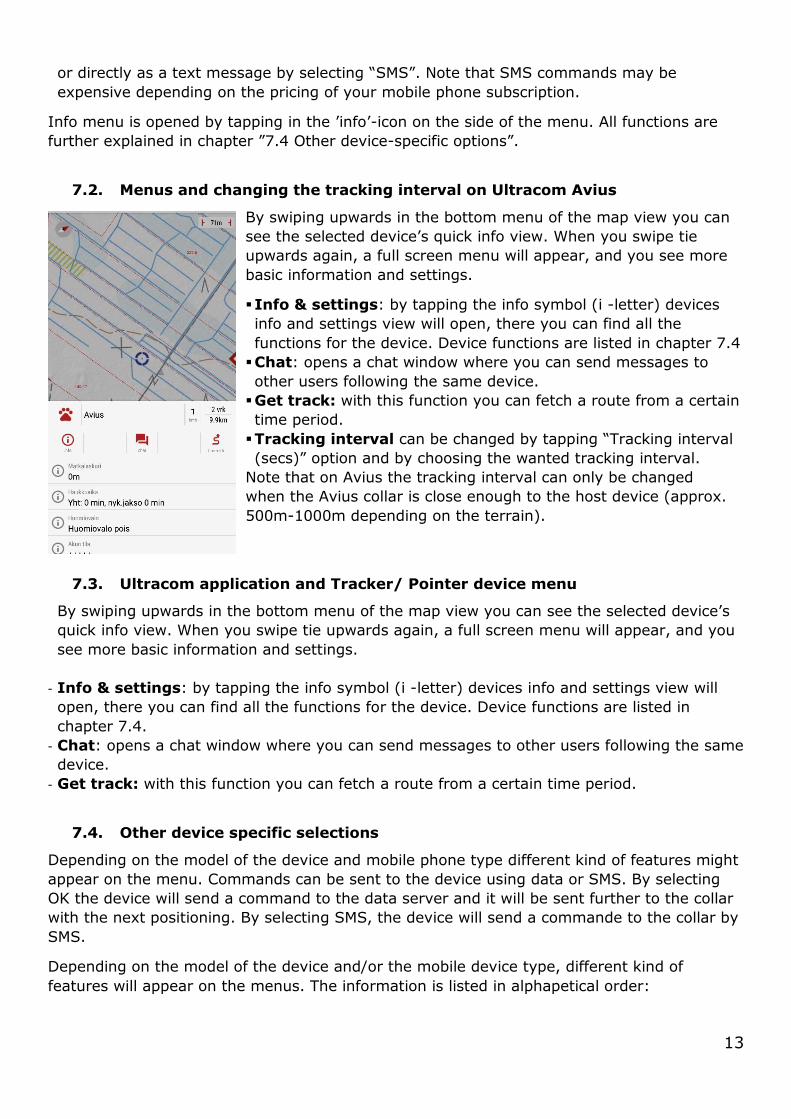
7.2. Menus and changing the tracking interval on Ultracom Avius
By swiping upwards in the bottom menu of the map view you can
see the selected device’s quick info view. When you swipe tie
upwards again, a full screen menu will appear, and you see more
basic information and settings.
▪ Info & settings: by tapping the info symbol (i -letter) devices
info and settings view will open, there you can find all the
functions for the device. Device functions are listed in chapter 7.4
▪ Chat: opens a chat window where you can send messages to
other users following the same device.
▪ Get track: with this function you can fetch a route from a certain
time period.
▪ Tracking interval can be changed by tapping “Tracking interval
(secs)” option and by choosing the wanted tracking interval.
Note that on Avius the tracking interval can only be changed
when the Avius collar is close enough to the host device (approx.
500m-1000m depending on the terrain).
7.3. Ultracom application and Tracker/ Pointer device menu
By swiping upwards in the bottom menu of the map view you can see the selected device’s
quick info view. When you swipe tie upwards again, a full screen menu will appear, and you
see more basic information and settings.
- Info & settings: by tapping the info symbol (i -letter) devices info and settings view will
open, there you can find all the functions for the device. Device functions are listed in
chapter 7.4.
- Chat: opens a chat window where you can send messages to other users following the same
device.
- Get track: with this function you can fetch a route from a certain time period.
7.4. Other device specific selections
Depending on the model of the device and mobile phone type different kind of features might
appear on the menu. Commands can be sent to the device using data or SMS. By selecting
OK the device will send a command to the data server and it will be sent further to the collar
with the next positioning. By selecting SMS, the device will send a commande to the collar by
SMS.
Depending on the model of the device and/or the mobile device type, different kind of
features will appear on the menus. The information is listed in alphapetical order:
14
Add admin: you may add a new administrator to the device. Application will ask you to add
the new admin’s telephone number. There can be maximum of three administrators in use.
Administrator can add and remove other admins and change the device settings.
Add temporary listener: you can add a user’s phone number that temporarily call and
listen the device. Temporary listeners will be removed automatically when the device is
turned off.
Application version/Application: Version of the application. By tapping the selection, the
application update command will open. Enter the safety code in the field and send the
command, either as a data or SMS command. The device will be updated to the latest
firmware version and it will return to normal tracking after the update. More information of
the update and changes in the firmware versions can be found on our support pages.
Bark Alarm: You can set the device to send an alert as SMS (Ultracom R10 will send the
alarm as a push-notification) to the software when the device registers the given number of
barks per minute. The alarm can be set from 1 to 100 barks. Setting the alarm to 0 will
disable the set alarm.
Bark sensitivity: You can adjust the bark sensitivity either gradually (on Ultracom R10) or in
five different steps (least sensitive, less sensitive, factory setting, sensitive, more sensitive).
With a more sensitive setting, the device responds more sensitively to barking and other
sounds. When adjusted less sensitive, the device does not react so easily to barking and
other sounds.
Bark frequency: How many barks has the device registeres during the last minute.
Bark time: the total bark time registered by the device and the bark time of the current
period in minutes.
Battery status: the remaining battery capacity. Tap to change the power saving mode
(normal, medium, high -> see more on “power saving mode/ power saving” below).
Beacon light: if the device has a beacon light, you can turn the light on and off on the
application. Beacon light is useful if the dog approaches a road or if it’s getting dark.
Call management: allow or disable all calls to the device. Device will always answer to the
call coming from the admin, regardless of what the call management settings is.
Change password: change the password of the Avius device.
Contact mode: sets the Avius host device in contact mode. In contact mode the Avius host
device transmits the signal of the selected Avius collar to other Avius host devices. The mode
switches off the host devices Bluetooth connection. By using the contact mode, the range of
the Avius collar can be increased signifigantly.
Note that when in contact mode the host device cannot transfer information to the user’s
mobile device, so a second Avius host device is required. You can switch off the contact mode
by tapping the connection button on the host device.
Country: you can change the country of use. The Avius device will change settings according
to the country of use.
Delete temporary user: remove temporary listeners (users that can call to the device) from
the device. Option asks you to enter the telephone number to be removed. All temporary
users may be removed by restarting the device or by deleting them individually.
Device APN: If the mobile operator on your devices SIM-card has changed, you may change
the contact info (APN) of the device with this option. In the drop-down menu choose the
operator of the SIM card. Send both SMS-messages created by the application to the device.
Frimware - collar: Avius collar application version.
Firmware – host device: Avius host device application version.
Geofence: device will send an SMS (on R10 the application sends a push-notification) to the
application when the device crosses the preset distance. Distance is 10-10000 meters.
Setting the distance to 0 will turn off the set geofence alarm.

15
GSM signal: the GSM signal level of the device (coverage).
Host device- battery status: Battery status of the host device.
Host device – frequency: you may change the host device’s radio frequency to a other
channel if there are too many Avius collars on the same channel and receiving the location
updates is taking too much time.
Latitude: latitude of the device
Longitude: longitude of the device.
Odometer: the distance measured in meters. Tap on the option to change the value to the
desired metric amount.
Power saving: Set the power saving mode as follows:
-Normal power saving: normal operation mode, no enhanced power saving.
-Mid level power saving: turns off the GPS from time to time to save power.
-High power saving mode: in addition to mid level power saving, device prevents calls and
text messages from all other users except for the admins.
Query listeners: lists all of the temporary users (users that can call your tracking device).
Temporary users will be reset automatically when the device is turned off.
Reset barktime: reset the total barking time calculated and the barking time of the current
session.
Satellites: number of currently found satellites.
Show admins: device will show its administrators. There can be maximum of three
administrators. Administrator can add and remove other administrators and change the
device settings.
Signal level: Avius VHF signal strenght of the device.
Smart tracking: you can turn on smart tracking by speed or barking interval. Device will
automatically increase the tracking interval if the preset speed or barking interval is
exceeded.
SMS settings: allow or prevent SMS-messages to the device. The admin can always send
text messages to the device even if the setting is disabled.
SMS tracking (min): sets up a text message monitoring for your device. Minimum is one
minute and maximum is 3600 min. It is not advisable to use SMS tracking as a default,
because it is generally charged by network operators for each message.
Speed km/h: speed of the device in km/h.
Stand alert: this selection will set a standing alarm for the device. When the device does not
move in the preset time, application gives an alarm to the admins mobile device. Standing
alarm can be set from 15 seconds to 250 seconds.
Temperature: the temperature of the device. Temperature is measured inside the device, so
the temperature is indicative only and should not be used for accurate temperature
measurement.
Time elapsed: time of last location received.
Timestamp: date and time of the last location information.
Tracking interval (secs): tracking interval in seconds. Tap the option and you may choose
the tracking interval for the device
8. Main menu functions
The main menu is opened by tapping on the “UC”-logo on the upper left corner of the screen.
On the main menu there are the following options.

16
8.1. Devices and adding a device
”Devices” will open the device menu. You can filter the device list by activity or by
favourites. You can edit devices and remove a device by swiping from right to left.
On the top of Devices -menu there is “Add..”, by selecting this you can add a new device.
You can backup and restore the device list and store it to the server by tapping on the top
right corner of the screen (three overlapping points). From the opening menu select “Backup
to server” or “Restore from server”. More information on storing and restoring devices can be
found on chapter 9.6.
With the ”Add device...” function the device will be added quickly on the device list. More
information of this function will be found on chapter 5.
8.2. Recently used devices
Five of the last selected and used devices will appear on the ”recently used” listing. You may
easily focus on another device by tapping on the device.
8.3. Landmarks and map tools
Tap on the ”Landmarks” option on the main menu to open the landmark entries stored in the
mobile device. The arrow on the top left corner of the view returns to the map view.
You can create landmarks (lines, markings etc.) using the map tools. Map tools can be
opened from the lower left side of the map screen (red dot which has a cross inside it). The
tools open in the middle of the screen.
To start making an entry, select the pen plus icon. You can see the coordinates of the cursor
on the top of the screen and the distance between the points of measurement. The drawing
line of the measure is indicated by dotted line.
To confirm the line, tap the icon again. To cancel the drawing, you may tap the pen icon with
a minus next to it.
Diskette icon opens the marking or line saving menu. Enter a name for the entry and select
whether to display it on the map. For example, if you want to temporarily remove a map
entry, you can set the “Visible” -option off.
Select and icon for the marking (more icons can be found by swiping left to right), tap “save”
and the marking is saved on the mobile device.
Note that the marking will not be automatically exported to the server. You can export the
marking with the “Back up to Server”. More info can be found on chapter 9.6.
The location marker “XY” -icon will open the coordinate search. Enter the coordinates Lat/N
and Lon/E and tap “Show on map” and the cursor of the application will focus on the given
coordinate.
On the map tools the rightmost icon (arrow circling itself) updates the map tiles of the
current map view. Map tiles are saved in the mobile device as they are downloaded from the
server. The program uses primarily the map tiles saved in the mobile device.

17
8.4. Drawing collections
You can create your own drawing collections (map areas and markings) in the “Ultracom My
Pages”-service. You can access “My Pages” via our website. All major markings are advisable
to be made in the “My Pages”-service. From the “My Pages”-service you can also share your
collection with other users.
You can find the available drawing collections by opening the main menu of the program and
select “Drawings”. Select the refresh-icon (arrows circling each other) and your own
collections and the collections that are shared to you will appear on the screen.
If you are an owner of a drawing collection you can add an access to the collection directly
from the application by swiping your finger from right to left and selecting “Add access” from
the drop-down menu.
This option opens a view to user’s mobile phone number, description (a name, for example)
and the access level. There are three levels of access; Read, Edit and Administration. By Read
access you can view the markings made in the application. By Edit -access you may edit the
collection in your “My pages”. Administration access gives you a full access to the collection
so that user can edit, add and delete notes and user rights.
8.5. Application settings
“Settings” -menu can be found in the application main menu. To access the main menu, tap
on the “UC”-icon in the top corner of the screen. Tap the ’Settings’ -option to open the
application settings. There are three tabs of settings: Map, My location and Display.
Additionally, in the upper right corner of the screen you will find the save option and the
setup menu (AviusLINK release).
Map -sheet contains a selection of available map material.
o Tap on the ”Map Database Id” option to access the map material you want to
use.
o You can add additional information to the map these include your own drawings,
highlights and hillshades. Tap on the “include all available features…” to select
the option you want to use.
o Last option is “Remove maps…” By tapping this option, you can remove the map
data stored on your mobile device. This choice is convenient e.g. in situations
where the map material has changed, and you need to download the updated
map data.
On My Position -tab you will find the settings related to your own location.
o In the “My data tracking password” -field you can specify the password for your
own location. If you give your friend your phone number and the password of
this field, your friend can add your phone number as a trackable application. The
default setting is 0000.
o The “Track size” option allows you to specify that how many location waypoints
of your own location are shown on the map. By increasing the value, a longer
period of location time will be shown. The default setting is 50.
18
o “Start GPS automatically at application start” –option enables the mobile devices
internal GPS-receiver automatically when the application is started. In this case
your location can be automatically displayed when the program is starting.
o With the “Keep my last position visible…” -option you can can specify whether to
display your own location on the map when GPS receiver is switched off.
o You can select an icon for your own position by tapping on the “My position
icon”. Swipe up and down to view all the icons.
On the Display – tab you can find the settings for the information displayed on the map.
o ’Silent Mode’ -option allows you to choose if there is signal when a setting is
changed. Default setting is off.
o Map rotation allows you to specify whether the map can be rotated with your
finger or whether the map is locked in the north-south direction
o Hide the side buttons -option determines how long the map scale tools appear
on the right side of the screen. Default setting is 5 seconds.
o ’Alternative bark color’ -option allows you to change the color of the route line
shown in the dog bark. Default setting is ’No’.
o ’Route thickness’ -option allows you to see whether a thin or thick route line is
displayed. A thick line may be easier to see in certain maps.
o Map cursor -icon selects the appearance of the cursor in the in the center of the
map. Tap on the icon to change it.
- In the upper right corner of the screen you can find an additional menu (three dots),
from which you can reset the “AviusLink”, if the Avius host device has to be connected
to another mobile device (feature releases the Bluetooth connection).
Remember to save the changes by tapping on the “Save”-selection on the top right corner of
the screen.
8.6. Account info
Account info -option is in the application main menu. To access the main menu, tap on the
“UC” -icon in the top left corner of the screen. On the “account info” –view you can find the
mobile phone number on which the application is locked, your license type, your service
subscriptions and your My Pages password. By tapping the top right corner refresh -icon
(round arrows) the application will update the latest information to My account -view.
On the top right corner of the screen there is also an additional menu (three dots) that you
can tap to open other functions:
- Open My Pages option will open your personal application pages in the mobile device
browser. In My pages you can manage the marketing permissions, manage your
contact information, view your device routes, order additional services and
subscriptions and manage your drawing collections.
- Register option opens the program registration screen. If your phone number
changes, you should move the application first with the “Change phone number”
function.
- Order/Activate allows you to order a subscription or activate an Ultracom
subscription code. For more information, see chapter 8.7.

19
- With the Change phonenumber option you can transfer your account (subscription,
markings, device lists etc.) to a new phone number. Enter a new phone number and
select “Start change”. You can then register the program to the new phone number.
8.7. Order/ activate -function
You can order a subscription directly in the program, from your retailer, or you can buy a
separate subscription activation card. Order/activate -function can be found on the
application main menu. Open the main menu by tapping on the “UC”-icon on the upper left
corner of the map view. From the main menu select “Order/ Activate”.
From the “Order Method” -dropdown menu select the order method:
- Use Activation code: you can enter an activation code from a subscription card and
activate the card to receive to subscription indicated on the card.
- Order an invoice by SMS: select the product in the drop-down menu. After selection,
tap “Proceed” and you will receive payment instructions via SMS. After your payment,
the service will be activated after 1-3 bank days.
- Pay now online: select the product in the drop-down menu. After selection, tap
“Proceed” and the application will transfer you to the mobile payment website. You will
find more information of the payment methods on the site.
8.8. About application
“About the application” is found in the main menu of the application. To access the
main menu, tap on the “UC”-icon on the upper left corner of the map view. In “about the
application”-view you can find the application version number, information on the map
licenses and link to our privacy policy.
9. Other functions
9.1. Reset AviusLINK (host device Bluetooth release)
Avius-host device may be connected to one mobile device at time. If you want to
reconnect it to another mobile device, you will need to reset the AviusLINK. This is done
by opening the main menu and selecting settings. In settings menu, open the additional
menu on the top right corner (three dots) and select “Reset AviusLINK”. Tap OK and the
Avius host device is resetted and it can be connected to another mobile device.
9.2. Ultracom R10 factory reset
It is possible to reset the Ultracom R10 to the factory settings so that the device admin and
other settings are removed from the device memory. You can also remove all of the route
data that the device has sent to the server.
Select your Ultracom R10 device and open “Info & settings” -menu. In the upper right corner
of the screen open the additional menu (three dots) and select “Factory reset”. Application
asks if you want to reset the device settings and if you want to also remove the saved routes
from the server. Select the desired function and tap ok.
Please note that routes will be permanently removed, and they cannot be restored.

20
Once the device is resetted to the factory settings, the device will reboot to first-time-use
mode to wait for an admin to add it to the application.
9.3. Transferring the app to another mobile device
Ultracom application is always registered to the mobile phone number where the registration
request is made. However, you can move the application to a new mobile phone number as
follows:
- In the application: open the main menu and select “Account info”. In the upper right
corner, open the additional menu and select “Change phonenumber”. Enter your new
phone number (where the application should be transferred) in the field “Your new
phonenumber” and select “Start Change”. After this you can change the SIM-card and
register the application to a new number. Application registration can be found in the
additional menu of “Account info”.
- My Pages -service: Sign in to My Pages and select “My account”. Next to the
telephone number field is “Change phonenumber” selection. Tap on the selection and
enter the new phone number to which the application is moved. After this you can
change the SIM-card and register the application to a new number. Application
registration can be found in the additional menu of “Account info”.
- Technical support: phone number change can be made in Ultracom technical
support. After the change have been made the application has to be registered.
Application registration can be found in the additional menu of “Account info”.
- Reseller: Ultracom retailers can guide you in the transfer of application as well as in
other possible problems.
9.4. Changing Ultracom Novus and Dog-GPS main user
If you wish to change your Ultracom Novus or Dog GPS admin do the following:
1. Remove the SIM card from the device.
2. Insert the card into your mobile device and turn on the mobile device.
3. Navigate to the contact list in the mobile phone menu and remove “DOGPS”-contact
from the SIM card.
4. Remove SIM -card from the mobile device and put it back in to the tracking device.
5. Insert the charged batteries into the tracking device.
6. Open the devices menu and remove the device from the list (swipe the screen from
right to left on the device and select “Delete”).
7. Add the device to the application again. When the application asks you to configure the
access point (APN), select the operator from the dropdown menu and send the settings
to the device.
8. Return to the map view and when the device appears on the map view, you are the
admin of the device.
9.5. Device list filtering (favorites, active devices etc.)
Tap open the main menu, tap on the “UC”-icon on the upper left corner of the map view.
Select “Devices” from the main menu. In the menu are listed all the devices added in your
application.

21
From the dropdown menu on the top of the screen you can filter the device view with
following options:
- “All” shows all devices and applications on the list.
- “Favorites” show only the devices and applications added as favorites. You can mark a
device as a favorite by putting the “Favorite” tab on, when the device or application is
added.
- “Favorites + Active” show the devices and applications marked as favorites and that
are currently on and active.
- “Recently used” show the last used devices and applications.
- “My Devices” show only the devices where you are the admin user.
9.6. Backing up and restoring device and markings list
Tap on the UC-icon on the upper left side of the screen. From the main menu select
“Devices”. In the view you see listed all devices you have added in your application.
In the upper right corner of the screen there is an additional menu (three dots). Tapping on
the selection will open the backup and restoring functions:
Back up to server: Tap open the window to back up devices and map markings to the
server. You can choose one or both of the options. Tap “Back up to server” to export the data
to the server. The application will tell you in an info window how many devices and markings
were saved on the server. At the same time, the program will give you an ID number that
allows the device list to be retrieved later. You can also share the ID so that your friends can
restore the same list you have backed up.
Restore from server: Tapping this option will open a window where you can restore the
saved devices to the “Device” list. If you leave the ID field blank, the application will bring
you the latest saved device list, if there is one availabe. You can also enter the last used
device list ID number or for example your friend’s device list number and the application will
download the the devices on that number to your devices list.
9.7. Editing and deleting devices from the device list
Tap on the UC-icon on the upper left side of the screen. From the main menu select
“Devices”. In the view you see listed all devices you have added in your application.
You can remove or edit devices by holding your finger on the device. From the menu that
opens select “Edit” to edit the device or “Delete” to remove the device.
“Send to a friend” selection send the selected device info to your friend. Enter your friends
phone number or select it from the contacts list and tap ’OK’ to send the information to a
friend’s mobile device. Your friend needs to have the Ultracom application installed. Send to a
friend is supported only in the Android operating system, so a device cannot be sent to Apple
iOS application.
9.8. Adding a demo
To open the application main menu, tap the “UC”-icon on the top left corner of the screen.
In the upper right corner of the screen there is an additional menu (three dots). Tap the “Add
demo” selection. This feature will add a demo device in the application, so you can try how

22
the tracking on the application works. Just tap ’Save’ option at the top of the screen to bring
demo in the ’Devices’ -menu. Demo device can only be tracked, and its settings cannot be
changed.


