
Page 1
innovative scan apps
Data capture with barcodes - Just made simple
User’s Guide
Our “Frequently Asked Questions” (FAQ) section on the website may also have an answer for your question. Visit www.moto-scan.com
MotoScan Windows Application for Zebra/Symbol CE and WM terminals
Page 2
innovative scan apps
Table of contents Installation .......................................................................................................................................................................... 4 Data transfer ....................................................................................................................................................................... 4 MotoScan Configurator ...................................................................................................................................................... 5
Change settings ......................................................................................................................................................... 5 Load settings from device ......................................................................................................................................... 5 Install application ...................................................................................................................................................... 6 Transfer settings to device ........................................................................................................................................ 6 Remove MotoScan .................................................................................................................................................... 6 Transfer database to device ...................................................................................................................................... 6 Autostart MotoScan on device .................................................................................................................................. 6 Start MotoScan on device ......................................................................................................................................... 6 Open User’s Guide (PDF) ........................................................................................................................................... 6 Activate license ......................................................................................................................................................... 6
Change settings................................................................................................................................................................... 7 General settings ............................................................................................................................................................. 8
Add ”Exit app” to main menu ................................................................................................................................... 8 Add ”View records” to main menu ........................................................................................................................... 8 Show OK message on PC when transfer is complete ................................................................................................ 8 Beeper volume .......................................................................................................................................................... 8 Date time format on main menu .............................................................................................................................. 8
Data record settings ....................................................................................................................................................... 8 Data delimiter ........................................................................................................................................................... 8 Append delimiter at the end of a record .................................................................................................................. 8 Decimal delimiter ...................................................................................................................................................... 8 Add text qualificator to each record ......................................................................................................................... 9 Append date/time stamp to each record.................................................................................................................. 9 Remove identifier from record ................................................................................................................................. 9 ”Device ID” and append to each record .................................................................................................................... 9
Directory settings ........................................................................................................................................................... 9 Docking ...................................................................................................................................................................... 9 Root directory for data file ........................................................................................................................................ 9 Use single output directory for all data files ............................................................................................................. 9 Create sub-directory for each output file type (menu) ............................................................................................. 9 Check for new settings on docking ......................................................................................................................... 10 Wireless ................................................................................................................................................................... 10 Enable FTP ............................................................................................................................................................... 10 FTP Host/IP .............................................................................................................................................................. 10 Port no ..................................................................................................................................................................... 10 User ......................................................................................................................................................................... 10 Password ................................................................................................................................................................. 10 FTP Directory for data file ....................................................................................................................................... 10 Upload to default FTP directory .............................................................................................................................. 10 Upload to record sub-directory for each record type(menu) ................................................................................. 10 Synchronization interval (min) ................................................................................................................................ 10 Check for new settings on docking (on connection) ............................................................................................... 10
File name settings ........................................................................................................................................................ 11 Use fixed file name .................................................................................................................................................. 11 File name extension ................................................................................................................................................ 11 Use time stamp as file name ................................................................................................................................... 11 Use ”Record-type ID” as file name .......................................................................................................................... 11
Database creation settings .......................................................................................................................................... 12 Application menu’s ...................................................................................................................................................... 13

Page 3
innovative scan apps
Enable this menu ..................................................................................................................................................... 14 Record type ID ......................................................................................................................................................... 14
Main menu title ........................................................................................................................................................... 14 Sub menu title ......................................................................................................................................................... 14 Insert scanned barcodes using field pattern ........................................................................................................... 14 Enable GS1 splitter .................................................................................................................................................. 14 Save automatically when all fields are completed .................................................................................................. 14 Synchronize after each record ................................................................................................................................ 14 Input fields .............................................................................................................................................................. 15 Enable field .............................................................................................................................................................. 15 Field title ................................................................................................................................................................. 15 Include field in output record ................................................................................................................................. 15 Set field as numeric only ......................................................................................................................................... 15 Keep field value for field after each registration .................................................................................................... 15 Default field value ................................................................................................................................................... 15 Field max length ...................................................................................................................................................... 15 Field min length ....................................................................................................................................................... 15 Field pattern ............................................................................................................................................................ 16 Field pattern applies to scanned values only .......................................................................................................... 16 Allow field to be empty ........................................................................................................................................... 16 Disable keyboard input ........................................................................................................................................... 16 Scanner .................................................................................................................................................................... 16 Database ................................................................................................................................................................. 16
File Menu .......................................................................................................................................................................... 17 More Menu’s ............................................................................................................................................................... 17
FTP Server Setup ............................................................................................................................................................... 18 Sync Status ........................................................................................................................................................................ 19 Navigating with the keypad / F-keys ................................................................................................................................. 19 MT2000 WIFI setup........................................................................................................................................................... 20 Data file definition ............................................................................................................................................................ 21
Page 4
innovative scan apps
Installation
1) First we recommend that you download the latest release from www.moto-scan.com. The software package contains to modules: MotoScan Configurator and Microsoft ActiveSync (Win XP) or
Microsoft Mobile Device Center (Win7+8 / Vista)
2) Start the installation process and be aware that on Windows 7 you must disable UAC before installing the software. Type UAC in the start-button search field and drag the slider all the way to
the bottom. Installation requires administrative rights.
3) If your do not have Microsoft Active Sync (MAS) for Windows XP installed, please install this first. Or
if you have Windows 7 or 8, the Microsoft Mobile Device Center (MMDC) either 32 or 64bit version must be installed. The installation files for the synchronization apps are included in the software
package; you just downloaded from the web site. Refer to the FAQ at the web site if you need more help for this.
4) Install MotoScan on the PC, take the device out of the docking station and put it back in. The
MMDC/MAS will now detect the device and turn green. We recommend that you keep the default
settings during the installation process.
Disable partnerships: Default: this box should be ticked, and thereby disable partnerships. Then ActiveSync / MDC will acknowledge all connections as Guest connections. This means that calendar, contacts etc. will not be synchronized. It is normally preferred to disable partnerships in a hand terminal / scanner work-setup, as
it is only annoying the user to take action each time you dock your scanner or hand terminal. This setting will be valid for all devices that are connected to this PC – also Smartphones and so on, but it makes it
easier to synchronize data for these kinds of applications in general
Important info for Windows 7 and later: Before installing anything you need to deactivate UAC (User
Access Control). In the search field, type UAC. Pull the slider to the bottom, press OK and restart the PC. If you do not do this, you may experience problems with the data transfer from the scanner/terminal to
the PC.
Data transfer Data from the terminal will synchronize with the PC when Microsoft ActiveSync/MDC have connection with
the scanner/terminal. This can be verified by watching the sys-tray for the green icon (ActiveSync only), and Mobile Device Center (Windows 7+8) will pop-up the connection screen.
When the scanner/terminal is connected the NPT TerminalSync software will retrieve all stored data from the
terminal and clean-up the memory of the terminal afterwards.
It is very important that the scanner/terminal finish the synchronization before it is removed
from the cradle again.
Another option is using the built-in functionality to synchronize to an FTP server via WIFI or 3G. The
terminal will send all data to the FTP server and clean-up the memory at configurable intervals. The status screen on the terminal will show the last time the device has been synchronized.

Page 5
innovative scan apps
MotoScan Configurator The setup utility for MotoScan is the administrator’s tool to modify and adapt the hand terminal software, to
fit the user’s needs for data capture. The setup utility is written in English and not intended for the end users to interact with.
The application is located on the desktop and in Start Applications MotoScan
The Configurator has following options:
Change settings Used for modifying the system options for the scanner/terminal device and to customize the menus and headlines that will be shown on the device.
Load settings from device This is for changing a setup on a specific terminal or backing up settings from a device. It loads all values
from the docked device so they can be modified. You can also use this if you need to copy a configuration from one device to another. Remember to “transfer settings” again afterwards, so they get set on the
docked device.

Page 6
innovative scan apps
Install application This is for loading a hand terminal device with the MotoScan application. It installs the application on the docked device, and reboots the terminal afterwards. Please notice that the application will automatically start
up after a reboot. Also used when you need to update a terminal without overwriting the settings already in the terminal. This will not delete any data stored in the terminal memory. We recommend that you un-install
previous versions of MotoScan on the devices before installing the most recent version
Transfer settings to device This will load the current settings to the docked hand terminal device.
This will not delete any data stored in the terminal memory.
Remove MotoScan This will delete MotoScan software on the device. The license stays on the device even if you delete the
application. This will also not delete any data stored in the terminal memory.
Transfer database to device This option will force a database refresh on the device when docked. This button is only visible when
database option is enabled and started from inside the configuration.
Autostart MotoScan on device If you select this option, this selection will be sent to the device next time you press “Transfer settings”.
If the device then later is warmbooted or coldbooted, the MotoScan application will automatically startup on the device.
Start MotoScan on device This will start up the application on the docked device. It allows the administrator to start up the MotoScan application at the terminal without having to navigate in Windows CE. This is very handy on hand terminals
without touch screen.
As the application runs on the terminal, the operating system (Windows CE) is not visible at all and interaction with Windows is shielded off and the operating system is hidden from the users.
Open User’s Guide (PDF) This opens the most recent version of this guide. Internet access and a PDF viewer are required to read the guide. A local copy of the PDF manual can also be found in the installation package.
Activate license After transferring the application to the terminal, you will either need to activate, buy a license or run in demo-mode. If your device stays in demo-mode, everything will be working correct but only 1 record will be
stored on the terminal.
You need to have your device placed in the cradle, and then press “Activate License”.
The ”Activate License” button will start an Internet browser and go to the registration site of the MotoScan software.
This must be done for each unit that needs to be unlocked from demo-mode. Follow the activation
procedure to get your system up and running right away.

Page 7
innovative scan apps
Change settings The configuration utility is divided into two main parts:
General, File- and data transfer settings etc (below: the 5 opened listings)
Menu settings for the application on the device. Here you can adapt and modify the application to fit
your needs and appearance. As default there will be 4 generally used scenarios set up – feel free to use them as they are, modify them or start all over with definitions.
Page 8
innovative scan apps
General settings
Application title on device Application title on device: Please feel free to change the name/appearance of the app on the devices. Brand the software as your own if you like.
Add ”Exit app” to main menu
Default value: “No”. If you choose YES as value, the main menu on the device will have a short cut to exit the application. This is not recommended for end-users, as there normally is no need to exit the application.
Add ”View records” to main menu
If you choose YES as value, the main menu on the device will have a short cut to view all stored records on
the device. The short cut key for this is also F1, which will work in any case. Once in ”View Mode”, press
Enter to exit and return to you previous action
Show OK message on PC when transfer is complete
Default value: ”No”. This setting will display an acknowledgement on the PC when data transfer is done. The
user will then have to press “Enter” on the PC to confirm this. It can be used if it is needed to make the user aware of when the data transfer is done and the terminal can be removed. In most cases this should be left
as ”No” unless a specific need for this is present.
Beeper volume
Default value “2”. This feature applies to most Win CE devices as they have their own beeper function, that
you can’t set directly with the buttons on the device.
Date time format on main menu
To adapt the date and time format shown on the main screen, please choose the format you prefer.
Data record settings
Data delimiter
Choose the data delimiter that you need from the list of available delimiters. Default value is semicolon (;).
Append delimiter at the end of a record
If your host system needs a record to end with your data delimiter change the default value to ”Yes”, otherwise leave it as is.
Decimal delimiter
Change the decimal delimiter to fit your local standard. Default value is ”period” (.).

Page 9
innovative scan apps
Add text qualificator to each record Default value is: “No”. If this is changed to ”Yes”, each record will get a qualificator “ “ around it to fit your needs
Append date/time stamp to each record Default value is: “No”. If this is changed to ”Yes”, each record will get a date and time stamp added. This
will be added in the record just after the Record-Identifier as field no. 2.
Note: Date and time will have to be set on the terminal after activating this feature. If ”Add Device-ID” is set to “Yes” also, then the time stamp will be placed after the Device-ID as field no. 3 .
Example without Device-ID: A;04122008234302;21345;1;A-1; ;
Example with Device-ID: A;Terminal01;04122008234302;21345;1;A-1; ;
Remove identifier from record Default value is: “No”. If this is changed to ”Yes”, the Record Identifier will not be a part of each record any more.
”Device ID” and append to each record
Default is ”No”. This option will add your pre-defined Device ID to each record. This is useful when more devices saves data to the host system and you would like the possibility to backtrack who did what. The user
specific Device ID must be set on each terminal after loading these settings.
You can also display the possibility to chance the Device ID directly in the main menu.
Directory settings
Docking
Root directory for data file
Please define a destination folder on the PC or network drive for the data files that comes from the device.
Default value is C:\TEMP\ Please change to fit your needs.
Please do not choose the root directory of the C-drive. Use a sub-directory like C:\Temp or another destination. The root directory on Windows 7, 8 and 10 PC’s are restricted to use for the operating system.
Use single output directory for all data files
Default value: ”Yes”. This setting will place all you output files in the same directory as defined before. The
value ”Yes” will force the next option to have the value ”No”.
Create sub-directory for each output file type (menu)
Default value: ”No”. This setting will place all you output files in the same directory as defined just before.
The value ”Yes” will force the previous option to have the value ”No”. If you set this to ”Yes” each menu will have each a destination folder where data is transferred to. The name
of these sub-directories will be named the same as their respective ”Record Type-ID” (set this in each
menu”s settings).
Page 10
innovative scan apps
Check for new settings on docking
Default value: ”No”. This setting will enable that the device looks for a newer settings-file each time the device is docked. In this way you can auto-update all your devices. Set the directory and the filename.
Wireless
Enable FTP Default value: ”No”. This setting will enable the FTP synchronization setting. Enabling FTP functionality does not turn off docking synchronization. Data exchange with the FTP server can happen through WIFI or 3G
connectivity.
FTP Host/IP Default value is empty. Enter the hostname or IP address the FTP server.
Port no Default value is: ”21”. Change the value if you are not using the default FTP network port.
User Default value is empty. Enter the username to the FTP server.
Password Default value is empty. Enter the password to the FTP server.
FTP Directory for data file Default value is: ”/”. Change if the data files should be delivered to another directory than the default on the FTP server. This is the FTP server’s directory “/” indicates the root folder of the FTP.
Upload to default FTP directory Default value is: ”yes”. Change if using another library than the default on the FTP server.
Upload to record sub-directory for each record type(menu) Default value is: ”no”. Change value if the data is to be stored in different sub directories for each type. If
you set this to ”Yes” each menu will have each a destination folder where data is transferred to. The name of these sub-directories will be named the same as their respective ”Record Type-ID” (set this in each
menu’s settings).
Synchronization interval (min) Default value is:”10”. Please enter the interval the terminal will connect to the FTP server for data
synchronization.
Check for new settings on docking (on connection)
Default value: ”No”. This setting will enable that the device looks for a newer settings-file each time the
device is connected to the ftp server. In this way you can auto-update all your devices. The directory at the ftp server is always the root, so you can’t change that. Type the filename. The timestamp on the
motoscan.ini file at your ftp server is used for comparing if the configuration is newer and will be used for updating the devices.

Page 11
innovative scan apps
File name settings
Use fixed file name
Default value is: ”Yes”. Please define a file name for the output data files – the default data file name is:
”MyData”. You can only chance this value to ”No” if you make one of the below mentioned options change
to ”Yes”.
File name extension
Default value is: ”.TXT”. Please change if you need to define another file extension name for the output data
files. The files will always be saved in a readable ASCII format regardless of the name and extension choice.
Use time stamp as file name
Default value is: ”No”. If you change this value to ”Yes”, the ”Use fixed file name” option will automatically turn into the value ”No”. If set to ”Yes”, the system will make an unique file name each time a device
delivers data to the PC. It can be handy in some situations to have separate files for each transaction.
These files will get the current system time as file name.
Use ”Record-type ID” as file name
Default value is: ”No”. If you change this value to ”Yes”, the ”Use fixed file name” option will automatically
turn into the value ”No”. If set to ”Yes”, the system will create a file name for each menu on the device. This will sort the registration types into separate file names, which can be handy in some scenarios. These files
will be named the same as their respective ”Record Type-ID” (set this in each menu’s settings).

Page 12
innovative scan apps
Database creation settings The database option lets you select the database file (CSV files) that you would like to use on the device.
To use the database functionality, first start the service from the service/log tab-sheet:
Choose the CSV file you would like to use as
source for your database. Choose the destination
directory of the MotoScan DB file that will be generated from the content of the CSV file.
MotoScan will create a .db file to be used on the terminal. The destination folder is also the folder
where the terminals will look for a database or an
updated database.
If you are using an FTP server and placed the database file in the root of the FTP server.
MotoScan will do a check to see if there are any
changes to the database when synchronizing; only
if there are changes to the database it synchronizes with the terminal.
Choose the separator type that the existing database is using. The formatting can be checked by pushing
the “Test source file” button. This will generate a preview of the database output.
Click “Save” at the bottom to generate the database for the device.
Close the database window when done.
Page 13
innovative scan apps
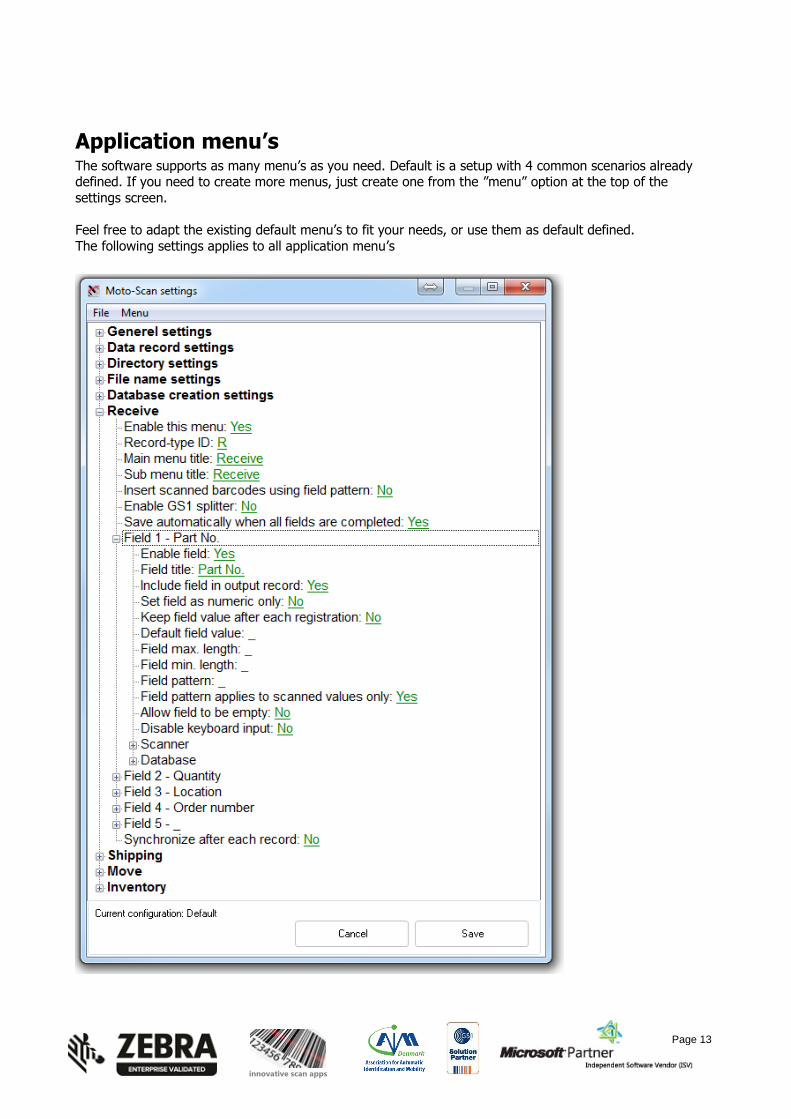
Application menu’s The software supports as many menu’s as you need. Default is a setup with 4 common scenarios already defined. If you need to create more menus, just create one from the ”menu” option at the top of the
settings screen.
Feel free to adapt the existing default menu’s to fit your needs, or use them as default defined.
The following settings applies to all application menu’s
Page 14
innovative scan apps
Enable this menu
This determines if this menu is active and visible on the terminal or de-activated and not visible on the terminal device.
Record type ID As the terminal only delivers 1 file to the host system, this identifier is used to determine what type of
registration the user made / for which one of the available applications the user has collected data. So each
application menu must have its own identifier towards your host system. You can modify the default values if needed. The Record Type ID size is default set to 1 character – there is no limit for your own definition of
this field’s value. You can also disable this feature, if you find no need for it.
Main menu title
This sets the text in the main menu for this application, e.g. “Inventory”. If text is too long to fit the screen,
it will be cut off when reading the screen. Please type short and direct words for the menu titles.
Sub menu title This sets the headline of the submenu for this application, e.g. the same as the main menu text “Inventory”
or a text that fits the task. If text is too long to fit the screen, it will be cut off when reading the screen. Please type short and direct words for the menu titles.
Insert scanned barcodes using field pattern Default set to: “No”, if enabled this option must be used with the “field pattern” option described below. This feature is able to insert a scanned value into the field with a matching pattern. This means that it is possible
to sort barcodes with specific pre-fixes into the same input field each time. To use this option a value must also be set under Field Pattern to determine the value(s) that will be entered to that field. If no value is seat
any entry will be allowed.
Enable GS1 splitter Default set to: “No”. Enable to split a GS1 code to different fields depending on the prefix code. To work, it
must be combined with a Field pattern value. Go to the field where the value should be input and set a Field pattern value to the GS1 code identifier, ex. 00. More fields on the same screen will automatically be sorted
by pattern. If the input barcode contains both a 02 and 37 they will be sorted in the designated fields. If any
AI’s are found without a Field pattern match, they will be ignored.
Save automatically when all fields are completed This option defines if MotoScan should end and save the data entry when the last field is scanned. If this
option is not activated, the user must press the Enter key on the terminal before the data is saved.
Synchronize after each record You can force a data sync after each record generation by setting this option to “yes”.
This option is not functional if the device is running in demo mode.

Page 15
innovative scan apps
Input fields
Enable field
If this is set to “Yes”, this field will be enabled and visible on the terminal. If you choose “No” this field will
not be visible on the hand terminal. If you disable a field, you will be asked if you still want to keep the placeholder for this field in the output file.
Field title
Please define the title for this field. Type a short and direct word for the title.
Include field in output record
Default: “Yes”. You can choose not to include this input field in the output record. This is mainly useful if you are using the field as a database search field.
Set field as numeric only
Default value is: “No”. If this is set to “Yes”, this input field will only accept numeric values. Caution:
barcodes containing alphanumeric values will beep as they are scanned, but the field will not accept the
alphanumeric values and will be left empty!
Keep field value for field after each registration
Default value is “No”. This option makes it possible to keep a field value the same for a series of registrations. The value will then stay the same until the user presses the ”up” button to place the cursor in
the field again and enter/scan a new value or until the user returns to the main menu (by pressing F1).
This is very handy in case you need to pick a certain amount of different items to a specific work order
number, employee number or stock location. But in some situations it is safer for the application that the user scans the repeatable numbers each time a registration is needed.
Default field value
As default, no default value for this option is set and default value is an empty field. This will allow you to
set a default value to a field. The user will see the default value as highlighted on the terminal. If the user
accepts the value as default, then the user should press Enter to proceed to next input fields. If the field that has the default value set in the last field of a registration, the registration is auto-confirmed.
If a field containing a default value is situated as the last field for this screen / registration, the registration is
automatically finalized with the default data in the field and saved in the terminal.
If the default value (for a numeric field) is set to the character minus (-) the field will automatically display
as having a negative value.
Field max length
If you want to limit the input values, you can set up a value for max length allowed for this field (both scanned and keyed input).
Field min length
If you want to limit the input values, you can set up a value for min length allowed for this field (both scanned and keyed input).
Page 16
innovative scan apps
Field pattern
If you want to limit the input values, to ensure correct values in this field, you can set up a pattern that the
input value must follow to be a valid value for this field (both scanned and keyed input). For example
Pattern: 00 – the input value must start with value 00 to go into this field. If you are using the GS1-Splitter, please be aware that this option needs to be set also on each field.
Field pattern applies to scanned values only
If you have set a field pattern, you can choose this pattern to be overruled if you type (using the keyboard)
in the input field instead of scanning. Default value: “Yes”. value for min length allowed for this field (both scanned and keyed input).
Allow field to be empty
You can allow the field to be empty, if needed. This is default set to NO, as the automatic scanning will be disturbed by fields with this option. But if you need it for your registration process, you have the option to
set the feature for a field.
Disable keyboard input
Default value is: “no”. This is set to “yes” you are not allowed to use the keyboard to fill out the field. Very
useful if you need to limit the input errors when looking up values in a database, or if you want to prevent users from typing wrong values instead of scanning barcodes.
Scanner
You can disable the scanner input on the field if needed. You can also trim the input string of the scanner
input, with a fixed start position and a fixed stop position. If set to “0” (Zero) the values are not active. You can set a start position and leave the stop position to zero, if you need to have a starting point but no
ending point of the data stream from the scanned barcode.
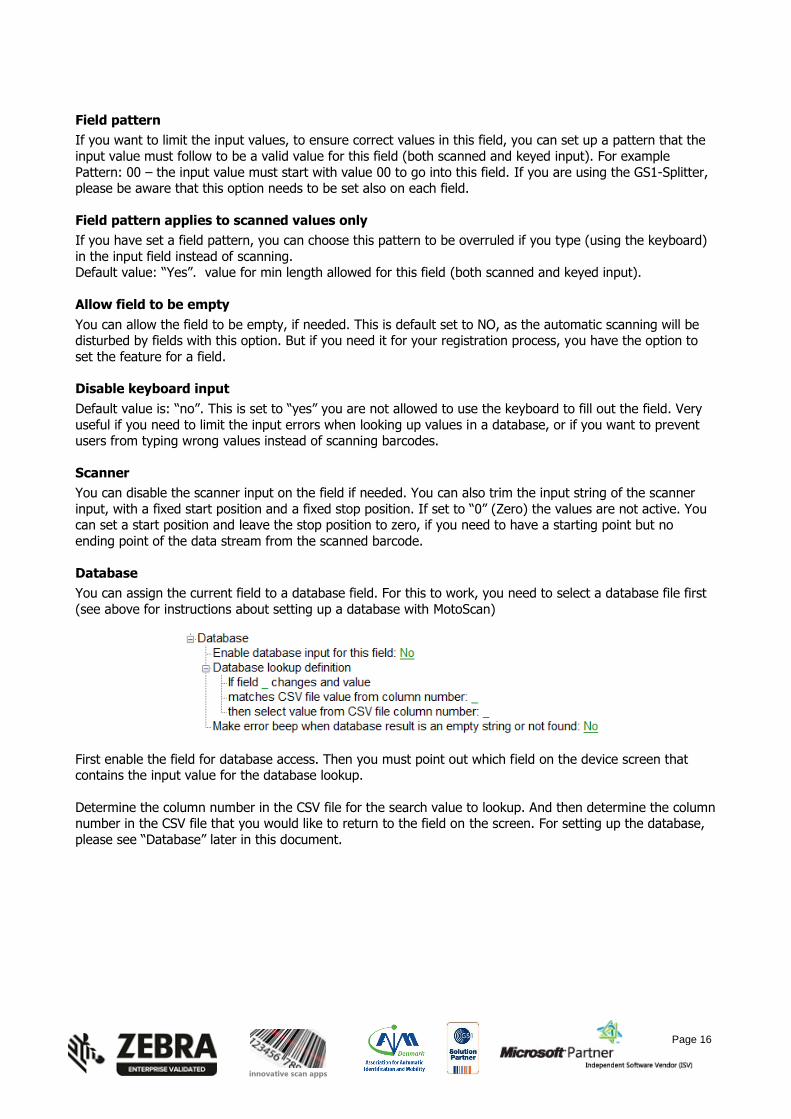
Database
You can assign the current field to a database field. For this to work, you need to select a database file first
(see above for instructions about setting up a database with MotoScan)
First enable the field for database access. Then you must point out which field on the device screen that contains the input value for the database lookup.
Determine the column number in the CSV file for the search value to lookup. And then determine the column number in the CSV file that you would like to return to the field on the screen. For setting up the database,
please see “Database” later in this document.

Page 17
innovative scan apps
File Menu In the top menu of the ”MotoScan settings” window, the ”File” option, you have the possibility to save the
setup and naming it as you need. This is handy when configuring more scanners for different departments or with different purposes. It is also possible to load default settings here. You can also return the
configurator to default settings.
More Menu’s In the top menu of the ”MotoScan settings” window you have the option to either delete or add more menus for your setup. If a menu is added, the main menu will display the menus and if there is no more place in
the main menu, the scroll down feature will display the rest of the main menu continued on ”page 2”.
Page 18
innovative scan apps
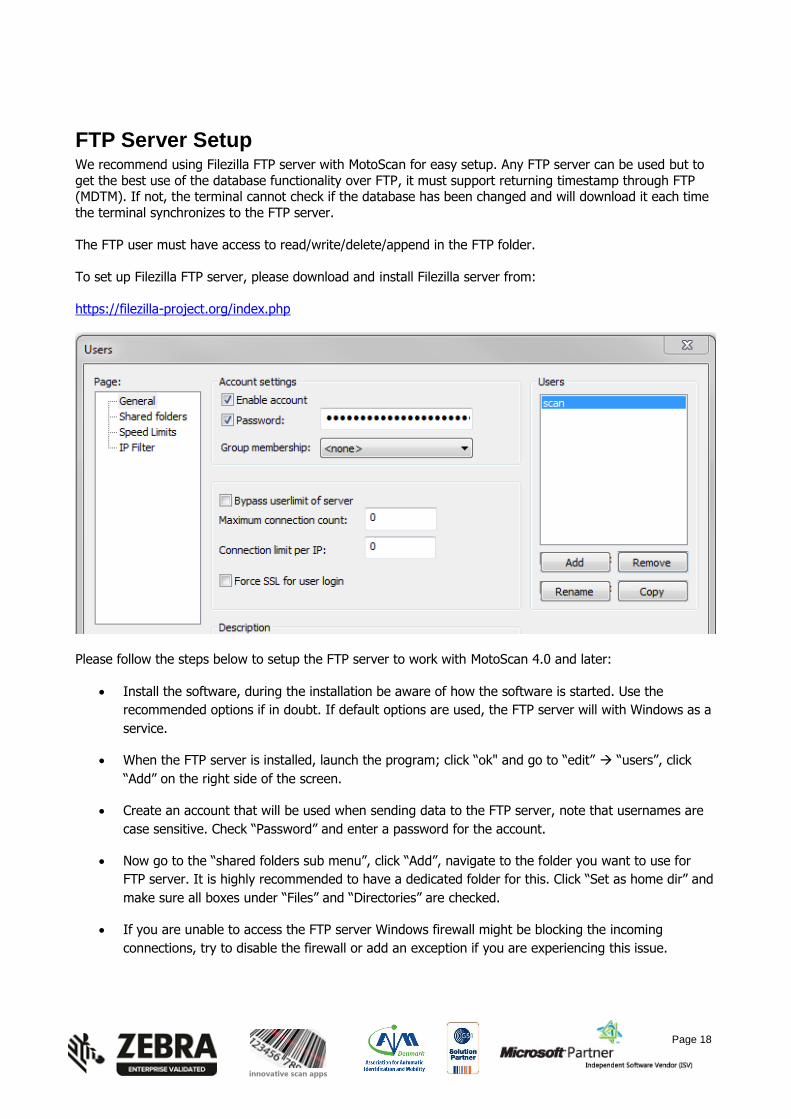
FTP Server Setup We recommend using Filezilla FTP server with MotoScan for easy setup. Any FTP server can be used but to
get the best use of the database functionality over FTP, it must support returning timestamp through FTP (MDTM). If not, the terminal cannot check if the database has been changed and will download it each time
the terminal synchronizes to the FTP server.
The FTP user must have access to read/write/delete/append in the FTP folder.
To set up Filezilla FTP server, please download and install Filezilla server from:
https://filezilla-project.org/index.php
Please follow the steps below to setup the FTP server to work with MotoScan 4.0 and later:
Install the software, during the installation be aware of how the software is started. Use the
recommended options if in doubt. If default options are used, the FTP server will with Windows as a
service.
When the FTP server is installed, launch the program; click “ok" and go to “edit” “users”, click
“Add” on the right side of the screen.
Create an account that will be used when sending data to the FTP server, note that usernames are
case sensitive. Check “Password” and enter a password for the account.
Now go to the “shared folders sub menu”, click “Add”, navigate to the folder you want to use for
FTP server. It is highly recommended to have a dedicated folder for this. Click “Set as home dir” and
make sure all boxes under “Files” and “Directories” are checked.
If you are unable to access the FTP server Windows firewall might be blocking the incoming
connections, try to disable the firewall or add an exception if you are experiencing this issue.

Page 19
innovative scan apps
Sync Status This menu on the device makes it possible to check the synchronization status of the device. Select the
menu on the device and it will show information regarding database and scan data synchronization. To force an update, press F5 or Up on the device when connected to the cradle or WIFI.
Navigating with the keypad / F-keys In the main menu you can enter a menu by pressing the corresponding number of the menu or press the
Up/Down arrow and select the menu by pressing the Enter key. As this app is made to support non-touch devices, the touch screen (if any on you device) is not active within the MotoScan application.
Once you have entered a menu, you have following navigational options:
UP/DOWN keys: Navigate between fields
Alfa/Num keyboard input mode: Press the orange colored “A“ button to shift between numeric and alphanumeric keys. If you experience that the device will not react to a F-key press, you may have pressed
the orange key by accident, and the F-key press will not work. Press the orange key again to get back to
numeric input mode.
F-Keys: To use a function key, you must press the F key followed by the number. F + 1 are a F1 key press.
Some hand terminals has direct F-keys on dedicated keys.
F1: Shows a list of saved registrations since last synchronization.
Browse through the registrations with the arrow keys. Press Enter to return to you previous screen
Within this view, the F2 key press will delete the current record shown on the screen.
F7: Change from positive to negative value in a numeric field
F9 or ESC: Exit and return to main menu
F3 + F9: When you are in the main menu this key combination exits the MotoScan application and returns
to the operating system of the device. For terminals without F-buttons, Left+right will have the same
function. This is for administrative use only, and it’s not intended for the users to know about
When is a registration saved?
When all fields in a registration have been filled out and cursor is situated in the last field, you can press the Enter key to save the registration. The terminal will signal a confirmation beep to let the user know that this
registration is complete. The fields are then cleared and ready for next registration.

Page 20
innovative scan apps
Restart terminal If somehow an application reset is needed:
MT2000: Press and hold button 2 and scanner-trigger button simultaneously until the boot screen is visible. MC2100: Press and hold the power button until the boot screen is visible
MC3000 and most other Motorola/Symbol/Zebra devices: Press and hold keys 7 + 9 + Power button simultaneously until the boot screen is visible and release the
keys.
The device will then boot up and the application will start up automatically (if chosen when you installed the
application) and be ready in the main menu of MotoScan application.
MT2000 WIFI setup The following steps will setup the Motorola MT2000 terminal for WIFI. It can be difficult to do on a device
without touchscreen, this guide will show how it can be setup using remote control software.
To setup WIFI on the scanner, we recommend downloading and installing Sparus EveryWan from the following location:
http://www.moto-scan.com/files/Sparus-remote-support.exe
When installing the software please make sure to remove any checks to automatically update the software. Please also remove the check in “Auto start Remote support when a device is connected to the
PC”.
This will allow you to remote control the terminal from a PC for easy setup of the device. Connect the device
you wish to configure to the pc and start up Sparus EveryWan, it should automatically detect the connected device. If not, go to the menu Connection Connect.
You should now be able to see the terminals interface on the PC. To set up WIFI on the scanner please do the following steps:
Start Config Wireless companion Option – Select regulatory from the drop down menu and select
your country from the menus, save and close options. Now go to: Wireless companion find WLANs select WLAN and enter the information needed. The
device should now be connected to your WLAN.

Page 21
innovative scan apps
Data file definition The terminal will transfer data to the PC in a simple ASCII text file. This is just an example, you can modify the output file to fit you exact needs.
The default settings define a data file consisting of:
A record identifier
Field separators
Field data
Default applications Example for record identifier
Receive R
Shipping D
Move M
Inventory I
Example of a data file content: I;1009030050151;20;Loc1;
F;1009030050151;20;Loc1;Loc2
F;1009030050151;20;Loc2;Loc3
Optional/additional data file content – see Application Menu chapter.
As you can enable / disable fields as you want to, the output file structure is more or less defined by you.
This is just an example of a default output file (and also reflects earlier versions default output files)
All applications have the following order in the data file:
The fields will scale to the current screen size, and if you intend to use 5 fields, the field 2 and 3 will share
the horizontal level and 4 and 5 will share the horizontal level. You will experience different scenarios of the screen layout depending on what device model you are using.
Field 1
Field 2
Field 3 Field 4


