dst quick start 14005 - jetchip.com
TRANSCRIPT

Dynamic Spectum Tuner 14005
Quick Start Guide Revision C
COPYRIGHT The JET DST OBDII Tuner software is copyright 2005 with all rights reserved. The distribution and sale of this software are for the exclusive use of the original purchaser for use exclusively on computers privately owned by that purchaser. Unauthorized copying, duplicating, selling, or otherwise distributing the software is in violation of the Federal Copyright Law.
LICENSE AGREEMENT
Use of this product constitutes acceptance of these terms and conditions and an agreement to abide by them. This is a license agreement and not an agreement for sale. JET Performance Products owns, or has licensed from the owner, copyrights in this software. The original purchaser is granted a personal, nonexclusive, non-transferable license to use this software under the terms stated in this agreement. You may not assign or transfer the software or this license without the express written consent of JET Performance Products. Any attempt to sublicense, assign, or transfer any of the rights, duties, or obligations there under is void. You may not copy (except for backup purposes), modify, alter, electronically transfer, lease or rent the software. This license is in effect until terminated. You may terminate it at any time by destroying the software. It will also terminate if you fail to comply with any of the terms and conditions of this agreement. If the license terms are not acceptable, remove the software from your computer.
LIMITED WARRANTY AND DISCLAIMER
JET Performance Products warrants for a period of ninety (90) days from the date of delivery that the software, under normal use, will substantially perform as described in the documentation when used on the supported hardware and system software. JET Performance Products' entire liability and your exclusive remedy under this warranty will be at JET Performance Products' option, to attempt to correct or help you work around errors, replace the software with functionally equivalent software, or to refund the purchase price and terminate this Agreement. EXCEPT FOR PRIOR EXPRESS LIMITED WARRANTIES, JET PERFORMANCE PRODUCTS MAKES, AND YOU RECEIVE, NO WARRANTIES, EXPRESS, IMPLIED STATUTORY OR IN ANY COMMUNICATION WITH YOU, AND JET PERFORMANCE PRODUCTS SPECIFICALLY DISCLAIMS ANY IMPLIED WARRANTY OF MERCHANTABILITY OR FITNESS FOR A PARTICULAR PURPOSE. JET PERFORMANCE PRODUCTS DOES NOT WARRANT THAT THE OPERATION OF THE SOFTWARE WILL BE UNINTERRUPTED OR ERROR FREE.
LIMITATION OF LIABILITY
IN NO EVENT WILL JET PERFORMANCE PRODUCTS BE LIABLE TO YOU FOR ANY DAMAGES, INCLUDING LOST PROFITS, LOST SAVINGS, OR OTHER INCIDENTAL OR CONSEQUENTIAL DAMAGES ARISING FROM THE USE OF THE SOFTWARE, EVEN IF JET PERFORMANCE PRODUCTS HAS BEEN ADVISED OF THE POSSIBILITY OF SUCH DAMAGES.

Table of Contents
Introduction............................................................................................................................................................. 4 Minimum PC Requirements ................................................................................................................................... 4 Program Installation................................................................................................................................................ 4 USB Driver Installation .......................................................................................................................................... 4 Reading The PCM................................................................................................................................................... 5 Editing Calibration Files (Tuning) .......................................................................................................................... 8
Opening A Calibration File................................................................................................................................. 8 Editing A Calibration File................................................................................................................................... 8 Calibration Parameters ........................................................................................................................................ 8
Switch Type Calibration Parameters............................................................................................................... 9 Constant Type Calibration Parameters ........................................................................................................... 9 2D and 3D Calibration Tables ........................................................................................................................ 9 Diagnostic Type Calibration Parameters ...................................................................................................... 11
Accessing Calibration Parameters .................................................................................................................... 11 Saving a Calibration File .................................................................................................................................. 12
Programming the PCM ......................................................................................................................................... 13

JET Performance Products
4
Introduction The JET DST OBDII Tuner package includes a set of two programs that allow you to quickly and easily make calibration changes to your OBDII GM vehicle and the interface to connect your PC to the vehicle. The JET Flash program is used to read and program your vehicle’s PCM (Powertrain Control Module) and the DST program is used to view and edit the various calibration parameters. Minimum PC Requirements While the DST program will run on virtually any PC running Windows 98 or later, we recommend the following minimum PC specifications:
Pentium 266 Windows XP 64 MB RAM 600 x 800 display resolution 150 MB free hard drive space
Program Installation To install the DST program, insert your JET DST OBDII CD into your CD ROM drive and the setup program will run automatically. If the CD does not auto-start, navigate to your CD-ROM drive and double click on the application files named ‘AUTORUN’ (autorun.exe) to begin the installation process. Follow the on-screen instructions to complete the installation. Note: If you are running Microsoft Vista, Windows 7 or Windows 8 please install the DS Tuner program as follows: 1. Log on to your PC as an administrator. 2. In order for the programs to install correctly the installation program must be run in Compatibility mode. Open the CD in Windows Explorer. (Do not use the auto run feature.) Locate the application file named 'DST_setup.exe' in the DSTuner folder or if you downloaded the setup program from our web site then locate this file. Before running the setup program right click on it. Select Properties from the list and then click the Compatibility tab. From there, pick the default 'Windows XP SP2 (or SP3)', check the 'Run as administrator' box, click on the 'Apply' button and then click on the 'OK' button. - 3. Now double click on the file to run the setup program to install the DST Tuner program. Follow the on-screen instructions to complete the installation. 4. After completing the installation you'll also need to set the DST Tuner and JETFlash programs to run in compatibility mode. To do so, right click on the DST Tuner icon on your Desktop. Select Properties from the list and then click the Compatibility tab. From there, click on the 'Run the program in compatibility mode, select the default ‘Windows XP SP2’ (or SP3), check the 'Run as administrator' box, click on the 'Apply' button and then click on the 'OK' button.. Then locate the JETFlash icon on your Desktop and follow the same procedure as described above for the DST Tuner program.
USB Driver Installation Before connecting the DST interface to your PC for the first time you’ll need to install the USB drives for the interface. To install these drivers insert your JET DST OBDII CD into the CD ROM drive in your PC
JET Performance Products
5
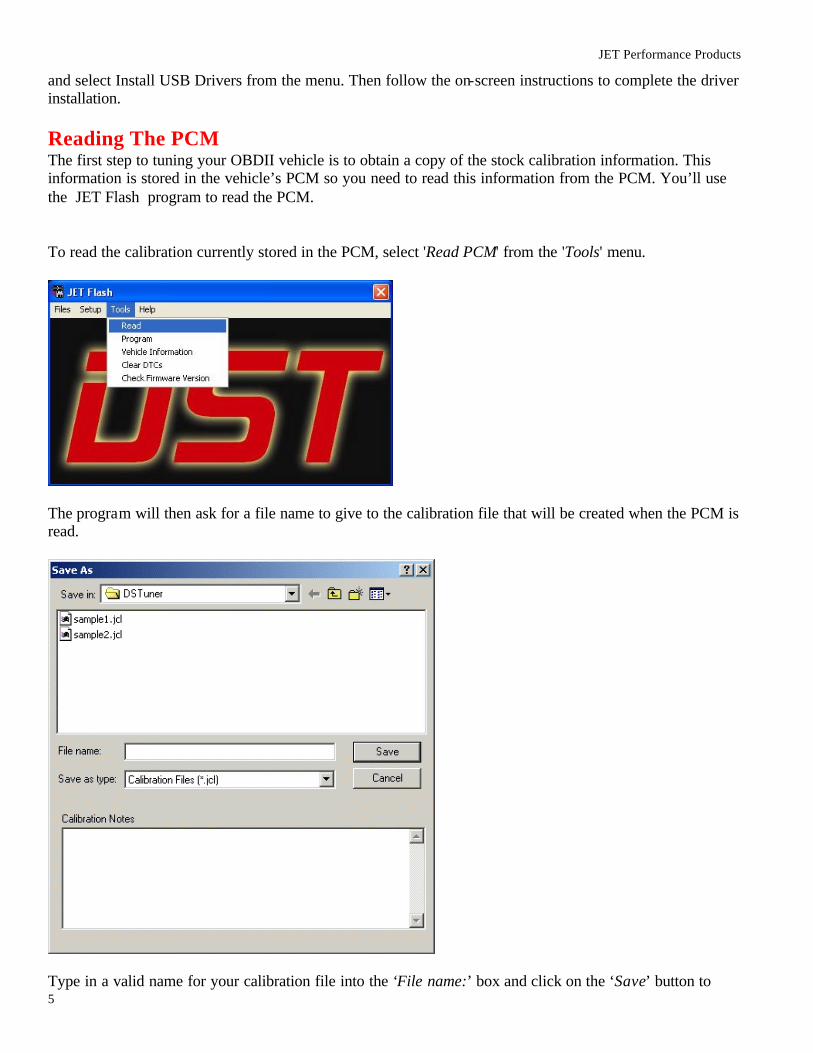
and select Install USB Drivers from the menu. Then follow the on-screen instructions to complete the driver installation. Reading The PCM The first step to tuning your OBDII vehicle is to obtain a copy of the stock calibration information. This information is stored in the vehicle’s PCM so you need to read this information from the PCM. You’ll use the JET Flash program to read the PCM. To read the calibration currently stored in the PCM, select 'Read PCM' from the 'Tools' menu.
The program will then ask for a file name to give to the calibration file that will be created when the PCM is read.
Type in a valid name for your calibration file into the ‘File name:’ box and click on the ‘Save’ button to

JET Performance Products
6
continue. You can add calibration no tes to your calibration file by typing the notes into the ‘Calibration Notes’ box in the lower half of the screen before clicking on the ‘Save’ button. These notes will be saved with the calibration information and can be viewed in both the JET Flash OBDII and DST programs.
After clicking on the ‘Save’ button the read PCM start screen will appear.
Before proceeding, connect the DST OBDII interface to your PC. Connect the other end of the converter to the ALDL diagnostics connector on the vehicle. (The ALDL connector is located under the dash on the

JET Performance Products
7
driver’s side.) Once the cable is connected, turn the ignition key on but DO NOT start the engine. After turning on the ignition, wait about 10 to 15 seconds to clear the GM security delay before proceeding with reading. Before proceeding:
1. Turn off all power consuming devices such as day time running light, interior lights, entertainment systems, etc.
2. Make sure your battery is fully charged. Do not attempt to read the PCM with a battery charger connected.)
3. Disable the OnStar system if installed Now click on 'OK' to begin the PCM read process. If all the connections have been properly made, the program will begin communicating with the PCM, sending the necessary instructions to start the memory read process. The following status window will be displayed during the read process:
The progress meter shows the progress on the reading of the PCM as it proceeds and the Status window describes what part of the process is currently underway. Depending on the type of vehicle and the PC you are using, the read will usually take about four minutes. When the FLASH read process is complete, the message shown below will be displayed:
Click 'OK' to complete the PCM read and close the Read Complete message box. The calibration information from your PCM will now be stored on your PC. NOTE: Its a good idea to keep a copy of the original stock calibration. This way, you'll have a baseline to return to if necessary.

JET Performance Products
8
Editing Calibration Files (Tuning) Now that you have a copy of the stock calibration that you can view and edit as needed. You will use the DST program to view and edit your calibration files. To begin tuning, run the DST program. Opening A Calibration File To open a PCM Calibration file select 'Open File' from the File menu or click on the Open File button on the tool bar at the top of the screen.
This will display the 'Open File' dialog box. Select the desired file and click the 'OK' button.
Select a calibration file and click on the ‘Open’ button to load the calibration file into the DST program. When you click on a calibration file name in the Open File screen, any notes that have been saved with the calibration file will be displayed in the Calibration Notes box at the bottom of the screen. Editing A Calibration File Once you have loaded a calibration file into DST program you are ready to begin tuning by editing the various calibration parameters. Calibration Parameters The JET DST program uses four different formats of calibration parameters to display the various

JET Performance Products
9
calibration values.
Switch Type Calibration Parameters The switch type calibration parameters are values that have only two states such as on or off , or Enabled or Disabled . This type of parameter will include calibration items such as ‘EGR System Enable’.
Constant Type Calibration Parameters Constant parameters represent single values or calibration constants such as the fan on temperature.
2D and 3D Calibration Tables Calibration Tables are used to display a series of values that depend on one (2D tables) or 2 other parameters (3D tables). An example of a typical 2D table would be the Knock Attack Rate Vs. RPM.

JET Performance Products
10
A good example of a common 3D table would be the Spark Advance versus Load versus RPM table.

JET Performance Products
11
Diagnostic Type Calibration Parameters The diagnostic type calibration parameters are paremeters that control the operation of the OBDII diagnostics.
Accessing Calibration Parameters The calibration parameters are grouped by the parame ter type as desdcribed above. To view and edit the various calibration parameters, select the type of parameter you want to work with by clicking on one of the calibration parameter menus at the top of the DST program screen.
For example, to view cons tant type parameters, click on the ‘Constants’ menu. The constant parameters are then arranged in sub-groups according to function. When you click on one of the calibration parameter menus the sub groups are then displayed.
To select the sub group you are interested in click on the sub group name to display all the parameters in that sub group. To make the calibration parameters easy to understand and more convenient to edit, the JET DST program displays all table values in correct engineering units rather than the binary values actually stored in the calibration file. You may view as many tables at once as you want. To view another table, simply select it from the menus.

JET Performance Products
12
To close a table, click on the window close box (X) in the upper right hand corner of the table. Note: You will NOT lose any changes that have been made to a table by closing it. The displayed table can be sized in height or width by clicking on an edge and dragging it to the desired size. Use the ‘Windows’ menu to arrange the tables you have open. Saving a Calibration File Once you are finished editing the calibration file you need to save it. To save the edited calibration file to a different file so you don’t over-write the original calibration file,select 'Save As' from the 'File' menu.
This will display the 'Save As' dialog box. Select another file or type in a new file name and click the 'Save' button.

JET Performance Products
13
Programming the PCM To test your modified calibration you need to program the new calibration into your vehicle’s PCM. This is done using the JET Flash program. Run the JET Flash program. Click on the ‘Tools’ menu and select ‘Program PCM’ from the drop-down list.
An Open File dialog screen will then be displayed.

JET Performance Products
14
Click on the file you want to use to program the PCM and then click on the ‘Open’ button. This will display the Program PCM connect message.

JET Performance Products
15
WARNING If the programming process does not complete successfully it is possible to damage the PCM. Under
no circumstances should you interrupt the programming process once it is started.
The following are recommendations for the successful programming of your PCM:
?? Before programming the PCM, make sure you can successfully read the PCM. This is a very similar process and if that is successful, then the programming should also work fine. YOU CAN NOT DAMAGE YOUR PCM BY READING IT.
?? Make sure the car battery is in good condition and fully charged. DO NOT try to program the PCM with a battery charger connected to the car battery. The correct range of the battery voltage for PCM programming is relatively narrow.
?? If you're using a laptop, make sure the laptop battery is fully charged. ?? Make sure you have good connections between the PC, ALDL connector and the interface cable and
that they are not likely to be unintentionally disconnected during the programming process. ?? Disable all power management functions on your PC. ?? Disable all screen savers on the PC. ?? Make sure there are no other applications (programs) running on your PC, including virus checkers. ?? Turn off all power consuming devices such as day time running light, interior lights, entertainment
systems, etc. ?? Make sure your battery is fully charged. Do not attempt to program the PCM with a battery charger
connected. ?? Disable the OnStar system if installed.
Before proceeding, connect DST OBDII interface to your PC. Connect the other end of the converter to the ALDL diagnostics connector on the vehicle. (The ALDL connector is located under the dash on the driver’s side.) Once the interface is connected, turn the ignition key on but DO NOT start the engine. After turning on the ignition, wait about 10 to 15 seconds to clear the GM security delay before proceeding with programming. Now click on 'OK' to begin the PCM programming process. If all the connections have been properly made, the program will begin communicating with the PCM, sending the necessary instructions to start the memory programming process. The programming status screen will then be displayed.
JET Performance Products
16
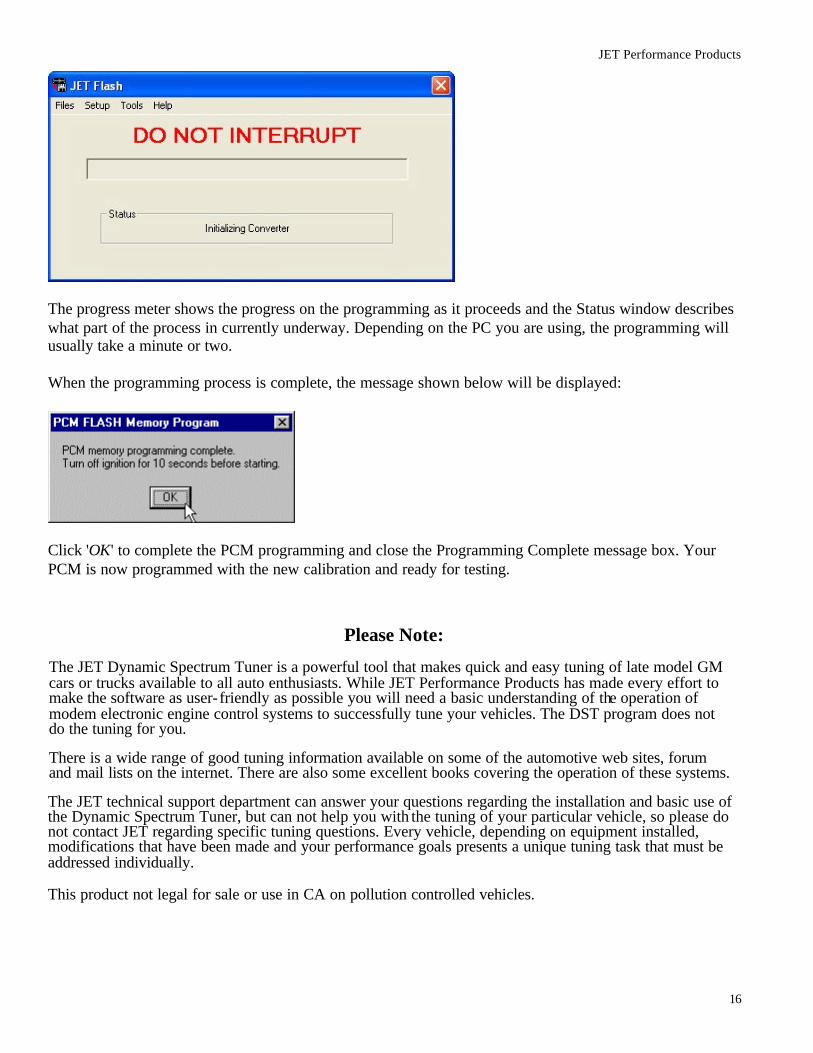
The progress meter shows the progress on the programming as it proceeds and the Status window describes what part of the process in currently underway. Depending on the PC you are using, the programming will usually take a minute or two. When the programming process is complete, the message shown below will be displayed:
Click 'OK' to complete the PCM programming and close the Programming Complete message box. Your PCM is now programmed with the new calibration and ready for testing.
Please Note:
The JET Dynamic Spectrum Tuner is a powerful tool that makes quick and easy tuning of late model GM cars or trucks available to all auto enthusiasts. While JET Performance Products has made every effort to make the software as user- friendly as possible you will need a basic understanding of the operation of modem electronic engine control systems to successfully tune your vehicles. The DST program does not do the tuning for you.
There is a wide range of good tuning information available on some of the automotive web sites, forum and mail lists on the internet. There are also some excellent books covering the operation of these systems.
The JET technical support department can answer your questions regarding the installation and basic use of the Dynamic Spectrum Tuner, but can not help you with the tuning of your particular vehicle, so please do not contact JET regarding specific tuning questions. Every vehicle, depending on equipment installed, modifications that have been made and your performance goals presents a unique tuning task that must be addressed individually. This product not legal for sale or use in CA on pollution controlled vehicles.

JET Performance Products
17
JET Performance Products 17491 Apex Circle
Huntington Beach, CA 92647
www.jetchip.com [email protected]