dynamics 365 for sales - user's guide...5 dynamics 365 for sales - user's guide dynamics...
TRANSCRIPT

1
Dynamics 365 for Sales - User's Guide
2
Contents
Dynamics 365 for Sales - User's Guide .............................................................................................5
Manage the sales process................................................................................................................5
Nurture sales from lead to order ....................................................................................................5
Create or edit a lead .....................................................................................................................6
Create a lead ............................................................................................................................6
Edit a lead ................................................................................................................................6
Qualify a lead and convert it to an opportunity ................................................................................6
Qualify a single lead ..................................................................................................................7
Qualify multiple leads.................................................................................................................7
What if you're no longer working a lead? ........................................................................................7
Re-open a lead ............................................................................................................................7
Create or edit an opportunity .........................................................................................................8
Create an opportunity ................................................................................................................8
Edit an opportunity ....................................................................................................................9
Add stakeholders to an opportunity .............................................................................................9
Additional considerations ......................................................................................................... 10
Close an opportunity as won or lost ............................................................................................. 10
Create or edit a competitor record ............................................................................................... 10
Create and work with quotes, orders, and invoices .......................................................................... 11
Create or edit a quote ................................................................................................................. 11
Create a quote from an opportunity........................................................................................... 11
Create a quote ........................................................................................................................ 11
Edit a quote ............................................................................................................................ 12
Create or edit an order ................................................................................................................ 12
Create an order from a quote ................................................................................................... 12
Create an order ....................................................................................................................... 13
Edit an order ........................................................................................................................... 13
Create or edit an invoice ............................................................................................................. 14
Create an invoice from an order ............................................................................................... 14
Create an invoice .................................................................................................................... 14
Edit an invoice......................................................................................................................... 15
Create an in-app marketing campaign............................................................................................. 15
Get started with in-app marketing ................................................................................................ 15
Import contacts, accounts, and leads ........................................................................................ 15
Create marketing lists .............................................................................................................. 15
Understand the difference between a campaign and a quick campaign ....................................... 15
Create a campaign or a quick campaign ................................................................................... 16
3
Track a campaign response ..................................................................................................... 17
See how your campaigns are doing with default marketing reports ............................................. 17
Let your customers unsubscribe from marketing communications ............................................... 17
Create a marketing list using in-app marketing ............................................................................. 17
Create a marketing list ............................................................................................................. 17
Add members to a marketing list .............................................................................................. 18
Associate campaigns or quick campaigns to a marketing list ...................................................... 20
Create or edit a campaign using in-app marketing ........................................................................ 21
Create a quick campaign using in-app marketing .......................................................................... 22
Add an activity to a campaign using in-app marketing ................................................................... 23
Add a planning activity to a campaign ....................................................................................... 23
Add a campaign activity to a campaign ..................................................................................... 24
Add a marketing list, sales literature, or product to a campaign using in-app marketing ................... 24
Track a marketing campaign response using in-app marketing (Sales) .......................................... 26
Create campaign responses manually ...................................................................................... 26
Create campaign responses automatically ................................................................................ 26
View and manage marketing communications with the Microsoft Dynamics Marketing Seller Portal . 26
View the Seller Portal for selected accounts .............................................................................. 27
View the Seller Portal for selected contacts ............................................................................... 27
Create and manage goals .............................................................................................................. 28
Create a goal .......................................................................................................................... 28
Edit a goal .............................................................................................................................. 28
Create or edit a goal rollup query ................................................................................................. 28
Copyright ...................................................................................................................................... 29

4

5
Dynamics 365 for Sales - User's Guide
Dynamics 365 for Sales helps you zero in on the right leads, contacts, and opportunities as you build out your team's sales pipeline. Built-in processes guide you from one stage of the sales process to the next, and easy-to-use dashboards help you set goals and provide actionable insights to help you close more deals.
Manage the sales process
Nurture sales from lead to order The sales process in Microsoft Dynamics 365 can help you close more sales and achieve higher customer satisfaction. You can achieve more consistent sales interactions by following the sales process as it takes you through each stage, from creating a lead to closing the sale. You also end up with a more complete history, which you can refer to later on if you plan to work with your customer again in the future, or if your customer needs support.
Your sales process begins with a lead—someone who is interested in the products or services you provide. Your leads might be automatically generated by Microsoft Dynamics Marketing, or they might come from other sources, such as website opt-in pages, email queries, or business cards you gather at trade shows.
Great job! You’ve got your lead…now what? If your lead isn’t already in Dynamics 365, start by creating your lead in the system.
After you’ve determined that your lead is interested in your solution and has the appropriate purchasing power, qualify your lead. Qualifying a lead in Dynamics 365 converts it to an opportunity.
Create or edit a lead
Qualify a lead and convert it to an opportunity
In this stage, you identify stakeholders, competitors, and sales team members and come up with a proposed solution.
Create or edit an opportunity
Now it’s time to present your proposal to your potential customer.
Create or edit an opportunity
Create or edit a quote
Did your opportunity accept or reject your proposal? Hopefully, congratulations are in order! Either way, at this stage you need to close your opportunity. This
Create or edit an order
Create or edit an invoice
Close an opportunity as won or lost

6
can include filling orders, preparing invoices, and sending follow-up messages, depending on how your organization handles the end game.
Note
Your Dynamics 365 system might look different because it was customized. This walkthrough guides you through the basic sales process, but your organization might offer further training for your system.
Create or edit a lead In Microsoft Dynamics 365, you use leads to keep track of business prospects that you haven't yet qualified through your sales process. A lead can be someone you’ve never done business with before, or it could be an existing client. You might get leads from different sources, such as advertising, networking, or email campaigns.
Create a lead
1. Go to Sales > Leads.
2. Click New.
3. In the Summary area of the Lead screen, type your lead’s company and contact information.
4. In the Details area of the Lead screen, type information about your lead’s industry and preferred
contact method.
5. Add any notes and activities (for example, phone calls or emails) related to this lead.
6. Click the Save button on the bottom right of the screen.
Edit a lead
1. Go to Sales > Leads.
2. Click the lead you want to edit.
3. Add any extra details you have about your lead.
4. Click the Save button on the bottom right of the screen.
Qualify a lead and convert it to an opportunity Does your lead have what you’re looking for—and vice versa? Once you’ve identified the timeframe, budget, purchase process, and decision makers for the sale, it’s time to qualify your lead. Qualifying a lead in Microsoft Dynamics 365 converts it to an opportunity.
Ideally, your leads or prospects should have a need that you can provide a solution for, and have the budget and influence necessary for making the purchasing decision. In addition, you should be able to provide their solution within the time frame they need it.

7
Qualify a single lead
1. Go to Sales > Leads.
2. Select the lead you want to qualify.
3. In the Qualify section of the sales process bar, type in all applicable information.
4. Click Qualify at the top of the Lead screen.
5. Click the Save button at the bottom right of the screen.
Qualify multiple leads
1. Go to Sales > Leads.
2. Select the check box next to all leads that you want to qualify.
3. Click Qualify at the top of the screen.
What if you're no longer working a lead? Let’s say you’ve been talking to a lead, and you determine that continuing to work the lead wouldn’t be worth the time, at least not right now. Not great news, but it happens.
You’ll need to disqualify the lead, and give the reason.
Note
While you could delete the lead, doing that isn’t recommended. Deletions can’t be undone, and deleting a lead also deletes any notes and documents associated with the lead. Instead, disqualify the lead to preserve the history. In addition, disqualifying the lead allows you to re-open the lead later if needed.
1. Open the lead.
2. On the command bar, click Disqualify, and then select the reason.
Re-open a lead Great news! A lead that you thought wasn’t interested has contacted you, and it looks like the person will buy after all. Assuming that you disqualified the lead (instead of deleting), you’ll be able to re-open it without re-entering all the old information.

8
1. On the list of activities, click the down arrow and then select the Closed Leads view.
2. Click the lead you want to re-open, and then click Reactivate Lead.
Create or edit an opportunity An opportunity is a lead who is now almost ready to buy—in other words, it’s a deal that you’re ready to win.
At this point in the sales process, you’re most likely in either the Develop or Propose stage. More information: Nurture sales from lead to order
Create an opportunity If you’re following the sales process from start to finish, you qualify a lead to turn it into an opportunity. More information: Nurture sales from lead to order
If you want to create an opportunity without first creating a lead, do the following:
9
1. Go to Sales > Opportunities.
2. Choose New.
3. In the Summary area of the Lead screen, type your lead’s company and contact information.
4. In the Details area of the Lead screen, type information about your lead’s industry and preferred
contact method.
5. Add any notes and activities (for example, phone calls or emails) related to this lead. More
information:
6. To add stakeholders, in the Stakeholders area, choose +.
7. To add sales team members, in the Sales Team area, choose +.
8. To add competitors, in the Competitors area, choose +.
9. To add products, in the Products area, choose +.
10. To add a quote, in the Quotes area, choose +. More information: Create or edit a quote
11. Choose the Save button on the bottom right of the screen.
Edit an opportunity
1. Go to Sales > Opportunities.
2. Choose the opportunity you want to edit.
3. Add any extra details you have about your lead.
4. Choose the Save button on the bottom right of the screen.
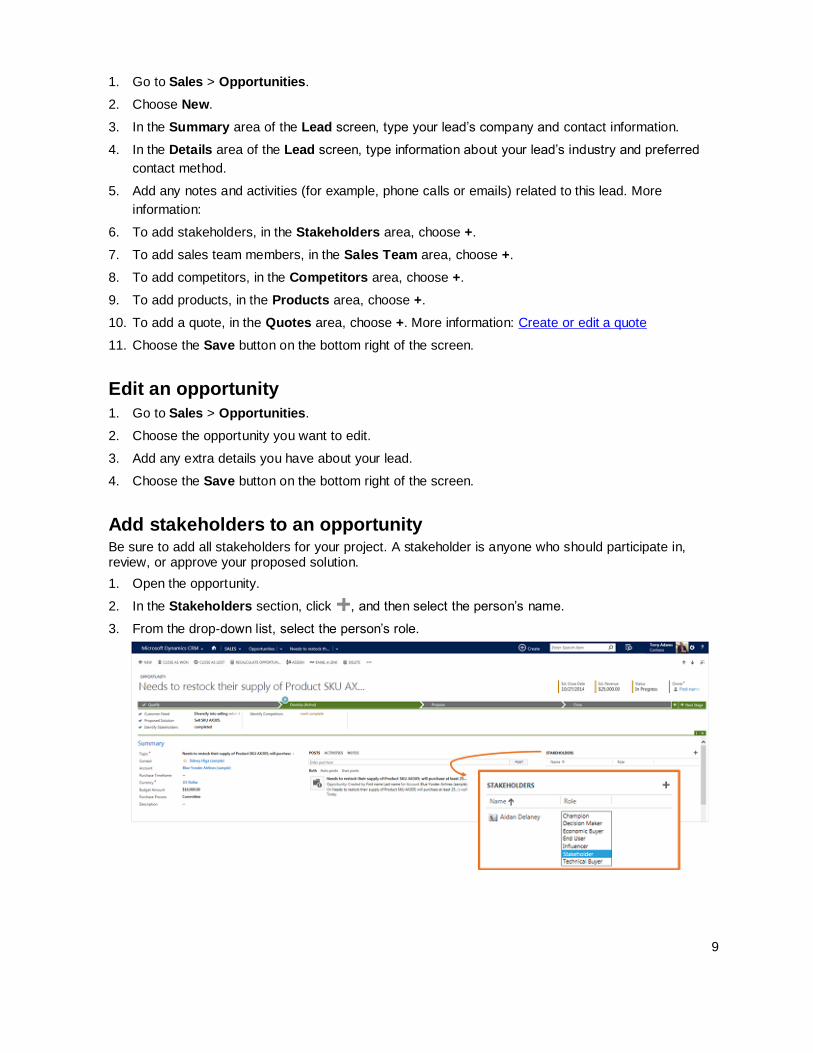
Add stakeholders to an opportunity Be sure to add all stakeholders for your project. A stakeholder is anyone who should participate in, review, or approve your proposed solution.
1. Open the opportunity.
2. In the Stakeholders section, click , and then select the person’s name.
3. From the drop-down list, select the person’s role.

10
Additional considerations
• A way that might help you increase your sales is to add all products that your customer might need.
Your Dynamics 365 system might offer product bundles or product families to make it easier for you
to choose products for upsell and cross-sell.
• If other people in your organization are working on this sale, be sure to add them as sales team
members.
• Nurture your opportunities through a Dynamics 365 marketing campaign. More information: Get
started with in-app marketing
Close an opportunity as won or lost If your customer has accepted your proposal, congratulations! Whether your customer accepted or declined your proposal, however, it’s now time to close that opportunity.
1. Go to Sales > Opportunities.
2. Choose the opportunity you want to edit.
3. To close your opportunity as won, choose Close as Won at the top of the Opportunity screen.
- OR -
To close your opportunity as lost, choose Close as Lost at the top of the Opportunity screen.
Create or edit a competitor record You already know that tracking your competitors and their strengths and weaknesses can help you win sales. Microsoft Dynamics 365 lets you store the details about competitors so that you and your colleagues can share and stay current with the latest details.
1. Choose Sales > Competitors.
2. Do one of the following:
• If you're using the Dynamics 365 application, click New.
• If you're using Dynamics 365 for Outlook, in the Records tab, click New.
3.
Fill in your information. Use the handy tooltips as a guide.
4. Choose Save.
5. To associate a competitor with an opportunity, in the Opportunity area, choose . In the Search
box, choose the Lookup icon, and then select an opportunity from the results.
11
Create and work with quotes, orders, and invoices
Create or edit a quote One way you might increase your sales is to add all products that your customer might need to your quote. Your Microsoft Dynamics 365 system might offer product bundles or product families to make it easier for you to choose products for upsell and cross-sell.
Most sales begin with a price quote, which eventually becomes an order.
You’ll probably edit a quote multiple times as a sale progresses. Initially, you create a draft, and then you need to activate it when it’s ready to go to a customer.
When the customer accepts the quote, you create an order. Otherwise, you close the quote as revised, canceled, or lost.
Create a quote from an opportunity
1. Go to Sales > Opportunities.
2. Choose the opportunity you want to add a quote to.
3. In the Quotes area of the Opportunity screen, choose +.
4. To add products from your opportunity to your quote, click Get Products at the top of the Quote
screen and choose OK.
5. Type shipping and payment information in the Shipping Information area of the Quote screen.
6. Type the billing and shipping addresses in the Addresses area of the Quote screen.
7. Choose the Save button at the bottom right corner of the screen.
8. When your quote is ready to send to your customer, choose Activate Quote at the top of the
screen.
Create a quote
1. Go to Sales > Quotes.
2. Choose New.
3. Add your customer’s contact information.
4. To add products from your opportunity to your quote, choose Get Products at the top of the Quote
screen and choose OK.
5. In the Shipping Information area, type shipping details.
12
6. In the Addresses area, type shipping and billing addresses.
7. Choose the Save button at the bottom right corner of the screen.
8. When your quote is ready to send to your customer, choose Activate Quote at the top of the
screen.
Edit a quote
1. Go to Sales > Quotes.
2. Choose the quote you want to edit.
3. Add or change any details about your quote.
4. Choose the Save button at the bottom right corner of the screen.
5. When your quote is ready to send to your customer, choose Activate Quote at the top of the
screen.
Create or edit an order Congratulations! Your hard work nurturing your customer has paid off and they’re ready to place an order for your products or services. In Microsoft Dynamics 365, an order can originate from a customer's acceptance of a quote, or you can place an order without an accepted quote, depending on the situation.
One way that can help you increase your sales is to add all products that your customer might need to your order. Your Dynamics 365 system might offer product bundles or product families to make it easier for you to choose products for upsell and cross-sell. If you’ve already prepared a quote for your customer, you can create an order from that quote.
Create an order from a quote Typically, you convert a quote that you have won into an order. Start with an active quote. Note that once a quote is accepted, you won’t be able to revise it.
1. Go to Sales > Quotes.
2. Select the quote you want to create an order from.
3. Click Create Order at the top of the Quote screen.
4. Add a description and indicate whether or not you want to close the opportunity in the Create
Order window and click OK.
5. To add products from your opportunity to your quote, click Get Products at the top of the screen,
select your opportunity, and click OK.
6. Click the Save button at the bottom right corner of the screen.
13
Create an order You can create an order that is based on your communication with a customer, instead of an accepted quote.
1. Go to Sales > Orders.
2. Click New.
3. Add your customer’s contact information.
4. To add products from your opportunity to your order, click Get Products at the top of the screen,
select your opportunity, and click OK.
Note
You need to enter the tax amount when you add a product to a quote, order, or invoice. Microsoft Dynamics 365 does not automatically calculate tax for individual products. However, the total tax is calculated automatically based on the sum of the tax amounts for all of the individual products in a quote, order, or invoice.
5. In the Shipping Information area, type shipping details.
6. In the Addresses area, type shipping and billing addresses.
7. Click the Save button at the bottom right corner of the screen.
Note
You close an order by either fulfilling the order or canceling the order. Products or services that are shipped are fulfilled. You should cancel orders for any products or services that are not shipped.
You can’t update or change an order after it has been closed or if it has been partially or completely fulfilled.
Edit an order
1. Go to Sales > Orders.
2. Select the order you want to edit.
3. Add or change any details about your order.
4. Click the Save button at the bottom right corner of the screen.

14
Create or edit an invoice When a customer places an order, you can create an invoice to bill them for the upcoming sale.
Typically, you convert an order into an invoice. However, you can also create an invoice that does not originate from an order.
Create an invoice from an order
1. Go to Sales > Orders.
2. Choose the order you want to create an invoice from.
3. Choose Create Invoice at the top of the screen.
4. Review the contents of the invoice and make any additions or corrections before sending to your
customer.
Create an invoice
1. Go to Sales > Invoices.
2. Choose New.
3. Add your customer’s contact information.
4. Choose Save at the top left to create the invoice record.
5. To add products from your opportunity to your order, choose Get Products at the top of the screen,
select your opportunity, and click OK.
6. To add information about a product on the invoice, in the Products area, choose the Add a
Product button , and then choose one of the following options:
Existing Product. A product created in the product catalog that is associated with a price list.
Write-in Product. A product that is available but not a part of the product catalog.
Get Products. Select products from a previously created opportunity.
You need to enter the tax amount when you add a product to a quote, order, or invoice. Microsoft Dynamics 365 doesn’t automatically calculate tax for individual products. However, the total tax is calculated automatically based on the sum of the tax amounts for all of the individual products in a quote, order, or invoice.
1. In the Shipping Information area, type shipping details.
2. In the Addresses area, type shipping and billing addresses.
3. Choose the Save button at the bottom right corner of the screen.
Note
You close an invoice either by canceling the invoice or setting the invoice status as paid.

15
Edit an invoice
1. Go to Sales > Invoices.
2. Choose the invoice you want to edit.
3. Add or change any details about your invoice.
4. Choose the Save button at the bottom right corner of the screen.
Create an in-app marketing campaign
Get started with in-app marketing Promote your business and improve sales with targeted marketing campaigns in Microsoft Dynamics 365. Create activities for each campaign and assign them to different team members. Track customer response and costs for each campaign. Follow this step-by-step guide to get started with your marketing campaigns.
Note
The Marketing work area within Dynamics 365 provides basic marketing features and gets you started with running marketing campaigns. Microsoft Dynamics Marketing takes you to the next level by providing deep customer insights and behavioral data to help plan and analyze your campaigns, greater functionality for automation and collaborating with team members, and social media integration. More information: Microsoft Dynamics Marketing Help Center
Import contacts, accounts, and leads Get your customer records into Microsoft Dynamics 365, and add these to marketing lists so you can target your campaigns.
Create marketing lists Group accounts, contacts, or leads into a targeted marketing list. You can create a marketing list easily with the search functionality in Microsoft Dynamics 365, so you find all of your customers in a particular area, for example, and add them to the member list. More information: Create a marketing list using in-app marketing
Understand the difference between a campaign and a quick
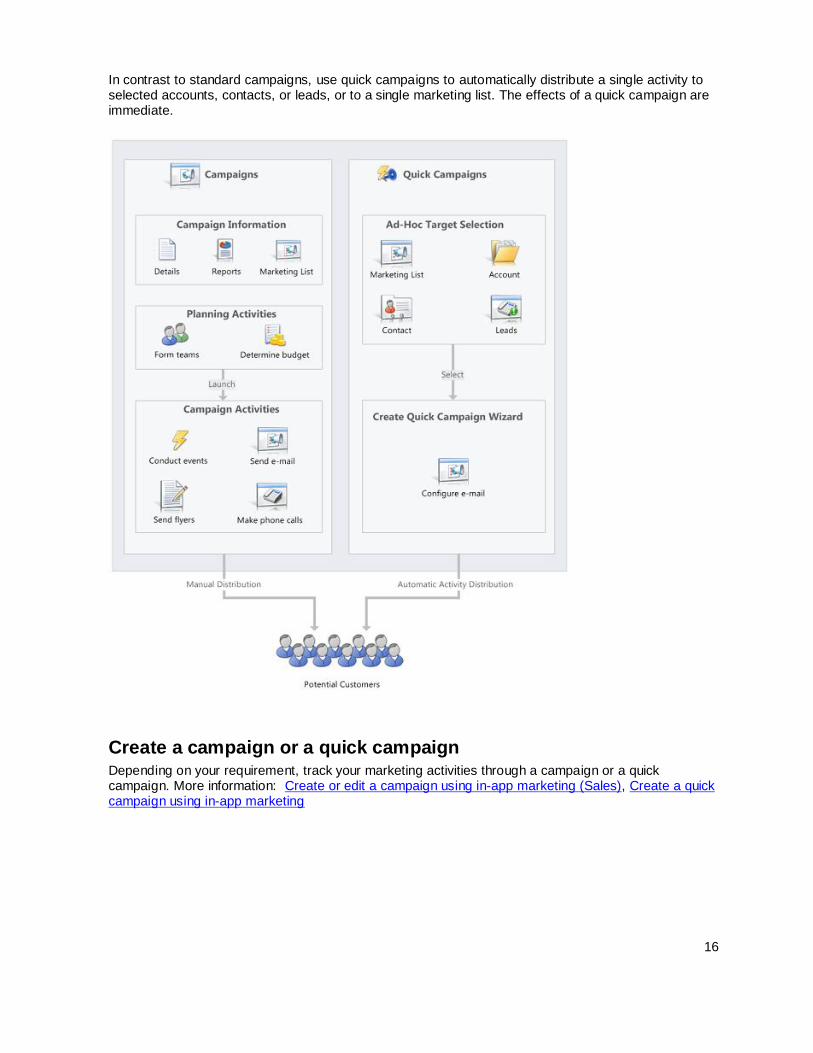
campaign In Microsoft Dynamics 365, use standard campaigns to manage the end-to-end process of a complete marketing campaign, like managing campaign and planning activities, distributing the activities to other team members, and tracking how the campaign did. Campaigns include extensive tracking features, including detailed information, reports, and multiple marketing lists.
16
In contrast to standard campaigns, use quick campaigns to automatically distribute a single activity to selected accounts, contacts, or leads, or to a single marketing list. The effects of a quick campaign are immediate.
Create a campaign or a quick campaign Depending on your requirement, track your marketing activities through a campaign or a quick campaign. More information: Create or edit a campaign using in-app marketing (Sales), Create a quick campaign using in-app marketing
17
Track a campaign response Record the replies you get from the potential customers in response to a specific marketing campaign to make sure your team can act on the responses. Measure the success of specific campaign activities based on their response rates. More information: Track a marketing campaign response using in-app marketing
See how your campaigns are doing with default marketing reports Use one of the following reports to assist you in monitoring and analyzing marketing activities:
• Campaign Activity Status: Use this report to track a campaign. The report displays a summary for
one campaign.
• Campaign Comparison: Use this report to identify your most and least successful campaigns.
• Campaign Performance: Use this report to track the progress and status of your campaigns.
Let your customers unsubscribe from marketing communications You can enable customers to unsubscribe from email marketing communications your organization sends them.
Note that you cannot add unsubscribe functionality to direct email or email templates.
Create a marketing list using in-app marketing Your marketing list is the core of running a successful marketing campaign. It can include any one type of customer record, such as leads, accounts, or contacts.
You can create two types of marketing lists:
• Static Use a static list if you prefer to add and update members manually.
• Dynamic Use a dynamic marketing list if you want the list to return a list of members dynamically
when needed, based on search criteria you set. For example, if you want to run a campaign to
members of a specific city, use a dynamic list. A dynamic marketing list retrieves the updated list of
members each time you open the list, create a quick campaign from the list, or distribute a
campaign activity for a campaign associated with the list.
Create a marketing list
1. Go to Marketing > Marketing Lists.
2. Click New.
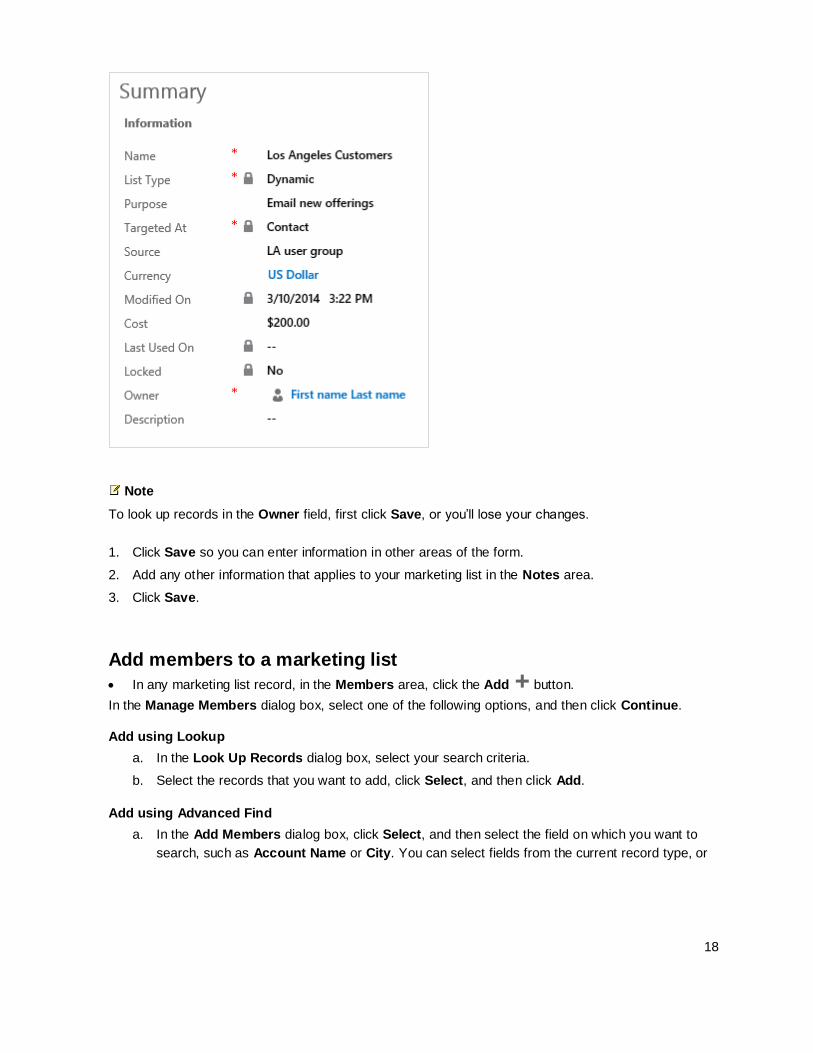
3. Add or change the information in the Summary area. This screenshot provides an example.
18
Note
To look up records in the Owner field, first click Save, or you’ll lose your changes.
1. Click Save so you can enter information in other areas of the form.
2. Add any other information that applies to your marketing list in the Notes area.
3. Click Save.
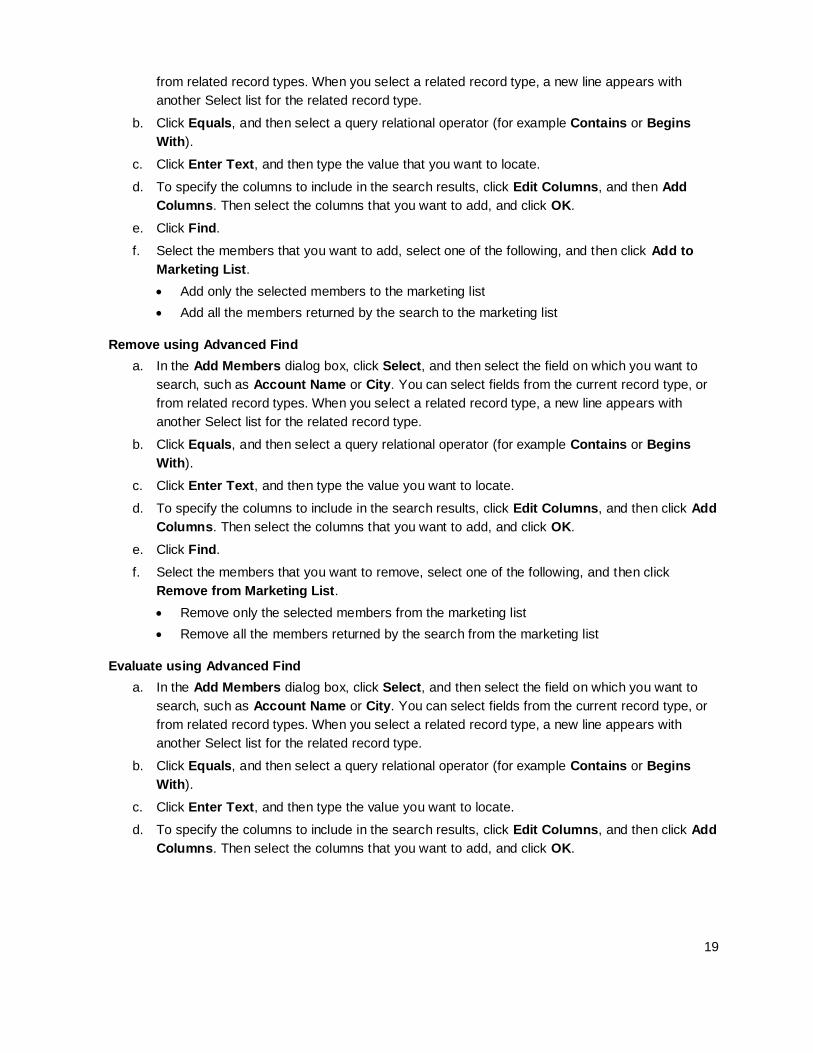
Add members to a marketing list
• In any marketing list record, in the Members area, click the Add button.
In the Manage Members dialog box, select one of the following options, and then click Continue.
Add using Lookup
a. In the Look Up Records dialog box, select your search criteria.
b. Select the records that you want to add, click Select, and then click Add.
Add using Advanced Find
a. In the Add Members dialog box, click Select, and then select the field on which you want to
search, such as Account Name or City. You can select fields from the current record type, or
19
from related record types. When you select a related record type, a new line appears with
another Select list for the related record type.
b. Click Equals, and then select a query relational operator (for example Contains or Begins
With).
c. Click Enter Text, and then type the value that you want to locate.
d. To specify the columns to include in the search results, click Edit Columns, and then Add
Columns. Then select the columns that you want to add, and click OK.
e. Click Find.
f. Select the members that you want to add, select one of the following, and then click Add to
Marketing List.
• Add only the selected members to the marketing list
• Add all the members returned by the search to the marketing list
Remove using Advanced Find
a. In the Add Members dialog box, click Select, and then select the field on which you want to
search, such as Account Name or City. You can select fields from the current record type, or
from related record types. When you select a related record type, a new line appears with
another Select list for the related record type.
b. Click Equals, and then select a query relational operator (for example Contains or Begins
With).
c. Click Enter Text, and then type the value you want to locate.
d. To specify the columns to include in the search results, click Edit Columns, and then click Add
Columns. Then select the columns that you want to add, and click OK.
e. Click Find.
f. Select the members that you want to remove, select one of the following, and then click
Remove from Marketing List.
• Remove only the selected members from the marketing list
• Remove all the members returned by the search from the marketing list
Evaluate using Advanced Find
a. In the Add Members dialog box, click Select, and then select the field on which you want to
search, such as Account Name or City. You can select fields from the current record type, or
from related record types. When you select a related record type, a new line appears with
another Select list for the related record type.
b. Click Equals, and then select a query relational operator (for example Contains or Begins
With).
c. Click Enter Text, and then type the value you want to locate.
d. To specify the columns to include in the search results, click Edit Columns, and then click Add
Columns. Then select the columns that you want to add, and click OK.

20
e. Click Find.
f. Select the members that you want to keep, select one of the following, and then click Update
Marketing List.
• Keep only the selected members in the marketing list
• Keep all the members returned by the search in the marketing list
Define the member selection criteria for a dynamic marketing list
1. In any marketing list, in the Members area, click the Add button.
2. In the Manage Members dialog box, click Select, and then select the field on which you want to
search, such as Account Name or City. You can select fields from the current record type, or from
related record types.
When you select a related record type, a new line appears with another Select list for the related record type.
3. Click Equals, and then select a query relational operator.
4. Click Enter Value, and then type the value that you want to locate (for example, "Seattle" or
"Email").
For some values, you can click the Lookup icon to open the Select Values dialog box and select the value you want.
5. To specify the columns to include in the search results, click Edit Columns, and then Add
Columns. Select the columns that you want to add, and click OK.
6. Click Use Query to add the matching records to your dynamic marketing list.
Associate campaigns or quick campaigns to a marketing list After you have created a campaign or quick campaign, you can associate it to your marketing list. You can also create a new campaign or quick campaign from your marketing list.
1. In the Campaigns or Quick Campaigns area, click the Add button.
2. Search for the campaign or quick campaign you want to associate to this marketing list.
Notes
• If you don’t have any campaigns, or if you want to create a new one, you can click + New. If you don’t have any quick campaigns, the Quick Campaign Wizard will start.
• This topic applies to the Marketing work area within Microsoft Dynamics 365. The Dynamics 365
Marketing work area provides a way for your sales force to run sales-driven marketing activities. If you use Microsoft Dynamics Marketing along with Dynamics 365, you might be looking for a similar topic for that product. Dynamics Marketing provides a full-scale set of functionality, automation, and analytical insights for multistage and multichannel campaigns. More information: Microsoft Dynamics Marketing Help Center

21
Create or edit a campaign using in-app marketing Promote your business, expand your reach to new customers, and improve sales by using campaigns in Microsoft Dynamics 365. Use campaigns to store all your marketing information and activities, and to measure the success of your efforts. Campaigns contain planning tasks and campaign activities you need to manage for the marketing campaigns.
Add strategic campaign information to your campaign, such as:
• Budgets and expenses
• Promotion codes
• Target products
• Marketing collateral, including sales literature
• Target marketing lists
Campaigns can include whatever planning activities you want to perform before you launch the campaign, and also the campaign activities you want to manage as part of the campaign. More information: Add an activity to a campaign using in-app marketing
1. Go to Marketing > Campaigns.
2. To create a new campaign, click New.
- OR -
To edit a campaign, open a campaign from the list.
3. Add or change information in the text boxes.
a. In the Campaign section, enter the campaign details such as, name, type, and the expected
response rate.
b. In the Schedules section, enter the proposed and actual start and end dates of the campaign.
c. Under Financials, enter details about the cost of the campaign and campaign activities, and
the budget and revenue of the campaign.
d. To track conversations in the planning phase of the campaign, in the Activities area, add
activities.
4. When you’re ready to save your data, click Save.
5. To add a marketing list to the campaign, in the Marketing Lists area, click +, and in the Look Up
Records dialog box, find and select a marketing list.
6. To create planning and campaign activities for your campaign, for example, identifying advertising
channels or prepare campaign communications to send to the members on the marketing lists, see
Add an activity to a campaign using in-app marketing.
Note
This topic applies to the Marketing work area within Microsoft Dynamics 365. The Dynamics 365 Marketing work area provides a way for your sales force to run sales-driven marketing activities. If you
22
use Microsoft Dynamics Marketing along with Dynamics 365, you might be looking for a similar topic for that product. Dynamics Marketing provides a full-scale set of functionality, automation, and analytical insights for multistage and multichannel campaigns.More information: Microsoft Dynamics Marketing Help Center
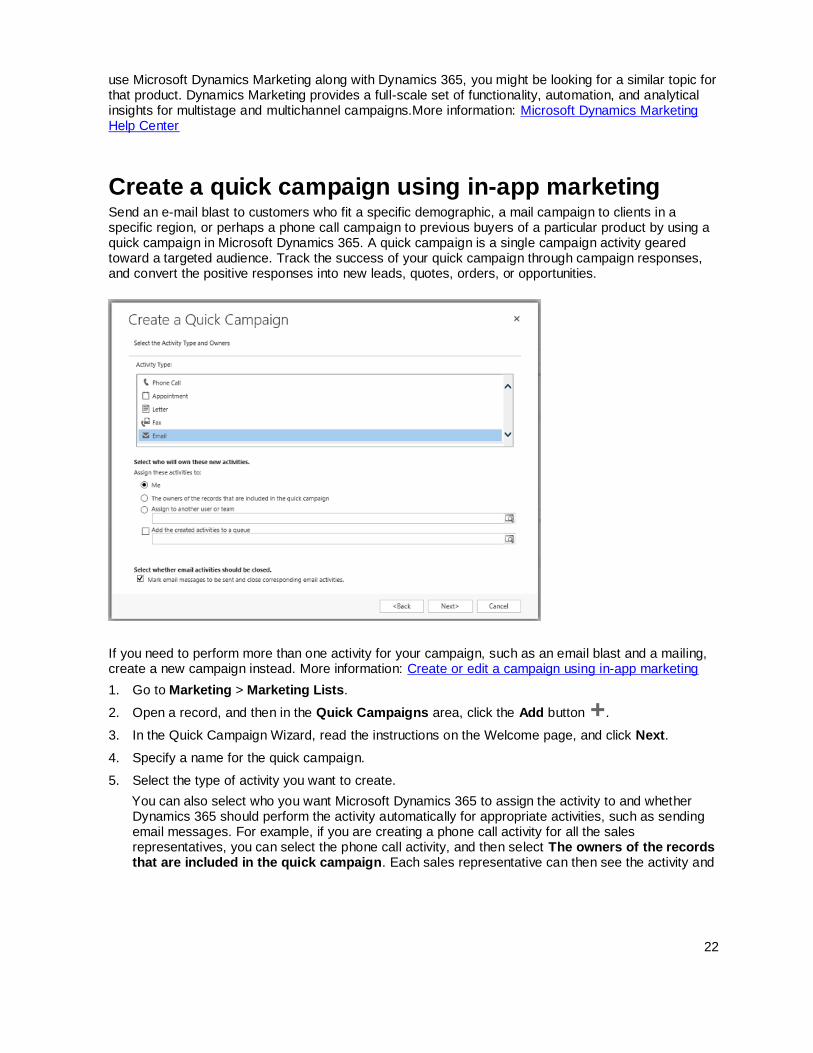
Create a quick campaign using in-app marketing Send an e-mail blast to customers who fit a specific demographic, a mail campaign to clients in a specific region, or perhaps a phone call campaign to previous buyers of a particular product by using a quick campaign in Microsoft Dynamics 365. A quick campaign is a single campaign activity geared toward a targeted audience. Track the success of your quick campaign through campaign responses, and convert the positive responses into new leads, quotes, orders, or opportunities.
If you need to perform more than one activity for your campaign, such as an email blast and a mailing, create a new campaign instead. More information: Create or edit a campaign using in-app marketing
1. Go to Marketing > Marketing Lists.
2. Open a record, and then in the Quick Campaigns area, click the Add button .
3. In the Quick Campaign Wizard, read the instructions on the Welcome page, and click Next.
4. Specify a name for the quick campaign.
5. Select the type of activity you want to create.
You can also select who you want Microsoft Dynamics 365 to assign the activity to and whether Dynamics 365 should perform the activity automatically for appropriate activities, such as sending email messages. For example, if you are creating a phone call activity for all the sales representatives, you can select the phone call activity, and then select The owners of the records that are included in the quick campaign. Each sales representative can then see the activity and
23
take action on it. However, if you are creating a large number of email activities that Dynamics 365 will perform automatically, you can assign the email activity to yourself instead of the record owners.
6. Add or change information in the text boxes in the activity form, and click Next.
7. Click Create.
Notes
• You can’t add records to a quick campaign after you create it.
• This topic applies to the Marketing work area within Microsoft Dynamics 365. The Dynamics 365 Marketing work area provides a way for your sales force to run sales-driven marketing activities. If you use Microsoft Dynamics Marketing along with Dynamics 365, you might be looking for a similar topic for that product. Dynamics Marketing provides a full-scale set of functionality, automation, and analytical insights for multistage and multichannel campaigns. More information: Microsoft Dynamics Marketing Help Center
Add an activity to a campaign using in-app marketing Make your marketing campaigns successful by creating, distributing, and assigning planning and campaign activities in Microsoft Dynamics 365. Planning activities are those you want to perform before you launch the campaign, and campaign activities are those you want to manage as part of the campaign. Examples of planning and campaign activities you can add include:
• Identify advertising channels and supporting materials
• Contact media channels to reserve time or space for advertising
• Create or refine target marketing lists
• Contact a design agency to request creation of collateral pieces and advertising materials
By default, a campaign targets an activity to the group of marketing lists that you select for the campaign. If you want to run a campaign activity on a subset of your marketing lists, you can distribute the activity to certain members instead.
Add a planning activity to a campaign
1. Go to Marketing > Campaigns.
2. In the campaign record you want to add the planning activity to, on the nav bar, click the down
arrow next to the campaign you’re working on and then click Planning Activities.
3. To add a new activity, click Add New Activity, and then select the type of activity you want to
create.
-OR-
To add an existing activity, click Add Existing Activity. In the inline lookup field, search for and select the activity.
4. In the new activity form, add or change information in the text boxes.
5. When you’re ready to save your data, click Save.

24
Add a campaign activity to a campaign
1. Go to Marketing > Campaigns.
2. In the campaign record you want to add the campaign activity to, on the nav bar, click the down
arrow next to the campaign you’re working on and then click Campaign Activities.
3. Click Add New Campaign Activity.
4. Type in all the information you can, and then click Save. This creates the campaign activity so you
can do more things with it, like add marketing lists.
5. To add a marketing list, click +. In the Look Up Records box, type in your search and click the
Search button, select one or more marketing lists, and click Add.
6. To distribute the new campaign activity, on the command bar, click Distribute Campaign Activity.
7. In the activity form, type or modify information in the text boxes, and click Distribute.
8. Choose who will own the activities, and click Distribute.
Note
You can only distribute campaign activities of type “mail merge” to marketing lists that contain the same
type of record. For example, if one marketing list contains accounts and a second marketing list
contains leads, the mail merge campaign activity will fail. Create a separate mail merge campaign
activity for each group of marketing lists with the same record type.
9. After all the distributed activities are closed, you can close the campaign activity. To close the
campaign activity, open the campaign activity record, and on the command bar, click Close
Campaign Activity. Set an appropriate status for the activity, and click OK.
10. When the activity is completed, update the campaign activity record with the actual costs. Open the
campaign activity and update the Actual Cost field. This can help guide you in planning future
campaign activities.
Note
This topic applies to the Marketing work area within Microsoft Dynamics 365. The Dynamics 365 Marketing work area provides a way for your sales force to run sales-driven marketing activities. If you use Microsoft Dynamics Marketing along with Dynamics 365, you might be looking for a similar topic for that product. Dynamics Marketing provides a full-scale set of functionality, automation, and analytical insights for multistage and multichannel campaigns. More information: Microsoft Dynamics Marketing Help Center
Add a marketing list, sales literature, or product to a campaign using in-app marketing Add all items to your campaign that your need in this marketing context. Usually you need to add marketing lists, but you might also want to refer campaigns to products and related campaigns, or you might want to add sales literature that documents sales procedures.

25
1. Go to Marketing > Campaigns.
2. Choose the name of the campaign that you want to add a list, product, or sales literature to. In the
nav bar, click the down arrow next to your campaign.
The following table shows what you need to do to add each type of item.
To add Do this
A marketing list Click Target Marketing Lists, and then click Add Existing Marketing List.
A product Click Target Products, and then click Add Existing Product.
Sales literature Click Sales Literature, and then click Add Existing Sales Literature.
A related campaign Click Related Campaigns, and then click Add Existing Campaign.
3. Select the type of record you want in the Look Up Records dialog box, in the Look for list.
4. Type the first few letters of the name of the record to narrow your search in the Search box, and
then click the Find button .
5. Select the check boxes for the records that you want to add in the list of records that appears, click
Add, and then click OK.
6. Click Save or Save and Close.
Note
To verify that the item you selected was added to the campaign, reopen the campaign. Under
Marketing, click Target Marketing Lists, or under Sales click either Target Products or Sales
Literature. The information you added appears in the list.
Note
This topic applies to the Marketing work area within Microsoft Dynamics 365. The Dynamics 365
Marketing work area provides a way for your sales force to run sales-driven marketing activities. If you
use Microsoft Dynamics Marketing along with Dynamics 365, you might be looking for a similar topic for
that product. Dynamics Marketing provides a full-scale set of functionality, automation, and analytical
insights for multistage and multichannel campaigns. More information: Microsoft Dynamics Marketing
Help Center

26
Track a marketing campaign response using in-app marketing (Sales) Record the replies you get from potential customers in response to a specific marketing campaign to make sure your team can act on the responses. Measure the success of specific campaign activities based on their response rates. You can manually create campaign responses in Microsoft Dynamics 365 or have Dynamics 365 generate them automatically.
Create campaign responses manually
1. Go to Marketing > Campaigns.
2. Select the campaign that you want to add campaign responses to, and under Responses, click
Add .
3. Add information in the Campaign Response form.
4. Click Save.
Create campaign responses automatically Make sure that you have the System Administrator or System Customizer security role or equivalent permissions.
1. Go to Settings > Administration.
2. Click the System Settings > Marketing tab.
3. Set the Create campaign responses for incoming email option to Yes.
Note
This topic applies to the Marketing work area within Microsoft Dynamics 365. The Dynamics 365 Marketing work area provides a way for your sales force to run sales-driven marketing activities. If you use Microsoft Dynamics Marketing along with Dynamics 365, you might be looking for a similar topic for that product. Dynamics Marketing provides a full-scale set of functionality, automation, and analytical insights for multistage and multichannel campaigns. More information: Microsoft Dynamics Marketing Help Center
View and manage marketing communications with the Microsoft Dynamics Marketing Seller Portal Stay up-to-date with communications that your Marketing department has sent to your contacts with the Seller Portal in Microsoft Dynamics Marketing. Access the Seller Portal from within Microsoft Dynamics 365 to stay well-informed about communications your customers have received from Microsoft Dynamics Marketing or to remove them from campaigns that don’t apply to them.
For more information about working with the Seller Portal in Microsoft Dynamics Marketing, see Use the Seller Portal to see and manage which messages are reaching your contacts.
27
If you’re a Dynamics 365 administrator who wants to enable the Seller Portal for your users, see Dynamics Marketing for Dynamics 365 users.
View the Seller Portal for selected accounts
1. Go to Sales > Accounts.
2. Select the accounts for which you want to view marketing communications in Microsoft Dynamics
Marketing.
3. Click the More button … at the top of the screen and then click View Marketing Portal.
4. Sign in to Microsoft Dynamics Marketing if prompted.
View the Seller Portal for selected contacts
1. Go to Sales > Contacts.
2. Select the accounts for which you want to view marketing communications in Microsoft Dynamics
Marketing.
3. Click the More button … at the top of the screen and then click View Marketing Portal.
4. Sign in to Microsoft Dynamics Marketing if prompted.
28
Create and manage goals
Use goals to keep track of your progress on achieving target revenue.
Create a goal Make sure that you have the System Administrator, System Customizer, Sales Manager, Vice President of Sales, Vice President of Marketing, or CEO-Business Manager security role or equivalent permissions.
1. Go to Goals.
2. Do one of the following:
• If you are using the Dynamics 365 application, click New.
• If you are using Dynamics 365 for Outlook, in the Records tab, click New.
3. On the New Goal form, enter information or observe any noted restrictions or requirements as
needed. Use the handy tooltips as a guide.
4. Click or tap Save or Save and Close.
Edit a goal Make sure that you have the System Administrator, System Customizer, Sales Manager, Vice President of Sales, Vice President of Marketing, or CEO-Business Manager security role or equivalent permissions.
1. Go to Goals.
2. Do one of the following:
• If you are using the Dynamics 365 web application, click Edit.
• If you are using Dynamics 365 for Outlook, in the Records group, click Edit.
3. Fill in your information. Use the handy tooltips as a guide.
4. Click Save and Close.
Create or edit a goal rollup query Use the rollup query to gather data about a given goal, including all its related goals, in one view.
Make sure that you have the Manager, Vice President, CEO-Business Manager, System Administrator, or System Customizer security role or equivalent permissions.
1. Go to Rollup Queries. How do I get there?
29
2. To create a new rollup query, in the Records group, click New.
-OR-
To edit a rollup query, click Edit.
3. Fill in your information. Use the handy tooltips as a guide.
Name. Enter a name between 1 and 50 characters.
Entity Type. Select the record type.
Owner. Click the Lookup icon, and select the user or team who will own this query.
Note
If you change this selection after you add your query criteria in the Query section, your query criteria
will be deleted.
4. In the Query section, add the criteria for your query. The criteria you can add depends on the
record type.
5. To see the results for the query, click View Records.
6. Click Save, Save and Close, or, to create a new rollup query, Save and New.
7. To view the data for a goal, on the nav bar, click Sales, and then click Goals.
8. Select the goal you want, and then click More Commands , and then click Recalculate.
The values of the actuals are recalculated. You can see the recalculated values in the Percentage Achieved, Actual, and In-Progress columns. If you open the goal, under Actuals, you can see the Last Rolled Up Date.
Note
The maximum number of records that can be counted in a goal rollup query is 5000.
Copyright
This document is provided "as-is". Information and views expressed in this document, including URL and other Internet Web site references, may change without notice.
Some examples depicted herein are provided for illustration only and are fictitious. No real association or connection is intended or should be inferred.
This document does not provide you with any legal rights to any intellectual property in any Microsoft product. You may copy and use this document for your internal, reference purposes.
The videos and eBooks might be in English only. Also, if you click the links, you may be redirected to a U.S. website whose content is in English.
© 2017 Microsoft. All rights reserved.

30
Microsoft, Active Directory, Azure, Bing, Cortana, Delve, Dynamics, Excel, Hyper-V, Internet Explorer, Microsoft Dynamics, Microsoft Edge, Microsoft Intune, MSDN, Office 365, OneDrive, OneNote, Outlook, Power BI, PowerPoint, PowerShell, PowerApps, SharePoint, Skype, SQL Server, Visual C#, Visual Studio, Windows, Windows PowerShell, and Windows Server are trademarks of the Microsoft group of companies. All other trademarks are property of their respective owners.