e-panel instructions · e-panel instructions model: mne125st, ... 1 r e v : g e-panel plus as...
TRANSCRIPT

E-Panel Instructions
Model: MNE125ST, MNE175ST, MNE250ST, MNE125AL, MNE175AL, MNE250AL,
MNE175STS, MNE250STS, MNE125LT, MNE175LT, MNE250LT, MNE125ALT, MNE175ALT,
MNE250ALT,
MNE125AL PLUS, MNE175AL PLUS, MNE250 PLUS
MNE125STM, MNE175STM, MNE250STM, MNE125ALM, MNE175ALM, MNE250ALM,
MNE125STMM
Left and Right hand 120/240VAC versions
Model Number code:
MNE---------------175-----------ST or AL----------------M-240 MidNite E-Panel inverter breaker steel or aluminum M=Magnum inverter, blank=OutBack ,S=stretched OB, LT=Lite,
-240=240VAC, blank=120VAC
Regular (narrow) OutBack E-Panel parts OutBack E-Panel as installed (narrow)
Left Hand Magnum as installed Right Hand Magnum E-Panel parts
E-Panel Instructions (continued)
2 | P a g e 1 0 - 0 0 3 - 1 R E V : G
IMPORTANT SAFETY INSTRUCTIONS
SAVE THESE INSTRUCTIONS - These instructions contain important safety and operating instructions for the
MidNite Solar MNPVHV solar combiner boxes and MNDC156-600 Disconnect Switch.
If you do not fully understand any of the concepts, terminology, or hazards outlined in these instructions, please
refer installation to a qualified dealer, electrician or installer. These instructions are not meant to be a complete
explanation of a renewable energy system.
GENERAL PRECAUTIONS
If service or repair should become necessary, contact MidNite Solar Inc. Improper servicing may result in a risk
of shock, fire or explosion. To reduce these risks, disconnect all wiring before attempting any maintenance or
cleaning. Turning off the inverter will not reduce these risks. Solar modules produce power when exposed to
light. When it is not possible to disconnect the power coming from the Photovoltaics by an external means such
as a combiner, cover the modules with an opaque material before servicing any connected equipment.
Do not work alone. Someone should be in the range of your voice or close enough to come to your aid when you
work with or near electrical equipment.
Remove rings, bracelets, necklaces, watches etc. when working with photovoltaic modules or other electrical
equipment. Power from an illuminated photovoltaic array makes a very effective arc welder with dire
consequences if one of the welded pieces is on your person.
E-Panel Instructions (continued)
3 | P a g e 1 0 - 0 0 3 - 1 R E V : G
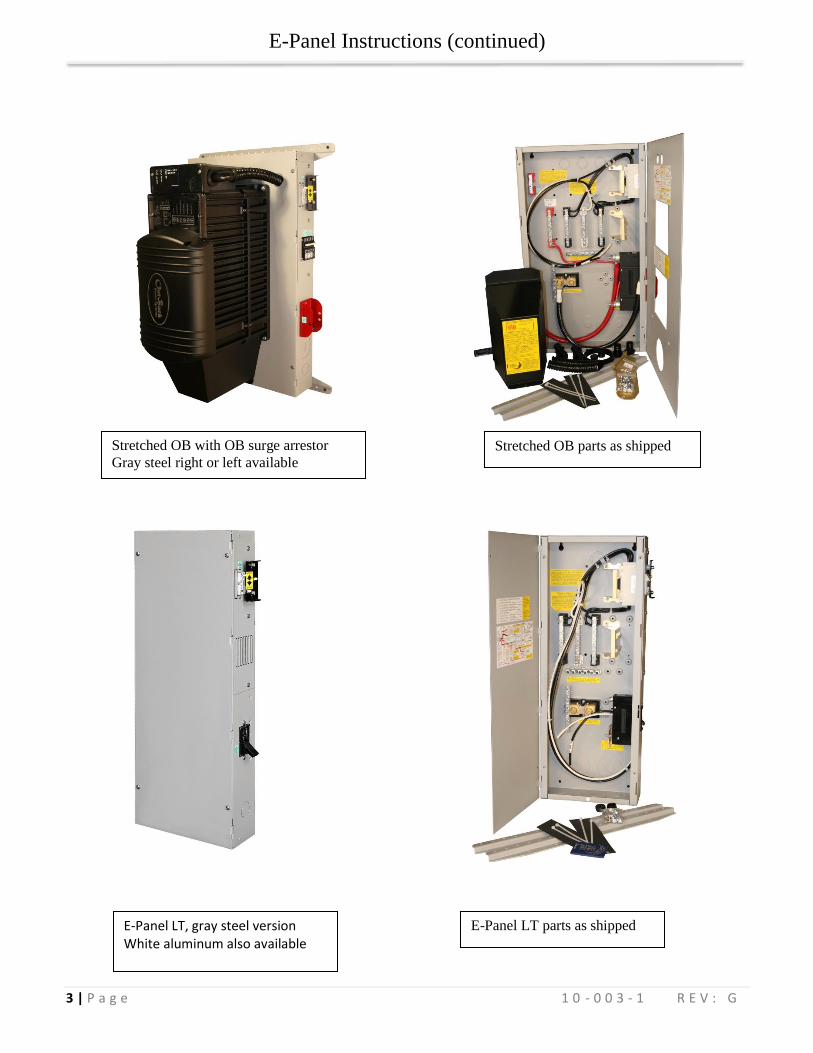
Stretched OB with OB surge arrestor
Gray steel right or left available
Stretched OB parts as shipped
E-Panel LT, gray steel version White aluminum also available
E-Panel LT parts as shipped

E-Panel Instructions (continued)
4 | P a g e 1 0 - 0 0 3 - 1 R E V : G
E-PANEL PLUS AS INSTALLED
White aluminum left hand only
E-PANEL WIRED
With MNSPD Surge Protector
Devices & charge control breakers
E-PANEL FOR MAGNUM MM
SERIES AS INSTALLED MM SERIES E-PANEL WIRED

E-Panel Instructions (continued)
5 | P a g e 1 0 - 0 0 3 - 1 R E V : G
The MidNite Solar E-Panel comes standard with the basic over-current protection and disconnects
required to install your renewable energy system. It can also expand to grow as your needs arise.
List of features:
● Steel or aluminum chassis with all the required openings and knock outs to aid in a NEC compliant
system installation
● Inverter mounts on a unique hinged door to keep the footprint of the system small as possible
● Mounting brackets are included to aid in one person installations
● Inverter battery breaker, inverter cables and snap in grommets included*
● 500 amp / 50mv shunt included for battery monitoring systems
● Bus bars are included for additional battery plus, PV plus and battery minus wiring
● Heavy duty 175 amp AC power distribution bus bars included
● 50 amp AC input disconnect for generator or utility included, pre-wired (15amp MM series)
● 50 amp AC bypass switch for bypassing inverter circuit, pre-wired (15amp MM series)
● Mounting bracket to aid in mounting an OutBack MX60 or MidNite Classic to the side of the E-Panel*
● Battery cable cover to enclose cables external to the chassis***
● Inverter and charge controller mounting hardware
● Rectangular cut outs for mounting a North American GFCI style AC outlet
● Cut outs for mounting up to six additional 13mm wide din rail mount breakers and three ¾” wide panel
mount breakers for additional circuits such as PV, wind, hydro or AC distribution
● Plastic snap in conduit and fittings from chassis to inverter for AC, BTS and control circuits (OB
versions)
● ETL listed to UL and CSA standards
* inverter cables and charge control bracket omitted on the LT configurations
*** LT versions do not have a cable cover, MM series uses the inverter battery terminal caps
Magnum-AE version 120/240VAC These models
have their own separate installation manual This shows the parts that come with the
120/240VAC E-Panels
E-Panel Instructions (continued)
6 | P a g e 1 0 - 0 0 3 - 1 R E V : G
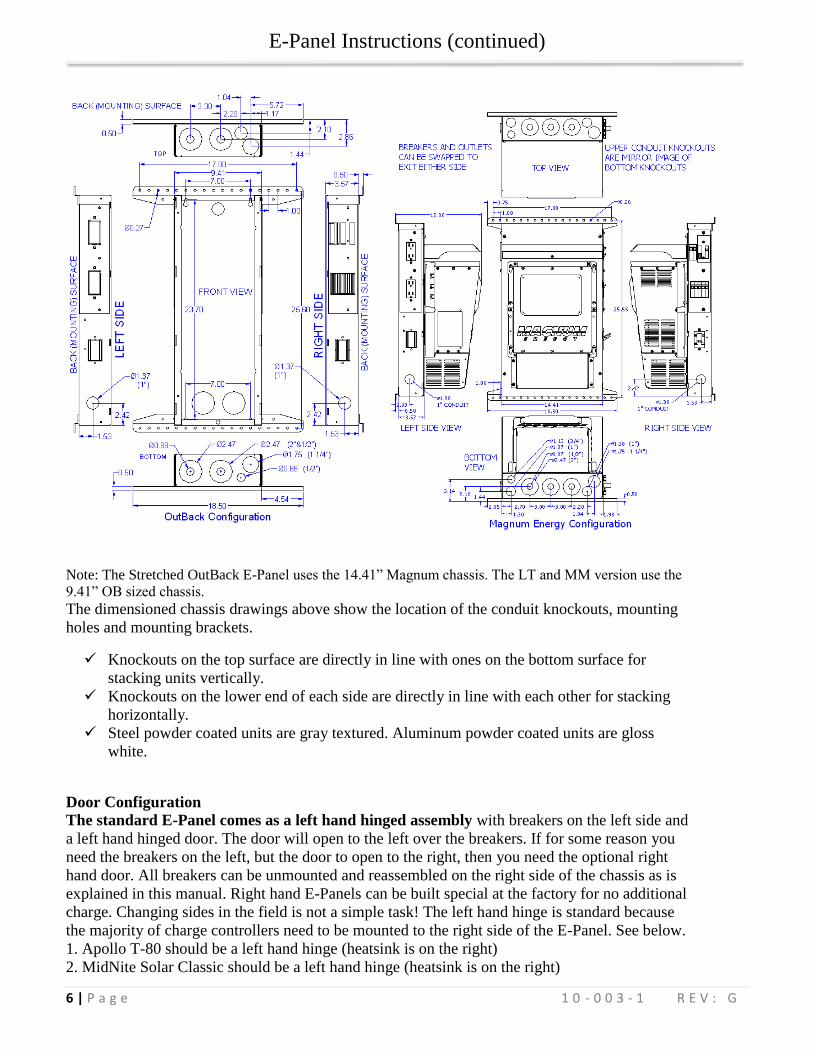
Note: The Stretched OutBack E-Panel uses the 14.41” Magnum chassis. The LT and MM version use the
9.41” OB sized chassis.
The dimensioned chassis drawings above show the location of the conduit knockouts, mounting
holes and mounting brackets.
Knockouts on the top surface are directly in line with ones on the bottom surface for
stacking units vertically.
Knockouts on the lower end of each side are directly in line with each other for stacking
horizontally.
Steel powder coated units are gray textured. Aluminum powder coated units are gloss
white.
Door Configuration
The standard E-Panel comes as a left hand hinged assembly with breakers on the left side and
a left hand hinged door. The door will open to the left over the breakers. If for some reason you
need the breakers on the left, but the door to open to the right, then you need the optional right
hand door. All breakers can be unmounted and reassembled on the right side of the chassis as is
explained in this manual. Right hand E-Panels can be built special at the factory for no additional
charge. Changing sides in the field is not a simple task! The left hand hinge is standard because
the majority of charge controllers need to be mounted to the right side of the E-Panel. See below.
1. Apollo T-80 should be a left hand hinge (heatsink is on the right)
2. MidNite Solar Classic should be a left hand hinge (heatsink is on the right)

E-Panel Instructions (continued)
7 | P a g e 1 0 - 0 0 3 - 1 R E V : G
3. OutBack MF80 should be left hand hinge (No knock out on the right side of chassis)
4. MX60 works equally as well on either side
5. WX controller works equally as well on either side
6 C40/C60 and Tri-star work equally as well on either side
7. Blue Sky has the heatsink on the left, so should use a right hand hinge.
See E-Panels explained on the MidNite website www.midnitesolar.com for exact part numbers
of door options and an explanation of each E-Panel platform. E-Panels Explained will further
help you in selecting the applicable E-Panel for your application.
The installation begins by selecting a wall. All E-Panels are indoor rated and should not be
placed outside unless precautions are made to keep rain and moisture off of the system. The wall
must have suitable clearance to open the door with inverter attached. It must also have adequate
clearance to operate the breakers and outlets that protrude out the sides. The NEC requires 30”
clear on the wall. The E-Panel may be located anywhere within this 30 inches, however make
sure you have sufficient room to the side to operate the circuit breakers. Some E-Panel
installations may have circuit breakers on both sides. The NEC also requires 36 inches free and
clear of obstructions in front of the E-Panel. The 36” clear area in front of all electrical panels is
to provide a space to fall back into incase of electrical shock. Each E-Panel with its’ inverter will
weigh close to 100 pounds so make sure your wall is adequate for this load. The mounting
brackets provided will span studs on 16 inch centers. Mount the top bracket as shown at about
64-68 inches off the floor. If stacking two systems vertically, make sure the breakers fall within
the NEC guidelines for height, (lowest and highest allowable). Number 10 screws with back up
washers will suffice, but ¼” (6mm) hardware provides for a better margin of safety.
A little pre-planning here will go a long way towards a successful installation. Battery box
placement and size also need to be thought out for NEC compliance. The remote display should
be approximately at eye level when attached to the E-Panel. Some installation photos below
show various ways to install your system.
A Positive Energy installation, NM Outdoors in an enclosure A Jay Peltz installation, CA
In the basement
A Lance Barker
installation, OR
In the house
A Positive Energy installation,
NM
Outdoors in an enclosure

E-Panel Instructions (continued)
8 | P a g e 1 0 - 0 0 3 - 1 R E V : G
You can make life a little easier by installing additional breakers for charge control, the inverter
and such while the E-Panel is still lying horizontal on a table. Do as much of the additional
wiring as possible before hanging the E-Panel on the wall. The following pictures show some of
the operations that can be done “on the bench” where access is optimal.
Field installed breakers
should be torqued to 20
inch pounds, then re-
torqued after one hour.
This is important! Wires
cold flow and sometimes
loosen up after the initial
tightening, so don’t skip
this step. E-Bay is a good
source for Sturdevant
Richmont torque screw
drivers if you are an
installer.
Be careful not to dislodge
larger knockouts on
concentric knockouts
Pre-tap inverter mounting
holes using a #3 Philips
screwdriver and thread
forming screws supplied
Attach inverter to door, but
don’t hang it on the chassis
until all other wiring is
done
Break off circuit breaker
tabs. Two per breaker Check fit for any burrs Attach bottom mounting
bracket

E-Panel Instructions (continued)
9 | P a g e 1 0 - 0 0 3 - 1 R E V : G
Breakers such as charge control input and output and DC-GFP can be completely wired prior to
installation on the wall. Field wiring is done at the PV, AC and DC terminal bus bars.
This picture shows the Outback E-Panel
mounted with two MNEPV63 charge control
breakers installed and an AC and DC MNSPD
Surge Protector Device. The upper mounting
bracket can be secured to the wall and then the
E-Panel chassis hung onto it using the keyhole
slots in the upper back of the chassis.
Before mounting the inverter to the chassis and
with the E-Panel mounted on the wall, complete
all wiring that will be coming to and going from
the E-Panel. The following pictures give you
some idea of what to expect.
The picture to the right is a Magnum 240V E-
Panel. Notice it has an OutBack OBDC-GFP
mounted on the left side of this right hand
hinge unit. There are a total of six din rail slots
available on each E-Panel for customer
configuration. This installation has two charge
controllers. You need a breaker in the PV
input and on the DC output of the charge
controller. This took up 4 din rail slots for this
system. The MidNite DC-GFP takes up 2 din
rail slots for the 63 amp version and 2 panel
mount knock out slots for the 80 amp
version. Neither one of these would work in
this case, so the two circuit OutBack GFP was
used. It takes up three slots on the blank plate
opposite the din rails. Note the green 6AWG
neutral to ground bonding wire in this picture.
The neutral to ground bond is required on all
systems per NEC. Note that if this were a
power back up system on a utility connected
home, this bonding wire would not be installed
as it would already be there on the service
entrance. On off-grid installations that
E-Panel Instructions (continued)
10 | P a g e 1 0 - 0 0 3 - 1 R E V : G
employ a sub panel circuit breaker box, you can make this neutral to ground bond in the sub-
panel. It is technically better to make this bond closest to the source of power (the E-Panel), but
many electrical inspectors will be looking for it in the sub-panel box. It will work just fine in
either location, just make sure you have adequate conductor sizes between the E-Panel and the
sub-panel. Do not rely on the hinges for grounding the equipment mounted to the door.
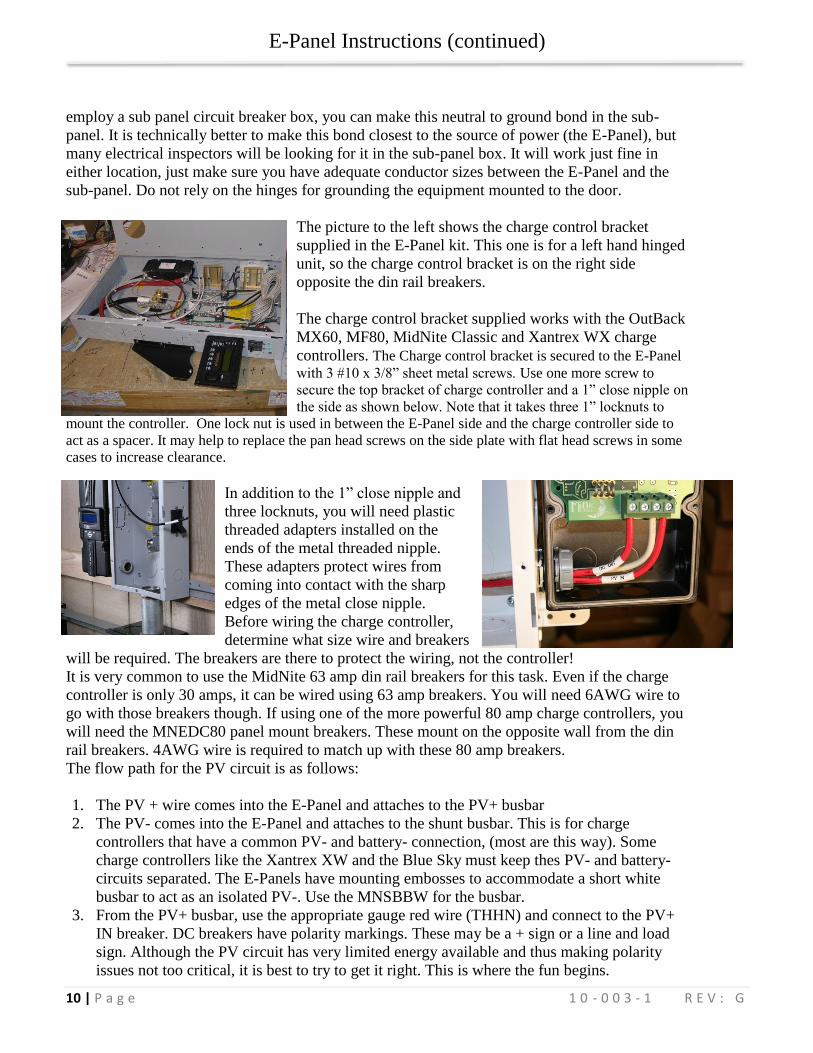
The picture to the left shows the charge control bracket
supplied in the E-Panel kit. This one is for a left hand hinged
unit, so the charge control bracket is on the right side
opposite the din rail breakers.
The charge control bracket supplied works with the OutBack
MX60, MF80, MidNite Classic and Xantrex WX charge
controllers. The Charge control bracket is secured to the E-Panel
with 3 #10 x 3/8” sheet metal screws. Use one more screw to
secure the top bracket of charge controller and a 1” close nipple on
the side as shown below. Note that it takes three 1” locknuts to
mount the controller. One lock nut is used in between the E-Panel side and the charge controller side to
act as a spacer. It may help to replace the pan head screws on the side plate with flat head screws in some
cases to increase clearance.
In addition to the 1” close nipple and
three locknuts, you will need plastic
threaded adapters installed on the
ends of the metal threaded nipple.
These adapters protect wires from
coming into contact with the sharp
edges of the metal close nipple.
Before wiring the charge controller,
determine what size wire and breakers
will be required. The breakers are there to protect the wiring, not the controller!
It is very common to use the MidNite 63 amp din rail breakers for this task. Even if the charge
controller is only 30 amps, it can be wired using 63 amp breakers. You will need 6AWG wire to
go with those breakers though. If using one of the more powerful 80 amp charge controllers, you
will need the MNEDC80 panel mount breakers. These mount on the opposite wall from the din
rail breakers. 4AWG wire is required to match up with these 80 amp breakers.
The flow path for the PV circuit is as follows:
1. The PV + wire comes into the E-Panel and attaches to the PV+ busbar
2. The PV- comes into the E-Panel and attaches to the shunt busbar. This is for charge
controllers that have a common PV- and battery- connection, (most are this way). Some
charge controllers like the Xantrex XW and the Blue Sky must keep thes PV- and battery-
circuits separated. The E-Panels have mounting embosses to accommodate a short white
busbar to act as an isolated PV-. Use the MNSBBW for the busbar.
3. From the PV+ busbar, use the appropriate gauge red wire (THHN) and connect to the PV+
IN breaker. DC breakers have polarity markings. These may be a + sign or a line and load
sign. Although the PV circuit has very limited energy available and thus making polarity
issues not too critical, it is best to try to get it right. This is where the fun begins.

E-Panel Instructions (continued)
11 | P a g e 1 0 - 0 0 3 - 1 R E V : G
4. The + (line) marking on the breaker would seem to indicate that you should connect the
PV+ to this terminal since the PV+ is the highest potential in the system. Our testing shows
this would be correct. The + side of the breaker needs to be connected to the highest
potential per the breaker instructions.
5. The - side of the PV in breaker goes to the charge controller PV+ input terminal.
6. The output of the charge controller is sometimes marked battery+ This terminal is to
connect to the charge controller output breaker. It will not connect to the + or Line side of
the breaker.
7. The other side of the breaker, + or line connects to the battery plus busbar. This connection
is important to observe polarity markings. In the event of a charge controller failure, they
quite often short internally, which means they are shorting out the battery. If proper polarity
is not observed, the breaker may not open and the wiring will burn up.
The factory installed red battery plus bus wire is 4AWG, so it is large enough for all breaker
sizes.
The diagrams above show 63 amp din rail mount breakers. When 80 amp breakers and or DC-
GFP are required, those breakers mount on the wall opposite the din rails. There
are three panel mount breaker slots to accommodate the 80 amp
breakers and DC-GFP. The 80 amp DC-GFP takes up two of the three slots. The third slot will
be used for the output of the 80 amp charge controller. The PV input to an 80 amp charge
controller could use a 63 amp din rail mount breaker. There is no additional DC-GFP required
when using the MidNite Classic controller. The DC-GFP and arc fault protector are built into the
Classic controllers.
Single charge controller wiring with 63 amp breakers

E-Panel Instructions (continued)
12 | P a g e 1 0 - 0 0 3 - 1 R E V : G
Mounting the inverter
The 6 x 20mm pan head Philips screws for mounting the inverter are
taptite (thread forming). Use one of these 6mm screws to pre-tap
threads into the steel doors extruded funnel holes. Aluminum doors
have press nuts and do not require tapping. Make sure to install all ¼”
star washers to bite through the powder coating.
One of the best features of the MidNite E-Panel is that one person can do all the lifting.
Slip Tab A into Slot B
Install inverter cables
Install the 3.5” bushing as shown protruding up into the inverter side of
the door before routing the inverter cables
through the door.
3.5” grommet protruding outward
The left Magnum inverter
is all wired and the DC
cover installed using four
10-32 x 7/16” taptite
screws and #10 internal
tooth star washers. The
upper shield is installed
using three 10-32 x 3/8”
machine screws and
kepnuts. Use small snap in
grommets for signal level
cables.

E-Panel Instructions (continued)
13 | P a g e 1 0 - 0 0 3 - 1 R E V : G
More tidbits to digest
Important! Torque din rail mount breakers Installing the breaker cover
to 20 in lb. Wait one hour and re-torque.
Six locations are available for additional 13mm wide breakers. These breakers would normally
be field installed for such things as: solar, wind or hydro charge controllers, DC ground fault
protector, AC and or DC distribution center and others. Remove the cut outs for the intended
breakers. Each 13mm wide breaker requires removal of two cut outs. 17.5mm wide breakers
require removal of three cut outs. It is important to torque the terminals to 20 inch pounds. It is
highly recommended to go back over all terminations after an hour and also conduct a pull test.
Doors
installed,
plastic conduit
installed,
wiring
complete. Note
the battery
cable routing.
It is important
to route cables
so the doors
close freely
without undue
force. The left
E-Panel battery
cables came
from above,
but could have
come from
below or back.
E-Panel Instructions (continued)
14 | P a g e 1 0 - 0 0 3 - 1 R E V : G
You may be surprised that what you thought was a tight connection actually pulls out with little
effort. This is caused be a phenomenon called cold flow. Copper is a relatively soft metal and
will continue to move under inadequate clamping pressure. A 20 inch pound of torque takes a lot
of strength! Use the supplied UL listed plastic 2” x 6” spacers to separate AC and DC breakers if
installed on the same din rail. Barriers are required per NEC between AC and DC circuits.
MidNite offers 150VDC breakers in 1,2,3,4,5,6,7,8,9,10,12,15,20,30,40,50 and 63 amps. AC
breakers are available in 10,15 and 20 amp sizes. Those breakers carry the UL489 and UL489A
branch circuit rating. 30 and 50 amp AC breakers are available in UL1077 listed versions, but are
not branch circuit rated.
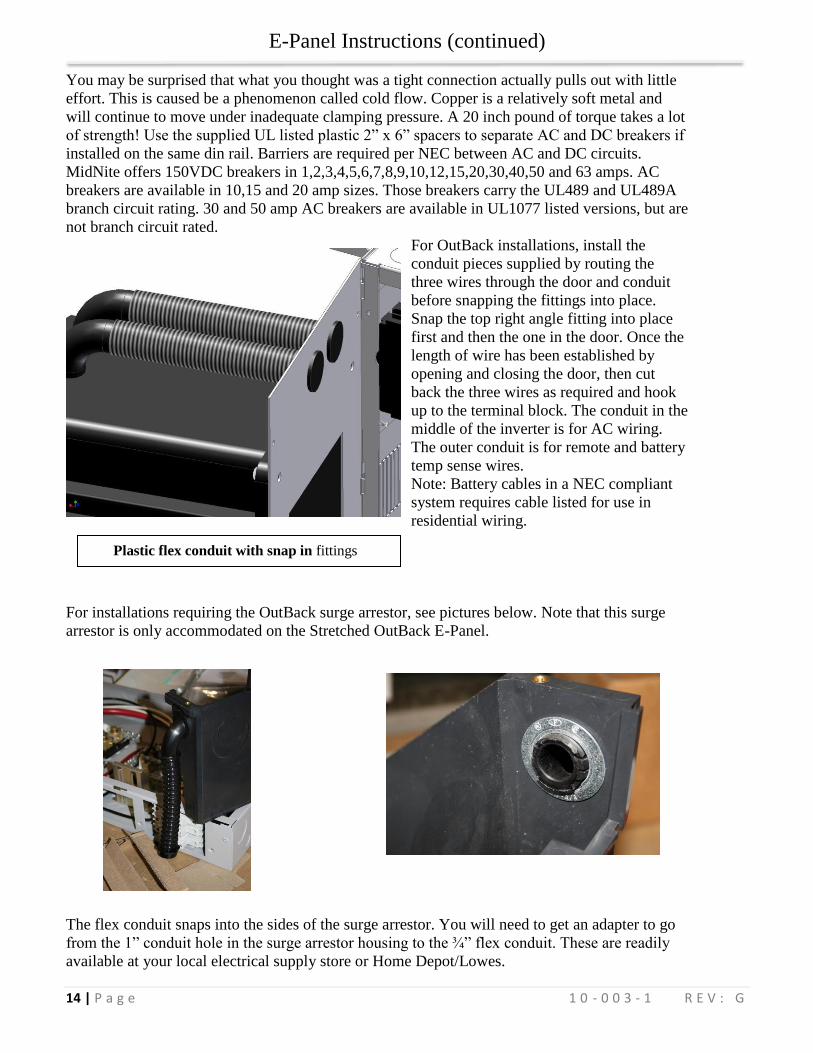
For OutBack installations, install the
conduit pieces supplied by routing the
three wires through the door and conduit
before snapping the fittings into place.
Snap the top right angle fitting into place
first and then the one in the door. Once the
length of wire has been established by
opening and closing the door, then cut
back the three wires as required and hook
up to the terminal block. The conduit in the
middle of the inverter is for AC wiring.
The outer conduit is for remote and battery
temp sense wires.
Note: Battery cables in a NEC compliant
system requires cable listed for use in
residential wiring.
For installations requiring the OutBack surge arrestor, see pictures below. Note that this surge
arrestor is only accommodated on the Stretched OutBack E-Panel.
The flex conduit snaps into the sides of the surge arrestor. You will need to get an adapter to go
from the 1” conduit hole in the surge arrestor housing to the ¾” flex conduit. These are readily
available at your local electrical supply store or Home Depot/Lowes.
Plastic flex conduit with snap in fittings
E-Panel Instructions (continued)
15 | P a g e 1 0 - 0 0 3 - 1 R E V : G
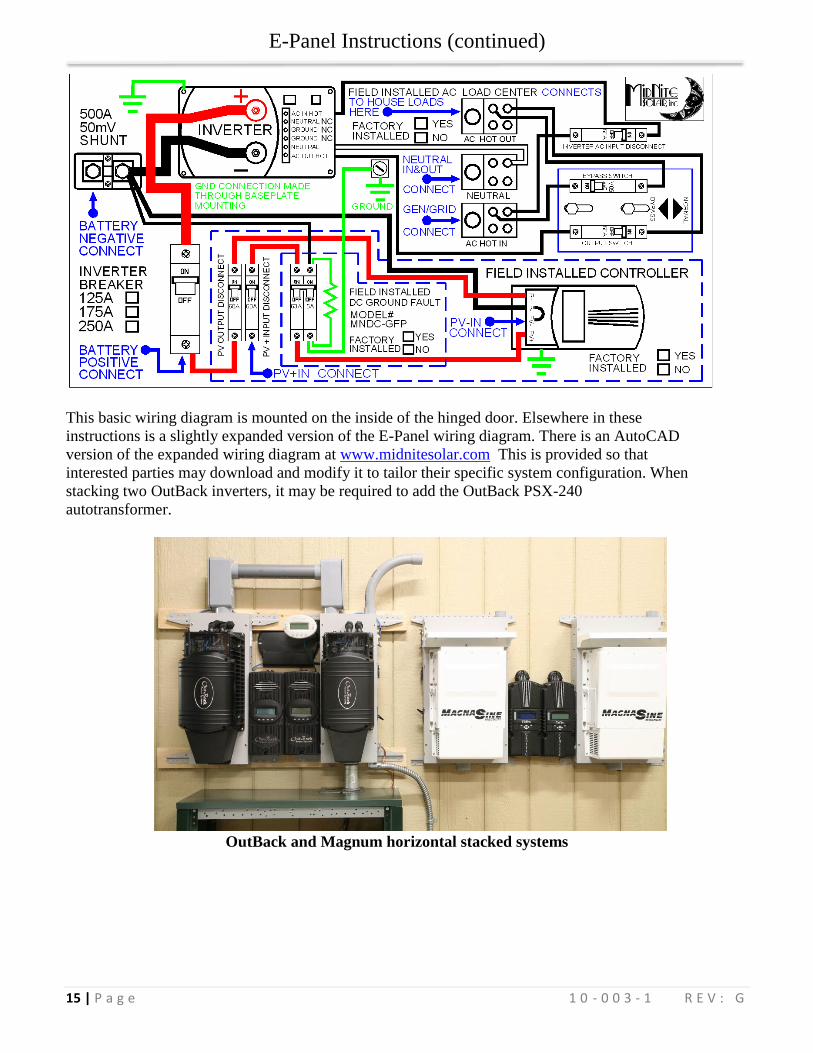
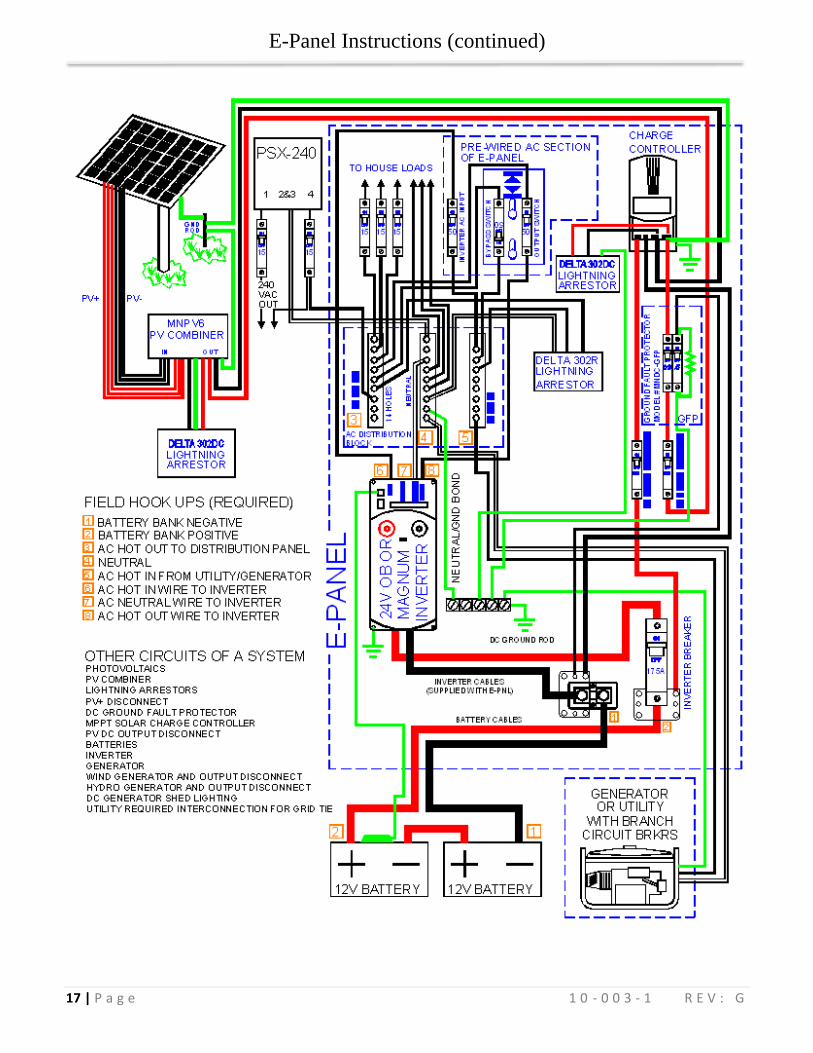
This basic wiring diagram is mounted on the inside of the hinged door. Elsewhere in these
instructions is a slightly expanded version of the E-Panel wiring diagram. There is an AutoCAD
version of the expanded wiring diagram at www.midnitesolar.com This is provided so that
interested parties may download and modify it to tailor their specific system configuration. When
stacking two OutBack inverters, it may be required to add the OutBack PSX-240
autotransformer.
OutBack and Magnum horizontal stacked systems

E-Panel Instructions (continued)
16 | P a g e 1 0 - 0 0 3 - 1 R E V : G
E-Panel parts locator, Door
Supplied insulators to achieve
required separation of AC and DC
circuits
E-Panel parts locator, internal Ground to Neutral connection
E-Panel Instructions (continued)
17 | P a g e 1 0 - 0 0 3 - 1 R E V : G

E-Panel Instructions (continued)
18 | P a g e 1 0 - 0 0 3 - 1 R E V : G
DIN RAIL MOUNT BREAKERS 20 IN-LBS (2.3NM)125 AMP INVERTER BREAKER 30 IN-LBS (3.4 NM)175 & 250A INVERTER BREAKER 15 ft-LBS (20.4 NM)
BATTERY CABLES MUST BE FINE STRAND SUPER FLEXIBLE SUCHAS COBRA CABLE OR EQUIV. COBRA CABLE IS THW LISTED. 2/0CABLE SHOULD HAVE 1330 STRANDS, 2AWG SHOULD HAVE 665.AC WIRING MUST BE APPROVED FOR RESIDENTIAL WIRING PERTHE NATIONAL ELECTRIC CODE, SUCH AS THHN AS AN EXAMPLE
120VAC 50 AMPS 60 Hz OR230VAC 50 AMPS 50Hz
AC HOTOUT
NEUTRAL AC HOT
TORQUE SMALL SCREWS TO 20-30 IN LBS (3.4 NM)TORQUE LARGE SCREWS TO 45 IN LBS (xxx NM)
IN
BATTERY POSITIVE
TORQUE LARGE SCREWS TO 45 IN-LBS (5.1 NM)
GROUNDGROUND GROUND
30 A
MP D
UAL
50 A
MP D
UAL
50 A
MP D
UAL
PLUSBUS
PLUSBUS
250AMP, 50000 AIC
175AMP, 50000 AIC
125 AMP, 5000 AIC
BATTERY NEGATIVETORQUE TO 15 FT-LBS (20.4 NM)
63 A
MP D
C O
UT
63 A
MP P
V I
N
DC-G
FP
WHITE
GREEN
TO PV IN+
#6 RED
#6 RED
#6 RED
#6 RED
33" #6 RED
40" #6 RED TO BAT +
DC OUT #6 RED
ACHOTIN
ACHOTOUTN
EU
TRAL
TO
IN
VERTER
PV
ONE
MPPT
PV
INPUT
ONE
ARRAY
OUTPUT
2 A
MP B
MK
STATUS
MAIN
SHUTOFF
MTG BRKT TOP AND BOTTOM
TO PV- 20" WHT #6
CUT TO 17.5"
13" 14AWG
21" 14AWG
CUT TO 17.5"
ME-BMK
20"
14AW
G
20"
14AW
G
15.5" #6AWG
20" #14AWG
2 AMP BRKR
ME-RC50ME-AGS
SNAP IN GROMMET
Magnum MS4448-AE & MS4024-AEsystem pre-wire with DC-GFP
FIELD INSTALLED
BREAKERS
175 amp/MS4448-AE
250 amp/MS4024-AE
AC AC DC
MNSPD MNSPD MNSPD
MidNite Solar 17722 – 67th
Ave NE Arlington, Wa 98223 360.403.7207 www.midnitesolar.com