e y sor brian schmidt, heating up - 3-6 @ sps - sps -...
TRANSCRIPT
Heating up
Fully alig
ned
with th
e Australian
Curriculum
The PrimaryConnections program is supported by astronomer, Professor Brian Schmidt, Nobel Laureate
ISBN 978-0-85847-329-4
9
780858 473294
Heating up Year 3 Physical sciences
PC:3:P1
PrimaryConnections: Linking science with literacy is an innovative program linking
the teaching of science with the teaching
of literacy in primary schools.
The program includes a sophisticated
professional learning component and
exemplary curriculum resources.
PrimaryConnections features an inquiry-
based approach, embedded assessment
and incorporates Indigenous perspectives.
The PrimaryConnections curriculum
resources span Years F–6 of primary school. Year 3Physical sciences
www.primaryconnections.org.au
Australian
Curriculum

Professional learning program
PrimaryConnections comprises a professional learning program supported with exemplary curriculum resources to enhance teaching and learning in science and literacy. Research shows that this combination is more effective than using each in isolation.
Professional Learning Facilitators are available throughout Australia to conduct workshops on the underpinning principles of the program: the PrimaryConnections 5Es teaching and learning model, linking science with literacy, investigating, embedded assessment and collaborative learning.
The PrimaryConnections website has contact details for state and territory Professional Learning Coordinators, as well as additional resources for this unit. Visit the website at: www.primaryconnections.org.au
PrimaryConnections projectDirector Ms Shelley Peers (Australian Academy of Science)Reference Group Professor Jenny Graves, AO FAA (Australian Academy of Science) [Chair] Ms Shelley Peers (Australian Academy of Science) ACT Department of Education and Training Australian Council of Deans of Education Australian Curriculum Assessment and Reporting Authority (ACARA) Australian Government Department of Education, Employment and Workplace Relations Australian Literacy Educators’ Association Australian Primary Principals Association Australian Science Teachers Association QLD Department of Education, Training and Employment Independent Schools Council of Australia Indigenous Education Consultative Body National Catholic Education Commission NSW Department of Education and Communities NT Department of Education and Training Primary English Teaching Association Australia SA Department for Education and Child Development TAS Department of Education VIC Department of Education and Early Childhood Development WA Department of Education

Lesson Lesson 1 Change detectives
Heat is important to us in many ways in our everyday lives. We use heat in practical ways, such as drying our hair, cooking our dinner and warming our water. We enjoy the feel of the Sun’s warmth on our skin on a spring day or the satisfying warmth of holding a cup of hot chocolate on a cold winter’s night. But we also know about the dangers of heat and react instinctively when we touch a hot stove or walk barefooted on hot sand. However, heat also preoccupies us. We worry about things being too hot or too cold—the daily temperature, our coffee, our food, the water in the shower, how we sleep.
The Heating up unit is an ideal way to link science with literacy in the classroom. It provides opportunities for students to investigate different heat sources and how heat moves from one object to another. Through hands-on activities, students investigate the difference in conductivity of materials.
Heating up
Fully alig
ned
with th
e Australian
Curriculum
Year 3 Physical sciences

Contents
ii
© Australian Academy of Science, April 2013.
Copyright for Education
Educators, academics and students in Australia, people working in associated organisations (such as education authorities, Education Services Australia, the Australian Curriculum, Assessment and Reporting Authority and the Australian Institute for Teaching and School Leadership) and people teaching, studying and learning in schools overseas where the Australian curriculum is taught, may freely use this material for non-commercial educational purposes.
Except as allowed under copyright law or as set out above, you may not reproduce, communicate or otherwise use any of this publication in any of the ways reserved to the copyright owner without the written permission of the Australian Academy of Science.
For permissions, contact the Business Manager, Primary Connections (Australian Academy of Science).
Published by the Australian Academy of Science.GPO Box 783 Canberra ACT 2601 Telephone: (02) 9386 4544 Fax: (02) 9387 7755 Email: [email protected] www.primaryconnections.org.au
Typesetter: Sharyn Raggett Font: Helvetica Neue, DIN Print house: Daniels Printing Craftsmen Cover images: iStockphoto.com
ISBN 978 0 85847 329 4
Acknowledgments
The PrimaryConnections – Linking Science with Literacy project is supported by the Australian Government.
Thanks to the trial teachers and students of the trial schools Australia-wide and Fellows of the Australian Academy of Science who contributed to this unit.
All material identified by is material subject to copyright under the Copyright Act 1968 (Cth) and is owned by the Australian Curriculum, Assessment and Reporting Authority 2014.
For all Australian Curriculum material except elaborations: This is an extract from the Australian Curriculum.
Elaborations: This may be a modified extract from the Australian Curriculum and may include the work of other authors.
Disclaimer: ACARA neither endorses nor verifies the accuracy of the information provided and accepts no responsibility for incomplete or inaccurate information. In particular, ACARA does not endorse or verify that:
• The content descriptions are solely for a particular year and subject;
• All the content descriptions for that year and subject have been used; and
• The author’s material aligns with the Australian Curriculum content descriptions for the relevant year and subject.
You can find the unaltered and most up to date version of this material at http://www.australiancurriculum.edu.au This material is reproduced with the permission of ACARA.
DisclaimersThe views expressed here are those of the author and do not necessarily represent the views of the Australian Government.
These materials are intended for education and training only. Every effort is made to ensure the accuracy of the information presented in these materials. We do not assume any liability for the accuracy or completeness of the information contained within. The Australian Academy of Science accepts no liability or responsibility for any loss or damage whatsoever suffered as a result of direct or indirect use or application of any of these training materials.

Contents
iii
The PrimaryConnections program v
Unit at a glance 1
Alignment with the Australian Curriculum: Science 2
Alignment with the Australian Curriculum: English and Mathematics 7
Teacher background information 8
Introduction to heat 8
Lesson 1 Warming up 10
Lesson 2 Hot spots 15
Lesson 3 Energy explorers 24
Lesson 4 Sharing the warmth 29
Lesson 5 Too hot to handle 34
Lesson 6 Getting warmer 39
Lesson 7 Finding the heat 46
Appendix 1 How to organise collaborative learning teams (Year 3—Year 6) 50
Appendix 2 How to use a science journal 54
Appendix 3 How to use a word wall 56
Appendix 4 How to facilitate evidence-based discussions 58
Appendix 5 How to conduct a fair test 61
Appendix 6 How to write questions for investigation 62
Appendix 7 Heating up equipment list 64
Appendix 8 Heating up unit overview 66

PrimaryConnections
iv
ForewordThe Australian Academy of Science is proud of its long tradition of supporting and informing science education in Australia. ‘PrimaryConnections: linking science with literacy’ is its flagship primary school science program, and it is making a real difference to the teaching and learning of science in Australian schools.
The PrimaryConnections approach has been embraced by schools since its inception in 2004, and there is substantial evidence of its effectiveness in helping teachers transform their practice. It builds teacher confidence and competence in this important area, and helps teachers use their professional skills to incorporate elements of the approach into other areas of the curriculum. Beginning and pre-service teachers find the approach do-able and sustainable. PrimaryConnections students enjoy science more than in comparison classes, and Indigenous students, in particular, show significant increases in learning using the approach.
The project has several components: professional learning, curriculum resources, research and evaluation, and Indigenous perspectives. With the development of an Australian curriculum in the sciences by ACARA in December 2010, it is an exciting time for schools to engage with science, and to raise the profile of primary science education.
Students are naturally curious. PrimaryConnections provides an inquiry-based approach that helps students develop deep learning, and guides them to find scientific ways to answer their questions. The lessons include key science background information, and further science information is included on the PrimaryConnections website (www.primaryconnections.org.au).
Science education provides a foundation for a scientifically literate society, which is so important for engagement in key community debates, such as climate change, carbon emissions, and immunisation, as well as for personal decisions about health and well-being. The inquiry approach in PrimaryConnections prepares students well to participate in evidence-based discussions of these and other issues.
PrimaryConnections has been developed with the financial support of the Australian Government and has been endorsed by education authorities across the country. The Steering Committee, comprising the Department of Education, Employment and Workplace Relations and Academy representatives, and the Reference Group, which includes representatives from all stakeholder bodies including states and territories, have provided invaluable guidance and support. Before publication, the teacher background information on science is reviewed by a Fellow of the Academy. All these inputs have ensured an award-winning, quality program.
The Fellows of the Academy are committed to ongoing support for teachers of science at all levels. I commend PrimaryConnections to you and wish you well in your teaching.
Professor Suzanne Cory, AC PresAA FRSPresident (2010–2013)Australian Academy of Science

v
PrimaryConnections Heating up
The PrimaryConnections programPrimaryConnections is an innovative program that links the teaching of science and literacy in the primary years of schooling. It is an exciting and rewarding approach for teachers and students, with a professional learning program and supporting curriculum resources. Further information about professional learning and other curriculum support can be found on the PrimaryConnections website: (www.primaryconnections.org.au)
The PrimaryConnections teaching and learning modelThis unit is one of a series designed to exemplify the PrimaryConnections teaching and learning approach, which embeds inquiry-based learning into a modified 5Es instructional model with the five phases: Engage, Explore, Explain, Elaborate and Evaluate (Bybee, 1997). The relationship between the 5Es phases, investigations, literacy products and assessment is illustrated below:
PrimaryConnections 5Es teaching and learning model
Phase Focus Assessment focus
ENGAGE Engage students and elicit prior knowledge Diagnostic assessment
EXPLORE Provide hands-on experience of the phenomenon Formative assessment
EXPLAIN Develop scientific explanations for observations and represent developing conceptual understandingConsider current scientific explanations
Formative assessment
ELABORATE Extend understanding to a new context or make connections to additional concepts through a student-planned investigation
Summative assessmentof the Science Inquiry Skills
EVALUATE Students re-represent their understanding and reflect on their learning journey, and teachers collect evidence about the achievement of outcomes
Summative assessmentof the Science Understanding
More information on PrimaryConnections 5Es teaching and learning model can be found at: www.primaryconnections.org.au
Developing students’ scientific literacyThe learning outcomes in PrimaryConnections contribute to developing students’ scientific literacy. Scientific literacy is considered the main purpose of school science education and has been described as an individual’s:
• scientific knowledge and use of that knowledge to identify questions, acquire new knowledge, explain scientific phenomena and draw evidence-based conclusions about science-related issues
• understanding of the characteristic features of science as a form of human knowledge and enquiry
• awareness of how science and technology shape our material, intellectual and cultural environments
• willingness to engage in science-related issues, and with the ideas of science, as a reflective citizen (Programme for International Student Assessment & Organisation for Economic Co-operation and Development [PISA & OECD], 2009).

PrimaryConnections
vi
Linking science with literacyPrimaryConnections has an explicit focus on developing students’ knowledge, skills, understanding and capacities in science and literacy. Units employ a range of strategies to encourage students to think about and to represent science.
PrimaryConnections develops the literacies of science that students need to learn and to represent their understanding of science concepts, processes and skills. Representations in PrimaryConnections are multi-modal and include text, tables, graphs, models, drawings and embodied forms, such as gesture and role-play. Students use their everyday literacies to learn the new literacies of science. Science provides authentic contexts and meaningful purposes for literacy learning, and also provides opportunities to develop a wider range of literacies. Teaching science with literacy improves learning outcomes in both areas.
AssessmentAssessment against the year level achievement standards of the Australian Curriculum: Science (ACARA, 2014) is ongoing and embedded in PrimaryConnections units. Assessment is linked to the development of literacy practices and products. Relevant understandings and skills are highlighted at the beginning of each lesson. Different types of assessment are emphasised in different phases:
Diagnostic assessment occurs in the Engage phase. This assessment is to elicit students’ prior knowledge so that the teacher can take account of this when planning how the Explore and Explain lessons will be implemented.
Formative assessment occurs in the Explore and Explain phases. This enables the teacher to monitor students’ developing understanding and provide feedback that can extend and deepen students’ learning.
Summative assessment of the students’ achievement developed throughout the unit occurs in the Elaborate phase for the Science Inquiry Skills, and in the Evaluate phase for the Science Understanding.

vii
PrimaryConnections Heating up
Alignment with the Australian Curriculum: ScienceThe Australian Curriculum: Science has three interrelated strands—Science Understanding, Science as a Human Endeavour and Science Inquiry Skills—that together ‘provide students with understanding, knowledge and skills through which they can develop a scientific view of the world’ (ACARA, 2014).
The content of these strands is described by the Australian Curriculum as:
Science Understanding
Biological sciences Understanding living things
Chemical sciences Understanding the composition and behaviour of substances
Earth and space sciences Understanding Earth’s dynamic structure and its place in the cosmos
Physical sciences Understanding the nature of forces and motion, and matter and energy
Science as a Human Endeavour
Nature and development of science
An appreciation of the unique nature of science and scientific knowledge.
Use and influence of science
How science knowledge and applications affect people’s lives and how science is influenced by society and can be used to inform decisions and actions
Science Inquiry Skills
Questioning and predicting
Identifying and constructing questions, proposing hypotheses and suggesting possible outcomes
Planning and conducting Making decisions regarding how to investigate or solve a problem and carrying out an investigation, including the collection of data
Processing and analysing data and information
Representing data in meaningful and useful ways; identifying trends, patterns and relationships in data, and using evidence to justify conclusions
Evaluating Considering the quality of available evidence and the merit or significance of a claim, proposition or conclusion with reference to that evidence
Communicating Conveying information or ideas to others through appropriate representations, text types and modes
There will be a minimum of four PrimaryConnections units for each year of primary school from Foundation to Year 6—at least one for each Science Understanding sub-strand of the Australian Curriculum. Each unit contains detailed information about its alignment with all aspects of the Australian Curriculum: Science and its links to the Australian Curriculum: English and Mathematics.
All the material in this table is sourced from the Australian Curriculum.

PrimaryConnections
viii
SafetyLearning to use materials and equipment safely is central to working scientifically. It is important, however, for teachers to review each lesson before teaching to identify and manage safety issues specific to a group of students. A safety icon is included in lessons where there is a need to pay particular attention to potential safety hazards. The following guidelines will help minimise risks:
• Be aware of the school’s policy on safety in the classroom and for excursions.
• Check students’ health records for allergies or other health issues.
• Be aware of potential dangers by trying out activities before students do them.
• Caution students about potential dangers before they begin an activity.
• Clean up spills immediately as slippery floors are dangerous.
• Instruct students never to taste, smell or eat anything unless they are given permission.
• Discuss and display a list of safe practices for science activities.
ReferencesAustralian Curriculum Assessment and Reporting Authority (ACARA). (2014). Australian Curriculum: Science. www.australiancurriculum.edu.au
Bybee, R.W. (1997). Achieving scientific literacy: from purposes to practical action. Portsmouth, NH: Heinemann.
Programme for International Student Assessment & Organisation for Economic Co-operation and Development. (2009). PISA 2009 assessment framework: key competencies in reading, mathematics and science. Paris: OECD Publishing.

1
PrimaryConnections Heating up
Unit at a glance Heating upPhase Lesson At a glance
ENGAGE Lesson 1Warming up
To capture students’ interest and find out what they think they know about how heat can be produced in many ways and can move from one object to another.To elicit students’ questions about heat and keeping warm.
EXPLORE Lesson 2Hot spotsSession 1Hot or not?Session 2Heat at home
To provide students with hands-on, shared experiences of identifying heat sources in the classroom and at home.
Lesson 3Energy explorers
To provide students with hands-on, shared experiences of ways in which heat is produced.
Lesson 4Sharing the warmth
To provide students with hands-on, shared experiences of heat moving from one object to another.
EXPLAIN Lesson 5Too hot to handle
To support students to represent and explain their understanding of how heat can be produced and can move from object to object, and to introduce current scientific views.
ELABORATE Lesson 6Getting warmer
To support students to plan and conduct an investigation to compare the conductivity of different materials.
EVALUATE Lesson 7Finding the heat
To provide opportunities for students to represent what they know about how heat can be produced in many ways and can move from one object to another, and to reflect on their learning during the unit.
A unit overview can be found in Appendix 8, page 66.

PrimaryConnections
2
Alignment with the Australian Curriculum: ScienceThis Heating up unit embeds all three strands of the Australian Curriculum: Science. The table below lists sub-strands and their content for Year 3. This unit is designed to be taught in conjunction with other Year 3 units to cover the full range of the Australian Curriculum: Science content for Year 3.
For ease of assessment the table below outlines the sub-strands and their aligned lessons.
Strand Sub-strand Code Year 3 content descriptions Lessons
Science Understanding
Physical sciences
ACSSU049 Heat can be produced in many ways and can move from one object to another
1–7
Science as a Human Endeavour
Nature and development of science
ACSHE050 Science involves making predictions and describing patterns and relationships
1–4, 6
Use and influence of science
ACSHE051 Science knowledge helps people to understand the effect of their actions
1–7
Science Inquiry Skills
Questioning and predicting
ACSIS053 With guidance, identify questions in familiar contexts that can be investigated scientifically and predict what might happen based on prior knowledge
1–4, 6
Planning and conducting
ACSIS054 Suggest ways to plan and conduct investigations to find answers to questions
4, 6
ACSIS055 Safely use appropriate materials, tools or equipment to make and record observations, using formal measurements and digital technologies as appropriate
2, 3, 4, 6
Processing and analysing data and information
ACSIS057 Use a range of methods including tables and simple column graphs to represent data and to identify patterns and trends
2–4, 6
ACSIS25 Compare results with predictions, suggesting possible reasons for findings
4, 6
Evaluating ACSIS058 Reflect on the investigation, including whether a test was fair or not
6
Communicating ACSIS060 Represent and communicate ideas and findings in a variety of ways such as diagrams, physical representations and simple reports
1–7
All the material in the first four columns of this table is sourced from the Australian Curriculum.

3
PrimaryConnections Heating up
Interrelationship of the science strandsThe interrelationship between the three strands—Science Understanding, Science as a Human Endeavour and Science Inquiry Skills—and their sub-strands is shown below. Sub-strands covered in this unit are in bold.
Relationship to overarching ideasIn the Australian Curriculum: Science, six overarching ideas support the coherence and developmental sequence of science knowledge within and across year levels. In Heating up these overarching ideas are represented by:
Overarching idea Incorporation in Heating up
Patterns, order and organisation
Students classify heat sources into groups according to the type of energy used to produce the heat. They explore the cause and effect of heat transfer from one object to another.
Form and function Students explore how materials can slow down heat flow (insulating properties). They explore the observable properties of heat sources in the classroom and at home.
Stability and change Students observe that the temperature of objects can change if they are touching a heat source. They identify that objects lose heat until they are the same temperature as the other object.
Scale and measurement
Students experience heat sources as cold, warm, hot and very hot. They measure how the temperature of materials changes over time to identify heat loss or gain, and discuss whether the heat has transferred to or from the material.
Matter and energy Students identify sources of heat energy, both those that are actively producing heat (primary sources) and those that are hotter than their environment due to stored heat (secondary sources). They discuss different energy sources that can be transformed into heat energy. Students explore basic principles of heat energy transfer and represent heat flow on annotated diagrams.
Systems Students investigate simple thermodynamic systems of heat transfer. They describe relationships and interactions between heat sources and other materials, such as the air or hot water.
• Biological sciences• Chemical sciences• Earth and space sciences• Physical sciences
• Nature and development of science • Use and influence of science
• Questioning and predicting• Planning and conducting• Processing and analysing data and information • Evaluating• Communicating
Science Understanding Science as a Human Endeavour Science Inquiry Skills
Year 3
All the terms in this diagram are sourced from the Australian Curriculum.
PrimaryConnections
4
Curriculum focusThe Australian Curriculum: Science is described by year level, but provides advice across four year groupings on the nature of learners. Each year grouping has a relevant curriculum focus.
Curriculum focus Years 3–6 Incorporation in Heating up
Recognising questions that can be investigated scientifically and investigating them
Students use their everyday experience of warming themselves, or use stimulus material about animals trying to keep warm, to generate inquiry questions about heat conduction. They develop their science investigation skills to conduct fair tests and gather evidence to support their claims.
Achievement standardsThe achievement standards of the Australian Curriculum: Science indicate the quality of learning that students typically demonstrate by a particular point in their schooling, for example, at the end of a year level. These standards will be reviewed regularly by ACARA and are available from the ACARA website.
By the end of this unit, teachers will be able to make evidence-based judgments on whether the students are achieving below, at or above the Australian Curriculum: Science Year 3 achievement standard.
General capabilitiesThe skills, behaviours and attributes that students need to succeed in life and work in the 21st century have been identified in the Australian Curriculum as general capabilities. There are seven general capabilities and they are embedded throughout the units. For further information see: www.australiancurriculum.edu.au
For examples of our unit-specific general capabilities information see the next page.

5
PrimaryConnections Heating up
Heating up—Australian Curriculum general capabilities
General capabilities
Australian Curriculum description Heating up examples
Literacy Literacy knowledge specific to the study of science develops along with scientific understanding and skills.PrimaryConnections learning activities explicitly introduce literacy focuses and provide students with the opportunity to use them as they think about, reason and represent their understanding of science.
In Heating up the literacy focuses are:• science journals• ideas maps• word walls• tables• t-charts• posters.
Numeracy
Elements of numeracy are particularly evident in Science Inquiry Skills. These include practical measurement and the collection, representation and interpretation of data.
Students:• collect and interpret data in tables • identify trends and patterns from numerical data• use measurement to quantify the amount of heat
in something.
Information and communication technology (ICT) competence
ICT competence is particularly evident in Science Inquiry Skills. Students use digital technologies to investigate, create, communicate, and share ideas and results.
Students are given optional opportunities to:• use interactive resource technology to view, record
and analyse information• use information technology to record and analyse
information.
Critical and creative thinking
Students develop critical and creative thinking as they speculate and solve problems through investigations, make evidence-based decisions, and analyse and evaluate information sources to draw conclusions. They develop creative questions and suggest novel solutions.
Students:• use reasoning to develop questions for inquiry• analyse data from investigations and relate it to their
original questions• consider different ways of thinking about heat sources
and why clothes keep them warm• develop evidence-based claims.
Ethical behaviour Students develop ethical behaviour as they explore principles and guidelines in gathering evidence and consider the implications of their investigations on others and the environment.
Students:• ask questions of others respecting each other’s point
of view.
Personal and social competence
Students develop personal and social competence as they learn to work effectively in teams, develop collaborative methods of inquiry, work safely, and use their scientific knowledge to make informed choices.
Students:• work collaboratively in teams• listen to and follow instructions to safely complete
investigations• participate in discussions.
Intercultural understanding
Intercultural understanding is particularly evident in Science as a Human Endeavour. Students learn about the influence of people from a variety of cultures on the development of scientific understanding.
• Cultural perspectives opportunities are highlighted where relevant
• Important contributions made to science by people from a range of cultures are highlighted where relevant.
All the material in the first two columns of this table is sourced from the Australian Curriculum.

PrimaryConnections
6
Cross-curriculum prioritiesThere are three cross-curriculum priorities identified by the Australian Curriculum:
• Aboriginal and Torres Strait Islander histories and cultures
• Asia and Australia’s engagement with Asia
• Sustainability.
For further information see: www.australiancurriculum.edu.au
Aboriginal and Torres Strait Islander histories and culturesThe PrimaryConnections Indigenous perspectives framework supports teachers’ implementation of Aboriginal and Torres Strait Islander histories and cultures in science. The framework can be accessed at: www.primaryconnections.org.au
Heating up focuses on the Western science way of making evidence-based claims about how heat is related to energy transfer and transformation. Students identify primary heat sources (that transform different energy sources to heat) and secondary sources (that transfer heat they have accumulated). They discuss how heat is exchanged between materials until they reach the same temperature.
Aboriginal and Torres Strait Islander Peoples might have other explanations for observations explored in this unit.
PrimaryConnections recommends working with Aboriginal and Torres Strait Islander community members to access local and relevant cultural perspectives. Protocols for engaging with Aboriginal and Torres Strait Islander community members are provided in state and territory education guidelines. Links to these are provided on the PrimaryConnections website.
SustainabilityIn Heating up, students discuss how heat sources need to continually transform another energy source to keep something warmer than its surrounding environment. Teachers might choose to elaborate on sustainable technologies to improve sustainable living in terms of heating and insulating homes. This might assist students to develop knowledge, skills and values for making decisions about individual and community actions that contribute to sustainable patterns of use of the Earth’s natural resources.
7
PrimaryConnections Heating up
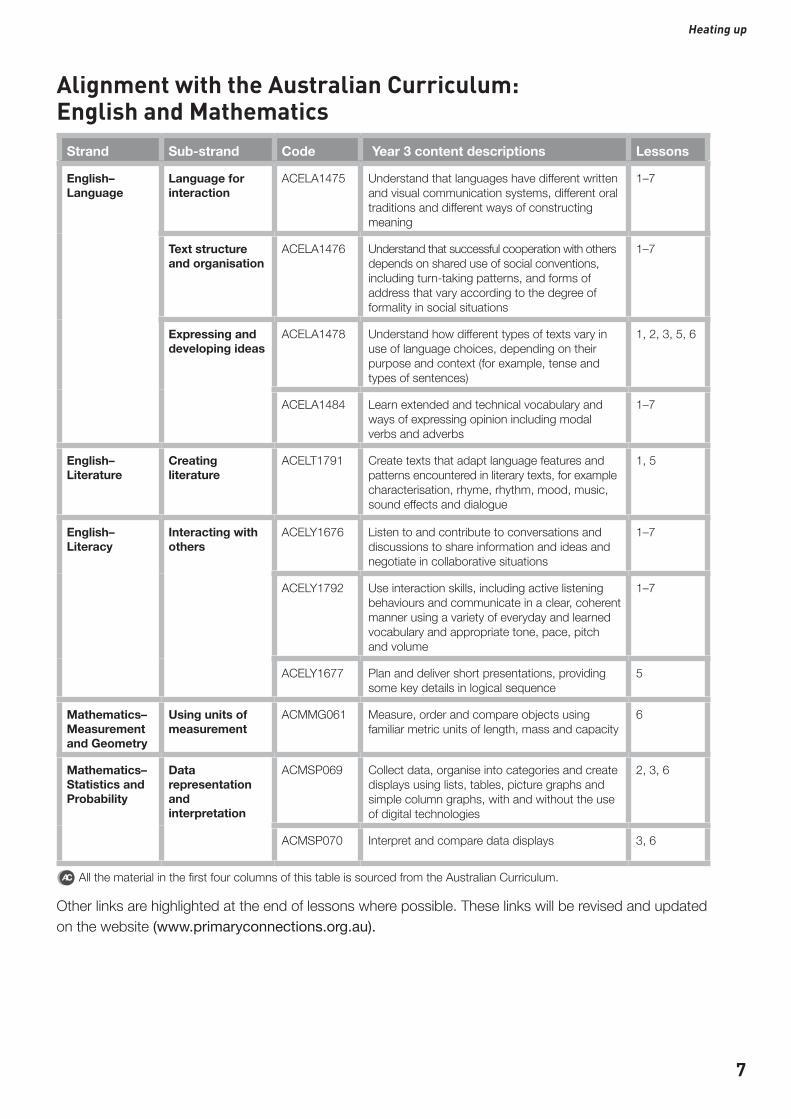
Alignment with the Australian Curriculum: English and Mathematics
Strand Sub-strand Code Year 3 content descriptions Lessons
English–Language
Language for interaction
ACELA1475 Understand that languages have different written and visual communication systems, different oral traditions and different ways of constructing meaning
1–7
Text structure and organisation
ACELA1476 Understand that successful cooperation with others depends on shared use of social conventions, including turn-taking patterns, and forms of address that vary according to the degree of formality in social situations
1–7
Expressing and developing ideas
ACELA1478 Understand how different types of texts vary in use of language choices, depending on their purpose and context (for example, tense and types of sentences)
1, 2, 3, 5, 6
ACELA1484 Learn extended and technical vocabulary and ways of expressing opinion including modal verbs and adverbs
1–7
English–Literature
Creating literature
ACELT1791 Create texts that adapt language features and patterns encountered in literary texts, for example characterisation, rhyme, rhythm, mood, music, sound effects and dialogue
1, 5
English–Literacy
Interacting with others
ACELY1676 Listen to and contribute to conversations and discussions to share information and ideas and negotiate in collaborative situations
1–7
ACELY1792 Use interaction skills, including active listening behaviours and communicate in a clear, coherent manner using a variety of everyday and learned vocabulary and appropriate tone, pace, pitch and volume
1–7
ACELY1677 Plan and deliver short presentations, providing some key details in logical sequence
5
Mathematics–Measurement and Geometry
Using units of measurement
ACMMG061 Measure, order and compare objects using familiar metric units of length, mass and capacity
6
Mathematics–Statistics and Probability
Data representation and interpretation
ACMSP069 Collect data, organise into categories and create displays using lists, tables, picture graphs and simple column graphs, with and without the use of digital technologies
2, 3, 6
ACMSP070 Interpret and compare data displays 3, 6
Other links are highlighted at the end of lessons where possible. These links will be revised and updated on the website (www.primaryconnections.org.au).
All the material in the first four columns of this table is sourced from the Australian Curriculum.

PrimaryConnections
8
Teacher background information
Introduction to heatHeat is a form of energy created by the movement of molecules in an object. All matter is made up of atoms and molecules (groupings of atoms). The atoms and molecules of a material are always moving. Even objects which are very cold have some heat energy because their atoms and molecules are still moving.
When molecules get more energy in them than they had before, they move faster, and we call that heat. Things are hot if their molecules are moving quickly and cold if their molecules are moving more slowly. Temperature is a way of measuring how fast the molecules are moving.
Heat itself isn’t a ‘thing’ but rather a process of energy transfer. For example, when you hold a cup of hot coffee, heat flows from the cup to your hand—the hot thing warms up a cooler thing by the transfer of heat or heat energy. As the cup of coffee is hotter than your hand, the molecules in your hand move faster as heat energy flows from the cup to your hand. Over time, the molecules of the hotter object slow down and the molecules of the colder object speed up until eventually the two objects are the same temperature.
If you leave your cup of coffee on your desk and come back to it later, the heat will have flowed from the cup to the room until the coffee is the same temperature as the room (called equilibrium).
Storing and producing heat Heat has its origins in other forms of energy:
• The Sun changes nuclear energy into light and heat energy.
• A fire and living cells can change chemical energy into heat energy.
• Some electrical devices can change electrical energy into heat energy.
• Kinetic (motion) energy can be changed into heat energy through friction.
These are all examples of primary sources of heat. We might produce heat as a side product of any work we might do.
Secondary sources of heat do not produce heat themselves but are previously heated by a primary heat source. If then moved to a cold environment they exchange heat with objects around them until all materials reach the same temperature.
Students’ conceptionsTaking account of students’ existing ideas is important in planning effective teaching approaches which help students learn science. Students develop their own ideas during their experiences in everyday life and might hold more than one idea about an event or phenomenon.
Students might think that the terms ‘hot’ and ‘cold’ are absolutes and opposites. However, ‘hot’ can be translated as ‘has a higher temperature than me’ and ‘cold’ as ‘has a lower temperature than me’. We intuitively understand the world in terms of what is hot or cold to us, but this would be very different if, for example, we had an internal body temperature of 120°C.
Students might think that ‘cold’ moves from one material to another. Statements such as ‘Don’t let the cold in!’ imply this. Heat energy always transfers from the hotter object to the colder one.

9
PrimaryConnections Heating up
To access more in-depth science information in the form of text, diagrams and animations, refer to the PrimaryConnections Science Background Resource which has now been loaded on the PrimaryConnections website: www.primaryconnections.org.au/science-background-resource/.
Note: This background information is intended for the teacher only.
ReferencesCool facts about heat. Beyond penguins and polar bears www.beyondpenguins.ehe.osu.edu/issue/keeping -warm/cool-facts-about-heat
Cool cosmos ‘What is heat?’ http://coolcosmos.ipac.caltech.edu/cosmic_classroom/light_lessons/thermal/heat.html
Burgoon, J., Heddle, M. & Duran, E. (2010). ‘Re-Examining the Similarities Between Teacher and Students Conceptions About Physical Science’, Journal Science Teacher Education (2911), 22:101–114.
Hapkiewicz, A. (1992). ‘Finding a List of Science Misconceptions’, MSTA Newsletter, 38 (Winter ’92), pp. 11–14.
Skamp, K. (Ed.) (2012). Teaching primary science constructively (4th Edn). South Melbourne: Cengage Learning Australia.

PrimaryConnections
Lesson 1 Warming up10
Lesson 1 Warming up
EN
GA
GE
AT A GLANCE
To capture students' interest and find out what they think they know about how heat can be produced in many ways and can move from one object to another.
To elicit students’ questions about heat and keeping warm.
Students:
• role-play the way they feel when they are hot or cold• discuss the ways they would warm up if they felt cold • explain the reasons they think different things help them to warm up• experience and explain their ideas on how heat moves.
Lesson focusThe focus of the Engage phase is to spark students’ interest, stimulate their curiosity, raise questions for inquiry and elicit their existing beliefs about the topic. These existing ideas can then be taken account of in future lessons.
Assessment focusDiagnostic assessment is an important aspect of the Engage phase. In this lesson you will elicit what students already know and understand about:
• how heat can be produced in many ways and can move from one object to another.
You will also monitor their developing science inquiry skills (see page 3).
Key lesson outcomesScience
Students will be able to represent their current understanding as they:
• discuss strategies animals have for keeping warm
• explain their existing ideas about how to stay warm
• identify heat sources
• discuss how heat moves.
Literacy
Students will be able to:
• contribute to class discussions about how to keep warm
• use talk to their share ideas
• represent their ideas about how heat moves
• contribute to the class science journal and word wall.

11Lesson 1 Warming up
PrimaryConnections Heating up
EN
GA
GE
This lesson also provides opportunities to monitor the development of students’ general capabilities (highlighted through icons, see page 5).
Equipment
FOR THE CLASS FOR EACH STUDENT
• class science journal• word wall• ideas map (see ‘Preparation’)• multimedia resources showing animals
or humans trying to keep warm (see ‘Preparation’)
• student science journal • ice block
Preparation• Read ‘How to use a science journal’ (Appendix 2).
• Read ‘How to use a word wall’ (Appendix 3).
• Create a template for an ideas map (see Lesson step 6) in the class science journal and record the topic 'keeping warm' in the centre.
• Prepare an area for students to stand and role-play the way they feel in different situations (see Lesson step 1). If the classroom is small consider using an outside area. Identify multimedia resources, such as pictures or videos, which show animals or humans trying to keep warm, for example:
• BBC Learning zone clip 12886, ‘Penguin Huddle’: www.bbc.co.uk/learningzone/clips/penguin-huddle/12886.html
• Discovery atlas: Snow monkeys: dsc.discovery.com/tv-shows/other-shows/videos/discovery-atlas-snow-monkeys.htm
• The book Antarctica by Helen Cowcher, ISBN: 0-374-40371-6.
• Create a page in the class science journal titled ‘Our questions about heat’.
• Optional: Display the science journal, multimedia resources and ideas map on an interactive whiteboard. Check the PrimaryConnections website to see if an accompanying interactive resource has been developed: www.primaryconnections.org.au
Lesson steps 1 Introduce the multimedia depicting animals trying to keep warm (see ‘Preparation’).
Ask questions, such as:• What do you think they are doing?• Why do you think they are doing that?• How might this help them keep warm?

Lesson 1 Warming up12
PrimaryConnections E
NG
AG
E
Note: In the Engage phase, do not provide any formal definitions or correct students’ answers as the purpose is to elicit students’ prior knowledge.
2 Introduce the class science journal and discuss its purpose and features.
Literacy focus
Why do we use a science journal?We use a science journal to record what we see, hear, feel and think so that we can look at it later.
What does a science journal include?A science journal includes dates and times. It might include written text, drawings, measurements, labelled diagrams, photographs, tables and graphs.
Record students’ answers in the class science journal. 3 Ask students to stand where they have space to move (see ‘Preparation’). Explain that
you are going to describe some situations and they will role-play as if they were in that situation.
4 Ask students to imagine that they are standing in a room that is at a very comfortable temperature. Then ask them imagine that the room is getting colder, and colder, until it is freezing. Ask the students to then imagine that the room is getting warmer and warmer, until it is extremely hot.
5 As a class discuss the activity, asking questions, such as:• What did you do when you acted like the room was freezing cold/extremely hot?• Why do you think you acted that way?• Have you ever been very cold/hot before? Why do you think that happened?
6 Introduce the class ideas map (see ‘Preparation). Discuss the purpose and features of an ideas map.
Literacy focus
Why do we use an ideas map?We use an ideas map to show our thoughts about a topic.
What does an ideas map include?An ideas map includes a title in the centre. Ideas are written around it and arrows are drawn between similar ideas. An ideas map might include pictures and symbols.
7 Ask students to think about ways to keep warm. Organise the ideas map using categories, such as:
• Go somewhere warm.• Stand near something warm.• Hold something warm. • Put warm clothes on.• Move your body.

13Lesson 1 Warming up
PrimaryConnections Heating up
EN
GA
GE
Ask students to add ideas to each of these categories, for example, by coming forward and drawing pictures or by describing things that they or you can record.
Optional: Ask students to create their own ideas map in their science journals.
Work sample of a class ideas map on ways to keep warm
8 Use guided questioning to find out what students think they know about heat and the movement of heat, for example:• Why do you think a heater is hot?• How do you think a blanket keeps you warm?• Why do people need heat?• In what everyday activities do we use heat?• What are some sources of heat that we rely on?• How do we measure heat?
Write students’ explanations on the ideas map and join them with arrows or lines to the ideas they explain.
9 Ask students to hold an ice block in their hands and observe and feel what happens. After the ice has melted and students have dried their hands ask them to touch their faces and describe how their hands feel. Ask students to draw a picture and write to explain what they think happened to cause the ice block to melt and why their hands were cold using the following sentence starters:
The ice block melted because … My hand was cold afterwards because …

Lesson 1 Warming up14
PrimaryConnections E
NG
AG
E
Record students’ questions about heat and warming up on the ‘Our questions about heat’ page of the class science journal.
10 Draw students’ attention to the word wall and discuss its purpose and features.
Literacy focus
Why do we use a word wall?We use a word wall to record words we know or learn about a topic. We display the word wall in the classroom so that we can look up words we are learning about and see how they are spelled.
What does a word wall include?A word wall includes a topic title or picture and words that we have seen or heard about the topic.
Ask students what words or images from today’s lesson would be useful to place on the word wall.
Invite students to contribute words from different languages to the word wall, including local Indigenous words for hot, cold, heat or warmth, if possible.
Curriculum linksEnglish• Use comparative language, such as cold, colder, coldest; warm, warmer, warmest.
The Arts• Discuss requirements of clothing that is used for warmth.
Indigenous perspectives• Discuss traditional ways to keep warm, for example, wearing a kangaroo skin.
Work sample of how heat moves

EX
PLO
RE
Lesson 2 Hot spots
EX
PLO
RE
15Lesson 2 Hot spots
PrimaryConnections
AT A GLANCE
To provide students with hands-on, shared experiences of identifying heat sources in the classroom and at home.
Session 1 Hot or not?
Students:
• identify heat sources in the classroom• identify primary and secondary heat sources• record observations in a table.
Session 2 Heat at home
Students:
• identify primary and secondary heat sources at home• take a photo or draw a heat source and bring to school.
Lesson focusThe Explore phase is designed to provide students with hands-on experiences of the science phenomenon. Students explore ideas, collect evidence, discuss their observations and keep records, such as science journal entries. The Explore phase ensures all students have a shared experience that can be discussed and explained in the Explain phase.
Assessment focusFormative assessment is an ongoing aspect of the Explore phase. It involves monitoring students’ developing understanding and giving feedback that extends their learning. In this lesson you will monitor students’ developing understanding of:
• how heat can be produced in many ways.

Lesson 2 Hot spots16
PrimaryConnections E
XP
LOR
E
Key lesson outcomesScience
Students will be able to:
• identify heat sources in the classroom
• sort heat sources into heat producers and things heated by heat producers
• identify heat sources at home.
Literacy
Students will be able to:
• understand the purpose and features of a table and T-chart
• use oral, written and visual language to record and discuss their observations of heat sources
• engage in discussion to compare ideas about heat sources.
This lesson also provides opportunities to monitor the development of students’ general capabilities (highlighted through icons, see page 5).
Teacher background informationHeat sources Whether or not something is a ‘source’ of heat depends on its surroundings. If a material is put in contact with a colder material whose atoms move more slowly then heat transfer will occur until both materials reach the same temperature.
Primary heat sources are heat sources that produce their own heat (see below for examples). A secondary heat source is something that is heated by a primary source and then transmits the heat to something colder, for example, a hot water bottle is a secondary heat source for warming the bed.
Producing heat Some examples of how heat can be produced are:
• Electrical energy is converted into thermal energy (heat) when you use objects such as computers, electrical stove elements, toasters, hair dryers or light bulbs.
• Movement energy (kinetic) from friction creates heat. For example, rubbing your hands, sharpening a pencil, spinning skateboard wheels.
• Chemical energy including burning. For example, foods we eat are converted into heat in our bodies; fire, candles and gas heaters burn to produce heat.
• Light from the sun is converted to heat as the sun's rays warm the earth's surface.
Students’ conceptionsWhen looking for heat sources, students might be confused by their body heat and identify things such as books as being warm. This might also arise from a confusion of what ‘warm’ means. Encourage students to identify whether things are actually warming their hand and ask the whole team to check whether they agree.
Students might think the wick of a candle is burning, however it is the wax vapour which burns to form the majority of the flame we see. The wick does burn, but its main purpose is to provide a way for the wax to get hot enough to vaporise and burn.

17Lesson 2 Hot spots
PrimaryConnections Heating up
EX
PLO
RE
Students might think that the Earth gets heat by thermal radiation from the Sun. The Sun is actually too far from the Earth to heat it directly. Instead, the light from the Sun is reflected or absorbed by objects on Earth. Absorbed light usually increases the energy in an object, causing the object to heat up.
Some students might think that materials are intrinsically warm (blankets) or cold (metals). They might think that objects that keep things warm—such as a sweater or gloves—may be thought to be sources of heat instead of the objects keeping things warm by trapping heat.
Session 1 Hot or not?
Equipment
FOR THE CLASS FOR EACH TEAM
• class science journal• word wall• team roles chart• team skills chart• 1 enlarged copy of ‘What’s hot?’
(Resource sheet 1)• candle• hot water bottle• kettle containing warm water• collection of heat sources or pictures of
them (see ‘Preparation’)
• role wristbands or badges for Director, Manager and Speaker
• each team member’s science journal• 1 copy of ‘What’s hot?’
(Resource sheet 1) per team member
Preparation• Read ‘How to organise collaborative learning teams (Year 3–Year 6)’ (Appendix 1).
Display an enlarged copy of the team skills chart and the team roles chart in the classroom. Prepare role wristbands or badges.
• Prepare an enlarged copy of ‘What’s hot?’ (Resource sheet 1).
• Collect other heat sources, or pictures of them, for students to explore in the classroom, such as a hairdryer, curling wand, computer, clock/radio, warm cup of tea.
• Optional: Display the pictures of heat sources and ‘What’s hot?’ (Resource sheet 1) on an interactive whiteboard. Check the PrimaryConnections website to see if an accompanying interactive resource has been developed (www.primaryconnections.org.au).
• Prepare a class T-chart with the column headings ‘Heat producers’, and ‘Heated by something else’. Leave space for a title at the top of the sheet (see Lesson steps 9 and 11).

Lesson 2 Hot spots18
PrimaryConnections E
XP
LOR
E
Lesson steps 1 Review the previous lesson using the class science journal. Using the ideas map,
review things that students identified as those to stand next to when trying to warm up. 2 Explain that students will be working in collaborative learning teams to see how many
different things they can find in the classroom that feel warm or hot. Discuss how to identify if things are warm or hot, for example, by feeling if they are warm to touch.
Optional: Allow teams to investigate more areas than just the classroom. 3 Discuss safe ways of searching for heat sources, including slowly moving a hand
towards something, and withdrawing before it gets too hot. 4 Introduce the enlarged copy of ‘What’s hot?’ (Resource sheet 1). Read through and
discuss. Discuss the purpose and features of a table.
Literacy focus
Why do we use a table?We use a table to organise information so that we can understand it more easily.
What does a table include?A table includes a title, columns with headings and information organised under each heading.
5 Model how to complete the table using a candle. Write ‘candle’ in the first column. Ask students to touch the candle. Ask questions, such as:• Did you expect it to be hot? Why/Why not?• What does it need in order to be hot? Why?
Light the candle and complete the rest of the columns. Safety note: Remind students to slowly move their hands towards the candle and
move their hands away when it becomes too hot. 6 Discuss the last column ‘Produces its own heat? Or heated by something else?’
Ask students:• Is the candle producing its own heat or is it heated by something else?
(Producing its own heat.)
• How do you know? (I can see it burning.)
Model how to complete the last column for a candle. 7 Show students the cold hot water bottle. Discuss what it is and what it is used for.
Pour warm water from a kettle into the hot water bottle. Ask students to feel the heat of it. Ask students:• Is the hot water bottle producing its own heat or is it heated by something else?
(Heated by something else.)
• How do you know? (The hot water in it was heated by a kettle.)
Discuss how students will form teams to complete an entry on their resource sheet for the hot water bottle and other items in the classroom.
19Lesson 2 Hot spots
PrimaryConnections Heating up
EX
PLO
RE
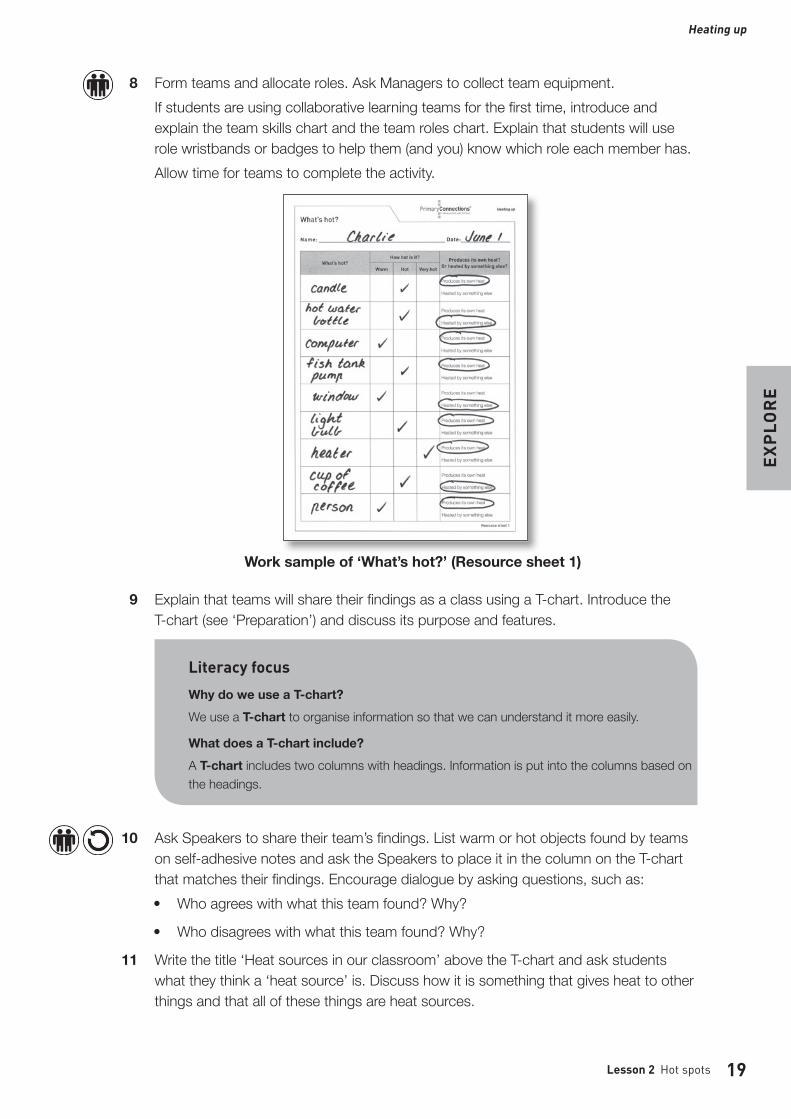
8 Form teams and allocate roles. Ask Managers to collect team equipment. If students are using collaborative learning teams for the first time, introduce and
explain the team skills chart and the team roles chart. Explain that students will use role wristbands or badges to help them (and you) know which role each member has.
Allow time for teams to complete the activity.
Work sample of ‘What’s hot?’ (Resource sheet 1)
9 Explain that teams will share their findings as a class using a T-chart. Introduce the T-chart (see ‘Preparation’) and discuss its purpose and features.
Literacy focus
Why do we use a T-chart?We use a T-chart to organise information so that we can understand it more easily.
What does a T-chart include?A T-chart includes two columns with headings. Information is put into the columns based on the headings.
10 Ask Speakers to share their team’s findings. List warm or hot objects found by teams on self-adhesive notes and ask the Speakers to place it in the column on the T-chart that matches their findings. Encourage dialogue by asking questions, such as: • Who agrees with what this team found? Why?
• Who disagrees with what this team found? Why?
11 Write the title ‘Heat sources in our classroom’ above the T-chart and ask students what they think a ‘heat source’ is. Discuss how it is something that gives heat to other things and that all of these things are heat sources.

Lesson 2 Hot spots20
PrimaryConnections E
XP
LOR
E 12 Read through the heat producers’ side of the T-chart and ask questions, such as:• What other heat producers can you think of?• Is there anything similar about any of the heat producers?
13 Ask students what they learned about heat and heat sources from today’s lesson and write their ideas in the class science journal.
14 Revise the ‘Our questions about heat’ page in the class science journal. Add any new questions that students might have.
15 Update the word wall with words and images.
Heat sources in our classroom
Heat producers Heated by something else
computerSunlightcandleaquarium lightpumpfridge motormatchespeopleheater
heat packhot water bottlewindow paneglass jars on window sill

Resource sheet 1
Heating up
Name: Date:
Copyright © Australian Academy of Science, 2014. ISBN 978 0 85847 329 4
PrimaryConnections
What’s hot?
What’s hot?How hot is it? Produces its own heat?
Or heated by something else?Warm Hot Very hot
Produces its own heat
Heated by something else
Produces its own heat
Heated by something else
Produces its own heat
Heated by something else
Produces its own heat
Heated by something else
Produces its own heat
Heated by something else
Produces its own heat
Heated by something else
Produces its own heat
Heated by something else
Produces its own heat
Heated by something else
Produces its own heat
Heated by something else

Lesson 2 Hot spots22
PrimaryConnections E
XP
LOR
E
Session 2 Heat at home
Equipment
FOR THE CLASS FOR EACH STUDENT
• class science journal• word wall• ‘Heat collection’ board• 1 enlarged copy of ‘Information note for
families’ (Resource sheet 2)
• student science journal• 1 copy of ‘Information note for families’
(Resource sheet 2)
Preparation• Set up a ‘Heat collection’ board for the students to place their photos or pictures of heat
sources brought from home. Use a T-chart format as in Session 1 with the title ‘Heat sources at home’, and the columns ‘Heat producers’ and ‘Heated by something else’.
• Prepare an enlarged copy of ‘Information note for families’ (Resource sheet 2).
Lesson steps 1 Review the previous lesson using the class science journal and T-chart. Discuss objects
and activities that were warm, hot or very hot to touch. 2 Explain to students that they will be looking for heat sources at home. Ask students to
find an object at home that is a heat source and either take a photo or draw a picture of it. Discuss examples of what they might find. Examples include a hairdryer, curling wand, matches, stove element, gas burners, hot water system, television, electric blanket, oven, clock/radio or printer.
3 Introduce the enlarged copy of ‘Information note for families’ (Resource sheet 2) and discuss the ‘Tasks to do’ section.
Remind students of safe ways of searching for heat sources, including slowly moving a hand towards something, and withdrawing before it gets too hot.
4 Show students the ‘Heat collection’ board where their photos and drawings will be placed for discussion in the next lesson.
5 Distribute ‘Information note for families’ (Resource sheet 2) to students. 6 Update the word wall with words and images.
Curriculum linksScience• Further investigate and compare different ways heat can be produced.
Mathematics• Create a graph of how many heat sources were found in different locations.

Heating up
Copyright © Australian Academy of Science, 2014. ISBN 978 0 85847 329 4
PrimaryConnections
Information note for families
Resource sheet 2
Introducing the ‘Heat at home’ projectThis term our class will explore heat in a science unit called Heating up.
As part of this unit students are asked to find things at home that are heat sources and either draw them or take a photo to share with the class.
Safety note: Students are asked to use safe ways to search for heat sources, including slowly moving a hand towards something and withdrawing before it gets too hot.
Tasks to do1. Students brainstorm with family and friends different objects at home that are heat sources and discuss if each one is warm, hot or very hot.
2. Discuss whether the object is producing heat or was heated by something else.
For example:
• A hairdryer. The vent area can get hot. It produces its own heat.
• A globe in a bedside lamp. It can get hot. It produces its own heat.
• A saucepan on stove. It gets very hot. It is heated by something else (a gas burner).
3. Students to choose one object that is a heat source and bring a photo or drawing of it to class.
This project will be shared with classmates on _______________________________.
Class teacher

PrimaryConnections E
XP
LOR
E
Lesson 3 Energy explorers
Lesson 3 Energy explorers24
AT A GLANCE
To provide students with hands-on, shared experiences of ways in which heat is produced.
Students:
• sort pictures into three groups according to how they produce heat• find objects and items to include in the groups.
Lesson focusThe Explore phase is designed to provide students with hands-on experiences of the science phenomenon. Students explore ideas, collect evidence, discuss their observations and keep records, such as science journal entries. The Explore phase ensures all students have a shared experience that can be discussed and explained in the Explain phase.
Assessment focusFormative assessment is an ongoing aspect of the Explore phase. It involves monitoring students’ developing understanding and giving feedback that extends their learning. In this lesson you will monitor students’ developing understanding of:
• how heat can be produced in many ways.
Key lesson outcomesScience
Students will be able to:
• identify three of the ways in which heat can be produced
• classify heat sources according to how they produce heat.
Literacy
Students will be able to:
• contribute to discussions about some ways in which heat is produced
• use questions to agree and disagree with teams’ claims.
This lesson also provides opportunities to monitor the development of students’ general capabilities (highlighted through icons, see page 5).

25Lesson 3 Energy explorers
PrimaryConnections Heating up
EX
PLO
RE
Teacher background informationEnergy can take on many forms and can change from one form to another. Many different types of energy can be converted into heat energy; light, electrical, kinetic, chemical, mechanical, nuclear and sound energy can cause a substance to heat up by increasing the speed of its molecules. In this unit, students will be looking at the following three types of energy that produce heat:
Electrical energy Electrical energy is converted into heat (thermal energy) when you use objects such as electric blankets, electric stove elements, toasters, hair dryers or light bulbs.
Kinetic energy (Motion energy) All moving things have kinetic energy. It is energy possessed by an object due to its motion or movement. The heavier a thing is and the faster it moves the more kinetic energy it has.
Energy from friction creates heat. For example, when you rub your hands, sharpen a pencil, make a skid mark with your bike or use the brakes on your car, friction generates heat.
Chemical energy Chemical energy is energy stored in atoms and molecules. Chemical energy is released in a chemical reaction, often in the form of heat. Examples of stored chemical energy include matches, batteries, petroleum, natural gas and dry wood. As each of these burns, they release chemical energy which is converted to thermal energy (heat) and light energy. For example, a match has chemical energy stored in it. When the match is struck, it burns and the chemical in it produces heat energy and light energy.
Reference CoolCosmos: What is heat? http://coolcosmos.ipac.caltech.edu/cosmic_classroom/light_lessons/thermal/heat.html
Equipment
FOR THE CLASS FOR EACH TEAM
• class science journal• word wall• team roles chart• team skills chart• ‘Heat collection’ board from Lesson 2,
Session 2• 1 enlarged copy of ‘Warming ways’
(Resource sheet 3) • objects, photos or pictures of heat sources
(see ‘Preparation)
• role wristbands or badges for Director, Manager and Speaker
• each team member’s science journal• 1 copy of ‘Warming ways’
(Resource sheet 3) per team member

Lesson 3 Energy explorers26
PrimaryConnections E
XP
LOR
E
Preparation• Collect objects, photos or pictures of heat sources that use:
• electricity, such as a hairdryer, heater, toaster, sandwich maker
• chemicals (burning), such as a tea candle, fire, gas heater, cigarette lighter
• friction, such as a pencil sharpener, hands rubbing together, sandpaper, skid mark from a bike, using the brakes on a car.
• Prepare an enlarged copy of ‘Warming ways’ (Resource sheet 3).
• Optional: Display ‘Warming ways’ (Resource sheet 3) on an interactive whiteboard. Check the PrimaryConnections website to see if an accompanying interactive resource has been developed: www.primaryconnections.org.au
Lesson steps 1 Review the previous lesson using the class science journal. Discuss objects that are
heat producers. Compare them with things that are heated by something else. 2 Ask students to place the photo or drawing that they have brought from home on
the ‘Heat collection’ board in the appropriate column. Discuss items with the class. Discuss the amount of heat it produces and whether it is a heat producer or heated by something else. Compare this with the T-chart from Lesson 2, Session 1, and note similarities and differences. Discuss how there are many different types of heat sources.
3 Introduce the enlarged copy of ‘Warming ways’ (Resource sheet 3). Explain that students will be working in collaborative learning teams to individually cut out and then sort the pictures into three groups according to what they think each uses to produce heat. Ask students to paste the pictures into their science journals, putting each group on a separate page, and pasting the title for the group at the top of the page.
4 Explain that each team will then find other things from the collection of objects and pictures, including those brought from home, of other items that might go in each group (see ‘Preparation’). Ask students to write or draw each item that they find onto the page of the group that they think it belongs to.
5 Form teams and ask Managers to collect team equipment. Allow time for teams to complete the activity.
6 Ask Speakers to present their team’s findings, providing reasons for their choices. Encourage students to agree or disagree with each team using the ‘Science question starters’ (see Appendix 5).
Ask teams questions, such as:• What did you use to help you decide how to make your groups?• Was there any object that you weren’t sure of which group to put it in? Why?
7 Revise the ‘Our questions about heat’ page in the class science journal. Add any new questions that students might have.
8 Update the word wall with words and images.

27Lesson 3 Energy explorers
PrimaryConnections Heating up
EX
PLO
RE
Work sample of heat sources that use electricity

Heating up
Copyright © Australian Academy of Science, 2014. ISBN 978 0 85847 329 4
Electricity Friction Burning
Resource sheet 3
Warming ways

EX
PLO
RE
Lesson 4 Sharing the warmth
EX
PLO
RE
29Lesson 4 Sharing the warmth
AT A GLANCE
To provide students with hands-on, shared experiences of heat moving from one object to another.
Students:
• observe that many objects do not produce heat• explore how objects obtain heat by being in contact with a heat source.
Lesson focusThe Explore phase is designed to provide students with hands-on experiences of the science phenomenon. Students explore ideas, collect evidence, discuss their observations and keep records, such as science journal entries. The Explore phase ensures all students have a shared experience that can be discussed and explained in the Explain phase.
Assessment focusFormative assessment is an ongoing aspect of the Explore phase. It involves monitoring students’ developing understanding and giving feedback that extends their learning. In this lesson you will monitor students’ developing understanding of:
• how heat can be produced in many ways and can move from one object to another.
Key lesson outcomesScience
Students will be able to:
• explore objects that do not produce heat
• identify heat sources inside and outside the classroom
• explore that some objects heat up when in contact with a heat source.
Literacy
Students will be able to:
• use oral, written and visual language to record and discuss investigation results
• engage in discussion to compare results.
This lesson also provides opportunities to monitor the development of students’ general capabilities (highlighted through icons, see page 5).

Lesson 4 Sharing the warmth30
PrimaryConnections E
XP
LOR
E
Teacher background informationHeat flow When two materials at different temperatures are placed in contact with each other, heat passes from the hotter object to the colder one until their temperatures are the same. This heat transfer is known as conduction. How quickly heat is transferred between the two materials depends on several variables. The more surface contact between the materials, the faster the transfer. Different materials also ‘heat up’ at different speeds. When heat travels easily through a material it is known as a heat conductor, and when heat travels slowly the material is known as a heat insulator. A metal spoon at room temperature is the same temperature as the air. It might feel colder than a wooden or plastic spoon because metal conducts heat so much better. Because your hand is hotter than room temperature, heat is conducted away from it, and a metal spoon cools your hand faster. A metal spoon at room temperature is the same temperature as the air. It might feel colder than a wooden or plastic spoon because metal conducts heat so much better. Because your hand is hotter than room temperature, heat is conducted away from it, and a metal spoon cools your hand faster. Heat flow depends strongly on the geometry and type of materials. For example, the recently discovered thinnest material graphene, which is composed of just a single layer of carbon atoms, is known for its fast heat transfer properties.
Students’ conceptionsStudents might think that heat is an intrinsic property of materials, that a metal is always hot or always cold depending on which memory students are drawing on. However, intrinsic properties of materials are their capacity to conduct heat and to store thermal energy when warmed by heat sources. Since metals conduct heat quickly they are useful cooking implements, spreading the heat from the heat source quickly and evenly through the material but they are not creating the heat themselves.
Equipment
FOR THE CLASS FOR EACH TEAM
• class science journal• word wall• team roles chart• team skills chart• metal teaspoon• heat pack• 1 enlarged copy of ‘Warm me up!’
(Resource sheet 4)
• role wristbands or badges for Director, Manager and Speaker
• each team member’s science journal• 1 enlarged copy of ‘Warm me up!’
(Resource sheet 4) • 1 timing device (eg, a stopwatch)• metal teaspoon

31Lesson 4 Sharing the warmth
PrimaryConnections Heating up
EX
PLO
RE
Preparation• Prepare an enlarged copy of ‘Warm me up!’ (Resource sheet 4).
• Pre-heat the heat pack for Lesson step 4.
• Optional: Display ‘Warm me up!’ (Resource sheet 4) on an interactive whiteboard. Check the PrimaryConnections website to see if an accompanying interactive resource has been developed: www.primaryconnections.org.au
Lesson steps 1 Review previous lessons using the science chat-board. Review the ‘Heat sources’
table and discuss how if something feels warm or hot it might be producing its own heat or it might be absorbing heat from something else.
2 Discuss how most things around us do not produce heat. Ask students to find objects in the classroom that do not produce heat. List students’ ideas in the class science journal.
3 Show students a metal spoon. Ask students to feel the spoon and describe its temperature.
4 Introduce the heated heat pack and ask students to feel that it is very warm. Ask students what they think will happen when you wrap the hot heat pack around the cold spoon.
5 Wrap a hot heat pack around the spoon, wait for one minute and then unwrap and ask some students to feel if the spoon is still cold or if it is warm, hot or very hot. Ask students what they think happened to make the spoon warmer.
6 Draw a picture of the spoon on the heat pack in the class science journal. Discuss the purpose and features of a labelled diagram.
Literacy focus
Why do we use a labelled diagram? We use a labelled diagram to show the shape, size and features of an object.
What does a labelled diagram include?A labelled diagram might include a title, an accurate drawing, a scale to show the object’s size and labels showing the main features. A line or arrow connects the label to the feature.
Ask students to draw arrows to show the heat going from the heat pack to the spoon. 7 Introduce the enlarged copy of ‘Warm me up!’ (Resource sheet 4) and discuss with
students. Explain that students will be working in collaborative learning teams to find ways of heating up the metal spoon. Discuss examples with students, such as putting it out on the court, placing it on the path, holding it next to a heater, putting it on a heated hot water bottle, putting it in warm water, putting it on hot sand, holding it over a candle, blowing it with a hairdryer, or putting it close to your skin for body heat.
8 Discuss that teams will look for places that are heat sources, place the metal spoon there for two minutes and then feel the spoon for whether it is warm, hot or very hot. Model how to measure for 2 minutes and how to complete the table.
9 Re-form teams and allocate roles. Ask Managers to collect team equipment.

Lesson 4 Sharing the warmth32
PrimaryConnections E
XP
LOR
E
10 Ask Speakers to present their team’s findings and which heat source they think would be the best to use to get warm and why they think that. Encourage students to provide reasons and evidence for their conclusions. Invite students to agree or disagree with each team using the ‘Science question starters’ (see Appendix 5).
Ask questions, such as:• What was the best heat source that you could find for the spoon?• Did it need to touch the heat source? Why do you think that?• How does the heat move to heat the spoon up?• Which heat source do we think is the best to warm up the spoon? Why?
11 Revise the ‘Our questions about heat’ page in the class science journal. Add any new questions that students might have.
12 Update the word wall with words and images.
Work sample of ‘Warm me up!’ (Resource sheet 4)

Heating up
Name: Date:
Copyright © Australian Academy of Science, 2014. ISBN 978 0 85847 329 4
PrimaryConnections
Resource sheet 4
Warm me up!
Draw each heat source touching the spoon. Draw arrows to show the heat source heating up the spoon.
Heat source________________________________
After 2 mins it was _________________________
Heat source________________________________
After 2 mins it was _________________________
Heat source________________________________
After 2 mins it was _________________________
Heat source________________________________
After 2 mins it was _________________________
Heat source________________________________
After 2 mins it was _________________________
Heat source________________________________
After 2 mins it was _________________________

PrimaryConnections
Lesson 5 Too hot to handle
Lesson 5 Too hot to handle34
EX
PLA
IN
AT A GLANCE
To support students to represent and explain their understanding of how heat can be produced and can move from object to object, and to introduce current scientific views.
Students:
• represent their understanding of heat sources and the movement of heat using everyday scenarios
• create a poster warning others about the dangers of heat.
Lesson focusIn the Explain phase students develop a literacy product to represent their developing understanding. They discuss and identify patterns and relationships within their observations. Students consider the current views of scientists and deepen their own understanding.
Assessment focusFormative assessment is an ongoing aspect of the Explain phase. It involves monitoring students’ developing understanding and giving feedback that extends their learning. In this lesson you will monitor students’ developing understanding of:
• how heat can be produced in many ways and can move from one object to another.
You are also able to look for evidence of students’ use of appropriate ways to represent what they know and understand about heat sources and transfer, and give them feedback on how they can improve their representations. You will also monitor their developing science inquiry skills (see page 2).
35Lesson 5 Too hot to handle
PrimaryConnections Heating up
EX
PLA
IN
Key lesson outcomesScience
Students will be able to:
• explain that heat transfers from hot objects to cooler ones
• review their understanding of heat sources and the production of heat.
Literacy
Students will be able to:
• use written and oral language to demonstrate their understanding of heat transfer
• create a poster to explain heat and how heat moves
• use scientific language to describe heat sources
• contribute to discussions about everyday scenarios involving heat transfer.
This lesson also provides opportunities to monitor the development of students’ general capabilities (highlighted through icons, see page 5).
Equipment
FOR THE CLASS FOR EACH TEAM
• class science journal• word wall• team roles chart• team skills chart• 1 enlarged copy of ‘Moving heat’
(Resource sheet 5)
• role wristbands or badges for Director, Manager and Speaker
• each team member’s science journal• 1 copy of ‘Moving heat’ (Resource sheet 5)
per team member• materials to create a poster
Preparation• Prepare an enlarged copy of ‘Moving heat’ (Resource sheet 5).
• Optional: Display ‘Moving heat’ (Resource sheet 5) on an interactive whiteboard. Check the PrimaryConnections website to see if an accompanying interactive resource has been developed: www.primaryconnections.org.au

Lesson 5 Too hot to handle36
PrimaryConnections E
XP
LAIN
Lesson steps 1 Review previous lessons using the class science journal. Ask questions, such as:
• What have we learned about heat?• How is heat produced? What ways do you know of?• What is a heat source?• What happens when two things are touching and one is hotter than the other?
2 Introduce the enlarged copy of ‘Moving heat’ (Resource sheet 5). Read through and discuss. Explain that each student will complete the resource sheet by drawing the missing heat source and showing how the heat from the heat source moves to the colder object. Allow time for students to complete the activity.
3 Discuss the completed resource sheets with students, explaining what heat source is missing, and using arrows to show the movement of heat. Discuss the producers of heat in each picture.
4 Discuss how heat moves from a hotter to a colder object; and that materials which allow heat to flow easily are called ‘conductors’.
5 Explain that students will be working in collaborative learning teams to choose one of the pictures excluding the lizard and create a poster to warn other students about the dangers of touching hot objects. For example, the poster might:• warn students not to touch the metal handle of a hot frying pan, or to be careful
when using a metal teaspoon in a hot cup of tea (because metal is a good conductor).
• warn students to be careful when walking barefooted on hot sand at the beach.
6 Discuss the purpose and features of a poster.
Literacy focus
Why do we use a poster? We use a poster to display ideas and information. We can view a poster to collect information about a topic.
What does a poster include?A poster includes a title, words and pictures. It might include graphs, photos and tables as well as borders, arrows and labels.
7 Ask students to include in their poster scientific words and information that they have learned during the unit about heat sources, how heat is produced and how heat moves.
8 Form teams. Ask Managers to collect team equipment. Allow time for teams to complete the activity.
9 Ask Speakers to present their team’s poster to the class. 10 Review the ‘Our questions about heat’ section of the class science journal and answer
any questions that can be answered.

37Lesson 5 Too hot to handle
PrimaryConnections Heating up
EX
PLA
IN
11 Optional: For each unanswered question, discuss with students whether the question is relevant to the topic and feasible to investigate. If it is, discuss a plan of action for a way to find that information, for example, through secondary sources, such as credible textbooks or websites, or carry out an investigation.
12 Update the word wall with words and images.
Curriculum linksScience• Read ‘The Magic Schoolbus in the Arctic’ (ISBN-10: 0590187244/ ISBN-13:
978-0590187244) or watch the animated YouTube video based on it. Discuss the characters’ experiences with heat, heat sources and keeping warm, and relate them to what they have learned during the unit.
Information and Communication Technology (ICT)• Find a digital camera for the class that can take infrared photographs. Some
computers, tablets and phones have programs or applications that allow you to take infrared photographs.
• Source multimedia resources to help students understand the concept of heat, for example, books or websites such as the BBC’s Ks3 Bitesize: Science website.

Heating up
Name: Date:
Copyright © Australian Academy of Science, 2014. ISBN 978 0 85847 329 4 Resource sheet 5
Moving heat
Draw in the missing heat source. Use arrows to show the movement of heat.
A lizard resting on warm rocks
Heat moves from the_______________________
to the____________________________________ .
A metal teaspoon in a hot cup of tea
Heat moves from the_______________________
to the____________________________________ .
Frying pan on a stove
Heat moves from the_______________________
to the____________________________________ .
Walking on hot sand
Heat moves from the_______________________
to the____________________________________ .

ELA
BO
RAT
E
Lesson 6 Getting warmer
39Lesson 6 Getting warmer
AT A GLANCE
To support students to plan and conduct an investigation to compare the conductivity of different materials.
Students:
• work in teams to investigate the conductivity of different materials when heated by hot water
• record and represent their findings in a table
• discuss and compare their results from the investigation.
Lesson focusIn the Elaborate phase students plan and conduct an open investigation to apply and extend their new conceptual understanding in a new context. It is designed to challenge and extend students’ science understanding and science inquiry skills.
Assessment focusSummative assessment of the Science Inquiry Skills is an important focus of the Elaborate phase (see page 3).
Key lesson outcomesScience
Students will be able to:
• conduct an investigation of the conduction of heat through different materials
• make predictions about what will happen to different materials placed in hot water
• observe, record and interpret the results of their investigation
• identify the differences in conductivity of different materials.
Literacy
Students will be able to:
• use oral, written and visual language to record and discuss investigation results
• record data in a table
• discuss findings and compare results.
This lesson also provides opportunities to monitor the development of students’ general capabilities (highlighted through icons, see page 5).

Lesson 6 Getting warmer40
PrimaryConnections E
LAB
OR
ATE
Teacher background informationHeat flow When two materials at different temperatures are placed in contact with each other, heat passes from one to the other until their temperatures are the same. This heat transfer is known as conduction.
How quickly heat is transferred between the two materials depends on several variables. The more surface contact between the materials, the faster the transfer. Different materials also ‘heat up’ at different speeds. Insulators are materials that block the flow of heat, while conductors are materials that allow heat to flow easily. Good insulators include plastics, air, fabrics that hold air and feathers.
Students’ conceptionsSometimes students believe that insulators are heat sources, because they seem to make things warm when they are actually slowing or blocking heat loss. Insulators will stop the heat from flowing, so things that are warm tend to say warm, but they are not a heat source.
Equipment
FOR THE CLASS FOR EACH TEAM
• class science journal• word wall• team roles chart• team skills chart• 1 enlarged copy of ‘Hot water investigation
planner’ (Resource sheet 6). • 1 timing device (eg, a stopwatch)• 1 measuring jug• hot water (<50°C)• towel
• role wristbands or badges for Director, Manager and Speaker
• each team member’s science journal• 1 copy of ‘Hot water investigation planner’
(Resource sheet 6)• 3 sticks or 3 spoons made of different
materials (see ‘Preparation’)• optional: 1 timing device (eg, a stopwatch)• sturdy cup or mug (see ‘Preparation’)
Preparation• Read ‘How to conduct a fair test’ (Appendix 5).
• Read ‘How to write questions for investigation’ (Appendix 6).
• Collect a container of at least 250 mL for each team, stable enough to not tip over when things are put inside, such as a glass jar or a ceramic mug.
• Optional: Have up to three teams sharing the same jar or mug.
• Collect sticks or spoons, such as a wooden spoon, a plastic spoon and a metal spoon, for each team.
• Optional: Have one of each type for each student, as they cool down quickly.

41Lesson 6 Getting warmer
PrimaryConnections Heating up
ELA
BO
RAT
E
• Set up a safety zone where you can prepare the hot water and keep the cups or mugs. Decide on a class safety procedure for team Managers to collect their sticks or spoons from the water, for example, by staggering when they are put into the hot water so not every team is collecting at the same time, and drying the sticks or spoons before handling them.
• Optional: Pour the water into the cups that each team is in charge of keeping safe on their table.
• Keep water temperature below 50°C, for example, by mixing almost boiled water with equal parts of cold water.
• Prepare an enlarged copy of ‘Hot water investigation planner’ (Resource sheet 6).
• Optional: Display ‘Hot water investigation planner’ (Resource sheet 6) on an interactive whiteboard. Check the PrimaryConnections website to see if an accompanying interactive resource has been developed: www.primaryconnections.org.au
Lesson steps 1 Review previous lessons using the science chat-board. Review the ‘Heat sources’
table and ask questions, such as:• What is a heat source?
• What happens when you put something next to a heat source? Does that always happen?
2 Explain that students will be working in collaborative learning teams to investigate what happens when different materials are put in contact with a heat source.
3 Discuss what heat sources might be used for the investigation, safely and cheaply. Explain that the class will use water that has been heated on a stove or with an electric kettle. Ask questions, such as:• When does water become hot? Why do you think that?
• Does it always stay hot? Why do you think that happens?
Remind students to take care during this lesson, as hot water can cause burns. 4 Discuss what the students will be investigating and ask: ‘What things might affect how much a spoon heats up in hot water?’ (how long the
spoon is in the water, the hotness of the water, how much of the spoon is in the water, the volume of water, what the spoon is made from)
5 Explain that students will test how well different materials conduct heat, so firstly identify that the thing to be changed in the investigation is the type of material.
6 Discuss ways to keep the investigation fair, asking questions, such as:• What if we put one stick in a cup with a little bit of water and one stick in a cup
with a lot of water?
• What if we put one stick in very hot water and one in warm water?
7 Introduce the enlarged copy of ‘Hot water investigation planner’ (Resource sheet 6) and read through with students.
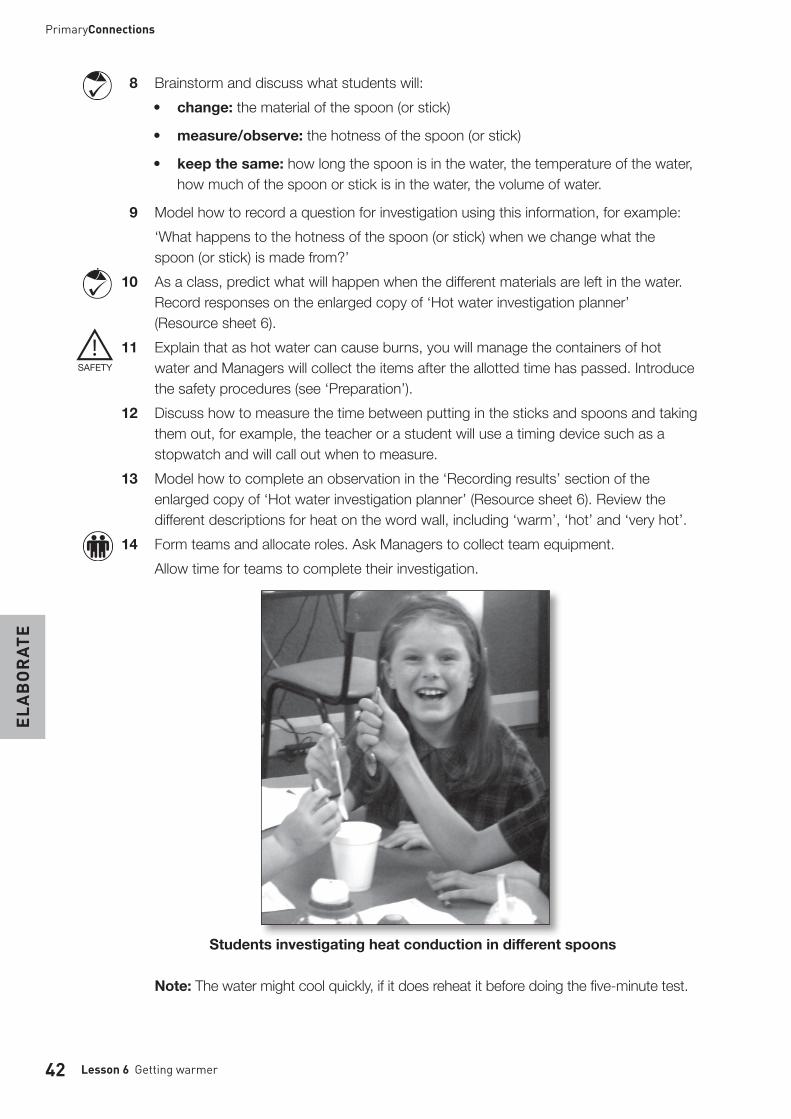
Lesson 6 Getting warmer42
PrimaryConnections E
LAB
OR
ATE
Note: The water might cool quickly, if it does reheat it before doing the five-minute test.
8 Brainstorm and discuss what students will:• change: the material of the spoon (or stick)
• measure/observe: the hotness of the spoon (or stick)
• keep the same: how long the spoon is in the water, the temperature of the water, how much of the spoon or stick is in the water, the volume of water.
9 Model how to record a question for investigation using this information, for example: ‘What happens to the hotness of the spoon (or stick) when we change what the
spoon (or stick) is made from?’ 10 As a class, predict what will happen when the different materials are left in the water.
Record responses on the enlarged copy of ‘Hot water investigation planner’ (Resource sheet 6).
11 Explain that as hot water can cause burns, you will manage the containers of hot water and Managers will collect the items after the allotted time has passed. Introduce the safety procedures (see ‘Preparation’).
12 Discuss how to measure the time between putting in the sticks and spoons and taking them out, for example, the teacher or a student will use a timing device such as a stopwatch and will call out when to measure.
13 Model how to complete an observation in the ‘Recording results’ section of the enlarged copy of ‘Hot water investigation planner’ (Resource sheet 6). Review the different descriptions for heat on the word wall, including ‘warm’, ‘hot’ and ‘very hot’.
14 Form teams and allocate roles. Ask Managers to collect team equipment. Allow time for teams to complete their investigation.
Students investigating heat conduction in different spoons

43Lesson 6 Getting warmer
PrimaryConnections Heating up
ELA
BO
RAT
E
15 Invite each team to share what they found out during their investigation. Record a summary of the class results on the ‘Recording results’ section of the enlarged copy of ‘Hot water investigation planner (Resource sheet 6).
16 Introduce the ‘Discussing results’ section of the ‘Hot water investigation planner’ (Resource sheet 6). Ask students questions, such as:• What happened to the temperature of the materials when they were in contact
with the hot water? Why?
• Were there any differences between the materials? For example, was there a difference in how hot they became? Why?
• After class discussion, allow students time to complete this section of the planner.
• Discuss how the spoon which became hottest is made of the material that is the best conductor i.e. it allows the heat to flow most easily.
Student work sample of the ‘Hot water investigation planner’ (Resource sheet 6)
17 Discuss practical applications of this finding, for example, which spoons to use to stir soup or hot drinks.
18 Update the word wall section with words and images.

Heating up
Copyright © Australian Academy of Science, 2014. ISBN 978 0 85847 329 4
Name: Date:
Other members of your team:
Resource sheet 6
Hot water investigation planner
What is your question for investigation?
What happens to
___________________________________________
when we change
___________________________________________?
What do you predict will happen? Explain why.
To make this a fair test what things (variables) are you going to:
Change?
Change only one thing
Measure/Observe?
What would the change affect?
Keep the same?
Which variables will you control?
Describe how you will set up your investigation.
Use drawings if necessary
What equipment will you need?
Use dot points
Write and draw your observations in your science journal

Heating up
Copyright © Australian Academy of Science, 2014. ISBN 978 0 85847 329 4 Resource sheet 6
Name: Date:
Recording results
Object How hot before putting in water
How hot 20 seconds after putting in water
How hot 3 minutes after putting in water
Stick or spoon made of
____________________
Stick or spoon made of
____________________
Stick or spoon made of
____________________
Discussing resultsWhat did our class find?
Why do we think that happened?

PrimaryConnections
46 Lesson 7 Finding the heat
Lesson 7 Finding the heat
EVA
LUAT
E
Lesson focusIn the Evaluate phase students reflect on their learning journey and create a literacy product to re-represent their conceptual understanding.
Assessment focusSummative assessment of the Science Understanding descriptions is an important aspect of the Evaluate phase. In this lesson you will be looking for evidence of the extent to which students understand:
• how heat can be produced in many ways and can move from one object to another.
Key lesson outcomesScience
Students will be able to:
• identify that heat can be produced in different ways by different heat sources
• explain heat can move from one object to another
• discuss and compare their ideas.
Literacy
Students will be able to:
• use oral, written and visual forms to present their understanding of heat production and transfer
• reflect on their learning in a science journal entry.
This lesson also provides opportunities to monitor the development of students’ general capabilities (highlighted through icons, see page 5).
AT A GLANCE
To provide opportunities for students to represent what they know about how heat can be produced in many ways and can move from one object to another, and to reflect on their learning during the unit.
Students:
• review the class ideas map• find, list and categorise things that produce heat• create a drawing to show how heat moves from one object to another• participate in a class discussion to reflect on their learning during the unit.

47Lesson 7 Finding the heat
PrimaryConnections Heating up
EVA
LUAT
E
Equipment
FOR THE CLASS FOR EACH STUDENT
• class science journal• word wall• ideas map from Lesson 1• 1 enlarged copy of ‘Where’s the heat?’
(Resource sheet 7)
• student science journal• 1 copy of ‘Where’s the heat?’
(Resource sheet 7)
Preparation• Prepare an enlarged copy of ‘Where’s the heat?’ (Resource sheet 7).
• Optional: Display ‘Where’s the heat?’ (Resource sheet 7) on an interactive whiteboard. Check the PrimaryConnections website to see if an accompanying interactive resource has been developed: www.primaryconnections.org.au
Lesson steps 1 Review the previous lessons using the class science journal. Review the ideas map
created in Lesson 1, and ask questions, such as:• Have you changed your ideas on anything? Why or why not?• What can we add to our ideas map now?
2 Ask students to review their drawings and ideas from Lesson 1 of the ice melting in the hand. Ask students to do the drawing again and use arrows to show how the heat is moving. Ask students if they have changed their explanations and discuss what their new ideas are. For example,
The ice block melted because … the heat from my hand moved to the ice block. My hand was cold afterwards because … the heat that was in it had moved to the ice
block. Cold doesn’t move to hot objects; it is the heat that moves out of the hot objects.
Work sample of review of how heat moves

Lesson 7 Finding the heat48
PrimaryConnections E
VALU
ATE
3 Introduce the enlarged copy of ‘Where’s the heat?’ (Resource sheet 7) and explain that students will complete the resource sheet to show what they have learned. Discuss the picture and what they think is happening. Discuss what will happen if the boy touches the saucepan handle.
4 Explain that students will:a) find examples of heat sources in the picture (things that are warm or hot) and
circle them
b) write the names of the objects that they circled in the table according to the energy that it is produced from.
5 Allow time for students to complete their copy of ‘Where’s the heat?’ (Resource sheet 7).
‘Where’s the heat?’ (Resource sheet 7)
6 Ask students to share their ideas with the class. Optional: Ask students to work in groups to create a short play about giving advice
to a shivering person on how to warm up. Ask students to consider what advice they might give and to provide evidence and reasoning for their claims.
7 Ask students to reflect on their learning during the unit using the class science journal. Ask questions, such as:• What ideas did you have about heat at the start of the unit?
• What did we want to find out about?
• What have you learned about heat? Why do you think that now?
• What activity did you enjoy most of all? Why?
• What activity did you find the most challenging? Why?
• What are you still wondering about?

Heating up
Name: Date:
Copyright © Australian Academy of Science, 2014. ISBN 978 0 85847 329 4
PrimaryConnections
Where's the heat?
Resource sheet 7
1. Find the heat sources and circle them.
2. Write and draw the objects in the column of what it takes to produce heat.
Electricity Burning Friction or motion

Appendix 150
PrimaryConnections
Appendix 1 How to organise collaborative learning teams (Year 3–Year 6)
IntroductionStudents working in collaborative teams is a key feature of the PrimaryConnections inquiry-based program. By working in collaborative teams students are able to:
• communicate and compare their ideas with one another• build on one another’s ideas• discuss and debate these ideas• revise and rethink their reasoning • present their final team understanding through multi-modal representations.
Opportunities for working in collaborative learning teams are highlighted throughout the unit.
Students need to be taught how to work collaboratively. They need to work together regularly to develop effective group learning skills.
The development of these collaborative skills aligns to descriptions in the Australian Curriculum: English. See page 7.
Team structureThe first step towards teaching students to work collaboratively is to organise the team composition, roles and skills. Use the following ideas when planning collaborative learning with your class:
• Assign students to teams rather than allowing them to choose partners.• Vary the composition of each team. Give students opportunities to work with others
who might be of a different ability level, gender or cultural background.• Keep teams together for two or more lessons so that students have enough time to
learn to work together successfully.• If you cannot divide the students in your class into teams of three, form two teams of
two students rather than one team of four. It is difficult for students to work together effectively in larger groups.
• Keep a record of the students who have worked together as a team so that by the end of the year each student has worked with as many others as possible.
Team rolesStudents are assigned roles within their team (see below). Each team member has a specific role but all members share leadership responsibilities. Each member is accountable for the performance of the team and should be able to explain how the team obtained its results. Students must therefore be concerned with the performance of all team members. It is important to rotate team jobs each time a team works together so that all students have an opportunity to perform different roles.
For Year 3–Year 6, the teams consist of three students—Director, Manager and Speaker. (For Foundation–Year 2, teams consist of two students—Manager and Speaker.)

51Appendix 1
PrimaryConnections Heating up
Each member of the team should wear something that identifies them as belonging to that role, such as a wristband, badge, or colour-coded peg. This makes it easier for you to identify which role each student is doing and it is easier for the students to remember what they and their team mates should be doing.
Manager The Manager is responsible for collecting and returning the team’s equipment. The Manager also tells the teacher if any equipment is damaged or broken. All team members are responsible for clearing up after an activity and getting the equipment ready to return to the equipment table.
Speaker The Speaker is responsible for asking the teacher or another team’s Speaker for help. If the team cannot resolve a question or decide how to follow a procedure, the Speaker is the only person who may leave the team and seek help. The Speaker shares any information they obtain with team members. The teacher may speak to all team members, not just to the Speaker. The Speaker is not the only person who reports to the class; each team member should be able to report on the team’s results.
Director (Year 3–Year 6) The Director is responsible for making sure that the team understands the team investigation and helps team members focus on each step. The Director is also responsible for offering encouragement and support. When the team has finished, the Director helps team members check that they have accomplished the investigation successfully. The Director provides guidance but is not the team leader.
Team skillsPrimaryConnections focuses on social skills that will help students work in collaborative teams and communicate more effectively.
Students will practise the following team skills throughout the year:
• Move into your teams quickly and quietly• Speak softly• Stay with your team• Take turns• Perform your role.
To help reinforce these skills, display enlarged copies of the team skills chart (see the end of this Appendix) in a prominent place in the classroom.
Supporting equityIn science lessons, there can be a tendency for boys to manipulate materials and girls to record results. PrimaryConnections tries to avoid traditional social stereotyping by encouraging all students, irrespective of their gender, to maximise their learning potential. Collaborative learning encourages each student to participate in all aspects of team activities, including handling the equipment and taking intellectual risks.
Observe students when they are working in their collaborative teams and ensure that both girls and boys are participating in the hands-on activities.

PrimaryConnections
TEAM ROLES
Manager Collects and returns all materials the team needs
Speaker Asks the teacher and other team speakers for help
Director Make sure that the team understands the team investigation and completes each step

PrimaryConnections
TEAM SKILLS
1 Move into your teams quickly and quietly
2 Speak softly
3 Stay with your team
4 Take turns
5 Perform your role

Appendix 254
PrimaryConnections
Appendix 2 How to use a science journal
IntroductionA science journal is a record of observations, experiences and reflections. It contains a series of dated, chronological entries. It can include written text, drawings, labelled diagrams, photographs, tables and graphs.
Using a science journal provides an opportunity for students to be engaged in a real science situation as they keep a record of their observations, ideas and thoughts about science activities. Students can use their science journals as a useful self-assessment tool as they reflect on their learning and how their ideas have changed and developed during a unit.
Monitoring students’ journals allows you to identify students’ alternative conceptions, find evidence of students’ learning and plan future learning activities in science and literacy.
Keeping a science journal aligns to descriptions in the Australian Curriculum: Science and English. See pages 2 and 7.
Using a science journal 1 At the start of the year, or before starting a science unit, provide each student with a
notebook or exercise book for their science journal or use an electronic format. Tailor the type of journal to fit the needs of your classroom. Explain to students that they will use their journals to keep a record of their observations, ideas and thoughts about science activities. Emphasise the importance of including pictorial representations as well as written entries.
2 Use a large project book or A3 paper to make a class science journal. This can be used at all year levels to model journal entries. With younger students, the class science journal can be used more frequently than individual journals and can take the place of individual journals.
3 Make time to use the science journal. Provide opportunities for students to plan procedures and record predictions, and their reasons for predictions, before an activity. Use the journal to record observations during an activity and reflect afterwards, including comparing ideas and findings with initial predictions and reasons. It is important to encourage students to provide evidence that supports their ideas, reasons and reflections.
4 Provide guidelines in the form of questions and headings and facilitate discussion about recording strategies, such as note-making, lists, tables and concept maps. Use the class science journal to show students how they can modify and improve their recording strategies.
5 Science journal entries can include narrative, poetry and prose as students represent their ideas in a range of styles and forms.

55Appendix 2
PrimaryConnections Heating up
6 In science journal work, you can refer students to display charts, pictures, diagrams, word walls and phrases about the topic displayed around the classroom. Revisit and revise this material during the unit. Explore the vocabulary, visual texts and ideas that have developed from the science unit, and encourage students to use them in their science journals.
7 Combine the use of resource sheets with journal entries. After students have pasted their completed resource sheets in their journal, they might like to add their own drawings and reflections.
8 Use the science journal to assess student learning in both science and literacy. For example, during the Engage phase, use journal entries for diagnostic assessment as you determine students’ prior knowledge.
9 Discuss the importance of entries in the science journal during the Explain and Evaluate phases. Demonstrate how the information in the journal will help students develop literacy products, such as posters, brochures, letters and oral or written presentations.
Heating up science journal entry

Appendix 356
PrimaryConnections
Appendix 3 How to use a word wall
IntroductionA word wall is an organised collection of words and images displayed in the classroom. It supports the development of vocabulary related to a particular topic and provides a reference for students. The content of the word wall can be words that students see, hear and use in their reading, writing, speaking, listening and viewing.
The use of a word wall, including words from regional dialects and other languages, aligns to descriptions in the Australian Curriculum: English. See page 7.
Goals in using a word wallA word wall can be used to:• support science and literacy experiences of reading, viewing, writing and speaking• provide support for students during literacy activities across all key learning areas• promote independence in students as they develop their literacy skills• provide a visual representation to help students see patterns in words and
decode them• develop a growing bank of words that students can spell, read and/or use in
writing tasks• provide ongoing support for the various levels of academic ability in the class• teach the strategy of using word sources as a real-life strategy.
OrganisationPosition the word wall so that students have easy access to the words. They need to be able to see, remove and return word cards to the wall. A classroom could have one main word wall and two or three smaller ones, each with a different focus, for example, high-frequency words.
Choose robust material for the word cards. Write or type words on cardboard and perhaps laminate them. Consider covering the wall with felt-type material and backing each word card with a self-fastening dot to make it easy for students to remove and replace word cards.
Word walls do not need to be confined to a wall. Use a portable wall, display screen, shower curtain or window curtain. Consider a cardboard shape that fits with the unit, for example, a large thermometer shape for the Heating up unit.
The purpose is for students to be exposed to a print-rich environment that supports their science and literacy experiences.
Organise the words on the wall in a variety of ways. Place them alphabetically, or put them in word groups or groups suggested by the unit topic, for example, words for the Heating up unit might be organised using headings, such as ‘Sources’ and ‘Descriptions of heat’.
Invite students to contribute words from different languages to the word wall. Group words about the same thing, for example, different names of the materials used in Heating up, on the word wall so that students can make the connections. Identify the different languages used, for example, by using different-coloured cards or pens to record the words.

57Appendix 3
PrimaryConnections Heating up
Plants in action word wall Material world word wall
Using a word wall1 Limit the number of words to those needed to support the science and literacy
experiences in the classroom.2 Add words gradually, and include images where possible, such as drawings,
diagrams or photographs. Build up the number of words on the word wall as students are introduced to the scientific vocabulary of the unit.
3 Encourage students to interact with the word wall. Practise using the words with students by reading them and playing word games. Refer to the words during science and literacy experiences and direct students to the wall when they need a word for writing. Encourage students to use the word wall to spell words correctly.
4 Use the word wall with the whole class, small groups and individually during literacy experiences. Organise multi-level activities to cater for the individual needs of students.
Heating up word wall

Appendix 458
PrimaryConnections
Appendix 4
How to facilitate evidence-based discussions
IntroductionArgumentation is at the heart of what scientists do; they pose questions, make claims, collect evidence, debate with other scientists and compare their ideas with others in the field.
In the primary science classroom, argumentation is about students:
• articulating and communicating their thinking and understanding to others• sharing information and insights• presenting their ideas and evidence • receiving feedback (and giving feedback to others) • finding flaws in their own and others’ reasoning• reflecting on how their ideas have changed.It is through articulating, communicating and debating their ideas and arguments that students are able to develop a deep understanding of science content.
Establish normsIntroduce norms before starting a science discussion activity. For example,
• Listen when others speak.• Ask questions of each other.• Criticise ideas not people.• Listen to and discuss all ideas before selecting one.
Question, Claim, Evidence and ReasoningIn science, arguments that make claims are supported by evidence. Sophisticated arguments follow the QCER process:
Q What question are you trying to answer? For example, ‘Which spoon will heat up the most?’
C The claim. For example, ‘The metal spoon heated up the most’.
E The evidence. For example, ‘We placed spoons made out of different materials in hot water. After 3 minutes the metal spoon was the hottest compared to the plastic and wooden spoons.’
R The reasoning. How the evidence supports the claim, for example, ‘Metal is a better conductor of heat than plastic and wood.’ Note: students might not yet demonstrate this level of reasoning in Year 3.
Students need to be encouraged to move from making claims only, to citing evidence to support their claims. Older students develop full conclusions that include a claim, evidence and reasoning. This is an important characteristic of the nature of science and an aspect of scientific literacy. Using science question starters (see next section) helps to promote evidence-based discussion in the classroom.

59Appendix 4
PrimaryConnections Heating up
Science question startersScience question starters can be used to model the way to discuss a claim and evidence for students. Teachers encourage team members to ask these questions of each other when preparing their claim and evidence. They might also be used by audience members when a team is presenting its results. (See PrimaryConnections 5Es DVD, Chapter 5).
Science question starters
Question type Question starter
Asking for evidence
I have a question about _______________________________ .
How does your evidence support your claim _____________ ?
What other evidence do you have to support your claim
___________________________________________________ ?
Agreeing I agree with ___________ because _______________________.
Disagreeing I disagree with ________________ because _______________.
One difference between my idea and yours is _____________.
Questioning further
I wonder what would happen if ________________________?
I have a question about _______________________________ .
I wonder why _______________________________________?
What caused ________________________________________?
How would it be different if ____________________________?
What do you think will happen if ________________________?
Clarifying I’m not sure what you meant there. Could you explain your thinking to me again?

DISCUSSION SKILLS
• Listen when others speak
• Ask questions of each other
• Criticise ideas not people
• Listen to and discuss all ideas before selecting one
PrimaryConnections

61Appendix 5
Heating up
Appendix 5 How to conduct a fair test
IntroductionScientific investigations involve posing questions, testing predictions, collecting and interpreting evidence and drawing conclusions and communicating findings.
Planning a fair test
All scientific investigations involve variables. Variables are things that can be changed (independent), measured/observed (dependent) or kept the same (controlled) in an investigation. When planning an investigation, to make it a fair test, we need to identify the variables.It is only by conducting a fair test that students can be sure that what they have changed in their investigation has affected what is being measured/observed.
‘Cows Moo Softly’ is a useful scaffold to remind students how to plan a fair test: Cows: Change one thing (independent variable) Moo: Measure/Observe another thing (dependent variable) and Softly: keep the other things (controlled variables) the Same.
To investigate whether the material of a spoon has an effect on its hotness, students could:
CHANGE the material of the spoonIndependent variable
MEASURE the hotness of the spoon Dependent variable
KEEP THE SAME
how long the spoon is in water, the temperature of the water, how much of the spoon is in the water, the volume of water.
Controlled variables
Will the temperature of the water affect how hot the spoon gets?
Will changing the material affect how hot the spoon gets?
Will the length of time it is in the hot water affect how hot the spoon gets?

Appendix 662
PrimaryConnections
Appendix 6 How to write questions for investigation
IntroductionScientific inquiry and investigation are focused on and driven by questions. Some questions are open to scientific investigation, while others are not. Students often experience difficulty in developing their own questions for investigation.
This appendix explains the structure of questions and how they are related to variables in a scientific investigation. It describes an approach to developing questions for investigation and provides a guide for constructing investigable questions with your students. Developing their own questions for investigation helps students to have ownership of their investigation and is an important component of scientific literacy.
The structure of questions for investigationThe way that a question is posed in a scientific investigation affects the type of investigation that is carried out and the way information is collected. Examples of different types of questions for investigation include:
• How does/do…?• What effect does…? • Which type of…?• What happens to…?All science investigations involve variables. Variables are things that can be changed, measured or kept the same (controlled) in an investigation.
• The independent variable is the thing that is changed during the investigation. • The dependent variable is the thing that is affected by the independent variable, and
is measured or observed. • Controlled variables are all the other things in an investigation that could change but
are kept the same to make it a fair test. An example of the way students can structure questions for investigation is:
What happens to ______________________ when we change ______________________ ?
dependent variable independent variable
The type of question for investigation in Heating up refers to two variables and the relationship between them, for example, an investigation of the variables that affect how much a spoon heats up in hot water. The question for investigation could be:
Q1: What happens to the hotness of the spoon when we change what the spoon is made from?
In this question, the hotness of the spoon depends on the material the spoon is made from. The material of the spoon is the thing that is changed (independent variable) and the hotness of the spoon is the thing that is measured or observed (dependent variable).

63Appendix 6
PrimaryConnections Heating up
Q2: What happens to the hotness of the spoon when we change how long it is in the water?
In this question, the hotness of the spoon depends on the time it is in the water. The time it is in the water is the thing that is changed (independent variable) and the hotness of the spoon is the thing that is measured or observed (dependent variable).
Developing questions for investigationThe process of developing questions for investigation in Heating up is to:
• Provide a context and reason for investigating, for example, what affects the flow of heat from one object to another?
• Pose a general focus question in the form of: ‘What things might affect ___________ (dependent variable)?’.
For example, ‘What things might affect how much a spoon heats up in hot water?’.• Use questioning to elicit the things (independent variables) students think might
affect the dependent variable, such as how long the spoon is in the water, the temperature of the water, how much of the spoon is in the water, the volume of water.
• Each of the independent variables can be developed into a question for investigation, for example, changing the material of the spoon. These are the things that might be changed (independent variables), which students think will affect the thing that is measured or observed (dependent variable).
• Use the scaffold ‘What happens to ___________ when we change __________?’ to help students develop specific questions for their investigation, for example, ‘What happens to the hotness of a spoon when we change what the spoon is made from?’.
• Ask students to review their question for investigation after they have conducted their investigation and collected and analysed their information.
• Encouraging students to review their question will help them to understand the relationship between what was changed and what was measured in their investigation. It also helps students to see how the information they collected relates to their prediction.

Appendix 764
PrimaryConnections
App
endi
x 7
Hea
ting
up e
quip
men
t lis
t
EQU
IPM
ENT
ITEM
QU
ANTI
TIES
LESS
ON
12
23
45
67
SESS
ION
12
Equi
pmen
t and
mat
eria
ls
cand
le1
per c
lass
colle
ctio
n of
hea
t sou
rces
or p
ictur
es o
f the
m1
set p
er c
lass
heat
pac
k1
per c
lass
hot w
ater
(<50
°C)
1 pe
r clas
s
hot w
ater
bot
tle1
per c
lass
ice b
lock
1 pe
r stu
dent
kettl
e co
ntain
ing
war
m w
ater
1 pe
r clas
s
labels
for ‘
Heat
col
lectio
n’ b
oard
3 pe
r clas
s
mea
surin
g ju
g1
per c
lass
mul
timed
ia re
sour
ces
show
ing
anim
als o
r hum
ans
tryin
g to
kee
p w
arm
1 se
t for
clas
s
objec
ts, p
hoto
s or
pict
ures
of h
eat s
ourc
es1
set f
or c
lass
stick
s or
spo
ons
mad
e of
diffe
rent
mat
erial
s3
per t
eam
stur
dy c
up o
r mug
1 pe
r tea
m
teas
poon
, met
al1
per c
lass
teas
poon
, met
al1
per t
eam
ther
mom
eter
, lar
ge o
ptio
nal
1 pe
r clas
s
timin
g de
vice,
eg.
a s
topw
atch
1 pe
r clas
s
timin
g de
vice,
eg.
a s
topw
atch
1
per t
eam
timin
g de
vice,
eg.
a s
topw
atch
opt
iona
l1
per t
eam
tow
el1
per c
lass
EQU
IPM
ENT
ITEM
QU
ANTI
TIES
LESS
ON
12
23
45
67
SESS
ION
12
Res
ourc
e sh
eets
‘Wha
t's h
ot?’
(RS1
), en
large
d1
per c
lass
‘Wha
t's h
ot?’
(RS1
) 1
per s
tude
nt
‘Info
rmat
ion
note
for f
amilie
s’ (R
S2),
enlar
ged
1 pe
r clas
s
‘Info
rmat
ion
note
for f
amilie
s’ (R
S2)
1 pe
r stu
dent
‘War
min
g w
ays’
(RS3
), en
large
d1
per c
lass
‘War
min
g w
ays’
(RS3
)1
per s
tude
nt
‘War
m m
e up
!’ (R
S4),
enlar
ged
1 pe
r clas
s
‘War
m m
e up
!’ (R
S4)
1 pe
r tea
m
‘Mov
ing
heat
’ (RS
5), e
nlar
ged
1 pe
r clas
s
‘Mov
ing
heat
’ (RS
5)1
per s
tude
nt
‘Hot
wat
er in
vest
igat
ion
plan
ner’
(RS6
), en
large
d1
per c
lass
‘Hot
wat
er in
vest
igat
ion
plan
ner’
(RS6
) 1
per t
eam
‘Whe
re’s
the
heat
?’ (R
S7),
enlar
ged
1 pe
r clas
s
‘Whe
re’s
the
heat
?’ (R
S7)
1 pe
r stu
dent
Teac
hing
tool
s
class
scie
nce
jour
nal
1 pe
r clas
s
wor
d w
all1
per c
lass
‘Hea
t col
lectio
n’ b
oard
1 pe
r clas
s
idea
s m
ap1
per c
lass
stud
ent s
cienc
e jo
urna
l1
per s
tude
nt
team
roles
cha
rt1
per c
lass
team
skil
ls ch
art
1 pe
r clas
s
role
wris
tban
ds o
r bad
ges
for D
irect
or, M
anag
er a
nd S
peak
er1
set p
er te
am

65Appendix 7
PrimaryConnections Heating up
App
endi
x 7
Hea
ting
up e
quip
men
t lis
t
EQU
IPM
ENT
ITEM
QU
ANTI
TIES
LESS
ON
12
23
45
67
SESS
ION
12
Equi
pmen
t and
mat
eria
ls
cand
le1
per c
lass
colle
ctio
n of
hea
t sou
rces
or p
ictur
es o
f the
m1
set p
er c
lass
heat
pac
k1
per c
lass
hot w
ater
(<50
°C)
1 pe
r clas
s
hot w
ater
bot
tle1
per c
lass
ice b
lock
1 pe
r stu
dent
kettl
e co
ntain
ing
war
m w
ater
1 pe
r clas
s
labels
for ‘
Heat
col
lectio
n’ b
oard
3 pe
r clas
s
mea
surin
g ju
g1
per c
lass
mul
timed
ia re
sour
ces
show
ing
anim
als o
r hum
ans
tryin
g to
kee
p w
arm
1 se
t for
clas
s
objec
ts, p
hoto
s or
pict
ures
of h
eat s
ourc
es1
set f
or c
lass
stick
s or
spo
ons
mad
e of
diffe
rent
mat
erial
s3
per t
eam
stur
dy c
up o
r mug
1 pe
r tea
m
teas
poon
, met
al1
per c
lass
teas
poon
, met
al1
per t
eam
ther
mom
eter
, lar
ge o
ptio
nal
1 pe
r clas
s
timin
g de
vice,
eg.
a s
topw
atch
1 pe
r clas
s
timin
g de
vice,
eg.
a s
topw
atch
1
per t
eam
timin
g de
vice,
eg.
a s
topw
atch
opt
iona
l1
per t
eam
tow
el1
per c
lass
EQU
IPM
ENT
ITEM
QU
ANTI
TIES
LESS
ON
12
23
45
67
SESS
ION
12
Res
ourc
e sh
eets
‘Wha
t's h
ot?’
(RS1
), en
large
d1
per c
lass
‘Wha
t's h
ot?’
(RS1
) 1
per s
tude
nt
‘Info
rmat
ion
note
for f
amilie
s’ (R
S2),
enlar
ged
1 pe
r clas
s
‘Info
rmat
ion
note
for f
amilie
s’ (R
S2)
1 pe
r stu
dent
‘War
min
g w
ays’
(RS3
), en
large
d1
per c
lass
‘War
min
g w
ays’
(RS3
)1
per s
tude
nt
‘War
m m
e up
!’ (R
S4),
enlar
ged
1 pe
r clas
s
‘War
m m
e up
!’ (R
S4)
1 pe
r tea
m
‘Mov
ing
heat
’ (RS
5), e
nlar
ged
1 pe
r clas
s
‘Mov
ing
heat
’ (RS
5)1
per s
tude
nt
‘Hot
wat
er in
vest
igat
ion
plan
ner’
(RS6
), en
large
d1
per c
lass
‘Hot
wat
er in
vest
igat
ion
plan
ner’
(RS6
) 1
per t
eam
‘Whe
re’s
the
heat
?’ (R
S7),
enlar
ged
1 pe
r clas
s
‘Whe
re’s
the
heat
?’ (R
S7)
1 pe
r stu
dent
Teac
hing
tool
s
class
scie
nce
jour
nal
1 pe
r clas
s
wor
d w
all1
per c
lass
‘Hea
t col
lectio
n’ b
oard
1 pe
r clas
s
idea
s m
ap1
per c
lass
stud
ent s
cienc
e jo
urna
l1
per s
tude
nt
team
roles
cha
rt1
per c
lass
team
skil
ls ch
art
1 pe
r clas
s
role
wris
tban
ds o
r bad
ges
for D
irect
or, M
anag
er a
nd S
peak
er1
set p
er te
am
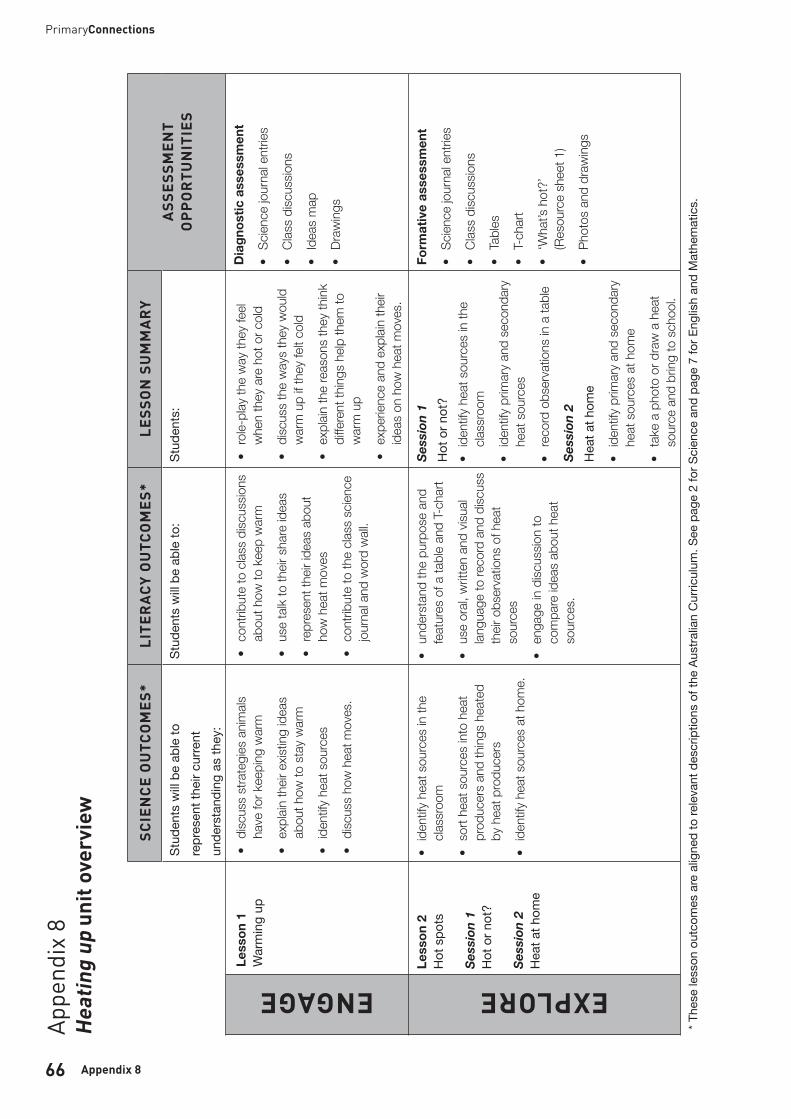
Appendix 866
PrimaryConnections
SC
IEN
CE
OU
TCO
ME
S*
LITE
RA
CY
OU
TCO
ME
S*
LES
SO
N S
UM
MA
RY
AS
SE
SS
ME
NT
OP
PO
RTU
NIT
IES
Stud
ents
will
be a
ble
to
repr
esen
t the
ir cu
rrent
un
ders
tand
ing
as th
ey:
Stud
ents
will
be a
ble
to:
Stud
ents
:
ENGAGE
Less
on 1
W
arm
ing
up•
disc
uss
stra
tegi
es a
nim
als
have
for k
eepi
ng w
arm
• ex
plain
their
exis
ting
idea
s ab
out h
ow to
sta
y w
arm
• id
entif
y he
at s
ourc
es
• di
scus
s ho
w h
eat m
oves
.
• co
ntrib
ute
to c
lass
disc
ussio
ns
abou
t how
to k
eep
war
m
• us
e ta
lk to
their
sha
re id
eas
• re
pres
ent t
heir
idea
s ab
out
how
hea
t mov
es
• co
ntrib
ute
to th
e cla
ss s
cienc
e jo
urna
l and
wor
d w
all.
• ro
le-pl
ay th
e w
ay th
ey fe
el w
hen
they
are
hot
or c
old
• di
scus
s th
e w
ays
they
wou
ld
war
m u
p if
they
felt
cold
• ex
plain
the
reas
ons
they
thin
k di
ffere
nt th
ings
help
them
to
war
m u
p
• ex
perie
nce
and
expl
ain th
eir
idea
s on
how
hea
t mov
es.
Dia
gnos
tic a
sses
smen
t
• Sc
ience
jour
nal e
ntrie
s
• Cl
ass
disc
ussio
ns
• Id
eas
map
• Dr
awin
gs
EXPLORE
Less
on 2
H
ot s
pots
Sess
ion
1 H
ot o
r not
?
Sess
ion
2 H
eat a
t hom
e
• id
entif
y he
at s
ourc
es in
the
class
room
• so
rt he
at s
ourc
es in
to h
eat
prod
ucer
s an
d th
ings
hea
ted
by h
eat p
rodu
cers
• id
entif
y he
at s
ourc
es a
t hom
e.
• un
ders
tand
the
purp
ose
and
feat
ures
of a
tabl
e an
d T-
char
t
• us
e or
al, w
ritte
n an
d vis
ual
langu
age
to re
cord
and
disc
uss
their
obs
erva
tions
of h
eat
sour
ces
• en
gage
in d
iscus
sion
to
com
pare
idea
s ab
out h
eat
sour
ces.
Sess
ion
1 H
ot o
r not
?•
iden
tify
heat
sou
rces
in th
e cla
ssro
om
• id
entif
y pr
imar
y an
d se
cond
ary
heat
sou
rces
• re
cord
obs
erva
tions
in a
tabl
e
Sess
ion
2 H
eat a
t hom
e
• id
entif
y pr
imar
y an
d se
cond
ary
heat
sou
rces
at h
ome
• ta
ke a
pho
to o
r dra
w a
hea
t so
urce
and
brin
g to
sch
ool.
Form
ativ
e as
sess
men
t
• Sc
ience
jour
nal e
ntrie
s
• Cl
ass
disc
ussio
ns
• Ta
bles
• T-
char
t
• ‘W
hat’s
hot
?’
(Res
ourc
e sh
eet 1
)
• Ph
otos
and
dra
win
gs
* The
se le
sson
out
com
es a
re a
ligne
d to
rele
vant
des
crip
tions
of t
he A
ustra
lian
Cur
ricul
um. S
ee p
age
2 fo
r Sci
ence
and
pag
e 7
for E
nglis
h an
d M
athe
mat
ics.
App
endi
x 8
Hea
ting
up u
nit o
verv
iew
SC
IEN
CE
OU
TCO
ME
S*
LITE
RA
CY
OU
TCO
ME
S*
LES
SO
N S
UM
MA
RY
AS
SE
SS
ME
NT
OP
PO
RTU
NIT
IES
Stud
ents
will
be a
ble
to:
Stud
ents
will
be a
ble
to:
Stud
ents
will
be a
ble
to:
EXPLORE
Less
on 3
En
ergy
exp
lore
rs•
iden
tify
thre
e w
ays
in w
hich
he
at c
an b
e pr
oduc
ed
• cla
ssify
hea
t sou
rces
acc
ordi
ng
to h
ow th
ey p
rodu
ce h
eat.
• co
ntrib
ute
to d
iscus
sions
abo
ut
way
s in
whi
ch h
eat i
s pr
oduc
ed
• cr
eate
labe
lled
diag
ram
s
• us
e qu
estio
ns to
agr
ee a
nd
disa
gree
with
team
s’ c
laim
s.
• so
rt pi
ctur
es in
to th
ree
grou
ps
acco
rdin
g to
how
they
pro
duce
he
at
• fin
d ob
jects
and
item
s to
in
clude
in th
e gr
oups
.
Form
ativ
e as
sess
men
t
• Sc
ience
jour
nal e
ntrie
s
• Cl
ass
disc
ussio
ns
• ‘W
arm
ing
way
s’
(Res
ourc
e sh
eet 3
)
• La
belle
d di
agra
ms
EXPLORE
Less
on 4
Sh
arin
g th
e w
arm
th
• ex
plor
e ob
jects
that
do
not
prod
uce
heat
• id
entif
y he
at s
ourc
es o
utsid
e th
e cla
ssro
om
• ex
plor
e th
at s
ome
objec
ts h
eat
up w
hen
in c
onta
ct w
ith a
hea
t so
urce
.
• us
e or
al, w
ritte
n an
d vis
ual
langu
age
to re
cord
and
disc
uss
inve
stig
atio
n re
sults
• en
gage
in d
iscus
sion
to
com
pare
resu
lts.
• ob
serv
e th
at m
any
objec
ts d
o no
t pro
duce
hea
t
• ex
plor
e ho
w o
bjec
ts o
btain
he
at b
y be
ing
in c
onta
ct w
ith a
he
at s
ourc
e.
Form
ativ
e as
sess
men
t
• Sc
ience
jour
nal e
ntrie
s
• Cl
ass
disc
ussio
ns
• ‘W
arm
me
up!’
(R
esou
rce
shee
t 4)
EXPLAIN
Less
on 5
To
o ho
t to
hand
le•
expl
ain th
at h
eat t
rans
fers
from
ho
t obj
ects
to c
ooler
one
s
• re
view
their
und
erst
andi
ng
of h
eat s
ourc
es a
nd th
e pr
oduc
tion
of h
eat.
• us
e w
ritte
n an
d or
al lan
guag
e to
dem
onst
rate
their
un
ders
tand
ing
of h
eat t
rans
fer
• cr
eate
a p
oste
r to
expl
ain h
eat
and
how
hea
t mov
es
• us
e sc
ientifi
c lan
guag
e to
de
scrib
e he
at s
ourc
es
• co
ntrib
ute
to d
iscus
sions
ab
out e
very
day
scen
ario
s in
volvi
ng h
eat t
rans
fer.
• re
pres
ent t
heir
unde
rsta
ndin
g of
hea
t sou
rces
and
the
mov
emen
t of h
eat u
sing
ever
yday
sce
nario
s
• cr
eate
a p
oste
r war
ning
oth
ers
abou
t the
dan
gers
of h
eat.
Form
ativ
e as
sess
men
t
• Sc
ience
jour
nal e
ntrie
s
• Cl
ass
disc
ussio
ns
• ‘M
ovin
g he
at’
(Res
ourc
e sh
eet 5
)
• Po
ster
s
* The
se le
sson
out
com
es a
re a
ligne
d to
rele
vant
des
crip
tions
of t
he A
ustra
lian
Cur
ricul
um. S
ee p
age
2 fo
r Sci
ence
and
pag
e 7
for E
nglis
h an
d M
athe
mat
ics.

67Appendix 8
PrimaryConnections Heating up
SC
IEN
CE
OU
TCO
ME
S*
LITE
RA
CY
OU
TCO
ME
S*
LES
SO
N S
UM
MA
RY
AS
SE
SS
ME
NT
OP
PO
RTU
NIT
IES
Stud
ents
will
be a
ble
to
repr
esen
t the
ir cu
rrent
un
ders
tand
ing
as th
ey:
Stud
ents
will
be a
ble
to:
Stud
ents
:
ENGAGE
Less
on 1
W
arm
ing
up•
disc
uss
stra
tegi
es a
nim
als
have
for k
eepi
ng w
arm
• ex
plain
their
exis
ting
idea
s ab
out h
ow to
sta
y w
arm
• id
entif
y he
at s
ourc
es
• di
scus
s ho
w h
eat m
oves
.
• co
ntrib
ute
to c
lass
disc
ussio
ns
abou
t how
to k
eep
war
m
• us
e ta
lk to
their
sha
re id
eas
• re
pres
ent t
heir
idea
s ab
out
how
hea
t mov
es
• co
ntrib
ute
to th
e cla
ss s
cienc
e jo
urna
l and
wor
d w
all.
• ro
le-pl
ay th
e w
ay th
ey fe
el w
hen
they
are
hot
or c
old
• di
scus
s th
e w
ays
they
wou
ld
war
m u
p if
they
felt
cold
• ex
plain
the
reas
ons
they
thin
k di
ffere
nt th
ings
help
them
to
war
m u
p
• ex
perie
nce
and
expl
ain th
eir
idea
s on
how
hea
t mov
es.
Dia
gnos
tic a
sses
smen
t
• Sc
ience
jour
nal e
ntrie
s
• Cl
ass
disc
ussio
ns
• Id
eas
map
• Dr
awin
gs
EXPLORE
Less
on 2
H
ot s
pots
Sess
ion
1 H
ot o
r not
?
Sess
ion
2 H
eat a
t hom
e
• id
entif
y he
at s
ourc
es in
the
class
room
• so
rt he
at s
ourc
es in
to h
eat
prod
ucer
s an
d th
ings
hea
ted
by h
eat p
rodu
cers
• id
entif
y he
at s
ourc
es a
t hom
e.
• un
ders
tand
the
purp
ose
and
feat
ures
of a
tabl
e an
d T-
char
t
• us
e or
al, w
ritte
n an
d vis
ual
langu
age
to re
cord
and
disc
uss
their
obs
erva
tions
of h
eat
sour
ces
• en
gage
in d
iscus
sion
to
com
pare
idea
s ab
out h
eat
sour
ces.
Sess
ion
1 H
ot o
r not
?•
iden
tify
heat
sou
rces
in th
e cla
ssro
om
• id
entif
y pr
imar
y an
d se
cond
ary
heat
sou
rces
• re
cord
obs
erva
tions
in a
tabl
e
Sess
ion
2 H
eat a
t hom
e
• id
entif
y pr
imar
y an
d se
cond
ary
heat
sou
rces
at h
ome
• ta
ke a
pho
to o
r dra
w a
hea
t so
urce
and
brin
g to
sch
ool.
Form
ativ
e as
sess
men
t
• Sc
ience
jour
nal e
ntrie
s
• Cl
ass
disc
ussio
ns
• Ta
bles
• T-
char
t
• ‘W
hat’s
hot
?’
(Res
ourc
e sh
eet 1
)
• Ph
otos
and
dra
win
gs
* The
se le
sson
out
com
es a
re a
ligne
d to
rele
vant
des
crip
tions
of t
he A
ustra
lian
Cur
ricul
um. S
ee p
age
2 fo
r Sci
ence
and
pag
e 7
for E
nglis
h an
d M
athe
mat
ics.
SC
IEN
CE
OU
TCO
ME
S*
LITE
RA
CY
OU
TCO
ME
S*
LES
SO
N S
UM
MA
RY
AS
SE
SS
ME
NT
OP
PO
RTU
NIT
IES
Stud
ents
will
be a
ble
to:
Stud
ents
will
be a
ble
to:
Stud
ents
will
be a
ble
to:
EXPLORELe
sson
3
Ener
gy e
xplo
rers
• id
entif
y th
ree
way
s in
whi
ch
heat
can
be
prod
uced
• cla
ssify
hea
t sou
rces
acc
ordi
ng
to h
ow th
ey p
rodu
ce h
eat.
• co
ntrib
ute
to d
iscus
sions
abo
ut
way
s in
whi
ch h
eat i
s pr
oduc
ed
• cr
eate
labe
lled
diag
ram
s
• us
e qu
estio
ns to
agr
ee a
nd
disa
gree
with
team
s’ c
laim
s.
• so
rt pi
ctur
es in
to th
ree
grou
ps
acco
rdin
g to
how
they
pro
duce
he
at
• fin
d ob
jects
and
item
s to
in
clude
in th
e gr
oups
.
Form
ativ
e as
sess
men
t
• Sc
ience
jour
nal e
ntrie
s
• Cl
ass
disc
ussio
ns
• ‘W
arm
ing
way
s’
(Res
ourc
e sh
eet 3
)
• La
belle
d di
agra
ms
EXPLORE
Less
on 4
Sh
arin
g th
e w
arm
th
• ex
plor
e ob
jects
that
do
not
prod
uce
heat
• id
entif
y he
at s
ourc
es o
utsid
e th
e cla
ssro
om
• ex
plor
e th
at s
ome
objec
ts h
eat
up w
hen
in c
onta
ct w
ith a
hea
t so
urce
.
• us
e or
al, w
ritte
n an
d vis
ual
langu
age
to re
cord
and
disc
uss
inve
stig
atio
n re
sults
• en
gage
in d
iscus
sion
to
com
pare
resu
lts.
• ob
serv
e th
at m
any
objec
ts d
o no
t pro
duce
hea
t
• ex
plor
e ho
w o
bjec
ts o
btain
he
at b
y be
ing
in c
onta
ct w
ith a
he
at s
ourc
e.
Form
ativ
e as
sess
men
t
• Sc
ience
jour
nal e
ntrie
s
• Cl
ass
disc
ussio
ns
• ‘W
arm
me
up!’
(R
esou
rce
shee
t 4)
EXPLAIN
Less
on 5
To
o ho
t to
hand
le•
expl
ain th
at h
eat t
rans
fers
from
ho
t obj
ects
to c
ooler
one
s
• re
view
their
und
erst
andi
ng
of h
eat s
ourc
es a
nd th
e pr
oduc
tion
of h
eat.
• us
e w
ritte
n an
d or
al lan
guag
e to
dem
onst
rate
their
un
ders
tand
ing
of h
eat t
rans
fer
• cr
eate
a p
oste
r to
expl
ain h
eat
and
how
hea
t mov
es
• us
e sc
ientifi
c lan
guag
e to
de
scrib
e he
at s
ourc
es
• co
ntrib
ute
to d
iscus
sions
ab
out e
very
day
scen
ario
s in
volvi
ng h
eat t
rans
fer.
• re
pres
ent t
heir
unde
rsta
ndin
g of
hea
t sou
rces
and
the
mov
emen
t of h
eat u
sing
ever
yday
sce
nario
s
• cr
eate
a p
oste
r war
ning
oth
ers
abou
t the
dan
gers
of h
eat.
Form
ativ
e as
sess
men
t
• Sc
ience
jour
nal e
ntrie
s
• Cl
ass
disc
ussio
ns
• ‘M
ovin
g he
at’
(Res
ourc
e sh
eet 5
)
• Po
ster
s
* The
se le
sson
out
com
es a
re a
ligne
d to
rele
vant
des
crip
tions
of t
he A
ustra
lian
Cur
ricul
um. S
ee p
age
2 fo
r Sci
ence
and
pag
e 7
for E
nglis
h an
d M
athe
mat
ics.

Appendix 868
PrimaryConnections
SC
IEN
CE
OU
TCO
ME
S*
LITE
RA
CY
OU
TCO
ME
S*
LES
SO
N S
UM
MA
RY
AS
SE
SS
ME
NT
OP
PO
RTU
NIT
IES
Stud
ents
will
be a
ble
to:
Stud
ents
will
be a
ble
to:
Stud
ents
will
be a
ble
to:
ELABORATE
Less
on 6
G
ettin
g w
arm
er•
cond
uct a
n in
vest
igat
ion
of th
e co
nduc
tion
of h
eat t
hrou
gh
diffe
rent
mat
erial
s
• m
ake
pred
ictio
ns a
bout
w
hat w
ill ha
ppen
to d
iffere
nt
mat
erial
s pl
aced
in h
ot w
ater
• ob
serv
e, re
cord
and
inte
rpre
t th
e re
sults
of t
heir
inve
stig
atio
n
• id
entif
y th
at d
iffere
nt m
ater
ials
cond
uct h
eat a
t diffe
rent
rate
s.
• us
e or
al, w
ritte
n an
d vis
ual
langu
age
to re
cord
and
disc
uss
inve
stig
atio
n re
sults
• re
cord
dat
a in
a ta
ble
• en
gage
in d
iscus
sion
to
com
pare
resu
lts.
• w
ork
in te
ams
to in
vest
igat
e w
heth
er o
r not
diffe
rent
m
ater
ials
are
heat
ed b
y ho
t w
ater
• re
cord
and
repr
esen
t the
ir fin
ding
s in
a ta
ble
• di
scus
s an
d co
mpa
re th
eir
resu
lts fr
om th
e in
vest
igat
ion.
Sum
mat
ive
asse
ssm
ent
of S
cienc
e In
quiry
Skil
ls
• Sc
ience
jour
nal e
ntrie
s
• Cl
ass
disc
ussio
ns
• ‘H
ot w
ater
inve
stig
atio
n pl
anne
r’ (R
esou
rce
shee
t 6)
EVALUATE
Less
on 7
Fi
ndin
g th
e he
at•
iden
tify
that
hea
t can
be
prod
uced
in d
iffere
nt w
ays
by
diffe
rent
hea
t sou
rces
• ex
plain
hea
t can
mov
e fro
m
one
objec
t to
anot
her
• dis
cuss
and
com
pare
their
idea
s.
• us
e or
al, w
ritte
n an
d vis
ual
form
s to
pre
sent
their
un
ders
tand
ing
of h
eat
prod
uctio
n an
d tra
nsfe
r
• re
flect
on
their
lear
ning
in a
sc
ience
jour
nal e
ntry.
• re
view
the
class
idea
s m
ap
• fin
d, lis
t and
cat
egor
ise th
ings
th
at p
rodu
ce h
eat
• cr
eate
a d
raw
ing
to s
how
how
he
at m
oves
from
one
obj
ect t
o an
othe
r
• pa
rticip
ate
in a
clas
s di
scus
sion
to re
flect
on
their
lea
rnin
g du
ring
the
unit.
Sum
mat
ive
asse
ssm
ent
of S
cienc
e Un
ders
tand
ing
• Sc
ience
jour
nal e
ntrie
s
• Cl
ass
disc
ussio
ns
• ‘W
here
’s th
e he
at?’
(R
esou
rce
shee
t 7)
* The
se le
sson
out
com
es a
re a
ligne
d to
rele
vant
des
crip
tions
of t
he A
ustra
lian
Cur
ricul
um. S
ee p
age
2 fo
r Sci
ence
and
pag
e 7
for E
nglis
h an
d M
athe
mat
ics.

Order your next unit at www.primaryconnections.org.au
YearBiological sciences
Chemical sciences
Earth and space sciences
Physical sciences
F Staying alive What’s it made of? Weather in my world On the move
1 Schoolyard safari Spot the difference Up, down and all around Look! Listen!
2 Watch it grow! All mixed up Water works Push pull
3 Feathers, fur or leaves? Melting moments Night and day Heating up
4
Plants in action Material world
Beneath our feet Smooth moves
Friends and foes Package it better
5 Desert survivors What’s the matter? Earth’s place in space Light shows
6 Marvellous micro-organisms Change detectives Earthquake
explorers
It’s electrifying
Essential energy

Heating up
Fully alig
ned
with th
e Australian
Curriculum
The PrimaryConnections program is supported by astronomer, Professor Brian Schmidt, Nobel Laureate
ISBN 978-0-85847-329-4
9
780858 473294
Heating up Year 3 Physical sciences
PC:3:P1
PrimaryConnections: Linking science with literacy is an innovative program linking
the teaching of science with the teaching
of literacy in primary schools.
The program includes a sophisticated
professional learning component and
exemplary curriculum resources.
PrimaryConnections features an inquiry-
based approach, embedded assessment
and incorporates Indigenous perspectives.
The PrimaryConnections curriculum
resources span Years F–6 of primary school. Year 3Physical sciences
www.primaryconnections.org.au
Australian
Curriculum