eargo plus | user guide€¦ · an audiologist is qualified by training ... these correspond to the...
TRANSCRIPT

Eargo Plus | User Guide

ii
Get ready to start hearing life to the fullest.A companion video of this user guide can be found at eargo.com/showme

iii
Welcome to Eargo IV
Getting to Know Your Eargo
Waking Up Your Eargo
Contents
05
07
09
21
Preparing Your Ears
Inserting and Removing Your Eargo Devices
01Indications for Use
65
67
71
73
33
45
Share the Love!
Troubleshooting Guide
Support
Appendix
31Adjusting Sound Profile
Your First Month and Beyond
Eargo Care
Finding the Perfect Fit 27
Let’s Get All Charged Up 11

iv
Welcome to Eargo!! If the two exclamation points above didn’t communicate to you that we’re super-excited to have you as a part of the Eargo family, hopefully this will: we’re super-excited to have you as a part of the Eargo family, and we know you’re going to enjoy your new Eargo Plus hearing devices.
STEP 2: CHARGECharge your Eargo devices (Pg. 09)
STEP 1: CLEANClean your ears (Pg. 05)
STEP 3: SIZEPick your size(Pg. 27)
STEP 4: ADJUSTFind the right setting for you (Pg. 31)
GET GOING IN 4 EASY STEPS
v
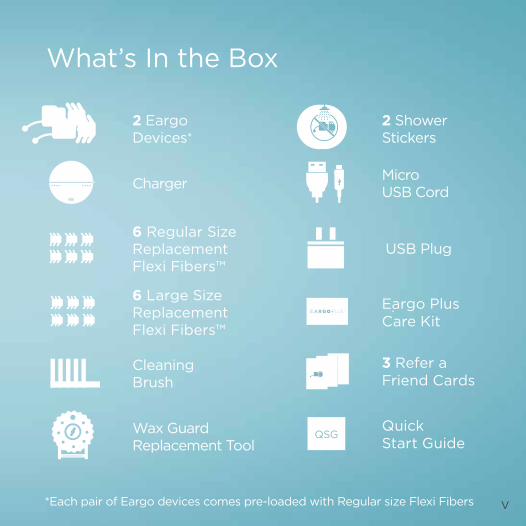
What’s In the Box
Charger
2 Eargo Devices*
6 Regular SizeReplacementFlexi Fibers™
6 Large Size ReplacementFlexi Fibers™
Micro USB Cord
2 ShowerStickers
USB Plug
Cleaning Brush
*Each pair of Eargo devices comes pre-loaded with Regular size Flexi Fibers
Eargo PlusCare Kit
3 Refer a Friend Cards
Wax GuardReplacement Tool
Quick Start Guide
QSG

01
Indications for Use The hearing instrument is intended to amplify and transmit sound to the ear and thereby compensate for mild to moderate impaired hearing.
Warning to Hearing Aid Dispensers
A hearing aid dispenser should advise a prospective hearing aid user to consult promptly with a licensed physician (preferably an ear specialist) before dispensing a hearing aid if the hearing aid dispenser determines through inquiry, actual observation, or review of any other available information concerning the prospective user, that the prospective user has any of the following conditions:
i. Visible congenital or traumatic deformity of the ear.ii. History of active drainage from the ear within the previous 90 days.iii. History of sudden or rapidly progressive hearing loss within the
previous 90 days.iv. Acute or chronic dizziness.v. Unilateral hearing loss of sudden or recent onset within the
previous 90 days.vi. Audiometric air bone gap equal to or greater than 15 decibels at
500 hertz (Hz), 1,000 Hz, and 2,000 Hz.vii. Visible evidence of significant cerumen accumulation or a
foreign body in the ear canal. viii. Pain or discomfort in the ear.

02
Important Notice for Prospective Hearing Aid Users
Good health practice requires that a person with a hearing loss have a medical evaluation by a licensed physician (preferably a physician who specializes in diseases of the ear) before purchasing a hearing aid. Licensed physicians who specialize in diseases of the ear are often referred to as otolaryngologists, otologists or otorhinolaryngologists. The purpose of medical evaluation is to assure that all medically treatable conditions that may affect hearing are identified and treated before the hearing aid is purchased.
Following the medical evaluation, the physician will give you a written statement that states that your hearing loss has been medically evaluated and that you may be considered a candidate for a hearing aid. The physician will refer you to an audiologist or a hearing aid dispenser, as appropriate, for a hearing aid evaluation.
The audiologist or hearing aid dispenser will conduct a hearing aid evaluation to assess your ability to hear with and without a hearing aid. The hearing aid evaluation will enable the audiologist or dispenser to select and fit a hearing aid to your individual needs.
If you have reservations about your ability to adapt to amplification, you should inquire about the availability of a trial rental or purchase option program. Many hearing aid dispensers now offer programs that permit you to wear a hearing aid for a period of time for a nominal fee after which you may decide if you want to purchase the hearing aid.

03
Federal law restricts the sale of hearing aids to those individuals who have obtained a medical evaluation from a licensed physician. Federal law permits a fully informed adult to sign a waiver statement declining the medical evaluation for religious or personal beliefs that preclude consultation with a physician. The exercise of such a waiver is not in your best health interest and its use is strongly discouraged.
Children with Hearing Loss
In addition to seeing a physician for a medical evaluation, a child with a hearing loss should be directed to an audiologist for evaluation and rehabilitation since hearing loss may cause problems in language development and the educational and social growth of a child. An audiologist is qualified by training and experience to assist in the evaluation and rehabilitation of a child with a hearing loss.
Additional Notices
A hearing aid will not restore normal hearing and will not prevent or improve a hearing impairment resulting from organic conditions.
In most cases infrequent use of a hearing aid does not permit a user to attain full benefit from it.
The use of a hearing aid is only part of hearing habilitation and may need to be supplemented by auditory training and instruction in lip reading.

04
Possible Side Effects
Minor itchiness, redness, and irritation may occur as your ear becomes accustomed to having an object in it. If this or anything related may arise, please contact Eargo.
If an actual allergic reaction occurs or you experience inflammation, discharge from the ear, excessive wax or other unusual conditions, contact a physician.
If, for any reason, your hearing devices do not operate properly, do NOT attempt to fix them yourself. Not only are you likely to violate any applicable warranties, you could cause further damage.
Caution
Always wear an Eargo device with a Flexi Fiber. Make sure that the Flexi Fiber is correctly attached. In very rare cases, the Flexi Fiber could remain in your ear when removing the Eargo device. If this happens, do not attempt to remove the Flexi Fiber yourself. Have the Flexi Fiber removed by a healthcare professional.

05
Preparing Your EarsCLEAN UP IN EAR 2
We know it’s exciting getting your Eargo devices. Heck, we’re so excited for you we can barely sit still. But before you go running off half-cocked, slamming your devices into place, please take a minute to remove any excess wax that may have accumulated in the ear canal. Sometimes, it can interfere with hearing by blocking the ear canal. Ear wax can also plug the sound openings or charging contacts on your Eargo devices.
In other words, clean those ears. A clean ear is a happy – and better functioning – ear. Our in-house doctors and audiologists urge you to not skip this step, even if you feel your ears are pretty clean already.
We recommend talking to your doctor or a hearing healthcare professional about how to best clean your ears. Now that your ears are nice and clean, let’s get started.

06

07
ReplaceableFlexi FibersTM
Removal Thread
Microphone
Speaker
Getting To Know Your Eargo
Left is L Right is R
GoldContact

08
Before you insert your Eargo devices, we want to familiarize you with their various parts. Just like in the theater, there are no small parts.
FLEXI FIBERS • Flexi Fibers allow Eargo devices to be comfortably suspended inside the ear canal. Which is totally where you want ‘em.
REMOVAL THREAD • The Removal Thread is used to insert and remove your Eargo devices. It should always be facing down when inserting the device into your ear.
MICROPHONE • The Microphone picks up sounds from your surroundings. Fair warning, it works super-well, so you might want to avoid groups of loud teenagers, small yappy dogs or those car stereos that shake the ground when they pass.
SPEAKER • The Speaker amplifies sound. The world’s about to be piped through, in stereo.
GOLD CONTACT • The Gold Contact is used in the charging of your device.
EAR PAIRING • Each device is labelled with either an L or an R. These correspond to the ear in which the Eargo device should be inserted. L is for your left ear and R is for your right. Simple, right? Or, is that left?

09
Waking Up Your EargoGETTING TO KNOW YOUR CHARGER
OK, this is the part where we tell you some things you might find kind of obvious. We’d just ask that you read everything through – you never know when you’re going to run across something you don’t know but need to. Heck, we’ve gone to the trouble to write all these words, it’d be a shame if no one read them. They’d get so lonely.
The Eargo charger is portable, which means it can charge your Eargo devices on the go. The charger also needs to get charged from time to time.
If you’re the curious sort - and we can’t blame you if you are - open the lid of the charger and take a peek inside. Those babies look good, don’t they. Keep the lid open until you see the lights of the charger come on...about 3 seconds. It takes longer for these lights to come on the first time you open the lid as your system is waking up from its deep sleep.
Enough peeking, now put the lid back on. Let them charge for a bit while you learn more about your Eargo devices. You know the old saying, a watched Eargo charges at approximately the same rate as an unwatched Eargo. That is an old saying, right? No? Well, let’s move on.

10
When charger is fully charged, all battery lights glow white.
Full Charge
When charger is at low charge, one battery light glows red.
Low Charge
Open the lid of the charger and the indicator lights will come on after about 3 seconds.
Checking the Charge
Charger Indicator Lights

11
Let’s Get All Charged UpCHARGING YOUR CHARGER
Let’s make sure your charger and Eargo devices are fully charged before using them. Sometimes the batteries drain while in shipment from our factory. It’s a long trip and they get bored and lonesome. You know how it is.
As you know by now, we like to make things as easy as we can for you. So when your Eargo devices arrive, they’re already placed inside the charger, but they may need a little more charge.
Connect the smaller end of the micro USB cord to the charger, and the larger end of the cord to the USB plug.
Plug the USB plug into a powered wall outlet.
While charging the charger, the Eargo devices will also charge if they’re in the cradle.

12
On the charger itself, all indicator lights will briefly glow. When this happens, the charger (and the Eargo devices inside) will begin to charge. But don’t worry if those lights turn off, that’s just the charger trying not to show off....your devices are still being charged. Bada bing, bada boom.
It’ll take about 6 hours to charge up fully. Then you’re good to go. In a literal and figurative sense.
Charger Lid
Micro USB Cord
Charger Indicator Lights
EargoCharger
Eargo Device Indicator Lights

13
Let’s Continue To Get Charged UpCHARGING YOUR EARGO DEVICES
When it comes time to recharge your Eargo devices, there are FIVE SIMPLE STEPS to follow.
FLIP • When you remove the Eargo device from your ear, the removal thread will be facing down. Before inserting your Eargo device into the charger, flip the device so that the removal thread is facing up.
POSITION • Position the Eargo device into the cradle with the speaker and Flexi Fibers facing inward. Remember, the removal thread should be out and up. Do not force it into place. With a little wiggle, it will slide right into the cradle.
PUSH • Gently push straight down on the black body of the Eargo device above the gold contacts, not on the white Flexi Fibers. When it is correctly positioned, the cradle light will change from blue to white.
CHECK CRADLE INDICATOR LIGHTS • When the cradle lights change from solid blue to solid white, charging will begin. For full details, turn to page 15. Replace the top of the charger.
CHECK EARGO DEVICE INDICATOR LIGHTS • Remove the top of the charger. Indicator lights scroll for 2 minutes to assess your charge level. For full details, turn to page 17.
1
2
3
4
5

1414
Position the device directly over the charging cradle.
Push down into cradle with a gentle wiggle.
Flip the device before insertion so removal thread is facing up.
1
2
3
Charging Cradle

15
Let’s Continue To Get Charged UpCRADLE INDICATOR LIGHTS
CHECK CRADLE INDICATOR LIGHTS • When the cradle lights under the Eargo device change from solid blue to solid white, charging will begin. The charging lights may flash blue for a few seconds before turning solid white when you first insert the Eargo devices into the cradle. This is normal - the charger is just calibrating.
But, if the charging lights continue to flash blue for an extended period of time, or remain solid blue, the Eargo devices are not inserted correctly. Remove and re-insert the Eargo devices.
You will know you’re all set when the charging lights under the Eargo devices remain solid white, and the Eargo Device Indicator Lights on the front of the charger turn on and start scrolling.
4

1616
Cradle Indicator
Lights
Charging lights inside cradle change from blue to white.4
SOLID WHITE LIGHTEargo deviceinserted correctly.
SOLID BLUE LIGHT Eargo device inserted incorrectly.
CONTINUOUS FLASHING Eargo device only partially inserted.

17
Let’s Continue To Get Charged UpEARGO DEVICE INDICATOR LIGHTS
CHECK EARGO DEVICE INDICATOR LIGHTS • As we mentioned at the end of step 4, the indicator lights on the front of the charger should be scrolling.
This will last for about 2 minutes while the charger is assessing how much charge the Eargo devices have left. This way the charger will know if it should charge the devices full blast, or just gently trickle-charge them. Clever little charger, eh? After this assessment period, the lights will show how much juice you have in each Eargo device (1 to 4 lights) and will dim after approximately 10 seconds. It takes approximately 6 hours to fully charge your Eargo devices and a full charge should give you up to 16 hours of use.
5

18
All 4 indicator lights turn on and start scrolling during 2 minute assessment period.
HOW YOUR DEVICE INDICATOR LIGHTS WORK
JUICE LEVEL 1-4 lights illuminate.
Eargo DeviceIndicator
Lights
FULL CHARGE 4 white lights on — device is fully charged.
LOW CHARGE 1 red light on — device has extremely low charge.

19

20
Let’s Continue To Get Charged UpSTORAGE AND BATTERY LIFE
Keep Your Eargo Devices Safe and Working Well
Proper storage of your Eargo devices will increase their lifespan and keep them in top working condition. When not in use, store them in the charger. That’ll keep them fully charged.
Please do not drop your Eargo devices or your charger onto any hard surfaces.
Maximizing Battery Life
To maximize the battery life of your Eargo devices, it is best to charge them once a day, overnight.
Turning Off Your Eargo Devices
Placing your Eargo devices in the charger automatically turns them off.

21
OK, the moment of truth is finally here. You are now ready to give those babies a test drive. Always check the devices’ charge level BEFORE removing them from the charger.
Simply pop the top off the charger, verify indicator lights illuminate. If not, recharge your Eargo devices (refer to page 13) otherwise remove one of the Eargo devices from the charging cradle. To keep things super simple, Eargo devices have no switches. They just turn on automatically 15 seconds after they are removed from the charger. Bada boom.
BEFORE AND AFTER
If you apply hairspray or cosmetics, please do so BEFORE inserting the Eargo devices. Otherwise they could clog the microphone. Likewise, if you apply hand lotion, please do so AFTER the devices have been inserted, so the lotion does not clog the microphone.
INSERTING
When you take the device* out of the charger, the removal thread will be facing up, so flip it over so the removal thread is facing down. Now, grab the removal thread at the base of the device and gently insert the Eargo device into your right or left ear canal.**
Inserting & Removing Your Eargo Devices

22
Remember, L is for left and R is for right. And, the key word here is gently. We know you’re excited, but don’t be
jamming that thing in.
The device should sit entirely in the ear canal, with the microphone up and
the removal thread down. As we said before, bada bing, bada boom.
INCORRECT Too far in INCORRECT Halfway out INCORRECT Upside down
*CAUTION: Do not use if device is damaged or removal thread is missing. Please contact Eargo immediately.
** Do not insert the Eargo device too deep into the ear canal. The removal thread needs to remain accessible. Do not proceed if there is any discomfort or pain.
23
ACTIVE CALIBRATION PROCESS
The Eargo devices turn on 15 seconds after removing them from the charger.
When first inserting your devices, they undergo an active calibration process for 30-60 seconds. During this time they may ring a bit. Don’t be alarmed - this is normal. It’s just the devices adjusting their tuning to your specific ear canal. Kind of like how an orchestra takes a minute or so to make sure they’re in tune with one another. You don’t have an orchestra in your ear, but you know what we mean.
If the ringing doesn’t stop, try pulling back on the device ever so slightly. This sometimes stops the ringing. You can also try rotating the device slightly to make sure the microphone is not touching the ear canal and causing feedback. If all else fails, remove the device from your ear, place it in the charging cradle, remove it again and re-insert the device into your ear.

24
“AROUND THE BEND” OR CURVED EAR CANALS
One thing to remember is that every person’s ear canals are shaped differently. In fact, it is not uncommon for the left and right ear canals to bend in different directions, even in the same person. If you feel light resistance when you first insert the Eargo device, and it doesn’t feel like it has gone in all the way, the Eargo device might just need a little help.
Give it a little nudge left, right, up or down to see if you have a bend in your ear canal, and if you can, nudge it around the bend so it goes into place more fully. But PLEASE be gentle and don’t force it.
It may help to gently pull the middle of your ear back while inserting the device with your other hand.

25
BLACK IS THE NEW CAMOUFLAGEThe Eargo device should be inserted almost completely in the ear canal, so the very back of the device is flush with the opening of the ear canal. The Eargo device will be almost completely invisible. The main part of the device that may be visible is the very back. In fact, this is why we make Eargo devices black (and not various skin colors). You see, the ear canal appears quite dark since it receives little light, so a black Eargo device is better camouflaged and more closely resembles the shadow in the canal than a skin-colored one would. Clever, right?

26
Inserting & Removing Your Eargo Devices
To remove the Eargo device, grasp the removal thread and gently pull*.
We know the devices are quite comfortable. We’re the ones who made them that way. Many people tell us they
forget they even have them in. But please don’t forget to take them out. Got to let
those babies breathe and recharge every now and then.
Eargo devices are designed for all day use, but not all night. Please remove them before
sleeping and especially before showering.
After removal, it’s a good idea to inspect your devices for wax build up, or to replace
the Flexi Fibers or wax guards if needed. You can read more about this in the Eargo
Care section (page 45).
*CAUTION: In very rare cases, the Flexi Fiber could remain in your ear when removing the Eargo device. If this happens, have the Flexi Fiber removed by a healthcare professional.

27
While every human being is unique like a snowflake or a...uh...well, snowflake is the only example we can think of...it turns out the size of our ear canals are not. So Eargo Flexi Fibers come in 2 sizes: Regular and Large. Regular is going to be the right fit for most people. The Large size is for those with larger ear canals. The different sized Flexi Fibers are easy to identify. The Regular size will look noticeably smaller than the Large size (we’ll slow down here so you can let that one sink in).
Your Eargo devices are locked and loaded with Regular size Flexi Fibers. If the Regular size feels too loose, swap them with the Large size to see if those are a better fit. You can find the Large size Flexi Fibers inside the Eargo Plus Care Kit.
We recommend you wear your Eargo devices for an hour or so before making a final decision on fit. Talk, laugh, eat, shout at the evening newscast – really pack that hour up with excitement. Your Eargo devices are designed to comfortably flex and keep their fit as you move throughout your day.
Occasionally, people have left and right ear canals which are different sizes. If this is the case for you, then you may find you need a Regular size in one ear and a Large size in the other. Use what feels best for you.
Finding the Perfect FitEVERYONE’S EARS ARE UNIQUE-ISH
REGULAR
LARGE
APPROXIMATE SIZE

28
ReplaceableFlexi FibersTM
Gray Markings
Base of Nose
Nose
Body of Device
Finding the Perfect FitPEEK UNDER THE HOOD

29
For a visual demonstration on how to change your Flexi Fibers, watch our video at eargo.com/showme. Make sure to bring the popcorn.
Grasp the body of the Eargo device between your thumb and index finger. With your other hand, grasp the Regular size Flexi Fiber on one side at the bottom and peel it up and away from the body of the device.
REMOVE THE REGULAR SIZE
Finding the Perfect FitCHANGING SIZES

30
Slide the Flexi Fiber onto the nose of the device*. The open side should go all the way down to the bottom of the nose. You want to make sure the Flexi Fiber is on the device nice and tight every time before you put them in your ear. You can do this by pushing and twisting the Flexi Fiber down the nose towards the base. Then give it a look to ensure that it’s all the way on the nose. If you can still see some of the gray markings on the nose, the Flexi Fiber is not on properly. Continue twisting the Flexi Fiber down the nose until the gray markings are covered.
REPLACE WITH THE LARGE SIZE
*Caution: Make sure that the Flexi Fiber is correctly attached. In very rare cases, the Flexi Fiber could remain in your ear when removing the Eargo device. If this happens, have the Flexi Fiber removed by a healthcare professional.

31
Quick double tap
31
SP1
SP2
SP3
SP4
LOW/PHONE
ONE BEEP
MED
TWO BEEPS
HIGH
THREE BEEPS
MAX
FOUR BEEPS
32
Adjusting Sound ProfileAMPLIFICATION LEVELS
Your Eargo devices have four sound profiles (SPs), ranging from low amplification (SP1) to maximum (SP4). To move from one SP setting to the next, open your hand (as if you were going to clap) and gently and rapidly double tap your ear.
Your Eargo device will beep when you’ve changed SPs. The number of beeps reflects the SP (e.g. 4 beeps for SP4). It will progress through all 4 levels and then repeat from the beginning (SP 1-2-3-4, then back to SP 1-2-3-4 etc.). Think of it as your volume carousel.
Sound settings are highly personal and often vary between ears and in different settings. Each ear is different, so do this for each ear independently. And remember, your Eargo devices should make sounds and speech crisper, but not louder per se.
SP1 is a special setting that has lower amplification and a special equalization curve designed for phone calls. When talking on a phone, try this setting to reduce any potential feedback.
Your Eargo devices will always start on SP1 every time you take them out of the charger. If your devices are customized, your preset levels may be different.
To get a sense of how rapid a double tap should be to change SPs, visit us at eargo.com/showme to see a visual demonstration.

33

34
Your First Month and BeyondGETTING DOWN WITH EARGO
A couple of things to know as you adjust to your new life with your Eargo devices. One, there will be quite a few new sounds coming at you – at your ear-region, to be exact. So we wanted to let you know what to expect, and to explain how that wonderful brain of yours will adjust very quickly to hearing more of the sound spectrum again. And two, we have a team of personal hearing professionals with decades of experience working with people who are adjusting to wearing hearing devices for the first time. They also have, to a person, outstanding haircuts and pearly white teeth. Smart and dashing. Hey, we have high standards around here. But, most importantly, they’re also available to you should you need any help getting adjusted to your new devices.

35
Slip in Something More ComfortableFINDING A COMFORTABLE FIT
We’re pretty proud of our patented Flexi Fibers around here. In fact, their designers can often be seen strutting, rather shamelessly, around the office. And why shouldn’t they? Thanks to Flexi Fibers, Eargo devices exert minimal force on the ear. We love your ears— why would we be exerting a lot of force on them? And the Flexi Fibers’ open fit allows air to flow in and out of the ear. Anyone who tells you a nice, gentle breeze in and out of the ear isn’t an absolute pleasure has obviously never experienced one. In other words, they’re incredibly comfortable. So comfortable you might forget you’re wearing them. If it wasn’t for the incredible sound quality, that is. And if your Eargo devices ever feel uncomfortable, just try repositioning them – pull them backward, forward, or rotate them a little. Just make sure you keep the microphone toward the top.
Some users have an itchy feeling in their ears for the first couple weeks of wearing their Eargo devices. This is completely normal. The ear has to adjust to having something in it, and the feeling usually goes away in a few weeks.

36
Whose Voice is That?HEARING YOUR OWN VOICE
Autophony is a fancy term for hearing your own voice. We like fancy words around here. We have one of those vocabulary calendars with a new word every day. Today’s word was “fritter” which means to squander or disperse. But amazing vocabulary aside, autophony is one of the most common things people notice when they begin wearing an in-ear hearing device. Remarkably, this typically goes away within a week or two when your brain gets adjusted to it. And eventually ignores it. We find you quite charming, but your brain probably figures why fritter (yay!) away time listening to you when there are so many other things out there to listen to.

37
Has the World Always Been This Loud?HEARING YOUR SURROUNDINGS
When first wearing your Eargo devices, keep the volume low. Your brain will likely be hearing sounds you may not have heard for some time. Your brain will be like a kid who’s been cooped up in a car for way too long suddenly being cut loose on a beach. Just running around out there hearing everything it can. And giggling happily to itself. Anyway, our point is, little sounds may suddenly seem very loud. Things like water running, bags of chips crinkling, paper crumpling, babies crying and the sound of traffic.
Your brain needs a little time to get used to hearing these high frequency sounds again. It probably hasn’t heard them for a long time. Give it a little while. The first weeks with your Eargo devices will be a time of adjustment. These sounds will begin to fade into the background as your brain relearns which ones are important and which can be ignored.

38

39

40
That beautiful brain of yours will focus in on speech and ignore less important sounds like paper crumpling. This usually happens over the first two to four weeks. Be patient. Your brain has a lot of adjusting to do! Once it’s adjusted, you can try increasing the volume to a higher sound profile (SP) to see which one gives you the greatest clarity. If these background noises continue to be an issue after 30 days, adjust the volume back down. Play around with the SPs. As in life or marriage or the exact way to make a good gumbo, there is no right or wrong answer. And remember you can select different SPs for each ear.
One final word on volume; Eargo devices should sound crisp and not loud. If something sounds loud, you probably have the volume too high. Switch to a lower SP.

41
It’s About to Get Pretty ConversationalSPEECH DISCRIMINATION
Within the first couple of weeks of acclimating to your Eargo devices – and to sounds you may not have heard for a while – your ability to understand speech should start to improve. So if you’ve been hanging around with a bunch of boring people or the conversationally challenged, it might be time to freshen up the ol’ friend group. After the first few weeks, many people find that it’s easier to hold a conversation in noisy environments. And your speech discrimination will likely continue to improve over time. Possibly for several months.
But remember, the key to anything is practice, so go outside and start talking!

42

43
Using the PhoneSometimes people experience feedback when talking on the phone and wearing a hearing device. This can happen when the phone is too close to the ear. The proximity can create a feedback loop between the phone’s speaker and the device’s microphone. If this happens, move the phone back from your ear a bit or try holding it at an angle. SP1 is designed for the phone, so if you ever experience feedback while on the phone, be sure to try this setting. Some people also have success using speaker phones.

Watching TVThere’s a lot of great TV out there. We have, like, 36 hours of stuff recorded on our DVR. At least. If we weren’t so busy helping people hear life to the fullest, we’d do some serious binge-watching. Many people note that they can watch TV at a much lower volume after they start wearing their Eargo devices. Usually the same volume that’s comfortable for their spouse or family. One of the many ways in which the Eargo devices benefit the people who AREN’T wearing them, too. If you find you still want the TV louder than your family does, you can temporarily increase the volume of your Eargo devices by using a higher SP while watching TV. OK. Happy watching. And listening.
44

You can follow along this cleaning section with our incredible, award winning videos made easily accessible at eargo.com/showme for your viewing pleasure. OK, they haven’t won any awards, but we think they should.
45
Eargo CareKeeping your Eargo devices in good shape is very important.
DAILY CAREWipe and brush off excess wax daily.
LONG-TERM CAREReplace Flexi Fibers if clogged with wax.
LONGER-TERM CAREReplace interior wax guard if clogged with wax.

Daily Care
KEEPING YOUR EARGO DEVICES CLEAN
Eargo devices are designed to help keep your ears clean. The Flexi Fibers may sweep out excess wax with each removal. There’s often a sizable amount of wax that may come out during the initial days of using your devices. That amount should lessen over time.
It’s very important to keep your devices clean. Wax buildup or other debris may lessen their sound quality and performance.
Never thought you’d spend so much time hearing about ear wax, did you? Well, surprise!
46
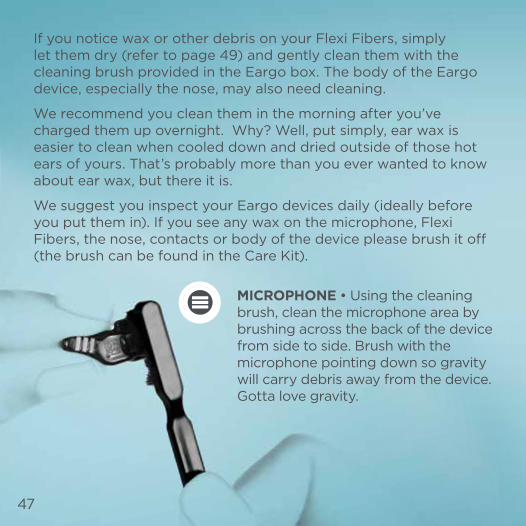
If you notice wax or other debris on your Flexi Fibers, simply let them dry (refer to page 49) and gently clean them with the cleaning brush provided in the Eargo box. The body of the Eargo device, especially the nose, may also need cleaning.
We recommend you clean them in the morning after you’ve charged them up overnight. Why? Well, put simply, ear wax is easier to clean when cooled down and dried outside of those hot ears of yours. That’s probably more than you ever wanted to know about ear wax, but there it is.
We suggest you inspect your Eargo devices daily (ideally before you put them in). If you see any wax on the microphone, Flexi Fibers, the nose, contacts or body of the device please brush it off (the brush can be found in the Care Kit).
MICROPHONE • Using the cleaning brush, clean the microphone area by brushing across the back of the device from side to side. Brush with the microphone pointing down so gravity will carry debris away from the device. Gotta love gravity.
47
48
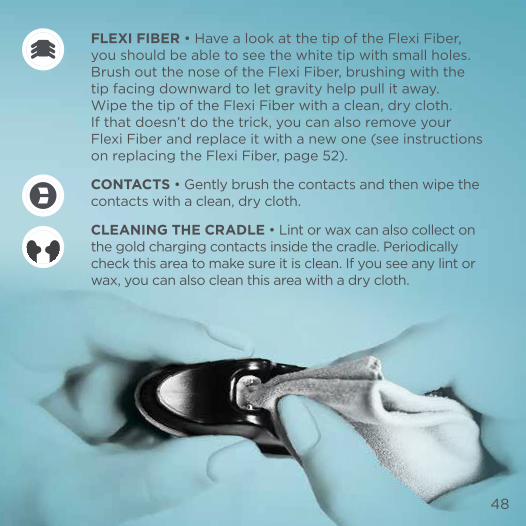
FLEXI FIBER • Have a look at the tip of the Flexi Fiber, you should be able to see the white tip with small holes. Brush out the nose of the Flexi Fiber, brushing with the tip facing downward to let gravity help pull it away. Wipe the tip of the Flexi Fiber with a clean, dry cloth. If that doesn’t do the trick, you can also remove your Flexi Fiber and replace it with a new one (see instructions on replacing the Flexi Fiber, page 52).
CONTACTS • Gently brush the contacts and then wipe the contacts with a clean, dry cloth.
CLEANING THE CRADLE • Lint or wax can also collect on the gold charging contacts inside the cradle. Periodically check this area to make sure it is clean. If you see any lint or wax, you can also clean this area with a dry cloth.

49
DON’T SHARE AND SHARE ALIKE
Now we know, being the generous individual that you are, it may be tempting to let others try your Eargo devices. But for hygienic reasons, please do not do this.
KEEP EARGO DRY
Now, let’s take some time to talk about the charger. Or, some more time, we should say. We love our charger, so you’ll have to forgive us for going on about it whenever we’re given the chance. Before placing your Eargo devices in the charger, make sure the devices are completely dry.
Long-term exposure to moisture can harm your devices. Let your devices air dry or dry them with a dry cloth.
Don’t use hot air or a hair dryer to dry your Eargo devices. It might give them that stylish, carefree, wind-blown look, but it could also damage their internal electronics.

50
EARGO DEVICES ARE NOT WATERPROOF
Last but certainly not least, Eargo devices are not waterproof. Please do not immerse or submerge your devices in water, alcohol or any liquid. Also, do not wear them while swimming or in the shower, hot tub or steam room.
We’ve even included a couple of handy shower stickers that you can use in your bathroom to remind you to take out your Eargo devices before showering.

51
ReplaceableFlexi FibersTM
ReplaceableWax Guard

52
Keeping your Eargo devices in good shape is very important. In this section, we will discuss the long term care of the Eargo devices. Long term care is necessary when the Flexi Fibers get filled with wax. OK, we know we keep talking about ear wax, but it just keeps coming up. Ear wax is annoying like that.
On average, the Flexi Fibers will likely need to be changed every 1-2 months due to wax build up. People with a lot of wax may need to do it more frequently. You’ll find out quickly which camp you’re in. Replacement Flexi Fibers can be found in the Care Kit. And don’t worry about running out of Flexi Fibers, you can always order more. It’s more important to have a clean, healthy and happy ear.
WAX ON, WAX OFF
Long-Term Care
2. Replace with new Flexi FIber1. Remove old Flexi Fiber

53
Long-Term CareFLEXI FIBER REMOVAL
Grasp the body of the Eargo device between your thumb and index finger.
STEP 1
Let’s talk about how to remove the Flexi Fibers. You can remove the Flexi Fibers in THREE SIMPLE STEPS.
Many people find it is easier to visualize how to do this by following along with the video found at eargo.com/showme.
With your other hand, grasp the Flexi Fiber on one side at the bottom and peel it up and away from the body of the device.
STEP 2

54
Don’t pull it straight back. Flexi Fibers are designed to stay put and won’t release if you pull them straight back. You need to gently pull the bottom of the Flexi Fiber away from the nose of the body of the device, and then just peel it up. It will come right off with no resistance.
STEP 3
Pull the Flexi Fiber completely away from the body of the device to reveal the nose of the body and replaceable wax guard. It is recommended that you discard the used Flexi Fiber.

55
Take the clean Flexi Fiber in your other hand. Face the open side of the Flexi Fiber towards the nose.
STEP 2
STEP 1
Now that the Flexi Fibers are removed, use a dry cloth to wipe the nose clean. Make it shine!
Long-Term CareFLEXI FIBER REPLACEMENT
Next, let’s replace the Flexi Fibers. Remember to use the correct sized Flexi Fibers. Replacement Flexi Fibers can be found in the Care Kit.
*Caution: Make sure that the Flexi Fiber is correctly attached. In very rare cases, the Flexi Fiber could remain in your ear when removing the Eargo device. If this happens, have the Flexi Fiber removed by a healthcare professional.
56
STEP 3
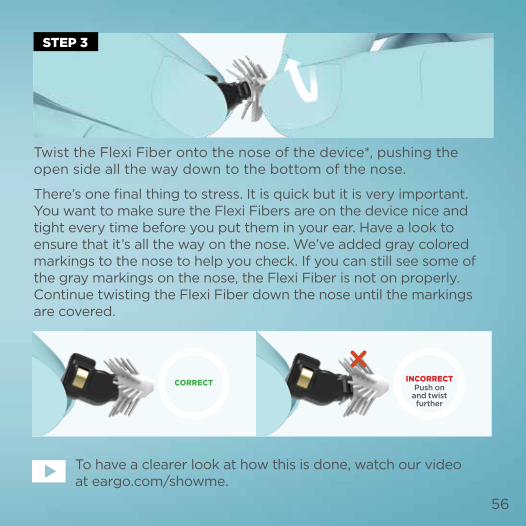
Twist the Flexi Fiber onto the nose of the device*, pushing the open side all the way down to the bottom of the nose.
There’s one final thing to stress. It is quick but it is very important. You want to make sure the Flexi Fibers are on the device nice and tight every time before you put them in your ear. Have a look to ensure that it’s all the way on the nose. We’ve added gray colored markings to the nose to help you check. If you can still see some of the gray markings on the nose, the Flexi Fiber is not on properly. Continue twisting the Flexi Fiber down the nose until the markings are covered.
Push on and twist further
INCORRECTCORRECT
To have a clearer look at how this is done, watch our video at eargo.com/showme.

57
Longer-Term CareIn this section, we will discuss Longer-Term Care of the Eargo devices, that is replacing the internal wax guard.
You shouldn’t need to do this every time you change the Flexi Fibers, since the Flexi Fibers are the first line of defense against wax. When changing the Flexi Fibers, give a look at the internal wax guard and make sure it’s clean. If it is, you’re all set. If not, then you can try to clean or replace the internal wax guard. To clean the wax guard of wax and other debris, gently brush the wax guard with the tip of the device pointed down to let gravity help pull wax away.
You can also change this wax guard anytime you notice a substantial amount of wax build up or roughly every 3 to 5 months. The time to change will vary depending on the amount of wax you may produce.
WAX OFF, WAX ON
1. Use metal side of tool to remove used Wax Guard
2. Use plastic side of tool to insert new Wax Guard

58
Wax Guard Wheel
Storage Kit
Changing Tool
Depository
Dispenser
Metal SidePlastic SideFor removing used wax guards.
For inserting new wax guards.
Wax Guard ChamberWax
Guard
Get to Know Your Wax Guard Replacement ToolTo change the wax guard, you will need the blue Wax Guard Replacement Tool* found in the Care Kit. The wax guard is very small and so is the tool to replace it, so don’t be shy in asking someone for help with this part if you need to.
*Only use tool and wax guards provided by Eargo.

59
Let’s get into how to remove the used wax guard.
As with Flexi Fiber replacement, many people find it is easier to visualize how to do this by following along with the video which can be found at eargo.com/showme.
Remove the Changing Tool from its clip at the bottom of the Wax Guard Replacement Tool.
STEP 1
Longer-Term CareREMOVING THE USED WAX GUARD
*The wax guard is disposable. Do not attempt to clean or reuse a wax guard. This could damage your hearing device.

60
STEP 2
USE THE METAL END TO REMOVE WAX GUARDS
Take the Eargo device between your thumb and index finger. With your other hand, use the threaded side – that’s the metal side of the tool – to gently twist the tool into the nose of the Eargo device to grab onto the used wax guard.* The key word is gently. You don’t need to apply too much force. Let the metal thread do all of the work here.
TWIST
STEP 3
Once the tool has grabbed onto the wax guard, pull firmly on the tool to remove the wax guard from the device. Voila! Wax guard removed.

61
STEP 4
We now get the old wax guard off of the tool. Push the metal end of the Changing Tool (with used wax guard engaged) into the middle of the dispenser as shown.
Slide the Changing Tool sideways across the dispenser slot. Pull the tool vertically to release the used wax guard into the depository.
Next, it’s time to put on a clean new wax guard.
STEP 5
62
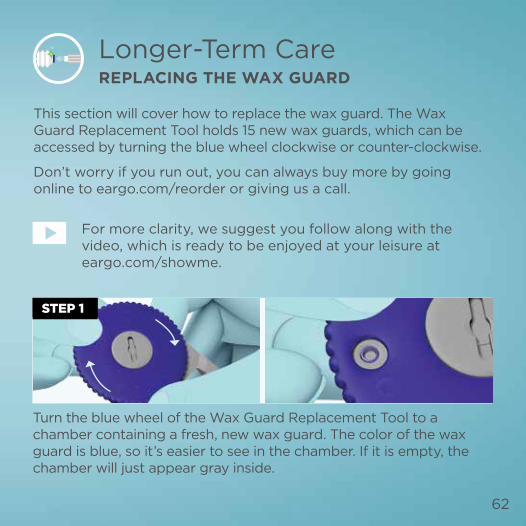
Longer-Term CareREPLACING THE WAX GUARD
Turn the blue wheel of the Wax Guard Replacement Tool to a chamber containing a fresh, new wax guard. The color of the wax guard is blue, so it’s easier to see in the chamber. If it is empty, the chamber will just appear gray inside.
STEP 2STEP 1
This section will cover how to replace the wax guard. The Wax Guard Replacement Tool holds 15 new wax guards, which can be accessed by turning the blue wheel clockwise or counter-clockwise.
Don’t worry if you run out, you can always buy more by going online to eargo.com/reorder or giving us a call.
For more clarity, we suggest you follow along with the video, which is ready to be enjoyed at your leisure at eargo.com/showme.

63
Push the Changing Tool’s plastic end firmly into the center of the blue wax guard to grab onto it. Once the wax guard feels engaged, pull it out.
STEP 3
You know how we used the metal end of the tool when we took the wax guard out? Well, now it’s time for the plastic side to shine.
STEP 2
USE THE PLASTIC END TO REPLACE WAX GUARDS
Grasp the body of the Eargo device between your thumb and
STEP 4

64
STEP 5
Once the wax guard is in line and flush with the nose of the device, pull the Changing Tool away. The wax guard will disengage and stay in place. Please take the time to ensure that the wax guard is correctly inserted.
Too far out - Push in furtherINCORRECTCORRECT
index finger. With your other hand gently insert the Changing Tool (with the clean wax guard engaged) as straight as you can into the open nose of the device.
Once again, the key word here is gently. Don’t push too hard or you might risk damaging the nose of the device and that’s the business end.
Too far in - Pull out slightlyINCORRECT
65
Share the Love! SAMPLE PACKS ARE FOR FRIENDS
Don’t keep the ease and comfort of Eargo devices all to yourself.
We’ll gladly send your friends a free fit and feel sample. Eargo samples aren’t packed with our powerful sound (that is to say they are non-working samples), but, your friends will still be able to experience the comfort and virtual invisibility of Eargo for themselves.
You can share the love with your friends by giving them one of the Refer a Friend cards from this box or they can order a sample pack at eargo.com or by calling 1-800-61-EARGO (1-800-613-2746). If any of them purchase Eargo devices, they’ll probably give you a big hug.

66

67
ISSUE POSSIBLE CAUSE SOLUTIONS
Poor sound quality • Low battery• Wax or debris buildup• Incorrect insertion in the ear• Change in hearing loss• Not set to correct program
• Charge your Eargo devices • Clean with dry cloth and cleaning brush• Adjust sound profile• Replace Flexi Fibers or internal wax guards• Adjust the device in the ear or remove and re-insert
the device
Eargo devices don’t charge
• Eargo devices not placed correctly in charger
• Charger discharged
• Remove and reposition Eargo devices correctly in charger signaled by the lights changing from blue to white
• Charge charger using USB cord and USB plug
No LEDs showing on charger
• Did not take the lid off• Charger discharged
• Take the lid off• Charge charger using USB cord and USB plug
No sound • Dead battery• Wax or debris is blocking
the speaker or microphone
• Charge your Eargo devices• Clean Flexi Fiber tip and microphone with brush • Replace Flexi Fibers or internal wax guards
Different volume in left and right ear
• Not set to correct program• Hearing loss different between ears
• Cycle through SPs on one ear until volume matches in both
Troubleshooting Guide

68
ISSUE POSSIBLE CAUSE SOLUTIONS
Poor sound quality • Low battery• Wax or debris buildup• Incorrect insertion in the ear• Change in hearing loss• Not set to correct program
• Charge your Eargo devices • Clean with dry cloth and cleaning brush• Adjust sound profile• Replace Flexi Fibers or internal wax guards• Adjust the device in the ear or remove and re-insert
the device
Eargo devices don’t charge
• Eargo devices not placed correctly in charger
• Charger discharged
• Remove and reposition Eargo devices correctly in charger signaled by the lights changing from blue to white
• Charge charger using USB cord and USB plug
No LEDs showing on charger
• Did not take the lid off• Charger discharged
• Take the lid off• Charge charger using USB cord and USB plug
No sound • Dead battery• Wax or debris is blocking
the speaker or microphone
• Charge your Eargo devices• Clean Flexi Fiber tip and microphone with brush • Replace Flexi Fibers or internal wax guards
Different volume in left and right ear
• Not set to correct program• Hearing loss different between ears
• Cycle through SPs on one ear until volume matches in both

69
Troubleshooting GuideISSUE POSSIBLE CAUSE SOLUTIONS
Not turning off • Not in charger • Place devices in charger to automatically turn them off
Flexi Fibers remain in your ear when removing the Eargo device
• Flexi Fibers not attached securely • Have the Flexi Fibers removed from your ear by a healthcare professional
Can’t get Flexi Fibers off of Eargo device for replacement
• Pulling Flexi Fibers straight back • Grab at the bottom of the Flexi Fibers and pull it out and up (see page 52)
Device is uncomfortable - too tight or loose
• Flexi Fibers are too large or too small
• Try a different size Flexi Fiber (see page 27 for instructions)

70
ISSUE POSSIBLE CAUSE SOLUTIONS
Not turning off • Not in charger • Place devices in charger to automatically turn them off
Flexi Fibers remain in your ear when removing the Eargo device
• Flexi Fibers not attached securely • Have the Flexi Fibers removed from your ear by a healthcare professional
Can’t get Flexi Fibers off of Eargo device for replacement
• Pulling Flexi Fibers straight back • Grab at the bottom of the Flexi Fibers and pull it out and up (see page 52)
Device is uncomfortable - too tight or loose
• Flexi Fibers are too large or too small
• Try a different size Flexi Fiber (see page 27 for instructions)

71
SupportHAVE QUESTIONS?
If your Eargo devices begin to have any issues, please consult the troubleshooting guide on the previous pages.
Have questions? We have answers and are ready to help. Just give us a call at 1-800-261-0702.
GuaranteeHAPPINESS GUARANTEED
If you’re not happy with your Eargo devices, return them within 45 days for a full refund. Call us at 1-800-261-0702 and we’ll tell you how.
But, don’t be surprised if we sound sad. We hate to see you go.

72
WELL, THAT’S IT!
You’ve made it to the end. Bravo! Now get out there and start hearing life to the fullest
73
AppendixStorage:Store in dry place, away from direct sunlight, or heat to avoid extreme temps. Keep out of reach of pets and children.
Temperature Limits:Eargo devices are designed for use from 5°C to 45°C (41°F to 113°F). Eargo devices can be stored from -20°C to 50°C (-4°F to 122°F). Do not use or store your devices outside of these ranges respectively. Battery Warnings: Eargo devices contain batteries which are dangerous if swallowed. To help prevent accidental ingestion of batteries:- Keep out of reach of children and pets- Check your medications before taking them – batteries have been
mistaken for pills- Never put batteries in your mouth, as they can easily be swallowed NATIONAL BUTTON BATTERY INGESTION HOTLINE: 202-625-3333. As with many batteries, Eargo device batteries have a risk of leakage. Periodically check Eargo devices for any signs of leakage (visible white residue). If you see such residue or suspect battery leakage for

74
any other reason, immediately discontinue use and contact Eargo immediately. If you suspect you have touched any battery fluid or residue, wash your hands thoroughly. Waste Disposal: Waste from electronic equipment must be handled according to local regulations.
Power Supply Specification:- Input: 100-240V ~ 50/60 Hz, 200mA max current- Output: 5.0V … 1100mA

75
Output saturation (90 dB SPL input)
Max 107 dB SPL
HFA 106
Full-on gain (50 dB SPL input)
HFA
26
dB
Reference test gain (60 dB SPL input)
Max 31 dB
HFA 26 Frequency range <200~7550 Hz
Attack and release times
BASIC attack
BASIC release
FAST attack
FAST release
REACHrelease
400 msec 15,000 msec 3 msec 100 msec 600 msec
2cc Coupler Data
Technical DataANSI S3.22-2014
Frequency Response Curve (2cc)
Frequency (Hz)
OS
PL9
0 (
dB
SP
L)
RTG
60
(d
B)
Input/Output (2cc, 2kHz)
Input (dB SPL)
Out
put
(d
B S
PL)
100
95
90
85
80
75
70
65
60
40 50 60 70 80 90

76
Measurements presented are without Flexi Fibers installed, in compliance with ANSI S3.22-2014.
Output saturation (90 dB SPL input)
Max 120 dB SPL
HFA 120
Full-on gain (50 dB SPL input)
HFA
41
dB
Reference test gain (60 dB SPL input)
Max 46 dB
HFA 41 Frequency range <200~7550 Hz
Total harmonic distortion
500 Hz 2 % 800 Hz 2
1600 Hz 1 Equivalent input noise (Noise Reduction OFF)
33
dB SPL
Current drain (test mode) Battery 0.9 mA
Idle 0.8
.4cc Ear Simulator Data Coupler Independent Specifications
Frequency Response Curve (.4cc Ear Simulator)
Frequency (Hz)
OS
PL9
0 (
dB
SP
L)
RTG
60
(d
B)

77
Compliance Information
This device complies with FCC Part 15 and 18 of the FCC Rules
This equipment has been tested and found to comply with the limits for a Class B digital device, pursuant to part 15 of the FCC Rules. These limits are designed to provide reasonable protection against harmful interference in a residential installation. This equipment generates, uses and can radiate radio frequency energy and, if not installed and used in accordance with the instructions, may cause harmful interference to radio communications. However, there is no guarantee that interference will not occur in a particular installation. If this equipment does cause harmful interference to radio or television reception, which can be determined by turning the equipment off and on, the user is encouraged to try to correct the interference by one or more of the following measures:
- Reorient or relocate the receiving antenna.
- Increase the separation between the equipment and receiver.
- Connect the equipment into an outlet on a circuit different from that to which the receiver is connected.
- Consult the dealer or an experienced radio/TV technician for help.

78
NOTES

79
Warning/Caution: Important information for injury prevention, handling and product safety.
Contains electronics, dispose according to local regulations or return to Eargo.
Product adheres to requirements of Type B applied part.
TEMP: Use between 5°C to 45°C (41°F to 113°F).
TEMP: Store between -20°C to 50°C (-4°F to 122°F).
Relative humidity: Store between 0% to 90% relative humidity.
Atmospheric pressure should be 600 hPa to 1000 hPa.
Do not use if package is damaged.
Single use only.
Information and Explanation of Symbols
Consult instructions for use.

80
Keep away from sunlight.
Keep dry.
Manufacturer.
Date of manufacture.
Catalogue number.
Serial number.

81
General Warnings - Only use medical grade (IEC 60601-1) or ITE approved (UL 60950) power supply.
- Hearing aid and accessories contain small parts which can be swallowed. Keep small parts out of reach of children due to choking hazard.
- Electrical equipment are an ignition source. Do not use hearing aids, or charger in an oxygen enriched environment.
- Hearing aid may impair remaining hearing. Only use as prescribed by your hearing care professional.
- Hearing aid must only be used by intended person. Use by another person may damage their hearing.
- Do not use an instrument, such as a cotton swab, to push the hearing aid in the ear canal. The hearing aid may be placed too deep and cause damage to the ear.
- Do not place charger in clothing pocket while charging with the micro USB cord. The charger may overheat and malfunction.
- Users with active implants such as a pacemaker should keep hearing aid, and charger away from the active implant.
- Do not use hearing aid during X-rays, MRIs, CT scans or other similar medical treatment to prevent damage to the hearing instrument.

82
- Do not wear the hearing aids in mines or other explosive areas, unless those areas are certified for hearing aid use.
- Check for electronic or wireless restrictions prior to using hearing aid, or charger to prevent electrical interference to nearby equipment.
- Do not expose hearing aid to contaminants such as hair spray, mousse, gel, lotions, etc. to prevent damage to the hearing aid.
- Avoid exposure to water or long term exposure to moisture to prevent damage to hearing aid and charger.
- Do not dry hearing aid with a hairdryer. Heat may damage hearing aid.
- Only clean hearing aid with brush and dry cloth. Be careful to prevent any damage to the hearing aid.
- To prevent damage and/or malfunction, do not modify hearing aid, charger, or accessories.
- Do not replace battery.

83
Warranty & RepairCATEGORY
Trial Period withMoney BackGuarantee
Eargo grants you a forty five (45) day trial period with money back guarantee valid from the date of delivery. Within this 45 day period, you can return your Eargo devices for a full refund. Devices need to be postmarked for return to Eargo within 45 days after the date of delivery.
Warranty period Eargo offers you a one (1) year limited warranty valid starting from the date of delivery.
REPAIR
What your warranty covers…
This limited warranty covers defects in material and workmanship for the Eargo hearing system, which includes the hearing devices, internal components, charger, cord and plug, within the limited warranty period listed below. This warranty is guaranteed by Eargo, Inc.
What you get with your repair?
For valid repairs, Eargo pledges to secure functionality at least equivalent to the original hearing device. At the discretion of Eargo, hearing devices may be replaced by new products or products manufactured from new or serviceable used parts or repaired using new or refurbished replacement parts.
Exclusions from warranty repair coverage
• Devices purchased from unauthorized distributors are not covered by this or any other Eargo warranty.
• Damage from improper handling or care, exposure to chemicals, immersion in water or undue stress.
• Damage caused by third parties or non-authorized service centers renders this warranty null and void.

84
CATEGORY
Trial Period withMoney BackGuarantee
Eargo grants you a forty five (45) day trial period with money back guarantee valid from the date of delivery. Within this 45 day period, you can return your Eargo devices for a full refund. Devices need to be postmarked for return to Eargo within 45 days after the date of delivery.
Warranty period Eargo offers you a one (1) year limited warranty valid starting from the date of delivery.
REPAIR
What your warranty covers…
This limited warranty covers defects in material and workmanship for the Eargo hearing system, which includes the hearing devices, internal components, charger, cord and plug, within the limited warranty period listed below. This warranty is guaranteed by Eargo, Inc.
What you get with your repair?
For valid repairs, Eargo pledges to secure functionality at least equivalent to the original hearing device. At the discretion of Eargo, hearing devices may be replaced by new products or products manufactured from new or serviceable used parts or repaired using new or refurbished replacement parts.
Exclusions from warranty repair coverage
• Devices purchased from unauthorized distributors are not covered by this or any other Eargo warranty.
• Damage from improper handling or care, exposure to chemicals, immersion in water or undue stress.
• Damage caused by third parties or non-authorized service centers renders this warranty null and void.
Number of repairs Unlimited during warranty period for repairs covered by warranty terms.
LOSS AND DAMAGE
Loss & Damage
Eargo offers a one time (1x) replacement for each device that is lost or damaged during the warranty period, for a fee (stated and updated at eargo.com/warranty). Devices damaged from improper use or care will not be replaced.
How to submit request for repair Call 1-800-261-0702 and we will be happy to assist.

85
How to submit request for repair: Call 1-800-261-0702 and we will be happy to assist.
Eargo, Inc.295 North Bernardo Ave., Suite 100Mountain View, CA 94043
Serial Number

86
Our Commitment to Your SatisfactionWe hope you love your Eargo devices, but if you’re not satisfied and you’re within the 45 day trial period, you can return your Eargo system for a full refund. To ensure your return is processed quickly, please follow the instructions below.
STEP 1Call 1-800-261-0702 to contact our customer service reps who will request a return kit and begin your refund process.
STEP 5Drop off the prepaid return envelope to the carrier indicated on the prepaid return label.
STEP 4Place the box in the shipper envelope. Peel the adhesive strip and close the self-sealing prepaid return envelope.
STEP 3Place all of the Eargo system contents back in the original box. Be sure to include both devices and charger.
STEP 2Pick up your return kit at your mail box and open it. Remove the shipping envelope with prepaid return label.

“Eargo” and “Eargo Plus” are registered trademarks of Eargo, Inc. The Eargo and Eargo Plus
wordmarks as well as the Eargo Logo are trademarks of Eargo, Inc. ©2017 Eargo, Inc.
User Guide LBL0077 Rev C 03/17
Support: 1-800-261-0702 www.EARGO.com
This is a new product, not used or refurbished.