eda and physical activity sensor user manual ......3 2 2 scope of application the edamove 3 detects...
TRANSCRIPT

User Manual
EdaMove 3
EDA and Physical Activity Sensor
Bedienungsaneitung

Imprint
EdaMove 3 User Manual
Version: 13.03.2018
The newest version of the User Manual can be found here:
https://www.movisens.com/wp-
content/downloads/EdaMove3_User_Manual.pdf
Frequently asked questions:
https://www.movisens.com/en/faq/
movisens GmbH
Augartenstraße 1
76137 Karlsruhe
Germany
Phone: +49 721 381344-0
Fax: +49 721 381344-90


Contents
1 Welcome! .......................................................................................................1
2 Scope of Application .................................................................................3
3 Instructions of Use .....................................................................................7
4 Scope of Delivery and Accessories ......................................................9
4.1 Scope of Delivery.................................................................................................... 9
4.2 Accessories ............................................................................................................. 10
4.3 Complementary Products ................................................................................ 11
4.4 Complete Measurement System................................................................... 12
5 Description of the Sensor ..................................................................... 14
6 Software Installation ............................................................................... 17
6.1 System Requirements ........................................................................................ 17
6.2 Installing the Software ...................................................................................... 18
6.3 Updating the Software ...................................................................................... 20
6.4 Updating the Sensor Firmware ...................................................................... 20
6.5 Uninstalling the Software ................................................................................. 21
7 Handling ..................................................................................................... 23
7.1 Charging the Sensor .......................................................................................... 26
7.2 Preparing a Measurement ............................................................................... 29
7.3 Starting a Measurement ................................................................................... 30
7.4 Attaching the Sensor to the Test Person ................................................... 32
7.5 Stopping a Measurement ................................................................................ 35
7.6 Storing Measurement Data ............................................................................. 36
7.7 Viewing Measurement Data ........................................................................... 41
7.8 Analyzing Data ..................................................................................................... 44

8 Maintenance and Proper Disposal .................................................... 47
8.1 Maintenance .......................................................................................................... 47
8.2 Cleaning Instructions ......................................................................................... 47
8.3 Cleaning the electrodes .................................................................................... 47
8.4 Cleaning of Wrist Bands ................................................................................... 47
8.5 Proper Disposal .................................................................................................... 48
8.6 Troubleshooting .................................................................................................. 48
9 Technical Data .......................................................................................... 50
10 Legal Notes ................................................................................................ 53
10.1 Copyright ................................................................................................................ 53
10.2 Disclaimer ............................................................................................................... 53
10.3 Trademarks ............................................................................................................ 53


1
1 1 Welcome!
Dear customer,
Thank you for choosing the EDA (electrodermal activity) and
physical activity sensor EdaMove 3 from movisens. This sensor
provides researchers the latest technology for the mobile
monitoring of psycho-physiological parameters in everyday life.
Please read this manual completely and thoroughly before
bringing the measurement system into service! In this manual
you will find the relevant information about using and
maintaining the measurement system as well as for solutions for
common problems.
If you have any further questions, don’t hesitate to call us. It is
our pleasure to help you:
Phone: +49 721 381344-0
E-Mail: [email protected]

3
2
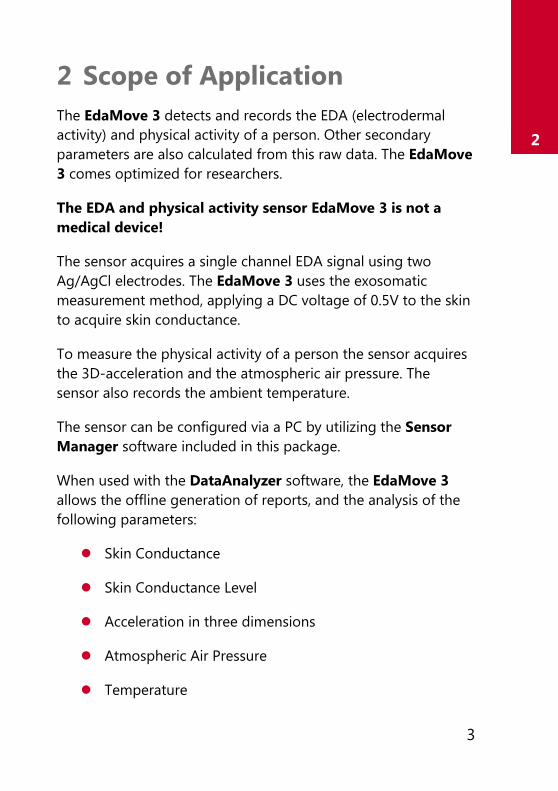
2 Scope of Application
The EdaMove 3 detects and records the EDA (electrodermal
activity) and physical activity of a person. Other secondary
parameters are also calculated from this raw data. The EdaMove
3 comes optimized for researchers.
The EDA and physical activity sensor EdaMove 3 is not a
medical device!
The sensor acquires a single channel EDA signal using two
Ag/AgCl electrodes. The EdaMove 3 uses the exosomatic
measurement method, applying a DC voltage of 0.5V to the skin
to acquire skin conductance.
To measure the physical activity of a person the sensor acquires
the 3D-acceleration and the atmospheric air pressure. The
sensor also records the ambient temperature.
The sensor can be configured via a PC by utilizing the Sensor
Manager software included in this package.
When used with the DataAnalyzer software, the EdaMove 3
allows the offline generation of reports, and the analysis of the
following parameters:
Skin Conductance
Skin Conductance Level
Acceleration in three dimensions
Atmospheric Air Pressure
Temperature

Movement Acceleration
Acceleration along the body axis
Inclination of body axes
Steps
Activity Classes
Body Position
Altitude
Activity Energy Expenditure
Total energy expenditure
Metabolic Equivalent of Task (MET)
Energy expenditure summary
Physical activity report
Physical activity and energy expenditure report
In addition to long term data recording and offline processing;
the EdaMove 3 can transmit a live analysis of EDA data and
physical activity parameters via Bluetooth Smart. When
connected to the Sensor Trigger application, changes in these
parameters can trigger questionnaires on the experience
sampling platform movisensXS.
Algorithms can be implemented to identify specific physiological
changes, allowing researchers to accurately capture answers and
to track very specific variables via interactive ambulatory
assessment studies.

5
2
The following parameters are measured and calculated on the
sensor in 1 minute epochs, and then transmitted via a Bluetooth
Smart interface:
EDA SCL mean 1/30 Hz
Temp mean 1/30 Hz
Movement Acceleration 1/30 Hz
Step Count
Step count 1/30 Hz
charging 1/10 Hz (whether the device is being charged)
State of charge 1/60 Hz (the current battery level)
These values are transmitted with 1 value per minute. Additional
live parameters will be available soon.
Tip:
movisens can calculate other
parameters from raw data upon
request.

7
3
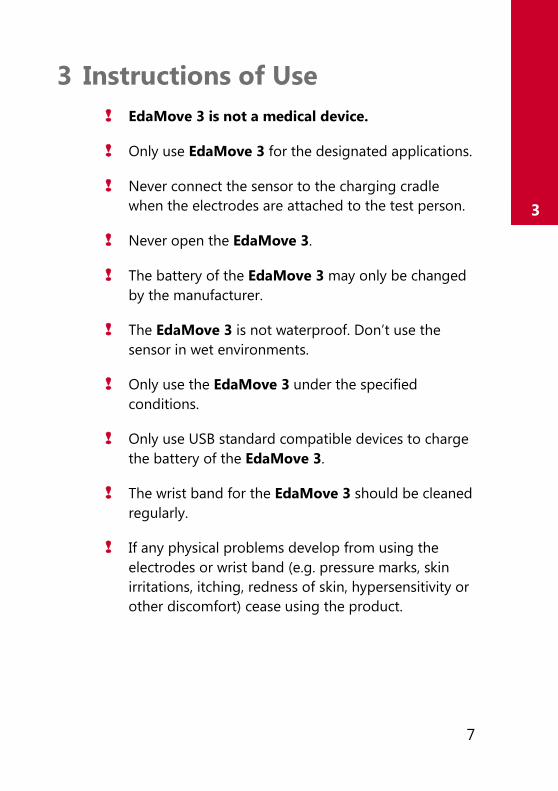
3 Instructions of Use
! EdaMove 3 is not a medical device.
! Only use EdaMove 3 for the designated applications.
! Never connect the sensor to the charging cradle
when the electrodes are attached to the test person.
! Never open the EdaMove 3.
! The battery of the EdaMove 3 may only be changed
by the manufacturer.
! The EdaMove 3 is not waterproof. Don’t use the
sensor in wet environments.
! Only use the EdaMove 3 under the specified
conditions.
! Only use USB standard compatible devices to charge
the battery of the EdaMove 3.
! The wrist band for the EdaMove 3 should be cleaned
regularly.
! If any physical problems develop from using the
electrodes or wrist band (e.g. pressure marks, skin
irritations, itching, redness of skin, hypersensitivity or
other discomfort) cease using the product.

9
4
4 Scope of Delivery and
Accessories
In this chapter, you’ll learn which parts come with the EdaMove
3, and what accessories are available. All of these parts can be
reordered as required. Please note the order numbers in the
following table to ensure the appropriate product is shipped.
Note: A PC is also required to perform measurements in addition
to the scope of delivery.
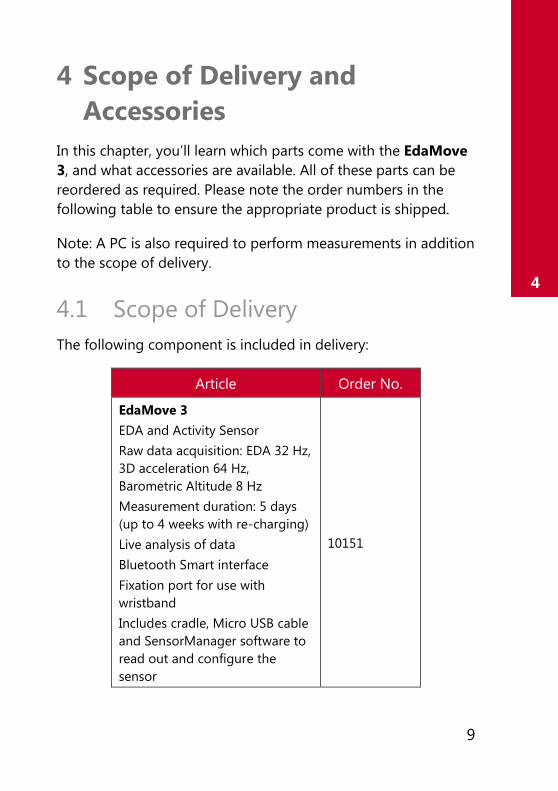
4.1 Scope of Delivery
The following component is included in delivery:
Article Order No.
EdaMove 3
EDA and Activity Sensor
Raw data acquisition: EDA 32 Hz,
3D acceleration 64 Hz,
Barometric Altitude 8 Hz
Measurement duration: 5 days
(up to 4 weeks with re-charging)
Live analysis of data
Bluetooth Smart interface
Fixation port for use with
wristband
Includes cradle, Micro USB cable
and SensorManager software to
read out and configure the
sensor
10151

10
4.2 Accessories
The following accessories can be ordered optionally:
Article Order No.
Wrist Band Move 3 (S)
Size: S
Wrist Measurement: 13 to 16 cm
10129
Wrist Band Move 3 (M)
Size: M
Wrist Measurement: 15 to 18 cm
10130
Wrist Band Move 3 (L)
Size: L
Wrist Measurement: 17 to 23 cm
10131
Wrist Band Move 3 (XL)
Size: XL
Wrist Measurement: 20 to 28 cm
10132
USB Charger
USB Charger for 110-240V 30100
USB Hub
USB Hub 2.0, 7 Ports 30101
Micro USB Cable 30102
Cradle
Cradle with Micro USB interface 30110
EDA Gel for Electrodes 40101
Adhesive Rings for EDA
Electrodes 40102
11
4
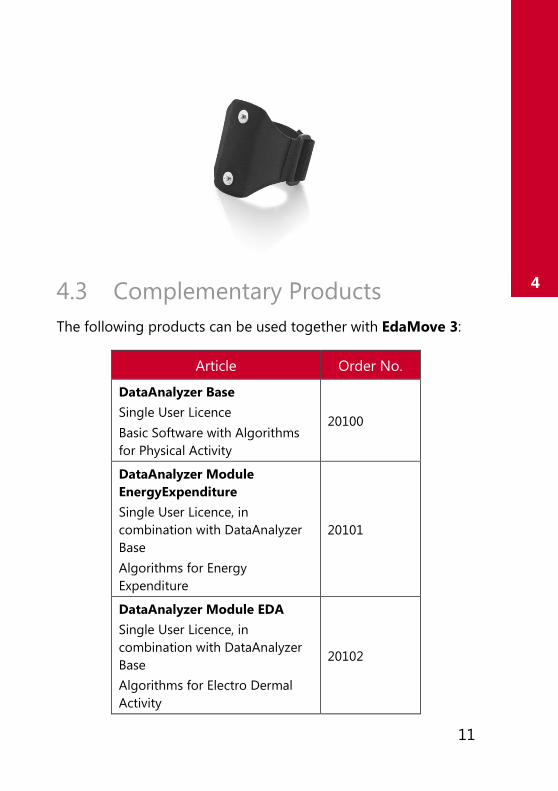
4.3 Complementary Products
The following products can be used together with EdaMove 3:
Article Order No.
DataAnalyzer Base
Single User Licence
Basic Software with Algorithms
for Physical Activity
20100
DataAnalyzer Module
EnergyExpenditure
Single User Licence, in
combination with DataAnalyzer
Base
Algorithms for Energy
Expenditure
20101
DataAnalyzer Module EDA
Single User Licence, in
combination with DataAnalyzer
Base
Algorithms for Electro Dermal
Activity
20102

12
movisensXS Basic
Experience Sampling for Android
Bundle license for 10.000 item
results usable with unlimited
number of smartphones
20110
movisensXS Gold
Experience Sampling for Android
Bundle license for 100.000 item
results usable with unlimited
number of smartphones
20111
movisensXS Platinum
Experience Sampling for Android
Bundle license for 1.000.000 item
results usable with unlimited
number of smartphones
20112
Sensor Trigger
Solution for Interactive
Ambulatory Assessment
to retrieve the sensor data on
your android device and trigger
forms in movisensXS.
20120
4.4 Complete Measurement System
Through a combination of the following components you can
measure and analyze EDA and physical activity data:
An EdaMove 3 sensor for the objective assessment and
recording of the electrodermal and physical activity

13
4
The movisens SensorManager software to configure and
transfer data from the sensor
The UnisensViewer for the visualization and
preprocessing of the sensor data and calculated results
The movisens DataAnalyzer software to analyze and
calculate outcome parameters, create reports, and
process the captured data
The experience sampling platform movisensXS (for
interactive ambulatory assessment)
The SensorTrigger application allows the EdaMove 3 to
transmit various parameters to an Android smartphone.
The application evaluates these parameters with
predefined and configurable algorithms and triggers
forms in movisensXS.
A detailed description of these components can be found in the
following documents:
Online help for UnisensViewer
DataAnalyzer User Manual
Online help movisensXS
Sensor Trigger User Manual

14
5 Description of the Sensor
The EdaMove 3 is a mobile sensor that measures electrodermal
(EDA) and physical activity. The EDA signal is assessed by an
exosomatic measurement with DC (direct current), using a
constant voltage system supplying 0.5 Vdc.
The measurable bandwidth for EDA signals in the literature is
from 0 to 5Hz when a DC voltage is applied to the skin. The
EdaMove 3 uses a sample rate of 32 Hz, to achieve an ideal
tradeoff between exact determination of skin conductance
reaction timing and preserving memory and battery.
The EdaMove 3 comes equipped with reusable, non-polarizing
sintered Ag/AgCl electrodes recessed in cylindrical plastic cases
for high quality recordings. The electrode disc diameter of 10
mm, results in an effective electrode area of 78.5 mm². The
electrode size should be noted in publications.
There are two attachment points for the sensor electrodes –
either the palm or the ankle. The attachment process for the
hand is detailed in chapter 7.4. The same principles apply when
the sensor needs to be attached to the ankle.

15
5
The EdaMove 3 utilizes a Bluetooth Smart interface to allow the
sensor to connect with a gateway or a mobile phone for live
applications. The Bluetooth Smart interface comes activated in
the default configuration of the sensor. If this feature is not
required, it can be deactivated by installing a different firmware.
(See 6.4)
A cradle with a micro USB interface comes included in the
delivery. To connect the sensor to a PC, you have to remove the
sensor and the electrodes from the test person and connect it to
the cradle.
The axes of the integrated acceleration sensor are described in
the following figure:
EdaMove 3 is equipped with a multi-colored LED to show the
status of the sensor:
Status-LED Meaning

16
Flashing red (once
per second)
The sensor is active and records
data
Flashing red
slowly (every two
seconds)
Delayed recording active
Flashing green
The sensor is connected to a PC or
a charger. The battery is fully
charged.
Flashing blue The sensor is connected to a PC or
a charger. The battery is charging.
Flashing magenta
The sensor is active and records
data. It is connected to a charger
and charging
Flashing yellow
The sensor is active, records data. It
is connected to a charger. The
battery is fully charged.
Flashing blue fast
(three times per
second)
The battery level is low, the sensor
will turn off soon.
Flashing red fast
(three times per
second)
An error occurred. Reset sensor (see
8.6). If the sensor doesn’t stop
flashing, please contact the
manufacturer.
No LED active The sensor is inactive.
Combinations of red and green blinking as well as red and blue
blinking are possible with the appropriate combination of the
above descriptions.
EdaMove 3 will vibrate upon Bluetooth disconnection.

17
6
6 Software Installation
6.1 System Requirements
Before installing the software, please check that the following
system requirements are fulfilled.
PC with one of the following Versions of Microsoft
Windows: Windows 7, Windows 8, Windows 8.1,
Windows 10
USB 2.0 or USB 3.0 interface
Administrator rights during installation
A minimum of 300 MB free space on hard disc
The included software consists of two programs:
SensorManager: A program that allows you to configure
the sensor, to start a measurement and to extract the
data from the sensor.
UnisensViewer: A program to view and edit the
recorded data.
Option:
The sensor trigger app and cloud based experience sampling
program movisensXS can also be utilized in addition to the
analysis software. This can provide further complementary
research data (see 0):
DataAnalyzer: A program that can generate detailed
reports and analyze the data collected by the sensor.

18
movisensXS: Experience sampling /Ecological
Momentary Assessment platform.
Sensor Trigger: android sensor trigger app that can
evaluate the analyzed data transmitted via a Bluetooth
smart interface.
6.2 Installing the Software
Please ensure that your PC fulfills the requirements described
above.
Step 1: Plug the USB drive into the USB port of your PC. The
content of the medium will be shown.
! If the window does not open automatically, select the
appropriate drive from the window “My computer”.
Step 2: Double click the file
“movisens_SensorManager_Setup.exe “
✓ The Installation runs automatically in the background. After a
successful installation, shortcuts are created in the Windows
Start Menu under the entry “movisens SensorManager”.
The following chapters detail how to use the software.
Step 3: Double click the file “UnisensViewer_Setup_Full.exe“
19
6
✓ The Installation runs automatically in the background. After a
successful installation a shortcut “UnisensViewer” is created
in the Windows Start Menu.

20
Option:
If you ordered a licence for the DataAnalyzer software package,
please follow the next step. The DataAnalyzer User Manual
explains how to use the application in detail.
Step 4: Double click the file “DataAnalyzer_Setup_Full.exe“
✓ The Installation runs automatically in the background. After a
successful installation a shortcut “movisens DataAnalyzer” is
created in the Windows Start Menu.
The use of the different programs is explained in the
DataAnalyzer User Manual.
6.3 Updating the Software
You need an internet connection to update the software. Select
Windows Start Menu movisens SensorManager Updater
If a new version is available, it will be downloaded and installed
automatically after starting the updater software.
6.4 Updating the Sensor Firmware
If the SensorManager contains a sensor firmware version that is
newer than the firmware on the sensor, an option to “Update
sensor” is displayed.
Step 1: Check that the sensor is charged.

21
6
Step 2: Start the update by clicking the “Update sensor” button.
! Never unplug the sensor during firmware update or
interrupt the firmware update process.
Special firmware versions can be installed to change the default
configuration of the sensor, allowing customized applications or
to deactivate the Bluetooth interface in order to extend battery
life. These firmware versions are available upon request from
movisens.
To install the new firmware, please start
Windows Start Menu movisens SensorManager Firmware
Updater
You can now select the new firmware and start the update.
6.5 Uninstalling the Software
The software can be uninstalled using the Windows Control
Panel.


23
7
7 Handling
This chapter describes how to prepare a measurement and how
to attach the sensor to a test person. Furthermore you get
information on how to save, delete and analyze data from the
sensor.
A typical usage scenario for the assessment of data and offline
analysis is shown in the following diagram. The relevant software
for each step is indicated on the left side of the diagram.

24
The different steps are described in further detail in the chapters
indicated on the right of the diagram.
If you want to use the sensor in combination with the experience
sampling platform movisensXS, the different steps to use the
sensor are shown in the following figure. Unlike the offline
measurement, the measurement is initiated on your mobile
device.
The right side of the diagram illustrates the process to prepare
and run a study on movisensXS.

25
7
To retrieve the data from the EdaMove 3, you have to read out
the sensor after the measurement. The results of movisensXS
only contain the sensor information that causes a trigger.
26
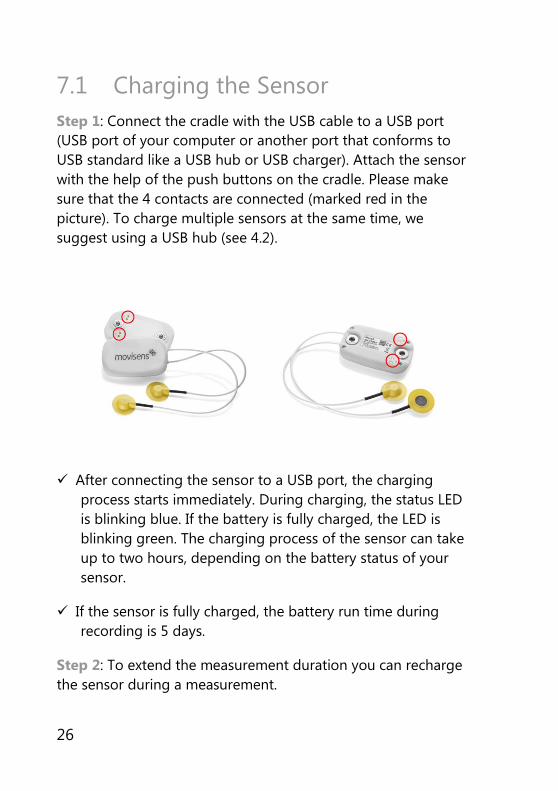
7.1 Charging the Sensor
Step 1: Connect the cradle with the USB cable to a USB port
(USB port of your computer or another port that conforms to
USB standard like a USB hub or USB charger). Attach the sensor
with the help of the push buttons on the cradle. Please make
sure that the 4 contacts are connected (marked red in the
picture). To charge multiple sensors at the same time, we
suggest using a USB hub (see 4.2).
✓ After connecting the sensor to a USB port, the charging
process starts immediately. During charging, the status LED
is blinking blue. If the battery is fully charged, the LED is
blinking green. The charging process of the sensor can take
up to two hours, depending on the battery status of your
sensor.
✓ If the sensor is fully charged, the battery run time during
recording is 5 days.
Step 2: To extend the measurement duration you can recharge
the sensor during a measurement.

27
7
! If you want to recharge the sensor, you first have to
remove the electrodes from the test person.
! If recharging while taking a measurement DO NOT to
plug it into your PC as that will stop the
measurement. Instead use a USB charger.
When recharging the sensor you have to ensure that the battery
is fully charged (until the sensor is blinking yellow).
! To be sure that the sensor is not running out of
battery, you must advise the test persons to recharge
the sensor every day until it is blinking yellow. The
recommended duration for daily recharging is 15
minutes.
If you recharge the sensor regularly you can make a
measurement up to the 1 month recording capacity of the
sensor.
If the sensor runs out of battery during a long measurement, the
recording will be stopped. The recording will not continue, even
if you connect it to a charger.
Tip:
If the sensor should be recharged by
the test person, you can define a
regular time (e.g. during the night or
during taking a shower in the morning)
when they can plug the sensor to a
USB charger.

28
If the sensor is discharged completely (e.g. after a long period
where it was not used), it can take up to several minutes until the
sensor reacts and can be identified by the computer.
You can check the battery status before the measurement with
the sensor manager, see the following section.

29
7
7.2 Preparing a Measurement
Before conducting a measurement please make sure you
installed the software as described in chapter 6.2.
Step 1: Start the SensorManager by selecting
Windows Startmenu movisens SensorManager
SensorManager
✓ SensorManager is now searching for available sensors.
Step 2: Connect EdaMove 3 with your PC using the cradle.
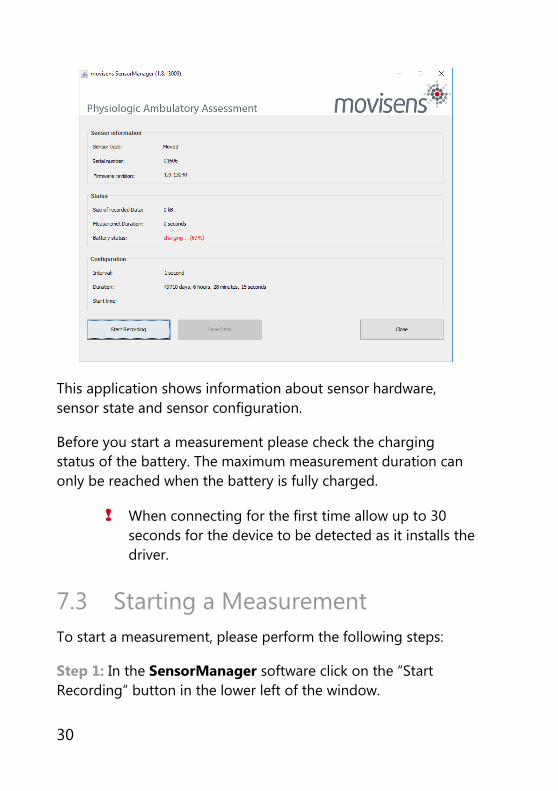
✓ The software will automatically detect the device and open
the following window:
30
This application shows information about sensor hardware,
sensor state and sensor configuration.
Before you start a measurement please check the charging
status of the battery. The maximum measurement duration can
only be reached when the battery is fully charged.
! When connecting for the first time allow up to 30
seconds for the device to be detected as it installs the
driver.
7.3 Starting a Measurement
To start a measurement, please perform the following steps:
Step 1: In the SensorManager software click on the “Start
Recording” button in the lower left of the window.

31
7
✓ You can see the following window:
Step 2: Please supply the following information into the text
fields:
Measurement duration: The maximum measurement
duration of the EdaMove 3 is about 5 days without
recharging the sensor. (see 0)
Start time: You can start the measurement immediately
or delayed at a specific time. If you want to start your
measurement delayed please specify date and time. The
given time should not be more than 2 days from now as
the maximum measurement duration can be influenced.
Step 3: Start the measurement by clicking the “Start” button.
✓ You will see the following window:

32
Step 4: Please follow the instructions and remove the sensor
from the PC.
✓ The status LED will flash red once per second as soon as the
measurement has started and data will be recorded. If a
delayed start was configured the LED flashes red every two
seconds until the measurement starts.
✓ At the end of the measurement the LED stops flashing.
! If you reconnect the sensor after starting a
measurement again with a PC, the measurement will
be stopped prematurely.
! If you connect the sensor to a USB charger, the
measurement won’t be stopped. That means you can
extend the measurement duration by intermittently
charging the sensor during a measurement (see 0).
7.4 Attaching the Sensor to the Test
Person
! Make sure that the sensor is NOT connected to the
cradle when the electrodes are attached to the test
person!

33
7
Step 1: Clean the electrodes, making sure that there are no
traces of old electrode gel and that the surfaces are free from
grease.
Step2: Connect the sensor to the wrist strap and lay the sensor
on a flat surface in front of the test subject. Make sure that the
electrode cables are lying towards the subjects elbow, not the
fingers and ensure that they are separated on either side of the
arm.
Step 3: Bring the electrode cables up and place them in the
hand of the test person. As the test person holds the electrodes
in place, secure the wrist strap over the cables. The strap should
be firm, but not too tight. This helps to keep the cables secure
and prevents them from being caught on any protruding object.
Step 4: Now attach the adhesive rings to the electrodes. Make
sure that the skin of the test person is clean and free from
grease.
Step 5: Fill the electrode with electrode gel, and then use a plain
object to scrape away any excess gel. Now you can remove the
protective foil from the adhesive ring, and place the electrode on
to the skin. Adjust the electrode cables to remove excess slack
34
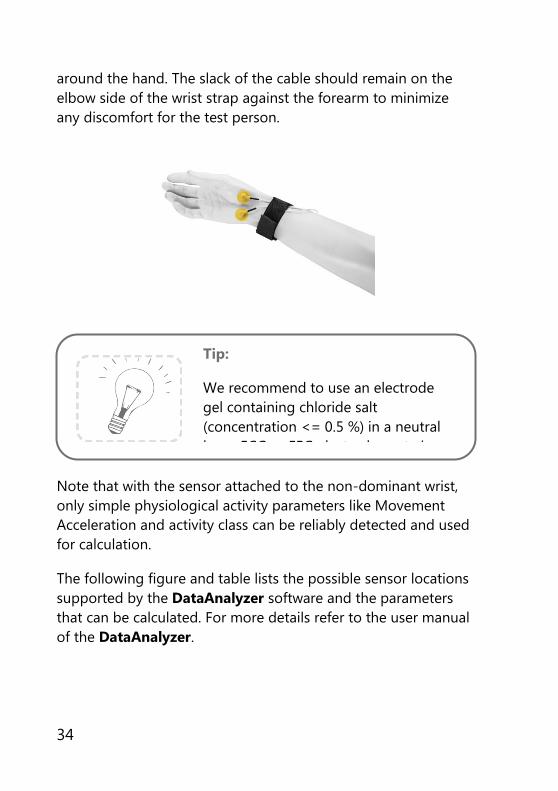
around the hand. The slack of the cable should remain on the
elbow side of the wrist strap against the forearm to minimize
any discomfort for the test person.
Note that with the sensor attached to the non-dominant wrist,
only simple physiological activity parameters like Movement
Acceleration and activity class can be reliably detected and used
for calculation.
The following figure and table lists the possible sensor locations
supported by the DataAnalyzer software and the parameters
that can be calculated. For more details refer to the user manual
of the DataAnalyzer.
Tip:
We recommend to use an electrode
gel containing chloride salt
(concentration <= 0.5 %) in a neutral
base. ECG or EEG electrode paste is

35
7
Sensor
location
Movement
acceleration
Activity
class
Body
position
Energy
expenditure
right, left
wrist ✓ ✓ - (✓)
right, left
ankle ✓ - - -
7.5 Stopping a Measurement
The measurement will automatically be stopped, if the
configured measurement duration has passed.
A running measurement will also be stopped when:
The sensor is connect to a PC

36
The end of the battery run time has been reached
If the battery is low, this is indicated by fast blue flashing (three
times per second). The sensor will then turn off soon.
7.6 Storing Measurement Data
The measurement data of the sensor is stored as raw data (e.g.
the acceleration data as it is measured). The data is not
processed or aggregated neither in the sensor nor in the
SensorManager software. That allows you to have a sustainable
database with all the raw data of your study that can be used
with future studies and with future algorithms.
To store recorded measurement data on the PC do the following
steps:
Step 1: Start the SensorManager by selecting
Windows Start menu movisens SensorManager
SensorManager
Step 2: Remove EdaMove 3 and the electrodes from the test
person and connect it to the PC using the cradle.
✓ After the SensorManager has detected the connected
sensor, the following windows will be shown:

37
7
Step 3: Click on „Save Data“.
✓ You will see the following window:

38
Step 4: Please type in the following information:
Select the base folder, where your measurements should
be stored. To do this, click the button after the text field.
Type in the ID of the measurement. If you want to use
date and time in the ID click the button after the text
input field.
If the measurement data shall be further processed with
the movisens DataAnalyzer the additional information
about the person and the sensor location is mandatory.
Step 5: Finally click on „Save data“
The measurement data will be stored either in the unisens
format or as a .csv file. Unisens is an open data format for multi
sensor data. You can find further information about unisens
here: www.unisens.org
A unisens data set consists of a meta file (unisens.xml) and
different data files for each measurement signal. If you select to
store data in unisens format, the following files will be
generated:

39
7
movementacceleration.bin is the result of the live analysis on the
sensor, the other .bin files are the raw data of the other
measurement parameters.
If you select to store data in .csv format, the following files will
be generated:

40
✓ The software confirms the end of data storing process. The
following window is shown:
Tip:
When storing data as .csv file, you
have to take into account that the size
of the data file doesn’t exceed the
maximum size of the program you
want to use (e.g. Microsoft Excel)
41
7
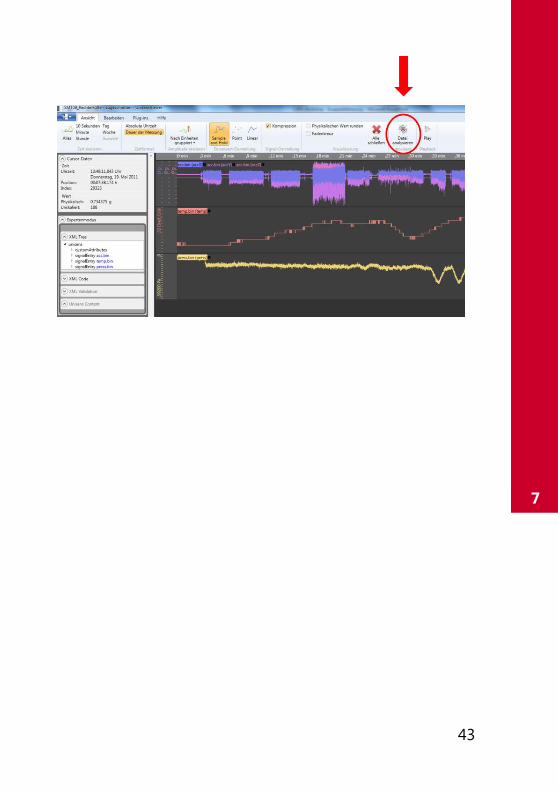
You can now directly show the stored data. The measurement
will be opened in the UnisensViewer. If you have installed the
DataAnalyzer you can directly start data analysis and generate
reports by clicking on “Analyze data”. You can find more
information in the DataAnalyzer User Manual.
7.7 Viewing Measurement Data
To view recorded measurements click on “Show data” directly
after storing the data.
To view previously stored measurements use Windows Explorer
to navigate to your measurements folder and then open the
folder with the desired ID. Then double click on the
“unisens.xml” file. The measurement will then be shown in the
UnisensViewer:
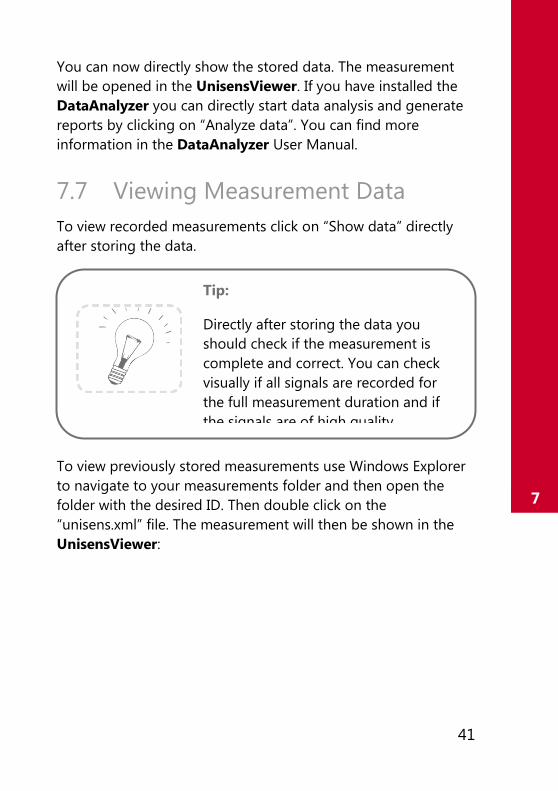
Tip:
Directly after storing the data you
should check if the measurement is
complete and correct. You can check
visually if all signals are recorded for
the full measurement duration and if
the signals are of high quality.

42
A first preprocessing of the data can be done with
UnisensViewer. You can crop your signal to the desired time,
set markers and annotate artefacts. Details can be found in the
online help of UnisensViewer.
You directly start the analysis of the data with DataAnalyzer by
clicking the “Analyze Data” button.
Tip:
Before changing the data of your
study, be sure to have a copy of your
raw data.
43
7

44
7.8 Analyzing Data
Option:
To analyze the data, movisens offers the modular analyzing
software DataAnalyzer. This scientific software package allows
the analysis of physiologic measurement data. Optimized for
movisens sensors, the software can also utilise raw data acquired
from sensors that also record raw data in the unisens format.
DataAnalyzer calculates secondary parameters from your
physiologic measurement data, creating summaries and reports
in just a few clicks. It is also possible to select an entire database
for batch-processing.
Upon selecting a measurement, all possible analysis outputs
(secondary parameters and reports) are shown. The list of
analysis outputs depends on your licensed modules and the

45
7
data contained in your measurement. You can now select the
desired analysis output. If you want to select more than one
analysis output keep the Ctrl-key pressed while selecting.
The results of the analysis are stored as a unisens data set. A
unisens data set consists of a meta file (unisens.xml) and
additional data files for each measurement signal and secondary
parameter. Secondary parameters are stored as a .csv file within
the unisens data set and are available for further processing e.g.
with Microsoft Excel or SPSS
Tip:
can also analyze your raw
data and generate reports according
to your needs. If you have any further
questions, please do not hesitate to
contact us.

47
8
8 Maintenance and Proper
Disposal
8.1 Maintenance
Besides charging the batteries, EdaMove 3 does not need any
further maintenance. The battery capacity will decrease slowly
with charging cycles and age. The battery can only be changed
by movisens. Please contact us in the case when a replacement
is necessary.
8.2 Cleaning Instructions
If you want to clean EdaMove 3, please note the following:
Disconnect the sensor from USB cable and wrist band.
Use a soft slightly moistened cloth.
Take care that no humidity enters the sensor housing.
8.3 Cleaning the electrodes
To clean the electrodes please consider the following:
Don’t touch the electrode area with sharp objects
Use cotton swabs to clean the electrode area and to
remove old electrode gel.
8.4 Cleaning of Wrist Bands
To clean the wrist bands please consider the following:
48
Wash the bands by hand and not in the washing
machine.
Use a mild liquid detergent.
Directly after washing, air -dry the bands before storing
or using it for new measurements.
8.5 Proper Disposal
EdaMove 3 is subject to the EU directive WEEE (Waste Electrical
and Electronic Equipment). Please consider your local
regulations for waste disposal.
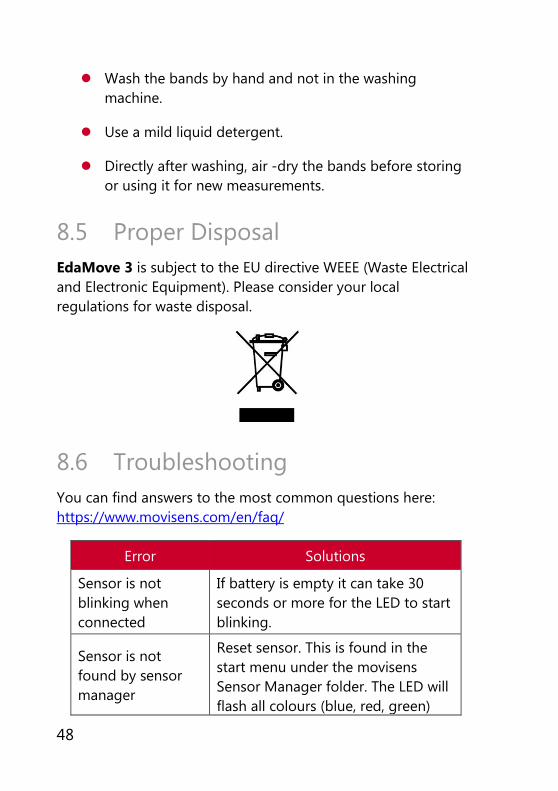
8.6 Troubleshooting
You can find answers to the most common questions here:
https://www.movisens.com/en/faq/
Error Solutions
Sensor is not
blinking when
connected
If battery is empty it can take 30
seconds or more for the LED to start
blinking.
Sensor is not
found by sensor
manager
Reset sensor. This is found in the
start menu under the movisens
Sensor Manager folder. The LED will
flash all colours (blue, red, green)

49
8
when it is reset.
Flashing Red (3
times per second)
An error occurred. Reset sensor. If
the sensor doesn’t stop flashing,
please contact the manufacturer.

50
9 Technical Data
Power supply Lithium-Polymer-Battery
Battery voltage 3,0 – 4,2 V
Number of charging cycles 300 (with 1 C / 1 C > 80%)
Internal Memory 4 GB
Maximum recording capacity 4 weeks
Battery run time (recording) ~ 5 days
Recharging time 1 hour
Size of sensor (W x H x D) 62,3mm x 38,6mm x 11,5mm
Weight of sensor 31 g
Internal sensors
EDA sensor:
Exosomatic method, constant
voltage, DC, 0,5V
Resolution: 14 bit, Input range 2 µS
up to 100 µS
Bandwith: DC to 8 Hz
Output rate: 32 Hz
3D acceleration sensor:
Measurement range: +/- 8 g
Noise: 4 mg
Output rate: 64 Hz
Pressure sensor:
Measurement range: 300 - 1000
hPa
Noise: 0,03 hPa
Output rate: 1 Hz
Temperature sensor:

51
9
Output rate: 1 Hz
Live analysis
EDA SCL mean
Temp mean
Movement Acceleration
Step count
charging
State of charge
Indicators
LED, 3-color
Vibration alarm
Marker
Interfaces Micro-USB, Bluetooth Smart (4.0)
API
Java API for USB (Windows)
Example for Bluetooth Smart
(Android)
Wear locations Wrist, Ankle
Environmental conditions
Temperature:
-20 °C - 60 °C
0 °C - 45 °C during charging
Humidity:
0 - 75 % Relative Humidity
Atmospheric pressure:
300 - 1100 hPa absolute
Warranty 1 year

53
10
10 Legal Notes
10.1 Copyright
The software that comes with EdaMove 3 is protected by
copyright. Renting, exchanging, broadcasting, duplication or
copies are not permitted.
10.2 Disclaimer
The material in this manual is for informational purposes only.
The products it describes are subject to change without prior
notice. movisens makes no representations or warranties with
respect to this manual or with respect to the products described
herein.
movisens shall not be liable for any damages, losses, costs or
expenses, direct, indirect or incidental, consequential or special,
arising out of, or related to the use of this material or the
products described herein.
The activity sensor EdaMove 3 is not a medical device and is not
intended to be used for medical purposes.
10.3 Trademarks
Windows and Windows XP are registered trademarks of
Microsoft Corporation.

Bedienungsaneitung
movisens GmbH
Augartenstraße 1
76137 Karlsruhe
Germany
Tel.: +49 721 381344-0
Fax: +49 721 381344-90
http://www.movisens.com