editing a subdivision using a cad drawing
TRANSCRIPT

1
Editing a Subdivision using a CAD drawing
In this Chapter you will learn
A method for using a CAD drawing of a new subdivision to update a parcels GIS layer
How to import a CAD drawing and export it to a shapefile
How to clean up a shapefile and prepare it for use as a construction layer
How to rotate and move a group of parcels
How to use the spatial adjustment tool bar to fit the construction layer into the parcel that
needs to be replaced by the subdivision
How to use the trace tool to trace features in the construction layer to edit a parcel polygon
layer
1. Using a CAD drawing as construction lines
This exercise assumes you have a CAD drawing, which usually come in .dwg format that shows you
a proposed subdivision along with the blocks and lots contained within. If you are presented with a
legal description that you need to draft yourself, you can do that in ArcGIS using the COGO tools
(which are only available for the ArcEditor and ArcInfo license levels and you can learn about in
topic 7.14), or a drafting program like AutoCAD, PC Traverse or Deed Plotter. The exercises in this
chapter also assume that your CAD drawing is georeferenced which means that the drawing
appears in the correct location on your map when you bring it into GIS. If you are working with a
drawing that is not georeferenced you may be able to assign a projection to it (see topic 1.23).
In Exercise 1 you will bring in a CAD drawing, select line features from this drawing that you will
need to construct the new subdivision in you GIS parcels layer and export those lines to a new
shapefile called “FairviewEstates_Construction_Lines”.
In Exercise 2 you will clean up this newly created construction shapefile which includes using the
spatial adjustment toolbar to fit the drawing into the parcel that is being replaced by the
subdivision. Even though we will end up using the spatial adjustment toolbar to fit and rotate the
subdivision, we will - as a side note – also practice rotating and moving a group of polygons
manually.
Finally, in Exercise 3 we will update the parcels layer by deleting the parcel that will be replaced by
the subdivision, and using the trace tool to build the new parcels from the construction shapefile.
Note that video 7.17 titled “Editing a Subdivision Using a CAD drawing” shows
all the steps in exercises 1, 2 and 3.

2
Exercise 1: Importing a CAD drawing into GIS and creating a Construction_Lines shapefile
1. Start ArcMap and open a new map document.
2. Add the Parcels shapefile to your map. Symbolize the
parcels so that the polygons are hollow and have a
bright green outline with a width of 2.
3. Add the FairviewEstates.dwg. To do this click the
“Add Data” button, and click once on
FairviewEstates.dwg to highlight it. Then click “Add”
to add all the layers contained in this drawing at once.
4. If your parcels are not already on top in your table of
contents, then move them to the top now.
5. Notice on your map (and in the figure on the right) that
the subdivision falls completely inside one existing
parcel.
6. Click the “+” in front of the FairviewEstates.dwg Group
layer to expose all the layers that are inside this group as
shown below.
7. Turn off all layers in the FairviewEstates.dwg group, except for the Polylines. This is the layer
that we will use to create the “FairviewEstates Construction_Lines” shapefile, which we will
then use in Exercise 3 to edit a parcel layer in GIS.
8. Follow the instructions on the next page to select all the polylines we need to build our
“Construction_Lines” shapefile.
3
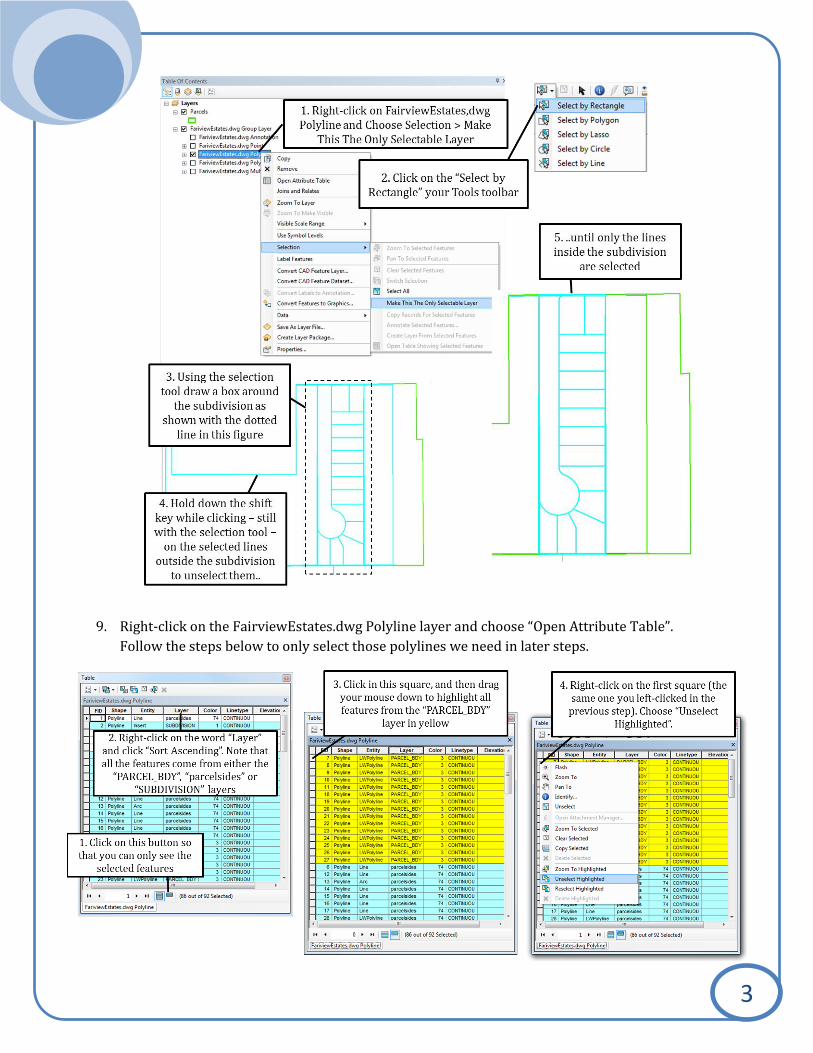
9. Right-click on the FairviewEstates.dwg Polyline layer and choose “Open Attribute Table”.
Follow the steps below to only select those polylines we need in later steps.

4
10. Close the attribute table.
11. Right-click on “FairviewEstates.dwg Polyline” and choose Data > Export data. Follow the
instructions below to save the selected features as a shapefile.
12. Click “Yes” when asked whether you would like to add the exported data to the map as a layer.
13. Clear selected features by clicking on the “Clear Selected Features” button or by going to
Selection > Clear Selected Features along the top of your screen.
14. Save you map document (call it “Fairview_Estates.mxd”). Leave your map open if you are
planning to do exercise 2 right away.
Exercise 2: Cleaning up the Construction_Lines shapefile
1. Start ArcMap and open the FairviewEstates map document you created in Exercise 1.
2. Before using the spatial adjustment toolbar to fit the new subdivision into the existing parcels
layer experiment with rotating and moving the FairviewEstates_Construction Lines as
explained in “Moving Polygons” and “Rotating Polygons” that can be found in the blue box on
the next page.
3. Turn off the parcel layer.
4. Add the “Construction_Line.lyr” to your map. This layer is symbolized in a unique way that will
help you spot problems in a layer that consists out of lines. The only reason you are temporarily
adding this Construction_Line.lyr is to copy this unique symbology to the Fairview_Estates_
Construction_Lines shapefile in the previous example.
5
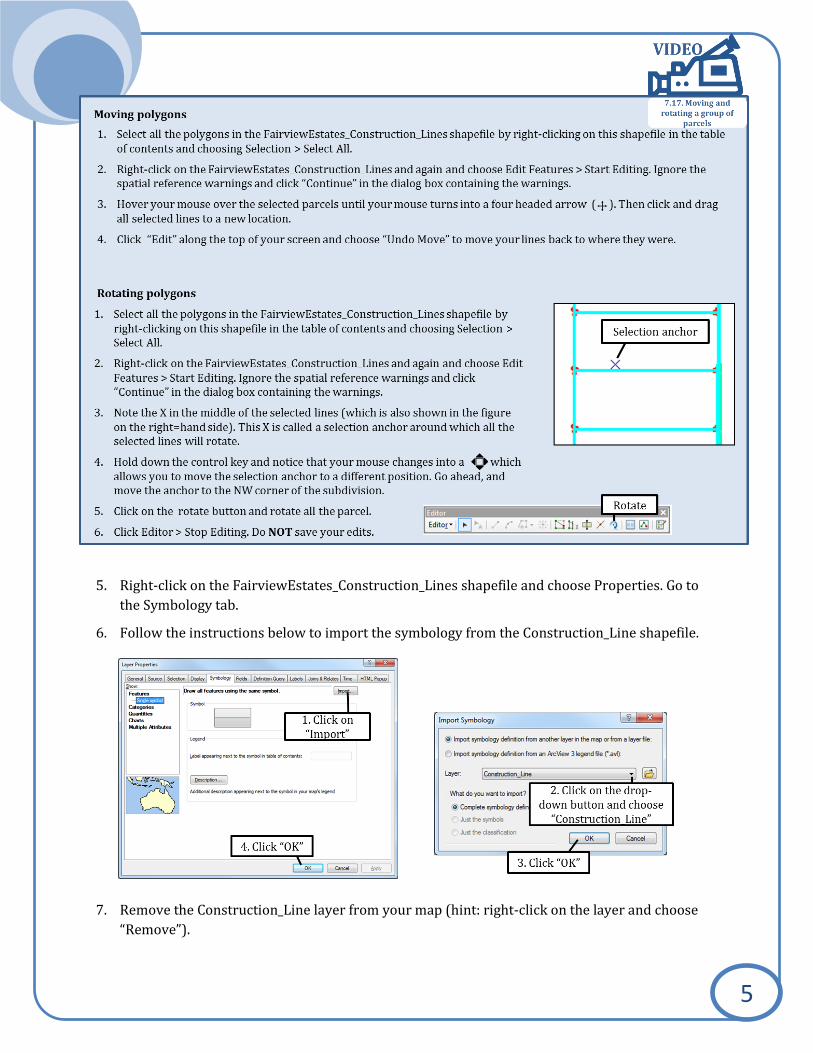
5. Right-click on the FairviewEstates_Construction_Lines shapefile and choose Properties. Go to
the Symbology tab.
6. Follow the instructions below to import the symbology from the Construction_Line shapefile.
7. Remove the Construction_Line layer from your map (hint: right-click on the layer and choose
“Remove”).

6
8. Turn off (do not remove) the FairviewEstates.dwg group, and
look at the red dots that are part of the
FairviewEstates_Construction_Lines. The figure on the right
hand side explains what a properly connected corner looks like
and where you can suspect a gap. Note that you will see two
dots when only two lines connect, for example when a straight
line turns into a curve.
9. Click on “Customize” along the top of your screen and then
choose Toolbars > Spatial Adjustment. This will add the
following toolbar to ArcMap:
10. To use this toolbar you first create displacement links from where the data
is now to where the data needs to go. In the next couple of steps we will
create four of those links as shown on the right, and then use those to move
the whole FairviewEstates_Construction_Lines shapefile.
11. Right-click on the FairviewEstates_Construction_Lines and choose Edit
Features > Start Editing.
12. Zoom in closely (1:50 or closer) to the North West corner of the subdivision
where the first link will be placed (see
figure on the right). Click on the “New
Displacement Link” on the Spatial
Analyst.
13. Click on the intersection on the
FairviewEstates_Construction_Lines
(in black) and then on the same
intersection in the Parcels layer (in
green) as shown on the right.
14. Zoom to Link 2 in the North East
corner of the subdivision and create a
displacement link (hint: click on “New
Displacement Link”, then click on the
corner in the FairviewEstates
Construction_Lines layer followed by
the same corner in the Parcel layer).

7
15. Create displacement links 3 and 4 in the South West and South East corners of the subdivision.
If you make any mistakes, refer to the blue box below to delete incorrectly placed displacement
links.
16. Once all four links are placed click the word “Spatial
Adjustment” and choose “Set Adjust Data…”
17. Make sure the “Choose Input for Adjustment” dialog matches the dialog box displayed above
and click OK.
18. Click on Spatial Adjustment > Adjustment Methods > Rubbersheet
19. Finally click on Spatial Adjustment > Adjust. Note that your FairViewEstates_Construction_Lines
now fit perfectly into the parcel where the new subdivision is being build.
20. It is good practice to clean up the displacement links because, if you wish to do another spatial
adjustment later on, you want to make sure you are not re-using the ones we just set up. Click
on the View Link Table button to open the Link Table.

8
21. In the table highlight all the link records
(hint: click on the first record, hold
down the shift button, and then click on
the last record) and then click on
“Delete Link” as shown on the right.
22. Save your edits (hint: if you are unhappy with the adjustment stop editing without saving the
edits, then repeat from step 11)
23. Turn off the parcel layer and zoom out
so you can see the whole
FairviewEstates_Construction_ Lines
layer. During the next steps we will
delete a number of lines so that all we
have left are single or perfectly
stacked lines indicating the outside of
the parcels.
24. The figure on the right shows a
number of errors that we will correct
in the next couple of steps.
25. Click on the Edit Tool on the Editor
Toolbar .
26. Using the Edit Tool click on the subdivision
boundary and then on the delete button on your
keyboard as shown on the right.
27. Keep using the Edit Tool to select and delete extra
and duplicate lines. If you accidentally delete a line
you want to keep go to Edit (along the top of your
screen) and choose “Undo”. If you really mess up you
can always click Editor > Stop Editing without saving
your edits and then try again.

9
28. Use the instructions below to fix the gap in the curve near the North West corner of the
subdivision.
29. Use the instructions below to fix part of the curve closer to the south of the subdivision.
30. Save your edits and stop editing. Clear any selected features (hint: click on Selection along the
top of your screen and choose “Clear Selected Features”.
31. Save your map document.

10
Exercise 3: Using the Construction_Lines shapefile to edit a parcels GIS layer
1. Start ArcMap and open the FairviewEstates map document you created in Exercise 1 and
worked on in Exercise 2.
2. Turn on the Parcel layer.
3. Zoom to the Parcel layer and make this layer the only selectable layer (hint: right-click on the
Parcels layer and choose Selection > Make This The Only Selectable Layer).
4. To start an edit session right-click on the Parcels layer and click Edit Features > Start Editing.
5. To avoid ending up with overlapping parcels we will first delete the parcel that is being
replaced with a subdivision, and then draw in the new parcels. Click on the Edit Tool on the
Editor Toolbar and then click on the parcel underneath the new subdivision. Click the delete
button on your keyboard.
6. Use the instruction below to draw the parcel in the North West corner of the subdivision.
7. Once you have created all the parcel polygons click on Editor > Save Edits. Note that it is good
practice to save your edits often, for example you should save your edits every time you create
two or three parcels.

11
8. Turn off the FairviewEstates Construction_Lines layer and turn on the FairviewEstates.dwg
Group Layer. Inside this Group Layer turn off all layers, except the annotation layer. We will use
the Lot number annotation to edit the attributes of the new parcels and assign parcel numbers.
9. Zoom out so you can see the entire subdivision.
10. The following steps require you to be in an edit session. If you are not in an edit session already,
start one now by right-clicking on the Parcels layer and choosing Edit Features > Start Editing. If
you are unsure if you are in an edit session try starting a session. If the “Start Editing” is greyed
out it means you are already in an edit session.
11. Open the properties for the Parcels layer and go to the
Label tab. Label the PARCEL_ID field in a green font as
shown on the right. Don’t forget to click the box in the
top-left corner to turn the labels on.
12. Click on the Edit tool and then click on Lot 1 in the
North East corner.
13. Click on the Attributes button on the Editor toolbar
and type in “LOT1” in the PARCEL_ID field for this
parcel as shown on the right.
14. Click on Lot 2, and type “LOT2” in the Attributes
dialog box. Repeat for all the parcels in the
subdivision.
15. Save you edits and stop your edit session.
16. Save your map document.
17. Turn off the FairviewEstates.dwg Group Layer.
Your parcels should now look like the ones in the
figure on the right.