electric scooter manual book - daymak · electric scooter manual book ... 2 speedometer indicate...
TRANSCRIPT
Electric Scooter Manual Book
Protect the Environment Safeguard the Planet
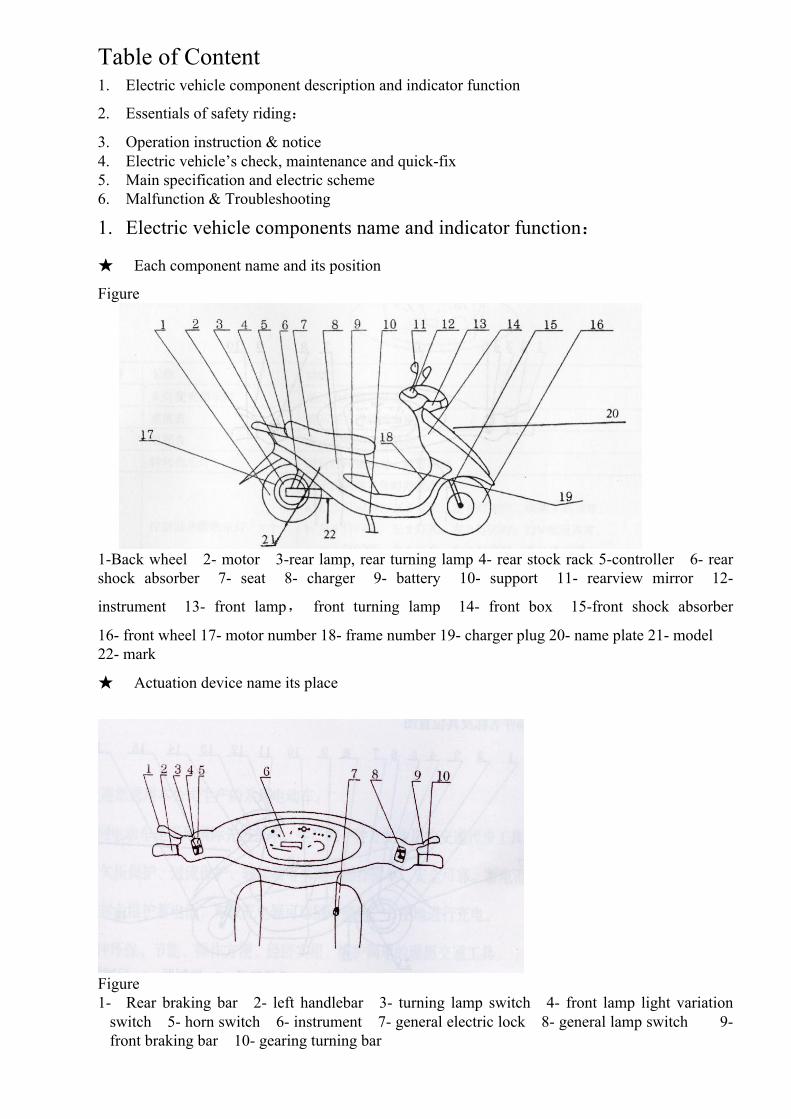
Table of Content 1. Electric vehicle component description and indicator function
2. Essentials of safety riding:
3. Operation instruction & notice 4. Electric vehicle’s check, maintenance and quick-fix 5. Main specification and electric scheme 6. Malfunction & Troubleshooting
1. Electric vehicle components name and indicator function:
★ Each component name and its position
Figure
1-Back wheel 2- motor 3-rear lamp, rear turning lamp 4- rear stock rack 5-controller 6- rear shock absorber 7- seat 8- charger 9- battery 10- support 11- rearview mirror 12-
instrument 13- front lamp, front turning lamp 14- front box 15-front shock absorber
16- front wheel 17- motor number 18- frame number 19- charger plug 20- name plate 21- model 22- mark
★ Actuation device name its place
Figure 1- Rear braking bar 2- left handlebar 3- turning lamp switch 4- front lamp light variation
switch 5- horn switch 6- instrument 7- general electric lock 8- general lamp switch 9- front braking bar 10- gearing turning bar
★Instrument and indicators
No. Description Function
1 Head lamp light variation indicator
Indicate status of head lamp
2 speedometer Indicate current speed of vehicle 3 odometer Indicate accumulated mileage of vehicle 4 Turning signal lamp Blink when vehicle is turning 5 Charger indicator Show working condition of charger 6 coulometer Show power level of battery
2.Essentials of safety riding: ★Check the vehicle before riding, so as to avoid accident. The main checking items are: abundance of electric
power, reliability of steering and braking device, normality of tyre pressure, normality of all appliance signal and other indicators.
★As to avoid other harms to motorized vehicle, the drivers should follow the following instructions: a. Wear bright garment; b. not too close to other vehicles; c. obey transport regulations, do not race for traffic; d. turn on turning lamps when turning, to make somebody’s attention; e. carefully ride at crossovers, entrance of parking area; f. do not ride by single hand; g. do not carry extra people or stuff; h. do not make sharp brake on raining days or wet road, should brake in advance to slowdown. �Garment protection a. Driver should wear helmet, eyeglasses and gloves; b. do not wear loose garment so as to avoid stripping operating bar and pedestrian. �Loading up a. Do not load high-weighted stuff. Over-load will affect vehicle performance and would be dangerous. b. Securely fix cargo on the vehicle to ensure a safe drive. c. Do not hang anything on handlebars, so as not to affect normal driving. �Do not flush the vehicle directly when cleaning, so as to avoid short circuiting by dampness.
3.Operating instructions & notice ★Starting up a. Withdraw main kickstand or side kickstand; b. Driver sits on seat, insert the key to electric lock cylinder, turn clockwise to ON position, so as to turn on
power; c. Turn speed regulating handle towards inner side slowly, to make start-up. Notice: When general electric lock is turned on and rear wheel is landed, the driver is not seated, do not turn
speed regulating handle preventing from abrupt forwarding of vehicle which will results in accidents easily. ★Speed shifting Turn speed shifting bar towards inner side (counterclockwise), vehicle will accelerate; turn it towards outer side (clockwise), the vehicle speed will be lowered. Attention: Turn speed shifting bar slowly so as to ensure safety driving and reduce mechanical failure. ★Turning a. Turn the switch on the turning lamp switch towards the desired direction, turning lamp start to blink; b. Press the button after turning, the turning lamp went out. Attention: Turn off turning lamp at once when the turn is over, so as to avoid confusion and accident. ★Braking When tightening front and rear wheel braking bar, braking front & rear wheel respectively. Attention: Though the vehicle has the feature of disconnection protection when braking(both front and rear wheel), driver needs to build the habit of resetting the speed shifting bar so as to avoid overturn and side list. ★Parking a. Turn off general power switch and air switch located below the seat prior to parking; b. Lower the main kickstand and side stand to securely park the vehicle;

c. Turn the key counterclockwise to “OFF” position, to lock the fork lock prior taking out the key. ★Charge a. Turn off general power switch; b. Open the seat and take out stock charger, plug to output charging socket at the electric vehicle, and then to
power socket. The average charging would take 3 to 8 hours, and do not use the electric vehicle when it is undercharged with electricity.
c. After charging, unplug and coil it, then put it back to the seat. Attention: The charger is specified made by our company, do not use other charger. Try not to use quick charger
in case of shorten battery life. d. Charging should proceed in condition of good ventilation not in the environment with corrosive gas or
inflammable condition. e. If the battery need a long-time storage, should be store in full battery and be recharged every month. f. Once found high temperature of battery when charging or abnormal in charging indicator, which indicating
malfunction in battery or charging circuit, should disconnect charging immediately and repair it by professional.
g. Charge battery in time after each driving, which is good to battery life. Ambient temperature will greatly affect battery, i.e. charged battery driving mileage will fall in winter or cold area, which is deemed normal; it will get back to normal once temperature rises.
4. Electric vehicle’s check, maintenance and quick-fix
★Daily check & maintenance a. Checking items of each drive: ① If turning lamp, braking lamp and horn are normal; ② Flexibility of steering mechanism; ③ Reliability of braking operation; ④ If any indicators are normal; ⑤ Eliminate the abnormality once it is found. b. Regular checking items ① Reliability of all fastenings, screw it tight once found unsecured; ② Check tightness and breaking off of all cable connections, reconnect it once found; ③ Check tyre pressure. Charge them to 1.75/1.85 kg once found under pressured; ④ Check if tyre is broken or wore out, if groove depth is less than 2mm or appear chap or broken in appearance,
should replace the tyre immediately. ★Adjustment of front & rear brakes ① Free travel of front & rear braking bars is 10 to 20mm; ② Braking bar travel length should not exceed 3/4 of all travel length when front & rear brake is at the tightest.
Adjust the travel length by adjusting regulating nut, right screw to decrease, left screw to increase; try clasp several times to ensure the requirement is met, otherwise readjust it. Ensure adjusting nut concave area should embedded at cylindrical plane of braking arm cylindrical pin after adjustment. Front & rear wheels should act freely if they’re within the range of free travel.
★Regular maintenance items and time table To ensure safe driving and elongate vehicle’s life, maintain the vehicle to the following. A check, adjust, clean (replace when necessary) L Lubrication C Clean
Travel mileage(KM) Item 200 1000 3000 5000 8000 10000 12000 Motor bearing A C C Controller A A Charger A A Front & rear braking block A A A Wheel bearing A C A C C A Front & rear shock absorber A A Front fork bearing A A Tyre A A A A A A A Main & Side kickstand A A A Lubrication of all position L L L L All bolts and nuts A A A A A A A
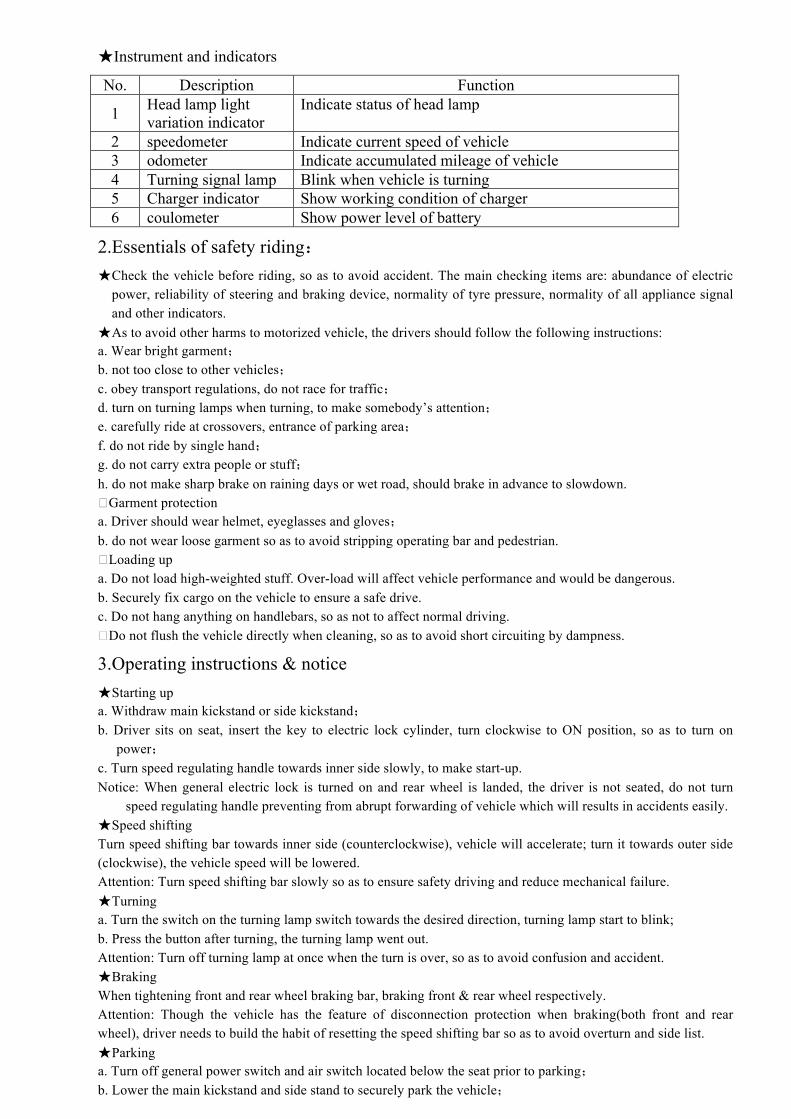
5. Main specification and Electric scheme
Description Overall weight
Standard load
Max. velocity
Braking in dry
condition
20Km/h
Braking in wet
condition
20Km/h
Noise
EEC series electric vehicle ≤110kg ≤75kg ≤50Km/h ≤4m ≤15m ≤60dB(A)
Volume 60V20Ah Nominal Voltage 60V
Battery
Model Lead-acid battery
Motor type Rare earths permanent magnet brush rotor variable motor Brushless stator DC motor
Nominal power 500W Efficiency ≥80%
Output torque ≥12N.m
Motor
Rotating speed(void) 600±20r/min Input voltage 110V/60Hz
Output voltage 58±2V Charging current 3.0±0.2A
charger Temp. control/temp. volume <40℃
Under voltage protection 45±2V
Over current protection ≤30A
Controller
conductibility ≥95%
Electric scheme

6. Malfunction & Troubleshooting
No Malfunction description Cause of malfunction Troubleshooting
1
Speed shifting not functional, or low velocity of
high shift
Under voltage in battery; 1) Loose connection of magnetic steel in
speed shifting bar; 2) Spring chucked or failure in the bar;
1) Charge the battery to fullest; 2) Clamp it tight after welding; 3) Replace the spring by supplier;
2 Motor not work
after cable connection
1) Affect power disconnection by braking knob not return to normal position;
2) Loose connection to battery; 3) Looseness in magnetic steel of shifting
bar,loose connection; 4) Loose motor connection or broken; 5) Fuse is gone;
1) Push the knob outwards; 2) Reconnect in repair; 3) Clamp after welding or
reconnect; 4) Repair at the store; 5) Check fuse, or stat the same
after replacement, repair by professional;
3
Short driving mileage after
charging
1) Low tyre pressure; 2) Insufficient charging or charger
malfunction; 3) Battery aging or damage; 4) Many ramps, strong against wind,
frequent braking & startup, heavy load;
1) Charge it full; 2) Charge full or check charger’s
plug; 3) Replace the battery; 4) Try to reduce the chance of
braking and mentioned situation;
4
Charger not working
1) Charger socket split off or loosened; 2) Battery fuse broken; 3) Battery connection broke off;
1) Fasten socket and connection; 2) Replace the fuse; 3) Weld connection;
5 others
1) When you met situations you cannot eliminate by using above instructions or cannot determine;
2) Internal broken in motor, controller, charger, power supply and battery unit;
When you met mentioned situation above, please go to the supplier or repair station, do not open the component, otherwise will invalid the warranty.
6 Powerless in
motor and make ticking noises
Low power in battery Charge it immediately