elibrary management systemelibrary.rajasthan.gov.in/downloadable_forms/user manual english.pdf ·...
TRANSCRIPT
E-Library Trimax IT Infrastructure Services Ltd
Version: 1.3 Page 1 of 148
eLibrary Management System
Language & Library Department
Government of Rajasthan
User Manual
Version 1.3
E-Library Trimax IT Infrastructure Services Ltd
Version: 1.3 Page 2 of 148
Table of Contents
1 Document Control ....................................................................................................................................... 7
1.1 Sign Off ..........................................................................................................................................7
1.2 Version Control ...............................................................................................................................7
2 e-LIBRARY ................................................................................................................................................ 8
2.1 How to access ..................................................................................................................................8
2.2 Book Search ....................................................................................................................................9
2.3 Feedback Form ............................................................................................................................. 10
2.3.1 Feedback Creation ........................................................................................................................ 10
2.4 Login Process ............................................................................................................................... 11
2.4.1 Log In .......................................................................................................................................... 11
2.4.2 Forgot Password ........................................................................................................................... 14
2.5 User Management ......................................................................................................................... 15
2.5.1 Search User .................................................................................................................................. 15
2.5.2 Create User .................................................................................................................................. 16
2.5.3 Edit User ...................................................................................................................................... 19
2.5.4 Reset User Password ..................................................................................................................... 19
2.5.5 Block / Unblock User .................................................................................................................... 20
2.6 Role Management ......................................................................................................................... 22
2.6.1 Search Menu ................................................................................................................................ 22
2.6.2 Create Menu ................................................................................................................................. 23
2.6.3 Edit Menu .................................................................................................................................... 24
2.6.4 Delete Menu ................................................................................................................................. 25
2.6.5 Create Menu Rights ...................................................................................................................... 26
2.6.6 Search Role .................................................................................................................................. 27
2.6.7 Create Role .................................................................................................................................. 28
2.6.8 Assign Rights ............................................................................................................................... 28
2.6.9 Edit Role ...................................................................................................................................... 30
2.6.10 Delete Role .............................................................................................................................. 30
2.7 Master Creation ............................................................................................................................ 31
2.7.1 Subject Master .............................................................................................................................. 31
2.7.1.1 Search Subject Master ............................................................................................................... 31
2.7.1.2 Create Subject Master ............................................................................................................... 32
2.7.1.3 Edit Subject Master ................................................................................................................... 33
2.7.1.4 Delete Subject Master ............................................................................................................... 33
2.7.2 Language Master .......................................................................................................................... 35
2.7.2.1 Search Language Master............................................................................................................ 35
2.7.2.2 Create Language Master ............................................................................................................ 36
E-Library Trimax IT Infrastructure Services Ltd
Version: 1.3 Page 3 of 148
2.7.2.3 Edit Language Master ............................................................................................................... 36
2.7.2.4 Delete Language Master ............................................................................................................ 37
2.7.3 Supplier Type Master .................................................................................................................... 39
2.7.3.1 Search Supplier Type Master ..................................................................................................... 39
2.7.3.2 Create Supplier Type Master ...................................................................................................... 39
2.7.3.3 Edit Supplier Type Master ......................................................................................................... 40
2.7.3.4 Delete Supplier Type Master ...................................................................................................... 41
2.7.4 Section Master .............................................................................................................................. 42
2.7.4.1 Search Section Master ............................................................................................................... 42
2.7.4.2 Create Section Master ............................................................................................................... 42
2.7.4.3 Edit Section Master ................................................................................................................... 44
2.7.4.4 Delete Section Master ............................................................................................................... 45
2.7.5 Location Master ............................................................................................................................ 46
2.7.5.1 Search Location Master ............................................................................................................. 46
2.7.5.2 Create Location Master ............................................................................................................. 46
2.7.5.3 Edit Location Master ................................................................................................................. 47
2.7.5.4 Delete Location Master ............................................................................................................. 48
2.7.6 Library Master .............................................................................................................................. 49
2.7.6.1 Search Library Master ............................................................................................................... 49
2.7.6.2 Create Library Master ............................................................................................................... 49
2.7.6.3 Edit Library Master ................................................................................................................... 50
2.7.6.4 Delete Library Master ............................................................................................................... 51
2.7.7 Frequency Master ......................................................................................................................... 52
2.7.7.1 Search Frequency Master .......................................................................................................... 52
2.7.7.2 Create Frequency Master ........................................................................................................... 52
2.7.7.3 Edit Frequency Master .............................................................................................................. 53
2.7.7.4 Delete Frequency Master ........................................................................................................... 55
2.7.8 Rack Master ................................................................................................................................. 55
2.7.8.1 Search Rack Master .................................................................................................................. 55
2.7.8.2 Create Rack Master ................................................................................................................... 56
2.7.8.3 Edit Rack Master ...................................................................................................................... 57
2.7.8.4 Delete Rack Master ................................................................................................................... 59
2.7.9 Publisher Master ........................................................................................................................... 60
2.7.9.1 Search Publisher Master ............................................................................................................ 60
2.7.9.2 Create Publisher Master............................................................................................................. 61
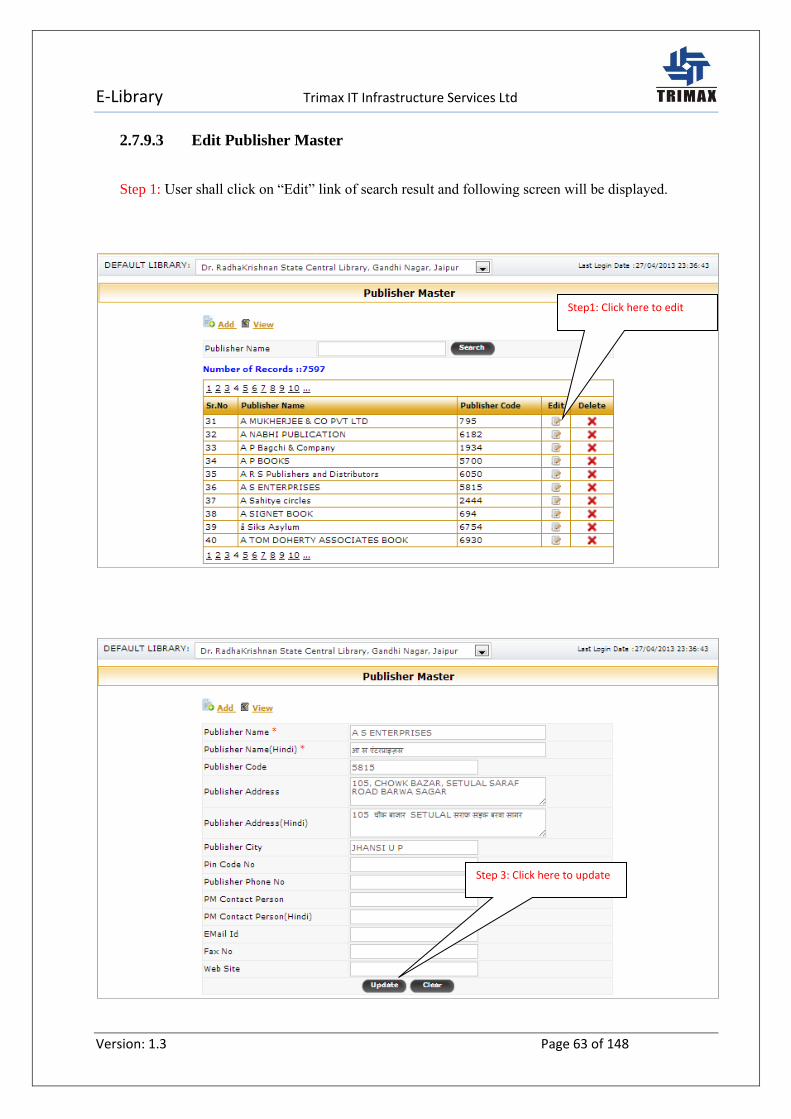
2.7.9.3 Edit Publisher Master ................................................................................................................ 63
2.7.9.4 Delete Publisher Master............................................................................................................. 65
2.7.10 Supplier Master ........................................................................................................................ 66
E-Library Trimax IT Infrastructure Services Ltd
Version: 1.3 Page 4 of 148
2.7.10.1 Search Supplier Master.............................................................................................................. 66
2.7.10.2 Create Supplier Master .............................................................................................................. 67
2.7.10.3 Edit Supplier Master ................................................................................................................. 68
2.7.10.4 Delete Supplier Master .............................................................................................................. 71
2.7.11 Periodical Master ...................................................................................................................... 72
2.7.11.1 Search Periodical Master ........................................................................................................... 72
2.7.11.2 Create Periodical Master............................................................................................................ 73
2.7.11.3 Edit Periodical Master ............................................................................................................... 74
2.7.11.4 Delete Periodical Master............................................................................................................ 77
2.7.12 Binder Master ........................................................................................................................... 78
2.7.12.1 Search Binder Master ................................................................................................................ 78
2.7.12.2 Create Binder Master ................................................................................................................ 79
2.7.12.3 Edit Binder Master .................................................................................................................... 80
2.7.12.4 Delete Binder Master ................................................................................................................ 82
2.8 Book Acquisition .......................................................................................................................... 82
2.8.1 User Demand ............................................................................................................................... 82
2.8.1.1 Search User Demand ................................................................................................................. 82
2.8.1.2 Create User Demand ................................................................................................................. 83
2.8.1.3 Edit User Demand ..................................................................................................................... 84
2.8.1.4 Delete User Demand ................................................................................................................. 85
2.8.2 Library Demand ........................................................................................................................... 86
2.8.2.1 Search Library Demand ............................................................................................................. 86
2.8.2.2 Create Library Demand ............................................................................................................. 87
2.8.2.3 Edit Library Demand................................................................................................................. 88
2.8.2.4 Delete Library Demand ............................................................................................................. 89
2.8.2.5 Approve Library Demand .......................................................................................................... 90
2.8.3 Acquisition Master ........................................................................................................................ 92
2.8.3.1 Search Acquisition Master ......................................................................................................... 92
2.8.3.2 Create Acquisition Master ......................................................................................................... 92
2.8.3.3 Edit Acquisition Master ............................................................................................................. 94
2.8.3.4 Delete Acquisition Master ......................................................................................................... 95
2.8.4 Newspaper Periodical .................................................................................................................... 96
2.8.4.1 Search Newspaper Periodical ..................................................................................................... 96
2.8.4.2 Create Newspaper Periodical ..................................................................................................... 98
2.8.4.3 Edit Newspaper Periodical ......................................................................................................... 99
2.8.4.4 Delete Newspaper Periodical ................................................................................................... 102
2.8.5 Newspaper Periodical Inward ...................................................................................................... 103
2.9 Book Master ............................................................................................................................... 104

E-Library Trimax IT Infrastructure Services Ltd
Version: 1.3 Page 5 of 148
2.9.1 Book Master ............................................................................................................................... 104
2.9.1.1 Search Book Master ................................................................................................................ 104
2.9.1.2 Create Book Master ................................................................................................................ 106
2.9.1.3 Edit Book Master .................................................................................................................... 110
2.9.1.4 Delete Book Master ................................................................................................................ 112
2.9.1.5 Create Copies of Books ........................................................................................................... 113
2.9.1.6 Generate Barcode ................................................................................................................... 114
2.9.2 Barcode generation ..................................................................................................................... 115
2.9.3 Book Binding Details .................................................................................................................. 117
2.9.3.1 Search Book Binding .............................................................................................................. 117
2.9.3.2 Create Book Binding ............................................................................................................... 118
2.9.3.3 Delete Book Binding ............................................................................................................... 120
2.9.3.4 Return Book Binding .............................................................................................................. 120
2.10 Member Registration & Renewal ................................................................................................. 121
2.10.1 Member Registration ............................................................................................................... 121
2.10.1.1 Search Member ...................................................................................................................... 121
2.10.1.2 Create Member and Membership .............................................................................................. 121
2.10.1.3 Edit Membership .................................................................................................................... 125
2.10.1.4 Delete Membership ................................................................................................................. 127
2.10.2 Membership Renewal .............................................................................................................. 128
2.10.3 Member Barcode and I-Card Generation ................................................................................... 130
2.11 Book Circulation ........................................................................................................................ 131
2.11.1 Book Issue ............................................................................................................................. 131
2.11.2 Book Deposit ......................................................................................................................... 132
2.11.3 Book Reserve ......................................................................................................................... 132
2.11.4 Book Lost & Withdrawal ......................................................................................................... 135
2.11.5 Reader Details ........................................................................................................................ 136
2.11.6 Reminder Generation .............................................................................................................. 138
1.1 Book Verification ........................................................................................................................ 139
1.1.1 Book Verification ............................................................................ Error! Bookmark not defined.
2.12 Feedback Redressal ......................................................................... Error! Bookmark not defined.
2.12.1 Feedback Creation ...................................................................... Error! Bookmark not defined.
2.12.2 Feedback Processing ............................................................................................................... 140
2.13 Reports ...................................................................................................................................... 142
2.13.1 Member Register .................................................................................................................... 142
2.13.2 Accession Register .................................................................................................................. 143
2.13.3 Book Search ........................................................................................................................... 144
2.13.4 Book Demand ........................................................................................................................ 146
E-Library Trimax IT Infrastructure Services Ltd
Version: 1.3 Page 6 of 148
2.13.5 Login Trail ............................................................................................................................. 146
2.13.6 Periodical Register Report ....................................................................................................... 147
E-Library Trimax IT Infrastructure Services Ltd
Version: 1.3 Page 7 of 148
1 Document Control
1.1 Sign Off
1.2 Version Control
Version Date Change Distributed To Author
1.0 05/11/2012 Drafted Team Kalpana
1.0 29/11/2012 Reviewed Ramakrishna Hebbar
1.1 19/04/2013 Rework Team Madhavi J
1.1 20/04/2013 Reviewed Ramkrishna Hebbar
1.2 29/04/2013 Rework Team Madhavi J
1.3 13/05/2013 Rework Team Madhavi J
Name Role / Responsibility Signed Date
E-Library Trimax IT Infrastructure Services Ltd
Version: 1.3 Page 8 of 148
2 e-LIBRARY
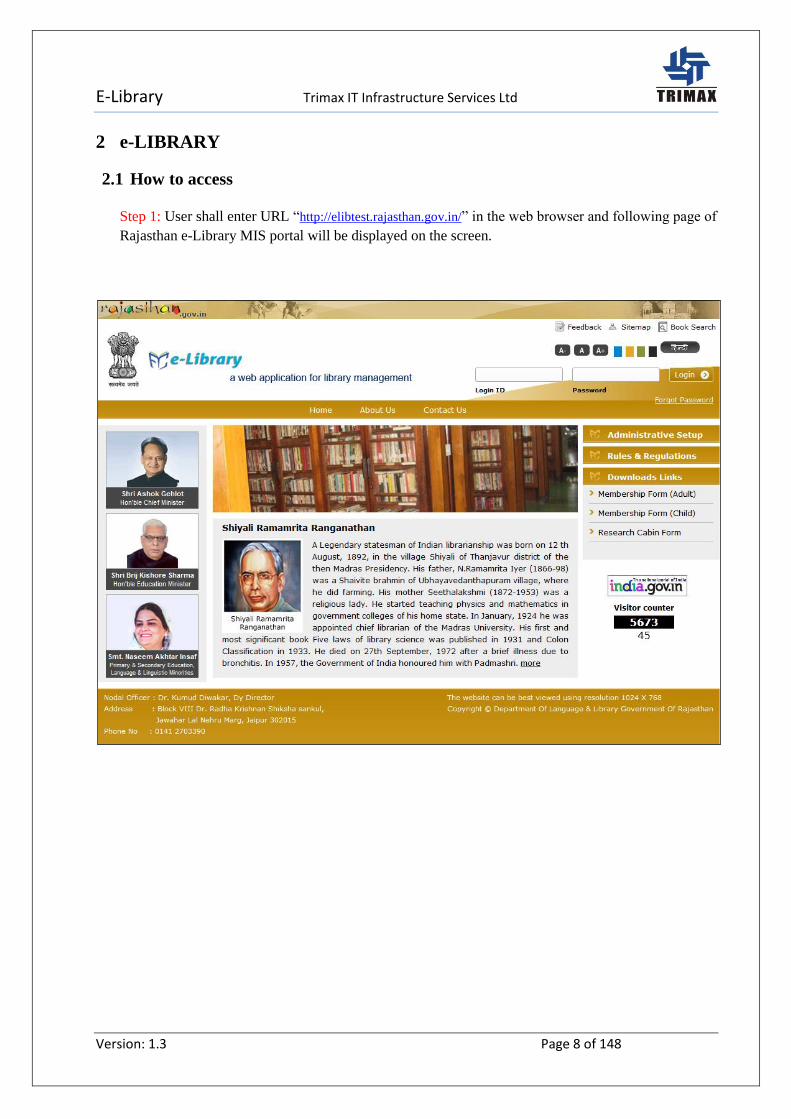
2.1 How to access
Step 1: User shall enter URL “http://elibtest.rajasthan.gov.in/” in the web browser and following page of
Rajasthan e-Library MIS portal will be displayed on the screen.

E-Library Trimax IT Infrastructure Services Ltd
Version: 1.3 Page 9 of 148
2.2 Book Search
Step 1: User can search the books on the basis of:
Book Title
Book Title(Hindi)
Author Name(Hindi)
Author Name
Publisher Name
ISBN Number
Key Word
Main Subject
Step 2: "Clear" button is provided; to clear the entered data.
Step:1: Select /
Enter Search Criteria
Step2: Click here to
search record

E-Library Trimax IT Infrastructure Services Ltd
Version: 1.3 Page 10 of 148
2.3 Feedback Form
2.3.1 Feedback Creation
Step 1: User can select “Feedback” to submit Feedback. User will register application and Library related
issue to the system. System will generate Feedback number, after registering the complaint
Following are the fields user shall enter and click on submit.
Following are fields use shall enter. All “*” marked are mandatory fields.
First Name (*)
First Name (Hindi) (*)
Middle Name (*)
Middle Name (Hindi) (*)
Last Name (*)
Last Name (Hindi) (*)
Mobile Name (*)
Email Address
Feedback Text (Description) (*)
Captcha Image Text (*)
Step 2: User shall enter all compulsory fields and click on “Save” button.
Step 3: User shall click on “Clear” button to clear text from all controls.
E-Library Trimax IT Infrastructure Services Ltd
Version: 1.3 Page 11 of 148
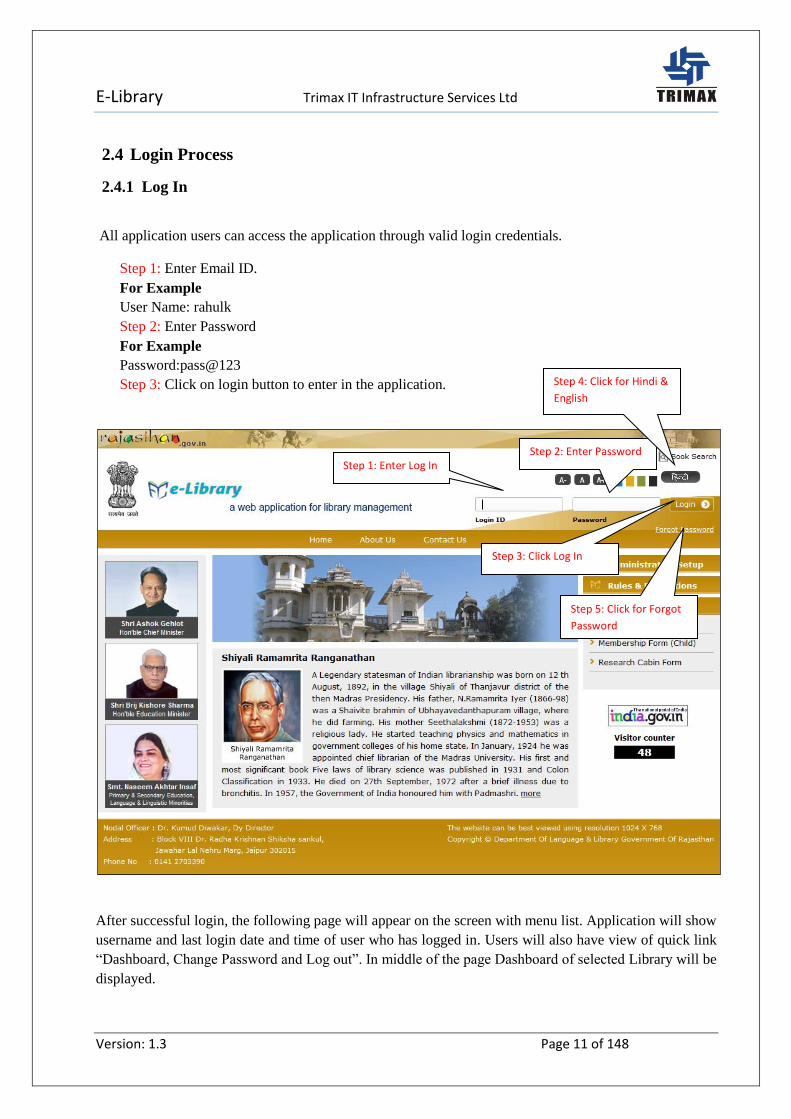
2.4 Login Process
2.4.1 Log In
All application users can access the application through valid login credentials.
Step 1: Enter Email ID.
For Example
User Name: rahulk
Step 2: Enter Password
For Example
Password:pass@123
Step 3: Click on login button to enter in the application.
After successful login, the following page will appear on the screen with menu list. Application will show
username and last login date and time of user who has logged in. Users will also have view of quick link
“Dashboard, Change Password and Log out”. In middle of the page Dashboard of selected Library will be
displayed.
Step 1: Enter Log In
ID Name
Step 2: Enter Password
Step 3: Click Log In
Step 4: Click for Hindi &
English
Step 5: Click for Forgot
Password
E-Library Trimax IT Infrastructure Services Ltd
Version: 1.3 Page 12 of 148
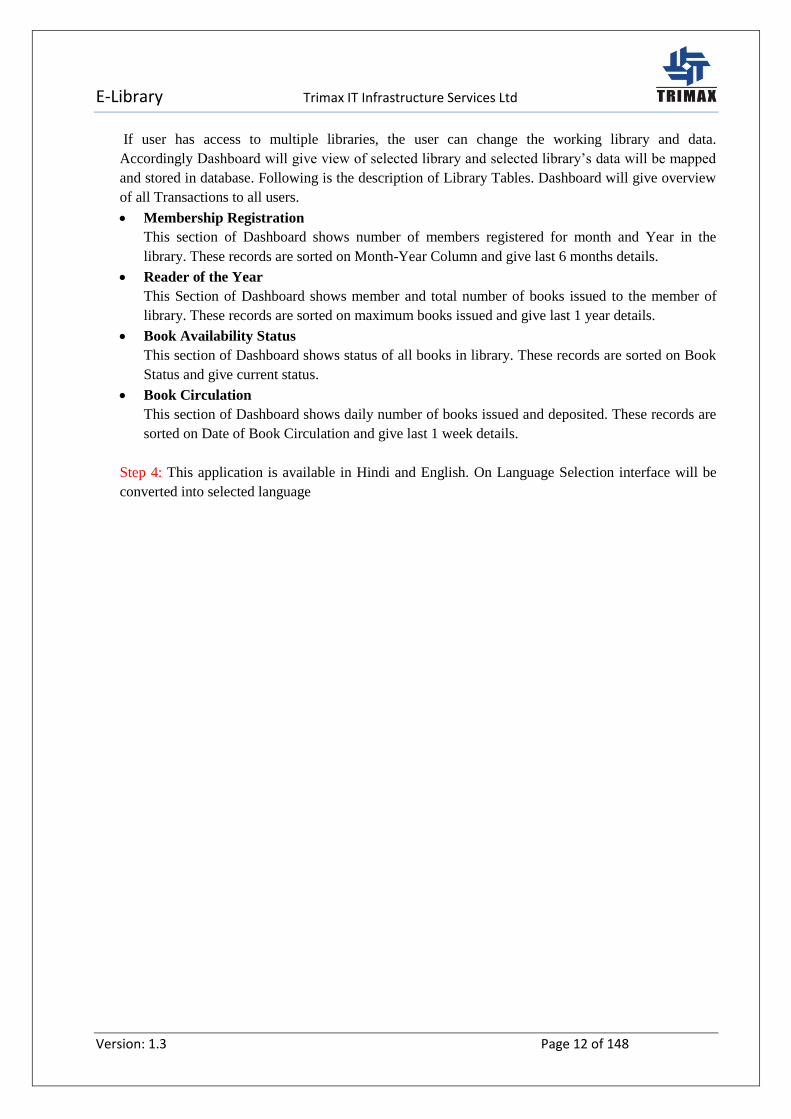
If user has access to multiple libraries, the user can change the working library and data.
Accordingly Dashboard will give view of selected library and selected library’s data will be mapped
and stored in database. Following is the description of Library Tables. Dashboard will give overview
of all Transactions to all users.
Membership Registration
This section of Dashboard shows number of members registered for month and Year in the
library. These records are sorted on Month-Year Column and give last 6 months details.
Reader of the Year
This Section of Dashboard shows member and total number of books issued to the member of
library. These records are sorted on maximum books issued and give last 1 year details.
Book Availability Status
This section of Dashboard shows status of all books in library. These records are sorted on Book
Status and give current status.
Book Circulation
This section of Dashboard shows daily number of books issued and deposited. These records are
sorted on Date of Book Circulation and give last 1 week details.
Step 4: This application is available in Hindi and English. On Language Selection interface will be
converted into selected language
E-Library Trimax IT Infrastructure Services Ltd
Version: 1.3 Page 13 of 148
Step 5: User can change his/her password as and when required. User needs to enter his or her
following details to change password.
Old Password
New Password
Confirm New Password

E-Library Trimax IT Infrastructure Services Ltd
Version: 1.3 Page 14 of 148
2.4.2 Step 6: User needs to click on save button to save password. Clear
button will clear text from controls of change password. Forgot Password
Step 1: In case user has forgotten password, user will click on “Forgot Password” option and
following screen will be displayed.
Step 6: Click to Change
password
Step 1: Click on Forgot
Password

E-Library Trimax IT Infrastructure Services Ltd
Version: 1.3 Page 15 of 148
Step 2: User will enter username and click on Submit. New one time password (OTP) will be
triggered to the user by SMS.
Dear User, Your One Time Password is :767877, for JL library. Please Login with this password within
one hour.
Step 3: User needs to log in to the system with one time password. Change password interface will
appear on login and user forcefully needs to change the password.
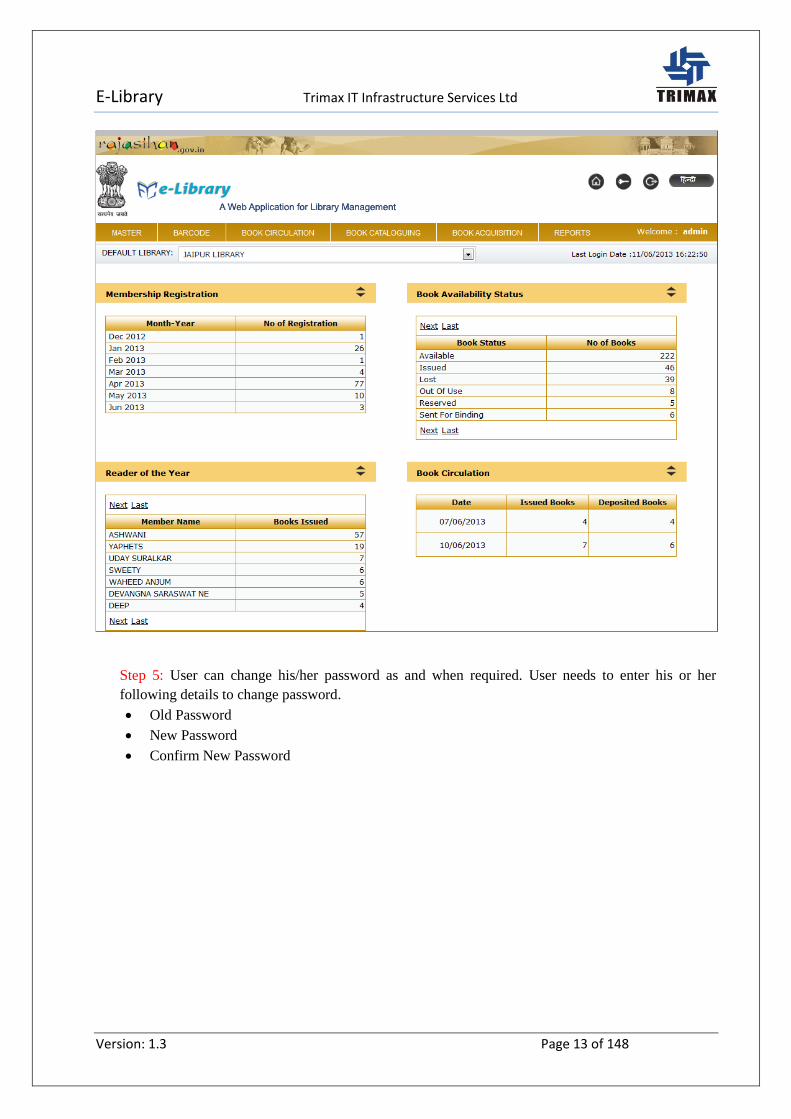
2.5 User Management
2.5.1 Search User
Step 1: To access “User Management” user will click on “Users” from “User Management”. By
default search screen will be shown on the screen and User will get view of all users created. User
shall click on “View” link to get view of records created.
Step 2: User will enter letter or username and click on “Search” button to search records. User will
have the view of searched record.
Step 2: Click to get One
Time Password
E-Library Trimax IT Infrastructure Services Ltd
Version: 1.3 Page 16 of 148
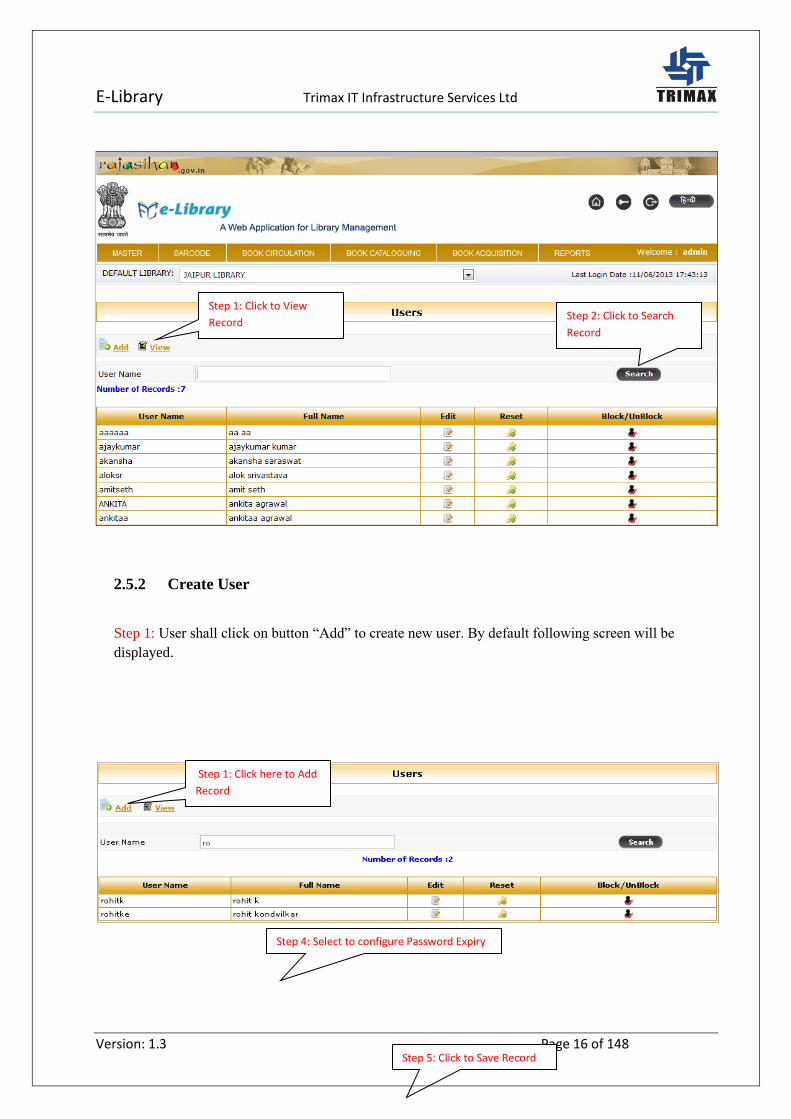
2.5.2 Create User
Step 1: User shall click on button “Add” to create new user. By default following screen will be
displayed.
Step 2: Click to Search
Record
Step 1: Click to View
Record
Step 5: Click to Save Record
Step 4: Select to configure Password Expiry
Step 1: Click here to Add
Record
E-Library Trimax IT Infrastructure Services Ltd
Version: 1.3 Page 17 of 148
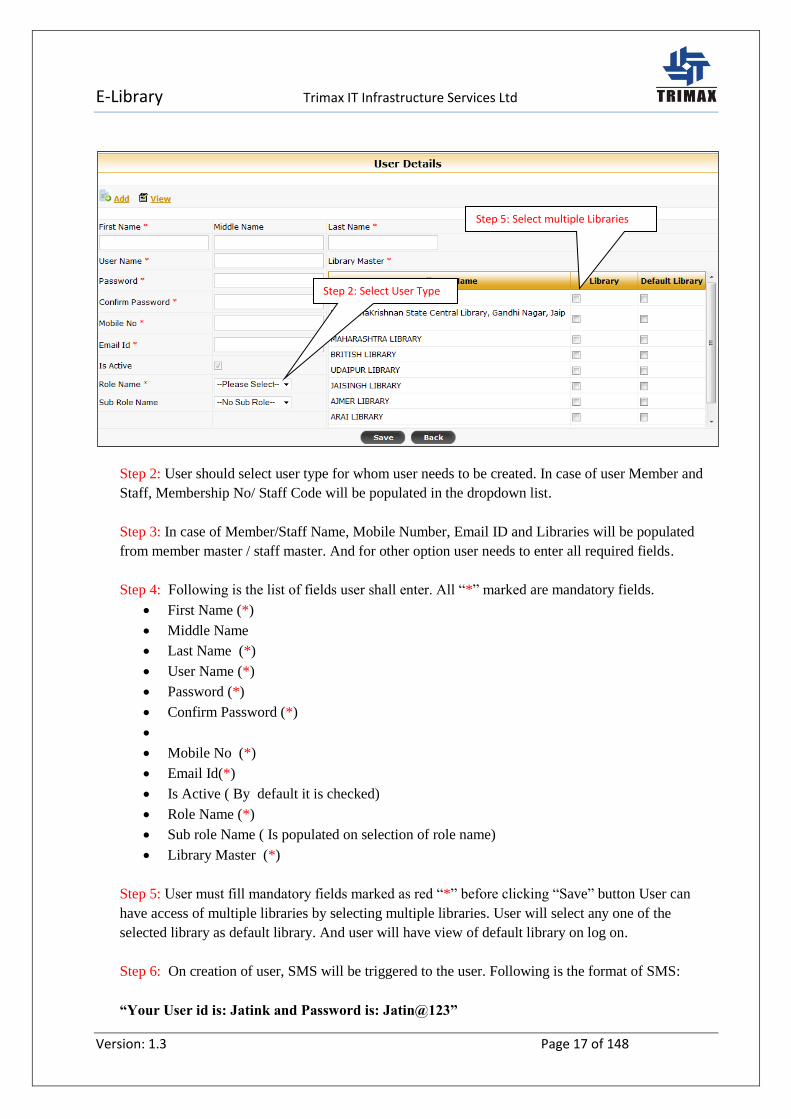
Step 2: User should select user type for whom user needs to be created. In case of user Member and
Staff, Membership No/ Staff Code will be populated in the dropdown list.
Step 3: In case of Member/Staff Name, Mobile Number, Email ID and Libraries will be populated
from member master / staff master. And for other option user needs to enter all required fields.
Step 4: Following is the list of fields user shall enter. All “*” marked are mandatory fields.
First Name (*)
Middle Name
Last Name (*)
User Name (*)
Password (*)
Confirm Password (*)
Mobile No (*)
Email Id(*)
Is Active ( By default it is checked)
Role Name (*)
Sub role Name ( Is populated on selection of role name)
Library Master (*)
Step 5: User must fill mandatory fields marked as red “*” before clicking “Save” button User can
have access of multiple libraries by selecting multiple libraries. User will select any one of the
selected library as default library. And user will have view of default library on log on.
Step 6: On creation of user, SMS will be triggered to the user. Following is the format of SMS:
“Your User id is: Jatink and Password is: Jatin@123”
Step 2: Select User Type
Step 5: Select multiple Libraries
E-Library Trimax IT Infrastructure Services Ltd
Version: 1.3 Page 18 of 148
Step 7: While logging in to the system, system will prompt user to change password forcefully for
first time log in.
E-Library Trimax IT Infrastructure Services Ltd
Version: 1.3 Page 19 of 148
2.5.3 Edit User
Step 1: User shall select record to be edited from search records. Following is the edit screen
displayed.
Step 2: User can update details as per requirement. User can change Role name and accordingly
rights of user will be changed.
2.5.4 Reset User Password Step 1: User shall select record for whom password need to reset from search records. Following is
the Search result screen.
Step 2: On confirmation from user, password of the user will be reset. Following is screen for the
same.
Step 2: Click here to
update record
E-Library Trimax IT Infrastructure Services Ltd
Version: 1.3 Page 20 of 148
Step 3: On password reset Email and SMS will be triggered to the user. Following is the format for
the same:
Dear Jatin, Your Password has been reset for duration of one hour. Your new Password is
admin#123 Please change your password if necessary in the mean time
Step 4: While logging in to the system, system will prompt user to change password forcefully for
first time log in.
2.5.5 Block / Unblock User
Step 1: To block or unblock, user will select record from search records.
Step 2: On confirmation from user, selected user will be blocked or unblocked. Following is screen
for the same
Step 1 Click here to reset
password Step 2 Confirmation to
Reset Password
E-Library Trimax IT Infrastructure Services Ltd
Version: 1.3 Page 21 of 148
Step 1 Click here to block
user
Step 2 Confirmation to
block user
E-Library Trimax IT Infrastructure Services Ltd
Version: 1.3 Page 22 of 148
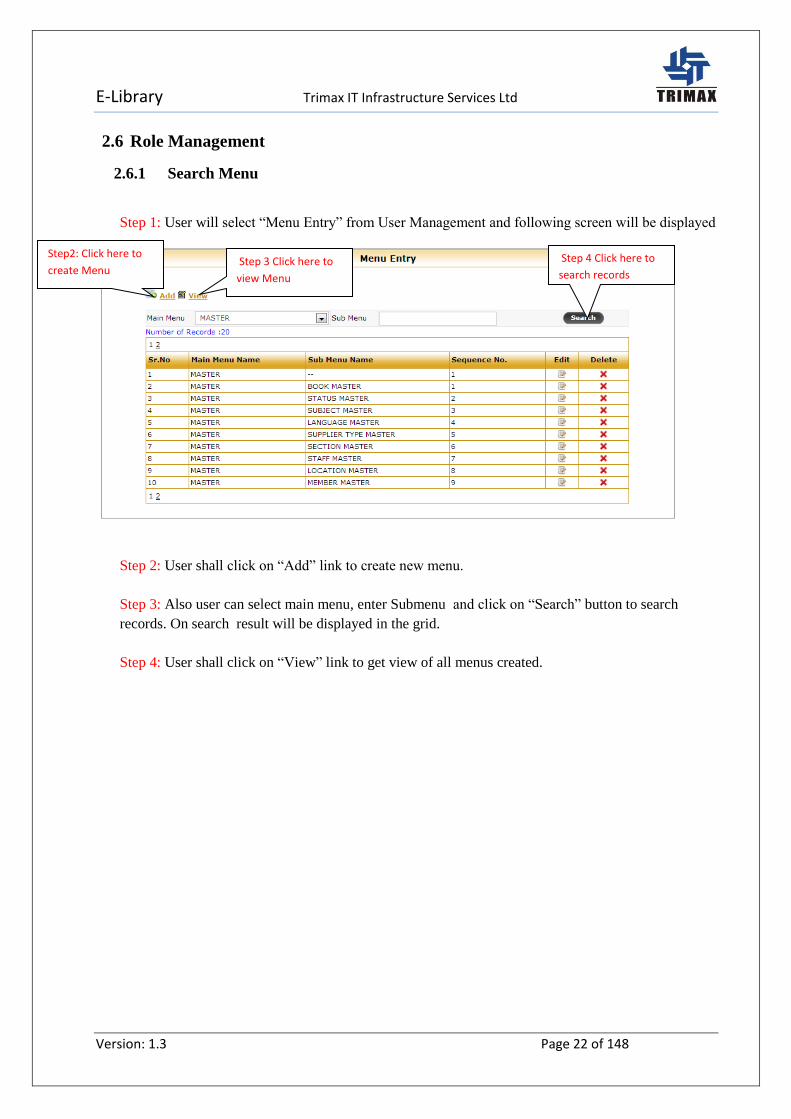
2.6 Role Management
2.6.1 Search Menu
Step 1: User will select “Menu Entry” from User Management and following screen will be displayed
Step 2: User shall click on “Add” link to create new menu.
Step 3: Also user can select main menu, enter Submenu and click on “Search” button to search
records. On search result will be displayed in the grid.
Step 4: User shall click on “View” link to get view of all menus created.
Step2: Click here to
create Menu Step 3 Click here to
view Menu
Step 4 Click here to
search records

E-Library Trimax IT Infrastructure Services Ltd
Version: 1.3 Page 23 of 148
2.6.2 Create Menu
Step 1: User shall click on “Add” link to create menu. By default following screen will be displayed.
Following are fields use shall enter. All “*” marked are mandatory fields.
Menu Categories(*)
Main Menu(*) ( On selection of Menu categories main menu will be populated)
Menu Name (English) (*)
Menu Name(Hindi) (*)
Page Url (*)Sequence No
Step 2: User shall enter all compulsory fields and click on “Save” button.
Step 3: User shall click on “Clear” button to clear text from all controls.
Step 2 Click here save Record
Step1: Click here to
create Menu
Step 3 Click here to clear the
Record
E-Library Trimax IT Infrastructure Services Ltd
Version: 1.3 Page 24 of 148
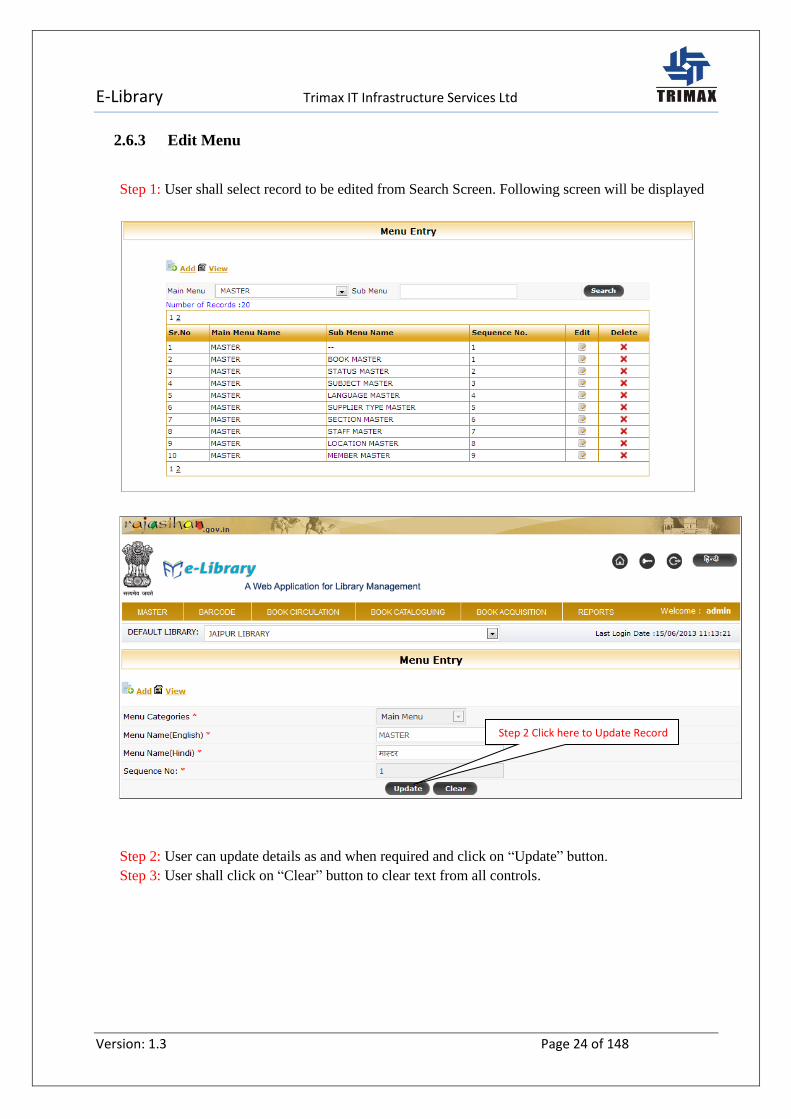
2.6.3 Edit Menu
Step 1: User shall select record to be edited from Search Screen. Following screen will be displayed
Step 2: User can update details as and when required and click on “Update” button.
Step 3: User shall click on “Clear” button to clear text from all controls.
Step 2 Click here to Update Record
E-Library Trimax IT Infrastructure Services Ltd
Version: 1.3 Page 25 of 148
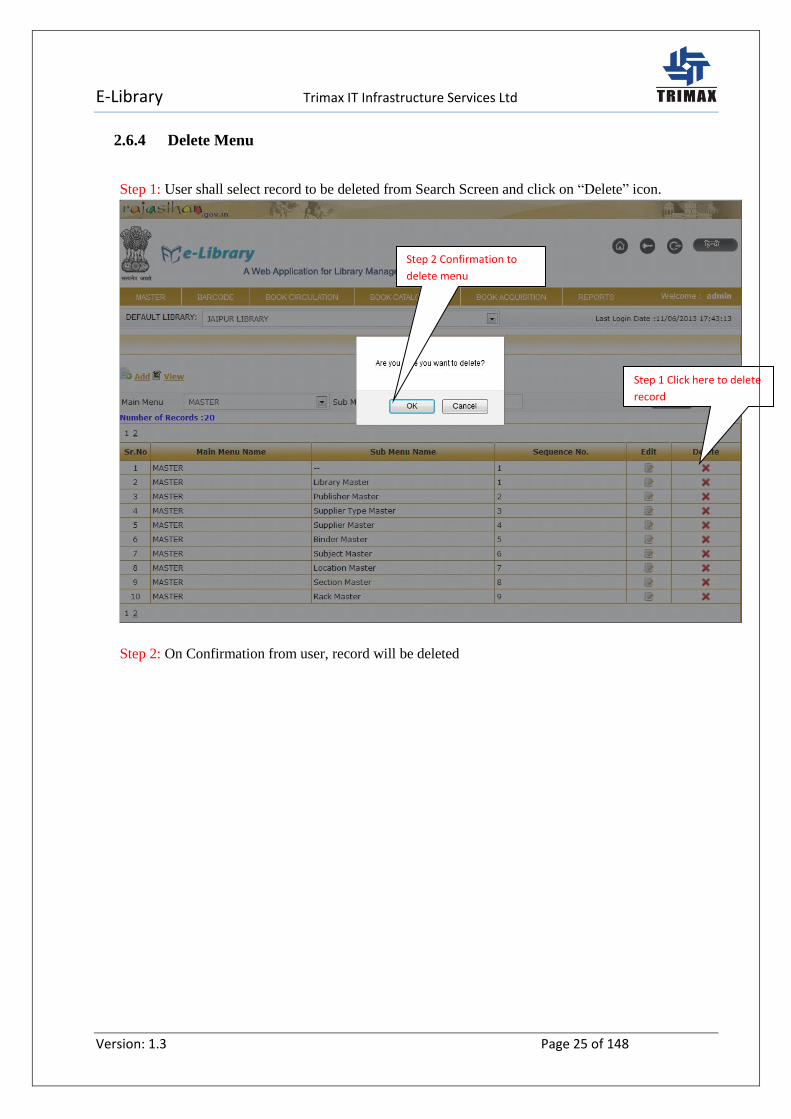
2.6.4 Delete Menu
Step 1: User shall select record to be deleted from Search Screen and click on “Delete” icon.
Step 2: On Confirmation from user, record will be deleted
Step 2 Confirmation to
delete menu
Step 1 Click here to delete
record
E-Library Trimax IT Infrastructure Services Ltd
Version: 1.3 Page 26 of 148
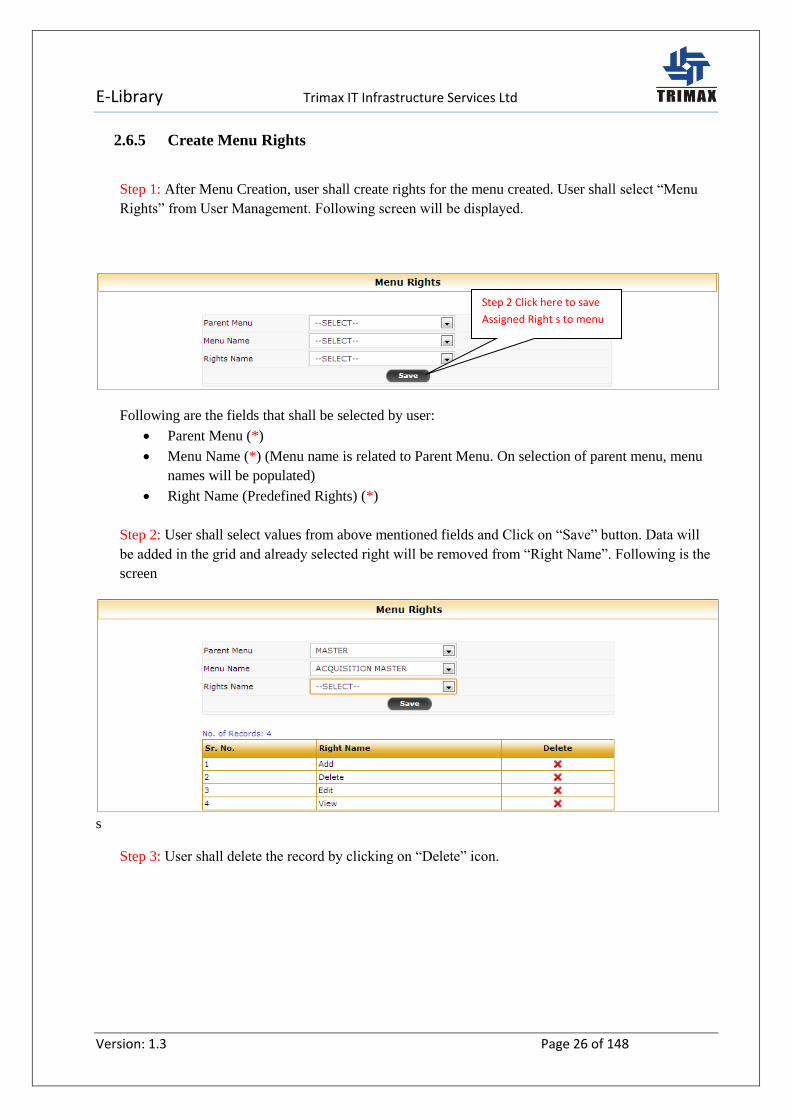
2.6.5 Create Menu Rights
Step 1: After Menu Creation, user shall create rights for the menu created. User shall select “Menu
Rights” from User Management. Following screen will be displayed.
Following are the fields that shall be selected by user:
Parent Menu (*)
Menu Name (*) (Menu name is related to Parent Menu. On selection of parent menu, menu
names will be populated)
Right Name (Predefined Rights) (*)
Step 2: User shall select values from above mentioned fields and Click on “Save” button. Data will
be added in the grid and already selected right will be removed from “Right Name”. Following is the
screen
s
Step 3: User shall delete the record by clicking on “Delete” icon.
Step 2 Click here to save
Assigned Right s to menu
E-Library Trimax IT Infrastructure Services Ltd
Version: 1.3 Page 27 of 148
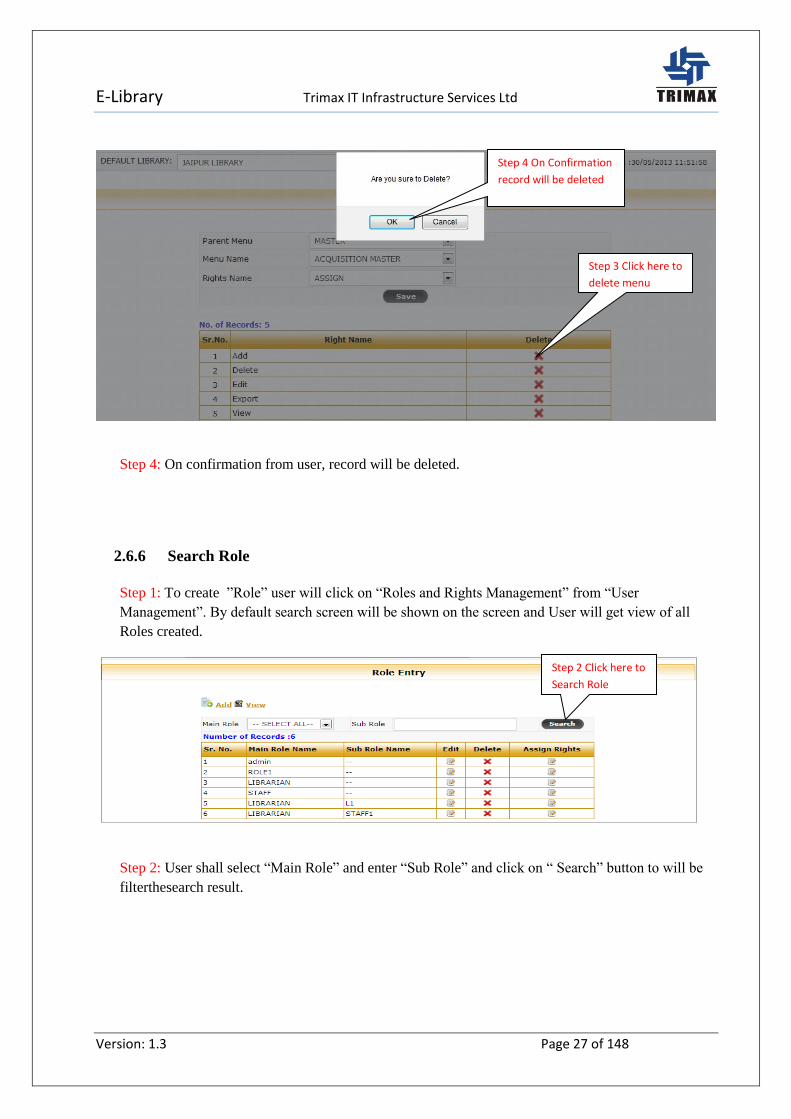
Step 4: On confirmation from user, record will be deleted.
2.6.6 Search Role
Step 1: To create ”Role” user will click on “Roles and Rights Management” from “User
Management”. By default search screen will be shown on the screen and User will get view of all
Roles created.
Step 2: User shall select “Main Role” and enter “Sub Role” and click on “ Search” button to will be
filterthesearch result.
Step 3 Click here to
delete menu
Step 4 On Confirmation
record will be deleted
Step 2 Click here to
Search Role

E-Library Trimax IT Infrastructure Services Ltd
Version: 1.3 Page 28 of 148
2.6.7 Create Role
Step 1: User shall click on “Add” link to create Role. By default following screen will be displayed.
Following are the fields that shall be selected and entered by user
Role Categories (*)
Role Name (English)(*)
Role Name(Hindi) (*)
Step 2: User shall enter all compulsory fields and click on “Save” button.
Step 3: User shall click on “Clear” Button to Clear controls.
2.6.8 Assign Rights
Step 1: User shall click on check boxes to assign rights to roles created. Following screen will be
displayed.
Step 2 Click here to
save role

E-Library Trimax IT Infrastructure Services Ltd
Version: 1.3 Page 29 of 148
Step 2: User shall Assign right by checking on checkbox and Click on “Save” button.
Step 1 & 2 Assign rights
and save
E-Library Trimax IT Infrastructure Services Ltd
Version: 1.3 Page 30 of 148
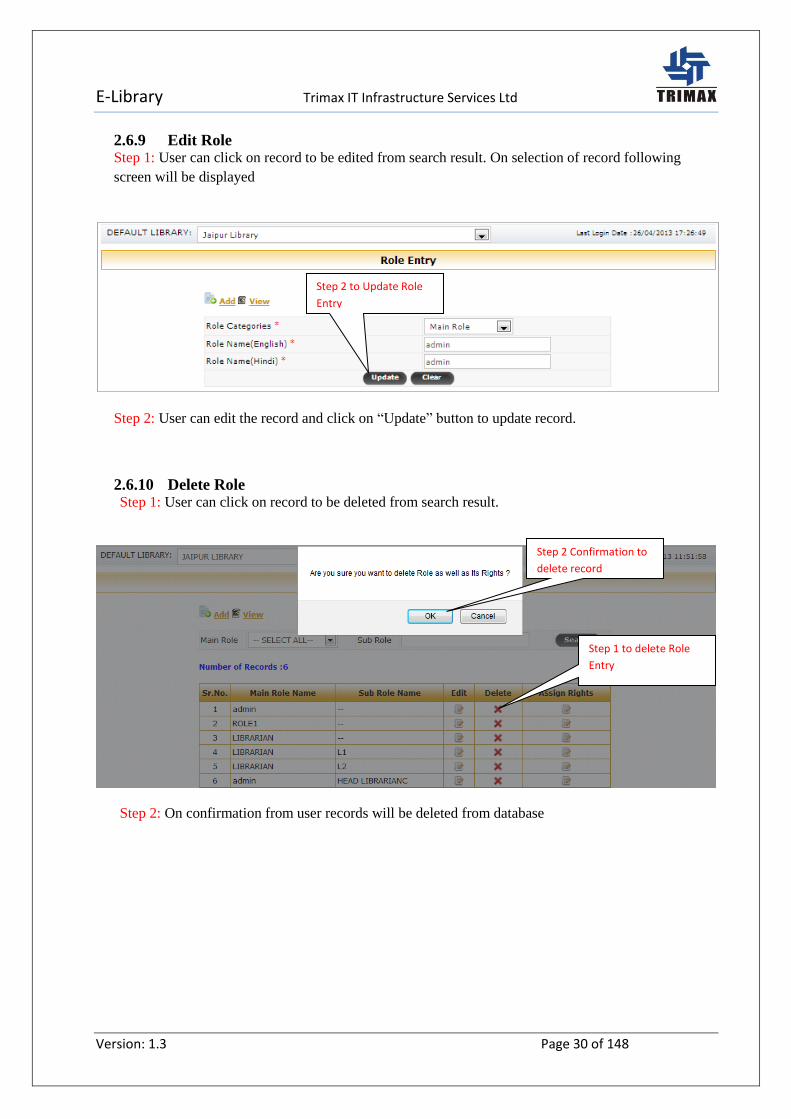
2.6.9 Edit Role Step 1: User can click on record to be edited from search result. On selection of record following
screen will be displayed
Step 2: User can edit the record and click on “Update” button to update record.
2.6.10 Delete Role Step 1: User can click on record to be deleted from search result.
Step 2: On confirmation from user records will be deleted from database
Step 2 to Update Role
Entry
Step 1 to delete Role
Entry
Step 2 Confirmation to
delete record

E-Library Trimax IT Infrastructure Services Ltd
Version: 1.3 Page 31 of 148
2.7 Master Creation
2.7.1 Subject Master
2.7.1.1 Search Subject Master
Step 1: User will select “Subject Master” from “Master”. This Master is generated to store master data of
book Subject. By default search page will be displayed. User shall click on “View” link to get view of
records created.
Step 2: User shall enter value in “Subject Name” to search record and click on “Search” button.
According to search values, filtered data will be displayed in the grid.
Step 2: Click here to Search
record.
Step 1: Click here to View records
E-Library Trimax IT Infrastructure Services Ltd
Version: 1.3 Page 32 of 148
2.7.1.2 Create Subject Master
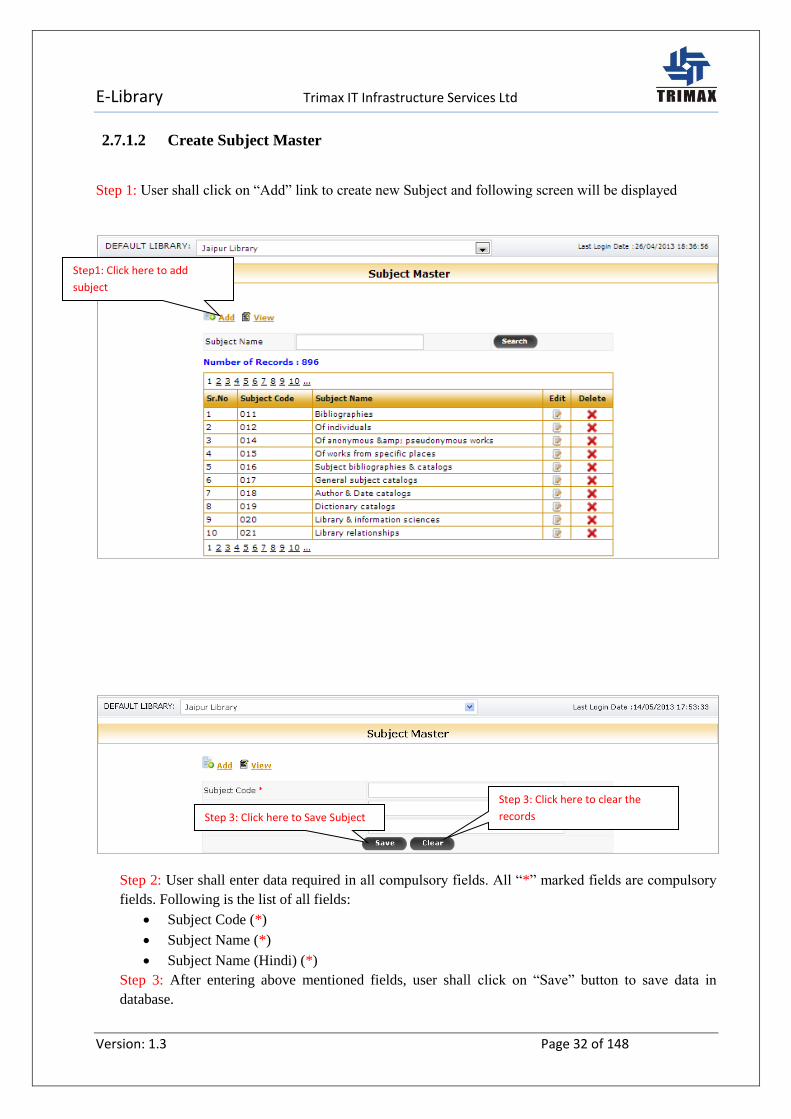
Step 1: User shall click on “Add” link to create new Subject and following screen will be displayed
Step 2: User shall enter data required in all compulsory fields. All “*” marked fields are compulsory
fields. Following is the list of all fields:
Subject Code (*)
Subject Name (*)
Subject Name (Hindi) (*)
Step 3: After entering above mentioned fields, user shall click on “Save” button to save data in
database.
Step 3: Click here to Save Subject
Step1: Click here to add
subject
Step 3: Click here to clear the
records
E-Library Trimax IT Infrastructure Services Ltd
Version: 1.3 Page 33 of 148
Step 4: User shall click on “Clear” button to clear the data from controls.
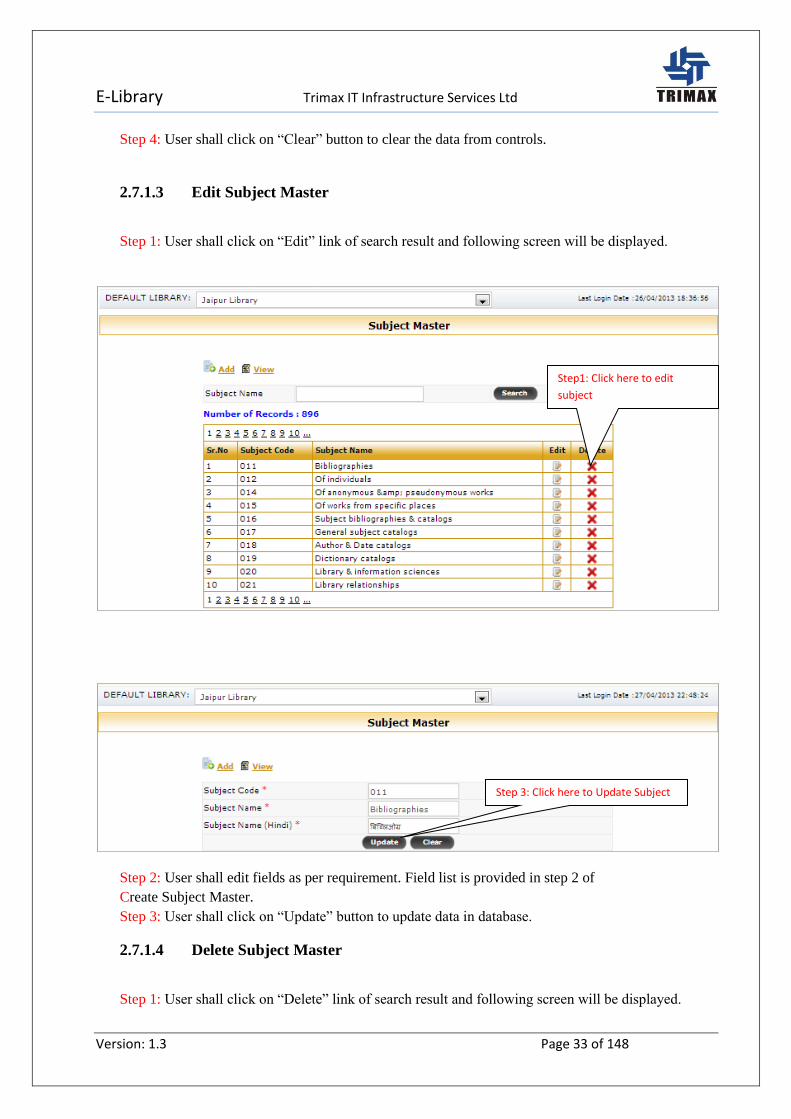
2.7.1.3 Edit Subject Master
Step 1: User shall click on “Edit” link of search result and following screen will be displayed.
Step 2: User shall edit fields as per requirement. Field list is provided in step 2 of
Create Subject Master.
Step 3: User shall click on “Update” button to update data in database.
2.7.1.4 Delete Subject Master
Step 1: User shall click on “Delete” link of search result and following screen will be displayed.
Step 3: Click here to Update Subject
Step1: Click here to edit
subject

E-Library Trimax IT Infrastructure Services Ltd
Version: 1.3 Page 34 of 148
Step 2: System will show confirmation message as shown above. On confirmation record will be
deleted and removed from Search Result.
Step 1: Click here to delete
Step 2: Confirmation to delete record

E-Library Trimax IT Infrastructure Services Ltd
Version: 1.3 Page 35 of 148
2.7.2 Language Master
2.7.2.1 Search Language Master
Step 1: User will select “Language Master” from “Master”. This Master is generated to store master
data of book Language. By default search page will be displayed. User shall click on “View” link to
get view of records created.
Step 2: User shall enter value in “Language” and click on “Search” button to search record.
According to search values filtered data will be displayed in the grid
Step 2: Click here to Search
record
Step 1: Click here to View records
E-Library Trimax IT Infrastructure Services Ltd
Version: 1.3 Page 36 of 148
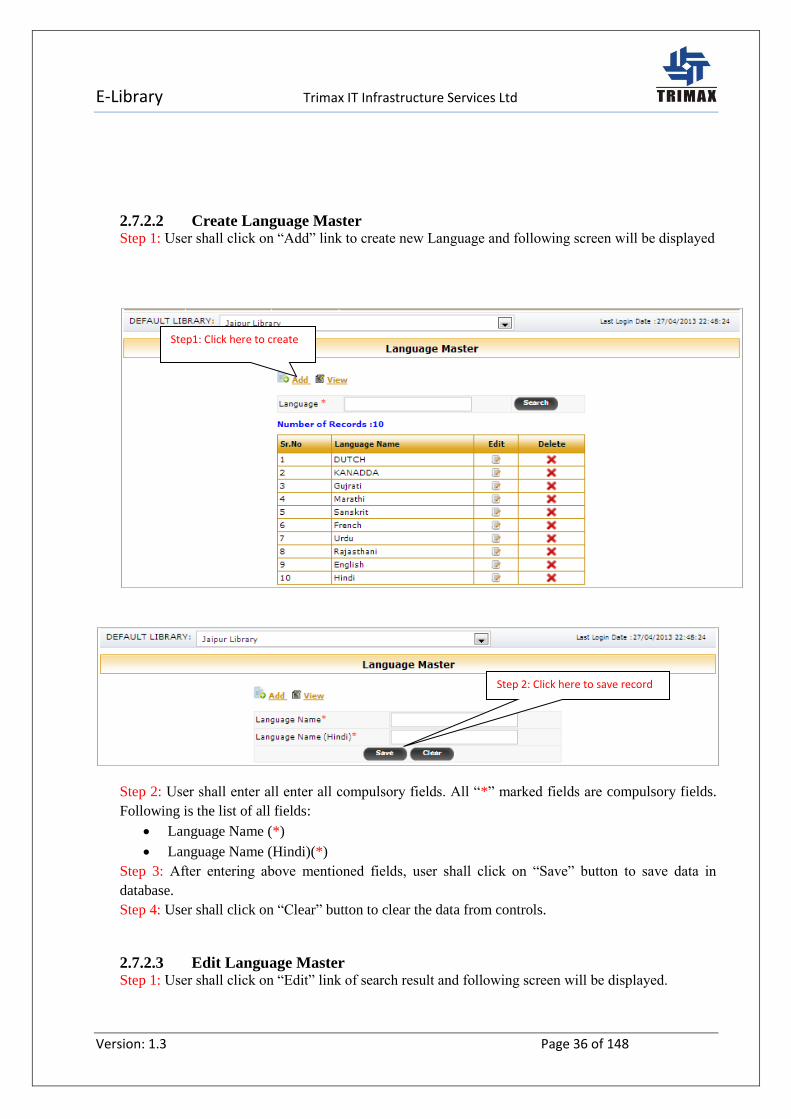
2.7.2.2 Create Language Master Step 1: User shall click on “Add” link to create new Language and following screen will be displayed
Step 2: User shall enter all enter all compulsory fields. All “*” marked fields are compulsory fields.
Following is the list of all fields:
Language Name (*)
Language Name (Hindi)(*)
Step 3: After entering above mentioned fields, user shall click on “Save” button to save data in
database.
Step 4: User shall click on “Clear” button to clear the data from controls.
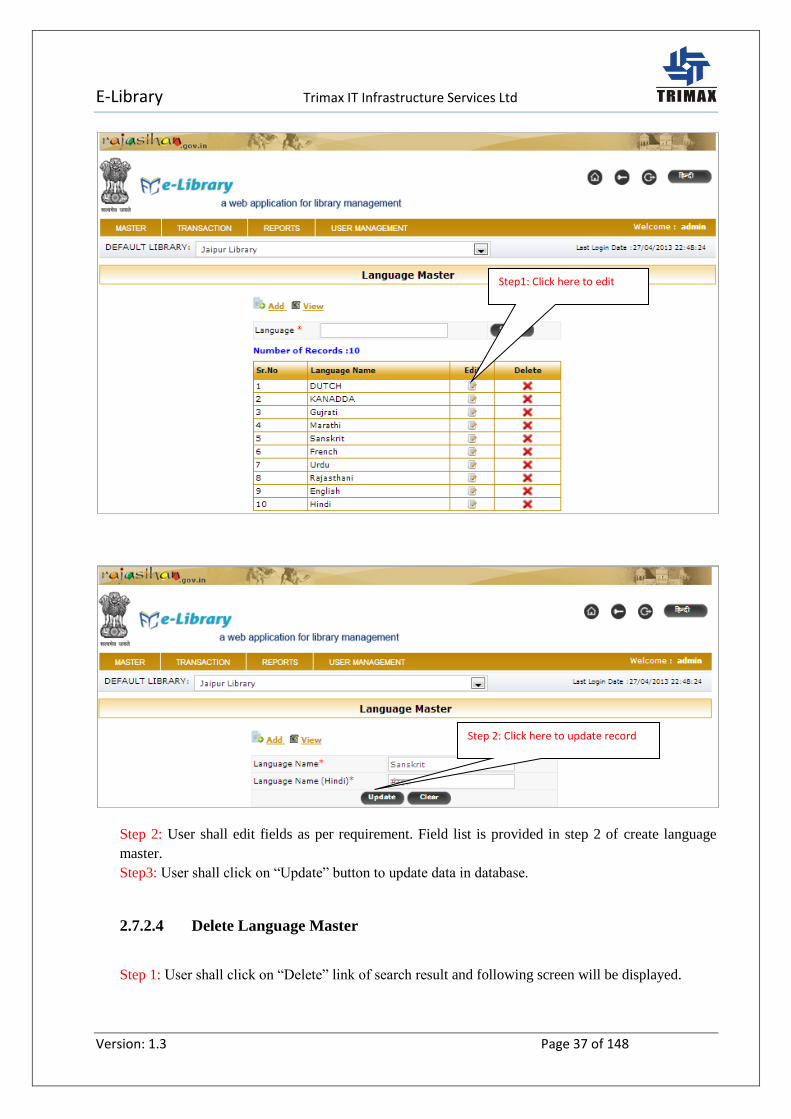
2.7.2.3 Edit Language Master Step 1: User shall click on “Edit” link of search result and following screen will be displayed.
Step 2: Click here to save record
Step1: Click here to create
E-Library Trimax IT Infrastructure Services Ltd
Version: 1.3 Page 37 of 148
Step 2: User shall edit fields as per requirement. Field list is provided in step 2 of create language
master.
Step3: User shall click on “Update” button to update data in database.
2.7.2.4 Delete Language Master
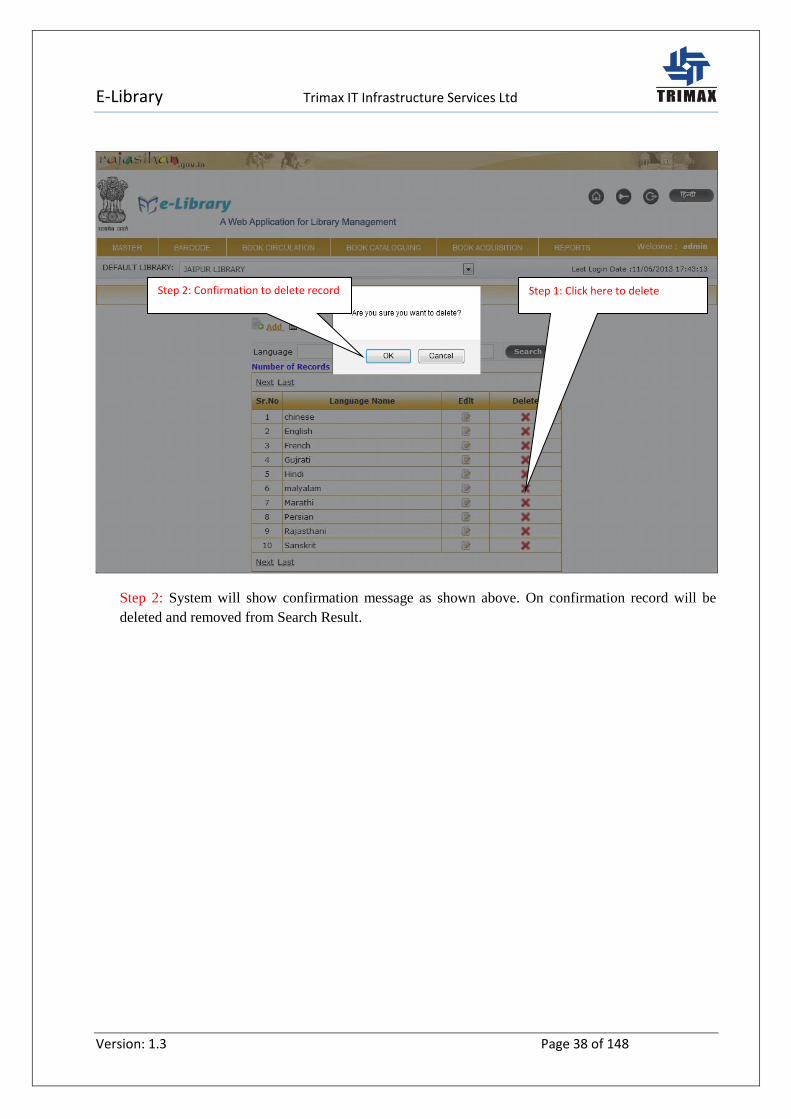
Step 1: User shall click on “Delete” link of search result and following screen will be displayed.
Step 2: Click here to update record
Step1: Click here to edit
E-Library Trimax IT Infrastructure Services Ltd
Version: 1.3 Page 38 of 148
Step 2: System will show confirmation message as shown above. On confirmation record will be
deleted and removed from Search Result.
Step 1: Click here to delete Step 2: Confirmation to delete record
E-Library Trimax IT Infrastructure Services Ltd
Version: 1.3 Page 39 of 148
2.7.3 Supplier Type Master
2.7.3.1 Search Supplier Type Master
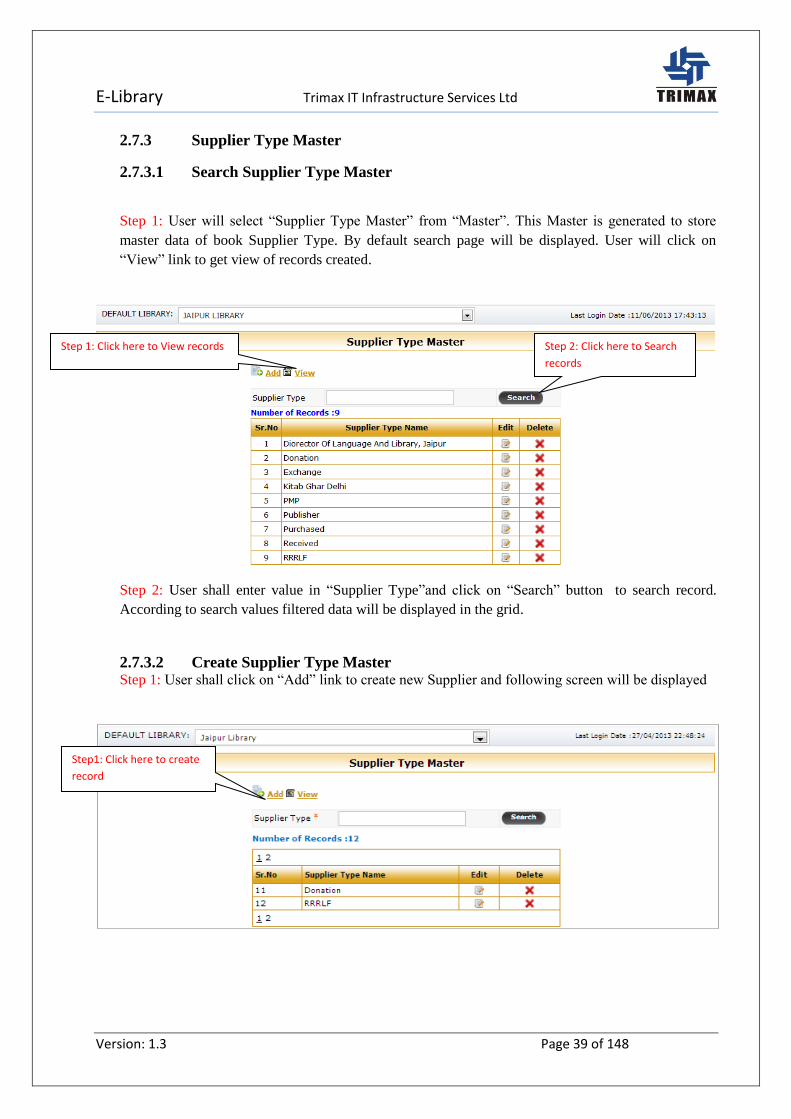
Step 1: User will select “Supplier Type Master” from “Master”. This Master is generated to store
master data of book Supplier Type. By default search page will be displayed. User will click on
“View” link to get view of records created.
Step 2: User shall enter value in “Supplier Type”and click on “Search” button to search record.
According to search values filtered data will be displayed in the grid.
2.7.3.2 Create Supplier Type Master Step 1: User shall click on “Add” link to create new Supplier and following screen will be displayed
Step 2: Click here to Search
records
Step1: Click here to create
record
Step 1: Click here to View records
E-Library Trimax IT Infrastructure Services Ltd
Version: 1.3 Page 40 of 148
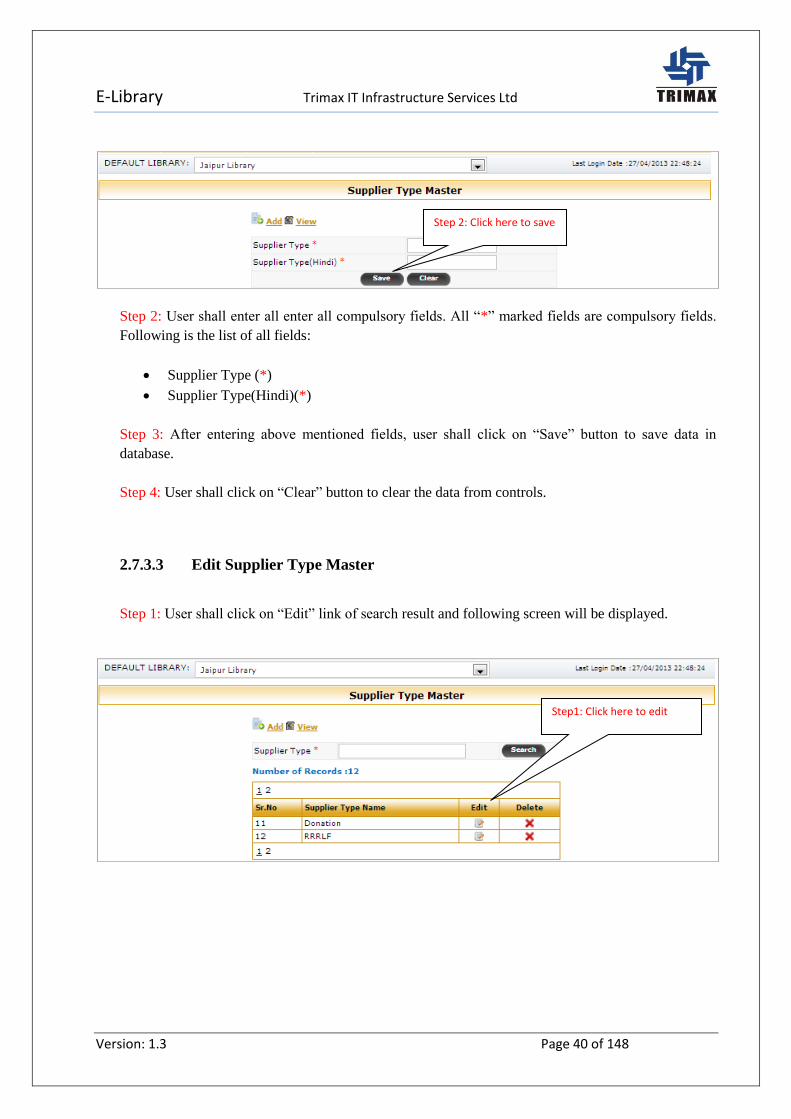
Step 2: User shall enter all enter all compulsory fields. All “*” marked fields are compulsory fields.
Following is the list of all fields:
Supplier Type (*)
Supplier Type(Hindi)(*)
Step 3: After entering above mentioned fields, user shall click on “Save” button to save data in
database.
Step 4: User shall click on “Clear” button to clear the data from controls.
2.7.3.3 Edit Supplier Type Master
Step 1: User shall click on “Edit” link of search result and following screen will be displayed.
Step 2: Click here to save
Step1: Click here to edit

E-Library Trimax IT Infrastructure Services Ltd
Version: 1.3 Page 41 of 148
Step 2: User shall edit fields as per requirement. Field list is provided in step 2 of Create Supplier
Type Master.
Step 3: User shall click on “Update” button to update data in database.
2.7.3.4 Delete Supplier Type Master
Step 1: User shall click on “Delete” link of search result and following screen will be displayed.
Step 2: System will show confirmation message as shown above. On confirmation record will be
displayed and removed from Search Result.
Step 1: Click here to delete Step 2: Confirmation to delete record
Step 2: Click here to update

E-Library Trimax IT Infrastructure Services Ltd
Version: 1.3 Page 42 of 148
2.7.4 Section Master
2.7.4.1 Search Section Master Step 1: User will select “Section Master” from “Master”. This Master is generated to store master
data of Library Section. By default search page will be displayed. User shall click on “View” to get
view of records created in case user in edit or add mode.
Step 2: User shall enter value in “Section” and click on “Search” button to search record. According
to search values, filtered data will be displayed in the grid.
2.7.4.2 Create Section Master
Step 1: User shall click on “Add” link to create new Section and following screen will be displayed
Step 2: Click here to Search
record
Step 1: Click here to View records
E-Library Trimax IT Infrastructure Services Ltd
Version: 1.3 Page 43 of 148
Step 2: User shall enter all compulsory fields. All “*” marked fields are compulsory fields.
Following is the list of all fields: Section Name (Hindi)(*)
Section Name(Hindi) )(*)
Step 3: After entering above mentioned fields, user shall click on “Save” button to save data in
database.
Step 4: User shall click on “Clear” button to clear the data from controls.
Step 2: Click here to save
Step1: Click here to create record

E-Library Trimax IT Infrastructure Services Ltd
Version: 1.3 Page 44 of 148
2.7.4.3 Edit Section Master
Step 1: User shall click on “Edit” link of search result and following screen will be displayed.
Step 2: User shall edit fields as per requirement. Field list is provided in step 2 of Create Section
Master.
Step3: User shall click on “Update” button to update data in database.
Step 2: Click here to update
Step1: Click here to edit
E-Library Trimax IT Infrastructure Services Ltd
Version: 1.3 Page 45 of 148
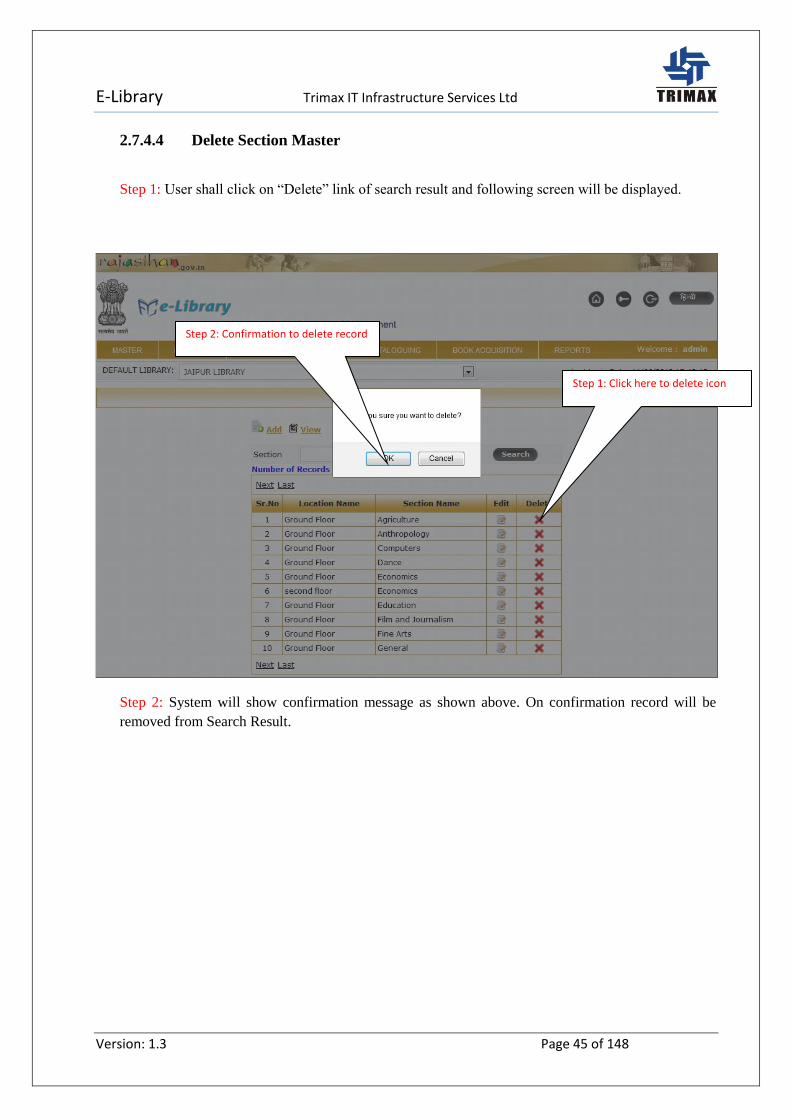
2.7.4.4 Delete Section Master
Step 1: User shall click on “Delete” link of search result and following screen will be displayed.
Step 2: System will show confirmation message as shown above. On confirmation record will be
removed from Search Result.
Step 1: Click here to delete icon
Step 2: Confirmation to delete record

E-Library Trimax IT Infrastructure Services Ltd
Version: 1.3 Page 46 of 148
2.7.5 Location Master
2.7.5.1 Search Location Master Step 1: User will select “Location Master” from “Master”. This Master is generated to store master
data of book Location. By default search page will be displayed. User shall click on “View” to get
view of created records.
Step 2: User shall enter value in “Location Name” and click on “Search” button to search record.
According to search values, filtered data will be displayed in the grid.
2.7.5.2 Create Location Master
Step 1: User shall click on “Add” link to create new Location and following screen will be displayed
Step 1: Click here to View records
Step2: Click here to search
record
Step1: Click here to create

E-Library Trimax IT Infrastructure Services Ltd
Version: 1.3 Page 47 of 148
Step 2: User shall enter all enter all compulsory fields. All “*” marked fields are compulsory fields.
Following is the list of all fields.
Location Name (*)
Location Name (Hindi) (*)
Step 3: After entering above mentioned fields, user shall click on “Save” button to save data in
database.
Step 4: User shall click on “Clear” button to clear the data from controls.
2.7.5.3 Edit Location Master
Step 1: User shall click on “Edit” link of search result and following screen will be displayed.
Step 3: Click here to save
Step1: Click here to edit

E-Library Trimax IT Infrastructure Services Ltd
Version: 1.3 Page 48 of 148
Step 2: User shall edit fields as per requirement. Field list is provided in step 2 of Create
Step3: User shall click on “Update” button to update data in database.
2.7.5.4 Delete Location Master
Step 1: User shall click on “Delete” link of search result and following screen will be displayed.
Step 2: System will show confirmation message as shown above. On confirmation record will be
deleted and removed from Search Result.
Step 1: Click here to delete
Step 2: Confirmation to delete record
Step 3: Click here to update

E-Library Trimax IT Infrastructure Services Ltd
Version: 1.3 Page 49 of 148
2.7.6 Library Master
2.7.6.1 Search Library Master Step 1: User will select “Library Master” from “Master”. This Master is generated to store master
data of Library. By default search page will be displayed. User shall click on “View” to get view of
records created in case user in edit or add mode.
Step 2: User shall enter value in “Library Name” and click on “Search” button to search record.
According to search values, filtered data will be displayed in the grid.
2.7.6.2 Create Library Master
Step 1: User shall click on “Add” link to create new Library and following screen will be displayed
Step 2: Click here to Search
record
Step 1: Click here to View records
Step1: Click here to
create

E-Library Trimax IT Infrastructure Services Ltd
Version: 1.3 Page 50 of 148
Step 2: User shall enter all enter all compulsory fields. All “*” marked fields are compulsory fields.
Following is the list of all fields.
Library Name (*)
Library Name (Hindi) (*)
Library Short Name (*)
Library Short Name (Hindi) (*)
Library Address(*)
Library Address (Hindi) (*)
Library Contact No(*)
Step 3: After entering above mentioned fields, user shall click on “Save” button to save data in
database.
Step 4: User shall click on “Clear” button to clear the data from controls.
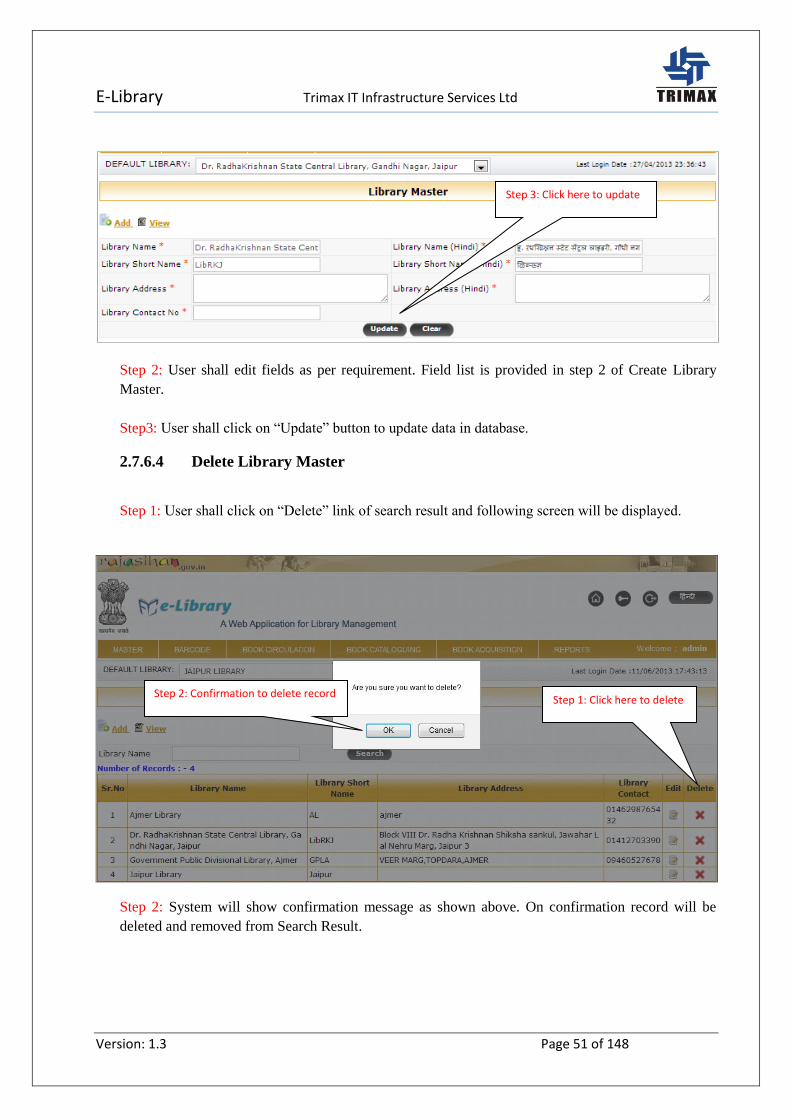
2.7.6.3 Edit Library Master
Step 1: User shall click on “Edit” link of search result and following screen will be displayed.
Step 3: Click here to save
Step1: Click here to edit
E-Library Trimax IT Infrastructure Services Ltd
Version: 1.3 Page 51 of 148
Step 2: User shall edit fields as per requirement. Field list is provided in step 2 of Create Library
Master.
Step3: User shall click on “Update” button to update data in database.
2.7.6.4 Delete Library Master
Step 1: User shall click on “Delete” link of search result and following screen will be displayed.
Step 2: System will show confirmation message as shown above. On confirmation record will be
deleted and removed from Search Result.
Step 1: Click here to delete Step 2: Confirmation to delete record
Step 3: Click here to update
E-Library Trimax IT Infrastructure Services Ltd
Version: 1.3 Page 52 of 148
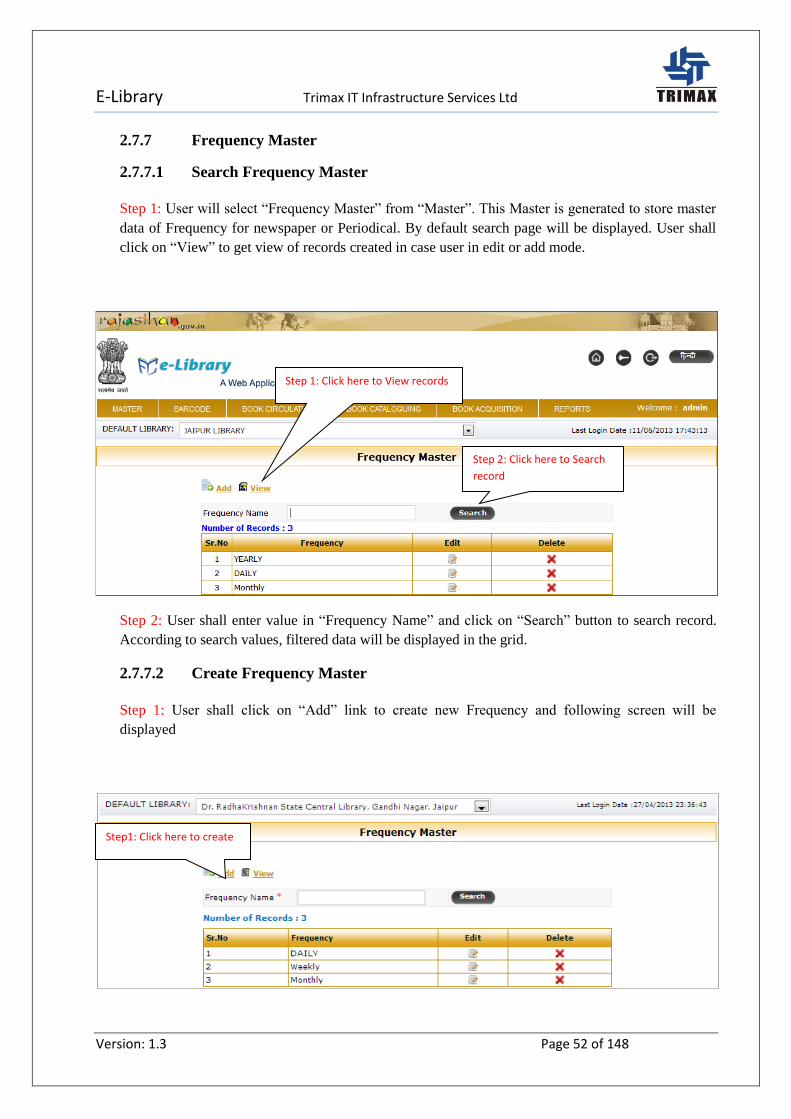
2.7.7 Frequency Master
2.7.7.1 Search Frequency Master
Step 1: User will select “Frequency Master” from “Master”. This Master is generated to store master
data of Frequency for newspaper or Periodical. By default search page will be displayed. User shall
click on “View” to get view of records created in case user in edit or add mode.
Step 2: User shall enter value in “Frequency Name” and click on “Search” button to search record.
According to search values, filtered data will be displayed in the grid.
2.7.7.2 Create Frequency Master
Step 1: User shall click on “Add” link to create new Frequency and following screen will be
displayed
Step 2: Click here to Search
record
Step 1: Click here to View records
Step1: Click here to create

E-Library Trimax IT Infrastructure Services Ltd
Version: 1.3 Page 53 of 148
Step 2: User shall enter all enter all compulsory fields. All “*” marked fields are compulsory fields.
Following is the list of all fields.
Frequency Name (*)
Frequency Name(Hindi) (*)
Step 3: After entering above mentioned fields, user shall click on “Save” button to save data in
database.
Step 4: User shall click on “Clear” button to clear the data from controls.
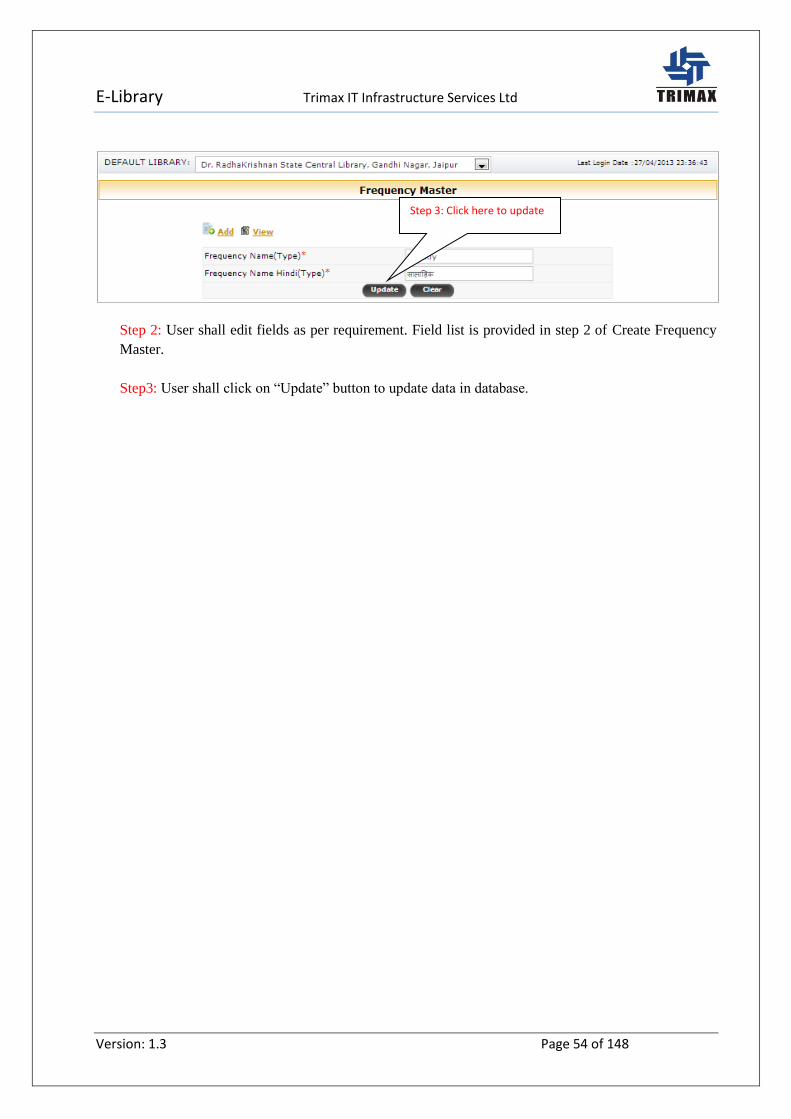
2.7.7.3 Edit Frequency Master
Step 1: User shall click on “Edit” link of search result and following screen will be displayed.
Step 3: Click here to save
Step1: Click here to edit
E-Library Trimax IT Infrastructure Services Ltd
Version: 1.3 Page 54 of 148
Step 2: User shall edit fields as per requirement. Field list is provided in step 2 of Create Frequency
Master.
Step3: User shall click on “Update” button to update data in database.
Step 3: Click here to update
E-Library Trimax IT Infrastructure Services Ltd
Version: 1.3 Page 55 of 148
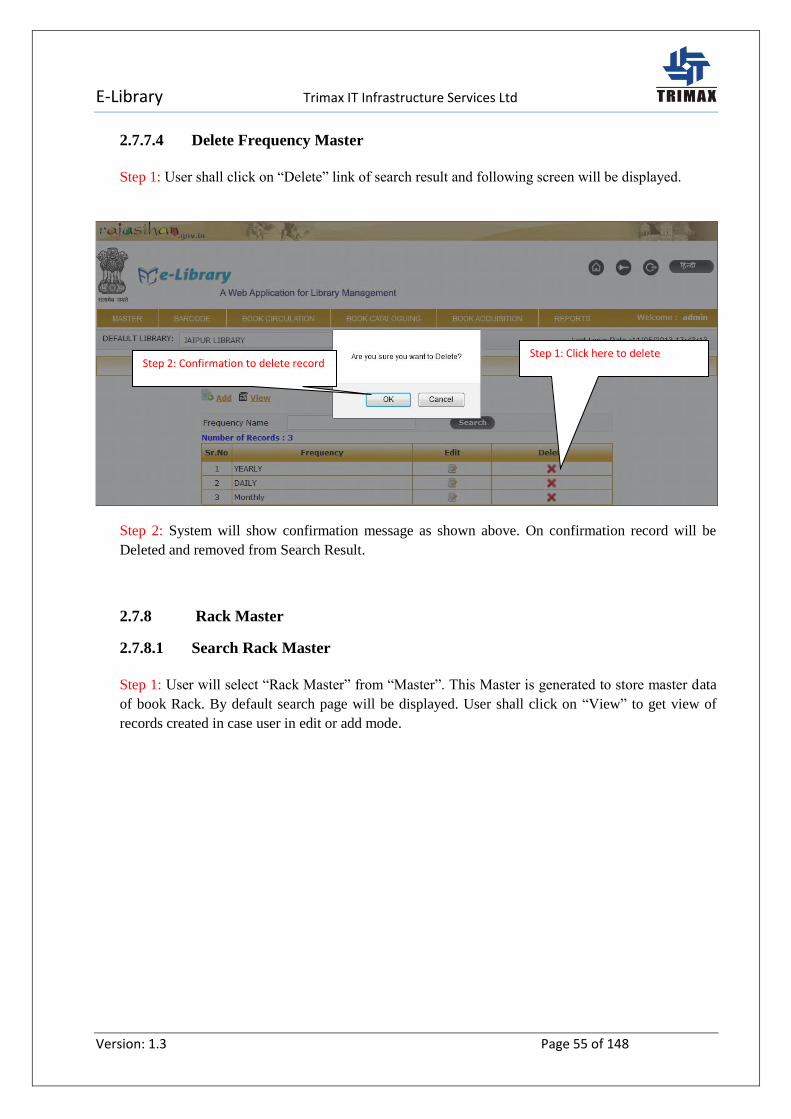
2.7.7.4 Delete Frequency Master
Step 1: User shall click on “Delete” link of search result and following screen will be displayed.
Step 2: System will show confirmation message as shown above. On confirmation record will be
Deleted and removed from Search Result.
2.7.8 Rack Master
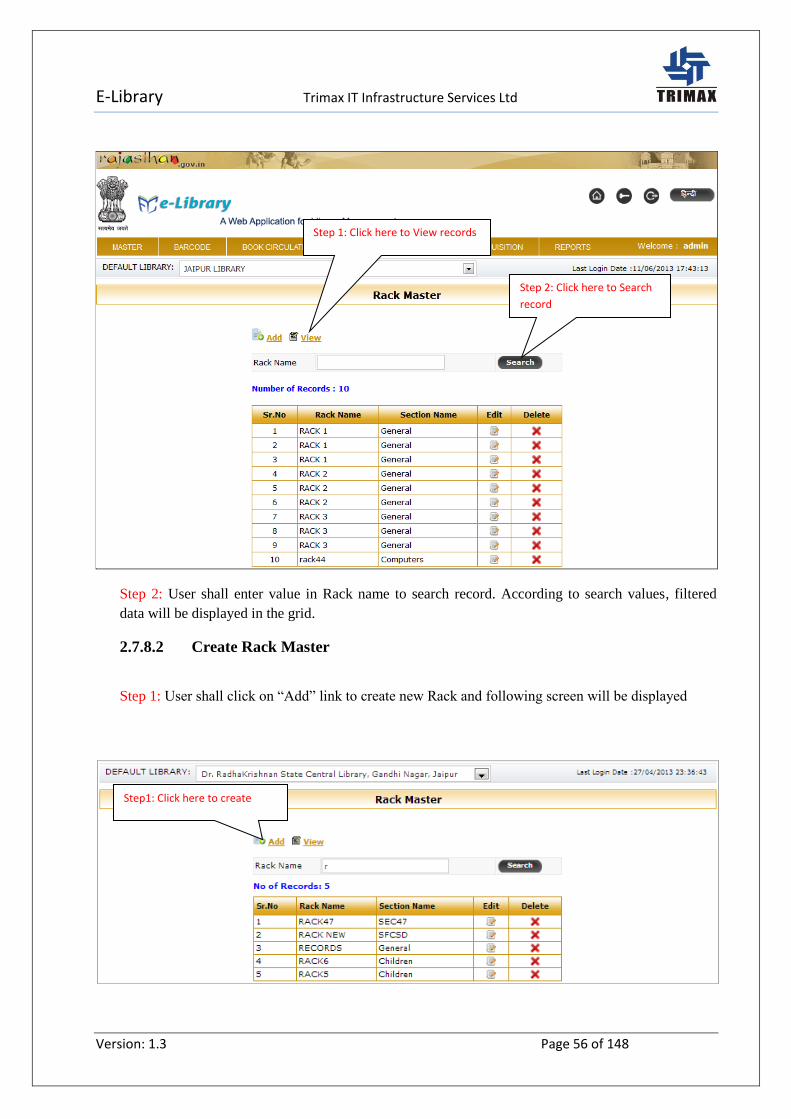
2.7.8.1 Search Rack Master
Step 1: User will select “Rack Master” from “Master”. This Master is generated to store master data
of book Rack. By default search page will be displayed. User shall click on “View” to get view of
records created in case user in edit or add mode.
Step 1: Click here to delete Step 2: Confirmation to delete record
E-Library Trimax IT Infrastructure Services Ltd
Version: 1.3 Page 56 of 148
Step 2: User shall enter value in Rack name to search record. According to search values, filtered
data will be displayed in the grid.
2.7.8.2 Create Rack Master
Step 1: User shall click on “Add” link to create new Rack and following screen will be displayed
Step 2: Click here to Search
record
Step 1: Click here to View records
Step1: Click here to create
E-Library Trimax IT Infrastructure Services Ltd
Version: 1.3 Page 57 of 148
Step 2: User shall enter all compulsory fields. All “*” marked fields are compulsory fields. Following
is the list of all fields.
Section Name(*)
Rack Name (*)
Rack Name(Hindi) (*)
Step 3: After entering above mentioned fields, user shall click on “Save” button to save data in
database.
Step 4: User shall click on “Clear” button to clear the data from controls.
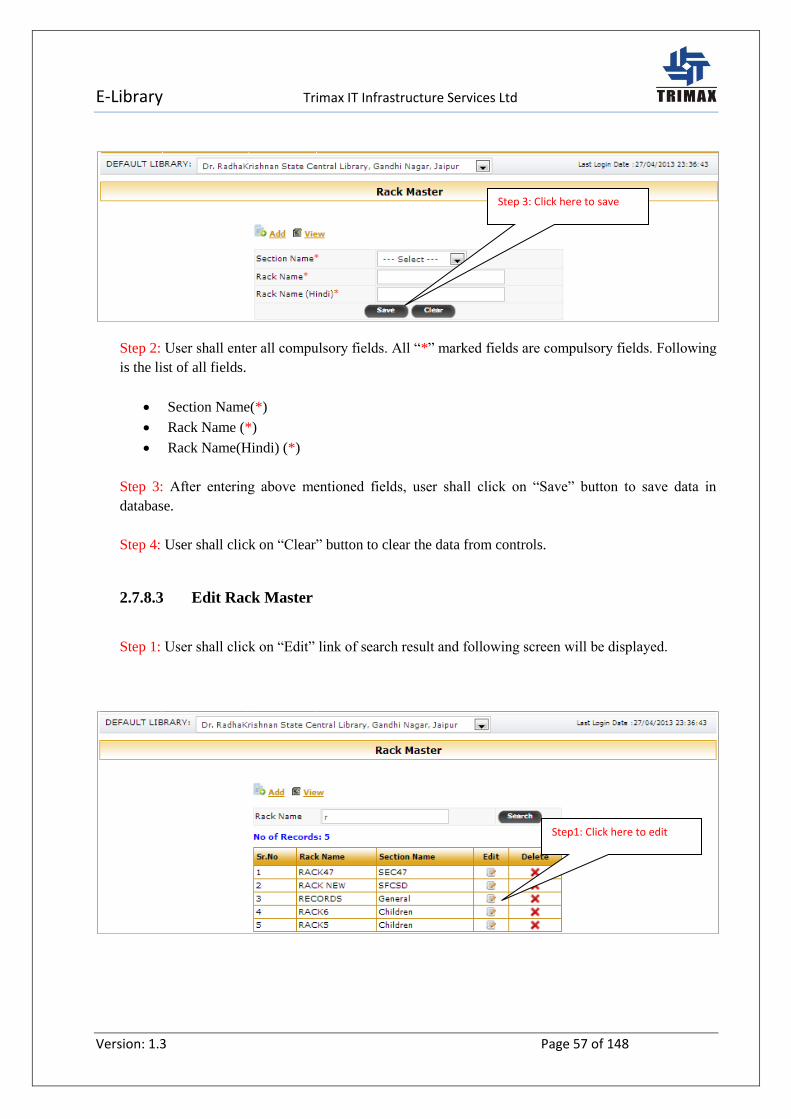
2.7.8.3 Edit Rack Master
Step 1: User shall click on “Edit” link of search result and following screen will be displayed.
Step 3: Click here to save
Step1: Click here to edit

E-Library Trimax IT Infrastructure Services Ltd
Version: 1.3 Page 58 of 148
Step 2: User shall edit fields as per requirement. Field list is provided in step 2 of Create Rack
Master.
Step3: User shall click on “Update” button to update data in database.
Step 3: Click here to update
E-Library Trimax IT Infrastructure Services Ltd
Version: 1.3 Page 59 of 148
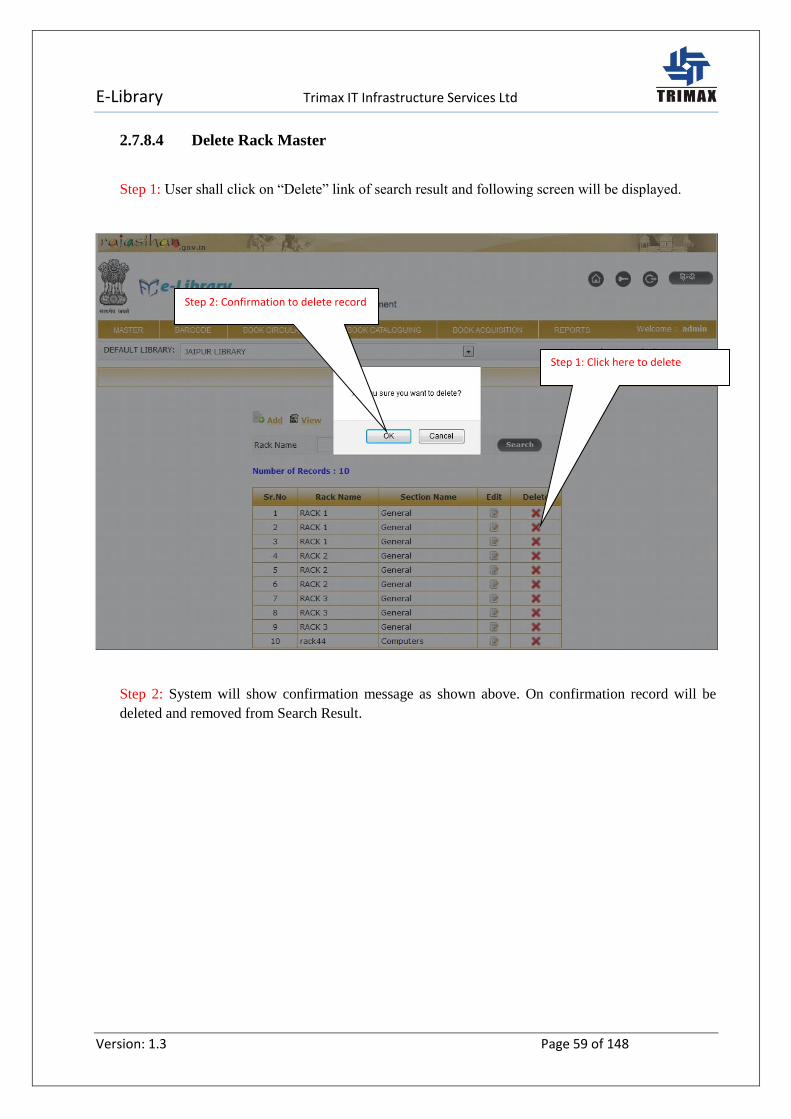
2.7.8.4 Delete Rack Master
Step 1: User shall click on “Delete” link of search result and following screen will be displayed.
Step 2: System will show confirmation message as shown above. On confirmation record will be
deleted and removed from Search Result.
Step 1: Click here to delete
Step 2: Confirmation to delete record
E-Library Trimax IT Infrastructure Services Ltd
Version: 1.3 Page 60 of 148
2.7.9 Publisher Master
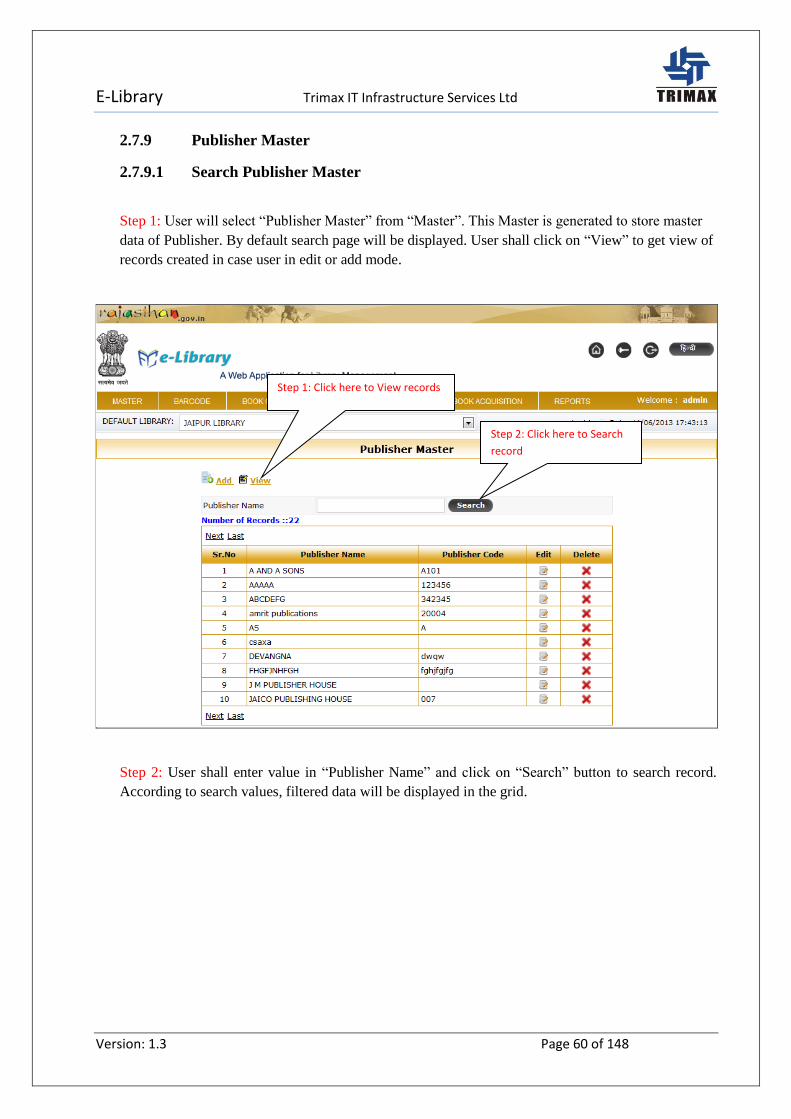
2.7.9.1 Search Publisher Master
Step 1: User will select “Publisher Master” from “Master”. This Master is generated to store master
data of Publisher. By default search page will be displayed. User shall click on “View” to get view of
records created in case user in edit or add mode.
Step 2: User shall enter value in “Publisher Name” and click on “Search” button to search record.
According to search values, filtered data will be displayed in the grid.
Step 2: Click here to Search
record
Step 1: Click here to View records
E-Library Trimax IT Infrastructure Services Ltd
Version: 1.3 Page 61 of 148
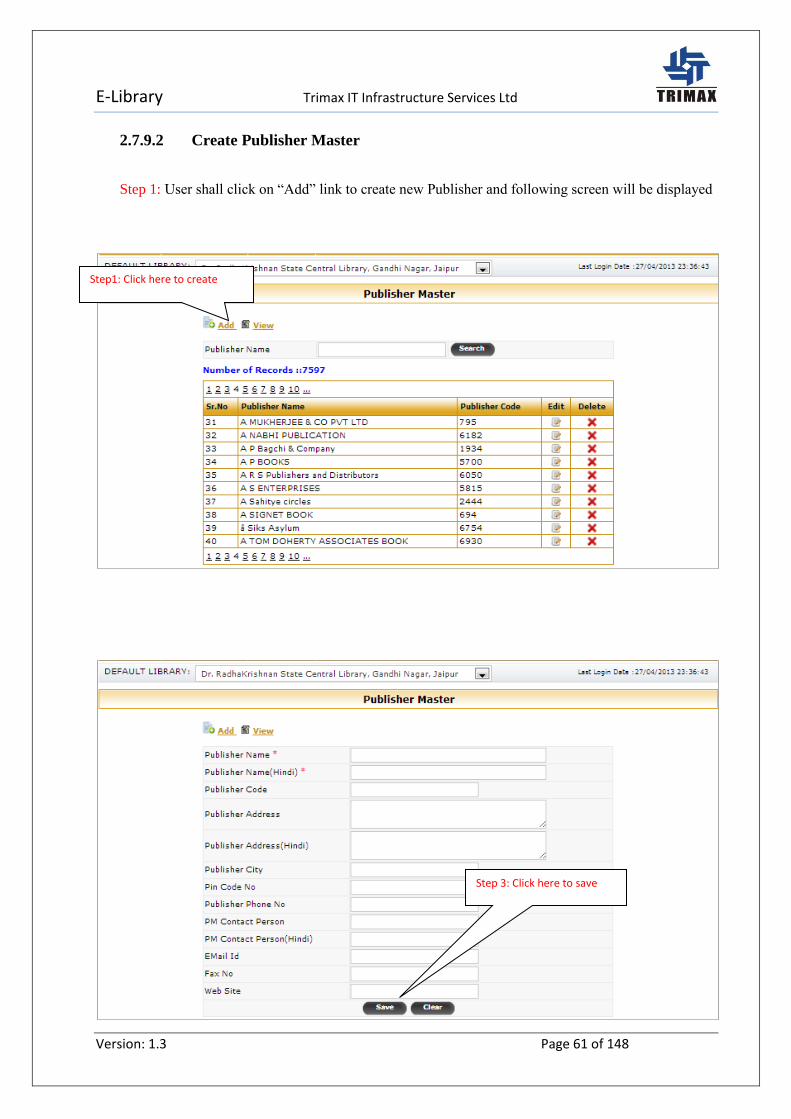
2.7.9.2 Create Publisher Master
Step 1: User shall click on “Add” link to create new Publisher and following screen will be displayed
Step 3: Click here to save
Step1: Click here to create

E-Library Trimax IT Infrastructure Services Ltd
Version: 1.3 Page 62 of 148
Step 2: User shall enter all enter all compulsory fields. All “*” marked fields are compulsory fields.
Following is the list of all fields.
Publisher Name(*)
Publisher Name(Hindi) (*)
Publisher Code
Publisher Address
Publisher Address (Hindi)
Publisher City
Pincode No
Publisher Phone No
PM Contact Person
PM Contact Person (Hindi)
Email Id
Fax No
Website
Step 3: After entering above mentioned fields, user shall click on “Save” button to save data in
database.
Step 4: User shall click on “Clear” button to clear the data from controls.
E-Library Trimax IT Infrastructure Services Ltd
Version: 1.3 Page 63 of 148
2.7.9.3 Edit Publisher Master
Step 1: User shall click on “Edit” link of search result and following screen will be displayed.
Step 3: Click here to update
Step1: Click here to edit

E-Library Trimax IT Infrastructure Services Ltd
Version: 1.3 Page 64 of 148
Step 2: User shall edit fields as per requirement. Field list is provided in step 2 of Create Publisher
Master.
Step3: User shall click on “Update” button to update data in database.
E-Library Trimax IT Infrastructure Services Ltd
Version: 1.3 Page 65 of 148
2.7.9.4 Delete Publisher Master
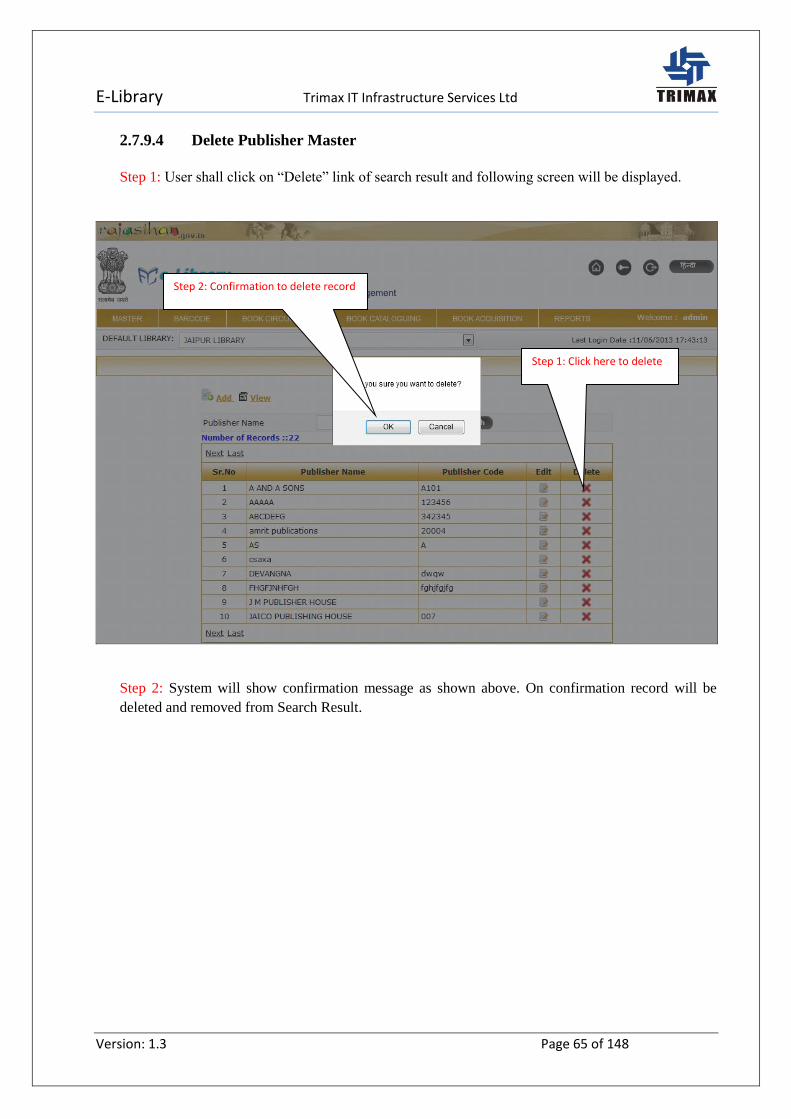
Step 1: User shall click on “Delete” link of search result and following screen will be displayed.
Step 2: System will show confirmation message as shown above. On confirmation record will be
deleted and removed from Search Result.
Step 1: Click here to delete
Step 2: Confirmation to delete record
E-Library Trimax IT Infrastructure Services Ltd
Version: 1.3 Page 66 of 148
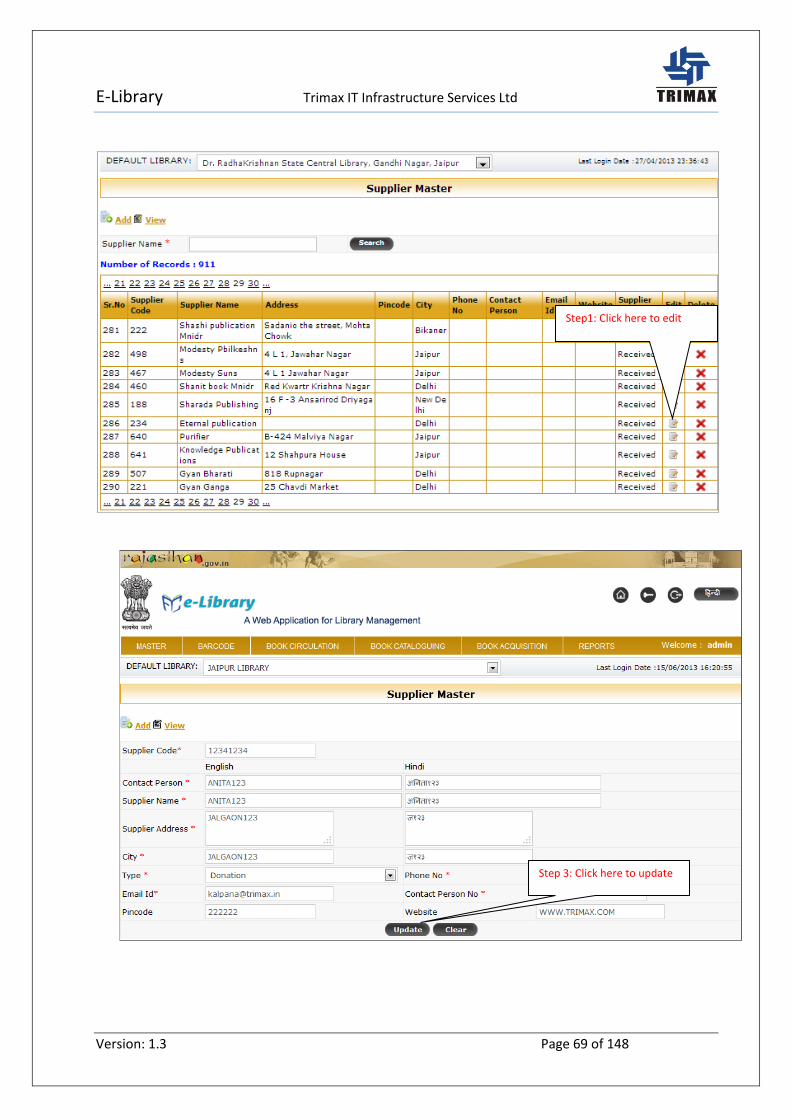
2.7.10 Supplier Master
2.7.10.1 Search Supplier Master
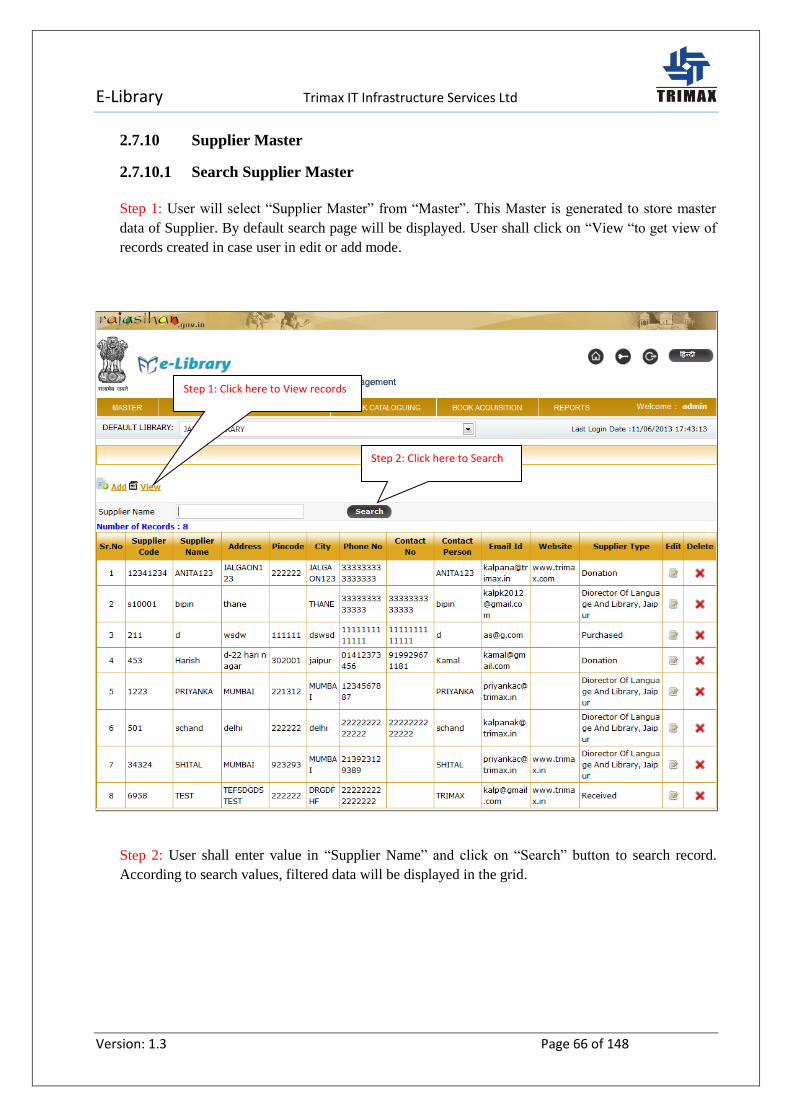
Step 1: User will select “Supplier Master” from “Master”. This Master is generated to store master
data of Supplier. By default search page will be displayed. User shall click on “View “to get view of
records created in case user in edit or add mode.
Step 2: User shall enter value in “Supplier Name” and click on “Search” button to search record.
According to search values, filtered data will be displayed in the grid.
Step 2: Click here to Search
Step 1: Click here to View records

E-Library Trimax IT Infrastructure Services Ltd
Version: 1.3 Page 67 of 148
2.7.10.2 Create Supplier Master
Step 1: User shall click on “Add” link to create new Supplier and following screen will be displayed
Step 3: Click here to save
Step1: Click here to create
E-Library Trimax IT Infrastructure Services Ltd
Version: 1.3 Page 68 of 148
Step 2: User shall enter all enter all compulsory fields. All “*” marked fields are compulsory fields.
Following is the list of all fields.
Supplier Code
Contact Person(*)
Contact Person (Hindi) (*)
Supplier Name(*)
Supplier Name(Hindi) (*)
Supplier Address(*)
Supplier Address (Hindi) (*)
City(*)
City (Hindi) (*)
Type (*)
Phone No(*)
Email Id(*)
Contact person No(*).
Website
Pin code No
Step 3: After entering above mentioned fields, user shall click on “Save” button to save data in
database.
Step 4: User shall click on “Clear” button to clear the data from controls.
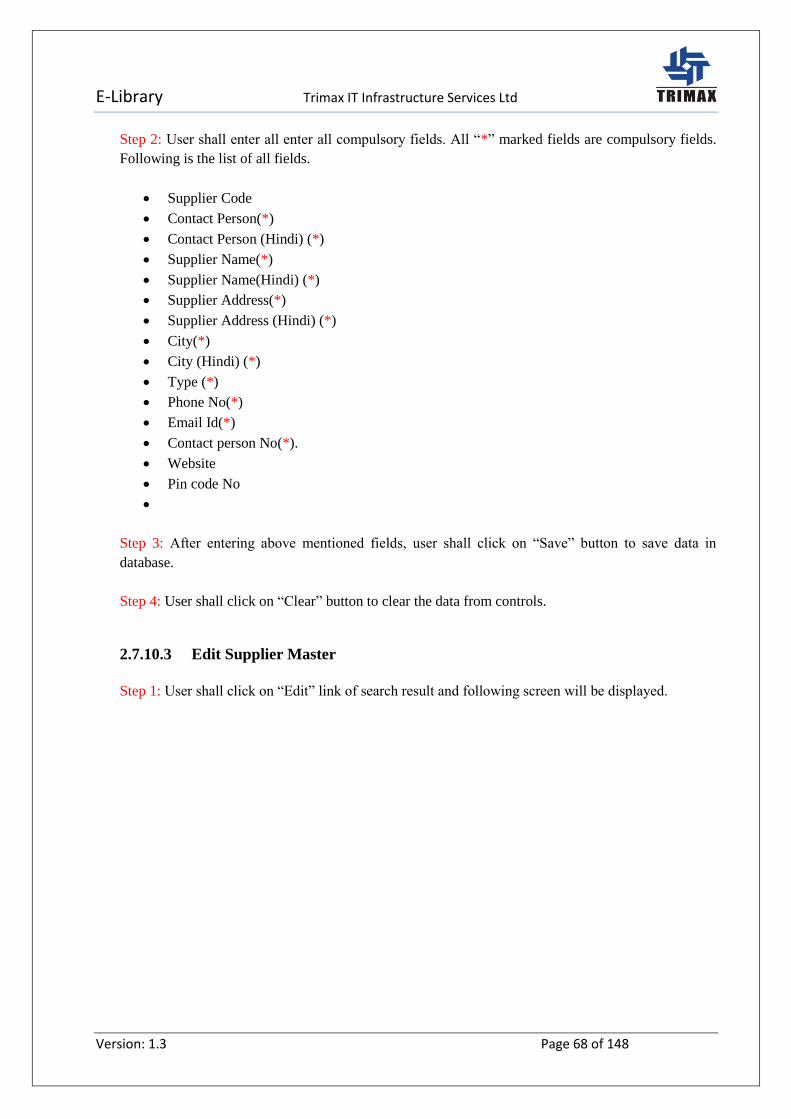
2.7.10.3 Edit Supplier Master
Step 1: User shall click on “Edit” link of search result and following screen will be displayed.
E-Library Trimax IT Infrastructure Services Ltd
Version: 1.3 Page 69 of 148
Step 3: Click here to update
Step1: Click here to edit

E-Library Trimax IT Infrastructure Services Ltd
Version: 1.3 Page 70 of 148
Step 2: User shall edit fields as per requirement. Field list is provided in step 2 of Create Supplier
Master.
Step3: User shall click on “Update” button to update data in database.

E-Library Trimax IT Infrastructure Services Ltd
Version: 1.3 Page 71 of 148
2.7.10.4 Delete Supplier Master
Step 1: User shall click on “Delete” link of search result and following screen will be displayed.
Step 2: System will show confirmation message as shown above. On confirmation record will be
deleted and removed from Search Result.
Step 1: Click here to delete Step 2: Confirmation to delete record

E-Library Trimax IT Infrastructure Services Ltd
Version: 1.3 Page 72 of 148
2.7.11 Periodical Master
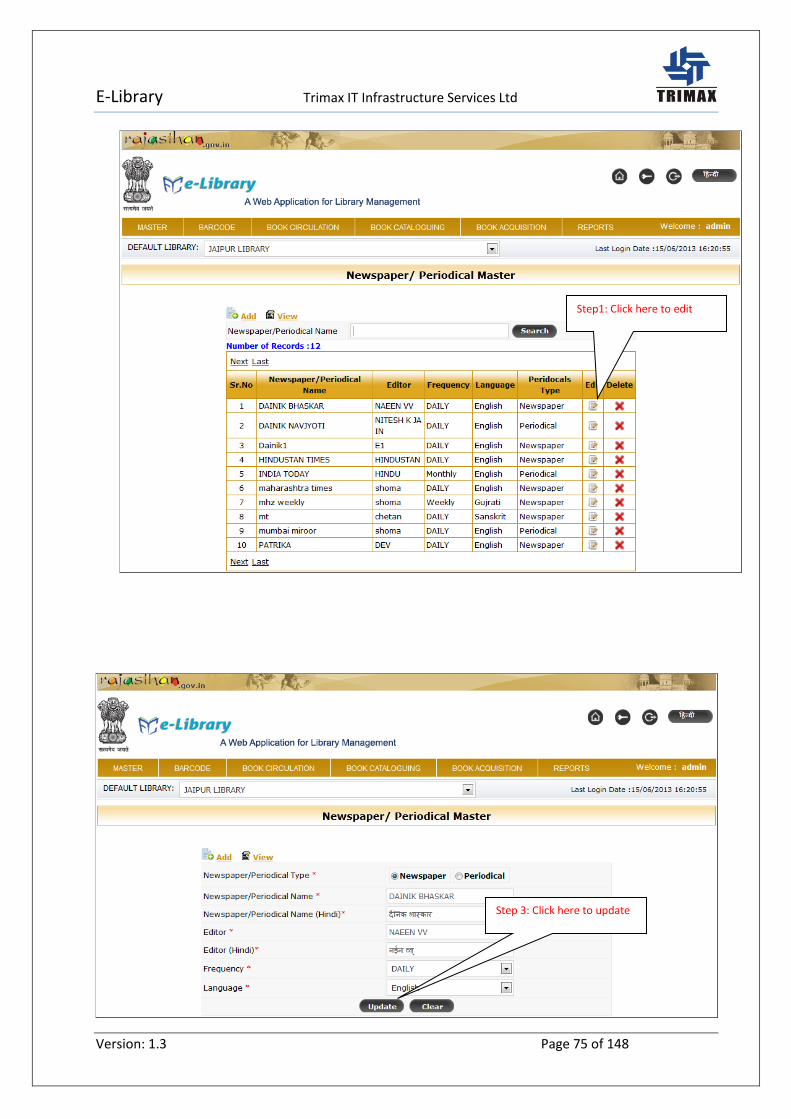
2.7.11.1 Search Periodical Master
Step 1: User will select “Periodical Master” from “Master”. This Master is generated to store master
data of Periodical. By default search page will be displayed. User shall click on “View” to get view
of records created in case user in edit or add mode.
Step 2: User shall enter value in “Newspaper/Periodical Name” to search record. According to search
values, filtered data will be displayed in the grid.
Step 2: Click here to Search
record
Step 1: Click here to View records

E-Library Trimax IT Infrastructure Services Ltd
Version: 1.3 Page 73 of 148
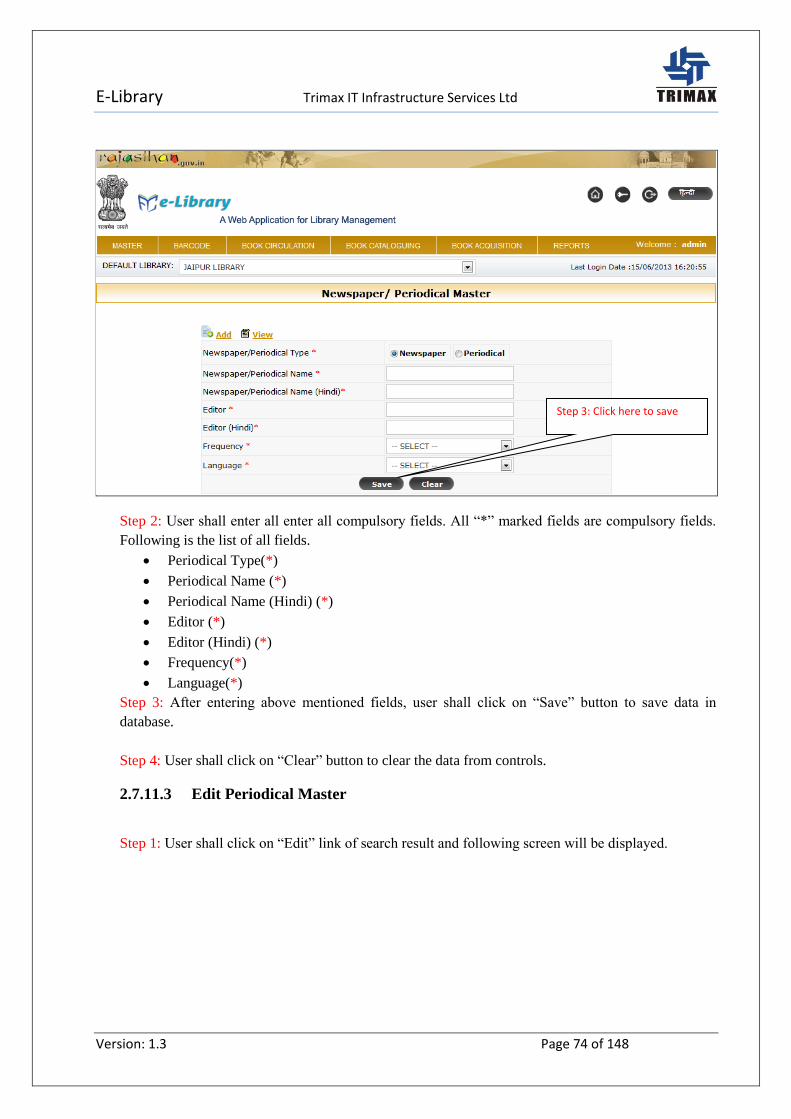
2.7.11.2 Create Periodical Master
Step 1: User shall click on “Add” link to create new Periodical and following screen will be
displayed.
Step1: Click here to
create
E-Library Trimax IT Infrastructure Services Ltd
Version: 1.3 Page 74 of 148
Step 2: User shall enter all enter all compulsory fields. All “*” marked fields are compulsory fields.
Following is the list of all fields.
Periodical Type(*)
Periodical Name (*)
Periodical Name (Hindi) (*)
Editor (*)
Editor (Hindi) (*)
Frequency(*)
Language(*)
Step 3: After entering above mentioned fields, user shall click on “Save” button to save data in
database.
Step 4: User shall click on “Clear” button to clear the data from controls.
2.7.11.3 Edit Periodical Master
Step 1: User shall click on “Edit” link of search result and following screen will be displayed.
Step 3: Click here to save
E-Library Trimax IT Infrastructure Services Ltd
Version: 1.3 Page 75 of 148
Step 3: Click here to update
Step1: Click here to edit

E-Library Trimax IT Infrastructure Services Ltd
Version: 1.3 Page 76 of 148
Step 2: User shall edit fields as per requirement. Field list is provided in step 2 of Create Periodical
Master.
Step3: User shall click on “Update” button to update data in database.
E-Library Trimax IT Infrastructure Services Ltd
Version: 1.3 Page 77 of 148
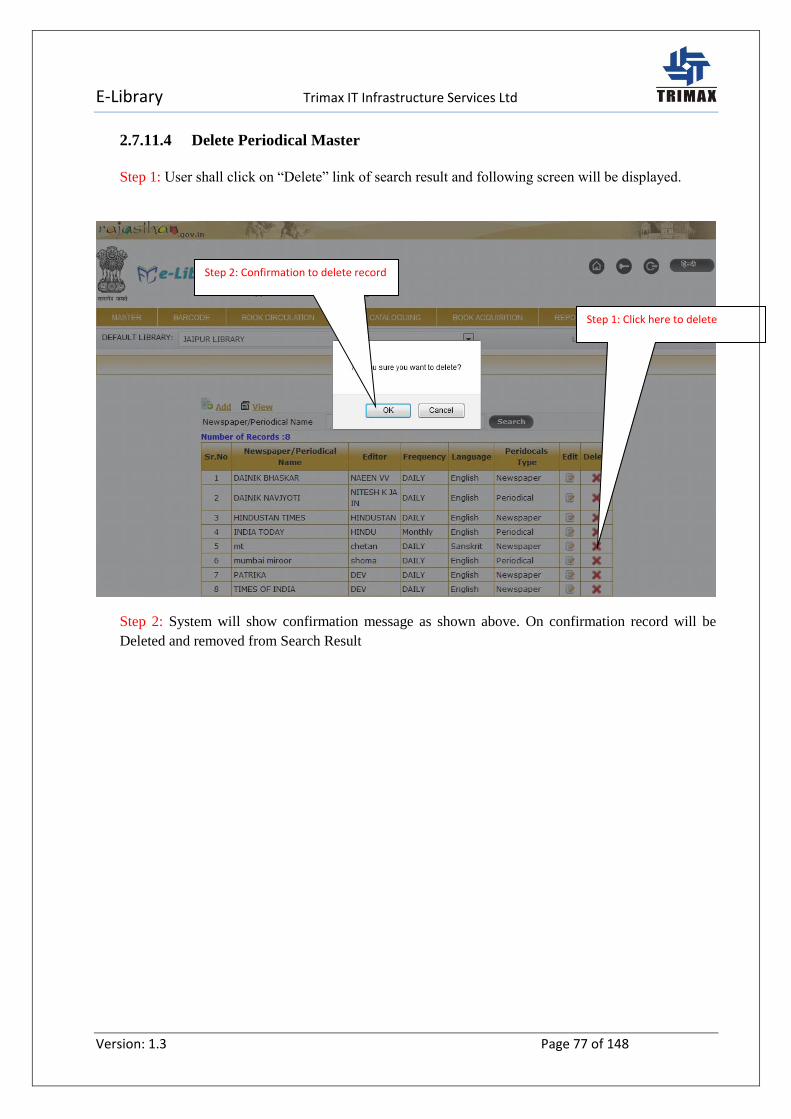
2.7.11.4 Delete Periodical Master
Step 1: User shall click on “Delete” link of search result and following screen will be displayed.
Step 2: System will show confirmation message as shown above. On confirmation record will be
Deleted and removed from Search Result
Step 1: Click here to delete
Step 2: Confirmation to delete record

E-Library Trimax IT Infrastructure Services Ltd
Version: 1.3 Page 78 of 148
2.7.12 Binder Master
2.7.12.1 Search Binder Master
Step 1: User will select “Binder Master” from “Master”. This Master is generated to store master data
of book Binder. By default search page will be displayed. User shall click on “View” to get view of
records created in case user in edit or add mode.
Step 2: User shall enter value in “Binder Name” and click on “Search” button to search record.
According to search values filtered data will be displayed in the grid
Step 2: Click here to Search
record
Step 1: Click here to View records
E-Library Trimax IT Infrastructure Services Ltd
Version: 1.3 Page 79 of 148
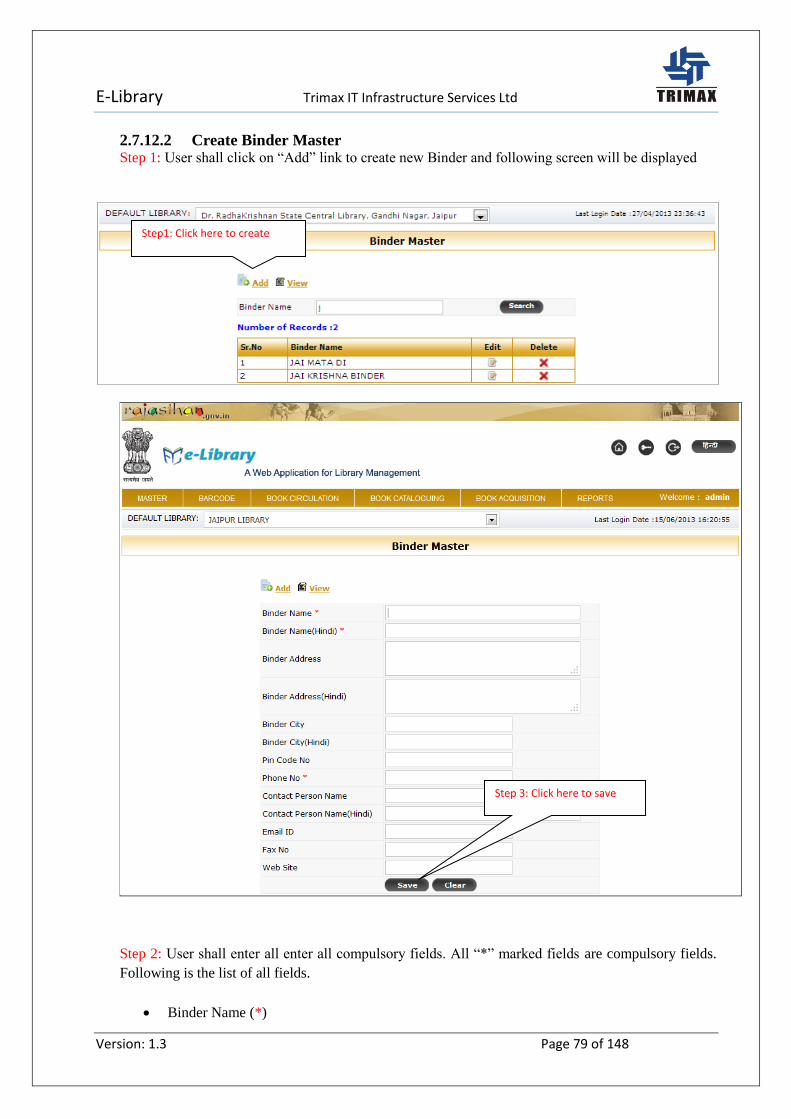
2.7.12.2 Create Binder Master Step 1: User shall click on “Add” link to create new Binder and following screen will be displayed
Step 2: User shall enter all enter all compulsory fields. All “*” marked fields are compulsory fields.
Following is the list of all fields.
Binder Name (*)
Step 3: Click here to save
Step1: Click here to create

E-Library Trimax IT Infrastructure Services Ltd
Version: 1.3 Page 80 of 148
Binder Name (Hindi) (*)
Binder Address
Binder Address (Hindi)
Binder City
Binder City (Hindi)
Pin code no.
Phone No (*)
Contact Person Name
Contact Person Name (Hindi)
Email Id
Fax No
Website
Step 3: After entering above mentioned fields, user shall click on “Save” button to save data in
database.
Step 4: User shall click on “Clear” button to clear the data from controls.
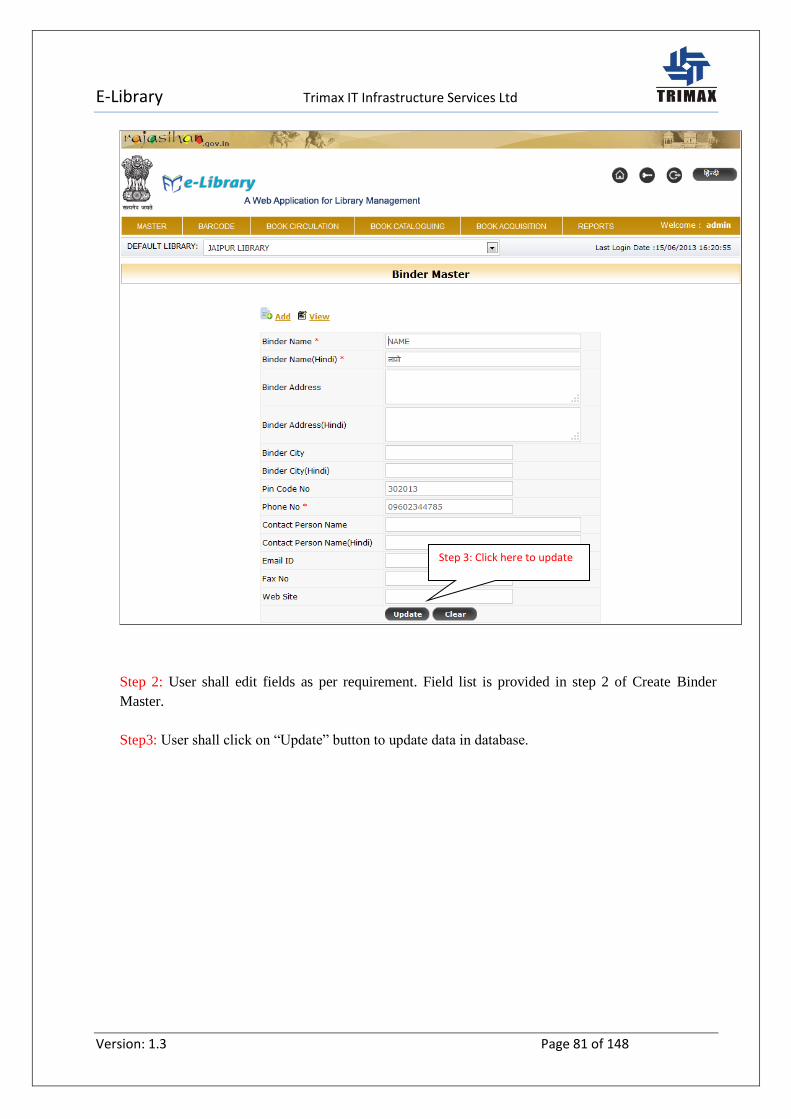
2.7.12.3 Edit Binder Master
Step 1: User shall click on “Edit” link of search result and following screen will be displayed.
Step1: Click here to edit
E-Library Trimax IT Infrastructure Services Ltd
Version: 1.3 Page 81 of 148
Step 2: User shall edit fields as per requirement. Field list is provided in step 2 of Create Binder
Master.
Step3: User shall click on “Update” button to update data in database.
Step 3: Click here to update
E-Library Trimax IT Infrastructure Services Ltd
Version: 1.3 Page 82 of 148
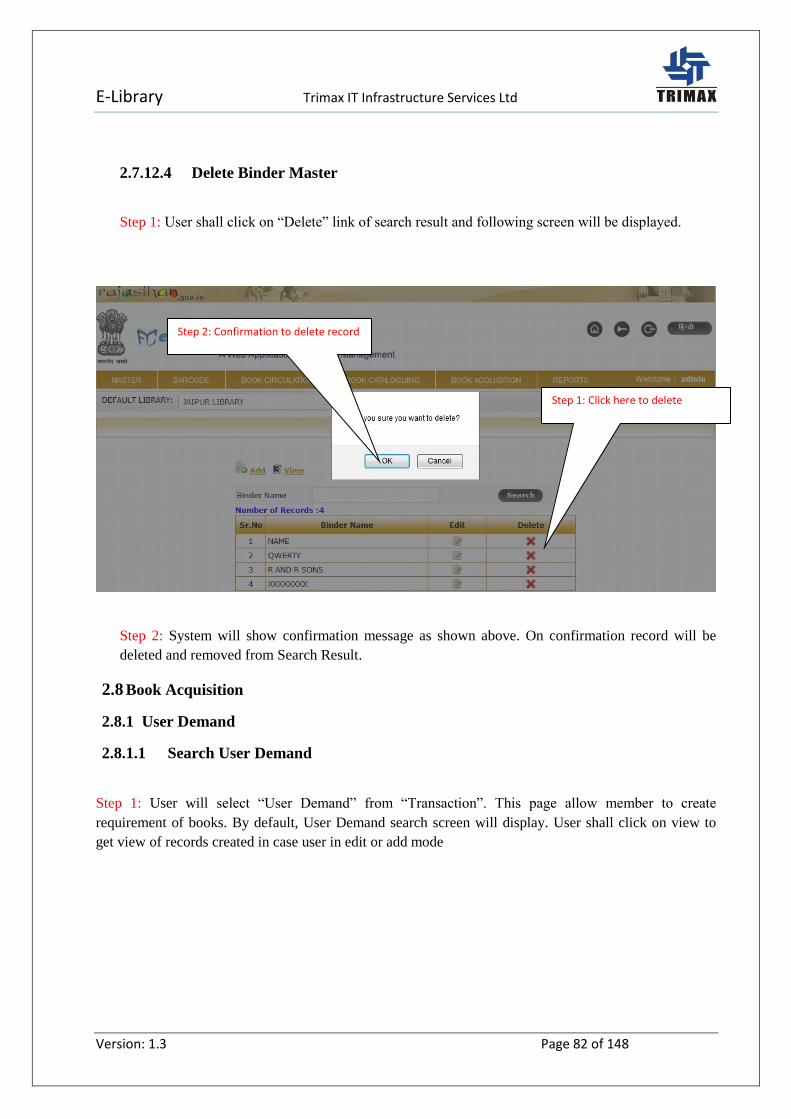
2.7.12.4 Delete Binder Master
Step 1: User shall click on “Delete” link of search result and following screen will be displayed.
Step 2: System will show confirmation message as shown above. On confirmation record will be
deleted and removed from Search Result.
2.8 Book Acquisition
2.8.1 User Demand
2.8.1.1 Search User Demand
Step 1: User will select “User Demand” from “Transaction”. This page allow member to create
requirement of books. By default, User Demand search screen will display. User shall click on view to
get view of records created in case user in edit or add mode
Step 1: Click here to delete
Step 2: Confirmation to delete record

E-Library Trimax IT Infrastructure Services Ltd
Version: 1.3 Page 83 of 148
Step 2: User shall enter value in book title to search record. According to search values filtered, data will
be displayed in the grid
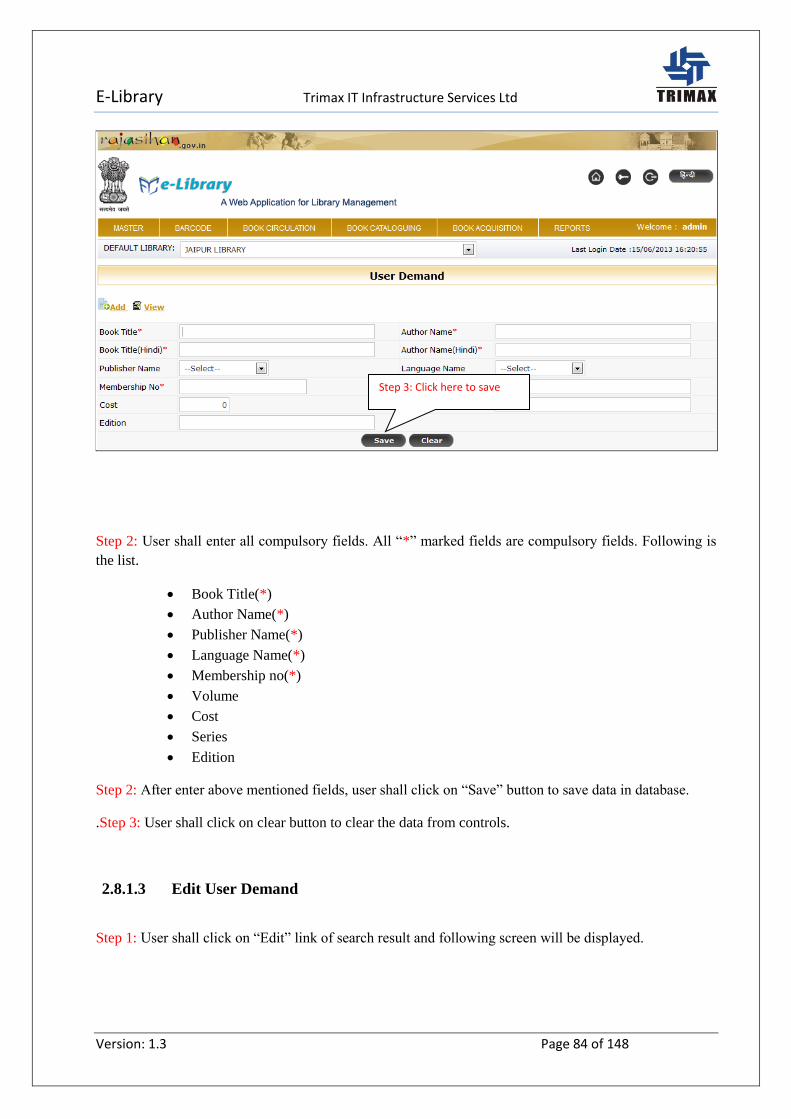
2.8.1.2 Create User Demand Step 1: User will click on “Add” link to create new user demand and following screen will be displayed.
Step 2: Click here to Search Step 1: Click here to View records
Step1: Click here to create
E-Library Trimax IT Infrastructure Services Ltd
Version: 1.3 Page 84 of 148
Step 2: User shall enter all compulsory fields. All “*” marked fields are compulsory fields. Following is
the list.
Book Title(*)
Author Name(*)
Publisher Name(*)
Language Name(*)
Membership no(*)
Volume
Cost
Series
Edition
Step 2: After enter above mentioned fields, user shall click on “Save” button to save data in database.
.Step 3: User shall click on clear button to clear the data from controls.
2.8.1.3 Edit User Demand
Step 1: User shall click on “Edit” link of search result and following screen will be displayed.
Step 3: Click here to save

E-Library Trimax IT Infrastructure Services Ltd
Version: 1.3 Page 85 of 148
Step 2: User shall edit fields as per requirement. Field list is provided in step 2 of Create
Step3: User shall click on “Update” button to update data in database.
2.8.1.4 Delete User Demand
Step 1: User shall click on “Delete” link of search and following screen will be displayed.
Step 3: Click here to update
Step1: Click here to edit

E-Library Trimax IT Infrastructure Services Ltd
Version: 1.3 Page 86 of 148
Step 1: System will show confirmation message as shown above. On confirmation record will be deleted
and removed from Search Result
2.8.2 Library Demand
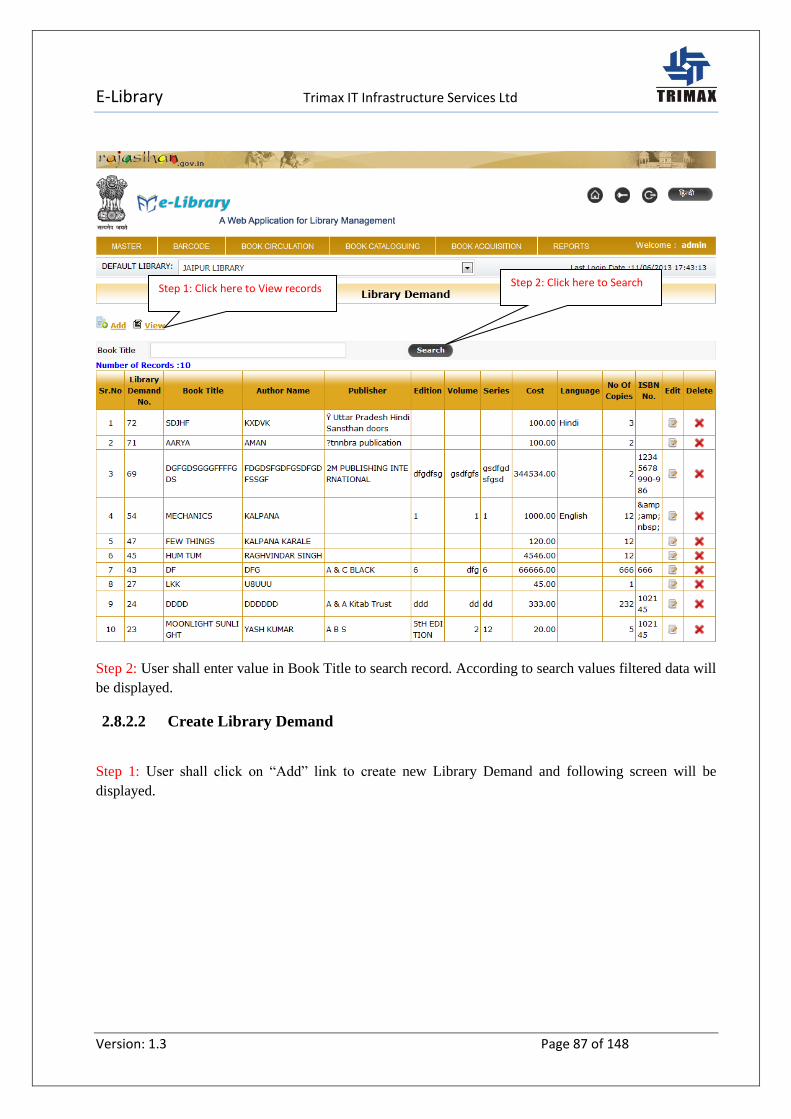
2.8.2.1 Search Library Demand
Step 1: User will select “Library Demand” from “Transaction”. This Master is generated to store master
data of Library demand. By default search page will be displayed. User shall click on view to get view of
records created in case user in edit or add mode
Step 1: Click here to delete
Step 2: Confirmation to delete record
E-Library Trimax IT Infrastructure Services Ltd
Version: 1.3 Page 87 of 148
Step 2: User shall enter value in Book Title to search record. According to search values filtered data will
be displayed.
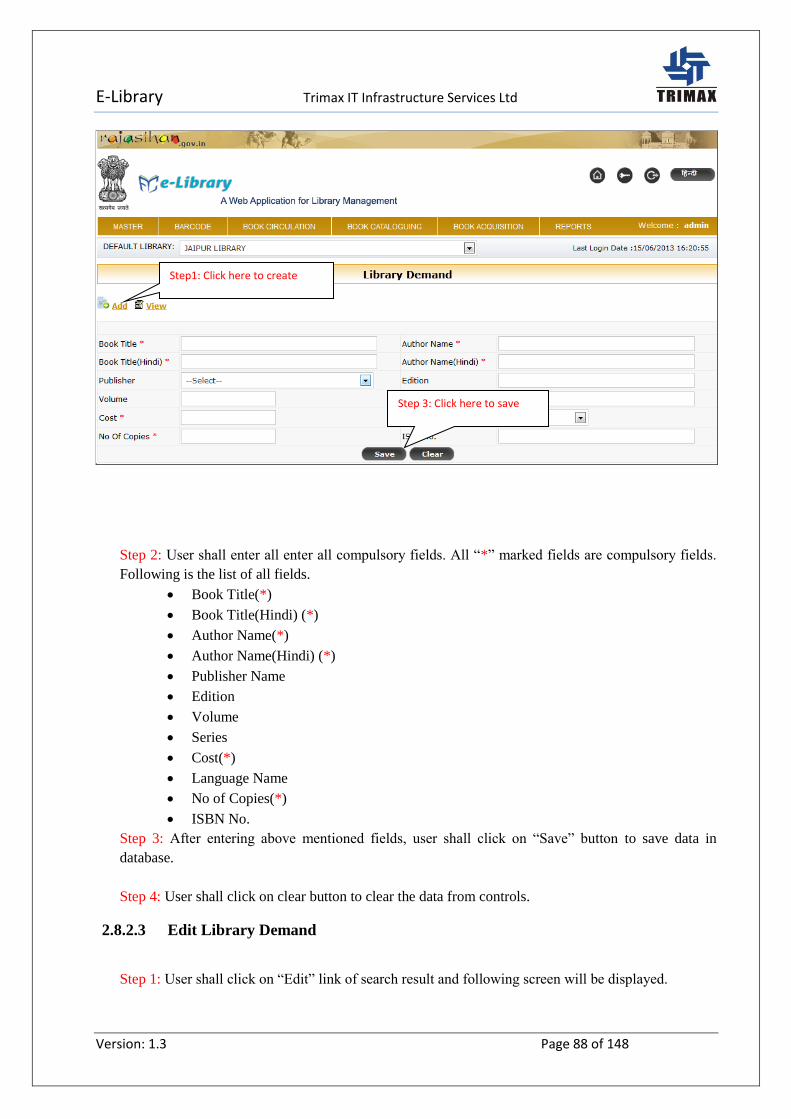
2.8.2.2 Create Library Demand
Step 1: User shall click on “Add” link to create new Library Demand and following screen will be
displayed.
Step 2: Click here to Search Step 1: Click here to View records
E-Library Trimax IT Infrastructure Services Ltd
Version: 1.3 Page 88 of 148
Step 2: User shall enter all enter all compulsory fields. All “*” marked fields are compulsory fields.
Following is the list of all fields.
Book Title(*)
Book Title(Hindi) (*)
Author Name(*)
Author Name(Hindi) (*)
Publisher Name
Edition
Volume
Series
Cost(*)
Language Name
No of Copies(*)
ISBN No.
Step 3: After entering above mentioned fields, user shall click on “Save” button to save data in
database.
Step 4: User shall click on clear button to clear the data from controls.
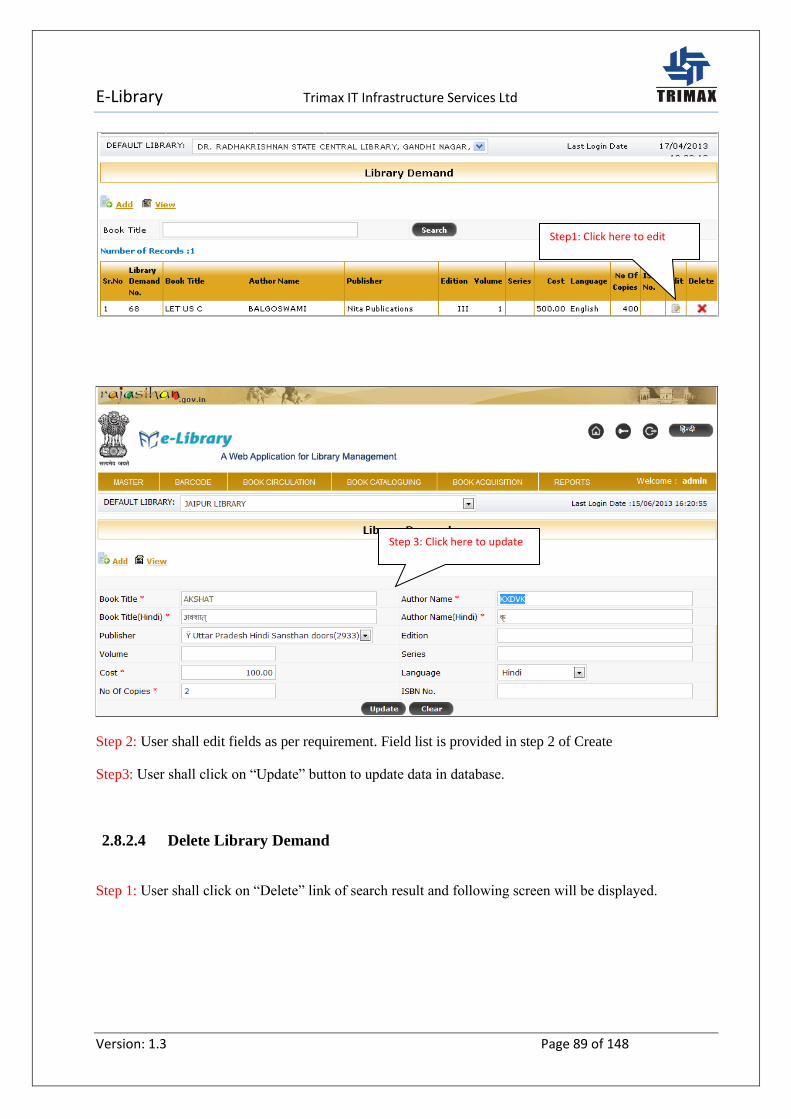
2.8.2.3 Edit Library Demand
Step 1: User shall click on “Edit” link of search result and following screen will be displayed.
Step 3: Click here to save
Step1: Click here to create
E-Library Trimax IT Infrastructure Services Ltd
Version: 1.3 Page 89 of 148
Step 2: User shall edit fields as per requirement. Field list is provided in step 2 of Create
Step3: User shall click on “Update” button to update data in database.
2.8.2.4 Delete Library Demand
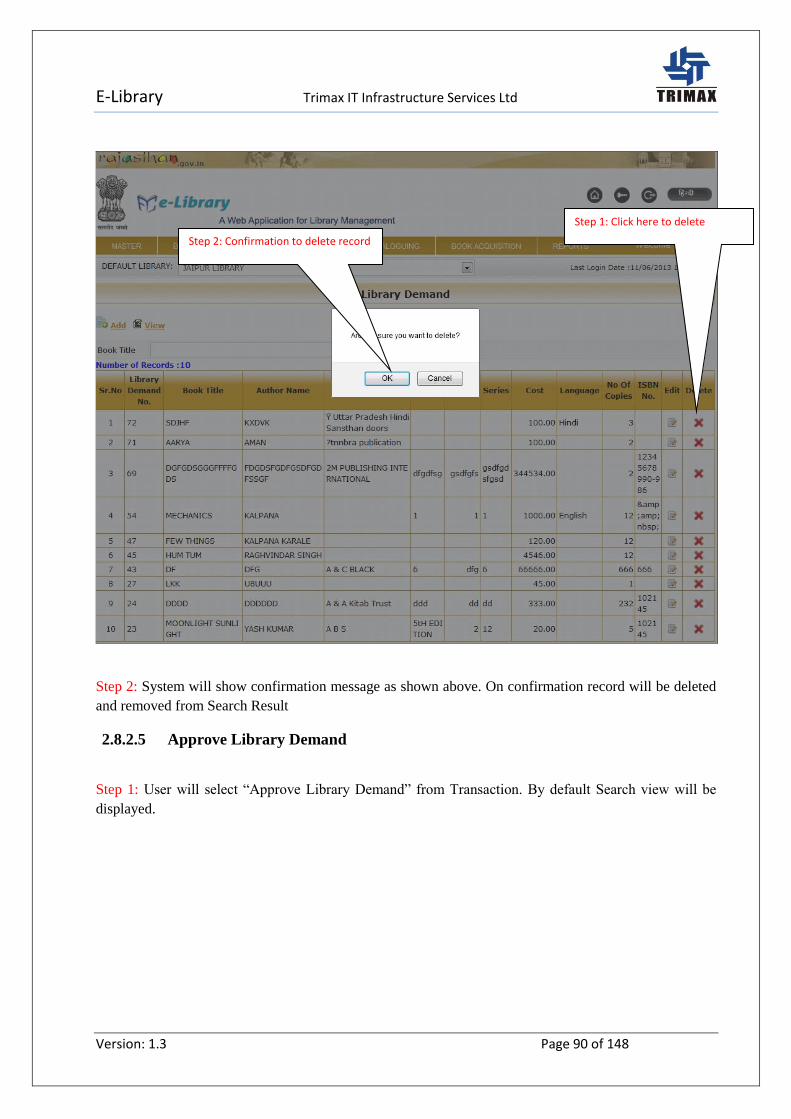
Step 1: User shall click on “Delete” link of search result and following screen will be displayed.
Step 3: Click here to update
Step1: Click here to edit
E-Library Trimax IT Infrastructure Services Ltd
Version: 1.3 Page 90 of 148
Step 2: System will show confirmation message as shown above. On confirmation record will be deleted
and removed from Search Result
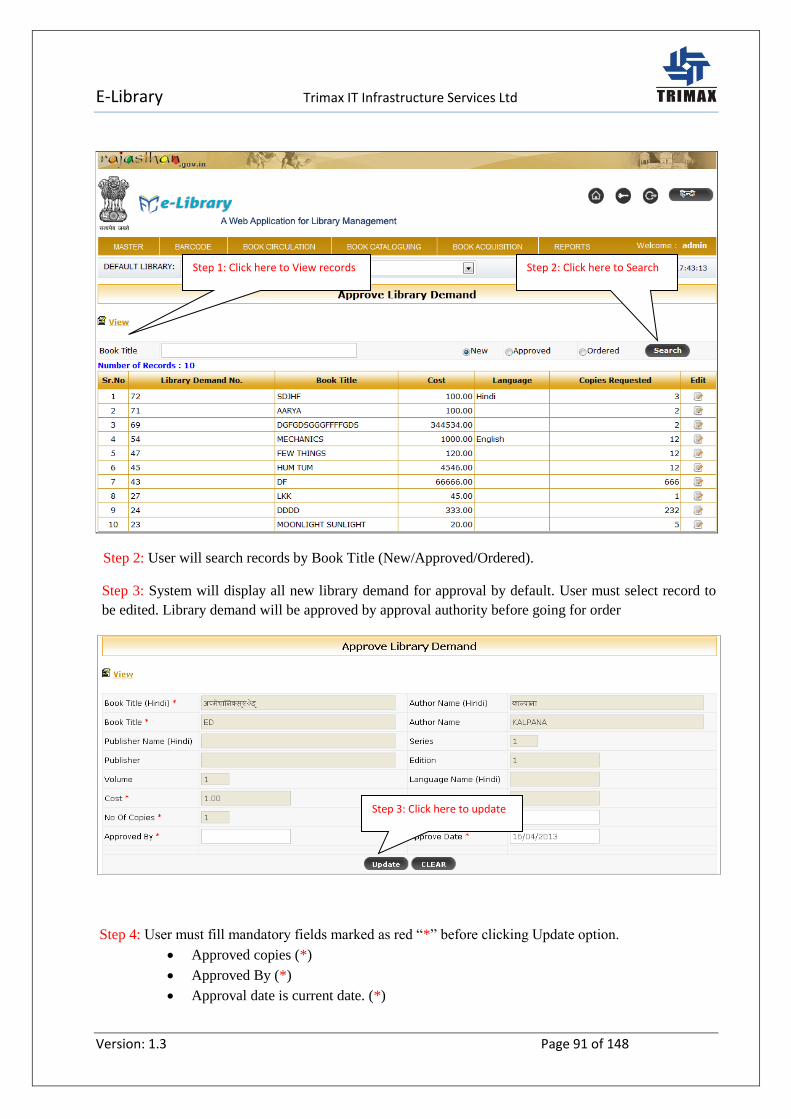
2.8.2.5 Approve Library Demand
Step 1: User will select “Approve Library Demand” from Transaction. By default Search view will be
displayed.
Step 1: Click here to delete
Step 2: Confirmation to delete record
E-Library Trimax IT Infrastructure Services Ltd
Version: 1.3 Page 91 of 148
Step 2: User will search records by Book Title (New/Approved/Ordered).
Step 3: System will display all new library demand for approval by default. User must select record to
be edited. Library demand will be approved by approval authority before going for order
Step 4: User must fill mandatory fields marked as red “*” before clicking Update option.
Approved copies (*)
Approved By (*)
Approval date is current date. (*)
Step 3: Click here to update
Step 2: Click here to Search Step 1: Click here to View records
E-Library Trimax IT Infrastructure Services Ltd
Version: 1.3 Page 92 of 148
2.8.3 Acquisition Master
Acquisition will store acquisition information associated with books.
2.8.3.1 Search Acquisition Master
Step 1: User will select “Acquisition Master” from “Master”. This Master is generated to store master
data of book Acquisition. By default search page will be displayed. User shall click on view to get view
of records created in case user in edit or add mode
Step 2: User shall enter value in Receipt Number to search record. According to search values filtered
data will be displayed in the grid
2.8.3.2 Create Acquisition Master
Step 1: User shall click on “Add” link to create new Acquisition Details and following screen will be
displayed
Step 2: Click here to Search Step 1: Click here to View records

E-Library Trimax IT Infrastructure Services Ltd
Version: 1.3 Page 93 of 148
Step 2: User shall enter all enter all compulsory fields. All “*” marked fields are compulsory fields.
Following is the list of all fields.
Receipt No(*)
Receipt Date(*)
Source Name(*)
Step 3: Click here to save
Step 2: Click here to add details
Step1: Click here to create
E-Library Trimax IT Infrastructure Services Ltd
Version: 1.3 Page 94 of 148
Supplier Name(*)
Quantity(*)
Currency Name(*)
Acquisition Details ( Multiple Records)
o Subject Name
o Number of books
Step 3: After entering above mentioned fields, user shall click on “Save” button to save data in
database.
Step 4: User shall click on clear button to clear the data from controls.
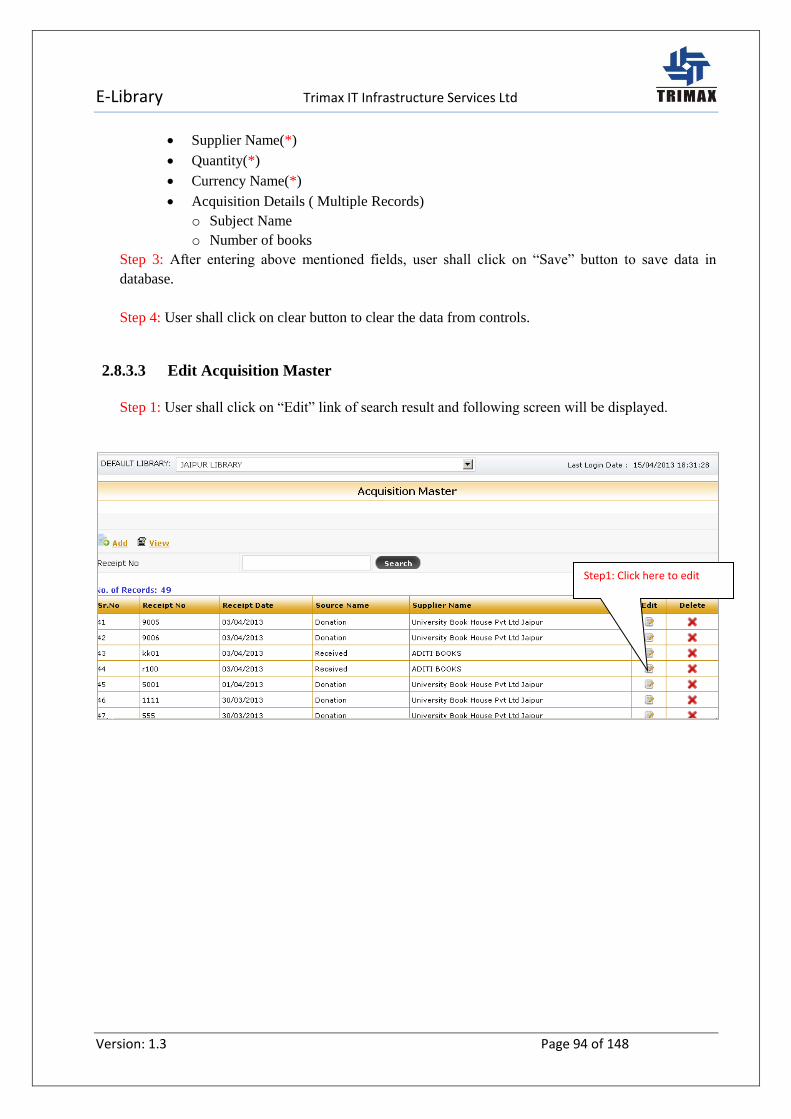
2.8.3.3 Edit Acquisition Master
Step 1: User shall click on “Edit” link of search result and following screen will be displayed.
Step1: Click here to edit

E-Library Trimax IT Infrastructure Services Ltd
Version: 1.3 Page 95 of 148
Step 2: User shall edit fields as per requirement. Field list is provided in step 2 of Create
Step3: User shall click on “Update” button to update data in database.
2.8.3.4 Delete Acquisition Master
Step 1: User shall click on “Delete” link of search result and following screen will be displayed.
Step 3: Click here to update

E-Library Trimax IT Infrastructure Services Ltd
Version: 1.3 Page 96 of 148
Step 2: System will show confirmation message as shown above. On confirmation record will be deleted
and removed from Search Result
2.8.4 Newspaper Periodical
2.8.4.1 Search Newspaper Periodical
Step 1: User will select “Newspaper Periodical” from “Master”. This Master is generated to store master
data of Newspaper Periodical. By default search page will be displayed. User shall click on view to get
view of records created in case user in edit or add mode
Step 1: Click here to delete
Step 2: Confirmation to delete record

E-Library Trimax IT Infrastructure Services Ltd
Version: 1.3 Page 97 of 148
Step 2: User shall enter value in Newspaper Periodical name to search record. According to search values
filtered data will be displayed in the grid
Step 2: Click here to Search Step 1: Click here to View records
E-Library Trimax IT Infrastructure Services Ltd
Version: 1.3 Page 98 of 148
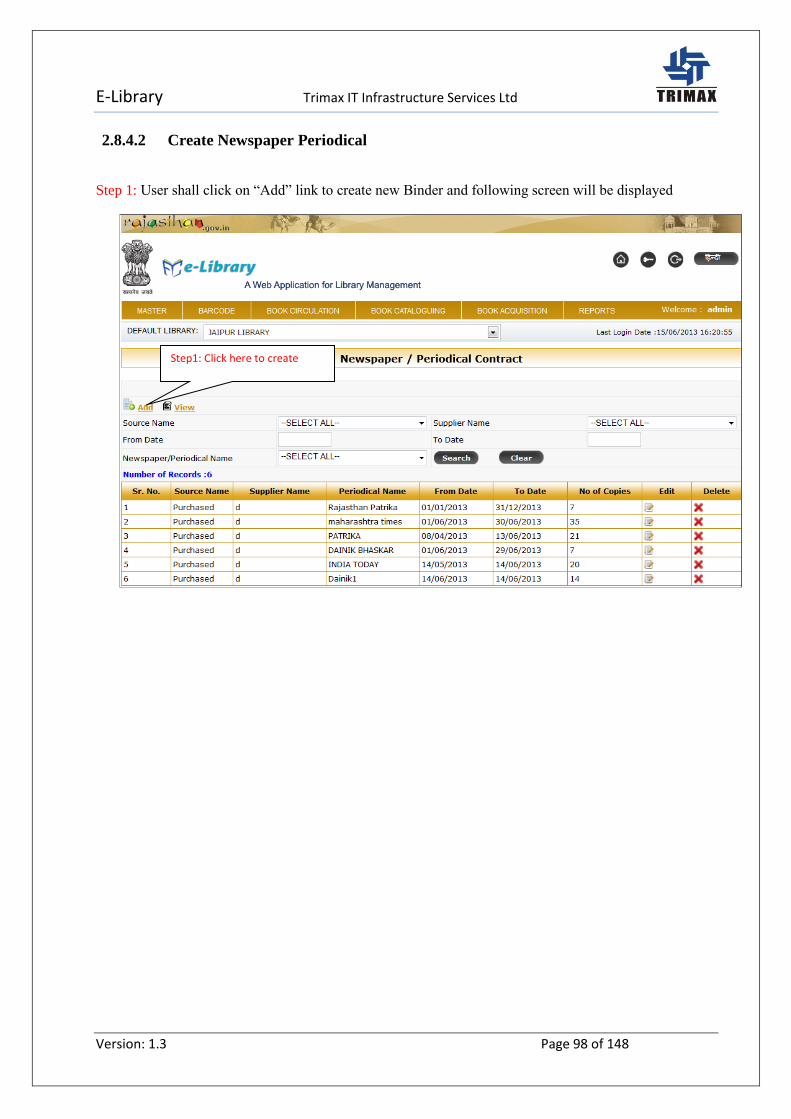
2.8.4.2 Create Newspaper Periodical
Step 1: User shall click on “Add” link to create new Binder and following screen will be displayed
Step1: Click here to create

E-Library Trimax IT Infrastructure Services Ltd
Version: 1.3 Page 99 of 148
Step 2: User shall enter all enter all compulsory fields. All “*” marked fields are compulsory fields.
Following is the list of all fields.
Newspaper Periodical Name (*)
Select Source Name(*)
Bill No
Bill Date
Valid From (*)
Valid To(*)
Step 3: After entering above mentioned fields, user shall click on “Save” button to save data in
database.
Step 4: User shall click on clear button to clear the data from controls.
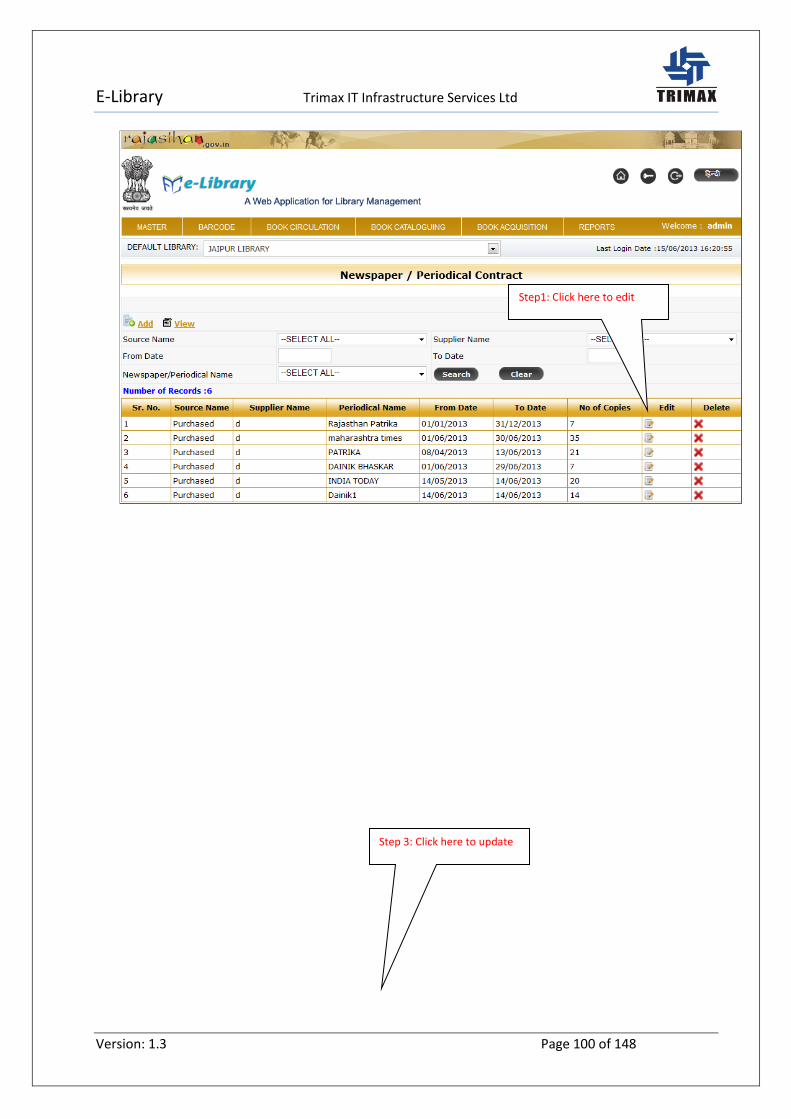
2.8.4.3 Edit Newspaper Periodical
Step 1: User shall click on “Edit” link of search result and following screen will be displayed.
Step 3: Click here to save
E-Library Trimax IT Infrastructure Services Ltd
Version: 1.3 Page 100 of 148
Step 3: Click here to update
Step1: Click here to edit
E-Library Trimax IT Infrastructure Services Ltd
Version: 1.3 Page 101 of 148
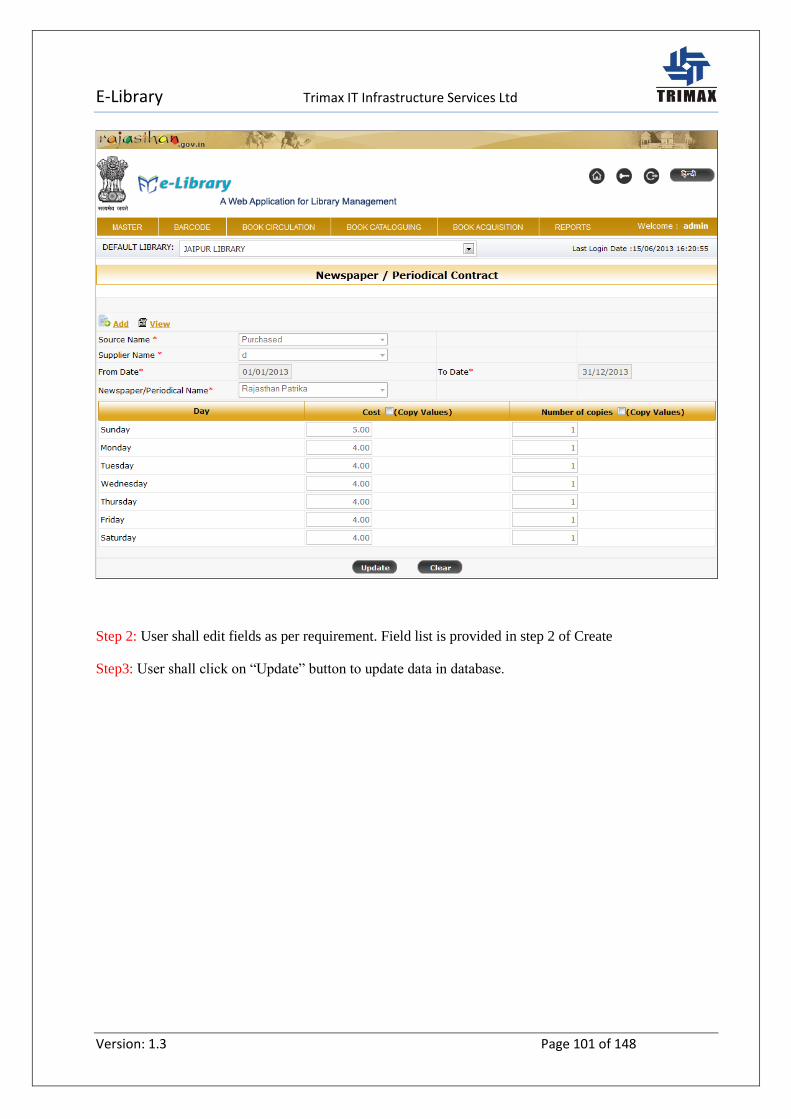
Step 2: User shall edit fields as per requirement. Field list is provided in step 2 of Create
Step3: User shall click on “Update” button to update data in database.

E-Library Trimax IT Infrastructure Services Ltd
Version: 1.3 Page 102 of 148
2.8.4.4 Delete Newspaper Periodical
Step 1: User shall click on “Delete” link of search result and following screen will be displayed.
Step 2: System will show confirmation message as shown above. On confirmation record will be
deleted and removed from Search Result
Step 1: Click here to delete
Step 2: Confirmation to delete record
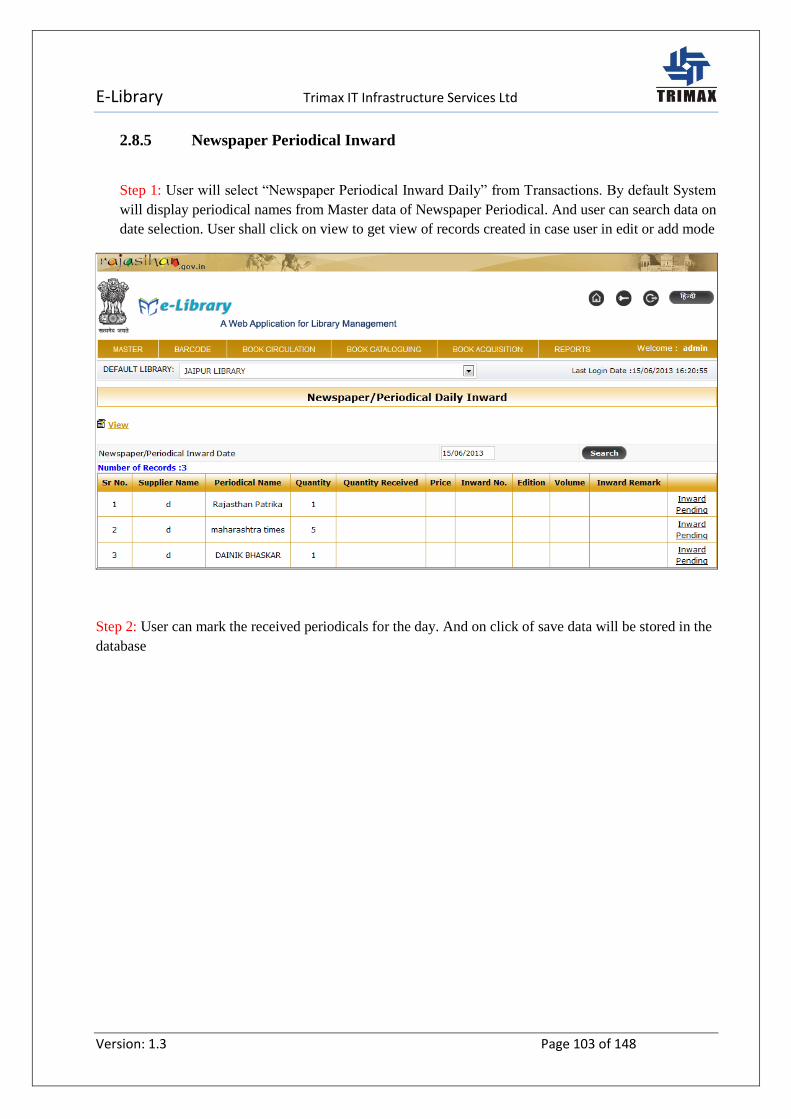
E-Library Trimax IT Infrastructure Services Ltd
Version: 1.3 Page 103 of 148
2.8.5 Newspaper Periodical Inward
Step 1: User will select “Newspaper Periodical Inward Daily” from Transactions. By default System
will display periodical names from Master data of Newspaper Periodical. And user can search data on
date selection. User shall click on view to get view of records created in case user in edit or add mode
Step 2: User can mark the received periodicals for the day. And on click of save data will be stored in the
database
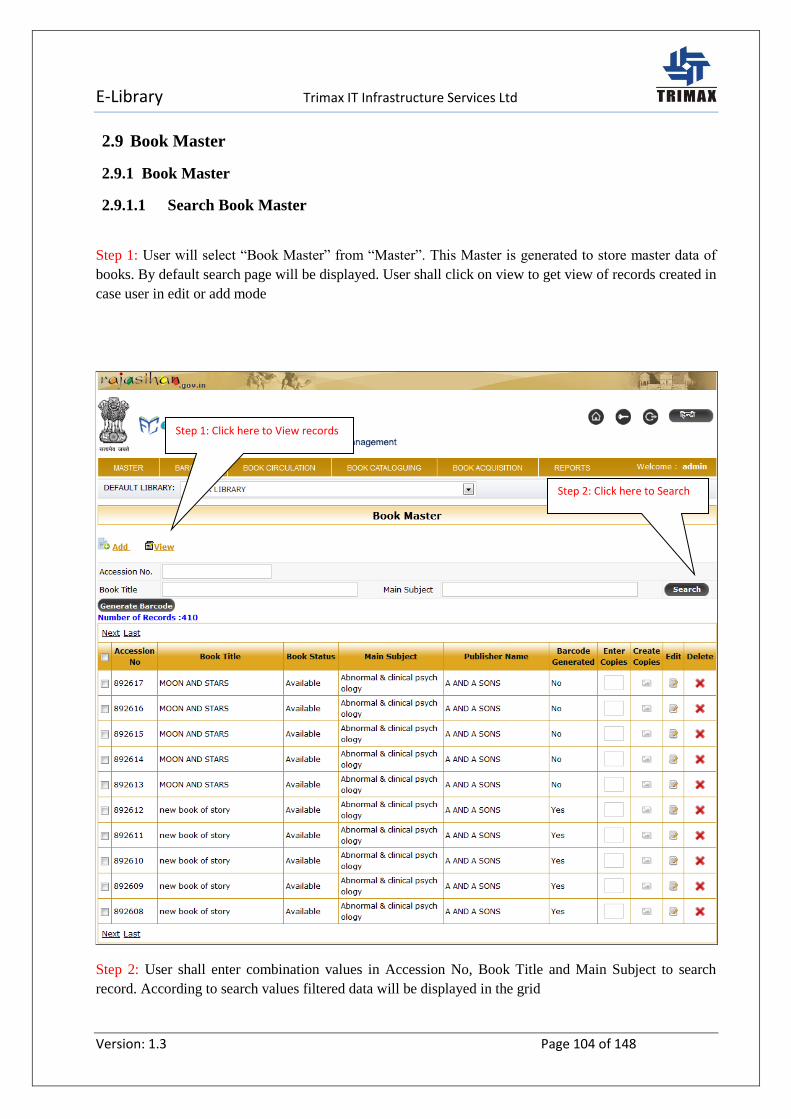
E-Library Trimax IT Infrastructure Services Ltd
Version: 1.3 Page 104 of 148
2.9 Book Master
2.9.1 Book Master
2.9.1.1 Search Book Master
Step 1: User will select “Book Master” from “Master”. This Master is generated to store master data of
books. By default search page will be displayed. User shall click on view to get view of records created in
case user in edit or add mode
Step 2: User shall enter combination values in Accession No, Book Title and Main Subject to search
record. According to search values filtered data will be displayed in the grid
Step 2: Click here to Search
Step 1: Click here to View records
E-Library Trimax IT Infrastructure Services Ltd
Version: 1.3 Page 105 of 148
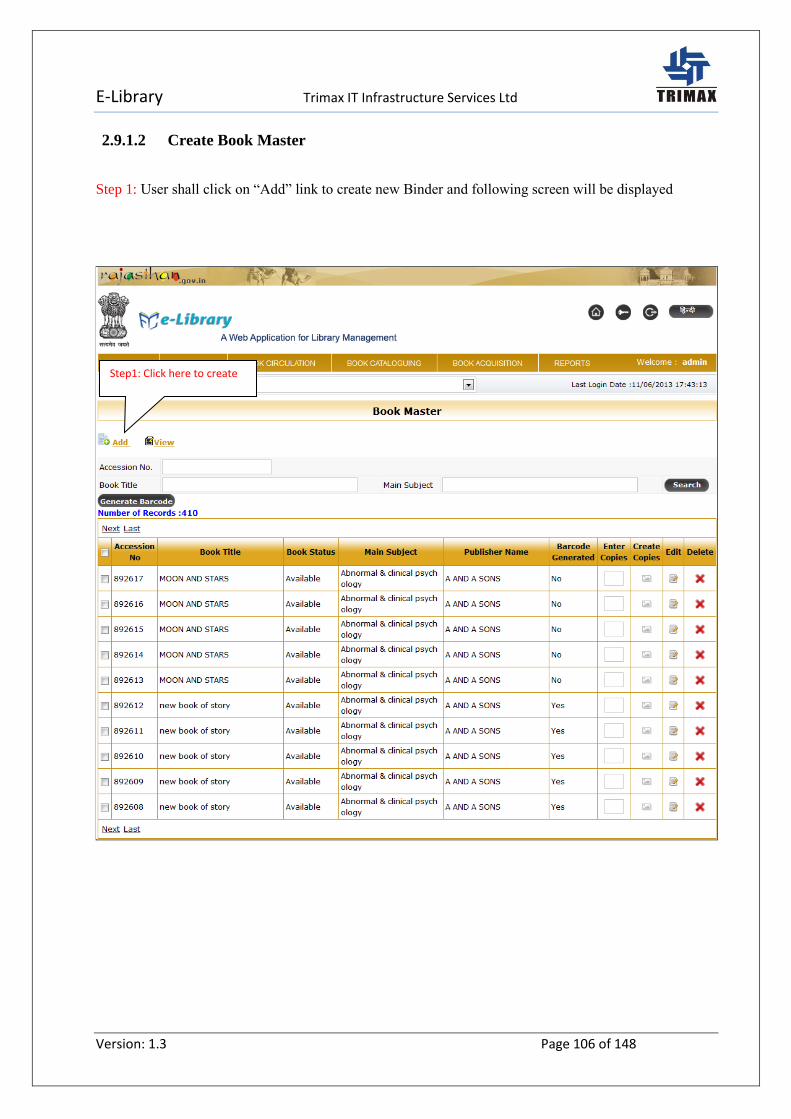
E-Library Trimax IT Infrastructure Services Ltd
Version: 1.3 Page 106 of 148
2.9.1.2 Create Book Master
Step 1: User shall click on “Add” link to create new Binder and following screen will be displayed
Step1: Click here to create
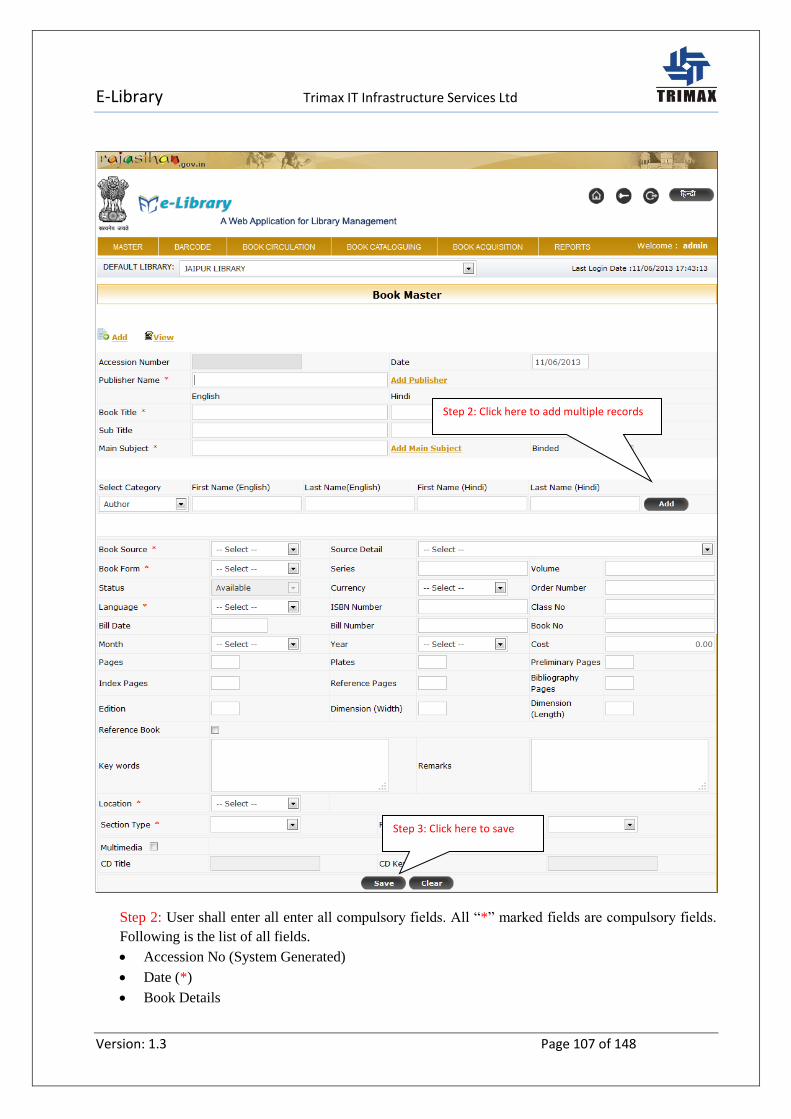
E-Library Trimax IT Infrastructure Services Ltd
Version: 1.3 Page 107 of 148
Step 2: User shall enter all enter all compulsory fields. All “*” marked fields are compulsory fields.
Following is the list of all fields.
Accession No (System Generated)
Date (*)
Book Details
Step 3: Click here to save
Step 2: Click here to add multiple records
E-Library Trimax IT Infrastructure Services Ltd
Version: 1.3 Page 108 of 148
Publisher Name ( shortcut link is provided to publisher Master) (*)
o Book Title(*)
o Book Title (Hindi) (*)
o Sub Title
o Sub Title (Hindi)
o Main Subject(*)
o Binded Y/N
Author/ Translator /Editor/Reviser Details (One book can have multiple and combination of
Author/ Translator/Editor/Reviser
o Select category (Author /Translator/Editor/Reviser
o First Name
o Last Name
Other Book Details
o Book Source(*)
o Source Details
o Book Form(*)
o Series
o Volume
o Status ( By default “Available”)
o Currency
o Order Number
o Language(*)
o ISBN No
o Class No
o Bill No
o Bill Date
o Book No
o Month
o Year
o Cost
o Pages
o Plates
o Preliminary Pages
o Index pages
o Reference Pages
o Bibliography Pages
o Editions
o Book Dimensions
o Width length
o Reference book Y/N
o Keywords
o Remarks
Multimedia Details
o CD Title
o CD Key

E-Library Trimax IT Infrastructure Services Ltd
Version: 1.3 Page 109 of 148
Book Location Details in Library
o Location(*)
o Section Type(*)(Section type is mapped with Location on change of Location section
will be changed)
o Rack No ( Rack No is mapped Section type. on change of Section type rack No will be
changed)
Step 3: After entering above mentioned fields, user shall click on “Save” button to save data in database.
Step 4: User shall click on clear button to clear the data from controls.

E-Library Trimax IT Infrastructure Services Ltd
Version: 1.3 Page 110 of 148
2.9.1.3 Edit Book Master
Step 1: User shall click on “Edit” link of search result and following screen will be displayed.
Step1: Click here to edit
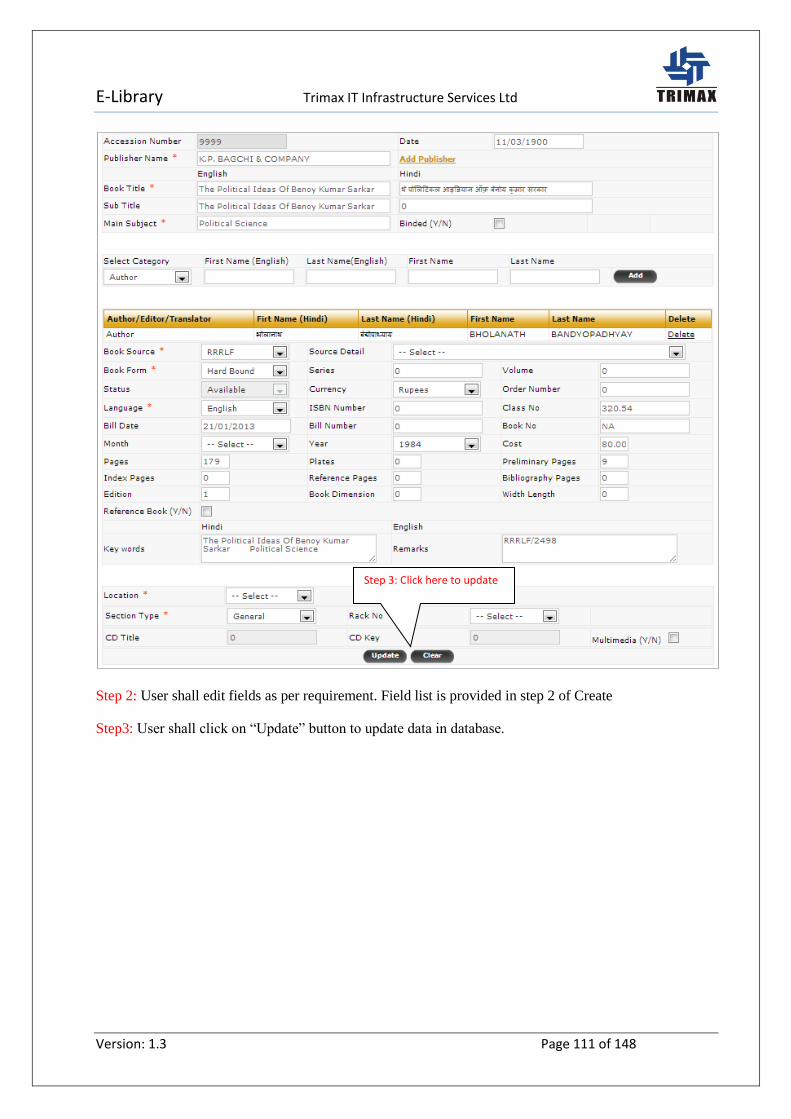
E-Library Trimax IT Infrastructure Services Ltd
Version: 1.3 Page 111 of 148
Step 2: User shall edit fields as per requirement. Field list is provided in step 2 of Create
Step3: User shall click on “Update” button to update data in database.
Step 3: Click here to update
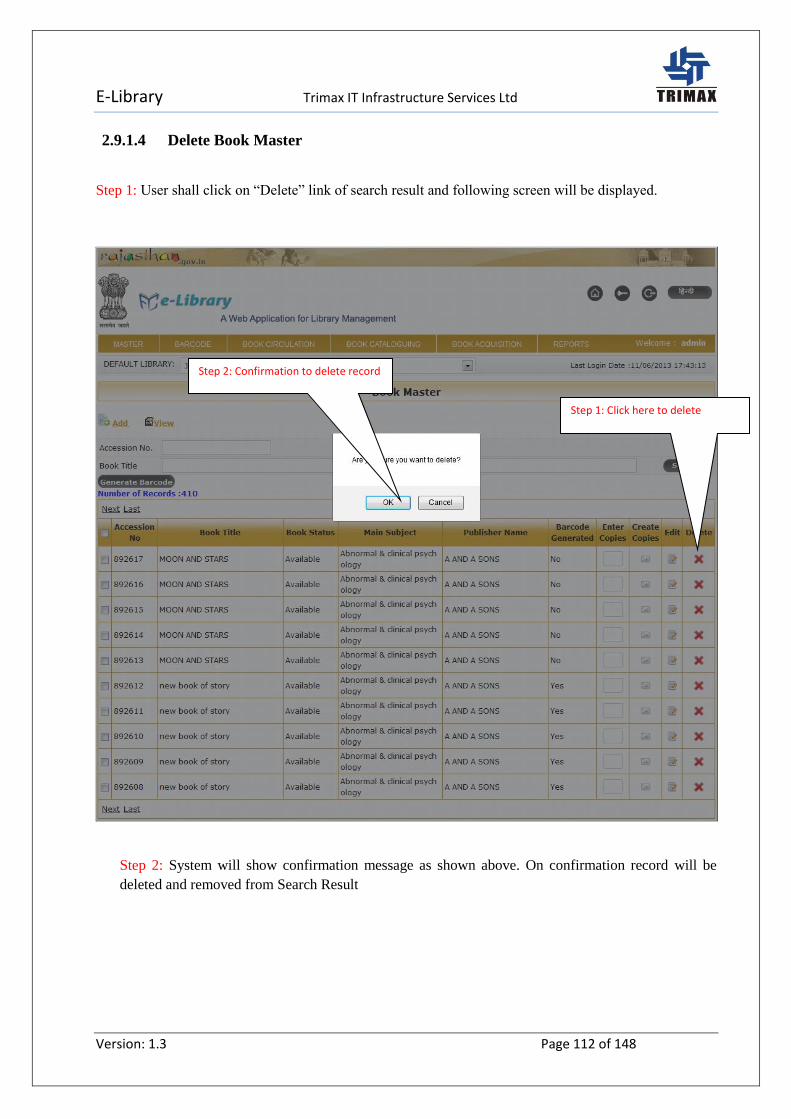
E-Library Trimax IT Infrastructure Services Ltd
Version: 1.3 Page 112 of 148
2.9.1.4 Delete Book Master
Step 1: User shall click on “Delete” link of search result and following screen will be displayed.
Step 2: System will show confirmation message as shown above. On confirmation record will be
deleted and removed from Search Result
Step 1: Click here to delete
Step 2: Confirmation to delete record

E-Library Trimax IT Infrastructure Services Ltd
Version: 1.3 Page 113 of 148
2.9.1.5 Create Copies of Books
Step 1: In the search result grid, user will enter number of copies to be created of book and click on
“create copy” link in next column. Following is the screen for the same
Step 2: System will show confirmation message to create number of copies. User shall click on “OK”
button to create desired number of copies and desired number of records will be created with unique
accession Number
Step 2:Enter No of copies
to be created
Step 3:On confirmation no of
copies can be created
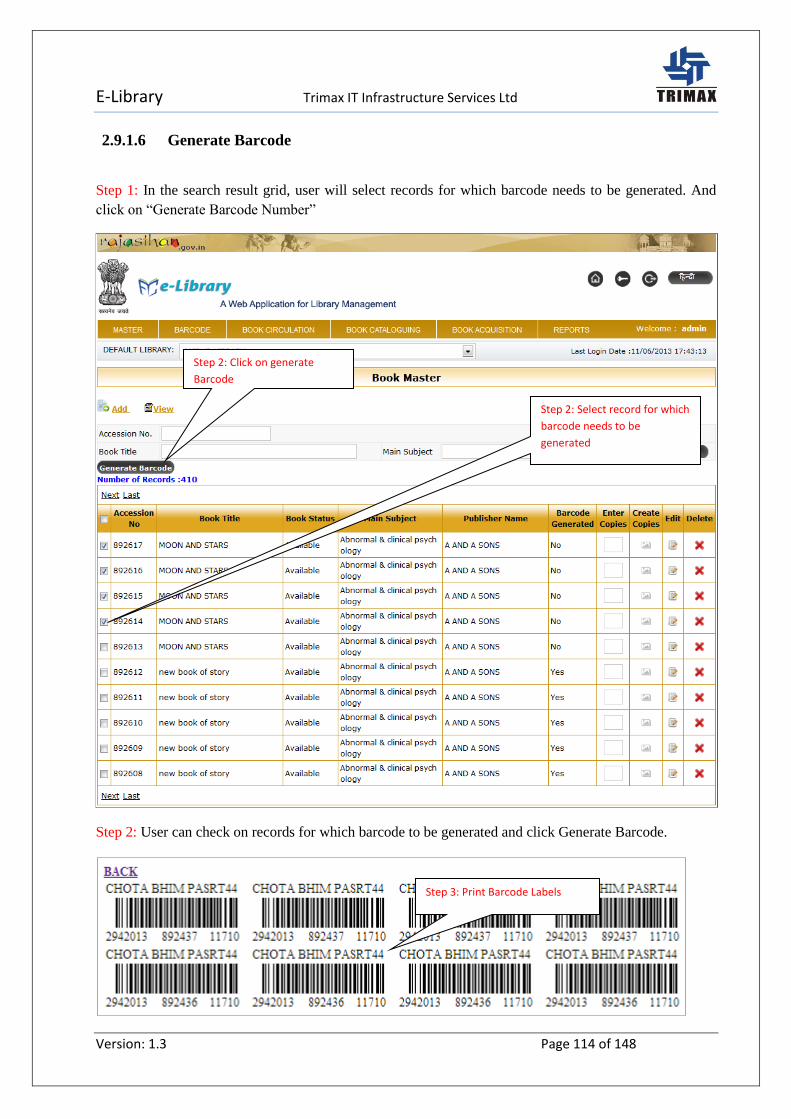
E-Library Trimax IT Infrastructure Services Ltd
Version: 1.3 Page 114 of 148
2.9.1.6 Generate Barcode
Step 1: In the search result grid, user will select records for which barcode needs to be generated. And
click on “Generate Barcode Number”
Step 2: User can check on records for which barcode to be generated and click Generate Barcode.
Step 2: Select record for which
barcode needs to be
generated
Step 2: Click on generate
Barcode
Step 3: Print Barcode Labels
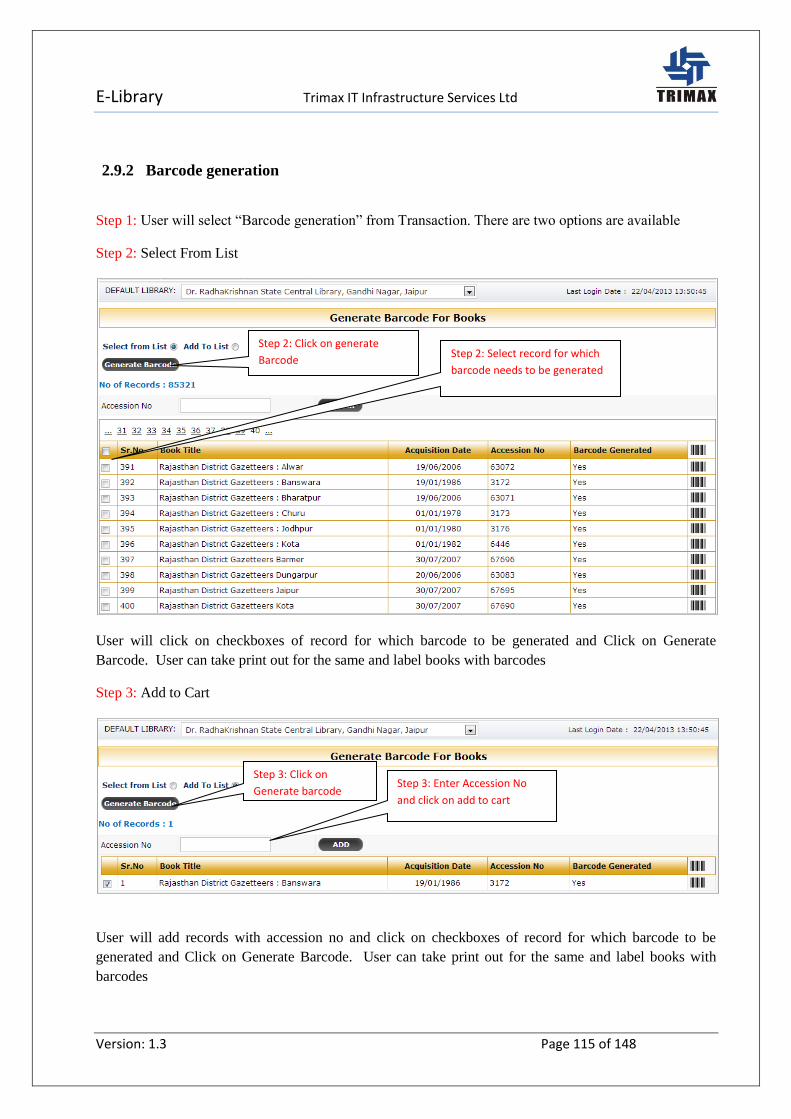
E-Library Trimax IT Infrastructure Services Ltd
Version: 1.3 Page 115 of 148
2.9.2 Barcode generation
Step 1: User will select “Barcode generation” from Transaction. There are two options are available
Step 2: Select From List
User will click on checkboxes of record for which barcode to be generated and Click on Generate
Barcode. User can take print out for the same and label books with barcodes
Step 3: Add to Cart
User will add records with accession no and click on checkboxes of record for which barcode to be
generated and Click on Generate Barcode. User can take print out for the same and label books with
barcodes
Step 2: Select record for which
barcode needs to be generated
Step 2: Click on generate
Barcode
Step 3: Enter Accession No
and click on add to cart
Step 3: Click on
Generate barcode
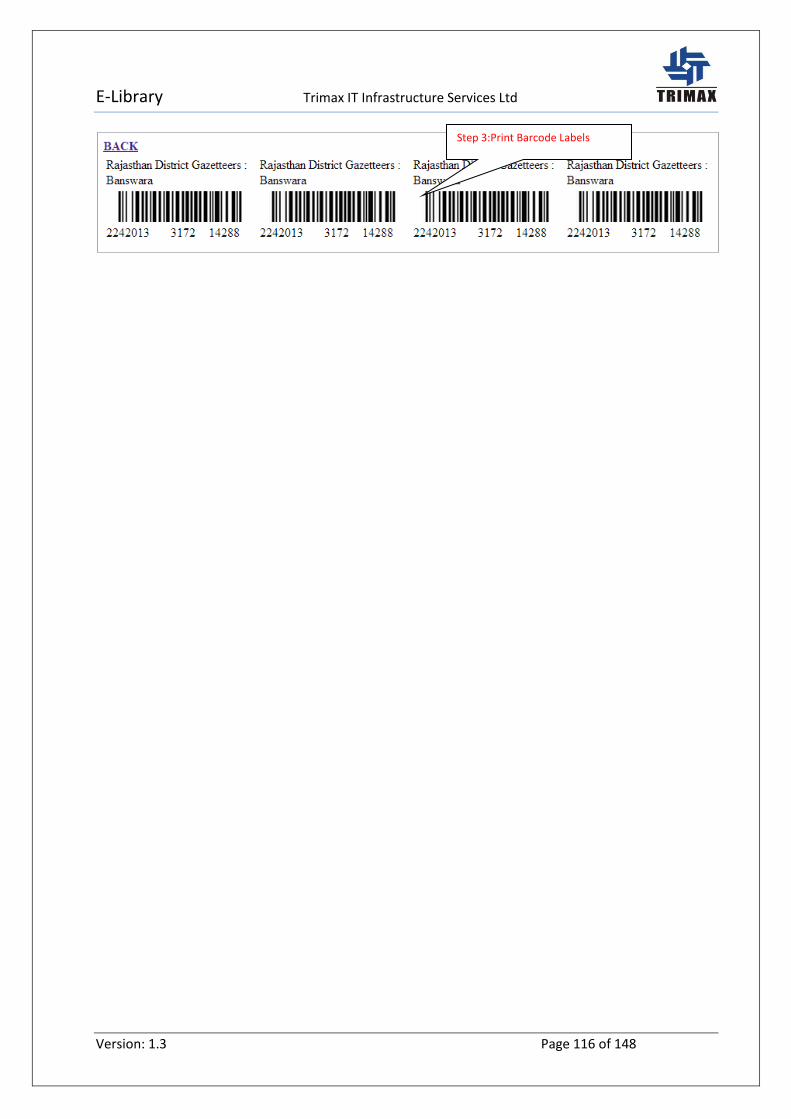
E-Library Trimax IT Infrastructure Services Ltd
Version: 1.3 Page 116 of 148
Step 3:Print Barcode Labels
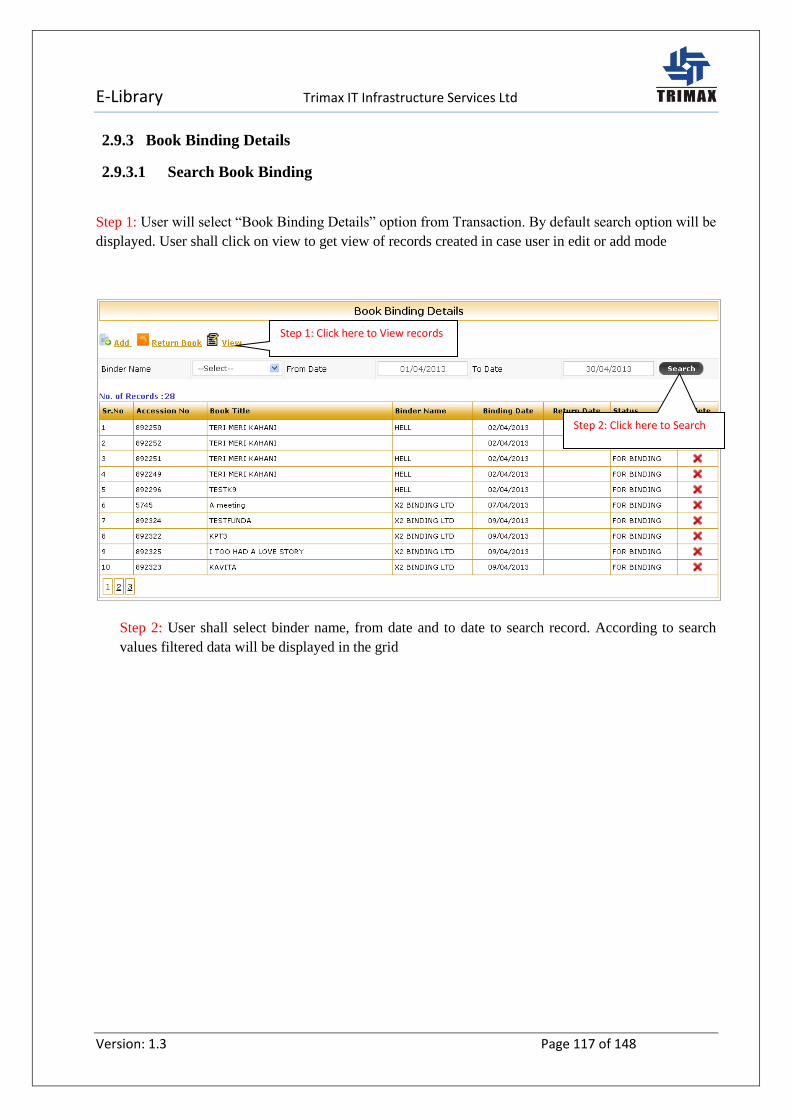
E-Library Trimax IT Infrastructure Services Ltd
Version: 1.3 Page 117 of 148
2.9.3 Book Binding Details
2.9.3.1 Search Book Binding
Step 1: User will select “Book Binding Details” option from Transaction. By default search option will be
displayed. User shall click on view to get view of records created in case user in edit or add mode
Step 2: User shall select binder name, from date and to date to search record. According to search
values filtered data will be displayed in the grid
Step 2: Click here to Search
Step 1: Click here to View records
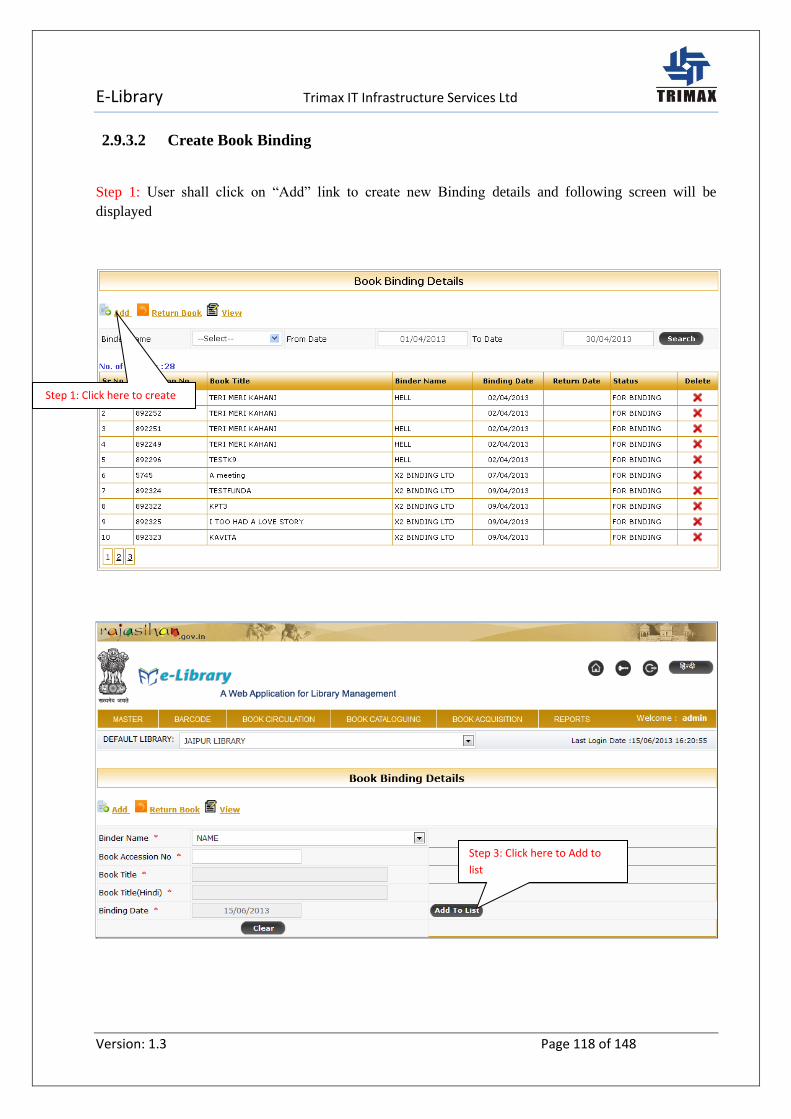
E-Library Trimax IT Infrastructure Services Ltd
Version: 1.3 Page 118 of 148
2.9.3.2 Create Book Binding
Step 1: User shall click on “Add” link to create new Binding details and following screen will be
displayed
Step 3: Click here to Add to
list
Step 1: Click here to create
E-Library Trimax IT Infrastructure Services Ltd
Version: 1.3 Page 119 of 148
Step 2: User shall enter all enter all compulsory fields. All “*” marked fields are compulsory fields.
Following fields will be entered and Click on “Save”
o Binder Name (*)
o Book Accession No (*)
o Book title (Accession No will populate Book Title) (*)
o Book title (Accession No will populate Book Title in Hindi) (*)
o Binding Date would be Current Date(*)
Step 3: After entering above mentioned fields, user shall click on “Save” button to save data in database.
Step 4: User shall click on clear button to clear the data from controls.
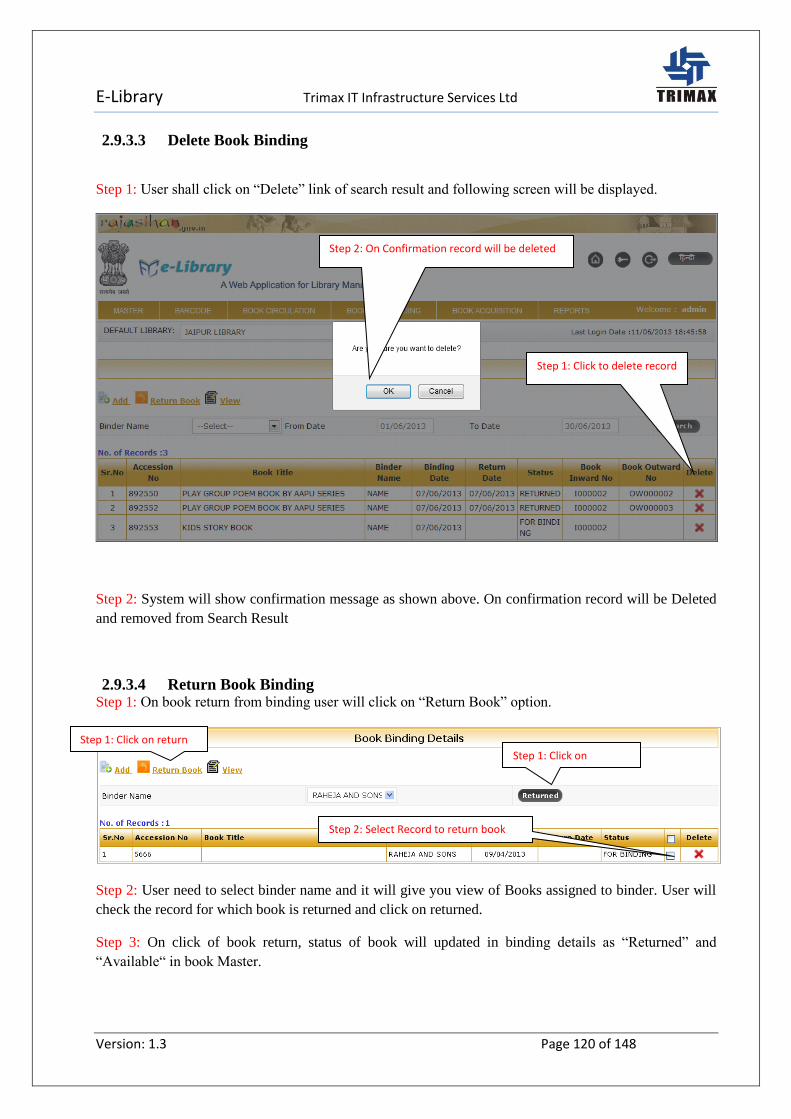
E-Library Trimax IT Infrastructure Services Ltd
Version: 1.3 Page 120 of 148
2.9.3.3 Delete Book Binding
Step 1: User shall click on “Delete” link of search result and following screen will be displayed.
Step 2: System will show confirmation message as shown above. On confirmation record will be Deleted
and removed from Search Result
2.9.3.4 Return Book Binding Step 1: On book return from binding user will click on “Return Book” option.
Step 2: User need to select binder name and it will give you view of Books assigned to binder. User will
check the record for which book is returned and click on returned.
Step 3: On click of book return, status of book will updated in binding details as “Returned” and
“Available“ in book Master.
Step 2: Select Record to return book
Step 1: Click on return
Step 1: Click to delete record
Step 2: On Confirmation record will be deleted
Step 1: Click on
returned
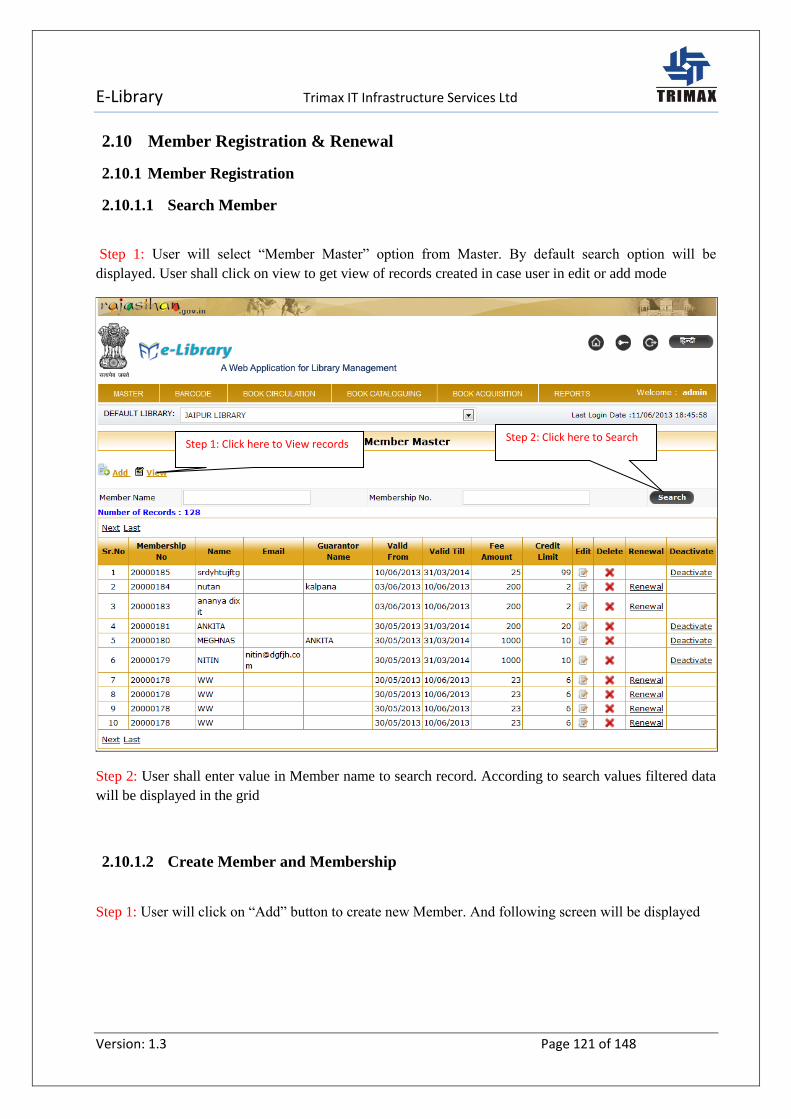
E-Library Trimax IT Infrastructure Services Ltd
Version: 1.3 Page 121 of 148
2.10 Member Registration & Renewal
2.10.1 Member Registration
2.10.1.1 Search Member
Step 1: User will select “Member Master” option from Master. By default search option will be
displayed. User shall click on view to get view of records created in case user in edit or add mode
Step 2: User shall enter value in Member name to search record. According to search values filtered data
will be displayed in the grid
2.10.1.2 Create Member and Membership
Step 1: User will click on “Add” button to create new Member. And following screen will be displayed
Step 2: Click here to Search Step 1: Click here to View records
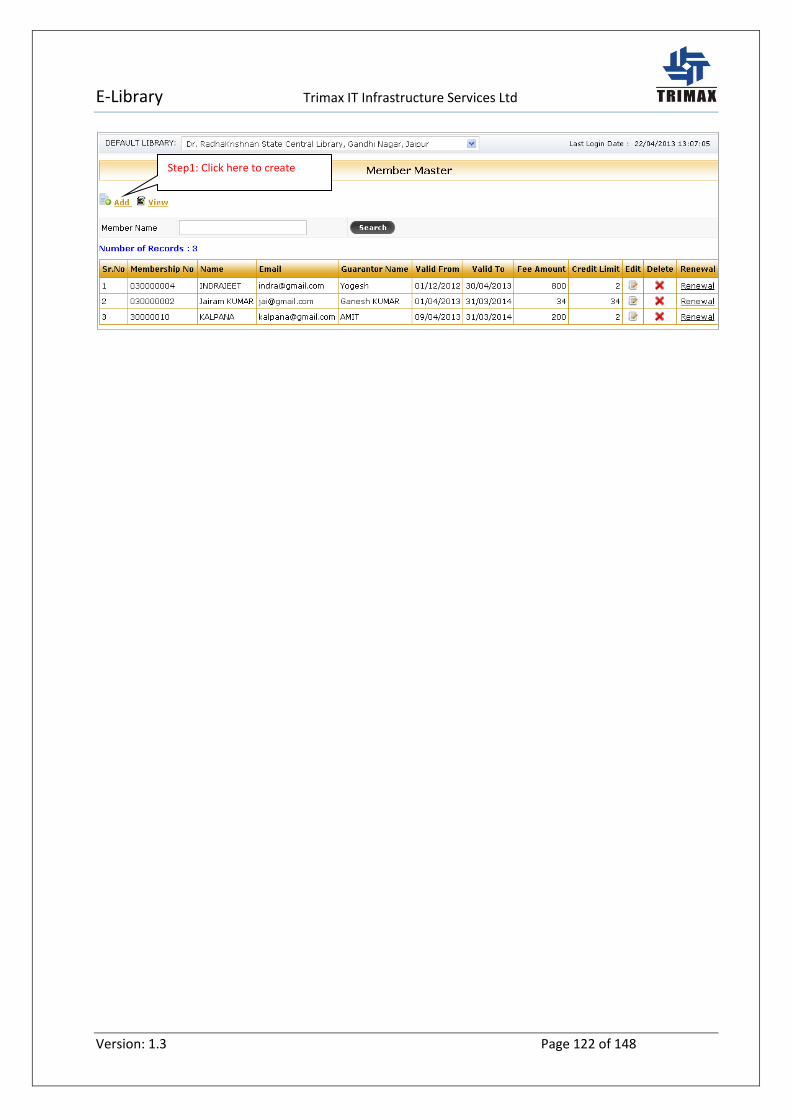
E-Library Trimax IT Infrastructure Services Ltd
Version: 1.3 Page 122 of 148
Step1: Click here to create
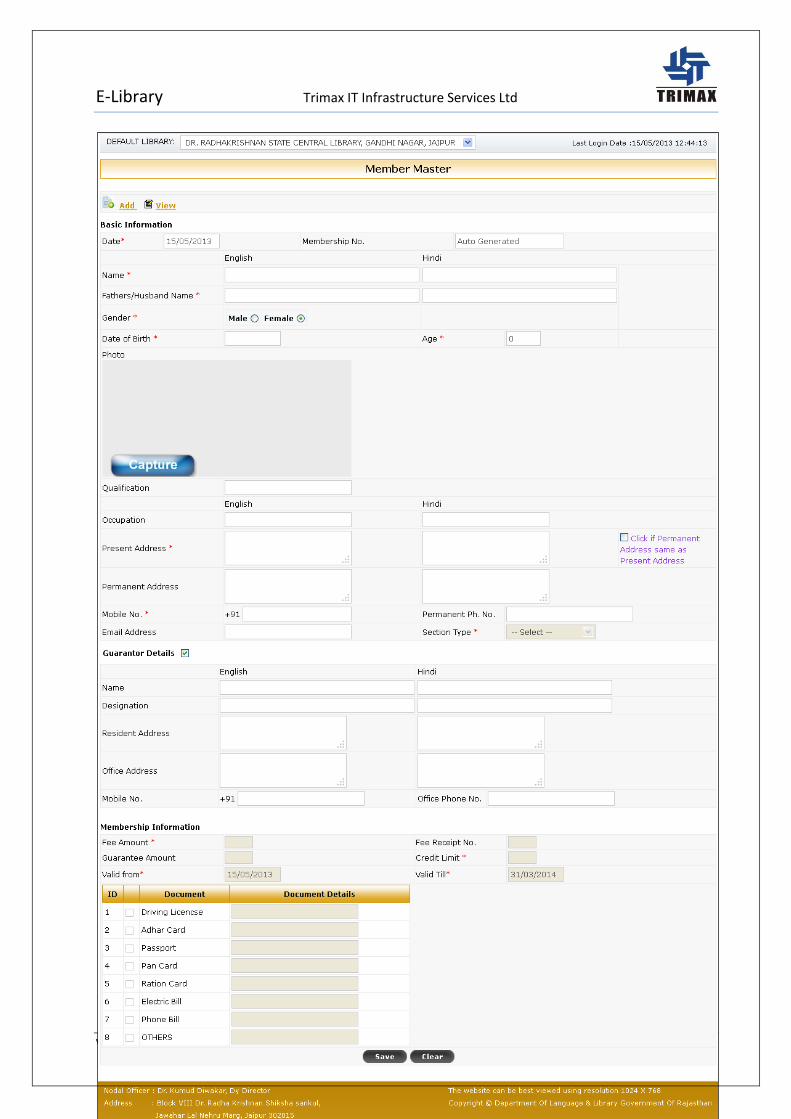
E-Library Trimax IT Infrastructure Services Ltd
Version: 1.3 Page 123 of 148
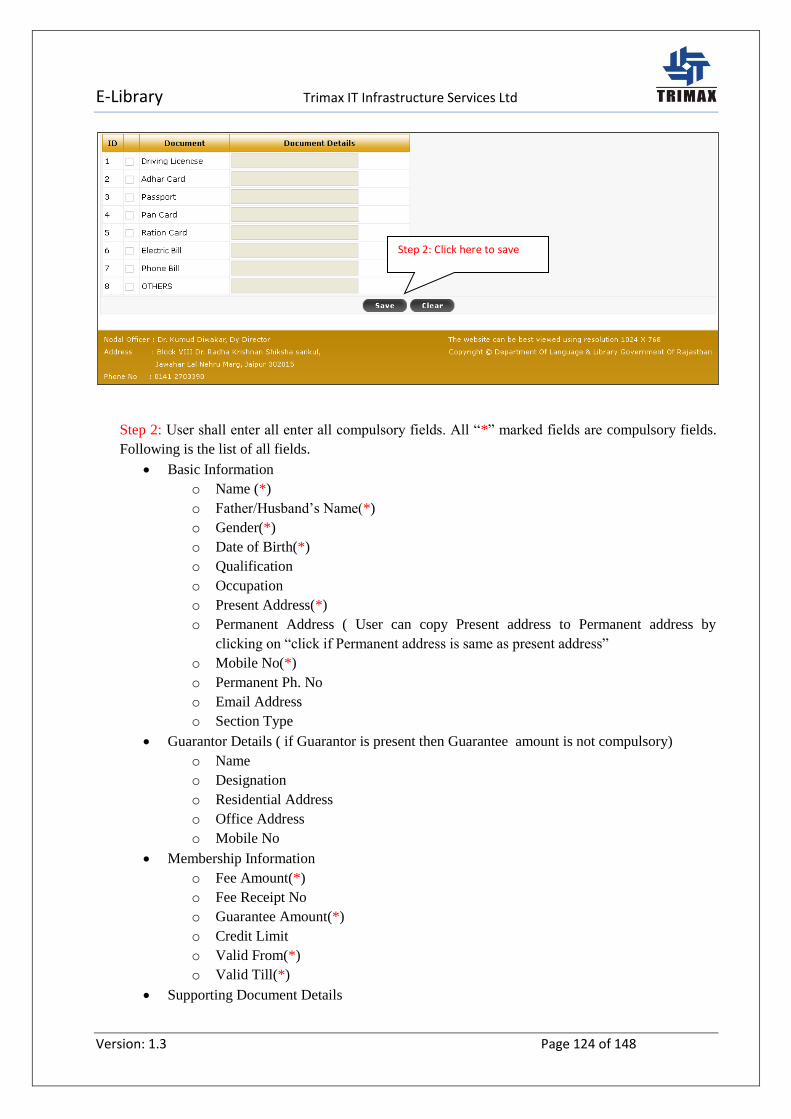
E-Library Trimax IT Infrastructure Services Ltd
Version: 1.3 Page 124 of 148
Step 2: User shall enter all enter all compulsory fields. All “*” marked fields are compulsory fields.
Following is the list of all fields.
Basic Information
o Name (*)
o Father/Husband’s Name(*)
o Gender(*)
o Date of Birth(*)
o Qualification
o Occupation
o Present Address(*)
o Permanent Address ( User can copy Present address to Permanent address by
clicking on “click if Permanent address is same as present address”
o Mobile No(*)
o Permanent Ph. No
o Email Address
o Section Type
Guarantor Details ( if Guarantor is present then Guarantee amount is not compulsory)
o Name
o Designation
o Residential Address
o Office Address
o Mobile No
Membership Information
o Fee Amount(*)
o Fee Receipt No
o Guarantee Amount(*)
o Credit Limit
o Valid From(*)
o Valid Till(*)
Supporting Document Details
Step 2: Click here to save
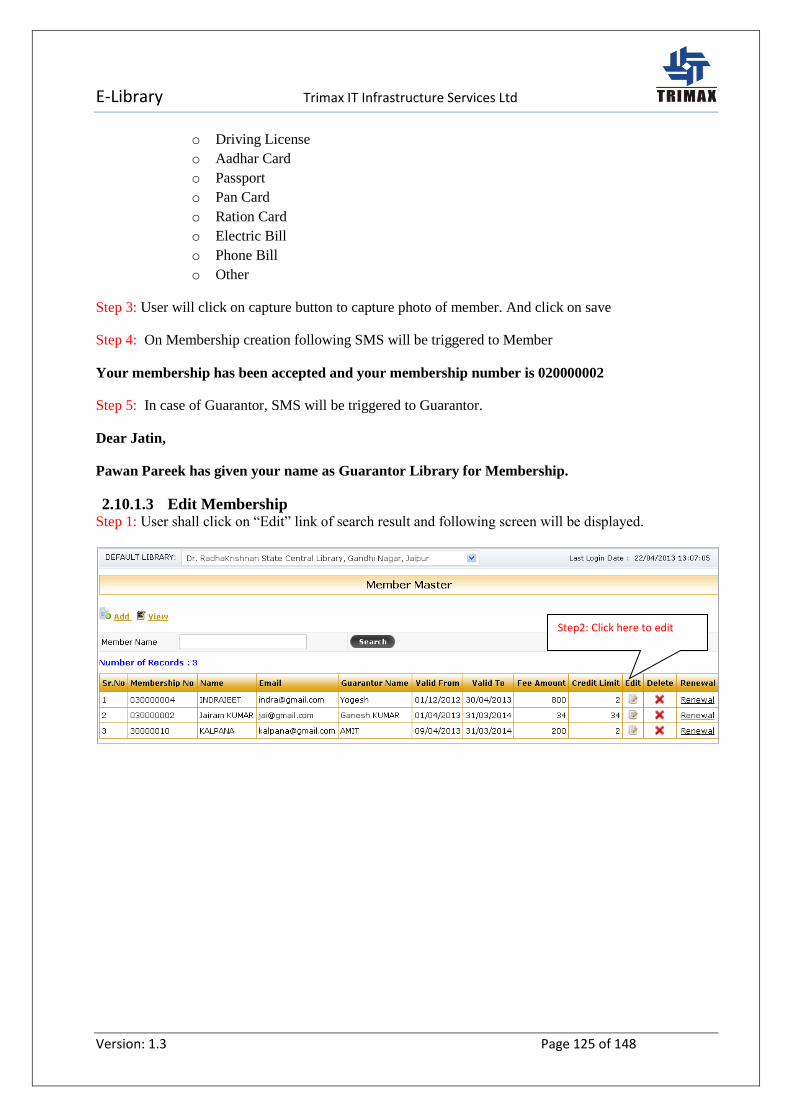
E-Library Trimax IT Infrastructure Services Ltd
Version: 1.3 Page 125 of 148
o Driving License
o Aadhar Card
o Passport
o Pan Card
o Ration Card
o Electric Bill
o Phone Bill
o Other
Step 3: User will click on capture button to capture photo of member. And click on save
Step 4: On Membership creation following SMS will be triggered to Member
Your membership has been accepted and your membership number is 020000002
Step 5: In case of Guarantor, SMS will be triggered to Guarantor.
Dear Jatin,
Pawan Pareek has given your name as Guarantor Library for Membership.
2.10.1.3 Edit Membership Step 1: User shall click on “Edit” link of search result and following screen will be displayed.
Step2: Click here to edit

E-Library Trimax IT Infrastructure Services Ltd
Version: 1.3 Page 126 of 148
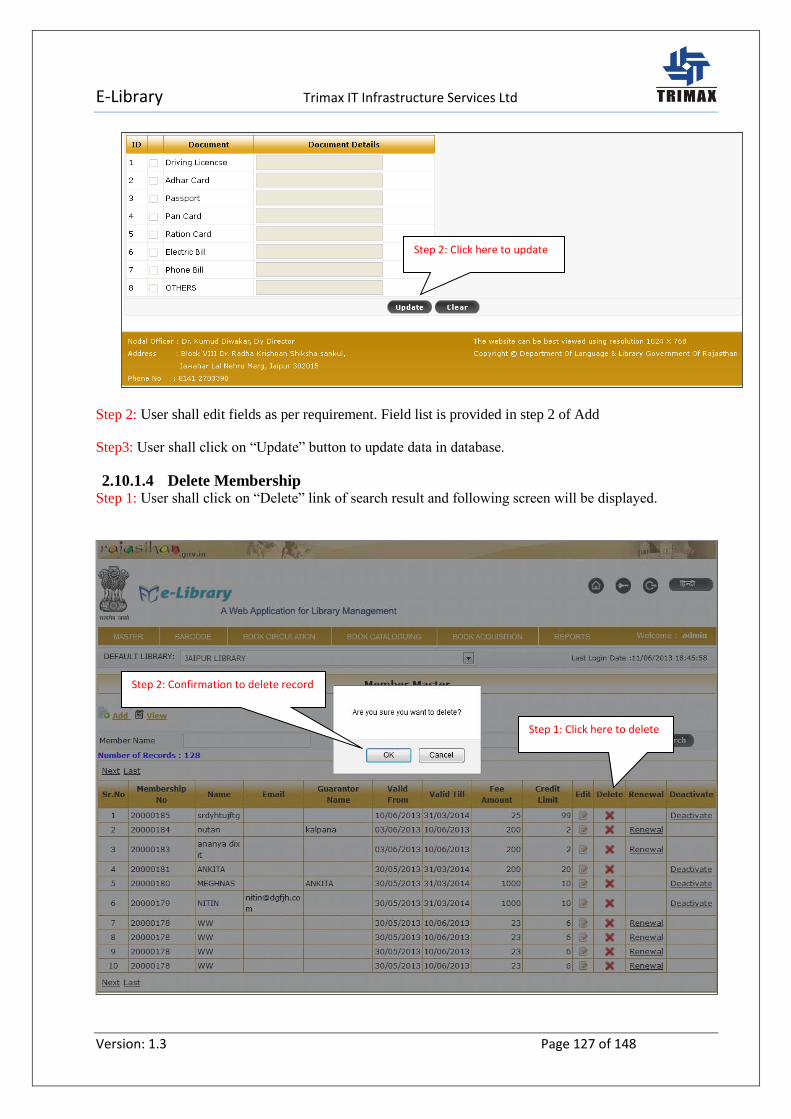
E-Library Trimax IT Infrastructure Services Ltd
Version: 1.3 Page 127 of 148
Step 2: User shall edit fields as per requirement. Field list is provided in step 2 of Add
Step3: User shall click on “Update” button to update data in database.
2.10.1.4 Delete Membership Step 1: User shall click on “Delete” link of search result and following screen will be displayed.
Step 1: Click here to delete
Step 2: Confirmation to delete record
Step 2: Click here to update
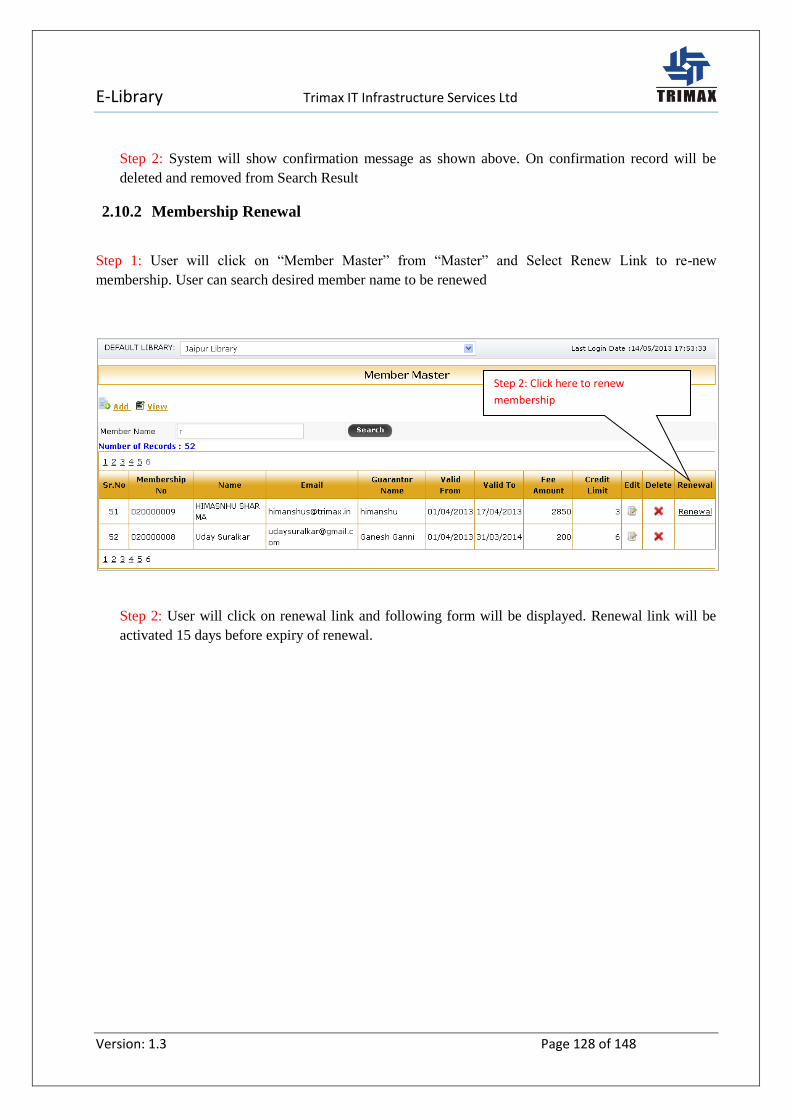
E-Library Trimax IT Infrastructure Services Ltd
Version: 1.3 Page 128 of 148
Step 2: System will show confirmation message as shown above. On confirmation record will be
deleted and removed from Search Result
2.10.2 Membership Renewal
Step 1: User will click on “Member Master” from “Master” and Select Renew Link to re-new
membership. User can search desired member name to be renewed
Step 2: User will click on renewal link and following form will be displayed. Renewal link will be
activated 15 days before expiry of renewal.
Step 2: Click here to renew
membership
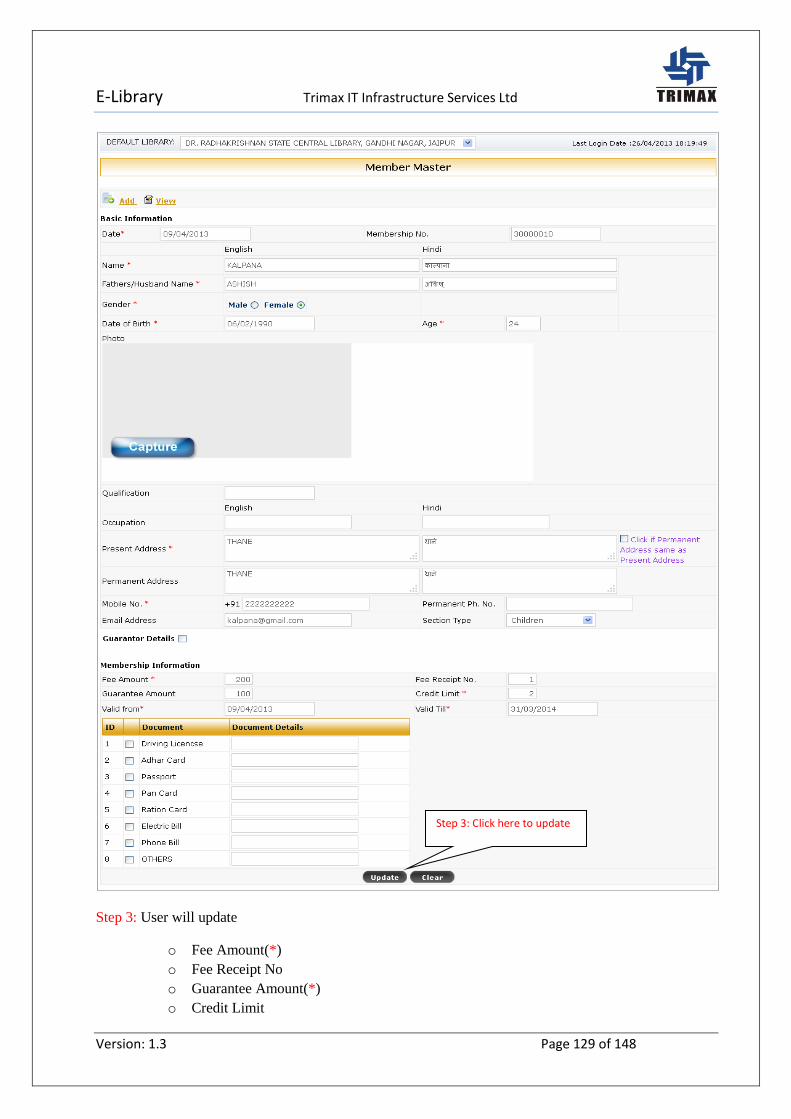
E-Library Trimax IT Infrastructure Services Ltd
Version: 1.3 Page 129 of 148
Step 3: User will update
o Fee Amount(*)
o Fee Receipt No
o Guarantee Amount(*)
o Credit Limit
Step 3: Click here to update
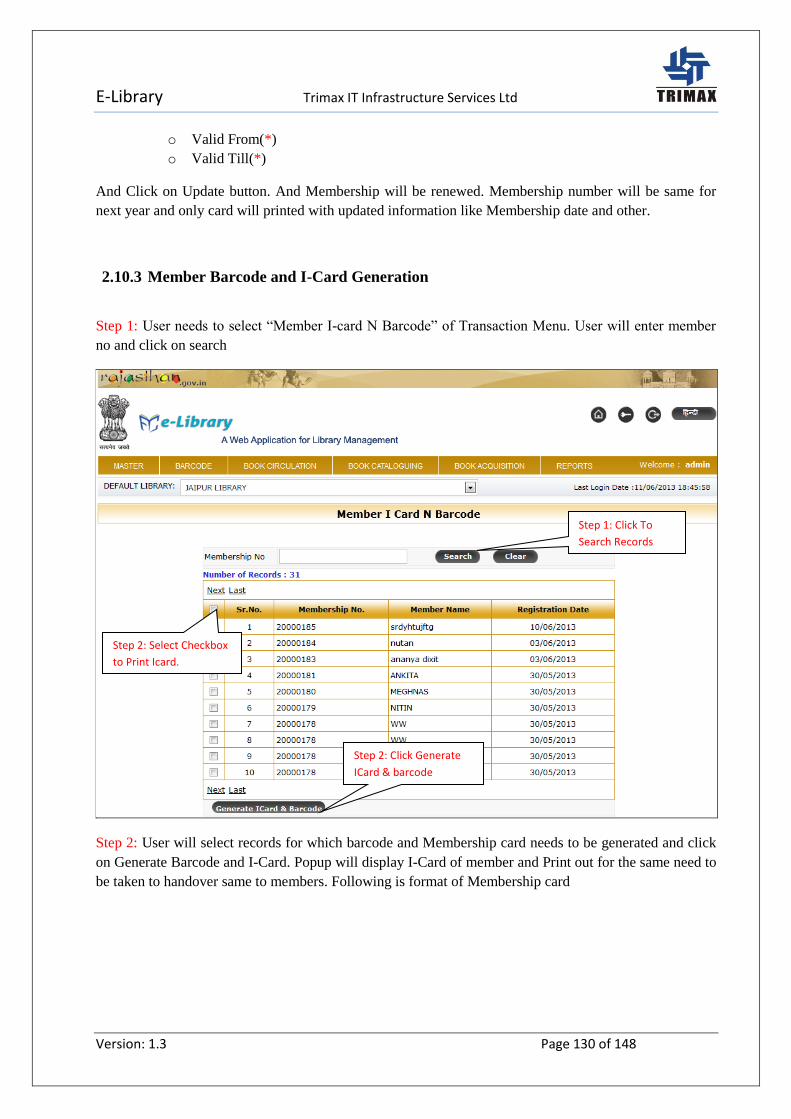
E-Library Trimax IT Infrastructure Services Ltd
Version: 1.3 Page 130 of 148
o Valid From(*)
o Valid Till(*)
And Click on Update button. And Membership will be renewed. Membership number will be same for
next year and only card will printed with updated information like Membership date and other.
2.10.3 Member Barcode and I-Card Generation
Step 1: User needs to select “Member I-card N Barcode” of Transaction Menu. User will enter member
no and click on search
Step 2: User will select records for which barcode and Membership card needs to be generated and click
on Generate Barcode and I-Card. Popup will display I-Card of member and Print out for the same need to
be taken to handover same to members. Following is format of Membership card
Step 1: Click To
Search Records
Step 2: Select Checkbox
to Print Icard.
Step 2: Click Generate
ICard & barcode

E-Library Trimax IT Infrastructure Services Ltd
Version: 1.3 Page 131 of 148
2.11 Book Circulation
2.11.1 Book Issue
Step 1: User will select “Book Issue” from Transaction
Step 2: User will select “Member Type”. It could be either member or staff.
With barcode scanner Membership no will be scanned.
Member Name and issue details will be displayed for valid membership number.
Credit Limit and Balance Limit will be displayed
Delete link is provided to delete record of issued books
Step 2: Enter/Scan Membership/Staff No
Step 2: Click here to
display Issued
Books
Step 2: Click here
to select Member
Type
Step 3: Click here to
select y Barcode/
Accession/ Book Title
Step 3: Enter/ Scan
Barcode No.
Step 4: Click
here to add
record
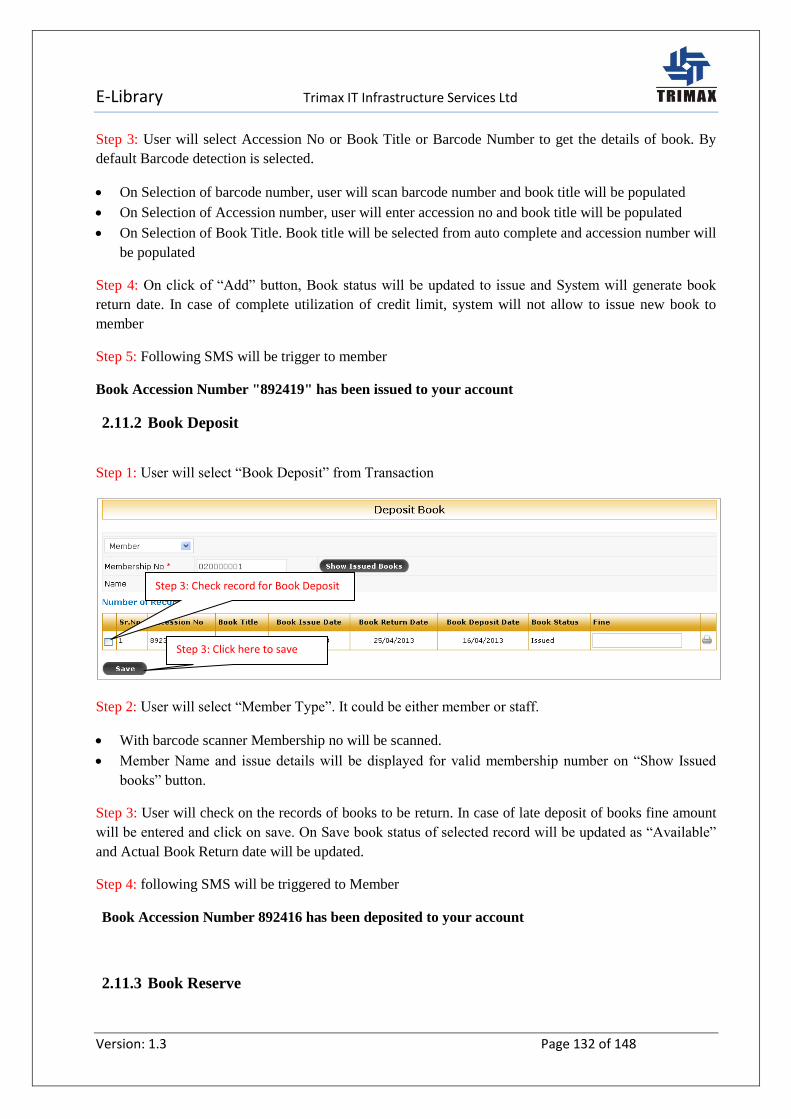
E-Library Trimax IT Infrastructure Services Ltd
Version: 1.3 Page 132 of 148
Step 3: User will select Accession No or Book Title or Barcode Number to get the details of book. By
default Barcode detection is selected.
On Selection of barcode number, user will scan barcode number and book title will be populated
On Selection of Accession number, user will enter accession no and book title will be populated
On Selection of Book Title. Book title will be selected from auto complete and accession number will
be populated
Step 4: On click of “Add” button, Book status will be updated to issue and System will generate book
return date. In case of complete utilization of credit limit, system will not allow to issue new book to
member
Step 5: Following SMS will be trigger to member
Book Accession Number "892419" has been issued to your account
2.11.2 Book Deposit
Step 1: User will select “Book Deposit” from Transaction
Step 2: User will select “Member Type”. It could be either member or staff.
With barcode scanner Membership no will be scanned.
Member Name and issue details will be displayed for valid membership number on “Show Issued
books” button.
Step 3: User will check on the records of books to be return. In case of late deposit of books fine amount
will be entered and click on save. On Save book status of selected record will be updated as “Available”
and Actual Book Return date will be updated.
Step 4: following SMS will be triggered to Member
Book Accession Number 892416 has been deposited to your account
2.11.3 Book Reserve
Step 3: Click here to save
Step 3: Check record for Book Deposit
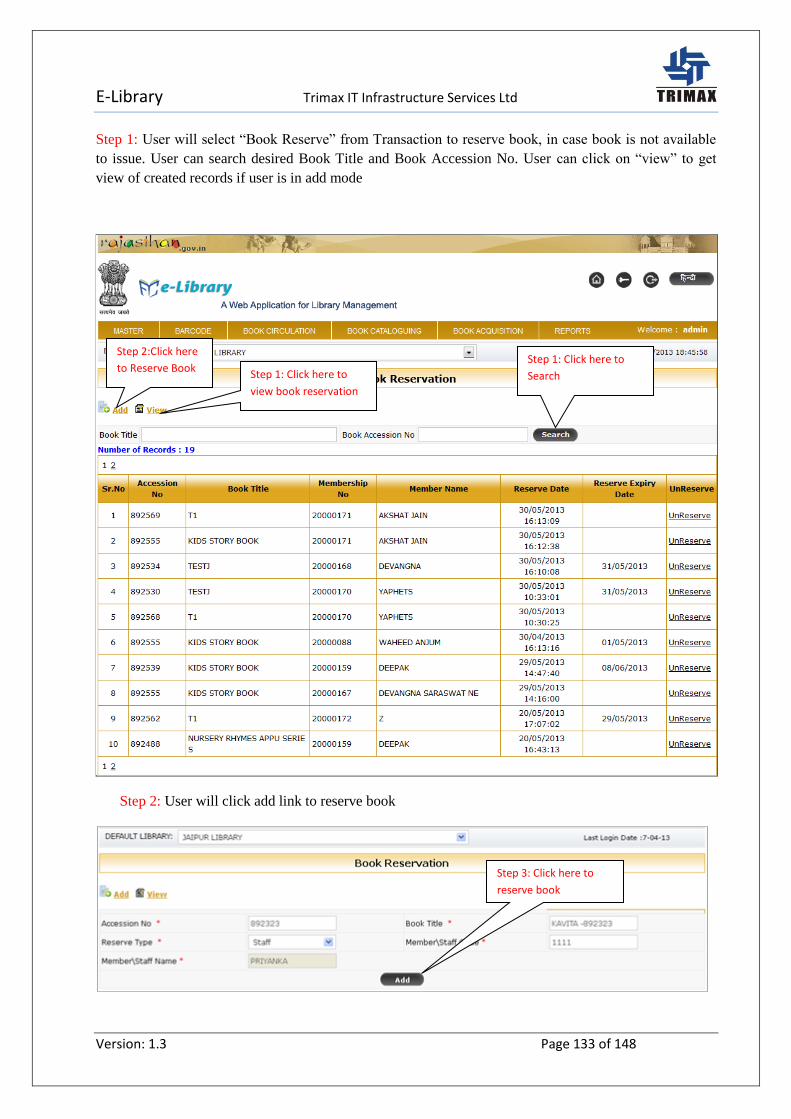
E-Library Trimax IT Infrastructure Services Ltd
Version: 1.3 Page 133 of 148
Step 1: User will select “Book Reserve” from Transaction to reserve book, in case book is not available
to issue. User can search desired Book Title and Book Accession No. User can click on “view” to get
view of created records if user is in add mode
Step 2: User will click add link to reserve book
Step 2:Click here
to Reserve Book Step 1: Click here to
view book reservation
Step 1: Click here to
Search
Step 3: Click here to
reserve book
E-Library Trimax IT Infrastructure Services Ltd
Version: 1.3 Page 134 of 148
Step 2: User will enter “*” marked fields and click on add button to reserve book
Accession No ( Valid Accession no will display Book Title)(*)
Reserve Type ( Member) (*)
Membership (valid code will display Member) (*)
Book reservation will be for 2 days i.e. Reserve day + 1 day. Book Reservation will lapse in 2 days and
user needs to reserve it again in case of requirement
Step 3: following Email will be triggered to Member, once it is book is available to issue
Dear Member,
Book With accession:025254
Title: Indian History is now available, which is reserved for you till 02/04/2013 .Please visit the
library asap.
Note: During book issue process, book will be issued to the person who has reserved it first
Step 3: Un-reserve link is provided in view screen. On confirmation from user book will be unreserved
E-Library Trimax IT Infrastructure Services Ltd
Version: 1.3 Page 135 of 148
2.11.4 Book Lost & Withdrawal
Step 1: User will select “Book Lost & Withdrawal” option from Transaction. By default search option
will be displayed. User can search records by entering search criteria. User can click on “view” to get
view of records created.
Step 2: User will click on add link to add Lost and Withdrawal details of book
Step 3: User will enter following fields with multiple records for different accession no.
Book Accession No(*)
Book Title (will be populated by validating accession no) (*)
Status(*)
Remark(*)
Batch(*)
Step 4: User will update book status as lost or withdrawn. Once it is updated to lost or withdrawn, book
won’t be available for issue
Step 5: User can delete record by selecting record. On confirmation data will be deleted from the
database
Step 2 : Click
here to add Book
Status
Step 1: Click here to
Search Book Status
Step 6: Click here to
delete
Step 4: Click here to
save book status
E-Library Trimax IT Infrastructure Services Ltd
Version: 1.3 Page 136 of 148
2.11.5 Reader Details
Step 1: User will select “Reader Details” from Transaction. By default it has Search view. It shows daily
reader counts section wise.
Step 2: Click here to
Add New Reader
Details Step 1:Click here to
Search Step 4: Click here to Delete
E-Library Trimax IT Infrastructure Services Ltd
Version: 1.3 Page 137 of 148
Step 2: User will click on add button to add daily new entry of readers count
Step 3: User will select date for which count needs to be entered and only one record is allowed for date
Male
Step 3: Click here to save
Step 3: Click here to
Edit

E-Library Trimax IT Infrastructure Services Ltd
Version: 1.3 Page 138 of 148
Female
Child
Date ( Default Date Current Date) (*)
Step 4: User needs to select record to be edited. User will edit record of fields mentioned in step 3 and
click on update
Step 5: User needs to select record to be deleted. On confirmation record will be deleted from database.
2.11.6 Reminder Generation
Step 1: User will select “Reminder” from Transaction. There are two reminders
Book Return Reminder
Application will get view of Book returned date expiry
Membership Renewal Reminder
Application will get view of Membership expiry
Step 1: Select Book
Reminder
Step 3:Click here to
send Reminder SMS
Step 2: Select Record to
send Reminder SMS
Step 3: Click here to send Reminder Email
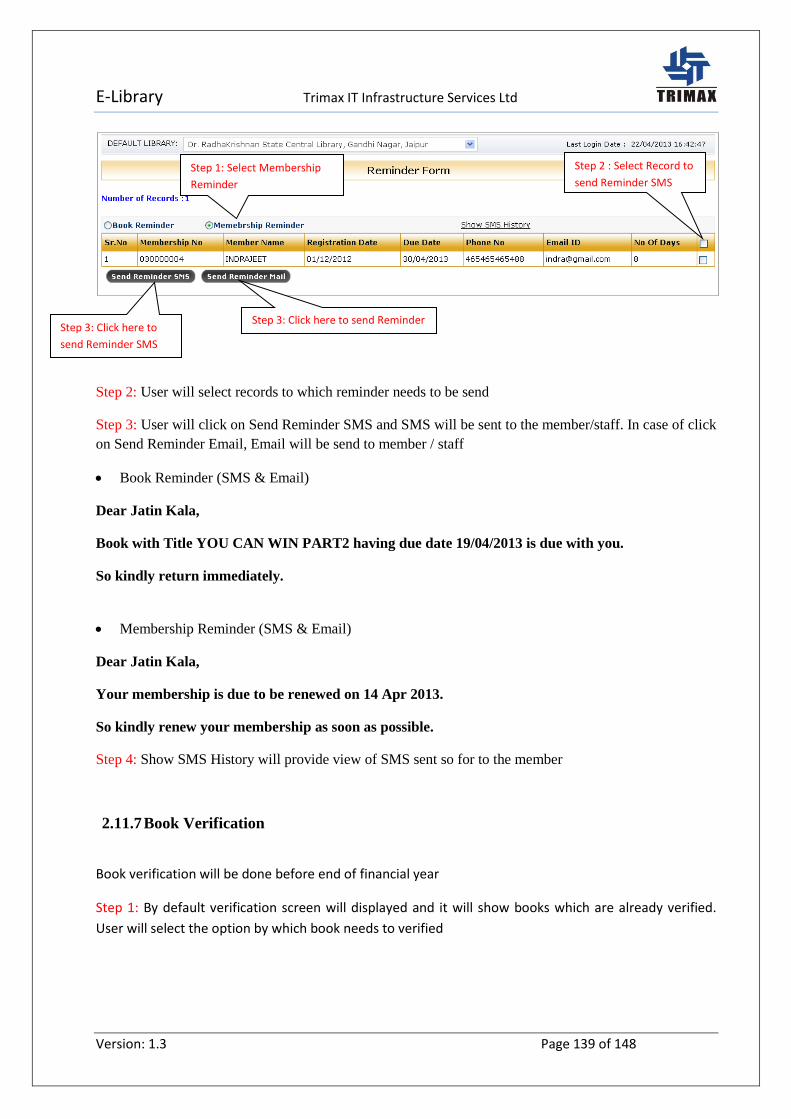
E-Library Trimax IT Infrastructure Services Ltd
Version: 1.3 Page 139 of 148
Step 2: User will select records to which reminder needs to be send
Step 3: User will click on Send Reminder SMS and SMS will be sent to the member/staff. In case of click
on Send Reminder Email, Email will be send to member / staff
Book Reminder (SMS & Email)
Dear Jatin Kala,
Book with Title YOU CAN WIN PART2 having due date 19/04/2013 is due with you.
So kindly return immediately.
Membership Reminder (SMS & Email)
Dear Jatin Kala,
Your membership is due to be renewed on 14 Apr 2013.
So kindly renew your membership as soon as possible.
Step 4: Show SMS History will provide view of SMS sent so for to the member
2.11.7 Book Verification
Book verification will be done before end of financial year
Step 1: By default verification screen will displayed and it will show books which are already verified.
User will select the option by which book needs to verified
Step 1: Select Membership
Reminder
Step 2 : Select Record to
send Reminder SMS
Step 3: Click here to
send Reminder SMS
Step 3: Click here to send Reminder
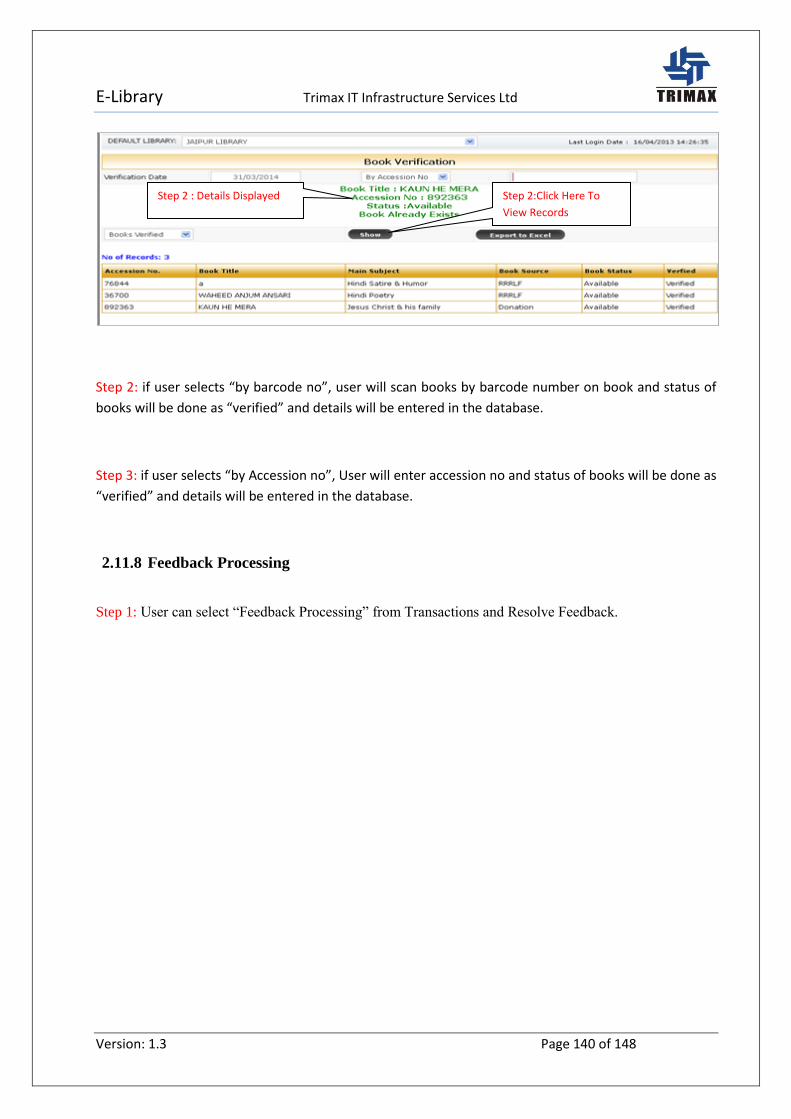
E-Library Trimax IT Infrastructure Services Ltd
Version: 1.3 Page 140 of 148
Step 2: if user selects “by barcode no”, user will scan books by barcode number on book and status of
books will be done as “verified” and details will be entered in the database.
Step 3: if user selects “by Accession no”, User will enter accession no and status of books will be done as
“verified” and details will be entered in the database.
2.11.8 Feedback Processing
Step 1: User can select “Feedback Processing” from Transactions and Resolve Feedback.
Step 2 : Details Displayed Step 2:Click Here To
View Records

E-Library Trimax IT Infrastructure Services Ltd
Version: 1.3 Page 141 of 148
Step 2: By default Search screen will be displayed. User can search Feedbacks created by and Update the
status of the application to the system.
Step 3: User can also view the history and status of Feedback created as and when required.
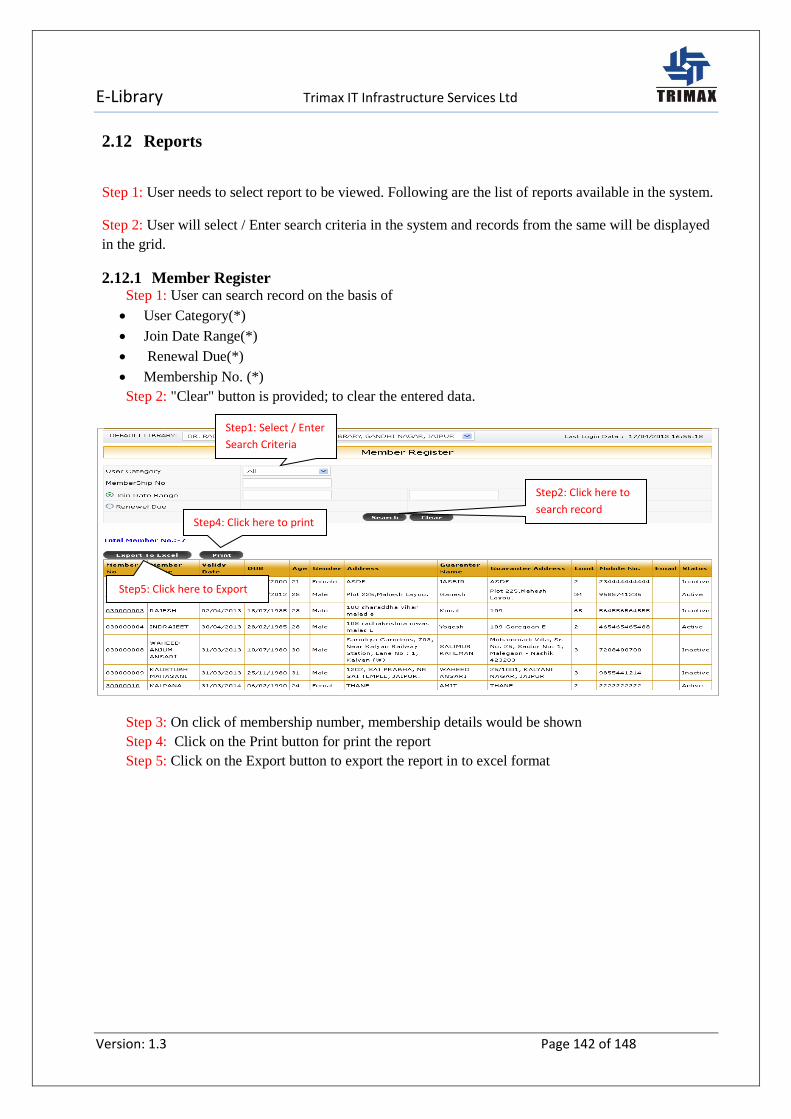
E-Library Trimax IT Infrastructure Services Ltd
Version: 1.3 Page 142 of 148
2.12 Reports
Step 1: User needs to select report to be viewed. Following are the list of reports available in the system.
Step 2: User will select / Enter search criteria in the system and records from the same will be displayed
in the grid.
2.12.1 Member Register Step 1: User can search record on the basis of
User Category(*)
Join Date Range(*)
Renewal Due(*)
Membership No. (*)
Step 2: "Clear" button is provided; to clear the entered data.
Step 3: On click of membership number, membership details would be shown
Step 4: Click on the Print button for print the report
Step 5: Click on the Export button to export the report in to excel format
Step1: Select / Enter
Search Criteria
Step2: Click here to
search record
Step5: Click here to Export
Step4: Click here to print

E-Library Trimax IT Infrastructure Services Ltd
Version: 1.3 Page 143 of 148
2.12.2 Accession Register
Step 1: User can search record on the basis of
Accession No.
Date Range
Category
Supplier Type
Author, Publisher
Language Status.
Step 2: "Clear" button is provided; to clear the entered data.
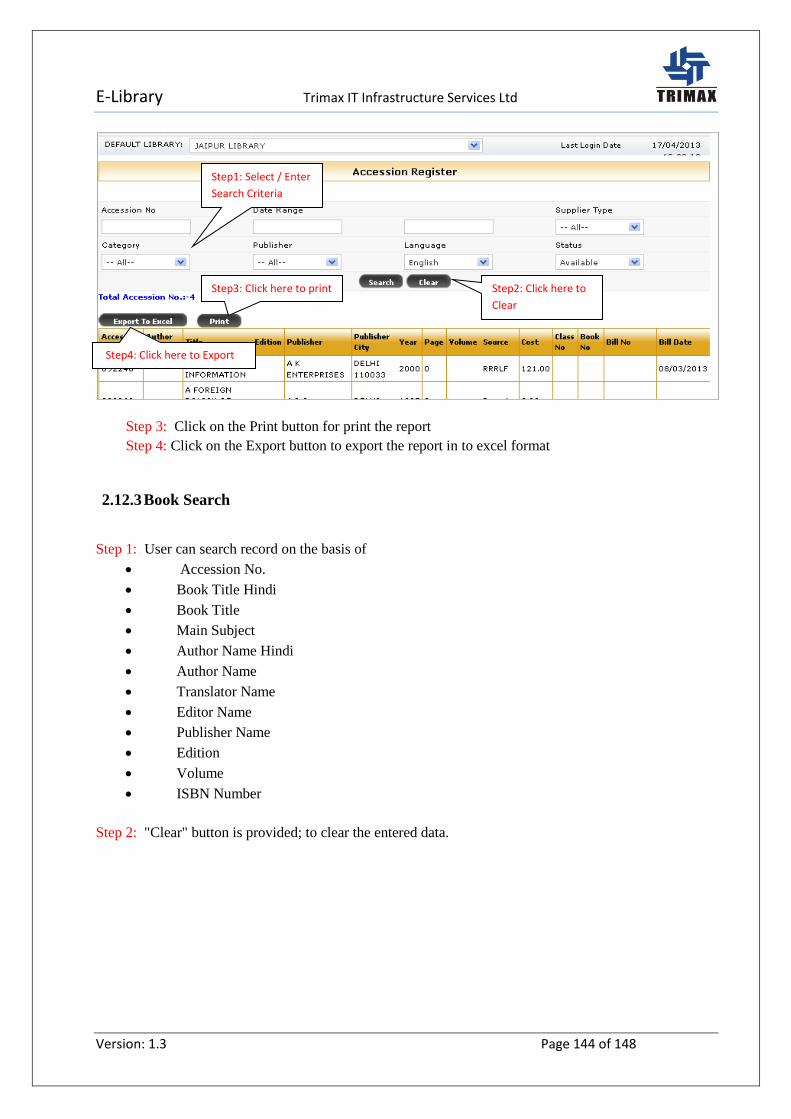
E-Library Trimax IT Infrastructure Services Ltd
Version: 1.3 Page 144 of 148
Step 3: Click on the Print button for print the report
Step 4: Click on the Export button to export the report in to excel format
2.12.3 Book Search
Step 1: User can search record on the basis of
Accession No.
Book Title Hindi
Book Title
Main Subject
Author Name Hindi
Author Name
Translator Name
Editor Name
Publisher Name
Edition
Volume
ISBN Number
Step 2: "Clear" button is provided; to clear the entered data.
Step1: Select / Enter
Search Criteria
Step2: Click here to
Clear
Step4: Click here to Export
Step3: Click here to print

E-Library Trimax IT Infrastructure Services Ltd
Version: 1.3 Page 145 of 148
Step1: Select / Enter
Search Criteria
Step2: Click here to
search record

E-Library Trimax IT Infrastructure Services Ltd
Version: 1.3 Page 146 of 148
2.12.4 Book Demand
Step 1: User can search record on the basis of
Demand Register
Approved Register
Ordered Register
Step 2: "Clear" button is provided; to clear the entered data.
Step 3: Click on the Print button for print the report
Step 4: Click on the Export button to export the report in to excel format
2.12.5 Login Trail
Step 1: User can search record on the basis of Date Range
Step 2: "Clear" button is provided; to clear the entered date
Step1: Select / Enter
Search Criteria
Step2: Click here to
search record
Step4: Click here to Export
Step3: Click here to
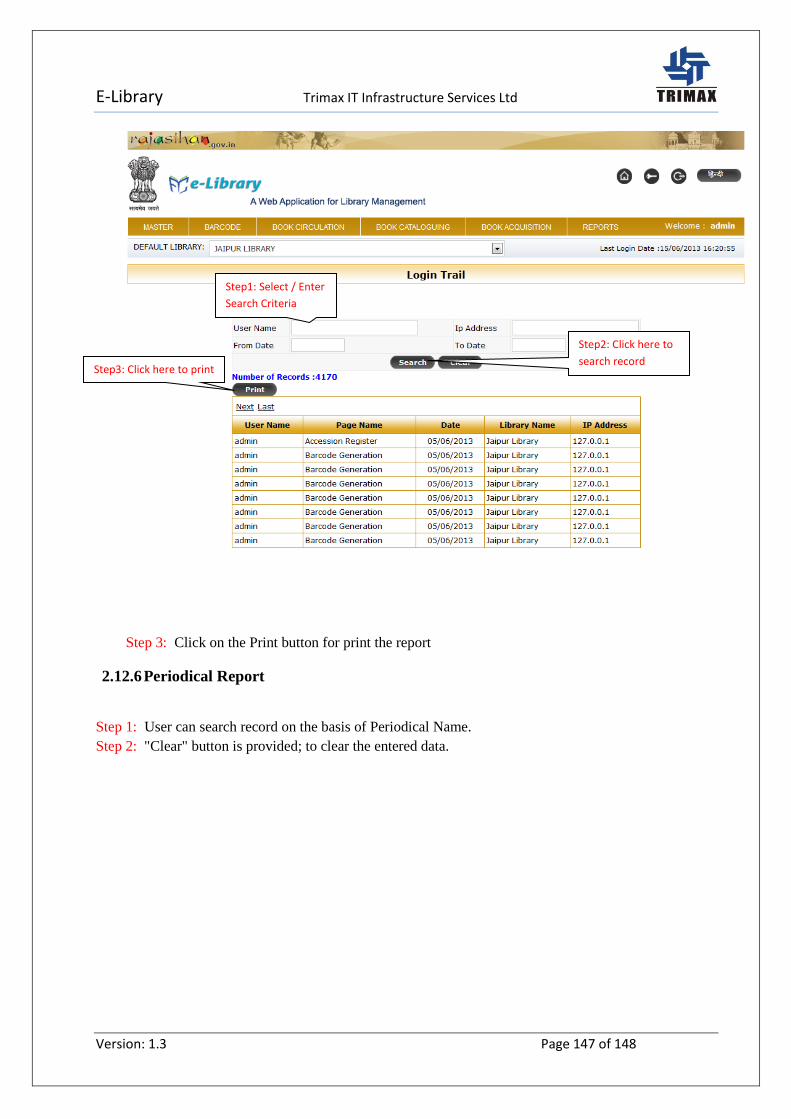
E-Library Trimax IT Infrastructure Services Ltd
Version: 1.3 Page 147 of 148
Step 3: Click on the Print button for print the report
2.12.6 Periodical Report
Step 1: User can search record on the basis of Periodical Name.
Step 2: "Clear" button is provided; to clear the entered data.
Step1: Select / Enter
Search Criteria
Step2: Click here to
search record Step3: Click here to print
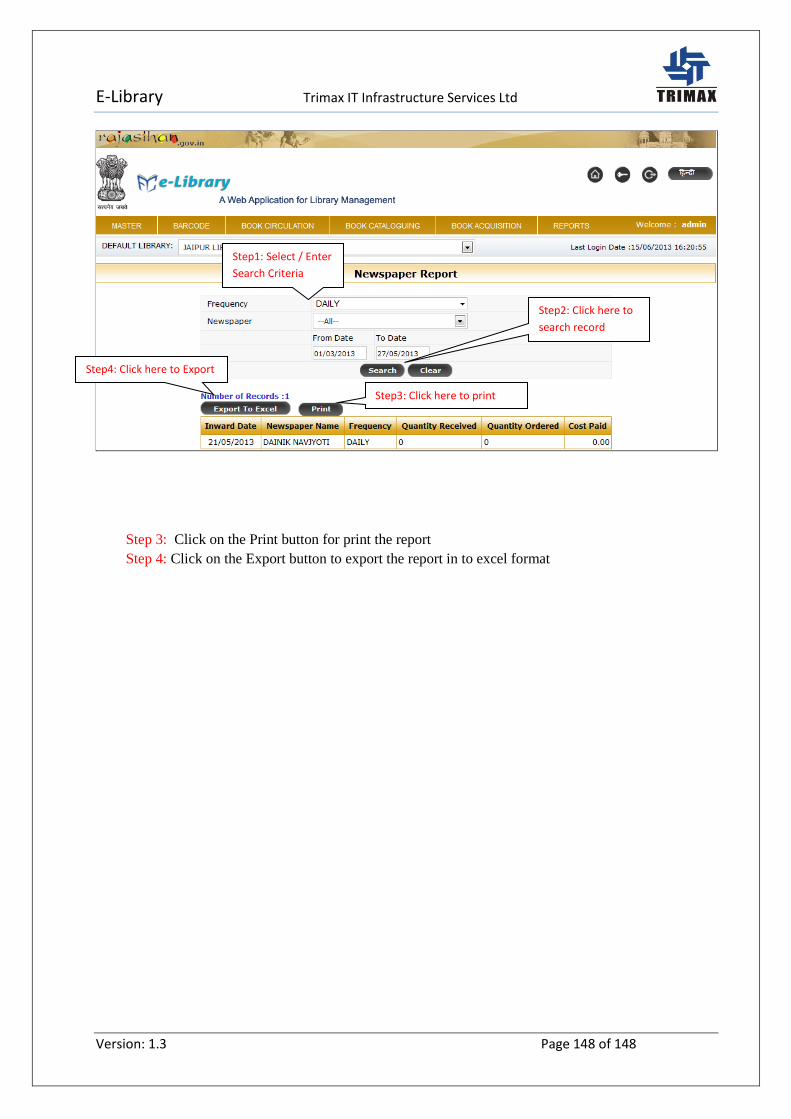
E-Library Trimax IT Infrastructure Services Ltd
Version: 1.3 Page 148 of 148
Step 3: Click on the Print button for print the report
Step 4: Click on the Export button to export the report in to excel format
Step1: Select / Enter
Search Criteria
Step2: Click here to
search record
Step4: Click here to Export
Step3: Click here to print