elluminate vcs client user guide v2 - online collaborative ... · page iv doc. revision 1.0...
TRANSCRIPT

Elluminate VCS Client Users Guide
Version 2.0© 2001 - 2009 Elluminate, Inc.All Rights Reserved

Copyright
No part of this document may be reproduced or transmitted in any form by any means, electronic or mechanical, including photocopy, recording or using any information retrieval system, without prior written permission. This document contains confidential proprietary information and is protected by law. This document and the information contained in it are intended for the original recipient(s) only. Any dissemination or distribution of the document without prior written permission is strictly prohibited.
Elluminate and the Elluminate logo are registered trademarks of Elluminate. Elluminate VCS is a trademark of Elluminate, Inc., all rights reserved.
Windows 2000, Windows XP, and Windows Vista are registered trademarks of Microsoft Corporation
All other brand or product names are trademarks or registered trademarks of their respective companies or organizations.
© 2009 Elluminate, Inc. All Rights Reserved.
Elluminate VCSversion 2.0
Doc. Revision 1.0 Page iii
ContentsPreface . . . . . . . . . . . . . . . . . . . . . . . . . . . . . . . . . . . . . . . . . . . . . . . . . . . . . . . . xi
Audience . . . . . . . . . . . . . . . . . . . . . . . . . . . . . . . . . . . . . . . . . . . . . . . . . . . . . . . . . . . . . . . . . xiWhat’s in this Book . . . . . . . . . . . . . . . . . . . . . . . . . . . . . . . . . . . . . . . . . . . . . . . . . . . . . . . . xi
About Screenshots . . . . . . . . . . . . . . . . . . . . . . . . . . . . . . . . . . . . . . . . . . . . . . . . . . . . . . xiText Conventions . . . . . . . . . . . . . . . . . . . . . . . . . . . . . . . . . . . . . . . . . . . . . . . . . . . . . . . xii
Chapter 1: Installing and Configuring the Elluminate VCS Client . . . . . . . . .1Overview . . . . . . . . . . . . . . . . . . . . . . . . . . . . . . . . . . . . . . . . . . . . . . . . . . . . . . . . . . . . . . . . . . 1In this chapter . . . . . . . . . . . . . . . . . . . . . . . . . . . . . . . . . . . . . . . . . . . . . . . . . . . . . . . . . . . . . . 1System Requirements . . . . . . . . . . . . . . . . . . . . . . . . . . . . . . . . . . . . . . . . . . . . . . . . . . . . . . . . 2Installing and Starting Elluminate VCS . . . . . . . . . . . . . . . . . . . . . . . . . . . . . . . . . . . . . . . . . . 2Selecting a Speaker . . . . . . . . . . . . . . . . . . . . . . . . . . . . . . . . . . . . . . . . . . . . . . . . . . . . . . . . . . 4Selecting a Microphone . . . . . . . . . . . . . . . . . . . . . . . . . . . . . . . . . . . . . . . . . . . . . . . . . . . . . . 5Selecting a Camera . . . . . . . . . . . . . . . . . . . . . . . . . . . . . . . . . . . . . . . . . . . . . . . . . . . . . . . . . . 7
Chapter 2: Starting theElluminate VCS Client . . . . . . . . . . . . . . . . . . . . . . . . . . . . . . . . . . . . . . . . . . . .9
Overview . . . . . . . . . . . . . . . . . . . . . . . . . . . . . . . . . . . . . . . . . . . . . . . . . . . . . . . . . . . . . . . . . . 9In this chapter . . . . . . . . . . . . . . . . . . . . . . . . . . . . . . . . . . . . . . . . . . . . . . . . . . . . . . . . . . . . . . 9Key Terms . . . . . . . . . . . . . . . . . . . . . . . . . . . . . . . . . . . . . . . . . . . . . . . . . . . . . . . . . . . . . . . 10Logging on to the Elluminate VCS Server . . . . . . . . . . . . . . . . . . . . . . . . . . . . . . . . . . . . . . . 11
About User Profiles . . . . . . . . . . . . . . . . . . . . . . . . . . . . . . . . . . . . . . . . . . . . . . . . . . . . . 11Starting Elluminate VCS from the Start Menu . . . . . . . . . . . . . . . . . . . . . . . . . . . . . . . . . . . . 12Making a Contact Request . . . . . . . . . . . . . . . . . . . . . . . . . . . . . . . . . . . . . . . . . . . . . . . . . . . 12About the Elluminate VCS Presence Window . . . . . . . . . . . . . . . . . . . . . . . . . . . . . . . . . . . . 16
Ribbon Bar . . . . . . . . . . . . . . . . . . . . . . . . . . . . . . . . . . . . . . . . . . . . . . . . . . . . . . . . . . . . 17Title Bar . . . . . . . . . . . . . . . . . . . . . . . . . . . . . . . . . . . . . . . . . . . . . . . . . . . . . . . . . . . . . . 17System Menu . . . . . . . . . . . . . . . . . . . . . . . . . . . . . . . . . . . . . . . . . . . . . . . . . . . . . . . . . . 18Main Menu . . . . . . . . . . . . . . . . . . . . . . . . . . . . . . . . . . . . . . . . . . . . . . . . . . . . . . . . . . . . 19Accessing Online Help . . . . . . . . . . . . . . . . . . . . . . . . . . . . . . . . . . . . . . . . . . . . . . . . . . . 21Accessing Version Information . . . . . . . . . . . . . . . . . . . . . . . . . . . . . . . . . . . . . . . . . . . . 21Updating the Elluminate VCS Client Manually . . . . . . . . . . . . . . . . . . . . . . . . . . . . . . . . 22
About the Elluminate VCS Session Window . . . . . . . . . . . . . . . . . . . . . . . . . . . . . . . . . . . . . 22Customizing the Ribbon Bar . . . . . . . . . . . . . . . . . . . . . . . . . . . . . . . . . . . . . . . . . . . . . . 23
Page iv Doc. Revision 1.0
Elluminate VCS Client Users Guide - Contents
General Tab for Point-to-Point and Multi-Point Sessions . . . . . . . . . . . . . . . . . . . . . . . . 23Video & Layout Tab for Point-to-Point Sessions . . . . . . . . . . . . . . . . . . . . . . . . . . . . . . 25Video & Layout Tab for Multi-Point Sessions . . . . . . . . . . . . . . . . . . . . . . . . . . . . . . . . 27Top Panel of the Session Window . . . . . . . . . . . . . . . . . . . . . . . . . . . . . . . . . . . . . . . . . . 28Bottom Panel of the Session Window . . . . . . . . . . . . . . . . . . . . . . . . . . . . . . . . . . . . . . . 30Minimizing the Elluminate VCS Client . . . . . . . . . . . . . . . . . . . . . . . . . . . . . . . . . . . . . 30
Using the Task Tray . . . . . . . . . . . . . . . . . . . . . . . . . . . . . . . . . . . . . . . . . . . . . . . . . . . . . . . . 31Using Standby Mode . . . . . . . . . . . . . . . . . . . . . . . . . . . . . . . . . . . . . . . . . . . . . . . . . . . . 31Exiting the Elluminate VCS Client . . . . . . . . . . . . . . . . . . . . . . . . . . . . . . . . . . . . . . . . . 32
Present & Share Workspace . . . . . . . . . . . . . . . . . . . . . . . . . . . . . . . . . . . . . . . . . . . . . . . . . . 33Using the Hide Pin . . . . . . . . . . . . . . . . . . . . . . . . . . . . . . . . . . . . . . . . . . . . . . . . . . . . . . 34
Chapter 3: Managing Contact Lists . . . . . . . . . . . . . . . . . . . . . . . . . . . . . . . . 35Overview . . . . . . . . . . . . . . . . . . . . . . . . . . . . . . . . . . . . . . . . . . . . . . . . . . . . . . . . . . . . . . . . 35In this chapter . . . . . . . . . . . . . . . . . . . . . . . . . . . . . . . . . . . . . . . . . . . . . . . . . . . . . . . . . . . . . 35About the Contact List . . . . . . . . . . . . . . . . . . . . . . . . . . . . . . . . . . . . . . . . . . . . . . . . . . . . . . 36
Symbols for User Online Status . . . . . . . . . . . . . . . . . . . . . . . . . . . . . . . . . . . . . . . . . . . 37About the Contacts Listbox . . . . . . . . . . . . . . . . . . . . . . . . . . . . . . . . . . . . . . . . . . . . . . . . . . 38Displaying the Online State of a Contact . . . . . . . . . . . . . . . . . . . . . . . . . . . . . . . . . . . . . . . . 40Modifying Visibility Settings for a Contact . . . . . . . . . . . . . . . . . . . . . . . . . . . . . . . . . . . . . . 40Modifying Visibility Settings for a Group . . . . . . . . . . . . . . . . . . . . . . . . . . . . . . . . . . . . . . . 40Tooltips for Contact Entries . . . . . . . . . . . . . . . . . . . . . . . . . . . . . . . . . . . . . . . . . . . . . . . . . . 41Groups Menu . . . . . . . . . . . . . . . . . . . . . . . . . . . . . . . . . . . . . . . . . . . . . . . . . . . . . . . . . . . . . 41
Invite Group to Meeting . . . . . . . . . . . . . . . . . . . . . . . . . . . . . . . . . . . . . . . . . . . . . . . . . 42Stealth Settings . . . . . . . . . . . . . . . . . . . . . . . . . . . . . . . . . . . . . . . . . . . . . . . . . . . . . . . . 42Sort List . . . . . . . . . . . . . . . . . . . . . . . . . . . . . . . . . . . . . . . . . . . . . . . . . . . . . . . . . . . . . . 42Delete Group . . . . . . . . . . . . . . . . . . . . . . . . . . . . . . . . . . . . . . . . . . . . . . . . . . . . . . . . . . 43Rename Group . . . . . . . . . . . . . . . . . . . . . . . . . . . . . . . . . . . . . . . . . . . . . . . . . . . . . . . . . 43Add New Contact . . . . . . . . . . . . . . . . . . . . . . . . . . . . . . . . . . . . . . . . . . . . . . . . . . . . . . 43Add New Group . . . . . . . . . . . . . . . . . . . . . . . . . . . . . . . . . . . . . . . . . . . . . . . . . . . . . . . . 44
Contacts Menu . . . . . . . . . . . . . . . . . . . . . . . . . . . . . . . . . . . . . . . . . . . . . . . . . . . . . . . . . . . . 44Invite Contact to Running Meeting . . . . . . . . . . . . . . . . . . . . . . . . . . . . . . . . . . . . . . . . . 45Forward Current Call . . . . . . . . . . . . . . . . . . . . . . . . . . . . . . . . . . . . . . . . . . . . . . . . . . . . 45Call Contact . . . . . . . . . . . . . . . . . . . . . . . . . . . . . . . . . . . . . . . . . . . . . . . . . . . . . . . . . . . 45Send / Show Instant Message... . . . . . . . . . . . . . . . . . . . . . . . . . . . . . . . . . . . . . . . . . . . . 45Block Contact / Unblock Contact . . . . . . . . . . . . . . . . . . . . . . . . . . . . . . . . . . . . . . . . . . 45Visibility and Stealth Settings > . . . . . . . . . . . . . . . . . . . . . . . . . . . . . . . . . . . . . . . . . . . 45Contact Details . . . . . . . . . . . . . . . . . . . . . . . . . . . . . . . . . . . . . . . . . . . . . . . . . . . . . . . . . 46

Contents
Doc. Revision 1.0 Page v
Delete from Contact List . . . . . . . . . . . . . . . . . . . . . . . . . . . . . . . . . . . . . . . . . . . . . . . . . 46Copy Contact . . . . . . . . . . . . . . . . . . . . . . . . . . . . . . . . . . . . . . . . . . . . . . . . . . . . . . . . . . 46Rename Contact . . . . . . . . . . . . . . . . . . . . . . . . . . . . . . . . . . . . . . . . . . . . . . . . . . . . . . . . 46Add New Contact . . . . . . . . . . . . . . . . . . . . . . . . . . . . . . . . . . . . . . . . . . . . . . . . . . . . . . . 46Add New Group . . . . . . . . . . . . . . . . . . . . . . . . . . . . . . . . . . . . . . . . . . . . . . . . . . . . . . . . 46Sort List . . . . . . . . . . . . . . . . . . . . . . . . . . . . . . . . . . . . . . . . . . . . . . . . . . . . . . . . . . . . . . 47Missed Calls List . . . . . . . . . . . . . . . . . . . . . . . . . . . . . . . . . . . . . . . . . . . . . . . . . . . . . . . 47Recent Calls List . . . . . . . . . . . . . . . . . . . . . . . . . . . . . . . . . . . . . . . . . . . . . . . . . . . . . . . 48
Chapter 4: Point-to-Point Sessions with the Elluminate VCS Client . . . . . . . . . . . . . . . . . . . . . . . . . . . . . . . . . . . . . . . . . . . 49
Overview . . . . . . . . . . . . . . . . . . . . . . . . . . . . . . . . . . . . . . . . . . . . . . . . . . . . . . . . . . . . . . . . 49In this chapter . . . . . . . . . . . . . . . . . . . . . . . . . . . . . . . . . . . . . . . . . . . . . . . . . . . . . . . . . . . . . 49Outgoing Point-to-Point Sessions . . . . . . . . . . . . . . . . . . . . . . . . . . . . . . . . . . . . . . . . . . . . . 50
Launching a Point-to-Point Session from the Contacts List . . . . . . . . . . . . . . . . . . . . . . 50Launching a Point-to-Point Session Using Instant Search . . . . . . . . . . . . . . . . . . . . . . . 53Launching a Point-to-Point Session Using the New Call Dialog Box . . . . . . . . . . . . . . 55Launching a Point-to-Point Session with an H.323 Endpoint . . . . . . . . . . . . . . . . . . . . . 56
Incoming Point-to-Point Sessions . . . . . . . . . . . . . . . . . . . . . . . . . . . . . . . . . . . . . . . . . . . . . 57Accepting an Incoming Session Request . . . . . . . . . . . . . . . . . . . . . . . . . . . . . . . . . . . . . 57Accepting an Incoming Session as a Voice-Only Call (No Video) . . . . . . . . . . . . . . . . . 59Accepting an Incoming Telephone Call into a Two-User Session . . . . . . . . . . . . . . . . . 60Putting an Active Session On Hold . . . . . . . . . . . . . . . . . . . . . . . . . . . . . . . . . . . . . . . . . 63Accepting an Incoming Call and Placing an Active Session On Hold . . . . . . . . . . . . . . 64Controlling Sessions via the Running Meetings Dialog Box . . . . . . . . . . . . . . . . . . . . . 66Rejecting an Incoming Session Request . . . . . . . . . . . . . . . . . . . . . . . . . . . . . . . . . . . . . 67Transferring an Active Session Via the Contact List . . . . . . . . . . . . . . . . . . . . . . . . . . . 68Ending an Active Point-to-Point Session . . . . . . . . . . . . . . . . . . . . . . . . . . . . . . . . . . . . . 68Inviting Other Participants into a Session - Starting a Multi-Point Session . . . . . . . . . . 69
Configuring Video Functions in a Point-to-Point Session . . . . . . . . . . . . . . . . . . . . . . . . . . . 71Muting Your Video Image . . . . . . . . . . . . . . . . . . . . . . . . . . . . . . . . . . . . . . . . . . . . . . . . 71Configuring Camera Settings . . . . . . . . . . . . . . . . . . . . . . . . . . . . . . . . . . . . . . . . . . . . . . 72Changing the Video Layout in a Session Window . . . . . . . . . . . . . . . . . . . . . . . . . . . . . 73Configuring Picture-in-Picture Mode . . . . . . . . . . . . . . . . . . . . . . . . . . . . . . . . . . . . . . . 74Manually Resizing a Video Window . . . . . . . . . . . . . . . . . . . . . . . . . . . . . . . . . . . . . . . . 75Taking a Snapshot . . . . . . . . . . . . . . . . . . . . . . . . . . . . . . . . . . . . . . . . . . . . . . . . . . . . . . 75Viewing Your Video Image as Your Caller Views It . . . . . . . . . . . . . . . . . . . . . . . . . . . 75
Configuring Audio Functions in a Point-to-Point Session . . . . . . . . . . . . . . . . . . . . . . . . . . . 76
Page vi Doc. Revision 1.0
Elluminate VCS Client Users Guide - Contents
Adjusting Speaker/Earphone Volume . . . . . . . . . . . . . . . . . . . . . . . . . . . . . . . . . . . . . . . 76Adjusting Microphone Volume . . . . . . . . . . . . . . . . . . . . . . . . . . . . . . . . . . . . . . . . . . . . 76Muting Your Microphone . . . . . . . . . . . . . . . . . . . . . . . . . . . . . . . . . . . . . . . . . . . . . . . . 76Muting Speakers . . . . . . . . . . . . . . . . . . . . . . . . . . . . . . . . . . . . . . . . . . . . . . . . . . . . . . . 76
Chapter 5: Multi-Point Sessions with the Elluminate VCS Client . . . . . . . . . . . . . . . . . . . . . . . . . . . . . . . . . . . . . . . . . . . 77
Overview . . . . . . . . . . . . . . . . . . . . . . . . . . . . . . . . . . . . . . . . . . . . . . . . . . . . . . . . . . . . . . . . 77In this chapter . . . . . . . . . . . . . . . . . . . . . . . . . . . . . . . . . . . . . . . . . . . . . . . . . . . . . . . . . . . . . 77About Multi-Point Sessions . . . . . . . . . . . . . . . . . . . . . . . . . . . . . . . . . . . . . . . . . . . . . . . . . . 78
About Roles . . . . . . . . . . . . . . . . . . . . . . . . . . . . . . . . . . . . . . . . . . . . . . . . . . . . . . . . . . . 78Inviting a Group into a Multi-Point Session . . . . . . . . . . . . . . . . . . . . . . . . . . . . . . . . . . 79
The Participants Panel . . . . . . . . . . . . . . . . . . . . . . . . . . . . . . . . . . . . . . . . . . . . . . . . . . . . . . 81Muting a Presenter or Participants Microphone . . . . . . . . . . . . . . . . . . . . . . . . . . . . . . . 82Asking for Microphone Un-Mute . . . . . . . . . . . . . . . . . . . . . . . . . . . . . . . . . . . . . . . . . . 82Rights for the Chair . . . . . . . . . . . . . . . . . . . . . . . . . . . . . . . . . . . . . . . . . . . . . . . . . . . . . 83Rights the Chair Has for a Presenter . . . . . . . . . . . . . . . . . . . . . . . . . . . . . . . . . . . . . . . . 84Rights the Chair Has for a Participant . . . . . . . . . . . . . . . . . . . . . . . . . . . . . . . . . . . . . . . 85Rights a Presenter Has for a Chair and Participant . . . . . . . . . . . . . . . . . . . . . . . . . . . . . 87Hand Raising During a Session by a Presenter . . . . . . . . . . . . . . . . . . . . . . . . . . . . . . . . 87Rights a Participant Has for a Chair and Presenter . . . . . . . . . . . . . . . . . . . . . . . . . . . . . 89Requesting the Presenter Role by a Participant . . . . . . . . . . . . . . . . . . . . . . . . . . . . . . . . 89Hand Raising During a Session by a Participant . . . . . . . . . . . . . . . . . . . . . . . . . . . . . . . 91Accepting an Incoming Call into a Multi-Point Session . . . . . . . . . . . . . . . . . . . . . . . . . 91Accepting an Incoming Telephone Call into an Multi-Point Session . . . . . . . . . . . . . . . 91Inviting Another Participant into a Multi-Point Session . . . . . . . . . . . . . . . . . . . . . . . . . 93Ending an Active Session in a Multi-Point Call . . . . . . . . . . . . . . . . . . . . . . . . . . . . . . . 95
Configuring Video Functions in a Multi-Point Session . . . . . . . . . . . . . . . . . . . . . . . . . . . . . 96Muting Your Video Image . . . . . . . . . . . . . . . . . . . . . . . . . . . . . . . . . . . . . . . . . . . . . . . . 96Configuring Camera Settings . . . . . . . . . . . . . . . . . . . . . . . . . . . . . . . . . . . . . . . . . . . . . 96Changing the Video Layout in the Session Window . . . . . . . . . . . . . . . . . . . . . . . . . . . . 97Dragging and Dropping Video Layouts . . . . . . . . . . . . . . . . . . . . . . . . . . . . . . . . . . . . . 98Manually Resizing a Video Window . . . . . . . . . . . . . . . . . . . . . . . . . . . . . . . . . . . . . . . . 98Following the Video Layout of the Chair . . . . . . . . . . . . . . . . . . . . . . . . . . . . . . . . . . . . 98Selecting a Preset Video Layout . . . . . . . . . . . . . . . . . . . . . . . . . . . . . . . . . . . . . . . . . . . 98Aligning Video Layouts . . . . . . . . . . . . . . . . . . . . . . . . . . . . . . . . . . . . . . . . . . . . . . . . . 98Taking a Snapshot . . . . . . . . . . . . . . . . . . . . . . . . . . . . . . . . . . . . . . . . . . . . . . . . . . . . . . 98
Configuring Audio Functions in a Multi-Point Session . . . . . . . . . . . . . . . . . . . . . . . . . . . . . 99
Contents
Doc. Revision 1.0 Page vii
Adjusting Speaker/Earphone Volume . . . . . . . . . . . . . . . . . . . . . . . . . . . . . . . . . . . . . . . 99Muting Your Microphone . . . . . . . . . . . . . . . . . . . . . . . . . . . . . . . . . . . . . . . . . . . . . . . . 99Muting Speakers . . . . . . . . . . . . . . . . . . . . . . . . . . . . . . . . . . . . . . . . . . . . . . . . . . . . . . . 99
Chapter 6: Data Collaboration Using Present & Share . . . . . . . . . . . . . . . . 101Overview . . . . . . . . . . . . . . . . . . . . . . . . . . . . . . . . . . . . . . . . . . . . . . . . . . . . . . . . . . . . . . . 101In this chapter . . . . . . . . . . . . . . . . . . . . . . . . . . . . . . . . . . . . . . . . . . . . . . . . . . . . . . . . . . . . 101Requesting Control in an Active Session . . . . . . . . . . . . . . . . . . . . . . . . . . . . . . . . . . . . . . . 102
Regaining Control in a Session . . . . . . . . . . . . . . . . . . . . . . . . . . . . . . . . . . . . . . . . . . . 103Sharing Documents in a Session . . . . . . . . . . . . . . . . . . . . . . . . . . . . . . . . . . . . . . . . . . . . . 104
Browsing Documents . . . . . . . . . . . . . . . . . . . . . . . . . . . . . . . . . . . . . . . . . . . . . . . . . . . 107Using the Functions in the Present Tab . . . . . . . . . . . . . . . . . . . . . . . . . . . . . . . . . . . . . 108Adding Another Document to a Session . . . . . . . . . . . . . . . . . . . . . . . . . . . . . . . . . . . . 110Preparing a Document for a Session . . . . . . . . . . . . . . . . . . . . . . . . . . . . . . . . . . . . . . . 110
Using the Whiteboard in a Session . . . . . . . . . . . . . . . . . . . . . . . . . . . . . . . . . . . . . . . . . . . . 111Hiding the Whiteboard . . . . . . . . . . . . . . . . . . . . . . . . . . . . . . . . . . . . . . . . . . . . . . . . . . 112
Sharing an Application in a Session . . . . . . . . . . . . . . . . . . . . . . . . . . . . . . . . . . . . . . . . . . . 113Allowing Participants to Control Shared Applications . . . . . . . . . . . . . . . . . . . . . . . . . 117
Sharing Your Desktop in a Session . . . . . . . . . . . . . . . . . . . . . . . . . . . . . . . . . . . . . . . . . . . 118Allowing a Participant to Control Your Shared Desktop . . . . . . . . . . . . . . . . . . . . . . . 119
Using Text Chat in a Session . . . . . . . . . . . . . . . . . . . . . . . . . . . . . . . . . . . . . . . . . . . . . . . . 120Using File Transfer in a Session . . . . . . . . . . . . . . . . . . . . . . . . . . . . . . . . . . . . . . . . . . . . . . 121
Sending Files . . . . . . . . . . . . . . . . . . . . . . . . . . . . . . . . . . . . . . . . . . . . . . . . . . . . . . . . . 121Receiving Transferred Files . . . . . . . . . . . . . . . . . . . . . . . . . . . . . . . . . . . . . . . . . . . . . . 122
Chapter 7: Instant Messaging . . . . . . . . . . . . . . . . . . . . . . . . . . . . . . . . . . . . 123Overview . . . . . . . . . . . . . . . . . . . . . . . . . . . . . . . . . . . . . . . . . . . . . . . . . . . . . . . . . . . . . . . 123In this chapter . . . . . . . . . . . . . . . . . . . . . . . . . . . . . . . . . . . . . . . . . . . . . . . . . . . . . . . . . . . . 123Instant Messaging . . . . . . . . . . . . . . . . . . . . . . . . . . . . . . . . . . . . . . . . . . . . . . . . . . . . . . . . . 124
Instant Messaging a User Not in Your Contact List . . . . . . . . . . . . . . . . . . . . . . . . . . . 125Text Output . . . . . . . . . . . . . . . . . . . . . . . . . . . . . . . . . . . . . . . . . . . . . . . . . . . . . . . . . . 126Saving Text Messages . . . . . . . . . . . . . . . . . . . . . . . . . . . . . . . . . . . . . . . . . . . . . . . . . . 126Clearing Text Output . . . . . . . . . . . . . . . . . . . . . . . . . . . . . . . . . . . . . . . . . . . . . . . . . . . 126Calling Your Instant Messaging Partner . . . . . . . . . . . . . . . . . . . . . . . . . . . . . . . . . . . . 126Adding Your Instant Messaging Partner to Your Contact List . . . . . . . . . . . . . . . . . . . 126
Chapter 8: Using the Web Portal Interface . . . . . . . . . . . . . . . . . . . . . . . . . 127Overview . . . . . . . . . . . . . . . . . . . . . . . . . . . . . . . . . . . . . . . . . . . . . . . . . . . . . . . . . . . . . . . 127

Page viii Doc. Revision 1.0
Elluminate VCS Client Users Guide - Contents
In this chapter . . . . . . . . . . . . . . . . . . . . . . . . . . . . . . . . . . . . . . . . . . . . . . . . . . . . . . . . . . . . 127Viewing Sessions . . . . . . . . . . . . . . . . . . . . . . . . . . . . . . . . . . . . . . . . . . . . . . . . . . . . . . . . . 128
Joining an Active Session . . . . . . . . . . . . . . . . . . . . . . . . . . . . . . . . . . . . . . . . . . . . . . . 128Starting a Session Manually . . . . . . . . . . . . . . . . . . . . . . . . . . . . . . . . . . . . . . . . . . . . . 129Deleting a Session . . . . . . . . . . . . . . . . . . . . . . . . . . . . . . . . . . . . . . . . . . . . . . . . . . . . . 129Managing a Running Session . . . . . . . . . . . . . . . . . . . . . . . . . . . . . . . . . . . . . . . . . . . . 130Modifying a Session . . . . . . . . . . . . . . . . . . . . . . . . . . . . . . . . . . . . . . . . . . . . . . . . . . . 131
Configuring and Scheduling a Session . . . . . . . . . . . . . . . . . . . . . . . . . . . . . . . . . . . . . . . . . 132Adding Users to a Session . . . . . . . . . . . . . . . . . . . . . . . . . . . . . . . . . . . . . . . . . . . . . . . 133Searching for a User . . . . . . . . . . . . . . . . . . . . . . . . . . . . . . . . . . . . . . . . . . . . . . . . . . . 134Advanced Search for a User . . . . . . . . . . . . . . . . . . . . . . . . . . . . . . . . . . . . . . . . . . . . . 134Configuring Details . . . . . . . . . . . . . . . . . . . . . . . . . . . . . . . . . . . . . . . . . . . . . . . . . . . . 135Sending an Email Invitation . . . . . . . . . . . . . . . . . . . . . . . . . . . . . . . . . . . . . . . . . . . . . 139Canceling a Session . . . . . . . . . . . . . . . . . . . . . . . . . . . . . . . . . . . . . . . . . . . . . . . . . . . . 140Modifying a Session . . . . . . . . . . . . . . . . . . . . . . . . . . . . . . . . . . . . . . . . . . . . . . . . . . . 140Searching for a Session . . . . . . . . . . . . . . . . . . . . . . . . . . . . . . . . . . . . . . . . . . . . . . . . . 140
Managing a Multi-Point Session from the Web Portal Interface . . . . . . . . . . . . . . . . . . . . . 141Viewing Users . . . . . . . . . . . . . . . . . . . . . . . . . . . . . . . . . . . . . . . . . . . . . . . . . . . . . . . . . . . 143
Viewing User Details . . . . . . . . . . . . . . . . . . . . . . . . . . . . . . . . . . . . . . . . . . . . . . . . . . . 145Viewing User Profile Information . . . . . . . . . . . . . . . . . . . . . . . . . . . . . . . . . . . . . . . . . . . . 145Changing Your Password . . . . . . . . . . . . . . . . . . . . . . . . . . . . . . . . . . . . . . . . . . . . . . . . . . . 146Exiting the Web Portal . . . . . . . . . . . . . . . . . . . . . . . . . . . . . . . . . . . . . . . . . . . . . . . . . . . . . 147
Chapter 9: Monitoring . . . . . . . . . . . . . . . . . . . . . . . . . . . . . . . . . . . . . . . . . . 149In this chapter . . . . . . . . . . . . . . . . . . . . . . . . . . . . . . . . . . . . . . . . . . . . . . . . . . . . . . . . . . . . 149Using the Log Window . . . . . . . . . . . . . . . . . . . . . . . . . . . . . . . . . . . . . . . . . . . . . . . . . . . . 150Using the Statistics Window . . . . . . . . . . . . . . . . . . . . . . . . . . . . . . . . . . . . . . . . . . . . . . . . 150
Viewing Statistics Details . . . . . . . . . . . . . . . . . . . . . . . . . . . . . . . . . . . . . . . . . . . . . . . 151
Chapter 10: Layout Galleries . . . . . . . . . . . . . . . . . . . . . . . . . . . . . . . . . . . . . 155Overview . . . . . . . . . . . . . . . . . . . . . . . . . . . . . . . . . . . . . . . . . . . . . . . . . . . . . . . . . . . . . . . 155In this chapter . . . . . . . . . . . . . . . . . . . . . . . . . . . . . . . . . . . . . . . . . . . . . . . . . . . . . . . . . . . . 155Point-to-Point Session - Layouts . . . . . . . . . . . . . . . . . . . . . . . . . . . . . . . . . . . . . . . . . . . . . 156
Audio/Video Only - 3 layout choices . . . . . . . . . . . . . . . . . . . . . . . . . . . . . . . . . . . . . . 156Audio/Video with Chat - 6 layout choices . . . . . . . . . . . . . . . . . . . . . . . . . . . . . . . . . . 156Audio/Video, Chat, File Transfer - 6 layout choices . . . . . . . . . . . . . . . . . . . . . . . . . . . 157Audio/Video and Present & Share- 4 layout choices . . . . . . . . . . . . . . . . . . . . . . . . . . 158Present & Share, Chat, and File Transfer - 10 layout choices . . . . . . . . . . . . . . . . . . . 159
Contents
Doc. Revision 1.0 Page ix
Multi-Point Session - Layouts . . . . . . . . . . . . . . . . . . . . . . . . . . . . . . . . . . . . . . . . . . . . . . . 161
Appendix A: Configuration Settings . . . . . . . . . . . . . . . . . . . . . . . . . . . . . . 163Overview . . . . . . . . . . . . . . . . . . . . . . . . . . . . . . . . . . . . . . . . . . . . . . . . . . . . . . . . . . . . . . . 163In this appendix . . . . . . . . . . . . . . . . . . . . . . . . . . . . . . . . . . . . . . . . . . . . . . . . . . . . . . . . . . 163General Settings . . . . . . . . . . . . . . . . . . . . . . . . . . . . . . . . . . . . . . . . . . . . . . . . . . . . . . . . . . 164
Startup . . . . . . . . . . . . . . . . . . . . . . . . . . . . . . . . . . . . . . . . . . . . . . . . . . . . . . . . . . . . . . 164User Profile . . . . . . . . . . . . . . . . . . . . . . . . . . . . . . . . . . . . . . . . . . . . . . . . . . . . . . . . . . . . . . 165
Default Logon . . . . . . . . . . . . . . . . . . . . . . . . . . . . . . . . . . . . . . . . . . . . . . . . . . . . . . . . 165Users with Impaired Hearing . . . . . . . . . . . . . . . . . . . . . . . . . . . . . . . . . . . . . . . . . . . . . 166
Communication Settings . . . . . . . . . . . . . . . . . . . . . . . . . . . . . . . . . . . . . . . . . . . . . . . . . . . 167 Maximum bandwidth allowed . . . . . . . . . . . . . . . . . . . . . . . . . . . . . . . . . . . . . . . . . . . 167
Communication - HTTPS Proxy . . . . . . . . . . . . . . . . . . . . . . . . . . . . . . . . . . . . . . . . . . . . . 168 Proxy . . . . . . . . . . . . . . . . . . . . . . . . . . . . . . . . . . . . . . . . . . . . . . . . . . . . . . . . . . . . . . . 168Authentication . . . . . . . . . . . . . . . . . . . . . . . . . . . . . . . . . . . . . . . . . . . . . . . . . . . . . . . . 169
Communication Advanced . . . . . . . . . . . . . . . . . . . . . . . . . . . . . . . . . . . . . . . . . . . . . . . . . . 169Network Interfaces . . . . . . . . . . . . . . . . . . . . . . . . . . . . . . . . . . . . . . . . . . . . . . . . . . . . . 170
Audio Settings . . . . . . . . . . . . . . . . . . . . . . . . . . . . . . . . . . . . . . . . . . . . . . . . . . . . . . . . . . . 171Changing Audio Settings . . . . . . . . . . . . . . . . . . . . . . . . . . . . . . . . . . . . . . . . . . . . . . . . 172Selecting an Echo Type . . . . . . . . . . . . . . . . . . . . . . . . . . . . . . . . . . . . . . . . . . . . . . . . . 173
Audio Settings - Advanced . . . . . . . . . . . . . . . . . . . . . . . . . . . . . . . . . . . . . . . . . . . . . . . . . . 174 Recording Mixer . . . . . . . . . . . . . . . . . . . . . . . . . . . . . . . . . . . . . . . . . . . . . . . . . . . . . . 174Input selection . . . . . . . . . . . . . . . . . . . . . . . . . . . . . . . . . . . . . . . . . . . . . . . . . . . . . . . . 174Speaker Mixer . . . . . . . . . . . . . . . . . . . . . . . . . . . . . . . . . . . . . . . . . . . . . . . . . . . . . . . . 174Miscellaneous . . . . . . . . . . . . . . . . . . . . . . . . . . . . . . . . . . . . . . . . . . . . . . . . . . . . . . . . 175
Video Settings . . . . . . . . . . . . . . . . . . . . . . . . . . . . . . . . . . . . . . . . . . . . . . . . . . . . . . . . . . . 176 Camera . . . . . . . . . . . . . . . . . . . . . . . . . . . . . . . . . . . . . . . . . . . . . . . . . . . . . . . . . . . . . 176
Video - Advanced Settings . . . . . . . . . . . . . . . . . . . . . . . . . . . . . . . . . . . . . . . . . . . . . . . . . . 176Capture . . . . . . . . . . . . . . . . . . . . . . . . . . . . . . . . . . . . . . . . . . . . . . . . . . . . . . . . . . . . . . 177Display and window handling . . . . . . . . . . . . . . . . . . . . . . . . . . . . . . . . . . . . . . . . . . . . 177
Sound Settings . . . . . . . . . . . . . . . . . . . . . . . . . . . . . . . . . . . . . . . . . . . . . . . . . . . . . . . . . . . 178Ringing Sounds . . . . . . . . . . . . . . . . . . . . . . . . . . . . . . . . . . . . . . . . . . . . . . . . . . . . . . . 178
System Settings . . . . . . . . . . . . . . . . . . . . . . . . . . . . . . . . . . . . . . . . . . . . . . . . . . . . . . . . . . 179Themes . . . . . . . . . . . . . . . . . . . . . . . . . . . . . . . . . . . . . . . . . . . . . . . . . . . . . . . . . . . . . . 179Idle detection . . . . . . . . . . . . . . . . . . . . . . . . . . . . . . . . . . . . . . . . . . . . . . . . . . . . . . . . . 179Maximum system load . . . . . . . . . . . . . . . . . . . . . . . . . . . . . . . . . . . . . . . . . . . . . . . . . . 179Performance test . . . . . . . . . . . . . . . . . . . . . . . . . . . . . . . . . . . . . . . . . . . . . . . . . . . . . . 180
System - Advanced Settings . . . . . . . . . . . . . . . . . . . . . . . . . . . . . . . . . . . . . . . . . . . . . . . . . 180

Page x Doc. Revision 1.0
Elluminate VCS Client Users Guide - Contents
Directory for temporary files . . . . . . . . . . . . . . . . . . . . . . . . . . . . . . . . . . . . . . . . . . . . 180Count of list entries . . . . . . . . . . . . . . . . . . . . . . . . . . . . . . . . . . . . . . . . . . . . . . . . . . . . 181
Security Settings . . . . . . . . . . . . . . . . . . . . . . . . . . . . . . . . . . . . . . . . . . . . . . . . . . . . . . . . . . 181 Encryption mode . . . . . . . . . . . . . . . . . . . . . . . . . . . . . . . . . . . . . . . . . . . . . . . . . . . . . . 182
Present & Share Settings . . . . . . . . . . . . . . . . . . . . . . . . . . . . . . . . . . . . . . . . . . . . . . . . . . . 182Application Sharing . . . . . . . . . . . . . . . . . . . . . . . . . . . . . . . . . . . . . . . . . . . . . . . . . . . . 182Export Directory . . . . . . . . . . . . . . . . . . . . . . . . . . . . . . . . . . . . . . . . . . . . . . . . . . . . . . 183Document sharing printer . . . . . . . . . . . . . . . . . . . . . . . . . . . . . . . . . . . . . . . . . . . . . . . 183
File Transfer Settings . . . . . . . . . . . . . . . . . . . . . . . . . . . . . . . . . . . . . . . . . . . . . . . . . . . . . . 183Directory . . . . . . . . . . . . . . . . . . . . . . . . . . . . . . . . . . . . . . . . . . . . . . . . . . . . . . . . . . . . 184
Chat Settings . . . . . . . . . . . . . . . . . . . . . . . . . . . . . . . . . . . . . . . . . . . . . . . . . . . . . . . . . . . . 185Output font . . . . . . . . . . . . . . . . . . . . . . . . . . . . . . . . . . . . . . . . . . . . . . . . . . . . . . . . . . . 185Events . . . . . . . . . . . . . . . . . . . . . . . . . . . . . . . . . . . . . . . . . . . . . . . . . . . . . . . . . . . . . . 185Advanced settings . . . . . . . . . . . . . . . . . . . . . . . . . . . . . . . . . . . . . . . . . . . . . . . . . . . . . 185
Instant Messaging . . . . . . . . . . . . . . . . . . . . . . . . . . . . . . . . . . . . . . . . . . . . . . . . . . . . . . . . . 186Signal incoming message . . . . . . . . . . . . . . . . . . . . . . . . . . . . . . . . . . . . . . . . . . . . . . . 186Advanced settings . . . . . . . . . . . . . . . . . . . . . . . . . . . . . . . . . . . . . . . . . . . . . . . . . . . . . 186
Index . . . . . . . . . . . . . . . . . . . . . . . . . . . . . . . . . . . . . . . . . . . . . . . . . . . . . . . . 189

Doc Revision 1.0 Page xi
Elluminate VCSversion 2.0
Preface
AudienceThis guide is intended for users who need to collaborate with live, interactive, full-frame rate, high quality, videoconferencing using Elluminate VCS and the products with which it interoperates.
What’s in this BookThis guide contains the following chapters:
Chapter 1, “Installing and Configuring the Elluminate VCS Client,” on page 1
Chapter 2, “Starting the Elluminate VCS Client,” on page 9
Chapter 3, “Managing Contact Lists,” on page 35
Chapter 4, “Point-to-Point Sessions with the Elluminate VCS Client,” on page 49
Chapter 5, “Multi-Point Sessions with the Elluminate VCS Client,” on page 77
Chapter 6, “Data Collaboration Using Present & Share,” on page 101
Chapter 7, “Instant Messaging,” on page 123
Chapter 8, “Using the Web Portal Interface,” on page 127
Chapter 9, “Monitoring,” on page 149
Chapter 10, “Layout Galleries,” on page 155
Appendix A, “Configuration Settings,” on page 163
About Screenshots
Screen shots used within this guide are examples based on a Windows Vista operating system. In some cases, they may not match the screens that appear on a Windows XP system.

Page xii 04 September 2009
Preface
Text Conventions
The following text conventions are used in this document:
Convention Description
1. Number Used to indicate a step in a task
Checkmark Used for listing the different options available to you to complete a task or function. Pick one only.
Bold Used to give emphasis to a term.
Italics Used to represent options or parameters.
Monospace Used to indicate pathnames, filenames and folders.

Doc Revision 1.0 Page 1
Elluminate VCSversion 2.0
Chapter 1: Installing and Configuring theElluminate VCS Client
OverviewThis chapter explains how to install and configure the Elluminate VCS Client on your system for the first time. Configuration tasks include selecting a speaker, microphone, and camera via the Configuration Wizard.
You can access the Configuration Wizard after installation by selecting Setup Video and Audio… from the main menu in the Elluminate VCS Client or by clicking the Setup button
in an active session window.
In this chapter“System Requirements” on page 2
“Installing and Starting Elluminate VCS” on page 2
“Selecting a Speaker” on page 4
“Selecting a Microphone” on page 5
“Selecting a Camera” on page 7
Page 2 04 September 2009
Chapter 1: Installing and Configuring the Elluminate VCS Client
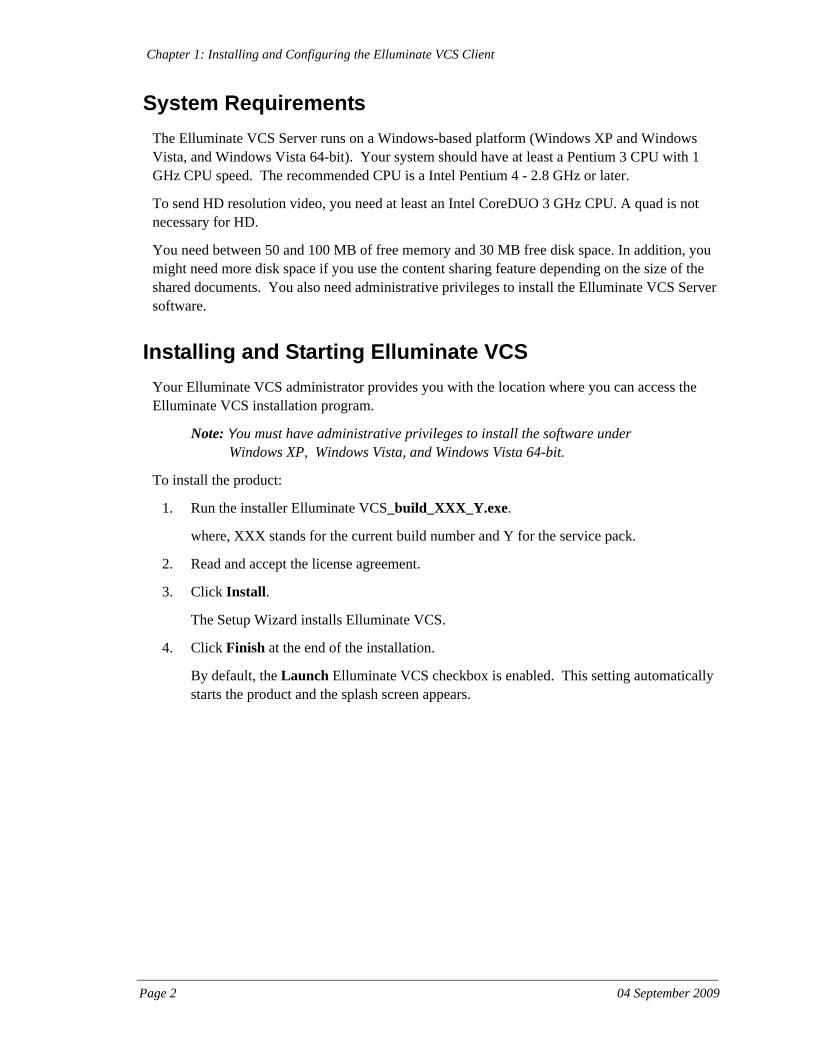
System RequirementsThe Elluminate VCS Server runs on a Windows-based platform (Windows XP and Windows Vista, and Windows Vista 64-bit). Your system should have at least a Pentium 3 CPU with 1 GHz CPU speed. The recommended CPU is a Intel Pentium 4 - 2.8 GHz or later.
To send HD resolution video, you need at least an Intel CoreDUO 3 GHz CPU. A quad is not necessary for HD.
You need between 50 and 100 MB of free memory and 30 MB free disk space. In addition, you might need more disk space if you use the content sharing feature depending on the size of the shared documents. You also need administrative privileges to install the Elluminate VCS Server software.
Installing and Starting Elluminate VCSYour Elluminate VCS administrator provides you with the location where you can access the Elluminate VCS installation program.
Note: You must have administrative privileges to install the software under Windows XP, Windows Vista, and Windows Vista 64-bit.
To install the product:
1. Run the installer Elluminate VCS_build_XXX_Y.exe.
where, XXX stands for the current build number and Y for the service pack.
2. Read and accept the license agreement.
3. Click Install.
The Setup Wizard installs Elluminate VCS.
4. Click Finish at the end of the installation.
By default, the Launch Elluminate VCS checkbox is enabled. This setting automatically starts the product and the splash screen appears.

Elluminate VCSversion 2.0
Doc Revision 1.0 Page 3
The Setup Wizard prepares the Elluminate VCS Client for first time use. The following message box appears.
5. Click OK. The Selecting a Speaker window appears.
The next sections explain how to configure audio and video on the Elluminate VCS Client for the first time using the Configuration Wizard.
Note: You can make changes to audio and video configurations whenever necessary with the Elluminate VCS Client whether you are logged on to the Elluminate VCS Client or logged off.

Page 4 04 September 2009
Chapter 1: Installing and Configuring the Elluminate VCS Client
Selecting a SpeakerThe Configuration Wizard displays the following window.
To select a speaker:
1. From Your available speaker devices box, select an audio device if you have more than one device installed on your system. If there is only one device installed, it is selected (highlighted in blue) by default.
2. Click the Test button to test whether your speakers are connected correctly.
If the speakers are correctly configured on your system you should hear music playing.
a. Click Stop to stop the music from continuing to play.
3. Adjust the speaker volume slider as necessary.
See “Selecting an Echo Type” on page 173 to select an echo type, which is necessary for eliminating echo problems from your speaker.
4. Click Next. See“Selecting a Microphone” on page 5 to continue.

Elluminate VCSversion 2.0
Doc Revision 1.0 Page 5
Selecting a MicrophoneThe Configuration Wizard displays the Microphone Settings window.
To select a microphone:
1. From Your available microphone devices box, select a microphone if you have more than one device installed on your system. If there is only one device installed, it is selected (highlighted in blue) by default.
An indicator displays the current recording level for the microphone.
2. If there is more than one microphone, make sure to select one that has the best audio detection or one that you specifically want to use for the Elluminate VCS Client.
3. Make sure to select a microphone that also records audio.
4. Click the Test Recording button and speak into the microphone to test that your voice comes through properly via the microphone. This is the audio that the remote party will hear.
The reading on the meter should be within the green region with peaks in the yellow region. It should not go into the red region.
5. Click Stop and Playback when you are done with the voice audio test.

Page 6 04 September 2009
Chapter 1: Installing and Configuring the Elluminate VCS Client
You should hear the test playback through your speakers.
6. Click Stop Playback to stop listening to your voice audio test.
7. Adjust the volume using the Microphone volume slider if necessary.
You can adjust your microphone volume during an active session if needed. See “Configuring Audio Functions in a Point-to-Point Session” on page 76 and/or “Configuring Audio Functions in a Multi-Point Session” on page 99 for more information.
8. Optionally, enable the Microphone boost checkbox if your normal microphone gain is not high enough in the meter (also helpful if your remote party tells you that your audio level is too low).
For insensitive microphones, you can activate the Microphone boost option to get a sufficient input signal. You should enable this option if during the initial test in the Configuration wizard, your recorded voice is still too low at maximum gain setting.
It might be necessary to switch off the microphone boost, if your microphone already delivers a high input level. This is the case if others indicates that they hear echoes from your side even if the echo cancellation is activated.
Note: This option is only is available for certain microphones and might be grayed out.
9. Enable AGC (Automatic Gain Control) to automatically adjust the strength of the incoming signal. Weaker signals receive more gain; stronger signals receive less gain or none at all.
10. Click Next. The Camera Settings window appears. See “Selecting a Camera” on page 7 to continue.

Elluminate VCSversion 2.0
Doc Revision 1.0 Page 7
Selecting a CameraThe Configuration Wizard displays the Camera Settings window.
To select a camera:
1. From Your available cameras box, select a USB camera you want to use. If there is only one device installed, it is selected (highlighted in blue) by default.
After you select a camera, it is activated and a preview of the video image appears in the Video Preview window.
2. Optionally, you can change the size of your video image from the Max image size listbox.
Image resolutions displayed are supported by the camera you selected. Some of the image sizes might be labeled with “Low frame rate.” This means that your video is not being transmitted in the best quality type of resolution.
3. Use the slider Video image controls to adjust color intensity, hue, contrast, and brightness of the video image.
Page 8 04 September 2009
Chapter 1: Installing and Configuring the Elluminate VCS Client
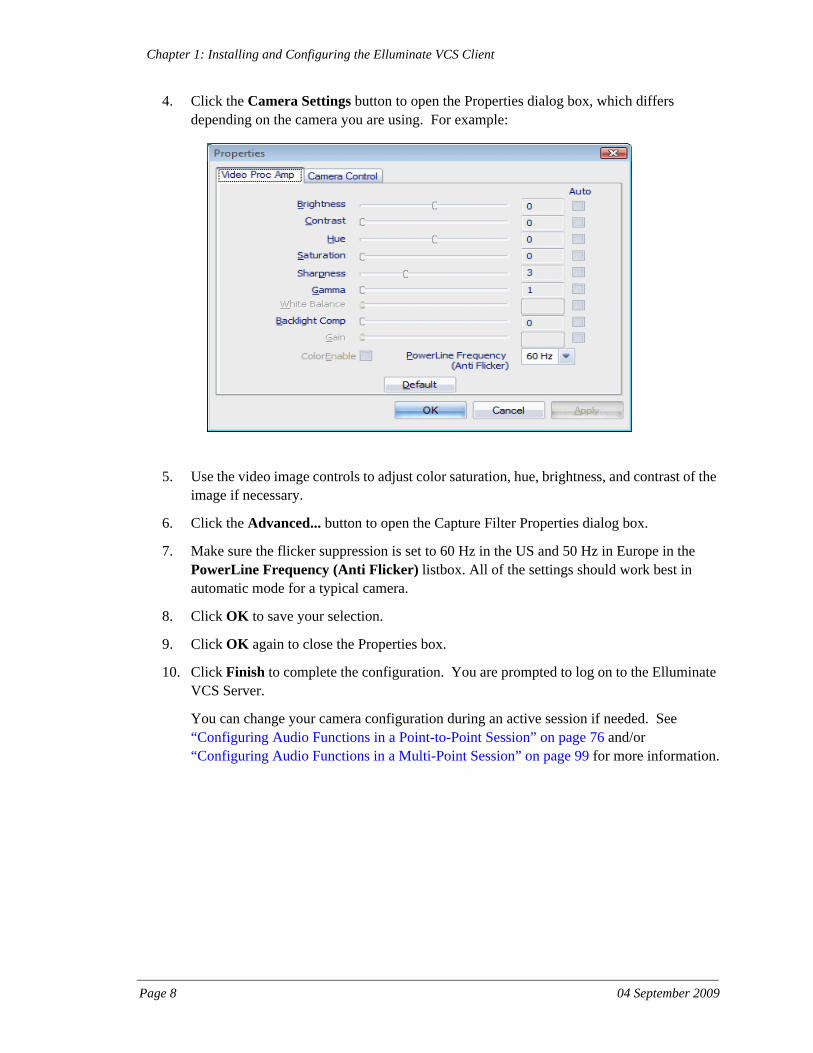
4. Click the Camera Settings button to open the Properties dialog box, which differs depending on the camera you are using. For example:
5. Use the video image controls to adjust color saturation, hue, brightness, and contrast of the image if necessary.
6. Click the Advanced... button to open the Capture Filter Properties dialog box.
7. Make sure the flicker suppression is set to 60 Hz in the US and 50 Hz in Europe in the PowerLine Frequency (Anti Flicker) listbox. All of the settings should work best in automatic mode for a typical camera.
8. Click OK to save your selection.
9. Click OK again to close the Properties box.
10. Click Finish to complete the configuration. You are prompted to log on to the Elluminate VCS Server.
You can change your camera configuration during an active session if needed. See “Configuring Audio Functions in a Point-to-Point Session” on page 76 and/or “Configuring Audio Functions in a Multi-Point Session” on page 99 for more information.

Doc Revision 1.0 Page 9
Elluminate VCSversion 2.0
Chapter 2: Starting theElluminate VCS Client
OverviewThis chapter explains how to login to the Elluminate VCS Server, start the Elluminate VCS Client, make a contact request for the first time, and understand the functions in the Presence and session windows.
In this chapter“Key Terms” on page 10
“Logging on to the Elluminate VCS Server” on page 11
“Starting Elluminate VCS from the Start Menu” on page 12
“Making a Contact Request” on page 12
“About the Elluminate VCS Presence Window” on page 16
“About the Elluminate VCS Session Window” on page 22
“Using the Task Tray” on page 31
“Present & Share Workspace” on page 33

Page 10 04 September 2009
Chapter 2: Starting the Elluminate VCS Client
Key TermsThe following terms are helpful in understanding Elluminate VCS.
Term Definition
Presence Window The main window of the Elluminate VCS Client for launching sessions.
Session A session is a conversation between two or more uses, such as a video call, audio call, chat, or data collaboration call. A Point-to-Point and Multi-Point call are both referred to as “sessions.” Also referred to as a “call.”
Session Window A session window is where you control video, audio, and data collaboration functions. For example, a session can be a video call, an audio call, and/or a chat. A session windows appears in both Point-to-Point and Multi-Point calls.
Point-to-Point Session A call between two users.
Multi-Point Session A call between multiple users.
Present & Share Provides document sharing, application sharing, desktop sharing, whiteboard, chat, and file transfer with one or more participants in a session.
Chat Lets you transfer text messages to the participants within an active session.
Instant Message Lets you transfer text messages outside of an active session with users who are not participating in a session.
Contact List A list of users on the Elluminate VCS Server in which you can call for a session.
Contact Group A group of users that you create from valid contacts in your Contract list.
Elluminate VCS web portal interface
The web browser interface where you can manage and schedule sessions.

Elluminate VCSversion 2.0
Doc Revision 1.0 Page 11
Logging on to the Elluminate VCS ServerAfter you configure the Elluminate VCS Client, the following dialog box appears letting you logon to the Elluminate VCS Server.
About User Profiles
You can create and manage several user accounts with different user names to logon to different Elluminate VCS servers. For example, you can use this feature if you have users with different User IDs using the same computer or if you have more than one Elluminate VCS account on one or more servers.
If you have more than one set of credentials to log on to different servers, you can manage these logons with the User Profile option from Settings… in the main menu of the Elluminate VCS Client (see “User Profile” on page 165 for more information).
Note: For security purposes, if you have multiple Elluminate VCS users using the same PC, you should create separate Windows user accounts under the Windows operating system for each user.

Page 12 04 September 2009
Chapter 2: Starting the Elluminate VCS Client
To logon to the Elluminate VCS Server:
1. Enter your User ID in the Elluminate VCS ID/email box.
Your ID format is "[email protected]" and is analogous to an email address; however, is not necessarily an actual e-mail address. Your credentials are provided by your Elluminate VCS administrator.
Note: There might be cases when you do not have to log in, but can access Elluminate VCS features in other ways once your installation is at this point. Your administrator can tell you if these cases apply to you.
2. Enter the Elluminate VCS Server name in the Server box.
3. Enter your password in the Password box.
4. Select your online state from the Log on as: listbox.
5. Click the Logon button.
A system check is perfomed followed by a prompt with the following message: “Welcome to the Elluminate VCS conference server.”
6. Click OK in the message box.
7. To place your first video call, see “Outgoing Point-to-Point Sessions” on page 50.
Starting Elluminate VCS from the Start MenuTo start the Elluminate VCS Client from the Start menu:
1. From the Start menu, select All Programs -> Elluminate VCS - > Elluminate VCS.
2. Logon to the Elluminate VCS Server using your user ID, server, and password.
See your Elluminate VCS administrator to get your login credentials.
Making a Contact RequestTo add a user to your contact list, you must send a request to the proposed user and wait for authorization. Once the contact accepts your request, you can add this user to your list.
To make a contact request:
1. Select Add New Contact from the Actions menu or right click on the All Contacts group in the Presence window.

Elluminate VCSversion 2.0
Doc Revision 1.0 Page 13
The Add new contact dialog box appears.
2. Enter the user ID in the User ID box. The ID format is “[email protected].” If you do not know the User ID yet, contact the person you are attempting to add or contact your Elluminate VCS administrator for assistance.
Do you like to see the online state of this user is enabled by default. Only clear this checkbox if you do not want to see the online status of this user in your Contacts list (see “Symbols for User Online Status” on page 37 for more details).
3. Click Next to proceed.
If the user ID is accepted by the Elluminate VCS Server, the following dialog box appears.
4. Accept the user name as is or modify it and click OK. You can change the name later if needed. The contact name appears in your list and awaits authorization. For example:

Page 14 04 September 2009
Chapter 2: Starting the Elluminate VCS Client
The following message box appears on the contact’s system. If the contact is not logged on to the Elluminate VCS Client, this dialog box will appear immediately after logon.
The contact has the following options:
Allow the requesting user to see my online state (default is enabled) — lets the contact grant you permission to view when they are online, busy, idle, or offline.
Block any further communication with request user — cancels the request. The contact does not want to accept calls from you.
Add the requesting user to my contact list — adds the contact to your contact list with the name that appears in the box below. You can also specify a group from the Group listbox if you created a group already.
Subscribe to requesting users online state (default is enabled) — lets you see when the contact is online, busy, or idle.
You can also rename the contact or add the contact into a group by selecting a group from the listbox.
The contact must click OK to accept the selections.
Your name appears in your contact’s list and awaits authorization.

Elluminate VCSversion 2.0
Doc Revision 1.0 Page 15
Once the contact accepts, the following dialog box appears on your system.
The following options are available:
Allow the requesting user to see my online state (default is enabled) — lets you grant permission to this contact to view when you are online, busy, idle, or offline.
Block any further communication with requesting user — cancels the request. You will not be able to call the contact and the contact will not be added to your contact list.
5. Click OK to accept your selections. The new user is added to your contact list and can be called for a session.

Page 16 04 September 2009
Chapter 2: Starting the Elluminate VCS Client
About the Elluminate VCS Presence WindowThis section describes the Elluminate VCS Presence window. Below is an example of the Presence window, which is logged on to the Elluminate VCS Server.
The main window of the Elluminate VCS Client displays information in a tree structure. The following information appears by default:
Missed Calls
Recent Calls
All Contacts
Contacts Online
The Contact list also shows missed calls and any groups you create to manage your contacts. In addition, you can enable the lists Blocked Contacts and Who else can see me? from the View menu. For more information about on using the contact list, see “Managing Contact Lists” on page 35.
The Main menu is located in the title bar. It lets you access all functions. The status bar at the bottom of the window lets you change your online status.
Local video and the remote video images (when in an active session) appear in a dual-session window. See “About the Elluminate VCS Session Window” on page 22 for more details.

Elluminate VCSversion 2.0
Doc Revision 1.0 Page 17
Ribbon Bar
The ribbon bar in the Elluminate VCS Presence window has the following buttons:
Title Bar
The title bar consists of the following elements (from left to right):
System menu
Main menu (click on the down arrow icon to open)
Application title
Help button (?)
Minimize button (_)
Close button (X)
Button Description
The Call button opens the New Call dialog box and lets you make a call to a contact or invite a contact to an active session.
The My VCS button opens the current User page in the Elluminate VCS web portal. From this page, if you hover your mouse over the telephone icon, you can see the online state of the user. You can also invite the user to call you.
The Schedule button opens the Elluminate VCS web portal where you can schedule a session.
The My Video button opens your video window so you can check your image and configure your camera settings and audio volume.
The Settings button opens the Settings window for configuring the system.
Page 18 04 September 2009
Chapter 2: Starting the Elluminate VCS Client
System Menu
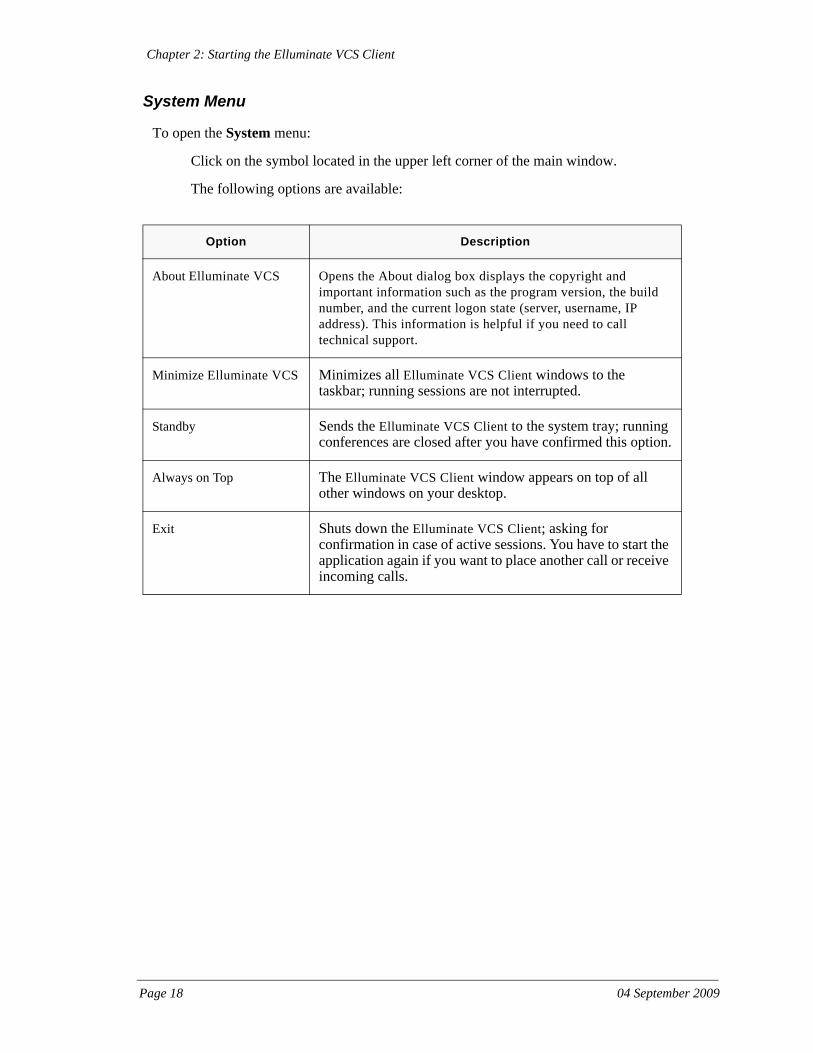
To open the System menu:
Click on the symbol located in the upper left corner of the main window.
The following options are available:
Option Description
About Elluminate VCS Opens the About dialog box displays the copyright and important information such as the program version, the build number, and the current logon state (server, username, IP address). This information is helpful if you need to call technical support.
Minimize Elluminate VCS Minimizes all Elluminate VCS Client windows to the taskbar; running sessions are not interrupted.
Standby Sends the Elluminate VCS Client to the system tray; running conferences are closed after you have confirmed this option.
Always on Top The Elluminate VCS Client window appears on top of all other windows on your desktop.
Exit Shuts down the Elluminate VCS Client; asking for confirmation in case of active sessions. You have to start the application again if you want to place another call or receive incoming calls.

Elluminate VCSversion 2.0
Doc Revision 1.0 Page 19
Main Menu
You can access many functions from the main menu. Available menu items are listed as follows:
Actions
Sub-Menu Description
Schedule a Meeting Opens the web portal interface where you can create a new scheduled session.
Manage a Meeting Opens the web portal interface where you can manage a running session.
Call Lets you select a user ID contact name and launch a call to a remote party. You can also launch a call by right-clicking on the user ID contact name from the All Contacts list in the Presence window.
Prepare a Meeting Document
Opens the Meeting Document Preparation window where you can convert documents into the Present & Share format upfront before a session starts, so that it can be loaded faster.
Add New Contact Add a new contact to your contact list. You can also add a new contact by right-clicking on the All Contacts list in the Presence window.
Add New Group Adds a new group to your contact list.
Import Contacts from File Imports new contacts from a file into your contact list.
Export Contacts to File Exports your contact list into a file.

Page 20 04 September 2009
Chapter 2: Starting the Elluminate VCS Client
View
Sub-Menu Description
My Video Displays the local video window.
Currently Running Meetings
Provides an overview of the currently running meeting and any meeting that is currently on hold.
Network Conditions & Call Statistics
Displays the Network and Call Statistics window.
Dial Pad Opens the dial pad for DTMF dialing during a call. This feature is grayed out unless it has been enabled on the Elluminate VCS Server.
Log Opens the Log window.
Received Files Opens the folder containing the files received via file transfer. For example, Document -> My Received Files.
Always on Top Keeps the Elluminate VCS window on top of other applications.
Sort all Lists By Sorts the contact list and all other lists by the following selected criteria:• Name • ID• Online State• Subscription State
Show Missed Calls Shows the Missed Calls list (selected by default).
Show Recent Calls Shows the Recent Calls list (selected by default).
Show Contacts Online Shows contacts that are online. (selected by default).
Show Blocked Contacts Shows contacts you have blocked (selected by default).
Show "Who else can see me"
Shows "Who else can see me" in the tree (deselected by default).

Elluminate VCSversion 2.0
Doc Revision 1.0 Page 21
My Current Status
Displays and sets your current online state (Free, Do Not Disturb, Busy, Away, and Invisible). For more information about on using the contact list, see “Managing Contact Lists” on page 35.
Service
Opens the Elluminate VCS web portal interface with the Current Users page displayed. See “Viewing Users” on page 143 for more information.
Settings ...
Opens the Elluminate VCS Settings window.
Setup Video and Audio ...
Opens the Elluminate VCS Audio/Video Configuration Wizard where you can make modifications to your speaker, microphone, or camera setup.
Help
Elluminate VCS Client Help — opens the online help system.
About Elluminate VCS Client — shows copyright info of the Elluminate VCS Client.
Logoff
Logs you off from the Elluminate VCS Server.
Close
Minimizes the Elluminate VCS Client to the taskbar.
Accessing Online Help
To access online help:
1. Click on the question mark symbol located in the upper right corner of the main window to display the Help menu.
2. Select Help to display the Elluminate VCS help pages.
You can also press F1 to open the help system.
Accessing Version Information
To display version information:
1. Click on the question mark symbol located in the upper right corner of the main window to open the Help menu.
2. Select About Elluminate VCS to view information about the Elluminate VCS Client version you are using and copyright information.

Page 22 04 September 2009
Chapter 2: Starting the Elluminate VCS Client
Updating the Elluminate VCS Client Manually
The integrated update feature is accessible whenever a newer version of the Elluminate VCS Client software is available on the Elluminate VCS Server in which you are connected. This process runs automatically upon starting the Elluminate VCS Client; however, you can also check for updates manually.
To manually check for updates:
1. Click on the question mark symbol located in the upper right corner of the main window to open the Help menu.
2. Select Update Elluminate VCS to update the Elluminate VCS Client software.
About the Elluminate VCS Session WindowThis section describes the controls available during an active session in the Elluminate VCS Client user interface. Below is an example of the session window (with the Video & Layout tab displayed) during an active session.

Elluminate VCSversion 2.0
Doc Revision 1.0 Page 23
Customizing the Ribbon Bar
Features that are available in the General tab are also accessible from the ribbon at the top of the session window. You can choose to hide this ribbon bar as follows:
1. Click the down arrow next to the ribbon to display a pop-up menu.
2. Select Minimize the Ribbon to remove the ribbon from the session window.
3. Select Show below Ribbon to show the ribbon in the session window.
The General tab and Video & Layout tabs in the Elluminate VCS session window are described as follows:
General Tab for Point-to-Point and Multi-Point Sessions
The following functions are available in the General tab for Point-to-Point and Multi-Point sessions:
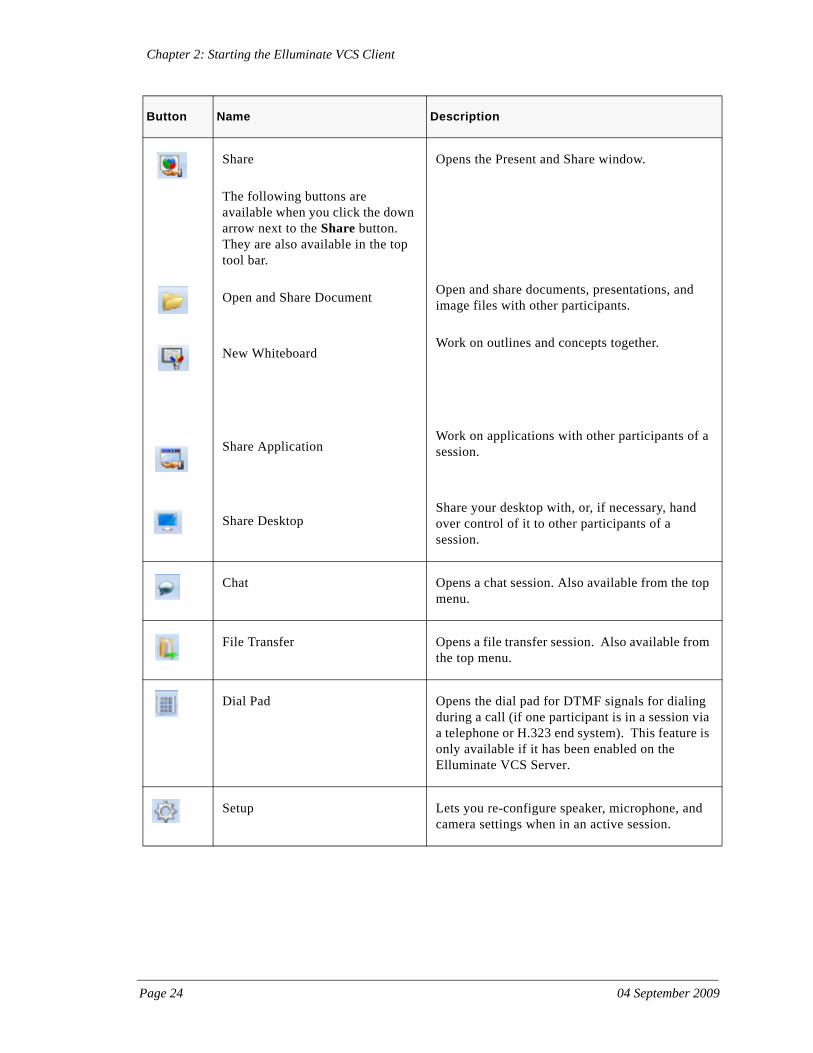
Button Name Description
End Session Ends the active session. Also available in the top tool bar.
Hold Puts the active session on hold.
Invite Invite a contact into an active session.
Manage Only available to the Chair in a Multi-Point session. Not available in a Point-to-Point session. Opens the web portal interface where you can manage a running Multi-Point session.
Page 24 04 September 2009
Chapter 2: Starting the Elluminate VCS Client
Share
The following buttons are available when you click the down arrow next to the Share button. They are also available in the top tool bar.
Open and Share Document
New Whiteboard
Share Application
Share Desktop
Opens the Present and Share window.
Open and share documents, presentations, and image files with other participants.
Work on outlines and concepts together.
Work on applications with other participants of a session.
Share your desktop with, or, if necessary, hand over control of it to other participants of a session.
Chat Opens a chat session. Also available from the top menu.
File Transfer Opens a file transfer session. Also available from the top menu.
Dial Pad Opens the dial pad for DTMF signals for dialing during a call (if one participant is in a session via a telephone or H.323 end system). This feature is only available if it has been enabled on the Elluminate VCS Server.
Setup Lets you re-configure speaker, microphone, and camera settings when in an active session.
Button Name Description

Elluminate VCSversion 2.0
Doc Revision 1.0 Page 25
Video & Layout Tab for Point-to-Point Sessions
You can customize the sizing and placement of the video images in an active Point-to-Point session. See “Layout Galleries” on page 155 for details about changing layouts in the Elluminate VCS Client.
The following functions are available by default in the Video & Layout tab for Point-to-Point sessions:
Button Name Description
Mute/Un-mute Mutes and un-mutes your video image during an active session.
Settings Opens the Camera Settings window where you can configure your camera settings if necessary.
Single Video Mode Displays the video in the session window with your caller’s video image only (in a single window).
Dual Video (vertical) Mode Displays your video image and your caller’s video image in a vertical layout.
Dual Video (horizontal) Mode Displays your video image and your caller’s video image in a horizontal layout.
Switch Video Lets you swap the positions of your video image and your caller’s video image.
Picture-in-Picture Lets you display your video in picture-in-picture mode when in Single Video Mode. In this mode, your local video image is shown in a smaller size within your caller's video window. Only available when in Single Video mode; otherwise, it is grayed out).
Normal Configures your video image and your caller’ video image to be in the default normal window view.
Large Configures your video image and your caller’s video image to be in a larger window view.

Page 26 04 September 2009
Chapter 2: Starting the Elluminate VCS Client
Full screen Configures your video image and your caller’s video image a full screen video image. When you select full screen, your video image is automatically configured to Picture-in-Picture mode. Press the Esc key to exit out of full screen view.
Snapshot Lets you take a digital picture of your image in the local video window and save it to your local drive as bitmap file.
Button Name Description
Elluminate VCSversion 2.0
Doc Revision 1.0 Page 27
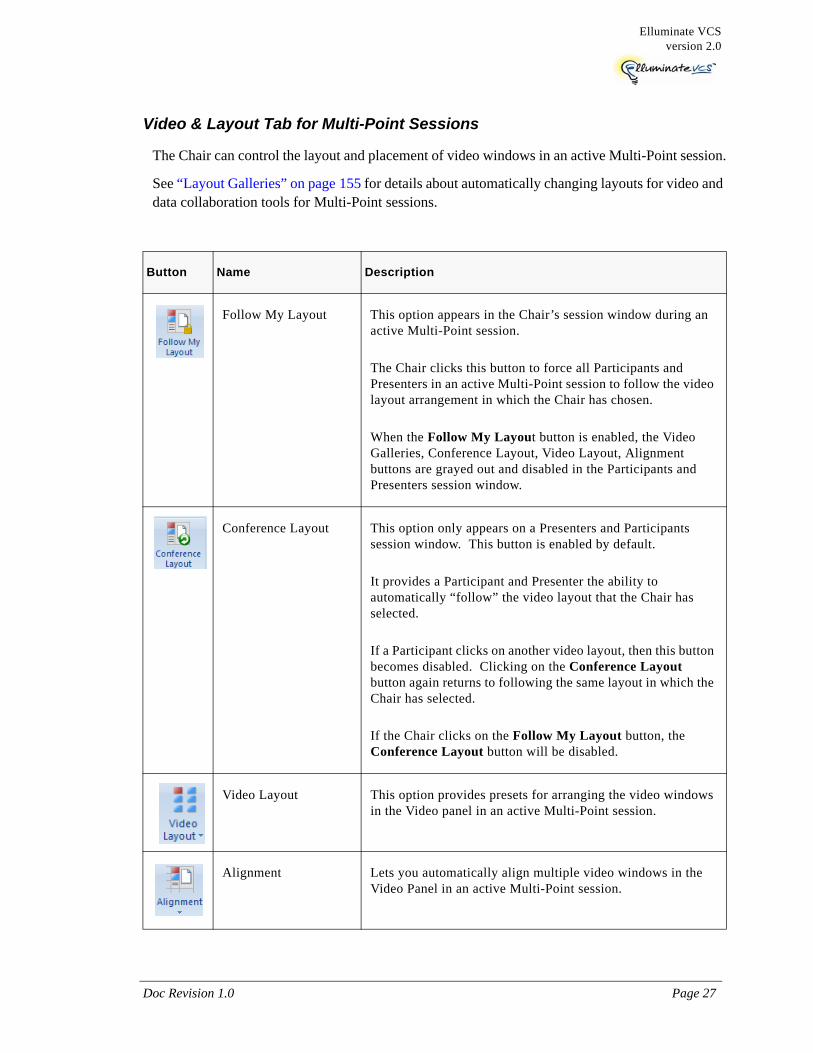
Video & Layout Tab for Multi-Point Sessions
The Chair can control the layout and placement of video windows in an active Multi-Point session.
See “Layout Galleries” on page 155 for details about automatically changing layouts for video and data collaboration tools for Multi-Point sessions.
Button Name Description
Follow My Layout This option appears in the Chair’s session window during an active Multi-Point session.
The Chair clicks this button to force all Participants and Presenters in an active Multi-Point session to follow the video layout arrangement in which the Chair has chosen.
When the Follow My Layout button is enabled, the Video Galleries, Conference Layout, Video Layout, Alignment buttons are grayed out and disabled in the Participants and Presenters session window.
Conference Layout This option only appears on a Presenters and Participants session window. This button is enabled by default.
It provides a Participant and Presenter the ability to automatically “follow” the video layout that the Chair has selected.
If a Participant clicks on another video layout, then this button becomes disabled. Clicking on the Conference Layout button again returns to following the same layout in which the Chair has selected.
If the Chair clicks on the Follow My Layout button, the Conference Layout button will be disabled.
Video Layout This option provides presets for arranging the video windows in the Video panel in an active Multi-Point session.
Alignment Lets you automatically align multiple video windows in the Video Panel in an active Multi-Point session.

Page 28 04 September 2009
Chapter 2: Starting the Elluminate VCS Client
Top Panel of the Session Window
The following functions are available in the top panel of the session window for Point-to-Point and Multi-Point sessions.
Fullscreen Configures your video image and your caller’s video image a full screen video image. When you select full screen, your video image is automatically configured to Picture-in-Picture mode. Press the Esc key to exit out of full screen view.
Snapshot Lets you take a digital picture of your image in the local video window and save it to your local drive as bitmap file.
Button Name Description
End Session Ends the session.
Open and share document Displays the Open dialog box where you select a document or file for sharing.
The document you select is open in the Import & Present window where you can assign actions for attendees in the session or adjust orientation.
New Whiteboard Opens the Whiteboard for use within an active session.
Share Application Lets you share an application with your caller in a active session.
Share Desktop Lets you share your desktop with your caller in a active session.
Chat Lets you chat with other participants in an active session.
Button Name Description

Elluminate VCSversion 2.0
Doc Revision 1.0 Page 29
File Transfer Lets you transfer files to other participants in an active session.
Button Name Description

Page 30 04 September 2009
Chapter 2: Starting the Elluminate VCS Client
Bottom Panel of the Session Window
The following functions appear in the bottom panel of an active session window for Point-to-Point and Multi-Point sessions.
Minimizing the Elluminate VCS Client
When you minimize Elluminate VCS Client, the program is not terminated and runs in the background. If you are in an active session, you do not have to close out.
To minimize the Elluminate VCS Client to the task tray:
1. Click the Elluminate logo symbol in the upper right corner of the Presence window.
2. Select Minimize Elluminate VCS to minimize the Elluminate VCS Client to the task tray.
Button Name Description
Statistics Provides information about the data transmission for incoming and outgoing data streams.
Unmute/Mute Microphone Lets any participant in an active session mute microphone sound.
Unmute/Mute Speakers Lets you mute your speakers when in an active session.
Speaker Volume Lets you adjust the speaker volume when in an active session. For example, if the remote caller’s voice is too loud, you can decrease the speaker volume.
Microphone Volume Lets you adjust your microphone volume when in an active session. For example iIf your remote caller cannot hear you properly, you should increase your microphone volume.
Elluminate VCSversion 2.0
Doc Revision 1.0 Page 31
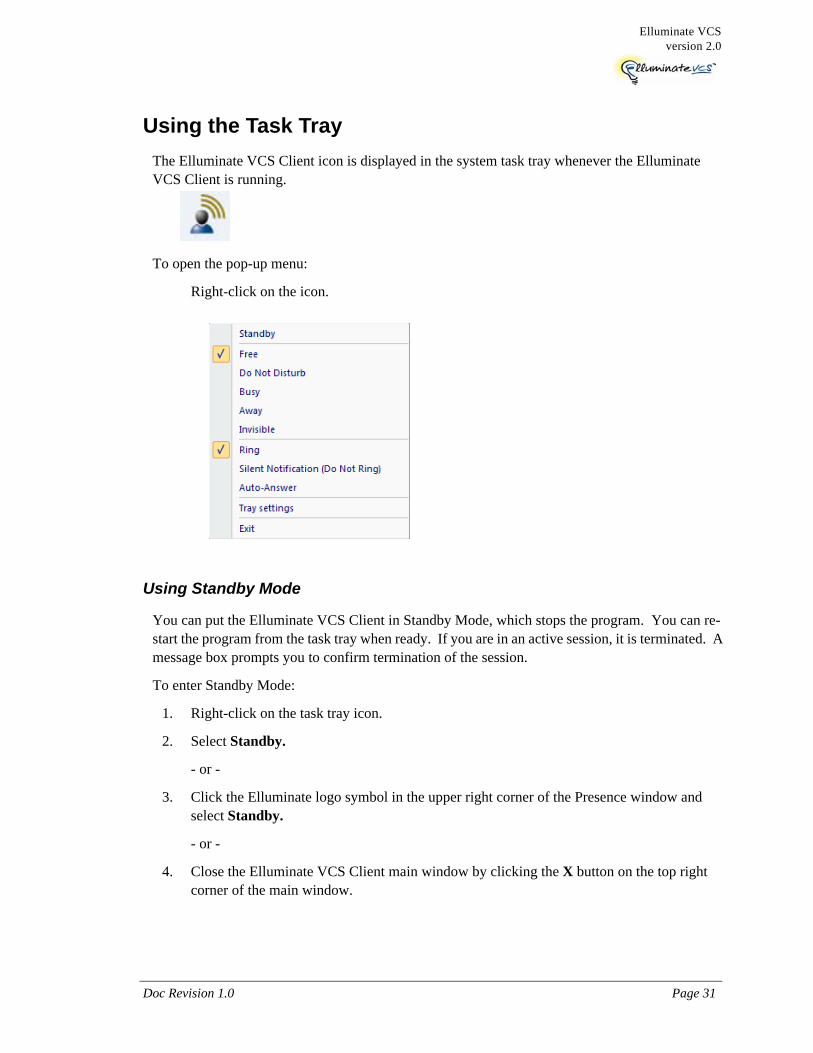
Using the Task TrayThe Elluminate VCS Client icon is displayed in the system task tray whenever the Elluminate VCS Client is running.
To open the pop-up menu:
Right-click on the icon.
Using Standby Mode
You can put the Elluminate VCS Client in Standby Mode, which stops the program. You can re-start the program from the task tray when ready. If you are in an active session, it is terminated. A message box prompts you to confirm termination of the session.
To enter Standby Mode:
1. Right-click on the task tray icon.
2. Select Standby.
- or -
3. Click the Elluminate logo symbol in the upper right corner of the Presence window and select Standby.
- or -
4. Close the Elluminate VCS Client main window by clicking the X button on the top right corner of the main window.

Page 32 04 September 2009
Chapter 2: Starting the Elluminate VCS Client
To re-open Elluminate VCS Client:
Right click on the tray icon and select Open Elluminate VCS.
Online Status
You can change your online status to one of the following states:
Free: calls are signaled normal.
Do not disturb: calls are not signaled, but appear in the list of missed calls.
Busy: calls are signaled normal.
Away: calls are signaled normal.
Invisible: calls are signaled normal.
Accepting Calls
You can change the way you accept an incoming session as follows:
Ring (default) — a ring is played and a dialog box appears showing you who is calling.
Silent Notification (Do Not Ring) — a dialog box appears, but no ringing tone is played.
Auto-Answer — the call is accepted automatically. For privacy reasons, this setting is reset to Ring the next time you start your Elluminate VCS Client.
Tray Settings
You can enable Settings -> General - Automatically start Elluminate VCS Client at Windows logon to have the Elluminate VCS Client start and minimize immediately into the task tray and wait for incoming calls when you logon to Windows.
Exiting the Elluminate VCS Client
To exit the Elluminate VCS Client:
Select Exit from the tray icon menu.
The Elluminate VCS Client is terminated. No calls can be made or answered.

Elluminate VCSversion 2.0
Doc Revision 1.0 Page 33
Present & Share Workspacethe Present & Share workspace is where you access data colloboration tools.
Below is an example of the Present and Share workspace window (with the General tab displayed) during an active session.
To open the Present & Share workspace:
1. In the General tab, click the Present button.
The Present window appears with the Present tab displayed,
See “Using the Functions in the Present Tab” on page 108 for details on the controls in the ribbon.
The video images of you and your caller automatically reduce and appear in the left column of the Present & Share window.
2. You can enlarge the video window by dragging the right bar to the left.

Page 34 04 September 2009
Chapter 2: Starting the Elluminate VCS Client
Using the Hide Pin
The Hide pin feature is useful if you have multiple panels active in a session and you need additional viewing space.
To minimize and hide video images:
Click the “Hide pin” symbol.
The video images are hidden to side panel on the left of the window.
To maximize and unhide video images:
Click the video icon again.
Doc Revision 1.0 Page 35
Elluminate VCSversion 2.0
Chapter 3: Managing Contact Lists
OverviewThis chapter explains how to use the Contact List and associated menus available in the Elluminate VCS Client Presence window. A Contact List is your “address book” for adding and maintaining other users to connect with the Elluminate VCS Client.
In this chapter“About the Contact List” on page 36
“About the Contacts Listbox” on page 38
“Displaying the Online State of a Contact” on page 40
“Modifying Visibility Settings for a Contact” on page 40
“Modifying Visibility Settings for a Group” on page 40
“Tooltips for Contact Entries” on page 41
“Groups Menu” on page 41
“Contacts Menu” on page 44
Page 36 04 September 2009
Chapter 3: Managing Contact Lists
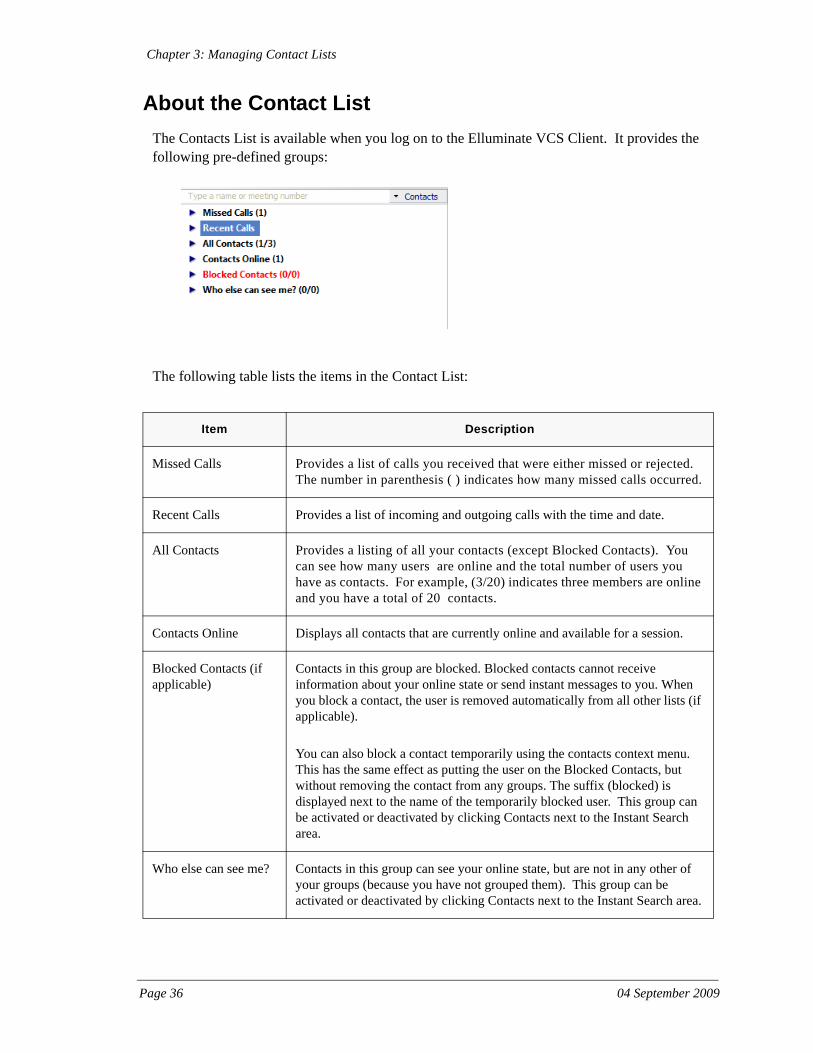
About the Contact ListThe Contacts List is available when you log on to the Elluminate VCS Client. It provides the following pre-defined groups:
The following table lists the items in the Contact List:
Item Description
Missed Calls Provides a list of calls you received that were either missed or rejected. The number in parenthesis ( ) indicates how many missed calls occurred.
Recent Calls Provides a list of incoming and outgoing calls with the time and date.
All Contacts Provides a listing of all your contacts (except Blocked Contacts). You can see how many users are online and the total number of users you have as contacts. For example, (3/20) indicates three members are online and you have a total of 20 contacts.
Contacts Online Displays all contacts that are currently online and available for a session.
Blocked Contacts (if applicable)
Contacts in this group are blocked. Blocked contacts cannot receive information about your online state or send instant messages to you. When you block a contact, the user is removed automatically from all other lists (if applicable).
You can also block a contact temporarily using the contacts context menu. This has the same effect as putting the user on the Blocked Contacts, but without removing the contact from any groups. The suffix (blocked) is displayed next to the name of the temporarily blocked user. This group can be activated or deactivated by clicking Contacts next to the Instant Search area.
Who else can see me? Contacts in this group can see your online state, but are not in any other of your groups (because you have not grouped them). This group can be activated or deactivated by clicking Contacts next to the Instant Search area.

Elluminate VCSversion 2.0
Doc Revision 1.0 Page 37
To expand the tree and view your contact, click the symbol next to All Contacts.
For example, expand the tree and view all contacts you have and see their online status. See the next section for a listing of symbol meanings.
Symbols for User Online Status
The color-coded symbols preceding entries in the Contact List indicate the current user state of each contact. The following table lists the symbols and their meanings.
Symbol Name/Color Meaning
Offline (blue) The contact is not connected or unknown to the Elluminate VCS Server. You cannot launch a session with this contact.
Online (green) The contact is online and can accept an incoming session.
Busy (orange) The contact is online, but in an active session.
Do not disturb (red) The contact does not want to be disturbed. A session made to this contact will be rejected automatically. Rejected calls appear in the Missed Calls list.
Away (opaque) The user is logged on but away from the computer.
Idle (yellow) The user is possibly away from the computer as the computer has been idle for a while.
Page 38 04 September 2009
Chapter 3: Managing Contact Lists
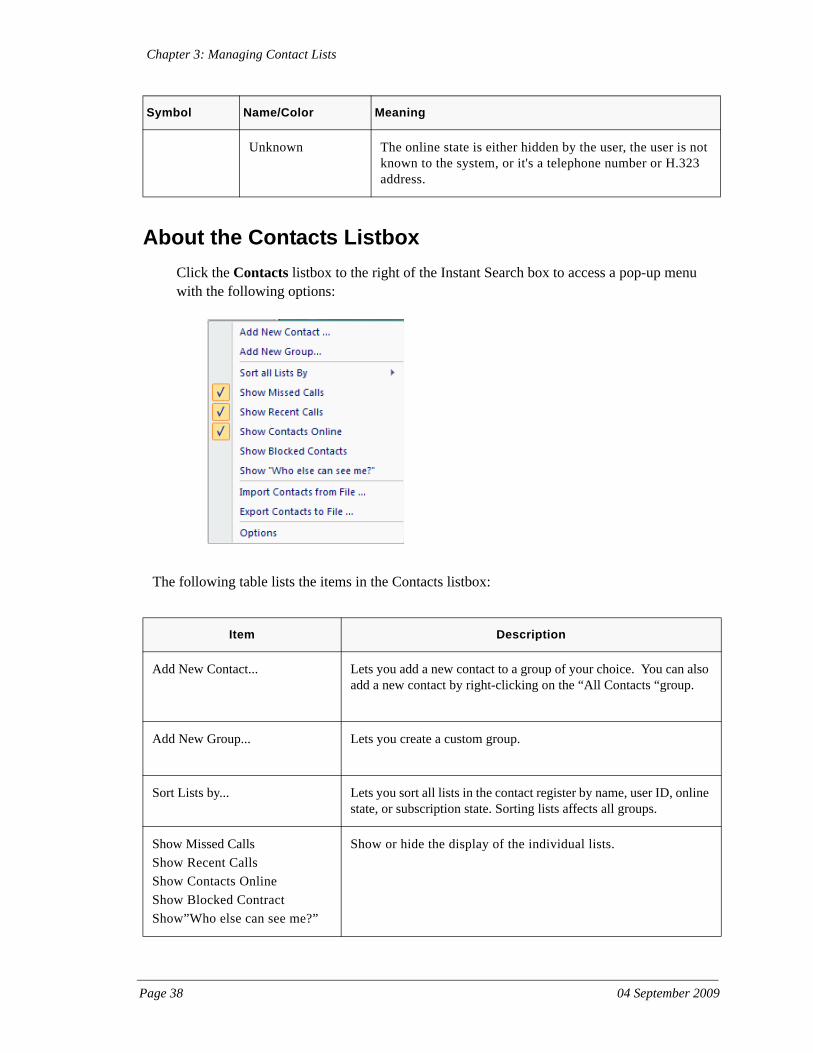
About the Contacts ListboxClick the Contacts listbox to the right of the Instant Search box to access a pop-up menu with the following options:
The following table lists the items in the Contacts listbox:
Unknown The online state is either hidden by the user, the user is not known to the system, or it's a telephone number or H.323 address.
Item Description
Add New Contact... Lets you add a new contact to a group of your choice. You can also add a new contact by right-clicking on the “All Contacts “group.
Add New Group... Lets you create a custom group.
Sort Lists by... Lets you sort all lists in the contact register by name, user ID, online state, or subscription state. Sorting lists affects all groups.
Show Missed CallsShow Recent CallsShow Contacts OnlineShow Blocked ContractShow”Who else can see me?”
Show or hide the display of the individual lists.
Symbol Name/Color Meaning

Elluminate VCSversion 2.0
Doc Revision 1.0 Page 39
Import Contacts from File...Export Contacts to File...
Import or export a contact list from a file.
Options Opens the Contact List dialog box where you can enter auto-accept rules for requests to be accepted automatically. For all other request you are prompted.
For example:* - automatically accepts requests from all users.*@elluminate.com - automatically accepts request for all users in the Elluminate.com domain.
Item Description
Page 40 04 September 2009
Chapter 3: Managing Contact Lists
Displaying the Online State of a ContactYou can see the online state of contact if the contact agreed to it when you added a new user to your contact list. The new contact is prompted whether to let you see the online state or not. (See “Making a Contact Request” on page 12 for more information.)
If you have a user in your contact list that has not given you permission to see the online state, a white area is displayed (which is the same as for unknown contacts).
Modifying Visibility Settings for a ContactYou can change the Stealth Settings for a single contact:
To change the visibility and stealth settings:
1. Right-click on a contact name.
2. Select Visibility and Stealth Settings.
3. Choose one of the following options:
Appear Permanently Offline to Contact — hides your online state from the selected contact.
Show Your Online State to Contact (default) — shows your online state to the selected contact.
Subscribe to Online State of Contact — if you disabled this option when making a contact request (see “Making a Contact Request” on page 12), selecting it will enable this feature, letting you see when a contact is online, busy, or idle.
Modifying Visibility Settings for a GroupYou can change the Stealth Settings for a group:
To change stealth settings:
1. Right-click on a group of contacts.
2. Select Stealth Settings.
3. Choose one of the following options:
Appear Permanently Offline to Group Members — if you want your online state to be hidden from other users.
Show Your Online State to Group (default) — shows your online state to a group.

Elluminate VCSversion 2.0
Doc Revision 1.0 Page 41
Tooltips for Contact EntriesWhen you hover with your mouse pointer over a contact list entry, the following three icons appear next to the contact as tooltips:
Call Contact — lets you automatically launch a session
Open Instant Messaging — lets you start an instant messaging session with the contact
Show Contact Details — provides contact name, user ID, email, phone, fax, address, comment, and visibility of online state.
Click on an icon to execute the corresponding action:
Groups MenuGroups are displayed with a group symbol (to open and close the group tree) followed by the group name.
You can see how many users of the group are online and the total number of members of the group. For example, “All contacts (3/20)” means three members are online in a group with a total of 20 members.
To display the Group menu:
Right-click on a group name. Depending on the group type (standard or user-defined) certain options are not available.

Page 42 04 September 2009
Chapter 3: Managing Contact Lists
Invite Group to Meeting
Used for launching a Multi-Point session. Opens the Invite Contacts to a Conference dialog box. For example:
The contacts in the group are listed as conference participants. You can add contacts from other groups as participants or remove contacts from the list. You can also enter a message to be sent to the participants.
Click the Invite button to launch a Multi-Point session. All participants are invited.
You can organize recurring conferences with the same users by putting them in a separate group, which you only use to start the session.
Stealth Settings
A submenu with two entries opens:
Appear permanently offline to group members — sets your online state to invisible/logged off for all group members.
Show your online status to contacts — shows your online state to all group members.
Sort List
Lets you sort a group by:
Name
User ID
Online State
Subscription State
The current mode is checked.

Elluminate VCSversion 2.0
Doc Revision 1.0 Page 43
Delete Group
This entry only appears when the group is completely empty. You have to confirm the deletion.
Rename Group
Opens the Change group name dialog where you can rename the group. The names of the four pre-defined groups cannot be changed.
Add New Contact
Select this option and the Add new contact dialog box appears. For example:
1. Enter the User ID of the user to be added in the User ID box.
2. Select the groups to which the contact is to be added from the Add to contact group listbox.
3. Enable Do you like to see the online state of this user? checkbox if you want to see the online state of this user. If the contact already exists, you are prompted with a warning and you can change the User ID.
4. Click Next and the Elluminate VCS Server attempts find the display name for the User ID.
If the user cannot be found on the Elluminate VCS Server, you receive a warning and you can change the user ID or enter the contact anyway. This might be the case especially for conference IDs or contacts starting with “tel:” or “h323:”.
When the Elluminate VCS Server finds the display name of the contact, it is presented to you. You can accept or modify it as necessary.
Note: You cannot add users to the “Contacts Online” or “Who else can see me?” groups because users appear online due to their membership in other groups.

Page 44 04 September 2009
Chapter 3: Managing Contact Lists
Add New Group
Opens the Add New Group dialog box where you can enter the new group name. For example:
The Elluminate VCS Client checks whether the name already exists before the group is created.
Contacts MenuContacts are shown with a status symbol that indicates their online state. Double-clicking on a contact immediately calls the user. If there is already another active call running, the Call dialog box opens. You can view the contact’s details via a tooltip.
A contact name is displayed in italics if the respective contact cannot see your online state. For example:
The contact has not subscribed to your online state or you have rejected the subscription request.
Your global state is set to invisible. In this case, all contacts are shown in italics.
If you have groups, contacts can be moved from one group to another by dragging and dropping them using your mouse.

Elluminate VCSversion 2.0
Doc Revision 1.0 Page 45
To display the Contacts menu:
Right-click on a contact name.
The following options are available for a contact:
Invite Contact to Running Meeting
This option is only available in the menu when you are in an active session. It lets you invite another contact into the session for a multi-point session.
Forward Current Call
This option is only available in the menu when you are in an active session. It lets you automatically call the selected contact and end your active session in one click.
Call Contact
Initiates a call immediately or, in case you are already in a session, opens the Call dialog for further options.
Send / Show Instant Message...
Opens the Instant Messaging dialog box where you can send messages to the corresponding contact.
Block Contact / Unblock Contact
If you block a contact, the person can no longer send instant messages to you.
Visibility and Stealth Settings >
Define for every single contact on whether the other party can see your online state. You can re-request the online state of the other party.
Contact Details...
Shows the following details of a contact:
Name
User ID
Phone
Comment
Visibility of online state for you and the contact

Page 46 04 September 2009
Chapter 3: Managing Contact Lists
Contact Details
Opens the Contact Details message box, which provides details on the contact such as name, user ID, email, phone, fax, address, comment, and visibility of online state.
Delete from Contact List
Deletes a contact. You can choose whether the contact is to be removed from the chosen group only or from all groups. If you chose to remove the contact from all groups, you can choose whether your online state is still shown to the contact.
Copy Contact
Copies a contact to another group. You can also copy a contact by dragging and dropping the contact name with your mouse.
Rename Contact
Assign a contact name to an existing contact.
Add New Contact
Add a new contact to a group of your choice. Enter the User ID into the dialog-box and choose to which group the new contact is to be added.
Add New Group
Enter the group name.

Elluminate VCSversion 2.0
Doc Revision 1.0 Page 47
The Elluminate VCS Client checks whether the name already exists, otherwise the group is created.
Sort List
Lets you sort the contact list by:
Name
User ID
Online state
Subscription state
The current mode is marked.
Missed Calls List
The Missed Calls list displays the most recently missed or rejected calls from a specified caller. It lets you perform the following actions:
Initiate a call using the list by double-clicking the desired record.
Erase the list by right-clicking on the list and select Clear List.
When you miss a call, a message appears in the task bar. For example:
Page 48 04 September 2009
Chapter 3: Managing Contact Lists
Recent Calls List
The Recent Calls list displays all past calls for which you initiated or received. The default format lists only the most recently missed or rejected calls made by a specified caller.
This list lets you perform the following actions:
Place a video call by double-clicking on the listed call.
Add the contact information of a certain record by right-clicking the desired record and selecting Add Contact.
Erase the list by right-clicking on the list and select Clear List.

Doc Revision 1.0 Page 49
Elluminate VCSversion 2.0
Chapter 4: Point-to-Point Sessions with theElluminate VCS Client
OverviewThis chapter explains how to launch a Point-to-Point session with the Elluminate VCS Client. It also explains how to configure video and audio functions during an active session.
A Point-to-Point videoconference session is a videoconference involving two sites.
A videoconference with more than two sites is called a Multi-Point session. For details about Multi-Point sessions, see Chapter 5, “Multi-Point Sessions with the Elluminate VCS Client,” on page 77.
In this chapter“Outgoing Point-to-Point Sessions” on page 50
“Incoming Point-to-Point Sessions” on page 57
“Configuring Video Functions in a Point-to-Point Session” on page 71
“Configuring Audio Functions in a Point-to-Point Session” on page 76

Page 50 04 September 2009
Chapter 4: Point-to-Point Sessions with the Elluminate VCS Client
Outgoing Point-to-Point SessionsYou can launch an outgoing point-to-point session in any of the following ways:
“Launching a Point-to-Point Session from the Contacts List” on page 50
“Launching a Point-to-Point Session Using Instant Search” on page 53
“Launching a Point-to-Point Session Using the New Call Dialog Box” on page 55
“Launching a Point-to-Point Session with an H.323 Endpoint” on page 56
Launching a Point-to-Point Session from the Contacts List
Before launching a Point-to-Point session from your contacts list, make sure that the online state of the user is online or idle and not busy or offline. If the caller is not online, you will receive a message to try again later.
To launch a Point-to-Point session using your contacts list:
1. Double-click on a name in your contact list.
- or -
2. Click the green phone symbol that appears when you pass your mouse cursor over the contact name.
Example of a contact list:

Elluminate VCSversion 2.0
Doc Revision 1.0 Page 51
The New Call dialog box appears and rings on the system of the contact you selected. For example:
The Incoming Call dialog appears on the system of the contact you selected and waits for the contact to accept the call. By default, this window appears on top of any other windows on the remote system.

Page 52 04 September 2009
Chapter 4: Point-to-Point Sessions with the Elluminate VCS Client
A session window automatically appears once the contact you selected accepts the call (with the Video & Layout tab displayed). For example:
The user ID of the contact you called appears in the title bar of the session window. Your user ID appears in the title bar of the contact’s session window.
3. Click the Video & Layout tab to customize the sizing and placement of the video images in an active session. See “Video & Layout Tab for Point-to-Point Sessions” on page 25 for details.
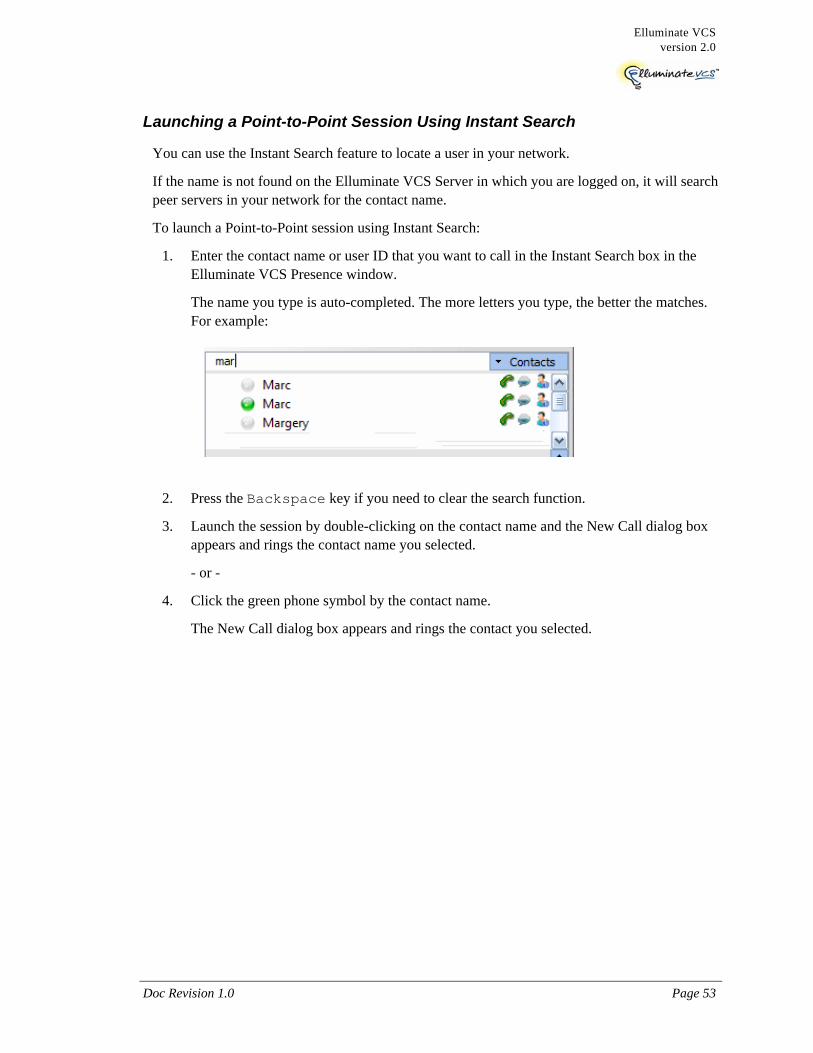
Elluminate VCSversion 2.0
Doc Revision 1.0 Page 53
Launching a Point-to-Point Session Using Instant Search
You can use the Instant Search feature to locate a user in your network.
If the name is not found on the Elluminate VCS Server in which you are logged on, it will search peer servers in your network for the contact name.
To launch a Point-to-Point session using Instant Search:
1. Enter the contact name or user ID that you want to call in the Instant Search box in the Elluminate VCS Presence window.
The name you type is auto-completed. The more letters you type, the better the matches. For example:
2. Press the Backspace key if you need to clear the search function.
3. Launch the session by double-clicking on the contact name and the New Call dialog box appears and rings the contact name you selected.
- or -
4. Click the green phone symbol by the contact name.
The New Call dialog box appears and rings the contact you selected.

Page 54 04 September 2009
Chapter 4: Point-to-Point Sessions with the Elluminate VCS Client
For example:
The Incoming Call dialog appears on the system of the contact you selected and waits for the contact to accept the call. By default, this window appears on top of any other windows on the remote system. A session window appears once the contact you selected accepts the call.

Elluminate VCSversion 2.0
Doc Revision 1.0 Page 55
Launching a Point-to-Point Session Using the New Call Dialog Box
To launch a session using the New Call dialog box:
1. Click the Call button to open the New Call dialog box.
2. Select the User ID, meeting ID, or phone number of the person you want to call from the listbox or manually enter a user ID.
3. Click the Call button.
The Incoming Call dialog appears on the system of the contact you selected and waits for the contact to accept the call. By default, this window appears on top of any other windows on the remote system. A session window appears once the contact you selected accepts the call.

Page 56 04 September 2009
Chapter 4: Point-to-Point Sessions with the Elluminate VCS Client
Launching a Point-to-Point Session with an H.323 Endpoint
The Elluminate VCS Server you are logged on to might also provide connectivity to legacy IP-based videoconferencing systems (based on the H.323 standard). In this case, an address you use when making calls is different from and Elluminate VCS user ID. Your Elluminate VCS administrator can tell you if H.323 services are available and how to access H.323 endpoints with your organization's dialing scheme.
To dial an H.323 endpoint:
1. Click the Call icon to open the New Call dialog box.
2. Enter the H.323 number in the following format:
H323:<IP Address> in the format ###.###.###.###
where the pound signs are the digits of the four part IP address separated by periods.
3. You can also enter an E.164 video phone address (or “alias”) provided to you by your IT administrator that matches the person or device you want to call.
For example:
h323:petermiller
where “petermiller” is the E.164 alias of the H.323 client.
- or -
h323:4583456
where 4583456 is the E.164 number of the H.323 client.
A user of a H.323 client can call you by entering the E.164 alias assigned to you. This requires the H.323 client to be registered with the Elluminate VCS gatekeeper or registered with a third-party gatekeeper that is peered with the Elluminate VCS gatekeeper.
4. Click the Call button.
You can start your session once the endpoint accepts the call.
Note: You can dial an H.323 client by IP address even if the H.323 client is not registered to be an Elluminate VCS gatekeeper.
Elluminate VCSversion 2.0
Doc Revision 1.0 Page 57
Incoming Point-to-Point SessionsThis section explains the following tasks for incoming Point-to-Point sessions:
“Accepting an Incoming Session Request” on page 57
“Accepting an Incoming Session as a Voice-Only Call (No Video)” on page 59
“Putting an Active Session On Hold” on page 63
“Accepting an Incoming Call and Placing an Active Session On Hold” on page 64
“Controlling Sessions via the Running Meetings Dialog Box” on page 66
“Rejecting an Incoming Session Request” on page 67
“Transferring an Active Session Via the Contact List” on page 68
“Ending an Active Point-to-Point Session” on page 68
“Inviting Other Participants into a Session - Starting a Multi-Point Session” on page 69
“Muting Your Video Image” on page 71
“Configuring Camera Settings” on page 72
“Changing the Video Layout in a Session Window” on page 73
“Configuring Picture-in-Picture Mode” on page 74
“Manually Resizing a Video Window” on page 75
Accepting an Incoming Session Request
When you receive an incoming session request, your system rings and the Incoming Call dialog box appears. The contact name of the remote caller is displayed at the top of the Incoming Call dialog box.

Page 58 04 September 2009
Chapter 4: Point-to-Point Sessions with the Elluminate VCS Client
For example:
To accept an incoming session request:
1. Click the Accept button to answer the call.
The session window appears with your video image and the video image of the remote caller. The name of the caller is displayed at the top title bar of the session window. You can begin your session.
Example of an active session window:
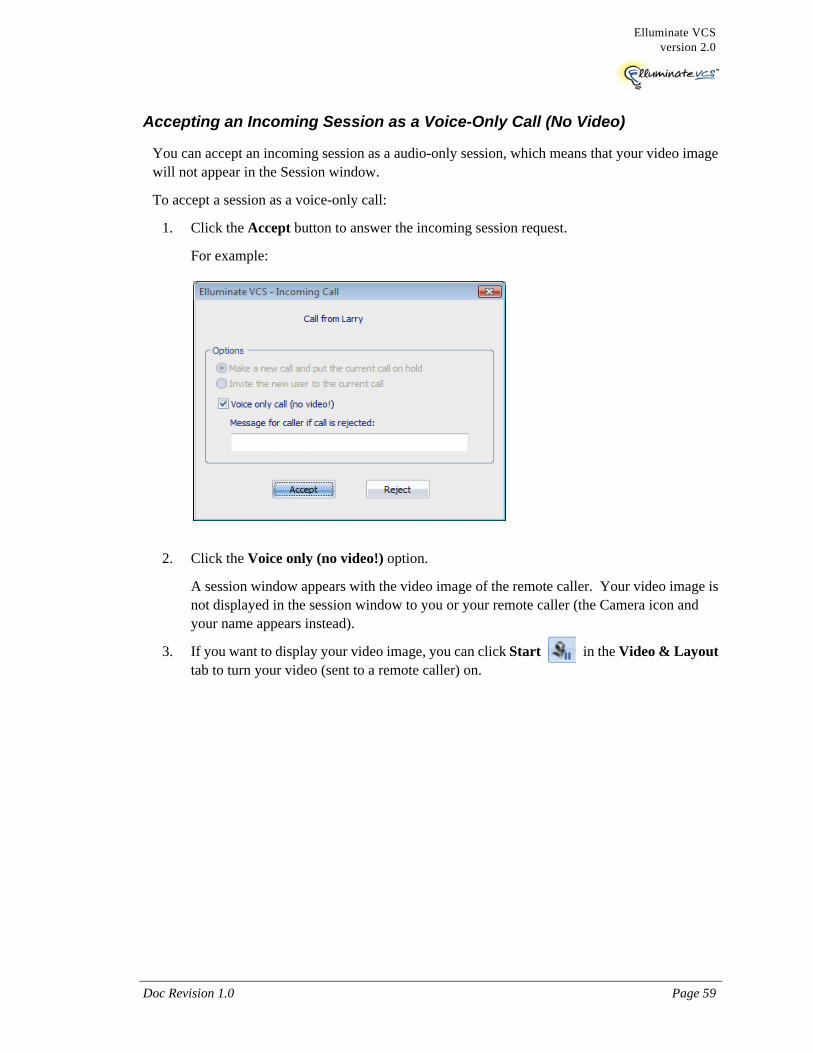
Elluminate VCSversion 2.0
Doc Revision 1.0 Page 59
Accepting an Incoming Session as a Voice-Only Call (No Video)
You can accept an incoming session as a audio-only session, which means that your video image will not appear in the Session window.
To accept a session as a voice-only call:
1. Click the Accept button to answer the incoming session request.
For example:
2. Click the Voice only (no video!) option.
A session window appears with the video image of the remote caller. Your video image is not displayed in the session window to you or your remote caller (the Camera icon and your name appears instead).
3. If you want to display your video image, you can click Start in the Video & Layout tab to turn your video (sent to a remote caller) on.

Page 60 04 September 2009
Chapter 4: Point-to-Point Sessions with the Elluminate VCS Client
For example:
Accepting an Incoming Telephone Call into a Two-User Session
When configured by your IT administrator, Elluminate VCS provides a way for a Participant to call into an active two-user session using a standard telephone.
To have a Participant call into an active two-user session:
1. The Elluminate VCS user needs to create a session with the telephone user. To do this, click the Schedule button in the Presence window to open the Web Portal Interface.
2. Follow the steps under “Configuring and Scheduling a Session” on page 132 to create a new session.
3. Start the session manually as explained in “Starting a Session Manually” on page 129 and make note of the Session ID number to give to the telephone participant. The Incoming Call dialog box appears with the session ID displayed at the top.
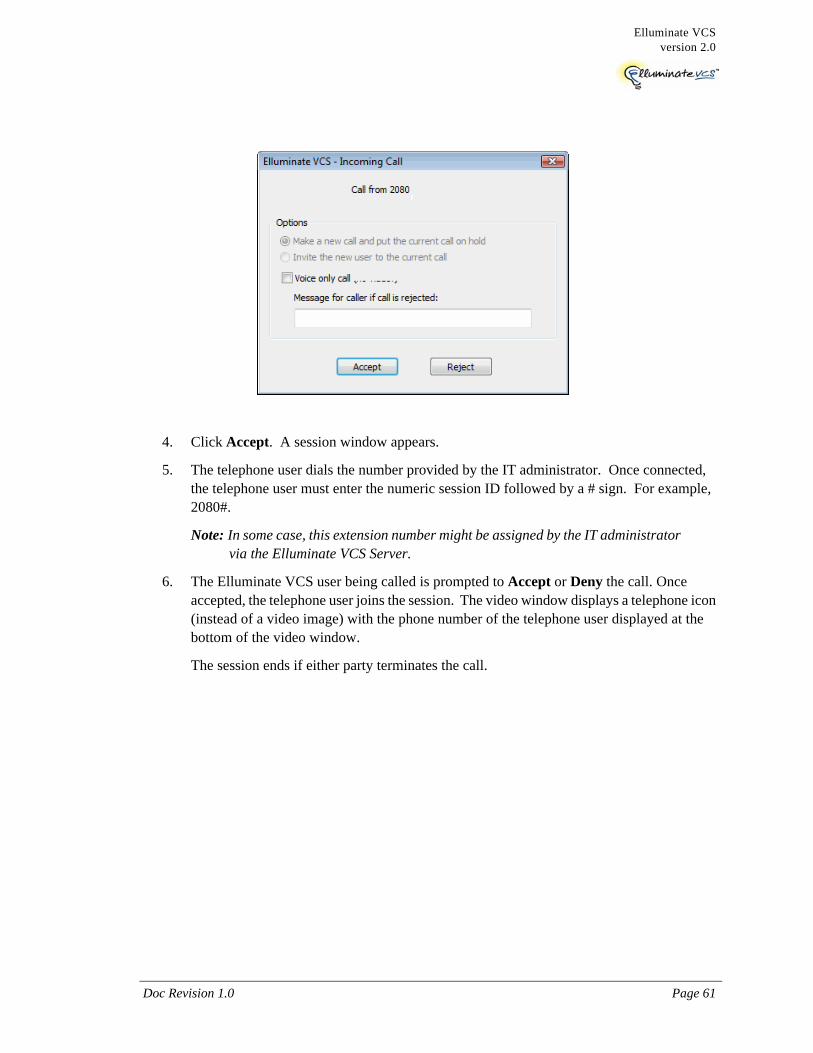
Elluminate VCSversion 2.0
Doc Revision 1.0 Page 61
4. Click Accept. A session window appears.
5. The telephone user dials the number provided by the IT administrator. Once connected, the telephone user must enter the numeric session ID followed by a # sign. For example, 2080#.
Note: In some case, this extension number might be assigned by the IT administrator via the Elluminate VCS Server.
6. The Elluminate VCS user being called is prompted to Accept or Deny the call. Once accepted, the telephone user joins the session. The video window displays a telephone icon (instead of a video image) with the phone number of the telephone user displayed at the bottom of the video window.
The session ends if either party terminates the call.

Page 62 04 September 2009
Chapter 4: Point-to-Point Sessions with the Elluminate VCS Client
For example:

Elluminate VCSversion 2.0
Doc Revision 1.0 Page 63
Putting an Active Session On Hold
You can put your active session on hold at any time.
To put your active session on hold:
1. Click Pause in the General tab of the Session window.
The active session is put “on hold” and the video images of you and your caller are replaced with camera images appear in the session window.
For example:
Additionally, the Running Meetings message box appears.
2. You can close this dialog and re-open it later, by selecting View -> Currently Running Meetings.
You can also control the session from this message box. See “Controlling Sessions via the Running Meetings Dialog Box” on page 66 for details.
3. Click Play in the General tab of the session window to resume the session.

Page 64 04 September 2009
Chapter 4: Point-to-Point Sessions with the Elluminate VCS Client
Accepting an Incoming Call and Placing an Active Session On Hold
You can accept an incoming call during an active Point-to-Point session, which puts the currently active session on hold. The new incoming caller is not joined into the session.
To put your active session “on hold and answer an incoming call:
1. When you receive the call, the Incoming Call dialog box appears on your system:
2. Click the Make a new call and put the current call on hold option.
3. Click the Accept button.
A new session window appears for the new call.

Elluminate VCSversion 2.0
Doc Revision 1.0 Page 65
Your previously active session is put “on hold.” The video images of you and your caller are replaced with camera images in the session window.
For example:
4. Click Play in the General tab of the Session window that is “on hold” when you want to resume the session. This will switch the active session to an “on hold” state.
The button changes to Pause . Click this button if you want to put the session back “on hold.”
Additionally, the Running Meetings dialog box appears.
You can close this dialog and re-open it later, by selecting View -> Currently Running Meetings.
You can also control the session from this message box. See “Controlling Sessions via the Running Meetings Dialog Box” on page 66 for details.

Page 66 04 September 2009
Chapter 4: Point-to-Point Sessions with the Elluminate VCS Client
Controlling Sessions via the Running Meetings Dialog Box
The Running Meetings dialog box lists current sessions that you are currently connected to or are “on hold.” The active session appears in bold in the Running Meetings box.
For example:
The controls in the Running Meetings dialog box are as follows:
When you finish a session, you can resume a call that you put on hold. To resume on “on hold” call:
Click Play to resume an “on hold” session.
The session that was “on hold” becomes active. The active session is then put “on hold.”
You can put both sessions on hold, but you can only have one session active at a time.
Button Name Description
Pause Indicates a currently active session. Click it to put the call on hold. You can put multiple calls on hold.
Play Indicates an on hold session. Click it to make the session active.

Elluminate VCSversion 2.0
Doc Revision 1.0 Page 67
Rejecting an Incoming Session Request
You can reject an incoming session request if you are busy or in another session and do not want to be disturbed.
To reject an incoming session request:
1. Click the Reject button.
2. Optionally, you can enter a custom message in the “Message for caller if call is rejected” box.
The remote caller receives a message box that says you are busy, cannot take the call, and to try again later. If you entered a message, it is appears as an additional message.
For example:

Page 68 04 September 2009
Chapter 4: Point-to-Point Sessions with the Elluminate VCS Client
Transferring an Active Session Via the Contact List
When you are in an active Point-to-Point session, you can transfer the session to a user from your contact list.
To transfer an active session to another user:
1. Right-click on the user name in the Contact List while in an active session.
2. Select Forward Current Call with <Active User ID> to <User ID>.
The Incoming Call dialog box appears on the remote user’s desktop. Once the remote user accepts the call, the current session ends on your computer and is forwarded to that user.
Ending an Active Point-to-Point Session
You or a remote caller can end an active point-to-point session at any time.
To end an active session:
Click the End Session button in the General tab of the session window.
The session window automatically closes and the call is terminated for both participants.

Elluminate VCSversion 2.0
Doc Revision 1.0 Page 69
Inviting Other Participants into a Session - Starting a Multi-Point Session
When you are in an active Point-to-Point session, you or your calling partner can invite one or more participants into the session. This makes the call a Multi-Point session. See Chapter 5, “Multi-Point Sessions with the Elluminate VCS Client,” on page 77 for more details.
To invite a contact into an active session and start a Multi-Point call:
1. Click the Invite button in the General tab in the session window. The Invite to Session... dialog box appears. For example:
2. Enter the contact name or user ID that you want to call into the global Instant Search box. The name you type is auto-completed. The more letters you type, the better the matches.
3. Select a contact name and click the Invite button.
You can also:
a. Click the Call icon during an active session.
- or -
b. Right-click on the contact name and select Invite Contact to Running Meeting. from the pop-up menu.
The New Call dialog box appears. For example:

Page 70 04 September 2009
Chapter 4: Point-to-Point Sessions with the Elluminate VCS Client
4. Click the Call button.
When your invitation is accepted, the session window refreshes and re-opens with the caller added to the active session.
The Meeting Information box appears.

Elluminate VCSversion 2.0
Doc Revision 1.0 Page 71
Configuring Video Functions in a Point-to-Point SessionThe following functions are available from the Video & Layout tab during an active session:
Muting Your Video Image
You can mute your video image at any time during an active session.
To mute your video image:
1. Click Stop button in the Video & Layout tab to turn your video (sent to a remote caller) off.
A camera icon replaces your video image. Your video image remains muted until you click on the button again to disable video mute. For example:

Page 72 04 September 2009
Chapter 4: Point-to-Point Sessions with the Elluminate VCS Client
Configuring Camera Settings
You can configure your camera setting at any time during an active session.
To configure camera settings:
Click the Settings button in the Video & Layout tab. The Camera Settings window appears.
See “Selecting a Camera” on page 7 for details on using the options in this window.
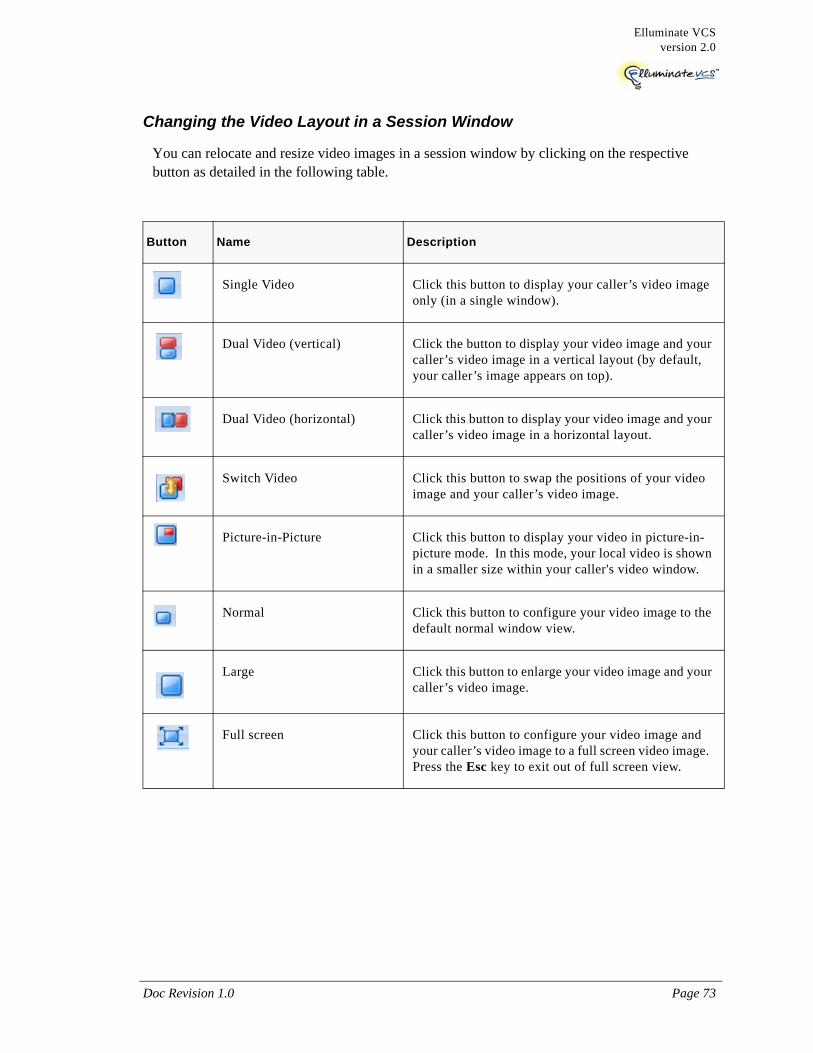
Elluminate VCSversion 2.0
Doc Revision 1.0 Page 73
Changing the Video Layout in a Session Window
You can relocate and resize video images in a session window by clicking on the respective button as detailed in the following table.
Button Name Description
Single Video Click this button to display your caller’s video image only (in a single window).
Dual Video (vertical) Click the button to display your video image and your caller’s video image in a vertical layout (by default, your caller’s image appears on top).
Dual Video (horizontal) Click this button to display your video image and your caller’s video image in a horizontal layout.
Switch Video Click this button to swap the positions of your video image and your caller’s video image.
Picture-in-Picture Click this button to display your video in picture-in-picture mode. In this mode, your local video is shown in a smaller size within your caller's video window.
Normal Click this button to configure your video image to the default normal window view.
Large Click this button to enlarge your video image and your caller’s video image.
Full screen Click this button to configure your video image and your caller’s video image to a full screen video image. Press the Esc key to exit out of full screen view.

Page 74 04 September 2009
Chapter 4: Point-to-Point Sessions with the Elluminate VCS Client
Configuring Picture-in-Picture Mode
You can reduce your video image to a thumbnail size during an active Point-to-Point session.
To configure your video image to Picture-in-Picture mode:
Click the Single Video button and then click the Picture-in-Picture button .
Your video image appears in the bottom right-hand corner.
For example:

Elluminate VCSversion 2.0
Doc Revision 1.0 Page 75
Manually Resizing a Video Window
To manually resize a video window:
Drag the border of the window using your mouse cursor.
Taking a Snapshot
You can take a digital picture of your video image in a session window and save it to your local drive as bitmap file by clicking the Snapshot button .
Viewing Your Video Image as Your Caller Views It
To view your video image as your caller views you:
1. Right-click in an area of your video image in a session window. A pop-up menu appears.
2. Select Show local video compressed to show your local video as the remote caller sees it when it is compressed and sent over the internet.

Page 76 04 September 2009
Chapter 4: Point-to-Point Sessions with the Elluminate VCS Client
Configuring Audio Functions in a Point-to-Point SessionOther applications that use and play sound typically adjust sound settings. This affects the sound quality for the Elluminate VCS Client. For example, if you are listening to music and adjust the sound of your music player, when you get an incoming call, you might need to re-adjust the volume.
The following functions are available in a session window:
Adjusting Speaker/Earphone Volume
You can adjust the speaker volume when in an active session by raising or lower ing the volume of a call.
To increase or decrease your speaker/earphone volume when in an active session:
At the bottom of a session window, move the slider to the right or left respectively.
Adjusting Microphone Volume
You can adjust the microphone volume when in an active session by raising or lowering the volume of a call.
To increase or decrease your speaker/earphone volume when in an active session:
At the bottom of a session window, move the slider to the right or left respectively.
Muting Your Microphone
To mute your microphone when in an active session:
Click on the Microphone button next to the slider and the audio input is muted and the remote party cannot hear you.
To un-mute your microphone:
Click on the Microphone button again.
Muting Speakers
To mute your speaker and earphones when in an active session:
Click on the Speaker button next to the slider.
To un-mute your speaker and earphone:
Click on the Speaker button again.

Doc Revision 1.0 Page 77
Elluminate VCSversion 2.0
Chapter 5: Multi-Point Sessions with theElluminate VCS Client
OverviewThis chapter explains how to launch a Multi-Point session with the Elluminate VCS Client. It also explains how to configure video and audio functions during an active session.
In this chapter“About Multi-Point Sessions” on page 78
“The Participants Panel” on page 81
“Configuring Video Functions in a Multi-Point Session” on page 96
“Configuring Audio Functions in a Multi-Point Session” on page 99
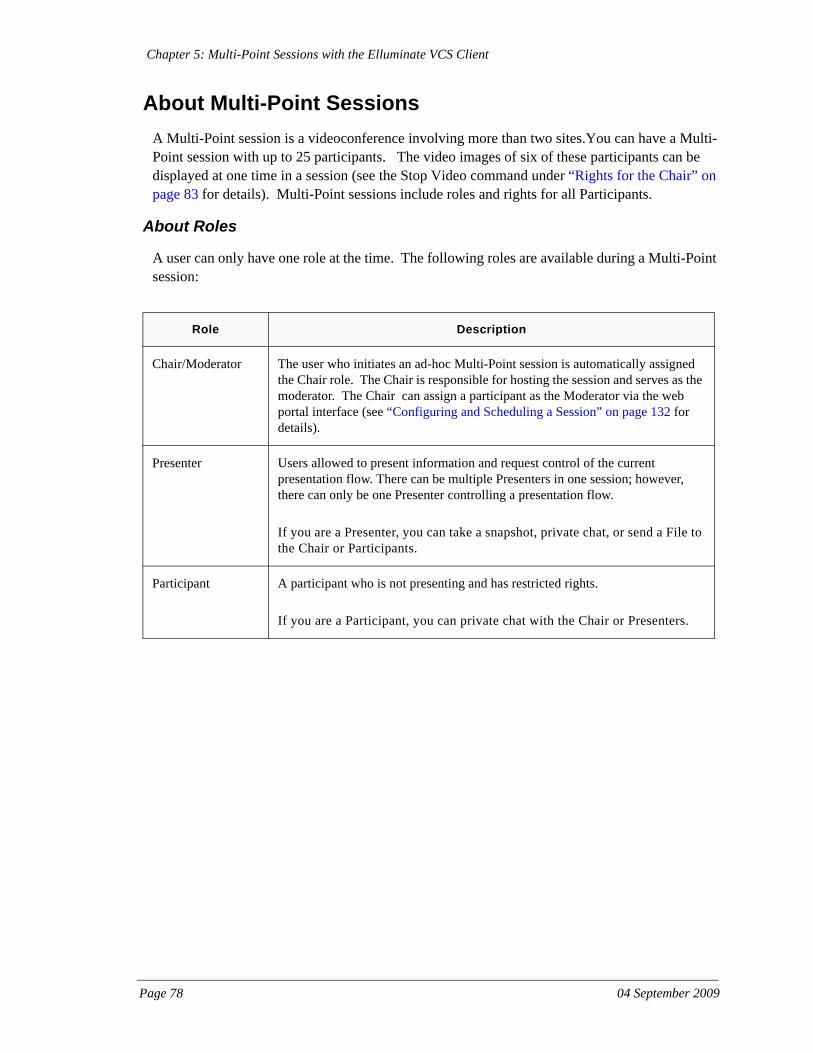
Page 78 04 September 2009
Chapter 5: Multi-Point Sessions with the Elluminate VCS Client
About Multi-Point SessionsA Multi-Point session is a videoconference involving more than two sites.You can have a Multi-Point session with up to 25 participants. The video images of six of these participants can be displayed at one time in a session (see the Stop Video command under “Rights for the Chair” on page 83 for details). Multi-Point sessions include roles and rights for all Participants.
About Roles
A user can only have one role at the time. The following roles are available during a Multi-Point session:
Role Description
Chair/Moderator The user who initiates an ad-hoc Multi-Point session is automatically assigned the Chair role. The Chair is responsible for hosting the session and serves as the moderator. The Chair can assign a participant as the Moderator via the web portal interface (see “Configuring and Scheduling a Session” on page 132 for details).
Presenter Users allowed to present information and request control of the current presentation flow. There can be multiple Presenters in one session; however, there can only be one Presenter controlling a presentation flow.
If you are a Presenter, you can take a snapshot, private chat, or send a File to the Chair or Participants.
Participant A participant who is not presenting and has restricted rights.
If you are a Participant, you can private chat with the Chair or Presenters.

Elluminate VCSversion 2.0
Doc Revision 1.0 Page 79
Inviting a Group into a Multi-Point Session
You can simultaneously invite a group of participants to a Multi-Point session using the Invite feature. The user who sends the invitation is the Chair. You can also schedule a Multi-Point session in advance and invite users. See “Configuring and Scheduling a Session” on page 132 for more information.
To invite multiple participants to a Multi-Point session:
1. Right-click on “All Contacts” in the Presence window. A pop-up menu appears.
2. Select Invite Group to Meeting...
The Invite Contact to Conference dialog box appears. For example:
3. Select the names of the users you want to invite from the Contacts box and click the Add>> button. The selected users appears under the Conference Participants box.
4. Optionally, add a message in the Message box. For example: Marketing Strategy Meeting. This message appears at the tops of the Incoming Call dialog box.
5. Click Invite.
The Incoming Call dialog box appears on your desktop as well as the desktops of all invited participants and waits for their acceptance. For example:

Page 80 04 September 2009
Chapter 5: Multi-Point Sessions with the Elluminate VCS Client
6. Click Accept to enter the Multi-Point session.
The Multi-Point session window appears and as participants accept the call, their video images appear in the session window. For example:

Elluminate VCSversion 2.0
Doc Revision 1.0 Page 81
The Participants PanelWhen you are in an active Multi-Point session, the Participants panel is displayed to the right of the session window. You can move this panel to the left by clicking the Video & Layout tab.
Example of the Participants panel:
You can hide the Participants panel as follows:
Click the Hide pin , which minimizes it to the side panel. For example:
Clicking on it from the side panel restores it to the session window.

Page 82 04 September 2009
Chapter 5: Multi-Point Sessions with the Elluminate VCS Client
Muting a Presenter or Participants Microphone
The Chair can mute a Presenter or Participant’s microphone during an active Multi-Point session.
To mute the microphone of a Participant during a Multi-Point session:
1. Click the microphone symbol next to the user name. A red ball with a white slash appears to indicate the the microphone is muted.
2. To un-mute the microphone, click on it again.
Asking for Microphone Un-Mute
If the Chair mutes the microphone of a Presenter or Participant. They can make a request to un-mute the microphone as follows:
1. Select Ask for Mic from the Ask menu.
2. The Chair is prompted to Accept or Deny the request.
3. If the Chair accepts the request, the Presenter or Participant receives a message that the request has been granted and the microphone is un-muted. If the Chair denies the request, they receive a message that the request was denied and the microphone remains in muted mode.
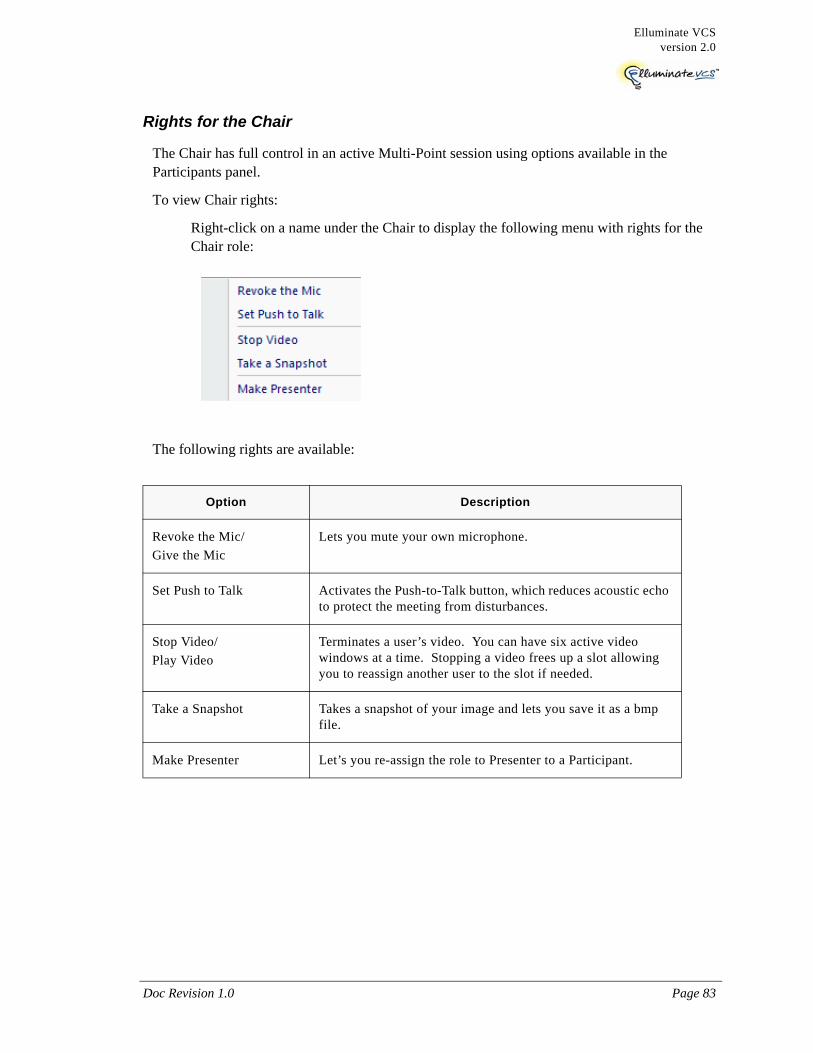
Elluminate VCSversion 2.0
Doc Revision 1.0 Page 83
Rights for the Chair
The Chair has full control in an active Multi-Point session using options available in the Participants panel.
To view Chair rights:
Right-click on a name under the Chair to display the following menu with rights for the Chair role:
The following rights are available:
Option Description
Revoke the Mic/Give the Mic
Lets you mute your own microphone.
Set Push to Talk Activates the Push-to-Talk button, which reduces acoustic echo to protect the meeting from disturbances.
Stop Video/Play Video
Terminates a user’s video. You can have six active video windows at a time. Stopping a video frees up a slot allowing you to reassign another user to the slot if needed.
Take a Snapshot Takes a snapshot of your image and lets you save it as a bmp file.
Make Presenter Let’s you re-assign the role to Presenter to a Participant.

Page 84 04 September 2009
Chapter 5: Multi-Point Sessions with the Elluminate VCS Client
Rights the Chair Has for a Presenter
For a Presenter, the Chair can revoke the mic, set push to talk, adjust audio level, stop video image transmission, take a snapshot of the Presenter, make the Presenter the Chair or a Participant, enter private chart, transmit one or more files, or remove from the session.
To view these rights:
Right-click on a name under the Presenter to display the following menu.
The rights are detailed as follows:
Option Description
Revoke the Mic/Give the Mic
Mutes and un-mutes the microphone of the Presenter during an active Multi-Point session.
Set Push to Talk Activates Push-to-Talk, which reduces acoustic echo to protect the session from audio disturbances.
Audio Level Adjusts the audio level of the Presenter’s microphone.
Stop Video/Play Video
Terminates a user’s video. You can have six active video windows at a time. Stopping a video frees up a slot allowing you to reassign another user to the slot if needed.
Take a Snapshot Takes a snapshot of the Presenter’s image and lets you save it as a bmp file.

Elluminate VCSversion 2.0
Doc Revision 1.0 Page 85
Rights the Chair Has for a Participant
For a Participant, the Chair can revoke the microphone, set push to talk, adjust audio level, stop video image transmission, take a snapshot of the Participant, make the Participant the Chair or a Presenter, enter private chat, transmit one or more files, or remove a Participant from an active session.
To view these rights
Right-click on a name under Participant to display the following menu:
Make Chair Changes the Presenter to the Chair role.
Make Presenter Restores the Presenter role if changed to Chair or Participant.
Make Participant Changes the Presenter to the Participant role.
Private Chat Starts a private chat session with the Presenter.
Send File Transmits one or more files to the Presenter.
Remove Terminates the Presenter from the active session.
Option Description

Page 86 04 September 2009
Chapter 5: Multi-Point Sessions with the Elluminate VCS Client
The following rights are available:
Option Description
Revoke the Mic/Give the Mic
Lets mute and un-mute a Participant’s microphone.
Set Push to Talk Activates Push-to-Talk, which reduces acoustic echo to protect the session from audio disturbances.
Audio Level Lets you adjust the Participant’s microphone audio level.
Stop Video/Play Video
Terminates a user’s video. You can have six active video windows at a time. Stopping a video frees up a slot allowing you to reassign another user to the slot if needed.
Take a Snapshot Let’s you take a snapshot of your image, a Presenter ‘s image, or a Participant’s image and save it as a bmp file.
Make Chair Lets you grant the Chair role to a Participant.
Make Presenter Lets you grant the Presenter right to a Participant.
Private Chat Start a private chat session with a Participant.
Send File Lets you send a file to a Participant.
Remove Lets you terminate a Participant from an active session.

Elluminate VCSversion 2.0
Doc Revision 1.0 Page 87
Rights a Presenter Has for a Chair and Participant
For a Chair and a Participant, a Presenter can take a snapshot of the Chair or Participant, start a private chat, and transmit files.
The following rights are available:
Hand Raising During a Session by a Presenter
A Presenter can make a comment or ask a question during an active session also known as a “hand raise.” The Chair has the authority to accept or deny the request.
To initiate a hand raise during a session:
1. Click Ask... from the drop-down list in the Participants panel.
The Hand Raise message box appears.
2. Enter your comment or question and click OK.
Option Description
Take a Snapshot Lets you take a snapshot of the Presenter, Chair, or Participant.
Private Chat Lets a Presenter start a private chat with a Chair or Participant.
Send File Lets you send a file to a Chair or Participant.

Page 88 04 September 2009
Chapter 5: Multi-Point Sessions with the Elluminate VCS Client
A message appears by your name with your comment or question in the Chair’s Participants panel and waits for acceptance or denial. For example:
Additionally, an icon containing the request appears by the name of the Presenter in the Participants panel for other users in the session to view by clicking on the icon.
If the Chair accepts or denies your request, you a prompted with a confirmation that your request was granted or denied. For example:
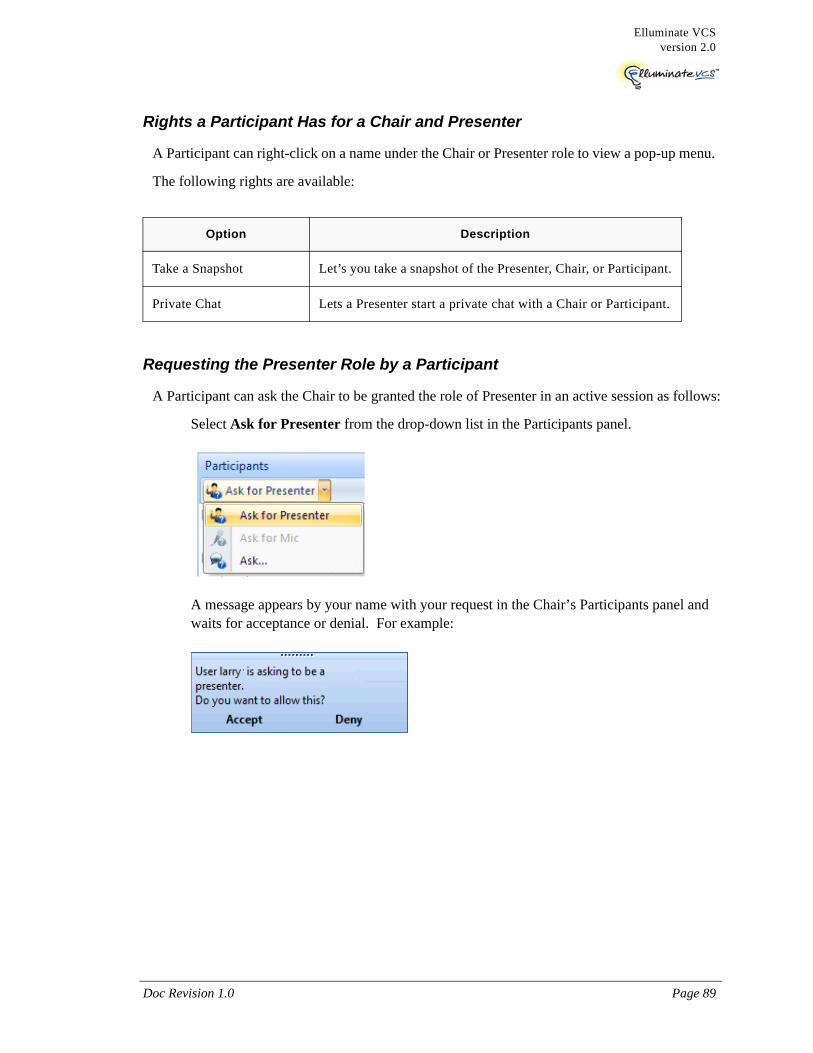
Elluminate VCSversion 2.0
Doc Revision 1.0 Page 89
Rights a Participant Has for a Chair and Presenter
A Participant can right-click on a name under the Chair or Presenter role to view a pop-up menu.
The following rights are available:
Requesting the Presenter Role by a Participant
A Participant can ask the Chair to be granted the role of Presenter in an active session as follows:
Select Ask for Presenter from the drop-down list in the Participants panel.
A message appears by your name with your request in the Chair’s Participants panel and waits for acceptance or denial. For example:
Option Description
Take a Snapshot Let’s you take a snapshot of the Presenter, Chair, or Participant.
Private Chat Lets a Presenter start a private chat with a Chair or Participant.
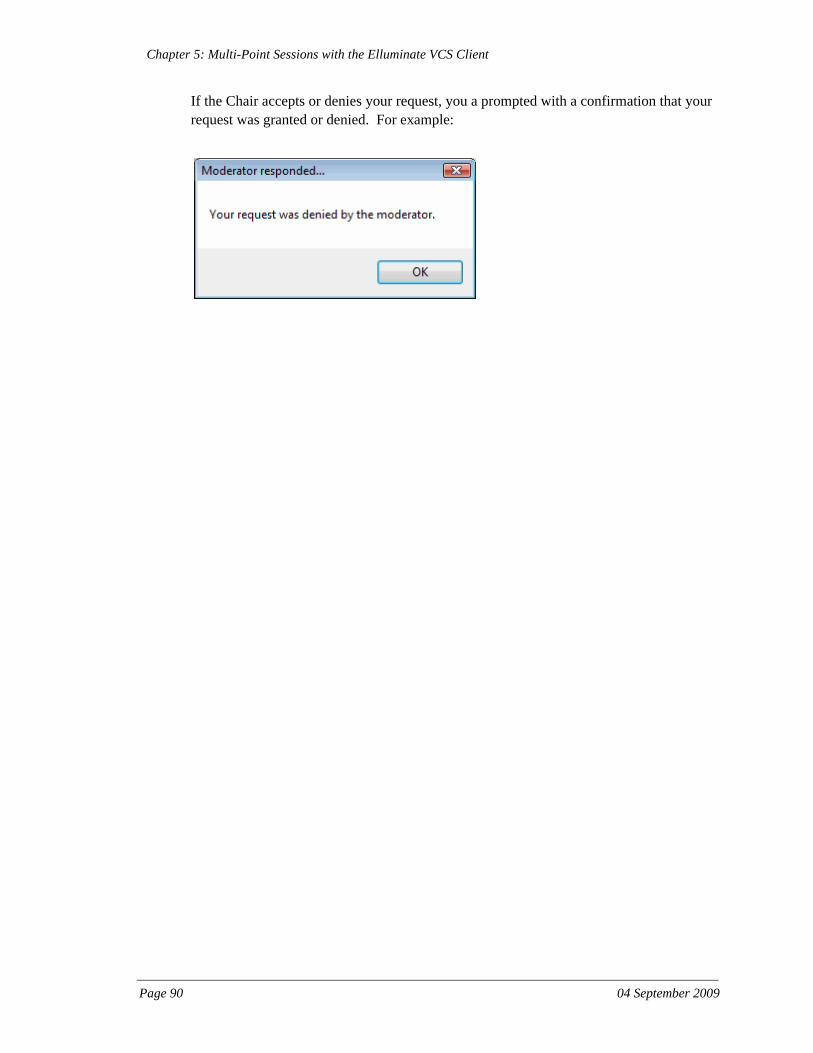
Page 90 04 September 2009
Chapter 5: Multi-Point Sessions with the Elluminate VCS Client
If the Chair accepts or denies your request, you a prompted with a confirmation that your request was granted or denied. For example:

Elluminate VCSversion 2.0
Doc Revision 1.0 Page 91
Hand Raising During a Session by a Participant
A Participant can make a comment or ask a question during an active session also known as a “hand raise.” The Chair has the authority to accept or deny the request.
See “Hand Raising During a Session by a Presenter” on page 87 as the steps are the same.
Accepting an Incoming Call into a Multi-Point Session
When you are in an active session, you can accept an incoming call and have the caller join the active session.
To accept an incoming call into an active session:
1. When you receive the call, the Incoming Call dialog box appears.
2. Select the Invite the new user to the current call option.
3. Click Accept.
A session window refreshes and re-opens with the caller added to your active session.
Accepting an Incoming Telephone Call into an Multi-Point Session
When configured by your IT administrator, Elluminate VCS provides a way for one or more Participants to call into an active Multi-Point session using a standard telephone.
To have a Participant call into an active Multi-Point session:
1. Start an ad-hoc Multi-Point session with three or more users.
2. Click the My VCS button in the Presence window to open the Web Portal Interface.
3. Click My Sessions and make note of the Session ID number to give to the telephone participant.

Page 92 04 September 2009
Chapter 5: Multi-Point Sessions with the Elluminate VCS Client
4. The telephone user dials the number provided by the IT administrator. Once connected, the telephone user must enter the numeric session ID followed by a # sign. For example, 8267#.
Note: In some case, this extension number might be assigned by the IT administrator via the Elluminate VCS Server.
5. The Chair is prompted to Accept or Deny the call. Once accepted, the telephone user joins the session and the incoming phone number appears in the Participants panel. The video window displays a telephone icon (instead of a video image) with the phone number of the telephone user displayed at the bottom of the video window.
The telephone caller can hang up when necessary to leave the session.
For example::

Elluminate VCSversion 2.0
Doc Revision 1.0 Page 93
Inviting Another Participant into a Multi-Point Session
In a Multi-Point session, only the Chair can invite another participant into the session as follows:
1. Click the Invite button in the General tab in the session window. The Invite to Session... dialog box appears. For example:
2. Enter the contact name or user ID that you want to call into the Instant Search box. The name you type is auto-completed. The more letters you type, the better the matches.
3. Select a contact name and click the Invite button.
You can also:
a. Click the Call icon during an active session.
- or -
b. Right-click on the contact name and select Invite Contact to Running Meeting from the pop-up menu.
The New Call dialog box appears. For example:

Page 94 04 September 2009
Chapter 5: Multi-Point Sessions with the Elluminate VCS Client
4. Click the Call button.
When your invitation is accepted, the session window refreshes and re-opens with the caller added to the active session.
The Meeting Information box appears.
Elluminate VCSversion 2.0
Doc Revision 1.0 Page 95
Ending an Active Session in a Multi-Point Call
You or a Participant can end an active Multi-Point session at any time. The session stays open until the last Participant exits the Elluminate VCS Client. However, this can be customized. See “Configuring and Scheduling a Session” on page 132 for details.
To end an active Multi-Point session:
Click the End Session button in the General tab of the Session window.
The Session window automatically closes and the call is terminated.

Page 96 04 September 2009
Chapter 5: Multi-Point Sessions with the Elluminate VCS Client
Configuring Video Functions in a Multi-Point SessionThe following functions are available from the Video & Layout tab during an active Mutli-Point session.
Muting Your Video Image
You can mute your video image at any time during an active session.
To mute your video image:
1. Click the Mute/Unmute Video button in the Video & Layout tab to turn your video (sent to a remote caller) off.
A camera icon replaces your video image. Your video image remains muted until you click on the button again to disable video mute.
Configuring Camera Settings
You can configure your camera setting at any time during an active session.
To configure camera settings:
Click the Settings button in the Video & Layout tab. The Camera Settings window appears.
See “Selecting a Camera” on page 7 for details on using the options in this window.

Elluminate VCSversion 2.0
Doc Revision 1.0 Page 97
Changing the Video Layout in the Session Window
You can relocate and resize video images in the session window by clicking on the respective button in the Video & Layout tab. These buttons are detailed in the following table.
Button Name Description
Single Video
Dual Video (vertical)
Dual Video (horizontal)
Click this button to display your caller’s video image only (in a single window).
Click the button to display your video image and your caller’s video image in a vertical layout (by default, your caller’s image appears on top).
Click this button to display your video image and your caller’s video image in a horizontal layout.
Switch Video
Picture-in-Picture
Normal
Large
Full screen
Click this button to swap the positions of your video image and your caller’s video image.
Lets you display your video in picture-in-picture mode. In this mode, your local video is shown in a smaller size within your caller's video window.
Click this button to configure your video image to the default normal window view.
Click this button to enlarge your video image and your caller’s video image.
Note: In a Multi-Point session, large pictures are only displayed if there is enough space on your screen to arrange them without overlapping.
Click this button to configure your video image and your caller’s video image to a full screen video image. Press the Esc key to exit out of full screen view.
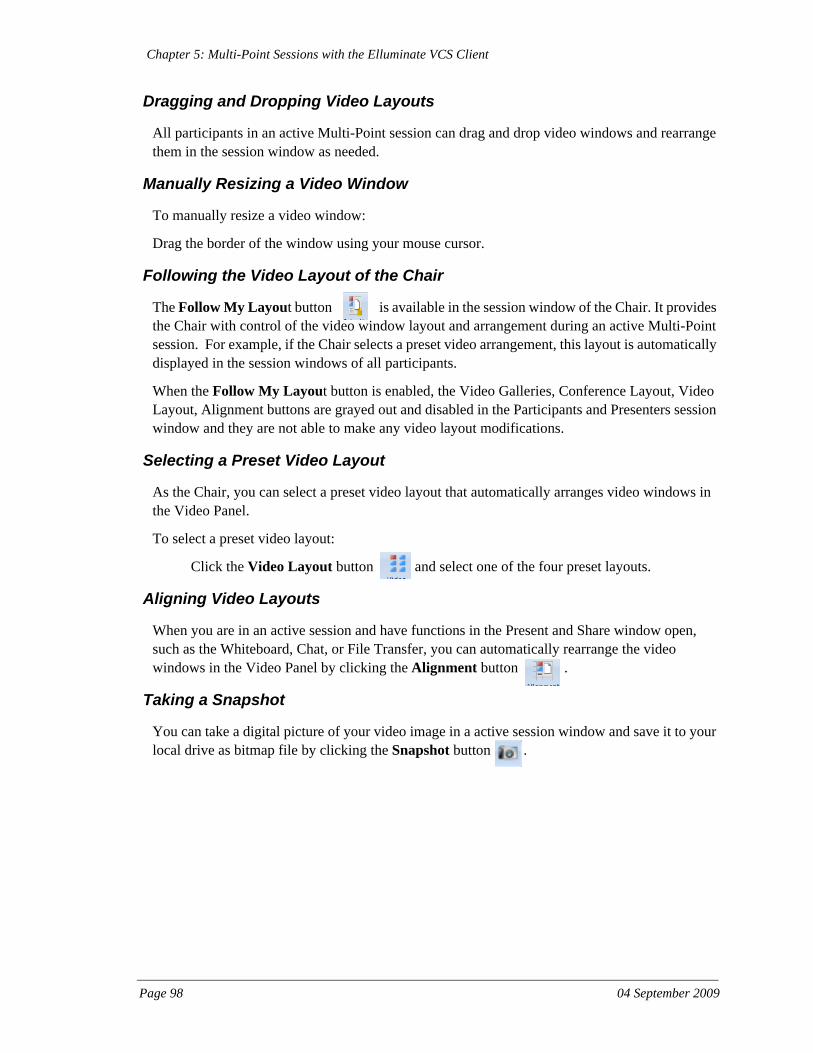
Page 98 04 September 2009
Chapter 5: Multi-Point Sessions with the Elluminate VCS Client
Dragging and Dropping Video Layouts
All participants in an active Multi-Point session can drag and drop video windows and rearrange them in the session window as needed.
Manually Resizing a Video Window
To manually resize a video window:
Drag the border of the window using your mouse cursor.
Following the Video Layout of the Chair
The Follow My Layout button is available in the session window of the Chair. It provides the Chair with control of the video window layout and arrangement during an active Multi-Point session. For example, if the Chair selects a preset video arrangement, this layout is automatically displayed in the session windows of all participants.
When the Follow My Layout button is enabled, the Video Galleries, Conference Layout, Video Layout, Alignment buttons are grayed out and disabled in the Participants and Presenters session window and they are not able to make any video layout modifications.
Selecting a Preset Video Layout
As the Chair, you can select a preset video layout that automatically arranges video windows in the Video Panel.
To select a preset video layout:
Click the Video Layout button and select one of the four preset layouts.
Aligning Video Layouts
When you are in an active session and have functions in the Present and Share window open, such as the Whiteboard, Chat, or File Transfer, you can automatically rearrange the video windows in the Video Panel by clicking the Alignment button .
Taking a Snapshot
You can take a digital picture of your video image in a active session window and save it to your local drive as bitmap file by clicking the Snapshot button .
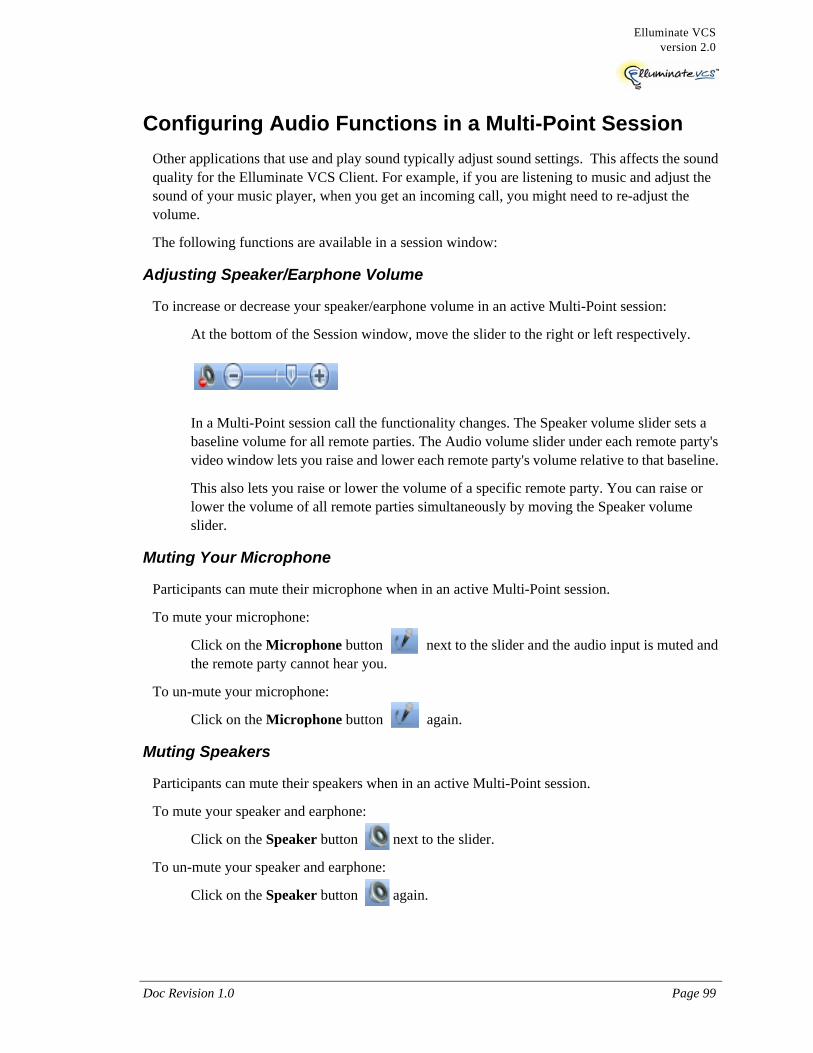
Elluminate VCSversion 2.0
Doc Revision 1.0 Page 99
Configuring Audio Functions in a Multi-Point SessionOther applications that use and play sound typically adjust sound settings. This affects the sound quality for the Elluminate VCS Client. For example, if you are listening to music and adjust the sound of your music player, when you get an incoming call, you might need to re-adjust the volume.
The following functions are available in a session window:
Adjusting Speaker/Earphone Volume
To increase or decrease your speaker/earphone volume in an active Multi-Point session:
At the bottom of the Session window, move the slider to the right or left respectively.
In a Multi-Point session call the functionality changes. The Speaker volume slider sets a baseline volume for all remote parties. The Audio volume slider under each remote party's video window lets you raise and lower each remote party's volume relative to that baseline.
This also lets you raise or lower the volume of a specific remote party. You can raise or lower the volume of all remote parties simultaneously by moving the Speaker volume slider.
Muting Your Microphone
Participants can mute their microphone when in an active Multi-Point session.
To mute your microphone:
Click on the Microphone button next to the slider and the audio input is muted and the remote party cannot hear you.
To un-mute your microphone:
Click on the Microphone button again.
Muting Speakers
Participants can mute their speakers when in an active Multi-Point session.
To mute your speaker and earphone:
Click on the Speaker button next to the slider.
To un-mute your speaker and earphone:
Click on the Speaker button again.

Page 100 04 September 2009
Chapter 5: Multi-Point Sessions with the Elluminate VCS Client

Doc Revision 1.0 Page 101
Elluminate VCSversion 2.0
Chapter 6: Data Collaboration UsingPresent & Share
OverviewThis chapter explains sharing and data collaboration functions available during Point-to-Point and Multi-Point session using Elluminate VCS. The following functions are available in the Present & Share window:
Document Sharing — share documents, presentations, and pictures with other participants in an active session. Browse the documents and make annotations collectively.
Application Sharing — work together on applications with other participants in an active session.
Desktop Sharing — share your desktop with others or hand over control of it to other participants in an active session.
Whiteboard — work on outlines and concepts together in an active session.
Chat — talk electronically with any participant in an active session.
File Transfer — send and receives files to other participants in an active session.
In this chapter“Requesting Control in an Active Session” on page 102
“Sharing Documents in a Session” on page 104
“Using the Whiteboard in a Session” on page 111
“Sharing an Application in a Session” on page 113
“Sharing Your Desktop in a Session” on page 118
“Using Text Chat in a Session” on page 120
“Using File Transfer in a Session” on page 121
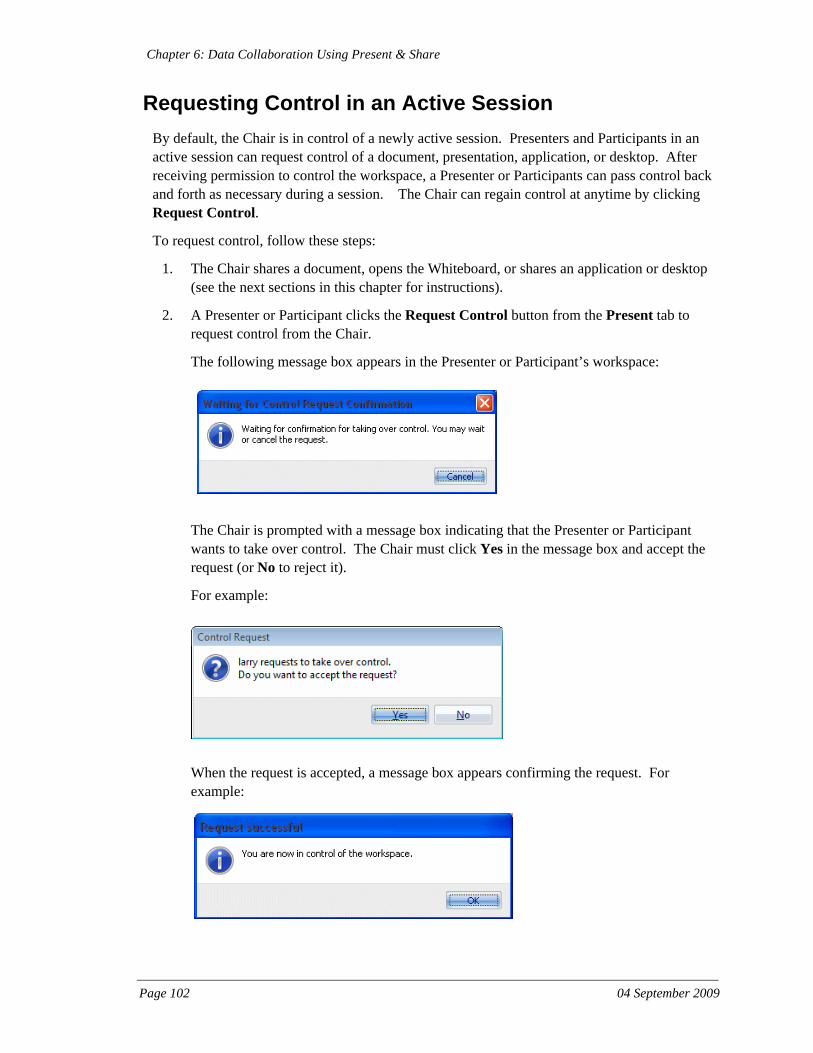
Page 102 04 September 2009
Chapter 6: Data Collaboration Using Present & Share
Requesting Control in an Active SessionBy default, the Chair is in control of a newly active session. Presenters and Participants in an active session can request control of a document, presentation, application, or desktop. After receiving permission to control the workspace, a Presenter or Participants can pass control back and forth as necessary during a session. The Chair can regain control at anytime by clicking Request Control.
To request control, follow these steps:
1. The Chair shares a document, opens the Whiteboard, or shares an application or desktop (see the next sections in this chapter for instructions).
2. A Presenter or Participant clicks the Request Control button from the Present tab to request control from the Chair.
The following message box appears in the Presenter or Participant’s workspace:
The Chair is prompted with a message box indicating that the Presenter or Participant wants to take over control. The Chair must click Yes in the message box and accept the request (or No to reject it).
For example:
When the request is accepted, a message box appears confirming the request. For example:
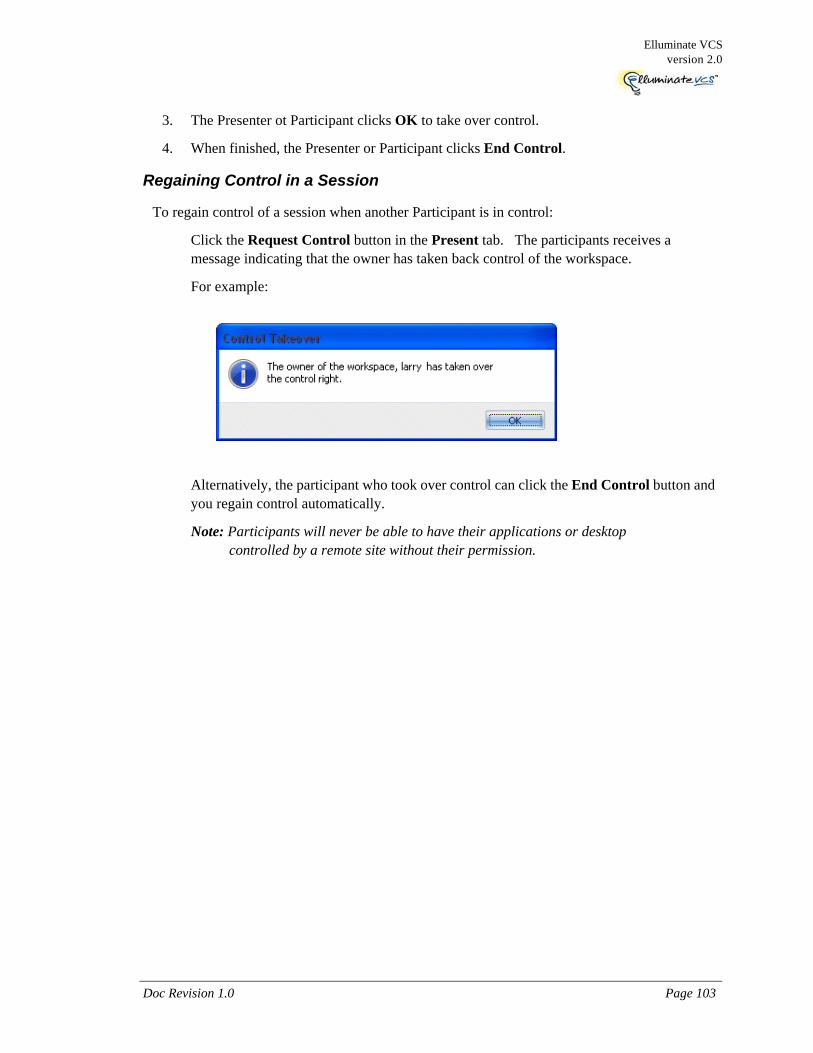
Elluminate VCSversion 2.0
Doc Revision 1.0 Page 103
3. The Presenter ot Participant clicks OK to take over control.
4. When finished, the Presenter or Participant clicks End Control.
Regaining Control in a Session
To regain control of a session when another Participant is in control:
Click the Request Control button in the Present tab. The participants receives a message indicating that the owner has taken back control of the workspace.
For example:
Alternatively, the participant who took over control can click the End Control button and you regain control automatically.
Note: Participants will never be able to have their applications or desktop controlled by a remote site without their permission.
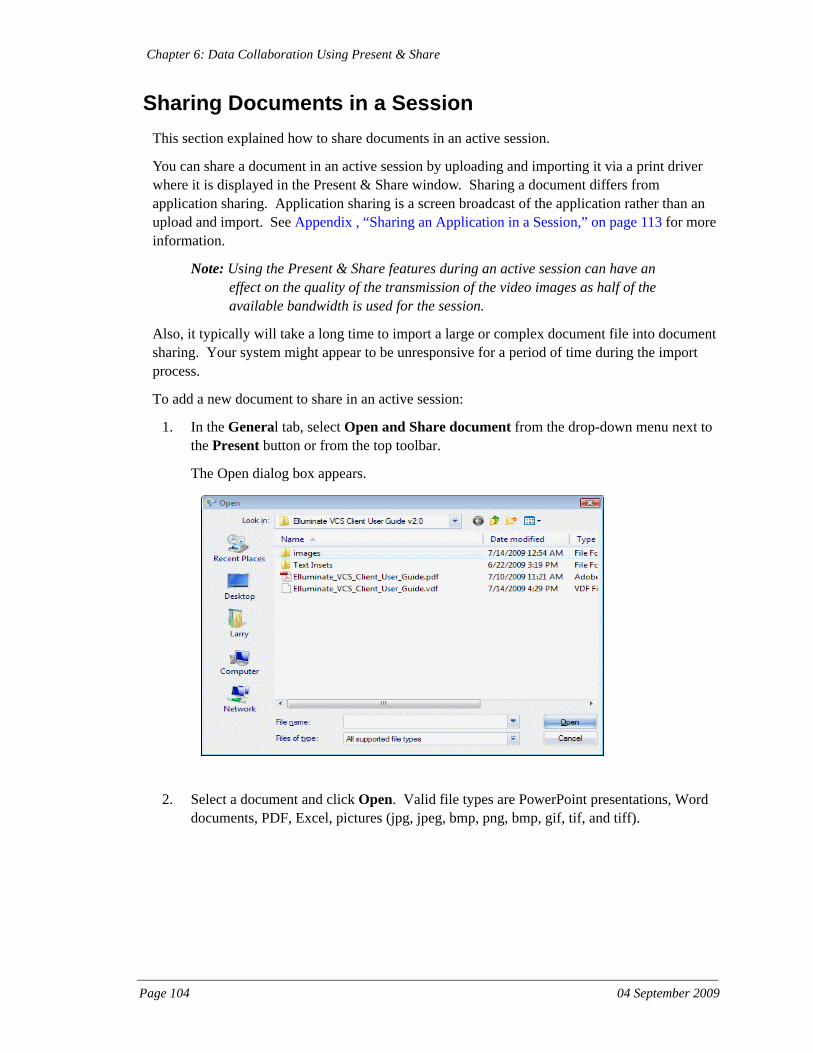
Page 104 04 September 2009
Chapter 6: Data Collaboration Using Present & Share
Sharing Documents in a SessionThis section explained how to share documents in an active session.
You can share a document in an active session by uploading and importing it via a print driver where it is displayed in the Present & Share window. Sharing a document differs from application sharing. Application sharing is a screen broadcast of the application rather than an upload and import. See Appendix , “Sharing an Application in a Session,” on page 113 for more information.
Note: Using the Present & Share features during an active session can have an effect on the quality of the transmission of the video images as half of the available bandwidth is used for the session.
Also, it typically will take a long time to import a large or complex document file into document sharing. Your system might appear to be unresponsive for a period of time during the import process.
To add a new document to share in an active session:
1. In the General tab, select Open and Share document from the drop-down menu next to the Present button or from the top toolbar.
The Open dialog box appears.
2. Select a document and click Open. Valid file types are PowerPoint presentations, Word documents, PDF, Excel, pictures (jpg, jpeg, bmp, png, bmp, gif, tif, and tiff).

Elluminate VCSversion 2.0
Doc Revision 1.0 Page 105
A message box appears depending on the type of file you choose. For example, if you choose a Word or PDF file, the Loading document pages message box appears.
This message box displays the name of the document and number of pages to process. This can take time depending on the size of the document being processed.
Once all the pages are loaded, the Import & Present window appears.
3. Click OK to import the document into the active session.
4. Choose the rights that the participants of the session can have in the document (in addition to viewing it). These options are enabled by default. If you disable one or more, these options are grayed out on the participants workspace.

Page 106 04 September 2009
Chapter 6: Data Collaboration Using Present & Share
The following rights appear in the Rights button on the ribbon bar. You can grants these rights to participants from the Rights button when working in an active workspace together.
5. Optionally, click the Rotate button if you want to change the orientation of the document.
6. Click OK in the Import & Present window. The document appears in the Present window on your system and the caller’s system.
Right Description
Print Lets the participants send the document to a printer from the Print command in the Main menu.
Save Lets the participants save a document in an intermediate format (for example, html page with the actual document embedded as picture) to their local drives.
Browse pages Lets the participants pages (Previous Page, Pages, and Next Pages functions) independently from the presenter.
Use telepointer Lets the participants access to use the telepointer function to highlight areas in a document.
Draw and annotate Lets the participants use the drawings tools annotate, and format text within the document.
Other attendees may change drawings
Lets participants make changes to drawings that others created.
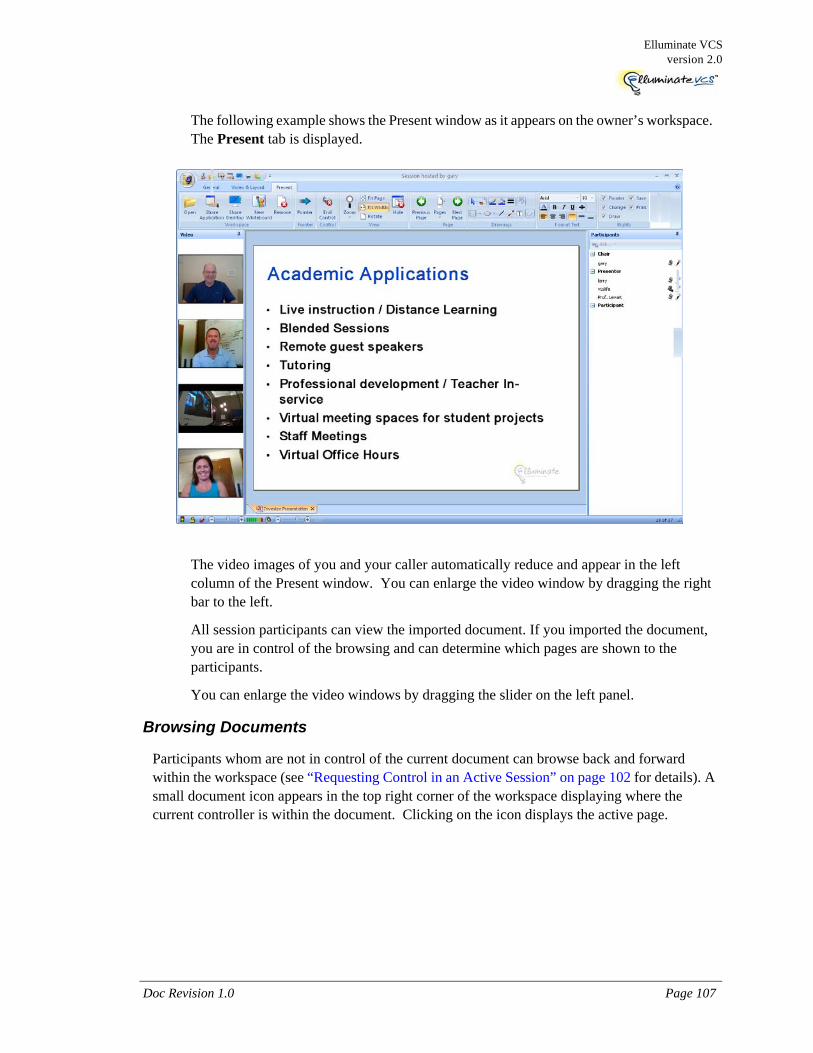
Elluminate VCSversion 2.0
Doc Revision 1.0 Page 107
The following example shows the Present window as it appears on the owner’s workspace. The Present tab is displayed.
The video images of you and your caller automatically reduce and appear in the left column of the Present window. You can enlarge the video window by dragging the right bar to the left.
All session participants can view the imported document. If you imported the document, you are in control of the browsing and can determine which pages are shown to the participants.
You can enlarge the video windows by dragging the slider on the left panel.
Browsing Documents
Participants whom are not in control of the current document can browse back and forward within the workspace (see “Requesting Control in an Active Session” on page 102 for details). A small document icon appears in the top right corner of the workspace displaying where the current controller is within the document. Clicking on the icon displays the active page.

Page 108 04 September 2009
Chapter 6: Data Collaboration Using Present & Share
Using the Functions in the Present Tab
The following functions are available in the Present tab when you are sharing a document or application in an active session:
Remove — only enabled for the Chair. Lets you remove the document from the Present workspace.
Pointer — click on this button to display a pointer that you can use to call attention to topics or other items in a document. Your user ID initials appear under the pointer for identification purposes.
Request Control — appears on the ribbon bar of the Present & Share workspace. Lets a user request control of the workspace from the user who is in control.
End Control - appears on the ribbon bar of the Present & Share workspace of the user who is in control. Ends taking control over the workspace.
Zoom — lets you adjust the viewing size the document to 25%, 50%, 75%, 100%, 150%, 200%, or 300%, Fit Page — fits the document within a page.Fit Width — fits the document in a fixed width.Rotate — lets you rotate the document top to bottom and side to side.
Hide — lets you hide the Present workspace from view on your system.
Unhide — lets you restore the Present window.
Full Screen — displays a full screen video image. Press the Esc key to exit out of full screen view.
Page — lets you scroll from page to page with the document. Click the down arrow to select a specific page number.
Drawings — provides drawing tools for you to use when sharing a document in an active session.

Elluminate VCSversion 2.0
Doc Revision 1.0 Page 109
Format Text — lets you format text when annotating a share document in an active session.
Rights — (this feature is only available in a Multi-Point session) displays rights (pointer, change, draw, save, and print) that the participants of the session can have for a presentaton (in addition to viewing it). If the Chair disables one or more rights, these options are grayed out on the Presenter or Participant’s workspace.
Rights appear in the Rights button on the ribbon bar. The Chair can grants these rights to a Presenter and/or Participant from the Rights button when working in an active workspace together.

Page 110 04 September 2009
Chapter 6: Data Collaboration Using Present & Share
Adding Another Document to a Session
You can add another document type (for example, a web page) to a session as follows:
1. Open the document in its native application (for example, a web browser).
2. Select the “VidSoft Document Sharing” printer from the Print menu.
Preparing a Document for a Session
To optimize the document import process, you can prepare it ahead of time by converting it into the intermediate format that is used by the Elluminate VCS Client to distribute the document in a session.
To prepare a session document:
1. From the Main Menu, select Actions -> Prepare a Meeting Document.
The Meeting Document Preparation window appears.
2. Follow step 1 to step 5 in “Sharing Documents in a Session” on page 104.
3. Once the document is imported., select Save the document in the .vdf format.
4. Select Save -> Presentation from the Elluminate menu.
5. Save the document in .vdf format. You are prompted that the document is being saved.
6. Click Close to exit the Meeting Document Preparation window.
7. Once you are in an active session, click Open to open the saved .vdf document.
The file is automatically distributed to all session participants.

Elluminate VCSversion 2.0
Doc Revision 1.0 Page 111
Using the Whiteboard in a SessionThe Whiteboard works similarly as sharing a document and drawing on it, only that it happens on a blank workspace. All participants can draw at the same time.
To open the Whiteboard:
1. Click the New Whiteboard button in the top toolbar of the Present and Share window.
A blank Whiteboard appears in the workspace of the Present & Share window.
2. You can enter text and drawings by clicking Drawings in the ribbon bar. You can format text by clicking Format Text in the ribbon bar.
3. If you want to hide your video images, while you share the Whiteboard. click the Hide Pin to minimize them to the side panel.
4. Optionally, click Save from the main menu to save the presentation in the Whiteboard to html or vdf format. You must the “Save” right to perform this step.
5. Optionally, click Print from the main menu to print the presentation in the Whiteboard. You must the “Print” right to perform this step.
Page 112 04 September 2009
Chapter 6: Data Collaboration Using Present & Share
Hiding the Whiteboard
Any participant can hide the Whiteboard from view.
To hide the Whiteboard:
1. Click the Hide button if you want to temporarily remove the Whiteboard from your view.
2. Click Unhide to redisplay the Whiteboard.
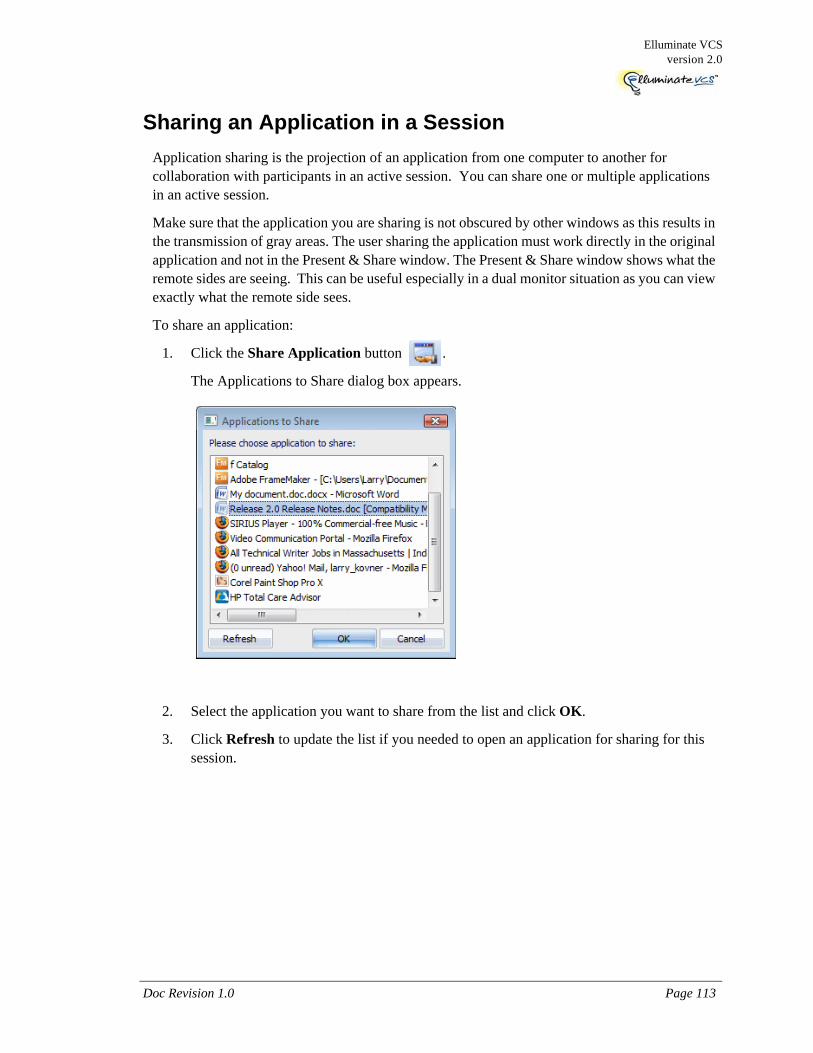
Elluminate VCSversion 2.0
Doc Revision 1.0 Page 113
Sharing an Application in a SessionApplication sharing is the projection of an application from one computer to another for collaboration with participants in an active session. You can share one or multiple applications in an active session.
Make sure that the application you are sharing is not obscured by other windows as this results in the transmission of gray areas. The user sharing the application must work directly in the original application and not in the Present & Share window. The Present & Share window shows what the remote sides are seeing. This can be useful especially in a dual monitor situation as you can view exactly what the remote side sees.
To share an application:
1. Click the Share Application button .
The Applications to Share dialog box appears.
2. Select the application you want to share from the list and click OK.
3. Click Refresh to update the list if you needed to open an application for sharing for this session.

Page 114 04 September 2009
Chapter 6: Data Collaboration Using Present & Share
The application you are sharing appears in the session window on your remote participant’s desktop. For example:
The session window on your desktop (as the user who initiated the share) appears as follows:
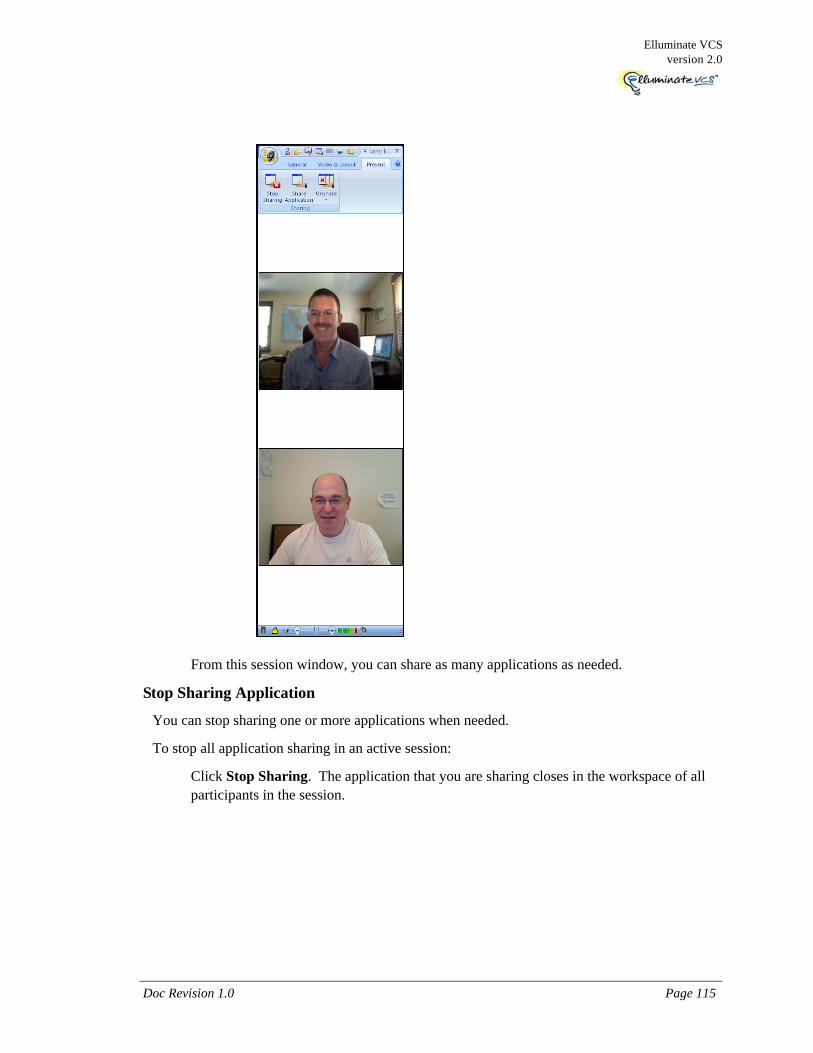
Elluminate VCSversion 2.0
Doc Revision 1.0 Page 115
From this session window, you can share as many applications as needed.
Stop Sharing Application
You can stop sharing one or more applications when needed.
To stop all application sharing in an active session:
Click Stop Sharing. The application that you are sharing closes in the workspace of all participants in the session.

Page 116 04 September 2009
Chapter 6: Data Collaboration Using Present & Share
Unsharing an Application
If you are sharing multiple applications, you can choose to unshare a specific application and keep the remaining applications in the active shared session.
To stop sharing a specific application:
1. Click Unshare.
2. Select a specific application from the pop-up list. For example:
The selected application is removed from sharing on your remote party’s workspace.

Elluminate VCSversion 2.0
Doc Revision 1.0 Page 117
Allowing Participants to Control Shared Applications
Participants can request control of the application as follows:
1. Click the Request Control button in the ribbon bar. The following message box appears on your system:
When the request is accepted, a message box appears confirming the request. For example:
You are blocked from accessing the application while the participant has control over the shared application
To regain control over your applications, see “Regaining Control in a Session” on page 103.
Note: Use caution when sharing applications. For example, sharing a Word document lets the remote participant have access to your system resources. The participant can attach to network drives, copy files, or to delete files on your hard disks. Therefore, you should monitor shared applications when they are controlled by a participant. To terminate remote operation immediately, press any key or press the mouse button on your system.

Page 118 04 September 2009
Chapter 6: Data Collaboration Using Present & Share
Sharing Your Desktop in a SessionYou can share your desktop with the other participants in a session.
To share your desktop:
1. Click Share Desktop button in the toolbar of the Present & Share window. The Desktop Sharing dialog box appears.
Your desktop appears in a separate workspace in the Present & Share window on the participant’s system. For example:
2. Click Stop Sharing in the Present tab to terminate the sharing of your desktop.

Elluminate VCSversion 2.0
Doc Revision 1.0 Page 119
Allowing a Participant to Control Your Shared Desktop
A participant can request control by clicking the Request Control button in the Present & Share toolbar. You are prompted to confirm the remote control. After confirmation your desktop is blocked for input.
To regain control over your desktop:
Press any key or mouse button.
Note: Use caution when sharing your desktop. The participant has full access to all functions of your computer. Always monitor your shared desktop when it is controlled by a participant. To stop a remote operation immediately, press any key or press the mouse button.

Page 120 04 September 2009
Chapter 6: Data Collaboration Using Present & Share
Using Text Chat in a SessionText chat lets you transfer text messages to the participants in an active Point-to-Point or Multi-Point session. You can format text using the formatting controls in the chat window.
If you want to send messages to contact who currently are not in a session with you use the Instant Messaging feature as detailed in Chapter 7, “Instant Messaging,” on page 123.
To send chat text during an active session:
1. Click the Chat button in the toolbar.
The Chat window opens in the session window. For example:
2. Select the participant for the Chat session from the Show listbox. Select “All” if you want all participants in an active session to receive your chat message.
3. Enter the text you want to send into the lower text box.
4. Press the Enter key or click the Send button to send the text to the select participant(s).
The Chat window opens automatically for all session participants who receive a chat message.
Sent and received messages and the participants sending them are displayed in the output field in the upper half of the dialog.
5. Click the Hide pin if you want to minimize the Chat window to the side panel.
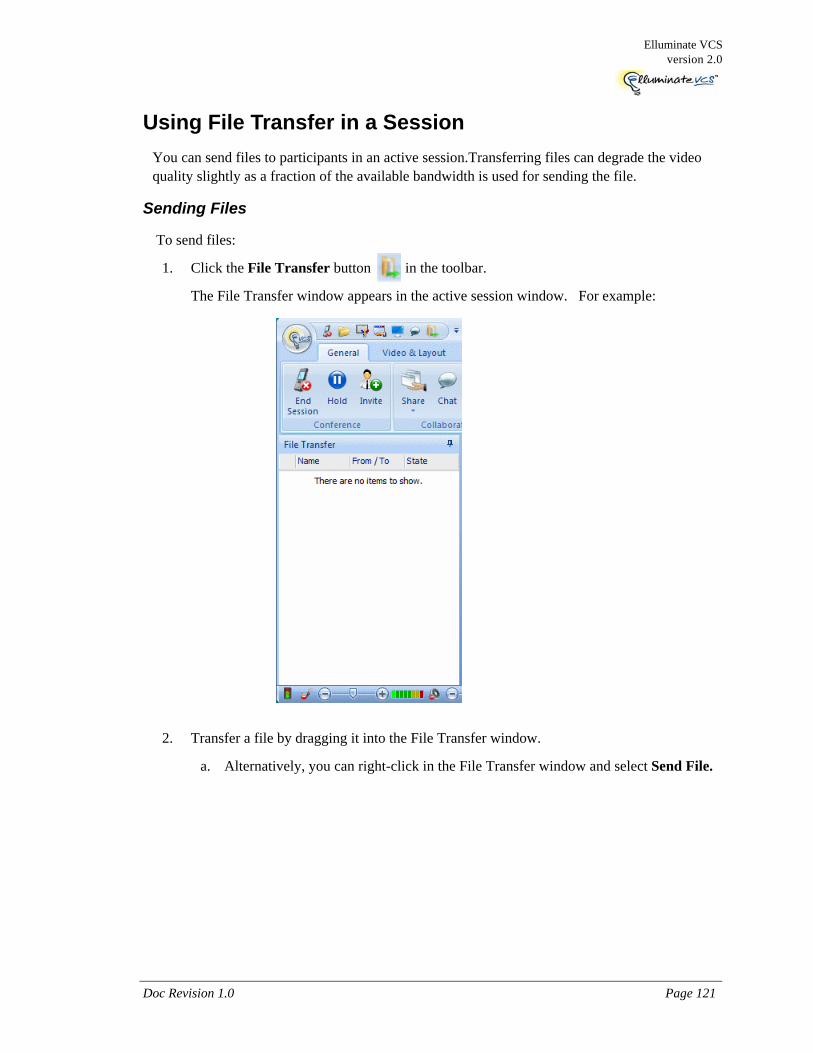
Elluminate VCSversion 2.0
Doc Revision 1.0 Page 121
Using File Transfer in a SessionYou can send files to participants in an active session.Transferring files can degrade the video quality slightly as a fraction of the available bandwidth is used for sending the file.
Sending Files
To send files:
1. Click the File Transfer button in the toolbar.
The File Transfer window appears in the active session window. For example:
2. Transfer a file by dragging it into the File Transfer window.
a. Alternatively, you can right-click in the File Transfer window and select Send File.

Page 122 04 September 2009
Chapter 6: Data Collaboration Using Present & Share
The Send File... dialog box opens..
3. Select the participant in which you want to send the file from the To: listbox. If you are in a multi-point session and want to send the file to multiple participants, select all members from the listbox.
a. If you selected all members, a confirmation dialog box appears. Click OK top proceed.
4. Optionally, you can click Search if you want to replace the file with another file.
5. Click Send to transfer the file.
When the file is successfully transferred, “completed” appears in the State column.
Receiving Transferred Files
On the receiving end, the file appears in the File Transfer window once it has been successfully received.
To access a received file:
1. Right-click within the File Transfer window.
2. Click Open to open the file.
- or -
3. Select Explore Directory to open the Explorer window with the default folder in which file was transferrred. For example:
<User>\My Documents\My Received files
Doc Revision 1.0 Page 123
Elluminate VCSversion 2.0
Chapter 7: Instant Messaging
OverviewThis chapter explains how to send instant messaging to another user in your network outside of an active session.
See “Using Text Chat in a Session” on page 120 for details on using the Chat feature inside an active session.
In this chapter“Instant Messaging” on page 124

Page 124 04 September 2009
Chapter 7: Instant Messaging
Instant MessagingInstant messaging lets you transfer text messages outside of an active session. You can text message users who are not participating in a session. If the contact is offline, the messages are delivered immediately at the next logon.
To send an instant message to a user in your contact list:
1. Right-click on the appropriate contact name.
2. Select Send / Show Instant Messages … The Instant Messaging dialog box opens.
You can also click the Instant Message icon next to the contact name to open the Instant Messaging dialog box.

Elluminate VCSversion 2.0
Doc Revision 1.0 Page 125
3. Enter the text you want to send in the Instant Messaging window. You can format the text using the formatting controls located in the toolbar.
4. Send the contents of the input field using the Send button or by pressing the Enter key.
Instant Messaging a User Not in Your Contact List
You can also use the Instant Search feature to instant message a user that is not in your contact list as follows:
1. Enter the name or user ID that you want to message in the Instant Search box in the Elluminate VCS Presence window.
The name you type is auto-completed. The more letters you type, the better the matches. For example:
2. Press the Backspace key if you need to clear the search function.
3. Click the Instant Message symbol or right-click on a contact name and select Send / Show Instant Messages... The Instant Messaging dialog box opens.

Page 126 04 September 2009
Chapter 7: Instant Messaging
Text Output
Sent and received messages are displayed in the output field located in the upper half of the window.
You can change the formatting of the message headers using from the Settings… menu from the Instant Messaging menu. See “Instant Messaging” on page 186 for details.
Saving Text Messages
You can save your text message to .txt format.
To save your text message:
1. Select Save Output from the Instant Messaging menu.
The Save As dialog box appears.
2. Choose a location to the save file and click Save.
Clearing Text Output
Text messaging is saved in the window from each online conversation you have with a contact. You can clear the text window.
To clear the text window:
Select Clear Output from the Instant Messaging menu.
The text in the window is removed.
Calling Your Instant Messaging Partner
You can make a call to your Instant Messaging partner from the Instant Messaging dialog box.
To call your Instant Messaging partner:
1. Select Call IM Partner from the Instant Messaging menu.
The New Call dialog box appears and establishes a call to your partner. Your session becomes active when your partner accepts the call.
Adding Your Instant Messaging Partner to Your Contact List
To add your instant messaging partner as a contact:
1. Select Add IM Partner to Contact List.
2. Follow the steps in “Add New Contact” on page 43.

Doc Revision 1.0 Page 127
Elluminate VCSversion 2.0
Chapter 8: Using the Web Portal Interface
OverviewThis chapter explains how to use the Elluminate VCS web portal interface to create, schedule, and manage Point-to-Point and Multi-Point sessions with the Elluminate VCS Client.
In this chapter“Viewing Sessions” on page 128
“Configuring and Scheduling a Session” on page 132
“Managing a Multi-Point Session from the Web Portal Interface” on page 141
“Viewing Users” on page 143
“Viewing User Profile Information” on page 145
“Changing Your Password” on page 146
“Exiting the Web Portal” on page 147
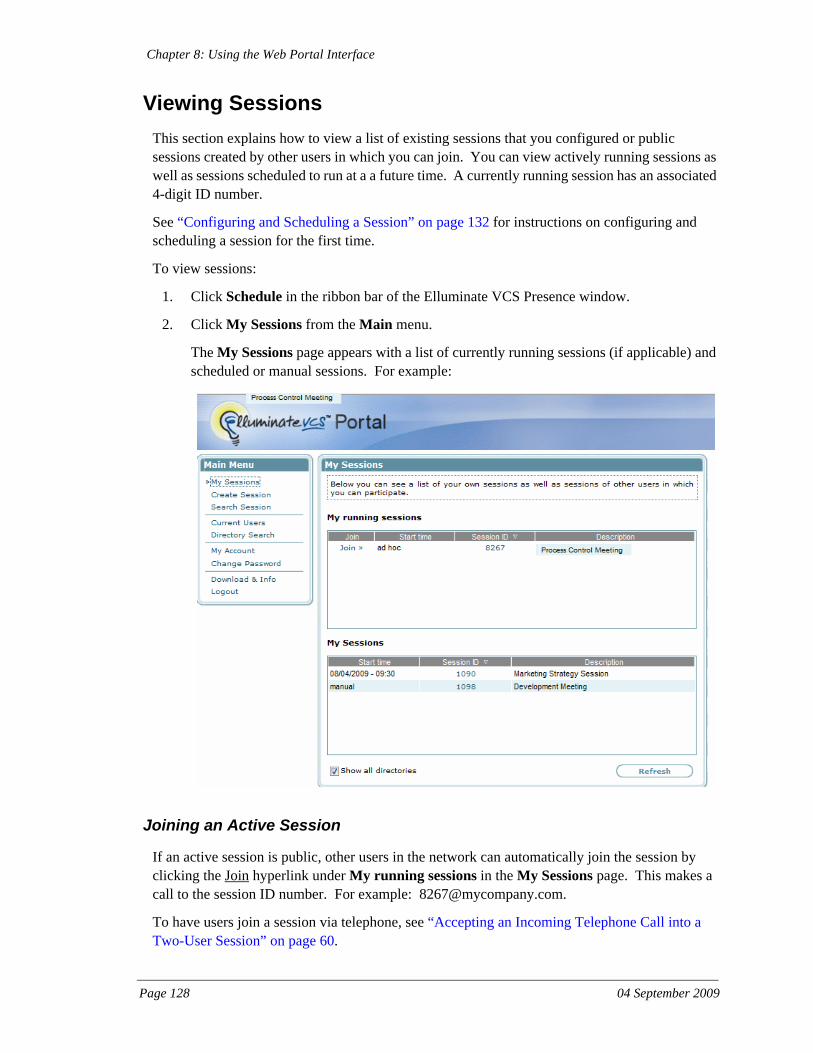
Page 128 04 September 2009
Chapter 8: Using the Web Portal Interface
Viewing SessionsThis section explains how to view a list of existing sessions that you configured or public sessions created by other users in which you can join. You can view actively running sessions as well as sessions scheduled to run at a a future time. A currently running session has an associated 4-digit ID number.
See “Configuring and Scheduling a Session” on page 132 for instructions on configuring and scheduling a session for the first time.
To view sessions:
1. Click Schedule in the ribbon bar of the Elluminate VCS Presence window.
2. Click My Sessions from the Main menu.
The My Sessions page appears with a list of currently running sessions (if applicable) and scheduled or manual sessions. For example:
Joining an Active Session
If an active session is public, other users in the network can automatically join the session by clicking the Join hyperlink under My running sessions in the My Sessions page. This makes a call to the session ID number. For example: [email protected].
To have users join a session via telephone, see “Accepting an Incoming Telephone Call into a Two-User Session” on page 60.

Elluminate VCSversion 2.0
Doc Revision 1.0 Page 129
Starting a Session Manually
You can start a session from the web portal interface manually.
To start a session manually:
1. Double-click on a manual session name from the My Sessions page. You can also manually start a scheduled session if needed.
The Edit Session page appears. For example:
2. Click the Start icon (right arrow) at the top of the window.
The users that have been included in the session are called. The session begins once users accept the calls.
Deleting a Session
To delete the session, click the trash can icon at the top of the Edit Sessions page. A message appears for you to confirm that you want to delete this session.
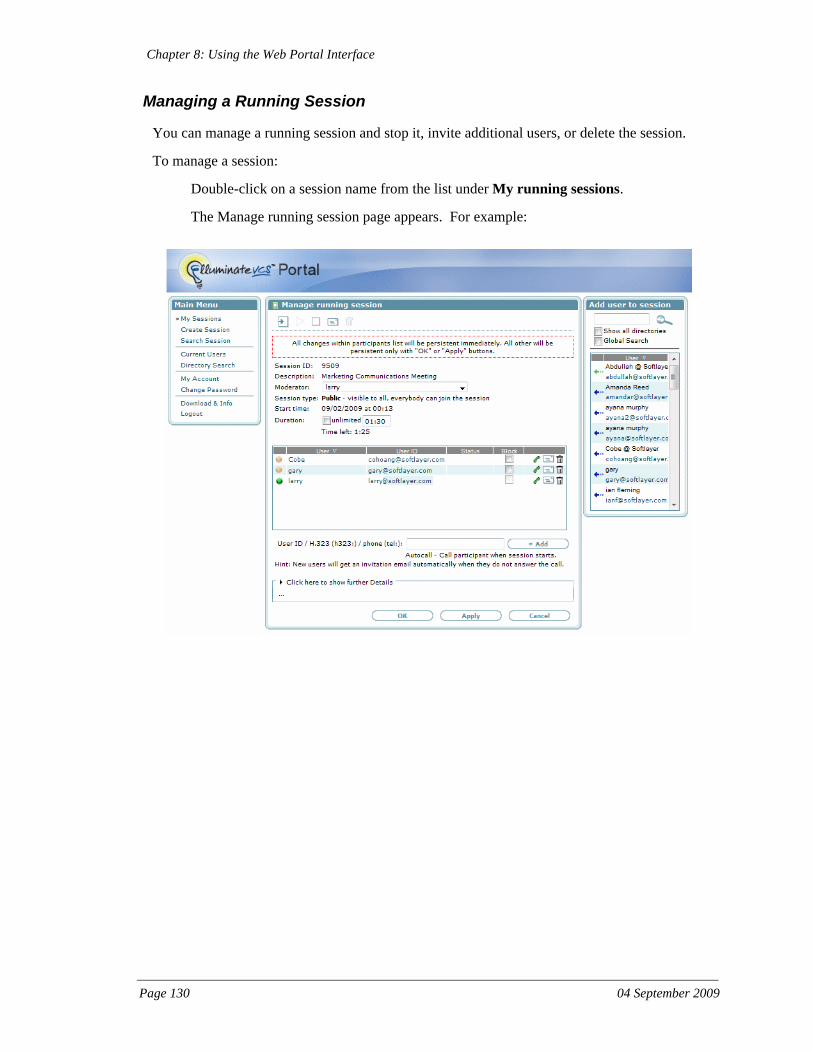
Page 130 04 September 2009
Chapter 8: Using the Web Portal Interface
Managing a Running Session
You can manage a running session and stop it, invite additional users, or delete the session.
To manage a session:
Double-click on a session name from the list under My running sessions.
The Manage running session page appears. For example:
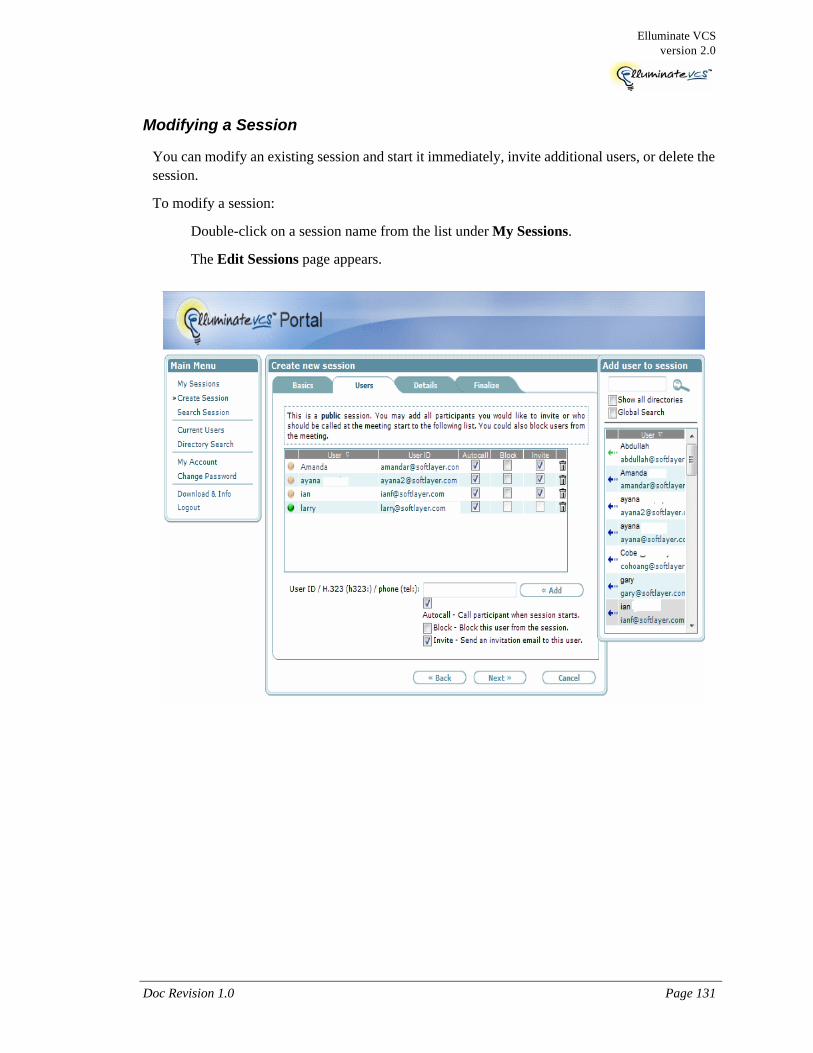
Elluminate VCSversion 2.0
Doc Revision 1.0 Page 131
Modifying a Session
You can modify an existing session and start it immediately, invite additional users, or delete the session.
To modify a session:
Double-click on a session name from the list under My Sessions.
The Edit Sessions page appears.

Page 132 04 September 2009
Chapter 8: Using the Web Portal Interface
Configuring and Scheduling a SessionYou can configure and schedule a session using the Elluminate VCS web portal interface and have it run immediately (ad hoc) or schedule it to commence at a later day and time.
To configure and schedule a session:
1. Click Schedule in the ribbon bar of the Elluminate VCS Presence window.
The Elluminate VCS portal opens in your web browser with the Basics tab displayed. For example:
In the Session ID box, a random number-based session name is automatically assigned. For example, “6367@your_company.com.”
2. Enter a description for the session in the Description box.
3. Select a session type. Your choices are:
Public — this session will be visible to all users. Any user that is configured and recognized by the Elluminate VCS Server can join the session from the web portal.
Private — this session will be visible only to invited users configured on the Elluminate VCS Server. Only invited users can join the session.
Moderated — this session will be visible to all users configured on the Elluminate VCS Server. A confirmation from the Moderator of the session is required for user beefore joining the session.
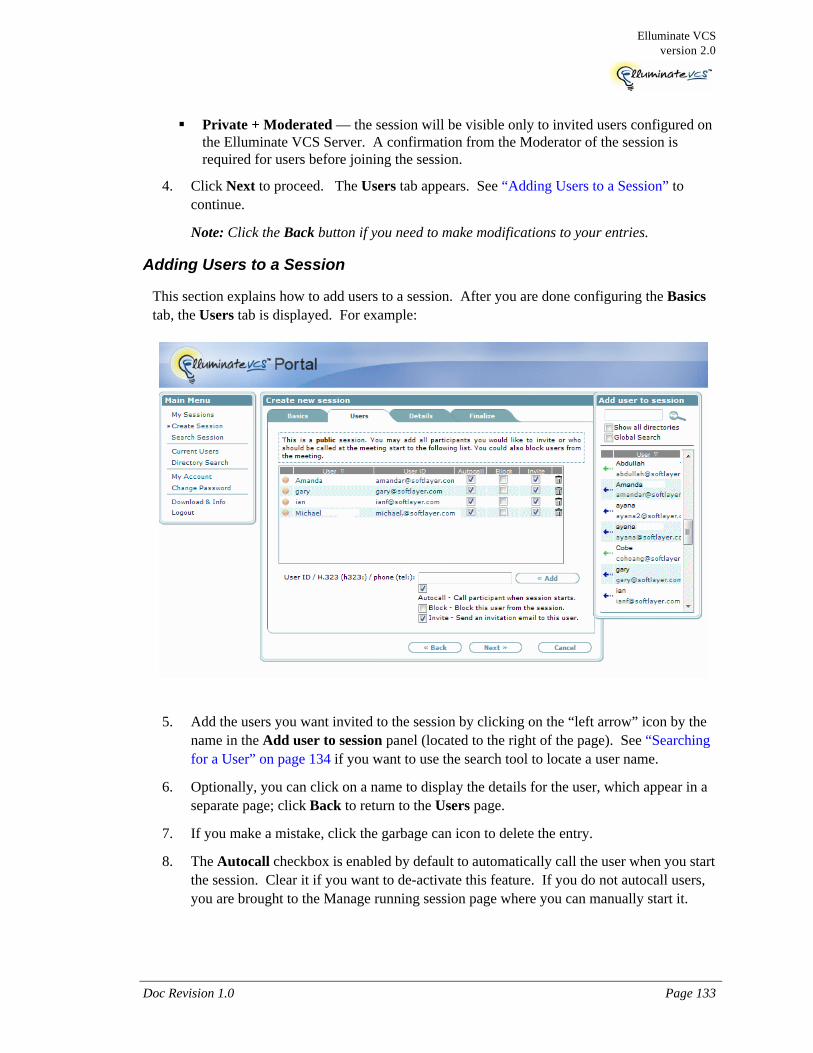
Elluminate VCSversion 2.0
Doc Revision 1.0 Page 133
Private + Moderated — the session will be visible only to invited users configured on the Elluminate VCS Server. A confirmation from the Moderator of the session is required for users before joining the session.
4. Click Next to proceed. The Users tab appears. See “Adding Users to a Session” to continue.
Note: Click the Back button if you need to make modifications to your entries.
Adding Users to a Session
This section explains how to add users to a session. After you are done configuring the Basics tab, the Users tab is displayed. For example:
5. Add the users you want invited to the session by clicking on the “left arrow” icon by the name in the Add user to session panel (located to the right of the page). See “Searching for a User” on page 134 if you want to use the search tool to locate a user name.
6. Optionally, you can click on a name to display the details for the user, which appear in a separate page; click Back to return to the Users page.
7. If you make a mistake, click the garbage can icon to delete the entry.
8. The Autocall checkbox is enabled by default to automatically call the user when you start the session. Clear it if you want to de-activate this feature. If you do not autocall users, you are brought to the Manage running session page where you can manually start it.
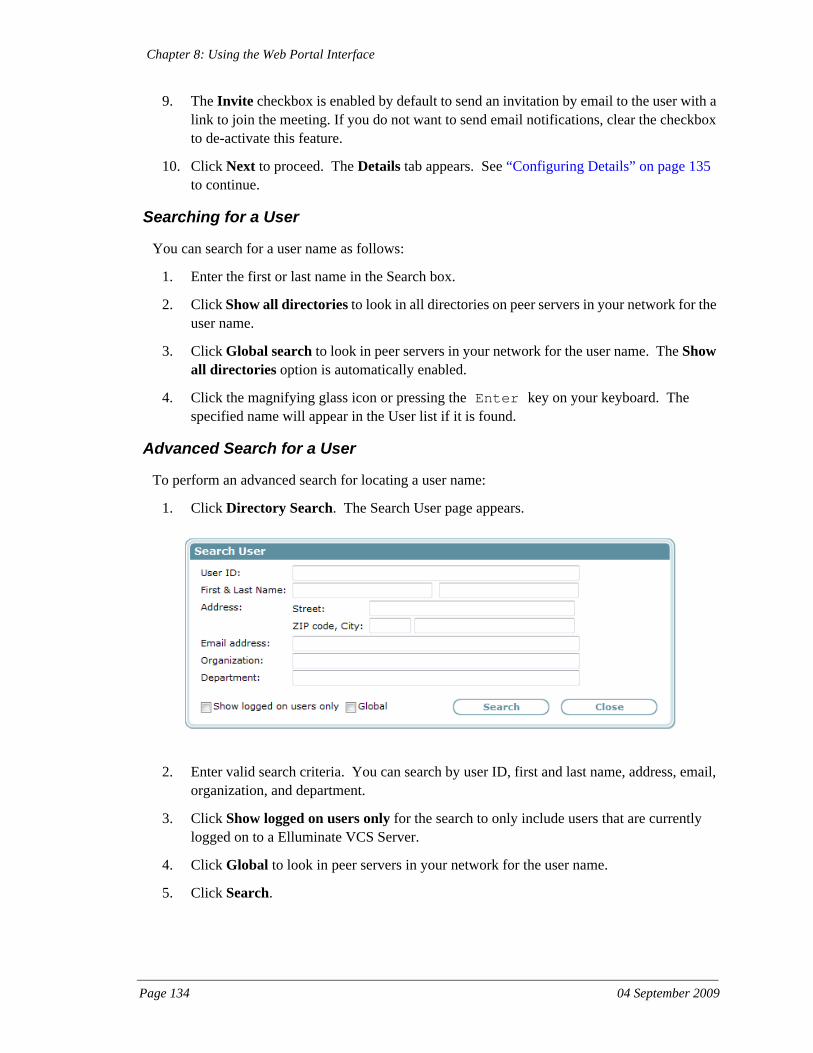
Page 134 04 September 2009
Chapter 8: Using the Web Portal Interface
9. The Invite checkbox is enabled by default to send an invitation by email to the user with a link to join the meeting. If you do not want to send email notifications, clear the checkbox to de-activate this feature.
10. Click Next to proceed. The Details tab appears. See “Configuring Details” on page 135 to continue.
Searching for a User
You can search for a user name as follows:
1. Enter the first or last name in the Search box.
2. Click Show all directories to look in all directories on peer servers in your network for the user name.
3. Click Global search to look in peer servers in your network for the user name. The Show all directories option is automatically enabled.
4. Click the magnifying glass icon or pressing the Enter key on your keyboard. The specified name will appear in the User list if it is found.
Advanced Search for a User
To perform an advanced search for locating a user name:
1. Click Directory Search. The Search User page appears.
2. Enter valid search criteria. You can search by user ID, first and last name, address, email, organization, and department.
3. Click Show logged on users only for the search to only include users that are currently logged on to a Elluminate VCS Server.
4. Click Global to look in peer servers in your network for the user name.
5. Click Search.

Elluminate VCSversion 2.0
Doc Revision 1.0 Page 135
Configuring Details
This section explains how to configure additional details for a session. After you add users, the Details tab is displayed. For example:
The following options are available in the Details tab:
Option Description
Moderator By default, the user creating the session is assigned as the Moderator. From this listbox, you can change the Moderator to be another user that you have previously added to the session. When the session starts, the Moderator is granted the Chair role and controls the session.
Start time Specify the date and time for the session to automatically start or click the manual checkbox if you want to manually start this session from the web portal page (instead of scheduling it to run at a specified time).
See “Modifying a Session” on page 131 if you decide you want to change the session from a manual start and schedule it to start automatically.
The Greenwich Mean Time value is automatically configured via your PC clock settings. For example, GMT-4.

Page 136 04 September 2009
Chapter 8: Using the Web Portal Interface
Duration You can specify a duration time for the session. The value must be in a 24-hour format (HH:MM). For example, 1:00 for 1 hour or 00:30 for 30 minutes. When the duration time is met, the session automatically closes for all users automatically.
If you chose to send an email invitation to users for the session, the duration time is indicated in the body of the email to notify the user.
If you specify a duration, you cannot end the session manually (by clicking the End Session button). You have to wait until the session expires. A two-minute warning message box appears to notify you.
If you do not want to specify a duration, you can select unlimited, which means there is no time limit to how long the sessions will run.
When will the session be terminated:
• When only one user remains in session — the session automatically terminates if only one user remains active.
• If the last user leaves — the session automatically terminates when the last user exits the session.
• Session stays open — the session must be terminated manually when finished.Note: If you set a duration time for the session to close, it overrides these options.
User session only once
Select this checkbox if you want the session to be automatically removed and no longer available once the session ends and is closed by all participants. If de-selected, the session is saved and you can re-start it again at a later time by selecting My Sessions from the Main menu.
Encrypt session Select this checkbox if all traffic that is video, audio, and data will be encrypted.
Option Description
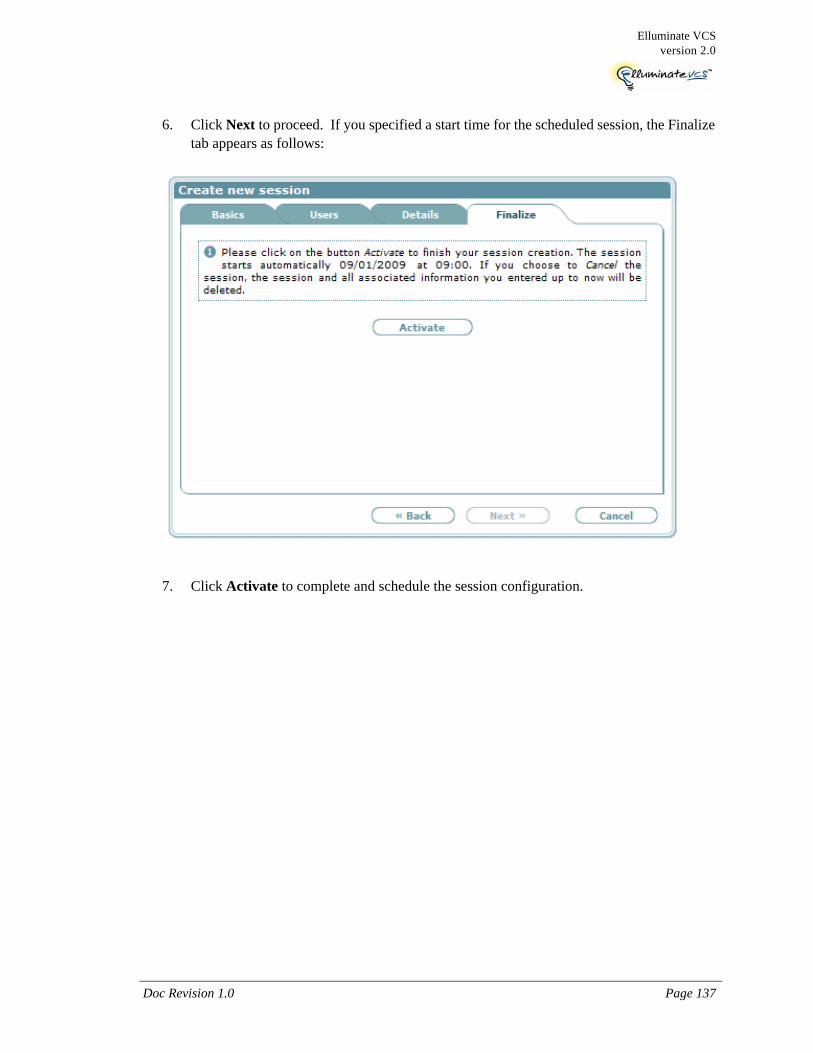
Elluminate VCSversion 2.0
Doc Revision 1.0 Page 137
6. Click Next to proceed. If you specified a start time for the scheduled session, the Finalize tab appears as follows:
7. Click Activate to complete and schedule the session configuration.

Page 138 04 September 2009
Chapter 8: Using the Web Portal Interface
If you specified a manually scheduled session. The Finalize tab is displayed as follows:
8. Click Save to save the session configuration and start it manually later.
9. Click Start to start the session immediately.
You are prompted if you want to send an email invitations for the session. See “Sending an Email Invitation” on page 139 to continue.
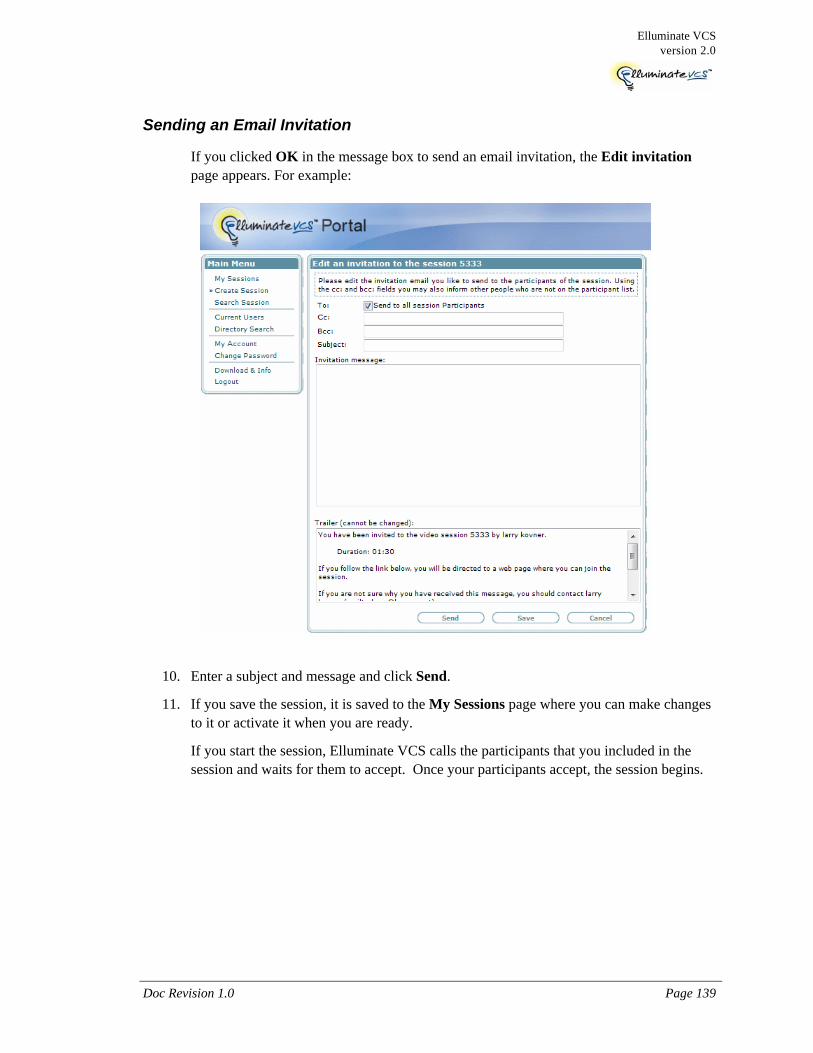
Elluminate VCSversion 2.0
Doc Revision 1.0 Page 139
Sending an Email Invitation
If you clicked OK in the message box to send an email invitation, the Edit invitation page appears. For example:
10. Enter a subject and message and click Send.
11. If you save the session, it is saved to the My Sessions page where you can make changes to it or activate it when you are ready.
If you start the session, Elluminate VCS calls the participants that you included in the session and waits for them to accept. Once your participants accept, the session begins.
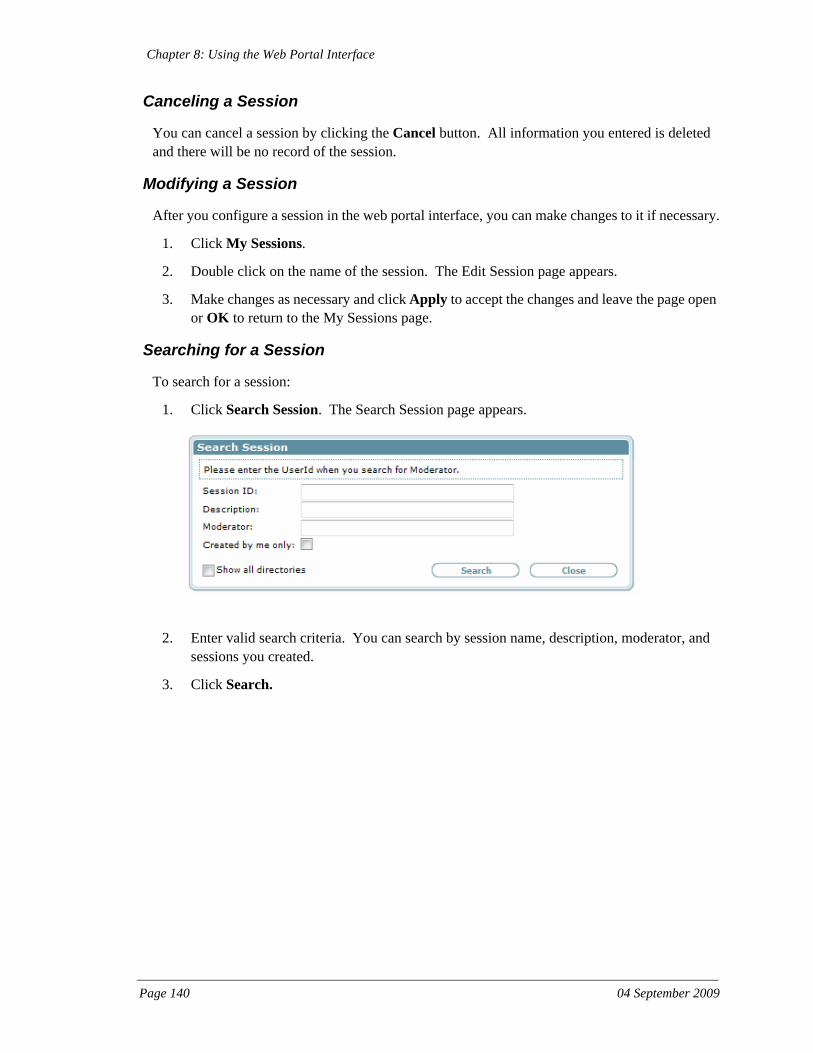
Page 140 04 September 2009
Chapter 8: Using the Web Portal Interface
Canceling a Session
You can cancel a session by clicking the Cancel button. All information you entered is deleted and there will be no record of the session.
Modifying a Session
After you configure a session in the web portal interface, you can make changes to it if necessary.
1. Click My Sessions.
2. Double click on the name of the session. The Edit Session page appears.
3. Make changes as necessary and click Apply to accept the changes and leave the page open or OK to return to the My Sessions page.
Searching for a Session
To search for a session:
1. Click Search Session. The Search Session page appears.
2. Enter valid search criteria. You can search by session name, description, moderator, and sessions you created.
3. Click Search.
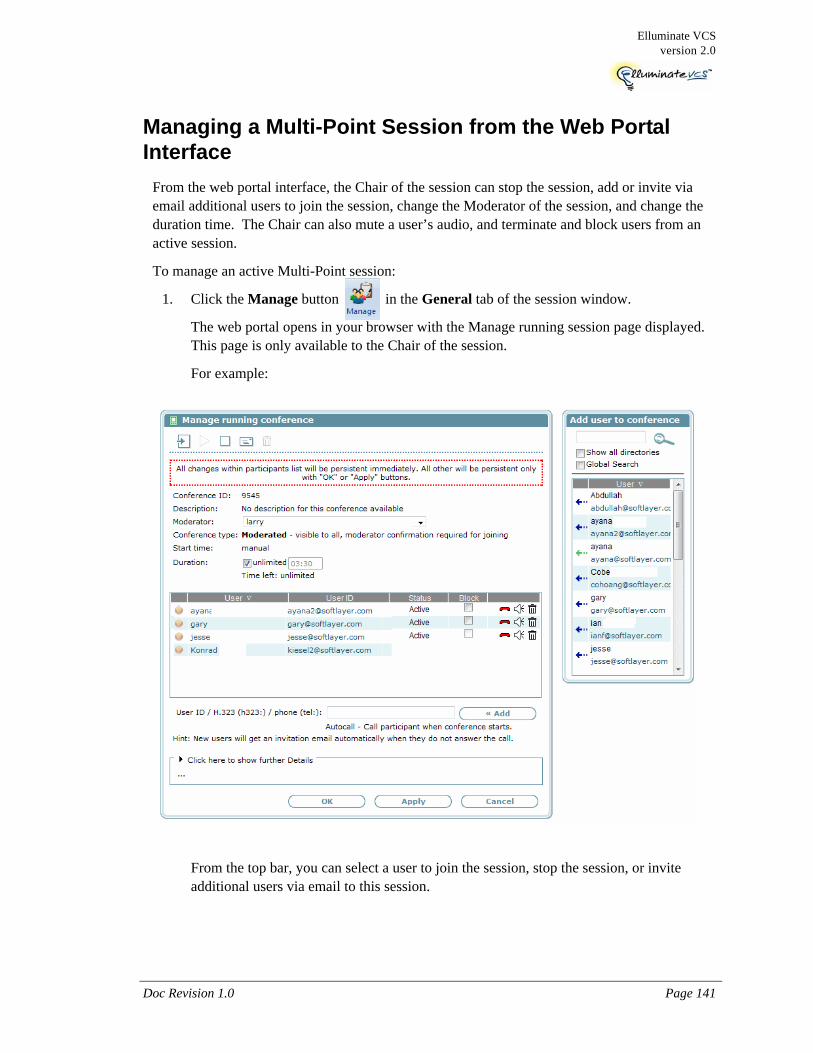
Elluminate VCSversion 2.0
Doc Revision 1.0 Page 141
Managing a Multi-Point Session from the Web Portal Interface
From the web portal interface, the Chair of the session can stop the session, add or invite via email additional users to join the session, change the Moderator of the session, and change the duration time. The Chair can also mute a user’s audio, and terminate and block users from an active session.
To manage an active Multi-Point session:
1. Click the Manage button in the General tab of the session window.
The web portal opens in your browser with the Manage running session page displayed. This page is only available to the Chair of the session.
For example:
From the top bar, you can select a user to join the session, stop the session, or invite additional users via email to this session.
Page 142 04 September 2009
Chapter 8: Using the Web Portal Interface
The session ID, Description, Moderator, Session type, Start time, and duration time appear in this page. There is also a counter (Time left) that indicates the amount of time left in the session.
Users that are currently in the session appear in a tabular list that specifies user name, user ID, status (if active in the session)
2. If you want to change the Moderator, select another user from the Moderator listbox.
3. If you want to add users to the session, click the arrow next to the user’s name in the Add user to session panel. The user is automatically called to join the running session once added.
4. If you need to remove a user, click the trash can icon and the user is removed from the running session.
5. You can hang up and redial a user by clicking on the telephone handset icon.
6. To add more details, click at the bottom of the page to display additional options.
7. Click Apply or OK to accept your selections. A confirmation appears telling you that your changes are successful.
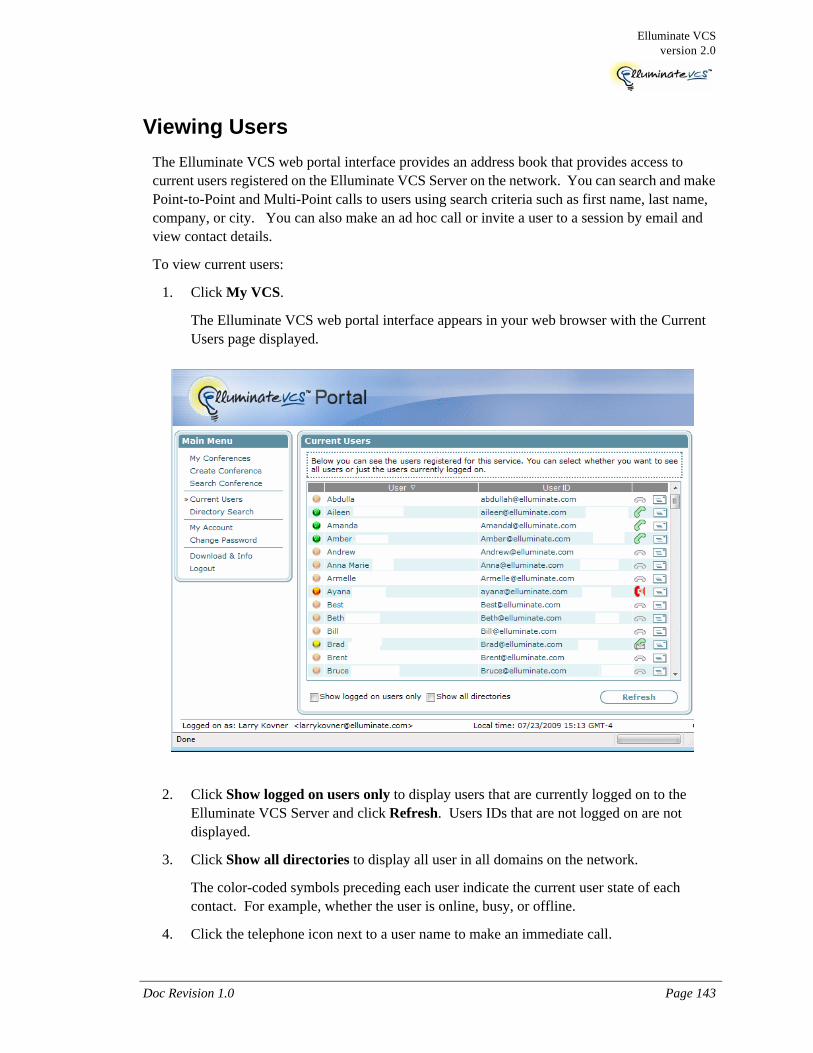
Elluminate VCSversion 2.0
Doc Revision 1.0 Page 143
Viewing UsersThe Elluminate VCS web portal interface provides an address book that provides access to current users registered on the Elluminate VCS Server on the network. You can search and make Point-to-Point and Multi-Point calls to users using search criteria such as first name, last name, company, or city. You can also make an ad hoc call or invite a user to a session by email and view contact details.
To view current users:
1. Click My VCS.
The Elluminate VCS web portal interface appears in your web browser with the Current Users page displayed.
2. Click Show logged on users only to display users that are currently logged on to the Elluminate VCS Server and click Refresh. Users IDs that are not logged on are not displayed.
3. Click Show all directories to display all user in all domains on the network.
The color-coded symbols preceding each user indicate the current user state of each contact. For example, whether the user is online, busy, or offline.
4. Click the telephone icon next to a user name to make an immediate call.

Page 144 04 September 2009
Chapter 8: Using the Web Portal Interface
5. Click on the mail icon to open the Invitation page where you can send an email inviting a user to a session. The following page appears:
6. Enter a message and click Send. If the user is online, a message box appears asking you if you want to make a call to this user now. Click OK if you want to call the user or Cancel if you do not want to call the user.
7. If you selected Cancel, a message box appears asking you for confirmation to send the email. Click OK to confirm this action. An email is sent to the user.

Elluminate VCSversion 2.0
Doc Revision 1.0 Page 145
Viewing User Details
To view details on a user:
1. Click Current Users.
2. Click on a user name. The Details page appears on the user. For example:
3. Click Back to return to the Current Users page.
This information can be updated in the My Accounts page as detailed in the next section.
Viewing User Profile InformationYou can view and update your personal contact details, which are displayed to users connected to the Elluminate VCS Server.
To view or update your account information:

Page 146 04 September 2009
Chapter 8: Using the Web Portal Interface
1. Click My Account. The Account page appears.
You can update the language, address , phone number, cell, and fax fields.
2. Click Apply to accept changes. A confirmation message appears telling you that the user profile was changed successfully.
Changing Your PasswordYou can change your user password for logging into the Elluminate VCS Server. You must be logged into the Elluminate VCS Server to change your password.
To change your user password:
1. Click Change Password. The Change Password dialog box appears.
2. Enter your old password.

Elluminate VCSversion 2.0
Doc Revision 1.0 Page 147
3. Enter your new password (minimum of five characters).
4. Enter your new password a second time for confirmation.
5. Click Apply to accept your entries. A message box appears telling you that your password change was successful.
Exiting the Web PortalTo exit the web portal interface:
Click Logout.
You are logged out of the web portal interface. You can log back in by entering your user ID and password.

Page 148 04 September 2009
Chapter 8: Using the Web Portal Interface

Doc Revision 1.0 Page 149
Elluminate VCSversion 2.0
Chapter 9: Monitoring
In this chapter“Using the Log Window” on page 150
“Using the Statistics Window” on page 150

Page 150 04 September 2009
Chapter 9: Monitoring
Using the Log WindowThe Log window and Statistics window let you monitor session activities.
To view the log:
1. Click Log from the View menu. The Log Window appears.
The Log window displays information about the activities of the current session. This includes server log on and log off, incoming or outgoing calls, and the usage of data session features. The activity log is erased on exiting the program.
Using the Statistics WindowThe Statistic window provides information about the data transmission for incoming and outgoing data streams. You can also access statistics from the bottom of an active session window.
To view the statistics window:
1. Click Network Conditions & Call Statistics from the View menu.
- or -
2. Click the Statistics button at the bottom of an active session window.

Elluminate VCSversion 2.0
Doc Revision 1.0 Page 151
The Statistic window appears:
The graphical display monitors the ratio between audio (red), video (green), and control data (yellow). Where control data can be normal signaling data, data for Forward Error Correction (FEC), or data for data conferencing.
Audio: indicates the sampling frequency (8 or 16 kHz) that is used and whether the signal received is a mono signal (M) or in case of a Multi-Point session, a stereo signal (S). The signal sent is always a mono signal.
Video: indicates the video compression standard used.
FEC (Forward Error Correction): indicates whether the automatic error correction procedures are activated. These procedures are activated upon the occurrence of transmission errors in the network.
Total [kBits/s]: displays the total of all audio, video, and control data transmitted or received in Kbps.
Packet loss [%]: indicates the relative loss of data during network transmission.
To view more in-depth information (for example, you might need this for technical support purposes):
Viewing Statistics Details
To view statistics for incoming traffic:
Click on the Details button at the top of the dialog box.
A dialog box provides detailed statistics useful for a technical support analyst. For example:
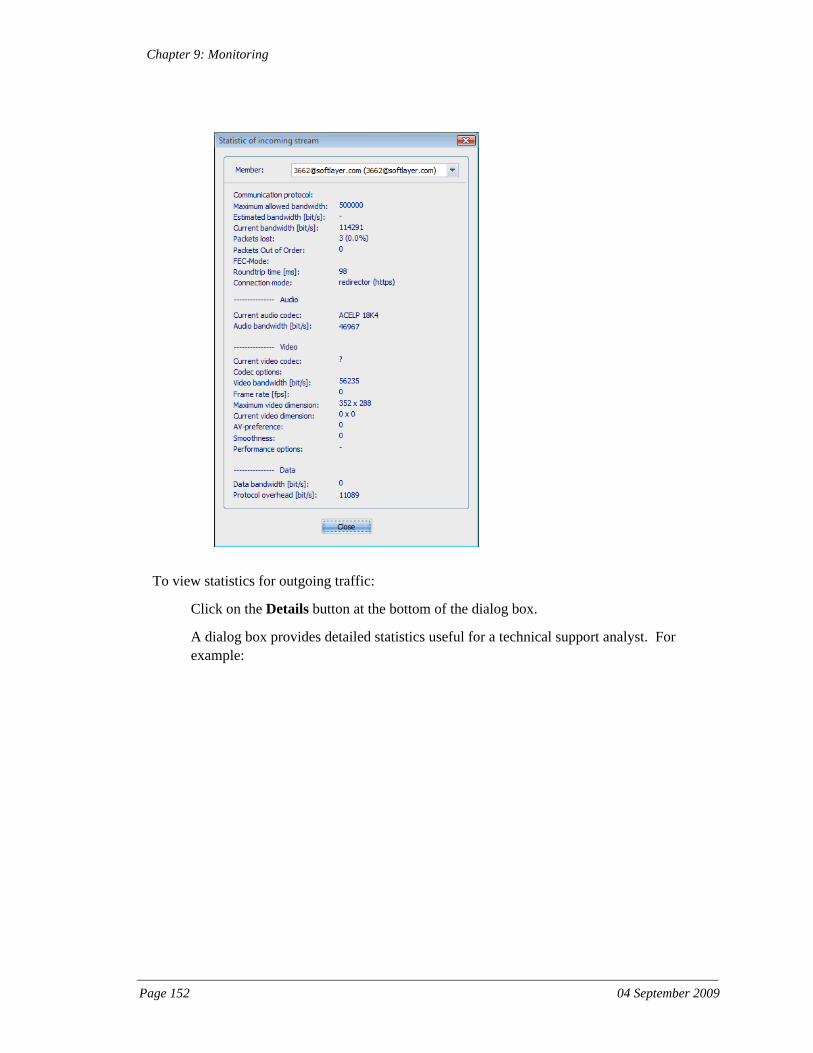
Page 152 04 September 2009
Chapter 9: Monitoring
To view statistics for outgoing traffic:
Click on the Details button at the bottom of the dialog box.
A dialog box provides detailed statistics useful for a technical support analyst. For example:

Elluminate VCSversion 2.0
Doc Revision 1.0 Page 153

Page 154 04 September 2009
Chapter 9: Monitoring

Doc Revision 1.0 Page 155
Elluminate VCSversion 2.0
Chapter 10: Layout Galleries
OverviewThis chapter provides examples of the video and collaboration tool layouts available in the Video & Layout tab during an active Point-to-Point or Multi-Point session in the Elluminate VCS Client.
In this chapter“Point-to-Point Session - Layouts” on page 156
“Multi-Point Session - Layouts” on page 161

Page 156 04 September 2009
Chapter 10: Layout Galleries
Point-to-Point Session - LayoutsClick the Layout tab in the ribbon.
Audio/Video Only - 3 layout choices
Audio/Video with Chat - 6 layout choices
Layout Selection
One video image with or without PIP
Two video images - vertical
Two video images - horizontal
Layout Selection
One video image with or without PIP, Chat left C V
Chat left, two video images horizontal C V V
One video image with or without PIP, Chat right V C
Two video images horizontal, Chat right V V C

Elluminate VCSversion 2.0
Doc Revision 1.0 Page 157
Audio/Video, Chat, File Transfer - 6 layout choices
One video image with or without PIP, Chat below VC
Two video images vertical, Chat below VVC
Layout Selection
One video image with or without PIP, Chat and File Transfer to the left
C VF
Two video images horizontal, Chat and File Transfer to the left
C V VF
One video image with or without PIP, Chat and File Transfer to the right
V C F
Two video images horizontal, Chat and File Transfer to the right
V V C F
One video image with or without PIP, Chat and File Transfer below
VCF
Layout Selection

Page 158 04 September 2009
Chapter 10: Layout Galleries
Audio/Video and Present & Share- 4 layout choices
Two video images horizontal, Chat and File Transfer below
VV CF
Layout Selection
Video left, Present & Share right V S
Share left, Video right S V
Video top, Present & Share bottom VS
Share top, Video bottom SV
Layout Selection

Elluminate VCSversion 2.0
Doc Revision 1.0 Page 159
Present & Share, Chat, and File Transfer - 10 layout choices
Chat and FT (CF) are always combined in the same panel group in the same top to bottom order.
Layout Selection
Chat and File Transfer left, Share middle, Video right C S VF
Video left, Share middle, Chat and File Transfer left V S C F
Video (remote only), Chat, and File Transfer left, Share right
VC SF
Video (remote and local), Chat, and File Transfer left, Share right
VV SCF
Share left, Video (remote only), Chat, and File Transfer right
S V C F
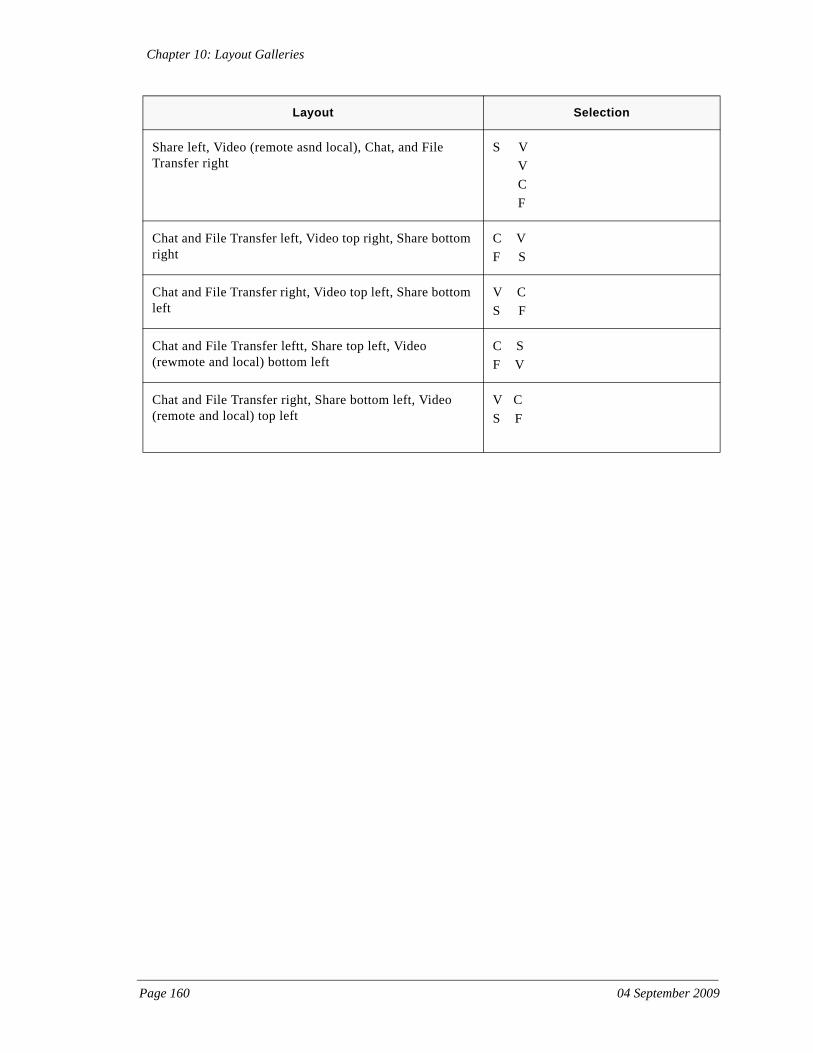
Page 160 04 September 2009
Chapter 10: Layout Galleries
Share left, Video (remote asnd local), Chat, and File Transfer right
S V V C F
Chat and File Transfer left, Video top right, Share bottom right
C VF S
Chat and File Transfer right, Video top left, Share bottom left
V CS F
Chat and File Transfer leftt, Share top left, Video (rewmote and local) bottom left
C SF V
Chat and File Transfer right, Share bottom left, Video (remote and local) top left
V CS F
Layout Selection

Elluminate VCSversion 2.0
Doc Revision 1.0 Page 161
Multi-Point Session - Layouts
Present & Share, Chat, and File Transfer - 8 layout choices
Layout Selection
Participant Panel, Chat, and File Transfer left, Share middle, Video right
P C S VF
Video left, Share middle, Participants Panel, Chat, and File Transfer left
P V S C F
Video, Participants Panel, Chat, and File Transfer left, Share right
VPC SF
Share left, Video, Participants Panel, Chat, and File Transfer right
VS P C F
Participant Panel, Chat, and File Transfer left, Share right, Video top
P VC SF
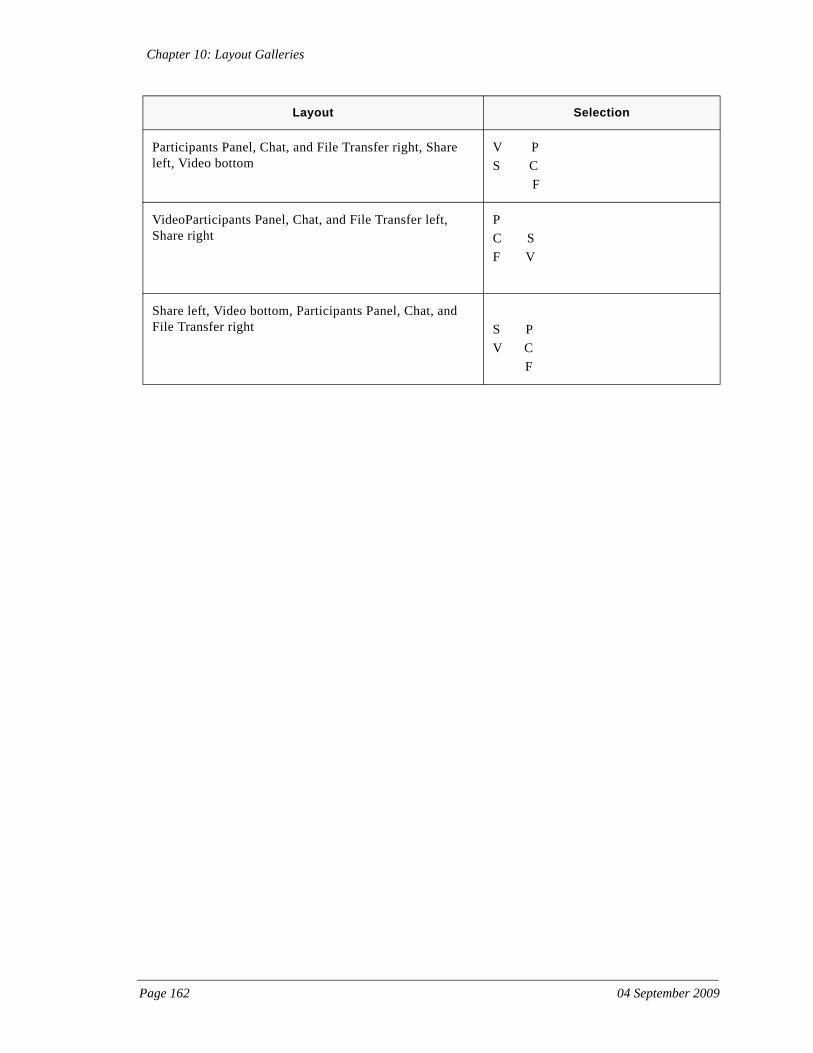
Page 162 04 September 2009
Chapter 10: Layout Galleries
Participants Panel, Chat, and File Transfer right, Share left, Video bottom
V PS C F
VideoParticipants Panel, Chat, and File Transfer left, Share right
PC SF V
Share left, Video bottom, Participants Panel, Chat, and File Transfer right S P
V C F
Layout Selection

Doc Revision 1.0 Page 163
Elluminate VCSversion 2.0
Appendix A: Configuration Settings
OverviewYou can adjust system settings for booting up and running the system, and customizing the system. When you install the product with the Configuration wizard, the system should be ready for use and adjustments in the Settings dialog might not be necessary.
In this appendix“General Settings” on page 164
“User Profile” on page 165
“Communication Settings” on page 167
“Communication - HTTPS Proxy” on page 168
“Communication Advanced” on page 169
“Audio Settings” on page 171
“Audio Settings - Advanced” on page 174
“Video Settings” on page 176
“Video - Advanced Settings” on page 176
“System Settings” on page 179
“System - Advanced Settings” on page 180
“Security Settings” on page 181
“Present & Share Settings” on page 182
“File Transfer Settings” on page 183
“Chat Settings” on page 185
“Instant Messaging” on page 186

Page 164 04 September 2009
Appendix A: Configuration Settings
General SettingsTo open the General Settings window:
Click Settings... from the Main menu and select General.
Startup
Automatically start Elluminate Client at Windows logon: starts the Elluminate VCS Server automatically when you logon to Windows.

Elluminate VCSversion 2.0
Doc Revision 1.0 Page 165
User ProfileTo open the User Profile window:
Click Settings... from the Main menu and select User Profile.
The User Profile window contains the user's account information for logging on to the Elluminate VCS Server. You can edit your current account information or add additional accounts for the use of different Elluminate VCS servers.
If you enter a new user profile at logon, the Elluminate VCS Client automatically prompts you to save the data as new account information.
Default Logon
To set the default logon to the Elluminate VCS Server:
1. Click the At startup auto-logon as check box.
2. Select the user account you want as the default logon each time you logon to Elluminate VCS Server.
3. When logging on to the Elluminate VCS Server, choose a user profile name from the Account listbox.
4. Click Logon.

Page 166 04 September 2009
Appendix A: Configuration Settings
Users with Impaired Hearing
You can switch the user alarm to a special mode that flashes an alert screen.
Click the Flashing screen alert checkbox and OK.

Elluminate VCSversion 2.0
Doc Revision 1.0 Page 167
Communication SettingsTo open the Communication window:
Click Settings... from the Main menu and select Communication.
Maximum bandwidth allowed
You can specify the maximum amount of bandwidth that the system uses for sending and receiving. You can choose pre-defined types for your Internet connection (for example, ISDN or ADSL), in the drop down box or adjust the bandwidth manually.
The typical settings for most high speed educational networks for best performance in a multipoint session are:
300 kbps for sending
900 kbps for receiving
You can change these settings to optimize video transmission during an ongoing conference if necessary. Also, your administrator can set server or group limits to the bandwidth you can use regardless of settings. Elluminate VCS might not use all of the bandwidth you indicate if it does not need it for maximum performance.
To change maximum bandwidth:
1. Uncheck the Use predefined bandwidth checkbox.
2. Use the sliders for Send and Receive or enter a value in the kBit/s box.
For example, 400 kbps for sending and 1000 kbps for receiving.
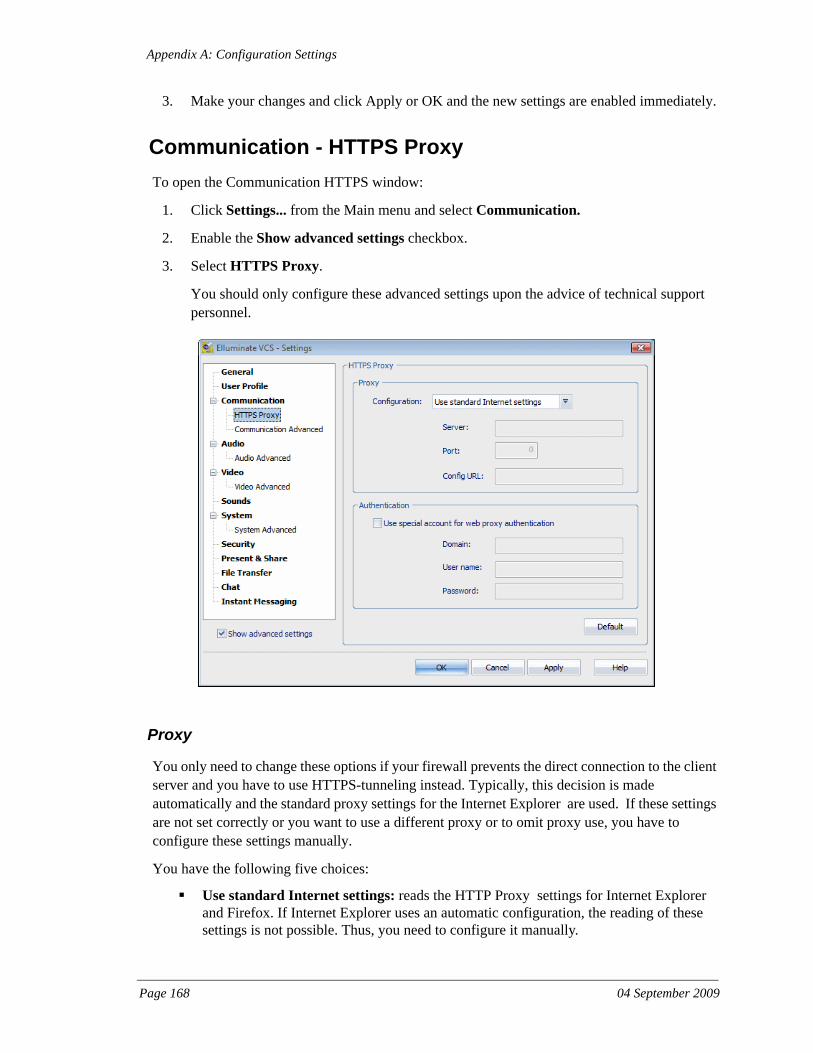
Page 168 04 September 2009
Appendix A: Configuration Settings
3. Make your changes and click Apply or OK and the new settings are enabled immediately.
Communication - HTTPS ProxyTo open the Communication HTTPS window:
1. Click Settings... from the Main menu and select Communication.
2. Enable the Show advanced settings checkbox.
3. Select HTTPS Proxy.
You should only configure these advanced settings upon the advice of technical support personnel.
Proxy
You only need to change these options if your firewall prevents the direct connection to the client server and you have to use HTTPS-tunneling instead. Typically, this decision is made automatically and the standard proxy settings for the Internet Explorer are used. If these settings are not set correctly or you want to use a different proxy or to omit proxy use, you have to configure these settings manually.
You have the following five choices:
Use standard Internet settings: reads the HTTP Proxy settings for Internet Explorer and Firefox. If Internet Explorer uses an automatic configuration, the reading of these settings is not possible. Thus, you need to configure it manually.

Elluminate VCSversion 2.0
Doc Revision 1.0 Page 169
No proxy in the case of HTTPS-tunneling, a direct connection without proxy is used.
User defined proxy settings: enter the server address (either dotted IP or DNS Name) and the port number to which the proxy is connected. Consult your system or network administrator for valid values.
Use automatic configuration: reads the proxy settings of the DHCP server. Consult your local network administrator on whether this kind of configuration is possible.
Use configuration script: the proxy configuration is set centrally using a configuration script, which contains all required settings (for example, this option is useful for large companies). If your proxy configuration works this way, you can enter the URL where the configuration script is located.
Authentication
Use special account for web proxy authentication:
If authorization at the proxy is required for the use of HTTPS tunneling, you must enter the domain name, user name, and password. Consult with your IT administrator if you need assistance with the type of proxy you are using.
Basic Authentication (for example, Squid proxy, enter username and password.
NTLM Authentication (for example, Microsoft ISA proxy, enter Windows domain, username, and password. If your computer is logged onto a Windows domain, you can leave these fields blank. The VCS client automatically uses your logon information for the Windows domain.
Communication AdvancedTo open the Communication HTTPS window:
1. Click Settings... from the Main menu and select Communication.
2. Enable the Show advanced settings checkbox.
3. Select Communication Advanced.

Page 170 04 September 2009
Appendix A: Configuration Settings
You should only use these advanced settings upon the advice of technical support personnel.
Network Interfaces
Default interface for multihomed: you can bind the VCS client to one of the local network interfaces only. Typically, the VCS client signals and uses all interfaces of the computer to find the optimal connection (auto mode). This can results in issues if several routes to the server or to other VCS clients exist. Limiting VCS client to one interface can prevent this.
You can set the Network connection type to:
auto - the VCS client detects the optimal connection type automatically.
Half NAT - requires inverse connection establishment.
Redirector only - all media streams are routed through the server.
Https only - all connection attempts are made using HTTPS-tunneling only.
Https/SSL only - all connection attempts are made using HTTPS-tunneling with an additional SSL wrapping only.
Warn if server connection is HTTPS: shows a warning if the VCS client can only connect via HTTPS with the server, thus potentially degrading call quality.
Use FEC if needed: switches on forward error correction in case of packet loss on the network connection.

Elluminate VCSversion 2.0
Doc Revision 1.0 Page 171
Audio SettingsTo open the Audio window:
1. Click Settings... from the Main menu and select Audio.
The current audio settings are displayed.
To change devices:
Click on Change…
The Audio Settings dialog box opens to change your settings.

Page 172 04 September 2009
Appendix A: Configuration Settings
Changing Audio Settings
If you have more than one sound card or an additional microphone in your camera, you can select the appropriate devices you want to use for audio input (microphone) and output (speakers).
To change your audio settings:
1. Make sure that the devices are connected correctly to your computer.
2. Select a speaker from the list.
3. Click the Test button to check the sound.
You should hear music on the selected speakers/headset.
4. Adjust the volume with the volume slider.
5. Select a microphone from the list.
The current input level appears next to the available microphones.
6. After you select a microphone, check the main microphone gain meter on the right side and adjust microphone gain to a proper value.
7. Optionally, you can enable Microphone boost (if applicable for the selected microphone). Whether you need a boost depends on the microphone that you are using. You can activate the boost if your microphone volume is too low, for example, your conferencing partners claim that they cannot hear your audio properly.

Elluminate VCSversion 2.0
Doc Revision 1.0 Page 173
8. Optionally, you can enable AGC (Automatic Gain Control) to automatically adjust microphone gain.
Selecting an Echo Type
You can select different pre-defined profiles for your acoustic environment. The profiles let you deal with acoustic echo issues. The following three pre-defined profiles are available:
Headset - select this option if you are using a headset connected to your computer. Typically, a headset does not generate an echo. Therefore, the default profile switches off all unnecessary features such as software-based echo compensation and Push to Talk.
Loudspeakers - select this option if you are using a separate microphone and loudspeakers connected to your computer. This combination produces an acoustic echo. Therefore, the default profile activates the software-based echo compensation and conditional Push to Talk during multi-party conferences. Conditional Push to Talk activates Push to Talk only when the software-based echo compensation cannot compensate the echo adequately.
Loudspeakers (with external echo compensation) - select this option if you are using a microphone and loudspeakers with additional or integrated echo compensation. This can be a professional acoustic echo compensation solution (for example, a USB echo canceling microphone with which your loudspeakers are connected). The default profile switches off features such as the software-based echo compensation and Push to Talk. The stereo feature is disabled during multiparty conferences as most external echo compensation solutions cannot deal well with stereo audio.
Regardless of the availability of echo compensation, you should adhere to the following recommendations to guarantee proper operation with external speakers and microphone:
Use only one microphone.
Use a directional microphone.
Position the microphone as near as possible to the person(s) speaking.
Position all persons speaking equal distance to the microphone.
Position loudspeakers so that the microphone does not pick up the sound of others directly.

Page 174 04 September 2009
Appendix A: Configuration Settings
Audio Settings - AdvancedTo open the Audio Settings - Advanced window:
1. Click Settings... from the Main menu and select Audio.
2. Enable the Show advanced settings checkbox.
3. Select Audio Advanced.
Recording Mixer
Uncheck Use recording mixer to disable the adjustment of the microphone gain level within the VCS client.
Automatic Gain Control - enable this option to have the Elluminate VCS Client automatically adjust microphone gain. If this mode does not work (for example, the remote party indicates that your audio is too loud or is unable to hear you), you should disable it.
Input selection
Choose whether your microphone is connected by the Microphone or line in port of your soundcard. If your microphone is connected to another port, you have to disable the use of the recording mixer by the VCS client and use the Windows volume control instead.
Speaker Mixer
Uncheck Use speaker mixer to disable the adjustment of the speaker volume level within the VCS client. This is helpful to prevent the VCS client from changing the volume during startup or

Elluminate VCSversion 2.0
Doc Revision 1.0 Page 175
during wake up from standby if you are currently using another audio application. Additionally, you can control which of the speaker mixers (Master and Wave) is set when moving the volume slider in the VCS client. If you select Internal volume control only, the Windows mixer is left alone and the VCS client only reduces the volume according to the volume slider.
Miscellaneous
Use Click to talk instead of push to talk in case of unhandled echo problems - if the Push-to-Talk button appears during a multi-party call, you can change it to Click-to-Talk instead. For Push-to-Talk you need to keep the button pressed with your mouse while you are speaking. With Click-to-Talk, you click it once when you start speaking and a second time, when you are finished. If you forget the second click, you cannot hear the others.
Uncheck Use Only Direct Sound Devices if your sound device does not appear among the devices listed in the Audio tab.
Note :To activate the new settings, you need to restart the Elluminate VCS Client.

Page 176 04 September 2009
Appendix A: Configuration Settings
Video SettingsTo open the Video window:
1. Click Settings... from the Main menu and select Video.
Camera
The currently selected camera is displayed.
To change the current settings:
Click the Change... button.
The Camera Settings window appears with a preview of your local Video window.
Video - Advanced SettingsTo open the Video - Advanced window:
1. Click Settings... from the Main menu and select Video.
2. Enable the Show advanced settings checkbox.
3. Select Video Advanced.
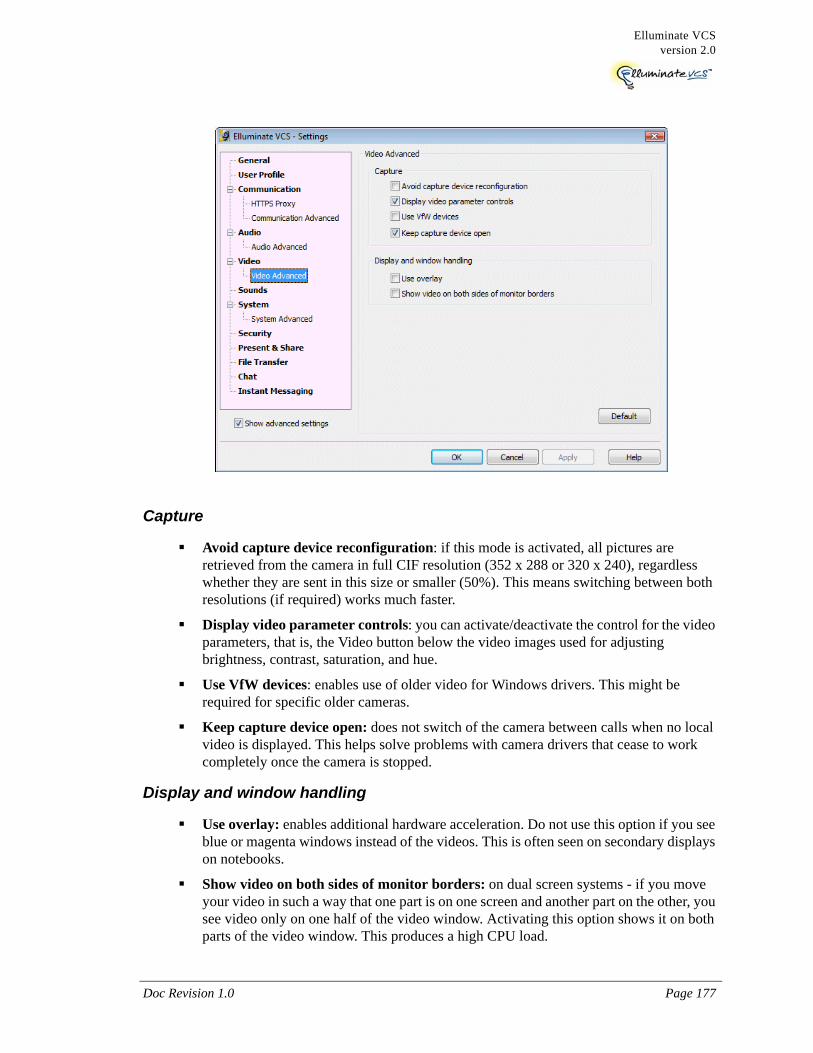
Elluminate VCSversion 2.0
Doc Revision 1.0 Page 177
Capture
Avoid capture device reconfiguration: if this mode is activated, all pictures are retrieved from the camera in full CIF resolution (352 x 288 or 320 x 240), regardless whether they are sent in this size or smaller (50%). This means switching between both resolutions (if required) works much faster.
Display video parameter controls: you can activate/deactivate the control for the video parameters, that is, the Video button below the video images used for adjusting brightness, contrast, saturation, and hue.
Use VfW devices: enables use of older video for Windows drivers. This might be required for specific older cameras.
Keep capture device open: does not switch of the camera between calls when no local video is displayed. This helps solve problems with camera drivers that cease to work completely once the camera is stopped.
Display and window handling
Use overlay: enables additional hardware acceleration. Do not use this option if you see blue or magenta windows instead of the videos. This is often seen on secondary displays on notebooks.
Show video on both sides of monitor borders: on dual screen systems - if you move your video in such a way that one part is on one screen and another part on the other, you see video only on one half of the video window. Activating this option shows it on both parts of the video window. This produces a high CPU load.

Page 178 04 September 2009
Appendix A: Configuration Settings
Sound SettingsTo open the Sounds window:
Click Settings... from the Main menu and select Sounds.
Ringing Sounds
Incoming call
System Speaker: rings on the system speaker (beeper) for incoming calls.
Play sound: plays the selected sound file as the ringing sound for incoming calls. Use the Volume slider to adjust the ringing volume. Click the Play button to check the sound.
Outgoing call
Play sound: plays the selected sound as long as your call is ringing the other party. Use the Volume slider to set the volume for the ringing volume. Click the Play button to check the sound.
IM received
Play sound: plays the selected sound when an IM arrives. Use the Volume slider to set the volume for this tone. Click the Play button to check the sound.

Elluminate VCSversion 2.0
Doc Revision 1.0 Page 179
System SettingsTo open the System Settings window:
Click Settings... from the Main menu and select System.
Themes
You can change the look and feel of the application by providing an alternate theme file. You can also create your own theme file.
Idle detection
A notification feature that lets other users see if your system is idle or active, (for example, whether you are typing and moving the mouse). If your system is inactive for the predefined time, the idle state is signaled to the server. Other users can see that you might possibly away from your computer and unavailable for a call.
Uncheck Show me as idle automatically checkbox if you do not want to signal your idle state to other users.
Check the Use screen saver settings checkbox if you want your state signaled to users as idle whenever your screen saver is active.
Maximum system load
You can set an approximate value for the CPU percentage the VCS client is allowed to consume. Setting this slider to 100% switches off any restriction on features the VCS client might otherwise impose due to load restrictions.
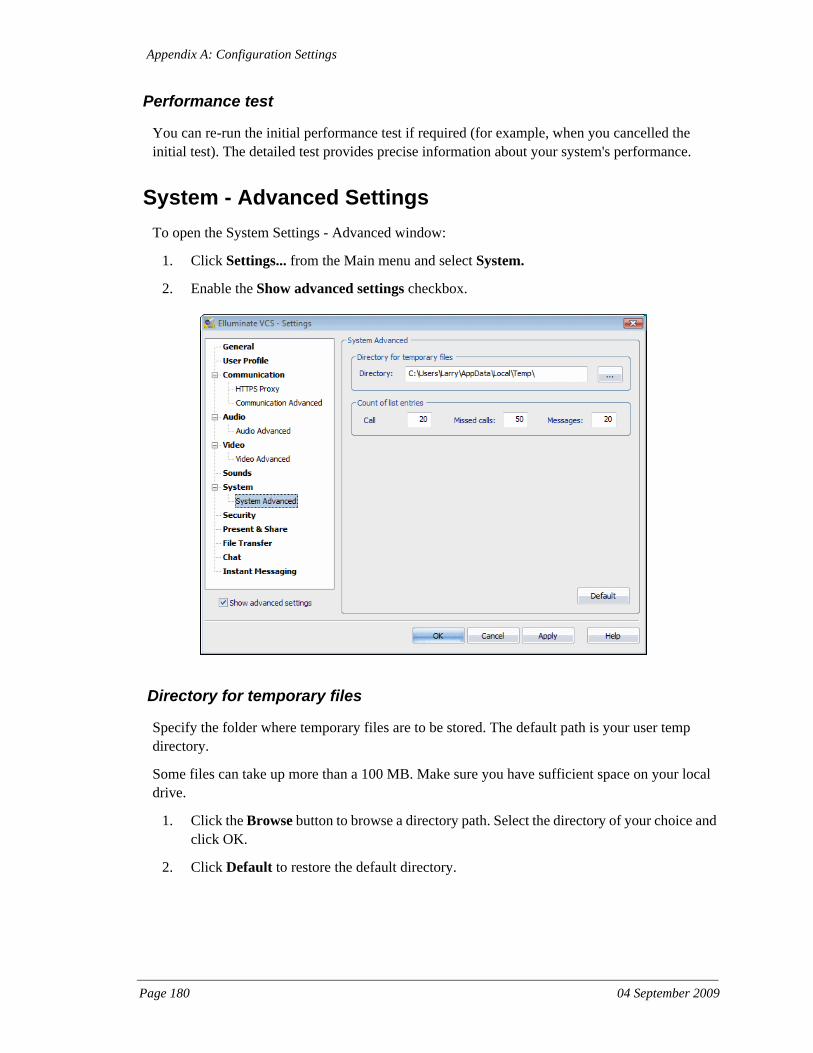
Page 180 04 September 2009
Appendix A: Configuration Settings
Performance test
You can re-run the initial performance test if required (for example, when you cancelled the initial test). The detailed test provides precise information about your system's performance.
System - Advanced SettingsTo open the System Settings - Advanced window:
1. Click Settings... from the Main menu and select System.
2. Enable the Show advanced settings checkbox.
Directory for temporary files
Specify the folder where temporary files are to be stored. The default path is your user temp directory.
Some files can take up more than a 100 MB. Make sure you have sufficient space on your local drive.
1. Click the Browse button to browse a directory path. Select the directory of your choice and click OK.
2. Click Default to restore the default directory.
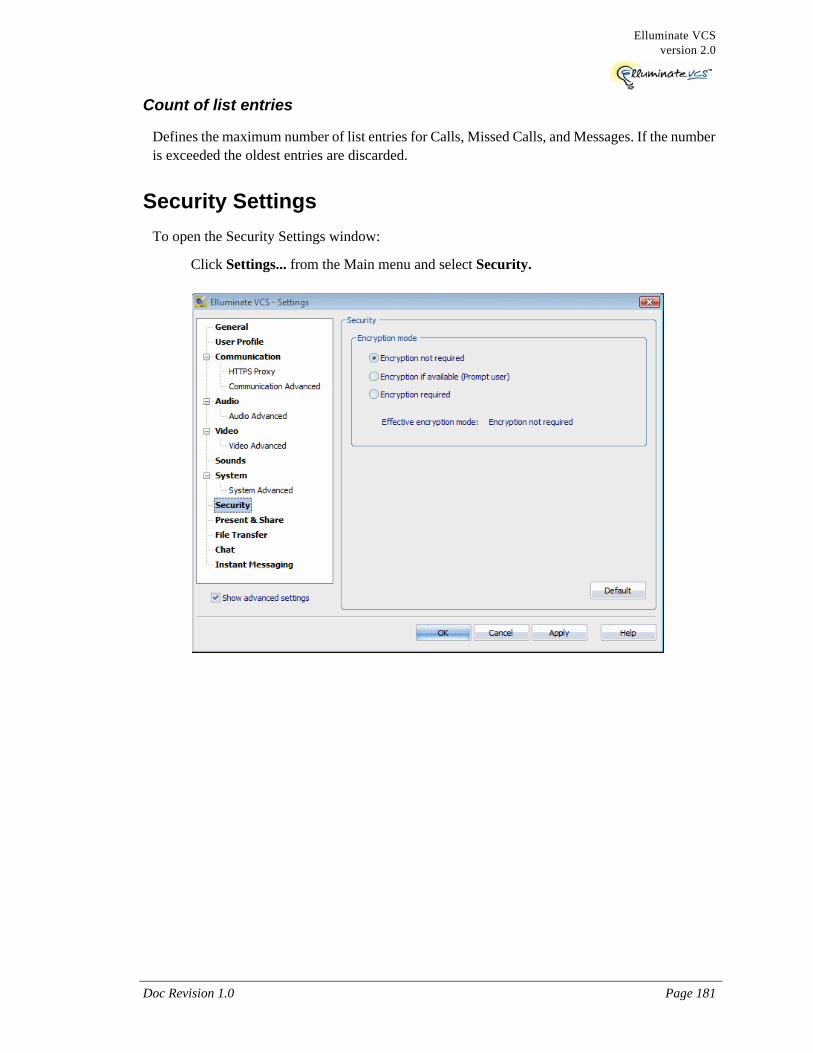
Elluminate VCSversion 2.0
Doc Revision 1.0 Page 181
Count of list entries
Defines the maximum number of list entries for Calls, Missed Calls, and Messages. If the number is exceeded the oldest entries are discarded.
Security SettingsTo open the Security Settings window:
Click Settings... from the Main menu and select Security.
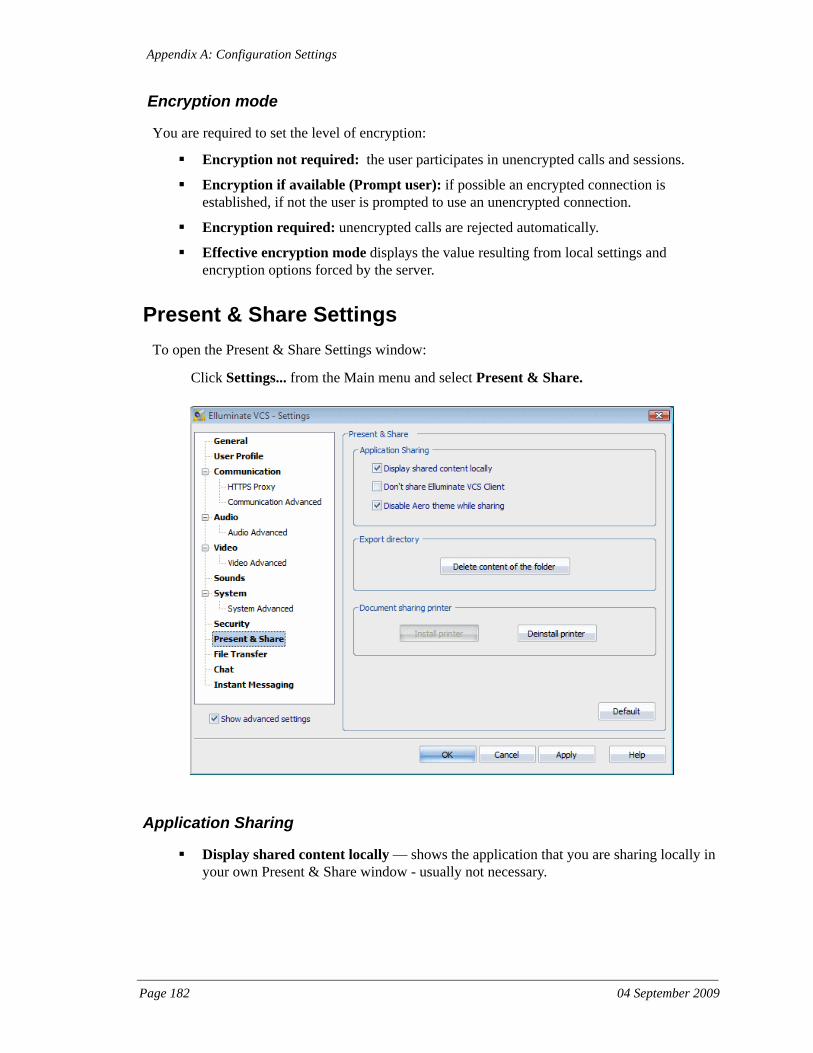
Page 182 04 September 2009
Appendix A: Configuration Settings
Encryption mode
You are required to set the level of encryption:
Encryption not required: the user participates in unencrypted calls and sessions.
Encryption if available (Prompt user): if possible an encrypted connection is established, if not the user is prompted to use an unencrypted connection.
Encryption required: unencrypted calls are rejected automatically.
Effective encryption mode displays the value resulting from local settings and encryption options forced by the server.
Present & Share SettingsTo open the Present & Share Settings window:
Click Settings... from the Main menu and select Present & Share.
Application Sharing
Display shared content locally — shows the application that you are sharing locally in your own Present & Share window - usually not necessary.
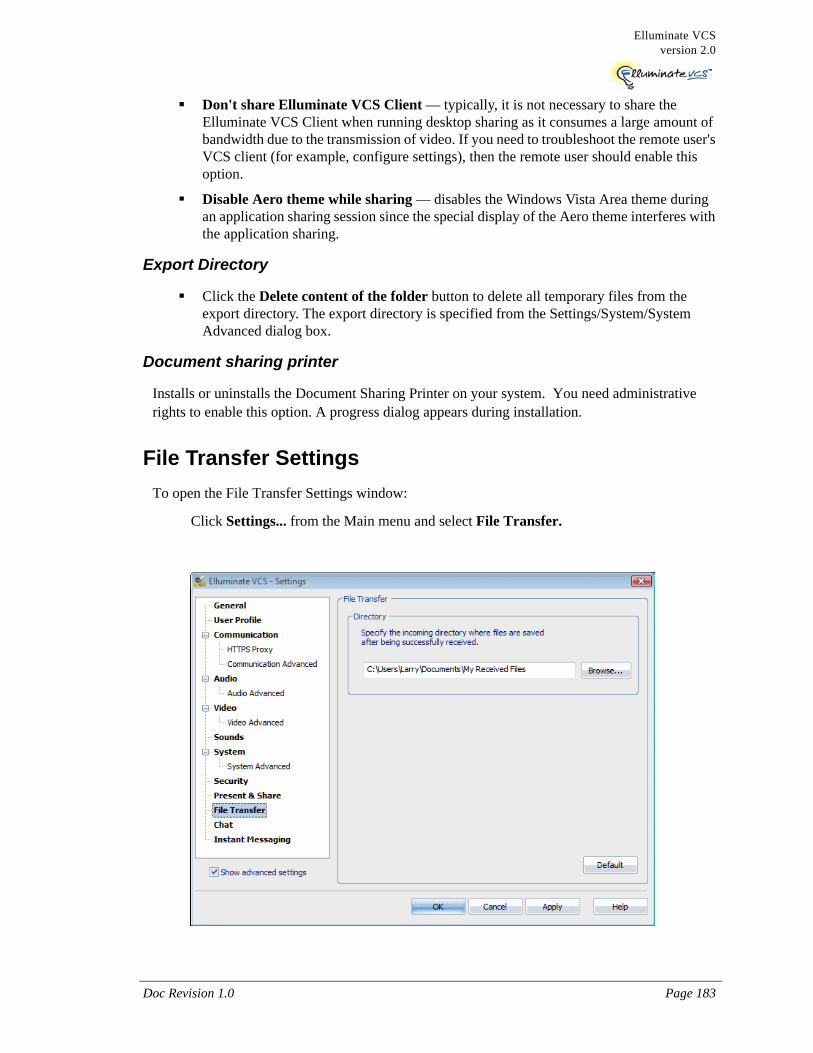
Elluminate VCSversion 2.0
Doc Revision 1.0 Page 183
Don't share Elluminate VCS Client — typically, it is not necessary to share the Elluminate VCS Client when running desktop sharing as it consumes a large amount of bandwidth due to the transmission of video. If you need to troubleshoot the remote user's VCS client (for example, configure settings), then the remote user should enable this option.
Disable Aero theme while sharing — disables the Windows Vista Area theme during an application sharing session since the special display of the Aero theme interferes with the application sharing.
Export Directory
Click the Delete content of the folder button to delete all temporary files from the export directory. The export directory is specified from the Settings/System/System Advanced dialog box.
Document sharing printer
Installs or uninstalls the Document Sharing Printer on your system. You need administrative rights to enable this option. A progress dialog appears during installation.
File Transfer SettingsTo open the File Transfer Settings window:
Click Settings... from the Main menu and select File Transfer.
Page 184 04 September 2009
Appendix A: Configuration Settings
Directory
1. Specify the folder where files received by a file transfer are to be stored. The default is the directory My Documents\My Received Files.
2. Click the Browse... button to browse to a directory path. Select a directory and click OK.
3. Click Default to restore the default directory.

Elluminate VCSversion 2.0
Doc Revision 1.0 Page 185
Chat SettingsTo open the Chat Settings window:
Click Settings... from the Main menu and select Chat.
Output font
Select the font for your chat messages.
Events
Select additional information within the chat application:
Show events: prints headers for the chat messages.
Show date of events: prints the event time.
Show time of events: prints the event date.
Advanced settings
Enable auto URL detection: turn URLs in chat messages into clickable hyperlinks.
Use return for send: activates the return key for sending (otherwise, Alt+S).
Color of headers: lets you set the colors for the different headers in the Chat field.
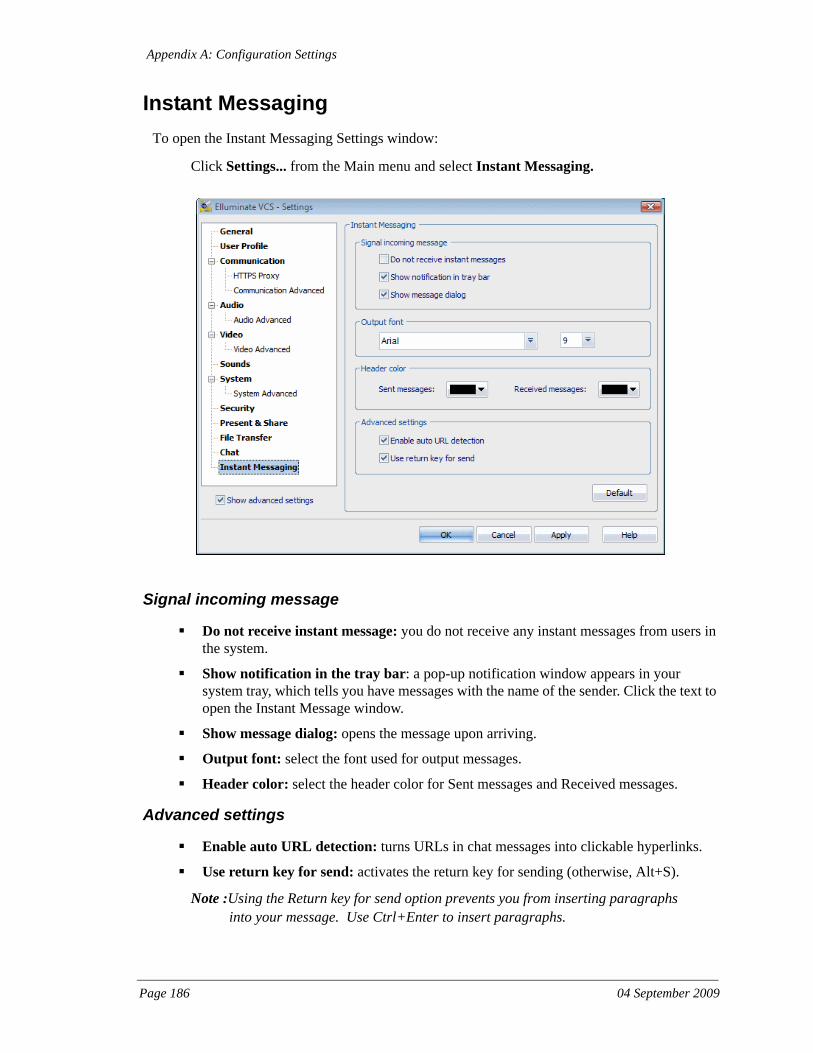
Page 186 04 September 2009
Appendix A: Configuration Settings
Instant MessagingTo open the Instant Messaging Settings window:
Click Settings... from the Main menu and select Instant Messaging.
Signal incoming message
Do not receive instant message: you do not receive any instant messages from users in the system.
Show notification in the tray bar: a pop-up notification window appears in your system tray, which tells you have messages with the name of the sender. Click the text to open the Instant Message window.
Show message dialog: opens the message upon arriving.
Output font: select the font used for output messages.
Header color: select the header color for Sent messages and Received messages.
Advanced settings
Enable auto URL detection: turns URLs in chat messages into clickable hyperlinks.
Use return key for send: activates the return key for sending (otherwise, Alt+S).
Note :Using the Return key for send option prevents you from inserting paragraphs into your message. Use Ctrl+Enter to insert paragraphs.

Elluminate VCSversion 2.0
Doc Revision 1.0 Page 187

Page 188 04 September 2009
Appendix A: Configuration Settings

Doc Revision 1.0 Page 189
Index
AAbout dialog box 18accepting an incoming call to a Multi-Point session 91accepting an incoming session request 57add requesting user to contact list 14adding
document to a session 110new contact 12, 19, 43new group 44
AGC 6aligning video layouts 98alignment 27always on top 18anti-flicker 8application sharing 113
control 117unshare single application 116
Ask for Mic option 82auto-accept rules 39auto-answer 32automatic gain control 6automatically accepting requests 39auto-start 32away status 32
Bbandwidth 167block contact 14, 36, 45bottom panel of session window 30browsing documents 107busy call 67busy status 32
CCall button 17Call menu item 19camera selection 7camera settings 8, 72, 96Capture filter properties 8Chair role 78change password 146changing bandwidth 167chat 120clearing
instant text messages 126Missed Calls list 47Recent Calls list 48
compressed video 75conference layout 27contact list 36contact request 12contacts
adding 43, 46blocking 45calling 45copying 46deleting 46details 41inviting to a session 45online status 37renaming 46tooltips 41visibility settings 40
Contacts listbox 38Contacts menu 44contacts online 36control shared applications 117
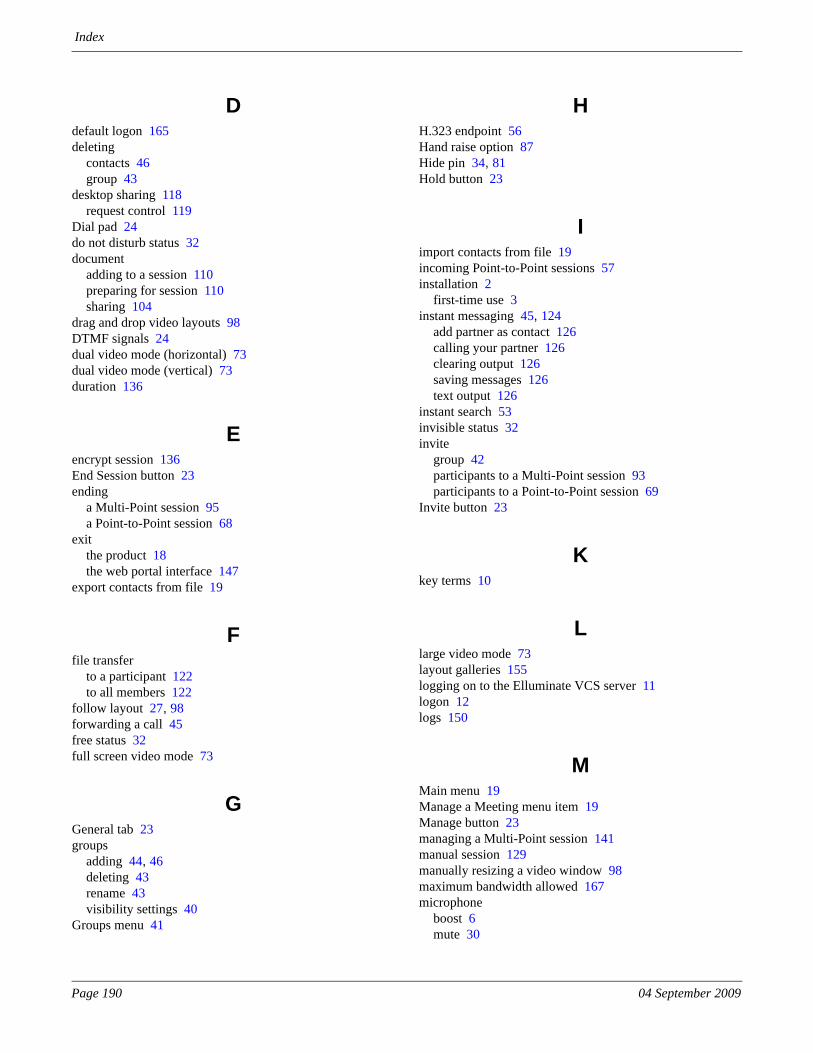
Page 190 04 September 2009
Index
Ddefault logon 165deleting
contacts 46group 43
desktop sharing 118request control 119
Dial pad 24do not disturb status 32document
adding to a session 110preparing for session 110sharing 104
drag and drop video layouts 98DTMF signals 24dual video mode (horizontal) 73dual video mode (vertical) 73duration 136
Eencrypt session 136End Session button 23ending
a Multi-Point session 95a Point-to-Point session 68
exitthe product 18the web portal interface 147
export contacts from file 19
Ffile transfer
to a participant 122to all members 122
follow layout 27, 98forwarding a call 45free status 32full screen video mode 73
GGeneral tab 23groups
adding 44, 46deleting 43rename 43visibility settings 40
Groups menu 41
HH.323 endpoint 56Hand raise option 87Hide pin 34, 81Hold button 23
Iimport contacts from file 19incoming Point-to-Point sessions 57installation 2
first-time use 3instant messaging 45, 124
add partner as contact 126calling your partner 126clearing output 126saving messages 126text output 126
instant search 53invisible status 32invite
group 42participants to a Multi-Point session 93participants to a Point-to-Point session 69
Invite button 23
Kkey terms 10
Llarge video mode 73layout galleries 155logging on to the Elluminate VCS server 11logon 12logs 150
MMain menu 19Manage a Meeting menu item 19Manage button 23managing a Multi-Point session 141manual session 129manually resizing a video window 98maximum bandwidth allowed 167microphone
boost 6mute 30
Index
Elluminate VCS Client User Guide Guide Page 191
selection 5test recording 5un-mute request 82volume 30
minimizing 18, 30Missed Calls list 47moderated session 132Multi-Point session 96
adjust speaker volume 99Chair rights 83Chair rights for a Participant 85Chair rights for a Presenter 84ending 95invite another participant 93invite group 79managing 141mute microphone 82, 99mute speakers 99Presenter rights for a Chair/Participant 87telephone call 91video layout 97
mutemicrophone 30, 76, 99speakers 76, 99video 71, 96
mute video 96My VCS button 17My Video button 17
NNew Call dialog box 55normal video mode 73
Oonline help 21online state 14online status for contacts 37outgoing Point-to-Point sessions 50
PParticipant role 78Participants panel 81password 12password change 146Pause control 63, 66Picture-in-Picture mode 25, 74Play control 63, 66pointer 108Point-to-Point session
adjust microphone volume 76adjust speaker volume 76audio functions 76ending 68inviting participants 69launching via contacts 50launching via instant search 53launching via the New Call dialog box 55launching with an H.323 endpoint 56mute microphone 76mute speakers 76mute video 71video layout 73
prepare a meeting document 19Presence window 16Present & Share workspace 33Present tab 108Presenter role 78preset video layouts 98private and moderated session 133private session 132public session 132Push to Talk 83putting an active session on hold 63
RRecent Calls list 48regain control 103rejecting an incoming session request 67rename
contact 46group 43
request control 102resizing a video window manually 75revoke microphone 83, 84ribbon bar 17
customizing 23rights 105ring 32roles 78
Ssaving instant text messages 126Schedule a Meeting menu item 19Schedule button 17scheduling a session 132search for a session 140selecting a camera 7selecting a microphone 5selecting a speaker 4

Page 192 04 September 2009
Index
Sent 126server name 12session
automatically terminating 136one-time schedule 136
session requestaccepting 57rejecting 67
Session window 22session window
bottom panel 30top panel 28
Settings button 17share
application 113desktop 118documents 104
show local video compressed 75silent notification 32single video mode 73snapshot 75, 98sort list
contacts 47groups 42
speakermutelmute
speakers 30selection 4volume 30
Standby mode 18, 31starting the product 12statistics 30, 150stop and play video 83stop sharing an application 115subscribe to online state 14switch video mode 73System menu 18system requirements 2
Ttask tray 31telephone call 60, 91test recording 5testing a speaker 4text chat 120title bar 17top panel of session window 28transferring a session 68
Uunsharing an application 116updating Elluminate VCS 22user ID 12user profile information 145user profiles 11
default logon 165
Vversion information 21Video & Layout tab 25video image controls 7video layout 27
for a Multi-Point session 97for a Point-to-Point session 73
video layoutsaligning 98drag and drop 98presets 98
View menu 20visibility settings
for a contact 40for a group 40
voice-only call 59
Wweb portal 21
adding users 133change password 146delete session 129email invite 139joining an active session 128manage a running session 130modify a session 131schedule session 132searching for users 134starting a session manually 129user profile information 145viewing sessions 128viewing users 143
Whiteboard 111hide 112
Who else can see me? 36