en high-definition digital terrestrial receiver. high-definition digital terrestrial receiver. dtr...
TRANSCRIPT

www.philips.com/support
For support call 0800 331 60 15
EN High-DefinitionDigitalTerrestrialReceiver
DTR 5520

2

3
ENG
LISHTable of contents
1 Important 41.1 Safetyinformation 51.2 Reducingpowerconsumption 6
2 Your HD receiver 72.1 What’sinthebox? 72.2 Whatyoualsoneed(notsupplied)? 82.3 Overview 82.4 Howtoreadthismanual? 92.5 Howtousethemenus? 9
3 Getting started 93.1 Preparingyourremotecontrol 93.2 ConnectingyourHDTV 103.3 InstallingyourHDreceiver 103.4 Whatifnochannelsarefound? 12
4 Using your HD receiver 134.1 Standby/wakeup 134.2 Switchingonandoff 134.3 Changingchannels 134.4 Adjustingvolume 134.5 Usingthechannelbanner 134.6 Usingchannellists 154.7 UsingtheTVguide 154.8 Scheduling/stoppingrecordings 164.9 UsingtheToolsmenu 17
5 Using more of your HD receiver 18
5.1 HDreceiver 185.2 Remotecontrol 195.3 Front-paneldisplaymessages 205.4 UsingtheMainmenu 21
6 Maintenance 276.1 Cleaning 276.2 Replacing 276.3 Disposing 27
7 Accessories and connections 287.1 Connectingyouraudioequipment 287.2 Connectingyourrecordingequipment 287.3 Connectingyour
standard-definitionTV 29
8 Guarantee and service 30
9 Technical data 30
10 Frequently asked questions 32
11 Glossary 35
12 Index 36
Contact information 37
Trademarks and partner logos 38

Important4
1 ImportantThankyouforpurchasingaPhilipsproduct.TaketimetoreadthisusermanualbeforeusingyourHDreceiver.Itprovidesimportantinformationontheinstallation,operationandsafetyofyourHDreceiver.KeepthismanualnexttoyourHDreceiverforfuturereference.
DisposalofyouroldproductYourproductisdesignedandmanufacturedwithhighqualitymaterialsandcomponents,whichcanberecycledandreused.Whenthis“crossed-outwheeledbin”symbolisattachedtoaproductoritspackaging,itmeansthattheproductiscoveredbytheEuropeanDirective2002/96/EC.Pleaseinformyourselfaboutthelocalseparatecollectionprocessforelectricalandelectronicproducts.Pleaseactaccordingtoyourlocalrulesanddonotdisposeofyouroldproductswithyournormalhouseholdwaste.Thecorrectdisposalofyouroldproductwillhelppreventpotentialnegativeconsequencesfortheenvironmentandhumanhealth.
The“Materialrecyclability”symbolaffixedonthepackagecardboardandusermanualmeansthatthesepartsarerecyclable.Sodonotdisposeofthemwithyournormalhouseholdwaste.
The“Materialrecyclability”symbolaffixedonplasticpackagingpartsmeansthatthesepartsarerecyclable.Sodonotdisposeofthemwithyournormalhouseholdwaste.
The“GreenDot”symbolaffixedonthecardboardmeansthatthemanufactureroftheproducthasfinanciallycontributedtothe“AvoidanceandRecoveryofPackagingWaste”organization.

5Important
ENG
LISH
1.1 Safety informationYourHDreceiverispoweredusinga12Vpowersupplyunit.YourHDreceiverhasbeenmanufacturedtomeettheappropriatesafetystandards,butyoumustfollowthebelowinstructionstooperateitsafely.Keeptheseinstructionsforfuturereference.
Warnings• YourHDreceiverdoesnotcontainanyuser-serviceableparts.Donotattempttoopenit.Allmaintenanceworkmustbecarriedoutbyqualifiedservicescentres.
• Beforeconnectingthe12Vpowersupplyunittothemains,checkthatthemainssupplyvoltagecorrespondstothevoltageprintedonit.Ifthemainsvoltageisdifferent,consultyourlocaldealer.
• The12Vpowersupplyunithasbeendesignedforindooruseonly.• Useonlytheoriginal12Vpowersupplyunit.• Topreventfireorshockhazard,donotexposeyourHDreceivertorainormoisture.• PlaceyourHDreceiveronafirmsurface,anddonotcovertheventilationopeningswithitemssuchasnewspapers,tableclothes,curtains,etc.
• DonotinstallyourHDreceivernearheatsourcessuchasradiators,stovesorotherequipmentthatproduceheat.Protectitfromdirectsunlight.
• InordertoensureafreeflowofairaroundyourHDreceiver,allowatleast5cmofspaceaboveandaroundit.ThispreventsoverheatingofyourHDreceiver.
• Donotplaceanycombustibleobjectssuchascandles,etc.,onyourHDreceiver.• Neverstandobjectsfilledwithliquids,suchasvases,ontopofyourHDreceiver.DonotplaceanythingonyourHDreceiverthatmightdriporspillintoit.Ifthishappens,disconnectthe 12VpowersupplyunitfromthewallsocketandhaveyourHDreceivercheckedatanyauthorizedservicecentre.
• Thebatteriesinstalledintheremotecontrolshouldnotbeexposedtoexcessiveheatsuchassunshine,fireorthelike.
Pleasealsopayattentiontoallthewarningsandcautionslistedthroughoutthismanual.

Important6
1.2 Reducing power consumptionYourHDreceiverisdesignedtoreduceitsimpactontheenvironmentandcomplieswiththeEuropeanDirective2009/125/EC.ThisispartofPhilips’ongoingcommitmenttoleadthewayinenvironmentalresponsibility.
Ithasastandbymodeofoperationthatneedsverylittlepower.Seethetablebelowandpleasenotethat: • WhenyourHDreceiverisinthestandbymode,yousaveenergy(andthereforemoney)andreducecarbondioxideemissionsthatdamagetheenvironment.
• YouusethestandbybuttononyourHDreceiverorremotecontroltoswitchbetweenonandstandbymodes.Inaddition,ifyourHDreceiverison,butyoudonotpressanybuttononitoryourremotecontrolfor3hours(configurable-see‘Automaticecomode’onpage24),yourHDreceiverwillautomaticallygetintothestandbymode.
• YouusetheON/OFFswitchontherearpanelofyourHDreceivertoturnoffyourHDreceiver.• IfyouarenotgoingtouseyourHDreceiverforseveraldays,youcancutitsenergyconsumptiontozerobyunpluggingitfromthemainswallsocket.
• Intheoffandstandbymodes,yourHDreceivercannotreceiveupdatesfromthenetwork.However,atreceiverwake-up,youwillbepromptedbyamessageifanupdatenotificationhasbeenreceived.
Mode Front-panel standby indicator and display
Typical power consumption (W)
Typical annual energy use (kWh)
Power adaptorunplugged
Not lit up 0 0
Standby Standbyindicatorisred
0.86
15*ActiveStandby
Standbyindicatorisorange
5.00
On Achannelnumberisshownonthedisplay
5.80
*BasedonyourHDreceiverbeingOnfor4hoursdailyandbeinginstandbyfor20hours.

7YourHDreceiver
ENG
LISH2 Your HD receiver
CongratulationsonyourpurchaseandwelcometoPhilips!TofullybenefitfromthesupportthatPhilipsoffers,registeryourproductatwww.philips.com/welcome.
2.1 What’s in the box?
GUIDE OPTIONS
INFO
DIGITAL RECEIVER
TEXT RADIO EXIT
AD
HDreceiver
Remotecontroland2xAAAbatteries
12Vpowersupplyunit HDMIcable RFcable
RetuneflyerFreeviewflyerQuickstartguide
Usermanual
CautionPlasticbagscanbedangerous.Toavoidsuffocation,keepthebagawayfrombabiesandchildren.

YourHDreceiver8
2.2 What you also need (not supplied)?
TV
2.3 Overview
Front panel
42 3 7
51 6
Rear panel81
2
3
4
5 6
7
10
9
Remote control
GUIDE OPTIONS
INFO
DIGITAL RECEIVER
TEXT RADIO EXIT
AD
1
2
4
5
3
Front Panel1 Standbyindicator2 Standbybutton3 Programme+/-buttons4 Resolutionbutton5 V-Outbutton6 Display7 HDindicator
Rear Panel1 AntennaIN*
2 AntennaoutputtoTV/VCR(antennasignal)*3 RJ45Ethernetconnector*
4 USB2.0connector*
5 HDMI™connector*
6 AUXSCARTconnector*
7 DIGITALaudioout(digital)*8 L/Raudioout(analogue)*9 ON/OFFswitch10 12Vpowerconnector*
* Safeextralowvoltage
Remote control1 Standby2 Menu,Text,Pictureformat,Radio,Exit3 Guide,Options,Up/Down,Left/Right,OK, Info,Back4 Volumecontrol,Programme+/-,Mute5 Alphanumerickeypad,Audiodescription, Subtitles
SCARTcable(requiredonlyifyouhaveastandard-definitionTVorifyouwanttorecordaprogrammetoanexternalrecordingdevice
suchasaVideoorDVD-Rrecorder)

9Gettingstarted
ENG
LISH
2.4 How to read this manual?
Danger Describessituationsofinjuryorlossoflife.
Warning Describesactionsthatmaycausedamageto theproduct.
Caution Describesactionsthatarerequiredtoavoid dangerousorillegalsituations.
Note Additionalinformation.
Tip Informationthatisusefultoknowbut
notessentialtothetask.Forexample,informationaboutalternativeuse.
2.5 How to use the menus?
Press MENU,GUIDE,OPTIONS or INFOonyourremotecontroltodisplaythe Mainmenu,TV guide, Toolsmenuorchannelbannerrespectively.
Use / / / tonavigatethroughthemenusandchangeanysetting.
Press or OKtoconfirmyourchoice. Press EXITtoremovethemenu.
Formoreinformation,seepages13to27.
3 Getting started3.1 Preparing your remote control
+
+
Removethebatterycoverbygentlypressingdowninthesmallcircleonthecoverandslidingitdownwards.
InsertthetwoAAAbatteriesasshown.Besuretomatchthe+and-marksonthebatteriestotheirrespectivemarksinsidethebatterycompartment.
Replacethebatterycover.
NoteForbetterreception,pointyourremotecontroldirectlyatthefrontpanelofyourHDreceiverwhilepressinganybutton.
CautionDonotleavebatteriesinyourremotecontrolforlongperiodsoftimewithoutuse.Replacebothbatteriesatthesametime.Donotdisposeofusedbatterieswithyourdomesticwaste.Usedbatteriesshouldberecycledattheendoftheirusefullife.Donotdisposeofbatteriesinafire.

Gettingstarted10
3.3 Installing your HD receiverBeforeyoustarttheinstallation,makesureyouhavemadealltherequiredconnections. Connectthe12Vpowersupplyunittothe12VinputconnectorontherearpanelofyourHDreceiver.
Connectthemainsplugtothemainswallsocket. EnsurethattheON/OFF switchonthe
rearpanelofyourHDreceiverisswitchedon(isinthe‘1’position).
YourHDreceiverdisplaysawelcomemessageafterafewseconds.
Press the greenbuttontostarttheinstallation. TheAntenna poweringmenuappears.
LettheAntenna poweringsettingbeOff unlessyouuseanindoorantennathatcanbepoweredbythecoaxialcableconnectedto the Antenna INsocketofyourHDreceiver(seenote).
Note YourHDreceivercanonlydeliver50mA
currentunder5V,sorefertoyourindoorantenna’susermanualtocheckifitspowerrequirementfitsthecapabilityofyourHDreceiver.
3.2 Connecting your HDTV
DangerRiskofelectricshock!Beforemakinganyconnections,ensurethatyourequipmentisdisconnectedfromthemains.
HD receiverAerial wall socket
1
2
TV
HDMI
Mains wall socket
Connecttheaerialcable(notsupplied)fromtheaerialwallsockettotheAntenna IN connectorontherearpanelofyourHDreceiver.
UsethesuppliedHDMIcabletoconnecttheHDMIconnectorontherearpanelofyourHDreceivertotheHDMIinputconnectorofyourTV.Forthenextstep,notethechosenHDMIinputofyourTV(e.g.‘HDMI1’).
ConnectyourTVtothemainsandselectthecorrectA/VsourceonyourTV.ThisshouldcorrespondtotheHDMIinputconnectortowhichyourHDreceiverisconnected.Ifnecessary,refertoyourTV’susermanualforinstructions.
Notes•Optionally,youcanalsousethesuppliedRFcabletoconnecttheRFoutputconnector (labelledTo TV/VCR) of your HDreceivertotheRFinputconnectorofyourTV.
•ToconnectyourHDreceivertoyourstandard-definitionTV,seepage29.

11Gettingstarted
ENG
LISH
Press the greenbuttontoconfirm.TheTV shapemenuappears.
LettheTV shapesettingbe16:9 if you use anHDMIconnectiontoyourTV.Press the greenbuttontoconfirmandstartscanningfortheavailablechannels.
Note Ifyouareinanareathatreceivessignals
frommorethanonenetworkandpossiblyvariantofthesamechannel(e.g.BBC1,BBC1Scotland),thenyourHDreceiverwillpromptyoutoselectthenetworkandchannelvariantthatyouwantintheAll TV andAll Radio lists.
Use / tohighlightthenetworkthatyouwanttoinstallandpressthegreenbutton.
Aprogressscreendisplaystoconfirmthatthesearchistakingplace.
Whenthesearchiscomplete,ascreendisplaysthenumberofTVandradiochannelsthatyourHDreceiverhasfound.YourHDreceiverautomaticallysavesthesechannels.Press the greenbuttontogotothenextstep.
Note IncaseyourHDreceiverdoesnotfindany
channels,seethe‘Whatifnochannelsarefound?’sectiononpage12.
Note Digitalterrestrialbroadcastingisprogressing
throughouttheUK.Pleasenotethatthereceptionofdigitalsignalsmayneedtobeverifiedasitcanbeadverselyaffectedbyphysicalelements,suchasmountainousareas,highbuildings,etc.Whenanaloguebroadcastinginyourregionisswitchedoff,thereshouldbeaqualityimprovementindigitalbroadcasting.Asdigitalswitchoverhappens,thenumberofdigitalchannelsavailableineachregionmayalsoincrease.Pleasevisitthiswebsitetofindoutwhenthedigitalswitchoverisscheduledforyourarea:www.digitaluk.co.uk

Gettingstarted12
3.4 What if no channels are found? IncaseyourHDreceiverdoesnotfindany
channels,checkyourconnections(seepages10and29)andpressthered buttontostartthefirstinstallationsetupagain.
IfyourHDreceiverisstillnotabletofindanychannels,presstheyellowbutton.Use / tomanuallycheckthequalityandstrengthofthesignalsreceivedbyyourantennainvariouschannelfrequencies.
If the Signal strengthbarisgreen,thenyourantennaandHDreceiverareproperlyconnected.Ifitisred,thenyouneedtofirstcheckyourconnection.IftheSignal quality barisgreen,thenyoucanbesurethatyouarereceivingdigitalbroadcastsignals.Ifyourreceptionisnotoptimal(fewchannelsor“blocky”image),youmustcheckyourantennainstallationasitmayneedtoberealignedorfixed.
OntheCode entry menu,use / or the numberbuttonstoenteryourarea’spostalcode,andthenpressOK to highlight PIN code.
Note Enteringyourpostalcodeismandatory.
Youwillnotbeabletocompletethefirstinstallationsetupwithoutenteringyourpostalcode.
TochangethedefaultPINcode(0000),press andusethenumberbuttonstoenteryounewPINcode.Youwillthenbepromptedtore-enteryourPINcodetoconfirm.
Note YournewPINcodecanbeany4-digit
numberotherthanthedefaultPINcode(0000).
Press the greenbuttontoconfirmyourchoiceandcompletetheinstallation.
YoucannowstartusingyourHDreceiver.

13UsingyourHDreceiver
ENG
LISH4 Using your HD receiver
4.1 Standby/wake upToputyourHDreceiverintostandby,press onyourHDreceiver’sfrontpanelorremotecontrol.TotakeyourHDreceiveroutofstandby,press again.YoucanalsopressBACK ,P+/P- or anynumberbuttononyourremotecontroltowakeupyourHDreceiver. Seepage6formoreinformation.
4.2 Switching on and offUse the ON/OFFswitchontherearpanelofyourHDreceivertoswitchyourHDreceiveron/off.Seepage6formoreinformation.
4.3 Changing channelsTochangechannels,usetheP+/P-onyourremotecontroloryourHDreceiver’sfrontpanel.Youcanalsousethenumberbuttonsonyourremotecontrol.Press BACK toswitchtothelastchannelyouwerewatching.Youcanalsousetheon-screenchannellistsorchannelbannertochangechannels(seesections4.5and4.6).
NoteInitially,HDprogrammesareavailableonlyonchannels50and51.Switchtothesechannelstowatch HD programmes.
4.4 Adjusting volumeToincreaseordecreasethevolume,pressVOL+/VOL-.ThevolumelevelisshownbrieflyonyourTV.Tomuteorrestorethesound,press .Whenyoumuteyoursound,the iconisshowninthetoprightcornerofyourTV.Thisicondisappearsafterafewseconds.
4.5 Using the channel banner
Channel informationWhenyouchangeachannel,thechannelbannerappearsbrieflytoshowinformationaboutthecurrentprogramme.Bydefault,itappearsfor5seconds.Tosetthelengthoftimethatthechannelbannerremainson-screen,seepage23.
NoteWhilerecordingaprogrammetoanexternalrecordingdevicesuchasaVCR,thechannelbanneroverlaywillnotberecorded.
Changing channelTochangethechannel,displaythechannelbannerbypressingINFO. Whenthechannelbannerison-screen,
use / to see what programmes are currentlyshowingonotherchannels.Ifyouseeaprogrammeyouwanttowatch, press OK.
Todisplaymoreinformationaboutthecurrentprogrammeonthechannellistedinthechannelbanner,pressINFO again.

UsingyourHDreceiver14
Todisplaywhatprogrammeisonnext(onthechannellistedinthechannelbanner),presstheyellowbutton.
Press INFO athirdtime,orpressEXITtoremovethechannelbannerwithoutchangingthechannel.Alternatively,pressBACK toreturntothechannelbanner.
4.5.1 More about the channel banner content

15UsingyourHDreceiver
ENG
LISH
4.7 Using the TV guideTheTV guideprovidesyouwithalistingofallprogrammesavailableonallchannelsforuptoeightdays,makingiteasytofindtheprogrammesyouwanttowatch.
Press GUIDE todisplaytheTV guide.
Use / toseewhatprogrammesareonatdifferenttimesonachannel.
Use / tomovethroughthelistofchannels.
Use the green(+1day)andred(-1day)buttonstomoveforwardandbackwardsbyadaythroughthelistings.
Use the bluebuttontoseewhatprogrammesareonfrom18:00hoursonwards.
Use the yellowbuttontojumpdirectlytotheprogrammelistforanyofthe next7days.
Press GUIDE ,BACK or EXIT to removetheTV guide.
Notes•Youcanalsoschedulearecordingusingthe
TV guide(seepage16).•Somechannelsmaynotofferanextensive
TV guide.
4.6 Using channel listsYouusethechannellistmenutoswitchtoanyTVorradiochannelfromtheAll TV or All Radiochannellist,oryourfavouritelists.
Changing channel Press OK todisplaythecurrentchannellist. Use / toselectthechannelyouwantto
watch. Press OKtopreviewthechannel;pressOK againtowatchit.
Changing current channel list Press OK todisplayallthechannelsofthecurrentchannellist.
Press todisplayalltheavailablechannelandfavouritelists.Tocreatenewfavouritelists,seepage21.
Use / tohighlightthelistyouwanttouse.
Press OKtoconfirmanddisplayallthechannelsoftheselectedlist.
Use / tohighlightachannelandpressOK topreviewit.PressOKagaintowatchthechannelorpressEXITtoremovethechannellistmenuwithoutchangingthechannel.

UsingyourHDreceiver16
HOW TO STOP A RECORDING?Whenaprogrammeisbeingrecorded,youcannotswitchtoanyotherchanneloruseanyoftheotherfeaturesofyourHDreceiver.TOSTOP/CANCELARUNNINGRECORDINGandreturntonormalliveTV,pressEXIT firstthenOK immediatelyafter.
Using recording timers Press MENU.todisplaytheMainmenu. MakesurethatTV guide & scheduling
is highlightedandpress or OK. The TV guide & schedulingmenuappears.
Inthe TV guide & schedulingmenu,use / to highlight Scheduled recordings
andpress or OK. TheScheduled recordingsmenuappears.
Toscheduleanewrecording,makesureNew timerishighlightedandpress or OK.TheNew manual recordingmenuappears.
4.8 Scheduling/stopping recordingsTorecordaprogramme,youmustfirstconnectyourHDreceivertoyourVCRoranyrecordingdeviceusingaSCARTcable(seepage28),andthenschedulearecordingusingtheTV guide orbysettingarecordingtimer.
Using TV guide Press GUIDE todisplaytheTV guide. Use / / / to highlight the programmeyouwanttorecordandpressOK.Inthemenuthatpopsup,pressoneofthefollowing:•OKagaintoconfirmtheschedulingoftherecording.
•EXITtoreturntotheTVchannelthatyouwerewatchingpriortodisplayingtheTV Guide.
•BACKtoreturntotheTV Guide.
IMPORTANT NOTE: Iftheschedulingismadeona‘Now’
programme(highlightedinblue),yourHDreceiversstartsrecordinginstantlyandislockedontheprogrammetosecureitsrecording.AnyattempttocontrolthereceiverdisplaysrEConyourHDreceiver’sfrontpanel.YoumustSTOPtherecordingtorecoverthecontrolofyourreceiver.
Iftheschedulingismadeonalaterprogramme,yourHDreceiverwillrecorditatthesetdateandtime.TheprogramishighlightedinredintheTV Guide.

17UsingyourHDreceiver
ENG
LISH
Note Ifparentalcontrolisonwhilescheduling
arecordingonalockedchannel,werecommendyoutogototheParental controlmenuandenteryourPINcode(thenreportedas“Typedin”).Inthatcase,therecordingwillstartautomatically.
Use / tohighlightthesettingyouwanttochangeandpress or OK. Use / tochangeitandpressthegreenbuttontoconfirmtherecordingtimer. Press the redbuttontocanceltherecordingtimerandreturntotheScheduled recordingsmenu.
Todeleteanalreadyscheduledrecording,use / tohighlightitandpressthered button.
Press EXITtoreturntowatchingliveTVorpress MenutoreturntotheMainmenu.
4.9 Using the Tools menuYou use the Toolsmenutodisplaysubtitles,changetheaudiolanguage,controlaudiodescriptionandsynchroniseaudiowithvideo.
Press OPTIONS todisplaytheTools menu.
Use / tohighlightthesettingyouwanttochange.
Press or OK andthenpress / to selectanoptionfromthelistthatappearsontheright.YoucanchangethesesettingsusingtheToolsmenu:
Settings Options
Subtitles OnOff(default)
Audiolanguage Availablelanguagesdependonthebroadcastprogramme.
Audiodescription OnOff(default)
Audiodesc.level Settheaudiodescriptionvolume.(Availableif‘Audiodescription’isturnedonandbroadcast.)
Lipsync Set the DIGITAL audiooutputdelaytosynchroniseaudiowithvideo.
Press tosaveyourchangesandreturntothetoolsmenu.
Press OPTIONS ,BACK or EXIT toremovethetoolsmenu.

UsingmoreofyourHDreceiver18
Rear panel
2 4 7 9
1 3 65 108
1 Antenna IN*:Toconnectyouraerialcablefromthewallsocket
2 To TV/VCR*: AntennaoutputtoTV/VCR(antennasignal)
3 Ethernet*: ToconnectyourHDreceivertoanInternetaccesspoint
4 USB 2.0*:UniversalSerialBusport5 HDMI*:ToconnecttotheHDMIinput
connectoronyourhigh-definitionTV6 AUX SCART*: Toconnecttothe
SCARTconnectoronyourstandard- definitionTVoranyrecordingdevice suchasaVCR.
7 DIGITAL audio out*: Toconnectanhi-fiamplifier
8 AUDIO L + R*: Toanhi-fiamplifier9 ON/OFF switch: Toswitchon/offyour
HDreceiver10 Power*:Toconnectthe12Vpowersupply
unit
*Safeextralowvoltage
5 Using more of your HD receiver
5.1 HD receiver
Front panel
42 3 7
1 5 6
1 Standby indicator: Red:initialisationmodeandstandby
mode Orange:active-standbymode2 standby button: Switches your HD
receiverintooroutofstandby 3 P+ & P- buttons:Tochangechannelup
ordown4 Res button:TochangetheHDMIoutput
resolutiontoAuto(default),576i, 576p,1080i or 1080p
5 V-Out button:Tochangetheactivevideo output to HDMI(default)orSCART
6 Display: 4-digitdisplay7 HD indicator:Lightsupwhen
youarewatchinganHDchannel

19UsingmoreofyourHDreceiver
ENG
LISH
5.2 Remote control
GUIDE OPTIONS
INFO
DIGITAL RECEIVER
TEXT RADIO EXIT
AD
1
7
8
9
10
5
4
6
12
15
17
3192
14
13
18
16
11
1 Switchtostandbyorwakeupfromstandby
2 MENU Open/close‘Main’menu3 RADIO Switchbetweenradioand
TVchannels4 EXIT Removemenus,channel
bannerandchannellists5 Colourbuttons Usedincontextualmenus
andMHEGapplications6 Open/close‘Tools’menu7 U,D,L, R Moveup/down/left/right
withinlistsormenus8 Returntotheprevious
channelormenuscreen9 P+/- Changechannelup/down10Numberbuttons Alphanumerickeypad11 Turnsubtitleson/off12 AD TurnAudioDescriptionon/off13 VOL+/- Turnvolumeup/down14 Mute/restoresound15 Open/closechannelbanner16OK Confirmselectionor
schedulearecordinginthe‘TVguide’
17 Open/close‘TVguide’18 TEXT Open/closeMHEG
applications19 Changepictureformat
setting

UsingmoreofyourHDreceiver20
5.3 Front-panel display messages
YourHDreceiverisstartingup
YourHDreceiveristunedtoTVchannel25.YourHDreceiverdisplaysr025 whenitistunedtoradiochannel25.
- rECisdisplayedeachtimeyoupressabuttononyourremotecontroltoindicatethat:
•Arecordingisinprogress•YourHDreceiverislockedontotheprogrammebeingrecorded- TounlockyourHDreceiver,youmuststoptherecordingbypressingEXIT
andthenOK.
Antennasignalisnotavailable
Subtitleon.oFFindicatesthatsubtitlesareturnedoff.
Mainmenuisopen
Channellistisopen
TVguideisopen
YourHDreceiverisswitchingtostandbymode
HDMIistheactiveA/Voutput(recommended)ofyourHDreceiver
AUXSCARTistheactiveA/VoutputofyourHDreceiver
Pictureformatis4:3withblackbars–16:9Eindicatesthatthepictureformatis4:3stretchedto16:9–16:9oindicatesthatthepictureformatis4:3zoomedintothescreenwidth.
Softwareupdateisstarting–L0 to L100indicatethatthesoftwareisbeingloaded–S0 to S100indicatethatthesoftwareisbeingloaded–Endindicatesasuccessfulupdate–FAiLindicatesafailedupdate.
Automaticresolutionadjustment(recommended)–otherpossiblesettingsareindicatedas576i,576P,720P,180i(for1080i)and180P(for1080p).
YourHDreceiverisinthefirstinstallationsetup

21UsingmoreofyourHDreceiver
ENG
LISH
5.4 Using the Main menu Press MENUtodisplaytheMainmenu.
Use / tohighlightasetting. Press or OKtoconfirmyourchoice. Press BACK toreturntotheMain menu.PressBACK again,MENU or EXITtoremovetheMainmenu.
NoteUse the colourbuttonstoperformcontextualactions,whicharedescribedatthebottomofthescreen.
5.4.1 Managing favourite listsYourHDreceiverallowsyoutocreatefavouriteliststhatincludethechannelsyouwatchthemost.Thisletsyouaccessyourfavouritechannelsquicklyinsteadofscrollingthroughtheentirelist.
Creating a favourite list OntheMainmenu,makesurethat
Favouritesishighlightedandpress or OK. TheFavouritesmenuappears.
Use / to highlight either TV channels or Radio channels,andpress or OK. Themenunowdisplaystheselectedfullchannellist(All TV or All Radio)andtheexistingfavouritelists.
Press the redbuttontocreateanewfavouritelist.YourHDreceiver,bydefault,namesthenewfavouritelistasList1(forTVchannels)orRLst1(forradiochannels).YoucancreateuptofourseparateTVandradiofavouritelists.Torenametheselists,see page 22.
Toaddachanneltoyourfavouritelist,use / tohighlightachannelandpress OK.
Toremoveachannelfromyourfavouritelist,use / tohighlightitandpressOK.
Whenyouarefinishedaddingallyourchannels,pressthegreenbutton.Press toreturntotheFavouritesmenu.

UsingmoreofyourHDreceiver22
Toaddachannel,presstheredbutton.Thenuse / tohighlightthechannelyouwanttoaddandpressOK. Press the green buttontosaveyourchanges.
Toremoveachannel,use / to highlight itandpressthegreenbutton.
Toreorderthechannelsinyourfavouritelist,use / tohighlightachannelyouwanttomoveandpressthebluebutton.Use / tomovethechannelupordownandpressOK.
Press toreturntotheFavouritesmenu.
Deleting favourite lists From the Favouritesmenu,use / to
highlight either TV channels or Radio channelsandpress or OK.Themenunowdisplaysthedefaultchannellist(All TV or All Radio)andanyexistingfavouritelists.
Use / tohighlightthefavouritelistthatyouwanttodelete,andpressthegreen button.
Press or BACK toreturntotheFavouritesmenu.
5.4.2 Using the Settings menuYou use the SettingsmenutocustomiseyourHDreceiver.Forexample,youcanlockcertainchannels,changedisplaysettings,etc.
Accessing the Settings menu From the Mainmenu,use / to highlight
Settingsandpress or OK. TheSettingsmenuappears.
Press or BACK toreturntotheMainmenu.
Renaming favourite lists From the Favouritesmenu,use / to
highlight either TV channels or Radio channelsandpress or OK. Themenunowdisplaysthedefaultchannellist(All TV or All Radio)andanyexistingfavouritelists.
Use / tohighlightthefavouritelistthatyouwanttorename,andpressthebluebutton.
IntheRename listmenuthatpopsup,use / or the numberbuttonstorenameyourfavouritelist.Pressthegreen buttontoconfirmorpresstheredbuttontoreturntothepreviousmenuwithoutsavinganychanges.
Press or BACK toreturntotheFavouritesmenu.
Modifying/Editing favourite lists From the Favouritesmenu,use / to
highlight either TV channels or Radio channelsandpress or OK. Themenunowdisplaysthedefaultchannellist(All TV or All Radio)andanyexistingfavouritelists.
Use / tohighlightthefavouritelistthatyouwanttomodify,andpress or OK.

23UsingmoreofyourHDreceiver
ENG
LISH
Setting your preferences From the Settingsmenu,use / to
highlight Preferencesandpress or OK. ThePreferencesmenuappears.
Use / / / / OK tonavigatethroughthesettingsandoptions,andmakechanges.
Press or BACK tosaveyourchangesandreturntothepreviousmenu.
You use the Preferencesmenutochangethesesettings:
Display•Banner duration - Use this to set the lengthoftime(3to10seconds)thatthechannelbannerremainson-screenwhenyouchangechannel.Bydefault,itissetto5 seconds.
•Timer warning duration - Use this tosethowsoonbeforethestartofaprogramshouldtherecord-timeralertyou.Theavailableoptionsare30 seconds before,1 minute before (default),2 minutes before or 5 minutes before.
•Front panel brightness - Use this to set the brightnessofthefront-paneldisplay.Youcanset this to Low,Medium (default)orHigh.
Language preferences•Information language - Use this to setyourpreferredlanguagefordisplayingprogrammeinformationtoEnglish (default),Gaelic,Welsh or Irish.
•Audio language - Use this to set your preferredaudiolanguagetoEnglish (default),Gaelic,Welsh or Irish.
•Default subtitles mode - Use this to set howyouprefertodisplaysubtitles.
YoucansetthistoActivated,Not activated,Auto when no correct audio(default),Auto when audio is muted or For hearing-impaired.
•Subtitles language - Use this to set your preferredlanguageforsubtitlestoEnglish (default),Gaelic,Welsh or Irish.
Recording•Record Link-Usethissettingtoenableordisablethecontrol,byyourHDreceiver,ofthestart-stoprecordingfunctionofyourVideoorDVD-Rrecorder(seethenoteonpage29).
Analog output•Video on AUX Scart - Use this to set thetypeofanaloguevideosignalsthatareoutputontheAUX SCART connectorofyourHDreceiver.YoucansetthistoRGB (defaultwhenV-OutissettoAV)orCVBS (defaultwhenV-OutissettoHDMI).
•Audio on AUX Scart -ThissettingapplieswhenyourHDreceiverisconnectedviaaSCARTCabletoastandard-definitionTV.UsethistosetthetypeofanalogueaudiosignalsthatareoutputontheAUX SCART connectorofyourHDreceiver.YoucansetthistoMono or Stereo (default).
•TV format - Use this to set the format oftheanaloguevideothatisoutputonthe AUX SCART connectorofyourHDreceiver.Youcansetthisto4/3 Letter Box,4/3 Centre Cut Out or 16/9(default).Theoptionsdeterminehowwidescreen(16:9)programmesshowonastandard-definitionTVwithaspectratioof4:3.
Digital output•HDMI output resolution - Use this to settheHDMIvideoresolutionto576i,576p, 720p, 1080i, 1080p,Auto (default)or Original.NotethatyoucanalsochangethissettingusingtheRESbuttononthefrontpanelofyourHDreceiver.
UsingmoreofyourHDreceiver24
Default volume Usethistosetthedefaultvolumeatwake-
upofyourHDreceiver.
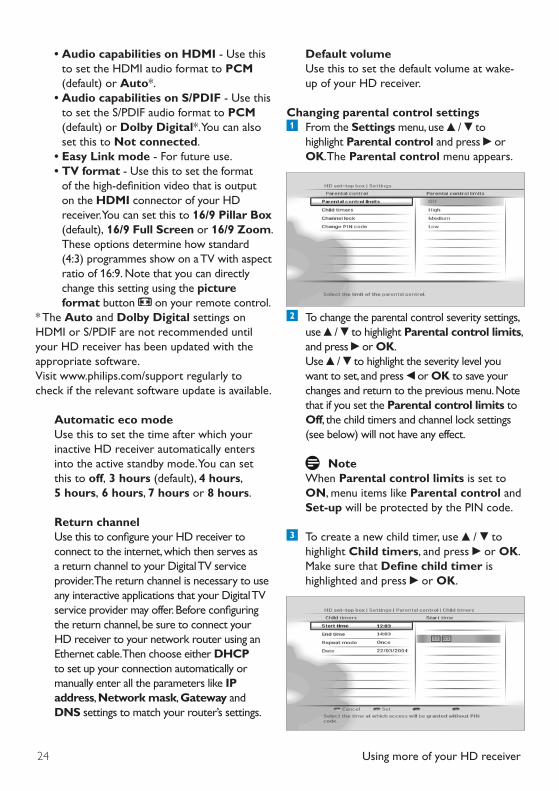
Changing parental control settings From the Settingsmenu,use / to
highlight Parental controlandpress or OK.TheParental controlmenuappears.
Tochangetheparentalcontrolseveritysettings,use / to highlight Parental control limits,andpress or OK. Use / tohighlighttheseveritylevelyouwanttoset,andpress or OK tosaveyourchangesandreturntothepreviousmenu.Note that if you set the Parental control limits to Off,thechildtimersandchannellocksettings(seebelow)willnothaveanyeffect.
Note WhenParental control limits is set to
ON,menuitemslikeParental controlandSet-upwillbeprotectedbythePINcode.
Tocreateanewchildtimer,use / to highlight Child timers,andpress or OK. MakesurethatDefinechildtimer is highlightedandpress or OK.
•Audio capabilities on HDMI - Use this tosettheHDMIaudioformattoPCM (default)orAuto*.
•Audio capabilities on S/PDIF - Use this tosettheS/PDIFaudioformattoPCM (default)orDolby Digital*.Youcanalsoset this to Not connected.
•Easy Link mode - For future use. •TV format - Use this to set the format ofthehigh-definitionvideothatisoutputontheHDMI connectorofyourHDreceiver.Youcansetthisto16/9 Pillar Box (default), 16/9 Full Screen or 16/9 Zoom. Theseoptionsdeterminehowstandard(4:3)programmesshowonaTVwithaspectratioof16:9.Notethatyoucandirectlychangethissettingusingthepicture formatbutton onyourremotecontrol.
*TheAutoandDolby DigitalsettingsonHDMIorS/PDIFarenotrecommendeduntilyourHDreceiverhasbeenupdatedwiththeappropriate software. Visitwww.philips.com/supportregularlytocheckiftherelevantsoftwareupdateisavailable.
Automatic eco mode Use this to set the time after which your
inactiveHDreceiverautomaticallyentersintotheactivestandbymode.Youcansetthis to off, 3 hours (default),4 hours, 5 hours, 6 hours,7 hours or 8 hours.
Return channel UsethistoconfigureyourHDreceiverto
connecttotheinternet,whichthenservesasareturnchanneltoyourDigitalTVserviceprovider.ThereturnchannelisnecessarytouseanyinteractiveapplicationsthatyourDigitalTVserviceprovidermayoffer.Beforeconfiguringthereturnchannel,besuretoconnectyourHDreceivertoyournetworkrouterusinganEthernetcable.ThenchooseeitherDHCP tosetupyourconnectionautomaticallyormanuallyenteralltheparameterslikeIP address,Network mask,GatewayandDNSsettingstomatchyourrouter’ssettings.

25UsingmoreofyourHDreceiver
ENG
LISH
Use / / / tosetthetimeperiodduringwhichyouwillbeabletowatchanyunlockedchannelwithouthavingtoenteryourPINcode.Pressthegreen buttontoconfirm.
Todeletethechildtimer,makesureModify child timerishighlightedand press the red button.
Tomodifythechildtimer,makesureModify child timerishighlightedand press or OK.Maketherequiredchangesandpressthe green buttontoconfirm.
Tolockachannel,use / to highlight Channel lock,andpress or OK. Use / tohighlightthechannelyouwanttolock,andpressOK. Press or BACK toreturntothepreviousmenu.
TochangeyourPINcode,use / to highlight Change PIN code,andpress or OK.Use the numberbuttonstofirstenteryourcurrentPINcodeandthenenteryournewPINcode.Usethenumber buttonstoenteryournewPINcodeagain,forconfirmation.IfyoucorrectlyenteredthePINcodes,yourHDreceiverbrieflydisplaysamessageconfirmingthatyourPINhasbeenchanged,andthenreturnstotheParental Controlmenu.
Note YournewPINcodecanbeany4-digit
numberotherthanthedefaultPINcode(0000).
Press or BACK toreturntotheSettingsmenu.
Retuning your HD receiver From the Settingsmenu,use / to
highlight Set-upandpress or OK. IntheSet-upmenuthatappears,makesure Channel installation is highlightedandpress or OK.
IntheChannel Installationmenuthatappears,makesureRe-tuneishighlightedandpress or OK.
Aprogressscreendisplaystoconfirmthatthesearchistakingplace.
Press the greenbuttontosaveanynewchannelsandreturntotheSet-upmenu.Press the redbuttontocancelthesearchandreturntotheSet-upmenu.
Note TheNetwork messagesmenu(underthe
Settingsmenu)alertsyouofanychangestoyournetworksuchasrecentlyaddedchannels,services,etc.Tosavetime,checkthismenubeforeretuningyourHDreceiver.
Updating your HD receiver’s software manuallyYoucanmanuallyupdateyourHDreceiversoftwareusingaUSBmemorystick.
DownloadthelatestsoftwarefilefromthePhilipswebsite(www.philips.com/support),unzipitandtransferittoaUSBmemorystick.Besuretoplacethedownloadedfileinthetop-levelfolderofyourUSBmemorystick.
ConnectyourUSBmemorysticktotheUSBconnectorontherearpanelofyourHDreceiver.
From the Settingsmenu,use / to highlight Set-upandpress or OK.
IntheSet-upmenuthatappears,use / to highlight Software updateandpress or OK.

UsingmoreofyourHDreceiver26
NoteResettingyourHDreceivertothefactorydefaultsettingserasesallofyourpreferencesandsettings.Forexample,allofyourfavouritelistsandrecordingtimerswillbeerased.
Changing other system settings From the Settingsmenu,use / to
highlight Set-upandpress or OK. TheSet-upmenuappears.
ToturnonoroffthechannelupdatesthatautomaticallyhappenwhenyourHDreceiverisintheactive-standbymode,makesure Channel installationishighlightedandpress or OK. Press to highlight Automatic updateandpress or OK. Use / to highlight On or Off. Press or BACK tosaveyourchangesandreturntothepreviousmenu.
Tocheckthesignalqualityofanychannelthatyouarereceiving,press to highlight Signal qualityandpress or OK. IntheSignal quality testmenuthatappears,use / toselectachannelthatyouwanttocheck.Press or BACK to returntothepreviousmenu.
Toturnonoroffpoweringyouractive-indoor antennausingtheAntenna IN connectorontherearpanelofyourHDreceiver,press to highlight Antenna poweringandpress or OK. Use / to highlight Off or On. Press or BACK tosaveyourchangesandreturntothepreviousmenu.
YourHDreceiverlocatesthesoftwareavailableonyourUSBmemorystickanddisplaysaconfirmationmessage.Pressthe greenbuttontoinstallthesoftwareimmediately.Presstheredbuttontocancelandreturntothepreviousmenu.Ifyoupress the greenbutton,yourHDreceiverupdatesthesoftwareandrestarts.Youmay,dependingontheupdate,thenberequiredtocompletethefirstinstallationsetup(seepage10).
Restoring factory default settings From the Settingsmenu,use / to
highlight Set-upandpress or OK. IntheSet-upmenuthatappears,
use / to highlight Factory resetandpress OK twice.
Amessageappearsaskingyoutoconfirm.Ifyouaresure,pressthegreenbutton,orpress the redbuttontocancelandreturntothepreviousmenu.Ifyoupressthegreenbutton,yourHDreceiverrestoresthefactorydefaultsettingsandrestarts.Youwillthenberequiredtocompletethefirstinstallationsetup(seepage10).

27Maintenance
ENG
LISH
Note Set Antenna powering to Ononlyifyou
needtopoweranactive-indoorantennathatrequiresa5Vpowersupplynotexceeding50mAcurrentconsumption.Besuretoreadyourindoorantenna’susermanualbeforeturningthissettingon.
Tocontrolantennaoutput,press to highlight Antenna outputandpress or OK. Use / to highlight Inactive in eco mode or Always active. Press or BACK tosaveyourchangesandreturntothepreviousmenu.
Note If Antenna output is set to Inactive in
ecomodewhileAntenna powering is set to On,thedevice(s)connectedtotheTo TV/VCR outputwillnotreceivetheantennasignal.
ToseeinformationaboutyourHDreceiver,press andhighlightSystem information. Detailssuchassoftwareversion,modelnumber,serialnumber,etc.,aredisplayedonthe right.
Press or BACK toreturntotheSettingsmenu.
6 Maintenance
6.1 CleaningForcleaning,useasoft,damp(notwet)cloth.Neveruseanyabrasiveclothandaerosolcleaners
6.2 ReplacingYourHDreceiverdoesnotcontainanyuser-serviceableparts.Donotattempttoopenit.Allmaintenanceworkmustbecarriedoutbyqualifiedservicecentres.
6.3 DisposingYourHDreceiverisdesignedandmanufacturedwithhigh-qualitymaterialsandcomponents,whichcanberecycledandreused.
Pleaseinformyourselfaboutthelocalseparatecollectionprocessforelectricalandelectronicproducts.
Pleaseactaccordingtoyourlocalrulesanddonotdisposeofyouroldproductswithyournormalhouseholdwaste.Thecorrectdisposalofyouroldproductwillhelppreventpotentialnegativeconsequencesfortheenvironmentandhumanhealth.

Accessoriesandconnections28
Recommended connection•ConnecttheHDMIoutputofyourHDreceivertoanHDMIsourceinputofyouramplifier.
•ConnecttheHDMIoutputofyouramplifiertoanHDMIinputofyourTV.
System settings•ForyourHDreceiver,settheAudio
capabilities on HDMI setting(underMenu > Settings > Preferences > Digital output)toAUTO.
•SelectthecorrectA/VsourceonyourTV.•SelectthecorrectA/Vsourceonyouramplifier.
•VolumecontrolsandnecessaryLipsyncadjustmentsareperformedbyyouramplifier.Refertoyouramplifier’susermanual.
7.2 Connecting your recording equipment
HD receiverAerial wall
socket
1
32
4
TV
HDMI
VCR
SCART
Mains wall socket
Connecttheaerialcable(notsupplied)fromtheaerialwallsockettotheAntenna IN connectorontherearpanelofyourHDreceiver.
UsethesuppliedHDMIcabletoconnecttheHDMI connectorontherearpanelofyourHDreceivertotheHDMIinputconnectorofyourTV.
7 Accessories and connections
7.1 Connecting your audio equipment
Audio Equipment
L RDigitalAnalogue
AC B
HDMIHDMI
TV
HDMI
C
HD receiver
Option A – Electrical S/PDIF connection (Digital)ConnecttheDIGITALaudiooutputofyourHDreceivertotherelevantaudioinputofyouraudioequipmentusinganelectricalS/PDIFcable(notsupplied).Refertotheusermanualofyouraudioequipmenttochoosetheproperdigitalaudioinput.
NoteWithadigitalconnectionviatheDIGITAL outputofyourHDreceiver,muteandvolumeoperationsaremanagedbyyouraudioequipmentandnotbyyourHDreceiver.
Option B – Analogue connectionConnecttheL/RaudiooutputstotherelevantaudioinputsofyouraudioequipmentusingadoubleCINCHcable(notsupplied).Refertotheusermanualofyouraudioequipmenttochoosetheproperanalogueaudioinputs.
Option C - HDMI connectionRecentamplifiersarefittedwithoneormoreHDMIsourceinput(s)andoneHDMIoutput.
29Accessoriesandconnections
ENG
LISH
UseaSCARTcable(notsupplied)toconnectthe AUX connectorontherearpanelofyourHDreceivertotheSCARTinputconnectorofyourVCRorotherrecordingequipment.
ConnectyourHDreceiverandotherequipmenttothemains.
NotesDouble Scheduling Tosucceedmakingrecording,donot
forgettosettimersonyourvideoorDVDrecorderaccordingtoyourHDreceiver’srecordingschedulings.
How to avoid double scheduling? Yourrecorderisfittedwithafeature
allowingitsstart-stopcontrolcompatible*withyourHDreceiver.
*TherecorderfunctionisactivatedbythevideosignalatitsSCARTinput.Oncethefunctionisactive,therecordingstartswhenvideoisonandstopswhenvideoisoff.
IfyourVideoorDVD-Rrecordersupportstheabovefunction,thesimpleschedulingofyourHDreceiverwillautomaticallycontrolyourrecorder.
Necessary system installation•Enable‘RecorderControl’onyourVideoorDVD-Rrecorder.Refertotheusermanualofyourrecorder.
•Set the Recording linksettingofyourHDreceiver(underMenu > Settings > Preferences > Recording)toON.
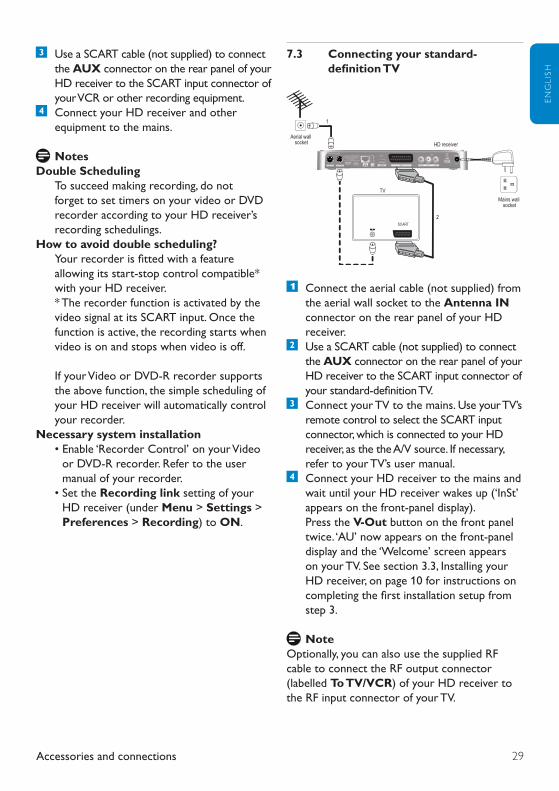
7.3 Connecting your standard-definitionTV
HD receiverAerial wall
socket
1
2
4
TV
SCART
Mains wall socket
Connecttheaerialcable(notsupplied)fromtheaerialwallsockettotheAntenna IN connectorontherearpanelofyourHDreceiver.
UseaSCARTcable(notsupplied)toconnectthe AUX connectorontherearpanelofyourHDreceivertotheSCARTinputconnectorofyourstandard-definitionTV.
ConnectyourTVtothemains.UseyourTV’sremotecontroltoselecttheSCARTinputconnector,whichisconnectedtoyourHDreceiver,asthetheA/Vsource.Ifnecessary,refertoyourTV’susermanual.
ConnectyourHDreceivertothemainsandwaituntilyourHDreceiverwakesup(‘InSt’appearsonthefront-paneldisplay). Press the V-Outbuttononthefrontpaneltwice.‘AU’nowappearsonthefront-paneldisplayandthe‘Welcome’screenappearsonyourTV.Seesection3.3,InstallingyourHDreceiver,onpage10forinstructionsoncompletingthefirstinstallationsetupfromstep 3.
NoteOptionally,youcanalsousethesuppliedRFcabletoconnecttheRFoutputconnector (labelledTo TV/VCR) ofyourHDreceivertotheRFinputconnectorofyourTV.

Guaranteeandservice30
9 Technical dataThisproductisinconformitywithEuropean95/47/ECand2002/21/ECdirectives.TheproductcomplieswiththefollowingEuropeancouncilDirectives:2006/95/EECand2004/108/EC.
Video decodingStandarddefinition• MPEG2MP@ML• MPEG4AVCMP@L3• Videobitrate 15Mbit/s• Resolution:576imax 720x576pixelsinterlaced
• Pictureformat4:3et16:9Highdefinition• MPEG2MP@HL• MPEG4AVCHP@L4• Videobitrate 20Mbit/s• Resolutionofbroadcast:720p,1080i• Upscale up to: up to 1080p50• Contentprotection:HDCPonHDMI
Audio Decoding• MPEGIlayerI,II• DolbyDigital• HE-AACstereo/Multichannel• DolbyDigital/HEAACtostereodown-mixing• DolbyDigitalPlustoDolbyDigitaltranscoding
• HE-AACtoDolbyDigitaltranscoding**Featuresubjecttofutureproductsoftwareupgrade
Convenience• Automaticinstallation• HDreceptionindicator• Automaticchannelupdate• TVandRadiomodes• 4xfavoriteTVchannellists• 4xfavoriteRadiochannellists• Programlistediting:Add,Move,Delete• Parentalcontrol–Childlock• 8daysElectronicProgramGuide
8 Guarantee and serviceForthePhilipswarrantyapplicabletoyourHDreceiver,pleasevisitthePhilipswebsite: www.philips.com/guarantee.IncaseyoudonothaveanInternetconnection,pleasecontactyourlocalPhilipsConsumerCareCentre(seepage37).

31Technicaldata
ENG
LISH
• Eventtimer8• EventprogrammingviaEPG• DVBsubtitling• DigitalTXT/MHEGwithInteractionchannel• VideoscalingonHDMIoutput:Auto,Original 576i,576p,720p,1080i,1080p50
• DolbyDigital5.1audiooutput• ECOpowermanagement• IPaddressassignment:ManualorDHCP• Softwareupdate: UpdateviaOTAdownload LocalupdateviaUSB
Application system resources• ProcessorSTi7105
Reception - Demodulation• ReceptionofDVB-Tbroadcast(EN300744)• ReceptionofDVB-T2broadcast(acc.D-Book6.1)• Demodulationtype:COFDMFFT• Inputfrequencyrange:UHFIV/V 470–862MHz
• ActiveRFLoop-through: Bandwidth47-862MHz Switchtopassiveloop-throughin standbymode
• Channelbandwidth(BW):8MHz• Network:MFN/SFN
Antenna control for indoor aerial• ViaRFINconnector• DCpowering:5Volts/50mA• Switchableviamenu:On/Off
Front-panel display / buttons• 4x7segmentLEDdisplay• 1xbi-colorLED• 1xblueLED• 5xButtons:Standby,P-,P+,Res,V-Out
Rear panel connections• RFin:typeIEC169-2female• RFout:typeIEC169-2male
• HDMIoutput• AUXSCARTconfigurablebymenu -SCARTVCRconfiguration(forrecorder)Outputs:CVBS*,fixedlevelL/Raudio -SCARTTVconfiguration(foraTV) Outputs:CVBS*orRGB/FB,fixedlevelL/Raudio,Slowblanking
• L/RanalogueAudiooutput• Digitalaudiooutput: CinchelectricalSPDIF
• DCpowerinlet• RJ45• USB2.0(Master)*Videostandard:PAL
Accessories• Remotecontrol Protocol:RC6
• Batteries:2x1.5VtypeAAA/R03• Usermanual• QSG• Freeviewflyer• Retuneflyer• HDMIcable• CoaxialRFcable• AC/DCpoweradaptorincl.mainscord
Miscellaneous• Temperaturerange(°C) Operating+5to+45°C Storage-25to+70°C
• Mains:AC230V+/-10%,50Hz• Powerconsumption:<6W Standby:<1W
Offmode:<0.3W• Weight:1.4kg Includingpackaging:2.3kg
• Dimensions: Product(mm)290x160x37 Packaging(mm)370x235x70
Duetocontinuedproductimprovement,thisspecificationmaychangewithoutnotice.

Frequentlyaskedquestions32
Your HD receiver seems to be switching off automatically after some time.Ifyourreceiverautomaticallygoesintostandbymode(standbyindicatoronthefrontpanellightsup),thisisduetotheEcomode.TheEcomodeissetto3hours,bydefault(environmentallyfriendlyproduct).Tomodifyit,gotoMenu > Settings > Preferences > Automatic Eco mode,andchooseadifferentvalue.Seepage24.
Your remote control is not working.• Makesurethatyoupointyourremote
controldirectlyatyourHDreceiverandthatnothingisbetweenitandyourHDreceiver.ThestandbyindicatoronyourHDreceiver’sfrontpanelshouldflasheachtimeyoupressaremotecontrolbutton.
• Checkthebatteriesandreplacethem,ifnecessary.
• If rECisdisplayed(onthefront-paneldisplay)everytimeyoupressabuttononyourremotecontrol,seebelow.
Your HD receiver displays “rEC” on the front-panel display each time you press a button on your remote control and your HD receiver is locked.Arecordingisrunning,whichlocksyourHDreceiver.TounlockyourHDreceiver,youmustSTOPTHERECORDINGbypressingEXITandthenOK.
The picture is not displayed on your HDTV and an HDCP authentication error is displayed.YourHDTVdoesnotsupportHDCP,whichallowsyourHDreceivertotransmitfull-resolutionvideotoyourHDTV.Asaresult,theHDMIoutputdisplaysamessagemaskingthevideo,whichasksyouforchangingtheresolutiondownto576p(seepage18-Resbutton).
10 Frequently asked questions
ConnectionYour HD receiver does not display any digital TV channels on your TV. You may also see the on-screen message “Signal lost”.• Checkthattheaerialcablefromtheaerial
wallsocketiscorrectlyconnectedtoyourHDreceiver(seepage10).
• Theremaybeatemporaryproblemwiththereception,caused,forexample,bybadweather;tryagainlater.
• Checkifthereisanynetworkmessagerelatedtothissignalloss.YoucanaccesstheNetwork messages menufromMenu > Settings > Network messages.
SetupYour HD receiver does not seem to be working and there are no lights on the front panel. • Checkthatthe12Vpowersupplyunit is
correctlyconnectedtoyourHDreceiver.• EnsurethattheON/OFFswitchonthe
rearpanelofyourHDreceiverisswitchedon(isinthe‘1’position).
Your HD receiver does not seem to be working and a channel number is shown on the front-panel display.• Checkthatallconnectionsareproperly
made(seepage10).• CheckthatyourTVispluggedintothemains
andthatitisswitchedon.• Checkthatyouhaveselectedthecorrect
A/Vchannel/sourceonyourTVdependingonhowyourHDreceiverisconnectedtoit(thatis,usingHDMIorSCART).RefertoyourTV’susermanualforinstructions.

33Frequentlyaskedquestions
ENG
LISH
Your HD receiver seems to lock up or get stuck while retuning it to search for new channels.InpartsofthecountrywheretheanalogueTVserviceshavealreadybeenswitchedoff,thetimetakentoretunecanincrease.ThisisbecauseyourHDreceiverscansforallthetransmittersinyourarea,whichcantakeupto15minutes.Pleasewaitfortheretunetocomplete.Thisisnotafault.
Youcannotfindallthechannelsyouthinkshould be available even after retuning your HD receiver.• Themissingchannelsmaynotbeavailable
inyourarea.CheckyourcoverageontheFreeviewwebsite:www.freeview.co.uk.
• Yourantennamayneedtobeupgraded(signalpower,position,orientationorcabling).
• Asignalboostermaybefittedonyourantenna.Considerhavingthisremovedasamplifiersarenormallynotrequiredafterthedigitalswitchover.ToohighasignallevelcancauseyourHDreceivertoskipsomechannels.
• Someearlydigitalreceiversmanufacturedpriorto2004supportonlythe2Kmodeofdigitaltransmissions.Aspartofthedigitalswitchover,theUKFreeviewTVplatformwillbeupgradedtoamorerobusttransmissionstandard.ThechangeintransmissionstandardhasbeenauthorisedbyOFCOMandthenewstandardissupportedbyproductsthathavethe“DigitalTick”.
• IfyouhaveaSKYbox,switchittostandbymodeandthenretunetheterrestrialreceiver.IfitthenreceivesallexpectedFreeviewchannels,thenthemodulatorneedsadjustingonyourSkybox.ContactSkytofindouthowtoadjustthemodulator.
The picture seems to be stretched or squashed.ChecktheTV formatsettingunderDigital output or Analog output(Main > Settings > Preferences).Alternatively,pressthepicture formatbutton onyourremotecontroltoscrollthroughthedifferentsettings.AlsorefertoyourTV’susermanual.
Your HD receiver displays ‘err’ on the front-panel display when you plug in a USB memory stick. ReformatyourUSBmemorystickusingacomputer.EnsurethatthefilesystemisFAT16orFAT32.
Youcannotfindallthechannelsyouthinkshould be available.RetuneyourHDreceiver(seepage25).Alternatively,resetyourHDreceivertoitsfactorydefaultsettings(seepage26)andproceedwiththefirstinstallationsetup.
NoteDuringthefirstinstallation,yourchoiceofthenetworkmayaffectthenumberofinstalledchannels.
YoudonotfindanyHDchannels.Initially,HDprogrammesareavailableonlyonchannels50and51.Switchtothesechannels.NotethattheHDindicatoronthefrontpanelofyourHDreceiverlightsupwhilewatchinganHDchannel.DigitalterrestrialbroadcastingisprogressingintheUK.Asdigitalswitchoverhappens,thenumberofdigitalchannelsavailableineachregionmayalsoincrease.Pleasevisitoneofthefollowingwebsitestofindoutwhenthedigitalswitchoverisscheduledforyourarea: www.digitaluk.co.uk www.freeview.co.uk/availability(coveragecheckerforHD)

Frequentlyaskedquestions34
You get a picture or a freezed picture, a program number on the front display and your receiver seems blocked while not responding to the remote control commands.YourHDreceiverhashungup.YouhavetoresetyourHDreceiver.PressthestandbybuttononthefrontpaneluntilInit isshownonthefront-paneldisplay.
Ifyouhavetriedalloftheactionssuggestedaboveandstillarenotabletoresolvetheproblem,contactyourlocalPhilipsConsumerCareCentre(seepage37).
Your HD receiver found all the expected channels after you retuned it. However, when you turned on your HD receiver the next day, the picture was breaking up and some channels were missing.YourHDreceiverhasanautomaticretuningfeature;thisallowsittokeepuptodatewithminorservicechanges.However,whenthesignallevelofnearbyrelaytransmittersarehighoriftheantennasignalisbeingamplified,theseproblemscanoccur.Tosolvethisproblem:• Turnofftheautomaticchannelupdates
featureofyourHDreceiver(seepage26).• Removeanysignalamplifiersorboosters
thatarefittedonyourantenna.Thesearenotrequiredafterthedigitalswitchover.
• Checkthatyourantennaisalignedproperlyandisamodeladaptedfordigitalsignalreceptioninyourarea.Ifyouarenotsure,pleaseusetheservicesofarecognisedCAIantennainstallationcompany.
Although you set Audio capabilities to “Auto” for HDMI or “Dolby Digital” for S/PDIF, your HD receiver does not deliver Dolby Digital 5.1 multi-channel audio output.• YourHDreceiverneedsasoftwareupgrade.• Visitwww.philips.com/supportregularly
tocheckiftheappropriatesoftwareforugradingyourHDreceiverviaUSBisavailable.
• Set the Audio capabilitiessettingtoPCM untiltheupgradeofyourHDreceiverisdone.

35Glossary
ENG
LISH11 Glossary
Analogue audioAnaloguesoundisoutputfromtheLEFT/RIGHTaudioconnectorsontherearpanelofyourHDreceiver.Theredandwhitesocketssendaudiothroughtwochannels,theleftandright.
Aspect ratioAspectratioreferstothelength-to-heightratioofTVscreens.TheaspectratioofastandardTVis4:3,whiletheratioofahigh-definitionorwidescreenTVis16:9.Theletterboxformatallowsyoutowatchavideowithawideraspectratioonastandard4:3TV.
DHCPDynamicHostConfigurationProtocol(DHCP)isanetworkprotocolthatenablesarouterorservertoautomaticallyassignIPaddressestodevicesthatarepartofitsnetwork.
Digital audioDigitalsoundisavailablewhenyouusetheDIGITALaudioconnector(coaxialS/PDIF)ontherearpanelofyourHDreceiver.Thesesocketssendaudiothroughmultiplechannels,insteadofjusttwochannelsasanaloguedoes.,
Dolby DigitalAsurroundsoundsystemdevelopedbyDolbyLaboratoriescontaininguptosixchannelsofdigitalaudio(frontleftandright,surroundleftandright,centreandsubwoofer).
DVB DigitalVideoBroadcasting
EPGElectronicProgrammeGuide
EasyLinkThePhilipsEasyLink™technologyenablesyoutocontrolmultipledevices,whichareconnectedthroughstandardHDMIcables,usingasingleremote.
HDCPHigh-bandwidthDigitalContentProtection(HDCP)isatypeofdigitalcopyprotectionsystem.Whenyourset-topisattachedviaanHDMIcabletoanHDCP-compliantHDTV,theHDTVandset-topnegotiateasecurelink,whichallowsyourset-toptotransmitfullresolutionvideotoyourHDTV.
HDMI High-DefinitionMultimediaInterface(HDMI)isahigh-speeddigitalinterfacethatcantransmituncompressedhigh-definitionvideoanddigitalmulti-channelaudio.Itdeliversperfectpictureandsoundquality,completelyfreefromnoise.HDMIisfullybackwardcompatiblewithDVI.
HDTVHigh-DefinitionTelevision
Lip SynchronisationSettingusedtosynchroniseaudiowithvideoincaseadelayisexperienced,inparticular,ifspeechdoesnotmatchlipmovements.
MPEGMotionPictureExpertsGroup.Acollectionofcompressionsystemsfordigitalaudioandvideo.
PIN CodeA4-digitcodeusedtopreventaccesstoinappropriateprogrammes(parentalcontrol).

Index36
SDTVStandard-DefinitionTelevision.
SurroundAsystemforcreatingthreedimensionsoundfieldsfullofrealismbyarrangingmultiplespeakersaroundthelistener.
USB memory stickAsmallsizestoragedevice,whichisusedtoupdateyourHDreceiver’ssoftware(see page25).ConnectittotheUSB 2.0 connnectorontherearpanelofyourHDreceiver.
12 Index
Changechannel,13-15Channelbanner,13,14ConnectHDMI,10SCART,29
Controlvolume,13
FavouritelistsCreate,21Delete,22Modify,22Rename,22
Frontpanel,18
Indoorantenna Setting,26 Powering,10,27InstallFirstinstallation,10
Rearpanel,18RecordProgrammes,16Stop,16,32
Remotecontrol,19Restorefactorysettings,26Retune,25Returnchannel,24
Softwareupdate,25Systemsettings,26Switchonandoff,13
TVguide,15
Wake-upyourHDreceiver,13

37Contactinformation
ENG
LISHContact information
DTR 5520/05Serialnumber:
UNITED KINGDOMPhone:08003316015

Trademarksandpartnerlogos38
Trademarks and partner logosThePhilipswordmarkandthePhilipsshieldareregisteredtrademarksofKoninklijkePhilipsElectronicsN.V.andareusedbyPaceplcunderlicensefromKoninklijkePhilipsElectronicsN.V.
ManufacturedunderlicensefromDolbyLaboratories.“Dolby”andthedouble-DsymbolaretrademarksofDolbyLaboratories.
HDMI,theHDMIlogo,andHigh-DefinitionMultimediaInterfacearetrademarksorregisteredtrademarksofHDMIlicensingLLCintheUnitedStatesandothercountries.
TrademarkoftheDVBDigitalVideoBroadcastingProject(1991to1996)
TheFREEVIEWserviceissubjecttocoverage.TheFREEVIEW,FREEVIEW+,FREEVIEWHDandFREEVIEW+HDwordsandlogosaretrademarksofDTVServicesLTD.©DTVServicesLtd2010.
The“HDTV”LogoisatrademarkofEICTA.
100%recycledpaper
Paceand aretrademarksand/orregisteredtrademarksofPaceplc.

39Trademarksandpartnerlogos
ENG
LISH

©2010KoninklijkePhilipsElectronicsN.V.Allrightsreserved.Documentordernumber:502-1040510