engineered vegetation control system
TRANSCRIPT

P.O. Box 2484, Fayetteville, NC 28302800-542-7011 Fax: 910-483-0784
E-mail: [email protected]
WeedEnder.com and UTECK.com
Manufactured By
Installation Practice and Catalog
Engineered Vegetation Control System

Table of Contents General Overview ................................................................................................................................. 1 How does U-TECK WeedEnder™ Weed Control Mat Work? ............................................................. 1 Environmental Impact ........................................................................................................................... 1 Scrap Disposal ..................................................................................................................................... 1 WeedEnder™ Rolls ........................................................................................................................ 1 - 2
Punched WeedEnder™ Roll .................................................................................................... 2 Punched and Slit Roll................................................................................................................ 2 Non-Punched Roll .................................................................................................................... 2
Footprints ........................................................................................................................................ 2 - 5 Adhesive/Caulk ..................................................................................................................................... 5 Staple Guns ..................................................................................................................................... 5 - 6 Staples .................................................................................................................................................. 6 Joining Strip ........................................................................................................................................... 6 Stakes .............................................................................................................................................. 6 - 7 Tools Required ................................................................................................................................ 7 - 8 Ground Preparation .............................................................................................................................. 8 New Guardrail Installation ................................................................................................................ 8 - 9 Seaming WeedEnder™ ................................................................................................................ 9 - 10 Installation on Existing Guardrail .................................................................................................. 10 - 11 Repair of Existing WeedEnder™ ................................................................................................ 11 - 12 “Patching” WeedEnder™ Material ..................................................................................................... 12 Installation of WeedEnder™ on Inconsistent Post Spacing ........................................................ 12 - 13 Footprint Installation .................................................................................................................... 13 - 14 Staple Gun Operating Instructions ..................................................................................................... 14 Attaching WeedEnder™ to Asphalt ............................................................................................ 15 - 16 Attaching WeedEnder™ to Road Prior to Overlay ............................................................................ 16 Attaching WeedEnder™ Behind Concrete Curb ................................................................................ 17 Attaching WeedEnder™ Over Concrete Curb ........................................................................... 18 - 19 WeedEnder™ Installation for “Boats” ......................................................................................... 19 - 20 Frequently Asked Questions ....................................................................................................... 21 - 23 Customer Service ............................................................................................................................... 24
Please contact customer service if you have any questions regarding this installation practice or during your WeedEnderTM installation.
Toll Free Phone: 1-800-542-7011 Ph: 910-483-5016
Fax: 910-483-0784
Mailing Address: U-TECK • P.O. 2484 • Fayetteville, NC 28302
12/16

1
General Overview (please read prior to installation) • Material Description: The WeedEnder™ is constructed of a very
dense, multi-directional needling of specially formulated synthetic polyester fibers and totally impregnated in a special resin with ultraviolet inhibitors to guard against deterioration. There is also a certain amount of fire-retardancy built into the product. This product also utilizes recycled materials. The matting is made of 100% recycled material including a mix of post-industrial and/or post-consumer recycled plastics, resins, polymer fiber and film waste.
How does U-TECK WeedEnder™ Weed Control Mat Work?
Close-up view of WeedEnderTM 100% recycled, polyester fiber material
• First recognize that weeds and vegetation need three things to grow and thrive: 1) Water 2) Nutrients 3) Sunlight (only the vegetation above the ground need sunlight.)
• The WeedEnder™, when properly installed, totally removes the sunlight from the soil. This is the key to an effective installation. Water is allowed to wick through due to a specially formulated process. This allows the root system to be nourished (through percolation), thereby greatly
reducing erosion from taking place either under or next to the WeedEnder™ installation. • Coupled with the special components making up its content, the manufacturing methodology
creates a product designed to be abused. It can be cut but it cannot be ripped under normal use. WeedEnder™ has been in place in the field since 1993 with no degradation.
Environmental Impact
• The WeedEnder™ Mat system does not rely on or need herbicides or pesticides to inhibit vegetation growth, and the
system actually works with nature without residual effects to the vegetation, the soil, or the surrounding environment. There are no environmental concerns with WeedEnder™. It has been deemed totally environmentally safe.
• No herbicides are needed before, during or after the installation of the WeedEnder™. It is safe to use around any sensitive area such as water, plants, gardens, farms, etc.
• If the WeedEnder™ was removed at a later date the soil beneath is totally unaffected. Vegetation would begin to grow again
immediately because WeedEnder™ does not affect root stability. Scrap Disposal
• Unlike herbicides, any scrap materials from installation of the WeedEnder™ can be disposed of in any dumpster or other
conventional method. – No special precautions are needed, as there are no toxic or
harmful chemicals in the material. WeedEnder™ Rolls
• General Description: – WeedEnder™ rolls are available in different lengths and
widths. The standard length is usually 250’ long. This may vary because of the millrun when the material is originally made. Each roll will be clearly marked with the footage on
Newly planted tree next to WeedEnder Installation Roll of WeedEnderTM Material

2
each roll. (Your order will total the correct length.) – You may also order odd size lengths to fit specific needs. This is usually the case on every
estimate. – Widths may be any width from 12" to 96". The standard for single guardrail is 36" to 48". The
standard for double guardrail is 48" to 96". WeedEnder™ rolls may be joined together for wider widths.
Punched WeedEnder™ Roll These rolls are punched with a hole larger than the actual size of your post. The guardrail standard spacing for this punch out is 6’3” center of hole to center of hole. Some installations require spacing of 12’6”. We can accommodate any consistent spacing. The punch out is also centered in the width of the roll unless your order specifies otherwise.
These rolls are standard for use on new construction prior to post installation or where the material can be lowered from the top of the post to the ground with no interference.
Punched and Slit This configuration is the same as pre-punched except that this roll is also perforated to accommodate a slit from the center of the punch out to one side. This enables you to open the roll at each guardrail post and slide WeedEnder™ around the post.
The reason the rolls are perforated instead of completely slit is for ease of handling by construction personnel. We can completely slit the material if so specified, but it is not recommended. Perforated or slit seams, used or unused, must always be finished using joining strips, etc, as per Seaming WeedEnder™ section, steps 4 - 9.
This type of roll is used for retrofit, repair or pre-existing installations.
Non-Punched This roll has no punch out or slit, but is ordered to the length and width needed.
This type of roll is usually used when the spacing of the installation is inconsistent, such as at end treatments, melts, boats, gore points or anywhere additional width is needed. (Almost all estimates require some WeedEnder™ in this configuration.)
Footprints
Punched roll Punched and slit roll Non-punched roll
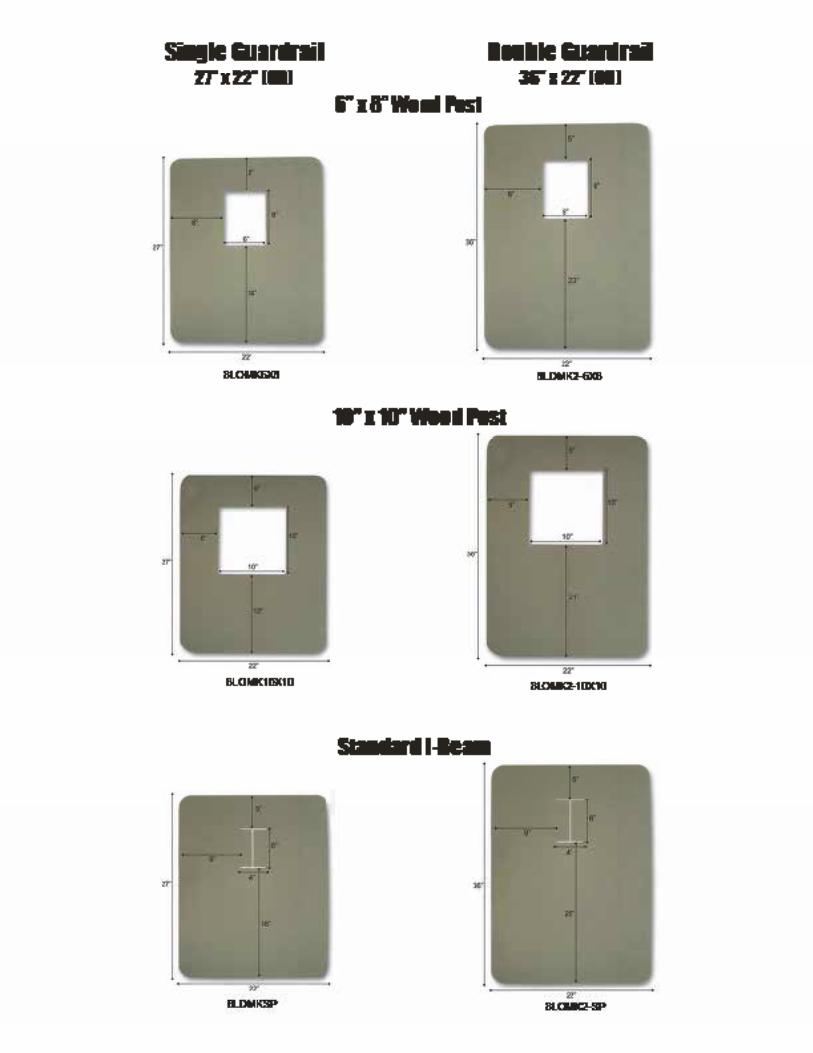
General Description – When the WeedEnder™ rolls are punched or if you cut the hole for the post on the job, the hole will be slightly larger than the post. This is by design so that it is easier to fit around the post and adjust the roll properly, allowing the material to lay flat.
The footprint is cut to the exact size and shape of the post being used. When properly installed, the footprint will block any vegetation from growing up next to the post.
Listed below are the standard sizes and shapes of footprints. Also included are footprints required for fences, signs, marker posts, etc. We can and will match any size or shape your company requires. Contact U-TECK customer service at 1-800-542-7011 if additional information is required.

3
Footprint Styles
• Small “I” Beam Post Footprint – VPN: 8FPWP-G (unit of measure = one each)
R ID: 3” x 2-1/2” R OD: 10” x 12” R This footprint is the correct size and shape
to fit the post, sometimes called the weak post, and is usually used with a cable instead of a guardrail.
• Standard “I” Beam Post Footprint – VPN: 8FPSP-G (unit of measure = one
each) R ID: 6” x 4” R IOD: 10” x 12” R This is the most widely used footprint,
designed to fit a standard “I” Beam (also referred to as a W6x8.5).
• Large “I” Beam Post Footprint – VPN: 8FPLP-G (unit of measure = one
each) R ID: 6-1/4” x 12-1/2” R OD: 14-1/2” x 20-1/2” R Designed to fit large “I” Beam type
posts, usually used with two and three post signs.
• Wooden Post Footprint – These footprints are designed for wooden posts. Used by D.O.T.’s and Municipalities for guardrails and signs.
– VPN: 8FP6X8WP (unit of measure = one
each) R ID: 6” x 8” R OD: 12” x 14”
– VPN: 8FP8X8WP (unit of measure = one each)
R ID: 8” x 8” R OD: 14” x 14”
Small “I” Beam Post Footprint
Standard “I” Beam Post Footprint
Large “I” Beam Post Footprint
6 x 8 Wooden Post Footprint
8 x 8 Wooden Post Footprint

4
– VPN: 8FP10X10WP-G (unit of mea- sure = one each)
R ID: 10” x 10” R OD: 16” x 16”
• Other wood post footprint sizes available are:
– VPN: 8FP4X4WP-G (unit of measure =
one each) R ID: 4” x 4” R OD: 10” x 10”
– VPN: 8FP4X6WP-G (unit of measure = one each)
R ID: 4” x 6” R OD: 10” x 12”
– VPN: 8FP6X6WP-G (unit of measure = one each)
R ID 6” x 6” R OD: 12” x 12”
• Mini-Footprints – These footprints are usually used for
chain link fences, signposts, pipes and conduits.
– VPN: 8FP2-5SP-G (unit of measure = one each) R Post size 2-1/2” diameter R OD: 6-3/4” x 8-3/4”
10 x 10 Wooden Post Footprint
2 1/2 in. diameter mini-footprint
– VPN: 8FP2X2SP-G (unit of measure = one each)
R Post size 2” diameter R OD: 6-3/4” x 8-3/4”
2 in. diameter mini-footprint
– VPN: 8FP1-75SP-G (unit of measure = one each)
R Post size 1-3/4” diameter R OD: 6-3/4” x 8-3/4”
1 3/4 in. diameter mini-footprint
5
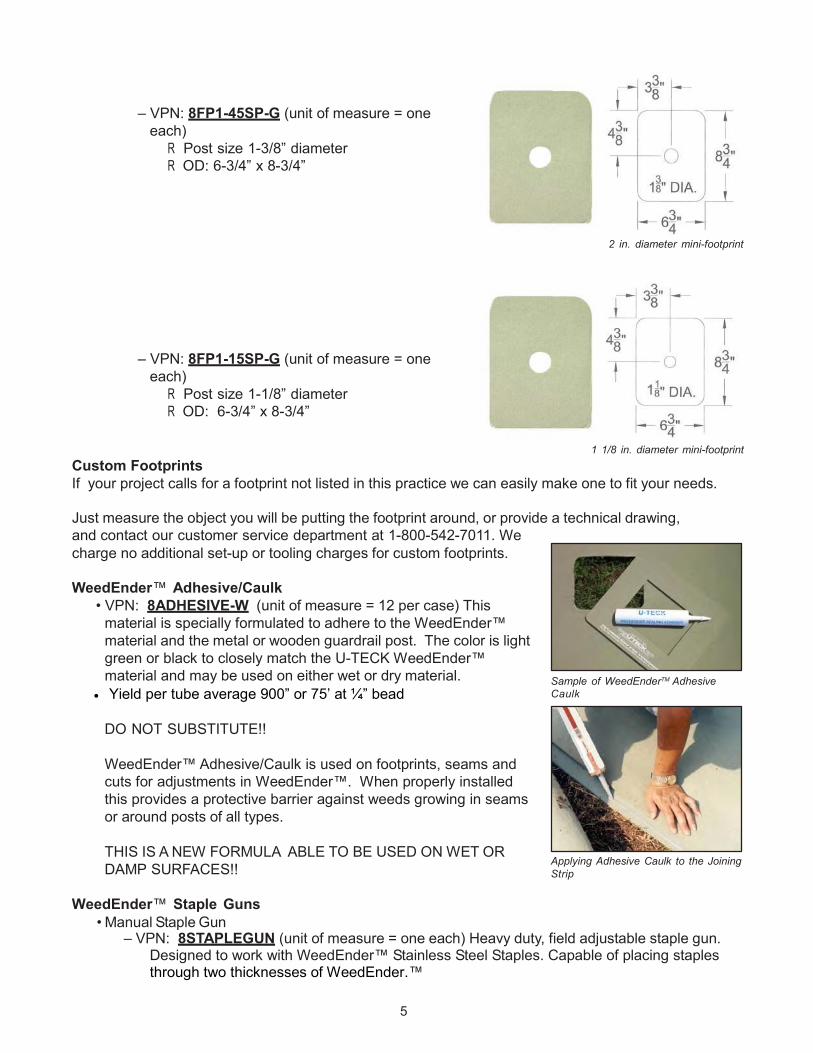
– VPN: 8FP1-45SP-G (unit of measure = one each)
R Post size 1-3/8” diameter R OD: 6-3/4” x 8-3/4”
2 in. diameter mini-footprint
– VPN: 8FP1-15SP-G (unit of measure = one each)
R Post size 1-1/8” diameter R OD: 6-3/4” x 8-3/4”
1 1/8 in. diameter mini-footprint Custom Footprints If your project calls for a footprint not listed in this practice we can easily make one to fit your needs. Just measure the object you will be putting the footprint around, or provide a technical drawing, and contact our customer service department at 1-800-542-7011. We charge no additional set-up or tooling charges for custom footprints.
WeedEnder™ Adhesive/Caulk
• VPN: 8ADHESIVE-W (unit of measure = 12 per case) This material is specially formulated to adhere to the WeedEnder™ material and the metal or wooden guardrail post. The color is light green or black to closely match the U-TECK WeedEnder™ material and may be used on either wet or dry material.
Yield per tube average 900” or 75’ at ¼” bead
DO NOT SUBSTITUTE!!
WeedEnder™ Adhesive/Caulk is used on footprints, seams and cuts for adjustments in WeedEnder™. When properly installed this provides a protective barrier against weeds growing in seams or around posts of all types.
THIS IS A NEW FORMULA ABLE TO BE USED ON WET OR DAMP SURFACES!!
WeedEnder™ Staple Guns
• Manual Staple Gun
Sample of WeedEnderTM Adhesive Caulk Applying Adhesive Caulk to the Joining Strip
– VPN: 8STAPLEGUN (unit of measure = one each) Heavy duty, field adjustable staple gun. Designed to work with WeedEnder™ Stainless Steel Staples. Capable of placing staples through two thicknesses of WeedEnder.™

6
• Pneumatic Staple Gun– VPN: 8STAPLEGUN-PN (unit of measure = one each)
Heavy duty pneumatic staple gun. One finger operation to eliminate operator fatigue, portable & economical, designed to work with WeedEnder™ Stainless Steel Staples. Du- rable construction in lightweight cast aluminum. The Pneu- matic Staple Gun is also capable of placing staples through two thicknesses of WeedEnder™. Requires the followingair supply: .05 cu.ft./cycle @ 80PSI.
WeedEnder™ Staples
– VPN: 8SSSTAPLE (unit of measure = one box of 2000) Specially designed with correct length and size to work with the WeedEnder™ material. Able to be used in either the manual staple gun or pneumatic staple gun.
Made of stainless steel for longevity. Used to staple seams in WeedEnder™, or to join two rolls together.
Manual Staple Gun
Pneumatic Staple Gun
When making seams or joining rolls, place staples at 4” intervals. Joining Strip
– VPN: 8J54X25-G (unit of measure = one roll 4” x 25’) The joining strip isconstructed of the same material as the WeedEnder™.
It is used anytime you splice the WeedEnder™ together, such as when
joining two rolls together, making adjustments for bends and re-seaming when cutting around objects. Always used when joining WeedEnder™ on punched and slit orperforated rolls. Joining Strips are used to eliminate any sunlight from penetrating between the two ends or sides being spliced together.
WeedEnder™ StakesGeneral Description: The WeedEnder™ matting requires that it bestaked in place on all sides according to U-TECK practice for anyparticular installation. USE ONLY U-TECK STAKES. We have designed a stake for every need. Please contact U-TECK customer service at 1-800-542-7011 for assistance.
•General Purpose Spiral Spike– This hardened steel spiral spike is used for most installations.
Its spiral design is driven into position with a standard hammer. The spiral “screw” into most soil conditions and also works well in rocky soils.
8RSPIKE: (unit measure = one box of 100)
Install every 18” in normal soil conditions or 15’’ for rocky conditions.
An illustration of joining strip usage Joining two rolls of WeedEnderTMwith the Joining Strip

7
Asphalt Fasteners
• Sand Stake – VPN: 8SASTAKE (unit of
measure = one box of 100) Constructed of Stainless steel and designed for use
in sandy or very loose soil conditions. Anchor on bottom expands as force is applied to remove stake, thereby causing resistance to upward pressure. Install every 18”.
• Asphalt Fasteners
– VPN: 8ASPIKE-W (unit of measure = one box of 250) Short spike designed to be used when WeedEnder™ is
applied directly to the asphalt. Usually it is later covered with crack sealant. Constructed of Stainless Steel. Install every 15” maximum.
Tools Required Some items listed below may not always be needed for each installation, but have been found to be useful, as each and every installation is different.
1) Weed eater with adequate cutting string and/or cutting edge. 2) Hatchet for removal of small shrubs, trees or roots from location. 3) Rake for removal of cuttings and debris from location. 4) Shovel to remove large debris, rocks or mounds of dirt. 5) Measuring tapes for short and long measurements. 6) T-Square and/or straight edge for cutting material to be seamed
7) Razor knife (caution should always be used whenever cutting WeedEnder™. Material cuts very easy when blade is its sharpest.) 8) Caulking gun for applying WeedEnder™ adhesive/caulk. 9) U-TECK’s WeedEnder™ Stapling Gun. (This is the only special tool required) 10) Hammer for driving anchoring spikes.
11) Pilot-hole driver for assisting in driving spikes or rocky soil. (Safety glasses should always be worn when striking a pilot-hole driver with a hammer.)
12) Brooms are useful for sweeping away dirt and debris from any asphalt, concrete or other surfaces that WeedEnder™ will be adhered to. (A blower would help speed the process and usually does better job.)
13) Templates can be easily fabricated to speed up installation around post, poles or any object that may be repeatedly encountered
Ground Preparation General: Ground preparation is the same regardless of the installation you are performing: guardrail, signs, delineators, sound wall, beautification, etc.
– Step 1: Remove all debris from the area to be covered by the WeedEnder™, such as limbs, brush, rocks, boulders, etc.
Sand Stake
Unprepared ground
Sand Stake Illustration
8
Cutting the WeedEnderTM roll when the per-punched holes do not match post spacing.
Tamping Site
– Step 2: Cut any weeds or grass even with the ground or as close as possible. (Never leave more than 1”.)
– Step 3: Remove and discard any and all cut weeds from the area to be covered by WeedEnder™.
– Step 4: DO NOT till up soil or remove root system unless it will prevent the WeedEnder™ from lying totally flat to the ground, as the root system left intact could possibly prevent future erosion.
– Step 5: Survey the area to be covered by WeedEnder™ to determine if there are any objects that will prevent WeedEnder™ from laying flat on the ground.
– Step 6: Tamp area that will be covered by WeedEnder™ if needed. (Check closely to make sure there are no tire ruts in
area to be covered by WeedEnder™.) – Step 7: Around sign post, especially 2 and 3 post signs, it may be required to level the soil
so the WeedEnder™ will lay flat and not have any dips. Fill in any depressed areas around post to bring up level with grade. Large dips can, under some conditions, accumulate dirt and trash and promote weed growth. (over a period of time, WeedEnder™ will conform to the ground)
– Step 8: The finished surface shall be smooth, firm, stable and free of rocks, clods, foliage, large roots or other material.
NOTE: Do not use herbicides in conjunction with the WeedEnder™ products. We do not need or want to destroy the vegetation root system, only to control the top vegetation.
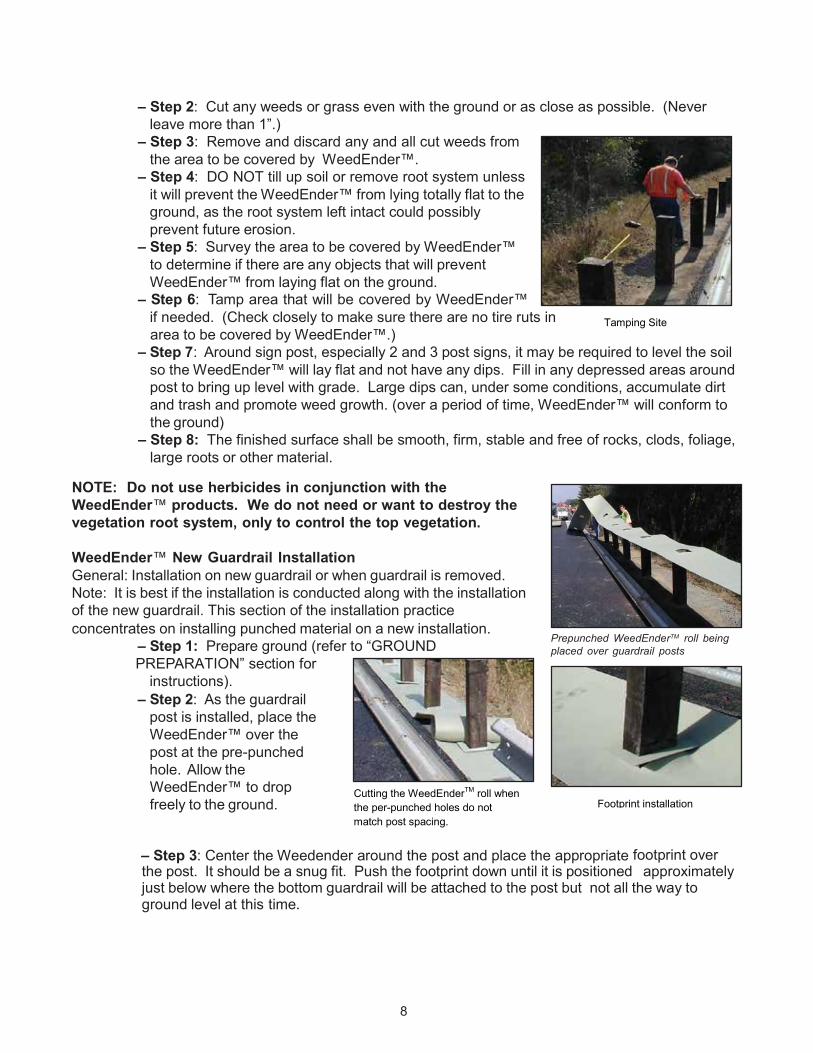
WeedEnder™ New Guardrail Installation General: Installation on new guardrail or when guardrail is removed. Note: It is best if the installation is conducted along with the installation of the new guardrail. This section of the installation practice concentrates on installing punched material on a new installation.
– Step 1: Prepare ground (refer to “GROUND PREPARATION” section for
instructions). – Step 2: As the guardrail
post is installed, place the WeedEnder™ over the post at the pre-punched hole. Allow the
Prepunched WeedEnderTM roll being placed over guardrail posts
WeedEnder™ to drop freely to the ground.
– Step 3: Center the Weedender around the post and place the appropriate footprint over
the post. It should be a snug fit. Push the footprint down until it is positioned approximately just below where the bottom guardrail will be attached to the post but not all the way to ground level at this time.
Footprint installation

9
Applying to two beads of adhesive caulk to the joining
strip
– Step 4: Continue this until the first guardrail roll is placed over each post along with the footprint.
– Step 5: If you encounter a condition that the pre-punched holes in the WeedEnder™ do not match post spacing, cut the roll of WeedEnder™. Use a straight edge as a guide to cut. You will need this to be exactly straight.
– Step 6: After step 5, continue on with the roll of WeedEnder™ and footprints being placed over the next guardrail post as in step 2 and 3. Be sure this roll of WeedEnder™ overlaps the previous roll of WeedEnder™ by at least 4”.
– Step 7: After completion of step 6, refer to section “Seaming WeedEnder™” in order to seam the overlap or cut you just made. Make seam as directed.
– Step 8: After completion of step 7, return to beginning of your installation. Position WeedEnder™ roll so that pre- punched hole is centered on post as much as possible.
Stapled seam
– Step 9: Install stakes along edge in manner directed for the specific stake used. Refer to the stake description section for proper spacing. Assuming you are making installation in average soil and using the recommended WeedEnder™ hook stake (VPN: 8SSSTAKE) you will install one each 18” on both sides. (It may be necessary to use a mixture of different stakes on the same installation. This should be dictated by the different soils encountered.)
Applying a bead of adhesive caulking to the footprint
– Step 10: Run a bead of WeedEnder™ adhesive/caulk under where the footprint will affix to the WeedEnder™ guardrail roll. Press firmly into place.
– Step 11: Run a heavy bead of WeedEnder™ adhesive/caulk around the guardrail post adhering it to the footprint. Be sure to fill all gaps between post and WeedEnder™ material. Use the corner of a scrap piece of material, or your finger, to smear adhesive around the post.
– Step 12: Continue to repeat previous steps until installation is completed. Seaming WeedEnder™ (Joining two rolls or splices in WeedEnder™)
• Joining Two Rolls – Step 1: Place any hard, flat object you have on site (such as
a board, a large sign, cardboard, plywood, etc.) under the two pieces to be seamed.
– Step 2: Overlap the two pieces to be seamed. (Approximately 4” overlap.)
– Step 3: Using a straight edge, cut through both pieces of overlapped WeedEnder™ – Step 4: Cut a piece of joining strip to match the length needed to cover from one side
of proposed seam to the other. – Step 5: Position the joining strip under the two edges to be seamed with one half of joining
strip width to each side. – Step 6: Run two zigzag beads of WeedEnder™ adhesive/caulk on joining strip, one on
each side.

10
Joining the two seams
– Step 7: Bring two sides tightly together. Press down
firmly to set adhesive. – Step 8: Place staple one on each end to hold into
position. On longer seams, additional staples may be necessary.
– Step 9: Now place staples approximately every 4” across entire length of seam.
Installation on Existing Guardrail
• Recommended product: Punched and slit rolls of desired width and length.
– Step 1: Follow ground preparation section before beginning installation. – Step 2: Unroll the roll of WeedEnder™ and place on
ground next to guardrail post. Place slit toward post. (Note: Always unroll on traffic side of guardrail post if at all practical. This will allow you to seam roll on field side for safety. It also makes a neater installation.)
– Step 3: After opening the slit at each guardrail post slide the WeedEnder™ around the post. Allow the WeedEnder™ to lay flat on the ground.
– Step 4: Using a straight edge, slit the footprint toward the side that would
Installing WeedEnderTM to existing guardrail
be placed to back side. This will align the seams for a neater looking job.
After opening the slit at each guardrail post slide the WeedEnderTM around the post
Slit the footprint toward the side that
– Step 5: Using joining strip seam WeedEnder™ roll at each guardrail post. (Refer to section on seaming.)
would be placed to the back side
– Step 6: Position WeedEnder™ roll so that it is straight and that the pre-punched hole is centered as closely as possible on the post.
– Step 7: Install spikes along edge in manner directed for the specific stake used. (Refer to
the spike description for proper spacing.) Assuming you are making the installation in average soil and using the recommended WeedEnder™ spiral spike, you will install one each 18” on both sides. If you are in rocky soil reduce the spacing interval to 15”.

11
Installing the spikes along the edge of the WeedEnderTM
material
– Step 8: Run a generous bead of WeedEnder™ adhesive/caulk under where the footprint will affix to the WeedEnder™ guardrail roll. Press firmly into place.
– Step 9: Pull footprint firmly around the guardrail post and together where it was slit. Press down firmly in place. (Slit always goes to the field side of post.)
– Step 10: With the foot- print firmly pressed down in place, staple into posi- tion. Place the first staple
Running a bead of adhesive caulk under the footprint
Pressing the footprint into place
centered over the slit as close to post as possible. Place the second staple at outer edge centered on the slit. Next, place one staple on each side.
– Step 11: Run a heavy bead of WeedEnder™ adhesive/ caulk around the guardrail post adhering it to the footprint. Be sure to fill all gaps between post and WeedEnder™ material. Use the corner of a scrap piece of material, or your finger, to smear adhesive around the post.
– Step 12: Continue to repeat previous steps until completed.
Note: Refer to other sections of this practice for specific situations.
Applying a bead of adhesive caulk around the guardrail post
Repair of Existing WeedEnder™ General: This section covers repairs on WeedEnder™ that has been damaged when an accident occurs in conjunction with guardrail damage. Recommended product: Punched & slit roll of WeedEnder™.
– Step 1: Determine ends of salvageable WeedEnder™ roll and straighten.
– Step 2: Replace any stakes on salvageable WeedEnder™ that are bent or damaged.
– Step 3: Cut and remove any damaged WeedEnder™. Follow “Ground Preparation” procedures.
– Step 4: Using new WeedEnder™ roll material, lay the WeedEnder™ out beside the replaced or reusable guardrail post.
– Step 5: Cut new WeedEnder™ at each end leaving enough new WeedEnder to overlap the existing WeedEnder by approximately 4”.
Note: Do not overdrive stake! Stop driving when you reach grade level, otherwise the material will have the appearance of ripples around the edges.
Preparing the ground for installation
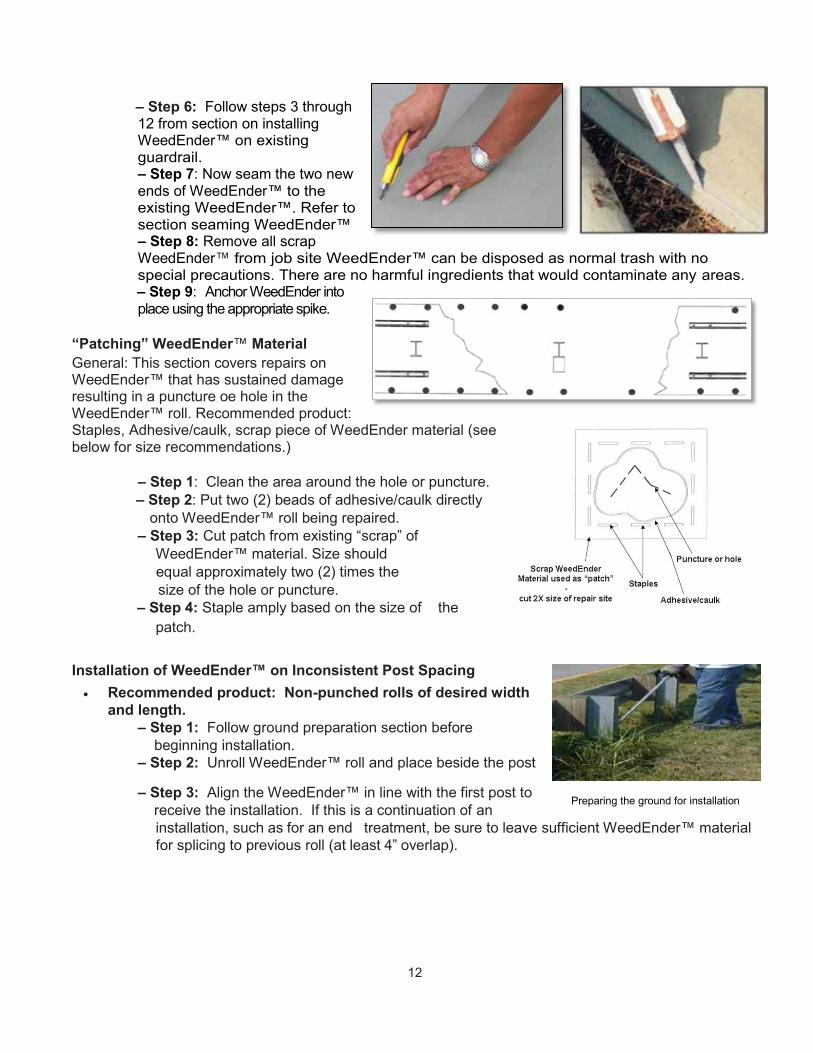
– Step 6: Follow steps 3 through 12 from section on installing WeedEnder™ on existing guardrail. – Step 7: Now seam the two new ends of WeedEnder™ to the existing WeedEnder™. Refer to section seaming WeedEnder™ – Step 8: Remove all scrap WeedEnder™ from job site WeedEnder™ can be disposed as normal trash with no special precautions. There are no harmful ingredients that would contaminate any areas.
– Step 9: Anchor WeedEnder into place using the appropriate spike.
“Patching” WeedEnder™ Material General: This section covers repairs on WeedEnder™ that has sustained damage resulting in a puncture oe hole in the WeedEnder™ roll. Recommended product: Staples, Adhesive/caulk, scrap piece of WeedEnder material (see below for size recommendations.)
– Step 1: Clean the area around the hole or puncture. – Step 2: Put two (2) beads of adhesive/caulk directly
onto WeedEnder™ roll being repaired. – Step 3: Cut patch from existing “scrap” of
WeedEnder™ material. Size should equal approximately two (2) times the size of the hole or puncture.
– Step 4: Staple amply based on the size of the patch.
Installation of WeedEnder™ on Inconsistent Post Spacing
Recommended product: Non-punched rolls of desired width and length.
– Step 1: Follow ground preparation section before beginning installation. – Step 2: Unroll WeedEnder™ roll and place beside the post
– Step 3: Align the WeedEnder™ in line with the first post to receive the installation. If this is a continuation of an
installation, such as for an end treatment, be sure to leave sufficient WeedEnder™ material for splicing to previous roll (at least 4” overlap).
12

13
– Step 4: Make a mark in the center of the width of the WeedEnder™ roll. This will be your center guide to cut out the hole for your guardrail post. – Step 5: With this center located, use a straight edge to
guide in cutting to remove the material, creating a post hole. Remove a portion of the WeedEnder™ material slightly larger than the post. (Post hole templates are available from U-TECK. Contact customer service for more (information.) – Step 6: With the WeedEnder™ roll still in place, repeat
STEP 5 for each of the posts. After all post holes are cut, proceed to STEP 7. – Step 7: If this is for a NEW installation (guardrails, fencing
or signs have not been erected) proceed to STEP 10. If this is for an EXISTING installation, go to STEP 8.
– Step 8: If there is an existing impediment (guardrail, fencing, signs, etc,) in place, use a straight edge to slit from the bottom of the hole you have cut out to one outer edge. Open the slit in a “V” shape at each post and slide the WeedEnder™ around the post. Allow the WeedEnder™ roll to now lay flat on the ground. (For safety’s sake, if at all possible, put the slit to the field side, not road side, of the post. This will allow you to perform the majority of your work at a safer distance from traffic.)
– Step 9: Splice the slit by seaming as instructed in “SEAMING WEEDENDER™” section. Now proceed to STEP 11.
–Step 10: Place the WeedEnder™ material over the post at the pre-punched hole. Allow the material to drop freely to the ground.
– Step 11: For NEW installation: Place footprint over post
and position just below where the guardrail or sign will be mounted.
For EXISTING installation: Slit with straight edge one side of the footprint and pull footprint firmly around post.
– Step 12: Position the WeedEnder™ on the ground so that all the posts are approximately centered in the cut out hole.
– Step 13: Stake the WeedEnder™ material in place using the proper spacing for each spike as recommended under spike description.
– Step 14: Refer to “FOOTPRINT INSTALLATION” section to secure footprints to WeedEnder™ roll.
– Step 15: On end treatments: do not leave sharp corners on the WeedEnder™ roll. It is more attractive to slightly round corners.
Footprint Installation – Step 1: Install footprints by running a bead of WeedEnder™ adhesive on WeedEnder™ roll at a point the footprint will be placed on the WeedEnder™ roll.
Making your WeedEnder material
Cut in a post hole
If there is an existing guardrail in place, slit the material from the hole to the edge
Stake the material in place

14
Operating the manual staple gun
Applying caulk to the footprint Pressing the footprint firmly into position
Loading staples into the manual staple gun
Mechanism for adjusting the depth of staple penetration
Run a heavy bead of caulk around the guardrail post.
Operating the manual staple gun
Press firmly into position. Staple footprint to WeedEnder, positioning the staple one on each side of the post horizontal to post.
– Step 2: If a footprint is required to be slit run a
bead of WeedEnder™ adhesive under where the
footprint will attach to the WeedEnder™ roll. Pulling the slit footprint tightly around the post push firmly down to the WeedEnder™ roll. Place a staple through the footprint and the WeedEnder, positioning one centered over slit horizontal and as close to the post as possible. Next, place staple centered over the slit and approximately 3/4” - 1” from the outer edge of the footprint. Now, place one staple horizontal on each side of the post 3/4” from outer edge.
– Step 3: Join any rolls together by seaming as instructed in
seaming section. – Step 4: Run a heavy bead of WeedEnder™ adhesive/ caulk
around the post adhering it to the footprint. Be sure to fill all gaps between post and WeedEnder™ material. Use the corner of a scrap piece of material, or your finger, to smear adhesive around the post.
Staple Gun Operating Instructions – Step 1: To load staples, first slide the magazine spring to
the rear of the stapler and lift up to open the magazine. – Step 2: Load up to three (3) cartridges of staples with
staple points downward. Lower magazine spring and gently ease spring forward, moving staples to the front of stapler. BE SURE NOT TO RELEASE SPRING ABRUPTLY – THIS MAY CAUSE STAPLES TO JAM.
– Step 3: Located on the front of the stapler is the mechanism for adjusting the depth of staple penetration. A scale is provided indicating 5 settings. The settings are listed #1 through #5. To change the setting, pull dial back and position dial to desired setting. Make sure the dial locks in place. #1 indicates shallow penetration #4 provides adequate penetration (recommended setting for standard use.) #5 indicates the deepest penetration.
– Step 4: When seaming WeedEnder™ material together, first align the joining strip under the seam. Place the stapler over the seam. Holding the stapler down with one hand on the stationary front handle, forces the rear handle down to insert staple. Release the rear handle gently. Repeat this procedure, placing staples at approximately 4” to 5” intervals.

15
– Step 5: The linkage mechanism and other movable parts of the staple gun have been lubricated during assembly.
These parts should be lubricated with light machine oil. It is important that the spring on the rear handle be well lubricated.
NOTE: When stapler repairs are required, please call customer service toll free at: 1-800-542-7011 Mailing Address for Stapler Repairs: U-TECK Attn: Repair Department 700 Mockernut Drive Fayetteville, NC 28312
Attaching WeedEnder™ to Asphalt
– Step 1: Perform the installation of the WeedEnder™ roll following standard procedures except for side that will be in contact with the asphalt.
– Step 2: Sweep asphalt curb in area that will be covered by WeedEnder™ material. – Step 3: Allow WeedEnder™ material to cover over 3” to 4”. Do not just butt the
WeedEnder™ up to the asphalt. – Step 4: Apply a generous bead of adhesive on the asphalt under the WeedEnder™ and then
spike the WeedEnder™ material in place using the U-TECK WeedEnder™ Asphalt spike (VPN: 8ASTAKE-W) into the asphalt every 15”. (Be sure the WeedEnder™ material is kept smooth and flat to the asphalt.)
– Step 5: Now install footprints as previously instructed. – Step 6: Cover the joint area of the WeedEnder™ to the asphalt liberally with crack sealant if
desired, approximately 4” on each side over the joint. (Use only a good, locally approved Crack sealant.)
c
rack sealant.)
Attaching WeedEnder to asphalt – New installation of punched material

16
Attaching WeedEnder to asphalt – Existing installation of punched and slit material in front
Attaching WeedEnder to asphalt – Existing installation of punched and slit material in back
Attaching WeedEnder™ to Road Prior to Overlay – Step 1: Prepare the road surface – sweeping away loose dirt, sand & gravel. – Step 2: Perform the installation of the WeedEnder™ roll following standard procedures
(staking) except for side that will be covered by overlay. – Step 3: Prior to applying the tack coat, overlap the WeedEnder™ material onto road sur-
face. Allow WeedEnder™ material to cover 3” to 4”. Do not just butt the WeedEnder™ up to the road.

17
– Step 4: Apply a generous bead of adhesive on the prepared road surface, under the edge of the overlapped WeedEnder™, and then spike the WeedEnder™ material in place using the U-TECK WeedEnder™ Asphalt spike (VPN: 8ASTAKE-W) into the asphalt every 15”. (Be sure the WeedEnder™ material is kept smooth and flat to the road.)
– Step 5: Cover the 3” – 4” overlap of the WeedEnder™ laying on the prepared road surface liberally with the tack coat.
– Step 6: Resume overlay procedures as per your local practice, but do not overlay new asphalt more than 6” onto WeedEnder™.
Attaching WeedEnder™ Behind Concrete Curb
– Step 1: Perform the installation of the WeedEnder™ material around the post following standard procedures except for side that will be in contact with concrete curb.
– Step 2: Clean concrete curb by sweeping to remove any loose concrete, gravel, dirt, etc. – Step 3: Do not have any dips in the soil at area next to the concrete curb. Have as level as
possible. – Step 4: Measure WeedEnder™ material so that it can be folded at a 90 degree angle and
run down beside the curb, approximately 3” +. (Do not place in that position at this time.) – Step 5: Insert the U-TECK Sand Spike (VPN: 8SASTAKE) long end first through the
WeedEnder™ material. Place the ancho r on the Sand Spike when it is through the fabric completely. Spacing between spikes should be 18”. (Treat anchor as a “V” with top side up.)
– Step 6: Fold WeedEnder™ material at a 90 degree angle and press down and in position up to the back side of the curb.
– Step 7: While holding the WeedEnder™ material in position next to the curb, complete driving the spike down and position. The top of the spike should run parallel to the concrete
curb. The other end of the spike should also go through the WeedEnder™ material
Attaching WeedEnder to asphalt – Existing installation of punched and slit material in back

18
Existing installation – Punched and slit in front or back
Installing WeedEnder TM over a concrete curb
– Step 8: Do not over-drive the spike.
– Step 9: Using either the WeedEnder™ Adhesive/ Caulk (VPN: 8ADHESIVE-W) or a standard good quality crack sealant fill any cracks or openings between the WeedEnder™ material and the curb.
– Step 10: Using a liberal coat, adhere the WeedEnder™ to the curb completely.
Attaching WeedEnder ™ over Con- Crete Curb
– Step 1: Perform the installation of the WeedEnder™ material around the post following
standard procedures except for side that will be in contact with concrete curb. – Step 2: Clean concrete curb by sweeping to remove any loose concrete, gravel, dirt, etc. – Step 3: Do not have any dips in the soil at area next to the concrete curb. Have as level as
possible. – Step 4: Measure WeedEnder™ material so that it goes over the concrete curb 3” +. – Step 5: Insert the U-TECK Sand Spike (VPN: 8SASTAKE) long end first through the
WeedEnder™ material. Place the anchor on the Sand Spike when it is through the fabric completely. Spacing between spikes should be 18”. (Treat anchor as a “V” with top side up.)
– Step 6: Drive the spike into the ground, leaving 4” to 5” of the spike above ground level. DO NOT DRIVE IN COMPLETELY UNTIL STEP 9!
– Step 7: Directly under where the WeedEnder™ material will come in contact with the concrete run two heavy beads of WeedEnder™ Adhesive/Caulk (VPN: 8ADHESIVE-W).

19
Existing installation – Punched and slit in front and back
– Step 8: Press the WeedEnder™
material firmly to the Adhesive/Caulk and concrete curb.
– Step 9: While holding the WeedEnder™ material down to the concrete curb complete driving the spike down. The top of the spike should be parallel to the concrete curb. The other end of the spike should also go through the WeedEnder™ material.
– Step 10: Do not over-drive the spike. – Step 11: OPTIONAL: If necessary, run
crack sealant down the joint where the WeedEnder™ material and concrete curb meet. This is an engineer’s option, as different situations may be encounter.
WeedEnder™ Installation for “Boats” (AKA “No Man’s Land”)
– Step 1: Ground Preparation: Refer to section “Ground Preparation” for proper procedures for ground preparation. In these areas be sure to remove any cans, rocks, old broken concrete, etc. These areas usually collect an abundance of trash and refuse.
– Step 2: Continue guardrail roll installation as you normally would, as instructed in section “Installation on Existing Guardrail”
– Step 3: Place stakes only along outside edges of the WeedEnder™ roll. (See Figure A) – Step 4: Guardrail rolls meet in center of boat area seam together as instructed in section
“Seaming WeedEnder”. Be sure the WeedEnder™ meets completely. Do not leave any open areas in center. (See Figure A)
Figure A

20
– Step 5: If the WeedEnder™ does not meet in the center then you must place a third sec-
tion of non-punched WeedEnder™. (See Figure A) – Step 6: Trim the third piece and tuck it under the guardrail previously installed around the
guardrail on each side of the boat. There MUST be at least 6 inches of WeedEnder™ tucked under. (See Figure A)
– Step 7: Cut WeedEnder™ to fit snugly to post or other fixture in center of boat. (Cut & seam if necessary) Caulk heavily in this area. (See Figure A)
– Step 8: Adjust the WeedEnder™ so that the center (third) piece and the WeedEnder™ around the guardrail lay flat without puckers.
– Step 9: Now lift top piece of WeedEnder™ off the center piece and apply two generous beads of WeedEnder™ Adhesive/Caulk. (See Figure A)
– Step 10: Press firmly down to set the adhesive/caulk. – Step 11: After caulking is complete, staple the seams together by placing staples every 4
inches down both seams, as referred to in section “Seaming WeedEnder”. (See Figure A) – Step 12: Continue the WeedEnder™ out an additional 4 feet past end of guardrail. Round
as shown in Figure A or as dictated by local practice. – Step 13: Continue as in step 11 except continue the WeedEnder™ on as the Guardrail
continues on. (See Figure B) – Step 14: Finish the installation by attaching the WeedEnder edges to the ground
using the appropriate spacing interval based upon the soil conditions.
Figure B

21
Frequently Asked Questions How does WeedEnder™ work? As we know, vegetation needs three things to grow and thrive: water, nutrients, and sunlight. The WeedEnder™ takes away one of these—Sunlight. When deprived of sunlight, the portion of the vegetation above the ground will not grow. Water and nutrients are allowed to penetrate the material due to a special manufacturing process while keeping out the sunlight.
Why do you allow the water and nutrients to wick (percolate) through the WeedEnder? For a number of reasons, but the three most important are:
1) This allows the root system under the guardrail or sign mat to continue to be nurtured so that erosion does not take place.
2) When used for tree mats or other landscaping purposes it again allows the root system to receive the nourishment that is needed for the plant or tree to grow and thrive. It even retards
evaporation so that the roots will continue to be moist even in dry climates or conditions. 3) By allowing the water to wick through the material, the WeedEnder™ does not add to the run off
problem as other methods of vegetation control such as asphalt. What is WeedEnder™ made of? A specially formulated type of Polyester (Ethyleneterephthalate) with special Ultra-violet Inhibitors and fire retardants.
Why does WeedEnder™ contain a fire retardant? This is to provide you with additional protection from cigarettes, ditch burns or just accidental burns. The fire retardant additive, plus the way the WeedEnder™ is installed, makes it extremely difficult to support a flame. Under some conditions it could even be used as a fire block.
Some products have herbicides in them. Does the WeedEnder? No! This would defeat the purpose of cutting back on herbicides. The WeedEnder™ does not need to be re-enforced by herbicides in order to be effective. It does the job alone. Also, it is so safe that any scrap can just be tossed into a dumpster with no special precautions.
How is WeedEnder™ manufactured? WeedEnder™ utilizes a special, non-woven, needled method of manufacturing. It is compressed to a very tight density. The manufacturing method, plus the special material make an extremely tough material designed to be abused. It can be cut, but is virtually impossible to rip under normal use.
Do you use any recycled materials? Yes. WeedEnder™ matting is made up of a specially formulated synthetic polyester fiber. This fiber is created by utilizing a diverse mix of plastic materials, including post-industrial and/or post-consumer, internal recycled plastics, off-class packaging resins, polymer fiber and film waste, which produces a high-quality fiber product for a variety of applications. Our raw fiber is, therefore, produced from 100% recyclable material, with approx. 15% to 30% coming from post-consumer recyclable material.
How long has WeedEnder™ been used? The first installations were in the state of Louisiana around 1993 and it is still in use today. We have observed no degeneration.
Is the WeedEnder™ environmentally safe? Yes. There are absolutely no harmful chemicals associated with the WeedEnder™. Unlike poisons, you do not have to be concerned about water supplies or adjacent vegetation. It only affects the vegetation over which it is placed. If WeedEnder™ is removed; the soil under it is totally unaffected.

22
The vegetation begins to grow again immediately. Unlike herbicides, scrap material can be disposed in any dumpster or other conventional manner.
How does it hold up to Ultra Violets? The specially formulated Polyester (Ethyleneterephthalate) plus added Ultra-Violent inhibitors provide excellent wear in all types of weather. You can expect many years of protection.
What about erosion? By allowing water and nutrients to wick through the material, the local root system remains intact, unlike poisons that can kill or permanently damage the root system and disturb the existence of adjacent vegetation. This is very important when trying to combat erosion.
What do I need to do to the area before I install the WeedEnder™? Remember the WeedEnder™ works on a principle of depriving the soil of sunlight. Therefore, remove any foreign objects such as large rocks, boulders, and limbs. Trim any weeds or underbrush as close to the ground as possible. This is normally about the same level as you would in a yard, and using a weed eater is the normal, recommended method of site preparation. In some areas you may have to add or remove soil and tamp. Refer to “Ground Preparation” section of the WeedEnder™ Installation Practice for details.
If WeedEnder™ is damaged during a wreck? WeedEnder™ can be easily repaired and reinstalled. If a guardrail or sign is damaged, just roll the WeedEnder™ back, repair the guardrail or sign and reinstall. Refer to “Repair of Existing WeedEnder” section of the WeedEnder™ Installation Practice for details.
Is the WeedEnder™ harmed by snow or ice? In a word—No.Because of the material (Ethyleneterephthalate) used to manufacture the WeedEnder™, it is equally effective in all types of temperatures and weather. And is not affected by freeze/thaw.
Will debris collect on the WeedEnder™? Yes and No. It will to the extent that debris will collect on any type of material such as concrete or asphalt. Primarily, as debris blows onto WeedEnder™, it will also blow off.
Does WeedEnder™ require any maintenance? No, not if installed properly.
Why is the WeedEnder™ more effective than asphalt? Asphalt without traffic will still allow weeds to grow through. Also, in some cases when using asphalt under guardrails you change the resistance force presented on impact from an automobile wreck and could, possibly, make the accident more severe. With the WeedEnder™ the impact is exactly the same as with just soil. Also, asphalt adds to your run off areas, as does concrete.
What is the ideal width to use under guardrails? 36” – 48” wide is usually sufficient for single guardrails while 48” – 96” is usually correct on double guardrails. There are, of course, variances with all rules, such as how close to the guardrail the pavement is, etc.
Can the WeedEnder™ be used on existing guardrails? Yes. We provide a WeedEnder™ roll that is punched and slit. This means that not only is the hole cut out for the guardrail post, there is also a perforated slit from the hole point to the outside edge. You,
23
therefore, simply slip the WeedEnder™ around the post and seam the material back together on the backside. This method is fast and effective.
Why are foot prints needed? On pre-punched rolls the punched out area is larger than the post, itself. This allows for ease of instal- lation. The footprint matches the exact profile of the post and acts to cover the hole once WeedEnder™ is in place. This will assure that you do not even get weed growth close to the post. We have a foot- print that matches most any post profile.
What if a sign requires a different sized mat than ones listed? Just contact Vegetation Control Products Customer Service Department (800-542-7011) and supply the information pertaining to the type post in question as well as the size of area needing to be covered. Our manufacturing department can assist with any specifications and match any size or shape needed.
What if I need to extend or WeedEnder™ to cover a larger or wider area? We have a simple method of joining the WeedEnder™ together so that you can achieve any length or width. Refer to “Seaming WeedEnder” section of the WeedEnder™ Installation Practice for more details.
Have you compared the costs of using WeedEnder™ verses concrete around signs? Yes! The in-place cost of WeedEnder™ is about 50% of the cost of concrete.
Is the WeedEnder™ different than most standard landscape fabrics. Yes! First, WeedEnder™ is approximately ¼” thick. It is a non-woven material especially chosen to be extremely tough. Unlike landscape fabric, WeedEnder™ is designed to be abused. It is almost impossible to rip. WeedEnder™ is designed and built for commercial use.
Is WeedEnder™ difficult to install? No! It is very much like laying carpet. Most of the WeedEnder™ products are pre-cut and fabricated for ease of installation.
Do I need any special tools to work with the WeedEnder™ installation? The only special tool needed is a special staple gun for joining additional lengths and widths. This is available from U-TECK. Normally, the only tools required are already on your truck: a knife, screwdriver and hammer.
Do I need to put anything such as bark, mulch, or stone over the WeedEnder? No. We only suggest it when WeedEnder™ is used for site beautification or to match the surrounding scenery. No cover is needed in order to make the WeedEnder™ effective.
Will the WeedEnder™ interfere with mowing operations? No. When properly installed under guardrail or around signs, it provides you with a clear area that you can mow right along. When used around trees and landscaping, you can drive onto and over the WeedEnder™ without damage to the WeedEnder™ or your equipment. Just maintain power mower level.

24
Customer Service When stapler repairs are required, or with any questions regarding installation, please call customer service toll free at:
Toll Free Phone: 1-800-542-7011 Ph: 910-483-5016 Fax: 910-483-0784
Mailing Address for Staplers Repairs: U-TECK Attn: Repair Department 700 Mockernut Drive Fayetteville, NC 28312

Non-punched RollsManufactured by U-TECKP.O. Box 2484, Fayetteville, North Carolina 28302 (800) 542-7011 ● Fax: (910) 483-0784 WeedEnder.com
Features• Controls unwanted vegetation• Cost-effective• Reduces runoff• Maintenance-free• No herbicides or poisons• Helps control erosion• Easy to install• Long-lasting• Environmentally safe• No disposal problems• Conforms to any shape• Reusable
This product is designed to control the growth of unwanted vegetation in an environmentally safe manner. This is accomplished without adding to your runoff problems, as would be the case when using asphalt, concrete, or other nonporous weed-control methods.
This type of roll is usually used when the spacing of the guardrail is inconsistent, such as at end treatments, or melts, in boats, and in beautification programs when using plants and shrubs. These non-punched rolls are also used for repairs, such as after an auto accident. (Almost all estimates require some WeedEnder® in these configurations.)
WeedEnder® Non-punched Rolls have no punch-out or slit and are available in different lengths and widths. The standard length is usually 250’ long. This may vary because of the millrun when the material is originally made. Each roll will be clearly marked with the footage on each roll. (Your order will total the correct length.) You may also order odd-size lengths to fit specific needs. This is usually the case on every estimate. Widths may be any width from 1’ to 8’. The standard for single guardrail is 3’ to 4’. The standard for double guardrail is 4’ to 6’. WeedEnder® rolls may be joined together for wider widths.
5/18
Engineered Vegetation Control Systems

Punched RollsManufactured by U-TECKP.O. Box 2484, Fayetteville, North Carolina 28302 (800) 542-7011 ● Fax: (910) 483-0784 WeedEnder.com
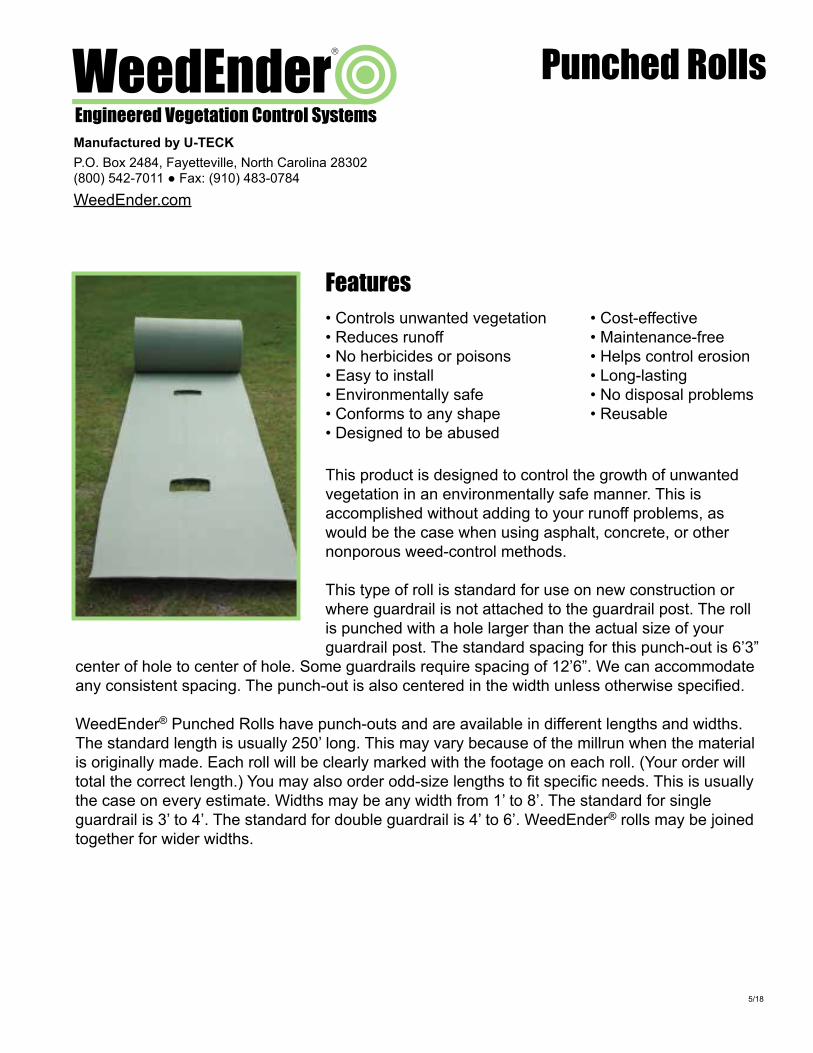
This product is designed to control the growth of unwanted vegetation in an environmentally safe manner. This is accomplished without adding to your runoff problems, as would be the case when using asphalt, concrete, or other nonporous weed-control methods.
This type of roll is standard for use on new construction or where guardrail is not attached to the guardrail post. The roll is punched with a hole larger than the actual size of your guardrail post. The standard spacing for this punch-out is 6’3”
center of hole to center of hole. Some guardrails require spacing of 12’6”. We can accommodate any consistent spacing. The punch-out is also centered in the width unless otherwise specified.
WeedEnder® Punched Rolls have punch-outs and are available in different lengths and widths. The standard length is usually 250’ long. This may vary because of the millrun when the material is originally made. Each roll will be clearly marked with the footage on each roll. (Your order will total the correct length.) You may also order odd-size lengths to fit specific needs. This is usually the case on every estimate. Widths may be any width from 1’ to 8’. The standard for single guardrail is 3’ to 4’. The standard for double guardrail is 4’ to 6’. WeedEnder® rolls may be joined together for wider widths.
Features• Controls unwanted vegetation • Cost-effective• Reduces runoff • Maintenance-free• No herbicides or poisons • Helps control erosion• Easy to install • Long-lasting• Environmentally safe • No disposal problems• Conforms to any shape • Reusable• Designed to be abused
5/18
Engineered Vegetation Control Systems

Punched and Slit Rolls
Manufactured by U-TECKP.O. Box 2484, Fayetteville, North Carolina 28302 (800) 542-7011 ● Fax: (910) 483-0784 WeedEnder.com
Features• Controls unwanted vegetation • Cost-effective• Reduces runoff • Maintenance-free• No herbicides or poisons • Helps control erosion• Easy to install • Long-lasting• Environmentally safe • No disposal problems• Conforms to any shape • Reusable• Designed to be abused
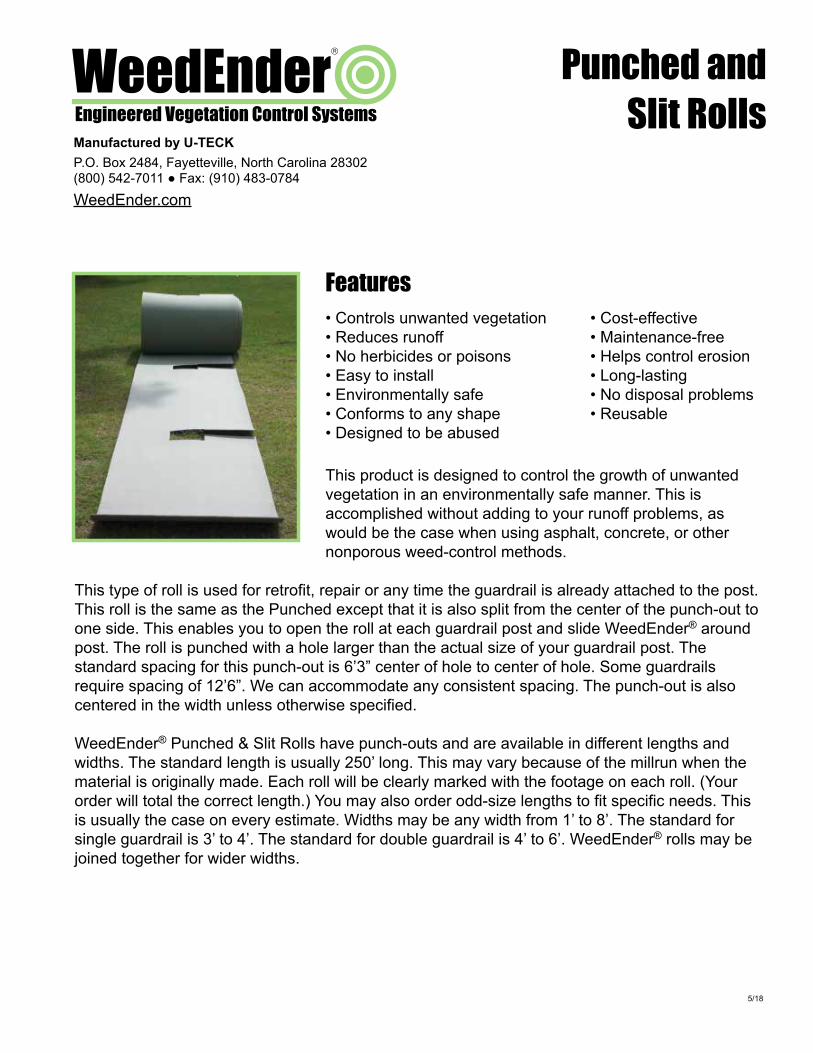
This product is designed to control the growth of unwanted vegetation in an environmentally safe manner. This is accomplished without adding to your runoff problems, as would be the case when using asphalt, concrete, or other nonporous weed-control methods.
This type of roll is used for retrofit, repair or any time the guardrail is already attached to the post. This roll is the same as the Punched except that it is also split from the center of the punch-out to one side. This enables you to open the roll at each guardrail post and slide WeedEnder® around post. The roll is punched with a hole larger than the actual size of your guardrail post. The standard spacing for this punch-out is 6’3” center of hole to center of hole. Some guardrails require spacing of 12’6”. We can accommodate any consistent spacing. The punch-out is also centered in the width unless otherwise specified.
WeedEnder® Punched & Slit Rolls have punch-outs and are available in different lengths and widths. The standard length is usually 250’ long. This may vary because of the millrun when the material is originally made. Each roll will be clearly marked with the footage on each roll. (Your order will total the correct length.) You may also order odd-size lengths to fit specific needs. This is usually the case on every estimate. Widths may be any width from 1’ to 8’. The standard for single guardrail is 3’ to 4’. The standard for double guardrail is 4’ to 6’. WeedEnder® rolls may be joined together for wider widths.
5/18
Engineered Vegetation Control Systems


Fencing RollsManufactured by U-TECKP.O. Box 2484, Fayetteville, North Carolina 28302 (800) 542-7011 ● Fax: (910) 483-0784 WeedEnder.com
WeedEnder® Fencing Rolls are designed to control the growth of unwanted vegetation in an environmentally
safe manner. This is accomplished without adding to your runoff problems, as would be the case when using asphalt, concrete, or other nonporous weed-control methods.
These fencing rolls are perfect to run underneath new or existing chain link fences, electric fences, or even decorative wooden fences. The rolls have punch-outs, and for existing fencing, they also can be slit from the center of the punch-out to one side. This enables you to open a roll at each fence post and slide WeedEnder® around the post. The punch-out in these rolls is slightly larger than the actual size of your fence post and centered in the width unless otherwise specified. And although post spacing varies by type of fence or terrain, we can accommodate any consistent spacing, or you can cut the holes for the fence posts during installation.
The rolls are available in different lengths and widths. The standard width is 2’; the standard length is 250’. This length may vary because of the millrun when the material is originally made. Each roll will be clearly marked with the exact footage, and your order will total the correct length. You may also order odd-size lengths to fit specific needs. Also, these rolls may be joined together for longer lengths.
Features• Controls unwanted vegetation • Cost-effective• Reduces runoff • Maintenance-free• No herbicides or poisons • Helps control erosion• Easy to install • Long-lasting• Environmentally safe • No disposal problems• Conforms to any shape • Reusable• Designed to be abused
5/18
Engineered Vegetation Control Systems


SignMatSingle Post
Manufactured by U-TECKP.O. Box 2484, Fayetteville, North Carolina 28302 (800) 542-7011 ● Fax: (910) 483-0784 WeedEnder.com
Features• Controls unwanted vegetation • Cost-effective• Reduces runoff • Maintenance-free• No herbicides or poisons • Helps control erosion• Easy to install • Long-lasting• Environmentally safe • No disposal problems• Conforms to any shape • Reusable• Designed to be abused
This type of WeedEnder® SignMat controls unwanted vegetation in an environmentally safe manner around single-post signs, such as mile markers and object markers. This is accomplished without adding to your runoff problems, as would be the case when using asphalt, concrete, or other nonporous weed-control methods. SignMat allows water and nutrients to seep through to keep the root system beneath it alive, thereby controlling erosion around the sign. And, if the sign is
moved, the SignMat can move with it because WeedEnder® can be reused.
WeedEnder® SignMat virtually stops the vegetation growth around and under signs. This allows the mower crew to proceed by at its normal speed with no stops required—and no return visits with weedeaters, herbicides or poisons. SignMat not only protects the sign from accidental damage from mowers but also provides a perfect avenue to creating a neat and manicured site conducive to positive visual appreciation.
WeedEnder® SignMat allows the signs to be read easily and without question, thus protecting both the reader and the responsible authority or municipality. SignMat is available in a variety of sizes and shapes and can be customized to specific requirements.
5/18
Engineered Vegetation Control Systems
uteck5016

SignMatDouble Post
Manufactured by U-TECKP.O. Box 2484, Fayetteville, North Carolina 28302 (800) 542-7011 ● Fax: (910) 483-0784 WeedEnder.com
Features• Controls unwanted vegetation • Cost-effective• Reduces runoff • Maintenance-free• No herbicides or poisons • Helps control erosion• Easy to install • Long-lasting• Environmentally safe • No disposal problems• Conforms to any shape • Reusable• Designed to be abused
This style of WeedEnder® SignMat is an environmentally safe way to control unwanted vegetation around double-post signs, such as those displaying speed limit or highway name. SignMat’s advanced design allows water and nutrients to seep through to keep the root system beneath it alive to control erosion around the sign. And, because the WeedEnder® material is reusable, if the sign is moved, the SignMat can move with it. All of this is accomplished without increasing your runoff problems, which would be the case if nonporous weed-control
methods such as asphalt or concrete were used.
Vegetation growth around and under signs is virtually stopped with WeedEnder® SignMat. This enables the mower crew to proceed by at its normal speed with no stops required—and no return visits with weedeaters, herbicides or poisons. SignMat protects the sign from accidental damage from mowers, in addition to providing an ideal avenue to creating a neat and manicured site conducive to positive visual appreciation.
WeedEnder® SignMat enhances the signs so they can be read easily and without question, which protects both the reader and the responsible authority or municipality. SignMat is available in a variety of shapes and sizes and can be customized to your specific needs.
6/15
Engineered Vegetation Control Systems
SignMatTriple Post
Manufactured by U-TECKP.O. Box 2484, Fayetteville, North Carolina 28302 (800) 542-7011 ● Fax: (910) 483-0784 WeedEnder.com
Features• Controls unwanted vegetation • Cost-effective• Reduces runoff • Maintenance-free• No herbicides or poisons • Helps control erosion• Easy to install • Long-lasting• Environmentally safe • No disposal problems• Conforms to any shape • Reusable• Designed to be abused
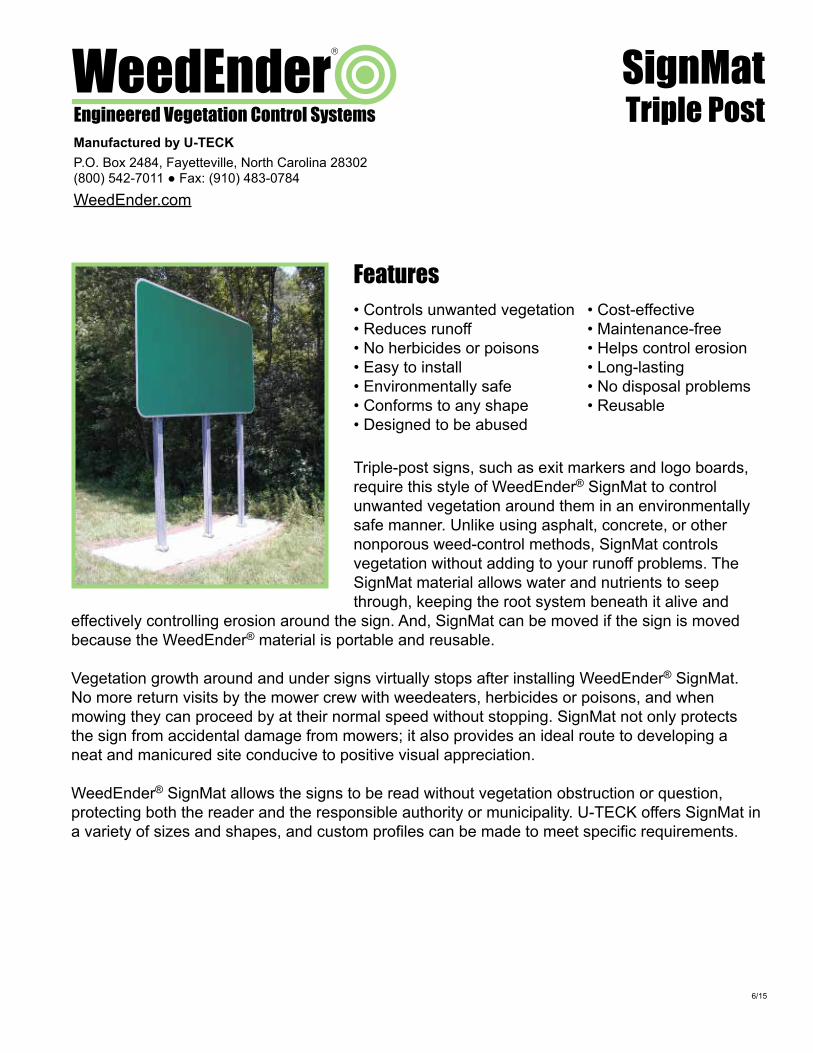
Triple-post signs, such as exit markers and logo boards, require this style of WeedEnder® SignMat to control unwanted vegetation around them in an environmentally safe manner. Unlike using asphalt, concrete, or other nonporous weed-control methods, SignMat controls vegetation without adding to your runoff problems. The SignMat material allows water and nutrients to seep through, keeping the root system beneath it alive and
effectively controlling erosion around the sign. And, SignMat can be moved if the sign is moved because the WeedEnder® material is portable and reusable.
Vegetation growth around and under signs virtually stops after installing WeedEnder® SignMat. No more return visits by the mower crew with weedeaters, herbicides or poisons, and when mowing they can proceed by at their normal speed without stopping. SignMat not only protects the sign from accidental damage from mowers; it also provides an ideal route to developing a neat and manicured site conducive to positive visual appreciation.
WeedEnder® SignMat allows the signs to be read without vegetation obstruction or question, protecting both the reader and the responsible authority or municipality. U-TECK offers SignMat in a variety of sizes and shapes, and custom profiles can be made to meet specific requirements.
6/15
Engineered Vegetation Control Systems

BigFootTM
Leave-Out Mat
Features• Easy to install • Cost effective • Fire-retardant • No Weeds - No herbicides
Manufactured by U-TECKP.O. Box 2484, Fayetteville, North Carolina 28302 (800) 542-7011 ● Fax: (910) 483-0784 WeedEnder.com
U-TECK is pleased to introduce another member of the WeedEnder® Vegetation Control System family...theWeedEnder® BigFootTM Leave-Out Mat. Comprised of 100% recycled polyester fibers, WeedEnder® materials are very strong, lightweight, fire retardant, and easy to install and are able to prevent weeds from growing up without herbicide use.
WeedEnder® BigFootTM Leave-Out Mats are designed and manufactured specifically to replace current “minor concrete vegetation control detail”
around guard rail posts in lieu of using grout as a post impact buffer.
Installation of the BigFootTM Leave-Out Mat around guard rail posts are much easier and less expensive than the traditional method.
• Traditional landscape fabric is not required when using the BigFootTM Leave-Out Mats.• Styrofoam block-outs, if used, stay in place after the surrounding concrete has set-up. • If styrofoam is not used as a block-out, the void
may be filled with traditional backfill.• The BigFootTM Leave-Out Mat is sized to overlap
onto the surrounding concrete by 2 inches.• They are then adhered directly to the concrete
using U-TECK's WeedEnder® adhesive. Mfg. part numbers 8ADHESIVE-W (green) or 8ADHESIVE-W-B (black)
Maintenance and repairs are now much less expensive, faster, and safer. No more having to mix grout out in the field. Most often the BigFootTM Leave-Out Mat will not need to be replaced, just repositioned and reattached to the concrete. If styrofoam blockouts are damaged, the remaining styrofoam can be discarded and the void now filled with traditional backfill and the BigFootTM Leave-Out Mat reattached.
Besides obvious installation and repair savings, WeedEnders BigFoot Leave-out Mats visually blend into their environment
®
TM
5/18
Engineered Vegetation Control Systems

FootprintsManufactured by U-TECKP.O. Box 2484, Fayetteville, North Carolina 28302 (800) 542-7011 ● Fax: (910) 483-0784 WeedEnder.com
Features• Controls unwanted vegetation • Cost-effective • Reduces runoff • Maintenance-free• No herbicides or poisons • Easy to install • Long-lasting • Reusable• Helps control erosion • No disposal • Conforms to any • Environmentally safe
problems shape abused
Small I-Beam PostVPN: 8FPWP-G
Standard I-Beam PostVPN: 8FPSP-G
Medium Wooden PostVPN: 8FP8X8WP
These footprints are constructed of the same material as the WeedEnder®. They are designed to control the growth of unwanted vegetation in an environmentally safe manner. This is accomplished without adding to your runoff problems, as would be the case when using asphalt, concrete, or other nonporous weed-control methods.
When the WeedEnder® guardrail roll is pre-punched, or if you cut the hole for the guardrail post on the jobsite, the punched-out area will be slightly larger than the post itself. This is by design to facilitate installation by making the WeedEnder® roll easier to fit around the guardrail post and adjust properly. The footprint is cut to the exact size and shape of the guardrail post being used and acts to cover the hole once the WeedEnder® roll is in place. When properly installed—by attaching the footprint to the guardrail roll using WeedEnder® Adhesive/Caulk and WeedEnder Staples—the footprint blocks any sunlight from penetrating next to the guardrail post and prevents any vegetation from growing up around the post. U-TECK has a footprint to match any guardrail post profile and, if needed, will custom cut a footprint to your specific requirements. 5/18
Engineered Vegetation Control Systems
Mini FootprintsManufactured by U-TECKP.O. Box 2484, Fayetteville, North Carolina 28302 (800) 542-7011 ● Fax: (910) 483-0784 WeedEnder.com
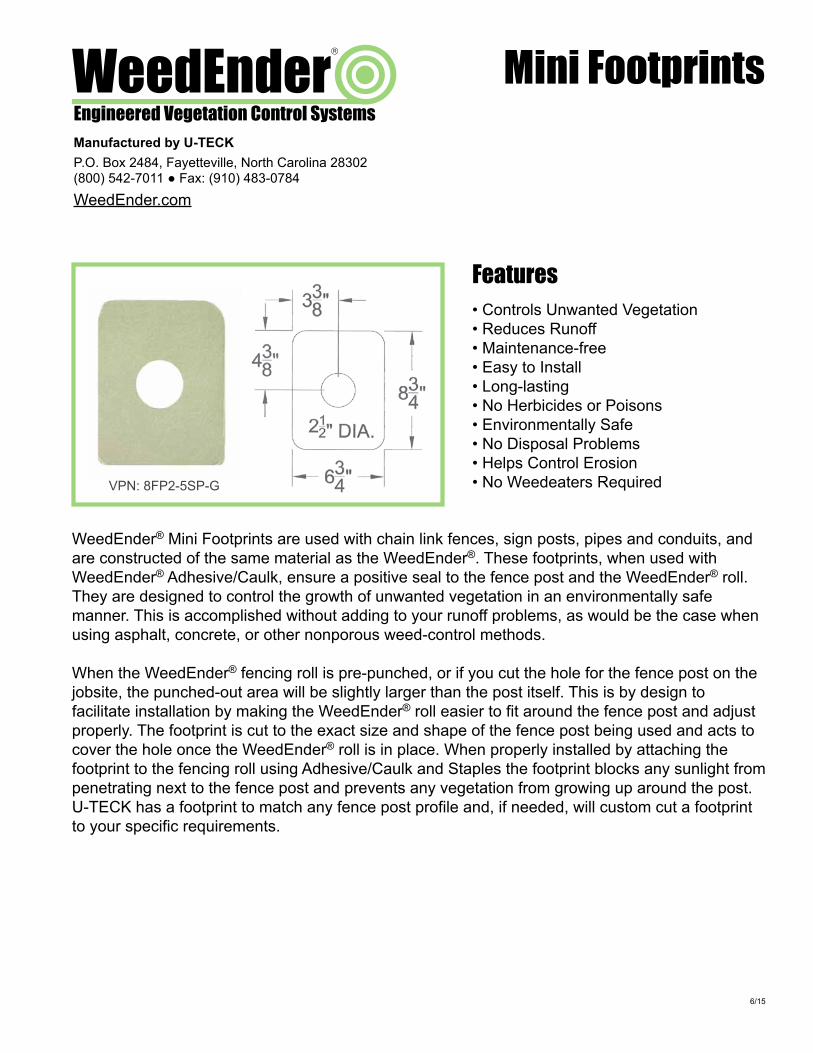
Features• Controls Unwanted Vegetation• Reduces Runoff• Maintenance-free• Easy to Install• Long-lasting• No Herbicides or Poisons• Environmentally Safe• No Disposal Problems• Helps Control Erosion• No Weedeaters RequiredVPN: 8FP2-5SP-G
WeedEnder® Mini Footprints are used with chain link fences, sign posts, pipes and conduits, and are constructed of the same material as the WeedEnder®. These footprints, when used with WeedEnder® Adhesive/Caulk, ensure a positive seal to the fence post and the WeedEnder® roll. They are designed to control the growth of unwanted vegetation in an environmentally safe manner. This is accomplished without adding to your runoff problems, as would be the case when using asphalt, concrete, or other nonporous weed-control methods.
When the WeedEnder® fencing roll is pre-punched, or if you cut the hole for the fence post on the jobsite, the punched-out area will be slightly larger than the post itself. This is by design to facilitate installation by making the WeedEnder® roll easier to fit around the fence post and adjust properly. The footprint is cut to the exact size and shape of the fence post being used and acts to cover the hole once the WeedEnder® roll is in place. When properly installed by attaching the footprint to the fencing roll using Adhesive/Caulk and Staples the footprint blocks any sunlight from penetrating next to the fence post and prevents any vegetation from growing up around the post. U-TECK has a footprint to match any fence post profile and, if needed, will custom cut a footprint to your specific requirements.
6/15
Engineered Vegetation Control Systems


Ped-Mat
Features• Fire-retardant • Long-lasting 15 year warranty• Improved visibility, reduces damage • Easy to install • Cost-effective • Discourages fire ants• No herbicides No runoff
Manufactured by U-TECKP.O. Box 2484, Fayetteville, North Carolina 28302 (800) 542-7011 ● Fax: (910) 483-0784
WeedEnder.com
Many years ago, U-TECK was approached by a major Regional Bell Operating Company (RBOC) to address their need for a herbicide-free alternative to control unwanted vegetation around pedestals. The solution is now known as WeedEnder®. Comprised of a dense, multi-directional needling of specially formulated syn-thetic polyester fibers, the material is additionally impregnated with a special resin with ultraviolet inhibi-tors and fire-resistant properties. Constructed from
100% recycled material, WeedEnder increases visibility, decreases herbicide use and site mainte-nance, and proves to be extremely durable.
Not to be confused with landscape fabrics, the ¼ inch matting is rugged and strong, held in place with a specially designed 316 stainless steel staking system and an adhesive/caulking formulation, created especially for use with the WeedEnder material, that can be used in wet or dry conditions. But as tough as it is, WeedEnder offers unusual versatility by allowing it to be rolled up in the event of line repairs or additions then rolled back into position without any decrease in performance.
While Ped-Mat dramatically reduces damage from Bush-Hogs and other heavy equipment by increasing visibility around your pedestals, it is also great for public relations by eliminating unsightly overgrown grass around pedestals or other fixtures on or next to someone’s manicured lawn. You get all of these benefits without the burden of weed-eating or unsightly herbicide use. Cost-effective, easy to install and low-maintenance. How many do you need?
4/18

Product Specifications
Ped-Mat 1 is die-cut to fit around a round pedestal with a 6", 8", 10", 12", or 14" diameter. Ped-Mat 2 is die-cut to fit around a square or rectangular pedestal with the following dimensions: 6 5/8" square, 12 7/8" square, or 10 ½" x 23. Ped-Mat 3 is not die-cut and fits in those hard-to-fit areas, such as next to poles, other pedestals, or other obstructions. You cut it to the size and shape needed.
** Note: Each Ped-Mat measures 3' x 4' and comes with ** Note: Other sizes and configurations are available upon request.
Joining Strip is a 4" x 25' strip to join the WeedEnder rolls. General Purpose Spiral Spikes are 6" long and are designed to hold the mat in place. 316 Stainless Steel Staples measure 1 1/4" x 5/8" and are packed 2,000 per box. These are used to join two widths of WeedEnder material with the joining strip. Manual Staple Gun holds 150 stainless steel staples and is specially designed for use with our staples and the WeedEnder material. Pre-set depth allows staple penetration through the material for splices and repairs. Adhesive/Caulk is specially formulated for primerless adhesion to the WeedEnder material and the metal or wooden guardrail posts (in wet or dry conditions) to inhibit weed growth.
Ordering Information
Note: All configurations of the Ped-Mat are also available in asphalt-color (black).
Product Color VPN Quantity Weight Pricing Unit Ped-Mat 1 Green 74001-G 10 37 lbs. 1 Ped-Mat 1 Green 74002-G 10 37 lbs. 1 Ped-Mat 1 Green 74003-G 10 37 lbs. 1 Joining Strip Green 74403-G 1 2.5 lbs. 1 316 SS Stakes N/A 74000 100 7 lbs. Box 316 SS Staples N/A 74100 2,000 3.8 lbs. Box Manual Staple Gun N/A 74200 1 4.4 lbs. 1 Adhesive/Caulk (tube) Green 8ADHESIVE-W 12 10 lbs. Case
Ped-Mat 1 Ped-Mat 2 Ped-Mat 3

TreeMatManufactured by U-TECKP.O. Box 2484, Fayetteville, North Carolina 28302 (800) 542-7011 ● Fax: (910) 483-0784 WeedEnder.com
The TreeMat gives your yard a cleaner look with a permanent edge around trees, mail boxes and poles. You'll never need to spray, weed, rake or add mulch. Created of 100% recycled material, the TreeMat lets in water, air and nutrients while completely suppressing weeds. You can even run the lawnmower right over the edge of the mat without harming it.
The TreeMat has perforated growth rings spaced every 2 in. that allows you to cut the mat as the tree grows.
This kit includes U-stakes to anchor the TreeMat in place.
12" TreeMat VPN: SGTM-122212-G 24" TreeMat VPN: SGTM-122224-G 36" TreeMat VPN: SGTM-122236-G
Features• Fits Trees of Any Size • Mowers Can Go Over It• Growth Rings Allow Resizing • Extremely Durable• Protects Trunk from Damage • Easy to Install• Beautifies Landscaped Areas • Safer Than Metal Grates
Engineered Vegetation Control System
5/18
Joining StripManufactured by U-TECKP.O. Box 2484, Fayetteville, North Carolina 28302 (800) 542-7011 ● Fax: (910) 483-0784 WeedEnder.com
Features
• Maintenance-free • Easy to install• Long-lasting • Environmentally safe• Conforms to any shape
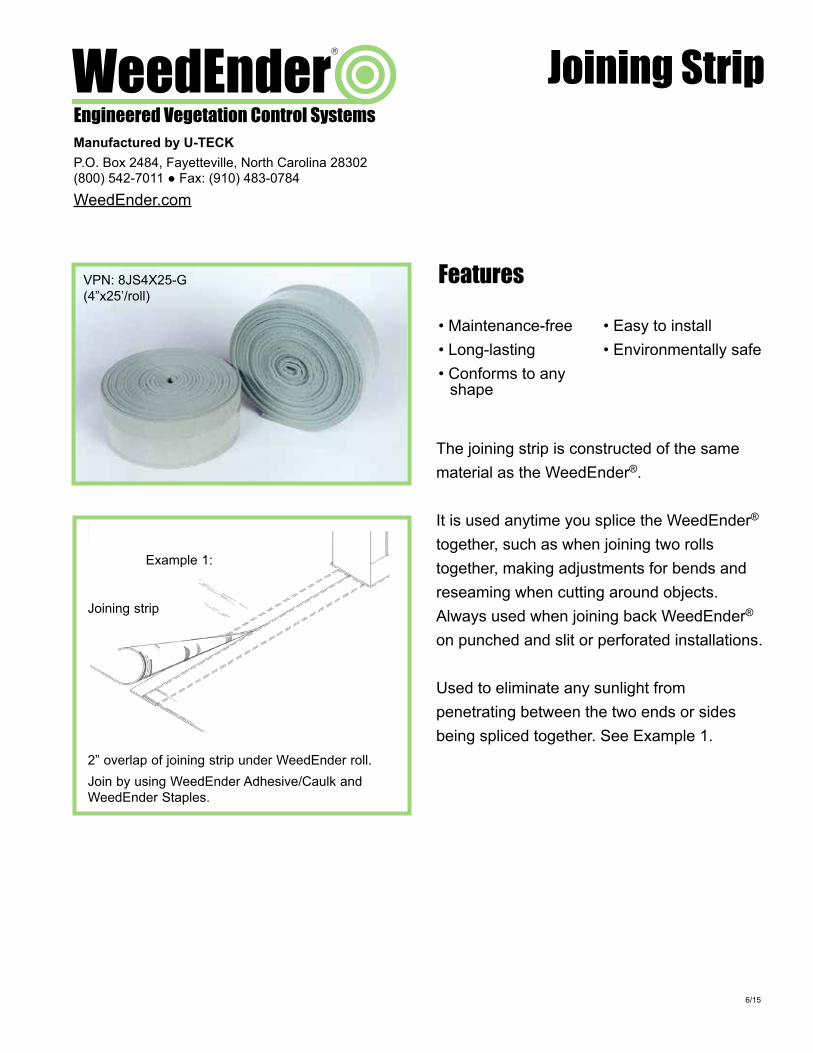
Joining strip
2” overlap of joining strip under WeedEnder roll. Join by using WeedEnder Adhesive/Caulk and WeedEnder Staples.
Example 1:
The joining strip is constructed of the same material as the WeedEnder®.
It is used anytime you splice the WeedEnder® together, such as when joining two rolls together, making adjustments for bends and reseaming when cutting around objects. Always used when joining back WeedEnder® on punched and slit or perforated installations.
Used to eliminate any sunlight from penetrating between the two ends or sides being spliced together. See Example 1.
VPN: 8JS4X25-G(4”x25’/roll)
6/15
Engineered Vegetation Control Systems


Adhesive/CaulkManufactured by U-TECKP.O. Box 2484, Fayetteville, North Carolina 28302 (800) 542-7011 ● Fax: (910) 483-0784 WeedEnder.com
Features• Environmentally safe • Easy to apply• Strong, durable bond • Won’t crack• Remains flexible • Fast-setting• Excellent adhesion • Moisture resistant
This product is a one-part, neutral curing, medium modulus adhesive/caulk, specially formulated for primerless adhesion to the WeedEnder® material and the metal or wooden guardrail post. This adhesive/caulk is supplied ready-to-use. Under pressure it flows readily from its container, and it cures to provide excellent resistance to cold, rain,
ozone, heat and sunlight. The adhesive/caulk color is light green to closely match the U-TECK WeedEnder® material.
Used for footprints, seams and cuts for adjustments in WeedEnder®. This prevents weeds from growing in seams and around posts of all types.
Usage Notes: Do Not substitute adhesive/caulk nor apply it to wet or damp surfaces as this product is specially formulated to adhere to the WeedEnder® material and to be applied in dry conditions.
5/18
Engineered Vegetation Control Systems

StaplesManufactured by U-TECKP.O. Box 2484, Fayetteville, North Carolina 28302 (800) 542-7011 ● Fax: (910) 483-0784 WeedEnder.com
Features• Stainless Steel • Corrosion-resistant• Easy to Attach • Superior Strength• Will Not Bleed
These staples are used to attach footprints to and make seams in the WeedEnder® material, and to join two rolls together. When making seams or joining rolls, place one staple every 4”; when attaching footprints, place one staple on each side of the footprint horizontal to the post.
Made of 316 stainless steel, these staples provide maximum corrosion resistance in this demanding application. They are specially designed to the correct length and size to work with the WeedEnder® material and in either the manual or pneumatic staple gun. These staples have been developed with broad, flat wire to offer greater holding power to the WeedEnder® material. These quality wide-crown staples are unaffected by dirt,
temperature and humidity, and their superior strength ensures their longevity. Sharpened to chisel points, these staples can pass through the WeedEnder® material without tearing.
VPN: 8SSSTAPLE(2,000/box)
Engineered Vegetation Control System

Cordless Adhesive Dispenser
Features• E360º rotateable cartridge holder fits 10oz, 1/10 gal, and 300ml to 310ml cartridges • Tool delivers up to 650 pounds pushing force to dispense the highest viscosity adhesives and
sealants • Auto-reverse feature helps reduce drips, waste, and clean-up • Set-and-Forget variable speed control for consistent flow rates and bead control • 18V battery pack • 1 hour charger
Manufactured by U-TECKP.O. Box 2484, Fayetteville, North Carolina 28302 (800) 542-7011 ● Fax: (910) 483-0784 WeedEnder.com
VPN: 8ADCKS-B
6/15
Engineered Vegetation Control System

Pneumatic Caulking Gun
(Single Component)Manufactured by U-TECKP.O. Box 2484, Fayetteville, North Carolina 28302 (800) 542-7011 ● Fax: (910) 483-0784 WeedEnder.com
Features• Standard 10.3 oz. tube• Piston rod action on tube plunger• Drawn aluminum barrel• True adjustable air regulator - 100 PSI max• Instant dump valve• Quick-release end cap• Barrel dismantles for easy cleaning• All component replaceable parts• Rotating air hose connector included
The Single Component Pneumatic Caulking Gun from U-TECK extrudes the WeedEnder sealing adhesive in a faster, smoother, and more consistent stream than manual guns for quality workmanship. It’s characterised by strong, quality construction, which ensures reliability and results in a longer working life and years of trouble-free use.
The Pneumatic Caulking Gun quickly delivers the contents of the standard 10.3 oz. adhesive tube to the area to be sealed or to the material to be joined, and its ergonomic design and quiet operation provide comfort and minimal operator fatigue, making it a state-of-the-art tool for the professional user.
The Caulking Gun comes equipped with these comfort and convenience features: Drawn Aluminum Barrel, which provides comfortable operation due to its lightweight, balanced design; 100 PSI True Adjustable Air Regulator, which controls the speed, or flow, of the material being dispensed; Instant Dump Valve, which releases all air pressure to prevent dripping, or “run-on”; and Quick Release End Cap, which reduces cartridge replacement time, thus increasing user efficiency.
VPN: 8ADCGS-P
5/18
Engineered Vegetation Control Systems

Pneumatic Staple Gun
Manufactured by U-TECKP.O. Box 2484, Fayetteville, North Carolina 28302 (800) 542-7011 ● Fax: (910) 483-0784 WeedEnder.com
Features• Maneuverable design• High-speed and efficient• Spring-loaded “Floating” magazine• Fast-cycling for quicker installations• Open trigger cavity• Automatic return of anvils• One-piece staple magazine/pusher• Independent staple clinch control• Independent staple penetration adjustment
The Pneumatic Staple Gun is the most suitable machine when high speed and efficiency are required. Its unique design combination of trigger valve, casting body, and piston diameter enables our tool to be one of the fastest-cycling tools on the market today. U-TECK believes that is important to users who need the decreased installation times required on today’s jobsites.
The Pneumatic Staple Gun’s open trigger cavity permits single- or multi-finger operation, making the tool more ergonomically acceptable and reducing operator fatigue to a minimum. The return of its anvils is automatic, and it is possible to adjust the clinching of the staple as well as its penetration. Additionally, its handy and maneuverable design features one-handed operation, ease of use in any awkward position, and easy reloading of standard WeedEnder stick staples.
The Staple Gun is a lightweight, well-balanced tool with these convenience features: One-piece Staple Magazine/Pusher, permitting fast reloading without removal of the pusher; Spring-loaded “Floating” Magazine, which eliminates staple jams; Independent Staple Clinch Control, to tailor the tightness of the staple leg clinch to your exact needs; and Independent Staple Penetration Adjustment, which controls the depth of staple penetration.
VPN: 8STAPLEGUN-PN
6/18
Engineered Vegetation Control Systems

Manual Staple Gun
Manufactured by U-TECKP.O. Box 2484, Fayetteville, North Carolina 28302 (800) 542-7011 ● Fax: (910) 483-0784 WeedEnder.com
Features• Lightweight• Jam-free design• High capacity• Built-in handle
This lightweight, well-balanced tool features a one-piece staple magazine and pusher, permitting fast reloading without removal of the pusher; a spring-loaded “floating” magazine, which eliminates staple jams; an independent staple clinch control to tailor the tightness of the staple leg clinch to your exact needs; and
an independent staple penetration adjustment, which controls the depth of staple penetration through the WeedEnder material. The built-in handle permits easy carrying and ensures consistent and reliable hand stapling. This economical hand-operated tool uses preformed stick staples and is ideal for use where compressed air is not available.
Heavy-duty and field-adjustable, this staple gun is designed to work with WeedEnder stainless steel staples and is capable of placing them through two thicknesses of WeedEnder material.
VPN: 8STAPLEGUN
5/18
Engineered Vegetation Control Systems

6/1/18