esupplierconnect · esupplierconnect is the fiat chrysler automobiles (following referenced as fca)...
TRANSCRIPT

Page 1/35 January 23, 2017 – v9.4
End User Manual
eSupplierConnect
Version 9.4
January 23rd, 2017

Page 2/35 January 23, 2017 – v9.4
Table of contents:
1 Introduction 3
2 About eSupplierConnect 5
2.1 Portal Access 6
2.2 Portal Structure 7
2.3 Actors (External Users) 9
2.4 Organization and Administration Structure 10
3 Self-Service 13
3.1 How to change personal data 14
3.1.1 Personal data 15
3.1.2 Change password 16
3.1.3 Challenge Questions and Answers 17
3.2 How to display user’s and company data 18
3.3 End User – Application request 20
3.4 User Application Manager 23
3.5 Requests on my user ID 25
4 Applications Launchpad 26
4.1 How to access to an application from eSupplier Connect 26
5 User Enable/Disable 27
6 Bulletins and Alerts (Supplier Side) 29
6.1 Bulletins 29
6.1.1 Bulletins Main Display 29
6.1.2 Display All Live Bulletins 29
6.1.3 Display All Archived Bulletins 29
6.2 Alerts 30
7 Need Help? 32
7.1 Help Desk Support 34
7.2 Supported Browser 35

Page 3/35 January 23, 2017 – v9.4
1 Introduction
This document is the End User Manual and provides all the required information to use eSupplierConnect
functionalities.
The next paragraphs explain:
PART 1
Basic information and general ‘guidelines’ of eSupplierConnect.
PART 2
Self-service management, which details how to change personal data (e.g. Name, Surname,
Password, etc.);
Application request, which details how the supplier can request authorization to specific
application(s) for supporting activities performed with Fiat Chrysler Automobiles;
Content management, which shows the guidelines of how to manage bulletins and alerts and how
to display them.
PART 3
Support area, which describes how to contact the Help Desk or find Information about
eSupplierConnect.
Not all the functionalities described in the next section will be available to every set of users. The availability depends on the user profile (end user or supplier administrator).
If a functionality is assigned to a subset of users, this will be highlighted in the title.
Page 4/35 January 23, 2017 – v9.4
PART 1
GENERAL INFORMATION

Page 5/35 January 23, 2017 – v9.4
2 About eSupplierConnect
eSupplierConnect is the Fiat Chrysler Automobiles (following referenced as FCA) suppliers’ portal through
which the suppliers’ partners will be able to access applications, resources and communications.
eSupplierConnect grants:
A unified access point for all FCA suppliers;
Multi-purpose portal content, not only related to Purchasing needs;
A single supplier portal to gather information;
Faster user ID provisioning and management;
Ease of access to applications with a single log on.

Page 6/35 January 23, 2017 – v9.4
2.1 Portal Access
In order to access eSupplierConnect, use the URL below:
https://www.esupplierconnect.com
The Global Home [Page] of eSupplierConnect is displayed:
Page 7/35 January 23, 2017 – v9.4
2.2 Portal Structure
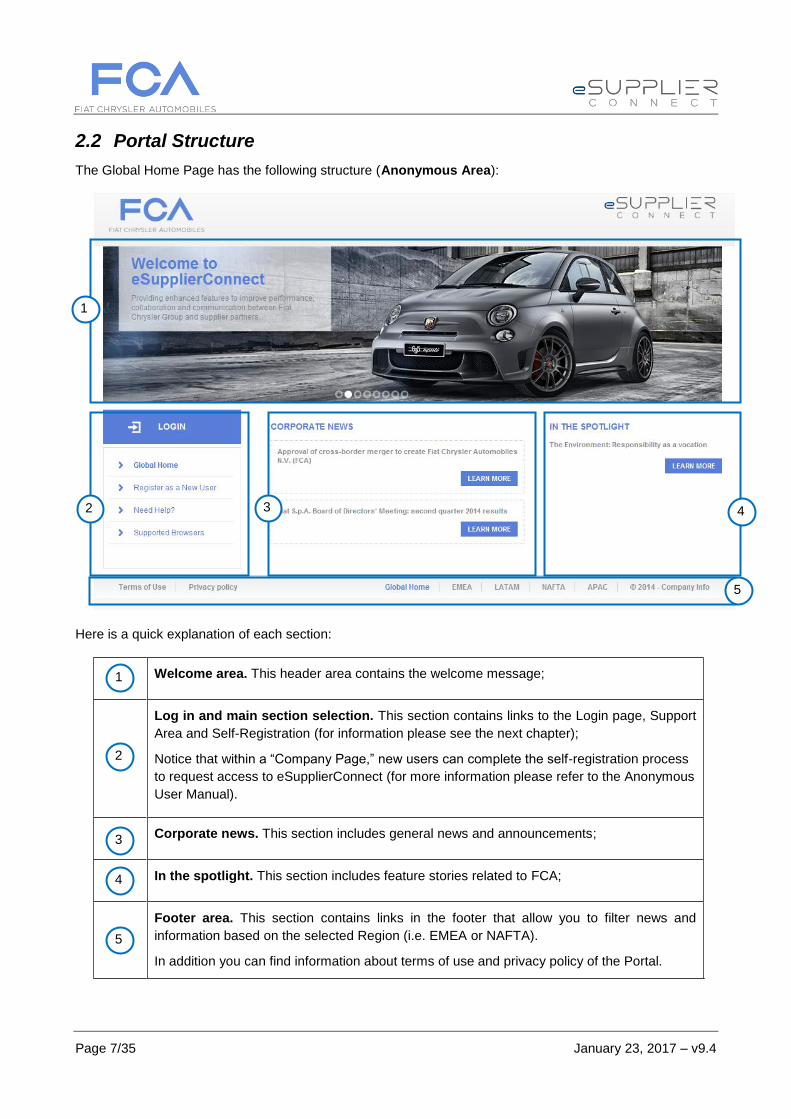
The Global Home Page has the following structure (Anonymous Area):
Here is a quick explanation of each section:
Welcome area. This header area contains the welcome message;
Log in and main section selection. This section contains links to the Login page, Support
Area and Self-Registration (for information please see the next chapter);
Notice that within a “Company Page,” new users can complete the self-registration process
to request access to eSupplierConnect (for more information please refer to the Anonymous
User Manual).
Corporate news. This section includes general news and announcements;
In the spotlight. This section includes feature stories related to FCA;
Footer area. This section contains links in the footer that allow you to filter news and
information based on the selected Region (i.e. EMEA or NAFTA).
In addition you can find information about terms of use and privacy policy of the Portal.
1
2
4
3
5
4 2 3
5
1
Page 8/35 January 23, 2017 – v9.4
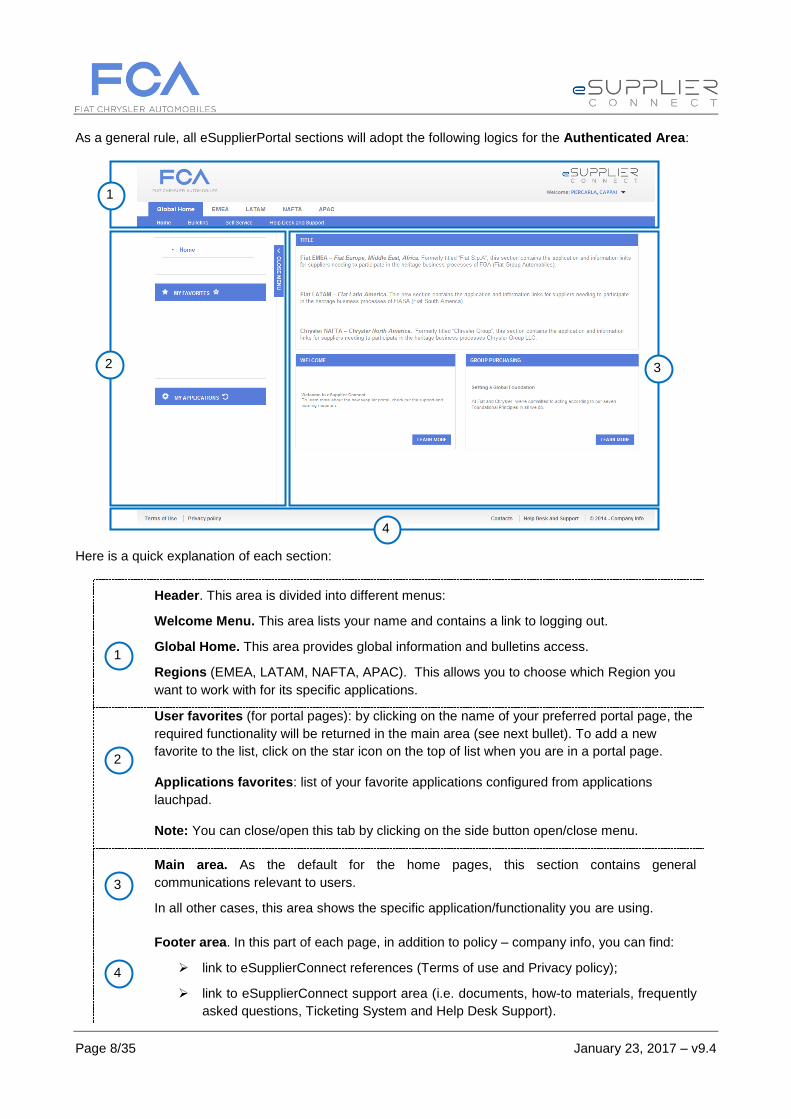
As a general rule, all eSupplierPortal sections will adopt the following logics for the Authenticated Area:
Here is a quick explanation of each section:
Header. This area is divided into different menus:
Welcome Menu. This area lists your name and contains a link to logging out.
Global Home. This area provides global information and bulletins access.
Regions (EMEA, LATAM, NAFTA, APAC). This allows you to choose which Region you
want to work with for its specific applications.
User favorites (for portal pages): by clicking on the name of your preferred portal page, the
required functionality will be returned in the main area (see next bullet). To add a new
favorite to the list, click on the star icon on the top of list when you are in a portal page.
Applications favorites: list of your favorite applications configured from applications
lauchpad.
Note: You can close/open this tab by clicking on the side button open/close menu.
Main area. As the default for the home pages, this section contains general
communications relevant to users.
In all other cases, this area shows the specific application/functionality you are using.
Footer area. In this part of each page, in addition to policy – company info, you can find:
link to eSupplierConnect references (Terms of use and Privacy policy);
link to eSupplierConnect support area (i.e. documents, how-to materials, frequently
asked questions, Ticketing System and Help Desk Support).
1
2 3
4
1
2
3
4

Page 9/35 January 23, 2017 – v9.4
2.3 Actors (External Users) The eSupplierConnect’s content and functionalities presented depend on the roles of the user that accesses
the portal.
From an eSupplierConnect perspective, each external user belongs to one of the following user categories:
Supplier Security Administrator (SSA). A supplier security administrator can:
o request access to applications;
o create specific supplier users;
o lock and unlock users; associate applications to user IDs;
o clone a user;
o reset the password of a user;
o create, modify or delete an Administration Group;
An SSA could be:
ROOT Administrator: A ROOT Administrator is the SSA of all the company. The user with
this role will be the person in charge of all the company and all the users created into the
system for his/her company;
Group Administrator: A Group Administrator is the SSA of his/her own Administration
Group subset of the company and all the users created into the system for his/her
Administration Group and the Groups underneath;
End User. An end user can:
o use the applications available for him/her;
o request access to extra applications, and/or supplier codes, available for his/her
organization.
Anonymous user (log in is not required). An Anonymous user can:
o Navigate in the Anonymous Area
o Self-register to the portal
Note: Supplier Security Administrators can also perform end user activities.

Page 10/35 January 23, 2017 – v9.4
2.4 Organization and Administration Structure A new external user registration into eSupplierConnect (the very first one) starts the definition of the
organizational structure of the supplier company triggering the creation of the ROOT Administration Group
that is the header of the company; this group must have at least a user with ROOT Administrator role.
All the supplier codes that belong to a company are assigned to the ROOT Administration Group and the
Root Administrator is the person in charge to manage them into eSupplierConnect.
The Root Administrator can divide its company in subsets (delegated administration) and assign part of the
supplier codes of the company to the different subsets, these subsets are called Basic Administration
group.
A Basic Administration Group is an intermediate level connecting a subset of supplier codes with certain
characteristics.
The real content of a grouping level, its organization and usage is an option input by the root administrator.
Page 11/35 January 23, 2017 – v9.4
Consider the following example:
The ROOT Administration group for a supplier is
“Group World”;
Under “Group World”, there are two different Basic Administration Groups:
“Region NAFTA”
“Region EU”;
“Region NAFTA” and “Region EU” are two different entities that can manage its own codes and its own
structure subset.
“Region NAFTA” has three different Basic Administration Groups:
“Country USA”;
“Country CANADA”;
“Country MEXICO”;
“Country USA” has two Basic Administrator Groups “TEXAS” and “CALIFORNIA” under it.
All these groups are different entities that can manage its own codes and its own structure subset.
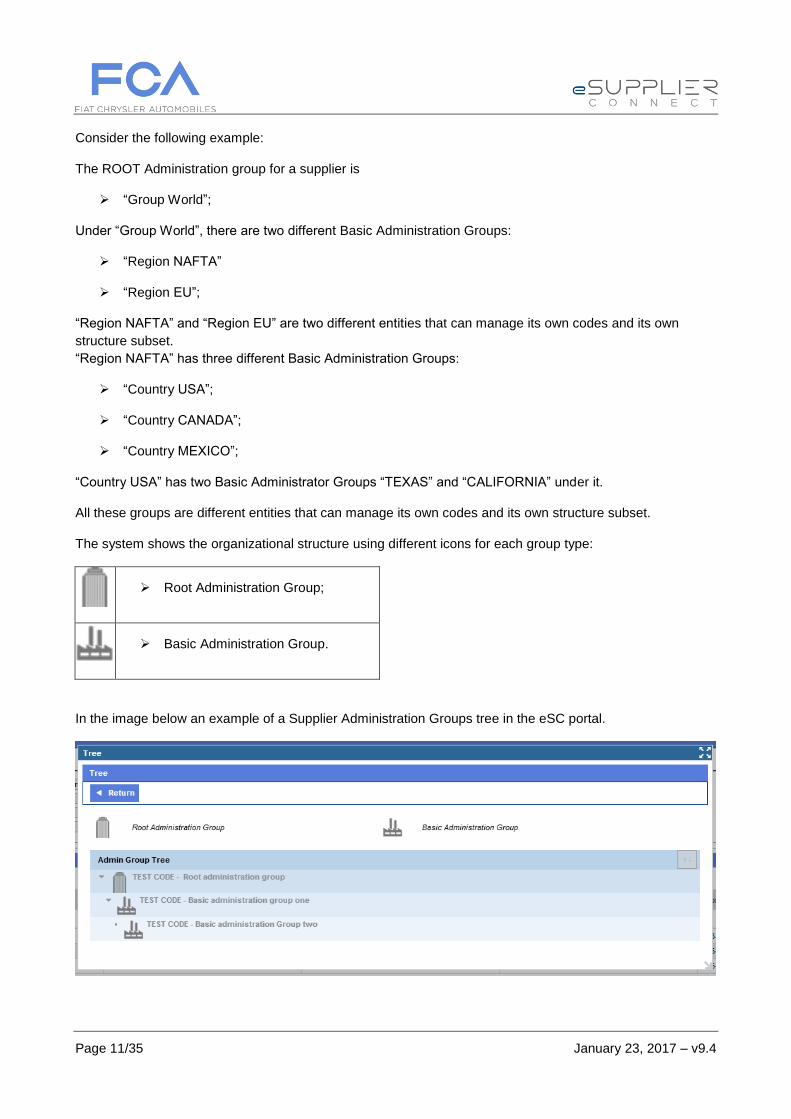
The system shows the organizational structure using different icons for each group type:
Root Administration Group;
Basic Administration Group.
In the image below an example of a Supplier Administration Groups tree in the eSC portal.

Page 12/35 January 23, 2017 – v9.4
PART 2
USER MANAGEMENT

Page 13/35 January 23, 2017 – v9.4
3 Self-Service
This section explains:
How to change personal data;
How to display company data;
How to find and add an application;
How to modify an account of a granted application;
How to check the status of own profiling requests.
The workflow to add an application depends on your role in eSupplierConnect:
End user;
Administrator (root or group).

Page 14/35 January 23, 2017 – v9.4
3.1 How to change personal data It is possible to change user personal data accessing the Self Service area from the Global Home page.
To change user personal data, follow the path: Global Home > Self Service > User Data Management
The “User Data management” is structured as below:
Self-Service User Data Management: Here the system reminds the user ID and name and
surname of the user logged;
Select the area where to make changes:
Personal data;
Change Password;
Challenging Questions and Answers.
Fields related to chosen area.
12
22
32
32
12
22

Page 15/35 January 23, 2017 – v9.4
3.1.1 Personal data
When changing personal user data, the following rules apply:
It is possible to change only fields with a white background.
It is not possible to change fields with a grey background
It is mandatory to insert an e-mail address not already used in the e-mail field.
After you have completed your changes select “Save personal data” to complete the changing.

Page 16/35 January 23, 2017 – v9.4
3.1.2 Change password To change your password, the following fields must be completed:
Current password;
New Password;
Confirm password.
When you have finished select the Change Password button to confirm .

Page 17/35 January 23, 2017 – v9.4
3.1.3 Challenge Questions and Answers To setup or change the challenge questions and answers, the following fields must be compiled. Once
finished select Save Q&A to confirm.
The challenge question and answer can be used to self-reset your password when needed (e.g.: In case of
forgotten password, it will be possible to self-reset own password answering to the challenge questions).
Page 18/35 January 23, 2017 – v9.4
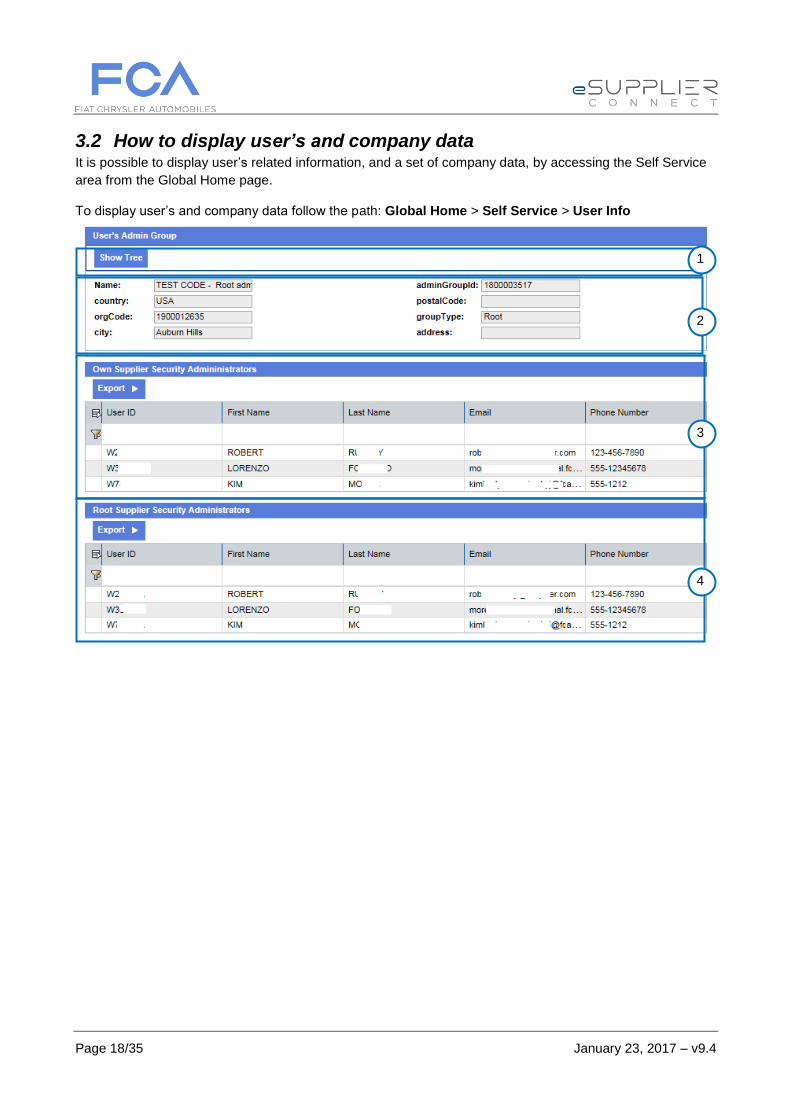
3.2 How to display user’s and company data It is possible to display user’s related information, and a set of company data, by accessing the Self Service
area from the Global Home page.
To display user’s and company data follow the path: Global Home > Self Service > User Info
12
22
32
42

Page 19/35 January 23, 2017 – v9.4
In the following table is a quick explanation of each section of the image above.
User’s Admin Group: Select Show Tree to display the organizational structure of your company;
Data of the Administration Group of the user.
Own Supplier Security Administrator: List of Administrator related to the Group the user
belongs to
Root Supplier Security Administrator: List of Administrator of the Root Administration Group
12
22
42
32

Page 20/35 January 23, 2017 – v9.4
3.3 End User – Application request
You can access the Applications Request by choosing which Region you want to work with for its specific
applications:
[Region] > Applications > Request Applications
Different search type logics are provided in order to search for and select the appropriate application.
The available search types are:
My Organization Applications: This option allows users to view all the available applications
for a certain organization;
All Available Applications: This option allows users to view all other applications available in
the system. The applications in this list should be authorized for the user’s organization before
they can be requested. Once authorized, the applications are moved in the My Organization
Applications list.

Page 21/35 January 23, 2017 – v9.4
Request new application(s) First Step, select one or more applications under My Organization
Applications:
In the following table is a quick explanation of each section of the image above.
Request Button. Click on the Request button to start the activation process for an application.
The application is marked as selected (the Request button is switched to Selected);
Next Step Button. Click Next Step button, to go ahead in the process;
Abort Button. Click this button to stop the application request process.
When you click the Next button the process will continue allowing the access to the next screen for the
applications profiling.
1
3
2
2 3
1

Page 22/35 January 23, 2017 – v9.4
Select Supplier Code(s) and submit your request, Second Step:
In the following table is a quick explanation of each section of the image above.
Select Application. Select the application to be profiled. When all the applications have been
profiled it is possible click on the Submit button.
Select Role. Select the role for the application. This option for some applications could be
unavailable. Some applications do not need roles for the profiling.
Select Supplier Code(s). Check the supplier’s codes you want to be configured for the
selected application.
Submit Button. Click this button to submit the profiling and complete the applications
configuration request.
Note: It is not possible to submit a new request until the previous one has not been completed.
1 2
3
4
3
4
1
2
Page 23/35 January 23, 2017 – v9.4
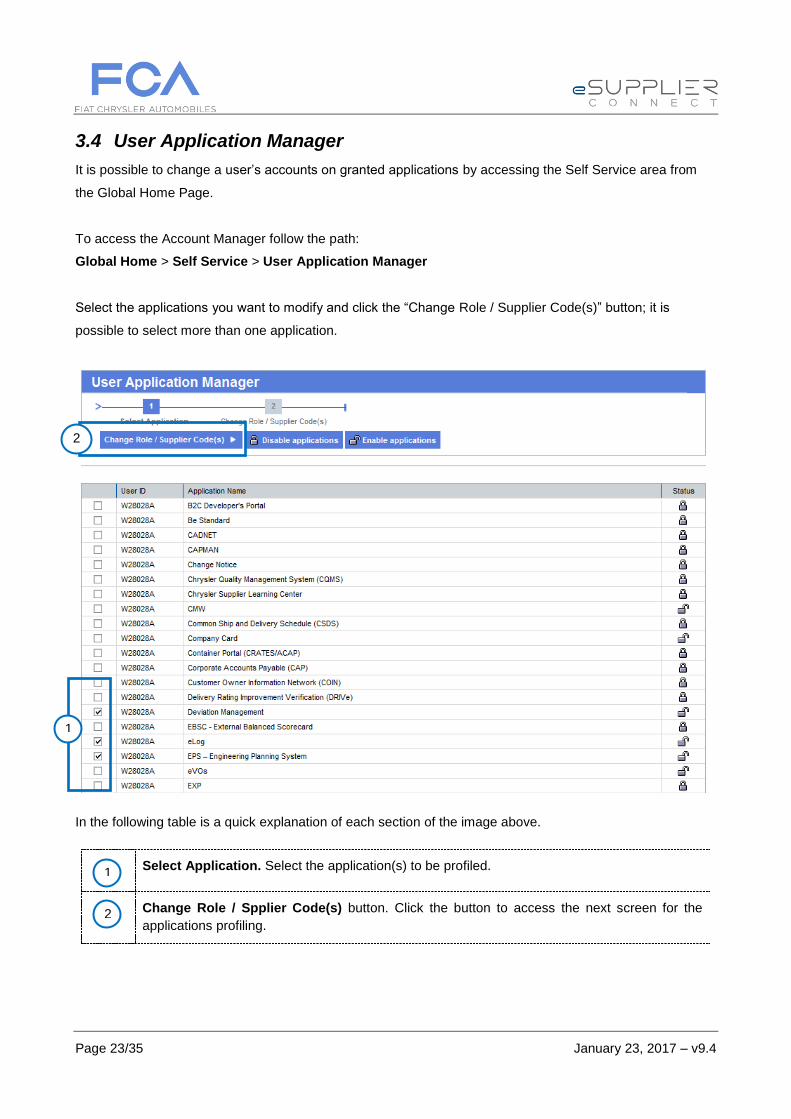
3.4 User Application Manager
It is possible to change a user’s accounts on granted applications by accessing the Self Service area from
the Global Home Page.
To access the Account Manager follow the path:
Global Home > Self Service > User Application Manager
Select the applications you want to modify and click the “Change Role / Supplier Code(s)” button; it is
possible to select more than one application.
In the following table is a quick explanation of each section of the image above.
Select Application. Select the application(s) to be profiled.
Change Role / Spplier Code(s) button. Click the button to access the next screen for the
applications profiling.
1
2
1
2

Page 24/35 January 23, 2017 – v9.4
User Application Manager, How to manage profile changes:
In the following table is a quick explanation of each section of the image above.
Select Application. Select the application to be profiled. When all the applications have been
profiled it is possible click on the Submit button.
Select Role. If needed, select the role for the application. This option for some applications
could be unavailable. Some applications do not need roles for the profiling.
Select Supplier Code(s). Check or uncheck the supplier’s codes to configure the selected
application.
Submit Button. Click this button to submit the profiling and complete the applications
configuration request.
Note: It is not possible to submit a new request until the previous one has not been completed.
1
2
4
1
2
3
4
3

Page 25/35 January 23, 2017 – v9.4
3.5 Requests on my user ID
It is possible to check the status of own profiling requests by accessing the Self Service area from the Global
Home Page.
To access the Request on my user ID follow the path:
Global Home > Self Service > Requests on my user ID
The same application will be also available at the following path:
[Region] > Applications > Requests on my user ID
It is possible to search request for:
Status
Requester ID
Submit Date (Range of dates)
It is also possible to filter the content of the table for:
Target ID
Type (of request)
Submit Date
Application Name
Status
In Charge To
Request ID
Last Update
Requester ID
Clicking on the application name link it is possible to display the details of the supplier codes requested for
the application. If there is more than one application in the request the application name is substituted by the
string “Details”. Clicking on the details string are displayed the details of the applications requested.

Page 26/35 January 23, 2017 – v9.4
4 Applications Launchpad
In this section will be explained how to access to an application from eSupplierConnect.
4.1 How to access to an application from eSupplier Connect You can access the Applications Launchpad by choosing which Region you want to work with for its specific
applications:
[Region] > Applications > Applications Launchpad
In the following table is a quick explanation of each section of the image above.
Application Name. The application can be run by clicking on the application name in the
“Application Name” column;
Star Icon. When you click on the Star icon, the icon color will change to yellow and the
application name will be added into the preferred list (on the far left side of the screen). This
allows users to quickly run the desired application without executing the search procedure
every time;
Preferred List. This area (set on the left side of the screen) contains all the applications
selected as described in the previous step. It allows a quick ‘find and run’ of an application.
1
2
3
1 2
3

Page 27/35 January 23, 2017 – v9.4
5 User Enable/Disable
Only users with an Administrator role are enabled to access the users’ enable/disable
management.
In the case that your user id has been disabled, please contact your Administrator.

Page 28/35 January 23, 2017 – v9.4
PART 3
COMMUNICATION

Page 29/35 January 23, 2017 – v9.4
6 Bulletins and Alerts (Supplier Side)
6.1 Bulletins Bulletins are information content made of text and attachment(s). These can be edited in more than one
language and can be both published and sent via email to subscribers (if needed).
Supplier partners can display bulletins content, but the maintenance of bulletins is managed by the
eSupplierConnect team.
The next paragraphs are specific to supplier users.
6.1.1 Bulletins Main Display
The main display section contains published bulletins and provides the following features:
Unread/Read identifier for every bulletin (unique to the user);
New identifier for every bulletin;
Urgent/Normal Priority identifier for every bulletin;
Direct access to All List Display component;
Access to bulletin subscriber service.
6.1.2 Display All Live Bulletins The Display All Live Bulletins component displays published bulletins and provides the following features:
Configurable number of displayed bulletins (paging) or list of all published bulletins;
New identifier for every bulletin;
Unread/Read identifier for every bulletin(unique to the user);
Urgent/Normal Priority identifier for every bulletin;
Search on bulletins titles (excluding attachments);
Access to bulletin subscriber service.
6.1.3 Display All Archived Bulletins This section provides similar functionalities to the previous one, but the search is conducted on all the
archived bulletins.

Page 30/35 January 23, 2017 – v9.4
6.2 Alerts Alerts are text messages that eSupplierConnect team to communicate something unusual. The alerts are
public on the eSupplierConnect pages.
Only the eSupplierConnect team is able to create and/or modify Alerts.
The next paragraph is specific to supplier users.
There are three different types of alerts, which are indicated by the communication’s level of relevance:
Informative. These are communications of information to suppliers with a low level of urgency.
Warning. These alert suppliers about important news affecting the system usability or the business
processes.
Alarm. These communicate critical news that is severely impacting the system usability or the
business processes.
Please note that you will see only Bulletins and Alerts suited for your use.
Page 31/35 January 23, 2017 – v9.4
PART 4
SUPPORT

Page 32/35 January 23, 2017 – v9.4
7 Need Help? This section explains what to do in case any problems arise or if you would like additional information about
eSupplierConnect, and what is the support service offered.
The Support Area is reachable from two different links:
Global Home;
Footer.

Page 33/35 January 23, 2017 – v9.4
In the footer area (see Chapter 2.2 for the definition of “footer area”), there are links to help users with
questions or issues concerning eSupplierConnect:
Need Help?, this links takes to the following content:
Support Area, this link contains all content and useful information to solve your issue. These
information are also replicated specifically in the following two main areas:
Reference Material, this link takes to the following content:
o Manuals
User guides that provide in-depth details on all sections of eSupplierConnect;
o Quick Reference Guides
Quick learning modules that describe eSupplierConnect functionalities;
o Frequently Asked Questions (FAQs)
Answers to commonly asked questions about new user registration, Covisint migration
and more;
Contact Help Desk, This link takes to two options for requesting support or help with a
problem;
o Create a Ticket
Visit the eSupport system to open a new ticket or check the status of an existing ticket;
o Call for Support
Use these telephone numbers to contact the help desk over the phone.

Page 34/35 January 23, 2017 – v9.4
7.1 Help Desk Support
The Help Desk options also include:
Create a Ticket: Visit the eSupport system to open a new ticket or check the status of an existing
ticket.
Note: Login is required.
Call for Support: Use these telephone numbers to contact the help desk over the phone.
Country Language Local number Toll free number
International English +44-2033182510
(same as UK) +800-85573586 (*)
Argentina Spanish +54-1152175860 0800-666-1239
Brazil Portuguese +55-1132301204 0-800-0380623
Canada English 1-647-556-5988 1-800-841-1752
(same as US)
China English +86-400-120-0758 10-800-713-1504
France English +33-975181792 0800-910563
Germany English +49-305683700517 0800-181-9127
India English Not available 1-800-841-1752
Italy Italian +39-02-266002 618 800-555797
Mexico Spanish +52-5546242417 01-800-099-0297
Poland Italian +48-223071194 00-800-1410155
Serbia English Not available 0800-190-163
Turkey English Not available 00-800-8529-5936
UK English +44-2033182510 0-800-088-5543
USA English 1-646-513-2694 1-800-841-1752
Venezuela Spanish +58-2123357483 0-800-100-4658
Notes
(*) When dialing a universal toll free number the caller must first dial the appropriate country's international access code (+).
When a user calls, he will be automatically directed to the 'Main Language' related to each number (e.g., Italy Italian,
USA English and Brazil Portuguese).
If the related language is not available because of the time zone, the call will be automatically redirected to the International
Number (English).

Page 35/35 January 23, 2017 – v9.4
7.2 Supported Browser
This section lists the browser currently supported by the eSupplierConnect portal.
Browser Version
Internet Explorer (IE)
Version 7
Version 8
Version 9 (Compatibility Mode)
Version 10
Firefox
Latest versions supported
Chrome Latest versions supported
Safari on Mac OS
Safari 5.0 on Mac OS 10.5/6
Safari 5.1 on Mac OS 10.6/7
Safari 6.0 on Mac OS 10.8